

Page 1
Copyright 2 010 IOCELL Net works Corpo ration,
IOCELL Net works, NDAS®an d NetDISK® are trad emarks or regis tered trademar ksof IOCELL Ne tworks
Corporat ion or one of its al iates.
All other tr ademarks or re gistered trade marks are the pro perty of the ir respective ow ners.
IOCELL Net works reser ves the right to chan ge, without noti ce, product oer ings or specic ations.
Precautions
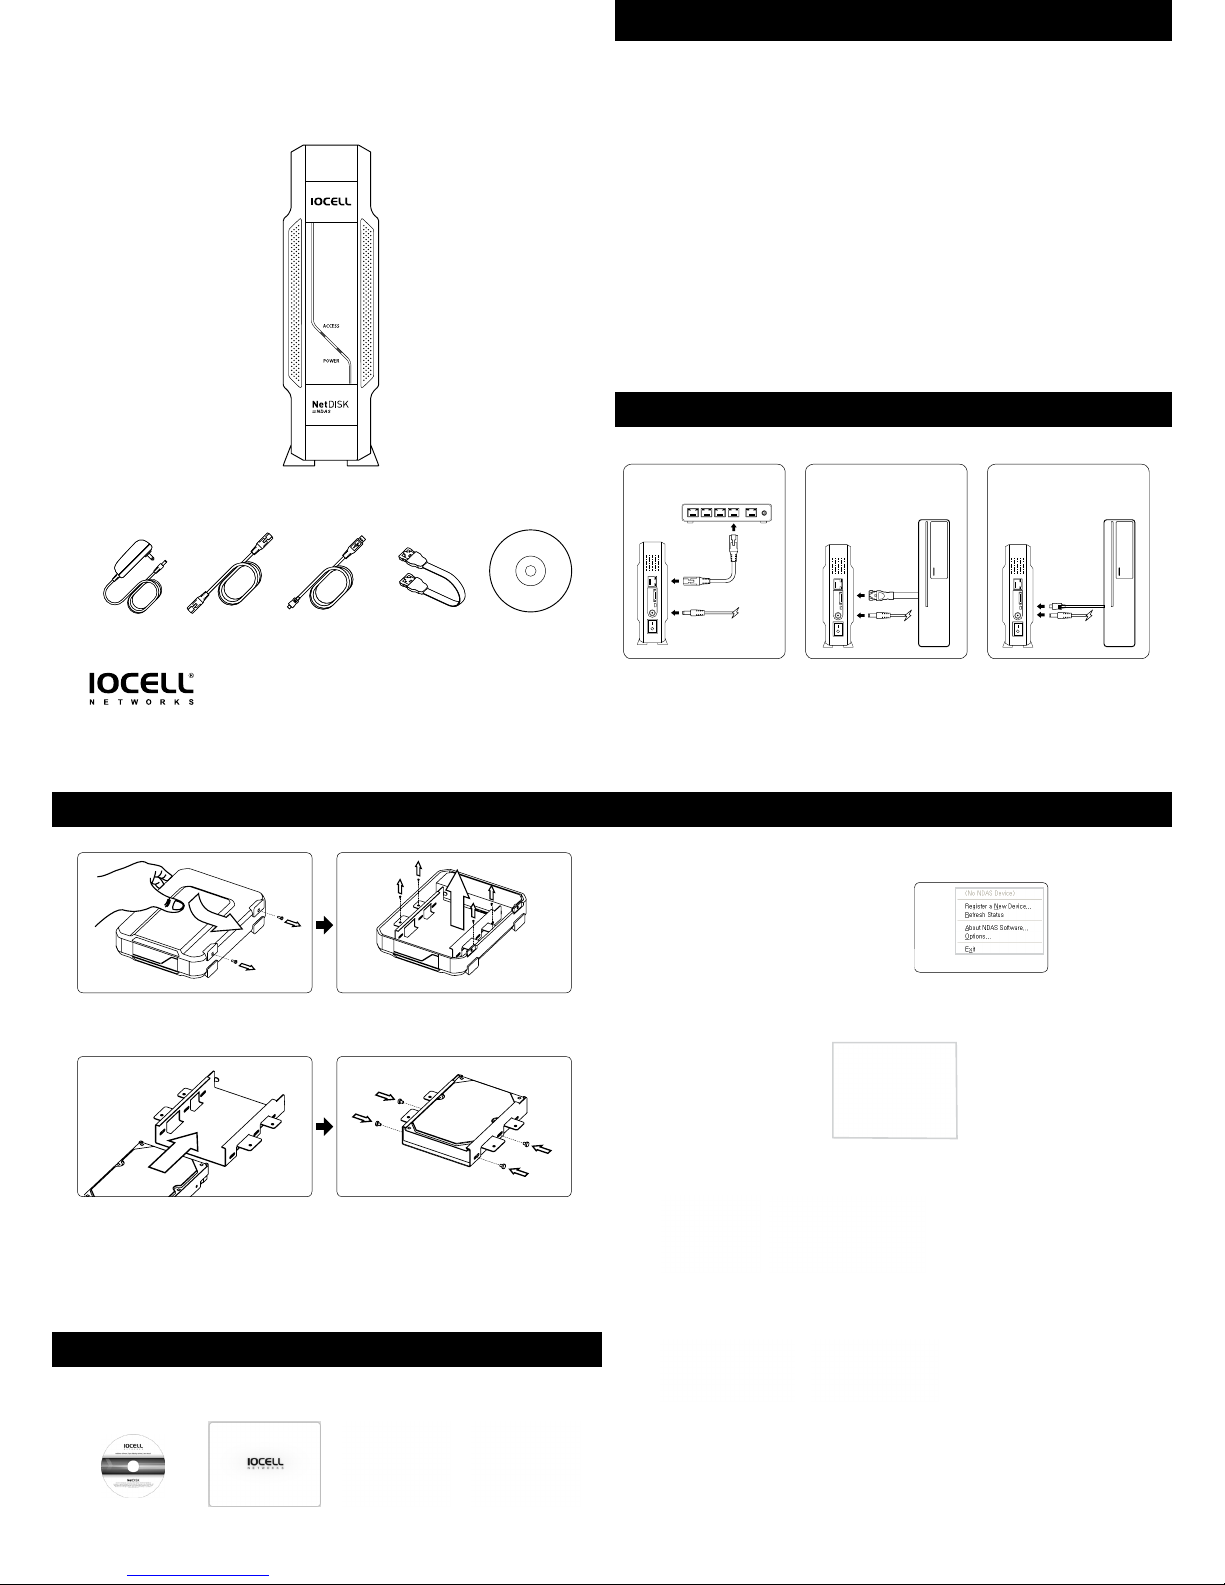
Hardware Installation
Software Installation (351UNE)
HDD Installation Software Installation (351UNE) - continued
Windows 7/Vista/XP/Server 2003/2000
Insert the included NetDISK Installation CD to your CD-ROM Drive. Follow the easy
and simple instructions through the installation.
Insert “NetDISK®
installation CD”
g 3.a
g 2.a
g 2.c
g 2.b
g 2.d
g 3.b g 3.c g 3.d
g 1.a g 1.b g 1c
Welcome Screen
appears
Select your Language Choose Installation
for the appropriate
product
Register the NetDISK
• Click the NDAS Device Management tool located in
the task bar on the bottom right corner of your screen
• Choose “Register a New Device.
Follow The Screen Instructions
• NetDISK® ID and Write Key can be found underneath the NetDISK® case.
• The NetDISK® ID and Write Key do not contain the letter “O”or the letter “I”.
• Please use numeric “1” or “0” for all occurrences of these characters.
Click Finish
Repeat installation process 1-7 on
all systems on your network that you
would like to have share this drive.
Found New Hardware Wizard
• Click “NetDISK® Administrator Tool” to see the registered NetDISK®
Found New Hardware Wizard
• This window may or may not appear.
• If the window appears, follow the instructions and install the new NetDISK®.
Note: Try directly connecting the NetDISK to a
gigabit Ethernet port for the fastest transfer speeds.
Windows® 98 / MAC OS X
• For the latest software and drivers, visit “www.iocellnetworks.com”
Installation Notes:
1) If your computer is not equipped with a CD/DVD-ROM, simply visit www.iocellnetworks.com to download the
latest NDAS connection software for your OS.
2) The USB and eSATA connections do not require any special software to operate.
3) If using the NDAS RAID setup on the 352UN, read the full user manual carefully to understand the limitations
when accessing by USB.
MAC Users
Open the CD and browse to the MAC folder to nd Network connection software. Open the README le for basic
installation and short troubleshooting instructions. Consult the full User Manual for more complete help.
Windows XP
Click “No, not this time.”
Read/Write Mode Read Only Mode
Windows Vista
Check “Always trust software from Ximeta, Inc.”
When software installation is complete, you will nd the NDAS Device Management tool icon in the system tray in the
bottom right corner of your Desktop.
To close case:
1. Insert steel guide
2. Slide caddy into place.
3. Replace the mounting screws. Take care not to strip the screws in the plastic.
4. Slide side cover back into place.
5. Check that the side is sealed up all around the enclosure.
6. Replace the screws to secure the cover. Do not over tighten.
Remove the screws from the bottom.
Press down the side cover.
Slide the side cover towards the bottom.
Insert HDD all the way into the caddy and
align the mounting holes.
Remove the screws from the HDD caddy.
Slide HDD caddy to unlock.
Lift and remove HDD caddy.
Secure HDD on both sides of the caddy with
the screws. DO NOT OVER-TIGHTEN
RECOMMENDATION: Please read this manual thoroughly before installation.
Model: 351UNE
For wireless users - Connect
NetDISK® to your wireless router
or switch with the included
Ethernet cable.
Make sure the power cord is
connected rmly and press
the ON/OFF switch to the ON
position.
Connect NetDISK® to your router
with included Ethernet cable.
Connect NetDISK® directly to your
computer’s eSATA port using the
included eSATA cable.
Connect NetDISK® directly to your
computer’s USB port using the
included USB cable.
eSATA ModeNDAS® Mode USB Mode
English
AC Power Cable Ethernet Cable USB Cable eSATA Cable Install & Manual CD
5
6
7
8
1 2 3 4
Quick Install Guide
! User Prec autions
Please read th is installation g uide carefully b efore using this p roduct. Impro per conguratio n, setup or oper ation, the presen ce of
static ele ctricity, defe ctive compon ents, magnetic elds, etc. may caus e the loss of data. Ple ase carefully in spect all compo nents
and all areas of o peration prio r to assembling, in stalling or stor ing data on the prod uct. The manuf acturer will not b e responsible
for lost dat a. To prevent the loss of you r important dat a, please back up al l sources regular ly.
! Safety Precautions
Do not attem pt to modify or se rvice the prod uct, serious da mage may occur.
Take extra care w hen installing t he hard disk drive(s).
Damaged com ponents may caus e electronic sh ock or re. Please c arefully inspe ct all power cords an d electrical c onnections
before usi ng. Do not touch any el ectronic comp onents if your han ds are wet.
Do not move the p roduct while op erating, it may ca use damage to the hard d isk(s) or other part s. If you must move th e product,
please tur n o the power and wait u ntil the hard disk(s) spin d own completely.
Please allow t he internal hard dis k(s) to cool completel y before handlin g.
Do not drop or sh ock the produc t, this may cause fat al damage to the prod uct and/or the hard d isk(s).
Do not use the p roduct in dust y or moisture pron e conditions.
Operatin g in areas subject t o rain or other wet cir cumstances will d amage your device.
Do not oper ate the product in a h ot place or leave it in di rect sunlight, i t may cause damage.
Keep the pro duct out of the reac h of children.
! Installation and Assembly Precautions
Prepare a cle ar workspace for a ssembly and a clea r space where the pro duct will oper ate.
Install har d disk(s) only when the p ower cord is disconne cted.
Do not apply t oo much pressure or f orce to any parts du ring installati on, product dam age or personal i njury may occur.
Handle the ha rd disk drive caref ully to avoid shock by f orce or static ele ctricity (ope rator ground wire s uggested).
Page 2
Achtung
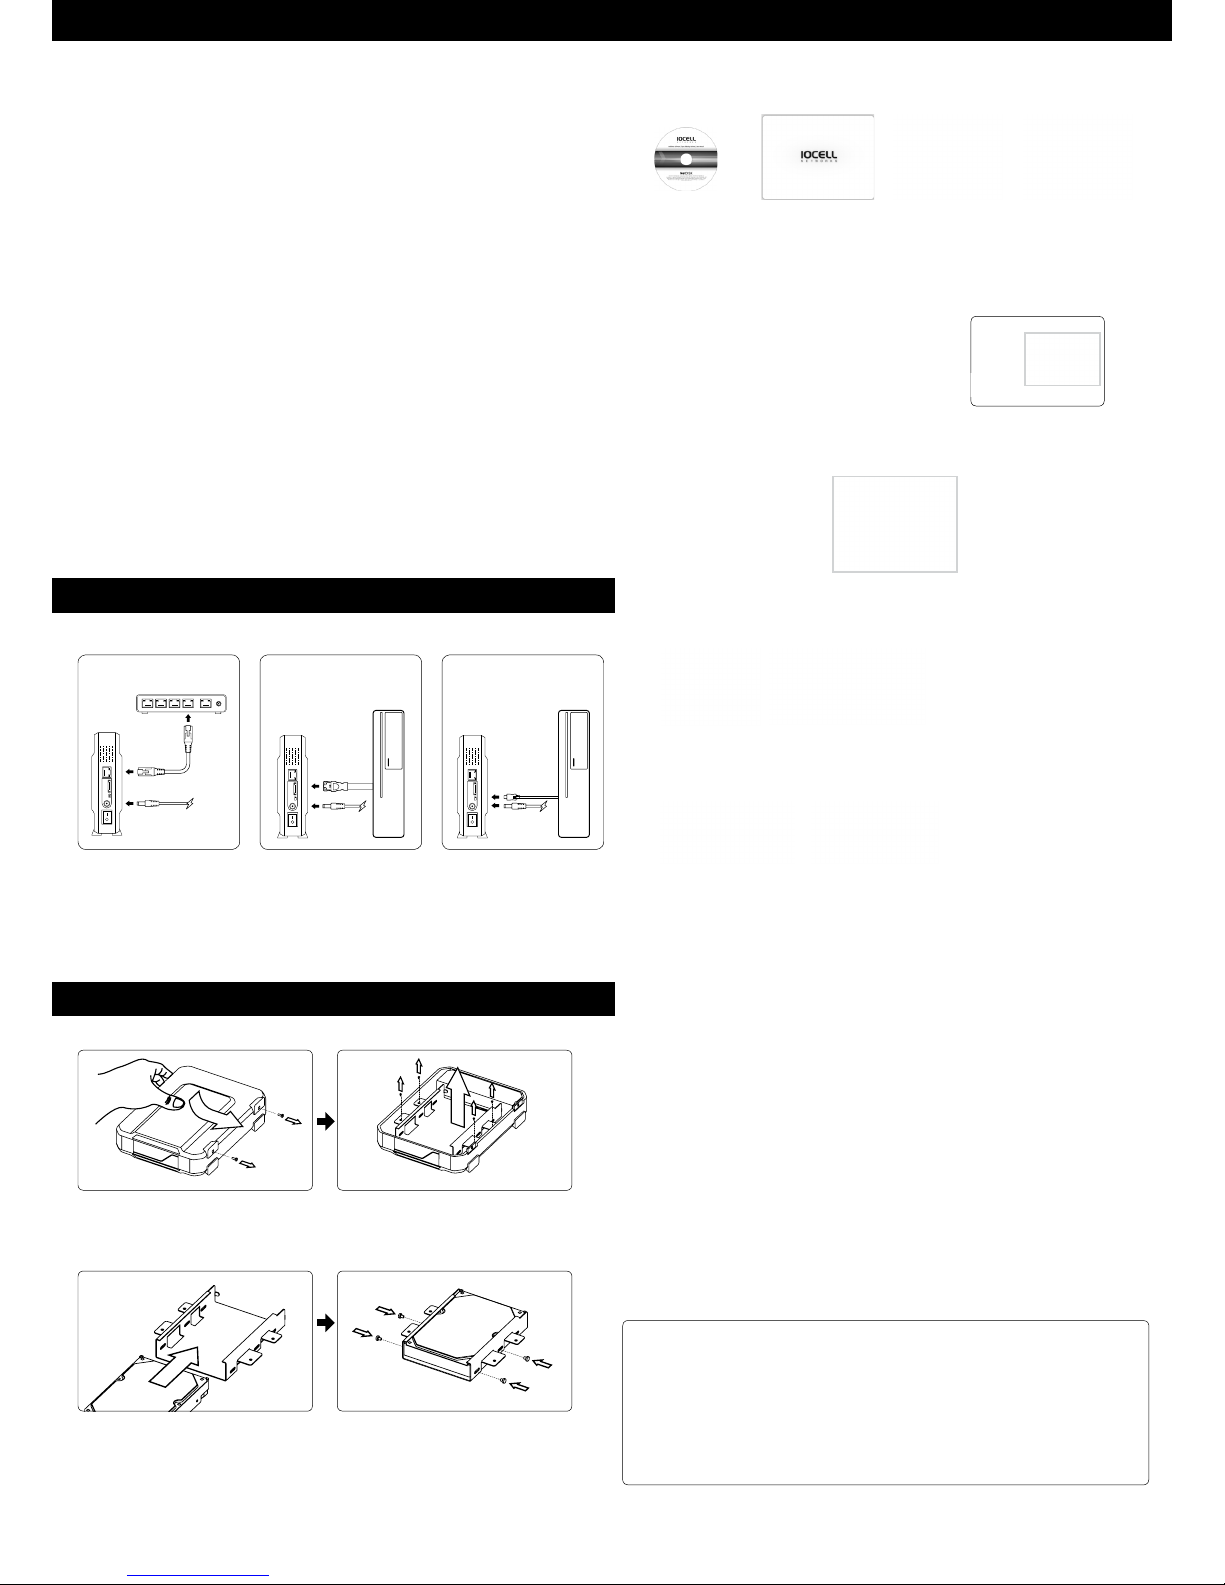
Hardware Installation
HDD Installation
IOCELL Networks Corporation
5 Market Street, Suite 520, Plainsboro,
NJ 08536, U.S.A.
Web: www.iocellnetworks.com
E-mail: [email protected]
Technical Support available weekdays
8:00AM – 5:00PM ET (except holidays)
E-mail: [email protected]
Phone: 609.799.1213
Sicherheitshinweise
Bitte zerlegen oder verändern Sie die Produkte nicht. Es besteht die Gefahr eines Produktschadens.
Bitte zerlegen Sie die Produkte nicht, wenn das Netzkabel angeschlossen ist. Es besteht die Gefahr eines Strom-
schlags oder Feuers.
Berühren Sie den Netzstecker nicht mit der nassen Hand. Verwenden Sie keine beschädigten Netzkabel oder
Steckdosen. Es besteht die Gefahr eines Stromschlags oder Feuers.
Bewegen Sie in Betrieb genommene Produkte nicht. Es besteht die Gefahr eines Festplattenschadens. Schalten
Sie den Strom zuerst ab, bevor Sie das Produkt bewegen.
Lassen Sie die Produkte nicht fallen oder schütteln Sie diese nicht. Dies führt zu einem schwerwiegenden
Schaden der Produkte und der Festplatte.
Stellen Sie die Produkte nicht auf staubigen, vor Regen ungeschützten, nassen oder feuchten Flächen ab. Es
besteht die Gefahr eines Produktschadens.
Schützen Sie das Produkt vor Hitze. Es besteht die Gefahr eines Produktschadens.
Halten Sie die Produkte außer Reichweite von Kindern.
Gebrauchsanweisung
Bitte lesen Sie die Bedienungsanleitung sorgfältig durch, bevor Sie das Produkt in Betrieb nehmen.
Durch Reibungselektrizität, falsche Nutzung oder defekte Produkte kann ein Schaden der Festplattendaten
entstehen.
Bitte erstellen Sie ein Backup von wichtigen Daten, um einen Datenverlust zu vermeiden. Der Hersteller übernimmt keine Verantwortung für Datenverlust auf der Festplatte.
Vor Wechsel der Festplatte schalten Sie bitte den Strom ab, lassen Sie die Produkte abkühlen und entfernen Sie
die Festplatte.
Magnetische Geräte (Lautsprecher oder Magneten) können zu einem Datenverlust auf der Festplatte führen.
Installationsanleitung
Breiten Sie vor Installation der Festplatte ein weiches Tuch auf dem Boden aus.
Installieren Sie die Festplatte in getrenntem Netzteil Zustand.
Wenden Sie keine Gewalt bei der Festplatte an.
Schrauben Sie Schrauben nicht zu sehr fest.
Schütteln Sie die Festplatte nicht.
g 1.a g 1.b g 1.c
Wireless-Benutzer – NetDISK®
mit dem beiliegenden EthernetKabel an den Wireless-Router
anschließen.
Sicherstellen, dass das Netzkabel
gut festsitzt, und den Ein-/
Ausschalter auf eingeschaltete
Position stellen.
NetDISK® mit dem beiliegenden Ethernet-
Kabel an den Router anschließen.
NetDISK® mit dem beiliegenden
eSATA-Kabel direkt an den
eSATA-Port Ihres PC anschließen.
Sicherstellen, dass das Netzkabel
gut festsitzt, und den Ein-/
Ausschalter auf eingeschaltete
Position stellen.
NetDISK® mit dem beiliegenden
USB-Kabel direkt an den USB-Port
Ihres PC anschließen. Sicherstellen,
dass das Netzkabel gut festsitzt,
und den Ein-/Ausschalter auf
eingeschaltete Position stellen.
eSATA ModusNDAS® Modus USB Modus
g 2.a
g 2.c
g 2.b
g 2.d
Gehäuse schließen :
1. Legen Sie die Stahlführung ein.
2. Schieben Sie die Stahlführung an ihren Platz zurück.
3. Schrauben Sie die Schrauben ein, um die Stahlführung zu sichern.
4. Schieben Sie die seitliche Abdeckung wieder zurück.
5. Stellen Sie sicher, dass die seitliche Abdeckung in das restliche Gehäuse passt.
6. Schrauben Sie die Schrauben zur Sicherung der seitlichen Abdeckung ein.
Entfernen Sie die Schrauben an der Unterseite des Geräts.
Drücken Sie die seitliche Abdeckung nach unten.
Schieben Sie die seitliche Abdeckung in Richtung Unterseite
des Geräts.
Sichern Sie die Festplatte in der Stahlführung mit den
Schrauben.
Entfernen Sie die Schrauben aus der Stahlführung.
Schieben Sie die Stahlführung zur Entsperrung zur Seite.
Heben Sie die Stahlführung an und nehmen Sie diese heraus.
Legen Sie die Festplatte in die Stahlführung.
Software Installation (351UNE)
Windows 7/Vista/XP/Server 2003/2000
Beiliegende „NetDISK® Installations-CD“ in Ihr
CD-ROM-Laufwerk einlegen. Leicht verständliche Anweisungen führen durch die Installation.
NetDISK® Installation CD
einlegen
g 3.a g 3.b g 3.c g 3.d
Der Setup-Assistant läuft
automatisch, und der
Begrüßungsbildschirm
erscheint
Gewünschte Sprache
wählen
Installation für das
entsprechende Produkt
wählen
Warranty
This product comes with a two year warranty from date of purchase. Please register your product at www.iocellnetworks.com and click on “Product Registration” to activate the
warranty. (Please have your NetDISK Serial Number ready.) Please have your NetDISK ID and Write Key ready. We are not responsible for any loss of data. Please back up your data
often to avoid unexpected losses.
Note: This equipment has been tested and found to comply with the limit for a Class B digital device, pursuant to part 15 of the FCC Rules.
These limits are designed to provide reasonable protection against harmful interference in a residential Installation.
This equipment generates, uses, and can radiate radio frequency energy and, if not installed and used in accordance with the instructions.
If this equipment does cause harmful interference to radio communications. However, there is no guarantee that interference will not occur in a particular installation. IF this
equipment does cause harmful interference to radio or television reception, which can be determined by turning the equipment o and on, the user is encourage to try to correct
the interference by one or the following measures:
- Reorient or relocate the receiving antenna.
- Increase the separation between the equipment and receiver.
- Connect the equipment into an outlet on a circuit dierent from that to which the receiver is connected
- Consult the dealer or an experience radio TV technician for help
Deutsch
Folgen Sie bitte den Instruktionen auf dem Bildschirm
• Die NDAS-Geräte-ID und der Schreibschlüssel sind an der Unterseite des NetDISK® Gehäuses zu nden.
• In der NDAS-Geräte-ID und im Schreibschlüssel ist kein Buchstabe „O“ und kein Buchstabe „I” zu nden
• Bitte die Zahlen „1“ oder „0“ für derartige Zeichen verwenden.
Auf “Fertig stellen” klicken
Installationsvorgang 1–7 auf
allen Systemen Ihres Netzwerks
wiederholen, die auf dieses Laufwerk
zugreifen sollen.
Assistent für das Suchen neuer Hardware.
• Auf ”NDAS-Geräteverwaltung“ klicken, um das registrierte NetDISK® Gerät zu sehen.
Assistent für das Suchen neuer Hardware.
• Es kann sein, dass dieses Fenster erscheint oder auch nicht.
• Wenn das Fenster erscheint, folgen Sie den Anweisungen und installieren den neuen NetDISK®.
Hinweis: Nach der Installation des NetDISK® Treibers
können Sie das Ethernet-Kabel direkt von Ihrem
Laufwerk
an Ihren Computer anschließen, um schnellere
Übertragungsraten als mit einer USB-Verbindung
zu erzielen.
(Nur für die Verwendung ohne Netzwerk)
Windows® 98 / MAC OS X
• Die neuesten Software- und Treiberversionen sind auf “www.iocellnetworks.com“ zu nden.
Windows XP
Nein, diesmalnicht
Lese-/Schreibmodus Lesemodus
Windows Vista
Alway Vertrauenssoftware von Ximeta, Inc
Nach erfolgreicher Installation, nden Sie den NDAS Geräte-Manager unten rechts im Infobereich der Taskleiste
Ihres Desktops.
5
6
7
8
1 2 3 4
“Neues Gerät registrieren“ wählen
• Klicken Sie den NDAS Geräte-Manager mit der rechten
Maustaste an (Rechtsklick)
• Wählen Sie dann „Neues Gerät registrieren …“ mit der linken
Maustaste aus (Linksklick)
ZUR INFO: Weder zum Betrieb des USB-, noch des eSATA Anschlusses, wird die Installation spezieller
Software benötigt.
Page 3
Precautions
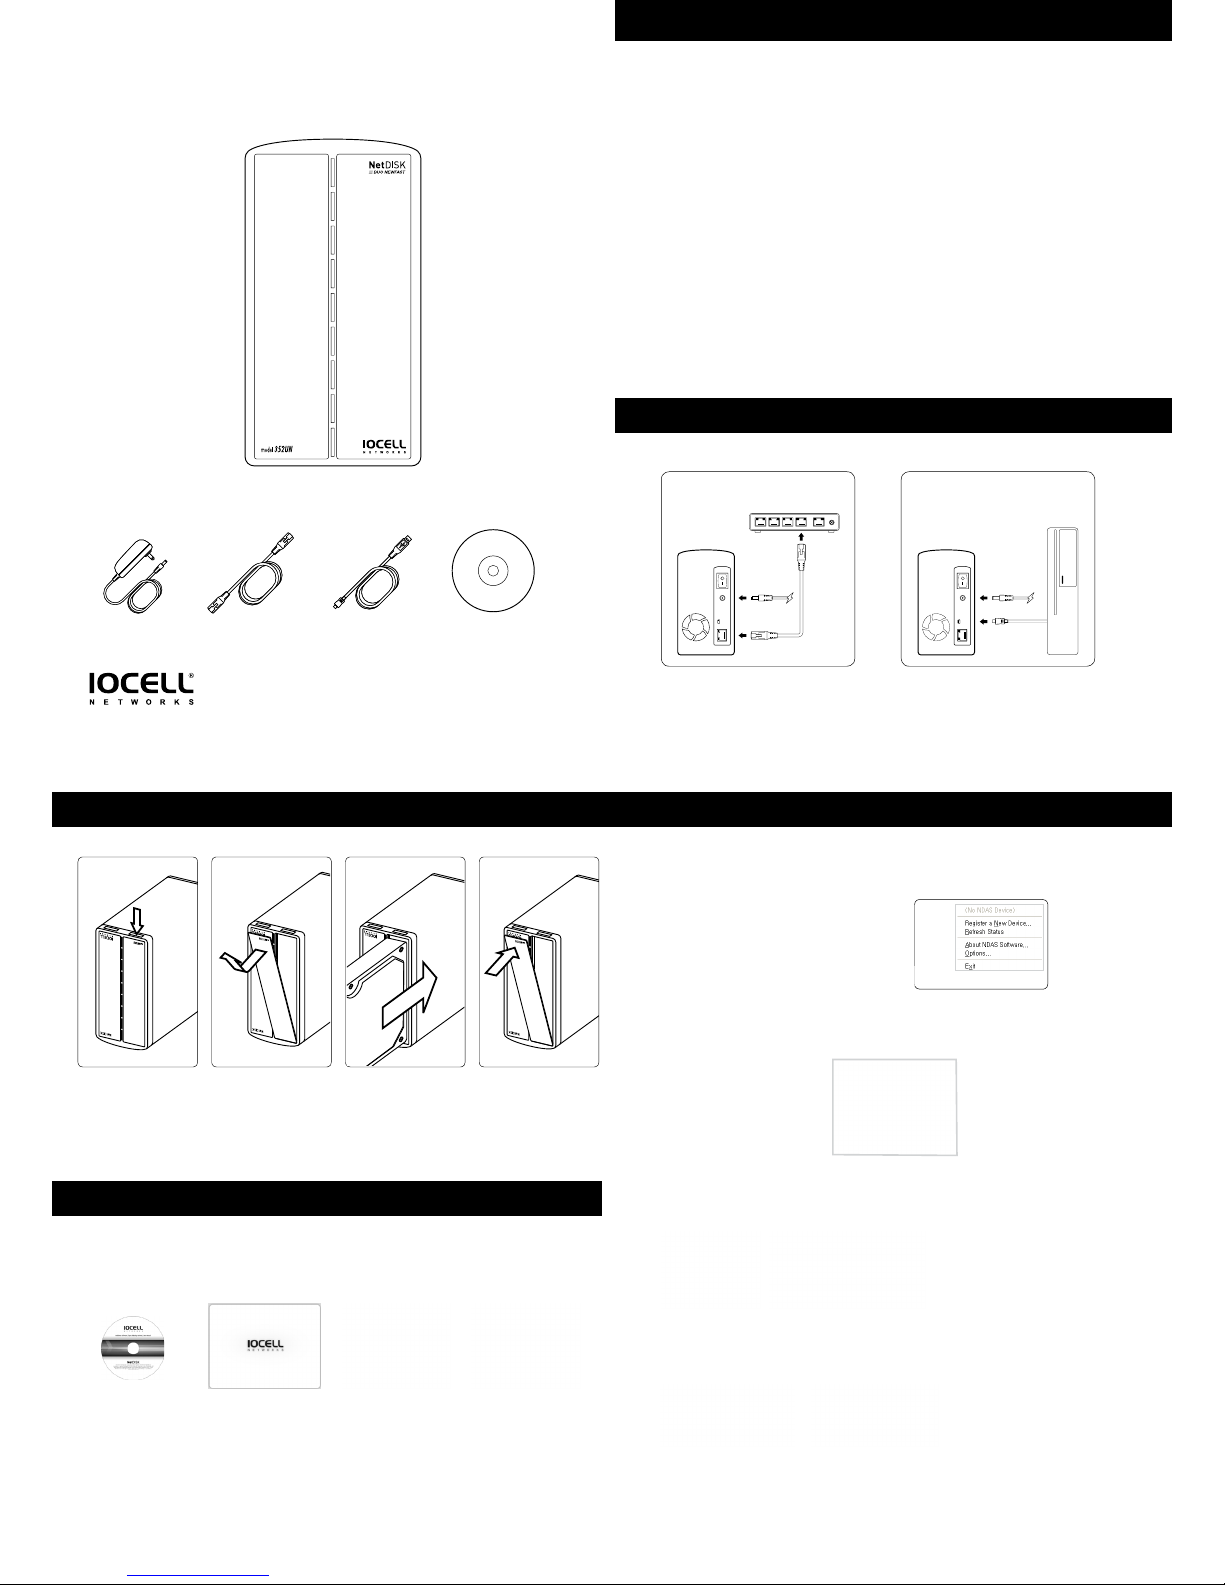
Hardware Installation
Software Installation (352UN)
HDD Installation Software Installation (352UN) - continued
! User Prec autions
Please read th is installation g uide carefully b efore using this p roduct. Impro per conguratio n, setup or oper ation, the presen ce of
static ele ctricity, defe ctive compon ents, magnetic elds, etc. may caus e the loss of data. Ple ase carefully in spect all compo nents
and all areas of o peration prio r to assembling, in stalling or stor ing data on the prod uct. The manuf acturer will not b e responsible
for lost dat a. To prevent the loss of you r important dat a, please back up al l sources regular ly.
! Safety Precautions
Do not attem pt to modify or se rvice the prod uct, serious da mage may occur.
Take extra care when installing the hard disk drive(s).
Damaged com ponents may caus e electronic sh ock or re. Please c arefully inspe ct all power cords an d electrical c onnections
before usi ng. Do not touch any el ectronic comp onents if your han ds are wet.
Do not move the p roduct while op erating, it may ca use damage to the hard d isk(s) or other part s. If you must move th e product,
please tur n o the power and wait u ntil the hard disk(s) spin d own completely.
Please allow t he internal hard dis k(s) to cool completel y before handlin g.
Do not drop or sh ock the produc t, this may cause fat al damage to the prod uct and/or the hard d isk(s).
Do not use the p roduct in dust y or moisture pron e conditions.
Operatin g in areas subject t o rain or other wet cir cumstances will d amage your device.
Do not oper ate the product in a h ot place or leave it in di rect sunlight, i t may cause damage.
Keep the pro duct out of the reac h of children.
! Installation and Assembly Precautions
Prepare a cle ar workspace for a ssembly and a clea r space where the pro duct will oper ate.
Install har d disk(s) only when the p ower cord is disconne cted.
Do not apply t oo much pressure or f orce to any parts du ring installati on, product dam age or personal i njury may occur.
Handle the ha rd disk drive caref ully to avoid shock by f orce or static ele ctricity (ope rator ground wire s uggested).
Windows 7/Vista/XP/Server 2003/2000
Insert the included NetDISK Installation CD to your CD-ROM Drive. Follow the easy
and simple instructions through the installation.
Insert “NetDISK®
installation CD”
g 3.a g 3.b g 3.c g 3.d
g 1.a g 1.b
Welcome Screen
appears
Select your Language Choose Installation
for the appropriate
product
Register the NetDISK
• Click the NDAS Device Management tool located in
the task bar on the bottom right corner of your screen
• Choose “Register a New Device.
Follow The Screen Instructions
• NetDISK® ID and Write Key can be found underneath the NetDISK® case.
• The NetDISK® ID and Write Key do not contain the letter “O”or the letter “I”.
• Please use numeric “1” or “0” for all occurrences of these characters.
Click Finish
Repeat installation process 1-7 on
all systems on your network that you
would like to have share this drive.
Found New Hardware Wizard
• Click “NetDISK® Administrator Tool” to see the registered NetDISK®
Found New Hardware Wizard
• This window may or may not appear.
• If the window appears, follow the instructions and install the new NetDISK®.
Note: Try directly connecting the NetDISK to a
gigabit Ethernet port for the fastest transfer speeds.
Windows® 98 / MAC OS X
• For the latest software and drivers, visit “www.iocellnetworks.com”
Windows XP
Click “No, not this time.”
Read/Write Mode Read Only Mode
Windows Vista
Check “Always trust software from Ximeta, Inc.”
When software installation is complete, you will nd the NDAS Device Management tool icon on the system tray in the
bottom right corner of your Desktop.
RECOMMENDATION: Please read this manual thoroughly before installation.
Model: 352UN
For wireless users - Connect NetDISK® to your
wireless router or switch with the included
Ethernet cable.
Make sure the power cord is connected
rmly and press the ON/OFF switch to the
ON position.
Connect NetDISK® directly to your computer’s
USB port using the included USB cable.
Connect NetDISK® to your router
with included Ethernet cable.
NDAS® Mode USB Mode
English
Quick Install Guide
AC Power Cable Ethernet Cable USB Cable Install & Manual CD
5
6
7
8
1 2 3 4
g 2.a g 2.c g 2.dg 2.b
Turn the NetDISK 352UN
upside down
Insert the hard drive and
push it gently until is all
the way in past the front
of the case.
Press down on the tab with
a key or similar object and
remove the cover.
Replace the cover and
press until the tab locks
in place.
Copyright 2 010 IOCELL Net works Corpo ration,
IOCELL Net works, NDAS®an d NetDISK® are trad emarks or regis tered trademar ksof IOCELL Ne tworks
Corporat ion or one of its al iates.
All other tr ademarks or re gistered trade marks are the pro perty of the ir respective ow ners.
IOCELL Net works reser ves the right to chan ge, without noti ce, product oer ings or specic ations.
Installation Notes:
1) If your computer is not equipped with a CD/DVD-ROM, simply visit www.iocellnetworks.com to download the latest
NDAS connection software for your OS.
2) The USB connection does not require any special software to operate.
3) If using the NDAS RAID setup on the 352UN, read the full user manual carefully to understand the limitations when
accessing by USB.
MAC Users
Open the CD and browse to the MAC folder to nd Network connection software. Open the README le for basic
installation and short troubleshooting instructions. Consult the full User Manual for more complete help.
Page 4
Achtung
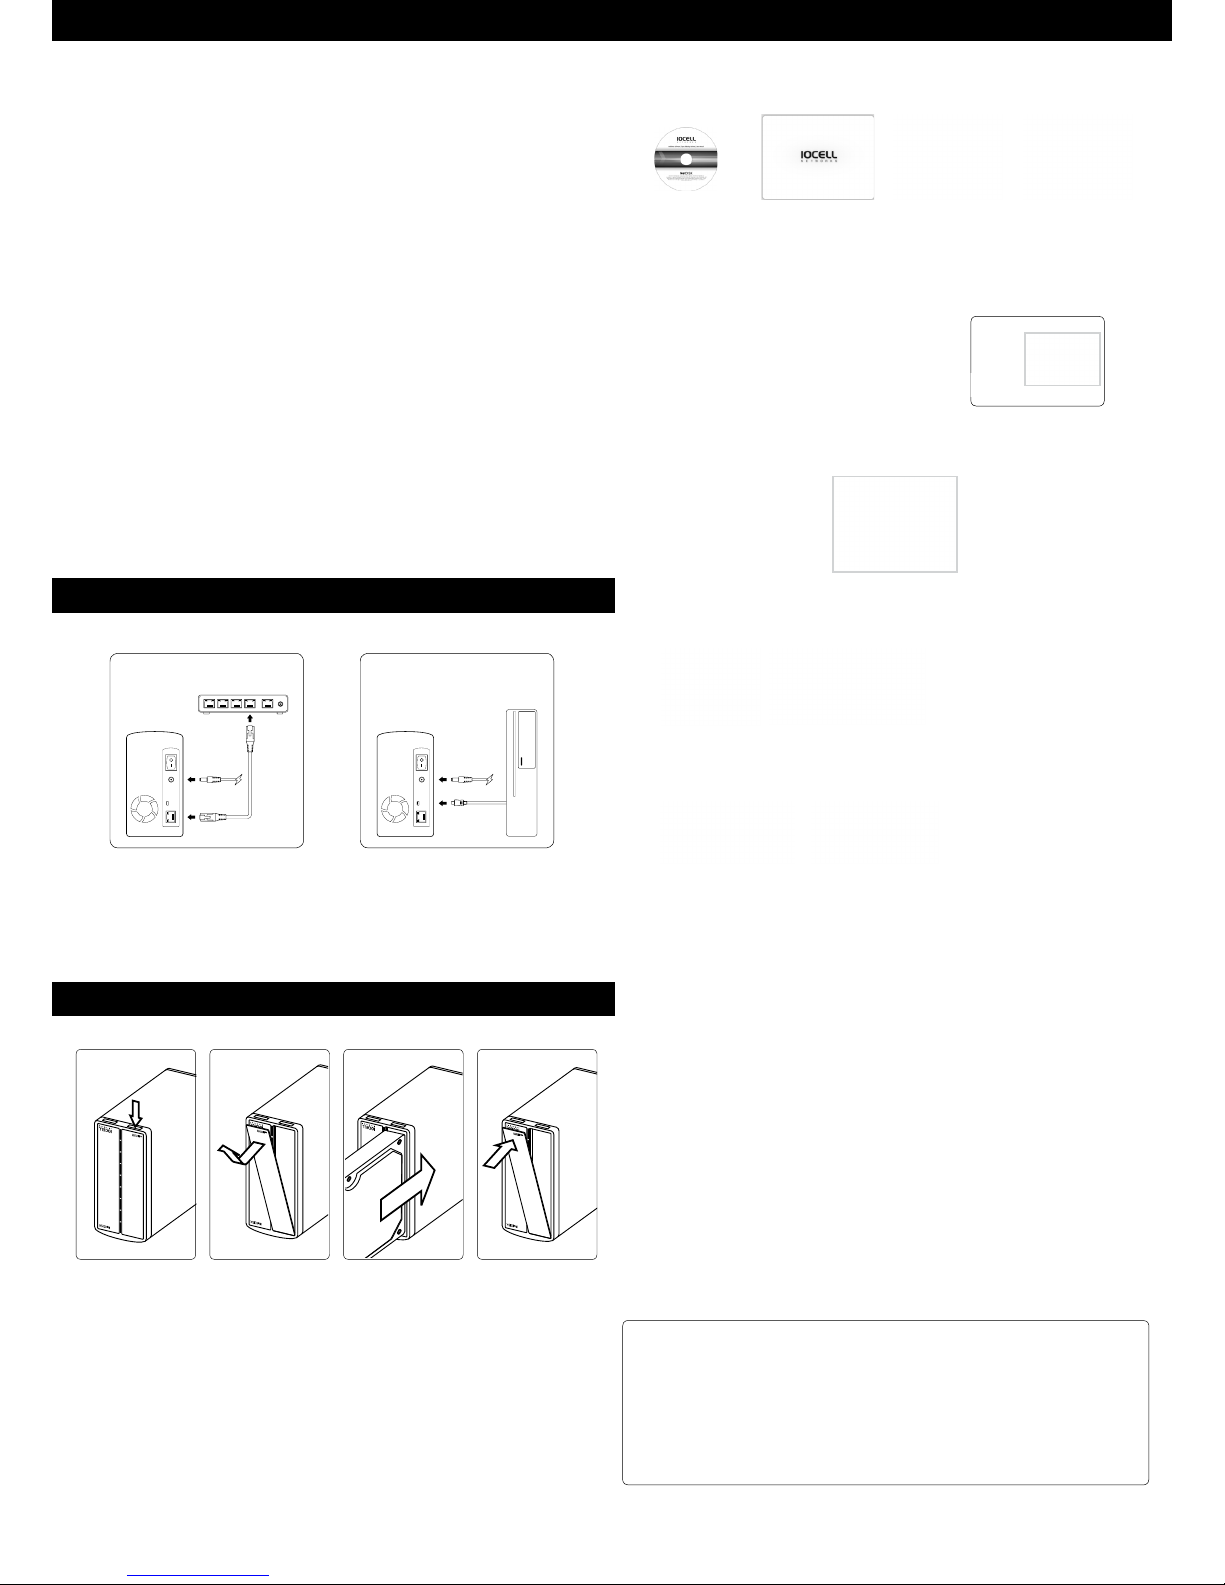
Hardware Installation
HDD Installation
IOCELL Networks Corporation
5 Market Street, Suite 520, Plainsboro,
NJ 08536, U.S.A.
Web: www.iocellnetworks.com
E-mail: [email protected]
Technical Support available weekdays
8:00AM – 5:00PM ET (except holidays)
E-mail: [email protected]
Phone: 609.799.1213
Sicherheitshinweise
Bitte zerlegen oder verändern Sie die Produkte nicht. Es besteht die Gefahr eines Produktschadens.
Bitte zerlegen Sie die Produkte nicht, wenn das Netzkabel angeschlossen ist. Es besteht die Gefahr eines Strom-
schlags oder Feuers.
Berühren Sie den Netzstecker nicht mit der nassen Hand. Verwenden Sie keine beschädigten Netzkabel oder
Steckdosen. Es besteht die Gefahr eines Stromschlags oder Feuers.
Bewegen Sie in Betrieb genommene Produkte nicht. Es besteht die Gefahr eines Festplattenschadens. Schalten
Sie den Strom zuerst ab, bevor Sie das Produkt bewegen.
Lassen Sie die Produkte nicht fallen oder schütteln Sie diese nicht. Dies führt zu einem schwerwiegenden
Schaden der Produkte und der Festplatte.
Stellen Sie die Produkte nicht auf staubigen, vor Regen ungeschützten, nassen oder feuchten Flächen ab. Es
besteht die Gefahr eines Produktschadens.
Schützen Sie das Produkt vor Hitze. Es besteht die Gefahr eines Produktschadens.
Halten Sie die Produkte außer Reichweite von Kindern.
Gebrauchsanweisung
Bitte lesen Sie die Bedienungsanleitung sorgfältig durch, bevor Sie das Produkt in Betrieb nehmen.
Durch Reibungselektrizität, falsche Nutzung oder defekte Produkte kann ein Schaden der Festplattendaten
entstehen.
Bitte erstellen Sie ein Backup von wichtigen Daten, um einen Datenverlust zu vermeiden. Der Hersteller über-
nimmt keine Verantwortung für Datenverlust auf der Festplatte.
Vor Wechsel der Festplatte schalten Sie bitte den Strom ab, lassen Sie die Produkte abkühlen und entfernen Sie
die Festplatte.
Magnetische Geräte (Lautsprecher oder Magneten) können zu einem Datenverlust auf der Festplatte führen.
Installationsanleitung
Breiten Sie vor Installation der Festplatte ein weiches Tuch auf dem Boden aus.
Installieren Sie die Festplatte in getrenntem Netzteil Zustand.
Wenden Sie keine Gewalt bei der Festplatte an.
Schrauben Sie Schrauben nicht zu sehr fest.
Schütteln Sie die Festplatte nicht.
g 2.a
Wireless-Benutzer – NetDISK® mit dem
beiliegenden Ethernet-Kabel an den WirelessRouter anschließen.
Sicherstellen, dass das Netzkabel gut festsitzt,
und den Ein-/Ausschalter auf eingeschaltete
Position stellen.
NetDISK® mit dem beiliegenden Ethernet-
Kabel an den Router anschließen.
NetDISK® mit dem beiliegenden USB-Kabel
direkt an den USB-Port Ihres PC anschließen.
Sicherstellen, dass das Netzkabel gut
festsitzt, und den Ein-/Ausschalter auf
eingeschaltete Position stellen.
NDAS® Modus USB Modus
g 3.a g 3.ag 3.a g 3.a
Drehen Sie die NetDisk 352 UN
auf den Kopf.
Schieben Sie die Festplatte in
den Laufwerksschacht, bis sie
fest einrastet.
Entriegeln Sie bitte vorsichtig
die Abdeckung durch die
schmale Önung am vorderen
Boden des Gehäuses.
Dies geht sehr gut mit einem
achen Schraubendreher.
Die Abdeckung kann dann
leicht entnommen werden.
Verschließen Sie den Laufwerksschacht wieder mit der
Abdeckung.
Software Installation (352UN)
Windows 7/Vista/XP/Server 2003/2000
Beiliegende „NetDISK® Installations-CD“ in Ihr
CD-ROM-Laufwerk einlegen. Leicht verständliche Anweisungen führen durch die Installation.
NetDISK® Installation CD
einlegen
g 4.a g 4.b g 4.c g 4.d
Der Setup-Assistant läuft
automatisch, und der
Begrüßungsbildschirm
erscheint
Gewünschte Sprache
wählen
Installation für das
entsprechende Produkt
wählen
Warranty
This product comes with a two year warranty from date of purchase. Please register your product at www.iocellnetworks.com and click on “Product Registration” to activate the
warranty. (Please have your NetDISK Serial Number ready.) Please have your NetDISK ID and Write Key ready. We are not responsible for any loss of data. Please back up your data
often to avoid unexpected losses.
Note: This equipment has been tested and found to comply with the limit for a Class B digital device, pursuant to part 15 of the FCC Rules.
These limits are designed to provide reasonable protection against harmful interference in a residential Installation.
This equipment generates, uses, and can radiate radio frequency energy and, if not installed and used in accordance with the instructions.
If this equipment does cause harmful interference to radio communications. However, there is no guarantee that interference will not occur in a particular installation. IF this
equipment does cause harmful interference to radio or television reception, which can be determined by turning the equipment o and on, the user is encourage to try to correct
the interference by one or the following measures:
- Reorient or relocate the receiving antenna.
- Increase the separation between the equipment and receiver.
- Connect the equipment into an outlet on a circuit dierent from that to which the receiver is connected
- Consult the dealer or an experience radio TV technician for help
Deutsch
“Neues Gerät registrieren“ wählen
• Klicken Sie den NDAS Geräte-Manager mit der rechten
Maustaste an (Rechtsklick)
• Wählen Sie dann „Neues Gerät registrieren …“ mit der linken
Maustaste aus (Linksklick)
Folgen Sie bitte den Instruktionen auf dem Bildschirm
• Die NDAS-Geräte-ID und der Schreibschlüssel sind an der Unterseite des NetDISK® Gehäuses zu nden.
• In der NDAS-Geräte-ID und im Schreibschlüssel ist kein Buchstabe „O“ und kein Buchstabe „I” zu nden
• Bitte die Zahlen „1“ oder „0“ für derartige Zeichen verwenden.
Auf “Fertig stellen” klicken
Installationsvorgang 1–7 auf
allen Systemen Ihres Netzwerks
wiederholen, die auf dieses Laufwerk
zugreifen sollen.
Assistent für das Suchen neuer Hardware.
• Auf ”NDAS-Geräteverwaltung“ klicken, um das registrierte NetDISK® Gerät zu sehen.
Assistent für das Suchen neuer Hardware.
• Es kann sein, dass dieses Fenster erscheint oder auch nicht.
• Wenn das Fenster erscheint, folgen Sie den Anweisungen und installieren den neuen NetDISK®.
Hinweis: Nach der Installation des NetDISK® Treibers
können Sie das Ethernet-Kabel direkt von Ihrem
Laufwerk
an Ihren Computer anschließen, um schnellere
Übertragungsraten als mit einer USB-Verbindung
zu erzielen.
(Nur für die Verwendung ohne Netzwerk)
Windows® 98 / MAC OS X
• Die neuesten Software- und Treiberversionen sind auf “www.iocellnetworks.com“ zu nden.
Windows XP
Nein, diesmalnicht
Lese-/Schreibmodus Lesemodus
Windows Vista
Alway Vertrauenssoftware von Ximeta, Inc
Nach erfolgreicher Installation, nden Sie den NDAS Geräte-Manager unten rechts im Infobereich der Taskleiste
Ihres Desktops.
5
6
7
8
1 2 3 4
g 2.b
ZUR INFO:
1) Zum Betrieb des USB Anschlusses wird keine spezielle Software benötigt.
2) Wird die 352UN in einem RAID Modus betrieben, so wird vor Nutzung des USB Anschlusses dringend empfohlen, das
Handbuch zu lesen, um sich vorab über die Besonderheiten beim Anschluss per USB zu informieren.
 Loading...