

Page 1

TC5000
Thin Client User’s Guide
Page 2

Copyright and Trademark notices
Copyright and Trademark Notices
Copyright 2005 I-O Corporation
ALL RIGHTS RESERVED
Information in this document is subject to change without notice and does not represent a commitment
on the part of the manufacturer. No part of this guide may be reproduced or transmitted in any form or
means and for any purpose, without the express written permission of the manufacturer.
I-O® is a registered trademark of I-O Corporation.
Citrix, WinFrame and ICA are registered trademarks of Citrix Systems, Inc. MetaFrame, Program
Neighborhood and SpeedScreen are trademarks of Citrix Systems, Inc.
Windows CE, Windows NT, Windows 2000, Windows XP and RDP are tradema rks or registered
trademarks of Microsoft Corporation.
All other trademarks and registered trademarks are property of their respective owners.
Every effort has been made to make this guide as complete and accurate as possible, but no warranty
of fitness is implied. The authors and the publisher shall have neither responsibility nor liability to any
person or entity with respect to loss or damages arising from the use of information contained in this
guide.
Document Number: WBT200-OMAN01-221
February 2005
I-O Corporation
1490 North 2200 West, Suite 100
Salt Lake City, UT 84116
801-973-6767
801-974-5683 fax
HTUwww.iocorp.comUTH
Thin Client User’s Guide 2
Page 3

Table of Contents
Table of Contents
Introduction......................................................................................................................................6
About The I-O Thin Client .............................................................................................................................6
About this Guide............................................................................................................................................6
Related Information.......................................................................................................................................7
Install the Thin Client ......................................................................................................................8
Step One: Unpack.........................................................................................................................................8
Step Two: Prepare ........................................................................................................................................8
Step Three: Connect accessories and power...............................................................................................9
Step Four: Connect to the Server ...............................................................................................................11
Step Five: Start the Thin client....................................................................................................................11
Status of LEDs on the Front and Rear Panels............................................................................................11
Shutting Down the Thin client .....................................................................................................................12
Setup the Thin Client.....................................................................................................................13
Step One: Start the Setup Wizard...............................................................................................................13
Step Two: Terminal Name & Network Properties.......................................................................................14
IP Address..............................................................................................................................................14
Name Servers........................................................................................................................................15
Step Three: Desktop Settings.....................................................................................................................15
Desktop Area and Refresh Frequency...................................................................................................16
Colors.....................................................................................................................................................17
Screen Saver .........................................................................................................................................17
Step Four: Additional Settings in the Control Panel....................................................................................18
122-Key Keyboard Support....................................................................................................................18
Date and Time........................................................................................................................................19
Step Five: Finish..........................................................................................................................................19
Creating Connections ...................................................................................................................20
Overview of the Terminal Connection Manager..........................................................................................20
Connections Tab....................................................................................................................................21
Configure Tab ........................................................................................................................................22
Creating Connections.............................................................................................................................22
Specifying AutoStart / Default Connection.............................................................................................23
Editing a Connection..............................................................................................................................23
Deleting a Connection............................................................................................................................24
Starting a Connection.............................................................................................................................24
Switching Connections...........................................................................................................................24
Closing a Connection.............................................................................................................................24
Thin Client User’s Guide 3
Page 4

Table of Contents
I-O 5250 Printing.........................................................................................................................................25
Configure the AS/400, iSeries or eServer i5 for TN5250e.....................................................................26
Create the I-O 5250 Printer Connection ................................................................................................27
Terminal Emulation.....................................................................................................................................31
RDP.............................................................................................................................................................36
ICA ..............................................................................................................................................................39
Microsoft Viewers........................................................................................................................................42
Internet Explorer..........................................................................................................................................43
E-Mail Client................................................................................................................................................44
Using Connections........................................................................................................................50
I-O 5250 Printing.........................................................................................................................................50
Start the I-O 5250 Printer Session.........................................................................................................50
Test the Printer Attached to the Thin Client...........................................................................................51
Eject a Page from the Printer.................................................................................................................52
Cancel the Print Job...............................................................................................................................52
End the I-O 5250 Printer Session..........................................................................................................52
I-O 5250 Printer Control Panel Options.................................................................................................52
Terminal Emulation.....................................................................................................................................53
RDP Connection to Windows Terminal Servers.........................................................................................54
ICA Connection to Citrix Servers ................................................................................................................55
Microsoft Viewers........................................................................................................................................56
Running the Viewer................................................................................................................................56
Printing from a Viewer............................................................................................................................57
Limitations of the Microsoft Viewers ......................................................................................................58
TC5000 Printing Overview..........................................................................................................................59
Windows Media Player................................................................................................................................60
E-mail..........................................................................................................................................................62
Configuring the E-mail Client.................................................................................................................62
E-Mail Overview.....................................................................................................................................68
Receiving Messages..............................................................................................................................73
Reading Messages ................................................................................................................................75
Composing and Editing Messages ........................................................................................................81
Organizing Messages ............................................................................................................................84
Advanced Configuration...............................................................................................................86
I-O Configuration Utility...............................................................................................................................86
Save a Configuration..............................................................................................................................87
Send a Configuration to a Thin Client....................................................................................................88
General Tab ................................................................................................................................................91
Display Tab .................................................................................................................................................92
Thin Client User’s Guide 4
Page 5

Table of Contents
Desktop Area and Refresh Frequency...................................................................................................92
Colors.....................................................................................................................................................93
Screen Saver .........................................................................................................................................93
Control Panel...............................................................................................................................................94
Internet Options......................................................................................................................................94
RDP Printers..........................................................................................................................................96
Keyboard................................................................................................................................................97
System ...................................................................................................................................................98
Mouse ..................................................................................................................................................100
Volume and Sounds.............................................................................................................................101
Certificates...........................................................................................................................................102
Regional Settings.................................................................................................................................103
Network and Dialup Connections.........................................................................................................105
LPR/LPD..............................................................................................................................................117
SNMP Setup ........................................................................................................................................118
ICA Global Settings..............................................................................................................................119
122-Keyboard.......................................................................................................................................120
USB Storage........................................................................................................................................121
Troubleshooting ..........................................................................................................................122
Firmware Upgrade Process ......................................................................................................................130
I-O Configuration Utility Upgrade Process................................................................................................133
Uninstalling the I-O Configuration Utility...................................................................................................134
Saving / Restoring the Thin Client’s Configuration ...................................................................................135
Saving a Configuration.........................................................................................................................135
Restoring a Configuration....................................................................................................................136
Restoring Factory Defaults........................................................................................................................138
Boot Up Process..................................................................................................................................138
General Tab Process...........................................................................................................................138
Accessing the Motherboard’s Startup Processes.....................................................................................140
Microsoft Software License........................................................................................................141
Manufacturer’s Warranty & Repair Policy.................................................................................145
FCC & European Compliance.....................................................................................................149
Thin Client User’s Guide 5
Page 6
Introduction
9
About The I-O Thin Client
The I-O Thin Client is a robust solution available for thin client computing in the IBM, Windows, Citrix
and UNIX environments.
Equipped with Microsoft's Windows CE.NET operating system, the product provides seamless
connectivity to Windows NT 4.0 TSE, Windows 2000, Windows XP, Windows 2003 and Citrix servers
using Microsoft’s RDP and Citrix’s ICA protocols. Using I-O Corporation’s award winding display and
printer emulations, complete access is provided for AS/400, iSeries and eServer i5 host environments.
The terminal emulation suite for UNIX connectivity.
Microsoft’s Internet Explorer V6 for CE browser is built into the thin client to provide instant access to
the Internet.
The thin client also includes Microsoft’s Media Player and viewers for Word, Excel, PowerPoint as well
as a PDF viewer. An e-mail thin client is also included.
The user-friendly software interface allows the system administrator to easily and quickly configure the
thin client. The I-O Configuration Utility allows the system administrator to remotely configure and
update the thin client.
Introduction
The term client is used in this guide to represent the I-O Thin Client.
Consistent with our policy of continuous development, the product you received may have features in
addition to those described in this guide. Please visit us at
HTUwww.iocorp.comUTH for current information.
About this Guide
This guide is intended to assist the network administrator of your organization to setup and configure
the software of the thin client.
The following symbols are used in the guide.
Caution: This symbol highlights procedures that, if not correctly performed or adhered to, could
damage or corrupt the product or adversely affect the security and functionality of the product.
Do not proceed beyond such points until the required conditions are fully understood and
achieved.
Note: This symbol denotes useful additional information that is relevant to the procedure or
feature being described.
Tip: This symbol denotes a hint, shortcut or alternate method to aid or supplement the
procedure being described.
The guide contains screenshots of relevant dialog boxes and windows for your reference. The sizes of
screenshots are not representative of the actual sizes of the dialog boxes and windows on your screen.
Thin Client User’s Guide 6
Page 7

Introduction
Related Information
Besides this guide, the following other documents contain information relevant to the thin client. These
documents are available in PDF format on the CD that was provided with the product. . They may also
be accessed from the Configuration Utility’s Help menu.
TN5250e Printer Emulation User’s Guide
This document provides detailed information about I-O Corporation’s TN5250e printer emulation.
I-O Configuration Utility Help
This document is available from the Help menu when the Configuration Utility is running.
Terminal Emulation User’s Guide
This document provides detailed information about the TeemTalk terminal emulation suite included
in the thin client.
Client for Windows CE Windows-Based Terminals Administrator’s Guide
This document provides the administrator with detailed information about configuring the ICA client.
Other resources that may be needed to fully utilize the features and capabilities of the thin client include:
Network Administrator
This individual’s assistance will be helpful for IP address assignment, general network issues, etc.
Microsoft Certified System Engineer
This individual’s assistance will be helpful for creating, configuring and utilizing Microsoft’s Terminal
Server capabilities.
Citrix Certified Administrator
This individual’s assistance will be required for creating, configuring and utilizing Citrix server
connections.
Thin Client User’s Guide 7
Page 8
Inst all the Thin Client
9
9
This chapter describes the procedure to install the product hardware.
Step One: Unpack
The carton in which the product was shipped to you contains the following:
TC5000 Series Thin client
Stand
External Power Supply
Mouse
104 or 122-Key keyboard
CD containing the I-O Configuration Utility and User’s Guides
Getting Started Guide
When you open the carton, if you find any discrepancy between the contents of the carton and the
above list, contact the dealer or reseller from whom you purchased the product immediately.
OTE: PLEASE RETAIN THE ORIGINAL CARTON AND PACKING MATERIAL. THEY WOULD BE REQUIRED TO
N
AVOID DAMAGE DURING TRANSIT.
Install the Thin Client
Step Two: Prepare
1. The site where you want to install the product must have the following
Two 100~120V AC, 2A, 50Hz, 3-pin power outlets (one each for the thin client and the display
unit).
OTE: ENSURE THAT THE POWER OUTLET IS PROPERLY REGULATED AND GROUNDED. A FLOATING
N
GROUND / CHASSIS COULD CAUSE AN ELECTRIC SHOCK.
Well ventilated, clean, dry and dust free atmosphere
Specified environmental conditions
Table or desk of suitable size.
2. Place the thin client in the upright or vertical position on the desk or table in a location that provides
easy access to the power switch on the front panel.
3. Ensure a minimum space of 2 inches (5cm) on all sides of the unit for efficient convection cooling.
AUTION: BE CERTAIN THE VENTS ON THE TOP AND BOTTOM OF THE UNIT ARE NOT BLOCKED!
C
Thin Client User’s Guide 8
Page 9
Install the Thin Client
Step Three: Connect accessories and power
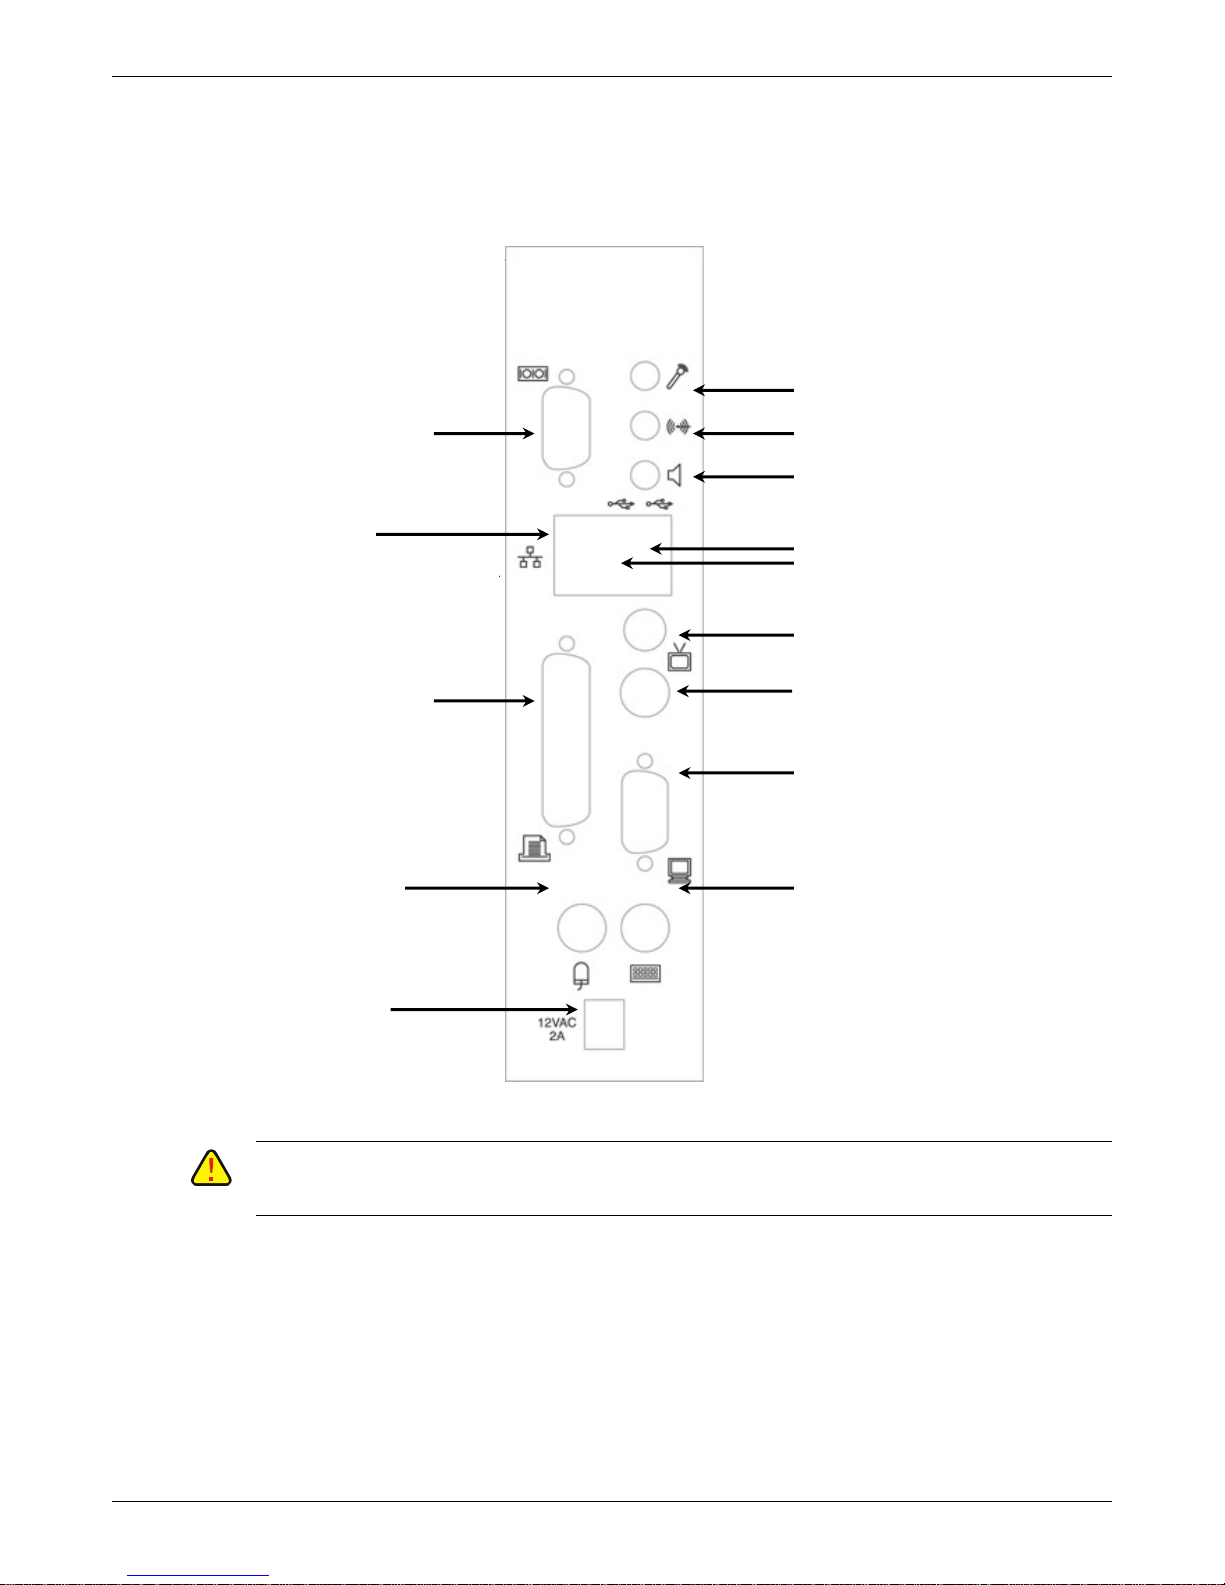
The connectors for devices supported by the product are located on the rear panel.
Microphone Input
Serial Port (COM1)
Network Port
Parallel Port (LPT1)
PS/2 Mouse Port
AC Power Input
Line Input
Speaker Output
USB Ports
RCA Video Port
S-Video Port
Video Port
PS/2 Keyboard Port
See the following page for details about the connectors and cables and the order for connecting them.
AUTION: BEFORE CONNECTING ANY CABLE, ENSURE THAT THE EXTERNAL POWER SUPPLY IS NOT
C
CONNECTED TO THE WALL OUTLET. THE POWER MUST BE CONNECTED ONLY AFT E R ALL OTHER
CONNECTIONS ARE MADE
Thin Client User’s Guide 9
.
Page 10
Install the Thin Client
9
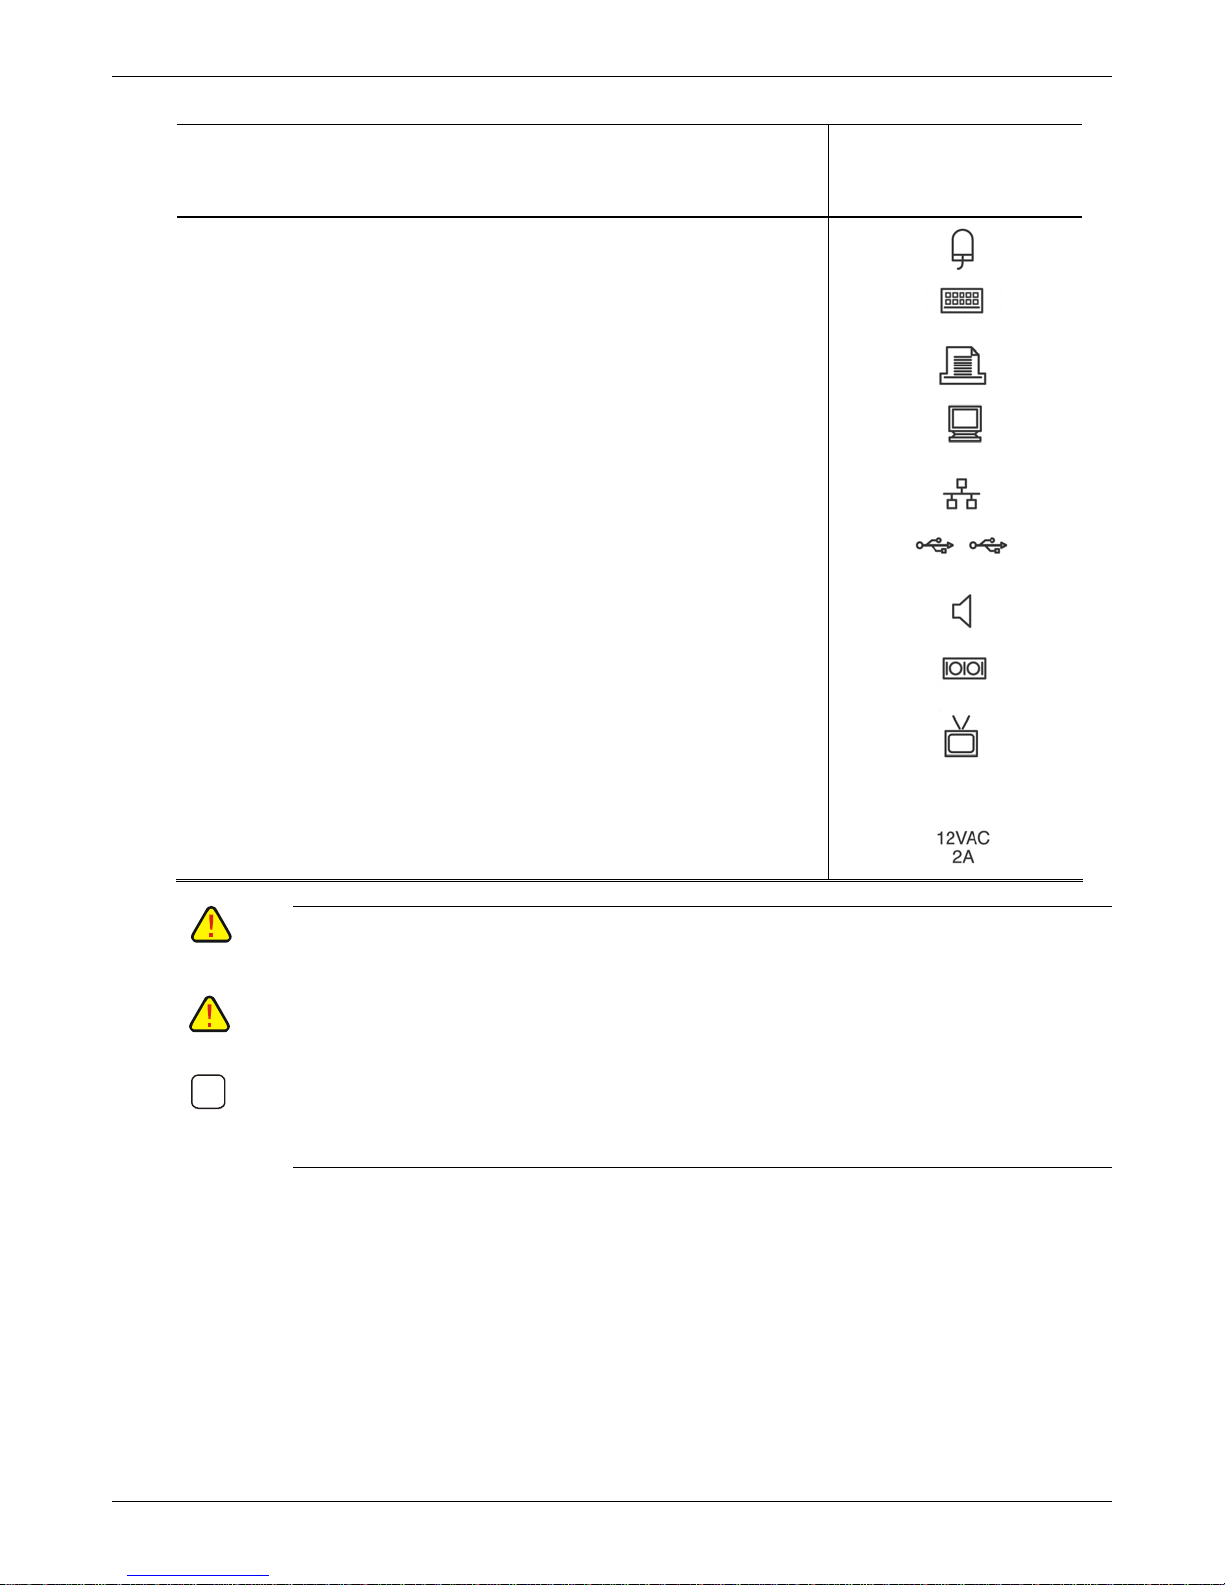
Follow the instructions below to connect various
accessories
9 Connect the mouse to the PS/2 Mouse port
9 Connect the keyboard to the PS/2 Keyboard port
9 (Optional) Connect the printer to the parallel port
9 Connect the video cable from the CRT or LCD display unit to the
DB-15 video port
9 Connect the network cable to the 10/100 Base-T Ethernet port
9 (Optional) Connect USB devices to the USB 1.1 ports
9 (Optional) Connect external speakers to the speaker port
9 (Optional) Connect serial devices (i.e. modem) to the COM ports
9 (Optional) Connect either a composite or SVGA TV cable. When
the TV display output is selected, the screen will be shown on both
the display and on the TV with one exception – LCD monitors
cannot support the TV output option.
Connector Symbol
9 Connect the output of the AC Transformer to the power inlet
CAUTION: ENSURE THAT THE SCREWS PROVIDED WITH D-TYPE CONNECTORS (LPT1, COM1 AND
VIDEO PORTS) ARE FASTENED.
AUTION: DO NOT USE A LCD MONITOR AND A TV TOGETHER. THE FREQUENCY REQUIRED FOR A
C
TV SIGNAL MAY DAMAGE THE LCD MONITOR.
NOTE:
CONNECTED AT THIS TIME
AT A LATER TIME
ATTACHING THE ACCESSORIES
OTHER OPTIONAL ACCESSORIES (SPEAKER OR MICROPHONE) SHOULD ALSO BE
, AND PRIOR TO POWERING UP THE THIN CLIENT. IF THEY ARE ATTACHED
, MAKE CERTAIN THAT THE POWER CONNECTOR IS DISCONNECTED WHILE
.
Thin Client User’s Guide 10
Page 11
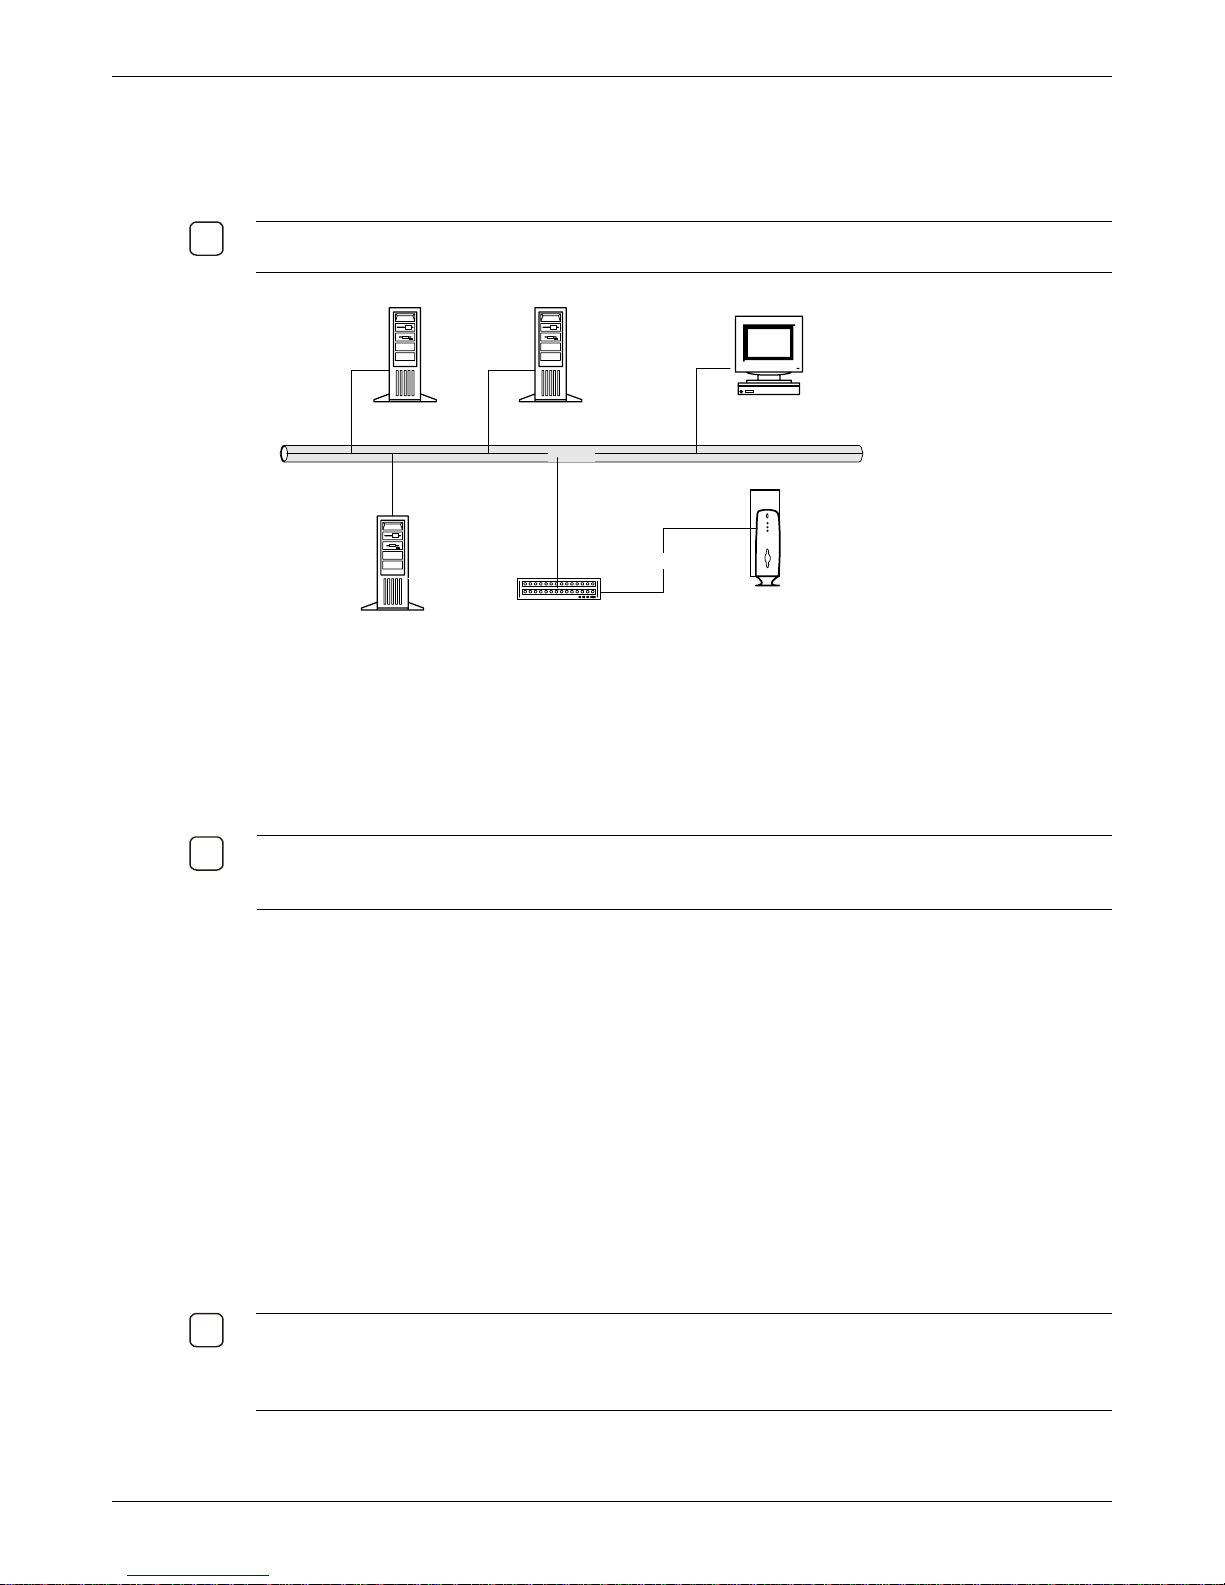
Step Four: Connect to the Server
9
9
9
Connect a 10/100Base-T cable from the network outlet of the thin client to a hub.
N
OTE: BEFORE CONNECTING ANY CABLE, ENSURE THAT EXTERNAL POWER SUPPLY IS DISCONNECTED
AND THAT NO POWER IS BEING SUPPLED TO THE THIN CLIENT.
Install the Thin Client
Host 1
ICA Server
Host 2
Ethernet
10/100Base-T
HUB
Workstation
Thin Client
Step Five: Start the Thin client
To start the thin client, connect the external power supply to the wall outlet and press the On/Off switch
located on the front panel. Refer to the Setup the Thin Client section for instructions to setup the thin
client software.
N
OTE: WHEN THERE IS A POWER INTERRUPTION TO THE EXTERNAL POWER SUPPLY, YOU MUST PRESS
THE ON/OFF SWITCH ON THE FRONT PANEL TO START THE UNIT. THE THIN CLIENT WILL NOT
AUTOMATICALLY RESTART WHEN THE SUPLY OF POWER RESUMES
.
Status of LEDs on the Front and Rear Panels
The front panel of the thin client has two LEDs on the right and left side of the On/Off switch.
The Power-LED on the left side glows green when the unit is switched on and remains on until the
unit is switched off.
The Internal Storage Access LED on the right side flickers red when the thin client is accessing the
thin client’s firmware or locally stored applications such as Internet Explorer.
The rear panel of the thin client has two LEDs next to the Network connector.
The green LED flashes when the thin client communicates at 100 Mbps and blinks slowly when
communicating at 10 Mbps.
The yellow LED turns on only when the thin client communicates at 10 Mbps.
OTE: THE THIN CLIENT, LIKE THE CURRENT PCS, ALWAYS HAS POWER APPLIED TO THE
N
MOTHERBOARD AS ALONG AS THE POWER TRANSFORMER IS CONNECTED. IN THE STAND BY CONDITION
(POWER LED ON THE FRONT IS OFF, BUT THE GREEN ETHERNET LED WILL BE ON), THE THIN CLIENT
ONLY USES
Thin Client User’s Guide 11
1 WATT OF POWER (WHEN ON AND RUNNING, THE THIN CLIENT USES 20 WATTS).
Page 12
Install the Thin Client
9
Shutting Down the Thin client
There are two methods for shutting down the thin client.
The fastest method is to click the Shutdown button on the Terminal Connection Manager screen.
Click Yes to confirm the unit is to be shut down.
Press and hold the On/Off switch on the front panel for about 20 seconds.
The Power LED will stop glowing.
OTE: EVEN IF THE THIN CLIENT IS SWITCHED OFF (USING THE POWER SWITCH ON THE FRONT PANEL), A
N
STANDBY SUPPLY OF POWER IS BEING PROVIDED TO THE MOTHERBOARD. TO COMPLETELY SWITCH OFF
POWER SUPPLY TO THE UNIT
AUTION: BE CERTAIN TO EXIT ALL ACTIVE CONNECTIONS PRIOR TO SHUTTING DOWN THE THIN CLIENT.
C
, THE EXTERNAL POWER SUPPLY HAS TO BE DISCONNECTED.
Thin Client User’s Guide 12
Page 13
Setup the Thin Client
9
This chapter describes the procedure to setup the software of the thin client. This procedure must be
performed by the system administrator. It is assumed the thin client has been installed properly using
the instructions in the previous section.
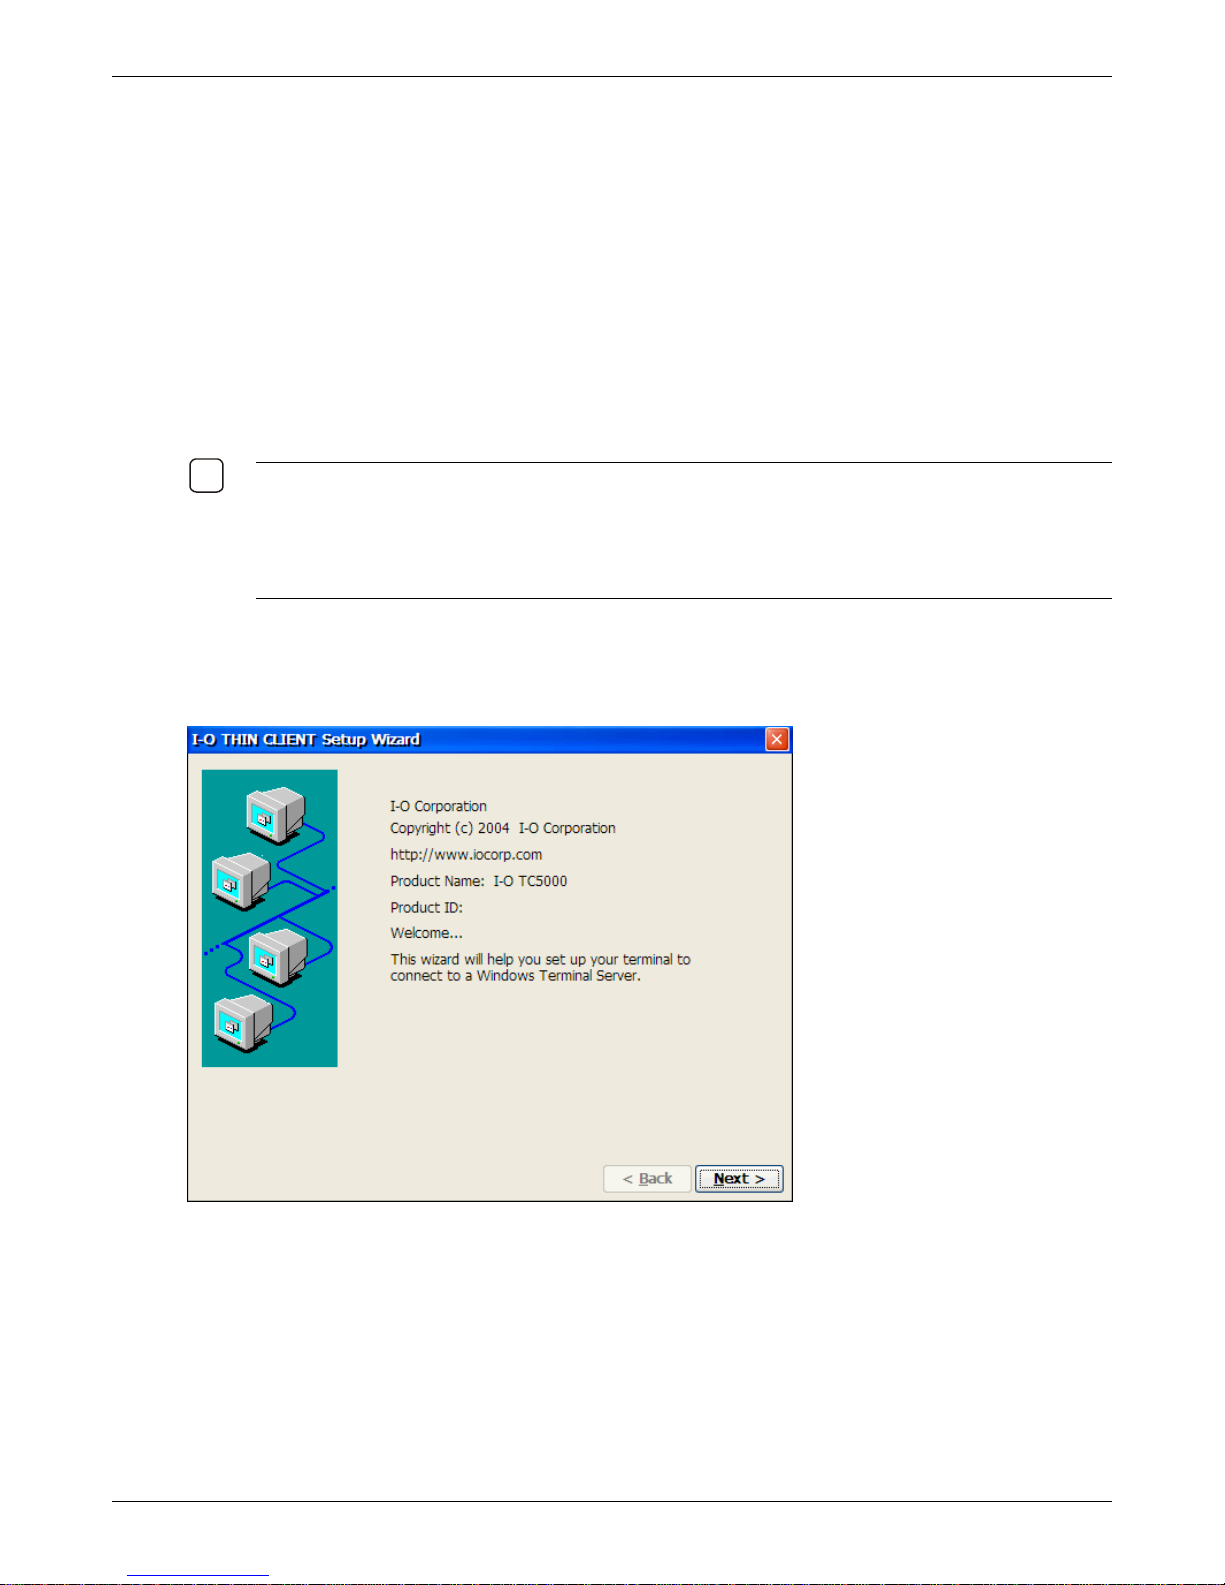
Step One: Start the Setup Wizard
When you switch the thin client on for the first time or if the thin client has been reset to factory defaults,
a Setup Wizard is automatically started. The wizard will guide you through the process of configuring
the thin client.
N
OTE: THE SETUP WIZARD IS STARTED AUTOMATICALLY UNDER THE FOLLOWING CIRCUMSTANCES:
WHEN YOU SWITCH THE THIN CLIENT ON FOR THE FIRST TIME.
HEN YOU RESTORE DEFAULT SETTINGS OF THE THIN CLIENT THROUGH THE HGENERALH TAB OF THE
W
TERMINAL PROPERTIES DIALOG-BOX.
The Setup Wizard has several dialog boxes that display in succession. Some dialog boxes provide
information, while others require input. Every dialog-box contains buttons to take you backward or
forward through the setup process, and to confirm or cancel input and selections.
Setup the Thin Client
The first dialog box of the Setup Wizard is shown below. Click Next> to continue.
Thin Client User’s Guide 13
Page 14
Setup the Thin Client
9
9
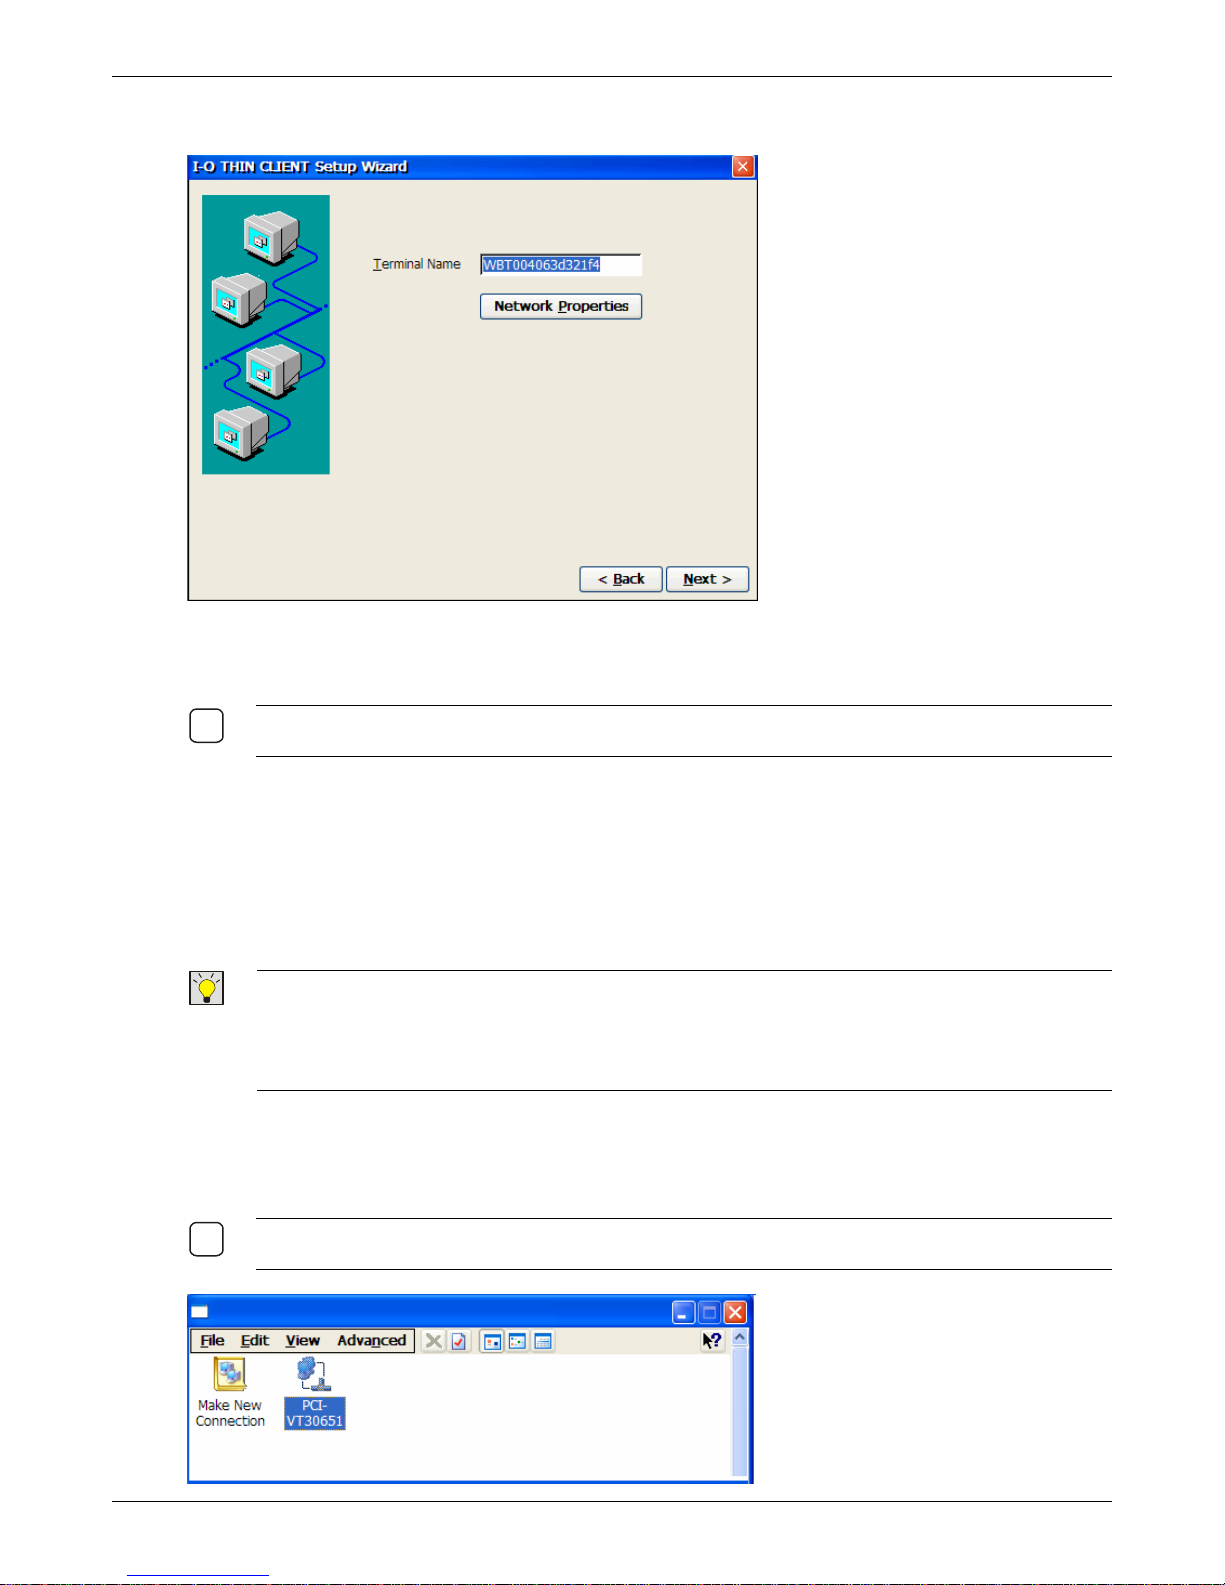
Step Two: Terminal Name & Network Properties
The above dialog box contains the field where you will enter the name this thin client will identified as to
the network. You may either accept the default name (which is based upon the MAC address of the
network interface component of the thin client), or enter a name of your choice.
OTE: THE NAME MAY BE UP TO 15 CHARACTERS IN LENGTHS, AND MUST BEGIN WITH AN ALPHA
N
CHARACTER.
You will next need to setup up the IP address of the thin client. This can either be done automatically
by DHCP, or you will need to manually enter a static IP address.
If the IP address is assigned automatically by DHCP, click the Next>button on this screen a nd skip
to Display Settings section below.
If the IP address is to be a static address (one that does not change), click the Network Properties
button to access the IP address setting screens.
IP: TO IMPLEMENT LPD PRINTING IT IS RECOMMENDED THAT YOU SPECIFY A STATIC IP ADDRESS FOR
T
THE THIN CLIENT. THIS IS NECESSARY BECAUSE, ON THE SERVER-SIDE YOU MUST SPECIFY THE
IP ADDRESS OF THE THIN CLIENT. IF YOU MUST USE DHCP, THEN IT IS PREFERABLE THAT YOU
RESERVE AN
AS THE
IP ADDRESS ON THE DHCP SERVER, FOR THE THIN CLIENT THAT YOU PLAN TO CONFIGURE
LPD SERVER.
IP Address
NOTE: IF THE IP ADDRESS IS TO BE SET BY DHCP, SKIP THIS STEP AS THE THIN CLIENT DEFAULTS TO
DHCP FOR ADDRESSING.
Thin Client User’s Guide 14
Page 15
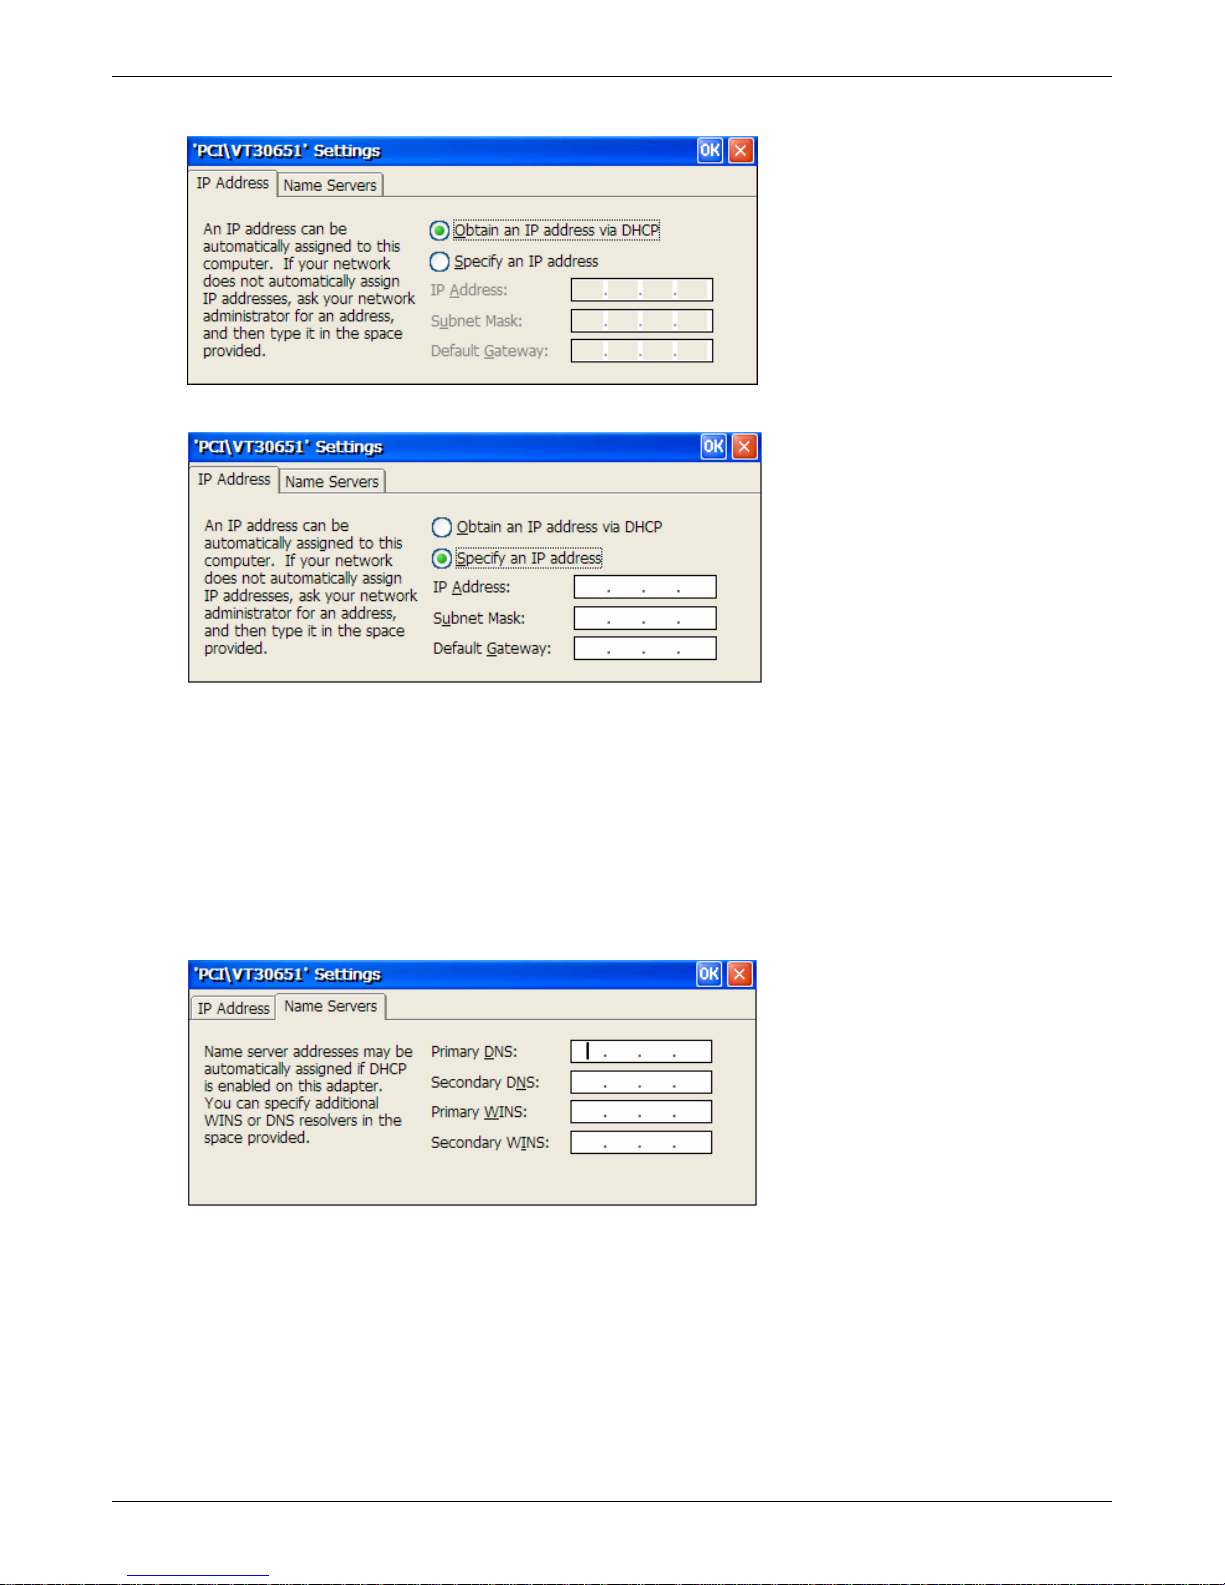
Right click on the PCI-VT30651 icon and select Properties.
Select the IP Address tab.
Setup the Thin Client
Select Specify an IP address. Then manually enter the IP Address, the subnet mask and default
gateway.
If there are DNS or WINS servers in the network, select the Name Servers tab. Otherwise, click the OK
button on the title line of this screen, then click the close button (the X in the upper right corner). Click
Next>to continue.
Name Servers
If there are DNS or WINS servers in the network, select the Name Servers tab.
Fill in the appropriate IP address for each server.
Click the OK button on the title line of this screen, then click the close button (the X in the upper right
corner). Click Next>to continue.
Step Three: Desktop Settings
You will configure the monitor resolution, color pallel and screen saver settings on this screen.
Thin Client User’s Guide 15
Page 16
9
9
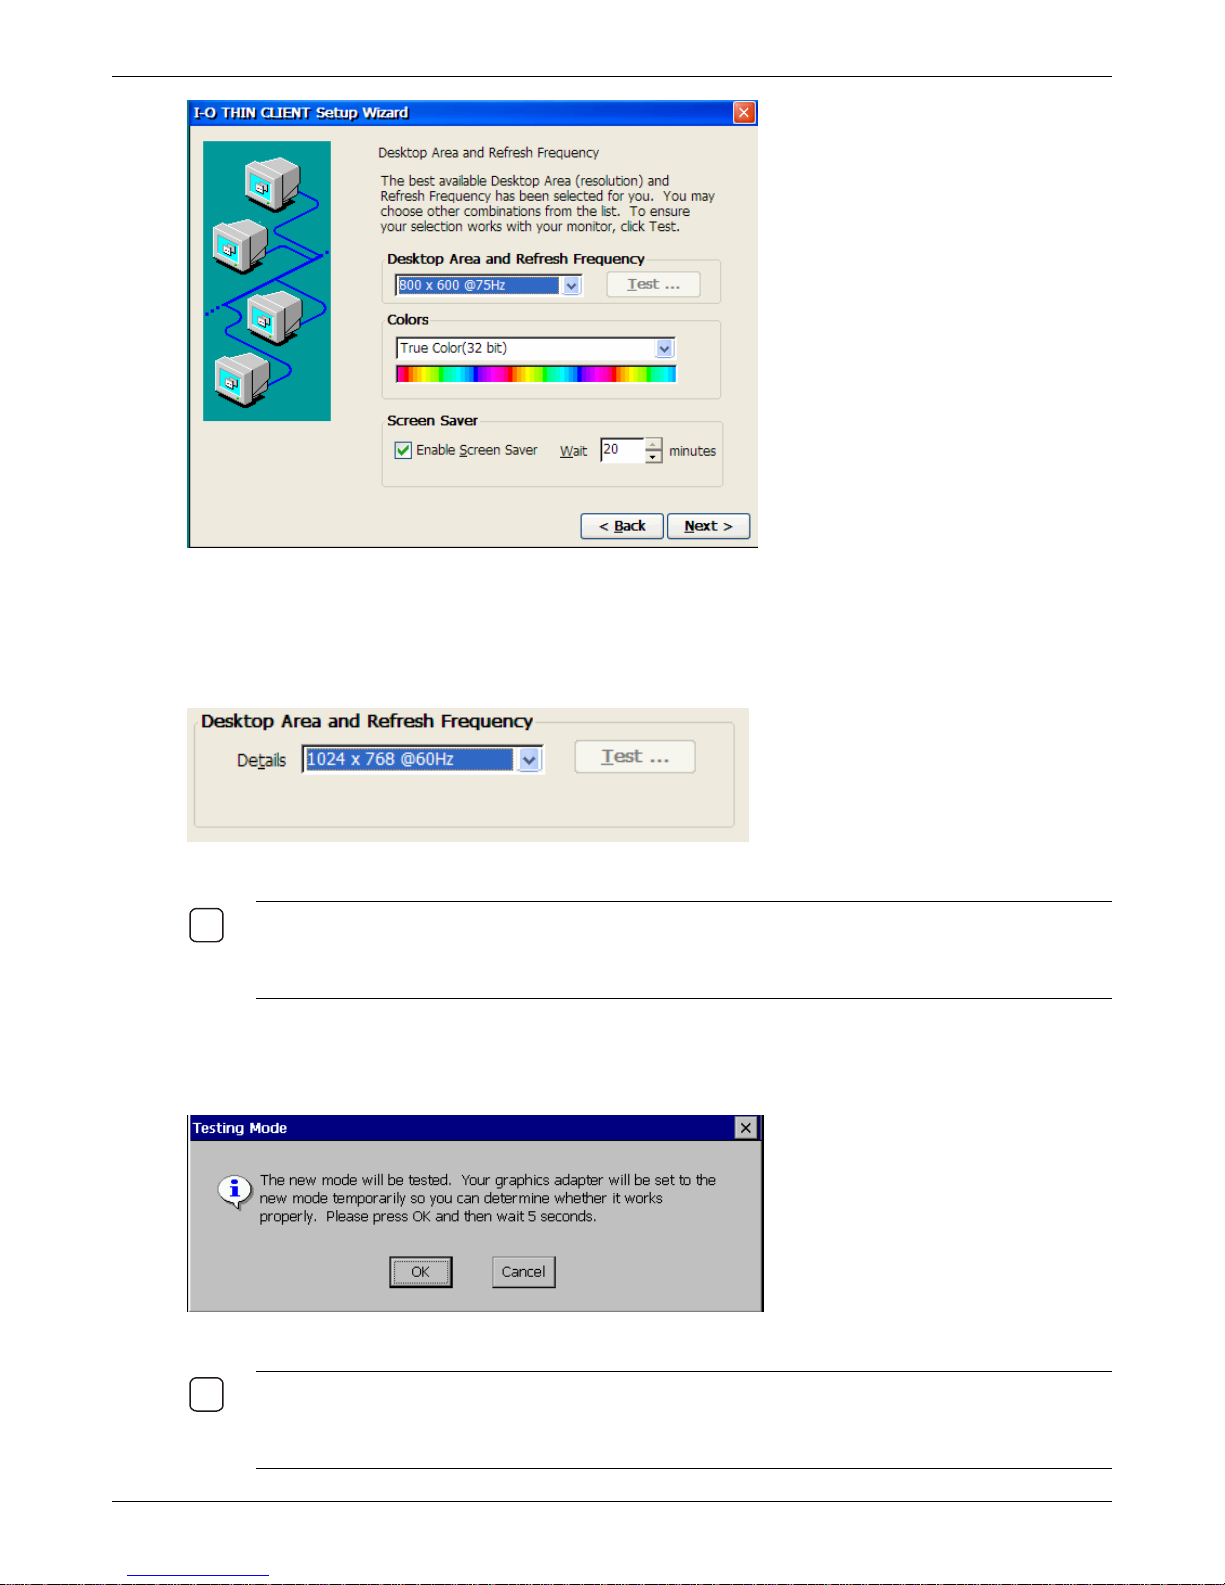
Desktop Area and Refresh Frequency
Setup the Thin Client
By default, the thin client is configured to display at a resolution of 800 x 600 and a refresh frequency of
75Hz.
Select the resolution and refresh rate appropriate for your monitor.
OTE: IN GENERAL CRT MONITORS CAN HANDLE A RANGE OF RESOLUTIONS AND REFRESH RATES.
N
HOWEVER, LCD MONITORS PREFER THE RESOLUTION AND REFRESH RATE TO BE SET TO MATCH THEIR
“NATIVE” RESOLUTION. GENERALLY THIS IS 1024 X 728 @ 60 HZ FOR 15” LCD MONITORS, AND 1280
X
1024 @ 60 HZ FOR 17” LCD MONITORS
If you select a resolution or refresh frequency other than the default setting, verify whether your monitor
supports the selected setting by clicking the Test button.
The following prompt is displayed.
Click OK to continue. A test pattern of black and white boxes will be displayed for about five seconds.
N
OTE: MONITORS WITH ON SCREEN DISPLAY (OSD) FEATURE MAY DISPLAY APPROPRIATE MESSAGES
(SUCH AS ‘OUT OF SYNC’ OR ‘OUT OF RANGE’) IF THE SELECTED RESOLUTION AND FREQUENCY ARE
NOT SUPPORTED
MONITOR CONNECTED TO THE THIN CLIENT
Thin Client User’s Guide 16
. THE EXACT TEXT OF THE OSD MESSAGE WOULD DEPEND ON THE MODEL OF THE
.
Page 17
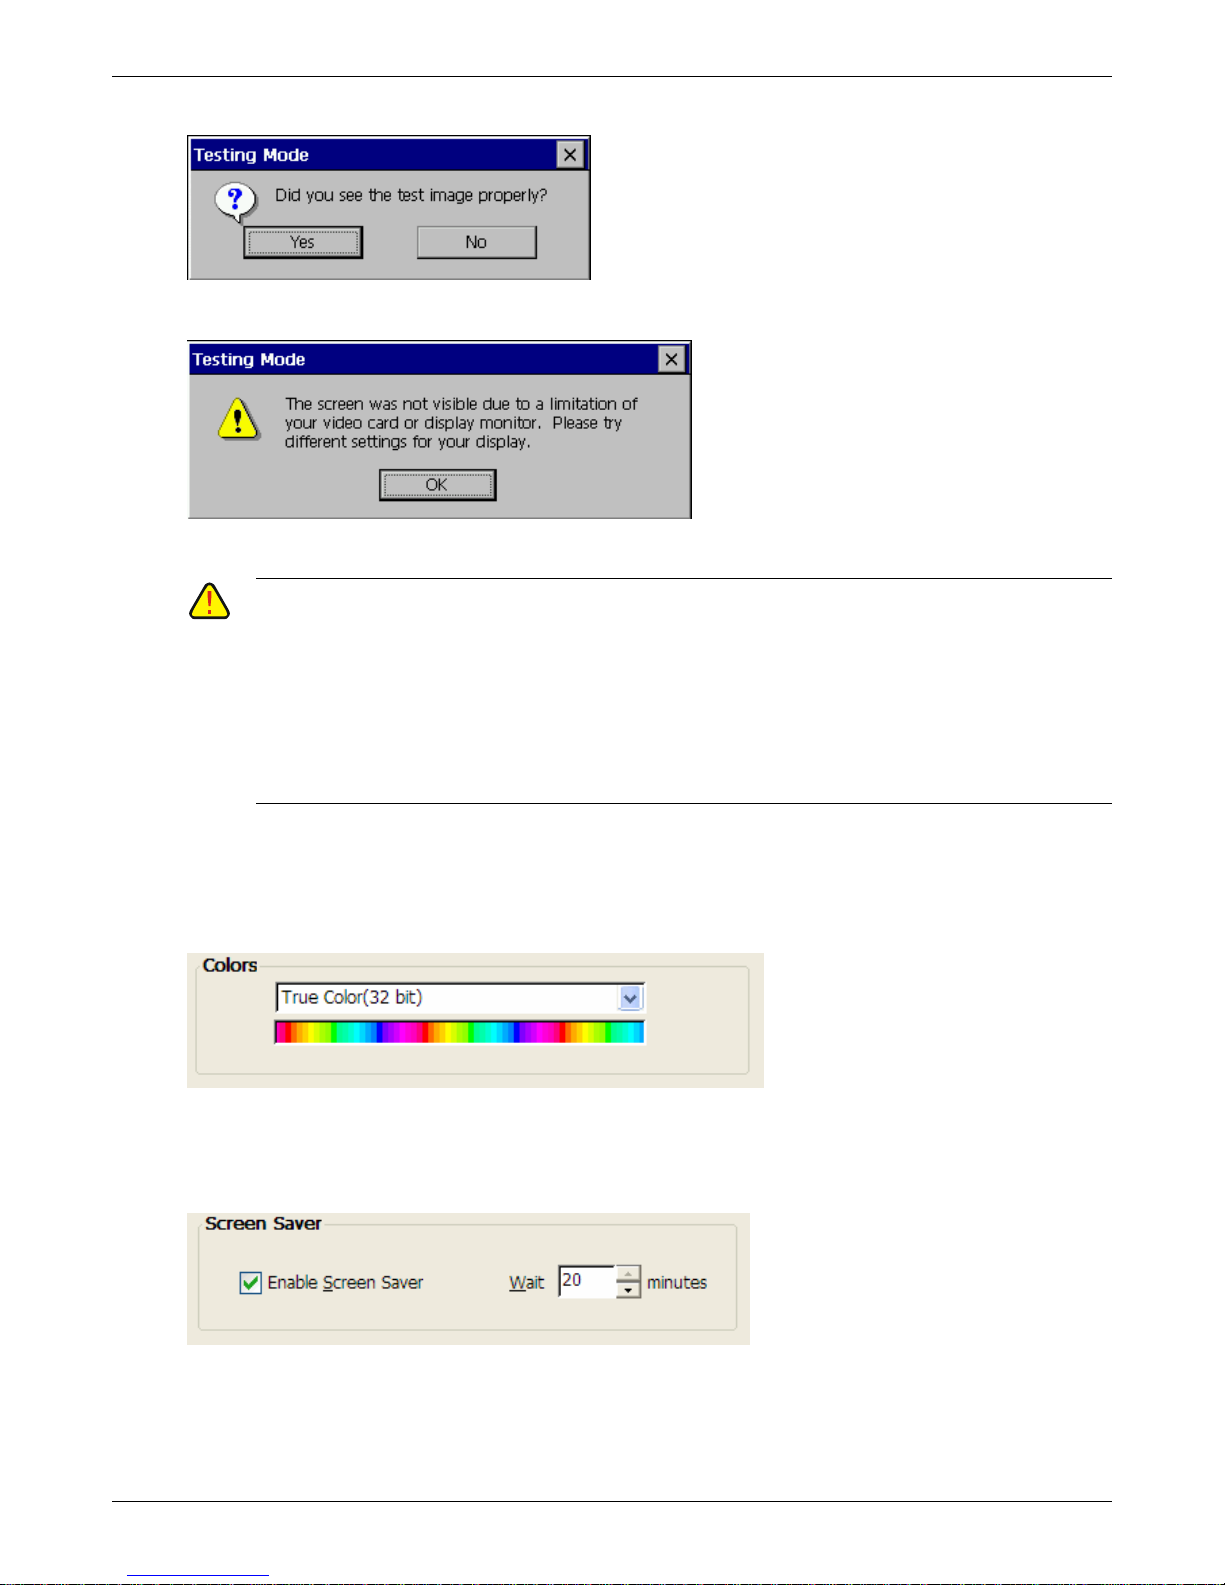
The screen then clear and a following message box will be displayed.
Setup the Thin Client
If the appropriate test pattern was displayed, click Yes to return to the setup wizard.
If the test pattern was not properly displayed, click No. The following message is displayed.
Click OK to change the setting and repeat the test.
C
AUTION: USE THE TEST BUTTON TO TEST THE SELECTED RESOLUTION OF THE MONITOR. FAILURE TO
DO SO WILL RESULT IN THE THIN CLIENT NOT BEING ABLE TO DISPLAY THE SCREEN.
I
F YOU HAVE SELECTED AN UNSUPPORTED SETTING AND THE MONITOR DOES NOT DISPLAY THE SCREEN,
YOU WILL NEED TO RESTART THE THIN CLIENT
. SHUT DOWN THE THIN CLIENT BY HOLDING IN THE
POWER BUTTON FOR SEVERAL SECONDS UNTIL THE POWER LED GOES OUT. PRESS THE POWER
BUTTON TO POWER UP THE THIN CLIENT. IMMEDIATELY AFTER THE I-O SPLASH SCREEN CLEARS,
PRESS THE
RESTORED TO THE FACTORY DEFAULTS AND THE
F7 KEY SEVERAL TIMES. AFTER A FEW SECONDS THE THIN CLIENT’S SETTINGS WILL BE
SETUP WIZARD WILL START.
Colors
Select the color pallet that your monitor supports from the Colors drop down box
Screen Saver
Enable the screen saver, if desired, by checking the Enable Screen Saver box. Select the time to wait
before the screen activates from the scroll box.
Click Next to proceed.
Thin Client User’s Guide 17
Page 18
Setup the Thin Client
Step Four: Additional Settings in the Control Panel
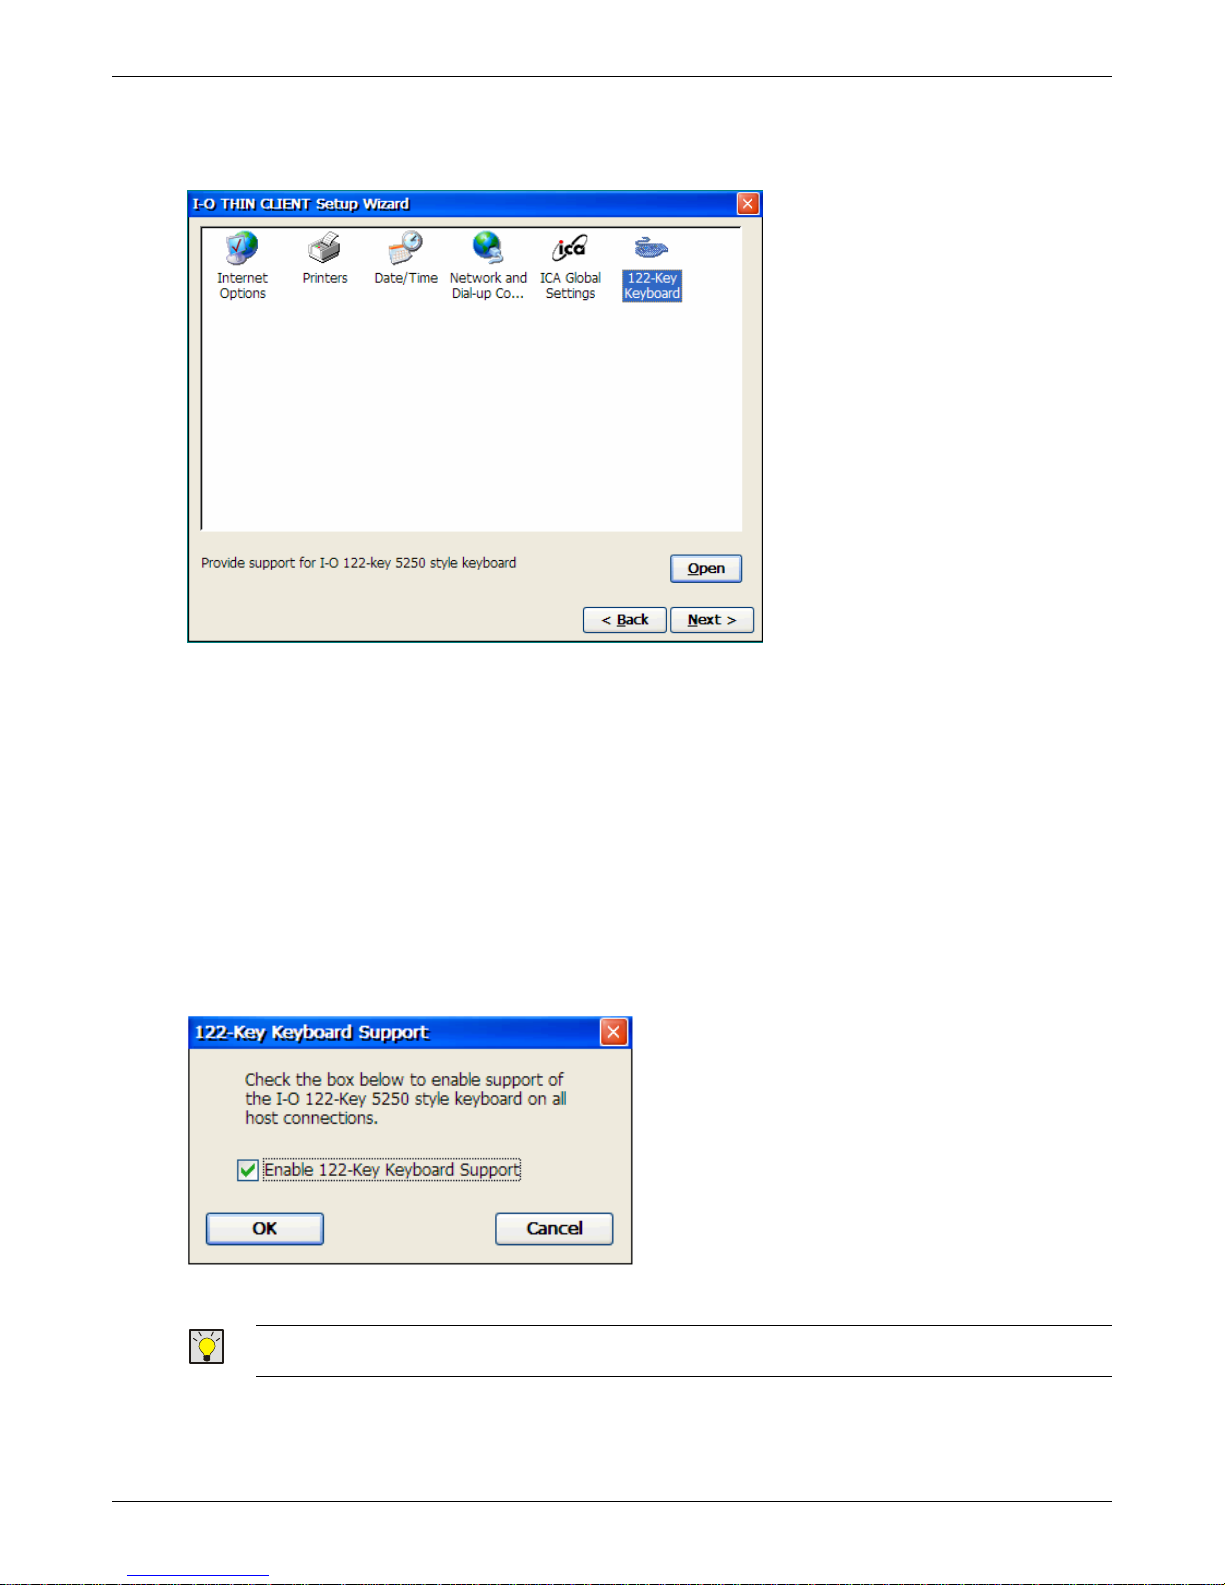
The startup wizard will next present the Windows Control Panel.
From this screen, any number of thin client properties may be configured. At a minimum, it is suggested
that the following items be configured:
122-Key Keyboard Support
Date and Time
After these items have been configured, click the Next button for the wizard to continue.
122-Key Keyboard Support
If an I-O 122-key 5250 Thin Client Keyboard is attached, select the 122-Key Keyboard icon. When the
I-O 122-key 5250 Thin Client Keyboard is attached and this option is enabled, users can swit ch back
and forth between IBM 5250 display sessions and Windows sessions with full keyboard functionality
available in both environments.
Click on the check box to enable this option. Click OK.
IP:: ON THE I-O 122-KEY 5250 THIN CLIENT KEYBOARD, 5250 FUNCTIONS ARE PRINTED ON THE KEY
T
CAPS IN BLACK. WHERE WINDOWS FUNCTIONS DIFFER, THEY ARE PRINTED IN BLUE.
Thin Client User’s Guide 18
Page 19
Setup the Thin Client
Date and Time
The thin client is equipped with a real time clock.
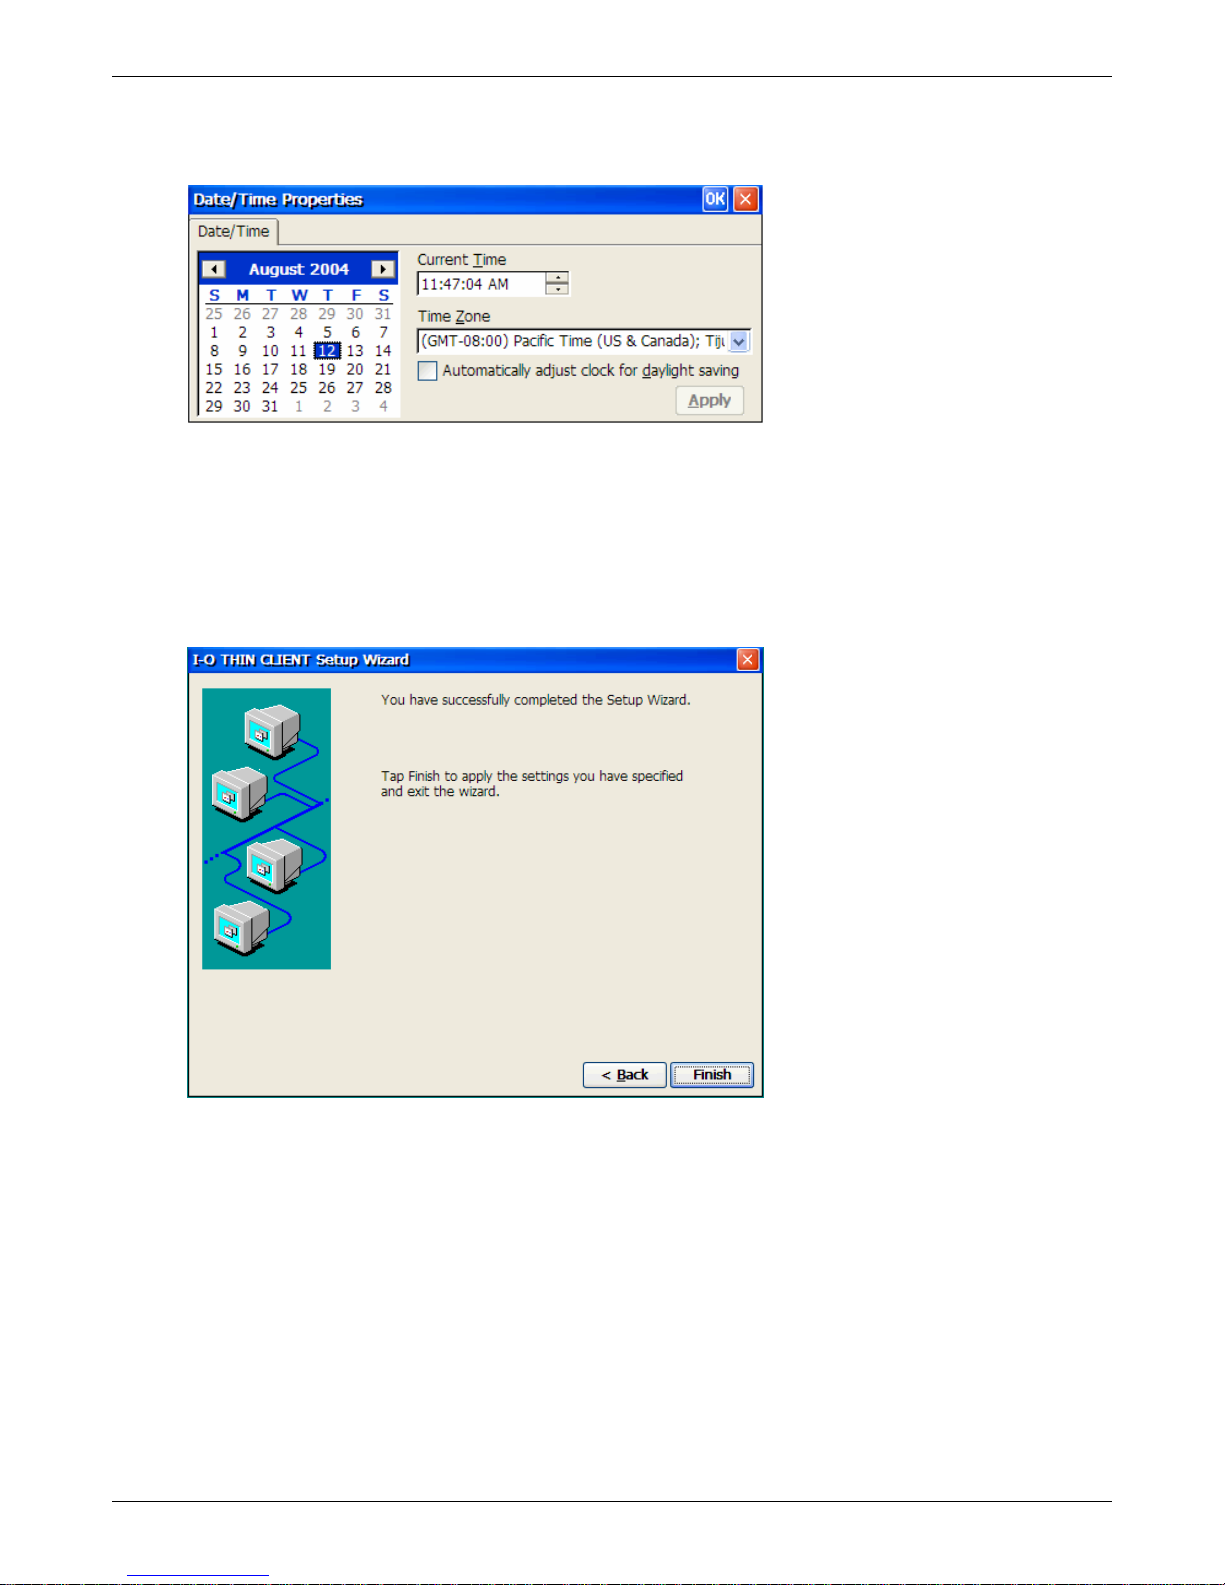
Select the date from the calendar. Set the current time in the scroll box. Select the time zone from the
drop down box. Check the box for automatic adjustment for daylight savings time. Click Apply and
then OK.
After these items have been configured, click the Next button for the wizard to continue.
Step Five: Finish
The above dialog-box marks the end of the Setup Wizard. Click Finish.
The screen will clear while the settings are being stored. The screen will then will turn black for several
seconds while the thin client is restarting. When the thin client has restarted, the Terminal Connection
Manager screen will be presented.
Thin Client User’s Guide 19
Page 20
Creating Connections
9
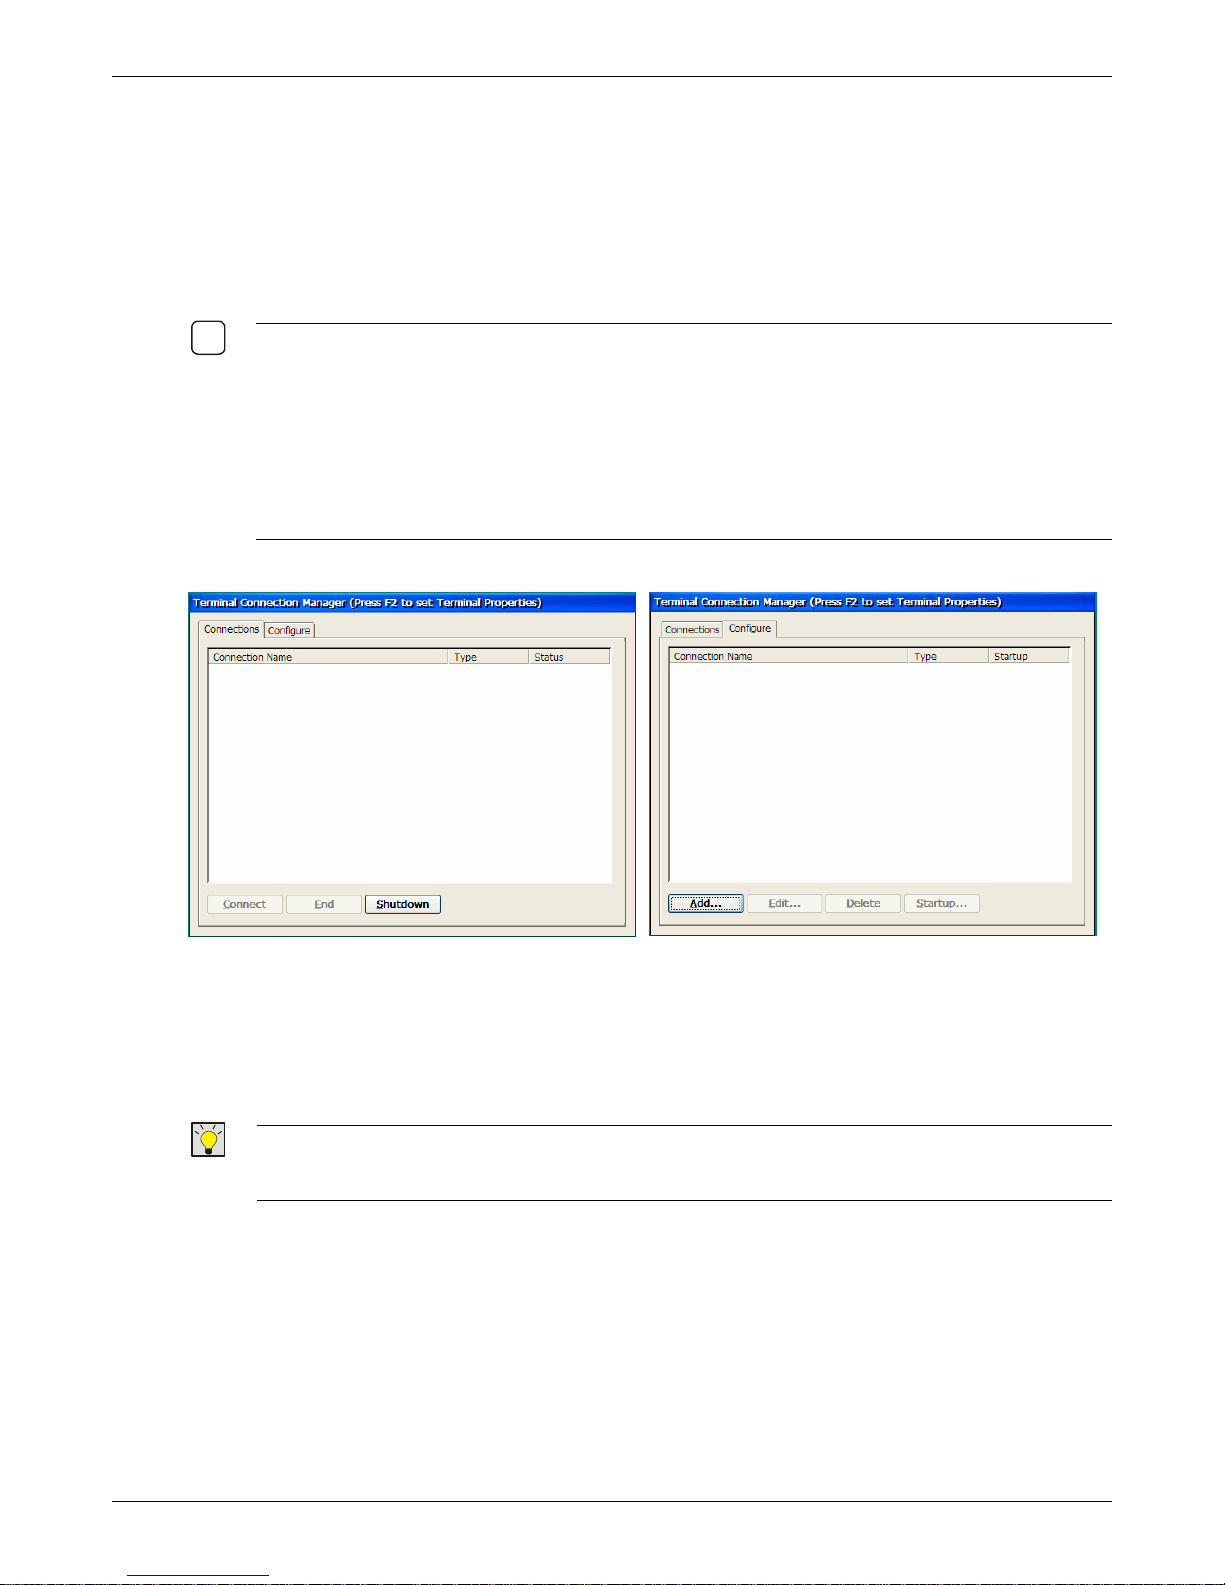
Overview of the Terminal Connection Manager
The Terminal Connection Manager window is displayed after the setup process, and ea ch time you
subsequently power on the thin client.
N
OTE: IN THE FOLLOWING SITUATIONS, THE TERMINAL CONNECTION MANAGER WILL NOT BE
DISPLAYED WHEN THE THIN CLIENT IS SWITCHED ON.
F YOU CONFIGURE A CONNECTION FOR AUTOSTART MODE, THE THIN CLIENT AUTOMATICALLY
I
STARTS THE PARTICULAR CONNECTION
MANAGER.
F YOU RESTORE PROPERTIES OF THE THIN CLIENT TO THE FACTORY DEFAULT SETTINGS, THE THIN
I
CLIENT AUTOMATICALLY STARTS THE
CONNECTION MANAGER.
SETUP WIZARD INSTEAD OF DISPLAYING THE TERMINAL
Creating Connections
, INSTEAD OF DISPLAYING THE TERMINAL CONNECTION
The Terminal Connection Manager has two tabs:
The Connections tab displays a list of available connections, and allows you to start/end
connections.
The Configure tab allows you to add, edit and delete connections, and to specify startup properties
for defined connections.
IP: AT ANY TIME, YOU CAN INVOKE THE TERMINAL CONNECTION MANAGER FROM AN OPEN SESSION,
T
BY PRESSING Ctrl+Alt+End. TO RETURN TO AN OPEN SESSION AND TO SWITCH BETWEEN SESSIONS,
Ctrl+Alt+ or Ctrl+Alt+.
PRESS
Thin Client User’s Guide 20
Page 21
Creating Connections
Connections Tab
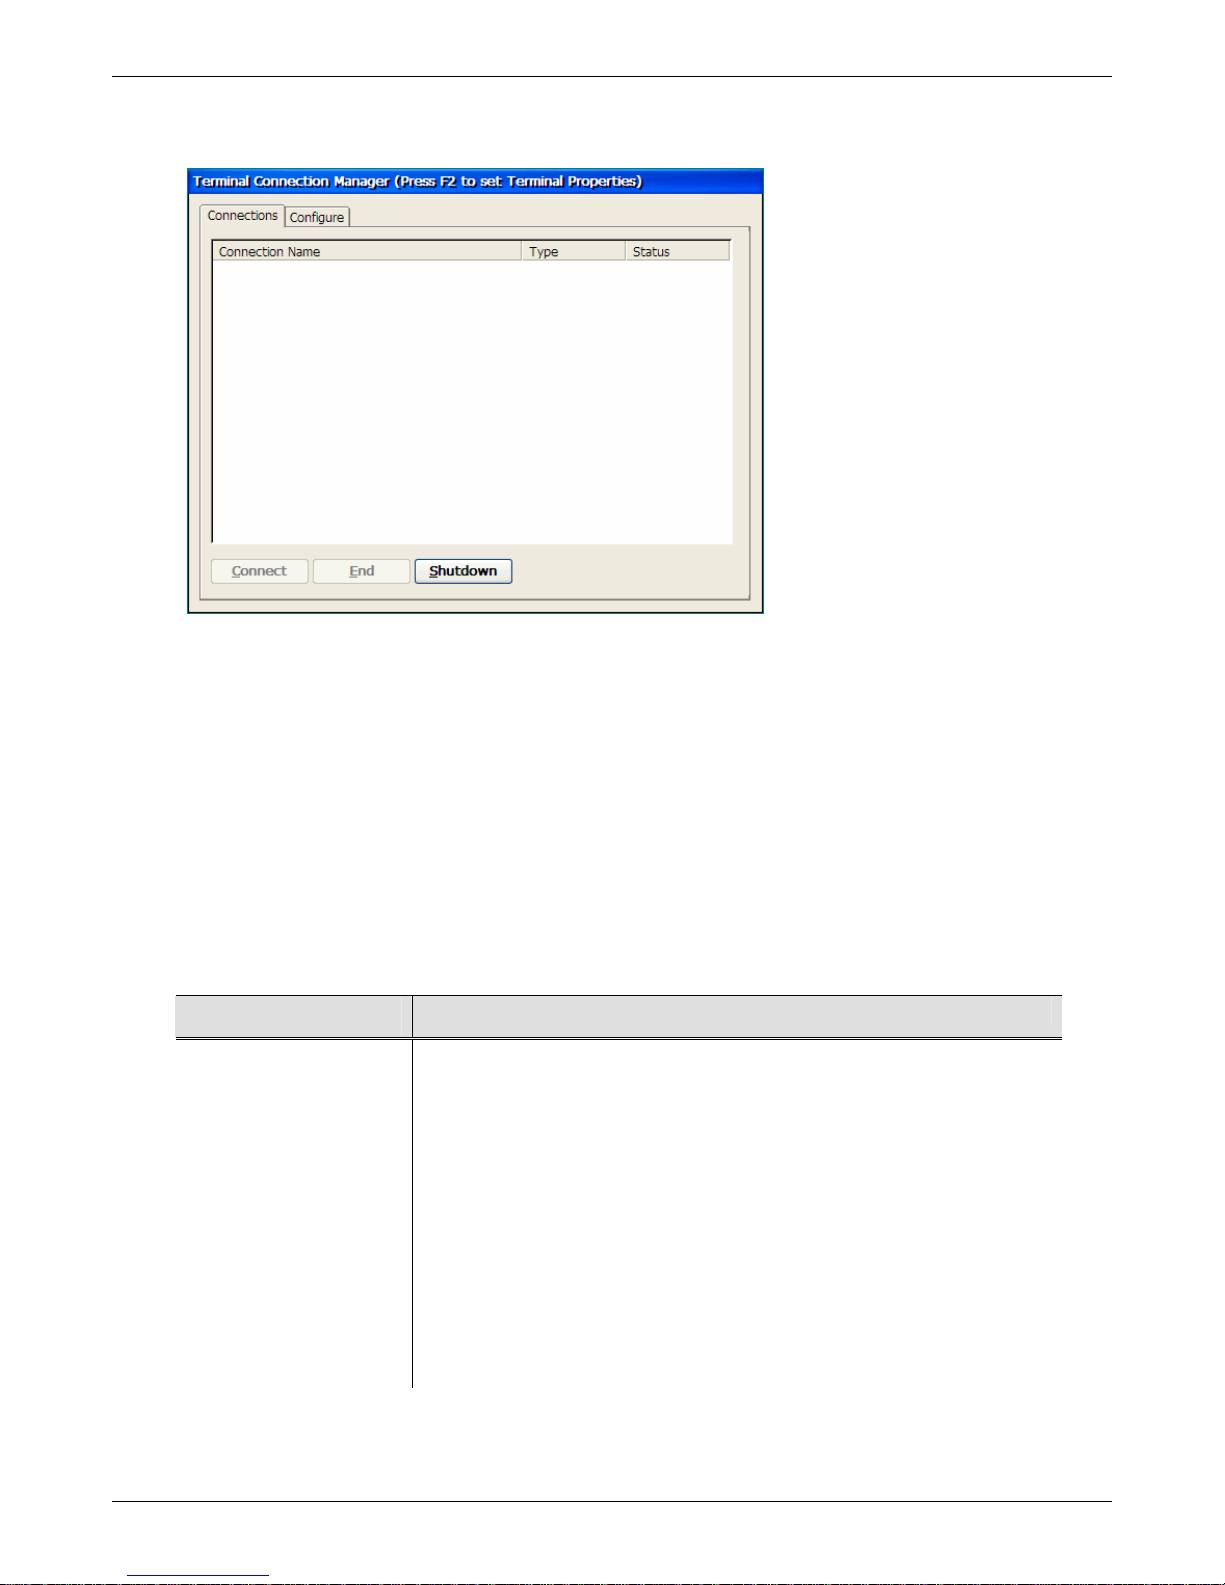
The Connections tab has the following buttons and a list (initially empty) of defined connections.
Connect: to start a highlighted connection. You can also start a connection by double clicking on it.
End: to close an active connection
Shutdown: to logout of or to shutdown the thin client
The list area has the following columns that list the name of the connection and the type of connection.
The connection types are abbreviated.
Connection Name is the name given to this connection when it was created.
Type identifies the type of connection
Status indicates the connection’s status
The following table describes what each abbreviation represents:
Connection Type
Description
Dialup Dial-up connection to a remote server.
ICA LAN connection to a server that supports Citrix’s ICA protocol.
IOP I-O 5250 Printer connection
Word Microsoft word processing viewer
E-mail Microsoft e-mail client
Image Microsoft image viewer
PDF Microsoft PDF file viewer
PowerPoint Microsoft presentation viewer
Excel Microsoft spread sheet viewer
RDP LAN connection to a Windows Terminal Server
TEC Terminal emulation connection
IE6 Internet Explorer
Thin Client User’s Guide 21
Page 22
Creating Connections
Configure Tab
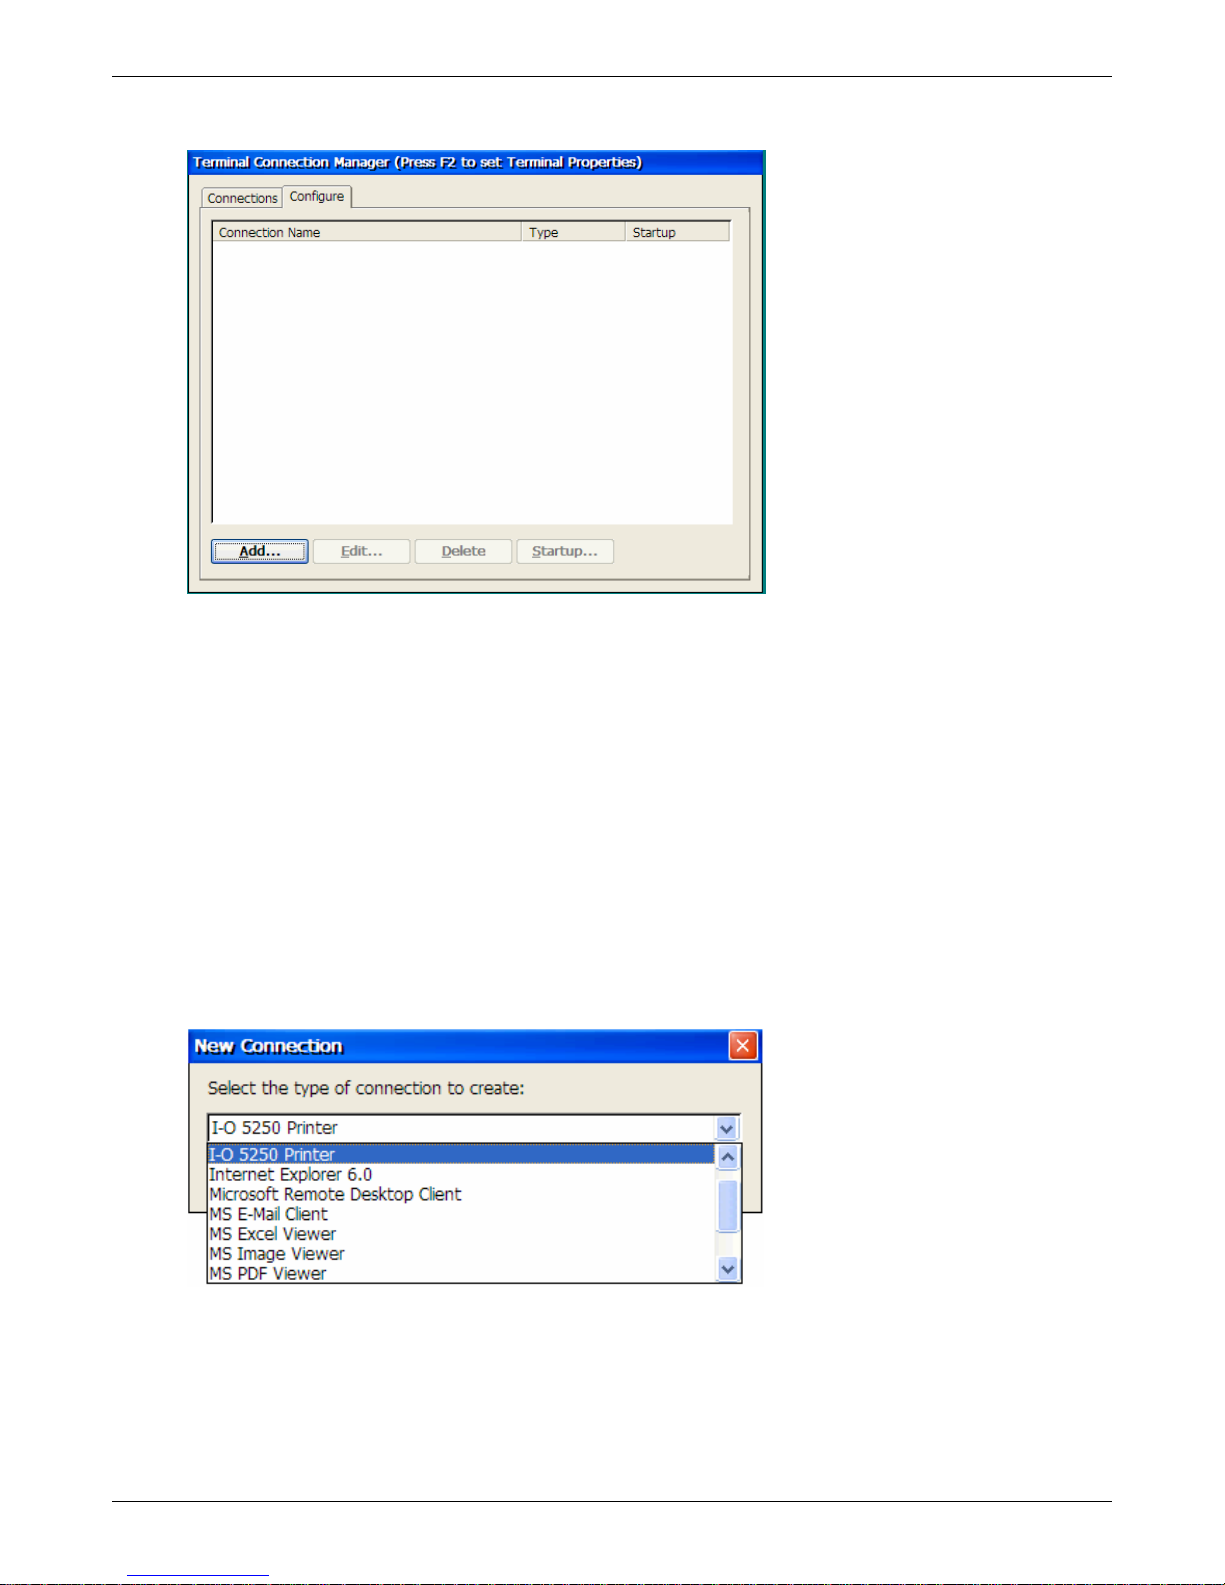
The Configure tab contains four buttons and a list (initially empty) of defined connections.
Add… creates a connection entry using the New Connection wizard.
Edit… edits defined connections.
Delete defined connections.
Startup… designates a particular connection to be the default connection, or to automatically start
when the thin client is switched on. The startup status is displayed in the Startup column on the
Connections Tab.
Creating Connections
This section describes the basic procedure for creating connections.
1. Click the Configure tab in the Terminal Connection Manager.
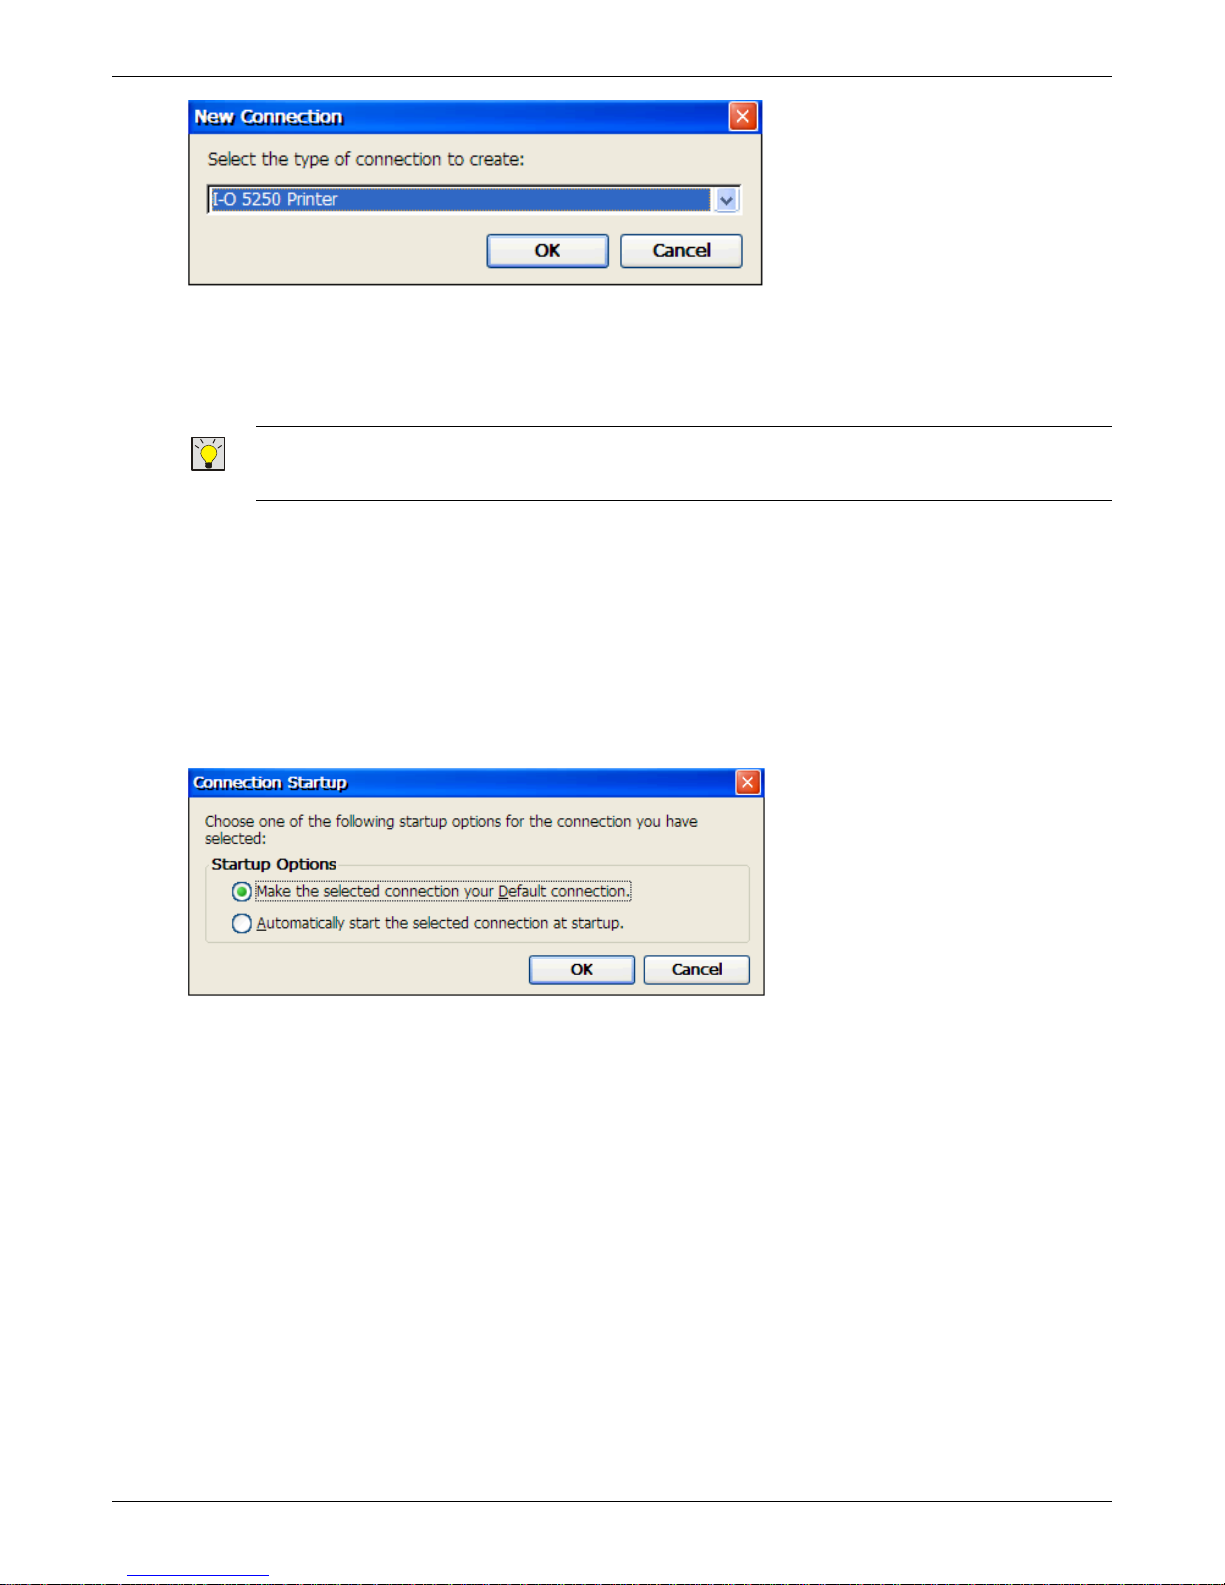
2. Click the Add button to display the New Connection dialog box.
3. From the New Connection dialog box, scroll up or down to the desired connection type. Click on
the connection.
Thin Client User’s Guide 22
Page 23
Creating Connections
4. Click OK.
5. Certain connections will start a configuration wizard. Follow the wizard prompts. Refer to the
appropriate sections in this manual for more information on configuring the different type of
connections.
TIP:
FOR MORE DETAILED CONFIGURATION INFORMATION, ADDITIONAL GUIDES FOR THE TN5250E
PRINTING, TERMINAL EMULATION AND ICA CLIENT ARE INCLUDED ON THE CD OR ARE ACCESSIBLE
THROUGH THE
CONFIGURATION UTILITY’S HELP MENU.
Specifying AutoStart / Default Connection
This section describes the procedure to configure the thin client to automatically start or highlight a
particular connection when the thin client is switched on.
1. Select the Configure sheet from the Terminal Connection Manager window.
2. Click on the connection for which you want to specify AutoStart or Default properties.
3. Click the Startup… button. The Connection Startup dialog-box is displayed.
The above dialog-box has two radio-buttons:
Make the selected connection your default connection
If you select this radio-button, the connection you selected in step 2 will be highlighted every
time you switch on the thin client. The word Default will be displayed in the Startup column of
the Configure tab of the Terminal Connection Manager.
Automatically start the selected connection at startup
If you select this radio-button, the connection you selected in step 2 will be automatically started
every time you switch on the thin client. The word AutoStart will be displayed in the Startup
column of the Configure tab of the Terminal Connection Manager.
4. After configuring the default and auto-start properties, click OK to return to the Configure screen.
Editing a Connection
1. Select the Configure sheet from the Terminal Connection Manager window.
2. Highlight the connection to be edited.
Thin Client User’s Guide 23
Page 24
Creating Connections
9
9
NOTE: CONNECTIONS CANNOT BE EDITED WHILE THEY ARE ACTIVE.
3. Click the Edit… button. A wizard, similar to the Connection wizard that has been described earlier in
the guide is displayed. For some connections, there are no configuration values that can be edited.
Deleting a Connection
1. Select the Configure tab from the Terminal Connection Manager window.
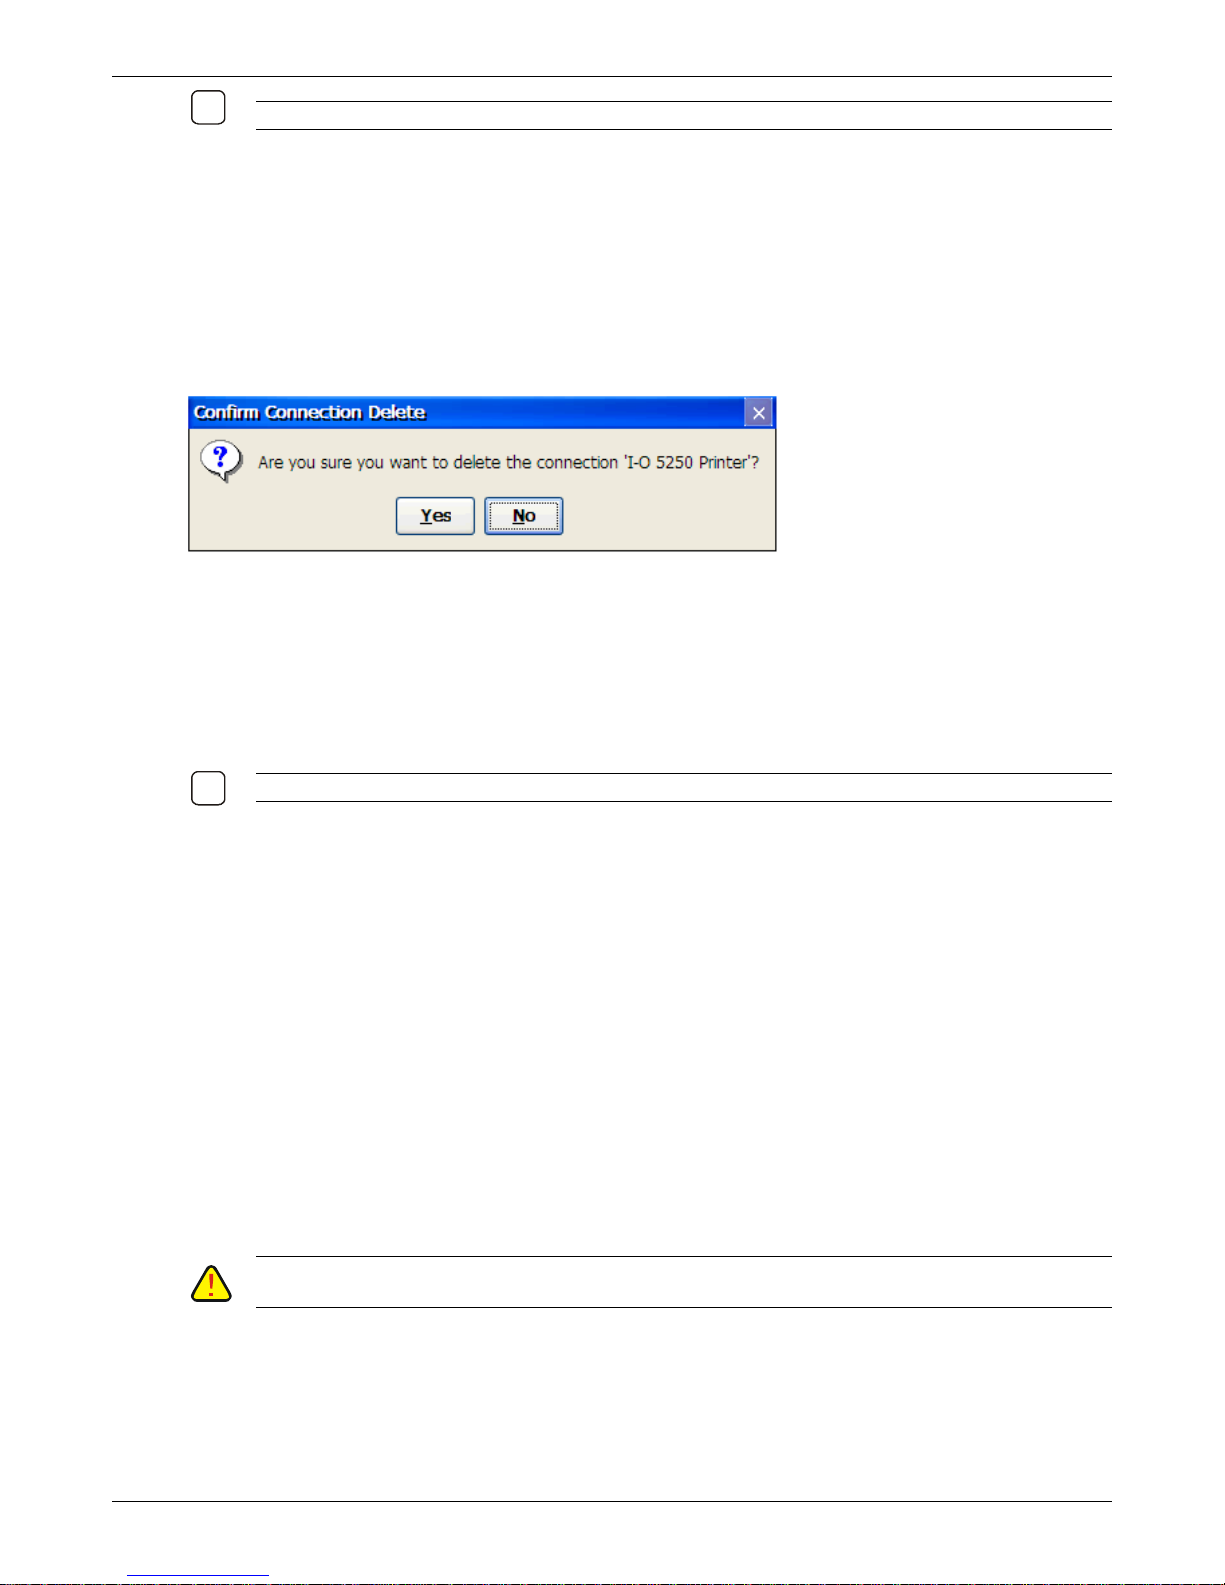
2. Highlight the connection to be deleted, and click the Delete button. A Confirm Connection Delete
prompt is displayed.
3. Click Yes to confirm deletion and No to cancel the delete command.
Starting a Connection
1. Select the Connections tab from the Terminal Connection Manager window.
2. Highlight the connection to start. Click Connect.
OTE: YOU CAN ALSO DOUBLE-CLICK ON THE CONNECTION TO START THE CONNECTION.
N
Switching Connections
When more than one connection is active, you can switch between connections by using these key
combinations:
To cycle through active connections, press CTRL+ALT+U
To return to the Connection Manager, press CTRL+ALT+END.
PARROW or CTRL+ALT+DOWNARROW.
Closing a Connection
1. Save the current document, file, etc. if applicable.
2. Logout of the session (such as an 5250 terminal, RDP or ICA session)
3. Click File | Close, or File | Exit, or double-click the “X” on the title line of the application.
C
AUTION: CLOSING A CONNECTION BEFORE PROPERLY ENDING TERMINAL SESSIONS CAN CAUSE THE
HOST TO BLOCK RESTARTING THE SESSION.
Thin Client User’s Guide 24
Page 25

Creating Connections
9
I-O 5250 Printing
I-O 5250 Printing for Thin Client is a simple to use IBM AS/400, iSeries or eServer i5 host printing
emulation. Connection to the IBM host is accomplished over the Ethernet link using TN5250e (a
TCP/IP printing protocol created for use with IBM AS/400, iSeries or eServer i5 hosts).
Configuration is required only on the thin client as the IBM host will automatically create a print device,
writer and spooler. The IBM host will either create its own name for the printer session, or you may
setup a name of your choice. However, the IBM host must be configured to use TCP/IP, TN5250e and
set for automatic device configuration.
With TN5250e, the IBM host recognizes only one type of printer device, a 3812 (a laser printer).
However, I-O’s 5250 Printer Emulation for thin clients contains a 3812 to 4214 conversion capability.
This allows not only laser printers, but dot-matrix and thermal printers to be attached to the thin client
and appear to the IBM host as a 3812 laser printer.
Print jobs sent from the IBM host are issued in IBM’s proprietary EBCDIC character set and use SNA
Character String (SCS) command structure. The I-O 5250 Printer Emulation co nverts EBCDIC to ASCII
and the SCS command structure to the printer’s command structure (PCL, Epson, and Propri nter). The
I-O 5250 Printer Emulation product and be customized to change the host print attributes if needed
(CPI, page orientation, etc.)
I-O also has included a number of advanced features in the I-O 5250 Printer Emulation. These include
the ability to send printer specific commands as part of the SCS data stream that the IBM host does not
know the printer is capable of performing. Other features include I-O’s bar code language, graphing
language, and even color support.
I-O 5250 Printing emulation can be configured with the following features:
Printer sessions supported 1
Printer emulations supported 3812
3812 to 4214 SCS command conversion Yes
Printer control screen Yes
Command Pass-Thru™ Yes
Computer Output Reduction (COR) Yes
Auto Print Orientation (APO) Yes
Printer overrides host control option Yes
Paper size control Yes
Orientation Yes
End of Line control Yes
EBCDIC to ASCII translation Yes
Parallel port connection Yes
Serial port connection Yes
USB port connection Yes
Customizable Telnet port number Yes
Host status indicator Yes
Printer status indicator Yes
N
OTE: MORE DETAILED INFORMATION ABOUT THE CONFIGURATION OF THE I-O 5250 PRINTING MODULE
IS PROVIDED IN THE TN5250E PRINTER EMULATION USER’S GUIDE. THIS GUIDE IS LOCATED ON THE
CD SUPPLIED WITH THE THIN CLIENT. IT MAY ALSO BE ACCESSED FROM THE CONFIGURATION UTILITY’S
HELP MENU.
Thin Client User’s Guide 25
Page 26

Creating Connections
Configure the AS/400, iSeries or eServer i5 for TN5250e
TN5250e is an extension of the Telnet display and printer protocol used in the IBM AS/400 systems. I-O
has customized the TN5250e protocol used in I-O 5250 Printer Emulation modules to include the same
laser and dot-matrix printer emulations as are used in all I-O LAN Printer Server products. The host
AS/400 sees a TN5250e printer as a 3812 page printer, yet I-O’s LAN Print Servers allow you to attach
either laser or dot matrix printers.
I-O recommends using TN5250e as the preferred AS/400 LAN printing protocol over the TCP/IP
LPR/LPD printing processes. This is because TN5250e is easy to configure, fast in operation, and with
I-O’s enhanced printer emulations provides nearly the same functionality as an twinax-attached printer
for both laser and dot-matrix printers.
To configure your AS/400 to support TN5250e printing, the AS/400 must meet the following
requirements:
Be running OS/400 V3R2 or newer, with the most recent applicable PTF’s applied.
Have the most recent version of Client Access installed on the AS/400.
Have the most recent version of the Telnet server installed on the AS/400.
Have the AS/400’s auto configuration function turned on.
Make certain that the AS/400 can create virtual devices and there are a sufficient number of devices
available to be created.
This is done using the AS/400 command:
CHGSYSVAL SYSVAL(QAUTOVRT) + VALUE(?)
The “?” is the maximum number of user-created virtual devices that can be created.
If the OS/400 version is earlier than V4R2, the Telnet server will need to be started using the
AS/400 command:
STRTCPSVR SERVER(*TELNET)
V4R2 and newer versions will automatically start the Telnet server.
After these requirements are met, the AS/400 (referred herein as IBM host or host) will automatically
configure the I-O 5250 Printer session the first time you attempt to make a connection. The IBM host
will create a 3812 paper printer device and assign a device name, or use the name you determine when
configuring the I-O 5250 Printer session.
Thin Client User’s Guide 26
Page 27
Creating Connections
9
9
9
Create the I-O 5250 Printer Connection
This section will guide you through creating an TN5250e printer connection.
N
OTE:: MORE DETAILED INFORMATION ABOUT THE CONFIGURATION OF TERMINAL EMULATION
CONNECTIONS IS PROVIDED IN THE TN5250e Printer Emulation User’s Guide. THIS GUIDE IS
LOCATED ON THE
CONFIGURATION UTILITY’S HELP MENU.
OTE: ONLY ONE I-O 5250 PRINTER CONNECTION MAY BE CREATED.
N
1. Click the Configure tab in the Terminal Connection Manager then click the Add button to display
the New Connection dialog box.
2. Click Add…. The New Connection dialog-box is displayed.
CD SUPPLIED WITH THE THIN CLIENT. IT MAY ALSO BE ACCESSED FROM THE
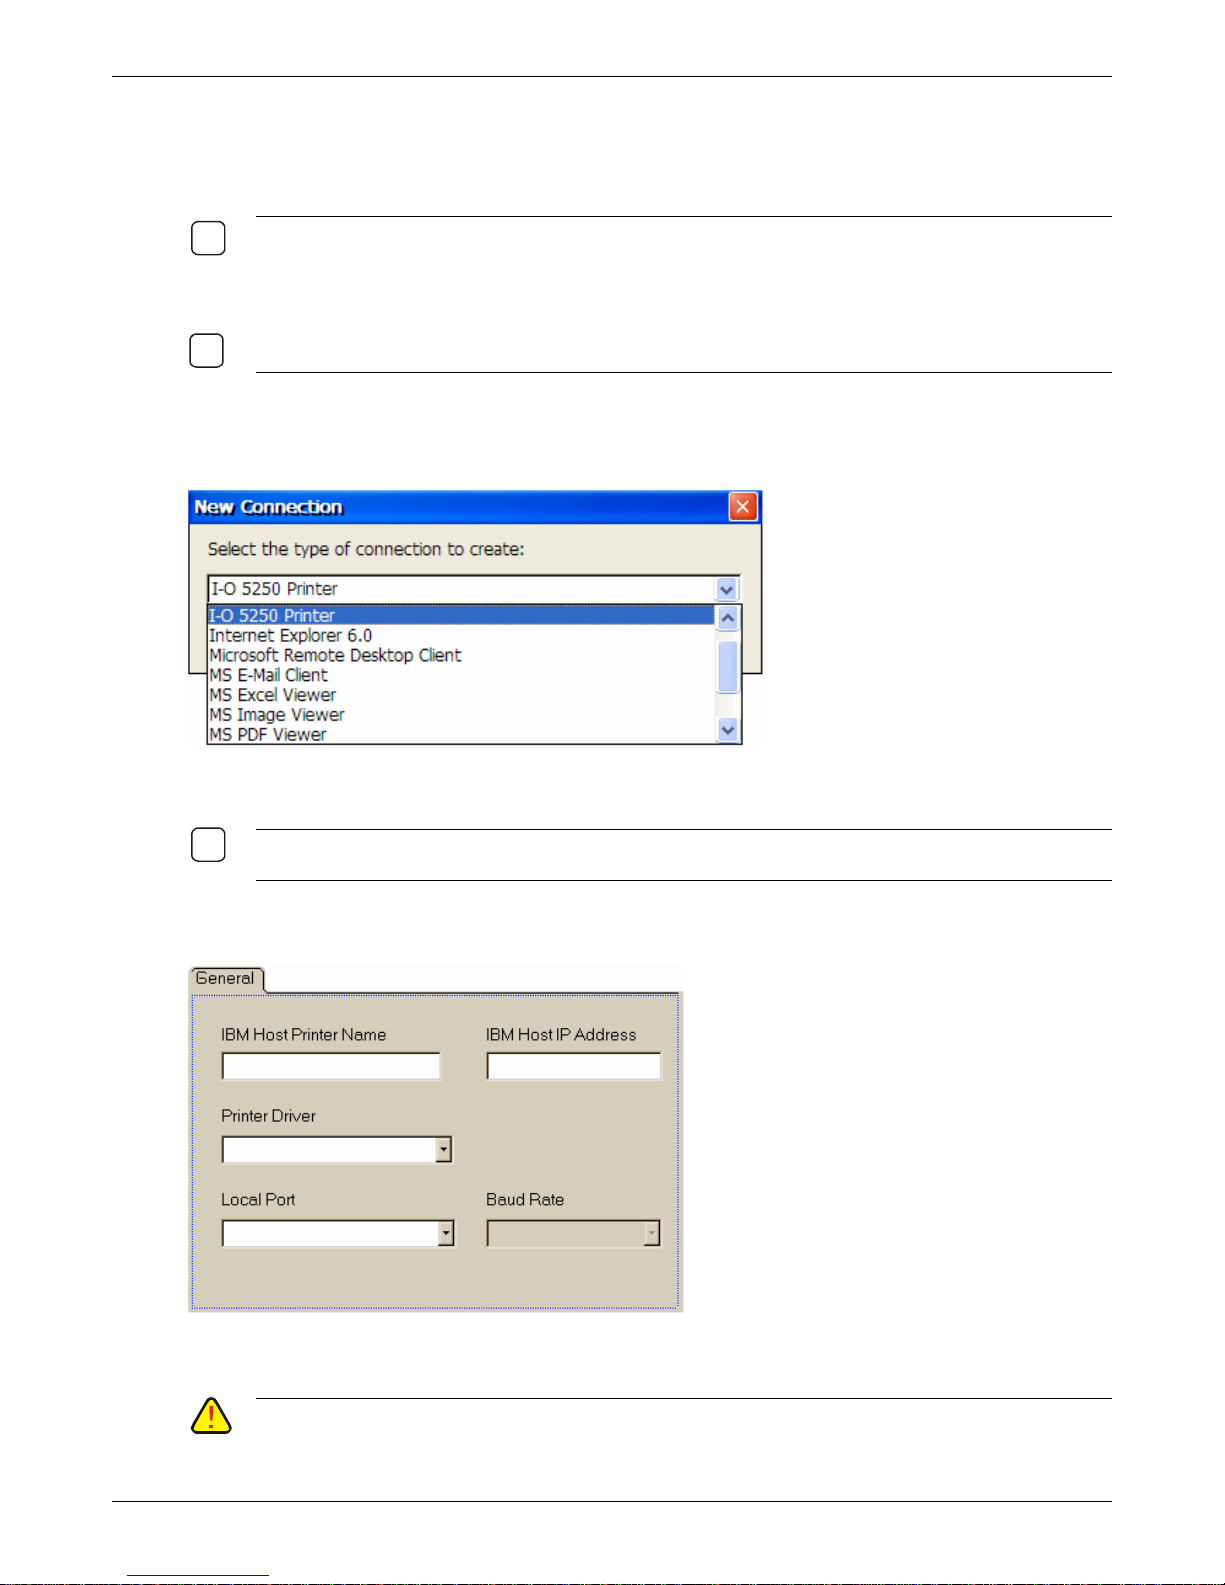
3. Select I-O 5250 Printer from the drop-down list and click OK. The I-O 5250 Printer Connection
configuration screen is displayed.
OTE: ONLY ONE 5250 PRINTER CONNECTION CAN BE CREATED. IF MORE THAN ONE IBM HOST
N
PRINTER CONNECTION IS REQUIRED, INSTALL ONE OF I-O’S MULTI-SESSION LAN PRINT SERVERS.
4. On General tab, you will enter the basic required information for establishing a TN5250e printer
connection with the IBM host.
IBM Host Printer Name: Enter the name that you want the IBM host to use for this printer session
(up to 8 characters maximum).
C
AUTION: IF YOU LEAVE THIS FIELD BLANK, THE IBM HOST WILL CREATE A 3812 DEVICE BUT WILL GIVE
THE PRINTER THE NAME OF QPADEVNNNN WITH NNNN BEING A 4-DIGIT NUMBER. HOWEVER, EACH
TIME THE
Thin Client User’s Guide 27
I-O PRINT SERVER CONNECTS TO THE IBM HOST, THE NNNN NUMBER FOR THE PRINTER MAY
Page 28
Creating Connections
9
BE DIFFERENT
THE LOCATION OF PRINTED OUTPUT
. THIS MAY CAUSE PROBLEMS WHERE A SPECIFIC PRINTER NAME IS USED IN SPECIFYING
. IT IS RECOMMENDED THAT YOU ENTER A PRINTER NAME!
IBM Host IP Address: Enter the TCP/IP address of the IBM host the I-O 5250 Printer session will
be connected to.
Printer Driver: From the drop down box, select the print driver supported by the printer attached to
the thin client.
For example, if you were attaching a HP LaserJet printer, you would select “HP PCL”. For Epson,
there are several general drivers. Select the one that most closely matches the Epson or Epson
compatible dot-matrix printer that is being attached.
It should be noted that the IBM host will always create a 3812 page printer device whenever
TN5250e is used for printing. This is a laser printer. To allow you to attach other printers besides
laser printers, I-O’s 5250 Printer Emulation module contains a 3812 to 4214conversion module. If
you choose to attach a dot-matrix printer to the thin client and select one of the dot-matrix print
drivers listed in the drop down box, I-O’s 5250 Printer Emulation module will first convert the 3812
SCS commands into 4214 SCS commands. Those 4214 SCS will then be converted into the
appropriate ASCII dot-matrix commands. To the IBM host, the attached dot-matrix printer appears
as a 3812 page printer.
OTE: BECAUSE THERE ARE DIFFERENCES IN THE WAY THAT LASER PRINTERS AND DOT-MATRIX
N
PRINTERS FUNCTION, NOT ALL OF THE NATIVE IBM HOST DOT-MATRIX FUNCTIONALITY IS AVAILABLE
THROUGH THIS CONVERSION PROCESS DUE TO THE FACT THAT THE
COMMANDS
CAN ONLY BE OBTAINED USING A TRUE
SUCH APPLICATIONS
TO PROVIDE THE COMPLETE
. SUCH FEATURES AS “LINE ALIGNMENT” USED FOR ALIGNING CHECKS PRIOR TO PRINTING
IBM 4214/5224/5225/5256 DOT-MATRIX EMULATION. FOR
, I-O RECOMMENDS THAT YOU USE ONE OF I-O’S LAN PRINT SERVER PRODUCTS
IBM DOT-MATRIX FUNCTIONALITY.
IBM HOST IS ONLY SENDING 3812
Local Port: Select from the drop down box the physical port that the printer is attached.
Baud Rate: If the COM1 serial port is the physical port the printer is attached, identify here the
speed of the port (make this rate the same as that set on the printer). The remainder of the serial
characteristics for this port have been set to: 8 data bits, no parity, 1 stop bit. This field is only
available when COM1 is selected in the Local Port field.
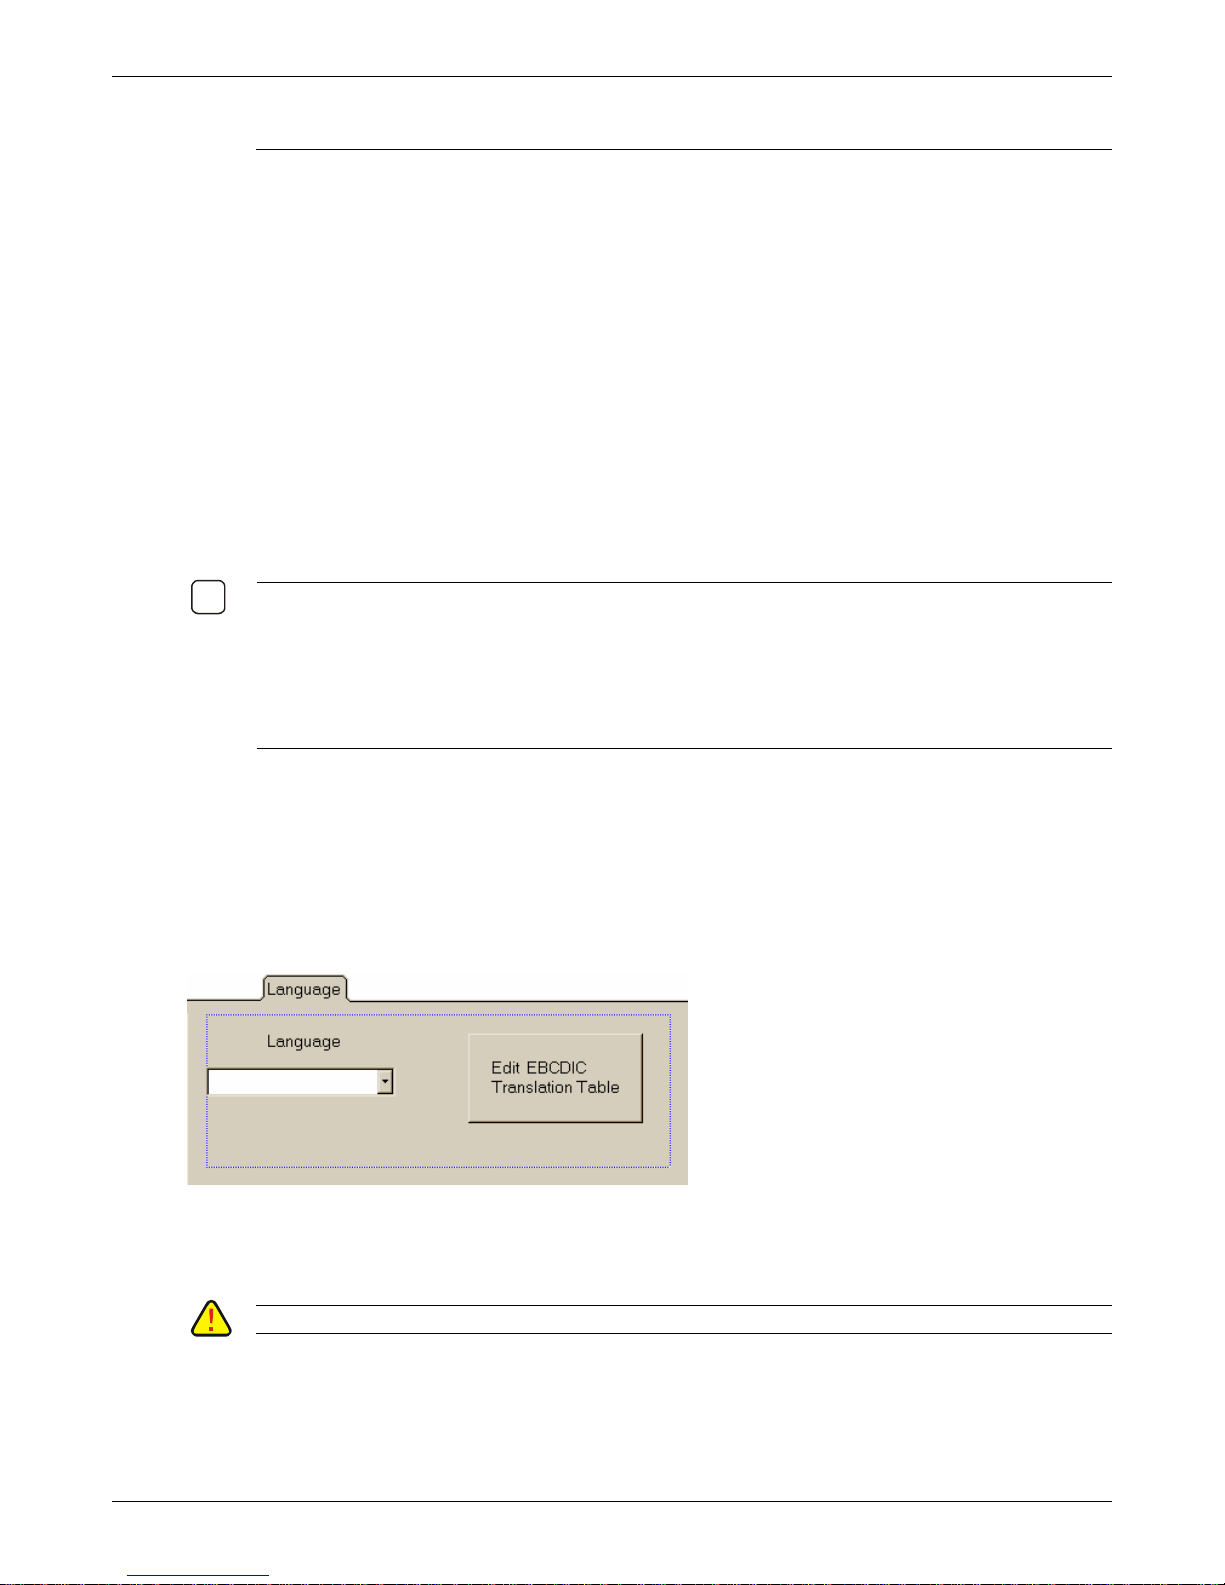
5. Select the Language tab. From the drop down box, select the host language to be used by the IBM
host when the command "Use Default Language" is received.
Language: Select the appropriate language from the drop down box.
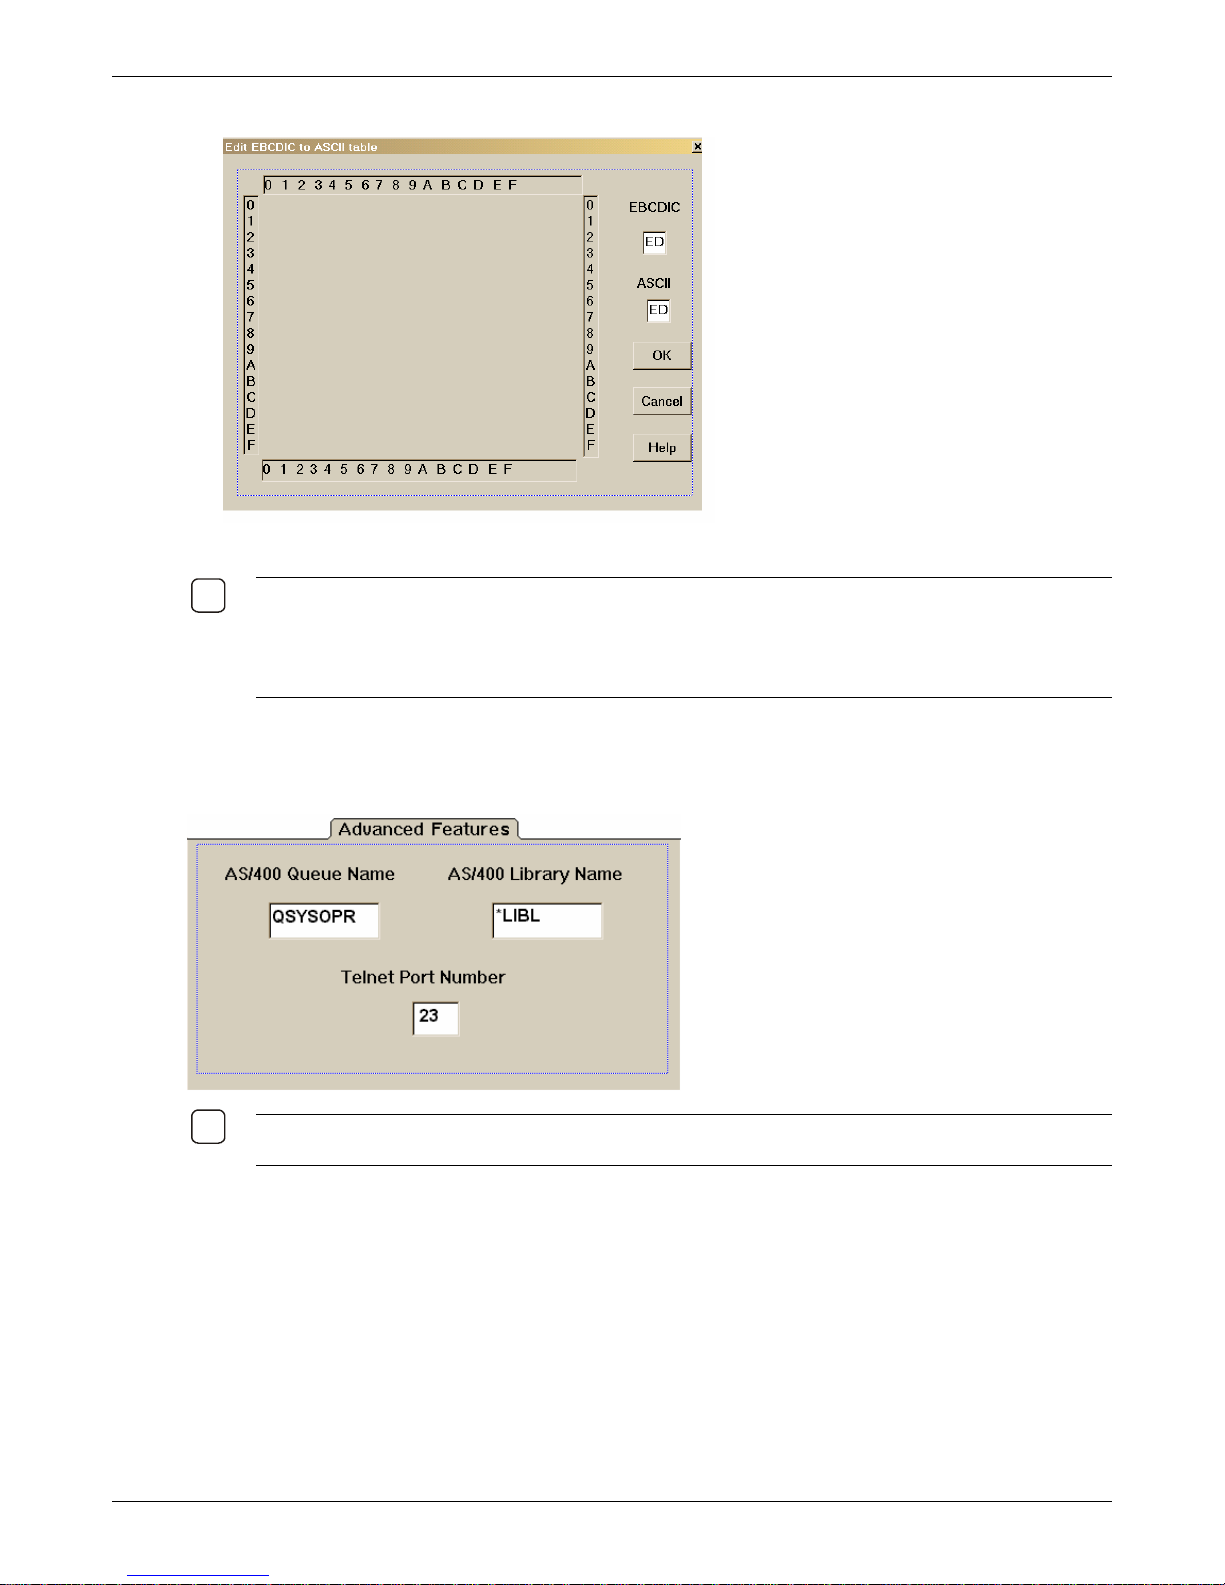
Edit EBCDIC Translation Table: Use this option to change the translation table that the I-O 5250
Printer Emulation module uses to convert IBM’s EBCDIC characters to ASCII characters.
AUTION: EDITING THIS TABLE SHOULD ONLY BE ATTEMPTED BY ADVANCED USERS.
C
If a character is printing on your printer with the wrong ASCII value, use the printer’s manual to
determine the ASCII HEX value of this character and that of the value you want in its place. Then
edit the translation table with by changing the incorrect ASCII value to the desired value.
EBCDIC: Enter the hexadecimal EBCDIC value you want to change.
Thin Client User’s Guide 28
Page 29
Creating Connections
9
9
ASCII: Enter the hexadecimal ASCII value for the character you actually want printed.
(Similar to actual screen)
NOTE: I-O USES IBM’S MULTINATIONAL CODE PAGE 500 (WITH MODIFICATIONS FOR THE SELECTED
LANGUAGE) FOR THE EBCDIC TABLE AND THEN CONVERTS TO ASCII CODE PAGE 850 AS THE
DEFAULT CONVERSION
TO
ROMAN 8, LATIN 1 (INCLUDES EURO SYMBOL), CODE PAGE 437, OR CODE PAGE 858 (INCLUDES
EURO SYMBOL).
. USING HOST DOWNLOAD COMMAND 17, YOU MAY CHANGE THE ASCII TABLE
6. Select the Advanced Features tab. Enter the values the IBM host uses for the message queue,
library and Telnet port number.
OTE: YOU NORMALLY DO NOT NEED TO MODIFY THESE VALUES AS THEY ARE THE TN5250E
N
DEFAULTS. REFER TO YOUR SYSTEM ADMINISTRATOR FOR ANY CHANGES HERE .
AS/400 Queue Name: Enter the name of the message queue on the IBM host. The default value
is QSYSOPR.
AS/400 Library Name: Enter the name of the library on the IBM host. The default value is *LIBL.
Telnet Port Number: Enter the TCP/IP port for Telnet on the IBM host. The default value is 23. If
a firewall is being used, port 23 may be blocked to prevent unwanted access to your network and
hosts. In such a case, the port number would be changed to another number. The maximum value
is 65535.
7. When you have completed making all configuration entries on the General, Language and
Advanced Features screens, click the OK on the title bar. Pause a few moments while the thin
client saves the changes (if adding a connection, a new entry will appear on the Terminal
Thin Client User’s Guide 29
Page 30

Connection Manager screen). Then click the Connections tab on the Terminal Connection
Manager screen.
Creating Connections
Thin Client User’s Guide 30
Page 31
Creating Connections
9
9
Terminal Emulation
This section describes the basic procedure for creating an IBM 5250 terminal display emulation
connection that will use TCP/IP and the network port of the thin client.
N
OTE:: FOR INSTRUCTIONS ON CREATING OTHER TYPES OF TERMINAL EMULATION CONNECTIONS, SUCH
AS IBM 3270, DEC VT, UNIX, ETC., REFER TO THE Terminal Emulation User’s Guide. THIS GUIDE
IS LOCATED ON THE
CONFIGURATION UTILITY’S HELP MENU.
OTE: UP TO 20 TERMINAL EMULATION CONNECTIONS MAY USED CONCURRENTLY. MORE
N
CONNECTIONS MAY BE CREATED
1. Click the Configure tab in the Terminal Connection Manager then click the Add button to display
the New Connection dialog box.
CD SUPPLIED WITH THE THIN CLIENT. IT MAY ALSO BE ACCESSED FROM THE
, BUT ACTUAL USAGE IS LIMITED TO 20 ACTIVE CONNECTIONS.
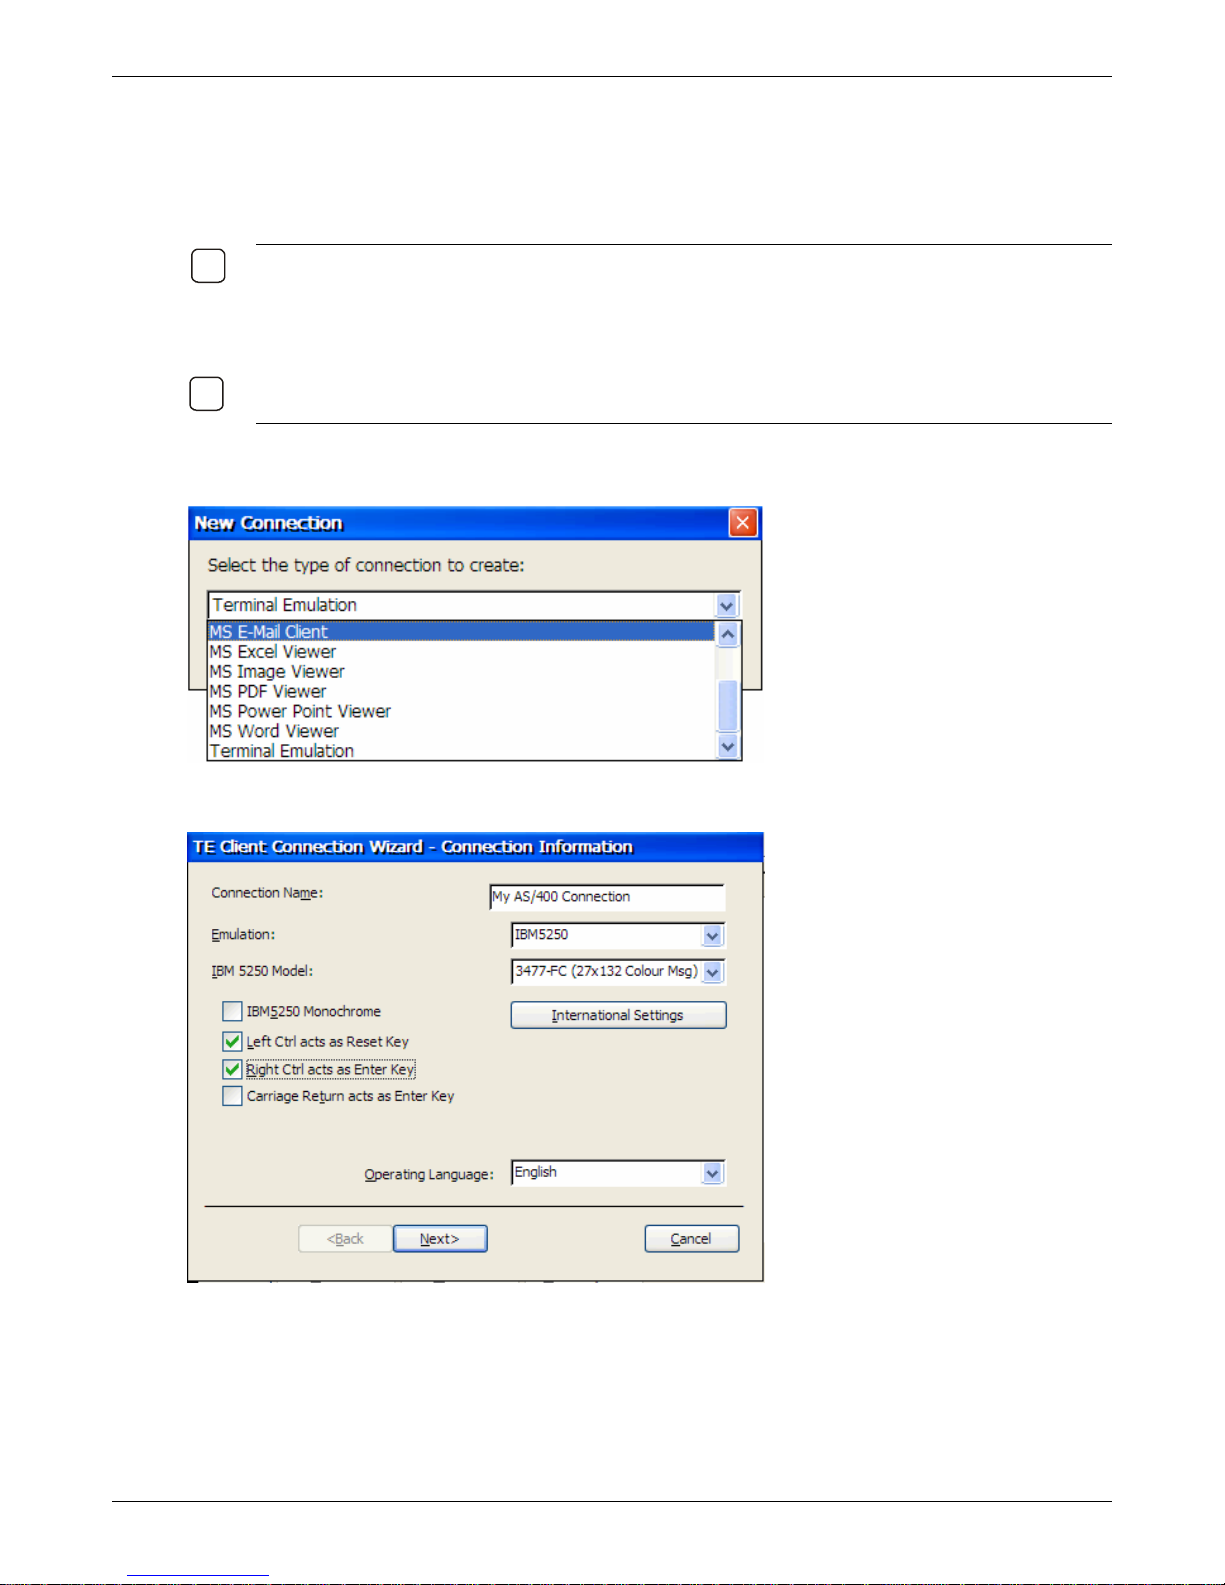
2. Select Terminal Emulation and click OK. The Connection Information dialog box will be
displayed.
3. On the Connection Information screen, you will select the emulation type, model, language and
keyboard options. After all the settings have been made, click Next> to continue.
Connection Name: Enter a name for this session that will appear on the Terminal Connection
Manager screen. The connection name can consist of a maximum of 42 characters (includi ng
special characters).
Emulation: Select the terminal emulation.
Thin Client User’s Guide 31
Page 32
Creating Connections
IBM 5250 Model: Select the model type in the list box.
IBM 5250 Monochrome: Check the box if a monochrome monitor is attached.
Left Ctrl acts as Reset Key: If using the I-O 122-key 5250 Thin Client Keyboard, check this box.
If using a standard 104/105 Windows keyboard, check this box if desired.
Right Ctrl acts as Enter : If using the I-O 122-key 5250 Thin Client Keyboard, check this box. If
using a standard 104/105 Windows keyboard, check this box if desired.
Carriage Return acts as Enter : Check this box if desired.
Operating Language: Specify the language to be used in all menus and dialog boxes by making
a selection in the list at the bottom of the dialog box.
Click Ok to continue.
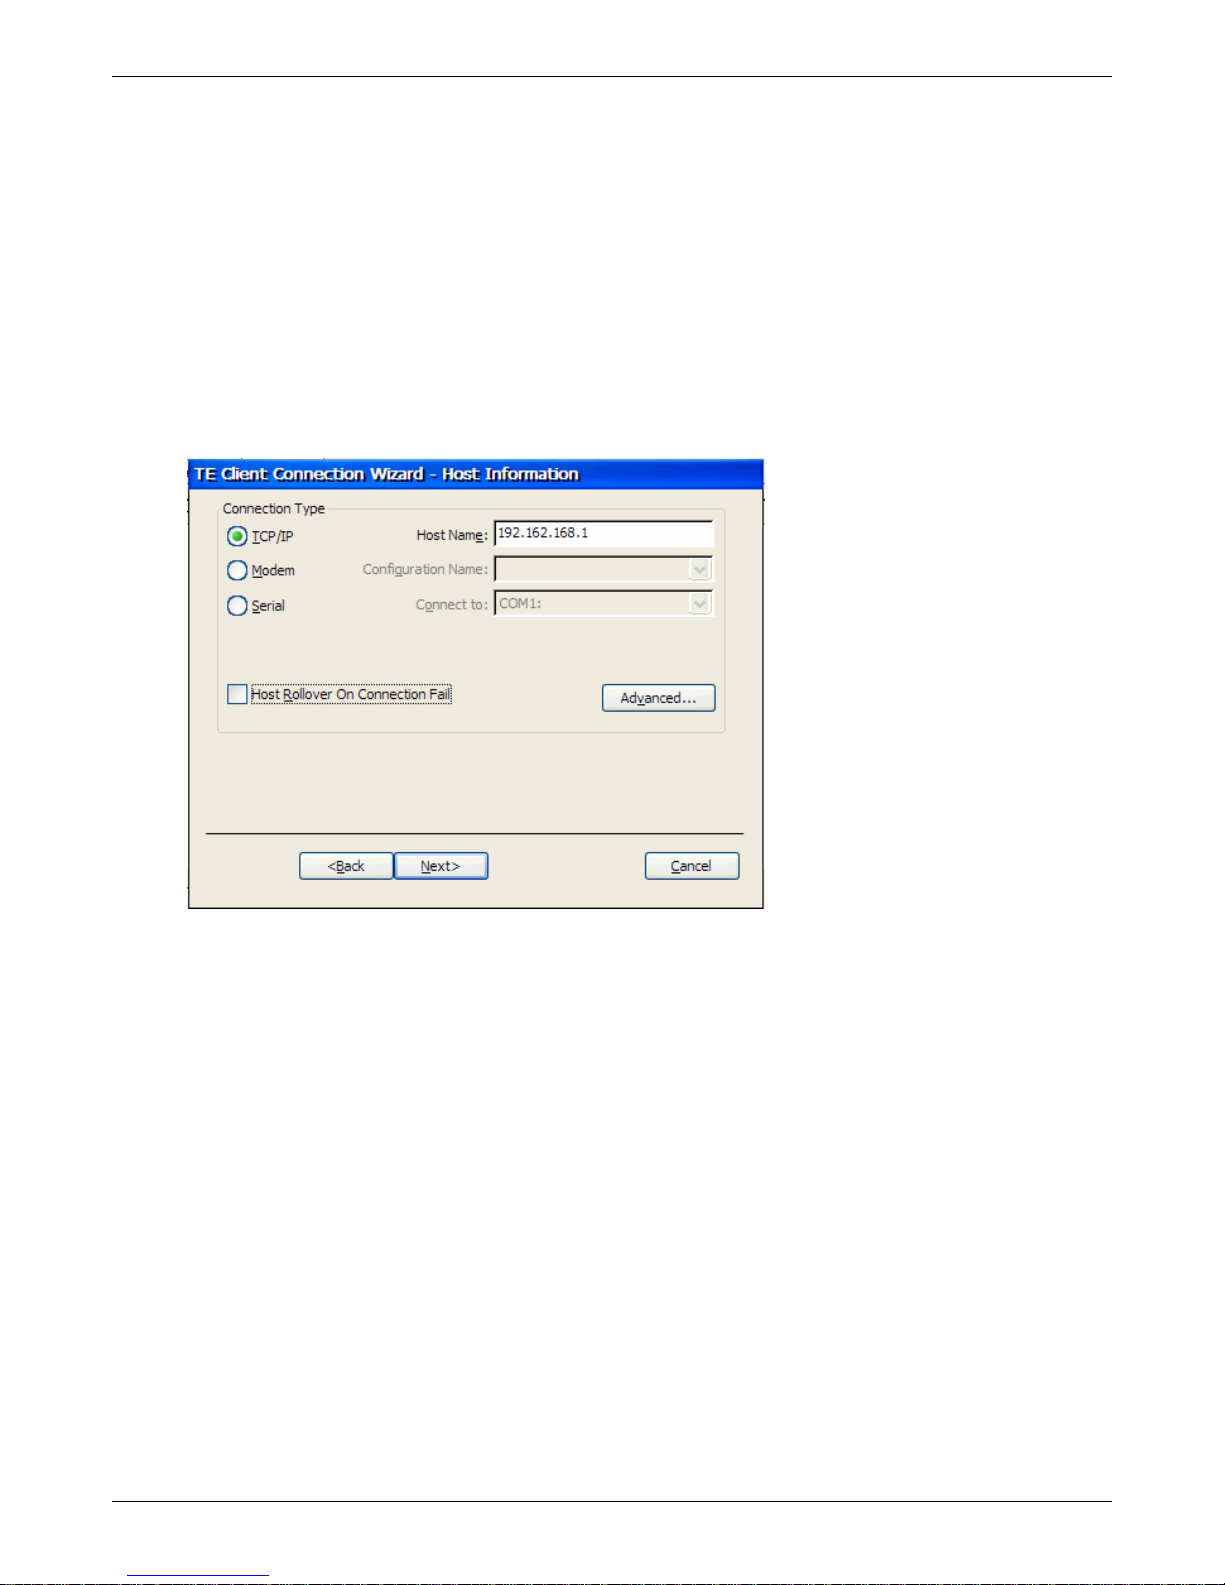
4. On the Host Information screen, host connection information will be entered. .
TCP/IP: Select this radio button for an Ethernet connection,
Modem: Refer to the Terminal Emulation User’s Guide for detailed instructions.
Serial: Refer to the Terminal Emulation User’s Guide for detailed instructions.
Host Name: Enter IP address of the host computer, or if available, enter the DNS/WINS name of
the host computer.
Host Rollover On Connection Fail: Check this box if there are alternate hosts that the thin client
is to attempt to connect to if the primary host is not available. The screen will be changed to display
additional host field. Enter the IP Address or DNS/WINS address of each alternate host.
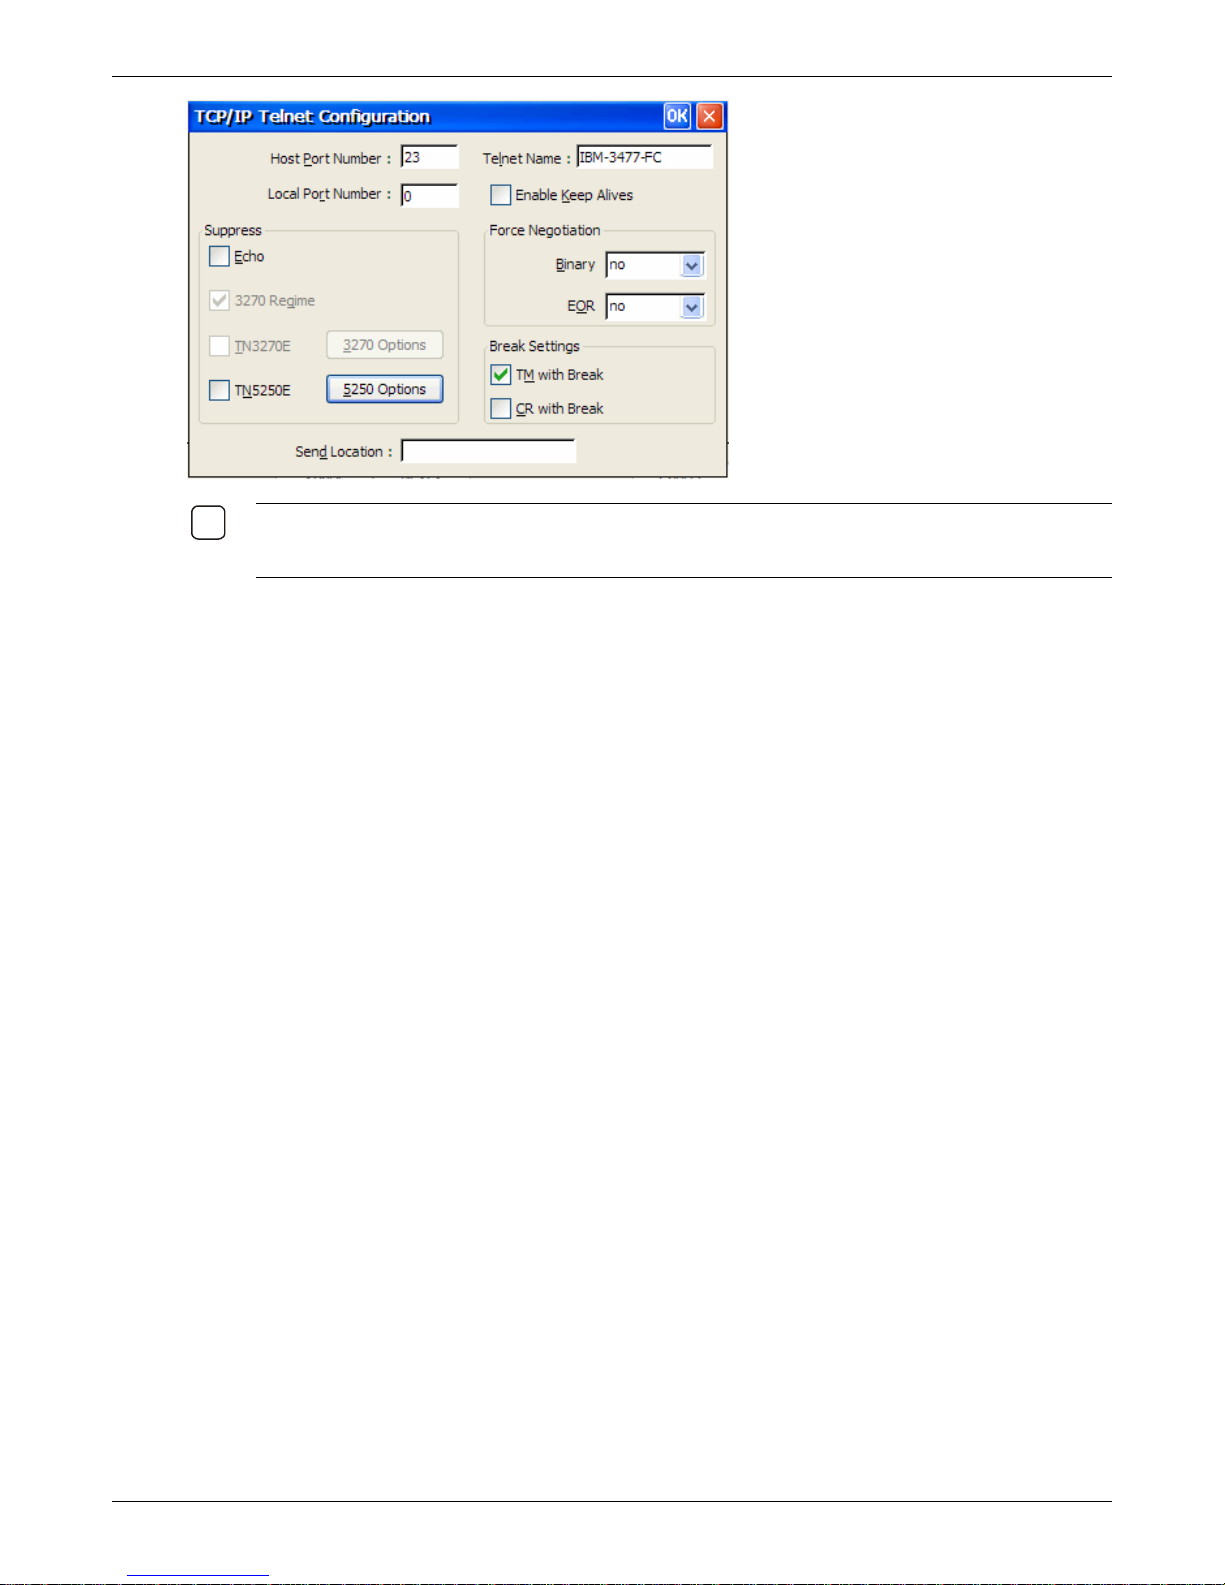
5. Click Advanced. The TCP/IP Telnet Configuration dialog-box is displayed. After configuring these
advanced TCP/IP settings, click OK to return to the Host Information dialog-box, and then click
Next> to continue.
Thin Client User’s Guide 32
Page 33
Creating Connections
9
OTE: FOR 5250 EMULATION, NO CHANGES ARE REQUIRED TO THE SETTINGS IN THIS DIALOG BOX.
N
HOWEVER, IF THE HOST SESSION NAME IS TO BE ASSIGNED OR THE AUTOSTART FEATURE IS TO BE
USED
, THEN SETTINGS IN THE 5250 OPTIONS AREA ARE REQUIRED.
Host Port Number: Provide the Telnet port number. The default value is 23. You can specify any
valid 16-bit port number. If you specify an invalid port number, this field will be set to one.
Local Port Number: In this field, you can specify the local Telnet port number. If you want the port
number to be allocated automatically, set this field to zero.
Telnet Name: It is recommended that this name not be changed. This is the model type that will
be reported to the host.
Enable Keep Alives: Selecting this option will prevent the session from being disconnected from
the host by an inactivity timeout.
Suppress | Echo: Select this check-box to prevent the emulation from echoing (repeating)
keystrokes.
Suppress | TN5250E: Select this check-box to suppress support for the TN5250E option.
Force Negotiation: These settings determine whether or not the Telnet support for Binary and
EOR options are supported. The default setting for both options is No.
No: This setting will not force negotiations. The host has to decide whether to support the option.
Do: This setting will force negotiation; the host will be informed that the option is supported.
Don’t: This option will force negotiation. A negotiation packet will be sent informing the host that the
option is not supported.
Break Settings: The setting of these options determine whether or not a timing mark (TM) and/or
carriage return (CR) is sent with a Telnet break packet. A timing mark is sent by default.
6. Click the 5250 Options button to configure the 5250 options. After configuring 5250 Options and
Advanced TCP/IP settings, click OK twice to return to the Host Information dialog-box, and then
click Next> to continue.
Thin Client User’s Guide 33
Page 34
Creating Connections
9
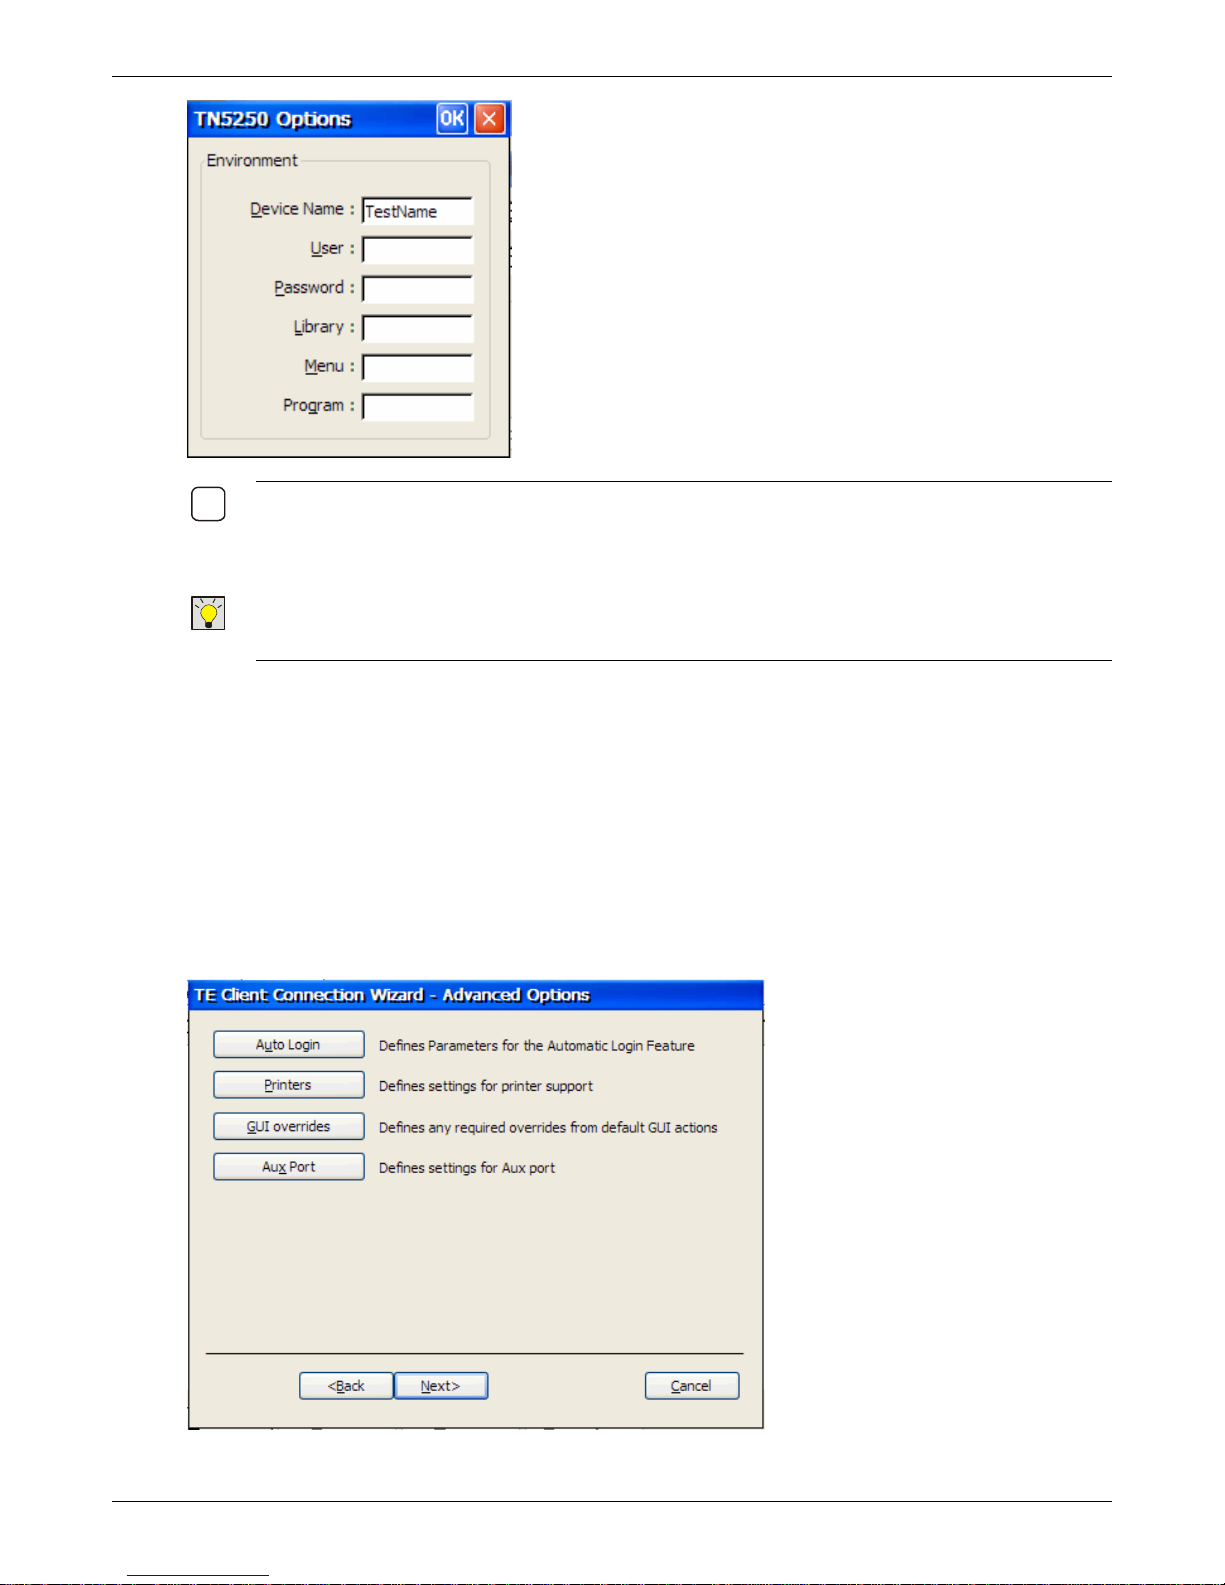
OTE: IF THE HOST IS TO ASSIGN ITS OWN SESSION NAMES AND THE NORMAL 5250 LOGIN IS DESIRED,
N
NO ENTRIES ARE REQUIRED IN THIS DIALOG BOX . THE HOST WILL AUTOMATICALLY ASSIGN A NAME IN
THE FORMAT OF
T
IP: THIS DIALOG BOX IS ONLY DISPLAYED BY CLICKING THE 5250 OPTIONS BUTTON IN THE TCP/IP
QPADEV????
TELNET CONFIGURATION DIALOG BOX WHEN TN5250E IS NOT SUPPRESSED AND THE IBM 5250 MODEL
IS NOT SET TO
3812-1 OR 5553-B01 PRINTERS.
Device Name: This enables you to enter the name of the device which the server will be requested
to assign to this Telnet session. If left blank, the host will assign a name in the format of
QPADEV????.
User, Password, Library, Menu: These options enable you to specify the initial entries required on
the standard startup screen so that it can be bypassed. Each entry can be a maximum of ten
characters.
Program: This enables you to specify the name of the initial program to run. The entry can be a
maximum of ten characters.
Click OK twice to return to the Host Information dialog-box, and then click Next> to continue.
7. The Advanced Options screen allows access to additional optional configuration screens.
Thin Client User’s Guide 34
Page 35

Creating Connections
9
NOTE: FOR 5250 EMULATION, ONLY THE GUI OVERRIDES OPTIONS MAY BE USEFUL. REFER TO THE
TERMINAL EMULATION USER’S GUIDE FOR INSTRUCTIONS ON THE USE OF THESE OPTIONAL
CONFIGURATION SELECTIONS
.
Thin Client User’s Guide 35
Page 36
Creating Connections
9
RDP
Remote Desktop Protocol (RDP) allows a "thin client" to communicate with a terminal server across a
Local Area Network (LAN) or Wide Area Network (WAN) by means of a dial-up, Integrated Services
Digital Network (ISDN), Digital Subscriber, Line (DSL), or Virtual Private Network (VPN) connection.
RDP is designed to provide remote display and input capabilities over network connections for
Windows-based applications running on a server.
This section describes the procedure to create a connection to a Windows Terminal Server using
Microsoft’s Remote Desktop Protocol.
N
OTE: PLEASE REFER TO YOUR MICROSOFT CERTIFIED SYSTEMS ENGINEER (MCSE) FOR
ASSISTANCE IN CREATING AND CONFIGURING RDP CONNECTIONS, AND USING THE THIN CLIENT IN
MICROSOFT’S TERMINAL SERVER ENVIRONMENT.
1. Click the Configure tab in the Terminal Connection Manager then click the Add button to display
the New Connection dialog box.
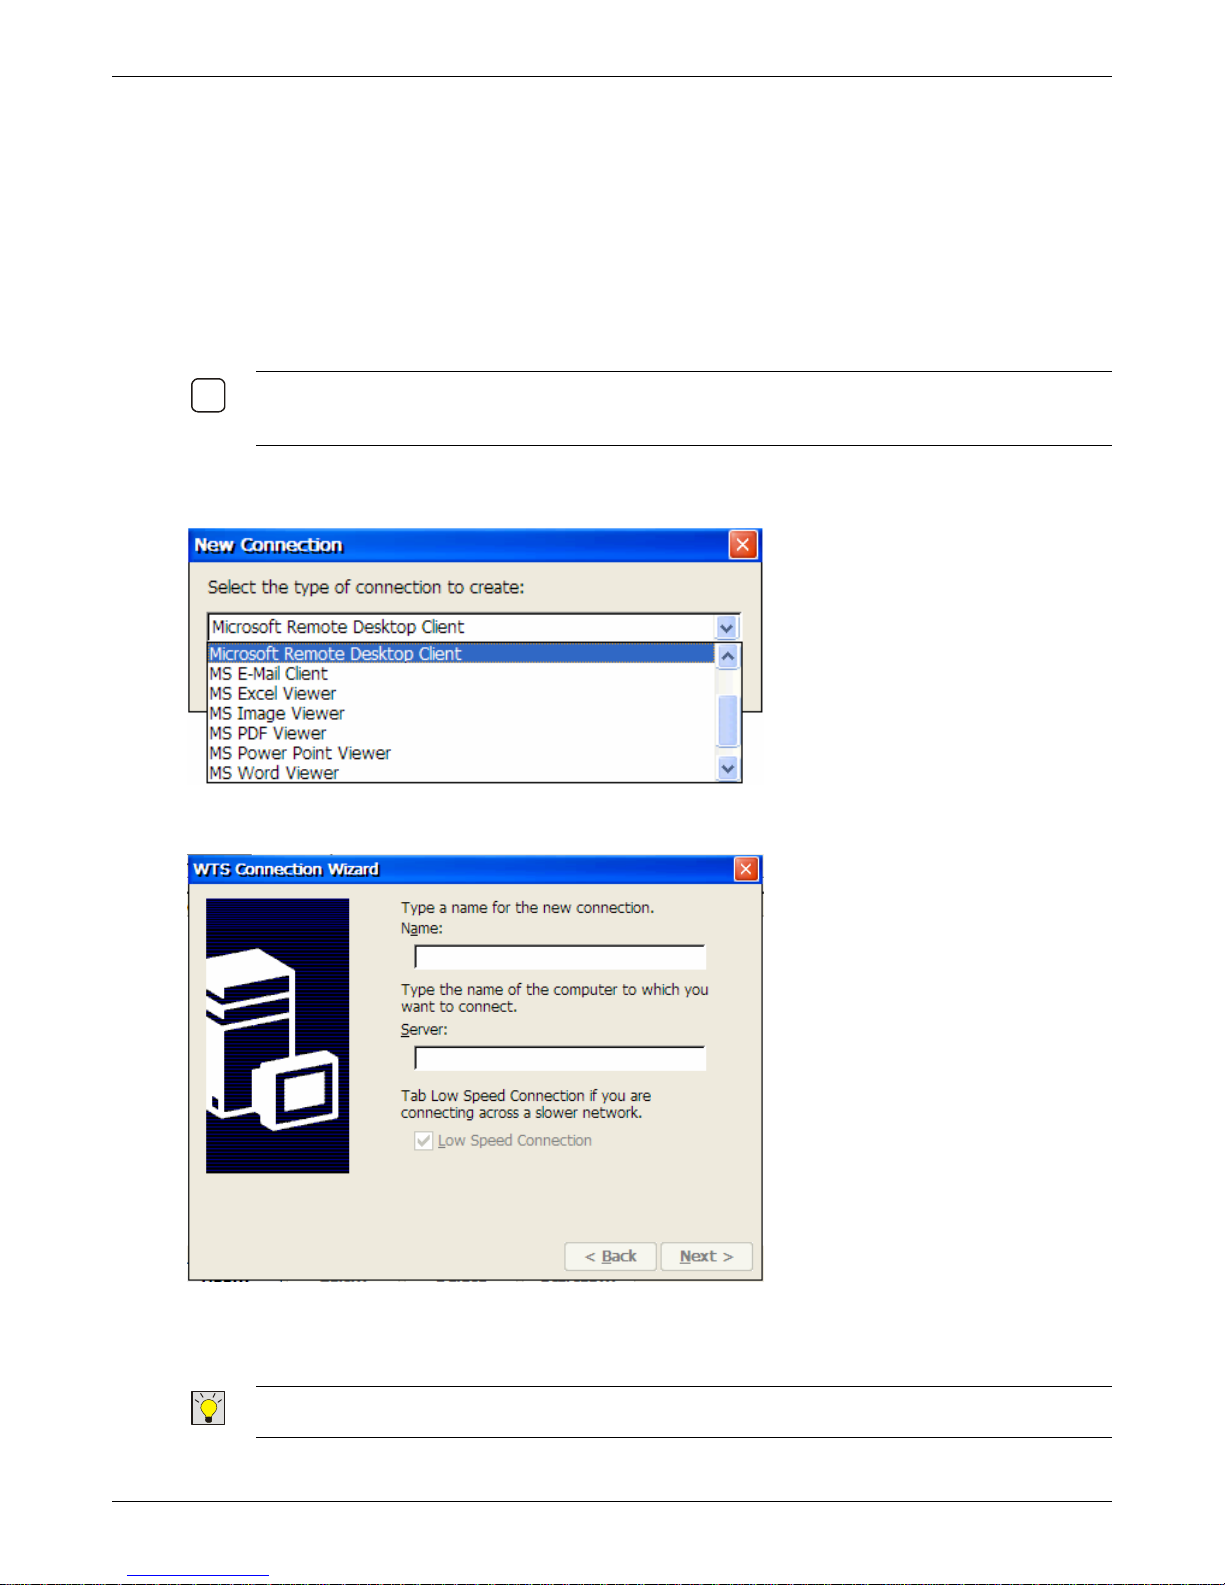
2. Select Microsoft Remote Desktop Client from the drop-down list and click OK. The first dialog-box
of the WTS Connection Wizard is displayed.
3. Provide a unique name for the new connection, and the IP address of the server in the Name and
Server fields respectively. The connection name that you provide here will be displayed in the
Terminal Connection Manager window.
T
IP: IF THE NETWORK HAS A WINS SERVER, YOU CAN PROVIDE THE NAME (INSTEAD OF IP ADDRESS) OF
THE SERVER IN THE SERVER FIELD.
Thin Client User’s Guide 36
Page 37
Creating Connections
If you are connecting across a slow network (for instance, a WAN), enable the Low Speed Connection
check-box. This setting causes data to be compressed before transmission, thus optimizing the
bandwidth usage. Note that while data compression reduces the transmission time, it consumes more
processor resources.
Click Next> to continue. The following dialog-box is displayed.
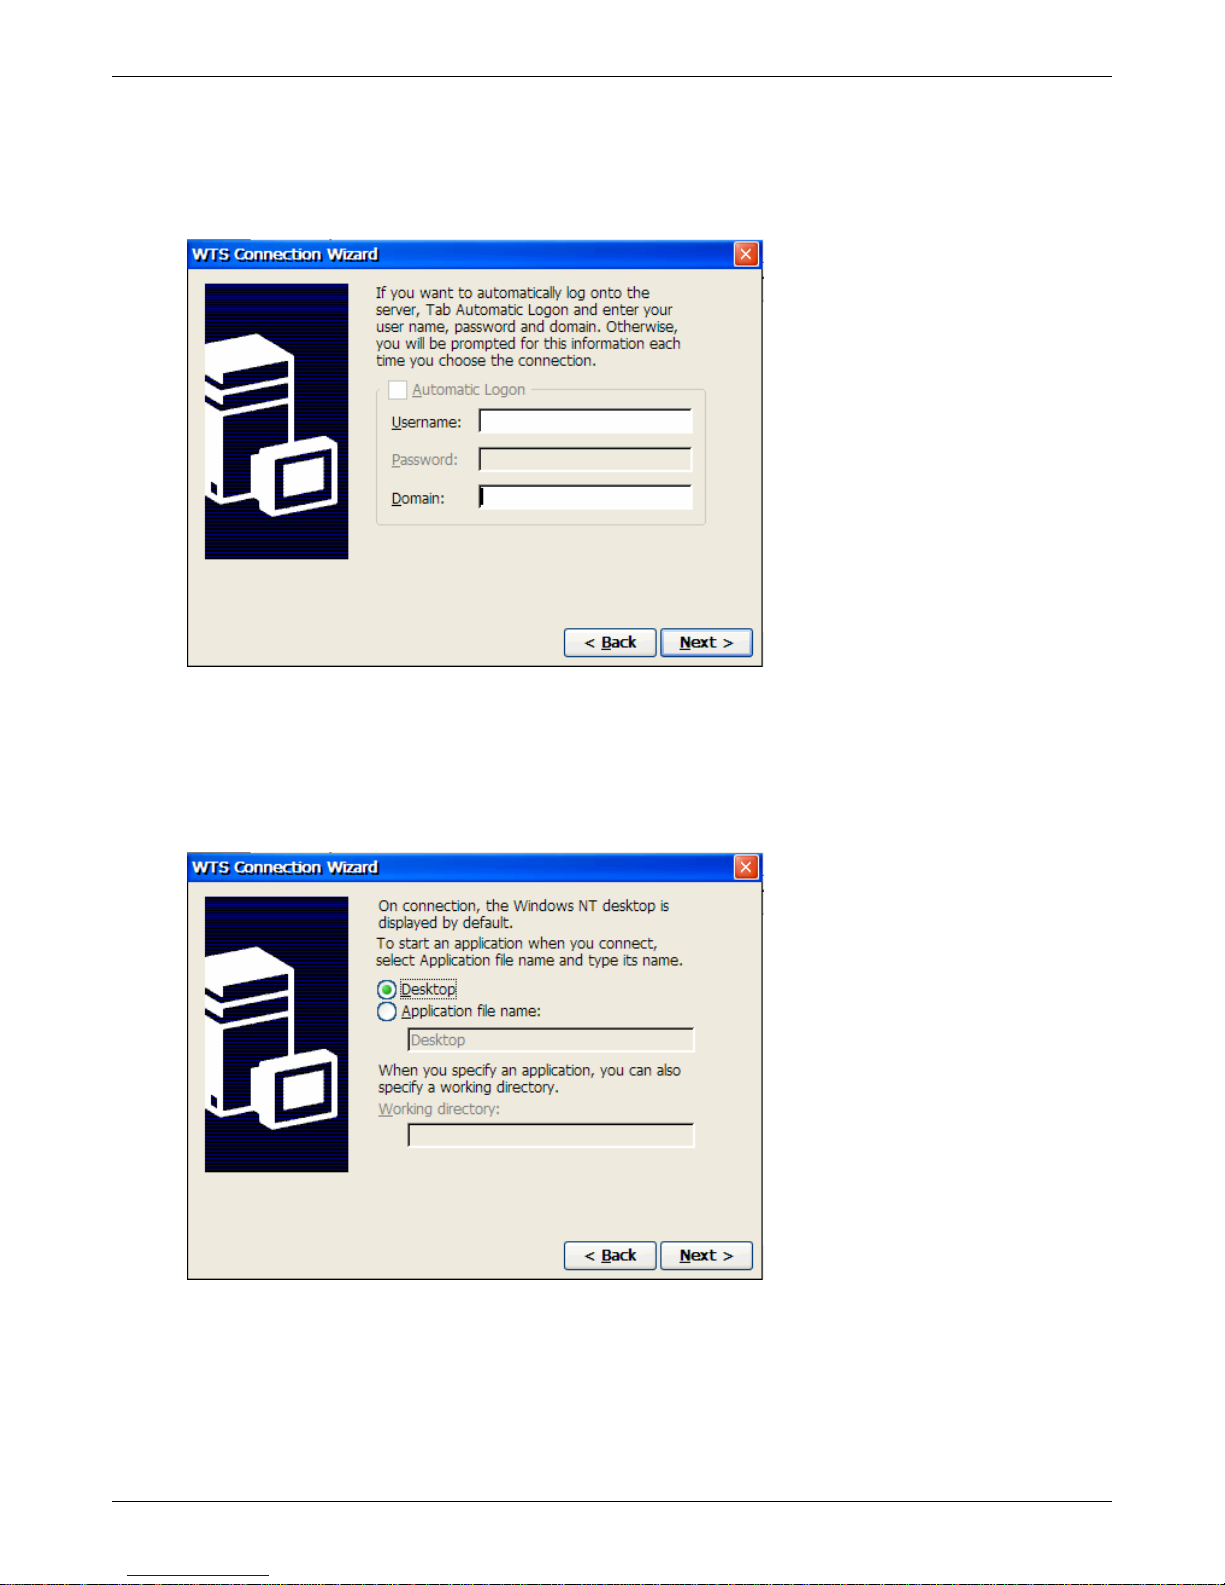
4. Information that you provide in the above dialog-box will be used to automatically logon to the
server after the connection is started. Select the Automatic Logon check-box to enable the
Username, Password and Domain fields and provide appropriate input.
If you do not enable the Automatic Logon option, a login prompt will be displayed each time you start
the connection.
Click Next> to proceed. The following dialog-box is displayed.
5. After connecting to the server, the client displays the Windows desktop by default. Instead, if you
want a particular application to be automatically started, select the Application file name radio
button and provide the name and path of the application file in the text field beneath the
Application file name radio-button. You can specify a working directory in the Working directory
field.
Click Next> to continue. The following dialog-box is displayed.
Thin Client User’s Guide 37
Page 38
Creating Connections
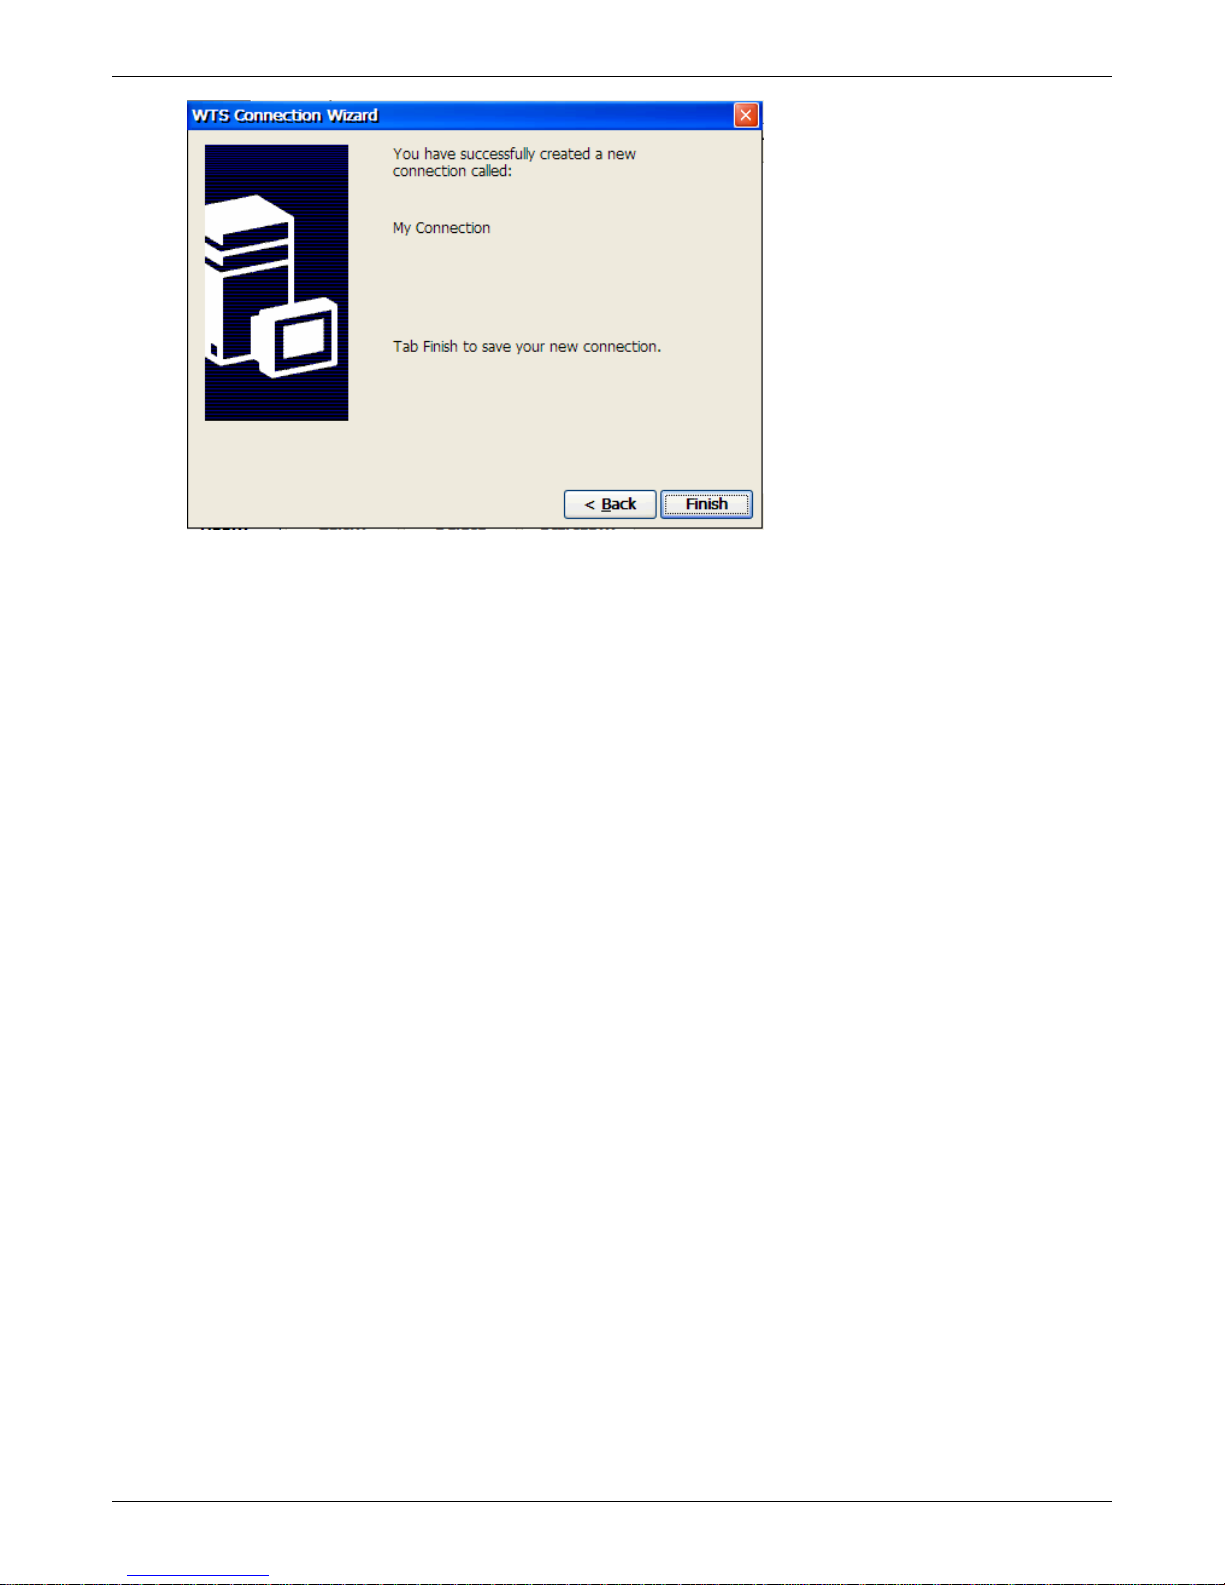
6. The above dialog-box marks the end of the WTS Connection Wizard. Click Finish to complete the
process. The name of the connection you created will be added to the list of connections displayed
in the Connections tab of the Terminal Connection Manager window.
Thin Client User’s Guide 38
Page 39
Creating Connections
9
9
ICA
The Citrix Independent Computing Architecture (ICA) is a general-purpose distributed presentation
services architecture. ICA is network protocol used by Windows based servers running Citrix
MetaFrame XP Presentation Sever, Metaframe, or WinFrame. The ICA technology shifts the
application processing from client to server. It is a core technology of Citrix MetaFrame server-based
computing software. ICA helps organizations reduce total cost of ownership by delivering businesscritical applications over heterogeneous computing environments. It also safeguards appli cation
performance, data security, and administrative control. The ICA protocol sends only keystrokes, mouse
clicks, and screen update signals across the network. Applications consum e just a fraction of the
network bandwidth usually required.
You can create, configure and run two types of ICA sessions: server connectins and published
applications:
Server connections allow user to connect to a specific computer running MetaFrame Pre sentation
Server. Users can run any aplications available on the desktop, and in any order.
Published applications are specific applications set up by an administrator for remote users to run.
When connected, users are presented with the application itself.
The following procedure describes hot to create connections to computers ru nning MetaFrame
Presentation Server.
OTE: CITRIX RECOMMENDS THAT YOU QUICKLY CREATE A CONNECTION AS OUTLINED IN THE
N
FOLLOWING PROCEDURE, AND THEN CONFIGURE THE CONNECTION TO BEST SUIT YOUR NEEDS. REFER
TO THE
WINDOWS CE FOR WINDOWS-BASED TERMINALS ADMINISTRATOR’S GUIDE. THIS GUIDE IS LOCATED
ON THE
UTILITY’S HELP MENU.
NOTE: PLEASE REFER TO YOUR MICROSOFT CERTIFIED SYSTEMS ENGINEER (MCSE) FOR
ASSISTANCE IN CREATING AND CONFIGURING
MICROSOFT’S TERMINAL SERVER ENVIRONMENT.
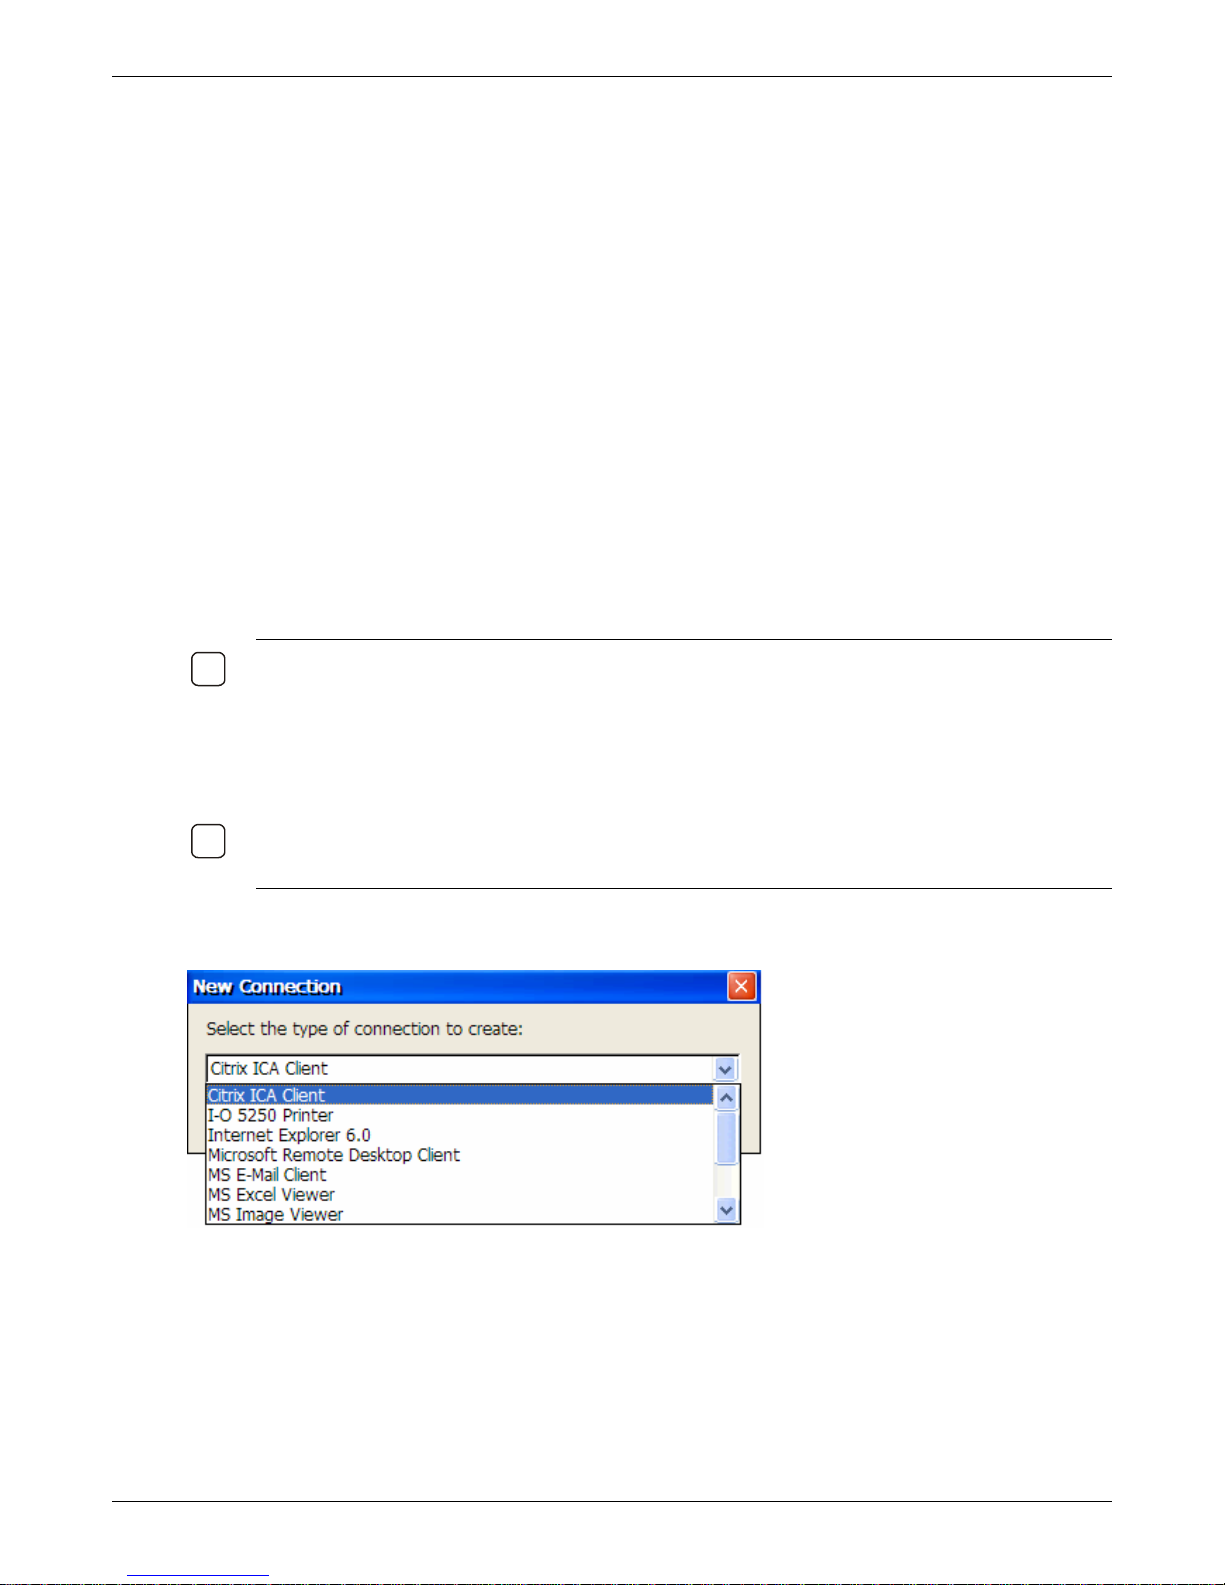
1. Click the Configure tab in the Terminal Connection Manager then click the Add button to display
the New Connection dialog box.
2. Select Citrix ICA Client from the drop-down list. The Select a Server or Published Application
dialog box is displayed.
EDITING A CONNECTION USING CONNECTION MANAGER SECTION OF THE CLIENT FOR
CD SUPPLIED WITH THE THIN CLIENT. IT MAY ALSO BE ACCESSED FROM THE CONFIGURATION
RDP CONNECTIONS, AND USING THE THIN CLIENT IN
Thin Client User’s Guide 39
Page 40
Creating Connections
9
9
OTE: DEPENDING UPON THE CITRIX SERVER ENVIRONMENT, IT MAY BE NECESSARY TO CHANGE THE
N
DEFAULT ICA SETTINGS PRIOR TO CREATING AN ICA CONNECTION. REFER TO THE EDITING THE
GLOBAL AND DEFAULT SETTINGS SECTION OF THE CLIENT FOR WINDOWS CE FOR WINDOWS-BASED
TERMINALS ADMINISTRATOR’S GUIDE. THE GLOBAL ICA CLIENT SETTINGS ICON IS FOUND ON THE
CONTROL PANEL OF THE TERMINAL PROPERTIES SCREEN. THIS CAN BE ACCESSED BY PRESSING F2
WHEN THE
CONNECTION MANAGER SCREEN IS BEING DISPLAYED.
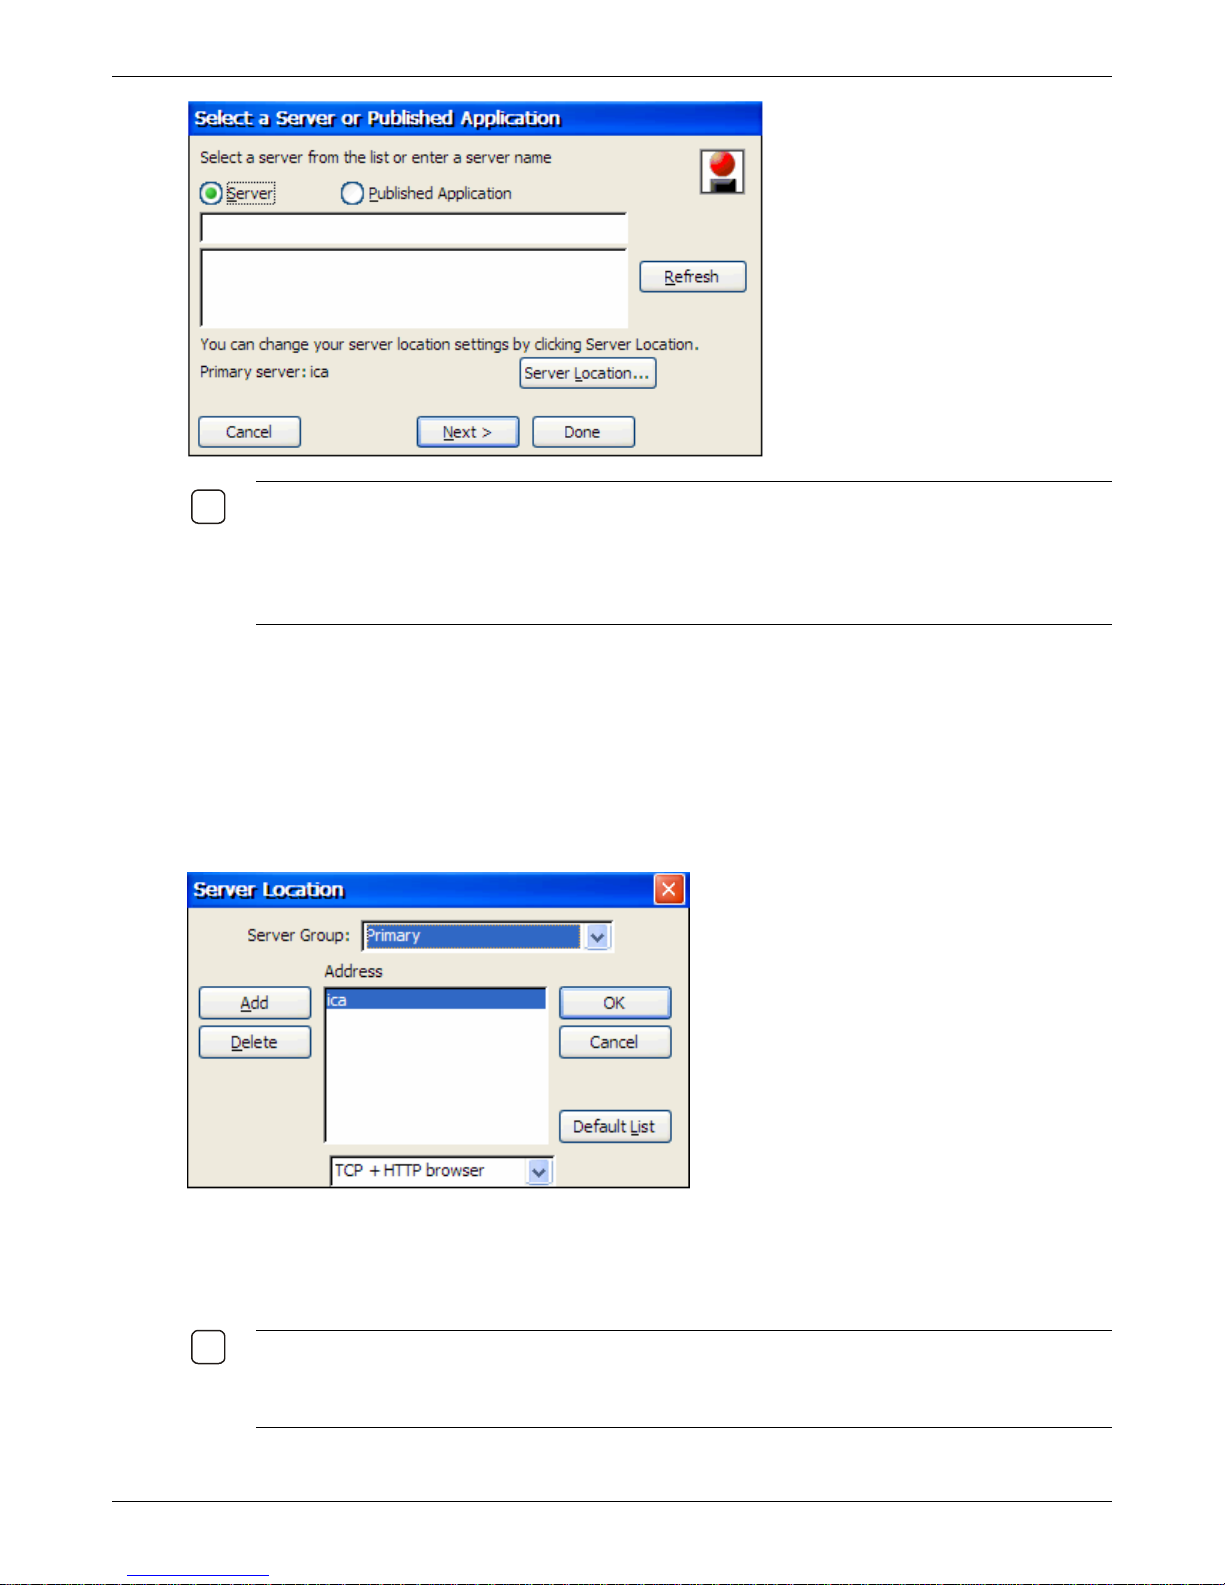
3. To connect to a server, click Server, or to connect to a Published Application. To display an upto-date list of servers or application, click Refresh.
To define or change server groups or browser protocol, click Server Location and go to Step 4.
— or —
Scroll through the displayed list and select the server or published application. Click Next and go to
Step 7.
4. The Server Location dialog box appears:
The client uses the information entered on the Server Location screen to help locate available servers
and published applications.
The default server location protocol is TCP+HTTP browser and the default value entered in the
Address box is ica.
OTE: FOR MORE INFORMATION ABOUT CREATING AN SSL (OR A TLS) CONNECTION AND USING
N
SSL+HTTPS OR UDP PROTOCOL, SEE THE USING ENCRYPTION AND CONFIGURING NETWORK
PROTOCOL AND SERVER LOCATION SECTIONS OF THE CLIENT FOR WINDOWS CE FOR WINDOWS-
ASED TERMINALS ADMINISTRATOR’S GUIDE.
B
Thin Client User’s Guide 40
Page 41
Creating Connections
5. Click Add and enter the IP Address/DNS anme and the port number of the computer running
MetaFrame Presentation Server on the remote network.
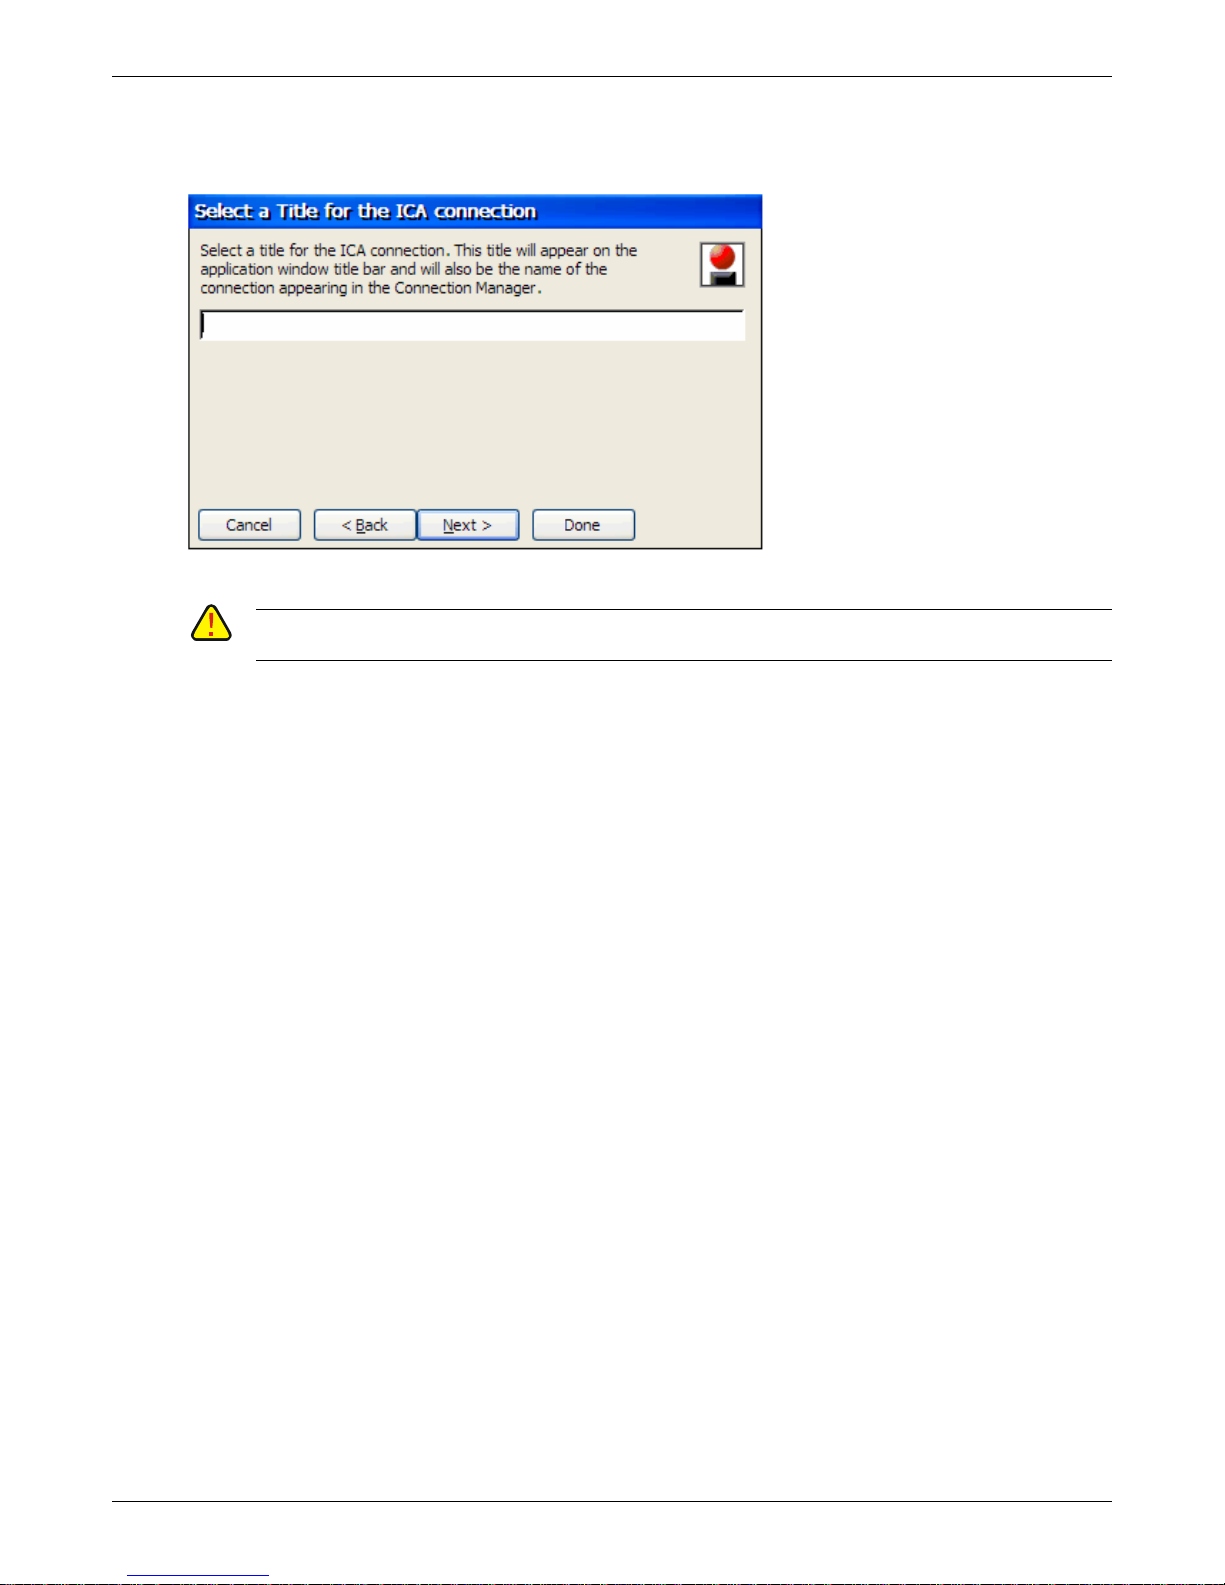
6. Click OK. The Select a Title for the ICA Connection dialog box appears.
7. Enter a name for the connection
AUTION: DO NOT USE THE FOLLOWING CHARACTERS IN YOUR CONNECTION NAME:
C
;,[]’!’%^&*()@#|\\<>?/
8. Click Done. The connection name will appear in the list of connections in the Connection Manager.
9. To complete the process, edit the connection you just created. Refer to the Editing a Connection
Using Connection Manager section of the Client for Windows CE for Windows-Based
Terminals Administrator’s Guide. This guide is located on the CD supplied with the thin client. It
may also be accessed from the Configuration Utility’s Help menu.
Thin Client User’s Guide 41
Page 42
Creating Connections
Microsoft Viewers
The thin client contains five viewers for files created in the following formats:
Word
Excel
PowerPoint
Image
Acrobat PDF
When using the Internet Explorer browser or viewing an e-mail attachment, viewers are automatically
loaded.
Before documents located on a USB storage device or a shared network drive (through Windows
terminal services or Citrix) can be viewed, a viewer connection must be created.
IP: IF YOU WILL NOT BE VIEWING FILES OTHER THAN WITHIN A BROWSER CONNECTION OR AS AN E-MAIL
T
ATTACHMENT, THERE IS NO NEED TO ADD CONNECTIONS FOR THE VIEWERS.
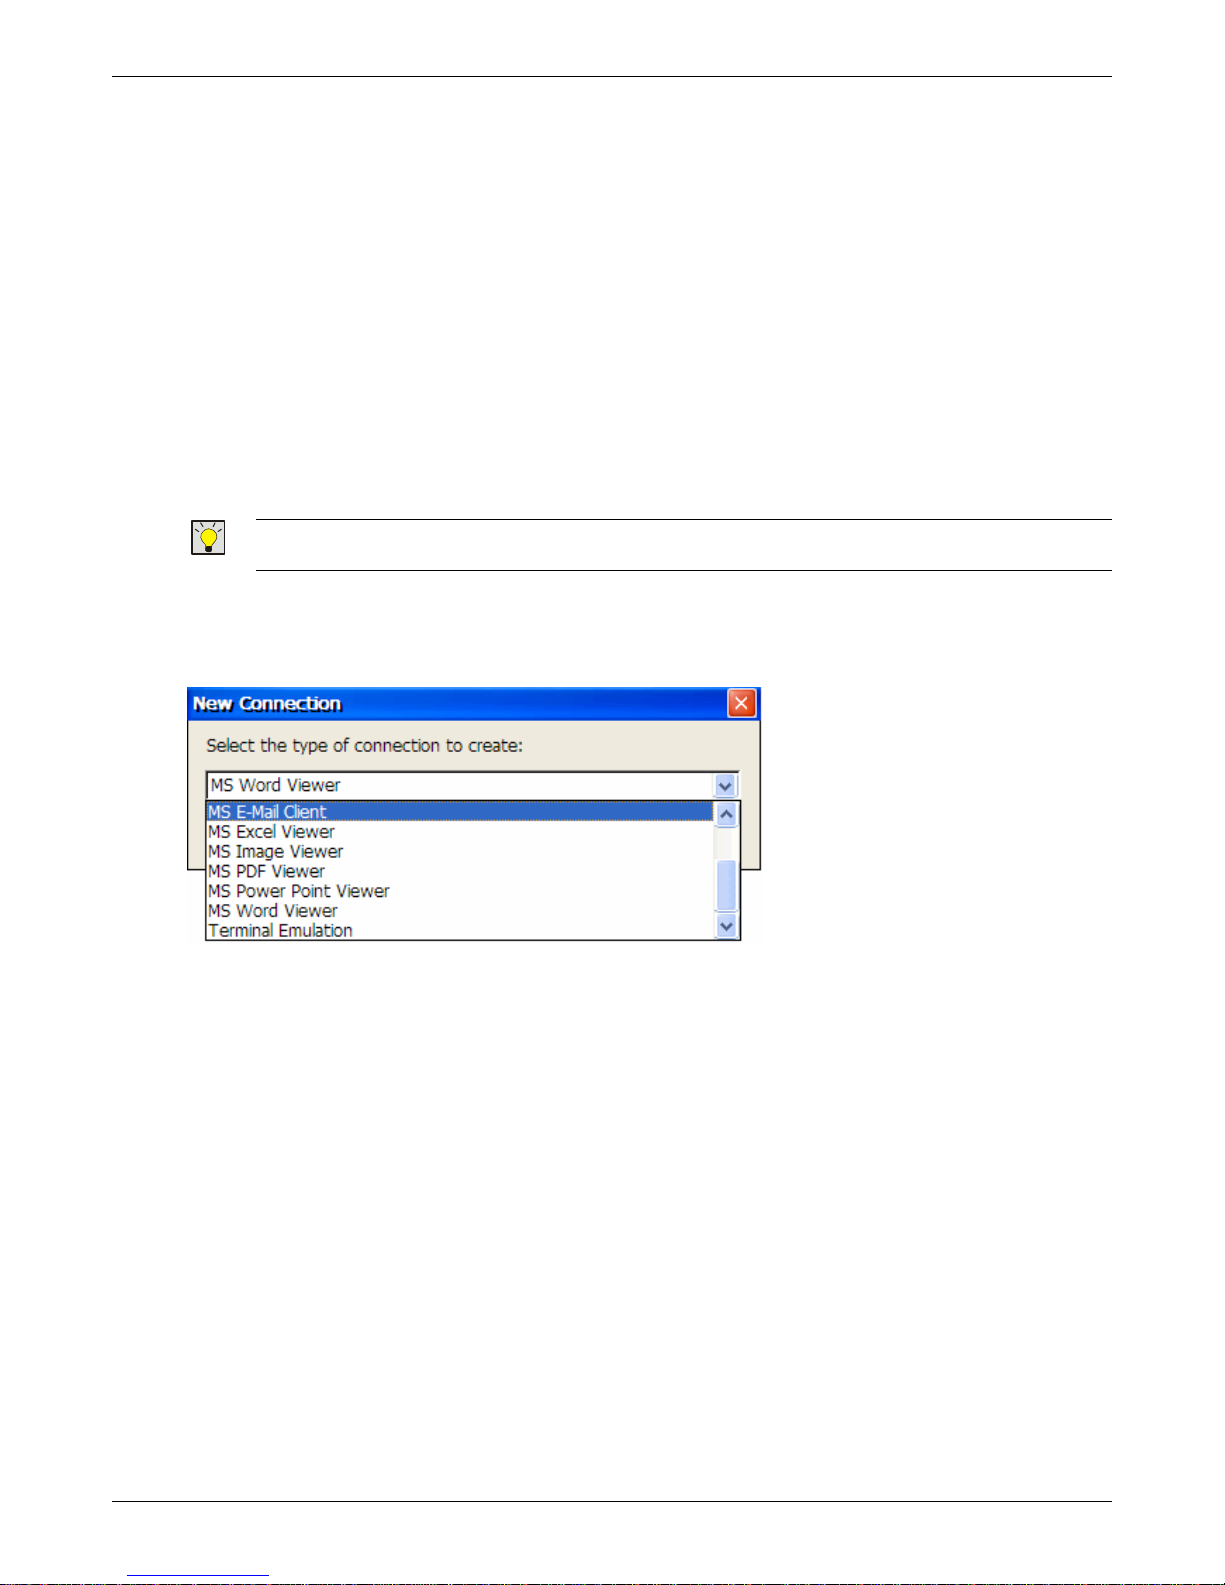
1. Click the Configure tab in the Terminal Connection Manager then click the Add button to display
the New Connection dialog box.
2. Select the desired viewer and click OK. A viewer entry will appear in the connections listing.
Thin Client User’s Guide 42
Page 43
Creating Connections
Internet Explorer
The thin client includes Microsoft’s Internet Explorer V6 for CE. This smaller version of Internet Explorer
is equivalent functionally to Internet Explorer V6. However, because the limited program storage area
size, the CE version does not include on Help, has limited area for cookies and favorites sto rage. Also,
because a thin client application cannot be updated in the same fashion as a standard Windows PC
application can, add on features like plug ins are not available. If more robust browsing capability is
required, a Windows Terminal Server or Citrix Metaframe server can provide access to Internet Explorer
V6 or other browsers.
1. Click the Configure tab in the Terminal Connection Manager then click the Add button to display
the New Connection dialog box.
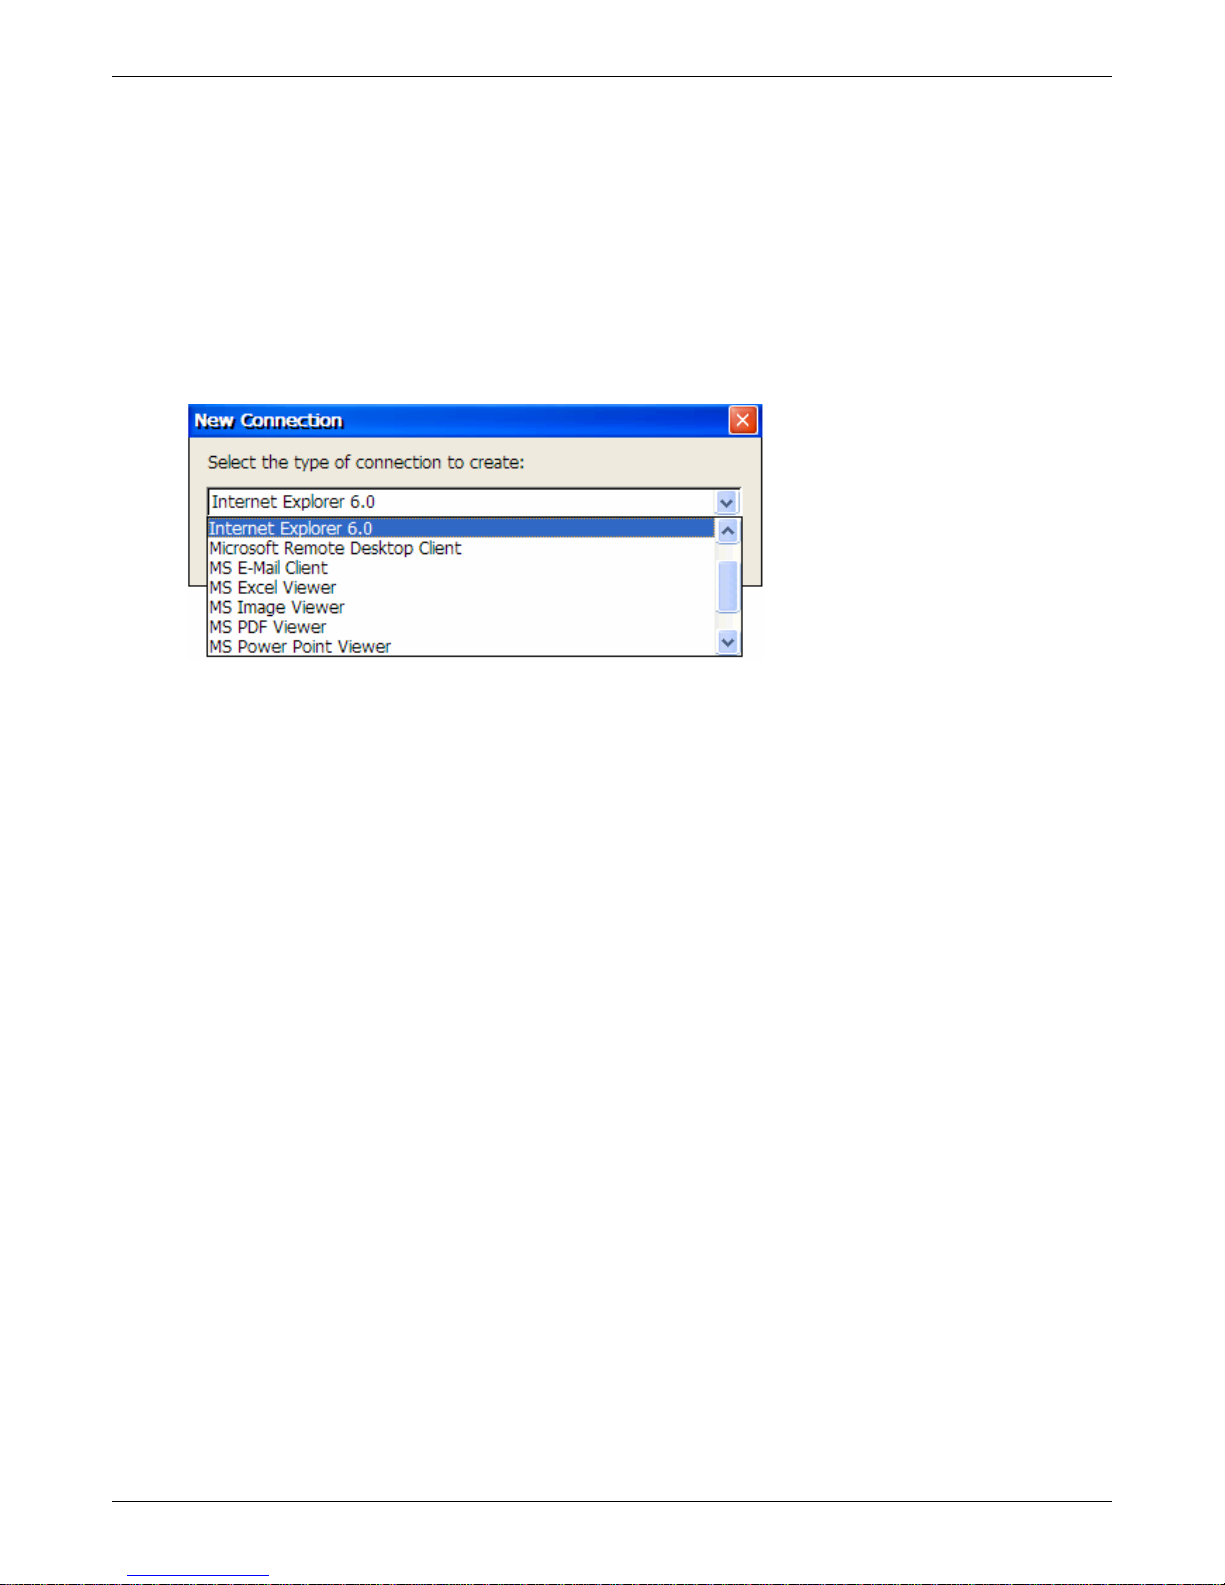
2. Select Internet Explorer 6.0 and click OK. An Internet Explorer listing will appear in the List of
Connections box.
Thin Client User’s Guide 43
Page 44
Creating Connections
E-Mail Client
The thin client includes an e-mail client that will allow you to send and receive e-mails through either a
POP3 or IMAP4 e-mail server. The e-mail client will create its own folder hierarchy with four default
folders: Inbox, Outbox, Deleted (local), and Sent. The messages you receive and send are stored in
these folders. Messages attachments may alternately be stored on a USB storage device.
The e-mail client requires two major steps to setup – creating the connection and configuring the e-mail
services so that e-mail can be accessed.
1. Click the Configure tab in the Terminal Connection Manager then click the Add button to display
the New Connection dialog box.
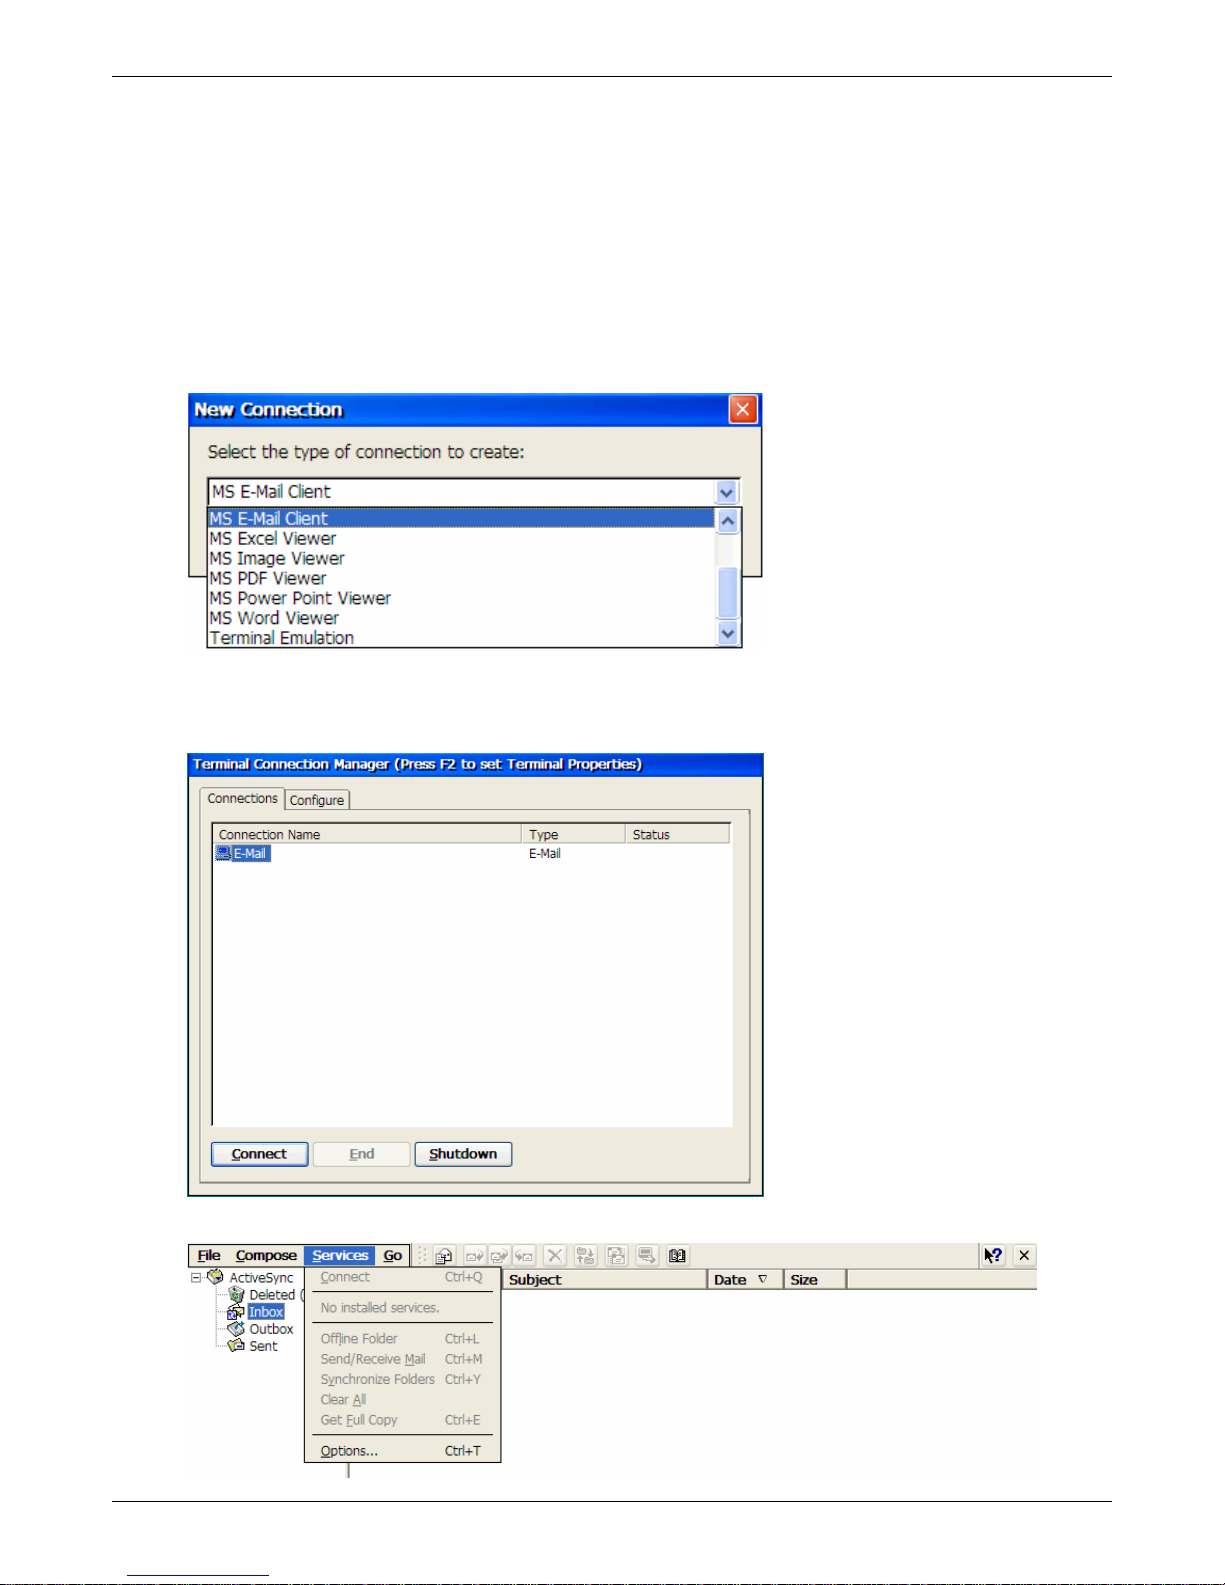
2. Select MS E-Mail Client and click OK. A new entry will appear in the connections listing.
3. Click on the Connections tab, then either double-click on the E-Mail connection, or highlight the
E-mail connection and click on the Connection button.
4. On the E-mail screen, click on the Services menu item. Then click the Option… menu item.
Thin Client User’s Guide 44
Page 45
Creating Connections
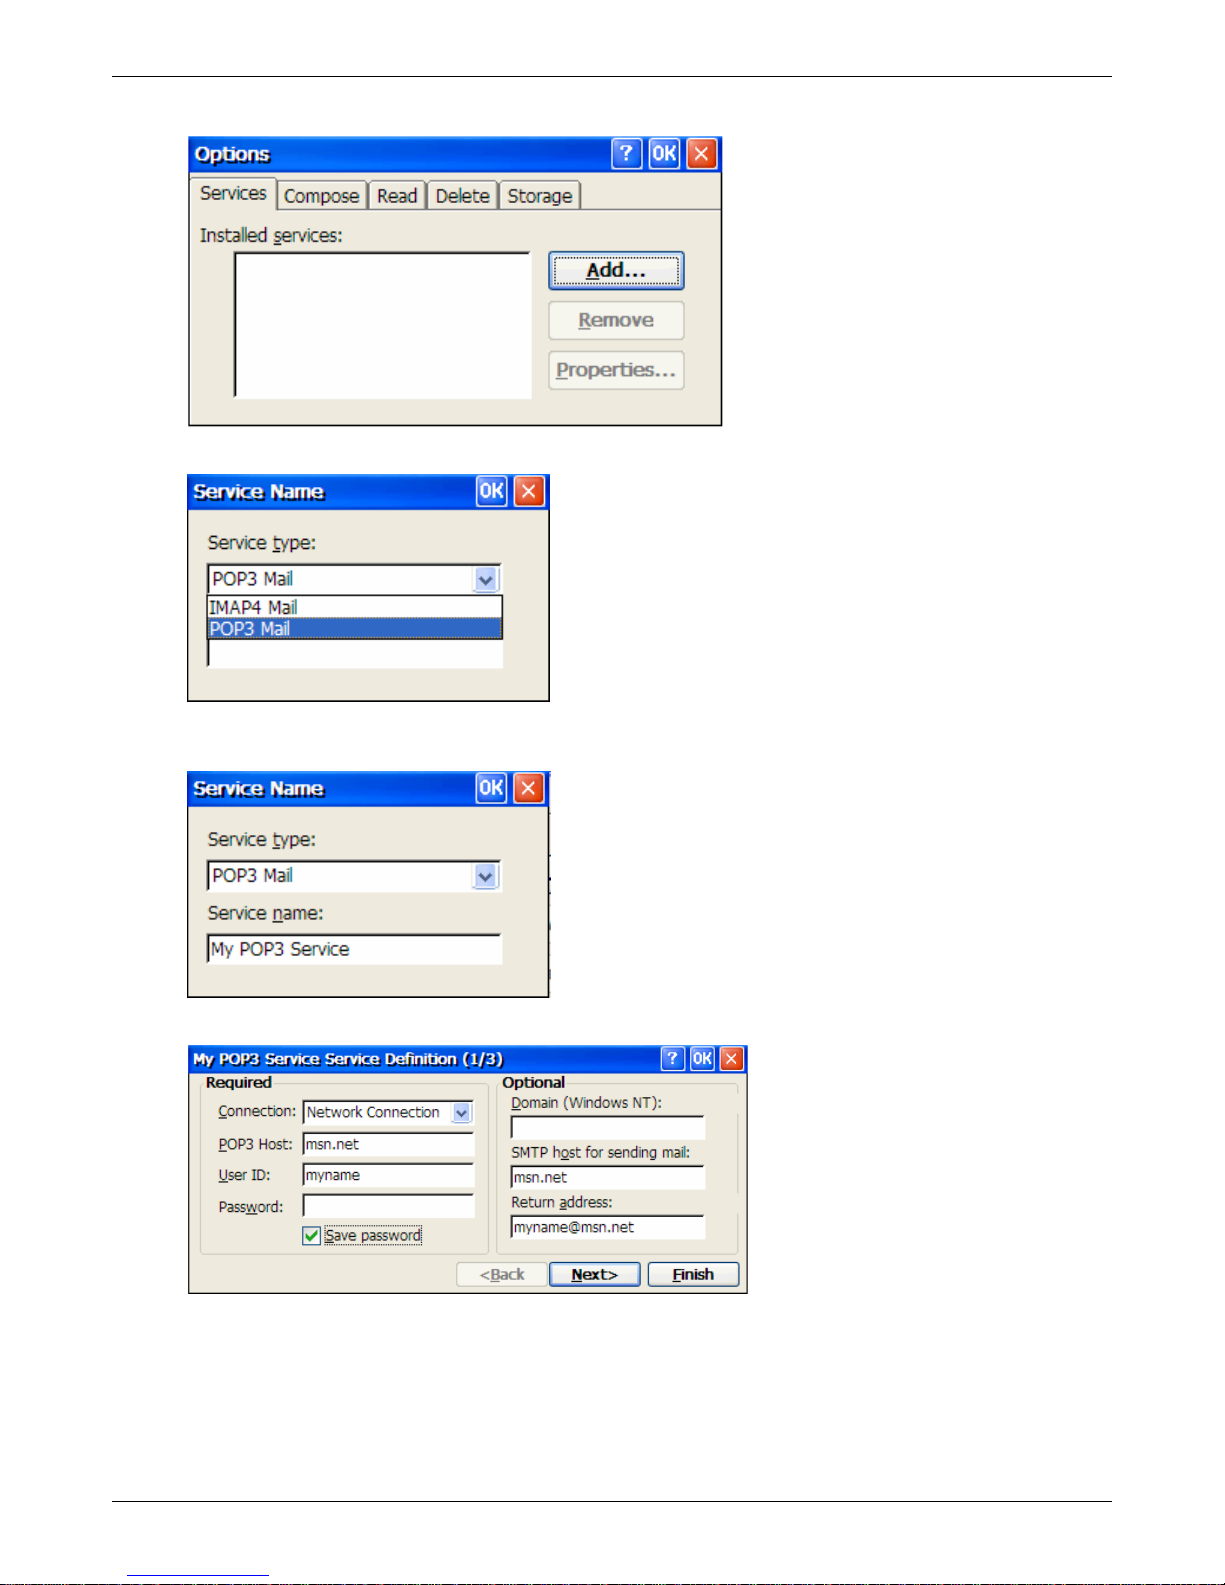
5. On the Options screen, click the Add button.
6. On the Service Name screen, select the type of e-mail server that you will be connecting to.
7. Also on the Service Name screen, enter a name you would like this service to appear as in the list
of Installed services listing on the Options screen. Click OK.
8. On the Service Definition screen, enter the following information. Click Next> when done.
Connection: Select Network Connection from the drop down list.
POP3 Host: Enter the name of your e-mail server that you will use to send an receive messages.
IMAP4 Host: Enter the name of your e-mail server that you will use to send an receive messages.
User ID: Enter the user name or mailbox ID you will use to login into your e-mail server.
Password: Enter the password. For security purposes, the password will not be displayed.
Thin Client User’s Guide 45
Page 46
Creating Connections
Save password: Check this box to have the password saved when the e-mail connection is
closed. This will eliminate the need to reenter the password each time you connect to the e-mail
server.
Domain: This field is not required for most ISP based e-mail servers. Enter the Windows NT
domain name. This name is required only when connecting to network, such as a corporate
intranet, that use Windows NT domain security. Refer to your system administrator for this
information.
SMTP host for sending mail: If your mail service uses a separate server for SMTP, enter the
name here. POP3 service supplied by an ISP requires SMTP.
Return address: Enter your e-mail address.
Click the Next> button when the above information is entered.
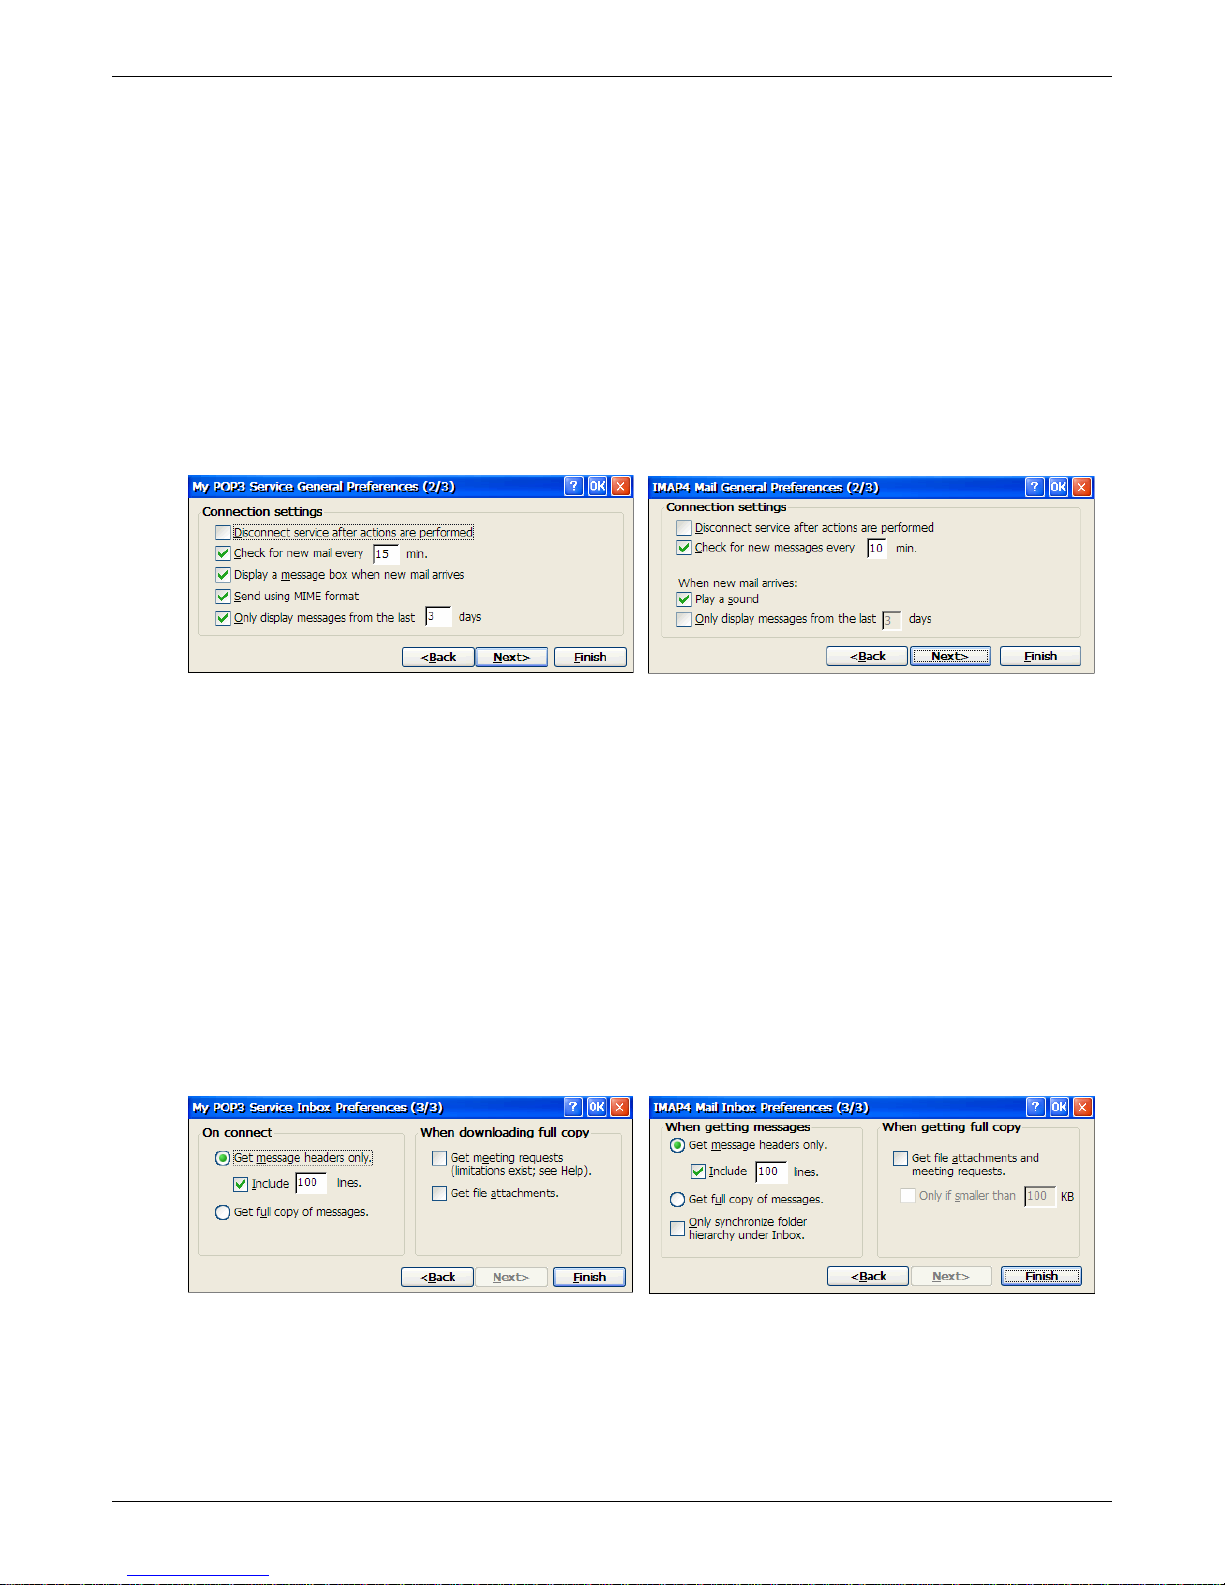
9. The General Preferences screen will be displayed. Select the connection settings, then click Next>
to continue.
Disconnect service after action are performed: Select o automatically disconnect from the
server upon completion of all pending actions. This option minimizes connection time and costs.
Check for new mail every ?? min.: Check this option and enter the time interval that you want the
e-mail client to wait before checking to see if new mail is available. If this option is not active, you
will have to manually initiate the Send/Receive operation to receive and/or send messages.
Display a message box when new mail arrives: (POP3 only) Check this option to have a
message pop up when mail arrives.
Send using MIME format: Check this option if MIME format is required.
Play a sound: (IMAP4 only) Check this option to be notified when messages are received.
Only display messages from the last ? days: Check this option and select the number of days to
display message entries for.
Click the Next> button to continue.
10. On the Inbox Preferences screen, select the following. Click Finish when done.
Get message headers only: Select this option to have only the titles of the messages downloaded
from the e-mail server. This will save time and storage space. When viewing a specific message,
there will be an option to download the complete message.
Include ??? lines: Check this option and enter message length to be downloaded.
Get full copy of messages: Select this option to have the complete message downloaded from
the e-mail server.
Thin Client User’s Guide 46
Page 47
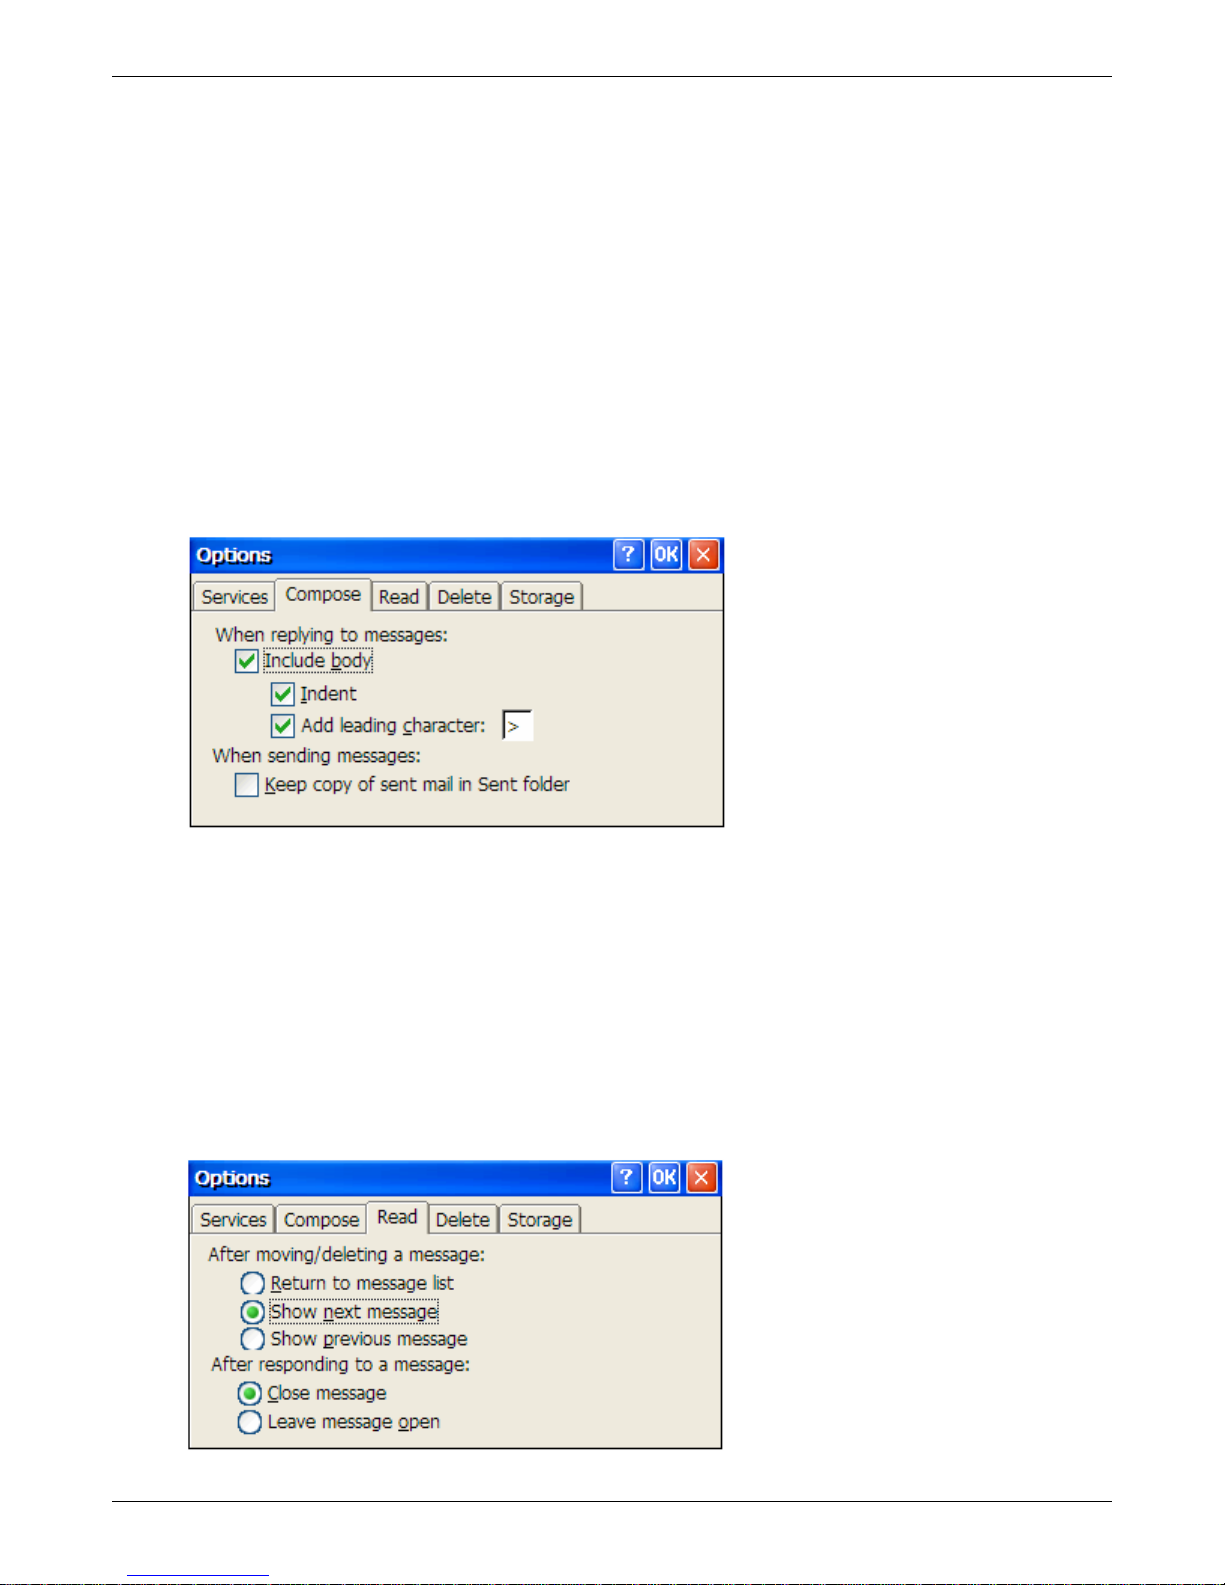
Creating Connections
Only sychronize folder hierarch under Inbox: (IMAP4 only) This option will speed download
time by downloading only the folder list every time you connect.
Get meeting requests: (POP3 only) Select this option to download and store copies of meeting
requests when receiving full copies of messages.
Get file attachments: (POP3 only) Select this option to download and save message attachments
when the full copy of the message is being received. This option could use significant amounts of
the thin client’s RAM and will slow download times. An optional USB storage device can be used as
the storage location for the attachments.
Get file attachments and meeting requests: (IMAP4 only) Select this option to download and
store meeting requests when receiving full copies of messages.
Only if smaller than: (IMAP4 only) Select this option to restrict the size of attachments you
download.
11. Click Finish> after making the desired configuration selections. The Options Screen will be
redisplayed and will contain the entry for the e-mail service just configured.
12. Select the Compose tab. Configure the following composition options:
Include replying to messages: Select this option to enable or disable the indent and leading
character options.
Indent: Selecting this option causes the message to be indented.
Add leading character: Selecting this option allows a leading character to be placed before the
original message. Click in the character field and type a character on the keyboard to be used as
the leading character.
Keep copy of sent mail in Sent folder: Selecting this option will keep a copy of every message
sent. This option will use RAM for storage unless USB storage has been activated in the Control
Panel and the USB device has been defined in the Storage tab.
13. Select the Read tab. Configure the following options to establish the default actions when reading
messages.
Thin Client User’s Guide 47
Page 48
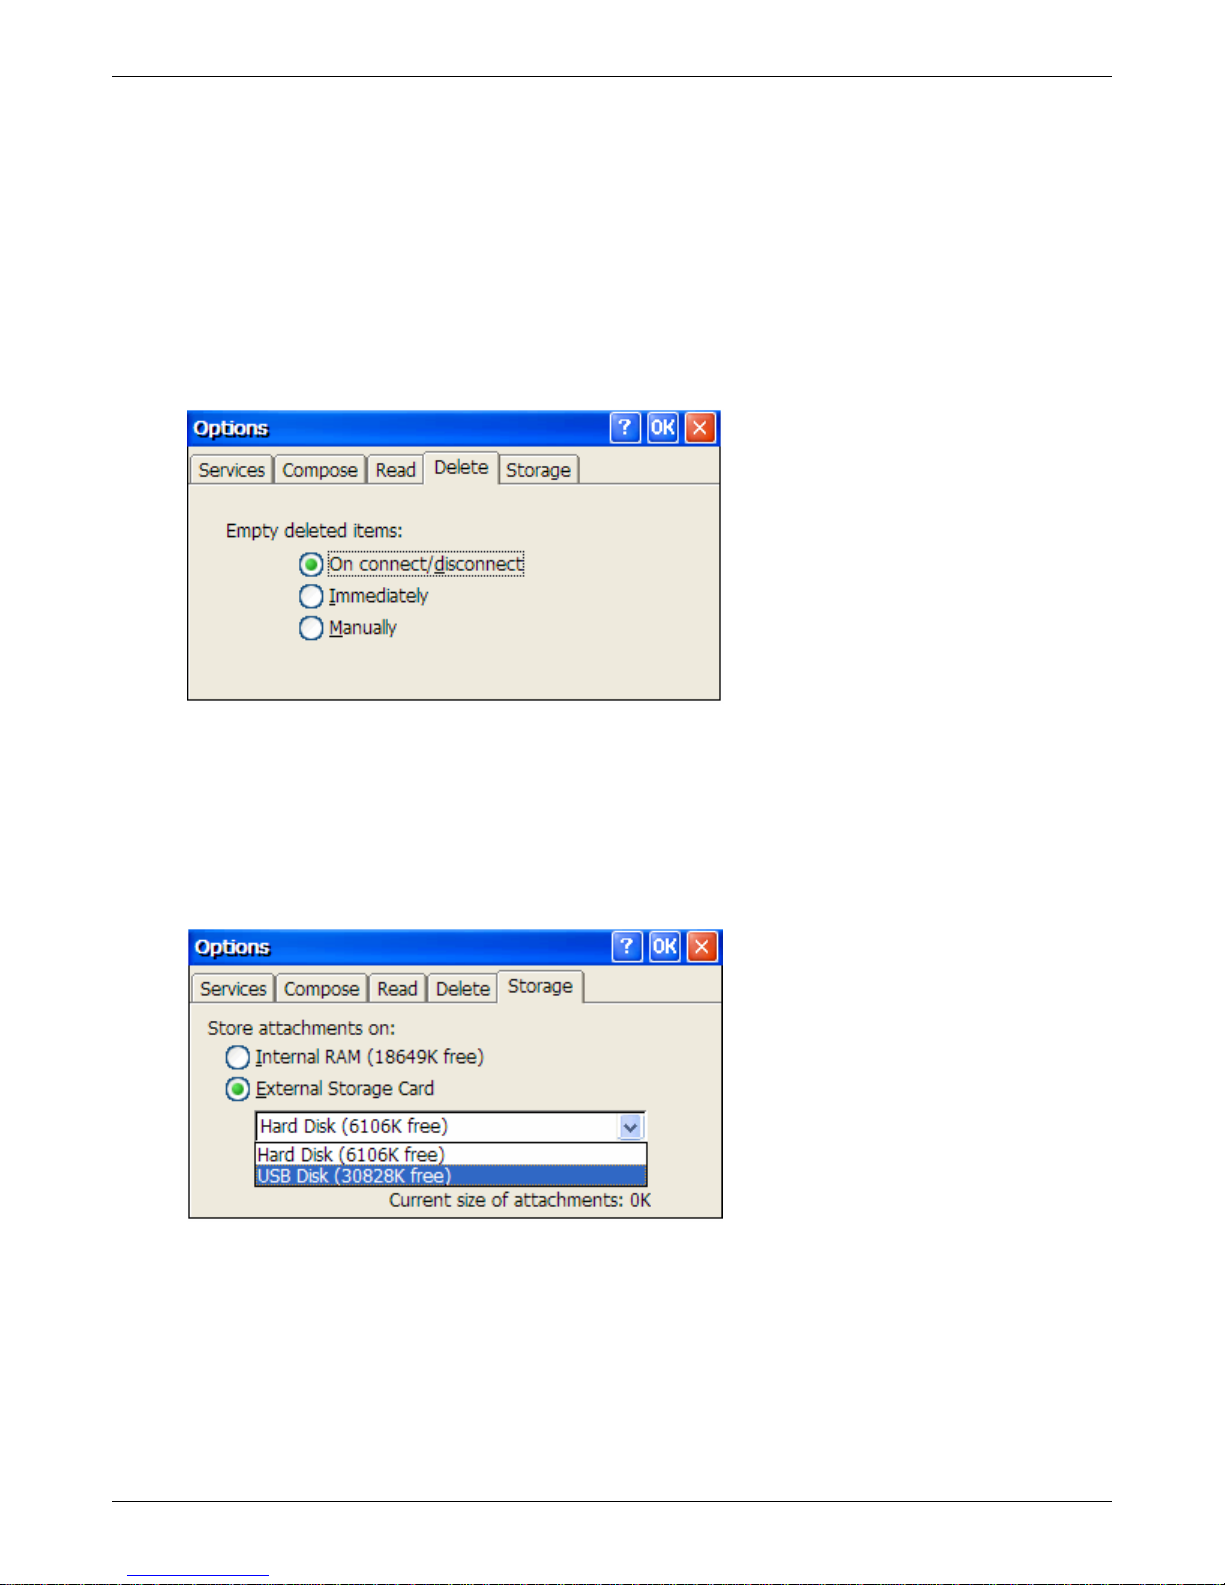
Creating Connections
Return to message list: Selecting this option will cause the message list to be redisplay after
moving or delete a message.
Show next message: Selecting this option will cause the next message in the list to displayed
when the current message is deleted.
Show previous message: Selecting this option will cause the previous message to be displayed.
Close message: Selecting this option will cause the message to close after replying to the
message.
Leave message open: selecting this option will cause the message to remain display after you
have replied to the message.
14. Select the Delete tab. Determine how deleted messages are to be handled.
On connect/disconnet: Select this option to have items marked for deletion (in the Delete folder)
removed when a connection or disconnection occurs.
Immediately: Select this option to cause items to be deleted at the time the delete function is
taken.
Manually: Select this option to cause the items to be retained until you manually delete them.
15. Select the Storage tab. Determine whether to store attachments in RAM or on an USB storage
device.
Internal RAM: Selecting this option will cause mail attachments to be stored in the RAM of the thin
client.
External Storage Card: Selecting this option will allow mail attachments to be stored on an USB
storage device.
If an external storage card option is selected, you will need to name directory for storage of the
attachments.
Thin Client User’s Guide 48
Page 49
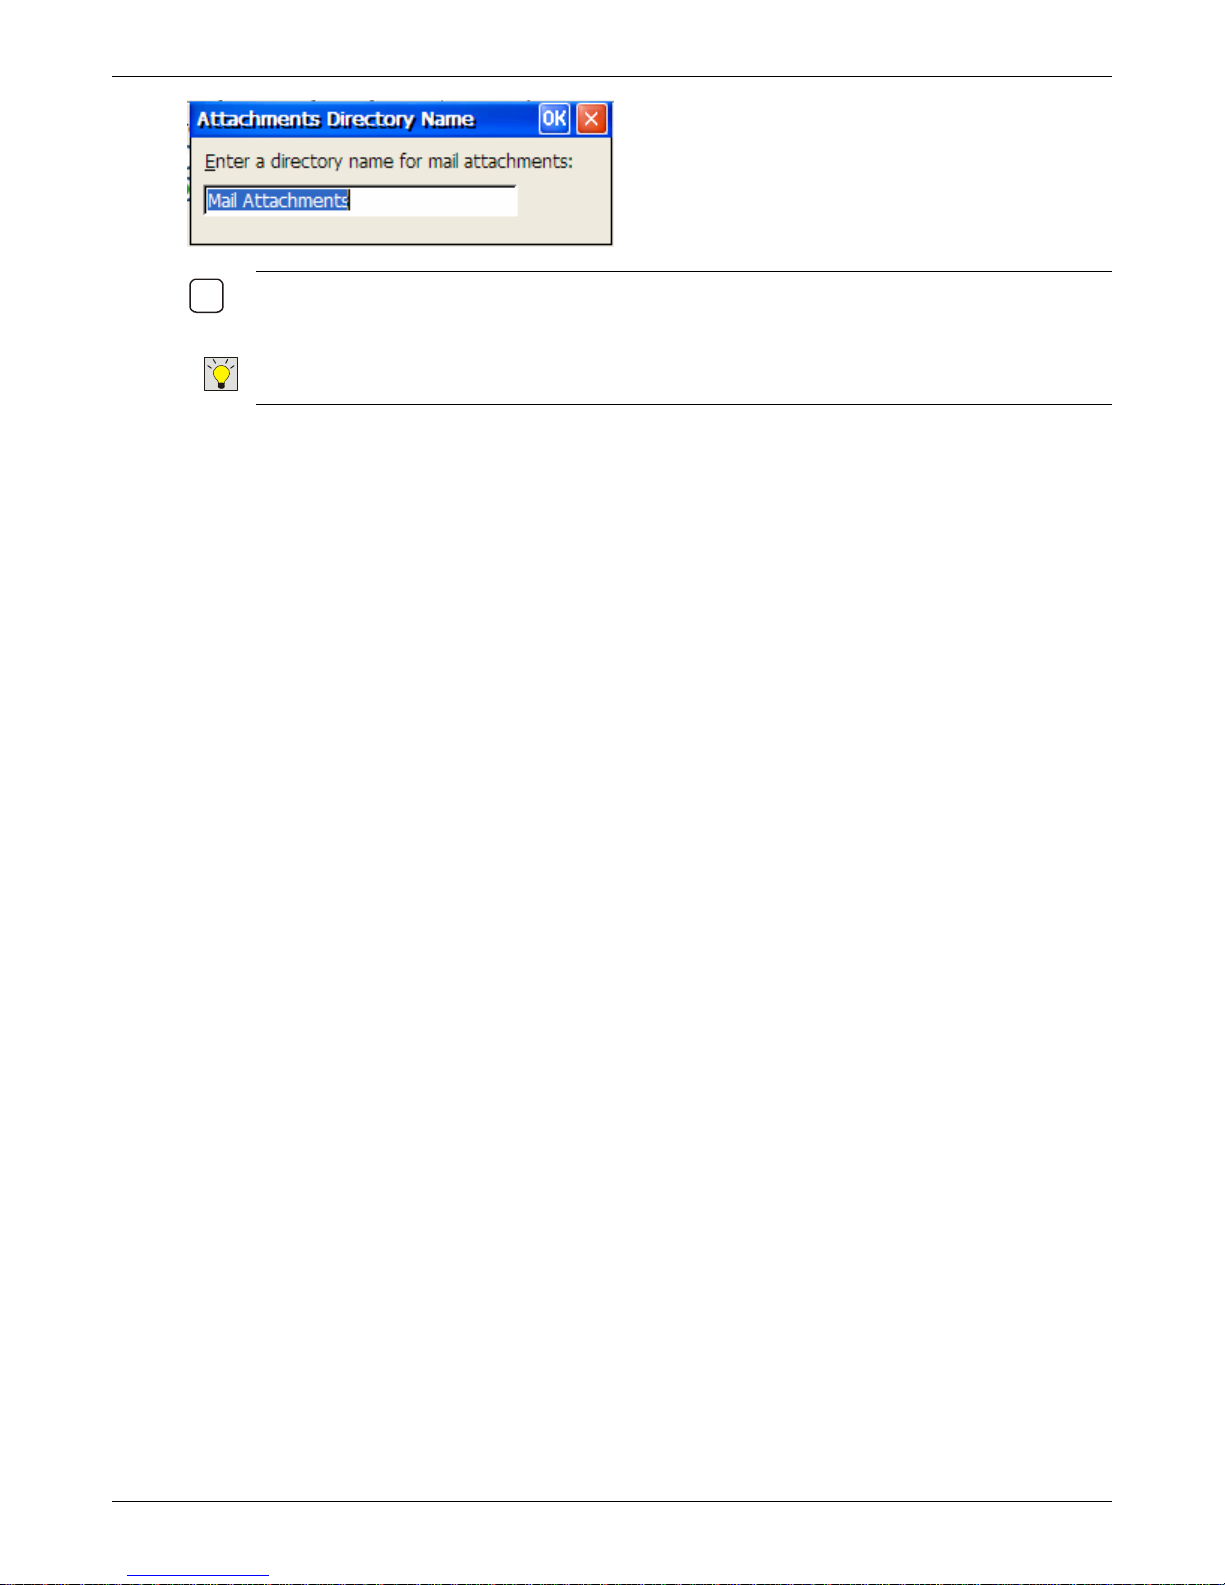
Creating Connections
9
N
OTE: STORING ATTACHMENTS IN THE INTERNAL RAM OF THE THIN CLIENT WILL USE UP VALUABLE
RAM USED FOR THE SYSTEM OPERATION. IT IS SUGGESTED THAT IF ATTACHMENTS ARE TO BE KEPT,
THAT AN
T
USB STORAGE DEVICE BE USED.
IP: THE USB STORAGE DEVICE IS ACTIVATED IN THE CONTROL PANEL.
Click OK after all configuration options have been selected. The main e-mail screen will be redisplayed.
Thin Client User’s Guide 49
Page 50
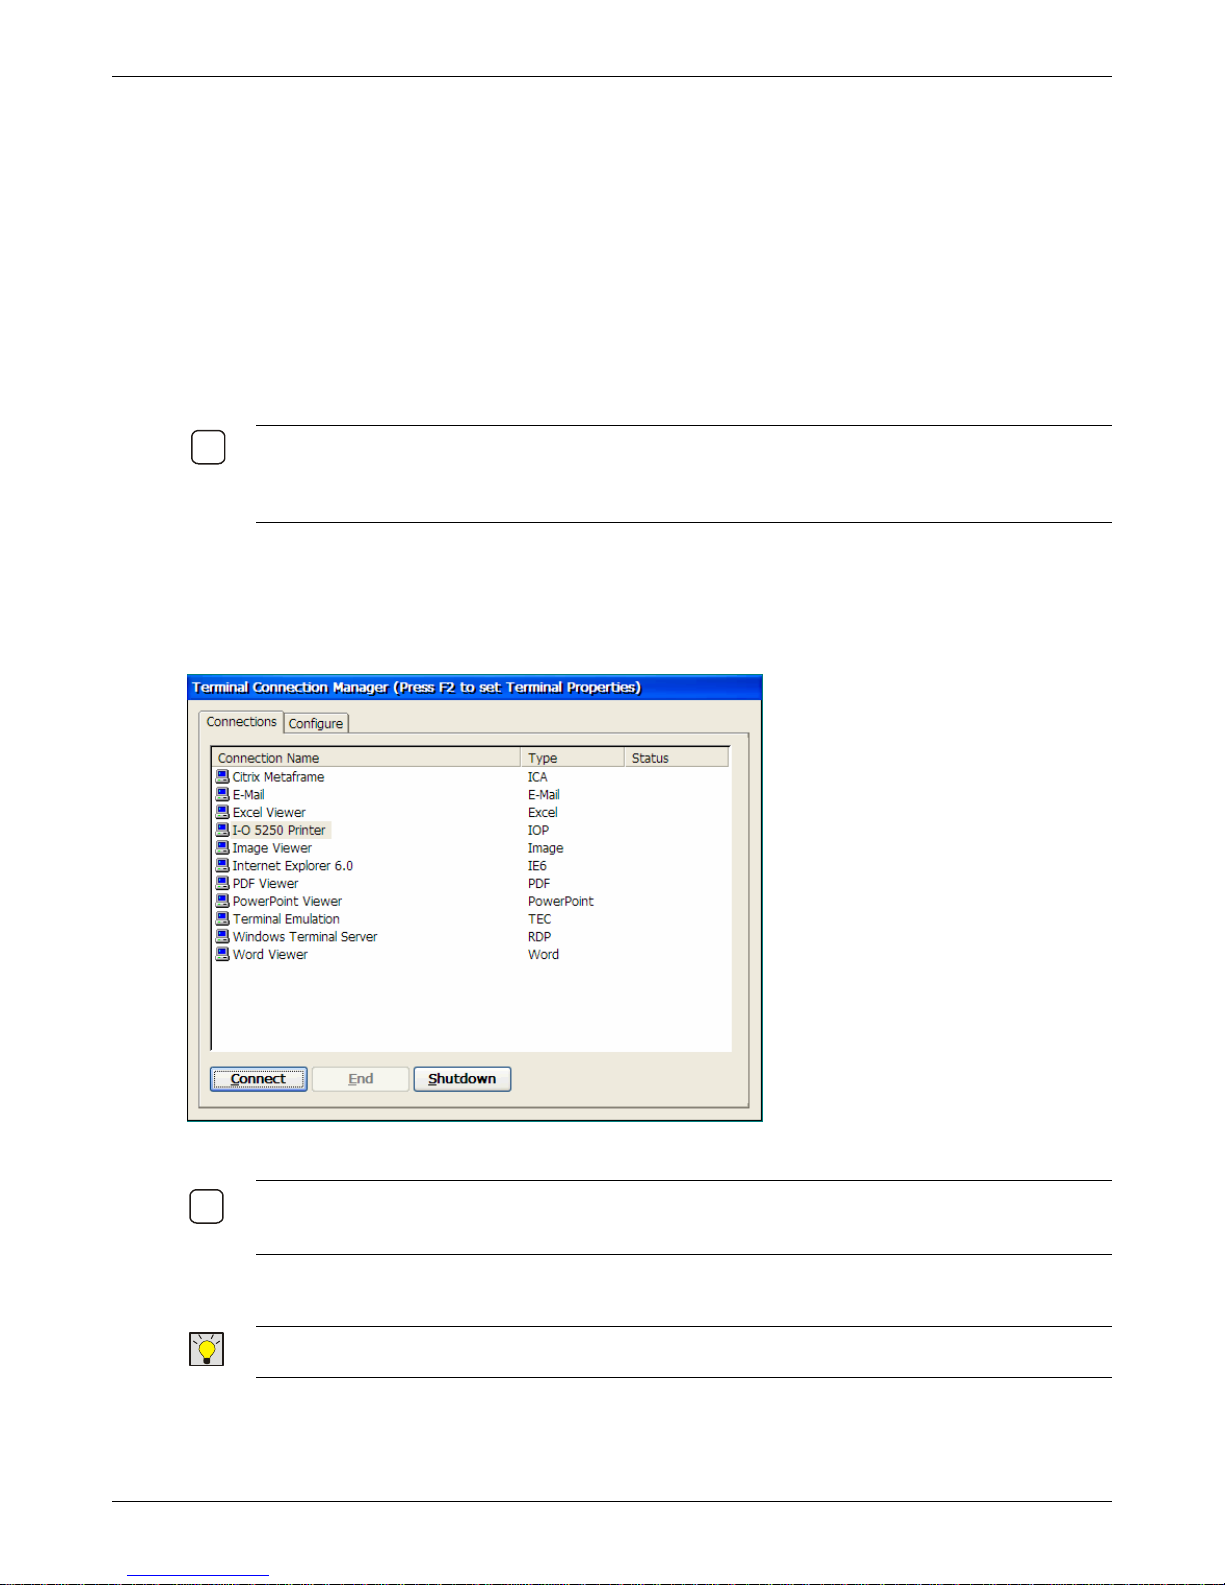
Using Connections
9
9
I-O 5250 Printing
Start the I-O 5250 Printer Session
When you start an I-O 5250 Printer connection, a Control Panel is displayed. This screen shows the
status of the IBM host connection and printer attached to the thin client. Printer control functions like
ejecting a page, printing a configuration report, canceling a printer job are executed using control
buttons.
N
OTE:: MORE DETAILED INFORMATION ABOUT THE USE OF THE I-O 5250 PRINTER EMULAITON IS
PROVIDED IN THE TN5250e Printer Emulation User’s Guide. THIS GUIDE IS LOCATED ON THE CD
SUPPLIED WITH THE THIN CLIENT
HELP MENU.
Other Control Panel options affecting the printer and print job are described in the Customizing the I-O
5250 Printer Session chapter.
To start an I-O 5250 Printer session, follow these steps:
. IT MAY ALSO BE ACCESSED FROM THE CONFIGURATION UTILITY’S
Using Connections
1. Click on the Connections Tab.
2. Click on the I-O 5250 Printer entry.
N
OTE: PRIOR TO STARTING A PRINTER SESSION, MAKE SURE THE PRINTER IS ATTACHED TO THE
APPROPRIATE LPT1, COM1 OR USB PORT, IS POWERED ON, AND YOU HAVE COMPLETED THE
CONFIGURATION OF THE
I-O 5250 PRINTER CONNECTION.
3. Click on the Connect button.
T
IP: TO QUICKLY ACTIVATE A CONNECTION, YOU MAY DOUBLE-CLICK ON THE I-O 5250 PRINTER
CONNECTION ENTRY IN LIEU OF STEPS 2 AND 3 ABOVE.
4. The following I-O 5250 Printer Control Panel will appear. From this control panel you can test the
printer connection, cancel host jobs that are currently printing, and change the way in which host
print jobs are handled, and end the printer session.
Thin Client User’s Guide 50
Page 51
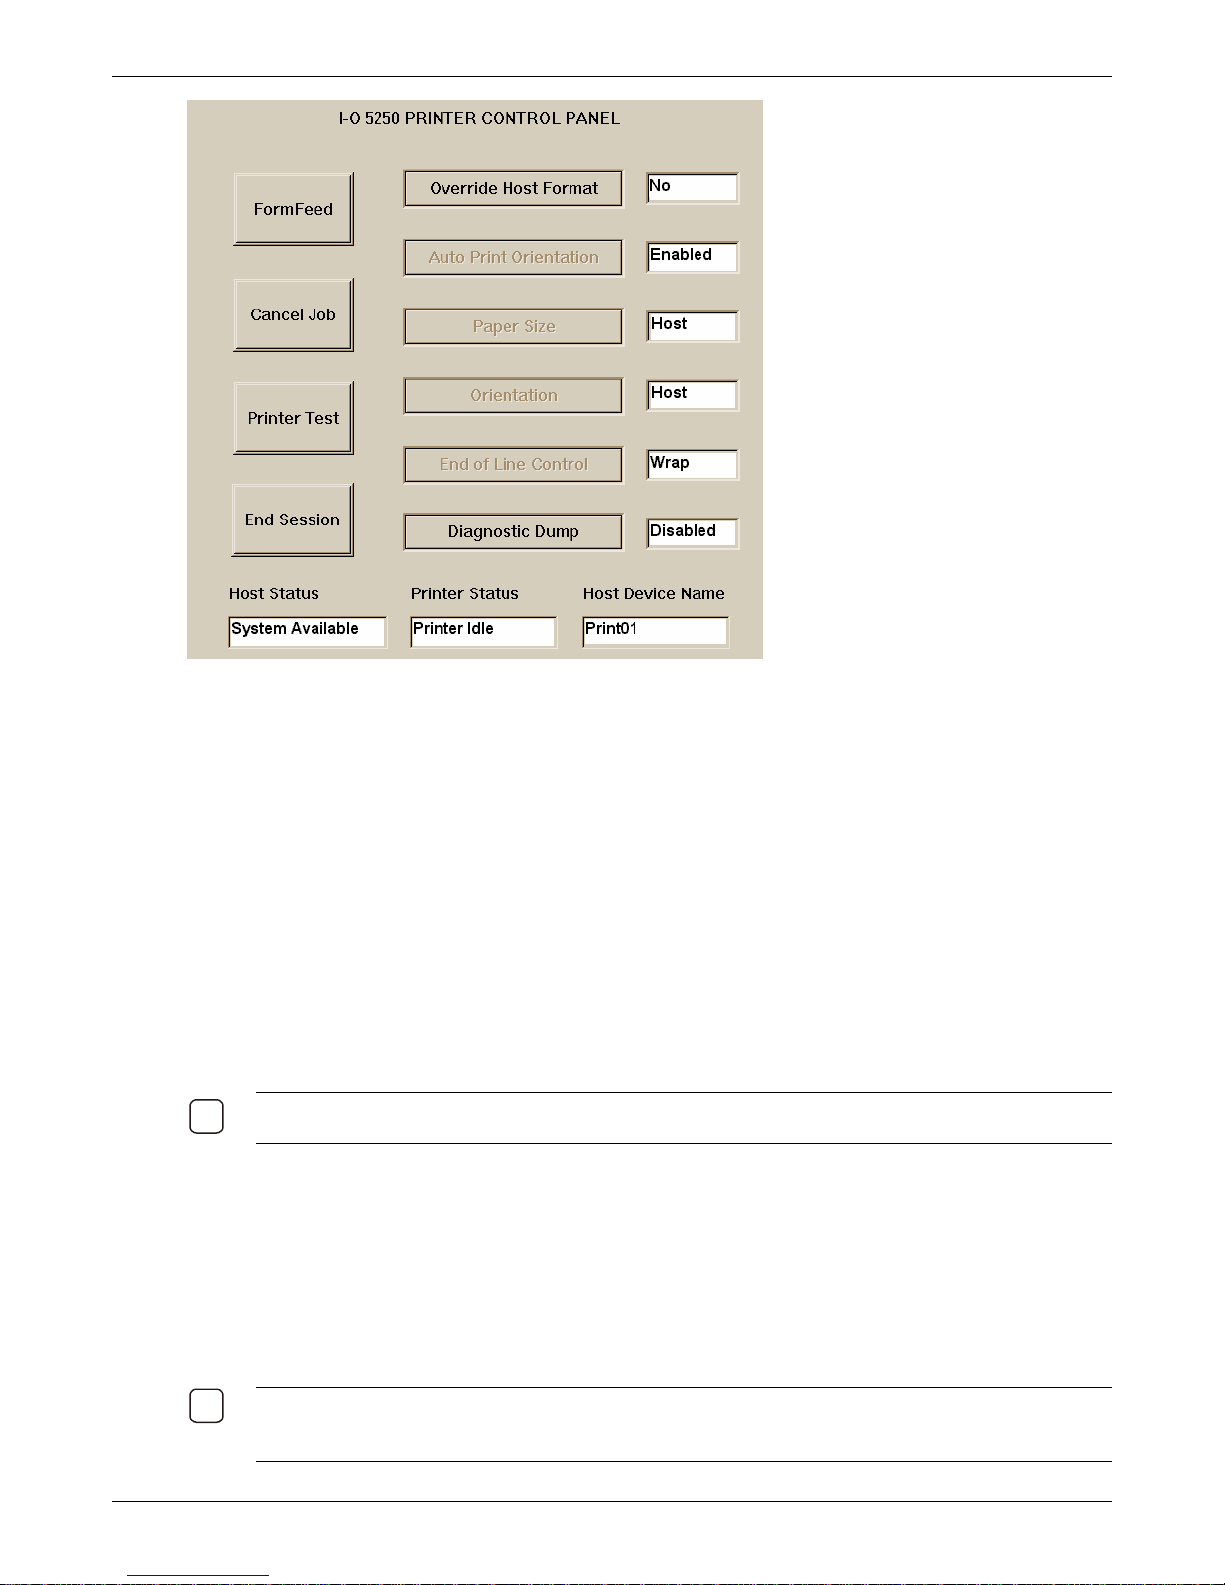
Using Connections
9
9
Host Status: This field will initially display the message “Waiting for System”. After a few seconds,
the Host Status field will display “System Available” indicating that the IBM host printer connection is
active. (Be patient, it may take a few seconds for the IBM host to complete the connection).
Printer Status: This field will display “Printer Idle” indicating that the attached printer is ready.
Host Device Name: This field will display the name of this printer connection as it appears on the
IBM host.
Once the Host Status field displays “System Available”, the I-O 5250 Printer connection is now ready to
accept printer jobs from the IBM host. On the IBM host, SCS print jobs are sent to this printer
connection by directing the print job to the printer device that has been defined with the Host Device
Name as shown above. All normal IBM host printer control functions are available from the host
(spooling, restarting, range printing, error status messaging, etc.)
It may be necessary or the user may desire to change the configuration of one or all print jobs. This can
be done in two ways: 1) use the Control Panel options, or 2) using I-O’s Host Download Commands.
These are described in detail in the Customizing the I-O 5250 Printer Session chapter in the TN5250e
Printer Emulation User’s Guide.
OTE: TO SWITCH BACK TO THE CONNECTION MANAGER SCREEN, PRESS CTRL+ALT+END. TO
N
ROTATE THROUGH ACTIVE CONNECTIONS, PRESS CTRL+ALT+DOWNARROW.
5. To end the printer session, click the End Session button.
Test the Printer Attached to the Thin Client
To verify the printer attached to the thin client is communicating properly with the I-O 5250 Printer
Connection, click on the Printer Test button. A two page configuration report will then be printed. (See
Appendix C for an example configuration report.)
N
OTE: ON THE CONFIGURATION REPORT, THE SYMBOL SET VALUES AND CONFIGURATION PARAMETERS
WILL DIFFER FROM THE REPORT THAT YOU WILL RECEIVE. THIS IS INCLUDED HERE ONLY AS AN EXAMPLE
OF THE TYPE OF CONFIGURATION REPORT YOU WILL RECEIVE
Thin Client User’s Guide 51
.)
Page 52
Using Connections
9
Eject a Page from the Printer
Sometimes data to be printed is sent to a laser printer, but the printer does not eject the page. Pressing
the FormFeed button will cause the printer to eject the page.
The FormFeed button may also be used to advance the paper to the top of the next page for a dotmatrix printer.
Cancel the Print Job
To cancel the current job that is printing, press the Cancel Job button
End the I-O 5250 Printer Session
To end the I-O 5250 Printer session, click the End Session button. If you have made any changes to
the control panel options, a message screen will ask if you want to save the changes.
If any configuration changes have been made using either the Control Panel options or through sending
Host Download commands from the IBM host, a message screen will be presented when th e End
Session button has been pressed.
Yes: Select Yes if you want the changes to be saved so they will be there when you restart the
printer connection.
No: Select No to discard the changes.
IP: REFER TO THE CUSTOMIZING THE I-O 5250 PRINTER SESSION CHAPTER IN THE TN5250E
T
PRINTER EMULATION USER’S GUIDE FOR A DETAIL DESCRIPTION OF THE USE OF HOST DOWNLOAD
COMMANDS.
I-O 5250 Printer Control Panel Options
These options can be changed at any time and as many times as desired during a 5250 printer session.
When you end the I-O 5250 Printer session, a message screen will ask if you want to save the changes.
When you restart the printer connection, the previously saved options will be active.
T
IP: SIMILAR COMMANDS ARE ALSO AVAILABLE AS HOST DOWNLOAD COMMANDS THAT ARE SENT FROM
THE IBM HOST TO THIS I-O 5250 PRINTER EMULATION SESSION.
NOTE: COMPLETE INSTRUCTIONS FOR CONFIGURING AND USING THE THIN CLIENT AND IBM HOST TO
USE THE
GUIDE.
I-O 5250 PRINTING MODULE ARE INCLUDED THE TN5250E PRINTER EMULATION USER’S
Thin Client User’s Guide 52
Page 53
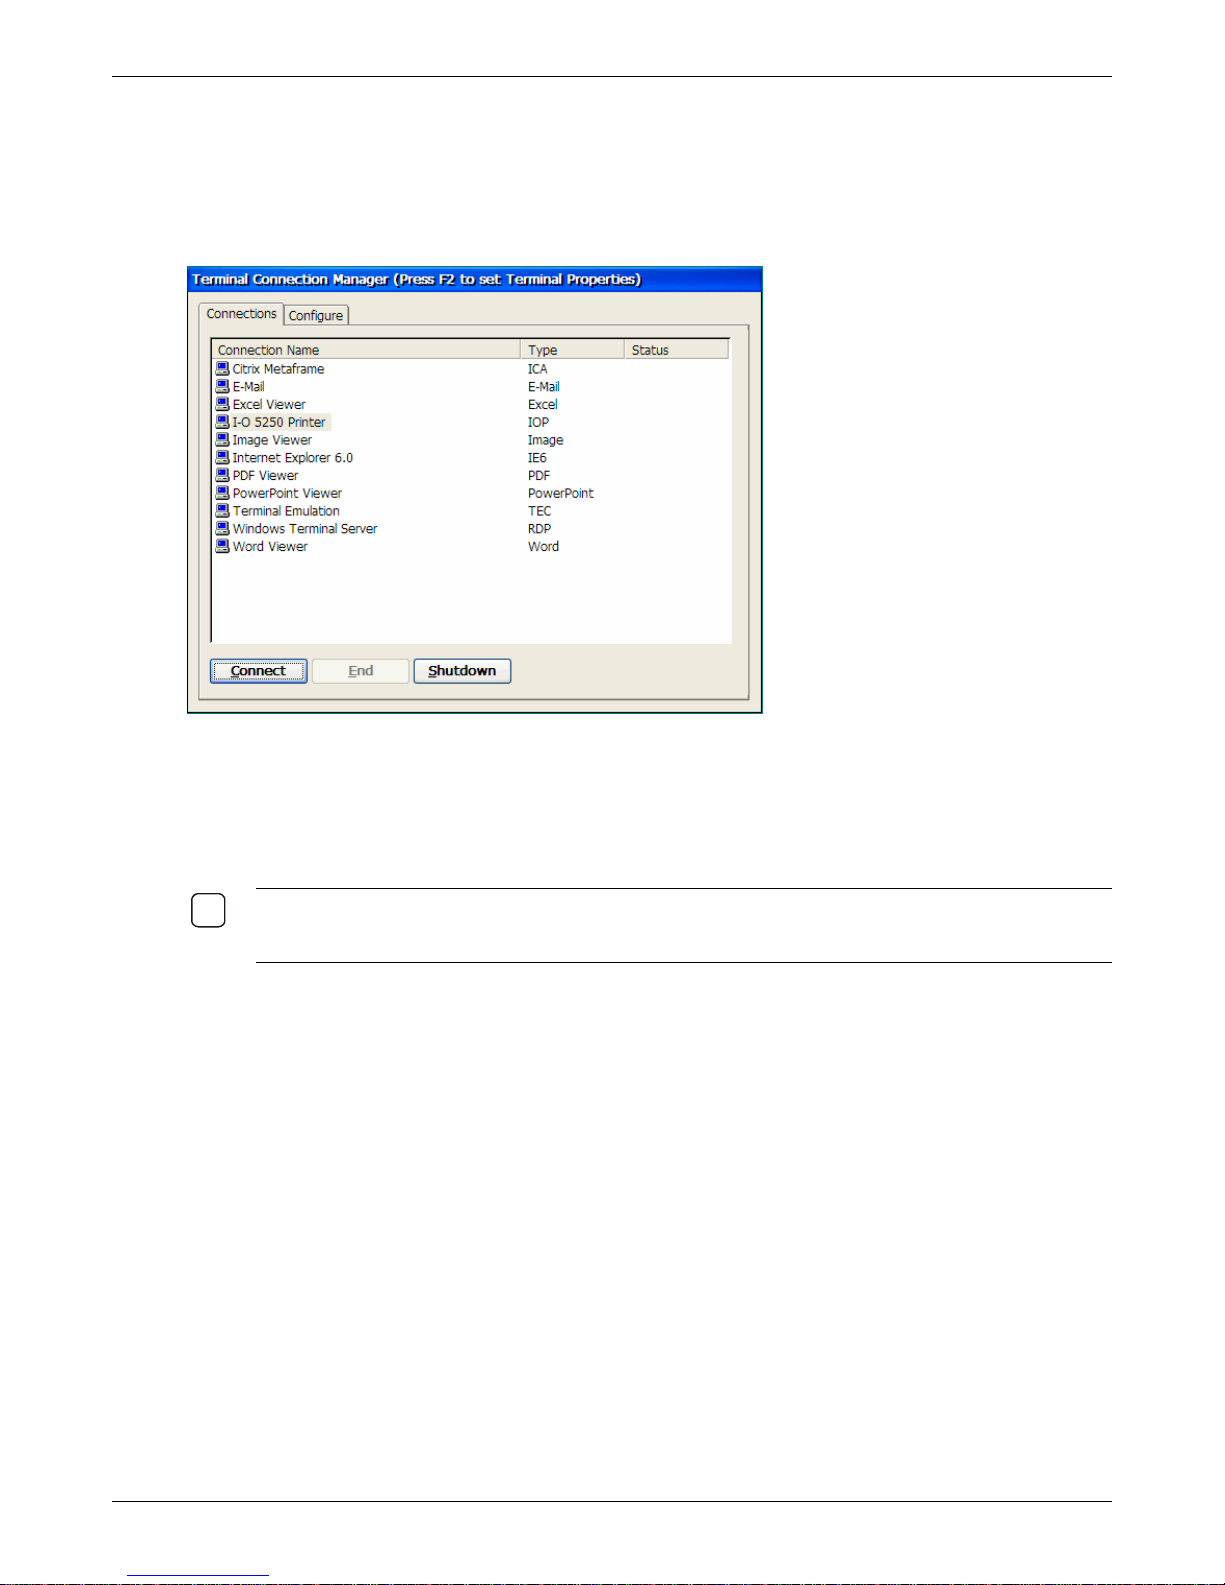
Using Connections
9
Terminal Emulation
To use a terminal emulation session:
1. On the Connections tab in the Connections Manager, double-click a terminal emulation connectio n
name (has TEC in the Type column), or click a connection name and then click Connect.
2. If the login for this connection has not been automated, enter the appropriate user name and
password.
3. Enter appropriate data, etc. for the host application being used.
4. To close the connection, click File | Exit. You may also click the close button (the X in upper right
corner) on the command bar.
N
OTE:: MORE DETAILED INFORMATION ABOUT THE USE OF TERMINAL EMULATION CONNECTIONS IS
PROVIDED IN THE Terminal Emulation User’s Guide. THIS GUIDE IS LOCATED ON THE CD SUPPLIED
WITH THE THIN CLIENT
.
Thin Client User’s Guide 53
Page 54
Using Connections
9
RDP Connection to Windows Terminal Servers
To use a RDP connection to a Windows terminal server:
1. On the Connections tab in the Connections Manager, double-click a RDP connection name (has
RDP in the Type column), or click a connection name and then click Connect.
2. If the login for this connection has not been automated, enter the appropriate user name and
password.
3. Run Windows applications as needed.
4. To close the connection, click File | Exit. You may also click the close button (the X in upper right
corner) on the command bar.
N
OTE:: REFER TO YOUR MCSE AND MICROSOFT DOCUMENTATION ON THE USE OF TERMINAL
SERVICES..
Thin Client User’s Guide 54
Page 55
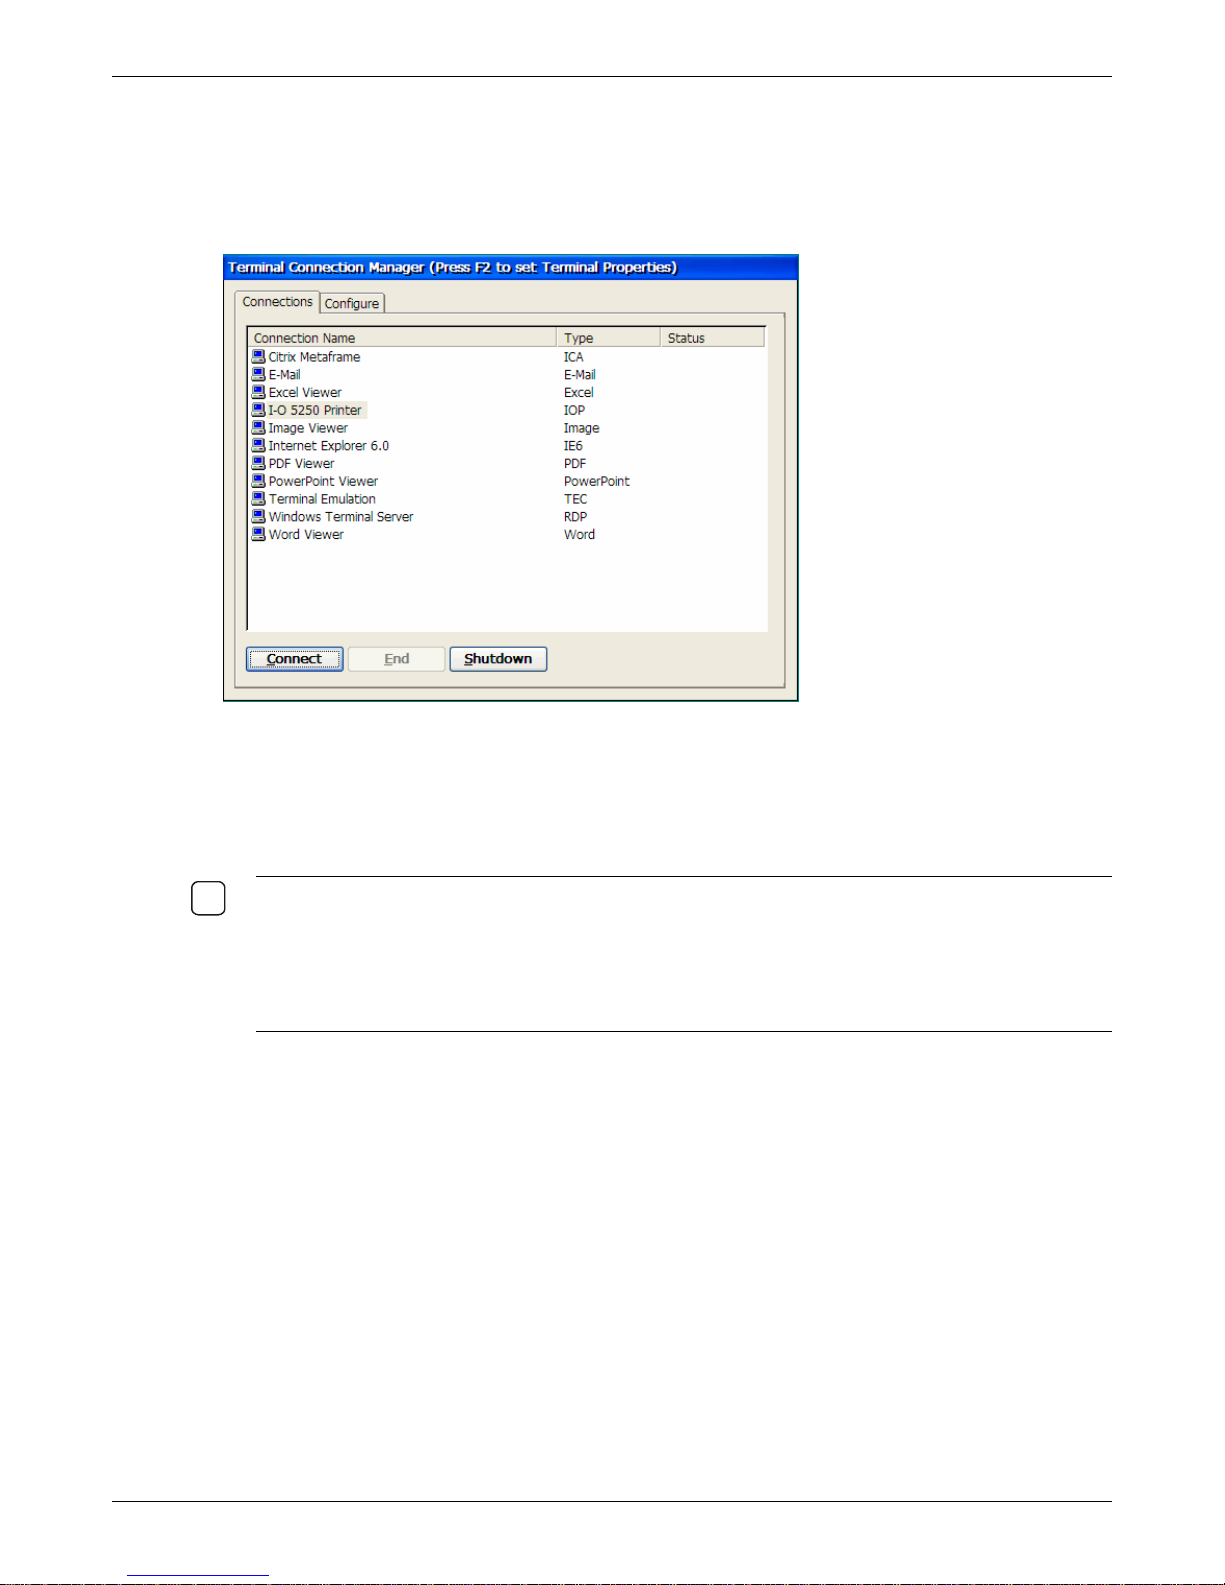
Using Connections
9
ICA Connection to Citrix Servers
To use an ICA connection to a Citrix server:
1. On the Connections tab in the Connections Manager, double-click an ICA connection name (has
ICA in the Type column), or click a connection name and then click Connect.
2. If the login for this connection has not been automated, enter the appropriate user name and
password.
3. Run the appropriate applications as needed.
4. To close the connection, click File | Exit. You may also click the close button (the X in upper right
corner) on the command bar.
OTE:: MORE DETAILED INFORMATION ABOUT THE USE OF ICA CONNECTIONS IS PROVIDED IN THE
N
CITRIX ICA CLIENT FOR WINDOWS CE WINDOWS-BASED TERMINALS ADMINISTRATOR’S GUIDE. THIS
GUIDE IS LOCATED ON THE
CONFIGURATION UTILITY’S HELP MENU.
EFER TO YOUR CITRIX CERTIFIED ADMINISTRATOR FOR ASSISTANCE IN THE CONFIGURATION AND USE
R
OF THE
ICA CLIENT AND OTHER CITRIX PRODUCTS.
CD SUPPLIED WITH THE THIN CLIENT. IT MAY ALSO BE ACCESSED FROM THE
Thin Client User’s Guide 55
Page 56
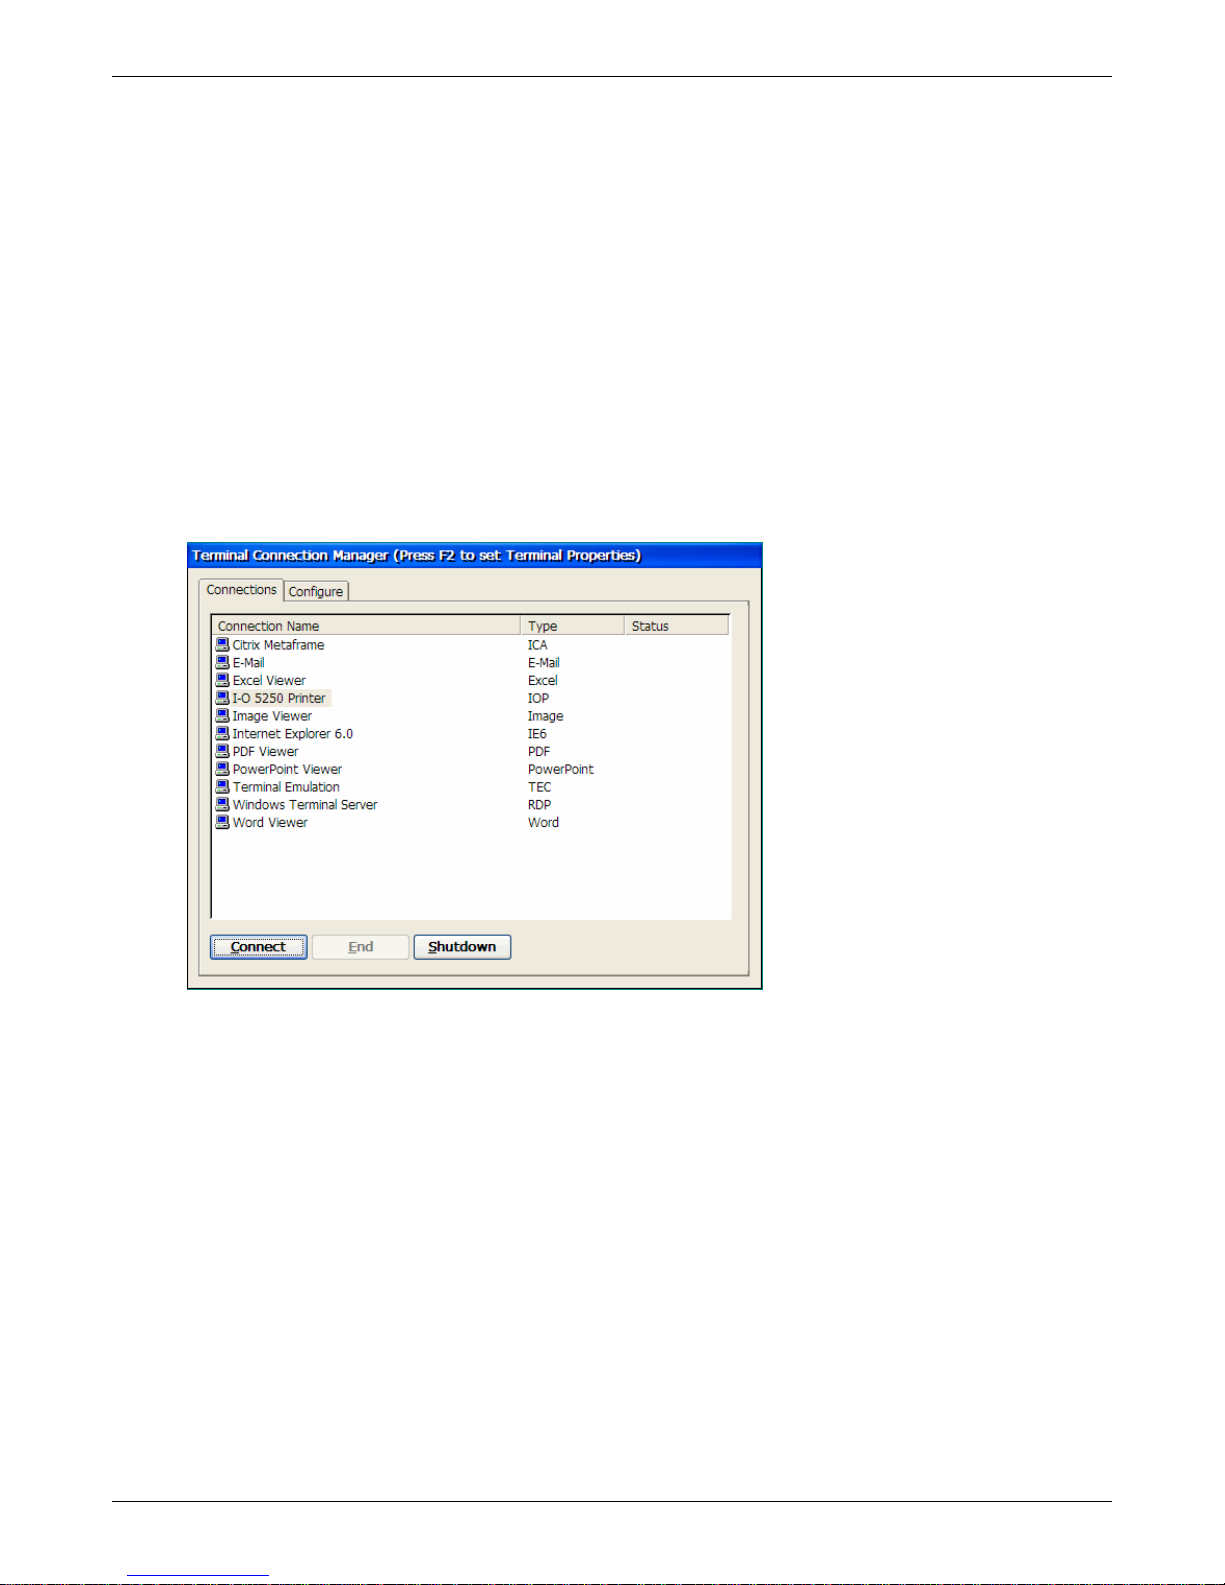
Using Connections
Microsoft Viewers
Viewers for documents created by Microsoft’s Word, Excel, PowerPoint as well as standard image files,
and PDF files can be viewed on the thin client.
If the document is accessed through the thin client’s Internet Explorer browser or e-mail client, the
appropriate viewer will open.
For documents that are stored on a USB storage device or are located on a shared network drive and
accessed through a RDP or ICA connection, a viewer connection must be used (refer to Creating
Connections). Once a viewer connection is setup, it is a simple matter of navigating to the document’s
location to view the document.
Running the Viewer
1. On the Connections tab in the Connections Manager, double-click the desired viewer connection,
or click the connection name and then click Connect.
2. Click File | Open, and navigate to the location where the document is stored.
3. Viewing options are available from the View menu.
4. On some of the viewers, the Settings menu will provide additional setup parameters that can be
customized.
5. The Image and PowerPoint viewers also include a slide show option.
6. To close the viewer connection, click File | Close, or double click the “X” in the upper corner of the
screen.
Thin Client User’s Guide 56
Page 57
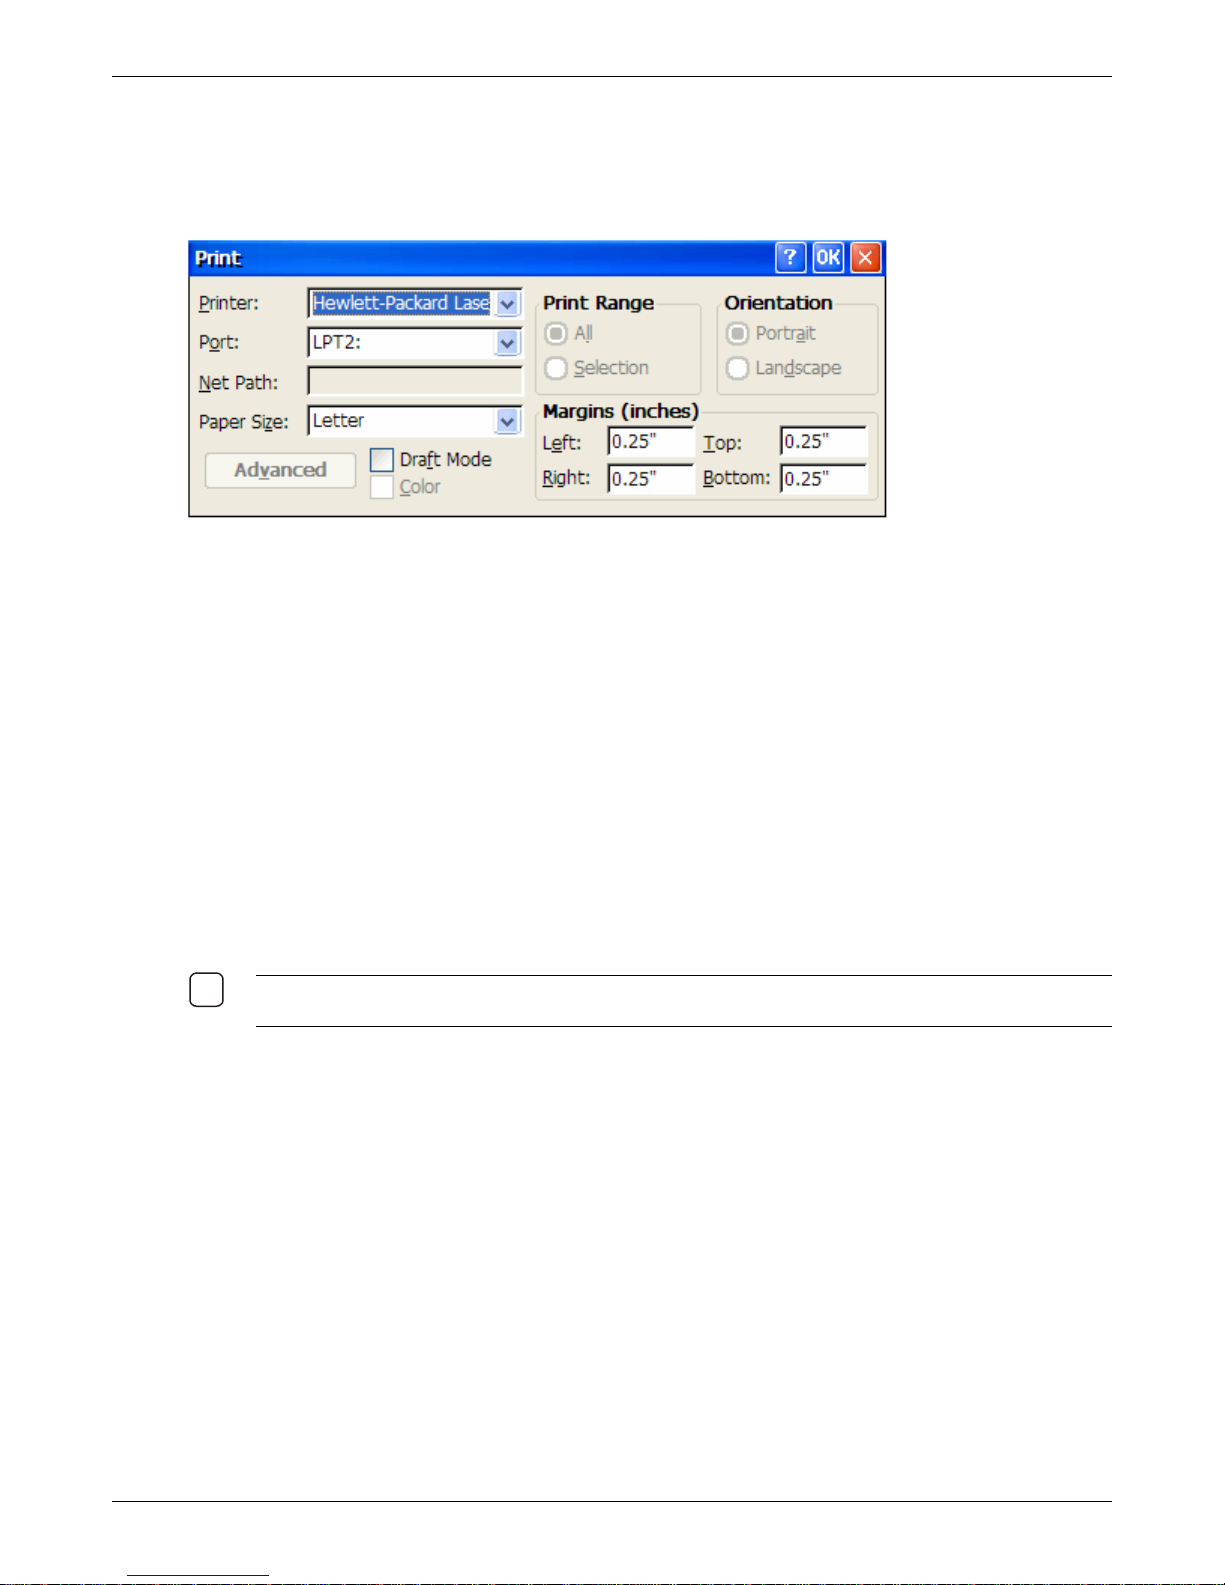
Using Connections
9
Printing from a Viewer
Viewer documents can be printed to a locally attached PCL laser printer.
1. Click File | Print, and the following screen appears.
Printer: Microsoft only supplies a driver for HP LaserJet or PCL compatible printers.
Port: From the drop down list, select the port that the printer is attached. For the USB port, select
LPT2. (Microsoft considers the USB port as LPT2 for printing purposes.) Selecting Network will
allow you to print via NetBIOS to a printer attached to a Windows PC or printer that has been setup
for NetBIOS printing.
Net Path: Enter the complete NetBios path name, such as
HT\\IR600-550-50\PrintTH.
Paper Size: Select the appropriate size of paper.
Draft Mode: Check this box to cause the printer to print in draft mode.
Margins: Enter the desired margins.
Print Range: Select the range to print.
Orientation: Select the orientation of the page.
Advanced: Presents a collection of advanced printing options.
Color: Enables color printing if supported by the printer.
OTE: NOT ALL OPTIONS MAY BE AVAILABLE IN A GIVEN VIEWER. FOR EXAMPLE MARGINS ARE ONLY
N
AVAILABLE WHEN PRINTING FROM AN INTERNET EXPLORER CONNECTION.
2. Click OK after all selections are made and you are ready to print. A progress message will popup
showing what page is currently being printed. You may also cancel the remainder of the print job
from this status message popup.
Thin Client User’s Guide 57
Page 58

Using Connections
Limitations of the Microsoft Viewers
The file viewers provide users with a way to read common Microsoft® Office® file types as well as PDF
files. The Microsoft file viewers in Windows CE .NET do not provide all of the features that are available
in their corresponding Windows desktop applications. Typically these limitations result in a different
document layout or presentation; however, in some cases, document content may not be visible.
There is no support for files created in versions of Microsoft Office earlier than Office 97.
The Microsoft Visual Basic® macro programming language is not supported.
Windows CE .NET does not provide the same set of fonts that is available on Windows-based
desktop platforms. If the original font is not available, the Windows CE .NET file viewers show the
closest possible approximation of the original format.
If sufficient memory for temporary file storage is not available on a device, very large documents or
documents that contain large graphical elements may not open, or may not display all of the
content.
File viewers do not use ClearType.
Font recommendations
The Microsoft file viewers map missing fonts to those that are installed on the available system. The
following list shows fonts that you should include in your platform for optimal performance with the
Microsoft Office viewers and the Microsoft PDF viewer:
Arial
Arial Italic
Times New Roman
Times New Roman Italic
Courier New
Symbol
Wingding
In addition, you should include these fonts for the Microsoft PowerPoint® viewer:
Impact
Verdana
Comic Sans MS
Microsoft Excel Viewer
The following list shows features not supported by the Microsoft Excel viewer:
Hyperlinks.
Data tables in charts.
WordArt. Plain text is substituted.
Surface charts. An image representing an unsupported chart appears in the chart's location.
The following list shows some of the additional limitations:
Certain types of 3D charts are mapped to equivalent 2D charts.
Supported 3D charts are only shown at a fixed camera angle.
Vertical text in the worksheet is mapped to 90-degree rotated text.
Thin Client User’s Guide 58
Page 59

Using Connections
TC5000 Printing Overview
The thin client has several methods for printing. The following is a brief overview of the various
methods:
I-O TN5250e Printing – receives print jobs from the IBM host directly to a printer attached to the thin
client. The printer is setup when the I-O 5250 Printing connection is added on the Connection Manager.
No other printer configuration is required on the thin client. The IBM host will automatically create a
printer device.
Host Print Transform Printing – receives print jobs from the IBM host to a printer attached to the thin
client. The printer is setup when the Terminal Emulation printer session is added on the Connection
Manager. The IBM host must have a printer created on it as well. Because of the well known problems
of this type of printing (often called the “black hole of printing”) it is recommended that IBM host printing
be done through the I-O TN5250e Printing connection.
LPR/LPD Printing – receives print jobs from a host or PC to a printer attached to the thin client. The
printer is setup using the LPR/LPD printing option on the Control Panel. No other printer configuration
is required on the thin client. The sending host or PC must have a LPR printer created and the
appropriate print driver installed. The thin client is the LPD device. LPR is the sending side and LPD is
the receiving side.
Local Printing (Viewer, E-mail and Internet Explorer) – prints to a PCL printer that is attached to the
thin client. No other printer configuration is required on the thin client. Note: Microsoft only supports HP
LaserJet or compatible PCL printers.
Network Printing (Viewer, E-mail and Internet Explorer) – prints to a PCL printer that is attached to
another Windows PC, or a NetBIOS capable printer. No other printer configuration is re quired on the
thin client. Note: Microsoft only supports HP LaserJet or compatible PCL printers.
RDP Printing, Method 1 – prints from applications running on a Microsoft Terminal Server. Printers are
created on the thin client using the Add Printer option on the Control Panel. When a connection is
made to a terminal server, the terminal server copies the printer objects to the terminal server. The user
then can select from those printers when they are running an application on the terminal serv er.
RDP Printing, Method 2 – also prints from applications run on a Microsoft Terminal Server. However,
printers are created on the terminal server in lieu of the thin client.
ICA Printing – prints from applications run on a Citrix Metaframe server. Printers are configured on the
Citrix server.
Thin Client User’s Guide 59
Page 60

Using Connections
Windows Media Player
The Windows Media Player V9acts as a universal player for rendering most standard multimedia
formats. This includes stored and live content in network audio and video formats. Multimedia file
formats and codecs supported by this version of the Windows Media Player control include the
following:
Audio streaming formats
Moving Picture Experts Group standard 1, Layer 1,2, 3 (.mpa, .mp2, .mp3)
Windows Media Audio (.wma)
Video streaming formats
Moving Picture Experts Group standard 1 (.mpg, .mpeg, .mpv, .mpe)
Advanced Streaming Format (.asf)
Windows Media Video Format (.wmv)
Advanced Stream Redirector (.asx)
Windows Media Audio Redirector (.wax)
Windows Media Video Redirector (.wvx)
Windows Media Redirector (.wmx)
Non-streaming (local playback) audio formats
Waveform Audio (.wav)
Sound File (.snd)
UNIX audio (.au)
Audio Interchange File Format (.aif, .aiff, .aifc)
Non-streaming (local playback) video formats
Audio-Video Interleaved (.avi)
Audio Codecs
Microsoft Pulse Code Modulation (PCM)
Microsoft GSM 6.10 Audio (GSM 610)
Microsoft CCITT G.711 A-Law and u-Law
Microsoft Adaptive Differential Pulse Code Modulation (MS ADPCM)
Interactive Multimedia Association Adaptive Differential Pulse Code Modulation (IMA ADPCM)
Microsoft MPEG-1 Layer 1; Microsoft MPEG-1 Layer 2
Windows Media Audio (WMA) v2, v7, v8, v9 (including Windows Media Audio 9 Voice)
Fraunhofer MPEG-1 Layer 3 (MP3)
Video Codecs
Microsoft MPEG-1 (MS MPEG-1)
Microsoft RLE8
Microsoft MPEG-4 v2, v3, ISO v1
Windows Media Video (WMV) v7, v8, v9 (including Windows Media Video 9 Image)
Thin Client User’s Guide 60
Page 61

Using Connections
Windows Media Video supports the following output formats on the primary GDI surface: PAL1,
PAL2, PAL4, PAL8, xRGB1555, RGB565, RGB24, BGR24, and xRGB8888 (ARGB8888).
Windows Media Video supports the following YUV formats for overlay surfaces: YUYV, YUV422
(YUY2), and YV12 (Planar YUV).
Thin Client User’s Guide 61
Page 62
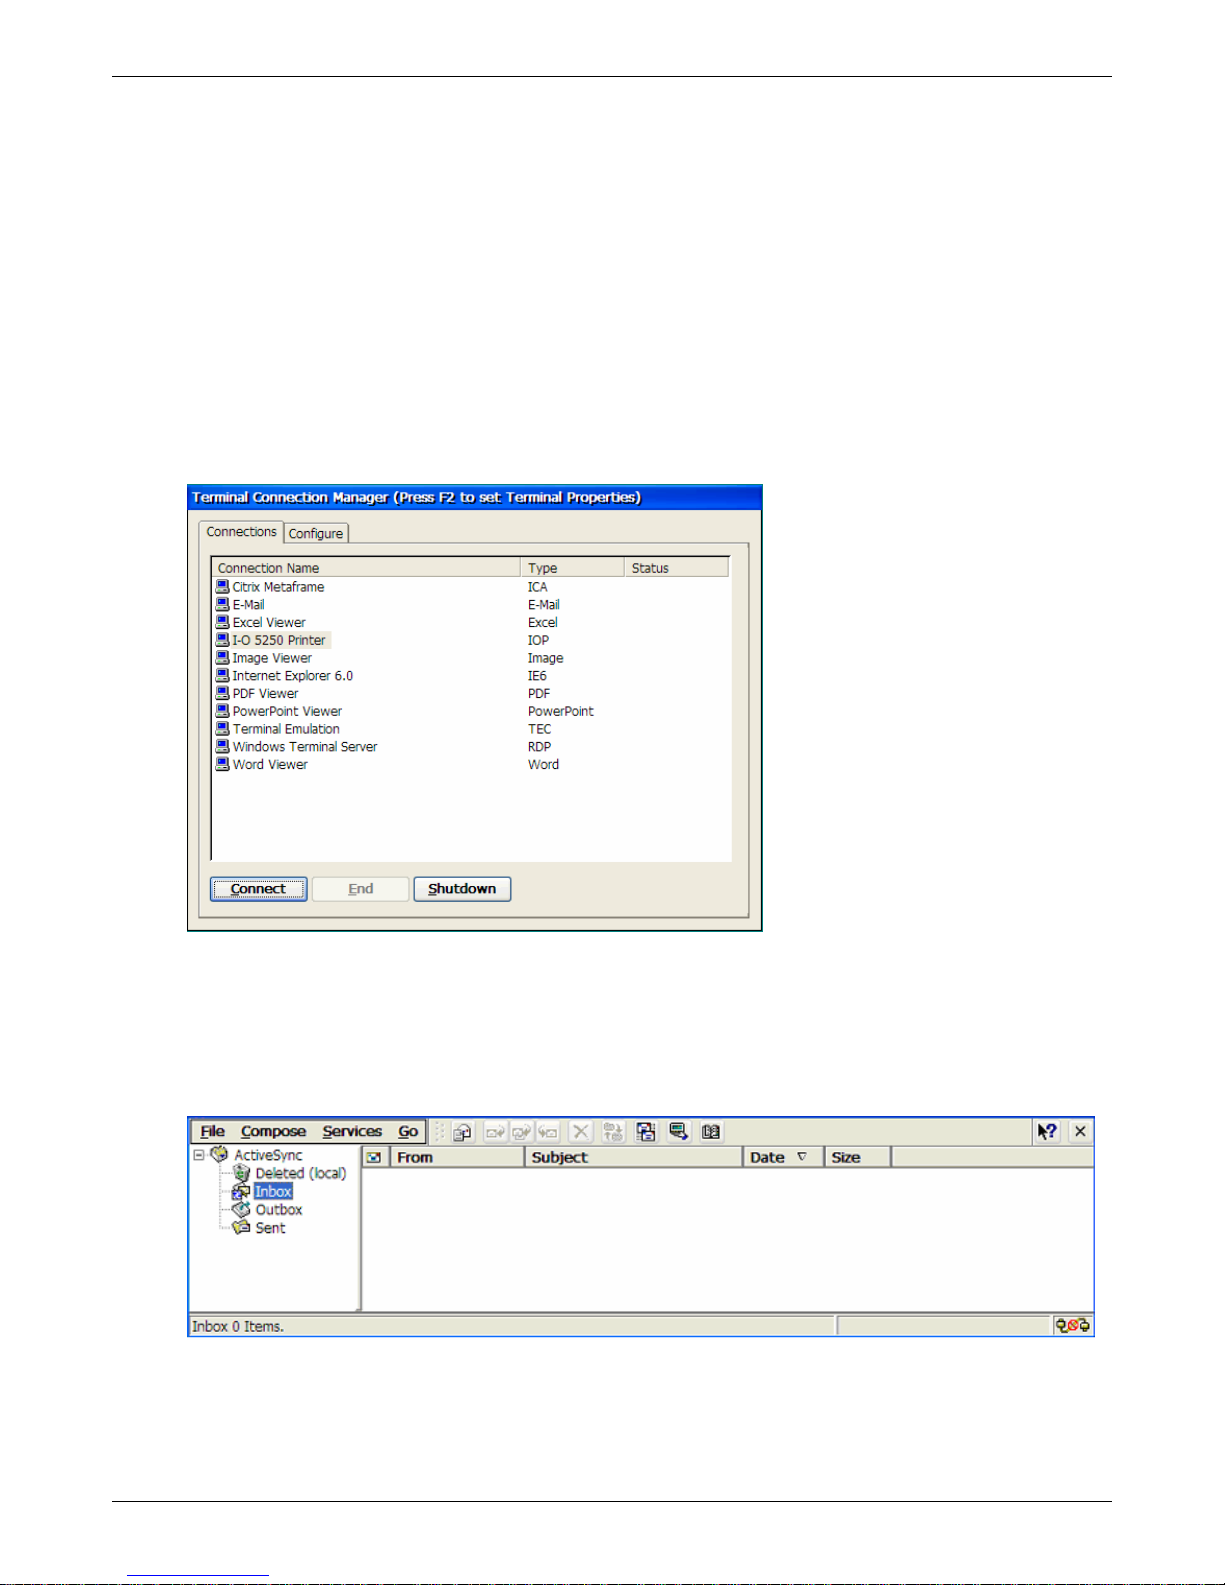
Using Connections
E-mail
Microsoft’s E-mail client provides you with the ability to send and receive e-mail via POP3 or IMAP4
servers, view and print attachments, save attachments either locally within the thin client in RAM or on
an external USB storage device.
To use the E-mail client, the client must first be added as a connection. Next, the basic e-mail
configuration parameters must be setup. After the client is configured, then you may use the client for
e-mail functions.
If the e-mail client has not been setup, refer to the Creating Connections chapter.
Configuring the E-mail Client
1. On the Connections tab in the Connections Manager, double-click the E-Mail conne ction, or click
the E-Mail connection name to highlight it and then click Connect.
2. The E-mail main screen will appear. On this screen will be the folders for incoming mail, out going ,
sent and deleted mail. Additional folders can be created as needed. In the larger portion of the
screen can be found the listing of e-mails in each folder. Menus allow access to the variou s
functions for sending, deleting, moving e-mails as well as setting up the configuration options. Icons
are available for creating, replying e-mail, forwarding and deleting an e-mail. Other Icons include
connecting to the e-mail server, receiving and sending already composed e-mails, and accessing
the address book.
3. To setup the basic e-mail connection options, click Services | Options, and the Options screen will
be displayed.
Thin Client User’s Guide 62
Page 63
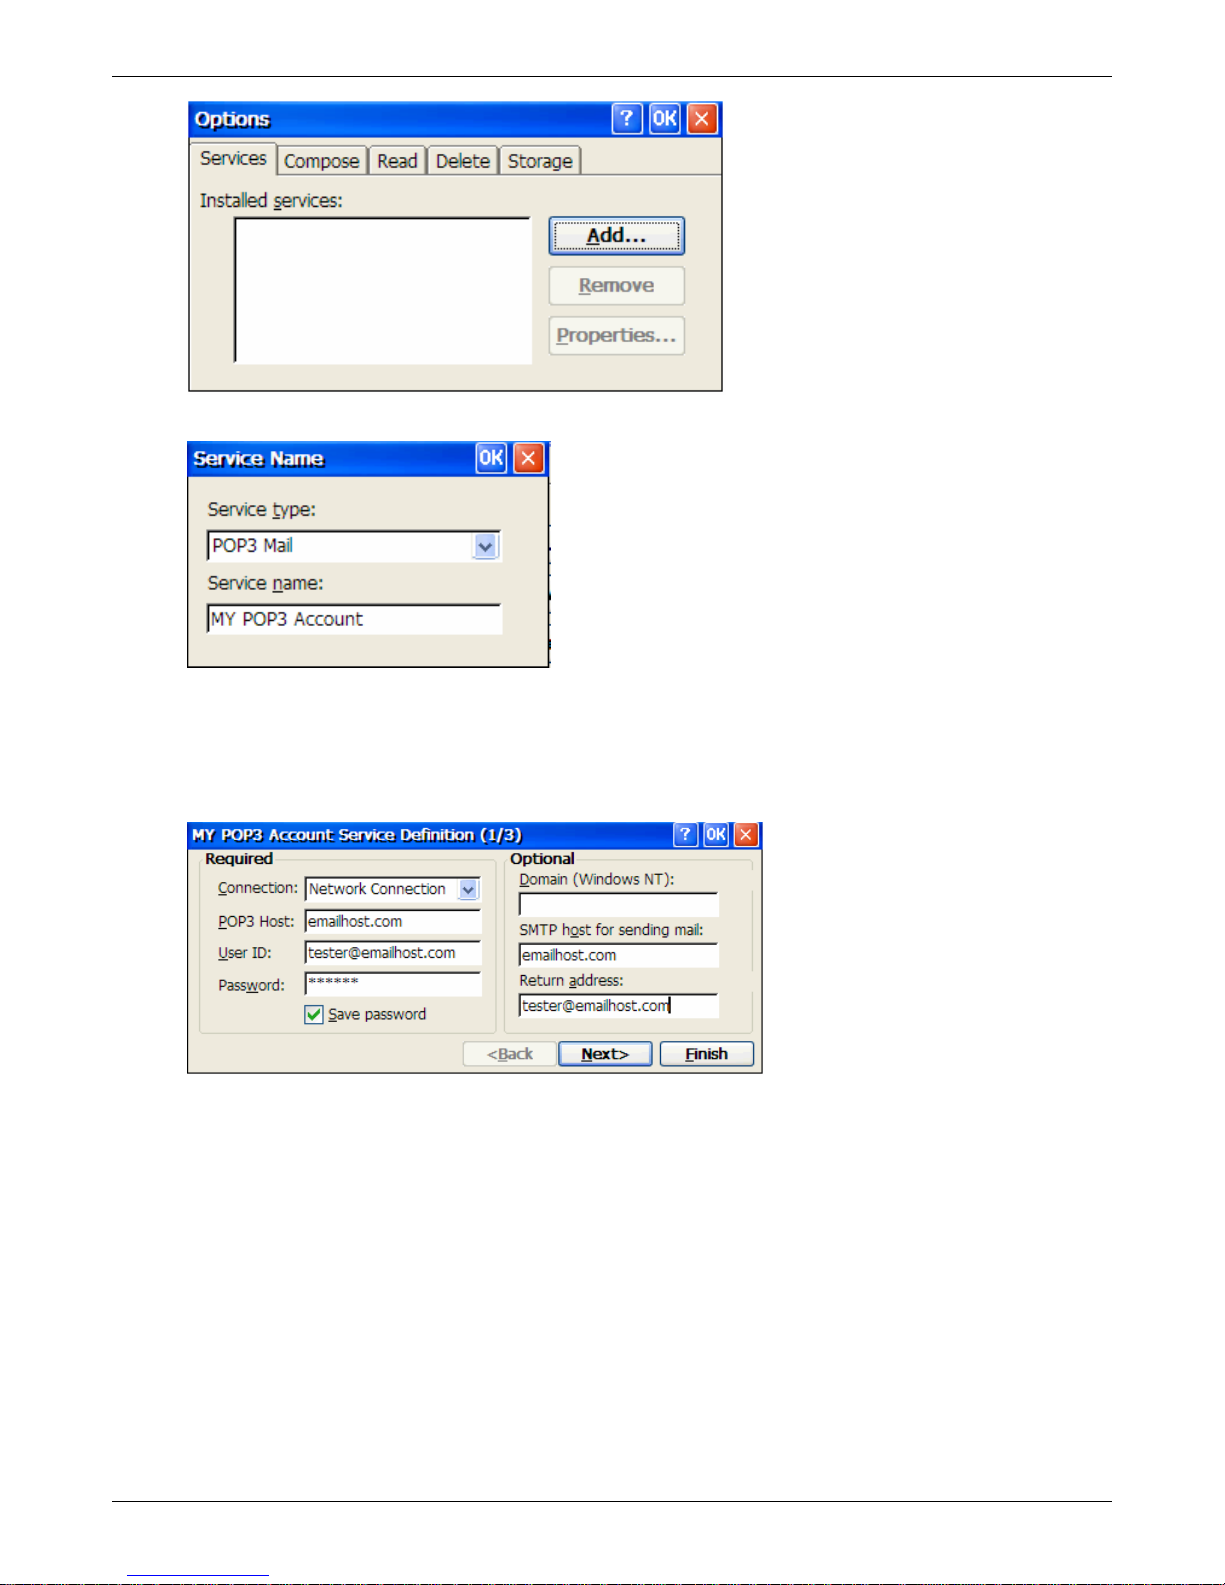
4. Click the Add button. The Service Name screen will appear.
Using Connections
Service Ty pe: Select either POP3 or IMAP4 depending upon your e-mail server type.
Service Name: Enter a unique name for this mail server.
Click OK to continue.
5. On the Service Definition screen, complete the following. Then click Next> to continue.
Connection: Select Network Connection from the drop down list. Other types of connections are
not supported for e-mail.
POP3 Host: Enter the name of your e-mail server.
User ID: Enter your e-mail username.
Password: Enter the password for your e-mail account. If you do not enter the password, each
time you connect to the e-mail server, you will be prompted to enter the password.
Save Password: Check this box to have your password remembered so that you will not be asked
for it each time you connect to the e-mail server.
Domain: If you are connecting to a network that uses Windows NT domain security, enter the
Windows NT domain name here. Generally most ISP based e-mail servers do not require this.
SMTP Host for sending mail: If your e-mail service uses a separate server for SMTP, enter the
name in this field. POP3 services use this field.
Return Address: Enter the desired return to e-mail address in this field.
Thin Client User’s Guide 63
Page 64
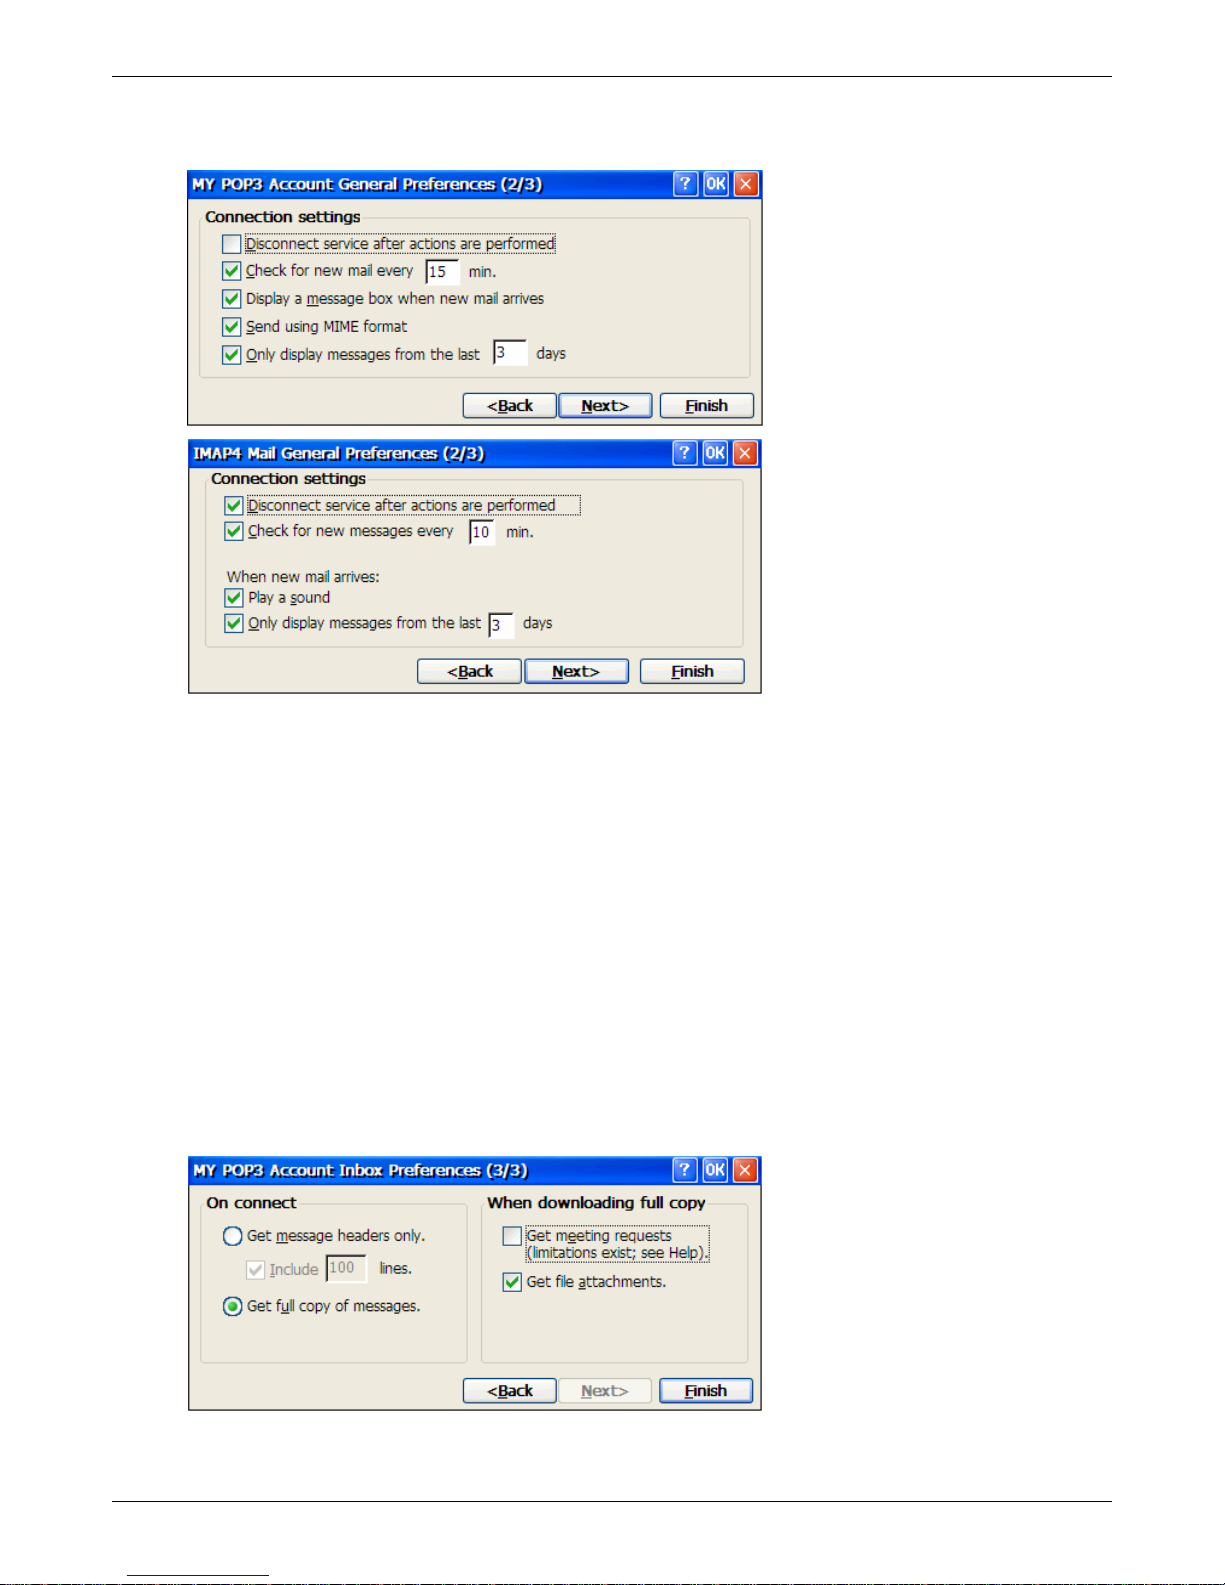
Using Connections
Click Next> to continue.
6. On the General Preferences screen, complete the following. Then click Next> to continue.
Disconnect service…: Check this option to automatically disconnect from the server upon
completion of all pending actions. This option most effectively utilizes connection time and
bandwidth.
Check for new mail…: Check this option to have the thin client check for new mail periodically.
Enter the desired amount of time to wait until the e-mail server is checked for new mail.
Display a message box…: (POP3 option) Check this option to be informed when new mail is
received.
Play a sound: (IMAP4 option) Check this option to be informed when new mail is received.
Send using…: (POP3 option) Check this option to send mail using the MIME format (messages
are sent with extended characters).
Only display messages…: Check this option if you want to specify the number of days in the past
that will be downloaded when a connection is made to the e-mail server. Messages on the e-mail
server older than this selection will not be downloaded.
Click Next> to continue.
7. On the Inbox Preferences screen, complete the following. . Then click Next> to continue.
Thin Client User’s Guide 64
Page 65
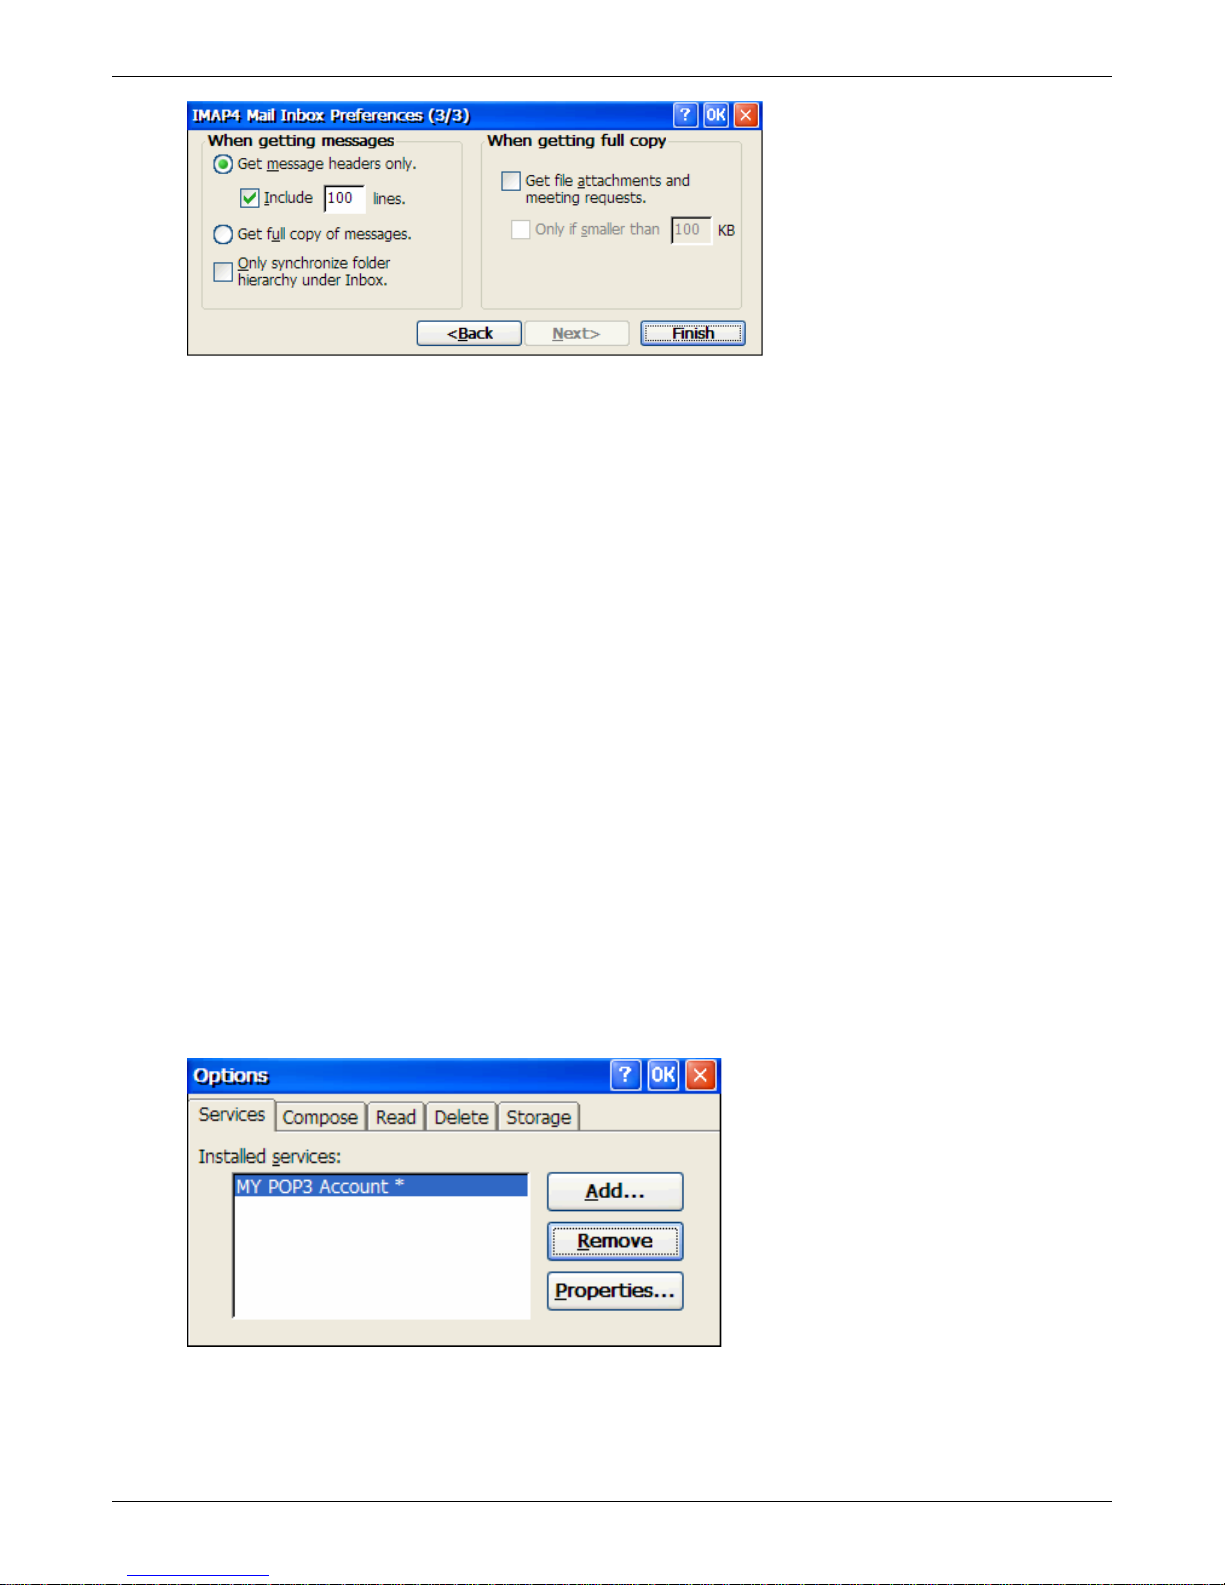
Using Connections
Get message headers only: Select this option to save storage space and time. Only the message
header will be downloaded. The full message may be later by selecting the message, then
Services | Get Full Copy.
Include ??? lines: Select the number of message headers to download.
Get full copy of messages: Select this option to download the complete message. This will
increase the amount of storage space used in the thin client and time to download the message.
Get meeting requests: (POP3 option) Check this option to have copies of meeting requests
downloaded when the full copy of the message is downloaded.
Only synchronize folder…: (IMAP4 option) Select to speed the download time by preventing the
complete download of the folder list every time a connection is made.
Get file attachments: Check this option to have all attachments to messages downloaded when
the full message is downloaded. This option will also use storage space. If the USB storage option
has been selected in the Control Panel, then attachments will be stored in the external USB device.
Get file attachments and meeting requests: (IMAP4 option) Check this option to download and
store meeting requests and message attachments when getting full copies of messages.
Only if smaller than: (IMAP4 option) Check this option to restrict the size of the attachments
downloaded. Setting 10K will limit the downloads to meeting requests only.
Click Finish when complete.
Remove a Service
E-mail services can be removed when no longer valid.
1. From the E-mail screen click Services | Options, and the Options screen will be displayed.
2. Click the Remove button, and the following message will be displayed:
Thin Client User’s Guide 65
Page 66
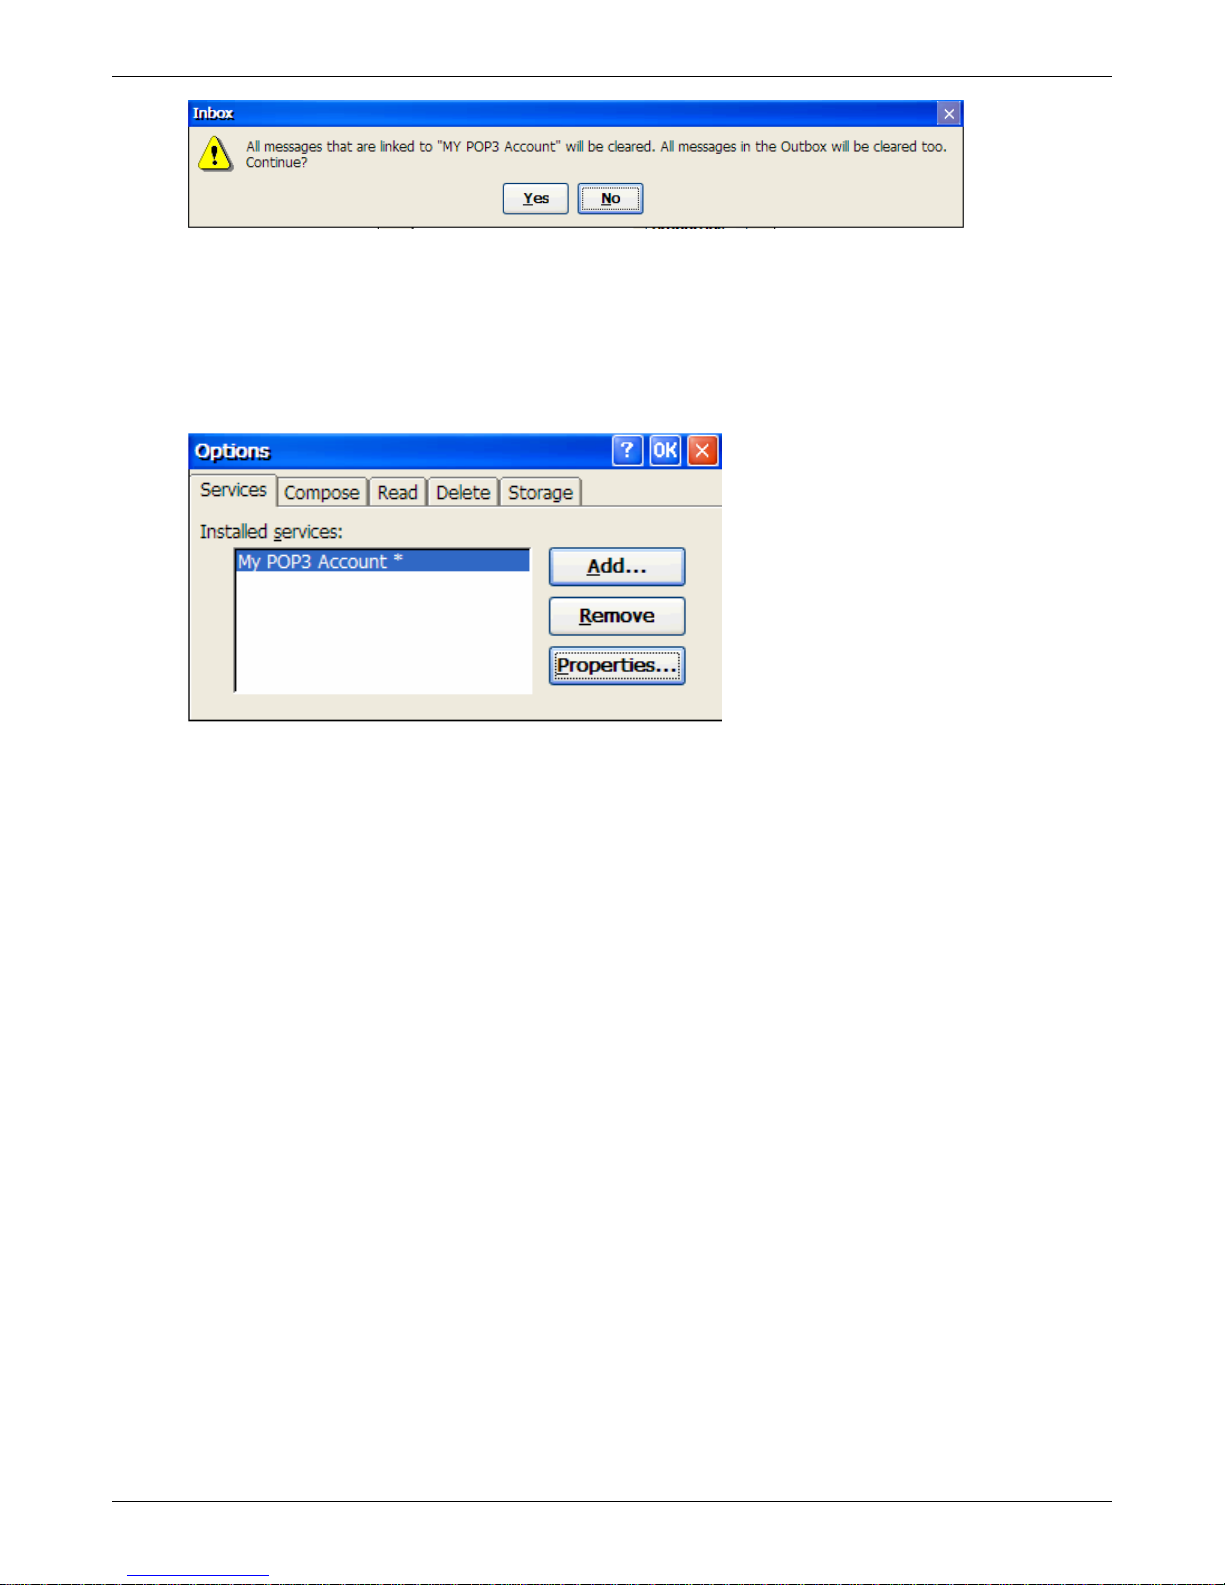
Using Connections
3. Click Yes to remove the service.
Edit a Service
Changes may be made to an e-mail service.
1. From the E-mail screen click Services | Options, and the Options screen will be displayed.
2. Click the Properties… button. The same screens are presented that are used in adding a service
(refer to Configuring the E-mail Client).
Thin Client User’s Guide 66
Page 67

Using Connections
Thin Client User’s Guide 67
Page 68
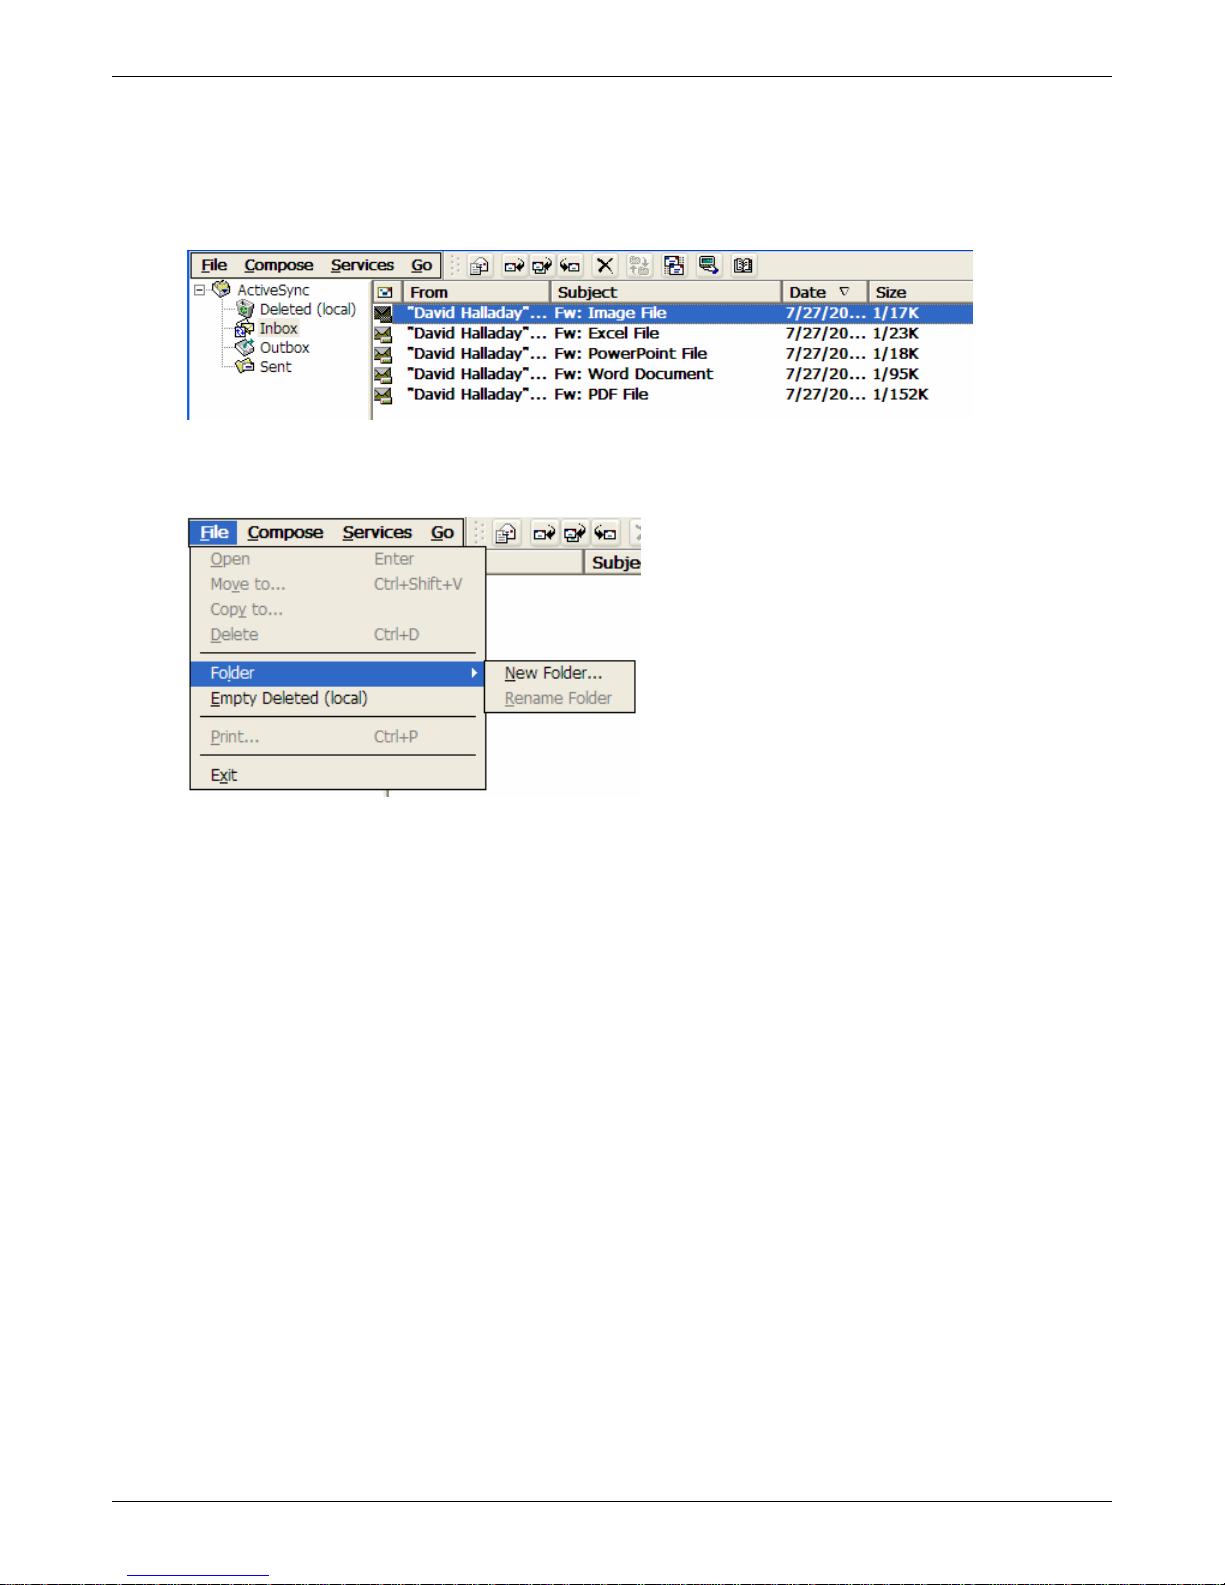
Using Connections
E-Mail Overview
Each time that the e-mail client is started, the default Message List screen will be presented. From this
screen, you create and send messages, received and read messages, store messages in fold ers and
delete unwanted messages.
File Menu
The following operations are available from the File Menu:
Open: The highlighted message will be opened.
Move to: The highlighted message will be moved to a different folder.
Copy to: The highlighted message will be copied to another folder.
Delete: The highlighted message or folder will be removed from the current folder and moved to
the Deleted (local) folder. The message will be deleted according to the setup options taken on the
Services | Options | Delete tab.
Folder | New Folder: Creates a new folder.
Folder | Rename Folder: The highlighted folder is renamed.
Empty Deleted (local): The messages stored in the deleted folder are immediately deleted.
Print: The highlighted message may be printed. The thin client local print dialog box will be
presented when this option is taken.
Exit: Closes the e-mail client. The “X” in the upper right corner (on the menu/tool bar) also closes
the client.
Compose Menu
New messages may be created here as well as replying to and forwarding messages.
Thin Client User’s Guide 68
Page 69
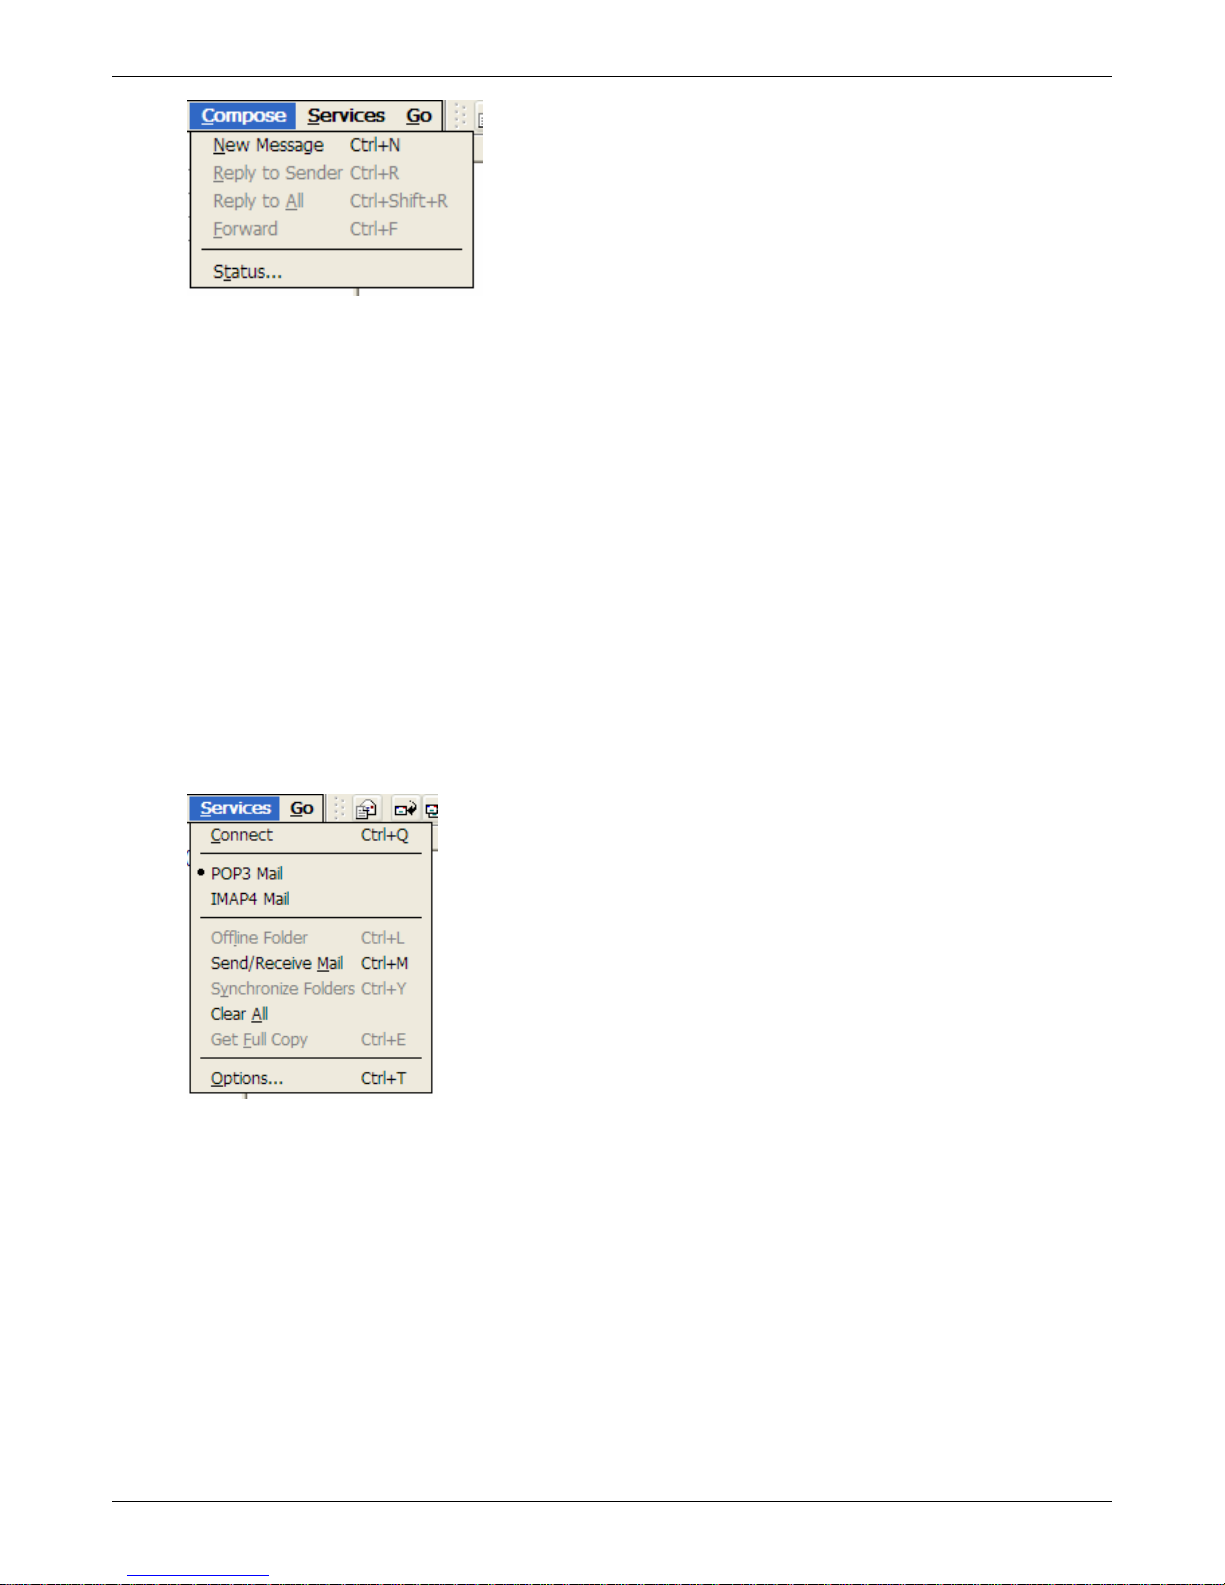
Using Connections
New Message: Opens the Compose Message screen.
Reply to Sender: Opens the Compose Message screen and attaches the current message if the
option is set on the Services | Options | Compose tab. The message is automatically addressed to
the sender.
Reply to All: Opens the Compose Message screen and attaches the current message if the option
is set on the Services | Options | Compose tab. The message is automatically addressed to not
only the sender, but also to those who received a copy of the original message.
Forward: Opens the Compose Message screen and attaches the current message if the option is
set on the Services | Options | Compose tab. You will need to enter the e-mail address to forward
the message to.
Status: Provides a listing of messages received, sent, etc.
Services Menu
The Services Menu allows you to connect and download messages from the e-mail server, to select
which e-mail service is active, to synchronize folders between the e-mail server and the thin client, as
well as configure the e-mail client.
Connect: Connects the e-mail server and downloads the messages according to the options
selected on the Inbox Preferences screen.
[Service]: This section of the menu will list the e-mail services that have been setup. The default
or active service will have a bullet in front of it. To change services, just click on the service.
Offline Folder: (IMAP4 only) All IMAP4 folders are automatically designated as offline. Message
in offline folders can be viewed when you are disconnected from the e-mail server. If a folder is not
designated as offline, you will be able to read and respond to the messages in that folder only when
connected to the server. The highlighted folder will be designated as offline/online when this option
is taken.
Send/Receive Mail: Initiates sending and receiving of e-mail. This function allows you to manually
send and receive e-mails even if the option on the General Preferences screen has been set to
check for new mail every few minutes. For POP3 e-mail servers, this function synchronizes the
incoming and outgoing mail folders between the thin client and the e-mail server.
Thin Client User’s Guide 69
Page 70
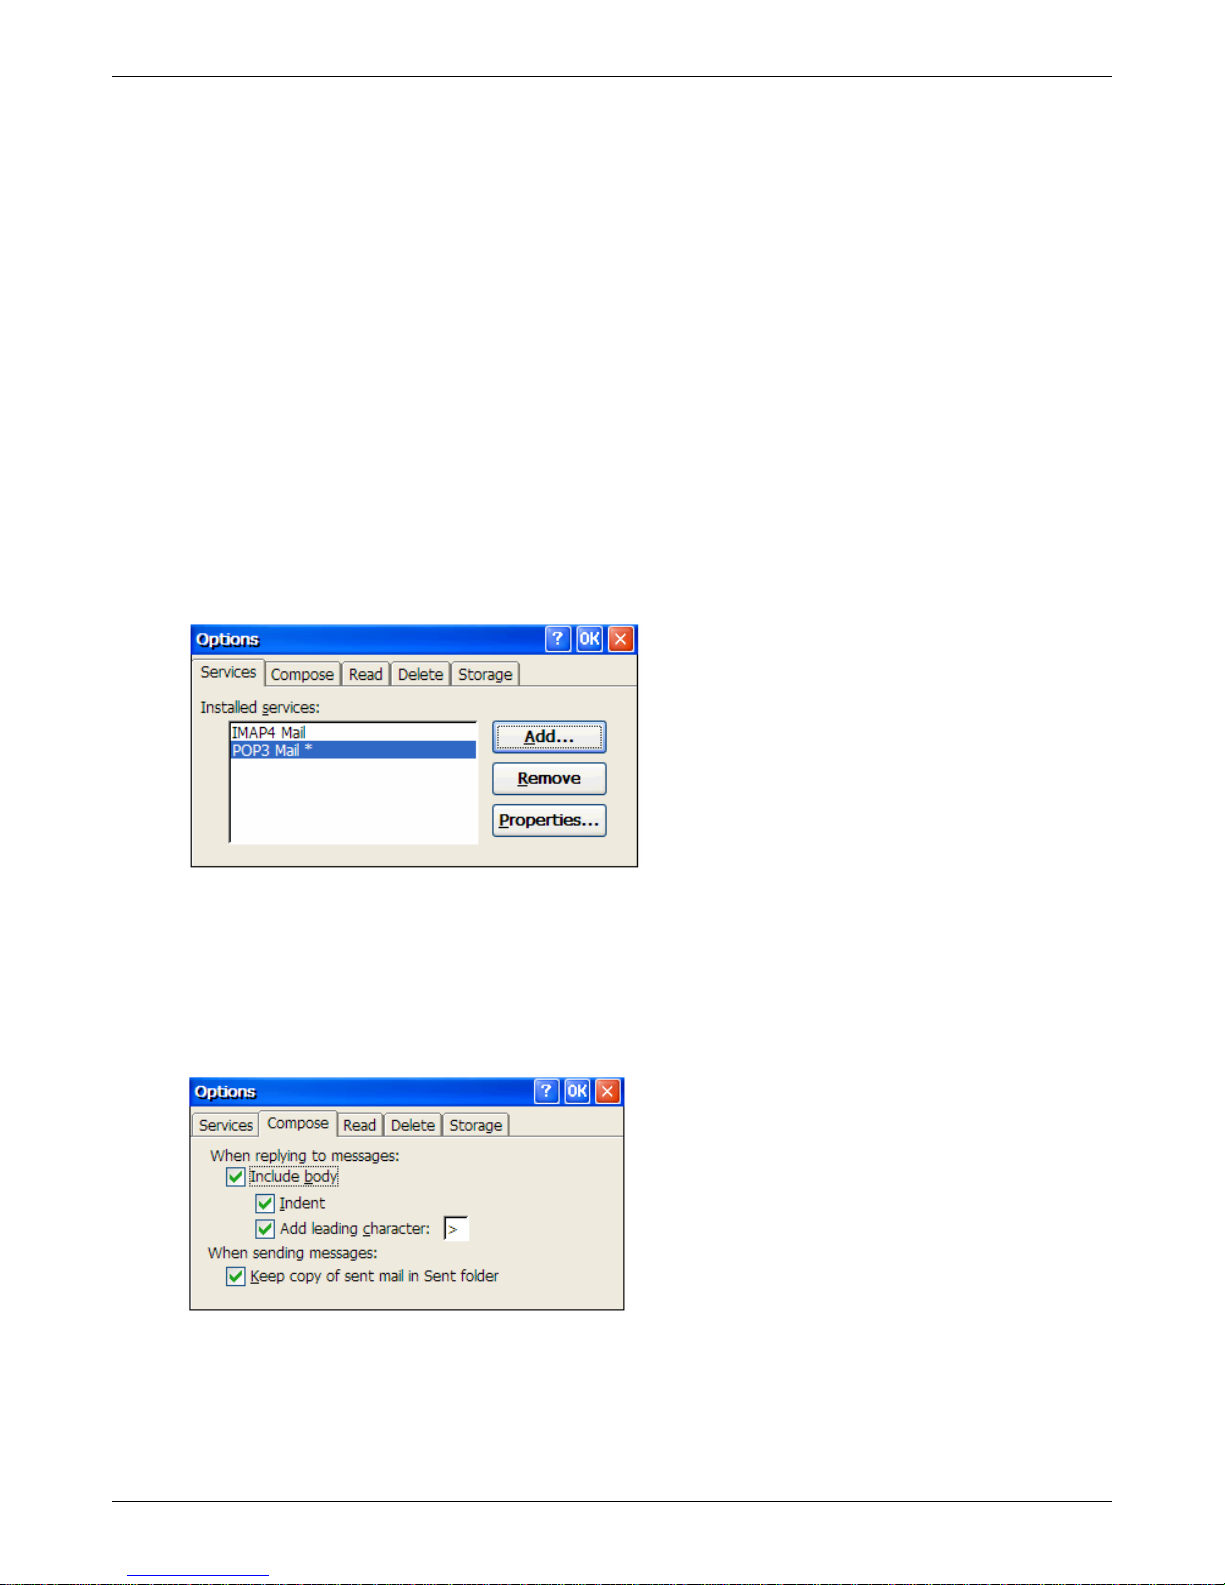
Using Connections
Synchronize Folders: Causes the contents of thin client’s folders and the e-mail server’s folders to
be compared and updated. New mail message are downloaded an d messages in the thin client’s
Outbox are sent when connection is made. For IMAP4 servers, this funct i on synchronizes the
incoming and outgoing mail folders between the thin client and the e-mail server.
Clear All: Causes all messages and folders to be cleared and the memory used for storing the
messages is released for use again. The messages still reside on the e-mail server and will be
downloaded the next time a connection is made.
Get Full Copy: If the option has been set on the Inbox Preference screen to download only the
message headers, this function will allow cause the full message including meeting requests and file
attachments to be downloaded.
Options from Services Menu
The Options Menu allows you to create, remove and change e-mail services. It addition it allows you to
access configuration options for composing new messages, reading messages, selecting deletion and
storage options.
Services Tab
ADD: Evokes the setup wizard used initially to setup the e-mail client.
Remove: Deletes the highlighted service.
Properties: Evokes the setup wizard used initially to setup the e-mail client.
Compose Tab
Include in body: Includes the original message as a part of the replay message.
Indent: Indents the original message making it easier to see.
Add leading character: The selected character is placed before each line of the original message.
Keep copy of sent mail in Sent folder: Places a copy of each mail sent in the Sent folder. This
allows you to keep a copy of your e-mails.
Thin Client User’s Guide 70
Page 71
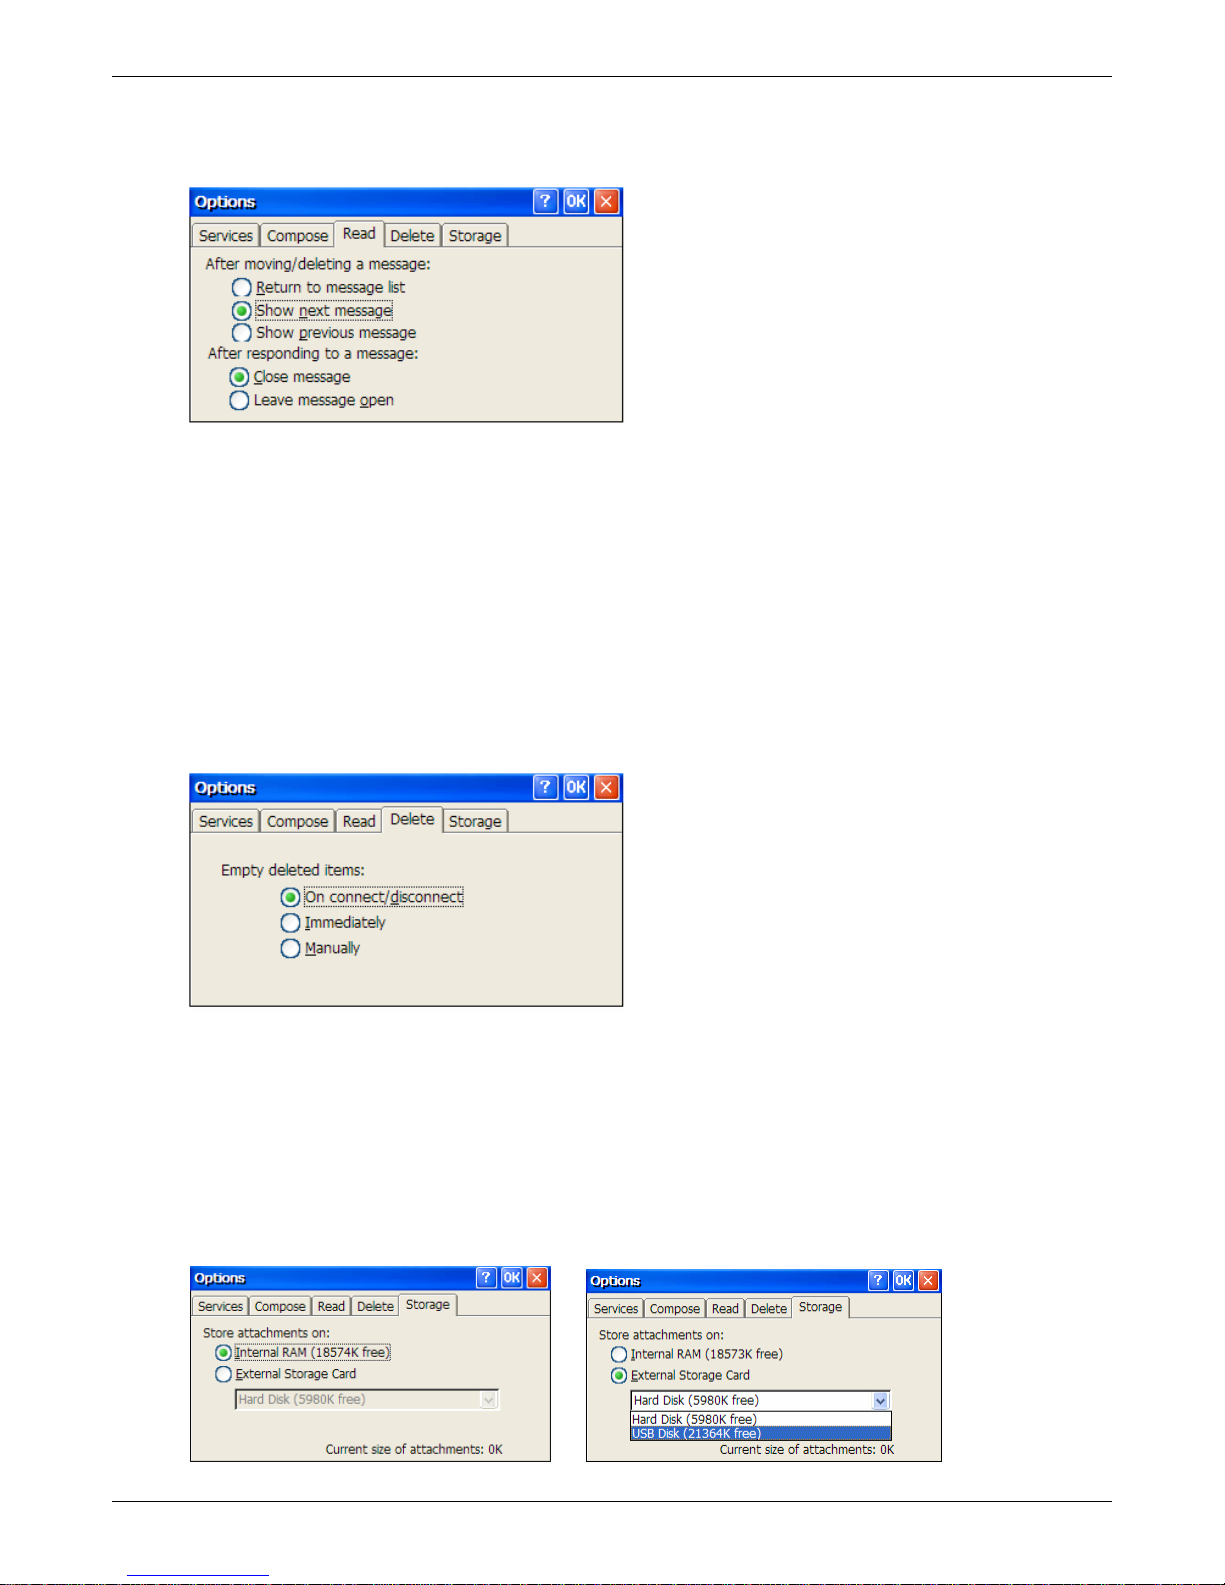
Using Connections
Read Tab
Return to message list: Causes the Message List to be presented when finished with the current
message.
Show next message: Causes the next message to be presented when finished with the current
message.
Show previous message: Causes the previous message to be presented when finished with the
current message.
Close message: Causes the current message to be closed after responding.
Leave message open: Causes the current message to be left open after responding.
Delete Tab
On connect/disconnect: Causes the messages to be deleted when a connection is established or
disconnected.
Immediately: Causes messages to be deleted immediately when the delete option is taken.
Manually: Messages that have been moved to the Delete (local) folder will remain in the folder until
they are individually deleted.
Storage Tab
Thin Client User’s Guide 71
Page 72
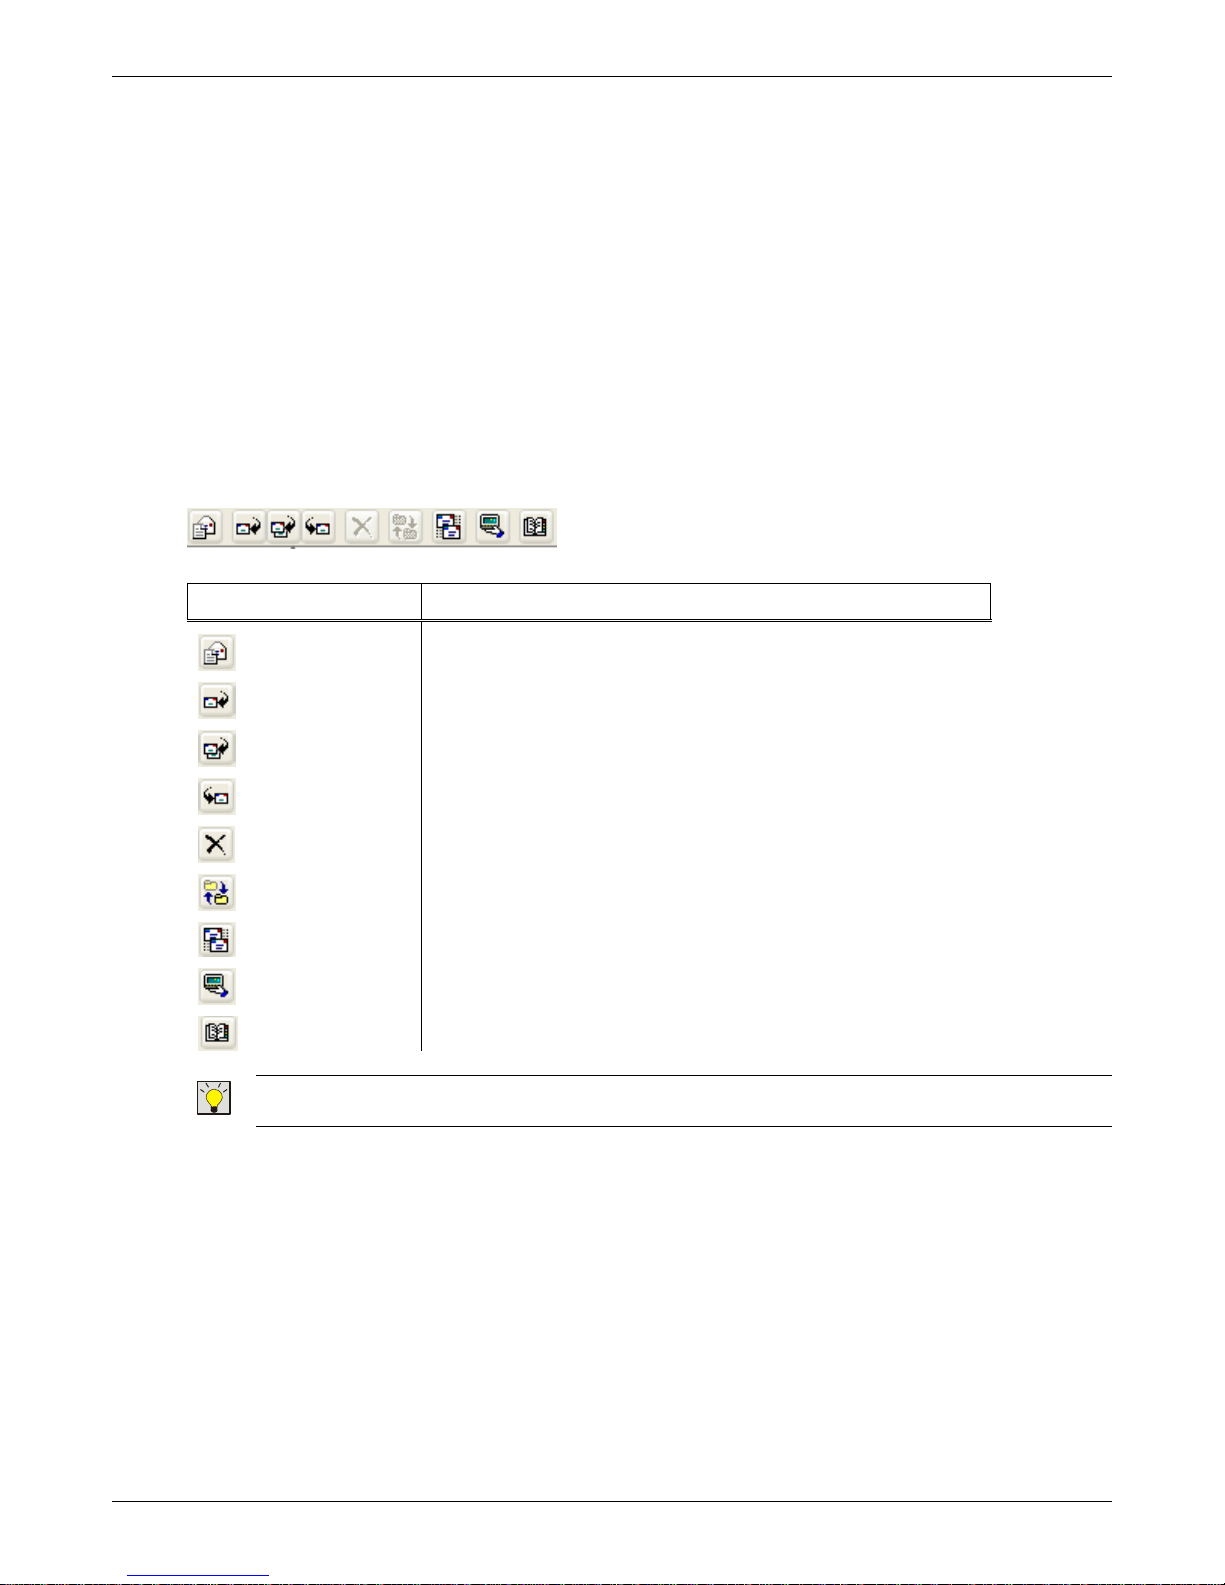
Using Connections
Internal RAM: Mail messages and attachments are stored in the thin client’s internal flash (Disk on
Module). There is a limited amount of storage available – it should be managed carefully as using
too much of it will limit the number of connections that can be opened.
External Storage Card: This option allows the use of a plug in USB storage device. Attachments
will be stored on this device freeing the thin client’s flash.
Go Menu
The Go menu provides access the Address Book.
Tool Bar
The Tool Bar (located to the right of the menus) provides quick one-click access to certain menu
functions.
Tool Bar Button Description
Create new mail message
Reply to the current message
Reply to all who received the current message
Forward current message
Delete the highlighted message
Offline Folder (IMAP4 only)
Send/Receive messages
Connect to e-mail service
Open Address Book
TIP: A BRIEF DESCRIPTION OF EACH ICON ON THE TOOL BAR WILL APPEAR WHEN THE MOUSE POINTER
IS PLACED OVER THE ICON AFTER A FEW SECONDS.
Thin Client User’s Guide 72
Page 73
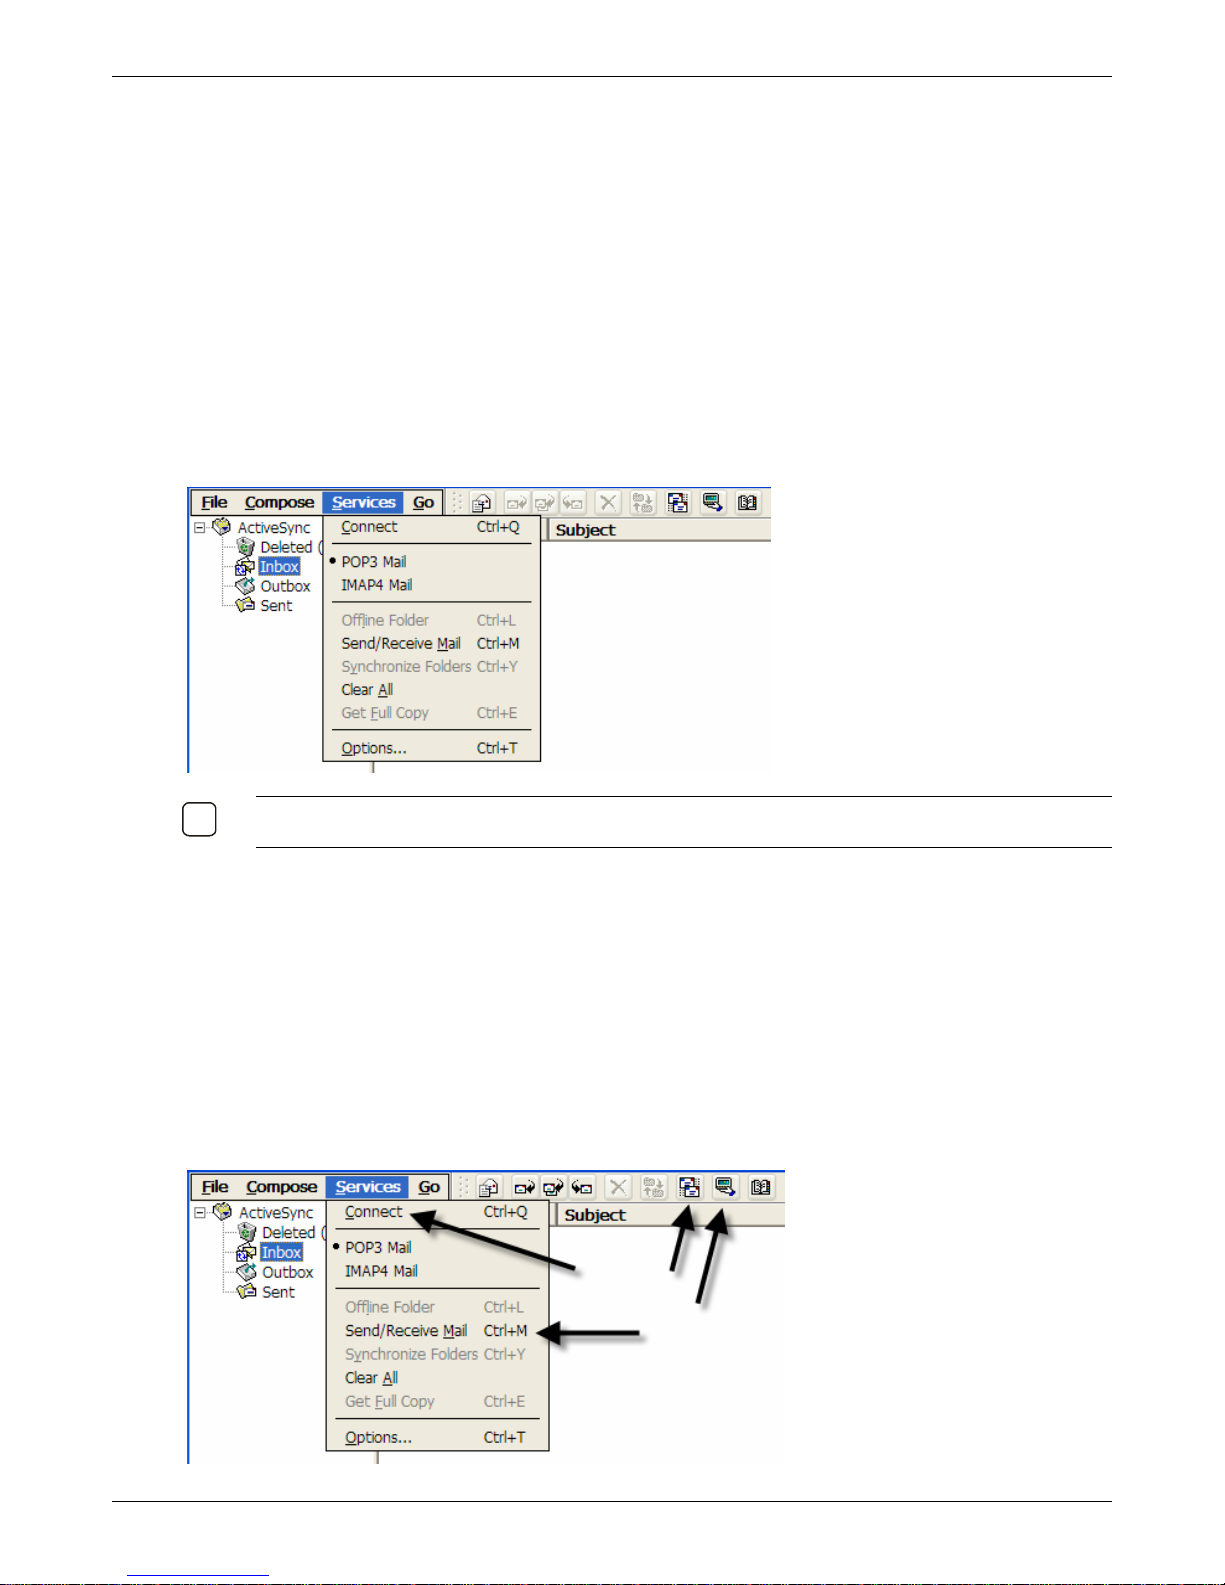
Using Connections
9
Receiving Messages
Messages are received by identifying the e-mail service and initiating a download of messages. The full
message, meeting request and attachments will be downloaded based upon the setup options selected
while configuring the e-mail client.
Selecting the Service
Prior to downloading e-mail messages, the mail service must be selected. If only one e-mail service
was setup when configuring the e-mail client, it will be used by default.
However, if more than one service has been setup (for example a POP3 and an IMAP4 service), then
you will need to select which service to download messages from.
1. Select the Services menu. Click on the desired service. A bullet will appear by the service.
N
OTE: IF ONLY ONE SERVICE WAS SETUP, BY DEFAULT, IT WILL BE AUTOMATICALLY USED (IT WILL
ALREADY HAVE A BULLET BY IT.)
Downloading Messages
Downloading messages can be accomplished in one of two ways:
Automatically if the “Check for new mail every ?? min.” option was selected on the General
Preferences screen when the service was setup. The e-mail client will check for new messages
every few minutes.
Manually when desired. You will need to initiate a connection to the e-mail server. This method
can also be used even though the e-mail client was setup for the automatic method.
1. To download messages manually, do one of the following:
Thin Client User’s Guide 73
Page 74
Click the Send/Receive icon on the tool bar.
Using Connections
Click the Connect icon
on the tool bar.
Click Services | Connect menu item.
Click Services | Send/Receive Mail menu item.
The messages on the thin client and mail server are synchronized. New messages are downl oaded to
the Inbox folder, messages in the Outbox folder are sent, and messages that have been deleted on the
server are removed from the thin client’s Inbox.
Full Copy vs Message Header
When configuring the default settings, you are given the option to download only the header or the
complete message. You may also choose to download meeting notices and attachments. Downloading
only the message header consumes less internal storage than the full message, notices an d
attachments.
If you selected on the Inbox Preferences screen to only download the message header, you may
download the full message. Select File | Get Full Copy while in the message window or Services | Get
Full Copy while in list view. This will also download message attachments and meeting requests if you
have those options selected in the Preferences dialog box. You can also choose to download full copies
of messages by default (see the Inbox Preferences screen).
Thin Client User’s Guide 74
Page 75
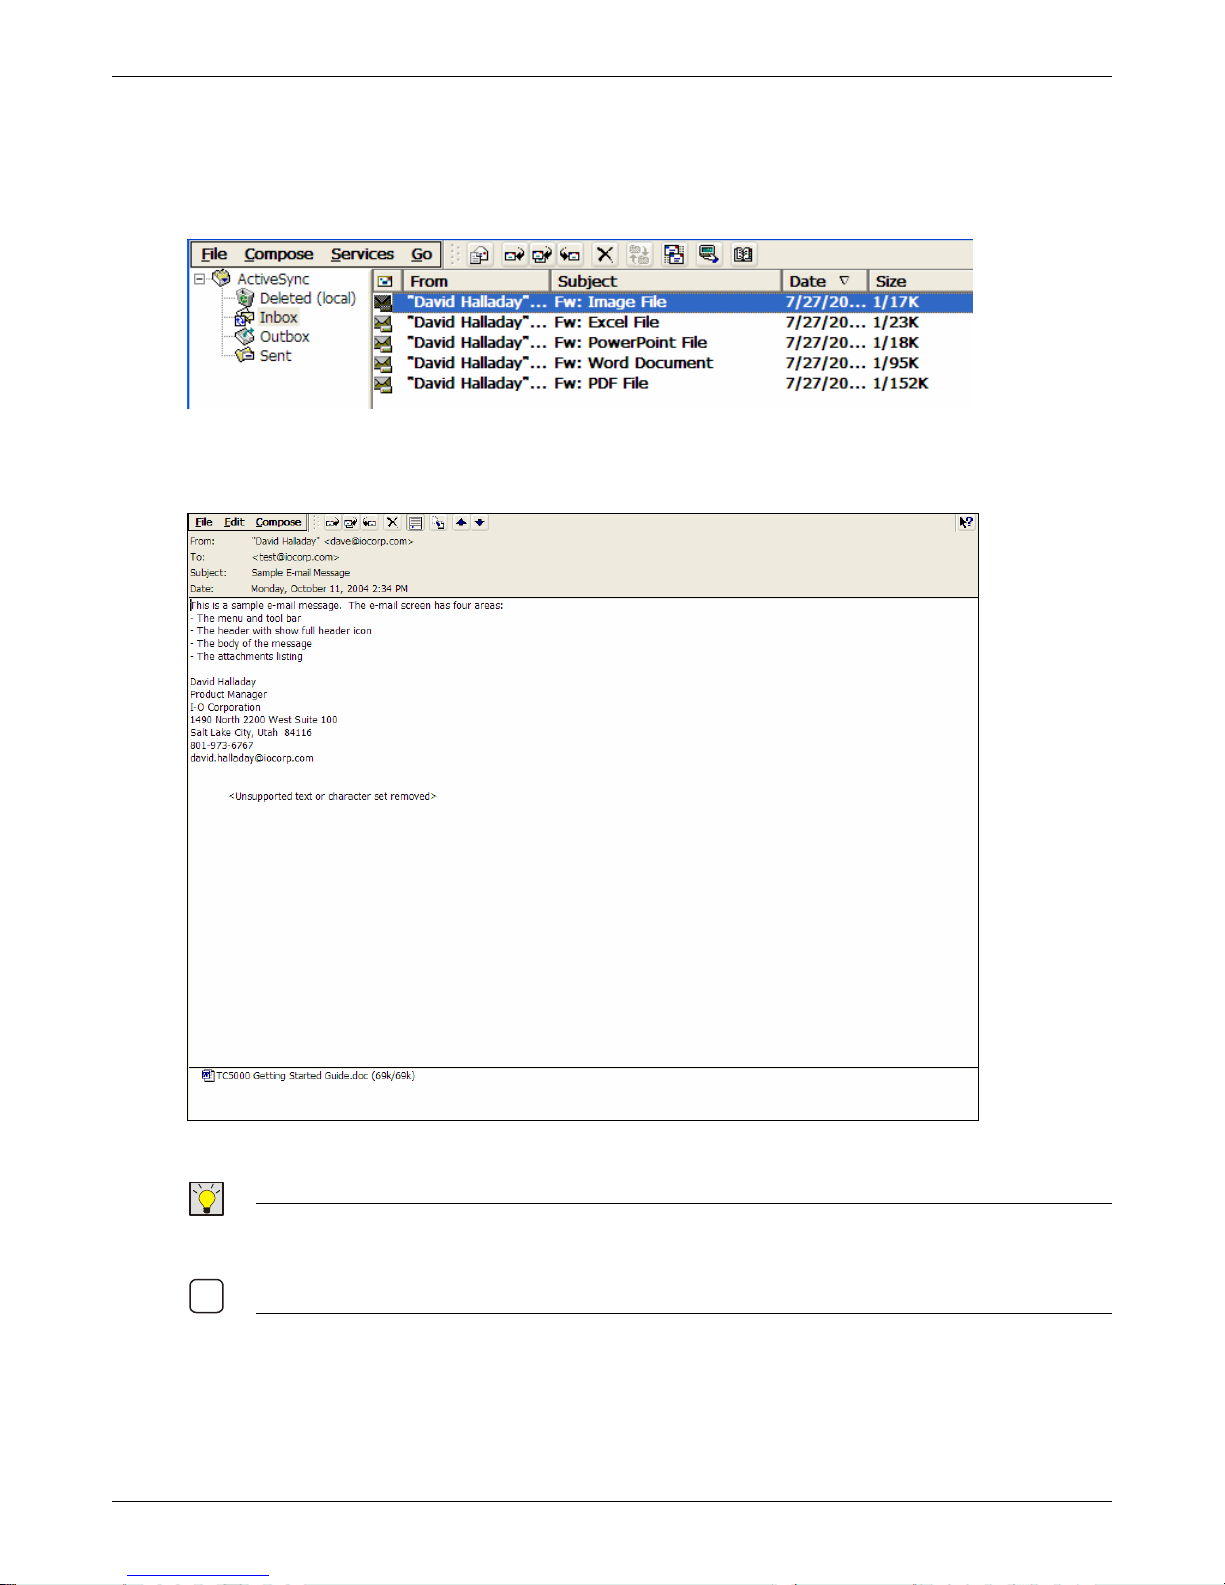
Using Connections
9
Reading Messages
To read a message:
1. Double-click a message in the Message List to open it.
2. The message will open. On this screen, you will find four areas: The menu/tool bar, the header, the
body of the message, and the attachments listing.
At this point, you can reply to the sender, reply to all senders, forward the message, view and save
attachments, and delete the message.
IP: TO SEE MORE HEADER INFORMATION, SELECT THE INVERTED TRIANGLE IN THE LOWER-RIGHT
T
CORNER OF THE HEADER AREA. SELECT THE TRIANGLE AGAIN TO COLLAPSE THE HEADER AREA.
N
OTE: ICONS ON THE TOOL BAR ARE AVAILABLE TO PERFORM MANY OF THE MENU OPTIONS.
Thin Client User’s Guide 75
Page 76
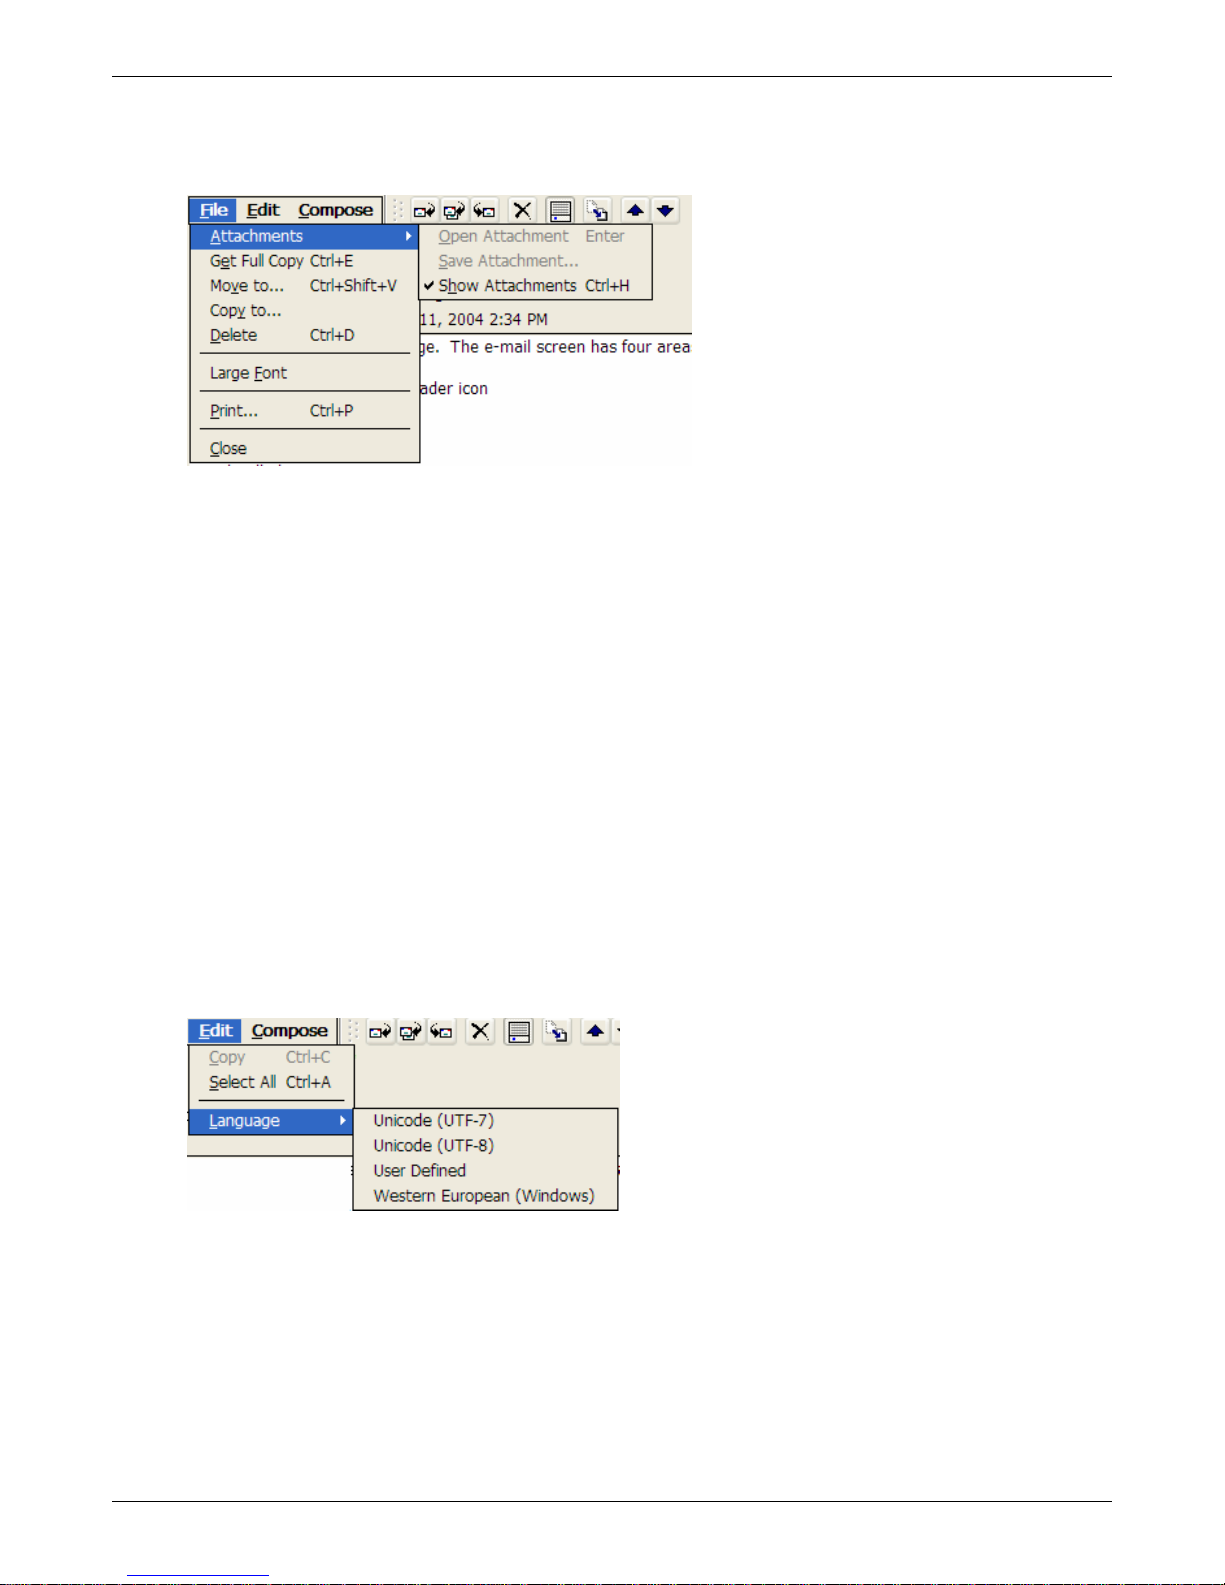
Using Connections
Menu and Tool Bar Descriptions
File Menu
Open Attachments: Select to open the attachments to the message.
Save Attachment: Presents a dialog box allowing you to choose where to stor e the attachment.
Show Attachments: Toggles on and off the display of attachments in the lower portion of the
message screen.
Get Full Copy: If the option has been set on the Inbox Preference screen to download only the
message headers, this function will allow cause the full message including meeting requests and file
attachments to be downloaded.
Move to: Presents a dialog box allowing you to choose where to move the message.
Copy to: Presents a dialog box allowing you to choose where to copy the message.
Delete: Allows you to delete the message. Messages will be deleted according to the settings on
the Options | Delete tab.
Large Font: Increases the font size of the message.
Print: Presents a printer dialog box for sending the message to the locally attached printer.
Close: Closes the message. You may also click on the “X” button on the Menu/Tool Bar line.
Edit Menu
Copy: Copy the selected text.
Select All: Selects all text on the message.
Language: Select the appropriate language for the message received. Generally this does not
need to be changed from the e-mail client’s default.
Thin Client User’s Guide 76
Page 77
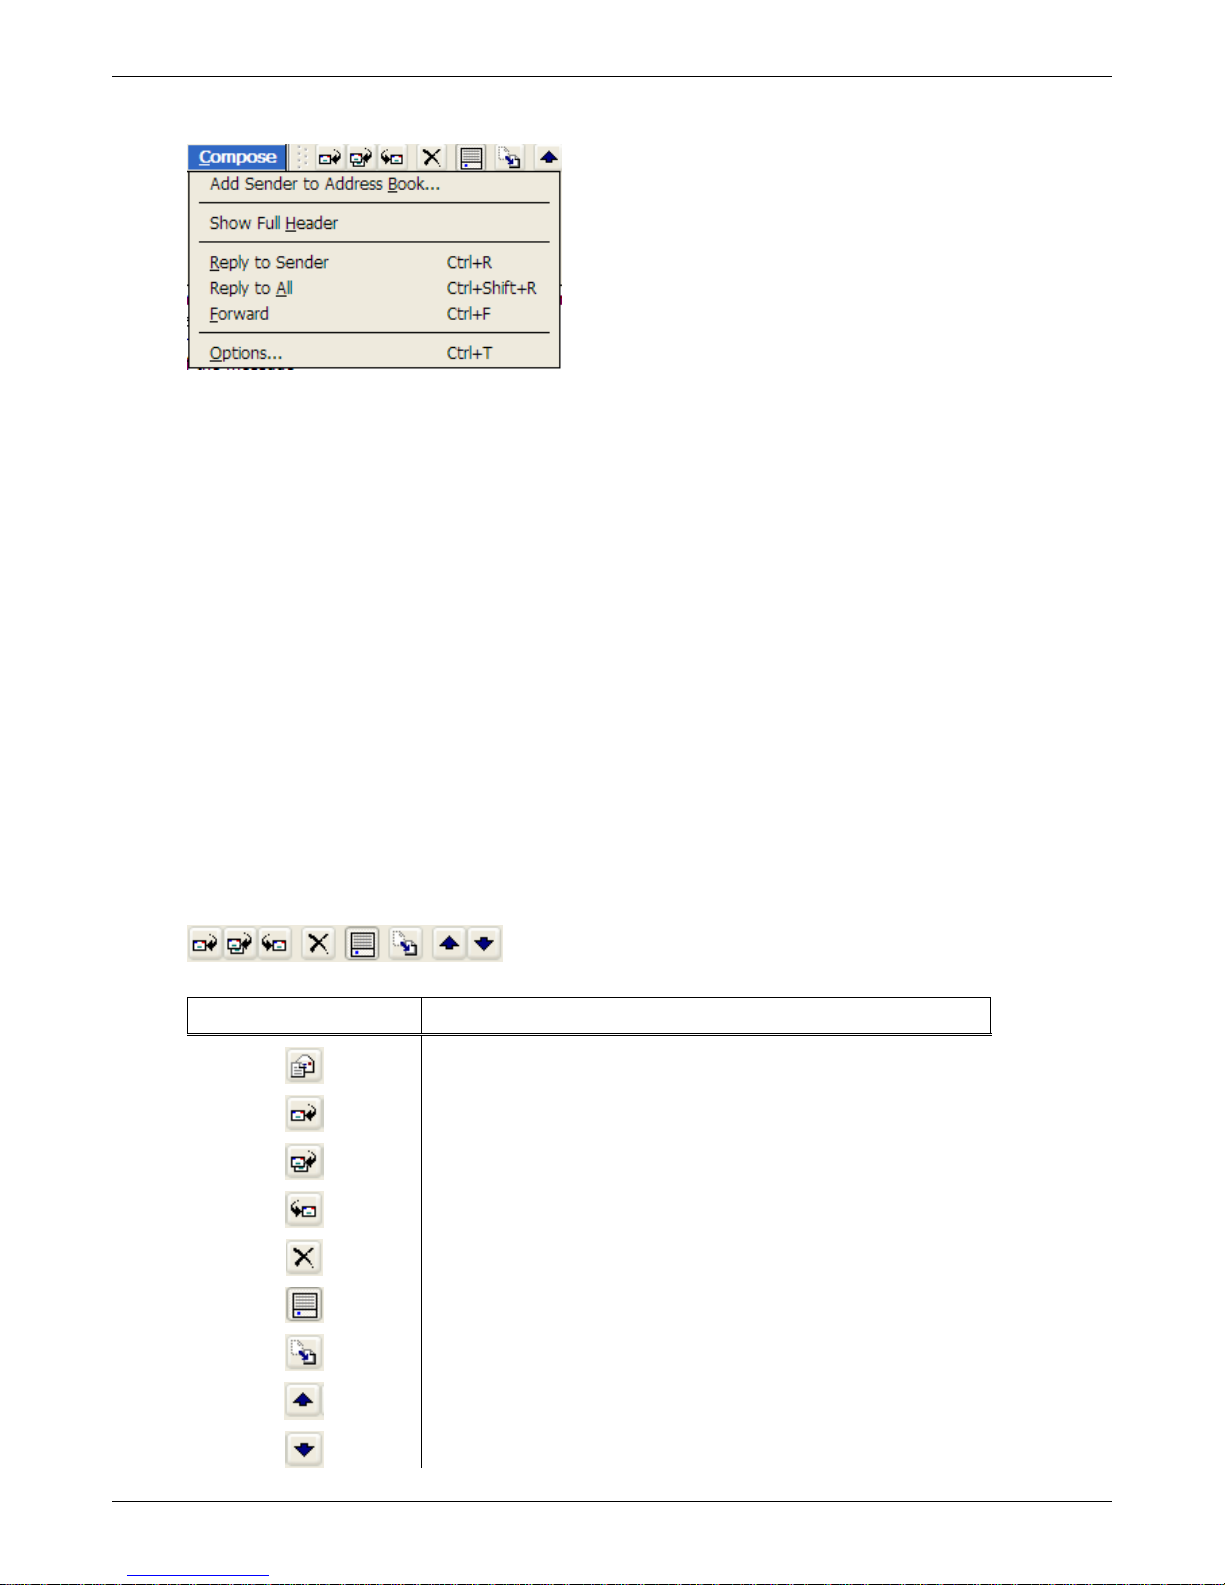
Using Connections
Compose Menu
Add Sender to Address Book: Provides access to the address book.
Show Full Header: Expands the header to show all message header information. The down and
up arrow icon on the right side of the header block can also be used to expand and collapse the
header.
Reply to Sender: Opens the Compose screen inserting the sender’s address in the To field. The
body of the message may be included depending upon the settings on the Options | Compose Tab.
You may edit the message as desired.
Reply to All: Opens the Compose screen inserting the addresses of the sender and all who
received a copy of the message. The body of the message may be included depending upon the
settings on the Options | Compose Tab. You may edit the message as desired.
Forward: Opens the Compose screen allowing you to enter the appropriate addresses. You may
edit the message as desired.
Options: Opens the Options Dialog screens. See Options from Services Menu for description of
these options.
Tool Bar Icons
The Tool Bar (located to the right of the menus) provides quick one-click access to certain menu
functions.
Tool Bar Button Description
Create new mail message
Reply to the current message
Reply to all who received the current message
Forward current message
Delete the highlighted message
Show listing of attachments in the Attachments block
Get Full Copy
Previous message
Next message
Thin Client User’s Guide 77
Page 78
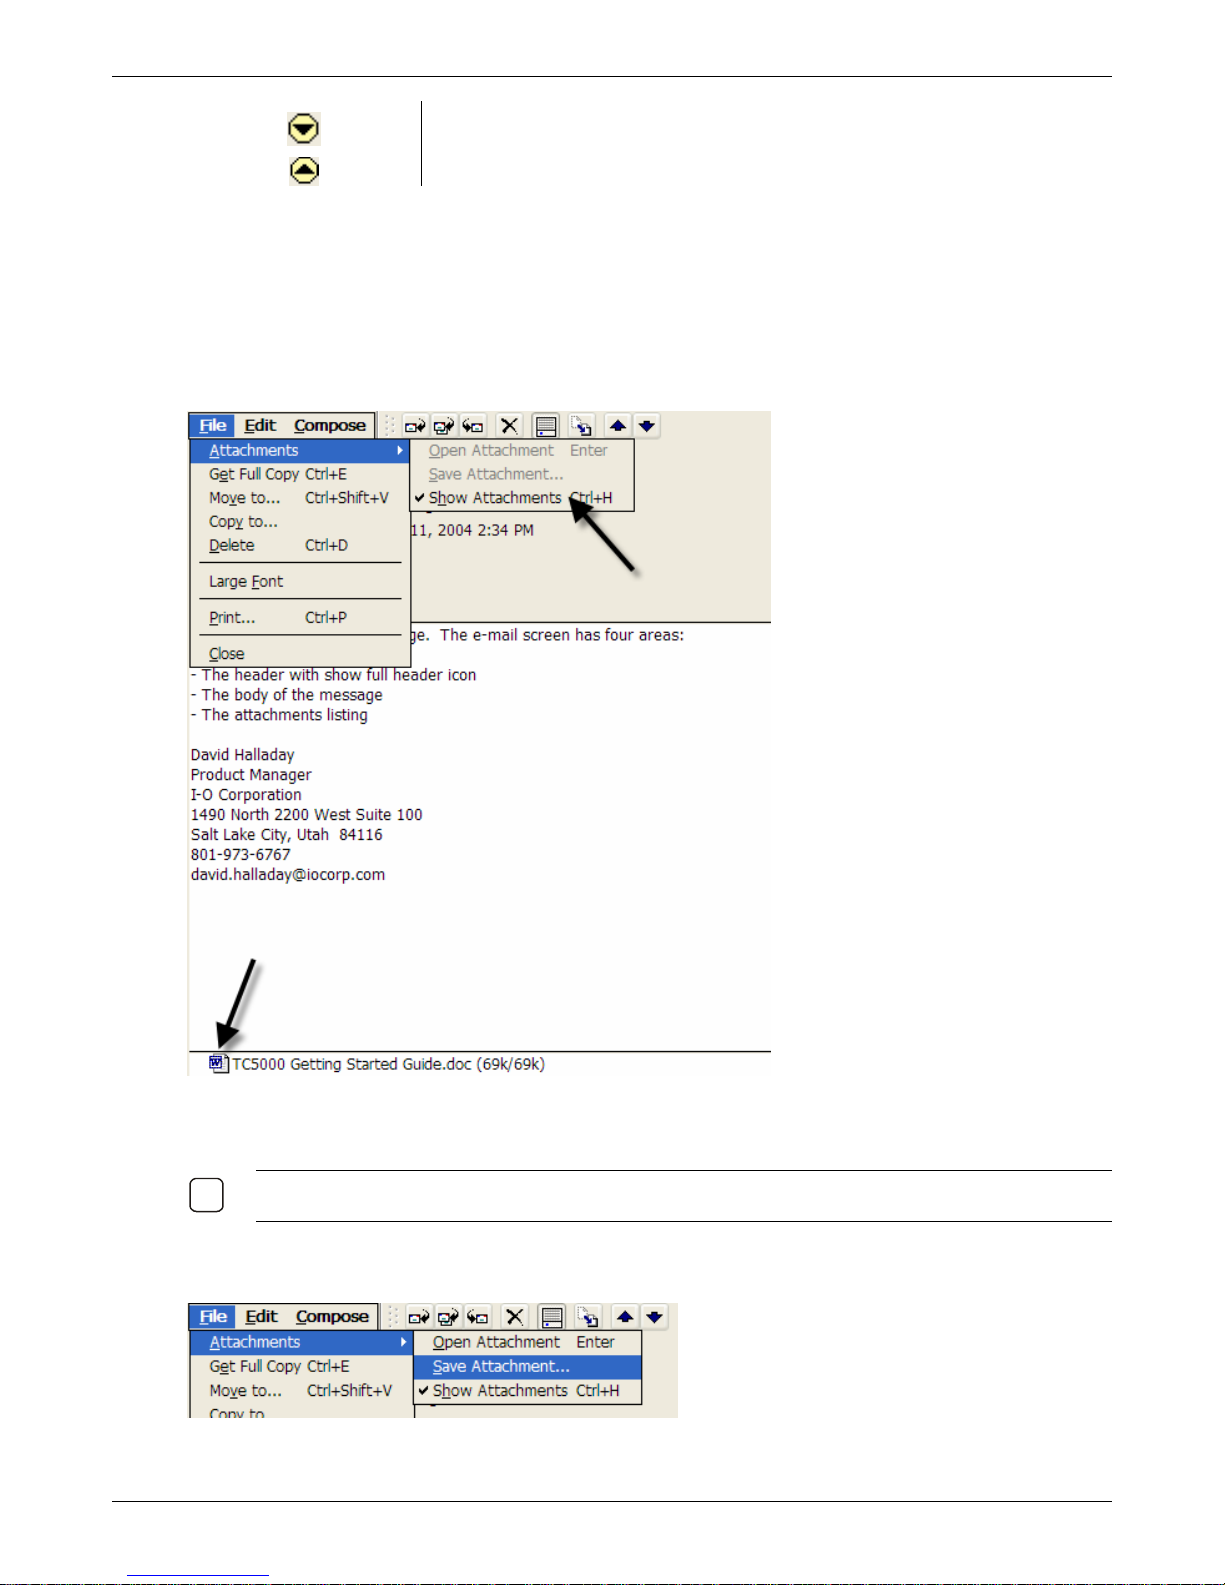
Using Connections
9
Show full header (located in the Header block)
Collapse the header (located in the Header block)
View and/or Save an Attachment
Attachments that have been downloaded when the message is downloaded from the e-mail server will
appear in the Attachments List block at the bottom of the message. If attachments are not shown, click
the File |Attachments | Show Attachments option. If the attachment was not downloaded when the
full message was downloaded, select the “Get file attachment” box on the Inbox Preferences screen
(see Services | Options | Properties).
1. On the Message List screen, select a message.
2. At the bottom of the message, click on the desired attachment. The proper file viewer will load.
N
OTE: VALID DOCUMENT TYPES ARE MICROSOFT WORD DOCUMENTS, POWERPOINT FILES, EXCEL
SPREAD SHEETS, ACROBAT PDF FILES, AND MOST IMAGES.
3. To save the attachment, you must open the attachment first. Then close the attachment. From the
File | Attachments menu, select the Save Attachment option.
4. The Save As dialog box will appear. Navigate to where you want to store the attachment. Name
the document as desired, and click OK.
Thin Client User’s Guide 78
Page 79
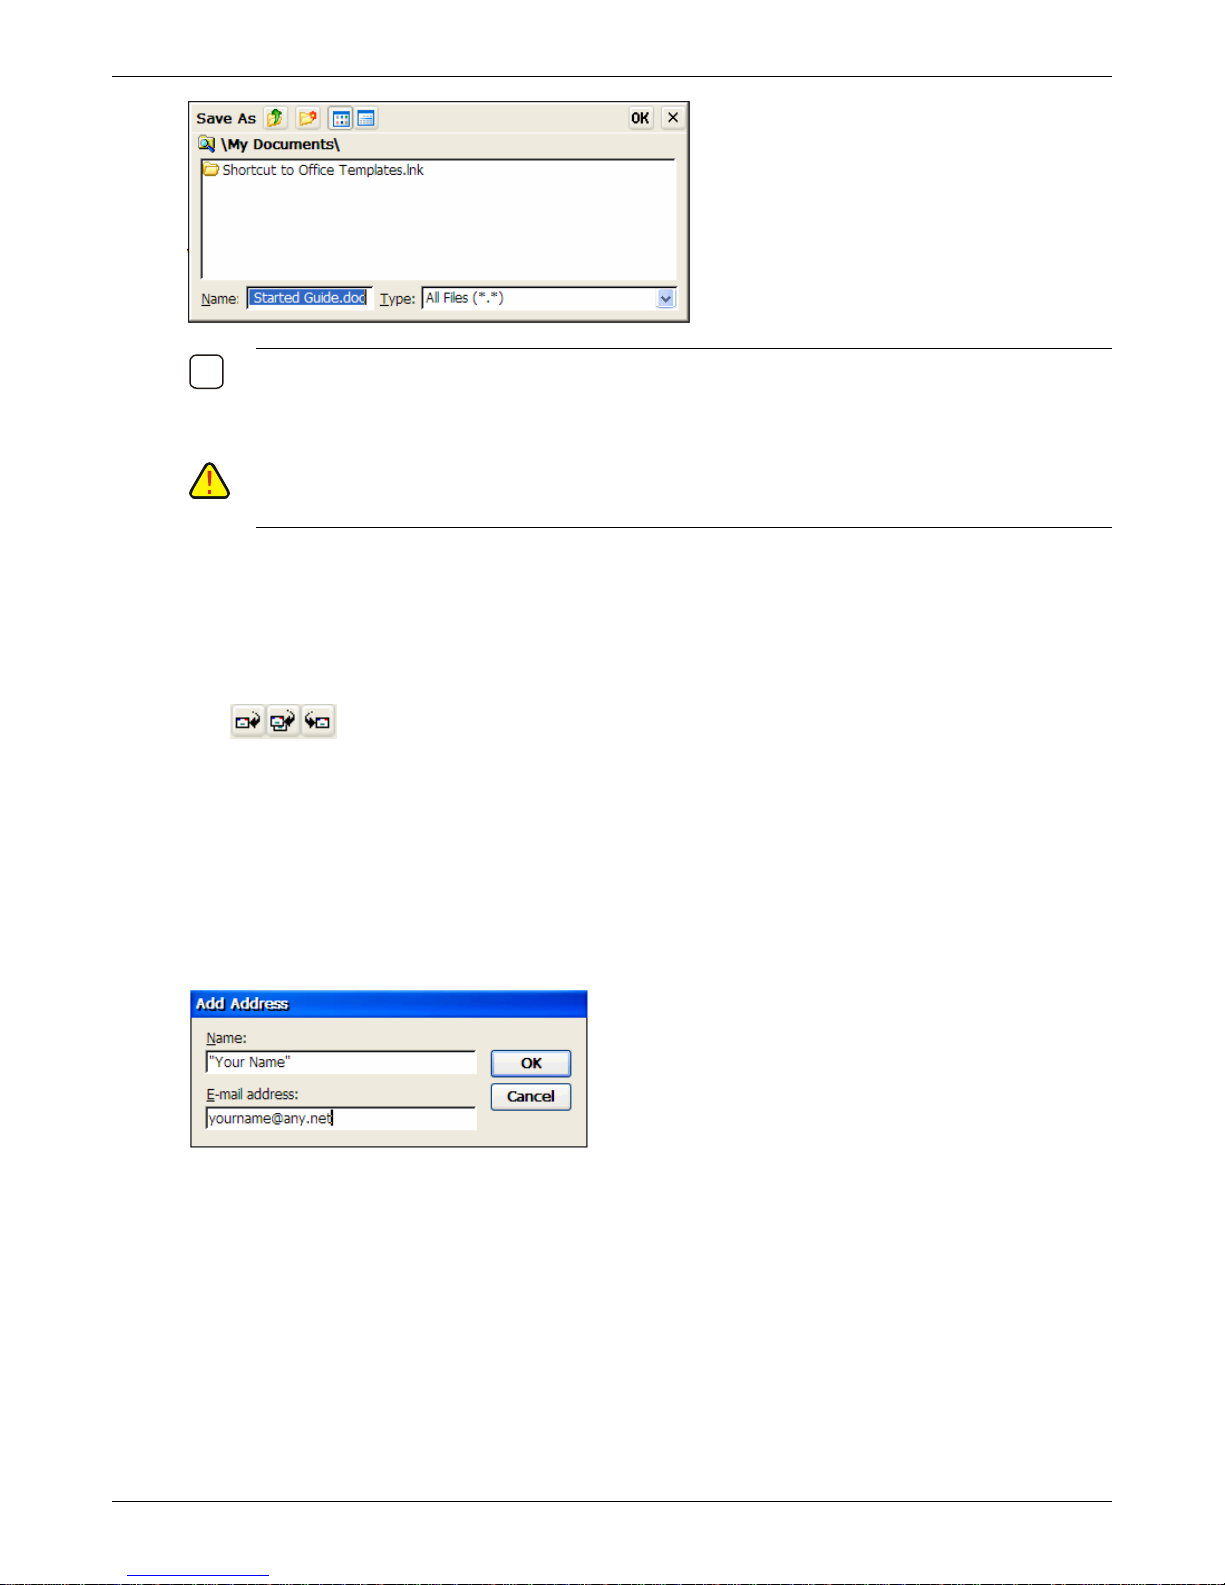
OTE: ATTACHMENTS CAN LATER BE RENAMED OR DELETED FROM THE SAVE AS SCREEN BY RIGHT
9
N
CLICKING ON THE ATTACHMENT. THIS FUNCTION IS ALSO AVAILABLE FROM THE FILE | OPEN DIALOG BOX
IN THE VIEWER
AUTION: SAVING ATTACHMENTS TO THE THIN CLIENTS LOCAL STORAGE WILL CONSUME VALUABLE
C
.
RAM. USING AN OPTIONAL USB STORAGE DEVICE WILL FREE UP THE LOCAL RAM FOR USE BY THE
THIN CLIENTS PROGRAMS
.
Reply to or Forward a Message
Using Connections
1. Open the message, and then select Compose | Reply to Sender, Reply to All, or Forward. You
also may use the respective icons on the tool bar.
2. The Compose screen will appear. The original message may be also included depending upon the
settings on the Options | Compose screen. Enter your response.
3. Select File | Send.
Add the Sender to Address Book
Open the message, and then select Compose | Add Sender to Address Book. A new contact card will
open with the sender's name and e-mail address already entered.
Or
Select Go | Address Book or click on the Address Book icon.
Thin Client User’s Guide 79
Page 80
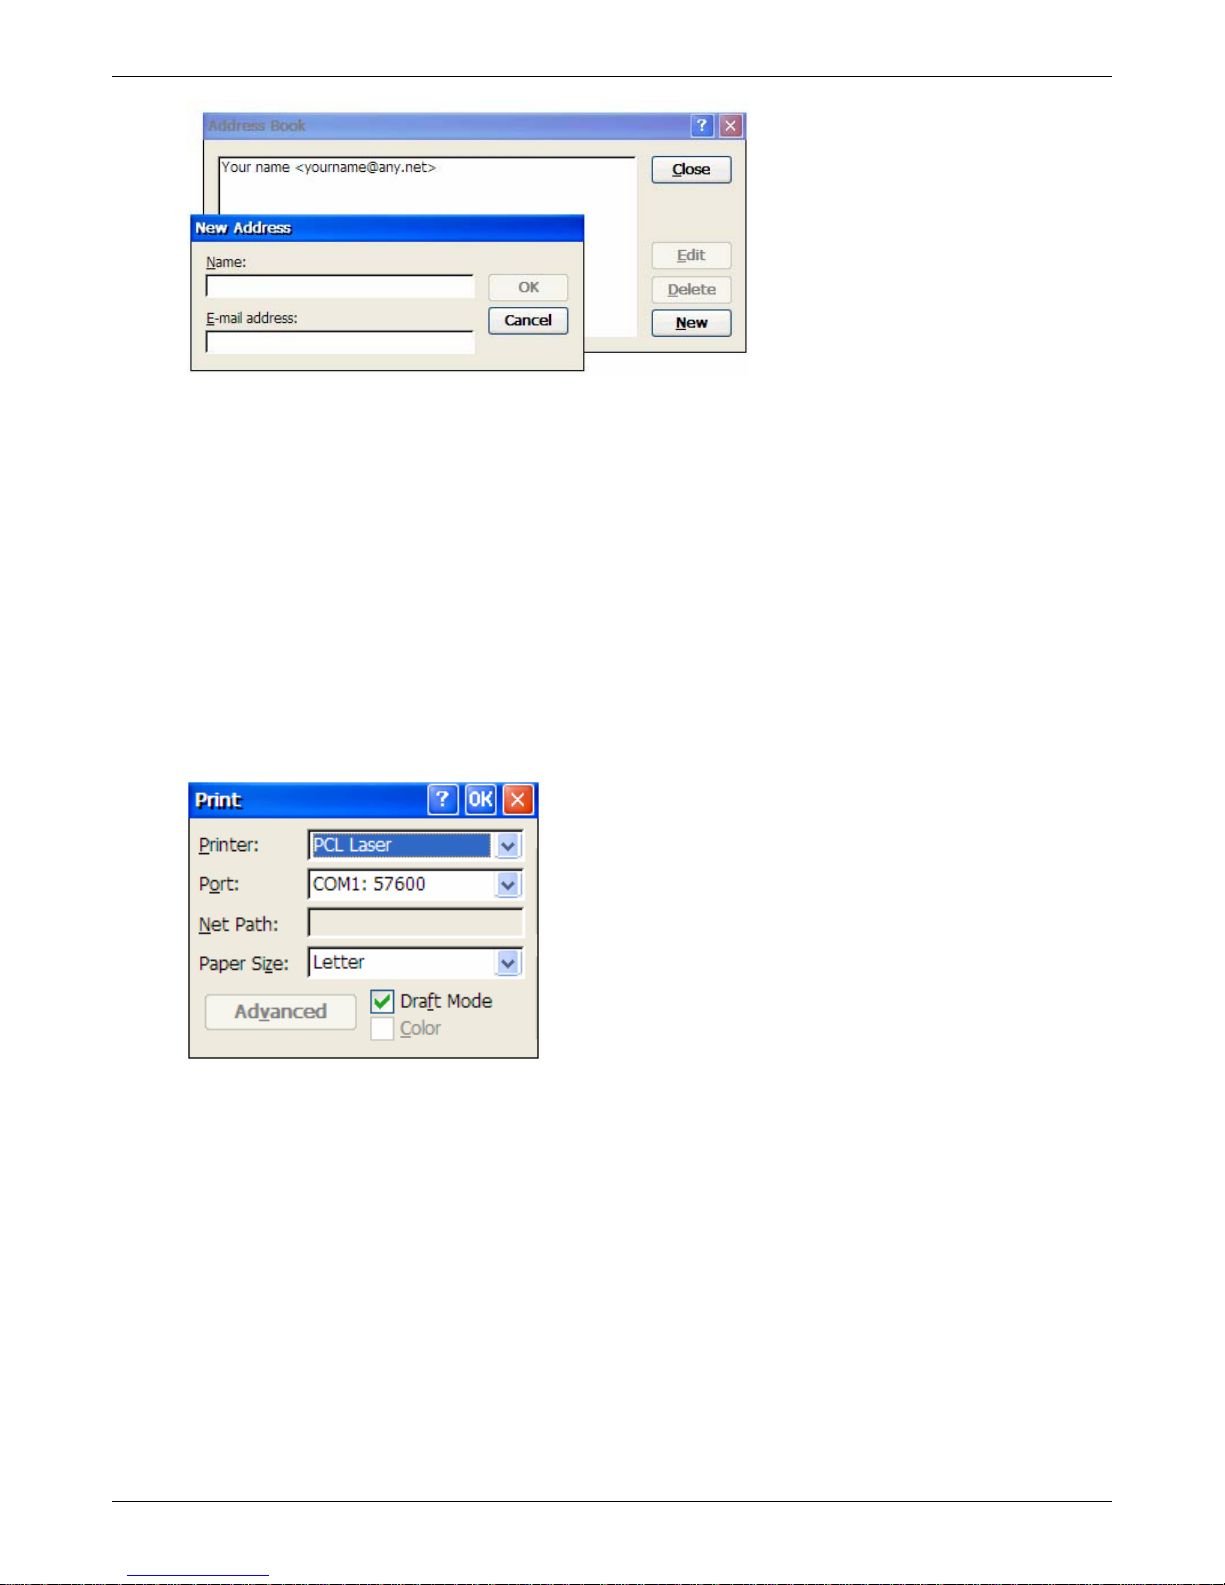
Using Connections
To add a new entry, select New. Enter the name you want to type in the To and CC fields of
messages in the Name field.
To delete an entry, select it, and then select Delete.
To edit an entry, select it, and then select Edit.
Print a Message
You may send a message to the locally attached printer. This printer function does not require setting
up any RDP, LPD or Citrix printers.
1. Open the message.
2. Select File | Print, and the following screen appears. Make the appropriate selections based upon
the printer attached. Click the OK button on the Title line (upper right hand corner of the dialog
box).
Printer: Microsoft only provides one print driver – a PCL laser driver – for the locally attached
printer.
Port: Select the appropriate serial or parallel port. If a USB printer is attached, select LPT2.
Net Path: If the printer is attached to the LAN, enter the fully NetBios path.
Paper Size: Select the appropriate paper size.
Draft Mode: Select whether to print in draft or final mode.
Thin Client User’s Guide 80
Page 81
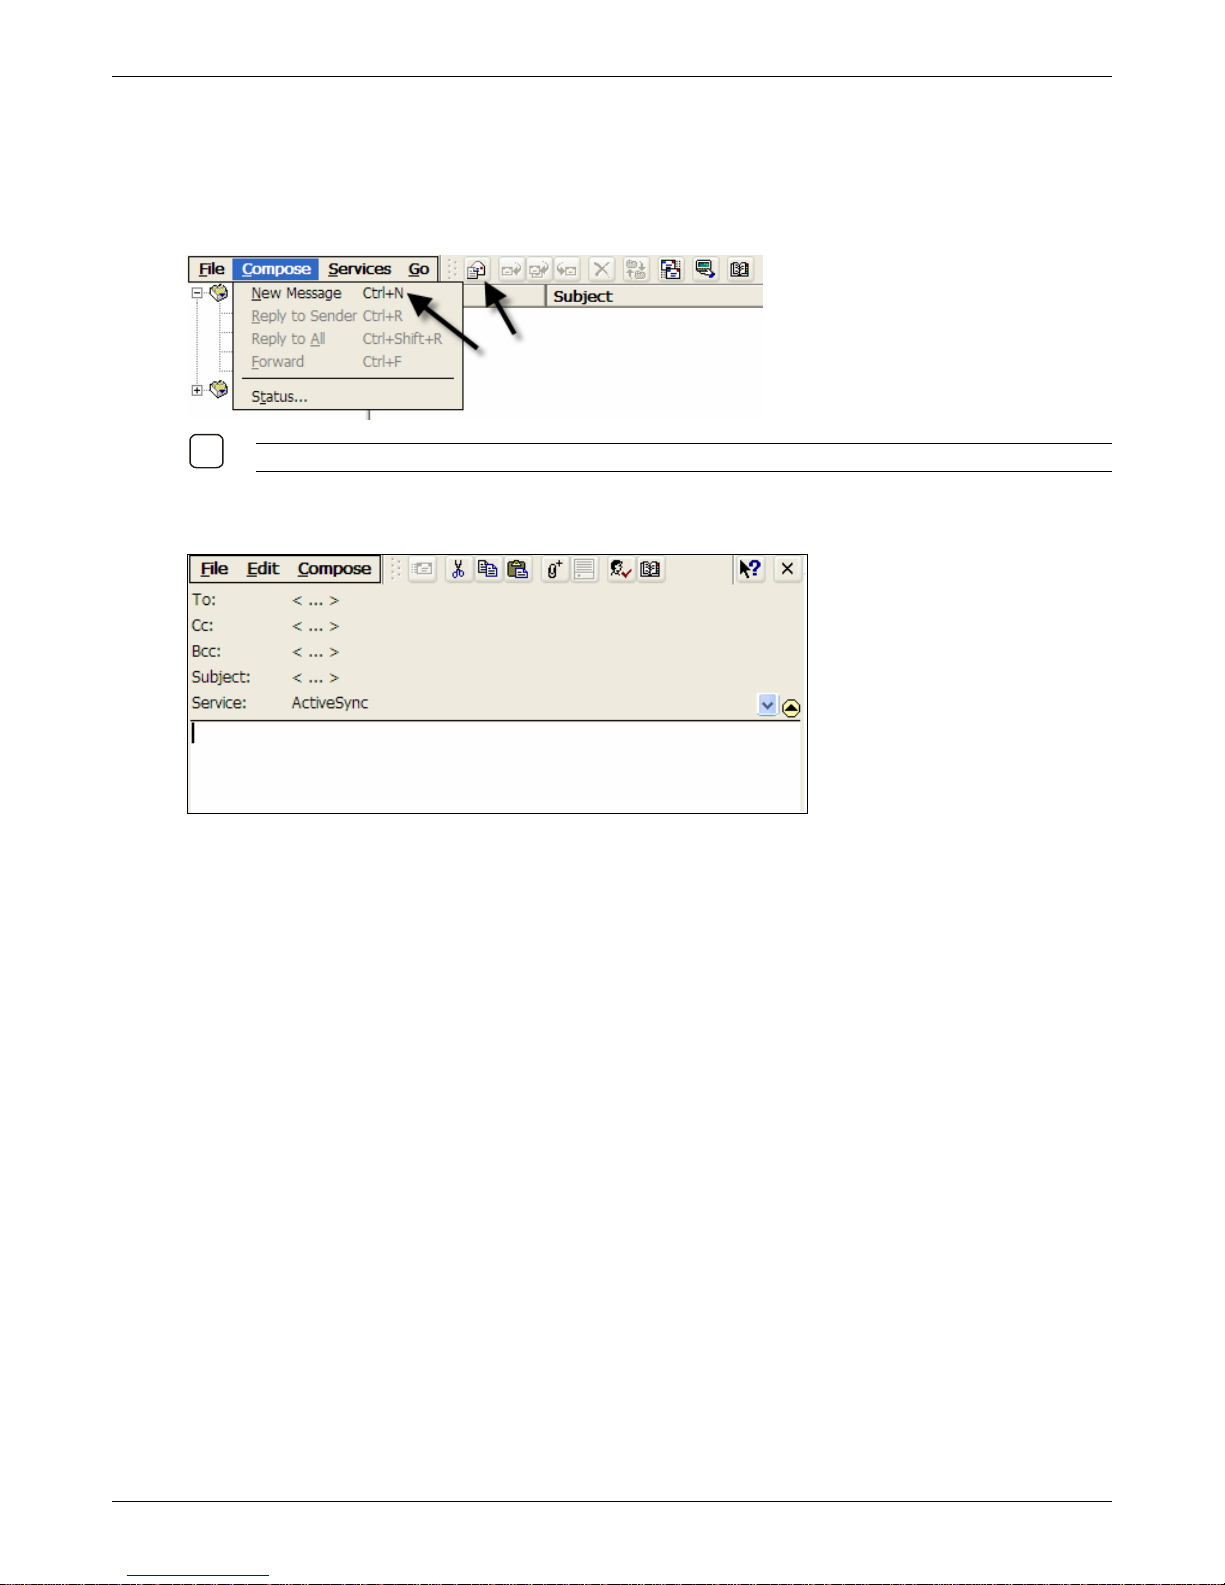
Using Connections
9
Composing and Editing Messages
Create a Message:
1. In the Message List view, select. Compose | New Message or click the New Message icon.
N
OTE: ICONS ON THE TOOL BAR ARE AVAILABLE TO PERFORM MANY OF THE MENU OPTIONS.
2. The Compose screen will appear. On this screen, you will find four areas: The menu/tool bar, the
header, the body of the message, and the attachments listing.
3. Enter the address of one or more recipients, separating them with a semicolon. If the recipient is
listed in the Address Book, enter a few letters of the recipient's name and select Compose | Check
Names (or click on the appropriate icon on the tool bar).. If there is only one match, the e-mail
address is inserted. If there is more than one match, select the correct address from the Choose Email Recipients dialog box. If there is no match, add a new e-mail address through Choose E-mail
Recipients. To include a blind copy, expand the header by selecting Compose | Show Full Header
(or click on the appropriate icon on the tool bar).
4. To attach a file, select File | Attachments | Add Attachment (or click on the appropriate icon on
the tool bar). Navigate to where the file is stored. Highlight the file, and click OK.
5. To save the message you are composing or editing, select File | Save. The message is not sent
and is saved in the Inbox folder of the active service.
6. To send the message, select File | Send (or click on the appropriate icon on the tool bar). If you
are working offline, the message is moved to the Outbox folder and will be sent the next time you
connect.
Thin Client User’s Guide 81
Page 82
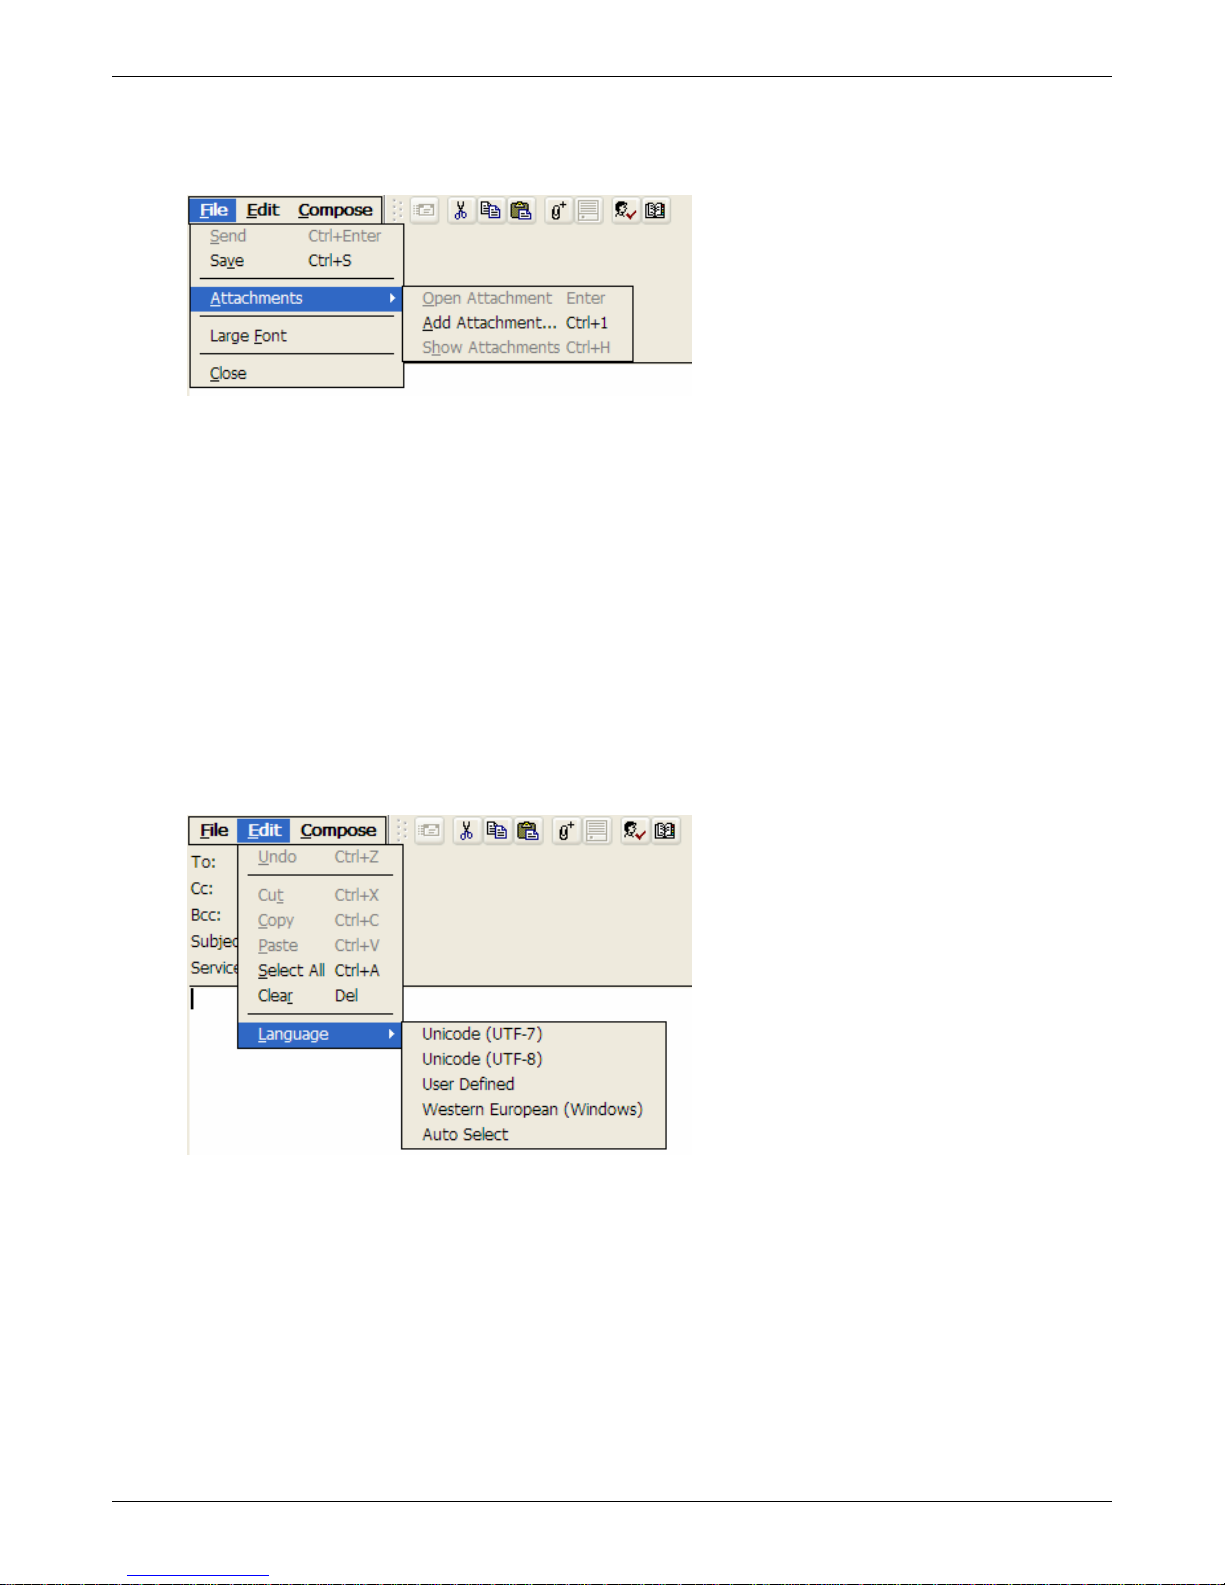
Using Connections
Menu and Tool Bar Icon Descriptions
File Menu
Send: Sends the current message. If you are working offline, the message is placed in the Outbox
and will be sent when a connection to the e-mail server is established.
Save: Saves the current message in the Inbox. You may open it later, edit it and either save or
send it at that time.
Open Attachments: Select to open the attachments to the message.
Save Attachment: Presents a dialog box allowing you to choose where to stor e the attachment.
Show Attachments: Toggles on and off the display of attachments in the lower portion of the
message screen.
Large Font: Increases the font size of the message.
Close: Closes the message. You may also click on the “X” button on the Menu/Tool Bar line.
Edit Menu
Undo: Reverses the last action.
Cut: Removes the selected text.
Copy: Copies the selected text to the clipboard.
Paste: Pasts the contents of the clipboard at the point where the cursor is located.
Select All: Selects all text.
Clear: Clears the selection.
Language: Provides a selection of different languages to use to send the message.
Thin Client User’s Guide 82
Page 83
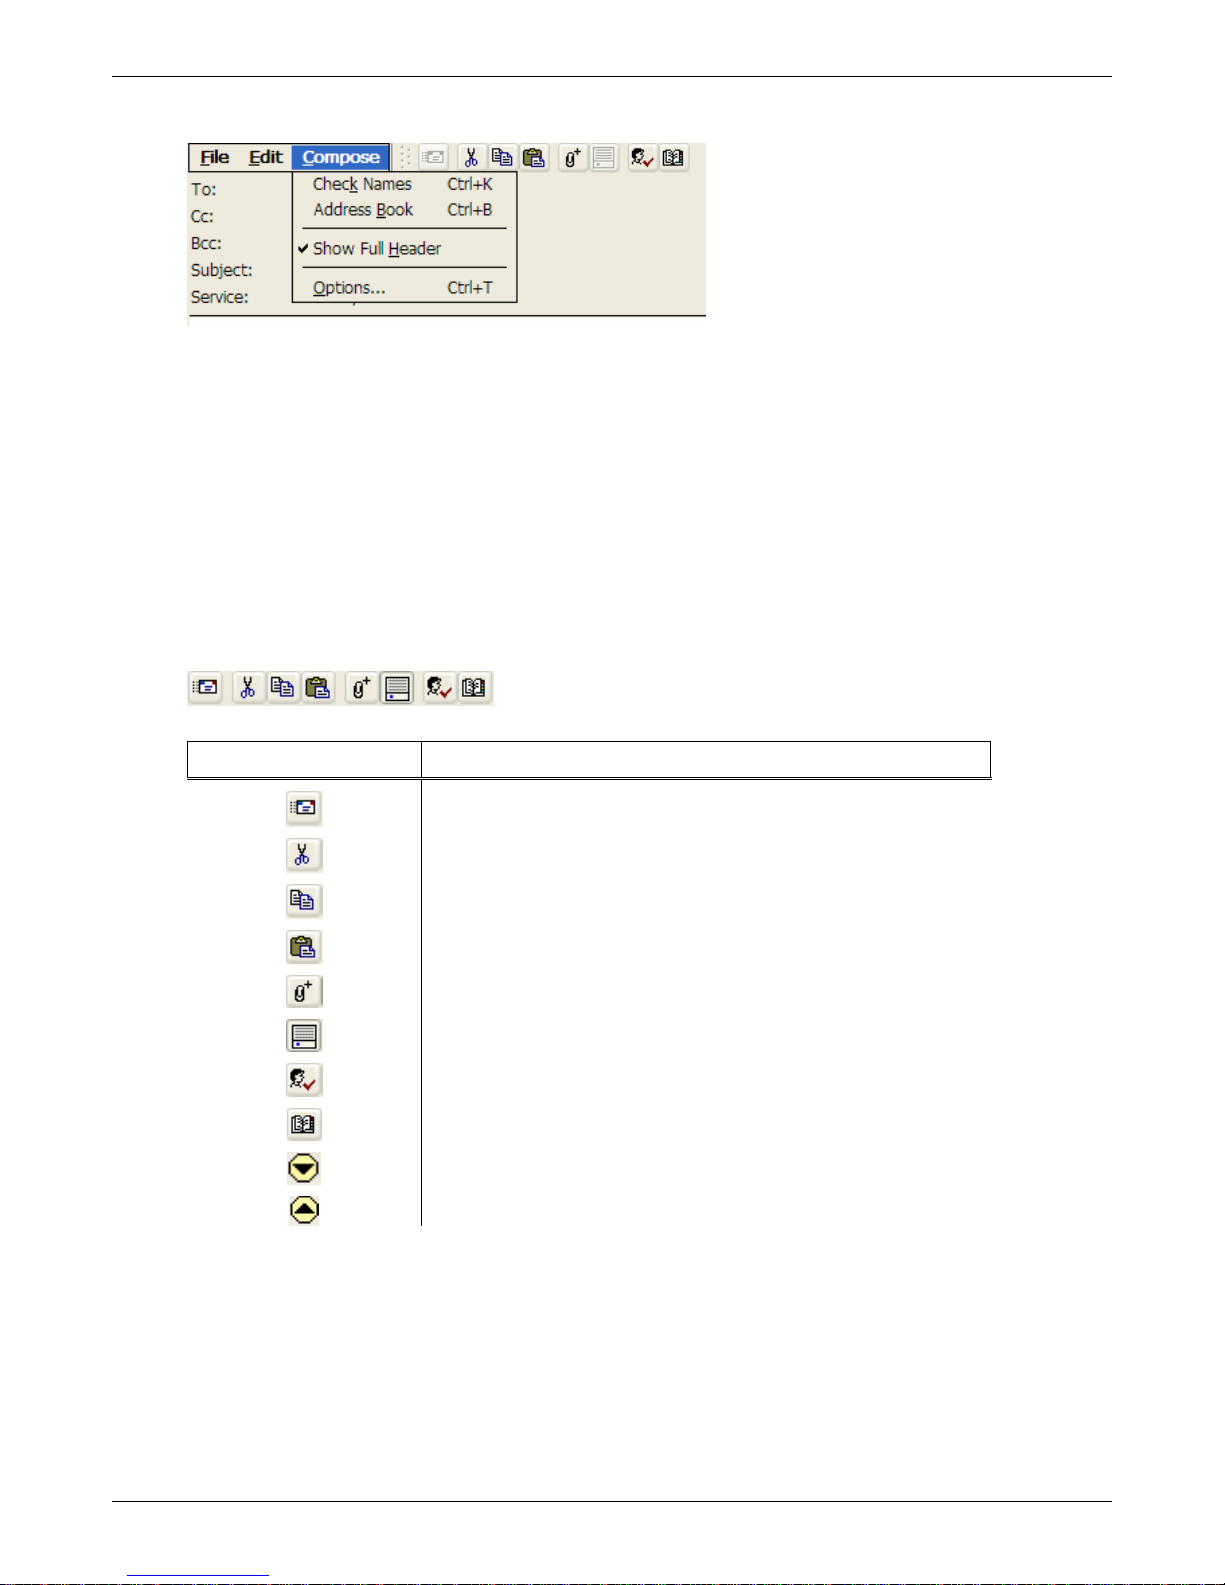
Using Connections
Compose Menu
Check Names: When entering an e-mail address, this option will cause the ad dress book to be
check for a matching entry. If more than one entry exists, the address book will be presented
allowing you to select which is the desired address.
Address Book: Causes the address book to be presented.
Show Full Header: Causes the expanded header to be presented or collapsed.
Options: Causes the Options dialog box to be presented.
Tool Bar Icons
The Tool Bar (located to the right of the menus) provides quick one-click access to certain menu
functions.
Tool Bar Button Description
Send the message
Cut the selected text
Copy the selected text
Paste the contents of the clipboard
Add an attachment
Show attachments in the attachments block
Check address book
Address book
Show full header (located in the Header block)
Collapse the header (located in the Header block)
Thin Client User’s Guide 83
Page 84
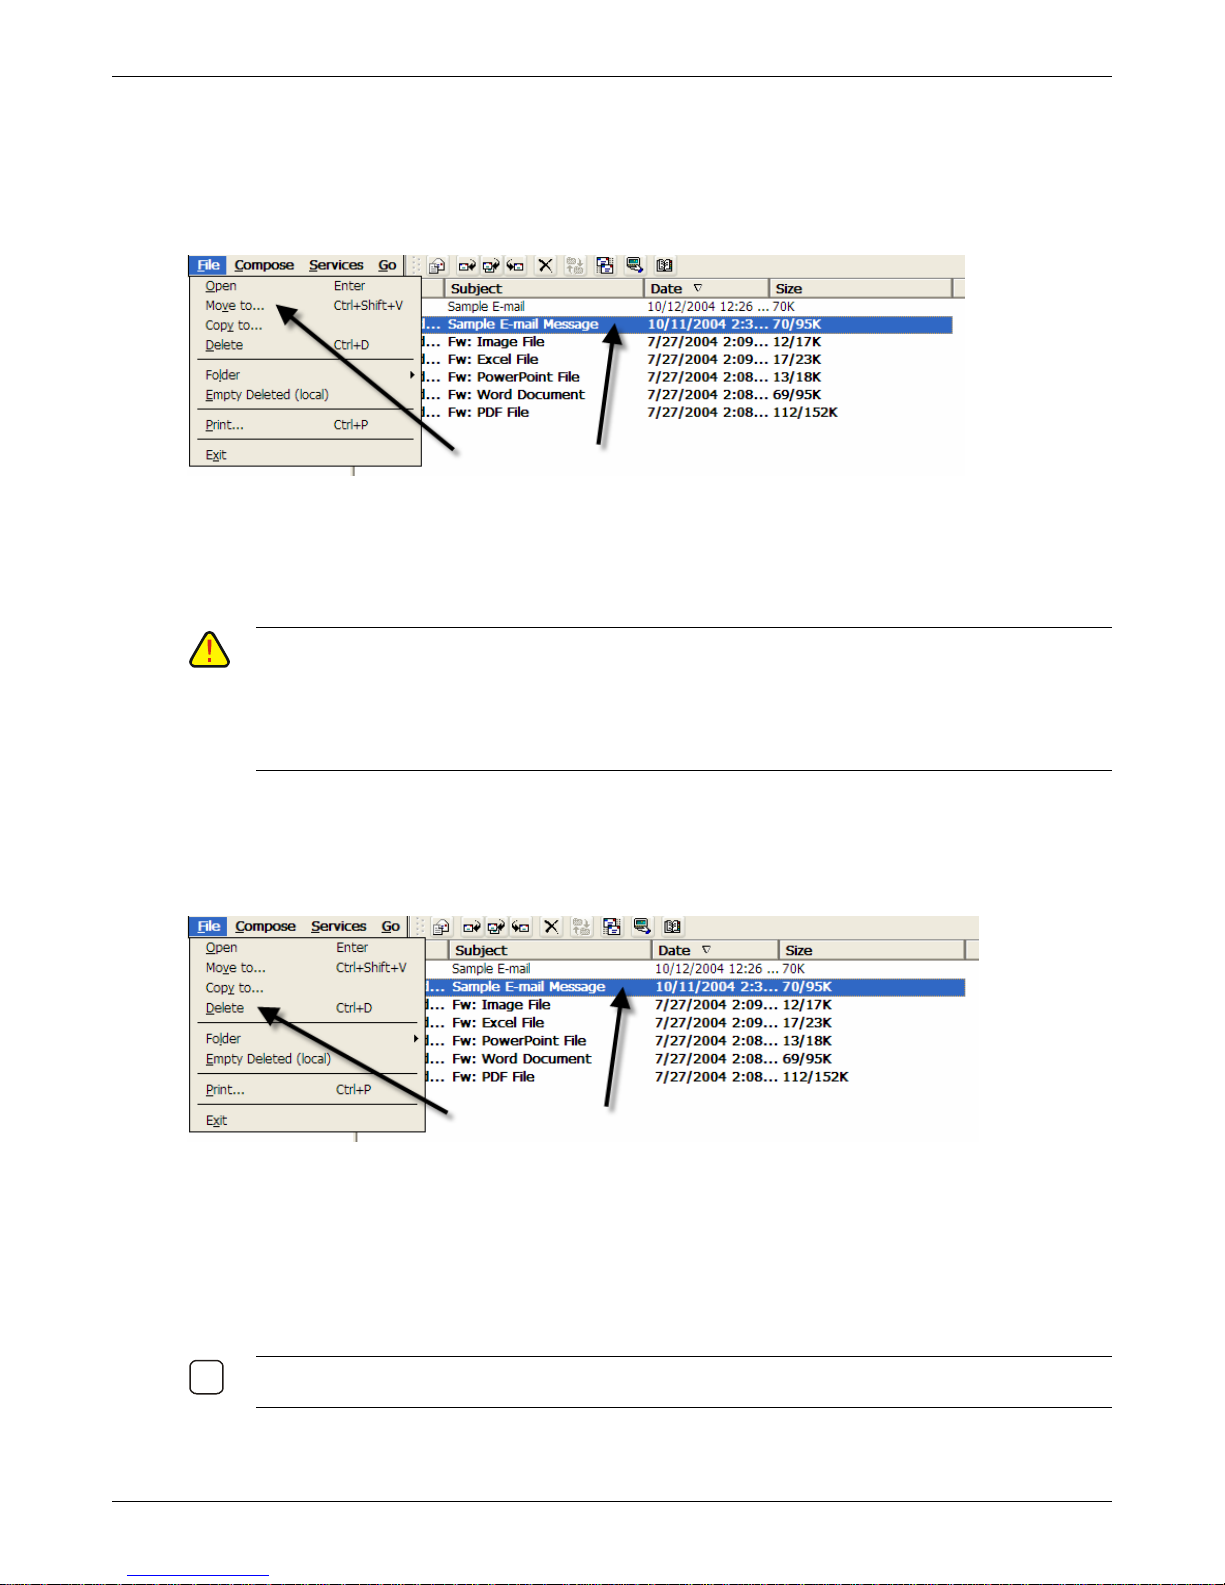
Using Connections
9
Organizing Messages
Move or Copy a Message
1. On the Message List view, select the message.
2. Select File | Move To or File | Copy To.
3. Select the destination folder.
If you are working offline, the message will be moved or copied from the e-mail server the next time you
connect.
AUTION: WHEN YOU MOVE A MESSAGE THAT YOU HAVE RECEIVED THROUGH POP3 OR
C
SYNCHRONIZATION TO A FOLDER YOU CREATED ON YOUR THIN CLIENT, THE COPY OF THE MESSAGE ON
THE E
-MAIL SERVER IS DELETED. THIS PREVENTS DUPLICATE COPIES OF MESSAGES. ALTHOUGH THE
COMPLETE MESSAGE IS MOVED
THE OPTION TO DOWNLOAD ATTACHMENTS
ACCESS THE MESSAGE ONLY FROM YOUR THIN CLIENT
, MESSAGE ATTACHMENTS WILL BE DELETED IF YOU HAVE NOT SELECTED
. ONCE THE MESSAGE IS MOVED, YOU WILL BE ABLE TO
.
Delete a message
1. On the Message List view, Select the message.
2. Select File | Delete. Messages are moved to the Deleted (local) folder and deleted according to the
option you have selected in Services | Options | Delete tab:
On connect/disconnect: Deletes messages when you connect or disconnect from your mail service
or exit Inbox.
Immediately: Deletes messages as soon as you select File | Delete.
Manual: Deletes messages when you select File | Empty Deleted (local).
OTE IF YOU ARE WORKING OFFLINE, MESSAGES THAT HAVE BEEN DELETED FROM THE SERVER WILL BE
N
DELETED FROM THE DEVICE THE NEXT TIME YOU CONNECT.
Thin Client User’s Guide 84
Page 85
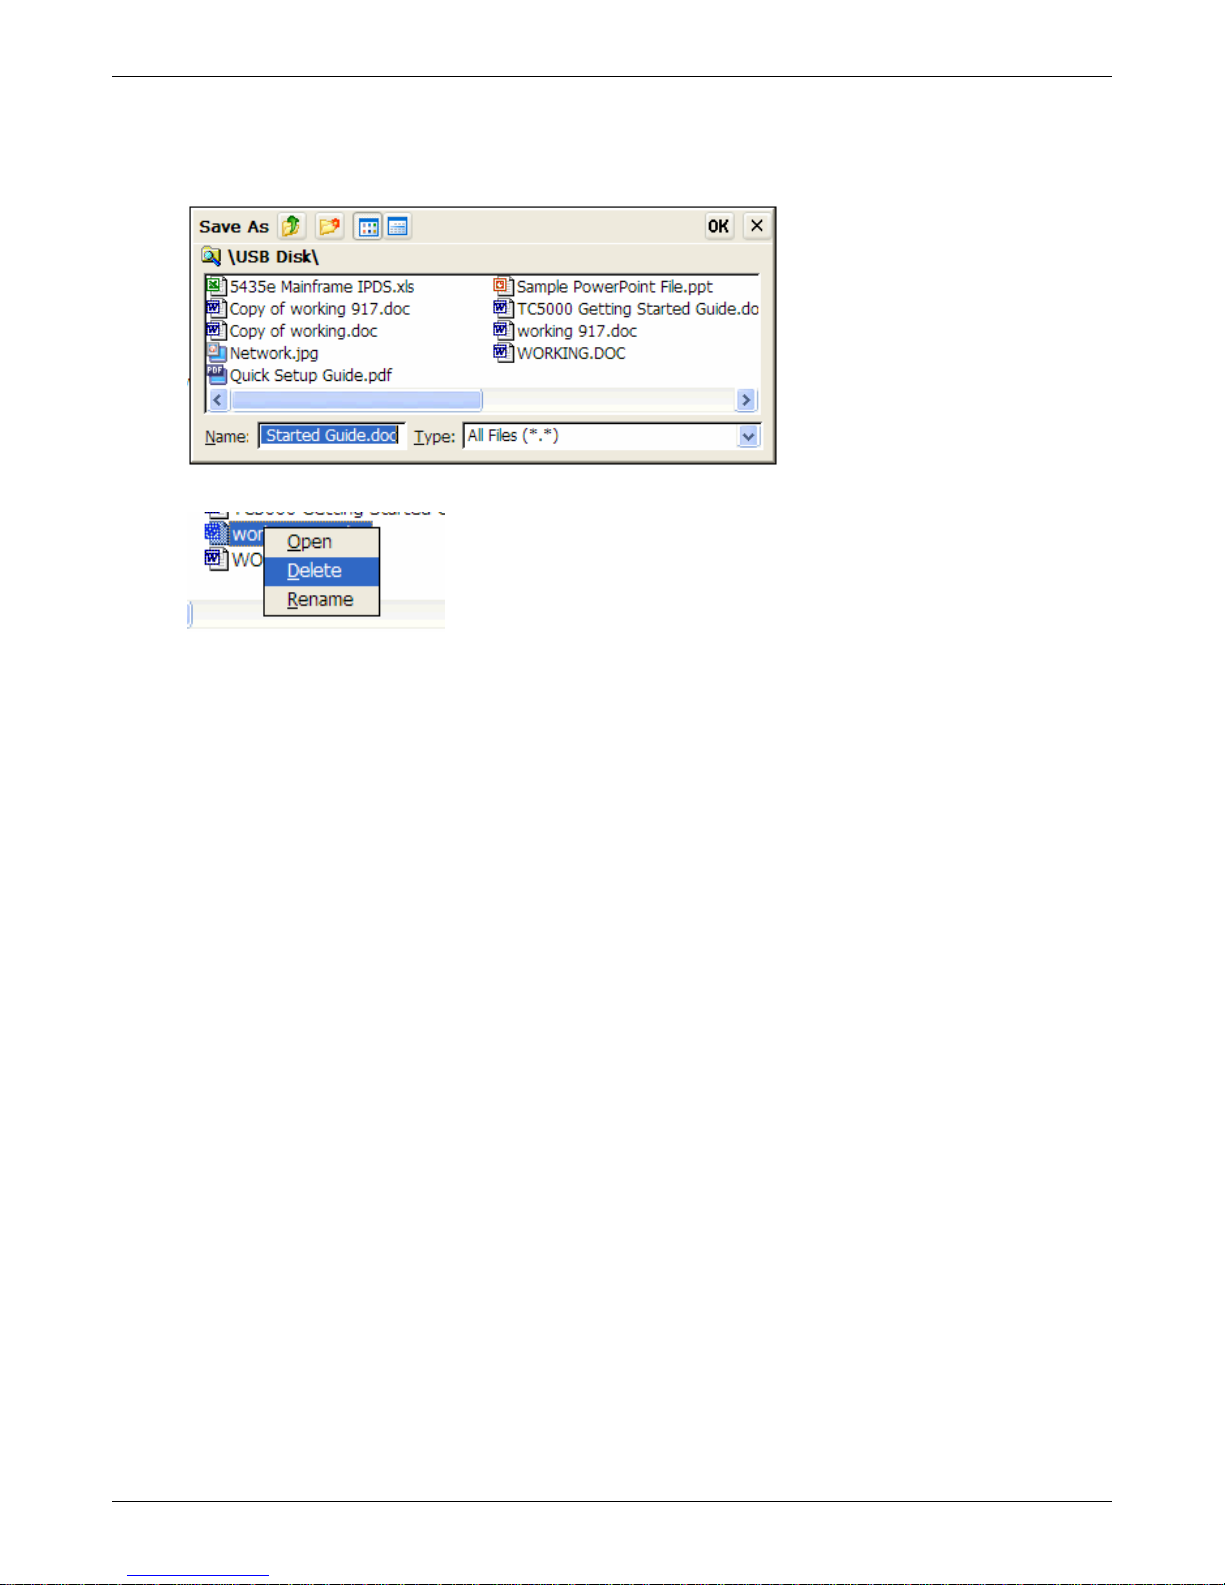
Using Connections
Deleting Attachments
Attachments can be deleted using the file viewer Open File dialog box, or the e-mail Save As dialog
box. In both cases, the same dialog box is opened.
1. After navigating to the directory where the attachment or file is stored, right click on the desired file.
2. Click on the Delete option. Answer Yes to confirmation message.
Working with Folders
The e-mail client contains folders from mail services you have set up. When you set up a service, it
appears in the Message List view. Each service contains four default folders: Inbox, Deleted (local),
Outbox, and Sent. The Deleted (local) folder contains messages that have been deleted on the thin
client. If you are using IMAP4, you may see a Deleted Items folder. This folder is for messages deleted
on the e-mail server. The behavior of the Deleted (local) and Sent folders depends on the options you
have chosen (see Services | Options | Delete tab).
You can also create your own folders. The behavior of the folders you create depends on whether you
are using POP3 or IMAP4.
If you are using POP3 and you drag messages to a folder you created, the link is broken between the
messages and their copies on the e-mail server. The next time you connect, the e-mail server will see
that the messages are missing from the thin client’s Inbox and delete them from the e-mail server. This
prevents you from having duplicate copies of a message, but it also means that you will no longer have
access to messages you move to folders you create from anywhere except the device.
If you are using IMAP4, the folders you create and the messages you move are mirrored on the e-mail
server. For example, if you move two messages from the Inbox folder to a folder called Family, the email server will create a copy of the Family folder and copy the messages into that folder. Therefore,
messages are available to you anytime you connect to your e-mail server, whether it is from your thin
client or another PC like device. This synchronization of folders occurs when you cre ate a new folder,
move messages into a folder, exit the Inbox program, or select Services | Synchronize Folders. If you
want to view the messages in a folder while disconnected from your e-mail server, select the folder and
then Services | Offline Folder.
Thin Client User’s Guide 85
Page 86
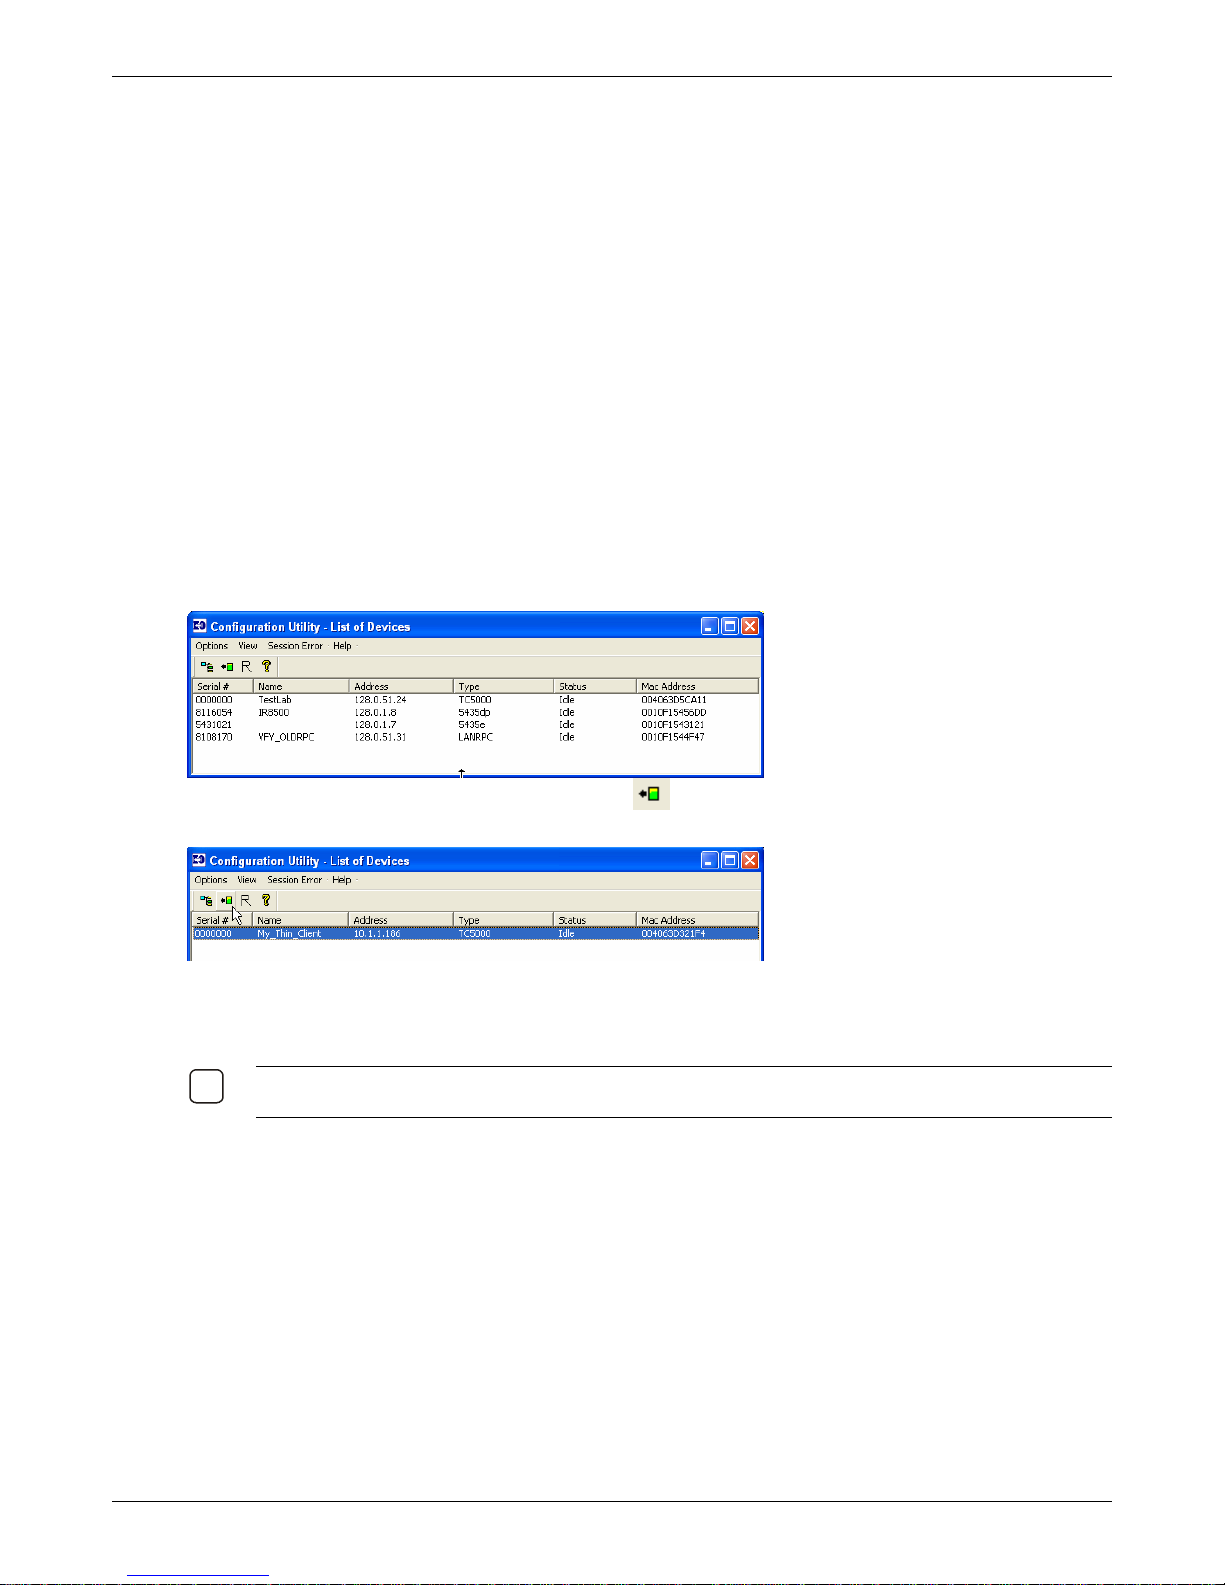
Advanced Configuration
9
The thin client includes the ability to customize the various configuration options. These include display
values, network connectivity, ICA and RDP options, etc.
This can be done either at the thin client or remotely using the I-O Configuration Utility.
I-O Configuration Utility
When using the I-O Configuration Utility, you will actually be using a keyboard and screen shadowning
process called VNC. This means that the on the PC running the I-O Configuration Utility, you will see
the actual screens on the thin client. Because the PC controls the keyboard and mouse on the thin
client, you can run the thin client remotely as if you were sitting right in front of the thin client. Note that
there will be a slight delay as the screens are being repainted on the PC – it takes a few moments for
the screens to be compressed and transmitted to the PC.
1. On the PC, start the I-O Configuration Utility. The local subnet will be scanned and will display a
listing of I-O Corporation devices. For remote sub-nets, set the scan options on the View | Scan
Options screen to display the devices.
Advanced Configuration
2. Highlight the desired thin client and click the (Open Device Configuration)
button. Alternately, you may double click the desire entry.
3. The VNC screen will appear and after a few seconds, the currently display screen on the thin client
will be displayed. From this point the mouse and keyboard on the PC are controlling the thin client.
As screens change on the thin client, they will be sent to the PC.
N
OTE: PLEASE BE PATIENT – IT MAY TAKE A FEW SECONDS FOR THE SCREENS TO BE UPDATED ON THE
PC.
Thin Client User’s Guide 86
Page 87
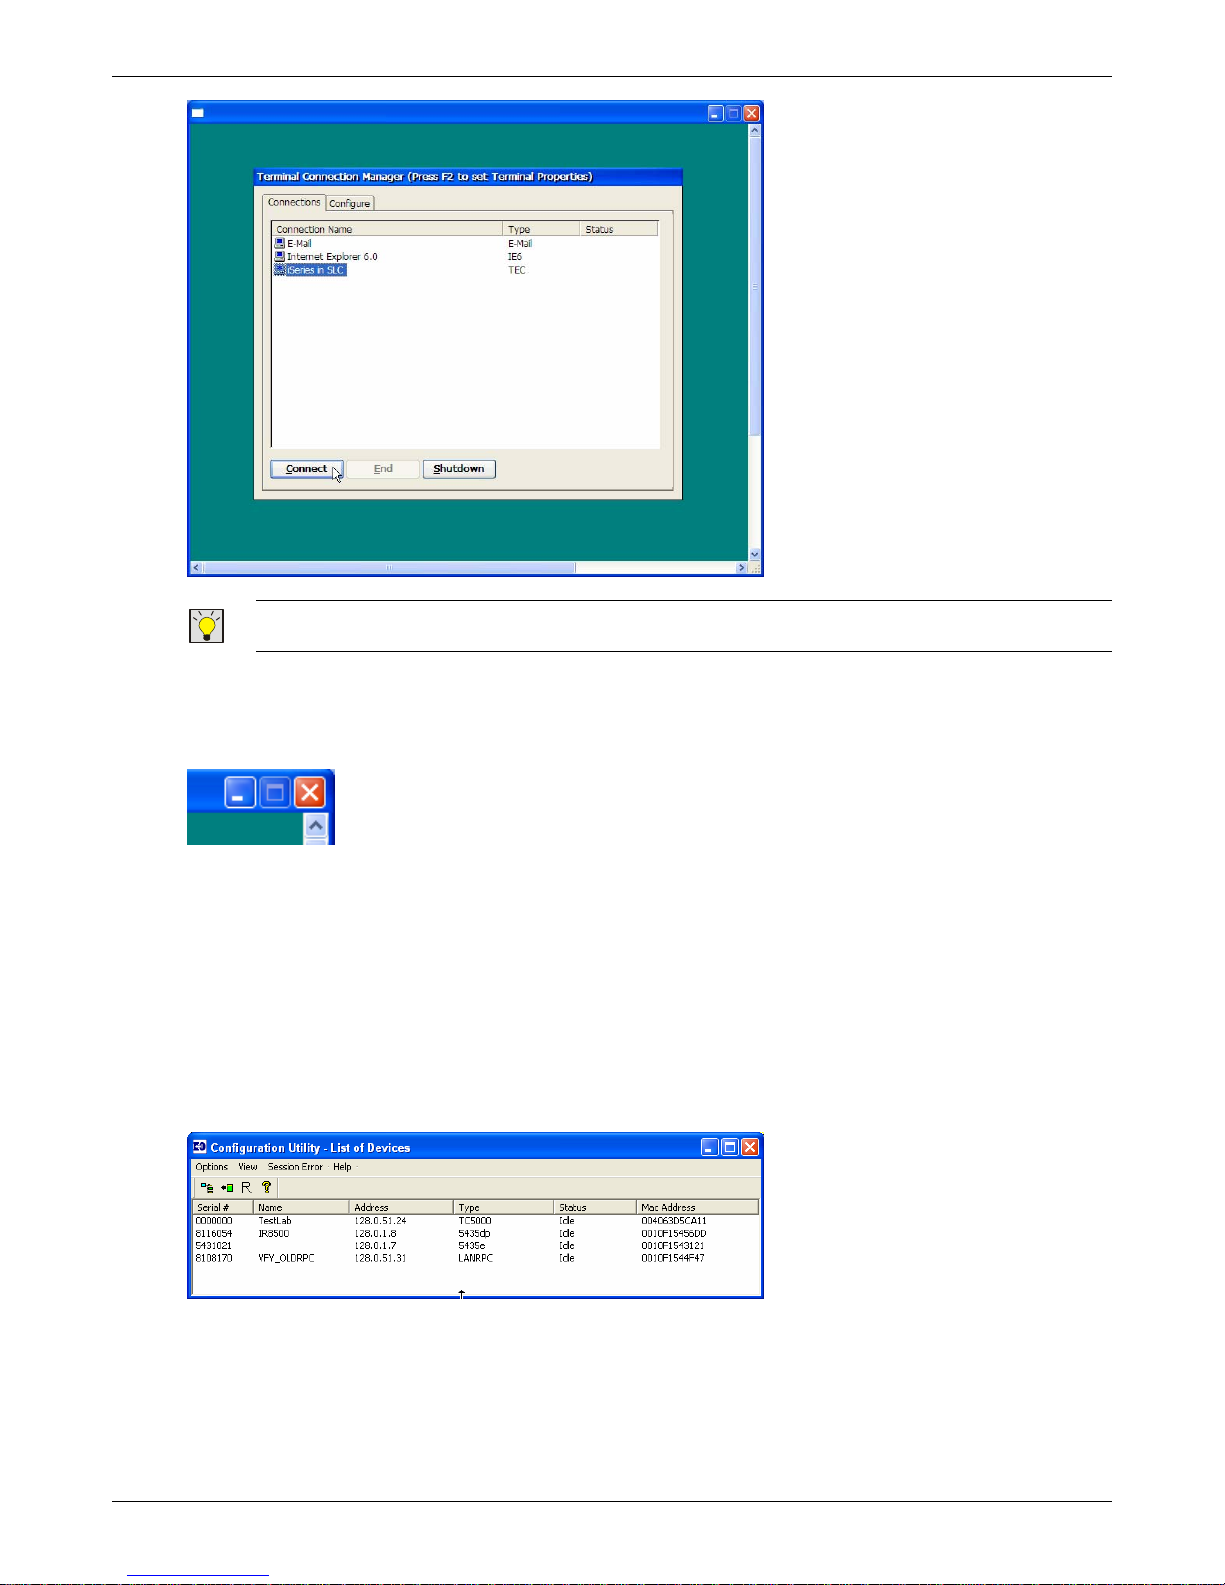
Advanced Configuration
IP: SETTING THE DISPLAY TO LOWER RESOLUTION AND COLOR PALLET WILL CAUSE THE THIN CLIENT
T
SCREENS TO APPEAR FASTER ON THE PC.
4. You may now perform any function on the thin client (including running connections, etc.)
5. To end the VNC session with the thin client, click the red X button on the title line (the upper right
corner of the VNC screen).
Save a Configuration
The I-O Configuration Utility provides a way to save a thin client’s configuration. The configuration may
then be sent back to the thin client if it were restored to factory defaults. Or a master configuration could
be created and then sent to other thin clients so that the setup and installation of multiple thin clients
can be may easier.
1. On the PC, start the I-O Configuration Utility. The local subnet will be scanned and will display a
listing of I-O Corporation devices. For remote sub-nets, set the scan options on the View | Scan
Options screen to display the devices.
2. Highlight the desired thin client. Then select the Options | Thin Client Config Copy | Retrieve
Configuration option on the menu.
Thin Client User’s Guide 87
Page 88
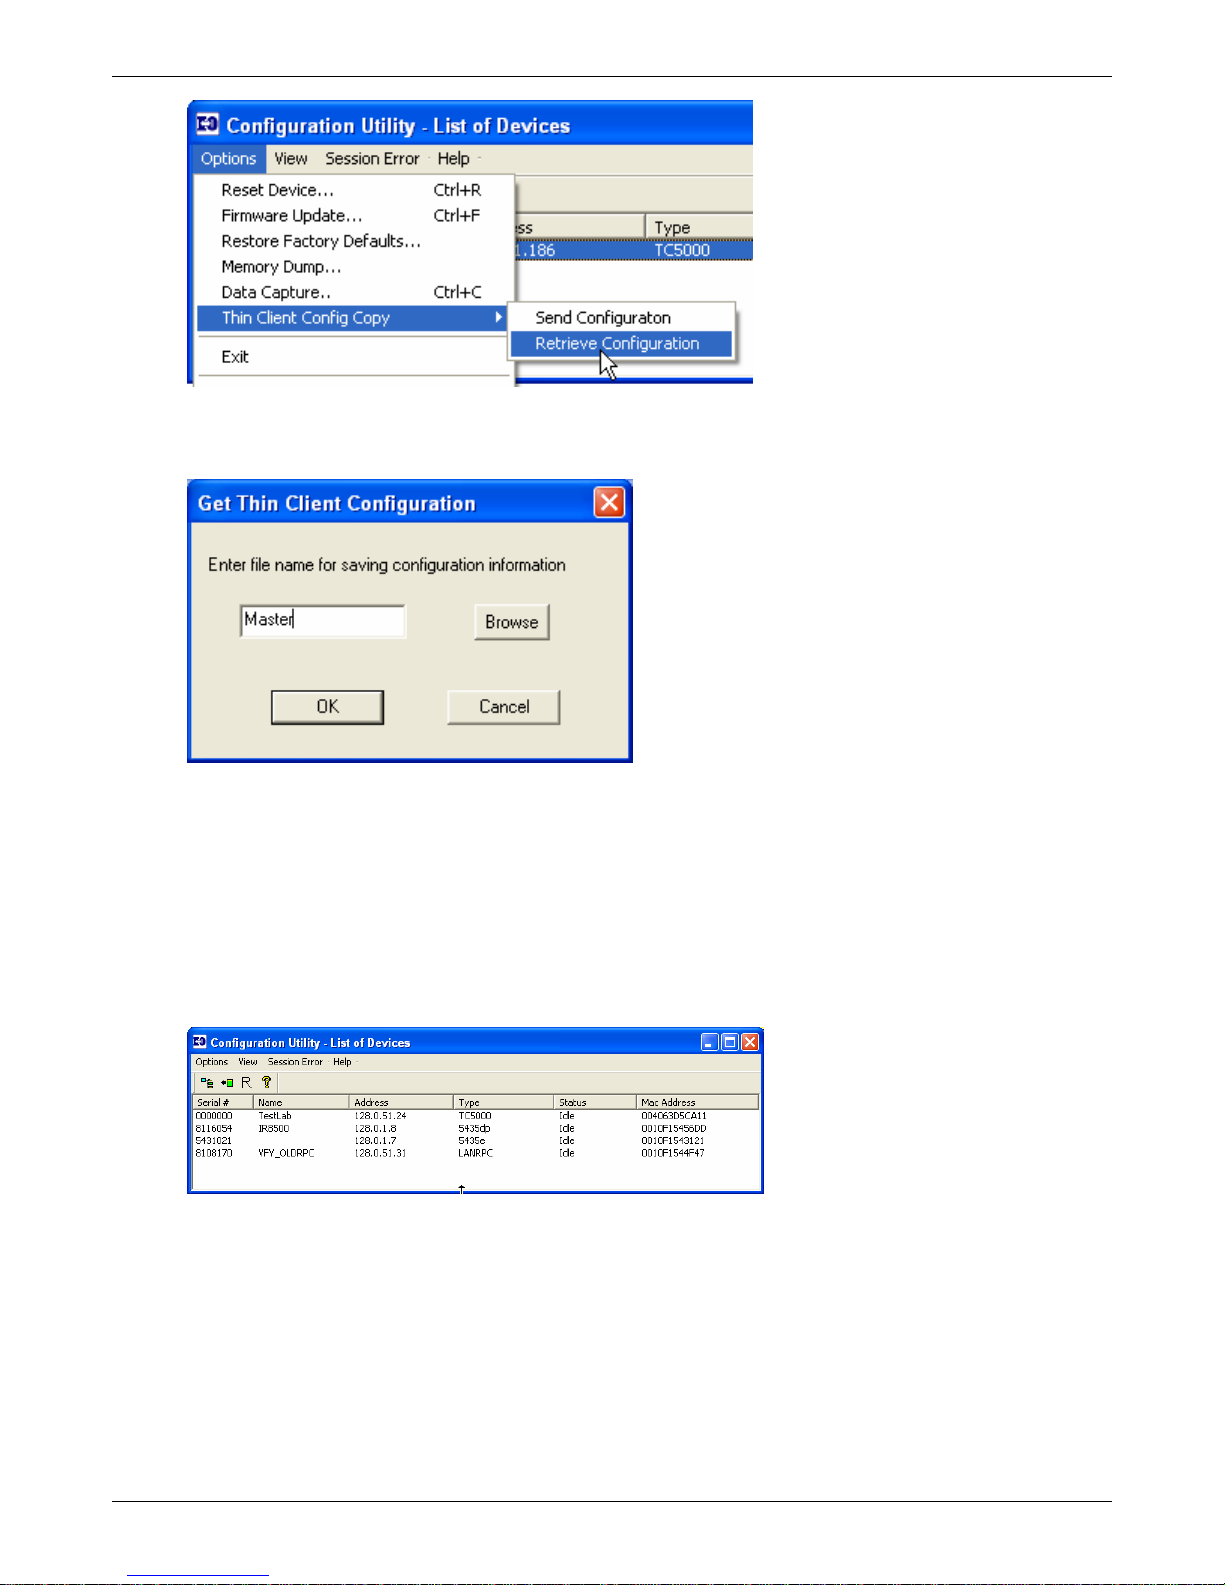
Advanced Configuration
3. The thin client’s configuration will be retrieved. In the field, enter the name for this configuration file.
If the file is to be saved in a different direction than where the I-O Configuration Utility is store, click
Browse to change directories. Click OK to save the file.
Send a Configuration to a Thin Client
Once a thin client’s configuration has been saved, it can be sent back to the thin client to restore the
customized configuration settings that were originally set up on the thin client. The file may also be a
master configuration file that can be sent or pushed to any number of thin clients where a standard
configuration has been established.
1. listing of I-O Corporation devices. For remote sub-nets, set the scan options on the View | Scan
Options screen to display the devices.
2. Highlight the desired thin client. Then select the Options | Thin Client Config Copy | Send
Configuration option on the menu.
Thin Client User’s Guide 88
Page 89
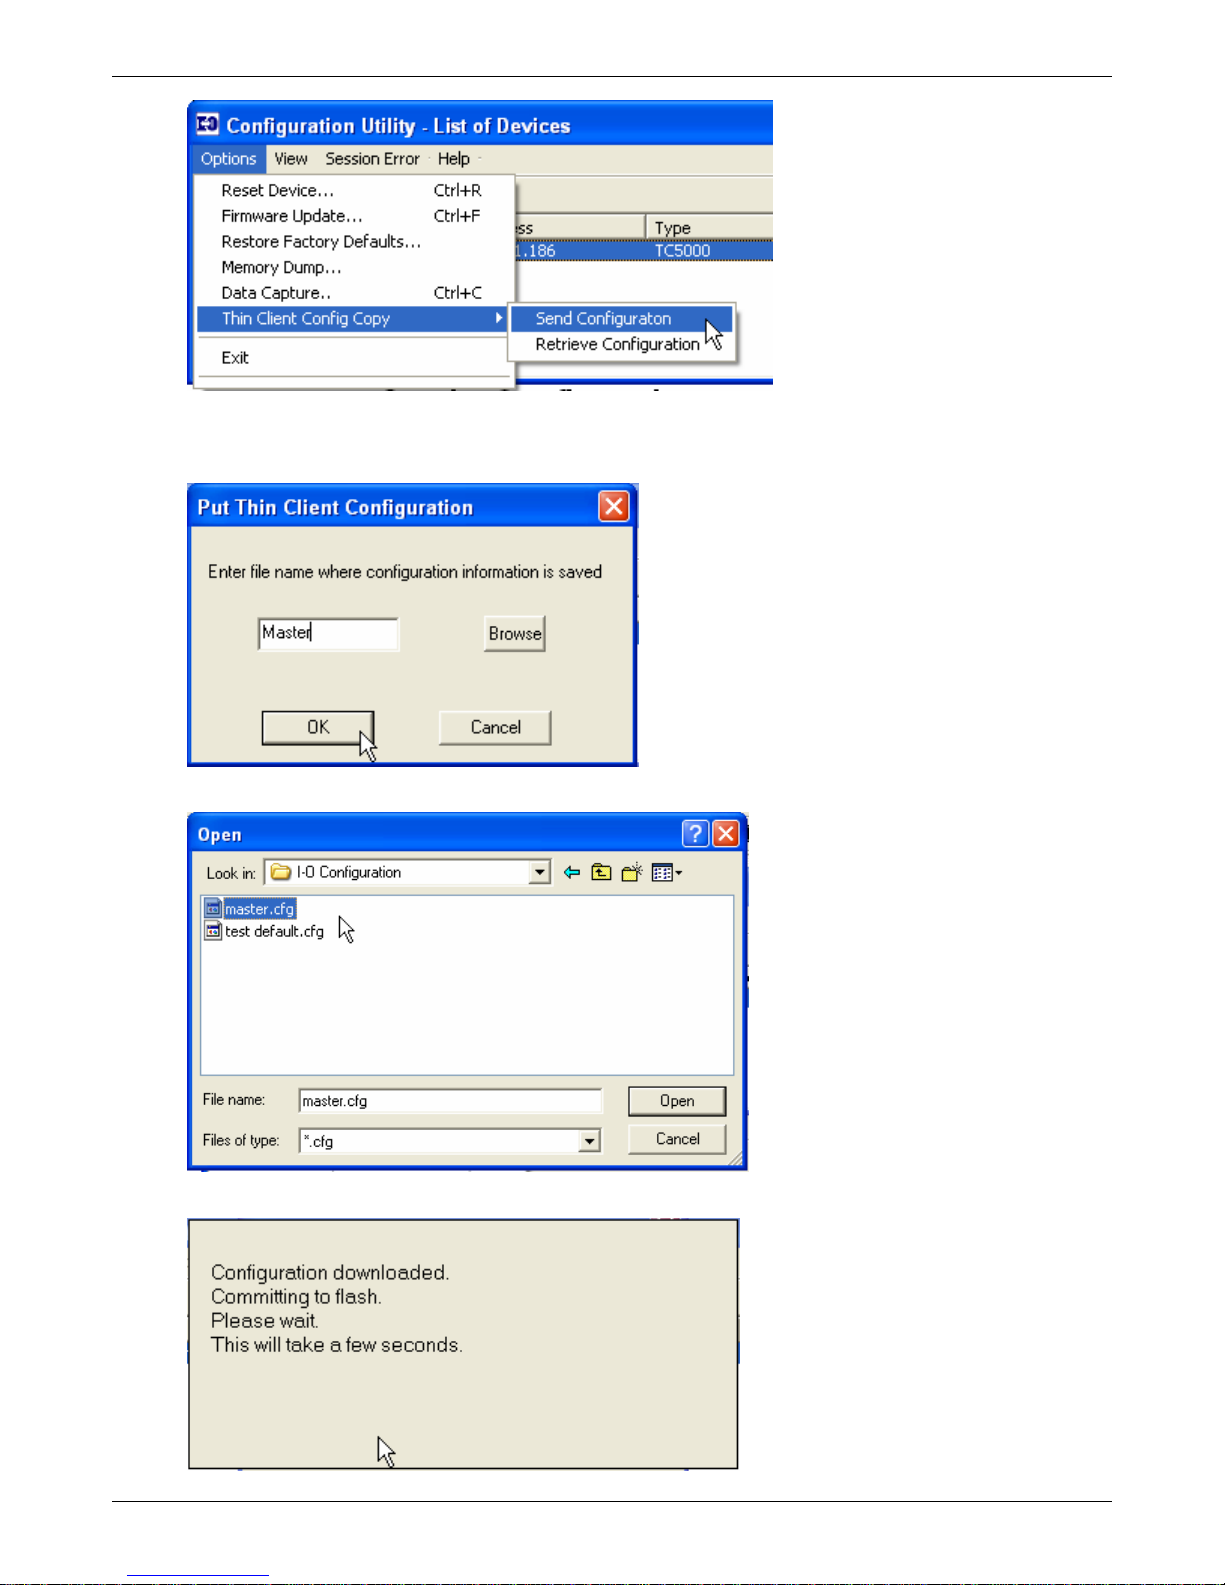
Advanced Configuration
3. On the Put Thin Client Configuration screen, enter the name of the previously saved configuration
file, or click the Browse button to find a file stored in a different directory. Click OK to send the file
to the thin client.
4. The configuration file be sent to the thin client.
Thin Client User’s Guide 89
Page 90
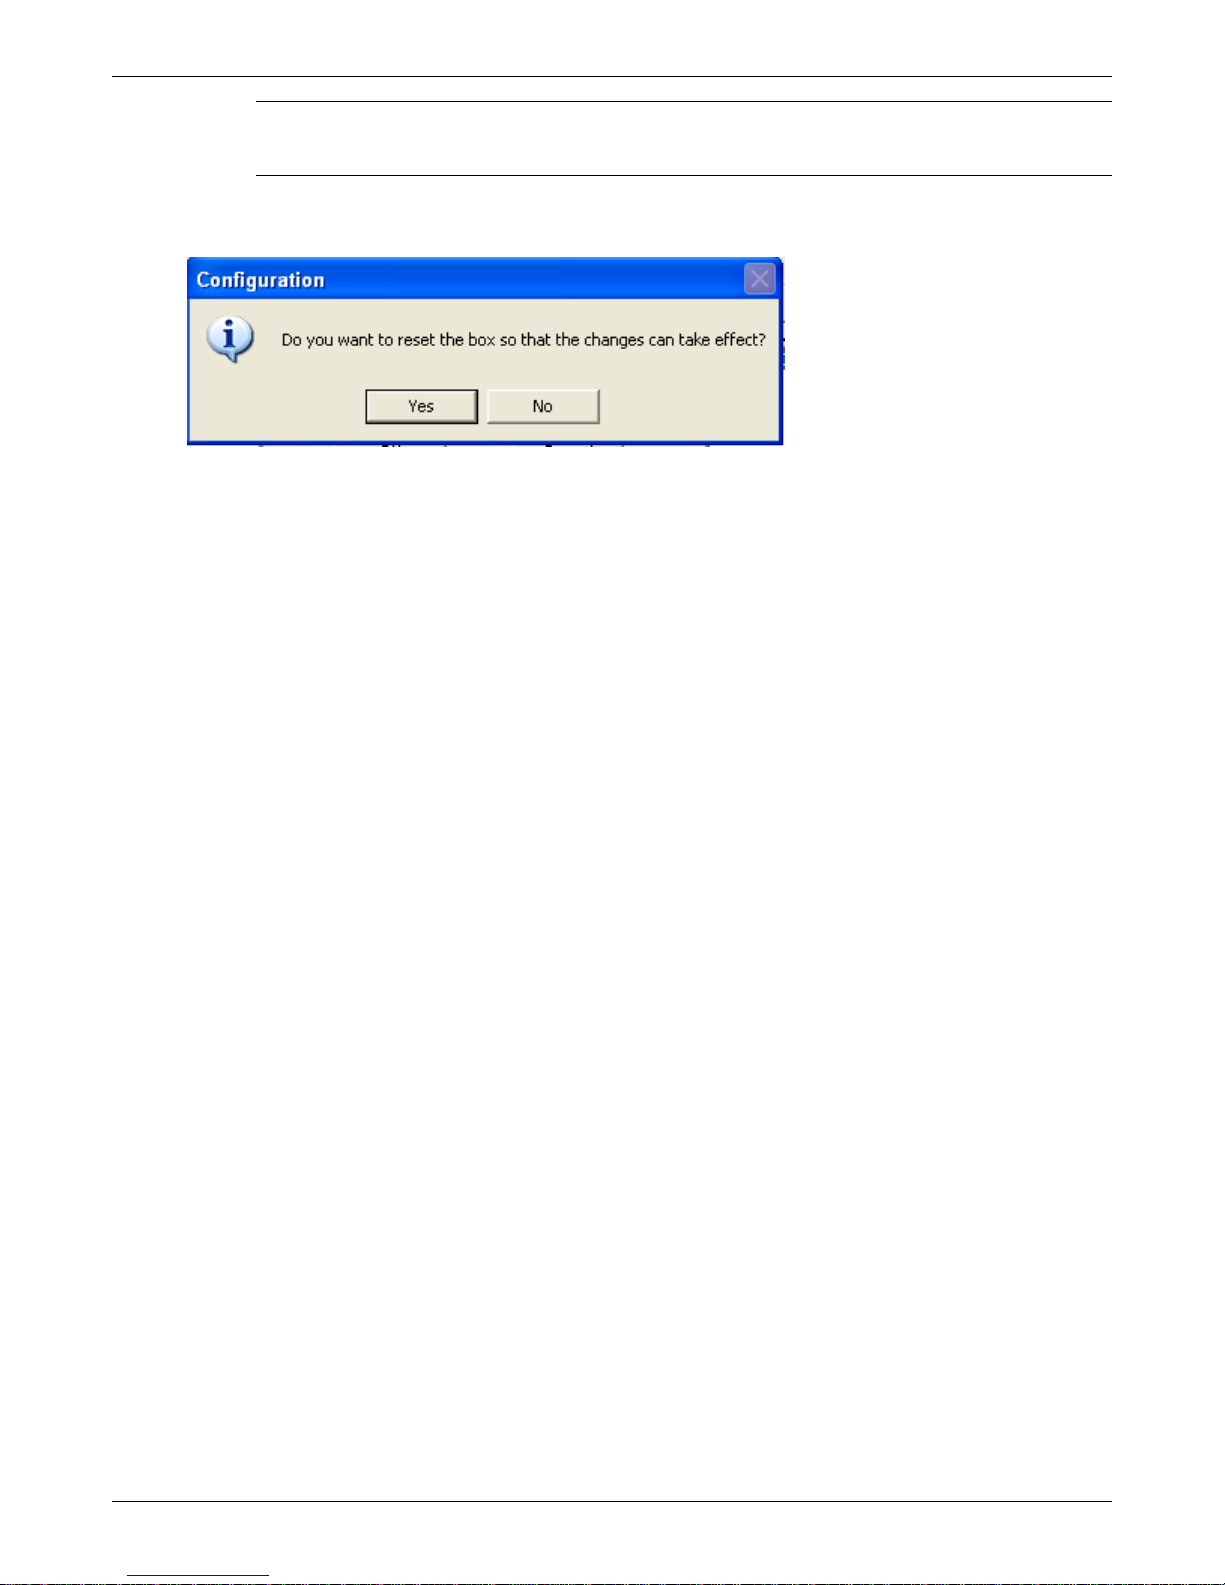
Advanced Configuration
CAUTION: DO NOT POWER DOWN THE THIN CLIENT WHILE THE CONFIGURATION FILE IS BEING SENT TO
THE THIN CLIENT. IF THE THIN CLIENT IS POWERED DOWN DURING THIS PROCESS, THE FLASH MAY
BECOME CORRUPTED AND REQUIRED RETURNING THE THIN CLIENT FOR REPAIR
.
5. After the configuration file has been sent to the thin client you will be asked to confirm resetting the
thin client. Click Yes
6. The thin client will restart and display the Connections Manager screen.
Thin Client User’s Guide 90
Page 91
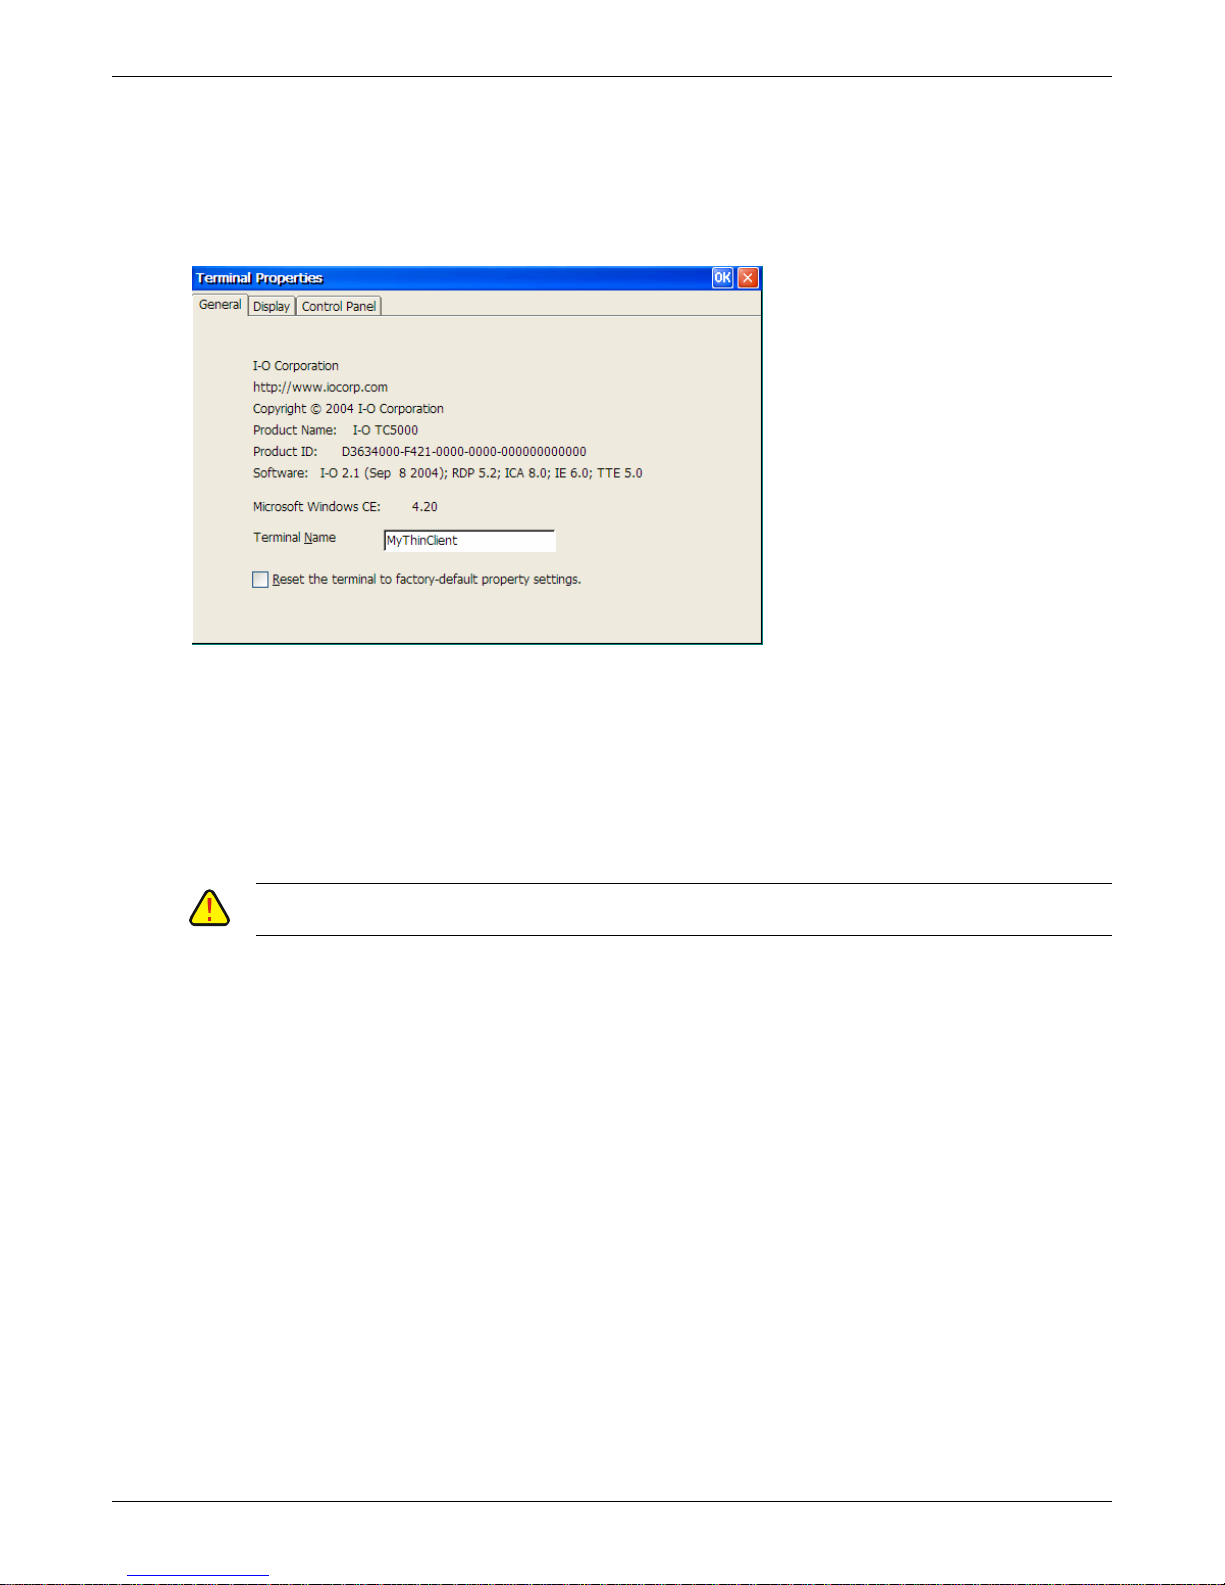
Advanced Configuration
General Tab
To access the Terminal Configuration screens, on the Connection Managerpress the F2 key.
The General Tab presents information about the current version numbers of the various software
modules that are contained in the thin client as well as Microsoft Product ID and I-O Serial Numbers.
[
Terminal Name: By default, the thin client has a unique name based upon the thin client’s MAC
address. You may either retain this name or enter another unique name the thin client will appear
as on the I-O Configuration Utility. This name will also be used to identify this thin client to other
computers when connected in a Microsoft or Citrix network environment. The name cannot begin
with a numeric value, nor can it contain the following characters: \:”;/~’@#$%^{}<>*+=|?,. or space.
Reset to Factory Defaults: Check this box to cause the thin client to be restored to the factory
defaults. You will be asked if you really want to reset the thin client. Then you will need to click the
OK button on the title line (upper right corner).
AUTION: SELECTING THIS OPTION WILL CLEAR ALL CONFIGURATION SETTINGS. BE CERTAIN YOU
C
WANT TO RESTORE THE THIN CLIENT TO ITS FACTORY DEFAULTS BEFORE TAKING THIS OPTION.
Thin Client User’s Guide 91
Page 92
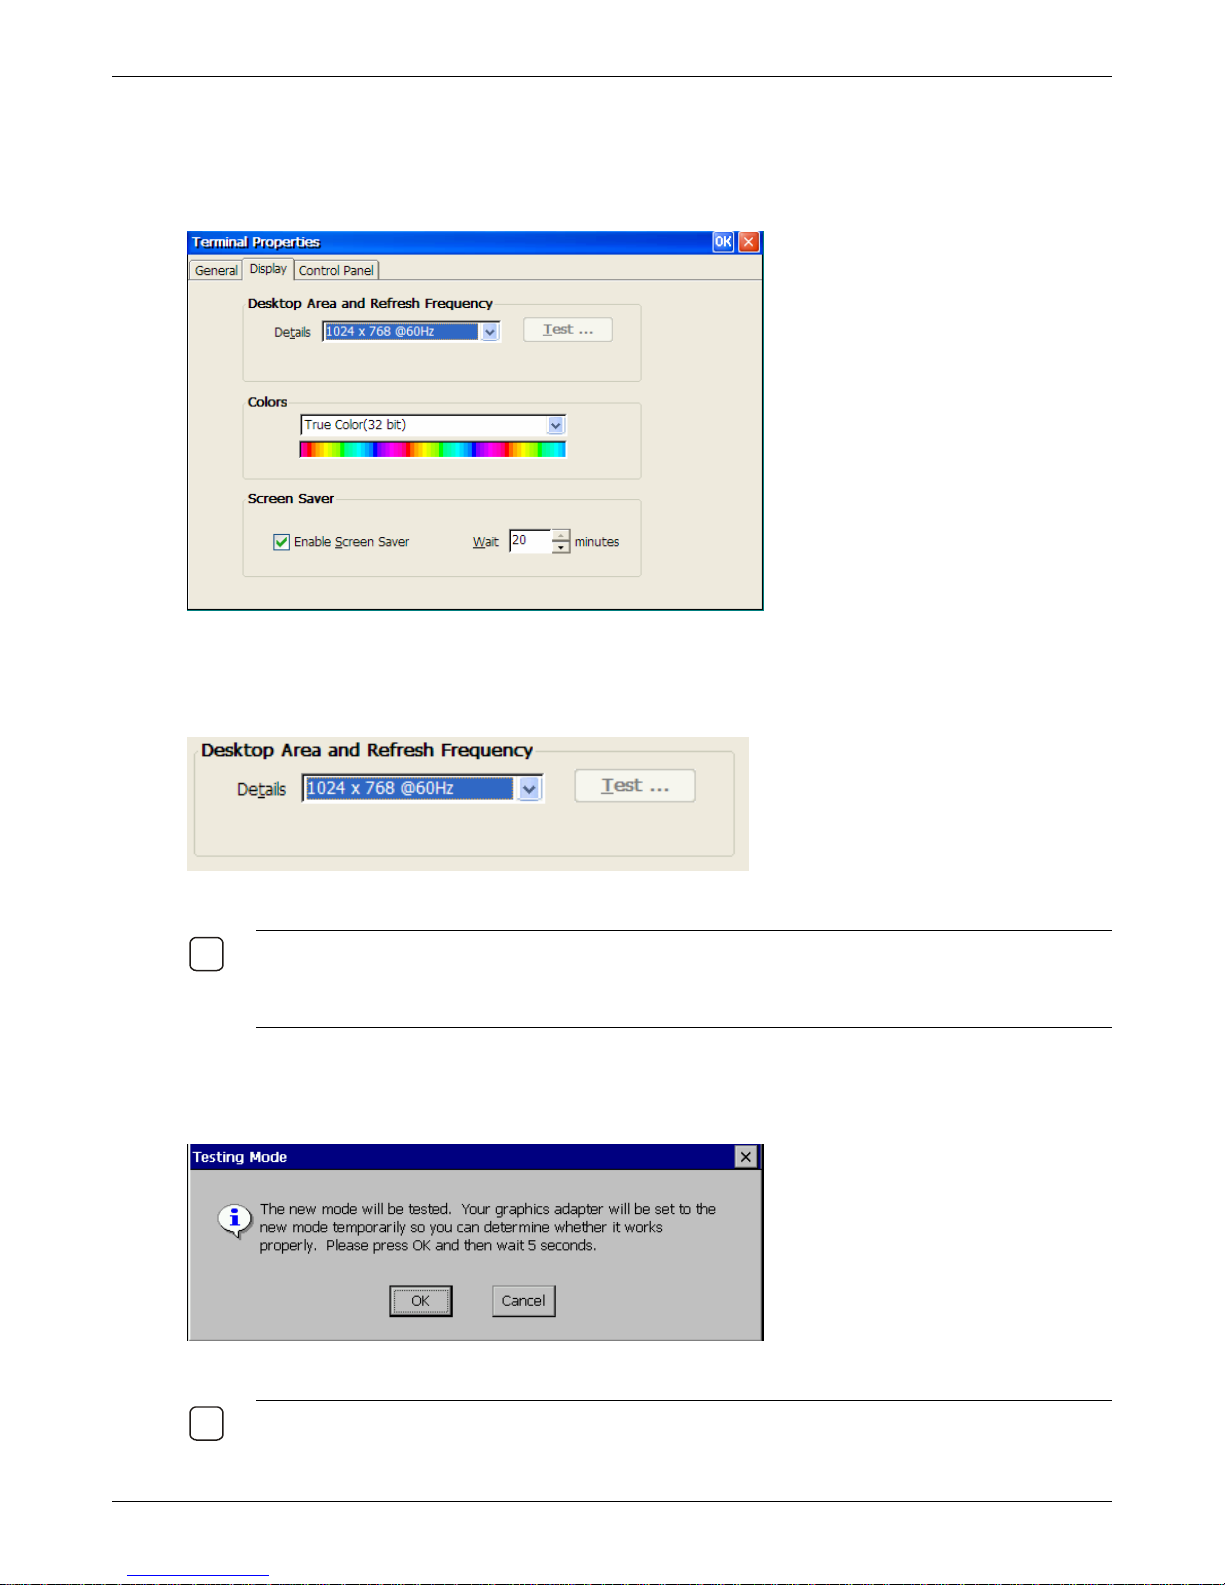
Advanced Configuration
9
9
Display Tab
This tab offers options on selecting the proper resolutions for the monitor attached to the thin client,
color pallets and the screen saver.
Desktop Area and Refresh Frequency
By default, the thin client is configured to display at a resolution of 800 x 600 and a refresh frequency of
75Hz.
Select the resolution and refresh rate appropriate for your monitor.
OTE: IN GENERAL CRT MONITORS CAN HANDLE A RANGE OF RESOLUTIONS AND REFRESH RATES.
N
HOWEVER, LCD MONITORS PREFER THE RESOLUTION AND REFRESH RATE TO BE SET TO MATCH THEIR
“NATIVE” RESOLUTION. GENERALLY THIS IS 1024 X 728 @ 60 HZ FOR 15” LCD MONITORS, AND 1280
X
1024 @ 60 HZ FOR 17” LCD MONITORS
If you select a resolution or refresh frequency other than the default setting, verify whether your monitor
supports the selected setting by clicking the Test button.
The following prompt is displayed.
Click OK to continue. A test pattern of black and white boxes will be displayed for about five seconds.
OTE: MONITORS WITH ON SCREEN DISPLAY (OSD) FEATURE MAY DISPLAY APPROPRIATE MESSAGES
N
(SUCH AS ‘OUT OF SYNC’ OR ‘OUT OF RANGE’) IF THE SELECTED RESOLUTION AND FREQUENCY ARE
Thin Client User’s Guide 92
Page 93
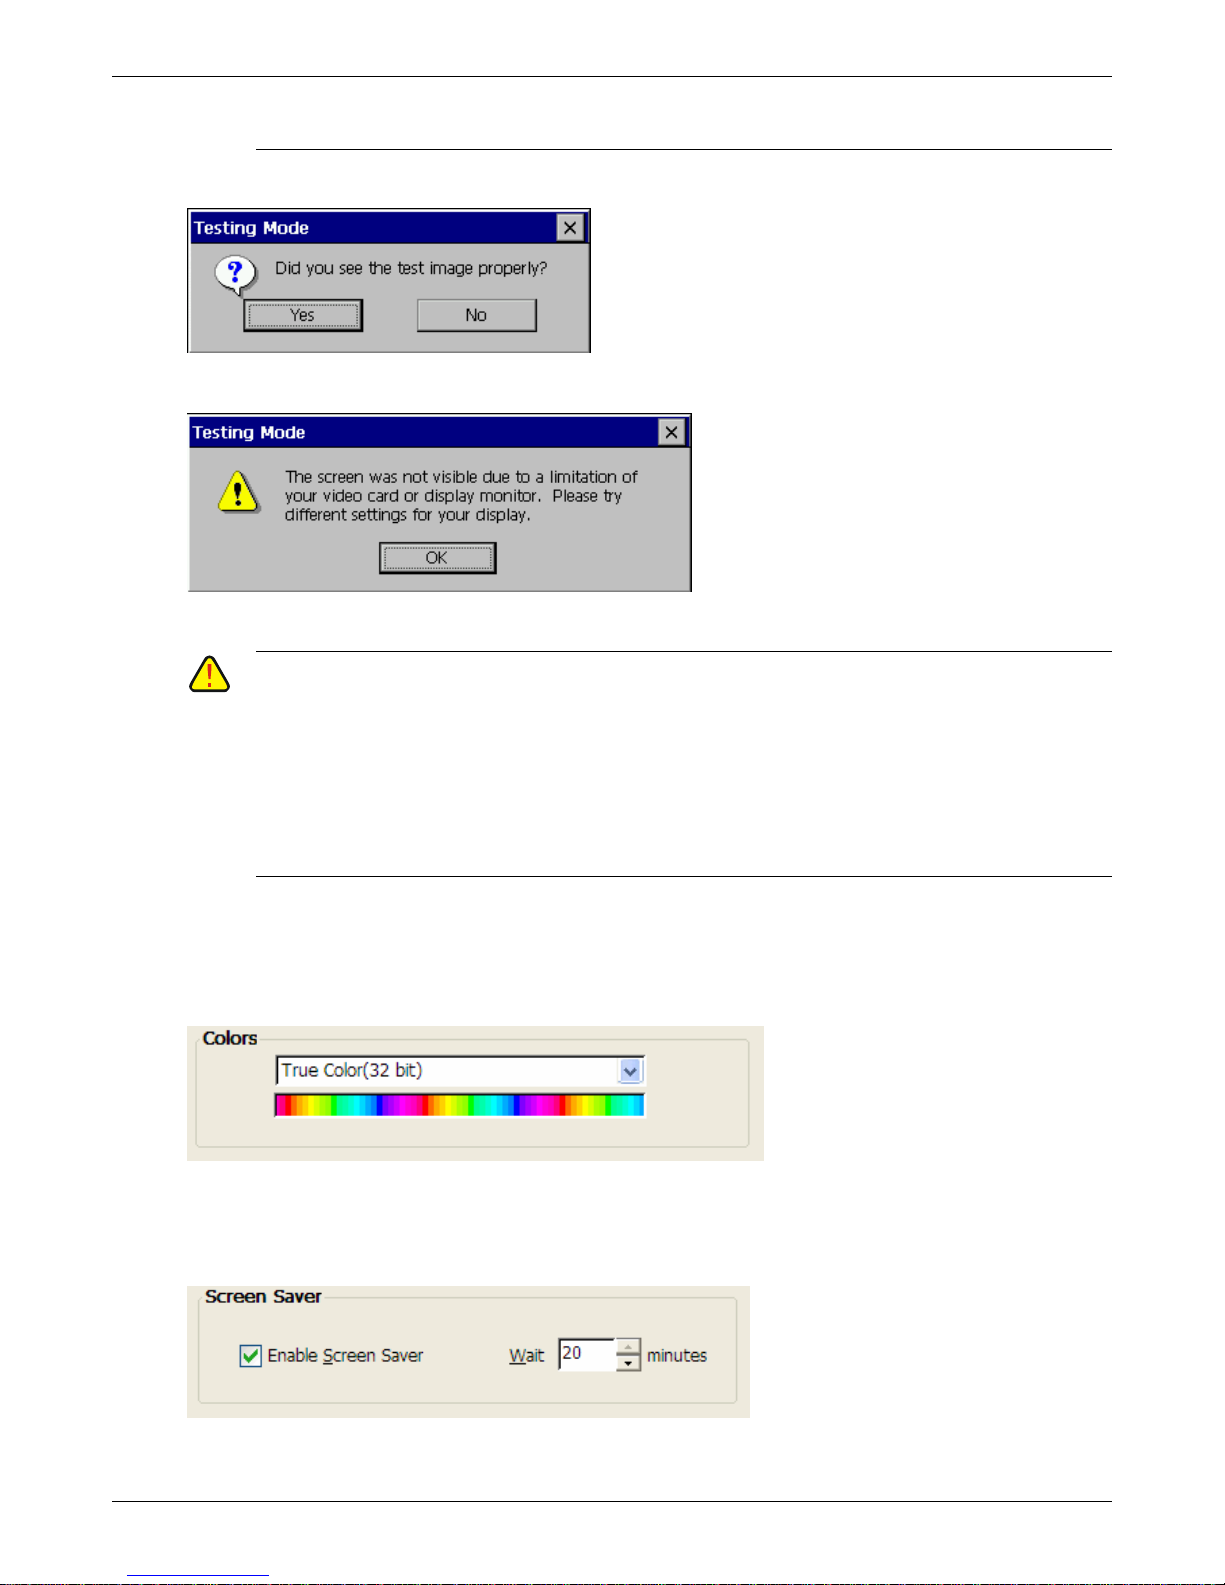
Advanced Configuration
NOT SUPPORTED
MONITOR CONNECTED TO THE THIN CLIENT
. THE EXACT TEXT OF THE OSD MESSAGE WOULD DEPEND ON THE MODEL OF THE
.
The screen then clear and a following message box will be displayed.
If the appropriate test pattern was displayed, click Yes to return to the setup wizard.
If the test pattern was not properly displayed, click No. The following message is displayed.
Click OK to change the setting and repeat the test.
C
AUTION: USE THE TEST BUTTON TO TEST THE SELECTED RESOLUTION OF THE MONITOR. FAILURE TO
DO SO WILL RESULT IN THE THIN CLIENT NOT BEING ABLE TO DISPLAY THE SCREEN.
IF YOU HAVE SELECTED AN UNSUPPORTED SETTING AND THE MONITOR DOES NOT DISPLAY THE SCREEN,
YOU WILL NEED TO RESTART THE THIN CLIENT
. SHUT DOWN THE THIN CLIENT BY HOLDING IN THE
POWER BUTTON FOR SEVERAL SECONDS UNTIL THE POWER LED GOES OUT. PRESS THE POWER
BUTTON TO POWER UP THE THIN CLIENT. IMMEDIATELY AFTER THE I-O SPLASH SCREEN CLEARS,
PRESS THE
RESTORED TO THE FACTORY DEFAULTS AND THE
F7 KEY SEVERAL TIMES. AFTER A FEW SECONDS THE THIN CLIENT’S SETTINGS WILL BE
SETUP WIZARD WILL START.
Colors
Select the color pallet that your monitor supports from the Colors drop down box
Screen Saver
Enable the screen saver, if desired, by checking the Enable Screen Saver box. Select the time to wait
before the screen activates from the scroll box.
Thin Client User’s Guide 93
Page 94
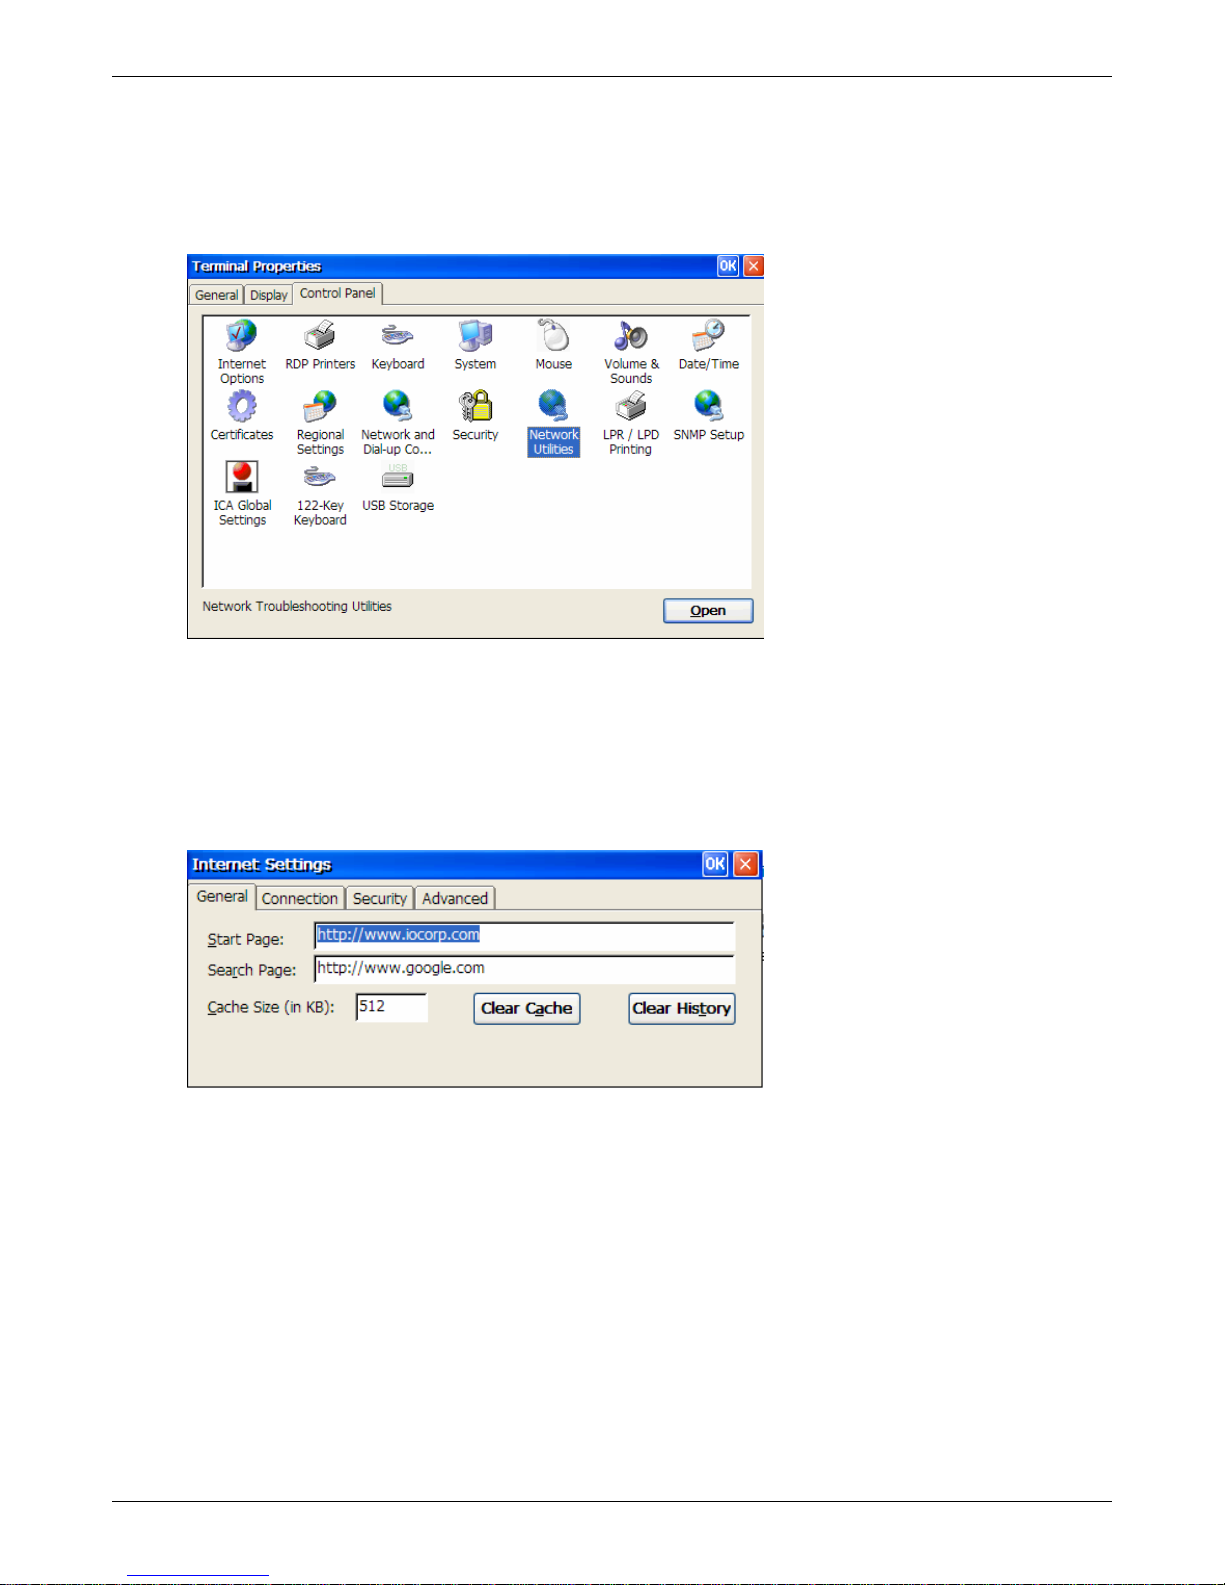
Advanced Configuration
Control Panel
The Control Panel offers options to customize many of the functional aspects of the thin client. After
making the various settings, click OK to or the X in the upper right corner to exit the Terminal Properties
screens and return to the Connection Manager.
Internet Options
Use this option to change the default values for the Internet Explorer 6 for CE application. The screens
may also be accessed by taking the View | Options menu selection when running Internet Explorer (IE).
General Tab
Start Page: Enter the Web you want the Internet Explorer to go to when IE is started.
Search Page: Enter the Web page you want to go to when selecting the Search option on the IE
menu.
Cache Size: Enter the amount of RAM to use for caching Web pages.
Clear Cache: Click this button to empty the cache.
Clear History: Click this button to clear the history of Web pages visited.
Thin Client User’s Guide 94
Page 95
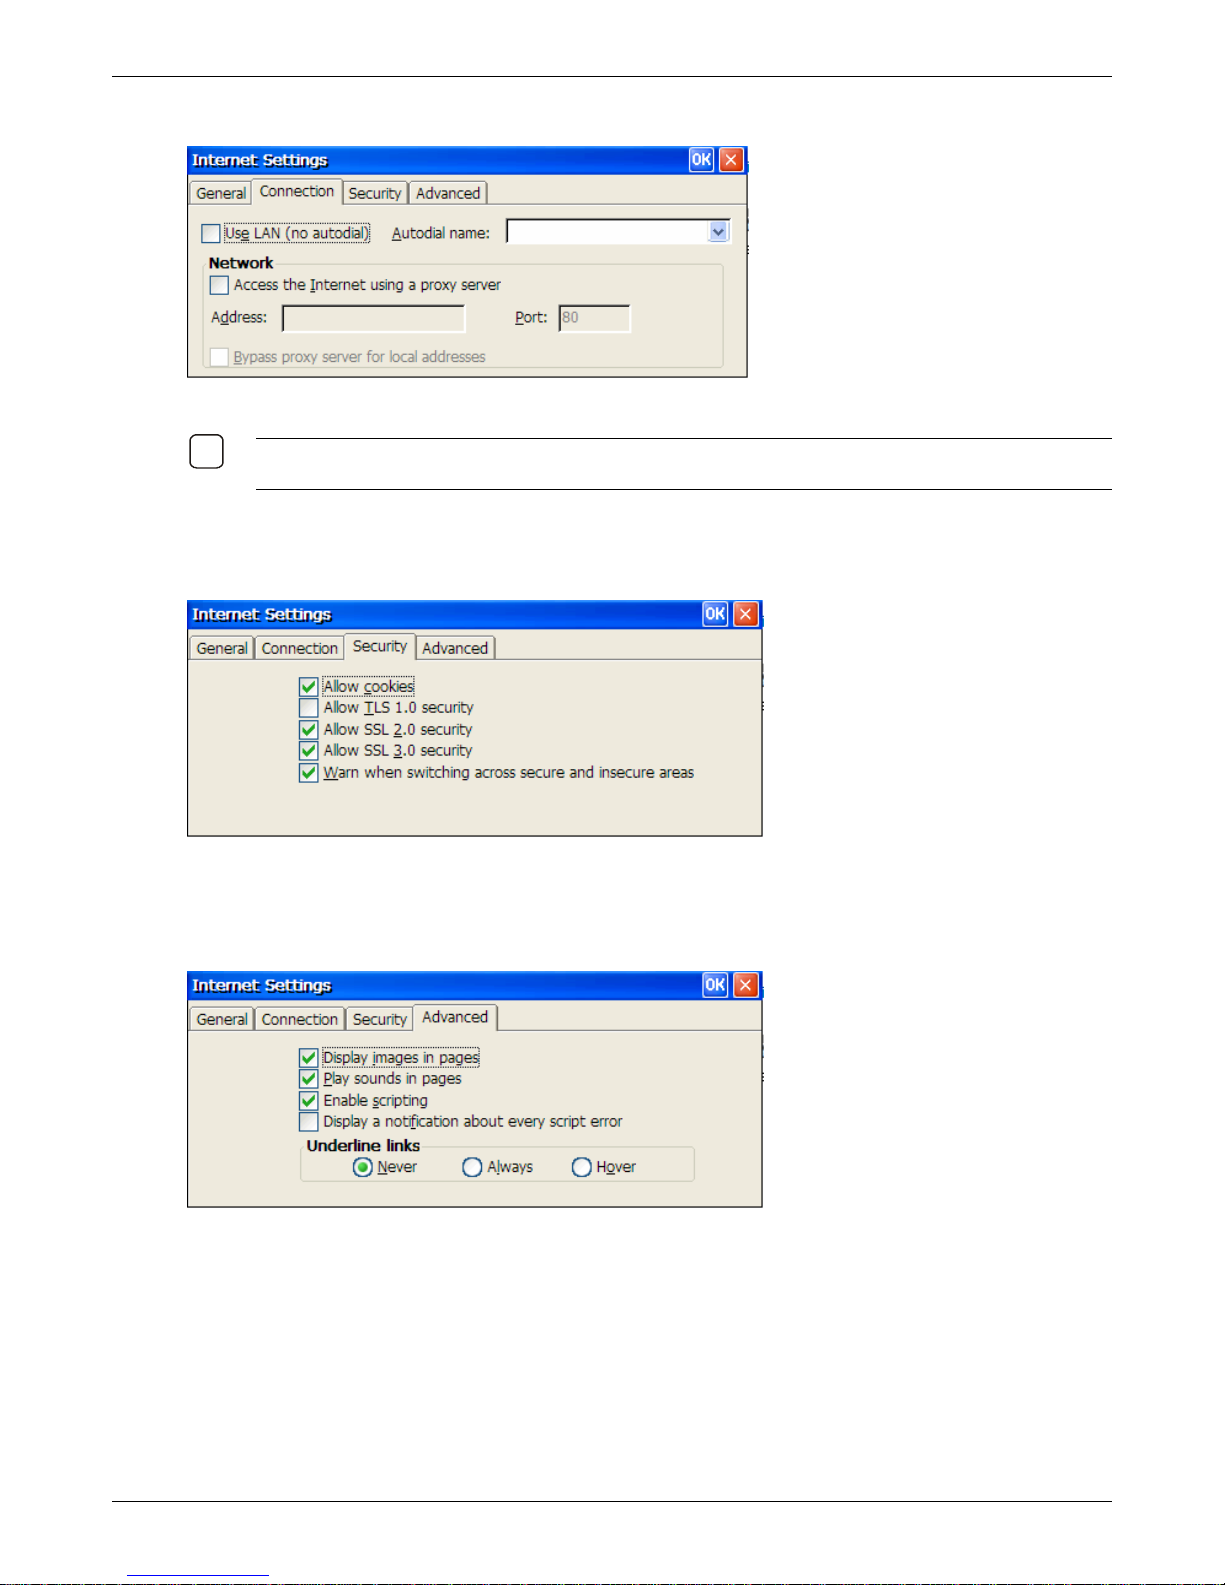
Connection Tab
9
Enter values on this screen to customize the connection.
OTE: IF THE INTERNET CONNECTION IS BEING MADE THROUGH THE ETHERNET LAN, NO CHANGES
N
ARE REQUIRED ON THIS PAGE.
Security Tab
Advanced Configuration
Select the various security levels and cookies options desired for the IE connection.
Advanced Tab
Select the display, sound, scripting and links options as desired.
Thin Client User’s Guide 95
Page 96
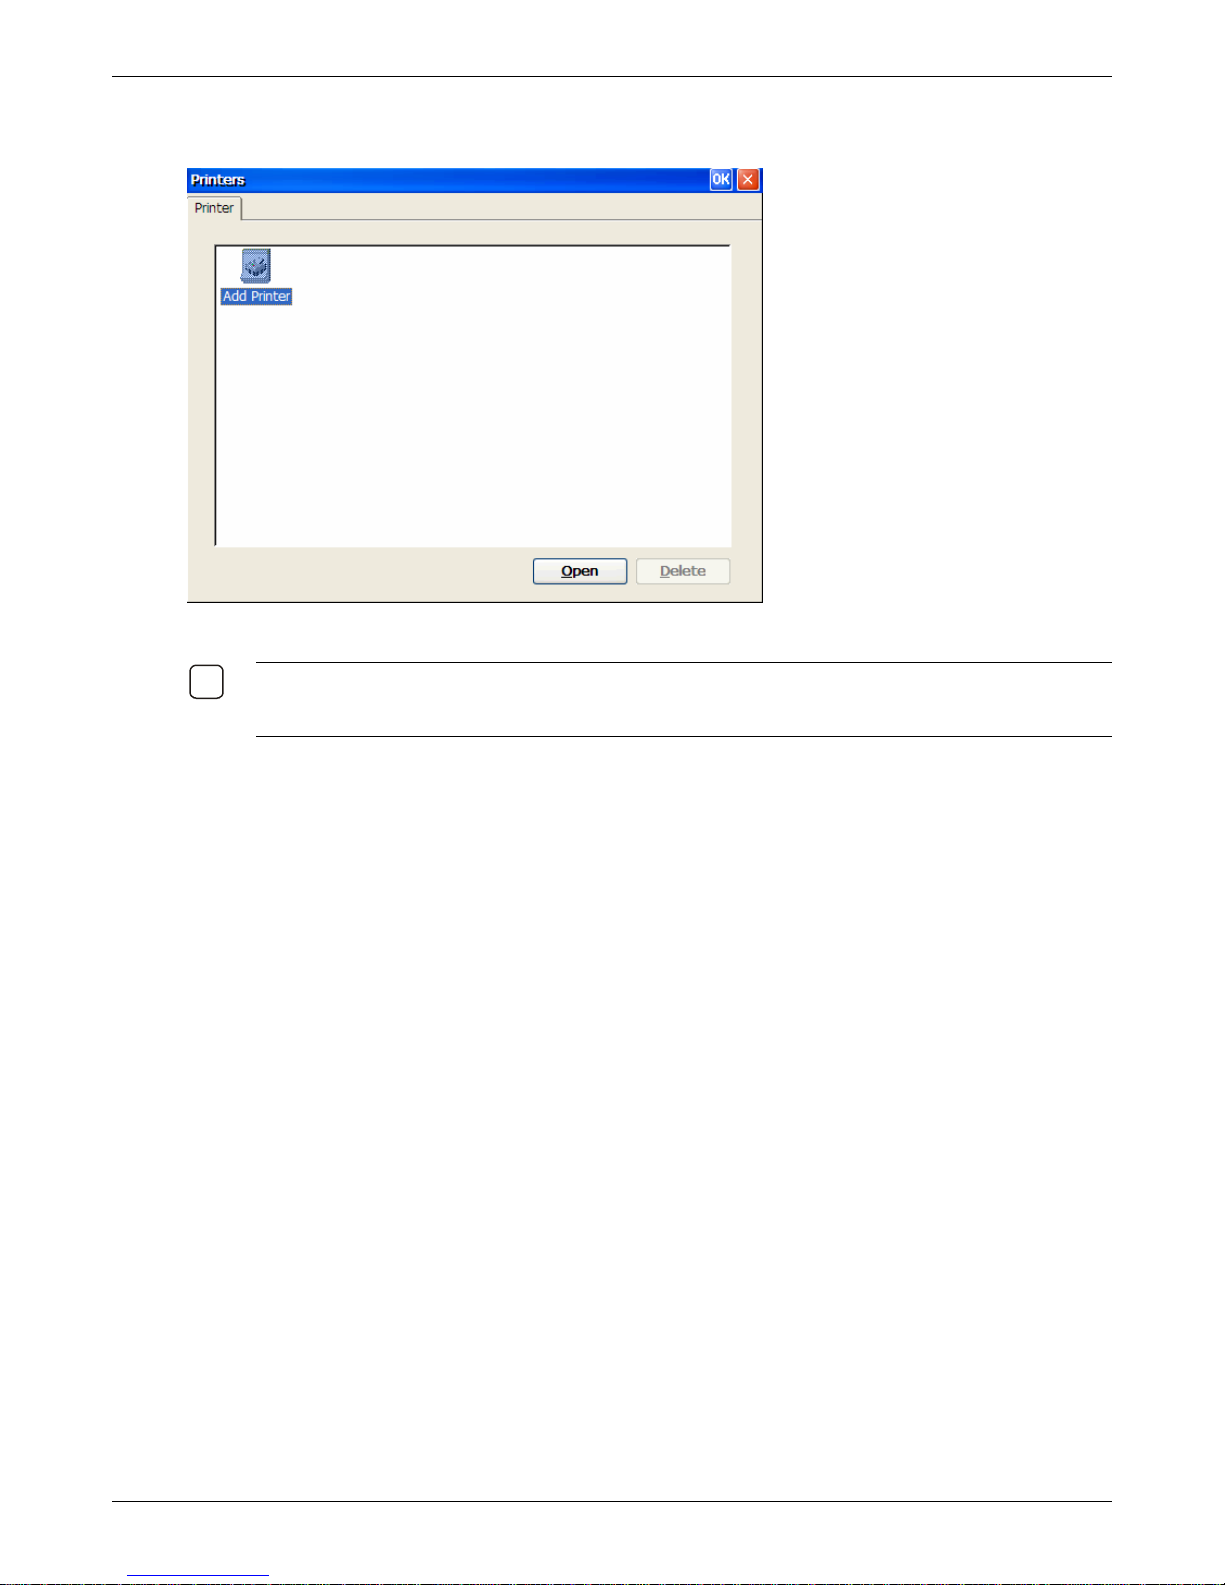
RDP Printers
9
The RDP Printer option provides access the local printer configuration tool.
Advanced Configuration
T
HE PRINTERS WITH THIS TOOL ARE USED ONLY BY RDP CONNECTIONS TO WINDOWS 2000 OR LATER
SERVERS WITH TERMINAL SERVICES ACTIVE. RDP PRINTERS ARE NOT USED BY ICA, INTERNET
EXPLORER, OR ANY OF THE VIEWERS.
To setup a RDP printer, click the Add Printer icon and follow the Add Printer Wizard.
Thin Client User’s Guide 96
Page 97
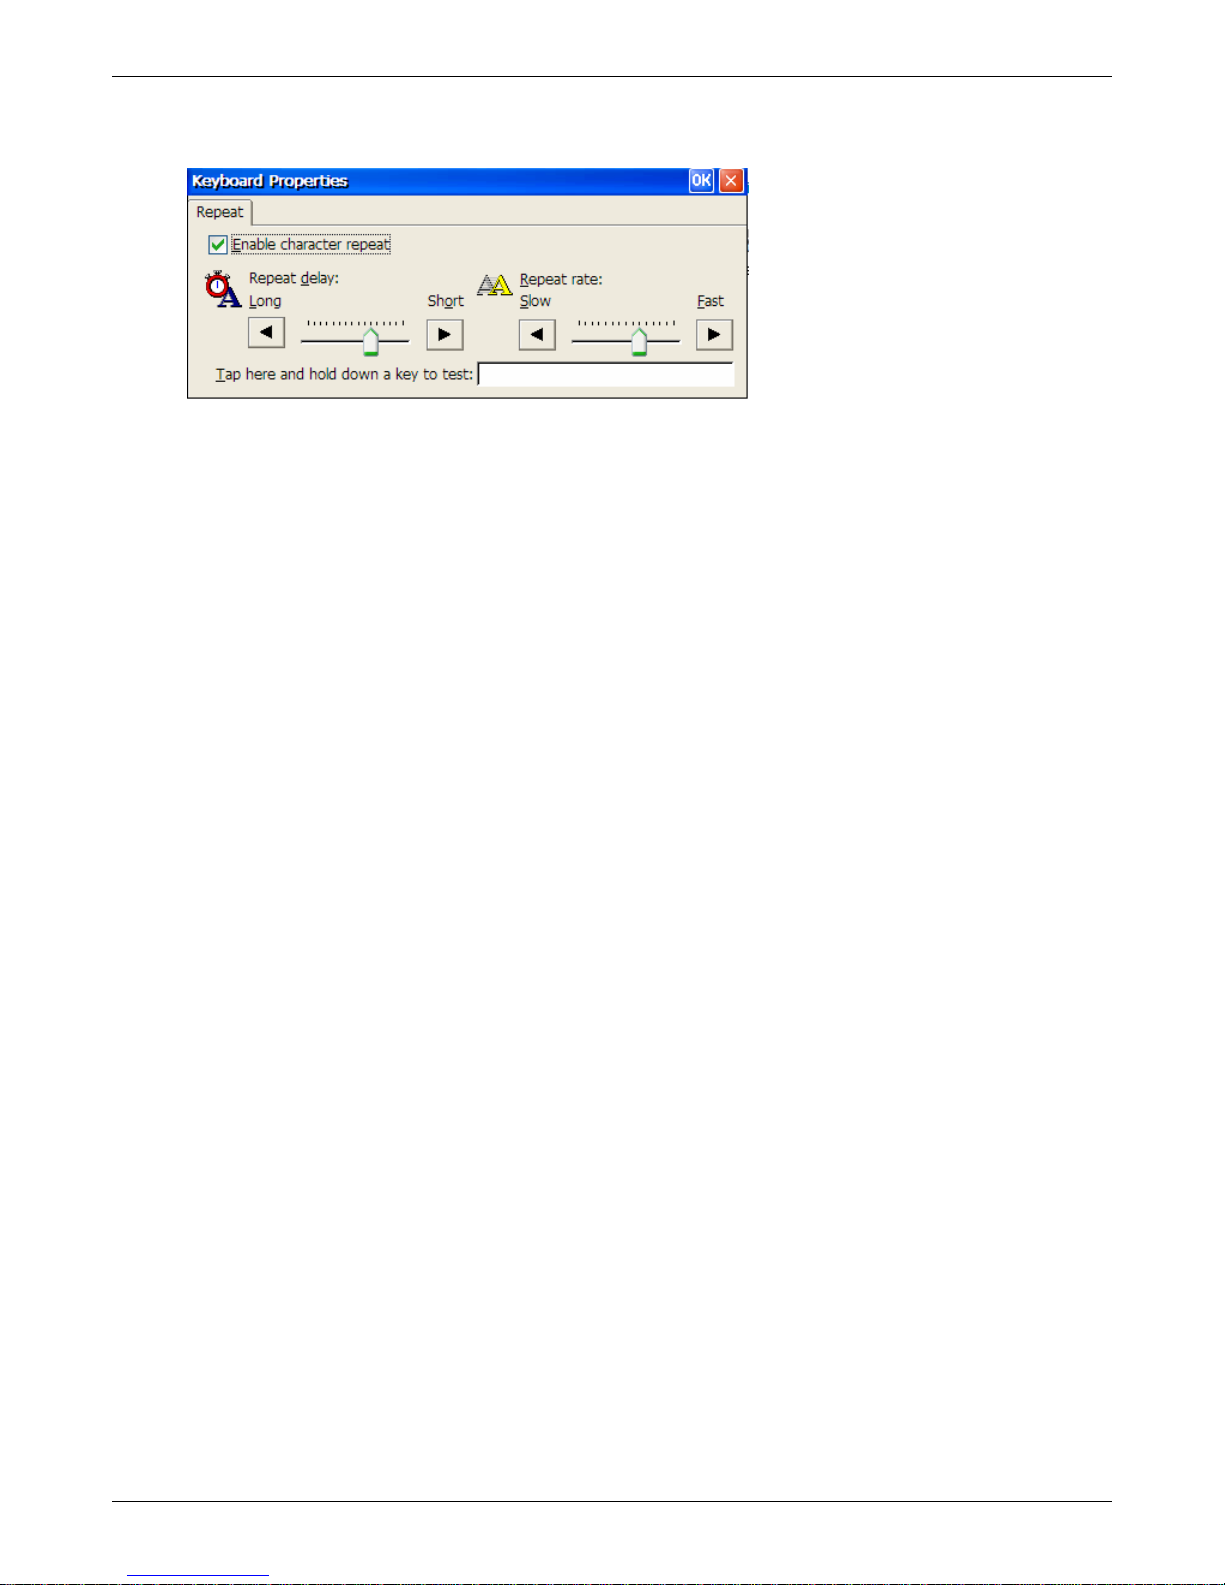
Advanced Configuration
Keyboard
The options on this screen are used to enable and customize how character repeat will function.
Thin Client User’s Guide 97
Page 98
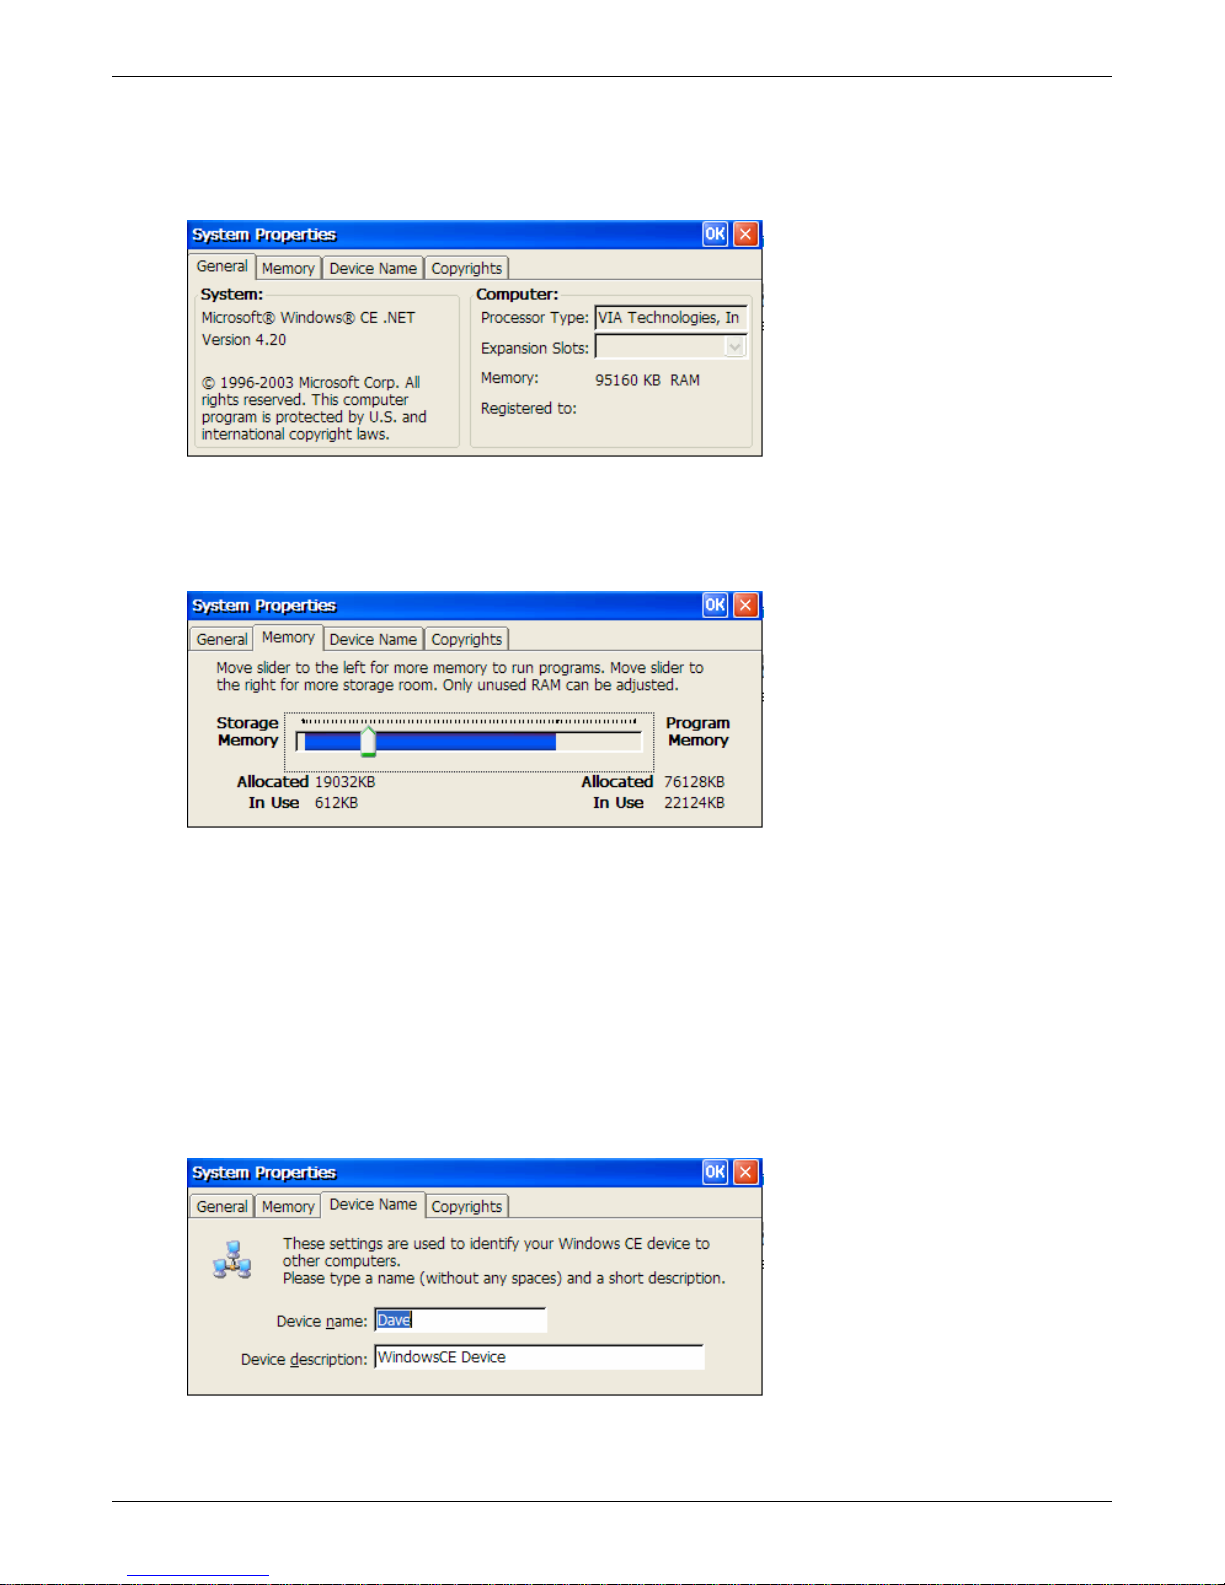
System
General Tab
This screen presents general information about the thin client.
Memory
Advanced Configuration
Use this screen to select how much of the RAM in the thin client can be used for local storage for IE
cookies, history, and cache as well as will be available for storage of e-mail attachments. Additional
storage may be added to the thin client for attachments by using a USB external storage device.
Program memory usage increases as connections are used. For example, twenty terminal emulation
connections may be configured, but if only one is used, the program memory utilization will be small (for
example 4000kb). If all twenty terminal emulation connections were active, the program memory
utilization would be much larger (for example 15000kb). The thin client has successfully been tested
with twenty sessions active. The limit of active sessions will be determined by the amount of available
memory not being used by storage.
Device Name
This screen can also be used to change the device name. This name will be displayed on the List of
Devices in the I-O Configuration Utility as well as to other computers in a Microsoft network.
Thin Client User’s Guide 98
Page 99
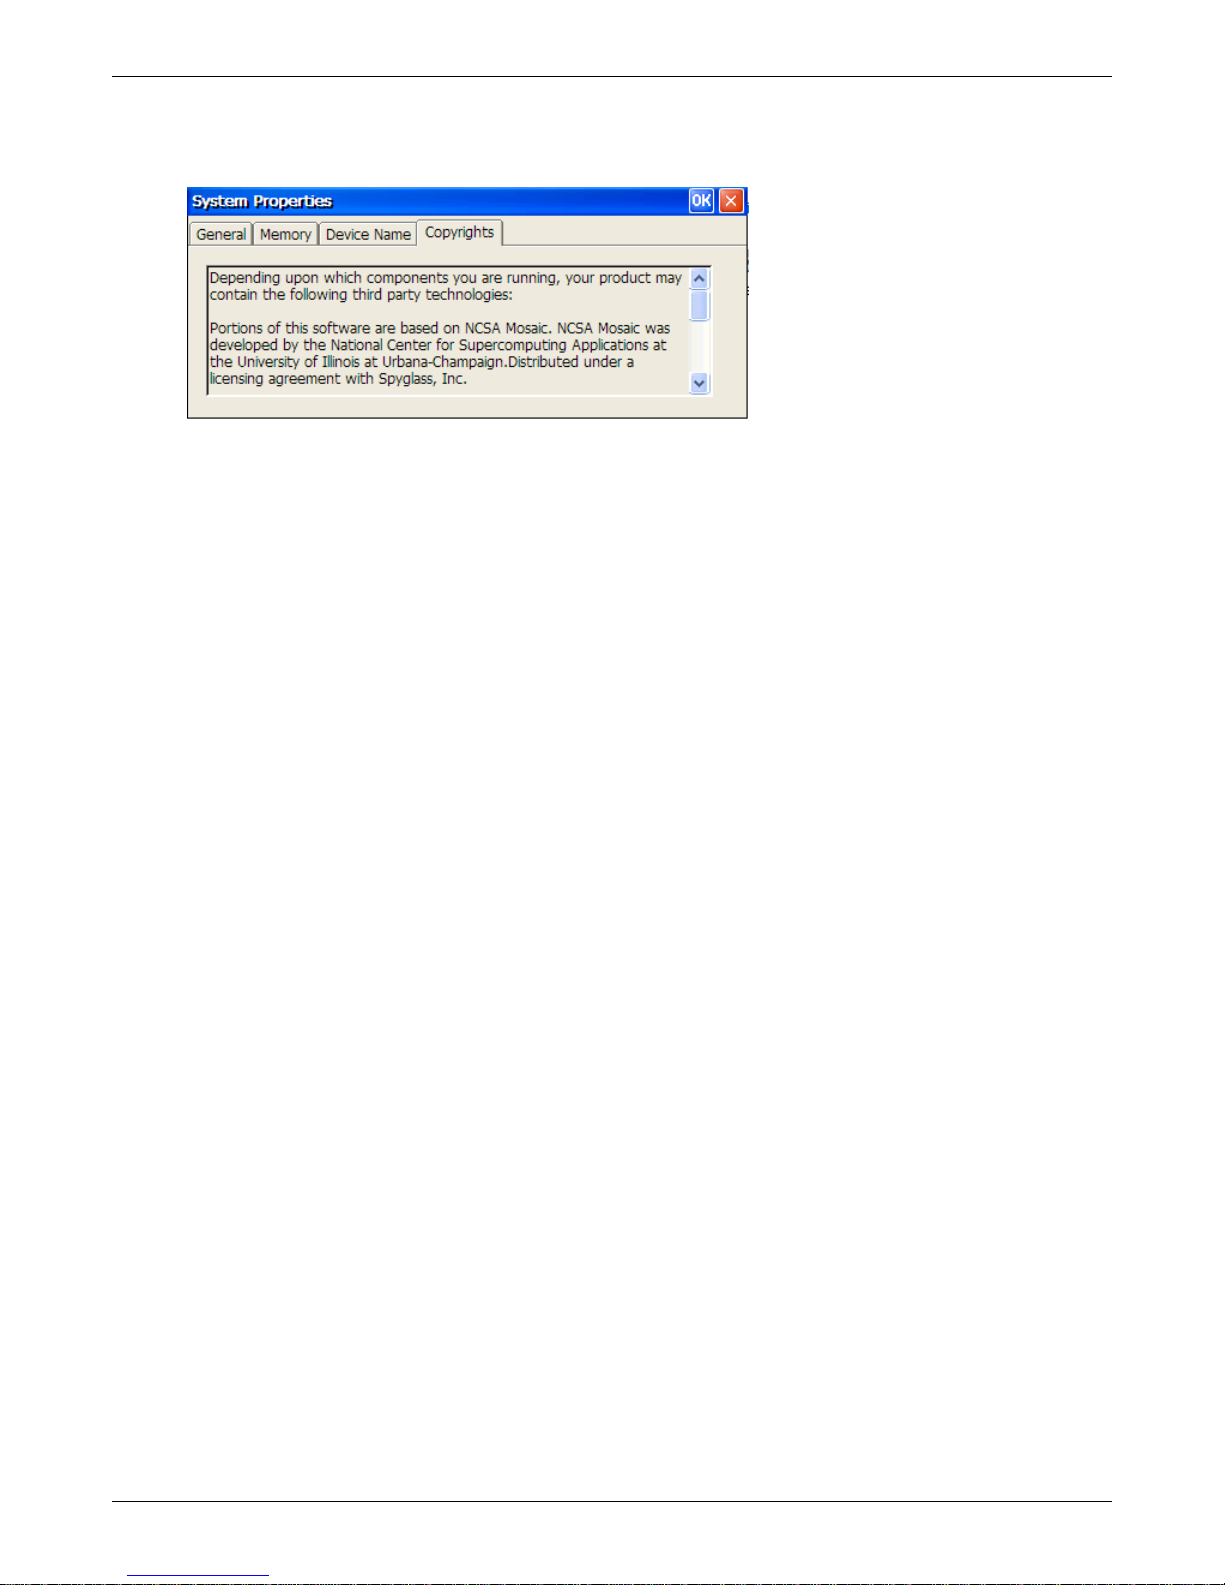
Copyrights
This screen displays the copyrights for various modules used in the thin client.
Advanced Configuration
Thin Client User’s Guide 99
Page 100
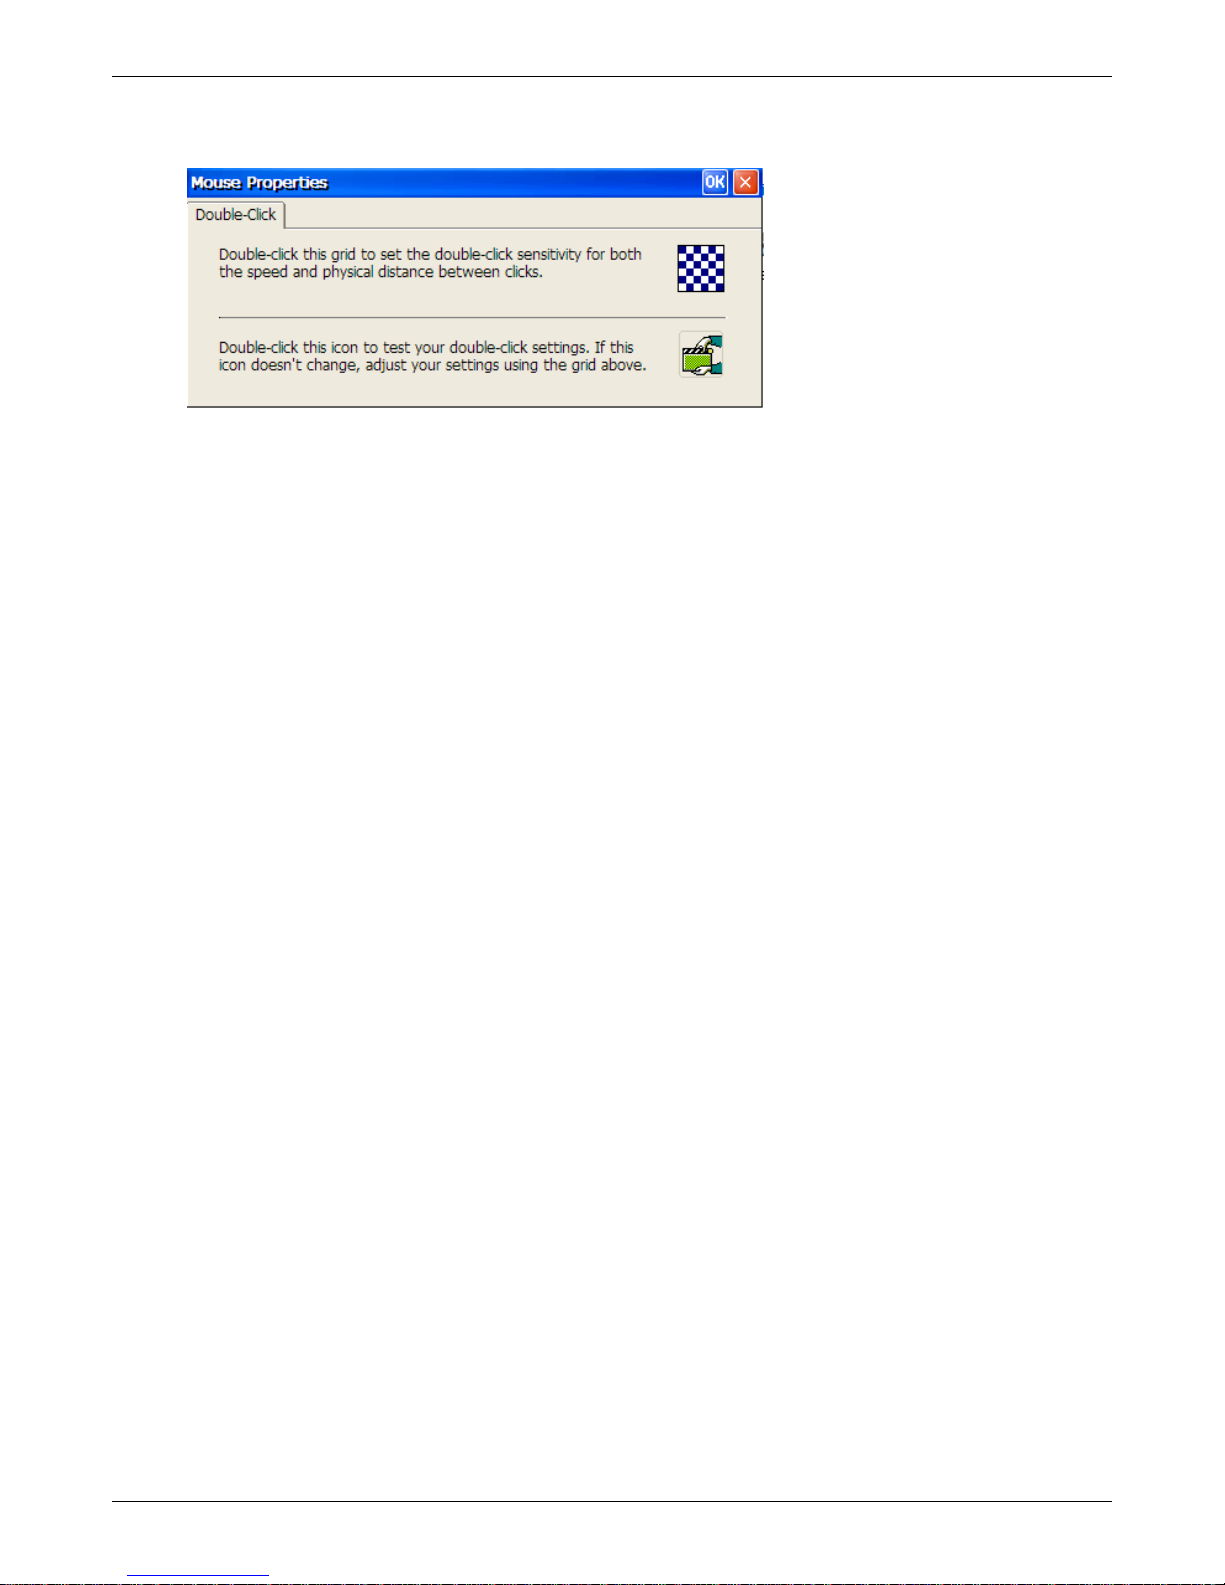
Advanced Configuration
Mouse
Use these options to set the double-click rate of the mouse buttons and to test that rate.
Thin Client User’s Guide 100
 Loading...