

Page 1
User Manual
Manuel de l’utilisateur
Bedienungsanleitung
取扱説明書
使用手冊
使用手冊
Copyright © 2016 In Win Development Inc. All Rights Reserved. 3RAMEE032600
Page 2
Product Story
English
English
Ready for a whole new experience? The standard for computer chassis is obsolete thanks to this new “Transformer.”
Ready for a whole new experience? The standard for computer chassis is obsolete thanks to this new “Transformer.”
In Win is known for its unconventional chassis design and meticulous craftsmanship. A traditional up-right case requires
In Win is known for its unconventional chassis design and meticulous craftsmanship. A traditional up-right case requires
to remove the side panels for hardware installation. This restricts users′access to customizing their PCs. In order to
to remove the side panels for hardware installation. This restricts users′access to customizing their PCs. In order to
provide PC enthusiasts with a truly innovative technical marvel, In Win has gone beyond the normal case structure and
provide PC enthusiasts with a truly innovative technical marvel, In Win has gone beyond the normal case structure and
introduced the world′s first motorized PC chassis, the H-Tower.
introduced the world′s first motorized PC chassis, the H-Tower.
A revolutionary wireless control allows its master to control the motion and lighting effect through a mobile device, so
A revolutionary wireless control allows its master to control the motion and lighting effect through a mobile device, so
the users can open up the case and transform it into an open-platform remotely. The unique opening and display
the users can open up the case and transform it into an open-platform remotely. The unique opening and display
method allows for quick and easy installation of components and enables gamers to showcase their PC interior.
method allows for quick and easy installation of components and enables gamers to showcase their PC interior.
The sleek H-shaped exterior and outstanding engineering of the H-Tower makes it truly state of the art.
The sleek H-shaped exterior and outstanding engineering of the H-Tower makes it truly state of the art.
Français
Français
Êtes-vous prêt pour une toute nouvelle expérience ? La norme du châssis de l'ordinateur est obsolète grâce à ce tout
Êtes-vous prêt pour une toute nouvelle expérience ? La norme du châssis de l'ordinateur est obsolète grâce à ce tout
nouveau "Transformer."
nouveau "Transformer."
In Win est bien connu pour son design de châssis peu conventionnel et son savoir-faire méticuleux. Il faut retirer les
In Win est bien connu pour son design de châssis peu conventionnel et son savoir-faire méticuleux. Il faut retirer les
panneaux latéraux d'un boîtier droit traditionnel pour pouvoir procéder à une installation matérielle. Cela freine les
panneaux latéraux d'un boîtier droit traditionnel pour pouvoir procéder à une installation matérielle. Cela freine les
utilisateurs dans la personnalisation de leur PC. Pour offrir aux amateurs de PC une merveille technique vraiment
utilisateurs dans la personnalisation de leur PC. Pour offrir aux amateurs de PC une merveille technique vraiment
innovante, In Win a dépassé la structure habituelle des boîtiers et présente le tout premier châssis de PC motorisé du
innovante, In Win a dépassé la structure habituelle des boîtiers et présente le tout premier châssis de PC motorisé du
monde, le H-Tower.
monde, le H-Tower.
Un contrôle sans fil révolutionnaire permet à son propriétaire de contrôler le mouvement et les effets lumineux grâce
Un contrôle sans fil révolutionnaire permet à son propriétaire de contrôler le mouvement et les effets lumineux grâce
à un appareil mobile, les utilisateurs peuvent donc ouvrir le boîtier et le transformer en une plateforme ouvrable à
à un appareil mobile, les utilisateurs peuvent donc ouvrir le boîtier et le transformer en une plateforme ouvrable à
distance. L'ouverture unique et la méthode d'affichage permettent l'installation rapide et facile des composants et
distance. L'ouverture unique et la méthode d'affichage permettent l'installation rapide et facile des composants et
permettent aux joueurs de montrer l'intérieur de leur PC.
permettent aux joueurs de montrer l'intérieur de leur PC.
L'extérieur mince en H et la conception remarquable du H-Tower en font vraiment un produit à la pointe de la technologie.
L'extérieur mince en H et la conception remarquable du H-Tower en font vraiment un produit à la pointe de la technologie.
Deutsch
Deutsch
Sind Sie bereit für eine völlig neue Erfahrung? Der Standard für Computergehäuse ist dank dieses neuen
Sind Sie bereit für eine völlig neue Erfahrung? Der Standard für Computergehäuse ist dank dieses neuen
„Wandlers”überholt.
„Wandlers”überholt.
In Win ist für sein unkonventionelles Gehäusedesign und sorgfältiges handwerkliches Können bekannt. Bei einem
In Win ist für sein unkonventionelles Gehäusedesign und sorgfältiges handwerkliches Können bekannt. Bei einem
herkömmlichen vertikalen Gehäuse müssen zur Hardwareinstallation die Seitenblenden abgenommen werden. Dies
herkömmlichen vertikalen Gehäuse müssen zur Hardwareinstallation die Seitenblenden abgenommen werden. Dies
schränkt den Zugriff des Nutzers zur Anpassung seines PCs ein. In Win hat die normale Gehäusestruktur außer Acht
schränkt den Zugriff des Nutzers zur Anpassung seines PCs ein. In Win hat die normale Gehäusestruktur außer Acht
gelassen und das weltweit erste motorisierte PC-Gehäuse, den H-Tower, eingeführt – ein wahrhaft innovatives
gelassen und das weltweit erste motorisierte PC-Gehäuse, den H-Tower, eingeführt – ein wahrhaft innovatives
technisches Meisterwerk für PC-Enthusiasten.
technisches Meisterwerk für PC-Enthusiasten.
Eine revolutionäre kabellose Steuerung ermöglicht die Regelung von Bewegungen und Lichteffekten über ein Mobilgerät,
Eine revolutionäre kabellose Steuerung ermöglicht die Regelung von Bewegungen und Lichteffekten über ein Mobilgerät,
sodass Nutzer das Gehäuse aus der Ferne öffnen und in eine offene Plattform verwandeln können. Die einzigartige
sodass Nutzer das Gehäuse aus der Ferne öffnen und in eine offene Plattform verwandeln können. Die einzigartige
Öffnungs-und Präsentationsmethode ermöglicht Gamern die einfache und schnelle Installation von Komponenten und
Öffnungs-und Präsentationsmethode ermöglicht Gamern die einfache und schnelle Installation von Komponenten und
die Präsentation ihres PC-Innenlebens.
die Präsentation ihres PC-Innenlebens.
Das schlanke H-förmige Äußere und die herausragende Bauweise des H-Tower machen es zu einem neuen technischen
Das schlanke H-förmige Äußere und die herausragende Bauweise des H-Tower machen es zu einem neuen technischen
Standard.
Standard.
日本語
日本語
スイッチ一つで全てのパネルが開閉、これまでの観念を覆すPCケースの誕生です。
スイッチ一つで全てのパネルが開閉、これまでの観念を覆すPCケースの誕生です。
常識にとらわれず、常に限界を打ち破る事がIN WINのコンセプトでありスピリットです。
常識にとらわれず、常に限界を打ち破る事がIN WINのコンセプトでありスピリットです。
通常のPCケースは、内部装置の取付けや取外しの際、工具を用い自らサイドパネルを開ける必要があり、作業の為に広いス
通常のPCケースは、内部装置の取付けや取外しの際、工具を用い自らサイドパネルを開ける必要があり、作業の為に広いス
ペースが必要でした。しかしこれらの手間や問題を、オートメーションで全てのパネルを自動開閉させるという、全く新し
ペースが必要でした。しかしこれらの手間や問題を、オートメーションで全てのパネルを自動開閉させるという、全く新し
いコンセプトで解決するPCケース、「H-Tower」が誕生します。
いコンセプトで解決するPCケース、「H-Tower」が誕生します。
H-Towerはパネルの開閉と逆転機能を搭載し、内部装置の取付けや取外しを容易にスピーディーに行うことができます。、
H-Towerはパネルの開閉と逆転機能を搭載し、内部装置の取付けや取外しを容易にスピーディーに行うことができます。、
そして変形する際の動きと美しいライティングはPCケースに、豊かな生命力をもたらすとともに、その利便性において、自
そして変形する際の動きと美しいライティングはPCケースに、豊かな生命力をもたらすとともに、その利便性において、自
作へヴィーユーザーに適していると言えるでしょう。
作へヴィーユーザーに適していると言えるでしょう。
さらにスマートフォンなどのAppとリンクさせることで、これらパネルの開閉とライティングの変化をワイヤレスでコントロ
さらにスマートフォンなどのAppとリンクさせることで、これらパネルの開閉とライティングの変化をワイヤレスでコントロ
ールすることが可能となります。
ールすることが可能となります。
独創的な「H」をモチーフとしたデザインは、シャープでスマートなシェイプを描き、外観を美しく演出します。
独創的な「H」をモチーフとしたデザインは、シャープでスマートなシェイプを描き、外観を美しく演出します。
Top of PC caseの風格を持つH-Tower。世界数量限定発売です。
Top of PC caseの風格を持つH-Tower。世界数量限定発売です。
繁體中文
繁體中文
準備好來一場不同的全新體驗了嗎? 一台會變形的機殼,突破傳統絕對出乎意料之外!
準備好來一場不同的全新體驗了嗎? 一台會變形的機殼,突破傳統絕對出乎意料之外!
不斷顛覆傳統、打破既有界限是迎廣一貫秉持的精神,一般的直立式機殼要拆裝內部系統配備時都必需拆開側板, 且礙於空間
不斷顛覆傳統、打破既有界限是迎廣一貫秉持的精神,一般的直立式機殼要拆裝內部系統配備時都必需拆開側板, 且礙於空間
限制,配件安裝變化受到許多限制,為了讓玩家擁有更佳的操作體驗、更酷炫的機殼,會變形的H-Tower因而誕生!
限制,配件安裝變化受到許多限制,為了讓玩家擁有更佳的操作體驗、更酷炫的機殼,會變形的H-Tower因而誕生!
H-Tower突破生硬的設計思維,賦與機殼開闔與翻轉功能,安裝便捷快速,便利於重度改裝玩家使用,變形與不變形之間賦予
H-Tower突破生硬的設計思維,賦與機殼開闔與翻轉功能,安裝便捷快速,便利於重度改裝玩家使用,變形與不變形之間賦予
電腦機殼更豐富的生命力。
電腦機殼更豐富的生命力。
首創結合手持裝置App程式,可無線操控機殼開闔與燈光變化,讓冷硬的機殼也能跟行動應用軟體完美結合,人機互動再昇華。
首創結合手持裝置App程式,可無線操控機殼開闔與燈光變化,讓冷硬的機殼也能跟行動應用軟體完美結合,人機互動再昇華。
鮮明的「H」線條打造俐落的外觀,讓機殼成為一項工藝鑑賞品,全球限量發行展現王者風範!
鮮明的「H」線條打造俐落的外觀,讓機殼成為一項工藝鑑賞品,全球限量發行展現王者風範!
简体中文
简体中文
准备好来一场不同的全新体验了吗? 一台会变形的机壳,突破传统出乎意料之外!
准备好来一场不同的全新体验了吗? 一台会变形的机壳,突破传统出乎意料之外!
不断颠覆传统、打破既有界限是迎广一贯秉持的精神,一般的直立式机壳要拆装内部系统配备时都必需拆开侧板,且碍于空间
不断颠覆传统、打破既有界限是迎广一贯秉持的精神,一般的直立式机壳要拆装内部系统配备时都必需拆开侧板,且碍于空间
限制,配件安装变化受到许多限制,为了让玩家拥有更佳的操作体验、更酷炫的机壳,会变形的H-Tower因而诞生!
限制,配件安装变化受到许多限制,为了让玩家拥有更佳的操作体验、更酷炫的机壳,会变形的H-Tower因而诞生!
H-Tower突破生硬的设计思维,赋与机壳开阖与翻转功能,安装便捷快速,便利于重度改装玩家使用,变形与不变形之间赋予
H-Tower突破生硬的设计思维,赋与机壳开阖与翻转功能,安装便捷快速,便利于重度改装玩家使用,变形与不变形之间赋予
计算机机壳更丰富的生命力。
计算机机壳更丰富的生命力。
首创结合手持装置App程序,可无线操控机壳开阖与灯光变化,让冷硬的机壳也能跟行动应用软件完美结合,人机互动再升华。
首创结合手持装置App程序,可无线操控机壳开阖与灯光变化,让冷硬的机壳也能跟行动应用软件完美结合,人机互动再升华。
鲜明的「H」线条打造利落的外观,让机壳成为一项工艺鉴赏品,全球限量发行展现王者风范!
鲜明的「H」线条打造利落的外观,让机壳成为一项工艺鉴赏品,全球限量发行展现王者风范!
Page 3
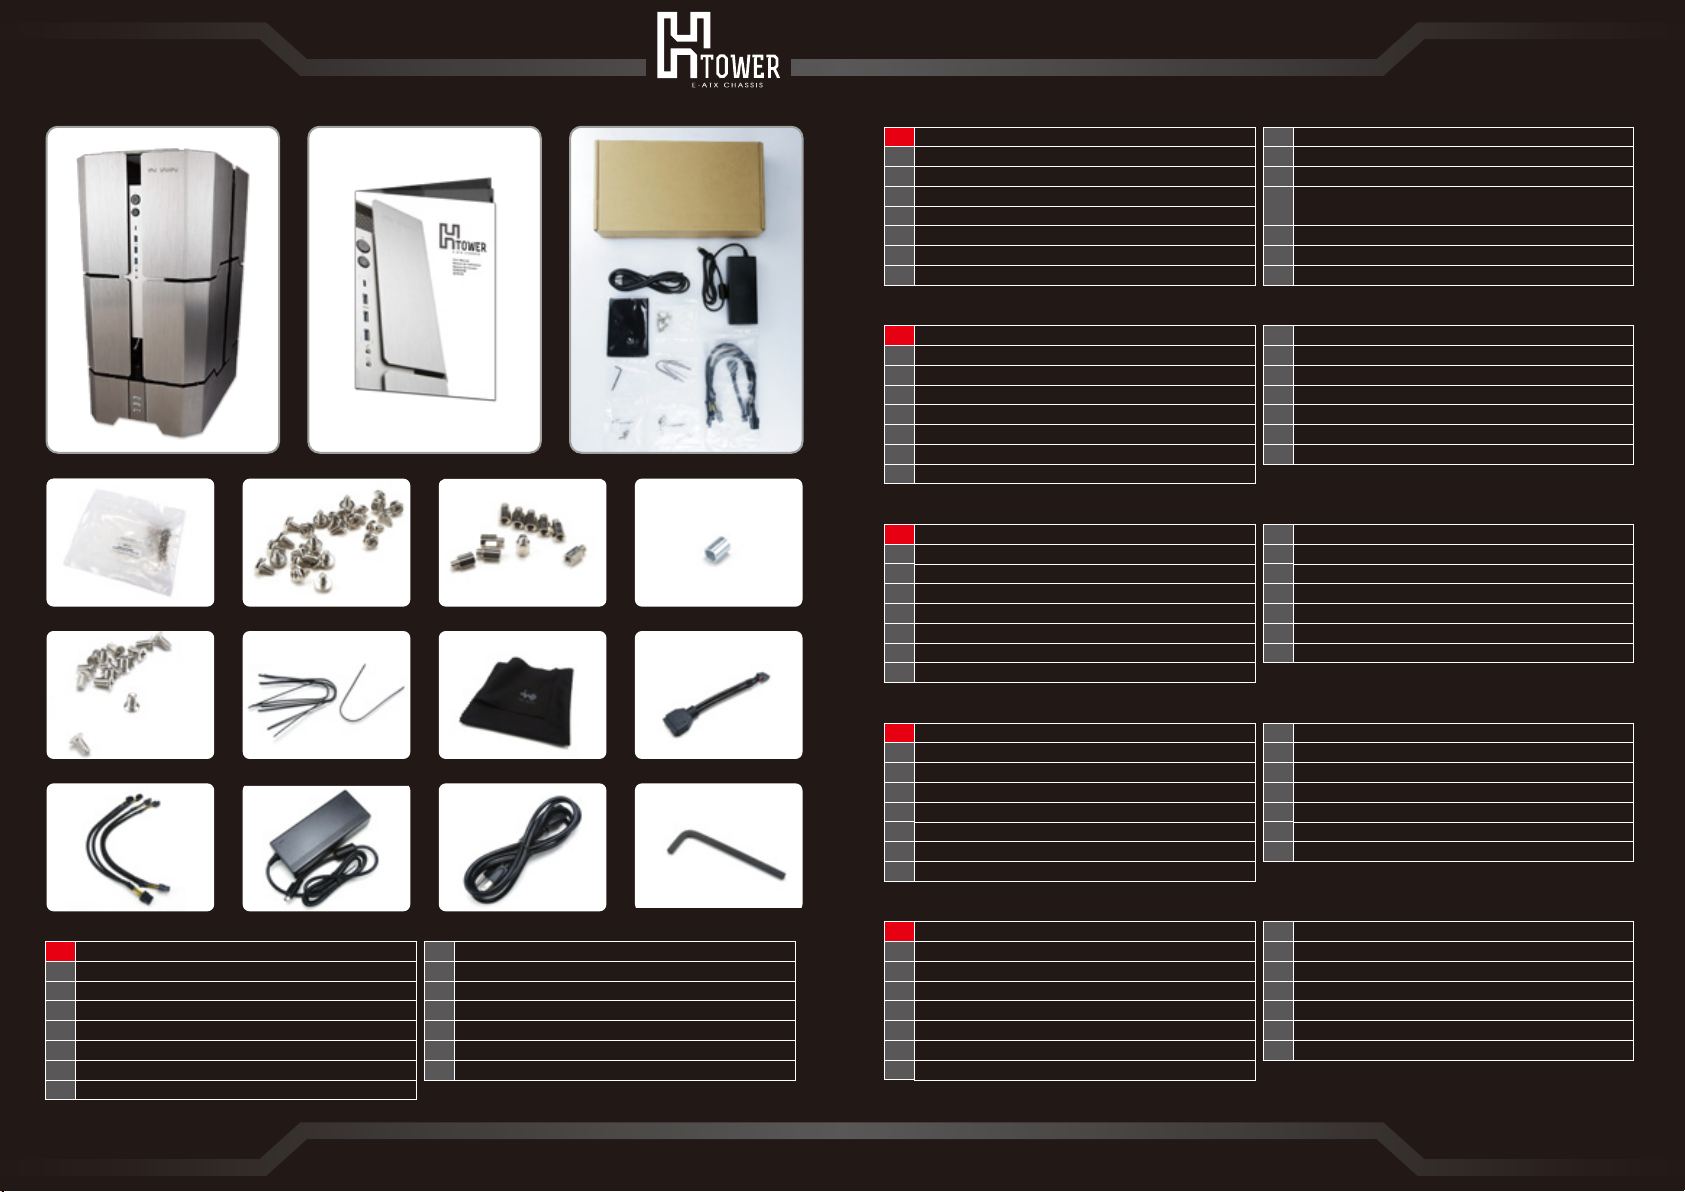
Package Content
1 2 3
a a-1 a-2 a-3
a-4 b c d
Français
Châssis du H-Tower
1
Manuel de l'utilisateur
2
Accessoires
3
Emballage des vis
a
Vis à tête hexagonale x 28
a-1
Entretoises de carte-mère x 10
a-2
Prise d'entretoise de carte mère x1
a-3
Vis HDD de 2,5" x 16
a-4
Deutsch
1
H-Tower-Gehäuse
Bedienungsanleitung
2
Zubehör
3
Schraubenset
a
Sechskantschraube x 28
a-1
otherboard-Abstandhalter x 10
a-2
Motherboard-Abstandhaltersockel x 1
a-3
Schraube für 2,5-Zoll-Laufwerk x 16
a-4
日本語
1
H-Tower PCケース
2
組立説明書
3
部品箱
a
ネジセット
a-1
六角ネジ×28
a-2
マザーボード固定用スタッド×10
a-3
マザーボードラックスリーブ×1
a-4
2.5”HDDネジ×16
Tyrap x 5
b
c
Tissu nettoyage x 1
d
Câble USB 3.0 vers USB 2.0 x 1
Rallonge de câble d'alimentation à 8 broches vers 4+4
e
broches x 2
f
Adaptateur x 1
g
Cordon d’ alimentation x 1
h
Clé hexagonale x 1
Kabelbinder x 5
b
c
Tuch x 1
d
USB 3.0-zu-USB 2.0-Kabel x 1
e
8-Pin-zu-4+4-Pin-Netzteilverlängerungskabel x 2
f
Netzteilx 1
g
Netzkabel x 1
Innensechskantschlüssel x 1
h
ケーブル固定ベルト×5
b
c
拭き取り布×1
d
USB3.0>USB2.0へのアダプタケーブル×1
e
8pin>4+4pin変換電源延長コード×2
f
変圧器×1
g
電源ケーブル×1
h
六角レンチ
e f g h
English
1
H-Tower chassis
2
User manual
3
Accerrories
Screw pack
a
a-1
Hexagon head screws x 28
a-2
Motherboard standoffs x 10
Motherboard standoff socket x 1
a-3
a-4
2.5” HDD screws x 16
b
Cable tie x 5
c
Wiping cloth x 1
d
USB 3.0 to USB 2.0 cable x 1
e
8pin to 4+4pin power supply extension cable x 2
f
Adapter x 1
g
Power cord x 1
h
Hex key x 1
01
繁體中文
1
H-Tower 機殼
2
組裝說明書
3
零件盒
a
螺絲包
a-1
六角頭螺絲 x 28
a-2
主機板固定銅柱 x 10
a-3
主機板鍋柱套筒 x 1
a-4
2.5” 硬碟螺絲 x 16
简体中文
1
H-Tower 机壳
2
组装说明书
3
零件盒
a
螺丝包
a-1
六角头螺丝 x 28
a-2
主机板固定铜柱 x 10
a-3
主机板锅柱套筒 x 1
a-4
2.5” 硬盘螺丝 x 16
束線帶 x 5
b
c
擦拭布 x 1
d
USB 3.0轉USB2.0轉接線x1
e
8pin轉4+4pin電源延長線 x 2
f
變壓器x1
g
電源線x1
h
六角板手
束线带 x 5
b
c
擦拭布 x 1
d
USB 3.0转USB2.0转接线x1
e
8pin转4+4pin电源延长线 x 2
f
变压器x1
g
电源线x1
h
六角板手
02
Page 4
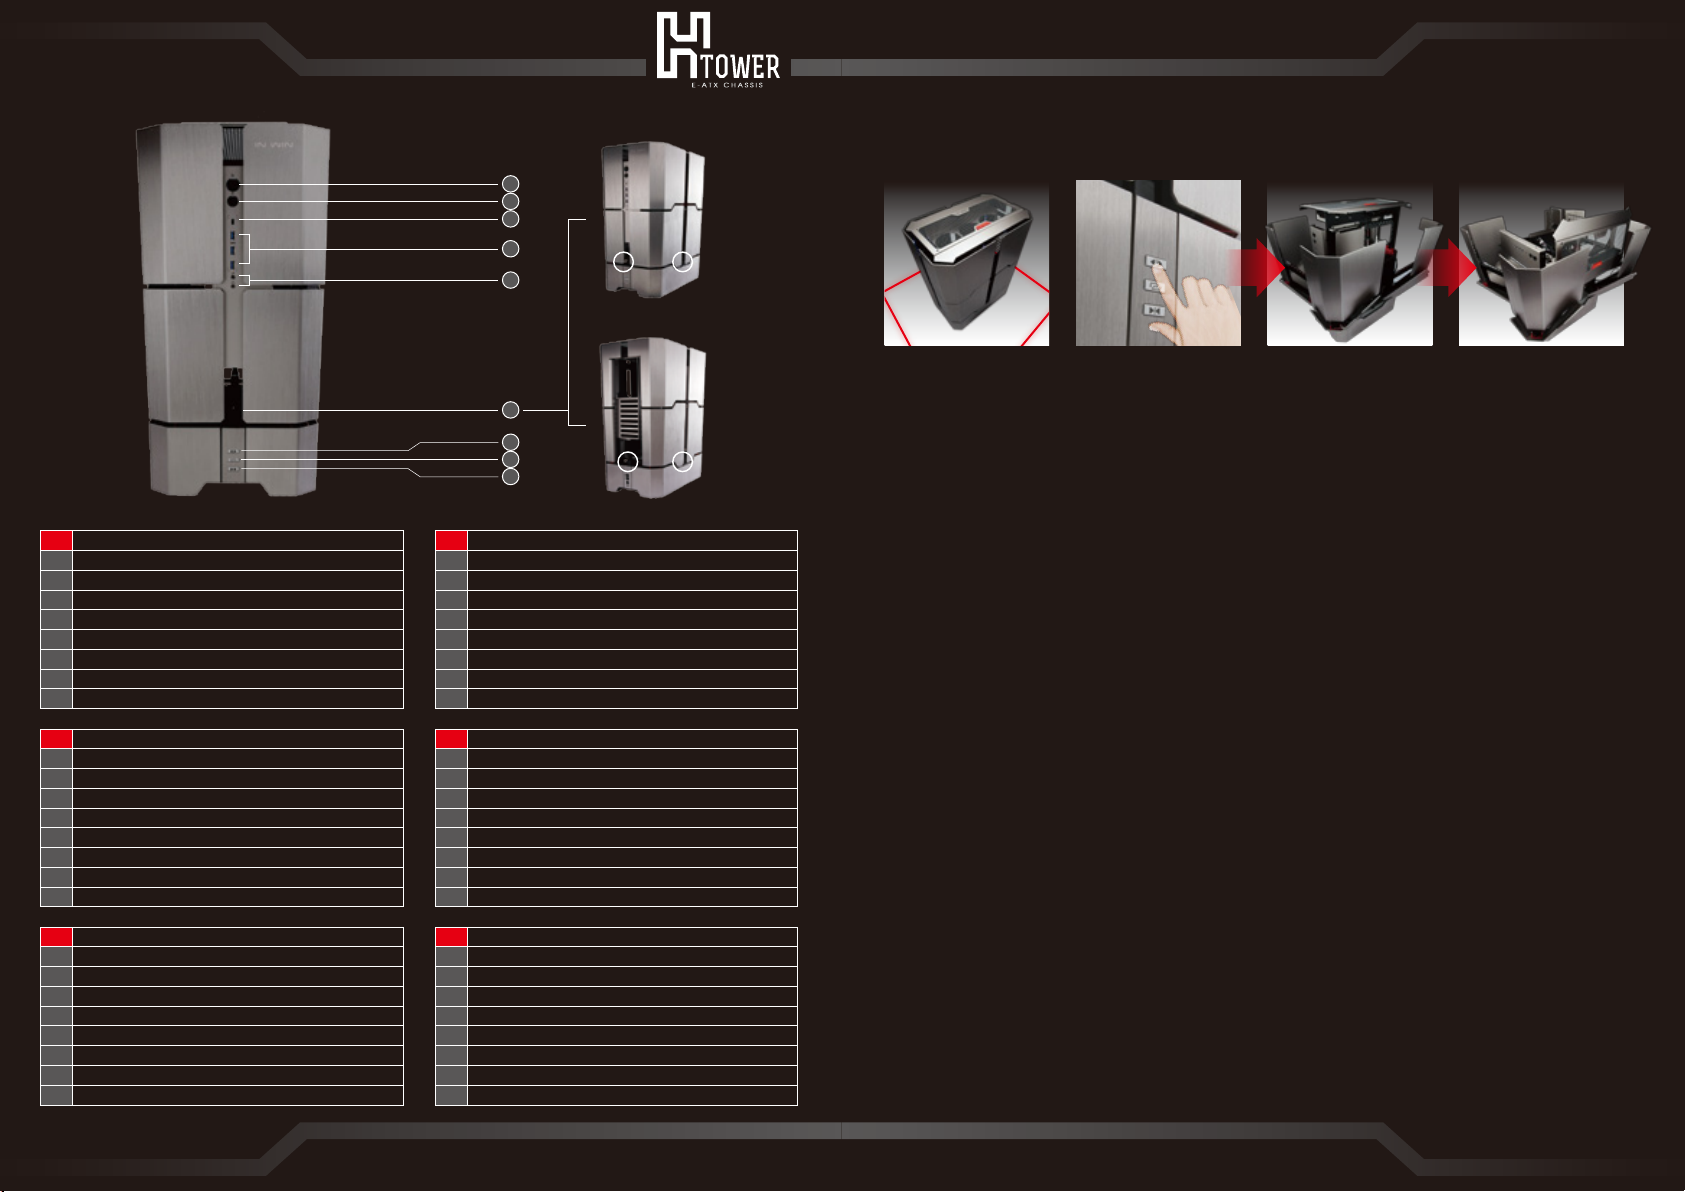
Front View
Operating Instructions and Notices
English Français
1
Power Button
2
HDD Indicator & Reset Button
3
USB 3.1 TYPE-C Port
4
USB 3.0 Port
5
Audio Ports (Earphone and Microphone)
Laser Indicator
6
7
Blade Open Button
8
Display Mode Button
9
Blade Close Button
Deutsch 日本語
1
Ein-/Austaste
2
Laufwerksanzeige und Reset-Taste
3
USB 3.1-Typ-C-Port
4
USB 3.0-Port
5
Audioanschlüsse (Kopfhörer und Mikrofon)
Laseranzeige
6
7
Flügel-öffnen-Taste
8
Präsentationsmodus-Taste
9
Flügel-schließen-Taste
繁體中文 简体中文
1
電源開關
硬碟指示燈 & 重新開機按鈕
2
3
USB 3.1 TYPE-C插槽
4
USB 3.0插槽
5
音源插孔(耳機和麥克風)
雷射指示燈頭
6
7
葉片開啟按鈕
8
自動展演模式按鈕
9
葉片關閉按鈕
1
2
3
4
5
6
7
8
9
1
2
3
4
5
6
7
8
9
1
2
3
4
5
6
7
8
9
1
2
3
4
5
6
7
8
9
Bouton d'alimentation
Voyant HDD & bouton de remise à zéro
Port USB 3.1 de TYPE-C
Port USB 3.0
Ports audio (écouteurs et micro)
Voyant Laser
Bouton d'ouverture de lame
Bouton de Mode d'affichage
Bouton de fermeture de lame
電源スイッチ
HDDインジケータ&再起動ボタン
USB 3.1 TYPE-Cプラグ
USB 3.0プラグ
オーディオ出力(イヤホンとマイク)
レーザーインジケータ
カバースタートボタン
オートデモモードボタン
カバーストップボタン
电源开关
硬盘指示灯 & 重新开机按钮
USB 3.1 TYPE-C插槽
USB 3.0插槽
音源插孔(耳机和麦克风)
激光指示灯头
叶片开启按钮
自动展演模式按钮
叶片关闭按钮
1 2
English
1. There is a laser scanning feature at the bottom of the chassis to notify the safe operating area.
Before the chassis is opened or closed, users will be notified as a red safe laser operation area,
where all nearby obstacles should be removed to avoid any damage.
2. Upon pressing the blade open button / blade close button for 2~3 seconds, users will be able
to open the blade of the chassis and rotate the motherboard strut bracket. Users can adjust the
blade of the chassis and the motherboard strut bracket as well as pause the movement of the
H-Tower to a desired vantage point.
3. When the display mode button is pressed for 5 seconds, the chassis will automatically open or
close in the full mode. Press blade open / close button to stop the display mode.
(Note: The H-Tower must be all the way opened/closed to activate this feature.)
4. When the blade open button/ blade close button is pressed for 5 second, LED diode will flicker
green lighting steadily. At the same time, when the user presses automatic performance button
for 2~3 second, the chassis will be in the “Full Display Mode”, which means the chassis itself
will be automatically open in the full mode. After 30 seconds, the chassis will be automatically
closed. Users will be able to enjoy this “Full Display Mode” every three minutes.
Français
1. Il y a une fonction de balayage laser au niveau de la partie inférieure du châssis pour notifier la
zone de sécurité d'utilisation. Avant d'ouvrir ou de fermer le châssis, les utilisateurs seront
avertis par une zone rouge de sécurité d'utilisation du laser rouge où tous les obstacles
environnants doivent être enlevés afin d'éviter tout dommage.
2. Quand l'utilisateur appuie sur le bouton d'ouverture / de fermeture de la lame pendant 2 à 3
secondes, il peut ouvrir la lame du châssis et faire pivoter le support de la carte mère. Les
utilisateurs peuvent ajuster la lame du châssis et le support de la carte mère et suspendre le
mouvement du H-Tower à un point de vue souhaité.
3. Lorsque vous appuyez sur le bouton de mode d'affichage pendant 5 secondes, le châssis s'ouvre
ou se ferme automatiquement en mode complet. Appuyez sur le bouton d'ouverture / de
fermeture pour arrêter le mode d'affichage.
(Note : Le H-Tower doit être totalement ouvert / fermé pour activer cette fonction.)
4. Lorsque vous appuyez sur le bouton d'ouverture / de fermeture de la lame pendant 5 secondes,
la diode DEL clignote en vert de façon constante. En même temps, lorsque l'utilisateur appuie
sur le bouton des performances automatiques de 2 à 3 secondes, le châssis sera en "Mode
d'affichage complet", ce qui signifie que le châssis même sera automatiquement ouvert en mode
complet. Après 30 secondes, le châssis se ferme automatiquement. Les utilisateurs peuvent
utiliser ce “Full Display Mode” ("Mode d'affichage complet") toutes les trois minutes.
03
04
Page 5

Internal Structure
Operating Instructions and Notices
1 2
Deutsch
1. Zur Kennzeichnung des sicheren Betriebsbereichs befindet sich eine Laserscanfunktion an der
Unterseite des Gehäuses. Vor dem Öffnen oder Schließen des Gehäuses wird der Betriebsbereich
durch einen roten Laser angezeigt; zur Vermeidung von Schäden müssen alle umliegenden
Hindernisse entfernt werden.
2. Durch 2- bis 3-sekündige Betätigung der Flügel-öffnen-Taste/Flügel-schließen-Taste können Sie
das Gehäuse öffnen und die Motherboard-Halterung drehen. Sie können die Flügel des Gehäuses
sowie die Motherboard-Halterung anpassen und die Bewegung des H-Tower an einem
gewünschten Punkt anhalten.
3. Wenn die Präsentationsmodus-Taste 5 Sekunden lang gedrückt wird, öffnet oder schließt sich
das Gehäuse automatisch komplett. Drücken Sie zum Beenden des Präsentationsmodus die
Flügel-öffnen-Taste/Flügel-schließen-Taste.
(Hinweis: Der H-Tower muss zum Aktivieren dieser Funktion vollständig geöffnet/geschlossen sein.)
4. Wenn die Flügel-öffnen-Taste/Flügel-schließen-Taste 5 Sekunden lang gedrückt wird, blinkt die
LED grün. Gleichzeitig wird bei 2-bis 3-sekündiger Betätigung der Präsentationsmodus-Taste der
„Präsentationsmodus“ aufgerufen, was bedeutet, dass sich das Gehäuse automatisch
komplett öffnet. Nach 30 Sekunden schließt sich das Gehäuse von selbst. Sie können diesen „
Präsentationsmodus“ alle drei Minuten aktivieren.
日本語
1. 本ケース底部にはレーザーインジケータがあり、ケースを開け閉めする前に安全操作範囲をスキャンし
ます。赤いレーザー光は、操作中に周辺にある物品にぶつかって破損しないよう、範囲内の全ての障害
となる恐れのあるものを取り除くことを指示するものです。
2. カバースタートボタン / カバーストップボタンを約2~3秒長押しすると、ケースのカバーが起動し、マ
ザーボードラックが回転します。必要に応じて調整し、任意のポジションで止めてください。
3. オートデモモードを約5秒間長押しするとケースのカバーが完全に開くか、完全に閉まるまで自動デモを
実施します。カバースタート/ストップボタンを押すと停止します。
4. カバースタートボタン / ファンストップボタンを約5秒間長押しすると、LEDライトが点灯して安定して
いることを示し、継続的にグリーンの光が点滅します。続けてすぐにオートデモモードボタンを約2~3
秒押すと「全自動デモモード」となり、ケースが自動的に30秒間完全に開いた後、自動的にカバーが閉
まります。3分ごとに1度のサイクルで行われます。
繁體中文
1. 本機殼底部設有雷射指示燈頭,在機殼展開及關閉前會先掃瞄安全操作範圍,提醒您在紅色雷射光指示範
圍內應清除所有可能之障礙物,避免操作過程中碰撞週遭物品造成損毀
2. 當按住葉片開啟按鈕 / 葉片關閉按鈕約2~3秒時,即可開啟機殼葉片及翻轉主機板架,可按照需求調整並
停留在任意定位點
3. 當按住自動展演模式按鈕約5秒時,機殼可自動展演至完全打開或自動收闔至完全關閉;按下葉片開啟 /
關閉按鈕即可停止
4. 當同時按住葉片開啟按鈕 / 葉片關閉按鈕約5秒左右,LED燈光將顯示穩定且持續的閃爍綠光,緊接著按
壓自動展演模式按鈕約 2~3秒,可進入「全自動展演模式」,機殼可自動完全展開30秒後自動完全收闔,
每3分鐘一個循環
简体中文
1. 本机箱底部设有激光指示灯头,在机箱展开及关闭前会先扫瞄安全操作范围,提醒您在红色激光光指示范
围内应清除所有可能之障碍物,避免操作过程中碰撞周遭物品造成损毁
2. 当按住叶片开启按钮 / 叶片关闭按钮约2~3秒时,即可开启机箱叶片及翻转主机板架,可按照需求调整并
停留在任意定位点
3. 当按住自动展演模式按钮约5秒时,机箱可自动展演至完全打开或自动收合至完全关闭;按下叶片开启 /
关闭按钮即可停止
4. 当同时按住叶片开启按钮 / 叶片关闭按钮约5秒左右,LED灯光将显示稳定且持续的闪烁绿光,紧接着按
压自动展演模式按钮约 2~3秒,可进入「全自动展演模式」,机箱可自动完全展开30秒后自动完全收合,
每3分钟一个循环
10
12
13
14
English Français
Fan / Liquid Cooling Radiator Mounting Area
10
11
2.5” HDD Bracket
12
Motherboard Mounting Area
13
PCI-E Expansion Slot
14
Power Supply Mounting Area
Lift Platform
15
16
Chassis Bottom
17
3.5” HDD Bracket
18
Limited Edition Number
19
Cable Management Area
Deutsch 日本語
Lüfter-/Flüssigkühlkörper-Montagebereich
10
11
Halterung für 2,5-Zoll-Laufwerk
12
Motherboard-Montagebereich
13
PCI-E-Erweiterungssteckplatz
14
Netzteil-Montagebereich
Hebeplattform
15
16
Gehäuseboden
17
Halterung für 3,5-Zoll-Laufwerk
18
Limited-Edition-Nummer
19
Kabelverwaltungsbereich
11
10
11
12
13
14
15
16
17
18
19
10
11
12
13
14
15
16
17
18
19
17
11
Ventilateur / Zone de montage du radiateur à liquide de refroidissement
Support HDD de 2,5”
Zone de montage de la carte mère
Emplacement d'expansion PCI-E
Zone de montage de l'alimentation électrique
Plateforme élévatrice
Bas de châssis
Support HDD de 3,5”
Nombre d'édition limitée
Zone de gestion du câble
ファン/水冷排気取付け部分
2.5インチHDD
マザーボード取付け部分
ネットワークアダプタPCI-E拡張スロット
パワーサプライ取付け部分
リフトプラットフォーム
ケース台座
3.5インチHDD
数量限定番号
ケーブル管理部分
19
18
15
16
05
06
Page 6

Internal Structure
繁體中文 简体中文
风扇 / 水冷排安装区
風扇 / 水冷排安裝區
10
11
2.5吋磁碟盤
12
主機板安裝區
13
介面卡PCI-E擴充槽
14
電源供應器安裝區
升降平台
15
16
機殼底座
17
3.5吋磁碟盤
18
限量編號
19
理線區域
10
11
2.5英寸磁盘盒
12
主机板安装区
13
适配卡PCI-E扩充槽
14
电源供应器安装区
升降平台
15
16
机箱底座
17
3.5英寸磁盘盒
18
限量编号
19
理线区域
Operating Instructions and Notices
1-a 1-b 1-c
English
1. Front panel ports I/O wires included:
1-a. USB3.0 Type A & USB3.1 Type C, 19-pin Connector
1-b. HD Audio Cable
1-c. Switch/LED Connector
2. For the best hardware installing condition, the motherboard mounting area must be set to a
horizontal position to prevent any collision and instant pressure on the main frame.
3. Prevent objects from falling into the gaps of the base during assembly.
4. The weight limit of the motherboard frame is 10kg.
5. Cable management area: avoid cables from entering the exclusion area for proper operation of
the blades.
Follow the dash line for cable management is recommended.
Français
1. Ports du panneau frontal/ câbles I/O fournis :
1-a. USB 3.0 de type A & USB 3.1 de type C, Connecteur à 19 broches
1-b. Câble audio HD
1-c. Commutateur/ Connecteur de DEL
2. Pour la meilleure condition d'installation matérielle, la zone de montage de la carte mère doit
être réglée à une position horizontale afin d'éviter toute collision et une pression instantanée
sur le cadre principal.
3. Éviter la chute d'objets dans les espaces de la base pendant l'assemblage.
4. La limite de poids du cadre de la carte mère est de 10kg.
5. Zone de gestion du câble : éviter que les câbles d' entrer dans la zone d'exclusion pour favoriser
le bon fonctionnement des lames.
Nous vous suggérons de suivre la ligne pointillée pour la gestion des câbles.
Deutsch
1. Kabel für I/O-Ports an der Frontblende:
1-a. USB 3.0, Typ A & USB 3.1, Typ C, 19-poliger Anschluss
1-b. HD-Audiokabel
1-c. Schalter/LED-Anschluss
2. Damit Sie Hardware optimal installieren können, muss der Motherboard-Montagebereich auf
eine horizontale Position
ausgerichtet sein; dies verhindert Kollisionen und Druck auf den Hauptrahmen.
3. Achten Sie darauf, dass während der Montage nichts in die Lücken der Basis fällt.
4. Die Gewichtsbeschränkung des Motherboard-Rahmens beträgt 10kg.
5. Kabelverwaltungsbereich: Achten Sie zur Gewährleistung eines ungehinderten Betriebs der
Flügel darauf, dass Kabel nicht in den
Sperrbereich gelangen. Befolgen Sie idealerweise die gestrichelte Linie der Kabelverwaltung.
日本語
1. 前方出力/入力ポートケーブルについて
1-a. USB3.0 Type A & USB3.1 Type C, 19-pin プラグ
1-b. HD Audio オーディオケーブル
1-c. 電源および LED ケーブルプラグ
2. 部品組み付けの際は、必ずマザーボードラックを水平にして最良の操作状態にしてください。瞬間的に
重圧をかけたり、マザーボードラックや周囲のファンにぶつけたりしないでください。
3. 部品組み付けの際は、ケース台座の隙間に異物が落下しないように注意してください。
4. マザーボードラックに搭載できる部品の総重量は10キロ以下です。
5. ケーブル管理区域:ケーブルをまとめる際は機器カバーが開く際に影響をおよぼさないよう、ストライ
プの区域を避けてください。点線に沿ってケーブルをまとめることを推奨します。
繁體中文
1. 前置輸出/入埠線材說明
1-a. USB3.0 Type A & USB3.1 Type C, 19-pin 接頭
1-b. HD Audio 音源線
1-c. 電源及 LED 線材接頭
2. 組裝系統配件時請務必讓主機板架呈現水平為最佳操作狀態,不可瞬間重壓或碰撞主機板架及四周葉片
3. 組裝系統配件時請避免異物掉落機殼底座間隙內
4. 主機板架可承載之系統配備總載重量在10公斤以內
5. 理線區域:理線時請避開條紋區域,以避免影響機器開闔,建議沿著虛線指示理線為佳
简体中文
1. 前置输出/入埠线材说明
1-a. USB3.0 Type A & USB3.1 Type C, 19-pin 接头
1-b. HD Audio 音源线
1-c. 电源及 LED 线材接头
2. 组装系统配件时请务必让主机板架呈现水平为最佳操作状态,不可瞬间重压或碰撞主机板架及四周叶片
3. 组装系统配件时请避免异物掉落机箱底座间隙内
4. 主机板架可承载之系统配备总载重量在10公斤以内
5. 理线区域:理线时请避开条纹区域,以避免影响机器开合,建议沿着虚线指示理线为佳
07
08
Page 7

Top & Side & Rear View
21
20
22
English Français
Top Airflow Mesh
20
21
Emergency Stop Switch
22
Bluetooth Indicator LED / Power Button
23
Horizontal Height Adjustment Hole
24
Laser Indicator Power Switch
LED Power Switch
25
26
Power Socket
22
23
20
21
22
23
24
25
26
24
23
Mailles pour l'écoulement d'air supérieur
Commutateur d' arrêt d' urgence
Voyant DEL Bluetooth / Bouton d'alimentation
Trou de réglage de la hauteur horizontale
Voyant du commutateur d'alimentation laser
Commutateur DEL d'alimentation
Prise d'alimentation électrique
25
26
繁體中文 简体中文
上置通風網
20
21
緊急停止按鈕
22
藍牙指示燈 / 開關
23
水平高度調整孔
24
雷射指示燈開關
LED燈開關
25
26
電源插座
上置通风滤网
20
21
紧急停止按钮
22
蓝牙指示灯 / 开关
23
水平高度调整孔
24
激光指示灯开关
LED灯开关
25
26
电源插座
Operating Instructions and Notices
English
1. During an emergency, press the Emergency
Stop Switch on the top to cease the chassis′s
operation, and to ensure safety.
The LED will blink red after the Emergency
Stop Switch is pressed. Press again to resume.
2. When the Bluetooth is turned on, the blue
LED will blink every 3 seconds continuously.
If not, press the on/off switch again.
Français
1. Pendant une urgence, appuyez sur le
commutateur d'arrêt d'urgence sur la partie
supérieure pour arrêter l'utilisation du châssis
et pour vous assurer de sa sécurité. Le voyant DEL clignote en rouge une fois que vous avez
appuyé sur le commutateur d'arrêt d'urgence. Appuyez à nouveau pour continuer.
2. Quand vous avez activé le Bluetooth, la DEL bleue clignote toutes les 3 secondes de manière
continue. Si ce n'est pas le cas, appuyez à nouveau sur le commutateur.
Deutsch 日本語
Oberes Luftstromgitter
20
21
Notstoppschalter
22
Bluetooth-LED / Ein-/Austaste
23
Horizontale Höhenanpassungsöffnung
24
Ein-/Ausschalter der Laseranzeige
Ein-/Ausschalter der LED
25
26
Netzanschluss
09
上方換気ネット
20
21
緊急停止ボタン
22
ブルートゥースインジケータ
23
水平高度調整穴
24
レーザーインジケータスイッチ
LEDライトスイッチ
25
26
電源プラグ
Deutsch
1. Drücken Sie während eines Notfalls zum Stoppen des Gehäusebetriebs und zur Gewährleistung
der Sicherheit den Notstoppschalter an der Oberseite. Die LED blinkt nach Betätigung des
Notstoppschalters rot. Zum Fortsetzen des Betriebs erneut drücken.
2. Wenn die Bluetooth-Funktion eingeschaltet ist, blinkt die blaue LED alle 3 Sekunden kontinuierlich.
Falls nicht, drücken Sie den Ein-/Ausschalter noch einmal.
10
Page 8

Operating Instructions and Notices
日本語
1. 緊急時に緊急停止ボタンを押すと機器のカバーの展開がストップして機器を保護します。
緊急停止ボタンを押すとLEDが赤く点滅します。再び押すと解除できます。
2. ブルートゥースが起動していると、3秒ごとに青い光が点滅します。青い光が点滅していない場合は
有効になっていません。スイッチを押してブルートゥースを起動してください。
繁體中文
1. 當發生緊急情況時,可按下緊急停止按鈕終止機器開闔,以達到保護措施;按下緊急停止按鈕後LED會
呈現紅光閃爍,再按一次即可解除
App Operation Steps
Bluetooth Connecting Steps
App Icon
Titanium / Black version Black / Red (ROG certified) version
English
H-Tower′s Bluetooth App allows users to control the structure of chassis wirelessly, and enjoy a
variety of functions including integrated laser light, side panel opening adjustment, LED light
controller, and auto mode display function.
1. Please download H-Tower App Android version from IN WIN website
http://www.inwin-style.com/event/H-Tower/
Titanium / Black version please download “IN WIN H-Tower"
Black / Red (ROG certified) version please download "ROG H-Tower"
2. Please enable your Bluetooth function on your mobile.
3. Please make sure the Bluetooth function on H-Tower is on. Blue light will flash constantly every
3 seconds when the Bluetooth is on. If there is no flash blue light, please press the power button
to enable the Bluetooth.
4. Open the H-Tower App and pair your mobile devices with H-Tower Bluetooth. When the screen
shows “CA06-Your Bluetooth Pairing Code” click to pair.
5. Scan the Bluetooth device, and select the correct H-Tower model on the list for pairing. Once the
pairing is successful, the Bluetooth blue light will flash twice every 3 seconds.
6. Slide right to enter the main control panel.
2. 當藍牙配件處於開啟狀態時會呈現持續且穩定的每三秒鐘藍光閃爍一次,如未閃爍藍光表示尚未開啟,
請按一下開關即可啟動藍牙
简体中文
1. 当发生紧急情况时,可按下紧急停止按钮终止机器开合,以达到保护措施;按下紧急停止按钮后LED会
呈现红光闪烁,再按一次即可解除
2. 当蓝牙配件处于开启状态时会呈现持续且稳定的每三秒钟蓝光闪烁一次,如未闪烁蓝光表示尚未开启,
请按一下开关即可启动蓝牙
11
Français
L'application Bluetooth du H-Tower permet aux utilisateurs de contrôler la structure du châssis
sans fil, et d'utiliser une variété de fonctions incluant une lumière laser intégrée, un réglage
d'ouverture du panneau latéral, un contrôleur du voyant DEL, et une fonction d'affichage du mode
automatique.
1. Veuillez télécharger la version Android de l'app du H-Tower à partir du site Internet IN WIN
http://www.inwin-style.com/event/H-Tower/
Version titane / noire, veuillez télécharger "IN WIN H-Tower"
Version noire / rouge (certifiée ROG), veuillez télécharger "ROG H-Tower"
2. Veuillez activer la fonction Bluetooth de votre mobile.
3. Assurez-vous que la fonction Bluetooth du H-Tower est sur On. Le voyant bleu clignote de
manière constante toutes les 3 secondes quand Bluetooth est sur On. S'il n'y a aucun voyant bleu
clignotant, appuyez sur le bouton d'alimentation pour activer Bluetooth.
4. Ouvrez l'app du H-Tower et couplez vos appareils mobiles avec le Bluetooth du H-Tower. Quand
l'écran vous indique "CA06-Your Bluetooth Pairing Code", cliquez pour coupler.
5. Scannez l'appareil Bluetooth, puis sélectionnez le modèle correct de H-Tower de la liste pour
effectuer le couplage. Une fois que vous avez réussi le couplage, le voyant bleu Bluetooth
clignote deux fois toutes les 3 secondes.
6. Faites glisser à la droite pour entrer dans le panneau de contrôle principal.
12
Page 9

Bluetooth Connecting Steps
App Icon
Titanium / Black version Black / Red (ROG certified) version
Deutsch
Die Bluetooth-App von H-Tower ermöglicht Nutzern die kabellose Steuerung der Gehäusestruktur
und den Einsatz einer Vielzahl von Funktionen, darunter das integrierte Laserlicht, das Öffnen der
Seitenblende, die Steuerung der LED-Beleuchtung und der automatische Präsentationsmodus.
1. Bitte laden Sie die Android-Version der H-Tower-App von der offiziellen In Win-Webseite herunter:
http://www.inwin-style.com/event/H-Tower/
Bei der Version Titan / Schwarz laden Sie bitte „IN WIN H-Tower“ herunter
Bei der Version Schwarz / Rot (ROG-zertifiziert) laden Sie bitte „ROG H-Tower“ herunter
2. Aktivieren Sie die Bluetooth-Funktion Ihres Mobilgeräts
3. Vergewissern Sie sich, dass die Bluetooth-Funktion am H-Tower aktiviert ist. Bei aktivierter
Bluetooth-Funktion blinkt die blaue Anzeige konstant alle 3 Sekunden. Bei inaktiver Leuchte
drücken Sie die Ein-/Austaste zum Aktivieren der Bluetooth-Funktion.
4. Öffnen Sie die H-Tower-App und koppeln Sie Ihr Mobilgerät mit dem H-Tower. Wenn der Bildschirm
„CA06 – Ihr Bluetooth-Kopplungscode“ anzeigt, zum Koppeln antippen.
5. Suchen Sie nach Bluetooth-Geräten und wählen Sie das korrekte H-Tower-Modell aus der
Kopplungsliste. Bei erfolgreicher Kopplung blinkt die Bluetooth-Anzeige alle 3 Sekunden blau.
6. Wischen Sie zum Aufrufen des Hauptsteuerungsfensters nach rechts.
日本語
H-Tower App をダウンロードすれば、携帯電話やタブレットPCなどのモバイルデバイスのブルートゥースを
通じてワイヤレスでケースの変形を操作する楽しさを味わうことができます。内蔵レーザー光による位置決定
、ケース展開角度調整、ライティング制御、オートデモ等のデザインで操作の楽しみを豊富に提供します。
1. IN WINウェブサイトよりAndroid 版H-Tower App をダウンロードしてください。
http://www.inwin-style.com/event/H-Tower/
チタンブラック版は “IN WIN H-Tower"をダウンロードしてください。
ブラックレッド (ROG認証) 版は "ROG H-Tower"をダウンロードしてください。
2. ご使用のモバイルデバイスのブルートゥースが有効になっていることを確認してください。
3. H-Tower のブルートゥースが有効になっていることを確認します。ブルートゥースが起動していると、3
秒ごとに青い光が点滅します。青い光が点滅していない場合は有効になっていません。スイッチを押して
ブルートゥースを起動してください。
4. モバイルデバイスのAppメニューから H-Tower とのブルートゥースペアリングを開始します。画面に
「CA06-ブルートゥース番号」が表示されたらペアリングをタップします。
5. モバイルデバイスがH-Tower ブルートゥースの検出に成功すると確認画面が出現します。確認をタップす
るとペアリング成功です。この時H-Tower のブルートゥースは継続的かつ安定的に、3秒ごとに青い光を2
回点滅させます。これでApp は接続に成功です。
6. 画面を左から右にスワイプさせてメイン画面に進みます。
繁體中文
下載 H-Tower App 程式可透過手機、平板等手持裝置的藍牙傳輸享受無線操控變形機殼的樂趣。內建雷射光
定位、機殼開闔角度調整、燈光控制、自動展演等設計,提供豐富的操作樂趣。
1. 請至迎廣網站下載 H-Tower App Android 版本 http://www.inwin-style.com/event/H-Tower/
鈦黑色版本請下載 “IN WIN H-Tower"
黑紅色 (ROG認證) 版本請下載 "ROG H-Tower"
2. 請確認您的行動裝置藍牙功能處於開啟狀態
3. 確認 H-Tower 的藍牙配件已開啟,當藍牙配件處於開啟狀態時會呈現持續且穩定的每三秒鐘藍光閃爍一次,
如未閃爍藍光表示尚未開啟,請按一下開關即可啟動藍牙
4. 點選行動裝置上的App選項開始進行與 H-Tower 的藍牙配對,當畫面顯示「CA06-藍牙編號」時即可點選配對
5. 當行動裝置成功搜尋到 H-Tower 藍牙時會出現確認畫面,請點選確認並配對成功,此時H-Tower 的藍牙配
件會呈現持續且穩定的每三秒鐘藍光閃爍二次,即表示 App 已成功連線
6. 並從畫面左側滑向右側進入主畫面
简体中文
下载 H-Tower App 程序可透过手机、平板等移动设备的蓝牙传输亨受无线操控变形机箱的乐趣。内建激光
光定位、机箱开合角度调整、灯光控制、自动展演等设计,提供丰富的操作乐趣。
1. 请至迎广网站下载 H-Tower App Android 版本 http://www.inwin-style.com/event/H-Tower/
钛黑色版本请下载 “IN WIN H-Tower"
黑红色 (ROG认证) 版本请下载 "ROG H-Tower"
2. 请确认您的移动设备蓝牙功能处于开启状态
3. 确认 H-Tower 的蓝牙配件已开启,当蓝牙配件处于开启状态时会呈现持续且稳定的每三秒钟蓝光闪烁一次
,如未闪烁蓝光表示尚未开启,请按一下开关即可启动蓝牙
4. 点选行动装置上的App选项开始进行与 H-Tower 的蓝牙配对,当画面显示「CA06-蓝牙编号」时即可点选
配对
5. 当行动装置成功搜寻到 H-Tower 蓝牙时会出现确认画面,请点选确认并配对成功,此时H-Tower 的蓝牙配
件会呈现持续且稳定的每三秒钟蓝光闪烁二次,即表示 App 已成功联机
6. 并从画面左侧滑向右侧进入主画面
13
14
Page 10

H-Tower App Operation Steps
Main Menu
2
3
Lighting Adjustment
Titanium / Black version
Black / Red (ROG certified)
Press to turn on the laser indicator red light for 5 seconds
1
1
4
Appuyez pour activer le voyant rouge laser pendant 5 secondes
Zum 5-sekündigen Einschalten der roten Laseranzeige drücken
タップするとレーザーインジケータの赤ランプが点灯して約5秒後に停止します
點選後雷射指示燈頭紅燈亮起約5秒後關閉
点选后激光指示灯头红灯亮起约5秒后关闭
Press and hold to open the blades, to stop, just simply let go
2
Appuyez et maintenez le bouton appuyé pour ouvrir les lames; afin d'arrêter,
simplement laisser aller.
Zum Öffnen der Flügel gedrückt halten, zum Stoppen einfach loslassen
長押しするとケースが開き始め、放すと動作が停止します
持續按壓啟動機殼開啟,放開則停止動作
持续按压启动机壳开启,放开则停止动作
Long press for 3 seconds to activate the display mode
3
Appuyez longuement pendant 3 secondes pour activer le mode d'affichage
Zum Aktivieren des Präsentationsmodus 3 Sekunden lang drücken
3秒以上長押しすると、ケースのデモモードが起動します
持續按壓3秒以上,啟動機殼展演模式
持续按压3秒以上,启动机箱展演模式
Press and hold to close the blades, to stop, just simply let go
4
Appuyez et maintenez le bouton appuyé pour fermer les lames; afin d'arrêter,
simplement laisser aller.
Zum Schließen der Flügel gedrückt halten, zum Stoppen einfach loslassen
長押しするとケースが閉まり始め、放すと動作が停止します
持續按壓啟動機殼關閉,放開則停止動作
持续按压启动机壳关闭,放开则停止动作
1
2
3
Click “SAVE” to keep your setting
1
Cliquez sur “SAVE” pour conserver votre réglage
Zum Beibehalten Ihrer Einstellung auf „SAVE“ tippen
毎回、調節が終了したら ”SAVE” をタップして設定値を保存します
每次調整完畢後需點選 “SAVE”以儲存設定值
每次调整完毕后需点选 “SAVE” 以储存设定值
2
Breathing lighting speed setting
Réglage de la vitesse de l'éclairage de respiration
Geschwindigkeitseinstellung der pulsierenden Beleuchtung
ブリージングライトの速度調節
呼吸燈速度調整
呼吸灯速度调整
3
Breathing light brightness setting
Réglage de la luminosité de la lumière de respiration
Helligkeitseinstellung der pulsierenden Beleuchtung
ブリージングライトの明るさ調節
呼吸燈明亮度調整
呼吸灯明亮度调整
Setting
Preset lighting, click “COLOR SAVE”to keep your setting
1
Présélectionnez la lumière, cliquez sur “COLOR SAVE” pour conserver votre réglage
Voreingestellte Beleuchtung, zum Beibehalten Ihrer Einstellung auf „COLOR SAVE“
tippen
1
2
製造元による初期設定のライティングです。毎回選択後にタップして設定値を保存します
原廠預設燈光,每次選取後需點選“COLOR SAVE” 以儲存設定值
原厂预设灯光,每次选取后需点选“COLOR SAVE” 以储存设定值
2
Color and brightness adjustment
Réglage de la couleur et de la luminosité
Farb- und Helligkeitsanpassung
ライティングのカラーと強度の調節
燈色與強度調整
灯色与强度调整
1
2
3
4
Laser Control
1
Contrôle laser
Lasersteuerung
レーザーライトスイッチ
雷射燈開關控制
激光灯开关控制
2
LED Control
Contrôle de la DEL
LED-Steuerung
LEDライトスイッチ
LED燈開關控制
LED燈開關控制
Redirection to IN WIN official website
3
Redirection vers le site officiel IN WIN
Link zur offiziellen In Win-Website
タップするとIN WINオフィシャルサイトへ移動します
點選後可連結至 IN WIN 官方網站
点选后可连结至 IN WIN 官方网站
4
Disconnect and close the App
Déconnectez et fermez l'application
App trennen und schließen
画面とAppを終了します
關閉畫面並結束App程式
关闭画面并结束App程序
15
16
Page 11

Troubleshooting
1-e
English
1. Blades Malfunction
1-a. Check to see if the“Emergency Stop Switch” was accidentally pressed. The LED indicator blinks red when
pressed.
1-b. Check and see if any cables are interfering with the blade operation.
1-c. Please check if the adapter plug is correctly positioned to the H-Tower power socket.
1-d. Be sure to confirm that blade interference has not occurred.
1-e. Due to the layout of interior components may vary based on different configurations, the unbalanced weight
distribution may cause the lift platform tilted. If the blades opened but the motherboard plate didn′t rotate,
please turn off the power and inspect the lift platform to make sure it is in parallel with chassis bottom. To
balance the lift platform, please insert the hex key into the horizontal height adjustment hole to adjust the lift
platform. Once the platform is balanced, please reconnect to the power for normal operation.
2. The blades may be opened manually during a power failure. Firstly, lie down the chassis on the side and remove
the 5 screws from the chassis base. Once the screws are removed, lift the chassis to the standing position and open
the blades manually. In order to prevent handling injuries, please have two people to operate the blades removal
manually.
3. When the LED or the laser light does not work properly, please check the switches on the lower back of the case.
4. If the pairing is unsuccessful, please follow the steps below:
4-a. Make sure your mobile device e.g. phones, and tablets, are fully charged, and within the 10 meters connection
distance without any obstacles.
4-b. Make sure your H-Tower Bluetooth is enabled.
4-c. Restart the Bluetooth again.
Français
1. Mauvais fonctionnement des lames
1-a. Assurez-vous que vous n'avez pas appuyé par accident sur le "Commutateur d'arrêt d'urgence". Le voyant DEL
clignote en rouge si vous appuyez.
1-b. Assurez-vous qu'aucun câble n'interfère avec le fonctionnement des lames.
1-c. Vérifiez que la prise de l'adaptateur est correctement positionnée sur la prise d'alimentation du H-Tower.
1-d. Assurez-vous qu'aucune interférence de lames n'a pas eu lieu.
1-e. En raison du fait que la mise en page de composants intérieurs peut varier en fonction des configurations
différentes, la répartition de poids asymétrique peut entraîner la plateforme de levage inclinée. Si les lames
ont ouvert, mais la plaque de la carte mère n'a pas pivoté, s'il vous plaît éteindre l'appareil et d'inspecter la
plateforme élévatrice pour vous assurer qu'il est en parallèle avec le bas du châssis. Pour équilibrer la
plateforme élévatrice, s'il vous plaît insérer la clé hexagonale dans le trou de réglage de la hauteur horizontale
pour régler la plateforme élévatrice. Une fois la plateforme est équilibré, s'il vous plaît se reconnecter à
l′alimentation pour un fonctionnement normal.2. Vous pouvez ouvrir les lames en retirant les cinq vis de la
partie inférieure de la base et effectuer une utilisation manuelle au cours d'une panne d'électricité.
2. Les lames peuvent être ouverts manuellement en cas de panne de courant. Tout d'abord, allonger le châssis sur le
côté en retirant les cinq vis de la partie inférieure de la base du châssis. Une fois les vis sont retirées, soulevez le
châssis à la position debout et ouvrir les lames manuellement. Afin d'éviter des blessures de manipulation, s'il
vous plaît avoir deux personnes pour exécuter le retrait des lames manuellement.
3. Quand la DEL ou la lumière laser ne fonctionne pas correctement, vérifiez les commutateurs de la partie
inférieure du boîtier.
4. Si le couplage n'a pas fonctionné, veuillez suivre les étapes suivantes ci-dessous :
4-a. Assurez-vous que votre appareil mobile, par exemple téléphone et tablette, est complètement rechargé et
que la distance de connexion est comprise dans les 10 mètres sans obstacle.
4-b. Assurez-vous que le Bluetooth du H-Tower est bien activé.
4-c. Redémarrez le Bluetooth.
21-c
Deutsch
1. Fehlfunktionen der Flügel
1-a. Prüfen Sie, ob versehentlich der „Notstoppschalter“ gedrückt wurde. Bei Betätigung blinkt die LED-Anzeige rot.
1-b. Prüfen Sie, ob die Flügel durch Kabel an der Bewegung gehindert werden.
1-c. Prüfen Sie, ob das Netzteil richtig am H-Tower angeschlossen ist.
1-d. Vergewissern Sie sich, dass die Flügel nicht blockiert werden.
1-e. Da das Layout der internen Komponenten je nach Konfiguration variieren kann, kann eine ungleichmäßige
Gewichtsverteilung dazu führen, dass die Hebeplattform kippt. Falls sich die Flügel öffnen, die Motherboard Platte aber nicht dreht, schalten Sie das Gerät bitte aus und prüfen Sie, ob die Hebeplattform parallel zum
Gehäuseboden ausgerichtet ist. Bitte stecken Sie zum Ausgleichen der Hebeplattform den Sechskantschlüssel in
die Öffnung zur horizontalen Höhenanpassung. Sobald die Plattform ausgeglichen ist, stellen Sie zur Fortsetzung
des normalen Betriebs bitte die Stromversorgung wieder her.
2. Die Flügel können während eines Stromausfalls von Hand geöffnet werden. Legen Sie das Gehäuse zunächst auf die
Seite und entfernen Sie die 5 Schrauben vom Gehäuseboden. Sobald die Schrauben entfernt sind, bringen Sie das
Gehäuse wieder in die stehende Position. Öffnen Sie die Flügel von Hand. Bitte führen Sie die manuelle Öffnung der
Flügel zur Vermeidung von Verletzungen zu zweit durch.
3.Wenn LED oder Laser nicht richtig funktionieren, prüfen Sie bitte die Schalter im unteren Bereich an der
Gehäuserückseite.
4. Falls die Kopplung scheitert, prüfen Sie bitte die nachstehenden Schritte:
4-a. Vergewissern Sie sich, dass Ihr Mobilgerät, bspw. Telefon oder Tablet, vollständig aufgeladen und maximal 10
Meter ohne Hindernisse vom Gehäuse entfernt ist.
4-b. Stellen Sie sicher, dass die Bluetooth-Funktion Ihres H-Tower aktiviert ist.
4-c. Starten Sie die Bluetooth-Funktion neu.
日本語
1. PCケースのカバーが正常に開かない時
1-a. ケース情報の緊急停止ボタンに誤って触れていないかどうかを確認してください。緊急停止ボタンが押されていると赤い
光のLEDが点滅します。
1-b. ケーブルがケースの動作に干渉していないかチェックしてください。
1-c. 変圧器のプラグが正しい方向でケースの電源プラグに挿入されているか、そして変圧器の電源インジケータが点灯してい
るかどうかをチェックしてください。
1-d. ケースのカバーが相互に干渉していないかチェックしてください。
1-e. システム構成より、重さがアンバランスになる可能性があります。それにより、リフトプラットホーム(マザーボードの
固定プレート)が傾く可能性が あります。カバーが開いたにもかかわらず、マザーボードプレートが動作しない場合は、
電源を切ってから、リフトプラットフォームがケースの底面と 水平になっているか確認してください。リフトプラットフ
ォームのバランスを調整するには、六角レンチを使い水平高度調整穴で調整して下さい。リフ トプラットフォームのバラ
ンス調整後に、電源を再投入してください。
2. 電源が切れているとき、カバーは手動で開くことができます。最初にケースを横置きにして、シャーシ底部のねじX5本を外
します。ねじを取り外した 後、ケースを縦置きにして、手動でケースのカバーを開けます。怪我など防ぐため、二人以上で
作業して下さい。
3. LED ライトまたはレーザーライトが正常に表示できない時は、ケース後方のレーザーインジケータとLEDインジケータスイッ
チがONになっているかどうかをチェックしてください。
4. ブルートゥースとのペアリングができない時は以下の手順を実行してください。
4-a. ご使用のモバイルデバイス(例:携帯電話、タブレットPC等)が十分に充電されているか、または電源に接 続されてい
るか、そしてH-Towerとの距離が遠くないことを確認してください。通常は障害物の無い10メートル以内の距離が最適
です。
4-b. H-Tower とモバイルデバイスに内蔵されているブルートゥースが有効になっていることを確認してください。
4-c. ブルートゥースを再起動してください。
繁體中文
1. 當機殼無法正常開闔時
1-a. 請先檢查是否誤觸位於機殼上方的緊急停止按鈕,當緊急停止按鈕開啟時LED會呈現紅光閃爍
1-b. 請檢查線材是否干涉機殼運作
1-c. 請檢查變壓器插頭是否以正確方向插入機殼電源插座,以及變壓器的電源指示燈是否有亮起
1-d. 請檢查機殼葉片是否互相干涉
1-e. 由於系統配備依使用者喜好及安裝位置不盡相同,主機板架上不均衡的重量分配可能會導致升降平台傾斜,當升降平台傾斜
或發生葉片已開啟但主機板架卻沒有翻轉的情況下,請先關閉電源並檢查升降平台是否與機殼底座保持水平狀態,必要時可
以零件盒所附之六角板手置入水平高度調整孔,將昇降平台調整至水平狀態後再接上電源即可正常操作
2. 當遇到停電或無法通電的狀況下,欲開啟機殼葉片時請先將機殼輕放平躺後卸下底座 5 個螺絲,再將機殼直立並手動打開葉片;
請注意搬運本產品及手動操作葉片時務必二人同時操作,以免造成產品或人員的傷害
3. 當 LED 燈或雷射燈無法正常顯示時,請先檢查機殼後方雷射指示燈及 LED 指示燈開關是否已打開
4. 當您無法成功配對藍牙配件時,請先嘗試以下步驟:
4-a. 確認您行動裝置 (例如:手機、平板等) 已充飽電或接上電源,且與 H-Tower 相距不遠。一般建議最適距離在10公尺內且無
任何障礙物
4-b. 確認您的 H-Tower 與行動裝置所內建的藍牙配件已開啟
4-c. 重新啟動您的藍牙配件
17
18
Page 12

Troubleshooting
1-e
简体中文
1. 当机箱无法正常开合时
1-a. 请先检查是否误触位于机箱上方的紧急停止按钮,当紧急停止按钮开启时LED会呈现红光闪烁
1-b. 请检查线材是否干涉机箱运作
1-c. 请检查变压器插头是否以正确方向插入机箱电源插座,以及变压器的电源指示灯是否有亮起
1-d. 请检查机箱叶片是否有交互干涉
1-e. 由于系统配备依使用者喜好及安装位置不尽相同,主机板架上不均衡的重量分配可能会导致升降平台倾斜,当升降平台
倾斜或发生叶片已开启但主机板架却没有翻转的情况下,请先关闭电源并检查升降平台是否与机壳底座保持水平状态,
必要时可以零件盒所附之六角板手置入水平高度调整孔,将升降平台调整至水平状态后再接上电源即可正常操作
2. 当遇到停电或无法通电的状况下,欲开启机壳叶片时请先将机壳轻放平躺后卸下底座 5 个螺丝,再将机壳直立并手动打开叶
片;请注意搬运本产品及手动操作叶片时务必二人同时操作,以免造成产品或人员的伤害
3. 当 LED 灯或激光灯无法正常显示时,请先检查机箱后方激光指示灯及 LED 指示灯开关是否已打开
4. 当您无法成功配对蓝牙配件时,请先尝试以下步骤:
4-a. 确认您移动设备 (例如:手机、平板等) 已充满电或接上电源,且与 H-Tower 相距不远。一般建议最适距离在10公尺内
且无障碍物
4-b. 确认您的 H-Tower 与移动设备所内建的蓝牙配件已开启
4-c. 重新启动您的蓝牙配件
21-c
日本語
日本語
本製品を操作する前に、人体への傷害や財産の損失を避けるため、この説明書をよくお読みください。
本製品を操作する前に、人体への傷害や財産の損失を避けるため、この説明書をよくお読みください。
1. レーザーの赤い光を直視しないでください。
1. レーザーの赤い光を直視しないでください。
2. 手を挟まないように注意してください。
2. 手を挟まないように注意してください。
3. お子さまに一人で操作させないでください。
3. お子さまに一人で操作させないでください。
4. 本製品を操作する時は、情報の毀損を避けるためにSSD耐震HDDを使用することを推奨します。
4. 本製品を操作する時は、情報の毀損を避けるためにSSD耐震HDDを使用することを推奨します。
5. レーザーライトの支持区域は安全操作範囲です。干渉が起きないよう物品を放置しないでください。
5. レーザーライトの支持区域は安全操作範囲です。干渉が起きないよう物品を放置しないでください。
6. 操作者が無理をしない状態で本製品を運搬してください。四方に十分なスペースを空けて、2人以上で運搬するよう推奨しますまた、手を
6. 操作者が無理をしない状態で本製品を運搬してください。四方に十分なスペースを空けて、2人以上で運搬するよう推奨しますまた、手を
傷つけないよう手袋を着用してください。運搬時に手をかけると場所はケース台座前後の凹み部分です。
傷つけないよう手袋を着用してください。運搬時に手をかけると場所はケース台座前後の凹み部分です。
7. 本製品を操作する前に使用マニュアルをよくお読みください
7. 本製品を操作する前に使用マニュアルをよくお読みください
繁體中文
繁體中文
操作本產品前請先詳閱本指引,以免造成人身傷害或財產損失
操作本產品前請先詳閱本指引,以免造成人身傷害或財產損失
1. 請勿直視雷射紅光
1. 請勿直視雷射紅光
2. 小心夾手
2. 小心夾手
3. 請勿讓幼童自行操作
3. 請勿讓幼童自行操作
4. 操作本產品時為避免造成資料損毀建議使用 SSD 防震硬碟
4. 操作本產品時為避免造成資料損毀建議使用 SSD 防震硬碟
5. 雷射燈指示區域為安全操作範圍,請勿放置物品以免造成干涉
5. 雷射燈指示區域為安全操作範圍,請勿放置物品以免造成干涉
6. 請確認操作者在不勉強的狀態下搬運本產品,建議四周淨空,由兩人共同搬運,並穿載手套以免割傷,搬運時的施方點在機殼底座的前後凹槽
6. 請確認操作者在不勉強的狀態下搬運本產品,建議四周淨空,由兩人共同搬運,並穿載手套以免割傷,搬運時的施方點在機殼底座的前後凹槽
7. 操作本產品前請先詳閱使用手冊
7. 操作本產品前請先詳閱使用手冊
简体中文
简体中文
操作本产品前请先详阅本指引,以免造成人身伤害或财产损失
操作本产品前请先详阅本指引,以免造成人身伤害或财产损失
1. 请勿直视激光红光
1. 请勿直视激光红光
2. 小心夹手
2. 小心夹手
3. 请勿让幼童自行操作
3. 请勿让幼童自行操作
4. 操作本产品时为避免造成数据损毁建议使用 SSD 防震硬盘
4. 操作本产品时为避免造成数据损毁建议使用 SSD 防震硬盘
5. 激光扫瞄区域为安全操作范围,请勿放置物品以免造成干涉
5. 激光扫瞄区域为安全操作范围,请勿放置物品以免造成干涉
6. 请确认操作者在不勉强的状态下搬运本产品,建议四周净空,由两人共同搬运,并穿载手套以免割伤,搬运时的施方点在机箱底座的前后凹槽
6. 请确认操作者在不勉强的状态下搬运本产品,建议四周净空,由两人共同搬运,并穿载手套以免割伤,搬运时的施方点在机箱底座的前后凹槽
7. 操作本产品前请先详阅使用手册
7. 操作本产品前请先详阅使用手册
Important Notice
English
Please read the instructions carefully before installation to avoid damage to the product or personal injury:
1. Do not look directly at red light laser.
2. Keep hands away of any moving parts.
3. Do not allow children to operate the chassis.
4. SSD is recommended to prevent data damage while operating the system.
5. Please do not place any item within the outlined safety operating area marked by the laser lights.
6. When moving the case, hold on tight to the bottom front and back notch. It is recommended to wear gloves as the edges may be
sharp.
7. Please read user manual before use.
Français
Veuillez lire attentivement les instructions avant l'installation, afin d'éviter tout dommage du produit ou toute blessure :
1. Ne regardez pas directement la lumière rouge du laser.
2. Ne touchez aucune pièce mobile.
3. Ne laissez pas les enfants utiliser le châssis.
4. SSD est recommandé pour éviter tout dommage des données lors de l'utilisation du système.
5. Veuillez ne placer aucun élément dans la zone d'utilisation soulignée marquée par les lumières laser.
6. Quand vous déplacez le boîtier, tenez fermement la partie frontale inférieure et le cran arrière. Nous vous recommandons de porter
des gants car les bords peuvent être tranchants.
7. Veuillez lire le manuel de l'utilisateur avant d'utiliser le produit.
Deutsch
Bitte lesen Sie zur Vermeidung von Produktschäden und Verletzungen vor der Installation aufmerksam die Anweisungen:
1. Blicken Sie nicht direkt in den roten Laser.
2. Halten Sie Ihre Hände von beweglichen Teilen fern.
3. Erlauben Sie Kindern nicht, das Gehäuse zu bedienen.
4. Aufgrund möglicher Datenschäden während des Systembetriebs werden SSDs empfohlen.
5. Bitte stellen Sie nichts innerhalb des durch das Laserlicht gekennzeichneten Sicherheitsbetriebsbereichs ab.
6. Transportieren Sie das Gehäuse an den Einkerbungen unten an Vorder- und Rückseite. Sie sollten Handschuhe tragen, da die Kanten
scharf sein könnten.
7. Bitte lesen Sie vor der Benutzung die Bedienungsanleitung.
19
Warranty
Warranty
English
English
1. For more detailed warranty information, please visit the In Win retail website at www.inwin-style.com
1. For more detailed warranty information, please visit the In Win retail website at www.inwin-style.com
2. The actual product is subject to change without prior notice. In Win Development Inc. reserves the right to
2. The actual product is subject to change without prior notice. In Win Development Inc. reserves the right to
make final modifications.
make final modifications.
Français
Français
1. Pour plus d'informations détaillées sur la garantie, consultez le site commercial de In Win à l'adresse :
1. Pour plus d'informations détaillées sur la garantie, consultez le site commercial de In Win à l'adresse :
www.inwin-style.com
www.inwin-style.com
2. Le produit est sujet à des modifications sans préavis. In Win Development Inc. se réserve le droit d'effectuer les
2. Le produit est sujet à des modifications sans préavis. In Win Development Inc. se réserve le droit d'effectuer les
modifications finales.
modifications finales.
Deutsch
Deutsch
1. Detaillierte Informationen zur Garantie finden Sie auf der In Win-Website unter www.inwin-style.com
1. Detaillierte Informationen zur Garantie finden Sie auf der In Win-Website unter www.inwin-style.com
2. Das tatsächliche Produkt kann ohne Vorankündigung geändert werden. In Win Development Inc. behält sich das Recht
2. Das tatsächliche Produkt kann ohne Vorankündigung geändert werden. In Win Development Inc. behält sich das Recht
vor, abschließende Modifikationen vorzunehmen.
vor, abschließende Modifikationen vorzunehmen.
日本語
日本語
1. 本製品の保証範囲と内容等に関する情報については、IN WINウェブサイトwww.inwin-style.com にてご覧ください。
1. 本製品の保証範囲と内容等に関する情報については、IN WINウェブサイトwww.inwin-style.com にてご覧ください。
2. 製品は実際の出荷内容に準じます。IN WIN社が最終的な変更の権利を留保します。
2. 製品は実際の出荷内容に準じます。IN WIN社が最終的な変更の権利を留保します。
繁體中文
繁體中文
1. 本產品之保固範圍及內容等相關資訊,請至迎廣網站www.inwin-style.com 查詢
1. 本產品之保固範圍及內容等相關資訊,請至迎廣網站www.inwin-style.com 查詢
2. 產品請以實際出貨內容為準,迎廣公司保留最終修改權利。
2. 產品請以實際出貨內容為準,迎廣公司保留最終修改權利。
简体中文
简体中文
1. 本产品之保固范围及内容等相关信息,请至迎广网站www.inwin-style.com 查询
1. 本产品之保固范围及内容等相关信息,请至迎广网站www.inwin-style.com 查询
2. 产品请以实际出货内容为准,迎广公司保留最终修改权利。
2. 产品请以实际出货内容为准,迎广公司保留最终修改权利。
20
 Loading...