

Page 1
3RAMEE034101
Copyright © IN WIN Development Inc. All Rights Reserved.
User Manual
使用者手冊‧繁體中文
使用者手册.简体中文
Manual del Usuario
Bedienungsanleitung
Manuel de l’utilisateur
Руководство по эксплуатации
取扱説明書
사용 설명서
Version 2.0
Page 2

Product Story
Aurora fan – Our philosophy “Contemporary and Innovative”
has served our brand for decades, and it motivates us to provide a more
complete and enjoyable PC experience. After relentlessly researching and
reconfiguring, In Win now releases its first retail PC fan, Aurora.
Derived from the mystical skyline phenomena that is the Northern Lights,
Aurora embodies free-flowing LED lights and its unique illuminated,
unpredictable nature. Its modular connector design not only keeps builds
nice and tidy with better cable management, but allows several fans to be
linked together to create a more synchronized and customizable
LED experience.
Contents
English
Español
Deutsch
日本語
Specification
Aurora LED Features
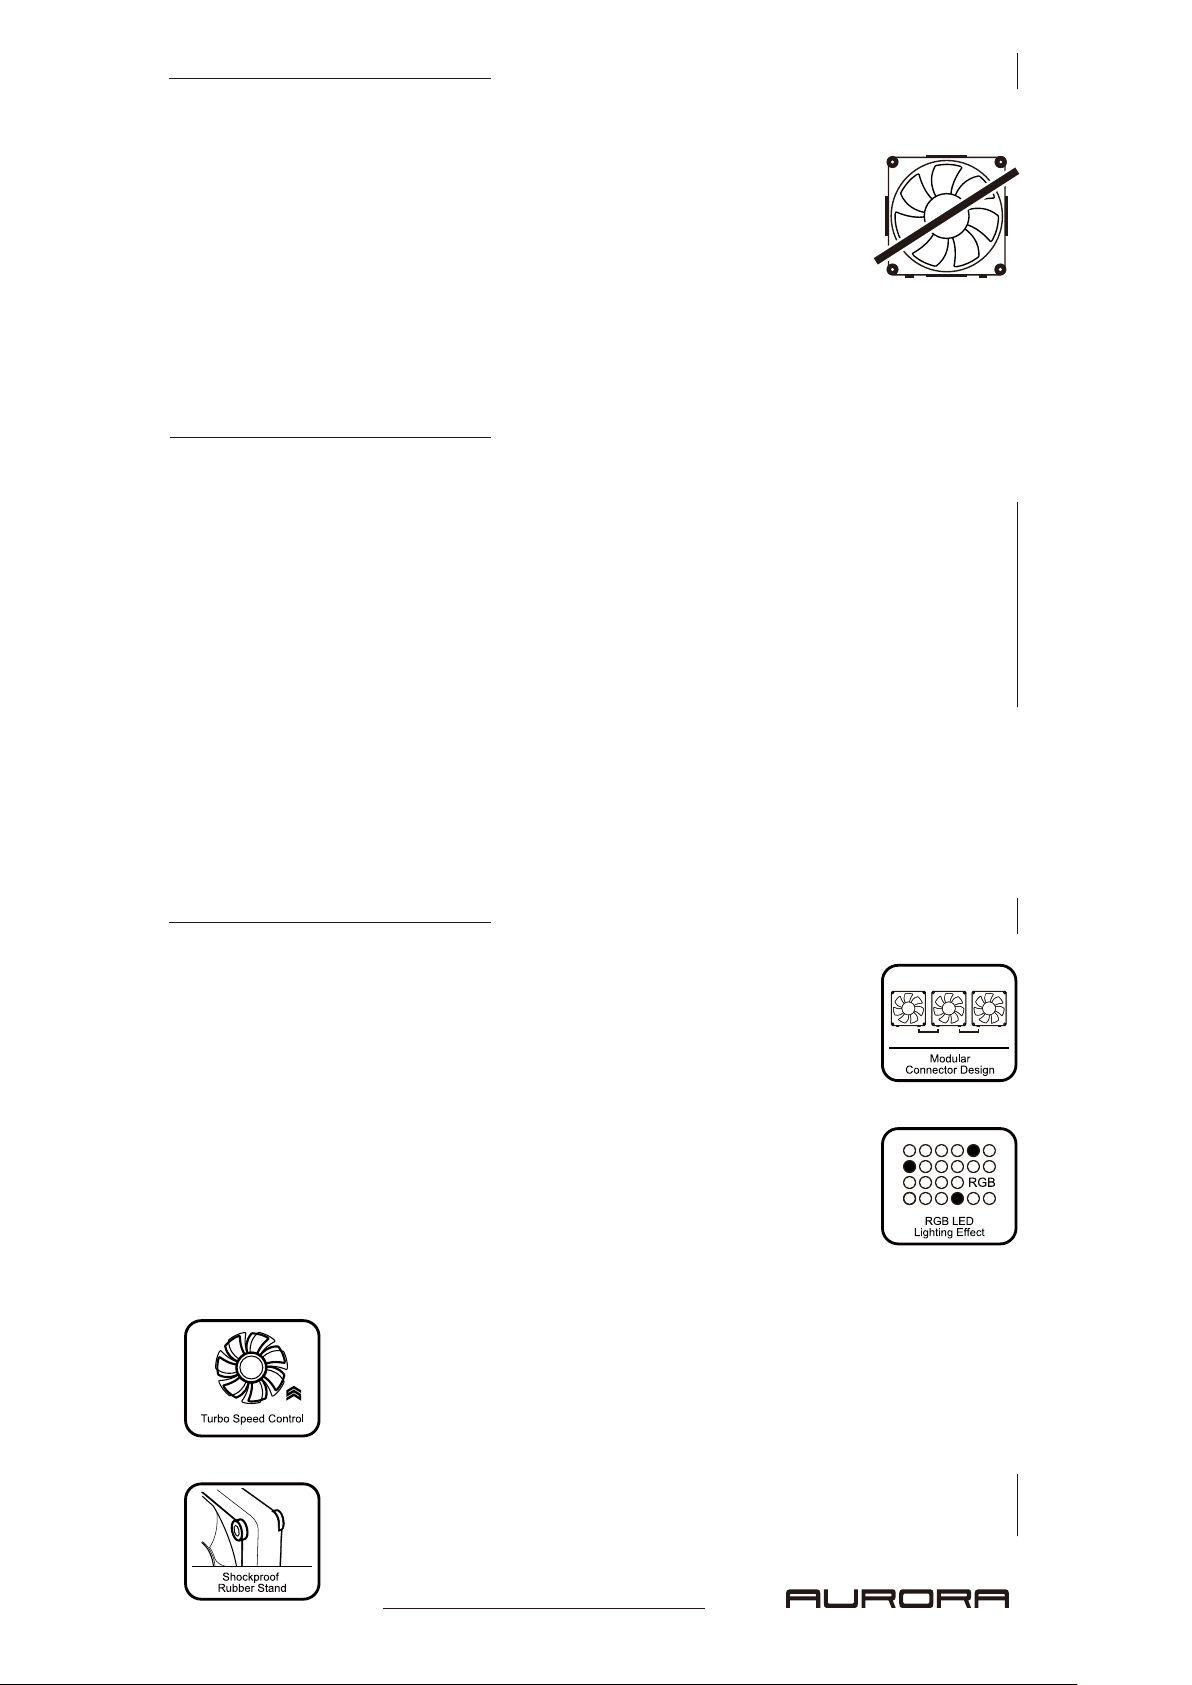
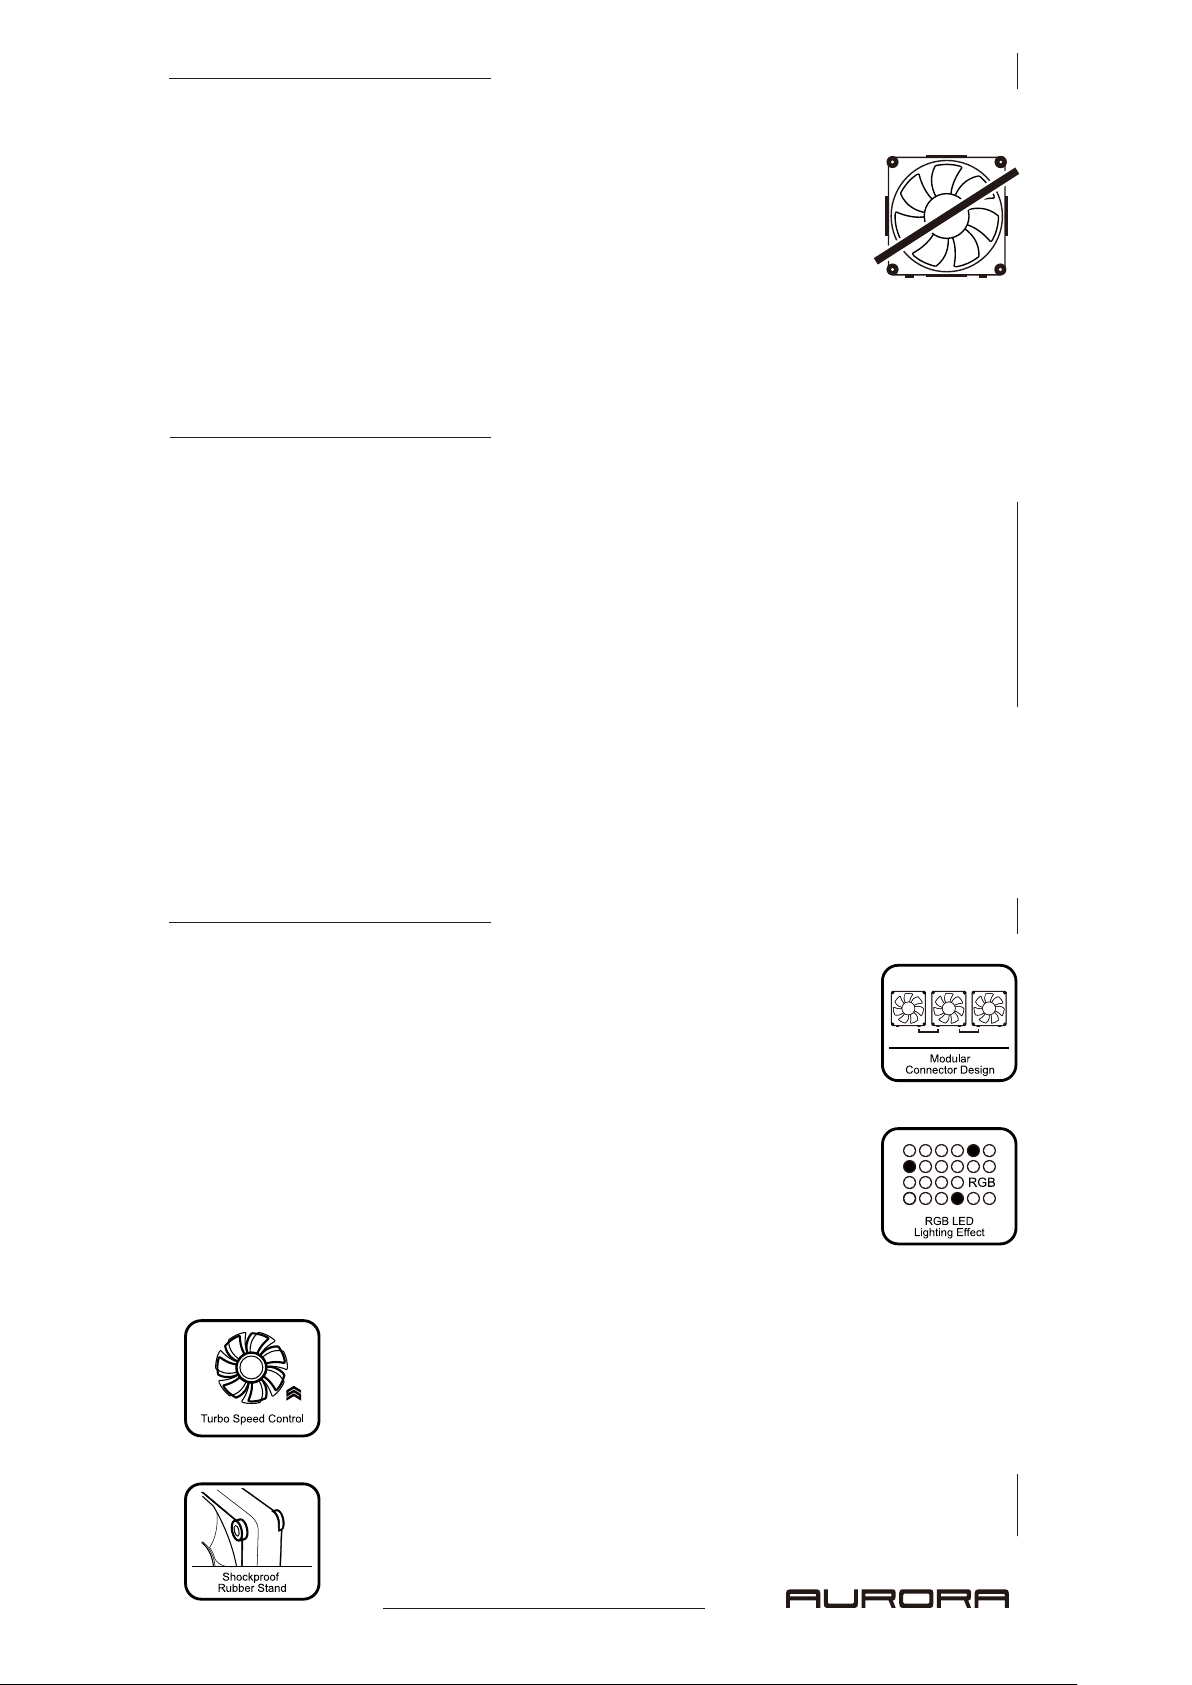
1. Modular Connector Design
The modular connector design allows each fan and LED strip to link with each other,
which also provides tidier cable management. By doing this, users will have a totally
customizable experience.
P1-P4
P13-P16
P17-P20
P29-P32
繁體中文
简体中文
Français
Руская
한국어
P5-P8
P9-P12
P21-P24
P25-P28
P33-P36
P37
P1English
2. Addressable RGB LED Lighting Effect
With a special IC chip inside, the LED light strip can present an array of colors
simultaneously. Users can use our exclusive software to change the lighting or
the frequency. There are endless possibilities since users are now given
control of your own fans.
3. Turbo Speed Control
Aurora can speed up the revolutions for better cooling performance. A useful
feature when overclocking and pushing PCs to their limits.
4. Shockproof Rubber Stand
With four shockproof rubber stands on the corners, Aurora eliminates unwanted
vibration for a much quieter experience.
Page 3
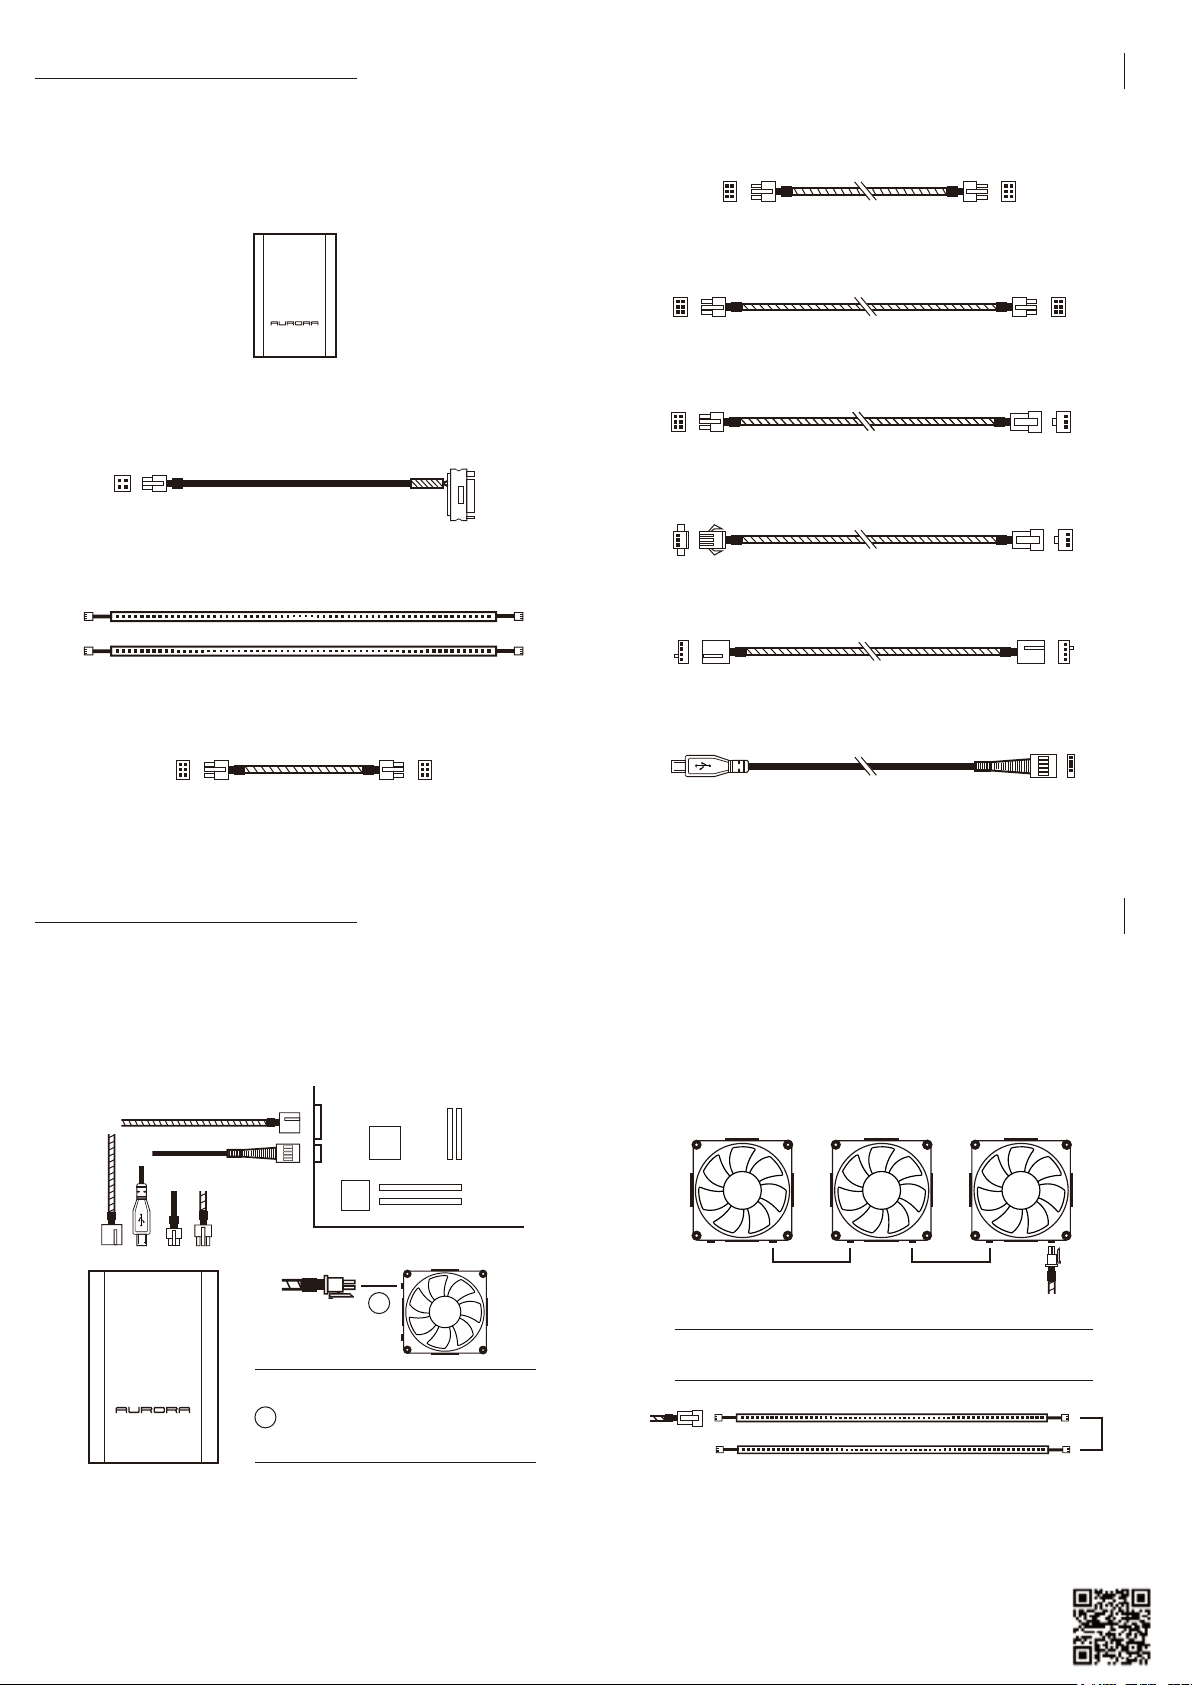
Components
P2
1. Aurora fans x 3
2. User manual x 1
3. Controller x 1
4. Screws x 12
5. Power wire
6. LED light strip 30cm x 2
8. 6-6 pin medium length connecting wire (connect fan to fan) x 1
9. 6-6 pin long connecting wire (connect fan to fan) x 1
<Retail Package Only>
10. 6-3 pin long connecting wire (connect fan to LED) x 1
11. 3-3 pin long connecting wire (connect LED to LED) x 1
12. 4-4 pin connecting wire x 1
7. 6-6 pin short connecting wire (connect fan to fan) x 2
Installation
1. Please make sure the power is off.
2. Install the fans in your PC case, and screw it in the designated areas.
3. Use power wire to connect the controller and the power.
4
Motherboard
5
3
6
6
IN
!
13. USB-4 pin connecting wire x 1
7. Use 6-6 pin short connecting wire to connect the OUT part of the
first fan and the IN part of the second fan.
8. Use 6-6 pin short connecting wire to connect the OUT part of the
second fan and the IN part of the third fan.
9. Use 6-3 pin connecting wire to connect the OUT part of the third
fan and the LED strip.
7 8
OUT IN OUT OUTIN
9
P3
When you are connecting the 6-6 pin short
connecting wire to the fan, please make
sure you insert the extended locking clip of
!
the 6-6 pin short connecting wire to the
corresponding opening of the fan.
4.
Use 4-4 pin connecting wire to connect the controller and the motherboard.
5. Use USB-4 pin connecting wire to connect the controller and the motherboard.
6. Use 6-6 pin long connecting wire to connect the controller and the IN
part of the first fan.
AURORA fans can be connected to each other through the 6-6pin
connecting wires, hence the installation above is a suggestion.
9
6-3 pin
10
3-3 pin
10. LED strips can be connected to each other directly or be connected
through 3-3 pin connecting wire
.
11. RGB lighting effect can be controlled through our exclusive software.
Please download the software at
(https://www.inwin-style.com/en/fans/aurora)
or scan the (QR code).
Page 4
Troubleshooting
If your fan does not operate properly, please follow the instructions below :
1. Please check your system’s power.
2. Please check the order between each connector’s IN part and the OUT part.
3. Please make sure all the connectors are connected properly.
Note to use
1. Please install the fan by following our instructions.
2. Please keep this product away from high temperatures. Keep away from machines such as
heaters that might cause high temperatures.
3. Please do not put anything in the impeller.
4. Please do not modify the wire or the connector provided by In Win.
5. Please only use your fan indoors.
6. Please bend the LED strip gently, and avoid causing too much physical strength or pressure.
7. Please do not use an LED strip that is not provided by In Win.
8. Please keep this product away from any liquid.
P4
Aurora LED 風扇特色
1. 輸出/入端子模組化
模組化的設計,玩家可以輕鬆串連風扇或是LED 燈條,組合出多種的散熱模式及燈光效果
,同時無需煩惱理線程序,保持整潔外觀。
2. Addressable RGB LED 燈光控制
每一顆LED 都內建有IC 控制芯片,因此Aurora 能夠同時發出多種不同的燈光,呈現多樣的
燈光效果,帶給玩家獨特的視覺體驗。玩家可以透過軟體控制自由組合專屬的燈光效果。
3. Turbo超速升壓控制
透過迎廣獨家專利技術,玩家在軟體上便可以啟動Turbo 功能,瞬間提高風扇轉速,
為系統帶來強大的風量,帶給玩家前所未有的散熱效能。
P5繁體中文
4. 防震膠墊設計
四角的防震膠墊,可減少風扇本體的震動和機箱共振效應,穩定風扇的安裝。
Page 5

產品內容物
P6
1. 迎廣Aurora 風扇 x 3
2. 使用者手冊 x 1
3. 控制盒 x 1
4. 螺絲x 12
5. 電源線
6. LED燈條 30cm x 2
8. 風扇接風扇 中長線 x 1 (6-6 pin)
9. 風扇接風扇 長線 x 1 (6-6 pin)
<只提供於零售包裝內>
10. 風扇接LED 長線 x 1 (6-3 pin)
11. LED接LED 長線 x 1 (3-3 pin)
12. 4-4 pin 連接線 x 1
7. 風扇接風扇 短線 x 2 (6-6 pin)
安裝風扇
1. 組裝前請確認電源是否完全斷電。
2. 將風扇裝入電腦機殼,並以螺絲固定。
3. 用電源連接線連接黑色控制盒和電源。
4
5
3
6
6
Motherboard
IN
!
13. USB-4 pin 連接線 x 1
7. 利用6-6 pin短接線連接第一顆風扇的OUT端和第二顆風扇的IN端。
8. 利用6-6 pin短接線連接第二顆風扇的OUT端和第三顆風扇的IN端。
9. 利用6-3 pin接線連接第三顆風扇的OUT端與LED燈條。
7 8
OUT IN OUT OUTIN
9
玩家可以透過內附的6-6 pin 連接線,自由串接風扇,因此上方的
安裝方式為建議安裝方式,玩家也可根據個人需求,自由搭配組裝。
P7
當您在連接風扇和6-6 pin接線時,請
將6-6 pin接線上方突起處,插入至風
!
扇上相對應的凹槽處。
4. 利用4-4 pin接線連接黑色控制盒和主機板的風扇處。
5. 利用USB-4 pin接線連接黑色控制盒和主機板。
6. 利用6-6 pin長接線連接黑色控制盒和第一顆風扇的IN端。
9
6-3 pin
10.
LED燈條和LED燈條之間可以直接串連或是透過內附的3-3 pin接線串連。
11. Addressable 燈光效果可以透過專屬軟體控制。
請於網站 https://www.inwin-style.com/tw/fans/aurora
或掃描QR Code下載軟體。
10
3-3 pin
Page 6
故障排除
若您的風扇無法正常運作,在進行維修檢測前,
請先依照下列步驟進行檢查。
1. 請先檢查電源的開關。
2. 檢查IN-OUT的接連順序。
3. 檢查接線與接頭之間是否連接妥當。
注意事項
1. 請依照此使用手冊之安裝說明和安全警告進行安裝。
2. 請將此產品遠離高溫區如: 散熱器、暖氣機或其它會產生高溫的設備。
3. 請勿將異物塞入風扇葉片處。
4. 請勿任意修改迎廣所提供的線材和接頭。
5. 僅限室內使用。
6. 請勿大幅度彎折LED 燈條或是大力擠壓。
7. 請勿使用非迎廣所提供的LED 燈條。
8. 請將本產品遠離任何液體。
P8
Aurora LED 风扇特色
1. 输出/入端子模块化
模块化的设计,玩家可以轻松串连风扇或是LED 灯条,组合出多种的散热模式及灯光效果
,同时无需烦恼理线程序,保持整洁外观。
2. Addressable RGB LED 灯光控制
每一颗LED 都内建有IC 控制芯片,因此Aurora 能够同时发出多种不同的灯光,呈现多样的
灯光效果,带给玩家独特的视觉体验。玩家可以透过软件控制自由组合专属的灯光效果。
3. Turbo超速升压控制
透过迎广独家专利技术,玩家在软件上便可以启动Turbo 功能,瞬间提高风扇转速,
为系统带来强大的风量,带给玩家前所未有的散热效能。
P9简体中文
4. 防震胶垫设计
四角的防震胶垫,可减少风扇本体的震动和机箱共振效应,稳定风扇的安装。
Page 7

产品内容物
P10
1. 迎广Aurora 风扇 x 3
2. 使用者手册 x 1
3. 控制盒 x 1
4. 螺丝x 12
5. 电源线
6. LED灯条 30cm x 2
7. 风扇接风扇 短线 x 2 (6-6 pin)
8. 风扇接风扇 中长线 x 1 (6-6 pin)
9. 风扇接风扇 长线 x 1 (6-6 pin)
<只提供于零售包装内>
10. 风扇接LED 长线 x 1 (6-3 pin)
11. LED接LED 长线 x 1 (3-3 pin)
12. 4-4 pin 连接线 x 1
13. USB-4 pin 连接线 x 1
安装风扇
1. 组装前请确认电源是否完全断电。
2. 将风扇装入计算机机壳,并以螺丝固定。
3. 用电源连接线连接黑色控制盒和电源。
4
5
3
6
6
当您在连接风扇和6-6pin接线时,请
将6-6 pin接线上方突起处,插入至风
!
扇上相对应的凹槽处。
Motherboard
IN
!
7. 利用6-6 pin短接线连接第一颗风扇的OUT端和第二颗风扇的IN端。
8. 利用6-6 pin短接线连接第二颗风扇的OUT端和第三颗风扇的IN端。
9. 利用6-3 pin接线连接第三颗风扇的OUT端与LED灯条。
7 8
OUT IN OUT OUTIN
9
玩家可以透过内附的6-6 pin 连接线,自由串接风扇,因此上方的
安装方式为建议安装方式,玩家也可根据个人需求,自由搭配组装。
9
6-3 pin
3-3 pin
P11
10
4. 利用4-4 pin接线连接黑色控制盒和主板的风扇处。
5. 利用USB-4 pin接线连接黑色控制盒和主板。
6. 利用6-6 pin长接线连接黑色控制盒和第一颗风扇的IN端。
10.
LED灯条和LED灯条之间可以直接串连或是透过内附的3-3 pin接线串连。
11. Addressable 灯光效果可以透过专属软件控制。
请于网站 https://www.inwin-style.com/cn/fans/aurora
或扫描QR Code下载软件。
Page 8

故障排除
若您的风扇无法正常运作,在进行维修检测前,
请先依照下列步骤进行检查。
1. 请先检查电源的开关。
2. 检查IN-OUT的接连顺序。
3. 检查接线与接头之间是否连接妥当。
注意事项
1. 请依照此使用手册之安装说明和安全警告进行安装。
2. 请将此产品远离高温区如: 散热器、暖气机或其它会产生高温的设备。
3. 请勿将异物塞入风扇叶片处。
4. 请勿任意修改迎广所提供的线材和接头。
5. 仅限室内使用。
6. 请勿大幅度弯折LED 灯条或是大力挤压。
7. 请勿使用非迎广所提供的LED 灯条。
8. 请将本产品远离任何液体。
P12
Características
1. Diseño modular de conectores
El diseño modular de conectores permite a cada ventilador y tira de LED unirse entre sí,
lo que también proporciona una administración de cables más organizada. Gracias a esta
característica, los usuarios disfrutan de una experiencia totalmente personalizable.
2. Efecto de iluminación de LED RGB direccionable
Con un chip IC especial, la tira de LED puede presentar una matriz de colores
simultáneamente. Los usuarios pueden utilizar nuestro software exclusivo para cambiar
la iluminación o la frecuencia. Las posibilidades son ilimitadas, ya que los usuarios ahora
tienen el control de sus propios ventiladores.
3. Control de velocidad Turbo
El ventilador Aurora puede acelerar las revoluciones para mejorar el rendimiento
de enfriamiento. Una característica útil cuando se aumenta la velocidad del reloj
y se somete a los equipos a sus límites.
P13Español
4. Base de goma a prueba de impactos
Con nuestras bases de goma a prueba de impactos en las esquinas, Aurora
elimina la indeseada vibración para disfrutar de una experiencia más silenciosa.
Page 9

Componentes
P14
1. Ventiladores Aurora x 3
2. Manual del usuario x 1
3. Controlador x 1
4. Tornillos x 12
5. Cable de alimentación x 1
6. Tira de luces de LED de 30 cm x 2
7. Cables de conexión cortos de 6-6 contactos
(conexión entre ventiladores) x 2
8. Cable de conexión de longitud media de 6-6 contactos
(conexión entre ventiladores) x 1
9. Cable de conexión largo de 6-6 contactos
(conexión entre ventiladores) x 1
<Solo en el paquete de venta al por menor>
10. Cable de conexión largo de 6-3 contactos
(conexión entre el ventilador y el LED) x 1
11. Cable de conexión largo de 3-3 contactos
(conexión entre LED) x 1
12. Cable de conexión de 4-4 contactos x 1
13. Cable de conexión USB de 4 contactos x 1
Instalación
1. Asegúrese de que la alimentación está desconectada.
2. Instale los ventiladores en la carcasa de su PC y atorníllelos en las áreas
designadas.
3.
Utilice el cable de alimentación para conectar el controlador
y la alimentación.
4
Motherboard
5
3
6
6
IN
!
Cuando conecte el cable de conexión
corto de 6-6 contactos al ventilador,
asegúrese de insertar el clip de bloqueo
!
extendido de dicho cable a la abertura
correspondiente del ventilador.
7. Utilice el cable de conexión corto de 6-6 contactos la parte SALIDA
del primer ventilador y la parte ENTRADA del segundo ventilador.
8. Utilice el cable de conexión corto de 6-6 contactos la parte SALIDA
del segundo ventilador y la parte ENTRADA del tercer ventilador.
9.
Utilice el cable de conexión de 6-3 contactos para conectar la parte
SALIDA del tercer ventilador y la tira de LED.
7 8
OUT IN OUT OUTIN
9
Los ventiladores AURORA se pueden conectar entre
sí mediante cables de conexión de 6-6 contactos,
por lo que la instalación anterior es una sugerencia.
9
6-3 pin
P15
10
3-3 pin
4.
Utilice el cable de conexión de 4-4 contactos para conectar el controlador
y la placa base.
5. Utilice el cable de conexión USB de 4 contactos para conectar el controlador
y la placa base.
6. Utilice el cable de conexión largo de 6-6 contactos para conectar el
controlador y la parte ENTRADA del primer ventilador.
10.
Las tiras de LED se pueden conectar entre sí directamente o a través del
cable de conexión de 3-3 contactos.
11. El efecto de iluminación RGB se puede controlar mediante nuestro
software exclusivo. Descargue el software de
https://www.inwin-style.com/es/fans/aurora o escanee el código QR.
Page 10

Solucionar problemas
Si el ventilador no funciona correctamente, siga las instrucciones que se indican a continuación :
1. Compruebe la alimentación del sistema.
2. Compruebe el orden entre la parte ENTRADA y la parte SALIDA de cada conector.
3. Asegúrese de que todos los conectores estén conectados correctamente.
Nota de uso
1. Instale el ventilador siguiendo nuestras instrucciones.
2. Mantenga este producto alejado de las altas temperaturas. Manténgase alejado
de máquinas que puedan provocar altas temperaturas, por ejemplo, calefactores.
3. No ponga nada en el impulsor.
4. No modifique el cable o el controlador proporcionado por In Win.
5. Utilice el ventilador solamente en interiores.
6. Doble la tira de LED con cuidado y evite causar demasiada tensión o presión física.
7. No utilice la tira de LED proporcionada por In Win.
8. Mantenga este producto alejado de cualquier líquido.
P16
Funktionen
1. Modulares Anschlusskonzept
Das modulare Anschlussdesign erlaubt es, Lüfter und LED-Leisten miteinander zu verbinden.
Zusätzlich wird ein aufgeräumtes Kabelmanagement ermöglicht. So wird dem Nutzer eine
vielseitige und an die individuellen Bedürfnisse anpassbare Nutzung geboten.
2. Regelbarer RGB LED-Lichteffekt
Durch einen besonderen, im Inneren verbauten Mikrochip kann die LED-Leiste eine Vielzahl an
vordefinierten Farben simultan wiedergeben.Mit Hilfe der exklusiven Software können Anwender
die Farben und Beleuchtungsmodi gemäß ihren eigenen Wünschen vielfältig anpassen.
3. Turbo-Drehzahlkontrolle
Die Aurora-Lüfter verfügen über einen Turbo-Modus, der die Kühlleistung
verbessert. Eine nützliche Eigenschaft beim Übertakten und Ausloten der
Leistungsgrenzen.
P17Deutsch
4. Vibrationsabsorbierende Gummipuffer
Mit Hilfe von vier vibrationsabsorbierenden Gummipuffern an den Ecken eliminiert
der Aurora ungewünschte Vibrationen und sorgt für eine deutlich verringerte
Geräuschkulisse.
Page 11

Komponenten
P18
1. Aurora-Lüfter x 3
2. Bedienungsanleitung x 1
3. Controller x 1
4. Montageschrauben x 12
5. Stromkabel x 1
6. LED-Leiste 30 cm x 2
7. 6-6-Pin-Verbindungskabel kurz (Verbindung von Lüfter zu Lüfter) x 2
8. Sechs 6-Pin Verbindungskabel mittlerer Länge
(Verbindung von Lüfter zu Lüfter) x 1
9. 6-6-Pin-Verbindungskabel lang
(Verbindung von Lüfter zu Lüfter) x 1
<Nur als Retail-Version>
10. 6-3-Pin-Verbindungskabel lang
(Verbindung von Lüfter zu LED-Leiste) x 1
11. 3-3-Pin-Verbindungskabel lang
(Verbindung von LED-Leiste zu LED-Leiste) x 1
12. 4-4-Pin-Verbindungskabel x 1
13. USB-4-Pin-Verbindungskabel x 1
Installation
1. Vergewissern Sie sich, dass der Strom abgeschaltet ist.
2. Installieren Sie die Lüfter in ihrem Gehäuse und befestigen Sie die Lüfter mit
Hilfe der beigelegten Schrauben an den vorgesehenen Montagelöchern.
3. Benutzen Sie das Stromkabel um den Controller mit dem
Netzteil zu verbinden.
4
Motherboard
5
3
6
6
IN
!
Wenn Sie den 6-Pin-Anschluss mit dem
Lüfter verbinden, achten Sie bitte darauf,
!
dass der Verriegelungsclip entsprechend
korrekt mit dem Lüfter verbunden wird.
7. Benutzen Sie das kurze 6-6-Pin-Verbindungskabel um die “OUT”-Buchse
des ersten Lüfters mit der “IN”-Buchse des zweiten Lüfters zu verbinden.
8. Benutzen Sie das kurze 6-6-Pin-Verbindungskabel um die “OUT”-Buchse
des zweiten Lüfters mit der “IN”-Buchse des dritten Lüfters zu verbinden.
9. Benutzen Sie das 6-3-Pin-Verbindungskabel um die “OUT”-Buchse des
dritten Lüfters mit dem LED-Leiste zu verbinden.
7 8
OUT IN OUT OUTIN
9
Die AURORA-Lüfter können mit Hilfe der 6-6-Pin Verbindungskabel
miteinander verbunden werden. Bei der oben gezeigten Installation
handelt es sich um ein Beispiel.
9
6-3 pin
3-3 pin
P19
10
4.
Benutzen Sie das 4-4-Pin-Verbindungskabel um den Controller am
Mainboard anzuschließen.
5. Benutzen Sie das USB-4-Pin-Verbindungskabel um den Controller mit dem
Mainboard zu verbinden.
6. Benutzen Sie das lange 6-6-Pin-Verbindungskabel um den Controller mit der
“IN”-Buchse des ersten Lüfters zu verbinden.
10.
Die LED-Leisten können entweder direkt oder bei größeren Abständen mit
Hilfe des 3-3-Pin-Verbindungskabels miteinander verbunden werden.
11. Die RGB-Lichteffekte können durch die exklusive Software gesteuert werden.
Bitte laden Sie die Software unter diesem Link
https://www.inwin-style.com/de/fans/aurora
oder alternativ über scannen des QR-Codes herunter.
Page 12

Fehlerbehebung
Wenn ihr Lüfter nicht wie vorgesehen funktioniert folgen Sie bitte den folgenden Hinweisen :
1. Bitte prüfen Sie die Stromzufuhr ihres Systems.
2. Bitte prüfen Sie die Reihenfolge zwischen den “IN”- und “OUT”-Anschlüssen.
3. Bitte vergewissern Sie sich, dass alle Anschlüsse fest sitzen.
Betriebshinweise
1. Installieren Sie den Lüfter gemäß unserer Installationsanweisung.
2. Vermeiden Sie es, das Produkt zu hohen Temperaturen auszusetzen. Nutzen Sie es
nicht in der Nähe von Wärmequellen wie Heizkörpern, Wärmespeichern, Öfen, o.Ä.
3. Führen Sie keine Gegenstände in die Öffnung des Lüfters ein.
4. Modifizieren Sie keine Kabel oder die von In Win mitgelieferten Anschlüsse.
5. Bitte nutzen Sie den Lüfter ausschließlich nur im Innenbereich.
6. Biegen Sie die LED-Leisten nur vorsichtig und vermeiden Sie dabei den Einsatz von zu viel Kraft oder Druck.
7. Schließen Sie keine LED-Leisten an, der nicht von In Win stammen.
8. Schützen Sie den Lüfter vor jeglicher Feuchtigkeit.
P20
Caractéristiques
1. Design Connecteur Modulaire
Le design connecteur modulaire permet de relier ensemble chaque ventilateur et
bande LED, assurant une meilleure gestion des câbles. Les utilisateurs peuvent ainsi
jouir d’une expérience totalement personnalisable.
2. Effet d’éclairage LED rouge/vert/bleu
Grace à une puce IC très spéciale à l'intérieur, la bande de lumière LED peut afficher
simultanément toute une gamme de couleurs. Il est possible de vous servir de notre logiciel
exclusif pour varier l’éclairage ou la fréquence. Les possibilités sont illimitées!
3. Contrôle Vitesse Turbo
Aurora peut accélérer les révolutions pour encore des meilleures performances
en refroidissement. Une caractéristique utile en cas de surcadençage et lorsque
vous poussez votre PC jusqu’à ses dernières limites.
P21Français
4. Pied Caoutchouc Antichoc
Avec des pieds en caoutchouc antichocs au quatre coins, Aurora élimine les
vibrations indésirables pour une expérience toujours plus silencieuse.
Page 13

Composants
P22
1. Ventilateurs Aurora x 3
2. Manuel d’utilisateur x 1
3. Contrôleur x 1
4. Vis x 12
5. Câble d’alimentation x 1
6. Bande Lumière LED de 30cm x 2
7. Câbles de connexion courts broche 6-6 pin
(connexion ventilateur à ventilateur) x 2
8. Câble de connexion 6-6 broches
(connexion ventilateur à ventilateur) x 1
9. Câble de connexion long broche 6-6 pin
(connexion ventilateur à ventilateur) x 1
<Vente au détail uniquement>
10. Câble de connexion long broche 6-3
(connexion ventilateur à LED) x 1
11. Câble de connexion broche 3-3
(connexion LED à LED) x 1
12. Câble de connexion broche 4-4 pin x 1
13. Câble de connexion USB- broche 4 pin x 1
Installation
1. Assurez-vous que l’appareil est débranché.
2. Installez les ventilateurs dans votre boîtier PC puis vissez-les sur les zones
désignées.
3. Utilisez le câble d’alimentation pour connecter le contrôleur et l’alimentation.
4
Motherboard
5
3
6
6
IN
!
Lorsque vous connectez le câble court 6-6
pin au ventilateur, assurez-vous que vous
avez bien inséré l’extension clip de sécurité
!
du câble 6-6 pin dans l’emplacement
correspondant sur le ventilateur.
7. Utiliser le câble de connexion court broche 6-6 pin pour connecter la partie
OUT du premier ventilateur et la partie IN du deuxième ventilateur.
8. Utiliser le câble de connexion court broche 6-6 pin pour connecter la partie
OUT du second ventilateur et la partie IN du troisième.
9. Utiliser le câble de connexion broche 6-3 pin pour connecter la partie OUT
du troisième ventilateur et la bande LED.
7 8
OUT IN OUT OUTIN
9
Les ventilateurs AURORA peuvent être connectés les uns aux autres à l’aide des
6 câbles à 6 broches. L’installation ci-dessus est une suggestion de configuration.
9
6-3 pin
3-3 pin
P23
10
4.
Utilisez le câble de connexion broche 4-4 pour connecter le contrôleur et
la carte-mère.
5. Utiliser le Câble de connexion USB- broche 4 pin pour connecter le contrôleur
et la carte-mère.
6. Utiliser le câble de connexion long broche 6-6 pin pour connecter le contrôleur
et la partie IN du premier ventilateur.
10.
Les bandes LED peuvent être connectées ensemble directement ou à
travers le câble de connexion broche 3-3 pin.
11. L’effet lumineux RVB peut être contrôlé via notre logiciel exclusif.
Vous pouvez le télécharger à l’adresse suivante :
https://www.inwin-style.com/fr/fans/aurora ou scanner le code QR.
Page 14

Dépannage
Si votre ventilateur ne fonctionne pas correctement,
veuillez suivre les instructions ci-dessous :
1. Veuillez vérifier l’alimentation du système.
2. Vérifiez l’ordre entre les parties IN et OUT de chaque connecteur.
3. Assurez-vous que tous les connecteurs sont bien branchés.
Note d’utilisation
1. Installez le ventilateur en suivant nos instructions.
2. Veuillez tenir ce produit à distance de toute machine, comme des chauffages,
pouvant générer des températures élevées.
3. Veuillez ne rien glisser dans le rotor.
4. Veuillez ne pas modifier le câble ou le connecteur fournis par In Win.
5. N’utilisez votre ventilateur qu’en intérieur.
6. Veuillez replier délicatement la bande LED et éviter d’appliquer trop de force physique ou pression.
7. Veuillez ne pas utiliser une bande LED non fournie par In Win.
8. Garder ce produit à distance de tout liquide.
P24
Характеристики
1. Модульная конструкция разъема
Модульная конструкция разъема позволяет соединять каждый вентилятор и
светодиодную ленту друг с другом, что также обеспечивает более упорядоченное
управление кабелями. Таким образом, пользователи будут иметь абсолютно
собственный индивидуальный опыт.
2. Адресный RGB светодиодный эффект освещения
С помощью специальной микросхемы внутри светодиодные ленты могут представить
множество цветов одновременно. Пользователи могут использовать наше эксклюзивное
программное обеспечение для изменения освещения или изменения частоты.
Существуют бесконечные возможности, так как теперь пользователям предоставляется
контроль над своими вентиляторами.
3. Контроль скорости Turbo
Aurora может ускорить обороты для повышения производительности
охлаждения. Это полезно при «разгоне» и «нажиме» ПК до его пределов.
P25Руская
4. Противоударная резиновая подставка
С помощью четырех ударопрочных резиновых подставок на углах Аврора
устраняет нежелательную вибрацию, обеспечивая более бесшумное качество.
Page 15

Компоненты
P26
1. Вентиляторы Аврора (Aurora) х 3
2. Руководство пользователя х 1
3. Регулятор х 1
4. Винты х 12
5. Провод электропитания х 1
6. Светодиодные ленты 30см х 2
7. 6-6 контактные короткие соединительные провода
(соединяет вентилятор с вентилятором) х 2
8. 6-6-контактный соединительный провод средней длины
(соединяет вентилятор с вентилятором) х 1
9. 6-6 контактный длинный соединительный провод
(соединяет вентилятор с вентилятором) х 1
<Только розничный пакет>
10. 6-3 контактный длинный соединительный провод
(соединяет вентилятор с СИД) x 1
11. 3-3 контактный длинный соединительный провод
(соединяет СИД с СИД) x 1
12. 4-4 контактный соединительный провод х 1
13. USB-4 контактный соединительный провод х 1
Установка
1. Убедитесь, что питание отключено.
2. Установите вентиляторы в Вашем ПК и закрепите его шурупами в
специально отведенных местах.
3. Используйте провод питания для подключения регулятора и питания.
4
Motherboard
5
3
6
6
IN
!
При подключении 6-6 контактного
короткого соединительного провода к
вентилятору, пожалуйста, убедитесь, что Вы
!
вставили расширенный фиксирующий
зажим 6-6 контактного короткого
соединительного провода к
7. Используйте 6-6 контактный короткий соединительный провод для
подключения OUT (выход) части первого вентилятора и IN (вход) части
второго вентилятора.
8. Используйте 6-6 контактный короткий соединительный провод для
подключения OUT (выход) части второго вентилятора и IN (вход) части
третьего вентилятора.
9. Используйте 6-3 контактный соединительный провод для подключения
OUT (выход) части третьего вентилятора и светодиодной ленты.
7 8
OUT IN OUT OUTIN
9
Вентиляторы AURORA могут быть соединены друг с другом через 6-6 контактные
соединительные провода, поэтому вышеуказанная установка рекомендуется.
9
6-3 pin
3-3 pin
P27
10
4.
Используйте 4-4 контактный соединительный провод для подключения
регулятора и материнской платы.
5. Используйте USB-4 контактный соединительный провод для подключения
регулятора и материнской платы.
6. Используйте 6-6 контактный длинный соединительный провод для
подключения регулятора и IN (вход) части первого вентилятора.
10.
Светодиодные ленты могут быть соединены друг с другом непосредственно
или быть соединены через 3-3 контактный соединительный провод.
11. Эффект освещения RGB можно контролировать с помощью нашего эксклюзивного
программного обеспечения. Загрузите программное обеспечение по ссылке
https://www.inwin-style.com/rs/fans/aurora или отсканируйте (QR-код).
Page 16

Устранение проблем
Если вентилятор не работает должным образом, пожалуйста, следуйте приведенным
ниже инструкциям:
1. Проверьте электропитание Вашей системы.
2. Пожалуйста, проверьте очередность между IN (вход) частью и OUT (выход)
частью каждого соединителя.
3. Убедитесь, что все разъемы подключены правильно.
Примечание для использования
1. Установите вентилятор, следуя нашим инструкциям.
2. Храните данное оборудование вдали от высоких температур. Храните вдали от таких
приборов как нагреватели, которые могут привести к высоким температурам.
3. Ничего не ставьте в крыльчатку.
4. Не изменяйте провод или соединитель (разъем), предоставленный In Win.
5. Используйте Ваш вентилятор только в помещении.
6. Согните светодиодные ленты осторожно и не применяйте слишком много физической
силы или давления.
7. Не используйте светодиодную ленту, не предусмотренную In Win.
8. Храните данное оборудование вдали от любой жидкости.
P28
主な機能
1. モジュラーコネクタ設計
モジュラーコネクタ設計は、それぞれのファンおよびLEDストリップがお互いに連係
できるようにするとともに、きれいなケーブルマネジメントを可能にします。
これにより、ユーザーは完全にカスタマイズされた体験を得ることができます。
2. RGB LED照明効果を適用
特別なICチップを内蔵することにより、LEDライトストリップはさまざまな色の配列を同時
に実現します。また、ユーザーは独自ソフトウェアを使用してライティングや回転数を変更
することができます。ユーザーは自分のファンを制御できるようになり、無限の可能性が広
がります。
3. ターボ・スピード・コントロール
オーロラは、より良い冷却性能のために回転数を上げることができます。 PCを
限界までオーバークロックして押し込むときの便利な機能。
P29日本語
4. 制振ラバースタンド
4つの制振ラバースタンドをファンの角に配置することで、Auroraは不要な振動
を排し、すぐれた静音性を実現します。
Page 17

コンポーネント
P30
1. Auroraファン × 3
2. ユーザーマニュアル × 1
3. コントローラ × 1
4. ネジ × 12
5. 電源ケーブル × 1
6. LEDライトストリップ 30cm × 2
7. 6 - 6ピン ショート 接続ケーブル
(ファン同士の接続用) × 2
8. 6-6ピン中間接続ケーブル (ファン同士の接続用) × 1
9. 6 - 6ピン ロング 接続ケーブル (ファン同士の接続用) × 1
<小売パッケージのみ>
10. 6 - 3ピン ロング 接続ケーブル (ファンとLEDの接続用) × 1
11. 3 - 3 ピン ロング 接続ケーブル (LED同士の接続用) × 1
12. 4 - 4ピン 接続ケーブル × 1
13. USB - 4ピン 接続ケーブル × 1
取り付け方
1. システムの電源がOFFになっていることをご確認ください。
2. PCケースにファンを取り付け、ネジで固定してください。
3. 電源ケーブルで、コントローラと電源を接続してください。
4
Motherboard
5
3
6
6
IN
!
6-6ピンショートケーブルをファンに接続す
る際は、ファンの開口部に6-6ピンケーブル
!
コネクタの延長固定クリップをしっかりと
挿入していることをご確認ください。
7. 6 - 6ピン ショート接続ケーブルで、1基目のファンのOUTと2基目の
ファンのINを接続して下さい。
8. 6 - 6ピン ショート接続ケーブルで、2基目のファンのOUTと3基目の
ファンのINを接続して下さい。
9. 6 - 3ピン接続ケーブルで、3基目のファンのOUTとLEDストリップを
接続して下さい。
7 8
OUT IN OUT OUTIN
9
AURORAファンは6-6ピンケーブルで相互接続することができます。
9
6-3 pin
3-3 pin
P31
10
4.
4 - 4ピン接続ケーブルで、コントローラとマザーボードを接続
して下さい。
5. USB - 4ピン接続ケーブルで、コントローラとマザーボードを接続
して下さい。
6. 6 - 6ピン ロング接続ケーブルで、コントローラと1基目のファンのIN
を接続して下さい。
10. 2本のLEDストリップは、お互いに直接接続したり、3 - 3ピン接続
ケーブルを使って接続することができます。
11. 当社独自のソフトウェアでRGBライティング効果を制御できます。
(https://www.inwin-style.com/ja/fans/aurora)またはスキャン
(QRコード)からソフトウェアをダウンロードしてください。
Page 18

トラブルシューティング
もし、ファンが正しく動作しなかった場合は、下記をご確認下さい。
1. システムの電源をご確認ください。
2. お互いのコネクタがINとOUTで接続されているかをご確認ください。
3. すべてのコネクタが正しく接続されているかご確認ください。
使用上の注意
1. 下記の指示にしたがって、ファンを取り付けて下さい。
2. ヒーターの側など、高温の場所でのご使用はお控えください。
3. ファンの羽根に物を置かないでください。
4. In Winが提供するケーブルやコネクタに加工を施さないでください。
5. ファンは室内でのみお使いください。
6. LEDストリップを曲げる際は、過剰な負荷や圧力がかからないよう、やさしくお取り扱いください。
7. In Winが提供するLEDストリップ以外は使わないでください。
8. 製品が水に濡れないよう取り扱ってください。
P32
특색
1. 모듈형 커넥터 디자인
모듈형 커넥터 디자인은 팬과 LED스트립을 연결하게 되는 각 케이블들을 편리하게
관리할 수 있는 기능을 제공합니다. 이러한 디자인을 통해 사용자에게 기존과는 완전히
다른 사용자 맞춤형 설치 경험을 제공하게 될 것입니다.
2. 주소 지정이 가능한 RGB LED 조명 효과
내부 특수 IC 칩을 사용해 LED 라이트 스트립이 동시에 색상 배열을 표시해 낼 수 있습니다.
사용자는 독점 소프트웨어를 통해 조명또는주파수를 변경할수있습니다. 사용자는 임의로
자신의팬을제어할수있기때문에무한한가능성을 제공해 드립니다.
3. 터보 스피드 컨트롤
오로라는 더 우수한 냉각성능을 위해 회전속도를 높일 수 있습니다. 사용자의 PC를
가장 최적의 상태로 만들어 드립니다.
P33한국어
4. 충격 방지 고무 스탠드
코너에 설치된 4개의 충격 방지 고무 스탠드를 통해 소음이 없는 더욱 조용한 환경을
경험할 수 있게 해드립니다.
Page 19

구성 요소
P34
1. 오로라 팬 x 3
2. 사용자 메뉴얼 x 1
3. 컨트롤러 x 1
4. 나사x 12
5. 전원선 x 1
6. LED 라이트 스트립 30cm x 2
7. 6-6 핀 짧은 연결선
(팬과 팬 연결) x 2
8. 6-6 핀 중간 길이 커넥팅 와이어 (팬과 팬 연결) x 1
9. 6-6 핀 긴 연결선 (팬과 팬 연결) x 1
<소매 패키지 전용>
10. 6-3 핀 긴 연결선 (팬과 LED 연결) x 1
11. 3-3 핀 긴 연결선 (LED와 LED 연결) x 1
12. 4-4 핀 연결선 x 1
13. USB-4 핀 연결선 x 1
설치하기
1. 전원이 꺼져 있는지 확인해 주십시오.
2. 팬들을 PC 케이스에 설치해 주시고 정확한 곳에 나사를 조여
고정시켜 주십시오.
3. 컨트롤러와 전원에 전원 와이어를 연결해 주십시오.
4
Motherboard
5
3
6
6
IN
!
6-6핀 쇼트 커넥팅 와이어를 팬에 연결하실
때, 6-6 핀 쇼트 커넥팅 와이어의 확장 잠금
!
클립을 삽입 확인해 주십시오.
7. 6-6 핀 짧은 연결선으로 첫 번째 팬의 OUT 파트와 두 번째 팬의 IN
파트를 연결해 주십시오.
8. 6-6 핀 짧은 연결선으로 두 번째 팬의 OUT 파트와 세 번째 팬의 IN
파트를 연결해 주십시오.
9. 6-3 핀 연결 선으로 세 번째 팬의 OUT 파트와 LED 스트립을 연결해
주십시오.
7 8
OUT IN OUT OUTIN
9
AURORA 팬은 6-6 핀 연결선을 통해 서로 연결할 수 있기
때문에 상기 설치 방법을 권장 드립니다.
9
6-3 pin
P35
10
3-3 pin
4.
4-4핀 연결선으로 컨트롤러와 마더보드를 연결해 주십시오.
5. USB-4핀 연결선으로 컨트롤러와 마더보드를 연결해 주십시오.
6. 6-6 핀 긴 연결선으로 컨트롤러와 첫 번째 팬의 IN 파트를 연결해
주십시오.
10. LED 스트립들은 서로 직접 연결시킬 수도 있고 또한 3-3 핀 연결선을
이용해 연결시킬 수도 있습니다.
11. RGB 조명효과는저희가 제공해 드리는 독점 소프트웨어를통해제어할수있습니다.
소프트웨어 ( https://www.inwin-style.com/kr/fans/aurora )
를다운로드하시거나 (QR 코드)를스캔하여 사용해 주십시오.
Page 20

문제 해결
저희 팬 제품이 정상적으로 작동하지 않을 경우, 아래와 같은 사항을 점검해 주십시오.
1. 시스템 전원이 켜져 있는지 확인해 주십시오.
2. IN 파트와 OUT 파트의 커넥터들이 정상적으로 연결이 되어 있는지 확인해 주십시오.
3. 커넥터들이 정확히 연결되어 있는지 확인해 주십시오.
사용 상 주의사항
1. 아래와 같은 점을 주의해 팬을 설치해 주십시오.
2. 고온 환경을 피해 주십시오. 히터와 같이 고온 환경을 유발할 수 있는 기기에서 멀리 떨어져 설치해 주십시오.
3. 임펠러에 어떠한 것도 넣지 마십시오.
4. In Win에서 제공되는 커넥터나 와이어에 대해 어떠한 변경 작업도 진행하지 마십시오.
5. 저희 팬 제품은 실내에서만 사용해 주십시오.
6. LED 스트립을 부드럽게 매어 주시고 어떠한 물리적 힘이나 압력을 가하지 마십시오.
7. In Win에서 제공하는 LED외 기타 다른 제품을 이용해서는 안됩니다.
8. 액체가 닿지 않도록 최대한 멀리 설치해 주십시오.
P36
Specification
Fan Size
Material
Starting Voltage
Rated Voltage
Rated Power
Rated Current
Speed Mode
Air Flow (CFM)
Air Pressure
LED
PWM
Noise Level dB(A)
Bearing Type
Life Expectation
Package Dimension x W x H)
P37
120 x 120 x 25 mm
PC
5V
DC 12V
0.84 W
0.5A
800 rpm – 1400 rpm (PWM)
Turbo Mode : 2000 rpm (Max)
40.26
1.50 mm/ H2O
Addressable (RGB)
Yes
23.7
Sleeve bearing
40℃ / 36000 hrs
454 x 186 x 50mm
 Loading...