


Akoustos Y4-1
User Manual
Involve Audio Pty. Ltd. © 2015

pg. 1
AUSTRALIAN DESIGNED
AND MANUFACTURED
is manual describes how to setup and use your Involve Audio™
Akoustos Y4 Pro Home Stereo System. e Setup guide describes
how to set up the speakers and sub-woofer(s) and attached other
devices such as your TV, DVD, set top box, Bluetooth device etc. so
you can enjoy a full rich surround sound not previously available.
Welcome to the wonderful world of Involve Audio!

pg. 2
Please read this guide
Please take the time to follow the instructions in this guide carefully. It will help you set
up and operate your Akoustos Y4 Pro Home Stereo system properly and enjoy all of its
advanced features. Please save this guide for future reference.
WARNING: To reduce the risk of re or electrical shock, do not expose the product to
rain or moisture.
WARNING: e apparatus shall not be exposed to dripping or splashing, and objects
lled with liquids, such as vases, shall not be placed on the apparatus. As with any
electronic products, use care not to spill liquids into any part of the system. Liquids can
cause a failure and/or a re hazard.
WARNING: No naked ame sources, such as lighted candles, should be placed on any
part of the system.
ese CAUTION marks are located on your Akoustos Y4-1 Amplier enclosure:
e lightning ash with arrowhead symbol within
an equilateral triangle alerts the user to the presence
of uninsulated, dangerous voltage within the system
enclosure that may be of sucient magnitude to
constitute a risk of electrical shock.
PLEASE NOTE : THERE ARE NO USER SERVICEABLE COMPONENTS
CONTAINED WITHIN THE Y4-1 SYSTEM.
e exclamation point within an equilateral
triangle, as marked on the system, is intended to
alert the user to the presence of important operating
and maintenance instructions in this owner’s guide.
CAUTION: TO REDUCE THE RISK OF ELECTRIC SHOCK,
DO NOT REMOVE THE COVER
NO USER SERVICEABLE PARTS INSIDE
REFER SERVICING TO QUALIFIED SERVICE PERSONNEL
RISK OF ELECTRIC SHOCK
DO NOT OPEN

pg. 3
Contents
About Involve Audio
1. What’s included
2. System Setup
2.1. Y Speaker Positioning
2.2. Speaker Distance & Orientation
2.3. Connecting the Y Speakers
2.4. Sub-Woofer Modes and Positioning
2.4.1. Mono Sub-Woofer
2.4.2. Stereo Sub-Woofer
2.4.3. Front/Rear Sub-Woofer
2.5. Connecting Sub-Woofer(s)
2.6. Setting up SweetSpot™ (SST™)
2.7. Connecting Your Devices
2.8. Connecting Your Bluetooth Device
3. Operating Instructions
3.1. Power up the System
3.2. Selecting Your Input Type
3.3. HDMI Device Select
3.4. Mode Selection
3.5. Volume
3.6. Sub-Woofer Level
3.7. Rear Speaker Level
3.8. Headphones
3.9. Remote Control
3.9.1. Standby
3.9.2. Input
3.9.3. Volume/Mute
3.9.4. Treble/Bass
4. Cleaning Your System
5. System Specications
6. END USER LICENSE AGREEMENT
4
5
6
9
9
10
11
12
13
15
16
17
18
18
18
19
20
20
20
20
21
23
24
25

pg. 4
About Involve Audio
Involve Audio Pty Ltd. (Melbourne Australia) was established in
2009. Our goal was to develop a new surround sound standard that is
noticeably better and more cost eective than traditional Dolby® and
other surround sound solutions that have been on the market for over
35 years.
Aer years of research and development, Involve Audio has achieved
a number of technical breakthroughs dealing with the core physics
involved with creating stereo and surround sound that are incorporated
into your Akoustos Y4 Pro Home Stereo System.
Involve™
Our patented process called Involve™ creates a full surround sound
experience from any stereo source including Television, Internet, mobile
devices, iPods, records, etc. without adding or subtracting any signals
to, or from, the original sound tracks. It provides the most accurate
representation of the audio provided.
SweetSpot™ (SST™)
We have created a patented technology called SweetSpot™ that enables
your Involve™ Akoustos Y4 sound system to be enjoyed by everyone
in the room no matter where they are, eliminating the need to nd the
best seat in the house. All the seats in the room are now in the same
surround sound eld and provide the same audio experience.

pg. 5
1: What’s Included
• Y4-1 Amplier
• Four (4) Y Speakers
• One (1) or Two (2) Sub-Woofer(s)
• IEC Power Cable
• Four (4) Y Speaker Cables
• Remote Control
• Two (2) Batteries for Remote Control
photo of system with all parts laid out on ground

pg. 6
2: System Setup
When setting up your system please follow the guidelines below to avoid any damage
or wear to your system.
• Turn OFF the system when connecting or disconnecting your Y Speakers,
Sub-Woofer or devices.
• Turn OFF the system before making changes to the Sub-Setting
• Do NOT place the Y4-1 Amplier on any so surface such as cloth or carpet.
Placing the Y4-1 Amplier on a so surface while the system is on will void your
warranty.
• e Y4-1 Amplier uses active cooling, keep the rear of the unit unobstructed to
allow adequate airow

pg. 7
2 3 41 5 6 7 8
11 12 13
14 10 9
1
Aux 1-2 Inputs
2
Line Out
3
Sub Out
4
HDMI Out
5
HDMI 1-3 In
6
Sub Setting
7
SST™ Setting
14
Front/Le/Mono Sub
13
Rear/Right/Mono Sub
12
Front Right Y Speaker
11
Rear Right Y Speaker
9
Rear Le Y Speaker
10
Front Le Y Speaker
Pg. 15
Pg. 15
Pg. 15
Pg. 15
Pg. 15
Pg. 11
Pg. 10
Pg. 10
Pg. 10
Pg. 10
Pg. 12
Pg. 12
Pg. 13
8
Power Connector
Pg. 18

pg. 8
B
D
C
F
G
E
A
Front Le Y Speaker
Front Right Y Speaker
Rear Le Y Speaker
Rear Right Y Speaker
(Stereo Sub-Woofer Mode shown)
Sub-Woofer
Sub-Woofer
Y4-1 Amplier
(Y Speakers shown wall mounted)
A
B
C
D
E
F
G

pg. 9
2.1 Y Speaker Positioning
e speakers are marked as
Front Le (FL), Front Right
(FR), Rear Le (RL) and Rear
Right (RR). Face the front of
the room where your front
speakers are to be placed. Le
and Right are taken from this
perspective including the rear
speakers. e diagram to the
le illustrates the positioning
of each speaker. Place the
speakers on the installed wall
mounts, speaker stands or
other raised unit.
Your speakers should be
placed at the same height as
your ears when sitting down.
If they are higher than this
they are best angled down to
send the sound to the centre
listening position.
2.2 Y Speaker Distance & Orientation
Speakers can be placed around the room in front and behind the centre listening
position. Ideally the centre listening position will be in the middle of a room however
this is oen not possible and so place your rear speakers as far to the rear of the centre
listening position as practical.
When orienting your Y Speakers turn the speaker so the outside electrostatic panel is
facing the front and back directly. e distance between the speakers should be set so
that the inside panels face the opposite side of the listen area. is should mean the
panels of each opposing front and back speaker line up and the inside panels are facing
the opposite side of the central listening position.
Front Le Y Speaker
Rear Le Y Speaker
Front Right Y Speaker
Rear Right Y Speaker
Diagram: Speaker Orientation for
pg. 10
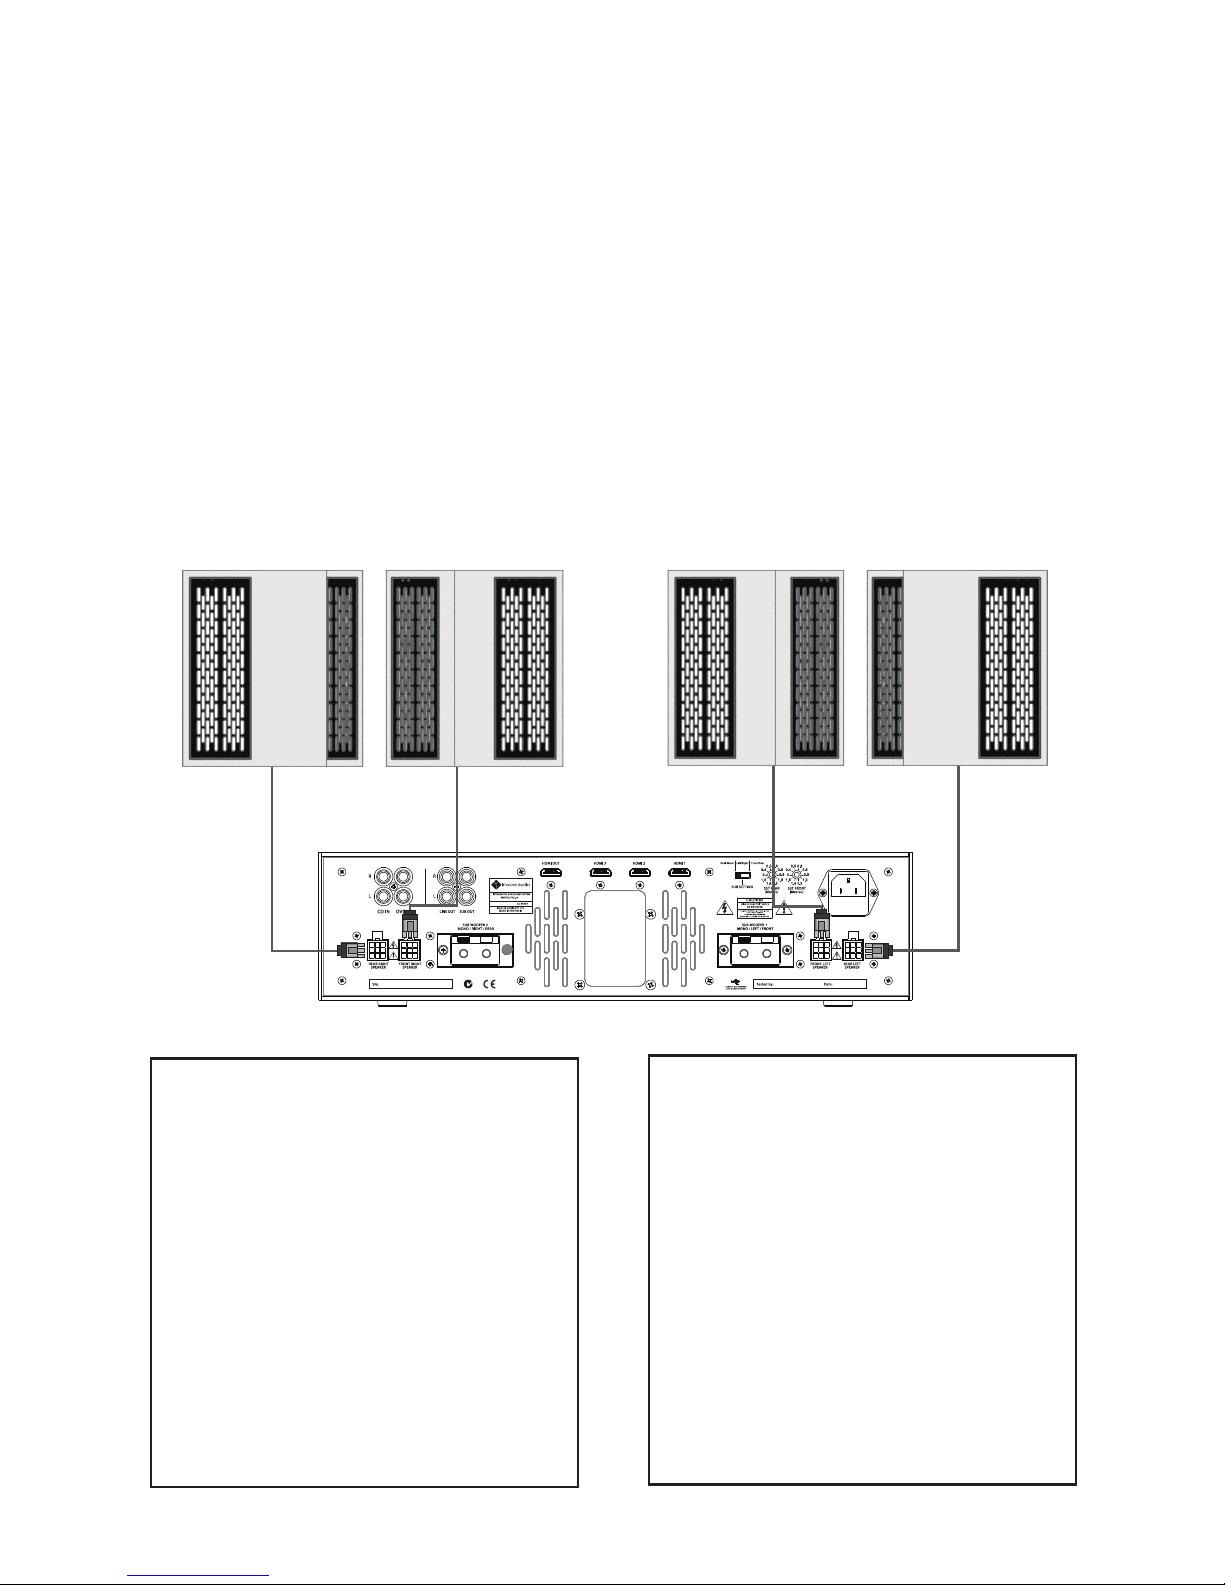
2.3 Connecting the Y Speakers
Before connecting/disconnecting your Y-Speakers ensure the system is turned OFF
Plug the four Y Speaker Cables into the Y Speakers and then into the corresponding
outputs on the Y4-1 Amplier, ensuring their positions match the outputs on the Y4-1
Amplier (FL, FR, RL, RR).
Speaker cables are supplied with your Akoustos Y4 Pro Home Stereo system.
Additional cables are available either from your accredited dealer or from the Involve
Audio web site (www.involveaudio.com). e performance of your system will NOT be
eected by long length extension cables which run through the roof, oor or walls of
your home.
Front Le Y SpeakerRear Le Y Speaker Front Right Y Speaker Rear Right Y Speaker
Close up of Y Speaker
Connections - Isometric plugged
into back of amplier
Y Speaker Cables
photo and store link/address

pg. 11
2.4 Sub-Woofer Modes and Positioning
ere are three subwoofer modes, Mono (Single Sub-Woofer), Stereo L/R (Two SubWoofers) and Front/Rear F/R (Two Sub-Woofers). e conguration can be selected
with the Sub Setting switch on the rear of the Y4-1 Amplier (Dual Mono, L/R, F/R)
Diagram: Woofer select switch and positions
When placing a Sub-Woofer in position, keep at least 3cm of space between the rear
of the Sub-Woofer and the wall. Any wall or hard object should not cover the sound
outlet.
Before making changes to the Sub-Setting
ensure the system is turned OFF
2.4.1 Mono Sub-Woofer
If your system has a single Sub-Woofer it
should be placed at the front of the room
just to the le or right of centre. e SubSetting on the rear of the Y4-1 Amplier
should be set to Dual Mono.
2.4.2 Stereo Sub-Woofer
For a Stereo conguration place both SubWoofers at the front of the room with one
on the le and one on the right as close
to the Front L/R Y Speakers as possible.
e Sub Setting on the rear of the Y4-1
Amplier should be set to L/R.
2.4.3 Front/Rear Sub-Woofer
For a Front/Rear Sub-Woofer conguration
place one Sub-Woofer at the front of the
room just to the le or right of centre. e
second Sub-Woofer should be placed at the
back of the room just to the le or right
of centre (ideally opposite to front SubWoofer) e Sub setting on the back of the
Y4-1 Amplier should be set to F/R
Stereo Sub-Woofer
Front/Rear Sub-Woofer

pg. 12
2.5 Connecting Sub-Woofer(s)
Attach the Sub-Woofer cable to the rear of the Y4-1 Amplier as shown in the diagram
(below, le) by pressing the coloured tabs, inserting the cable and releasing the tabs.
e alternate end of the cable is then matched and inserted into the Sub-Woofer.
Unscrew the terminals on the Subwoofer, insert the cable into the revealed hole
and screw back in the connector (below, right), matching the positive and negative
terminals on the Y4-1 Amplier and Sub-Woofer. Once connected set your sub-woofer
setting as detailed in section 2.4.
Rear/Right/Mono Sub-Woofer Front/Le/Mono Sub-Woofer
Amplier Woofer Connection Woofer Connection

pg. 13
2.6 Setting up SweetSpot™ (SST™)
SweetSpot™ allows you to sit anywhere within the room and still receive a correct stereo
image. To set up this technology rst ensure your Y Speakers are placed and oriented
correctly as shown in sections 2.1 Y Speaker Positioning and 2.2 Y Speaker Distance
and Orientation.
e Front and Rear speakers have separate SST™ Settings to ensure SST™ is operating at
the highest quality. e SST™ factory default setting is 0.5, which covers a wide range
of environments. To set up SweetSpot™ for your listening environment follow the steps
below.
1. Measure the distance from the most o centre seating position to the closest Front Y
Speaker, as shown in the diagram on the next page to obtain the Close Distance.
2. Measure the distance from the most o centre seating position to the furthest Front
Y Speaker, as shown in the diagram on the next page to obtain the Far Distance.
3. Subtract the Close Distance from the Far Distance to obtain the Delay Distance,
refer to the table below and set the SST™™ FRONT dial to the corresponding number.
is delays the outside Electrostatic Panel on the Y Speakers by the time dierence
between the close and far speaker.
Far Distance - Close Distance = Delay Distance
Delay Distance
(Metres)
0m
0.4m
0.5m
0.6m
0.8m
0.9m
1.0m
1.2m
1.4m
1.6m
Delay Distance
(Feet, Inches)
0’
1’ 4”
1’ 8”
2’
2’ 8”
3’
3’ 3”
3’ 11”
4’ 7”
5’ 3”
SST™™ REAR/
FRONT`Setting
0
0.4
0.5
0.6
0.8
0.9
1.0
1.2
1.4
1.6
4. Repeat steps 1-3 for the SST™ REAR Setting by measuring distances to the Rear
Speakers. By doing this you will have calibrated SST™ correctly.

pg. 14
Close Distance
Close Distance
Far Distance
Far Distance
Front Le Y Speaker
Rear Le Y Speaker
Front Right Y Speaker
Rear Right Y Speaker
SST™™ Measurements
SST™™ Setting Dials
pg. 15
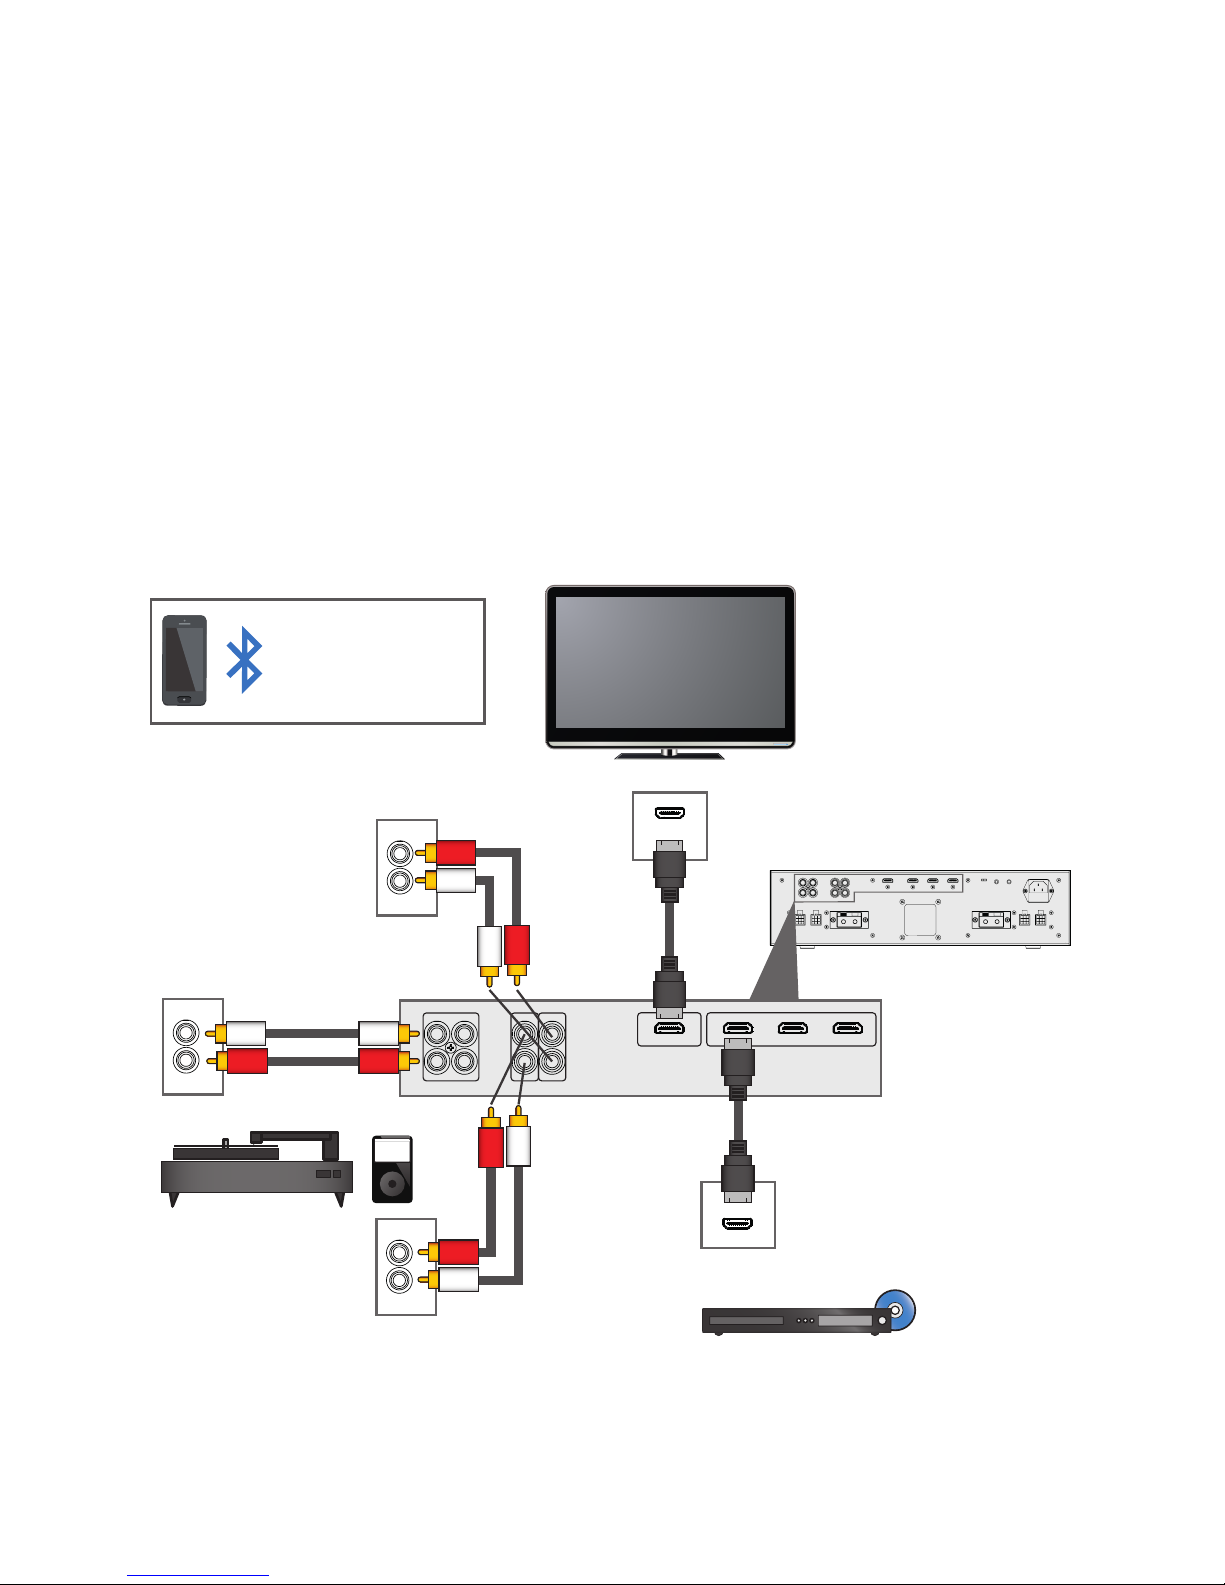
2.7 Connecting Your Devices
Before connecting your devices ensure the system is turned OFF
Your Akoustos Y4 Pro Home Stereo system is designed for easy connection to your
devices with three HDMI input connections and two RCA input connections.
Connect your RCA or HDMI cables (not supplied with the Akoustos system) from
your device into the Y4-1 Amplier.
Once you have connected your devices into the Y4-1 Amplier connect a HDMI cable
from the HDMI Out of the Y4-1 Amplier to your TV.
For more information on selecting your device go to section 3.2 Selecting Your Input
Typ e
OUT IN
RCA IN LINE OUT SUB OUT
TV
BluRay/Game Console/DVD/PVR
Amplier/Head Phone Amplier
Active Subwoofer
CD/Record/Personal Music Player
Bluetooth Devices*
*refer to section 2.8
pg. 16
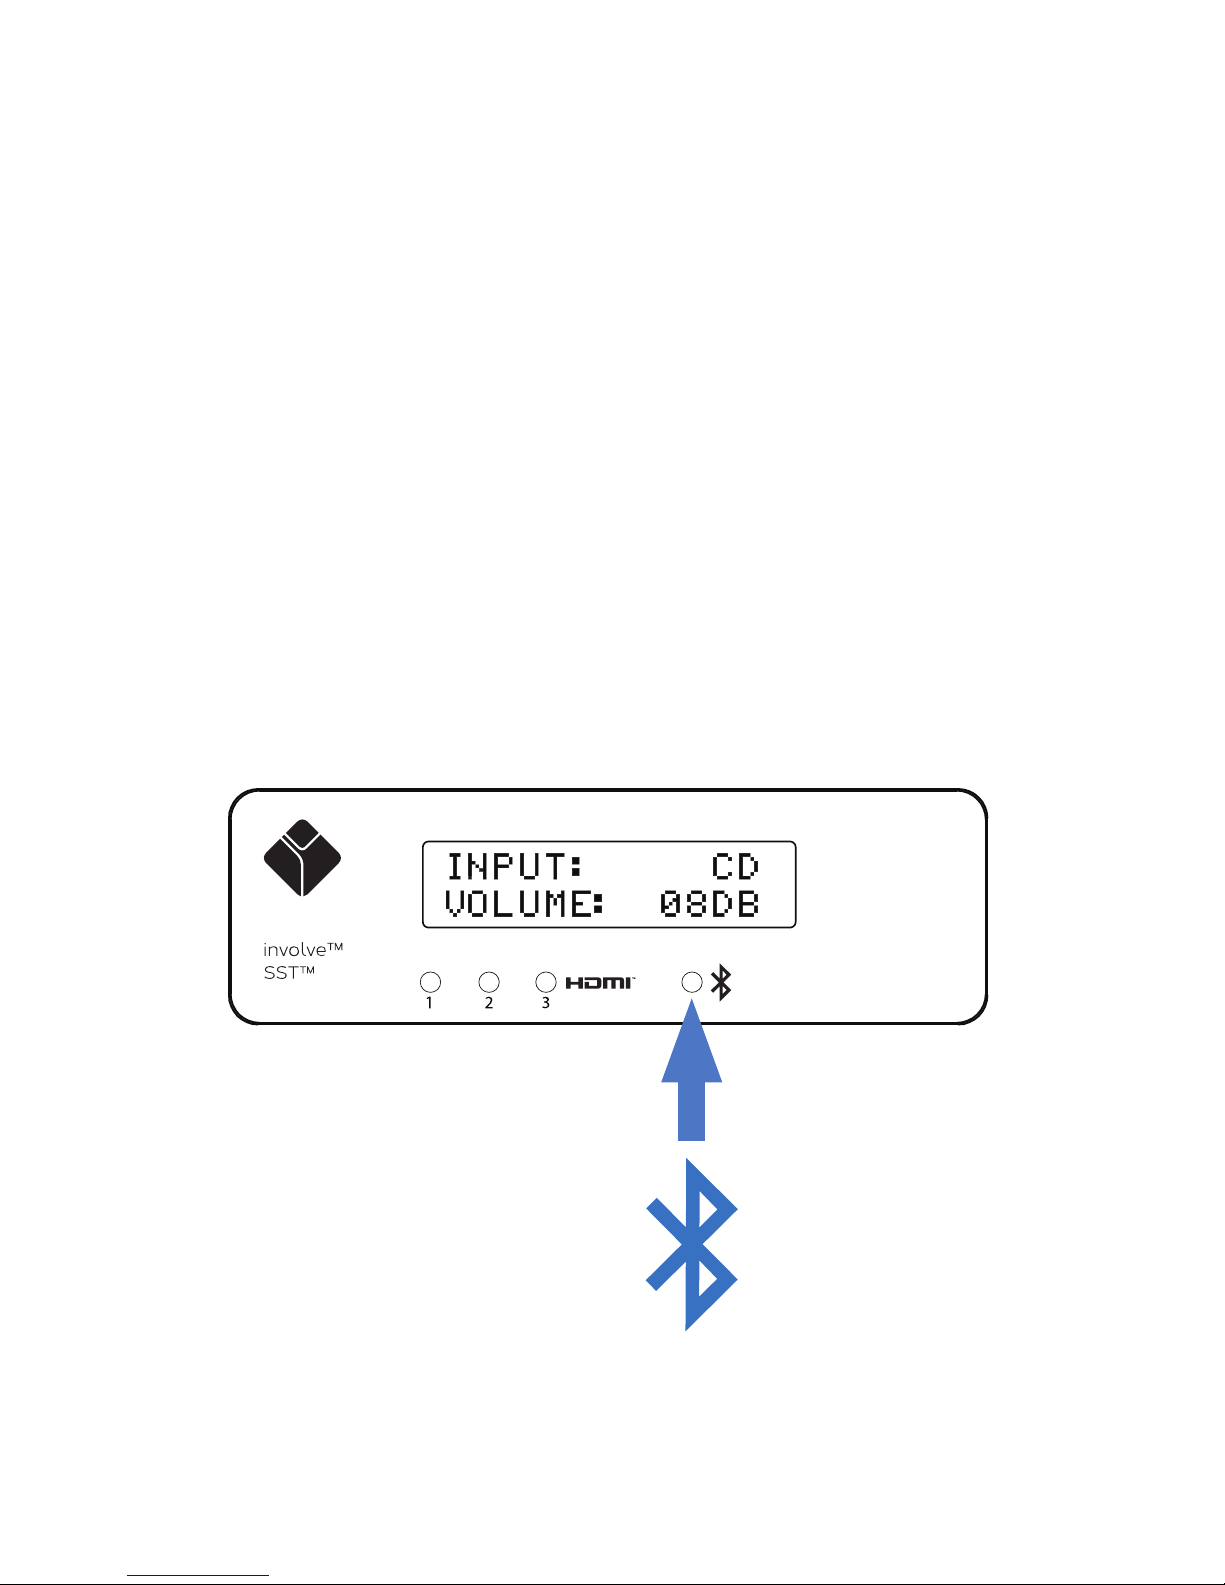
2.8 Connecting Your Bluetooth Device
e Akoustos Y4 Pro Home Stereo system features Bluetooth to allow you to connect
your device wirelessly. To connect your device to the Akoustos Y4 Pro Home Stereo
system follow the instruction below.
1. Set the Akoustos Y4 input to Bluetooth.
2. Set your device’s volume to below 80%
3. Pair your device’s Bluetooth with “Involve Audio” following your device’s operating
instructions.
*If a password is asked for use “0000” or refer to your device’s operating instructions.
**e Bluetooth light on the front of the Y4-1 Amplier will turn on once paired. If the
Akoustos Y4 system is set to Bluetooth an audible beep will also be heard.
4. Adjust volume on the Y4-1 Amplier to your liking. You may also control the vol-
ume with your device, avoid setting your devices volume higher than 90%.
pg. 17
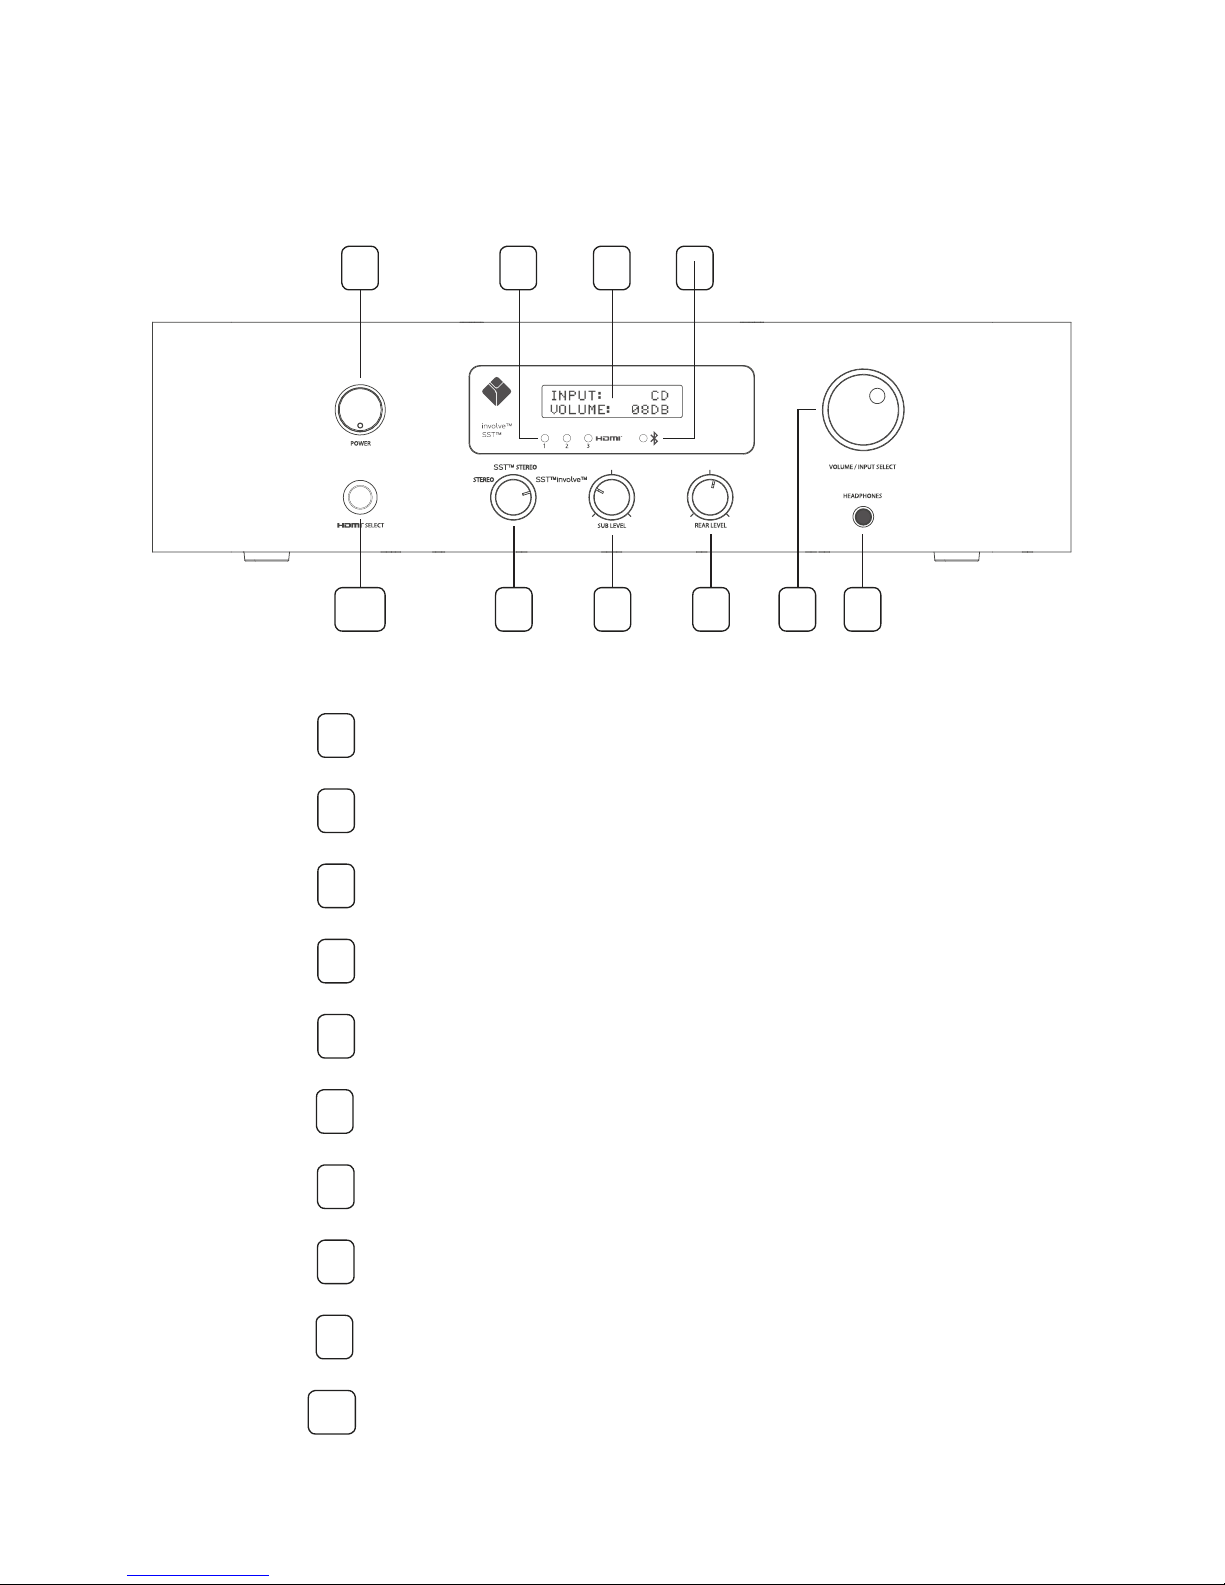
1 3 42
10 9 8 7 6 5
1
Power Switch
2
HDMI Input Selection
3
Main Display
4
Bluetooth Connect LED
5
Headphones Socket
6
Volume Knob
7
Rear Level Knob
10
HDMI Device Select Button
8
Sub-Woofer Level Knob
Mode Select Knob
Pg. 18
Pg. 18
Pg. 18
Pg. 16
Pg. 20
Pg. 20
Pg. 20
Pg. 19
Pg. 18
Pg. 20
9
3: Operating Instructions

pg. 18
3.3 HDMI Device Select
e Akoustos Y4 Pro Home Stereo system features 3 HDMI inputs and a HDMI
Output to allow you to connect your HDMI devices to the Akoustos Y4 System and
switch between them. To play media from your HDMI device (such as a Bluray player
or Games Console) follow the instruction below.
1. Follow the instructions in Section 2.7 on page 15 to connect your devices and
television to the Akoustos Y4 Pro Home Stereo System.
2. Set the Y4-1 Amplier input by pressing the Volume Knob until HDMI is shown.
3. Use the HDMI Device Select Button to change the HDMI input to the device you
wish to view or listen to media from. e HDMI input selected is shown on the HDMI
Input Selection with LED’s indicating which input is selected.
3.2 Selecting Your Input Type
ere are 4 dierent input types on the Y4-1 Amplier. ese are selected by pressing
the Volume Knob on the front of the system repeatedly until the device is selected. e
Main Display will indicate which input you have selected. e diagram below shows
the looped order in which input types are selected. e input type selected will be
displayed on the main display.
3.1 Power up the System
Ensure the power connector is plugged into the back of the system and is turned on at
the plug. To power up your system press the Power Switch down. When powered up
the light on the power switch should turn on.
DVD CD HDMI Bluetooth
1 2 3
pg. 19
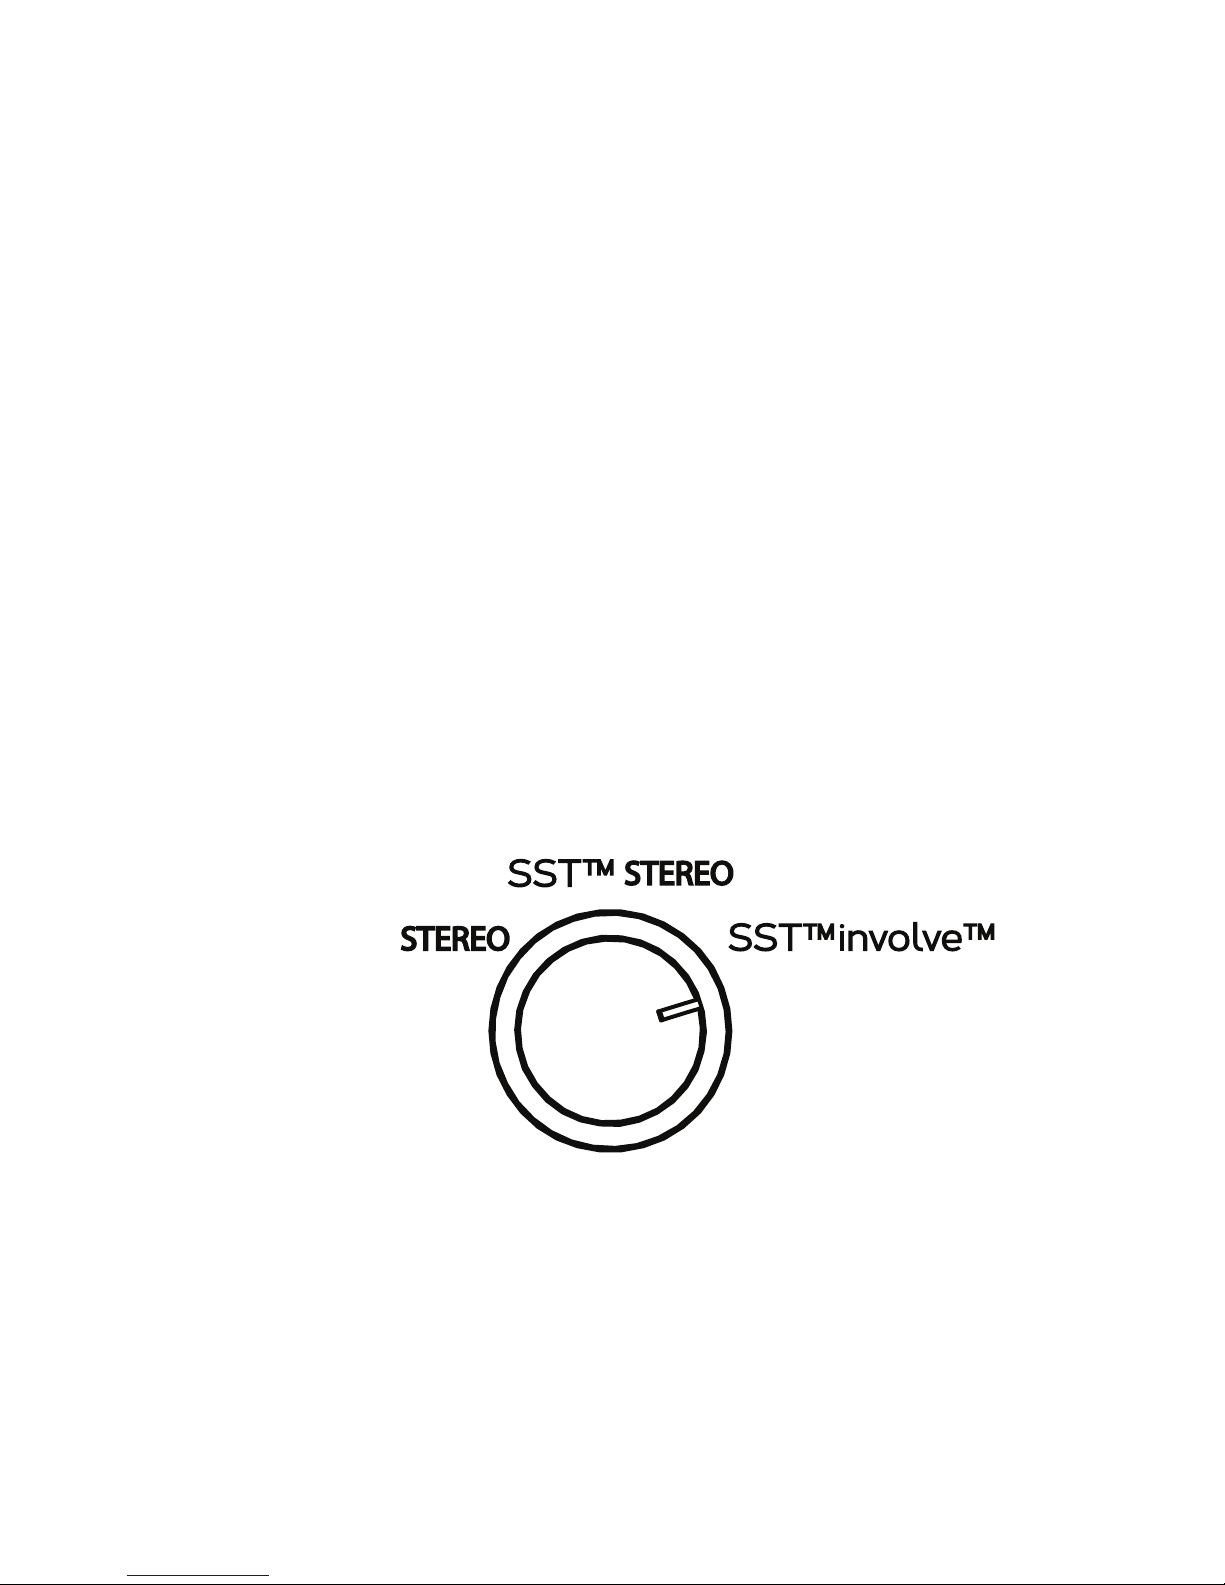
3.4 Mode Selection
Your Akoustos Y4 Pro Home Stereo System features 3 dierent modes of listening,
Stereo, Stereo SST™ and Involve™ SST™. To switch between modes use the Mode
Selection switch shown in the diagram on page 17.
Stereo
Sets the system to bypass Involve™ processing and turn OFF SweetSpot™. You will only
hear sound from the front Y Speakers and Sub-woofer. We recommend you use this to
compare and demonstrate the eects of SweetSpot™ and Involve™.
Stereo SST™
e system will bypass Involve™ processing and turn ON SweetSpot™. Sound will only
be produced by the front Y Speakers and Sub-Woofer
Involve™ SST™
e recommended way of listening as it provides the fullest and most accurate
reproduction of audio. e system will use both Involve™ and SweetSpot™. Sound will
be heard from all speakers attached to the system.

pg. 20
3.5 Volume
Use the Volume Knob to adjust the system volume, turn clockwise to increase volume
and anti-clockwise to decease volume. e volume can be adjusted from -∞db to
+20db. Try to avoid going above 0db, instead adjust the volume output on your input
device higher if possible. e volume is displayed on the Main Display.
At 0db the system is taking the signal from your device directly with no extra gain.
When above 0db the system must add gain, which can degrade the quality of the
sound. When below 0db the system is removing gain, this does not degrade the quality
of the sound. is is why systems use both negative and positive numbers for volume
control.
3.6 Sub-Woofer Level
Use the Sub-Woofer Knob on the front of the system to vary the bass level of the
system to your individual preference.
3.7 Rear Speaker Level
e volume of the rear speaker can be adjusted with the Rear Level Knob to your
preference.
3.8 Headphones
Headphones can be plugged into the 6.35mm Headphone Socket on the front of the
unit. Before plugging in your headphones into the system turn the volume down below
-10db. Once your headphones are plugged in the Y Speakers and Sub-Woofers will be
muted. You can adjust the volume with the Volume Knob as normal.

pg. 21
3.9 Remote Control
3.9.1 Standby
lisQui dolor re imentore nit excea in cusaect emodiss equunt mint ius est re ea coremquis repedi re dolore lacipiento eaquisin perissit, quas amenihit dunderorunt esecull
acitas eos essus et debis et que nulligent.
Hil mollabo rrorro cullectur?
3.9.2 Input
Tem evel is dolendi tiorenis excerovid eosae siminus tempos estem hil il ex enis mosam
volest, solupti ntiatiatur simin provide praepernam eicab in esse moditib uscipsa
ecaborroriam quam simet et eatae venda dus eaturia descienest licaborro ocim nusa
illorentur?
3.9.3 Volume/Mute
Borpor aute illenist illesequate parum que con cus none conse eos modicae pudipsam
nimus dolor molorro que pore, cuptatis alis et optati blantisti quistio. Nem dolupta
tempeliquas aut vellenimolor aute sim reperemollit reriatum re, nihicidis natem. Ut
opta volupti volore, adignim oluptaquo bea sam il in nost alit exerupt
3.9.4 Treble/Bass
Lorempera quaerum aliciun turepe porem eum que vit etus.
Doloria a quid moluptusam eatur rerrum rendae es ium aut est, sam eveles
utemporibus quunt quia experorrum ex et quas et ea conse delCid et voluptatquis
restiusam es comni ulpa con coriation ea vero et as que quam quaepra nonem aut
faccaborrum dolupta ipienihil magnim net apelese ctiisque numqui ut duciducia aut
doluptatem

pg. 22
Remote Control Diagram

pg. 23
Always ensure your Akoustos Y4 system is switched o prior to cleaning.
Your Y4-1 Amplier and associated sub-woofer can be cleaned with a slightly damp
cloth. A mild cleaning agent such as a window cleaning agent can be used by spraying
a cloth with the agent a gently rubbing it on the system. DO NOT SPAY WATER OR
ANY OTHER LIQUID DIRECTLY ONTO ANY PART OF THE SYSTEM. Ensure no
cleaning residue remains aer you have used it on you system.
Akoustos Y4 speakers can attract dirt and dust and should be cleaned periodically.
is is done by setting a vacuum cleaner on its LOWEST setting and opening any vents
which lower the pressure of the vacuum cleaner. Gently vacuum any dust or other
particles out of the speakers.
Cleaning the outside casing around the speakers can be done with a damp cloth. DO
NOT spray liquid into the speakers as this is likely to damage your speakers.
4: Cleaning Your System

pg. 24
5: System Specifications
Akoustos Y4-1 Amplier
Amplier Class AB
THD Less than 0.1%
OHMS 4 Ohm Capable
Inputs Two (2) RCA
ree (3) HDMI
One (1) Bluetooth
Outputs HDMI
Headphone
Outside Material Aluminium Composite
Dimensions 420mm x 370mm x 110mm
Power RMS 68W per channel, 680W total
Power Peak 135W per channel, 1350W total
Weight X.X kg
Y Speaker
ESP Panels Two (2) Electrostatic Panels
THD 0.1%
Power RMS 68W
Power Peak 135W
Frequency Response 220hz to greater than 20,000Hz
Outside Material Aluminium Composite
Dimensions 335mm x 304mm x 262mm
Weight 1.5kg
Sub-Woofer
THD xx%
Power RMS 68W
Power Peak 135W
Dual Drivers Two (2) 5’ Long throw cones
Frequency Response 40hz to greater than 220hz
Outside Material Aluminium Composite
Dimensions 335mm x 263mm x 263mm
Weight 8.5kg

pg. 25
END USER LICENSE AGREEMENT
IMPORTANT: READ CAREFULLY: is End User License Agreement
(“EULA”) is a legal agreement between you, the End User (“End User” or
“You”), and Involve Audio Pty Ltd (“Involve”) governing your use of the
technology and soware and data and data content belonging to Involve,
its vendors and licensors (“Technology”), that is contained in this audio/
video device (“System”). By tearing open the protective wrapping on this
System, you are agreeing to be bound by the terms of this EULA. In the
event you disagree with any of the terms contained herein, DO NOT
UNWRAP THIS SYSTEM. Return the sealed System to Involve or your
point of purchase for a full refund.
Copyright laws and international copyright treaties, as well as other
intellectual property laws and treaties protect the Technology contained
within this System. e Technology is being licensed, not sold. is
EULA grants you the right to use the Technology only on this Involve
system. You may NOT transfer, lend, distribute, prepare derivative
works, reverse engineer, de-compile, or disassemble the Technology,
except and only to the extent that applicable law expressly permits such
activity. You agree that you will use the Technology and the System solely for your own personal non-commercial use.
You agree that your non-exclusive license to use the Technology will
terminate if you violate these restrictions. If your license terminates,
you agree to cease any and all use of the Technology or Data. Involve,
its vendors, and licensors reserve all rights in the Technology, including
all ownership rights. You agree that the vendors and licensors of Involve
may enforce their rights under this Agreement directly in their own
name

pg. 26
Involve warrants this System in accordance with the provisions of the
warranty card delivered with this System. EXCEPT AS EXPRESSLY
SET FORTH THEREIN, INVOLVE, ITS VENDORS, AND ITS LICENSORS HEREBY DISCLAIM ALL WARRANTIES, EXPRESS OR
IMPLIED,AND STATUTORY, IN CONNECTION WITH THE TECHNOLOGY, INCLUDING WITHOUT LIMITATION, THE IMPLIED
WARRANTIES OF MERCHANTABILITY, NON-INFRINGEMENT
OF THIRD PARTY RIGHTS, AND FITNESS FOR A PARTICULAR
PURPOSE. IN NO EVENT WILL INVOLVE, ITS VENDORS, OR ITS
LICENSORS BE LIABLE FOR ANY INDIRECT, SPECIAL,INCIDENTAL, OR CONSEQUENTIAL DAMAGES ARISING OUT OF THE USE
OR INABILITY TO USE THE TECHNOLOGY. IN NO EVENT SHALL
INVOLVE BE LIABLE FOR ANY DAMAGES.
None of the Technology shall be exported or re-exported in violation of
any export provisions of Australia or the United States or any other applicable jurisdiction. Any attempt to sublicense, assign, or transfer any of
the rights, duties, or obligations hereunder shall be void. is agreement
shall be governed by and interpreted under the laws of the Commonwealth of Australia in the State of Victoria, with regard to its conicts of
law provisions.
YOU ACKNOWLEDGE THAT YOU HAVE READ AND UNDERSTAND THIS AGREEMENT AND AGREE TO BE BOUND BY ITS
TERMS. YOU FURTHER AGREE THAT THIS AGREEMENT IS THE
COMPLETE AND EXCLUSIVE STATEMENT OF THE AGREEMENT
BETWEEN YOU AND INVOLVE AND SUPER CEDES ANY PROPOSAL OR PRIOR AGREEMENT, ORAL OR WRITTEN, AND ANY
OTHER COMMUNICATIONS RELATING TO THE SUBJECT MATTER OF THIS AGREEMENT.
 Loading...