

Page 1

6CH LCD DIMMER PACK WITH SHUCKO
Thanks for purchasing 6CH LCD dimmer pack. This controller is 6-channel
dimmer pack with shucko socket. It can work alone or used as a DMX pack, as
well controlled by analog signal. When it works stand alone, there are 12
built-in program can be chosen, the speed can be adjusted When work as DMX
pack, it can be controlled by 1 to 6 channels, by address is between 001 to 512.
When it is under analog signal, it can be controlled by 6 channels signal in DC
0-10V The dimming is various in SWITCH, LINEAR, SQUARE As well, it has
the function of pre-heat ing, circuit brake protection, phase compensation, DMX
M/S, etc…Before operation, please carefully read this manual first. Thanks!
Parameter:
POWER SUPPLY----------------------------- SINGLE PHASE AC 220V 50-60HZ
3-PHASEAC 220V 50-60HZ
LOAD-------------------------------------------------------------------MAX:6*10A/CH
DMX OUTPUT------------------------------------------------3PIN female XLR socket
DMX INPUT-----------------------------------------------------3PIN male XLR socket
ANALOGUE INPUTS----------------------------------------DC 0-10V 8PIN D socket
DIMENSIONS------------------------------------------------------482mmX40mmX90mm
THE POWER SUPPLY ON-LINE DIAGRAM:
SINGLE PHASE AC220V 50-60HZ:
E L N
E E L3 L2 L1 N N N
3-PHASE AC220V 50-60HZ:
E L3 L2 L1 N
E E L3 L2 L1 N N N
1 of 1 pages
Page 2
Operating instructions:
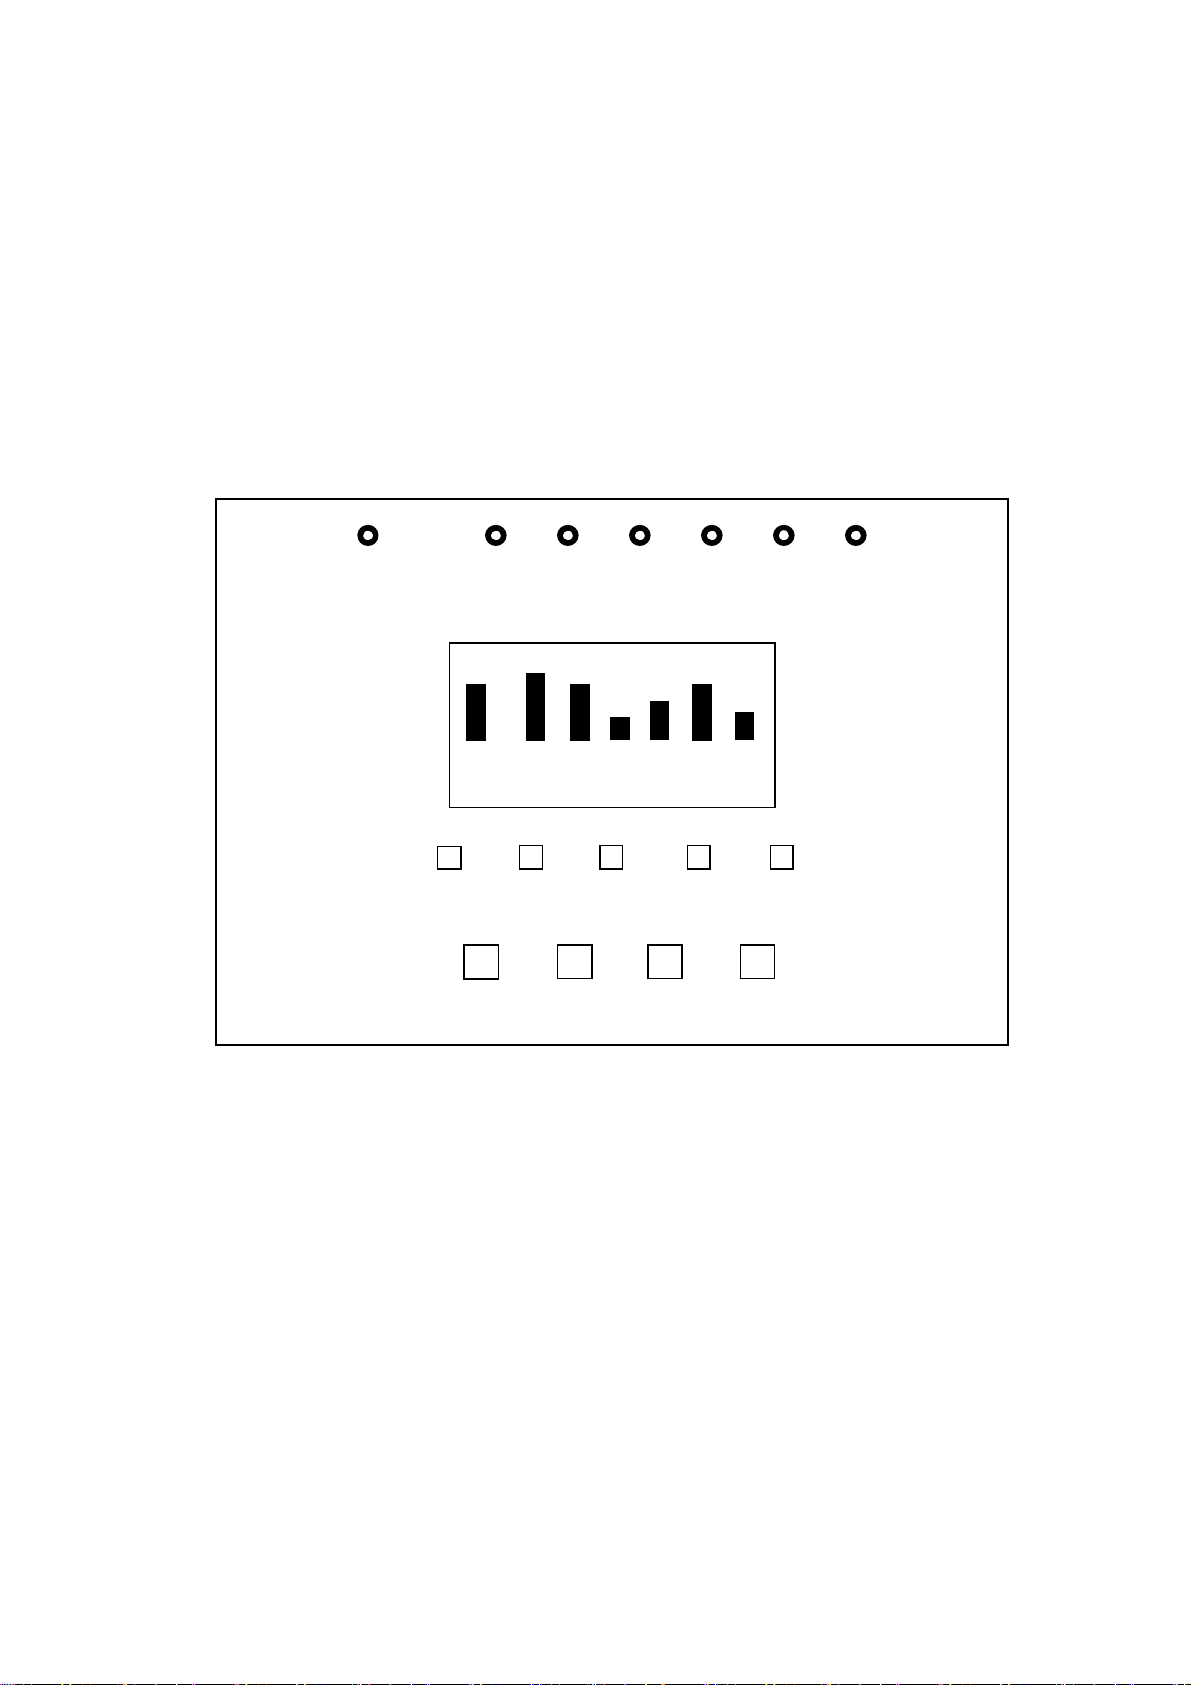
1,START MENU:
Connect to switch on power supply, first the LCD shows the edition number and start the automatic check in
alternate current, and then, The this time DMX instructions the light flash is slow. After completes. Enter to start
menu. (Meet the plank show the diagram) In start menu, the first each channel of manifestation front value, the
first each channel of manifestation inside the front changes the value of the channel; The second each channel of
manifestation preface number, the first each channel of manifestation inside front changes the preface number of
the channel. The LCD holds the above blue color instructions light to should bright degree in each channel.
DMX 1 2 3 4 5 6
2 1 2 3 4 5 6
CHANNEL
1 2 3 5 6
MENU UP DOWN ESC
The front-panel shows the diagram
2. The factitiousness adjusts the light
2.1 The single channel factitiousness adjusts the light
Hold in the LCD bottom row contain six channel key, each key to should in its bottom
arithmetic figure a channel for meaning preface number. The key presses behind, to
should the channel value add/ reduce 1, be to add to 100%, then add 1, then for 0, be to
reduce to 0, then reduce 1, then for 100%;Keep on pressing down over two second, then
reduce 1, then quickly add/ reduce 1, its to should passage value as well circulate add/
reduce. LCD or the channel instructions can hold its value the light instructions
appearance. Add/ reduce the function be decided by the key of ESC, on the system
electricity empress, recognize tacitly for adding, Convert to add/ reduce function every
press once ESC key, henceforth.
2.2 All channels factitiousness adjusts the light:
Add:While starting the menu, it is each to press once Up key all channels adds 1, be
some a the channel adds to 100% then stop the channel’s value add. Keep on pressing
down over two second, then add quickly 1, be some a the channel adds to 100% then
2 of 2 pages
Page 3

stop the channel’s value add.
Reduce:While starting the menu, it is each to press once DOWN key all channels reduce
1, be some the channel reduces to 0 hours then stops the channel’s value reduces. Keep
on pressing down over two second, then reduce quickly 1, be some a the channel reduces
to 0 hours then stop the channel’s value reduces。
Note:The factitiousness adjusts the light independence in other adjust the light, namely in course of
circulate the inside place a view, or suffers the control of DMX, or suffer the emulation signal control,
or prepare hot, move to adjust the light does not change other value, the passage outputs then with
they inside of the biggest value outputs.
2.3 FUNCTION MENU:
3.1 FIRST CLASS FUNCTION MENU:
While starting the menu, press MENU under“start”menu, then enter first-class function
menu, the LCD displays as following
Dmx fail
Press once UP/DOWN to circularly choose one of following six first-class functions in
the menu:Dmx fail、Dmx addr、preheating、Curve、preset。
Under the first-class function menu, press ESC to exit the function menu, enter to
“start”menu.
Under the first-class function menu, press MENU, Then enter the second-class
function menu.
3.2 Second-class function menu:
3.2.1 DMX FAIT menu
A. Under the DMX FAIL first-class function menu, press MENU and enter the second-class
function menu, it will display the current mode, if it is running built-in scene 8, it displays as
following:
3 of 3 pages
Page 4

Dmx fail
The movable light marks the
Place Position, below the type is together。
Prog08
B. Press UP/DOWN once to circularly choose:Hold/ Analog/ Prog01-12。
[Hold]:The last-received DMX signal will be kept。
[Analog]:suffer the DC0-10V analogue input. When there is the DMX signal,
analogue will underlie DMX signal
[Progxx]:when there is the DMX signal during running one of the built-in
scenes 01-12, the DMX signal will precede the built-in scenes.
The instruction movable light will flash if there is DMX signal.
C. If choose Hold/Analog, Then press ESC/MENU to exit the DMX FAIL
second-class function menu, enter the first-class function menu
D. If choose progxx, press MENU to exit DMX FAIL second-class function
menu, enter the first-class function menu; Press ESC to enter speed menu for
circulating built-in scenes, then press UP/DOWN to circularly choose the expected
speed, press and hold UP/DOWN more then two seconds to speed up the circulation。
THE speed ranges 00. Is-20.0S.
Speed
00.4S
E. In chosen-speed menu, it is invalid to press MENU;
4 of 4 pages
Page 5

Press ESC to exit DMX FAIL second-class function menu, enter the first-class function
menu.
3.2.2:PHA CORR Menu.
A. Under the first-class function in PHA CORR menu, press MENU to enter the
second-class function menu, it shows the current mutual compensation status; it runs
Pha corr
as following if the current status is YES.
B. Press UP/DOWN to choose: Yes/No。
Yes
[No]: without mutual compensation
[Yes]: with mutual compensation
C. Press MENU/ESC to exit CORR PHA Second-class function menu, enter the PHA
CORR first-class function menu.
3.2.3: DMX ADDR Menu
A. Under the first-class function DMX ADDR menu, press NENU enter second-class
function menu, the manifestation is a current DMX address to establish way, run as
Dmx addr
follow the diagram if front Block.
Block
B. Press UP/DOWN then circulates to choose: Block/Single。
[Block]: Establishing a receiving address for first channel The other address adds 1 one
5 of 5 pages
Page 6

by one, can pass the Single function checking
[Single]: Establishing address for single channel, it does not affect the other addresses.
C. In the second-class function in DMX ADDR menu, press ESC to exit the second-class
function menu, enter the first-class function menu. Press MENU to enter the
third-class function menu.
D. 1. Set up Block for the third-class function DMX ADDR menu, it runs as following if the
first channel address it 011
Start
[011]
Press UP/DOWN once, address will increase or decrease by 1, then all channels will
be updated, based on the first channel address, all addresser after the first channel
address will increase/decrease by 1 in turn. Press and hold UP/DOWN more than two
seconds, the address will increase/decrease by 1 quickly. All channel addresses
range 001-512.
Press ESC to exit third-class function in DMX ADDR menu, enter the second-class
function menu Block mode. Invalid to Press MENU.
E. 2. Set up Single for the third-class function in DMX ADDR menu If channel address is
011, the movable light cursor will be under the channel sequence number, showing as
Chan[1]
[011]
following:
Press UP/DOWN once, channel sequence number increaser/decreases by
6 of 6 pages
Page 7

1, The second line shows the channel address, press and hold it more then two
seconds, the channel sequence number quickly increases/decreases by 1, the
second line will shows the relevant channel address accordingly. Channel sequence
number circulates from Chan [1] to Chan[12].
Press MENU, the movable light mark turns to the channel sequence number address
line, press UP/DOWN, the address adds/reduce 1, the other channel address is
constant, hold it more than two seconds, address quickly adds/reduce 1. The channel
address ranges 001~512 circulating. If the channel sequence number is 3, channel
sequence address is 023, then show as following:
Chan[3]
[023]
Then press MENU, the movable light cursor will switch between the channel
sequence number and channel sequence number address line, press UP/DOWN to
change the relevant value.
Press ESC to exit the third-class function in ADDR DMX ADDR menu, enter the
second-class function menu single mode.
3.2.4:PREHEATING menu
A. Under the first-class function in PREHEAING menu, Press MENU to enter the
second-function menu, it shows the current setup mode for PREHET, it runs as following the
diagram if current setup mode is All.
Preheat
All
B. Press UP/DOWN to choose:All/single。
[All]:based on preheating value of the first channel, set up preheating value for all
7 of 7 pages
Page 8

channels, can pass the singled function checking.
C. Under the second-class function PREHEATING menu, press ESC to exit
second-class function menu, enter the first-class function menu。Press MENU to enter
third-class function menu
D. 1. Setup ALL for the third-class function in PREHEATING menu, If preheating value of
the first channel is 20%, then show the diagram as following:
All
[020%]
Press the UP/DOWN once, preheating value adds/reducer 1%, this time
all the channels work the same as the first channel, press the key
And hold it more then two seconds, it will speed up adding/reducing
Preheating value by 1%, all preheating values range 000%-050%. Press
ESC to exit PREHEATING third-class function menu, enter PREHEATING
Second-class function menu All mode。It is invalid to press MENU.
E. 2 Setup Single for preheating third-class function menu。If preheating
value of the first channel is 23%, the movable light cursor will be under the channel
Chan[1]
sequence number, showing the diagram as following:
[023%]
Press UP/DOWN, The channel sequence number adds/reduces 1, it will shows the
preheating value on the second line, press the key and hold it more than two seconds,
8 of 8 pages
Page 9

the channel sequence number will adds/reduce 1 quickly, preheating value one the
second line varies accordingly, the channel sequence number circulates from Chan[1]
to Chan[12].
Press the key of MENU, the movable light mark transfer to the line of channel
sequence number, then press the UP/DOWN once to add/reduce preheating value by
1%, the preheating value of other channel remains constant, press the key and hold it
more then two seconds, preheating value adds/reduce 1 quickly. The preheating
value circulates between 000% to 050%. If channel sequence number is 3, the
preheating value of channel sequence number is 35%, the diagram show as
following:
Chan[3]
[035%]
Then press MENU, the movable light cursor switches between the channel sequence
number and preheating value, press UP/DOWN to change relevant value.
Press ESC to exit the third-class function PREHEATING menu, enter the
second-class function menu Single mode.
3.2.5:CURVE Menu
A. Under the first-class function in CURVE menu, press MENU enter
second-class function curve menu, the manifestation adjusts the movable light
characteristic for the front, running as follow the diagram if front is LINEAR:
Curve
Linear
9 of 9 pages
Page 10

B. Press once UP/DOWN then circulates to choose b:Linear/Switch/Square。
[Linear]:The line adjusts the movable light.
[Switch]:The switch type adjusts the movable light, 50% below for
0 output,50% is above to output with 100%.
[Square]:The curve adjusts the movable light。
C. Press MENU/ESC withdraw second function in CURVE menu, enter the
first-class function menu.
3.3 After entering the function. If there is no press exceed 20 seconds, it will exit to function
menu. Enter to start menu.
4. M/S Controls
Keep the same set of each controller and connect them with 3PIN XLR cable. Now it can
work under DMX M/S control.
Warning
1. This apparatus must be earthed.
2. To prevent fire or shock hazard, do not expose this apparatus to rain or moisture.
3. The inside places a view elucidation:(bottom form inside, each binary system the
number mean the one step, among them 1 mean bright degree as 0,0 mean bright
degree as 100%, each procedure is to circulates circularly.)
PROG01:000001、000010、000100、001000、010000、100000
PROG02:100000、010000、001000、000100、000010、000001
PROG03:100001、010010、001100、010010
PROG04:011111、101111、110111、111011、111101、111110
PROG05:011110、101101、110011、101101
PROG06:000001、000011、000111、001111、011111、1111111、000000
PROG07:111111、011111、001111、000111、000011、000001、 000000
10 of 10 pages
Page 11

PROG08:100000、110000、111000、111100、111110、111111、 000000
PROG09:100001、110011、111111、110011、100001、000000
PROG10:100000、110000、111000、111100、111110、111111
111110、111100、111000、110000、100000、000000
PROG11:110000、001100、000011
PROG12:001100、010010、100001、000000
3.CONNECT THE LINE DIAGRAM:
SINGLE PHASE AC220V 50-60HZ:
THREE PHASE CONNECTI ON DI AGRAMSI NGLE PHASE CONNECTI ON DI AGRAM
LL
L L
NN
LL
N N
NN
L L
N
N
L L
NN
LL
N N
L3L2L1NN L
11 of 11 pages
 Loading...