

Page 1
Qubit™ 4 Fluorometer
Catalog Number Q33226
Publication Number MAN0017209
Revision A.0
For Research Use Only. Not for use in diagnostic procedures.
Page 2
Information in this document is subject to change without notice.
Revision
Date
Description
DISCLAIMER: TO THE EXTENT ALLOWED BY LAW, THERMO FISHER SCIENTIFIC AND/OR ITS AFFILIATE(S) WILL NOT BE LIABLE FOR
SPECIAL, INCIDENTAL, INDIRECT, PUNITIVE, MULTIPLE OR CONSEQUENTIAL DAMAGES IN CONNECTION WITH OR ARISING FROM
THIS DOCUMENT, INCLUDING YOUR USE OF IT.
Revision history: MAN0017209
A.0 05 October 2017 New user guide.
Important Licensing Information: This product may be covered by one or more Limited Use Label Licenses. By use of this product,
you accept the terms and conditions of all applicable Limited Use Label Licenses.
Manufacturer: Life Technologies Holdings Pte Ltd | Block 33 | Marsiling Industrial Estate Road 3 | #07-06, Singapore 739256
Trademarks: All trademarks are the property of Thermo Fisher Scientific and its subsidiaries unless otherwise specified. Kimwipes is
a registered trademark of Kimberly-Clark Corporation.
© 2017 Thermo Fisher Scientific Inc. All rights reserved.
ii
Qubit™ 4 Fluorometer User Guide
Page 3

Contents
About this guide ............................................................................................................ 3
1. Product information ................................................................................................ 5
Product contents .............................................................................................................................................. 5
Product description ......................................................................................................................................... 6
Instrument exterior components ................................................................................................................... 7
Product specifications ..................................................................................................................................... 8
2. Getting started ........................................................................................................ 9
Set up the Qubit™ 4 Fluorometer ................................................................................................................... 9
Optional: Configure instrument settings ..................................................................................................... 11
Guidelines for using the Qubit™ 4 Fluorometer ........................................................................................ 16
3. Perform assays ..................................................................................................... 17
Overview ........................................................................................................................................................ 17
Optional: Use Reagent Calculator to prepare Qubit™ Working Solution ............................................... 18
Calibrate assays on the Qubit™ 4 Fluorometer .......................................................................................... 20
Read samples ................................................................................................................................................. 24
Results ............................................................................................................................................................. 26
Fluorometer mode ......................................................................................................................................... 29
Ion Sphere™ Assay ......................................................................................................................................... 31
4. Manage data .......................................................................................................... 32
Introduction ................................................................................................................................................... 32
View detailed sample data ........................................................................................................................... 32
Rename data files........................................................................................................................................... 35
Export data ..................................................................................................................................................... 36
Delete data ...................................................................................................................................................... 39
5. Manage, import, and create assays ....................................................................... 40
Overview ........................................................................................................................................................ 40
Manage assays ............................................................................................................................................... 40
Show/Hide assays ........................................................................................................................................ 41
Move assays ................................................................................................................................................... 43
Import assays ................................................................................................................................................. 45
Create your own assay for the Qubit™ 4 Fluorometer .............................................................................. 50
6. Instrument maintenance ....................................................................................... 51
Maintenance and cleaning............................................................................................................................ 51
Software updates ........................................................................................................................................... 52
Device verification test ................................................................................................................................. 54
Qubit™ 4 Fluorometer User Guide
1
Page 4

Appendix A: Troubleshooting...................................................................................... 55
Troubleshooting ............................................................................................................................................. 55
Critical Qubit™ Assay considerations ......................................................................................................... 57
Appendix B: Ordering information .............................................................................. 59
Qubit™ 4 Fluorometer and accessories ....................................................................................................... 59
Appendix C: Safety ...................................................................................................... 60
Symbols on instruments ............................................................................................................................... 60
Safety labels on instruments ........................................................................................................................ 61
General instrument safety ............................................................................................................................ 62
Chemical safety .............................................................................................................................................. 63
Chemical waste safety................................................................................................................................... 64
Electrical safety .............................................................................................................................................. 65
Biological hazard safety ................................................................................................................................ 66
Safety and Electromagnetic Compatibility (EMC) standards ................................................................. 67
Documentation and support ....................................................................................... 69
Obtaining support ......................................................................................................................................... 69
2
Qubit™ 4 Fluorometer User Guide
Page 5

Overview
This user guide describes how to operate the Qubit™ 4 Fluorometer.
User
documentation
The guides listed below are available with the Qubit™ 4 Fluorometer.
thermofisher.com/qubit to access protocols, application notes, and tutorials.
Text and keyboard
Text and keyboard conventions used in the Qubit™ 4 Fluorometer User Guide are
user documentation, see page 4.
User attention
words
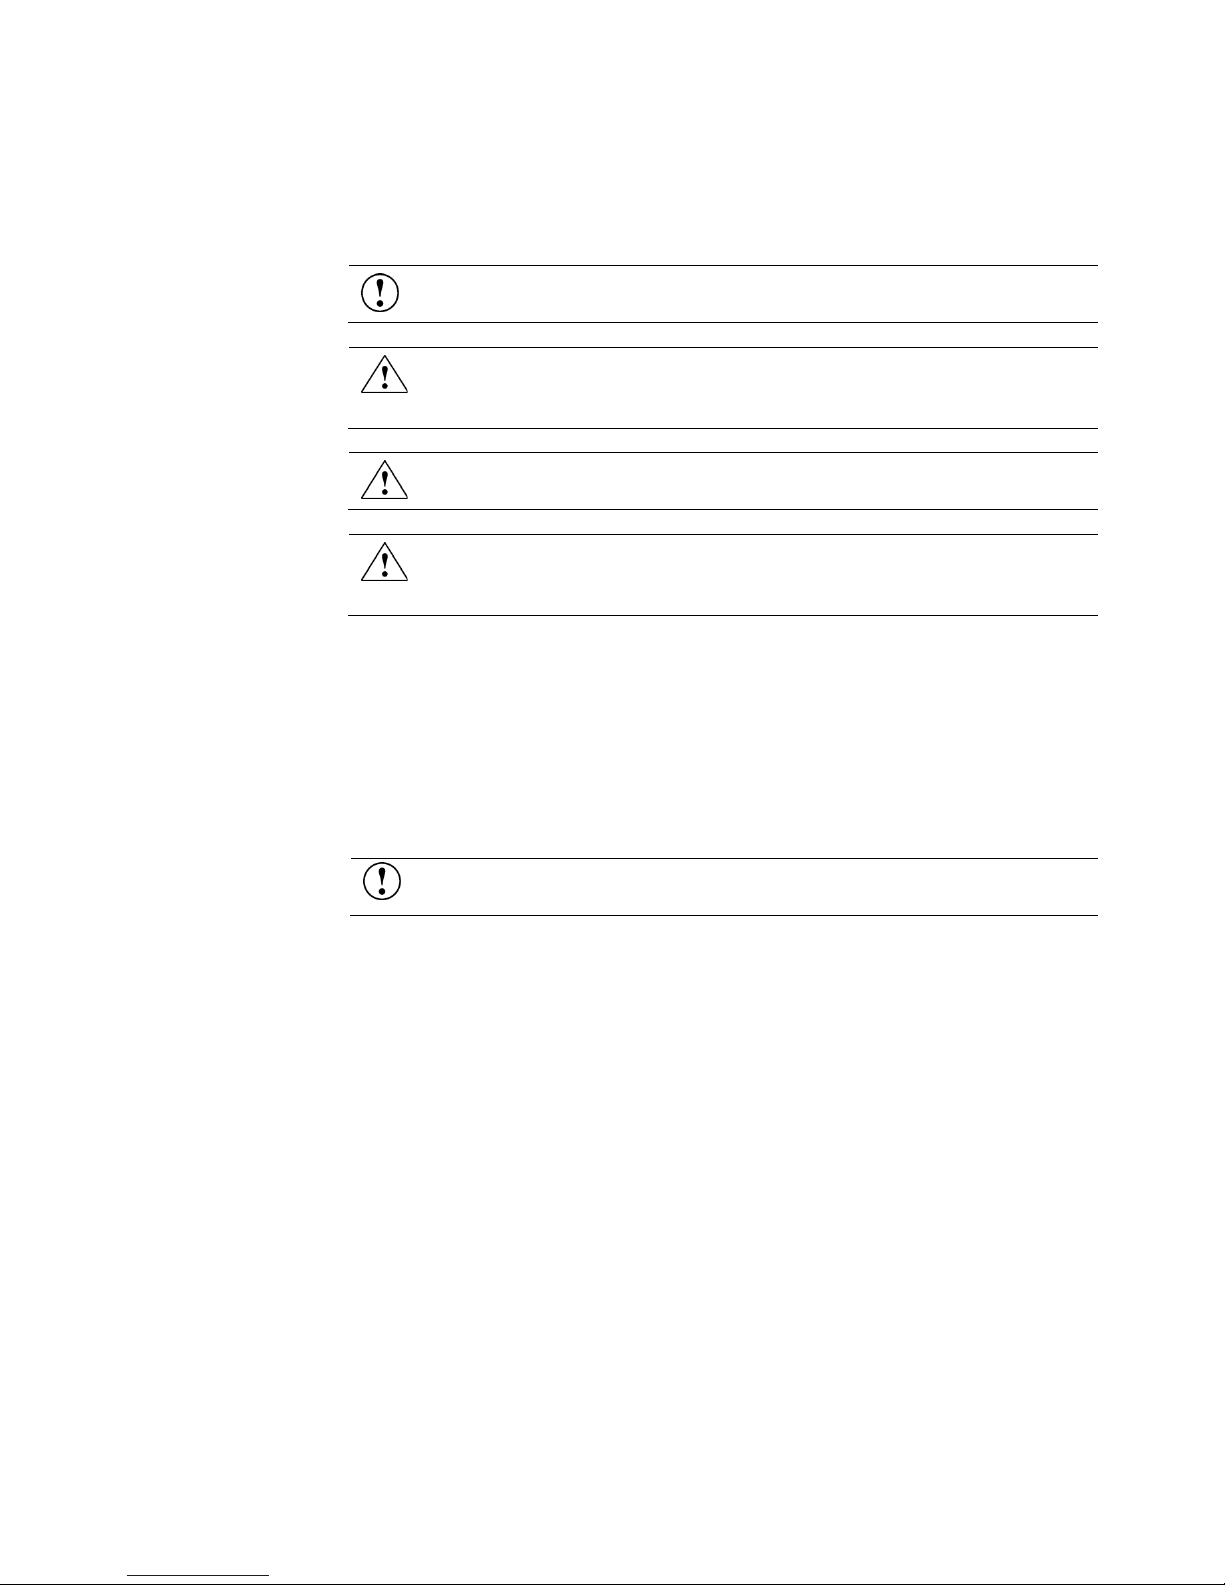
Two user attention words appear in Thermo Fisher Scientific user documentation.
About this guide
Guide Pub. No.
Qubit™ 4 Fluorometer User Guide
Qubit™ 4 Fluorometer Quick Reference Card (QRC)
Additional resources are available on the Qubit™ Technical Resources page. Go to
MAN0017209
MAN0017210
conventions
listed below. For safety alert words and symbols used in Thermo Fisher Scientific
Convention Use
Bold
Right arrow symbol () indicates a menu choice, and
Each word implies a particular level of observation or action as described below.
Bold text indicates user action. For example:
Click Run.
separates successive commands you execute or select from a
drop-down or shortcut menu. For example:
Select SettingsInstrument settings.
Note: Provides information that may be of interest or help but is not
critical to the use of the product.
IMPORTANT! Provides information that is necessary for proper
instrument operation, accurate installation, or safe use of a chemical.
Qubit™ 4 Fluorometer User Guide
3
Page 6
Safety alert words
Four safety alert words appear in Thermo Fisher Scientific user documentation at
points in the document where you need to be aware of relevant hazards. Each
particular level of observation or action, as defined below:
Except for IMPORTANT! safety alerts, each safety alert word in a Thermo Fisher
to Thermo Fisher Scientific instruments (see “Safety symbols” in Appendix C).
SDSs
The Safety Data Sheets (SDSs) for any chemicals supplied by Thermo Fisher
SDSs, see “Safety Data Sheets (SDS)”.
alert word—IMPORTANT, CAUTION, WARNING, DANGER—implies a
IMPORTANT! – Provides information that is necessary for proper
instrument operation, accurate installation, or safe use of a chemical.
CAUTION! – Indicates a potentially hazardous situation that, if not
avoided, may result in minor or moderate injury. It may also be used to
alert against unsafe practices.
WARNING! – Indicates a potentially hazardous situation that, if not
avoided, could result in death or serious injury.
DANGER! – Indicates an imminently hazardous situation that, if not
avoided, will result in death or serious injury. This signal word is to be
limited to the most extreme situations.
Scientific document appears with an open triangle figure that contains a hazard
symbol. These hazard symbols are identical to the hazard symbols that are affixed
Scientific are available to you free 24 hours a day. For instructions on obtaining
IMPORTANT! For the SDSs of chemicals not distributed by Thermo
Fisher Scientific contact the chemical manufacturer.
4
Qubit™ 4 Fluorometer User Guide
Page 7

The Qubit™ 4 Fluorometer is shipped with the components listed below:
The complete user guide is also available for download at thermofisher.com/qubit.
See page 6 for the description and specifications of the Qubit™ 4 Fluorometer.
Upon receiving the
Examine the instrument carefully for damage incurred during transit. Ensure that
See page 9 for instructions to set up the Qubit™ 4 Fluorometer.
Register your
Go to thermofisher.com/qubit to register your instrument. You will be asked to
Product contents
Qubit™ 4 Fluorometer 1 each
Universal Power Cord with 4 adaptor plugs
(for U.S./E.U./U.K./Australia)
USB drive (includes the user guide) 1 each
Qubit™ 4 USB cable 1 each
Qubit™ 4 Fluorometer Quick Reference Card (QRC) 1 each
Certificate of Conformity (COC) 1 each
Qubit™ screen cleaning cloth 1 each
1. Product information
Component Quantity
1 each
instrument
instrument
all parts of the instrument, including the accessories listed above, are included with
the product. Damage claims must be filed with the carrier; the warranty does not
cover in-transit damage.
supply the serial number, your name, and your contact details. Registering your
instrument ensures that you will receive notifications of software upgrades and
information on new assays for use with the Qubit
™
4 Fluorometer.
Qubit™ 4 Fluorometer User Guide
5
Page 8

Product description
Qubit™ 4
The Qubit™ 4 Fluorometer is a benchtop fluorometer that can be used for the
programmed into the instrument.
Features
•
Japanese.
Fluorometer
quantitation of DNA, RNA, microRNA, and protein, as well as for the measurement
of RNA integrity and quality using the highly sensitive and accurate fluorescence-
™
based Qubit
the Qubit
performing a sequencing run on the Ion Personal Genome Machine
Sequencer. You can also use the Qubit
assays. Additionally, Ion Sphere™ Particle quality can be evaluated on
™
4 Fluorometer using the Ion Sphere™ Quality Control Kit prior to
™
4 Fluorometer to directly measure the
™
(PGM™)
fluorescence of samples or to create new assays using the MyQubit software pre-
Fast and highly accurate quantitation of DNA, RNA, and protein in less than
3 seconds per sample.
• Measure percentage of intact and degraded RNA in the sample in less than
5 seconds per sample.
• High levels of accuracy using only 1–20 µL of sample, even with very dilute
samples.
• Use of dyes selective for dsDNA, RNA, or protein minimizes the effects of
contaminants in the sample.
• Stores results from up to 1000 samples.
• Large, state-of-the-art color touchscreen for easy workflow navigation.
• Graphically displays up to 20 data points for quantitation assays.
• Instrument indicates samples that are in the extended range or out of range in
the graph, as well as in the simple sample output screen.
• Saves sample data as a CSV (comma separated value) file.
• Exports data to a USB drive or directly to your computer via a USB cable.
™
• On-board Reagent Calculator provides instructions to prepare Qubit
working
solution using your sample and standard inputs.
• Allows easy definition and saving of assay preferences.
• Instrument user interface can be personalized to show only the frequently used
assays, to add new assays, including user-defined assays created with the
MyQubit software and web tool, and to display in the language of your choice
including English, French, Spanish, Italian, German, simplified Chinese and
6
Qubit™ 4 Fluorometer User Guide
Page 9
Top view
Back view
configuration in your country.
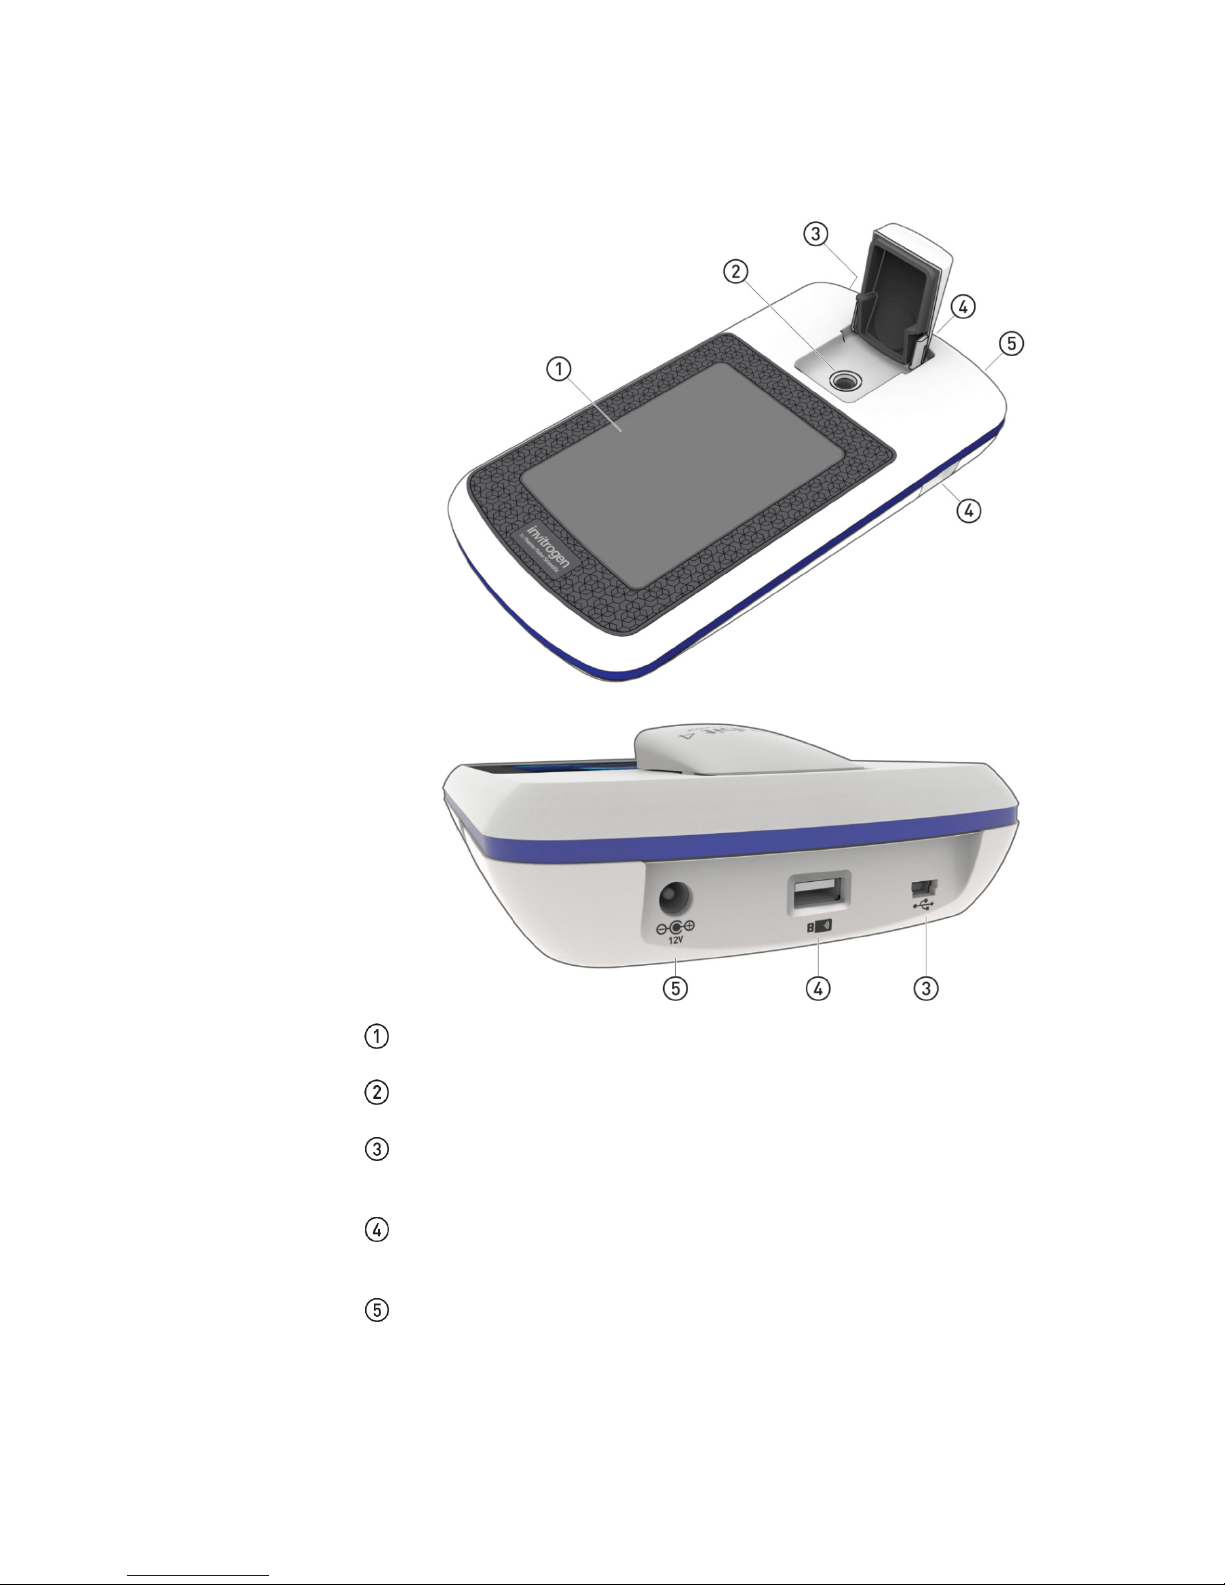
Instrument exterior components
Touchscreen is the user interface containing the controls for all the functions
needed and displays data from the assays.
Sample chamber is used to load the assay tube containing the sample into the
fluorometer for analysis.
USB cable port (type mini-B) allows you to transfer your data directly to your
computer using the USB cable supplied with the instrument or any other similar
USB cable.
USB drive ports (Type A) allow you to transfer and save data to your computer
using the USB flash drive supplied with the instrument (or any other similar
USB drive) for record keeping and printing purposes.
Power inlet connects the Qubit™ 4 Fluorometer to an electrical outlet using the
supplied power cord and the appropriate plug, based on the electrical outlet
Qubit™ 4 Fluorometer User Guide
7
Page 10

Product specifications
Physical
Instrument type: Benchtop fluorometer
Technical
Dynamic range: 5 orders of magnitude
USB drive
Capacity: 4 Gigabyte
characteristics
specifications
Instrument dimensions: 5.4 in (w) × 10 in (l) × 2.2 in (h)
(13.6 cm × 25 cm × 5.5 cm); rectangular shape
Weight: 26.2 oz (743 g)
Operating power: 100–240 VAC, 1.0 A/1.2 A
Frequency: 50/60 Hz
Electrical input: 12 VDC, 2.5 A
Installation site: Indoor use only
Operating temperature: 10–40°C
Operating humidity: 20–80% (non-condensing)
Processing time: ≤5 seconds/sample
Light sources: Blue LED (max ~470 nm)
Red LED (max ~635 nm)
Excitation filters: Blue 430–495 nm
Red 600–645 nm
Emission filters: Green 510–580 nm
Red 665–720 nm
Detectors: Photodiodes; measurement capability from
300–1000 nm
Calibration type: 2- or 3-point standard
Tube type: 0.5-mL Real Time PCR (polypropylene) tubes
Warm-up time: <35 seconds
8
Qubit™ 4 Fluorometer User Guide
Page 11
Set up the
The Qubit™ 4 Fluorometer is a stand-alone instrument that does not require
4. Plug the power cord into the electrical outlet.
5. The instrument automatically powers on, first displaying the splash screen,
6. To power down the Qubit™ 4 Fluorometer, unplug it.
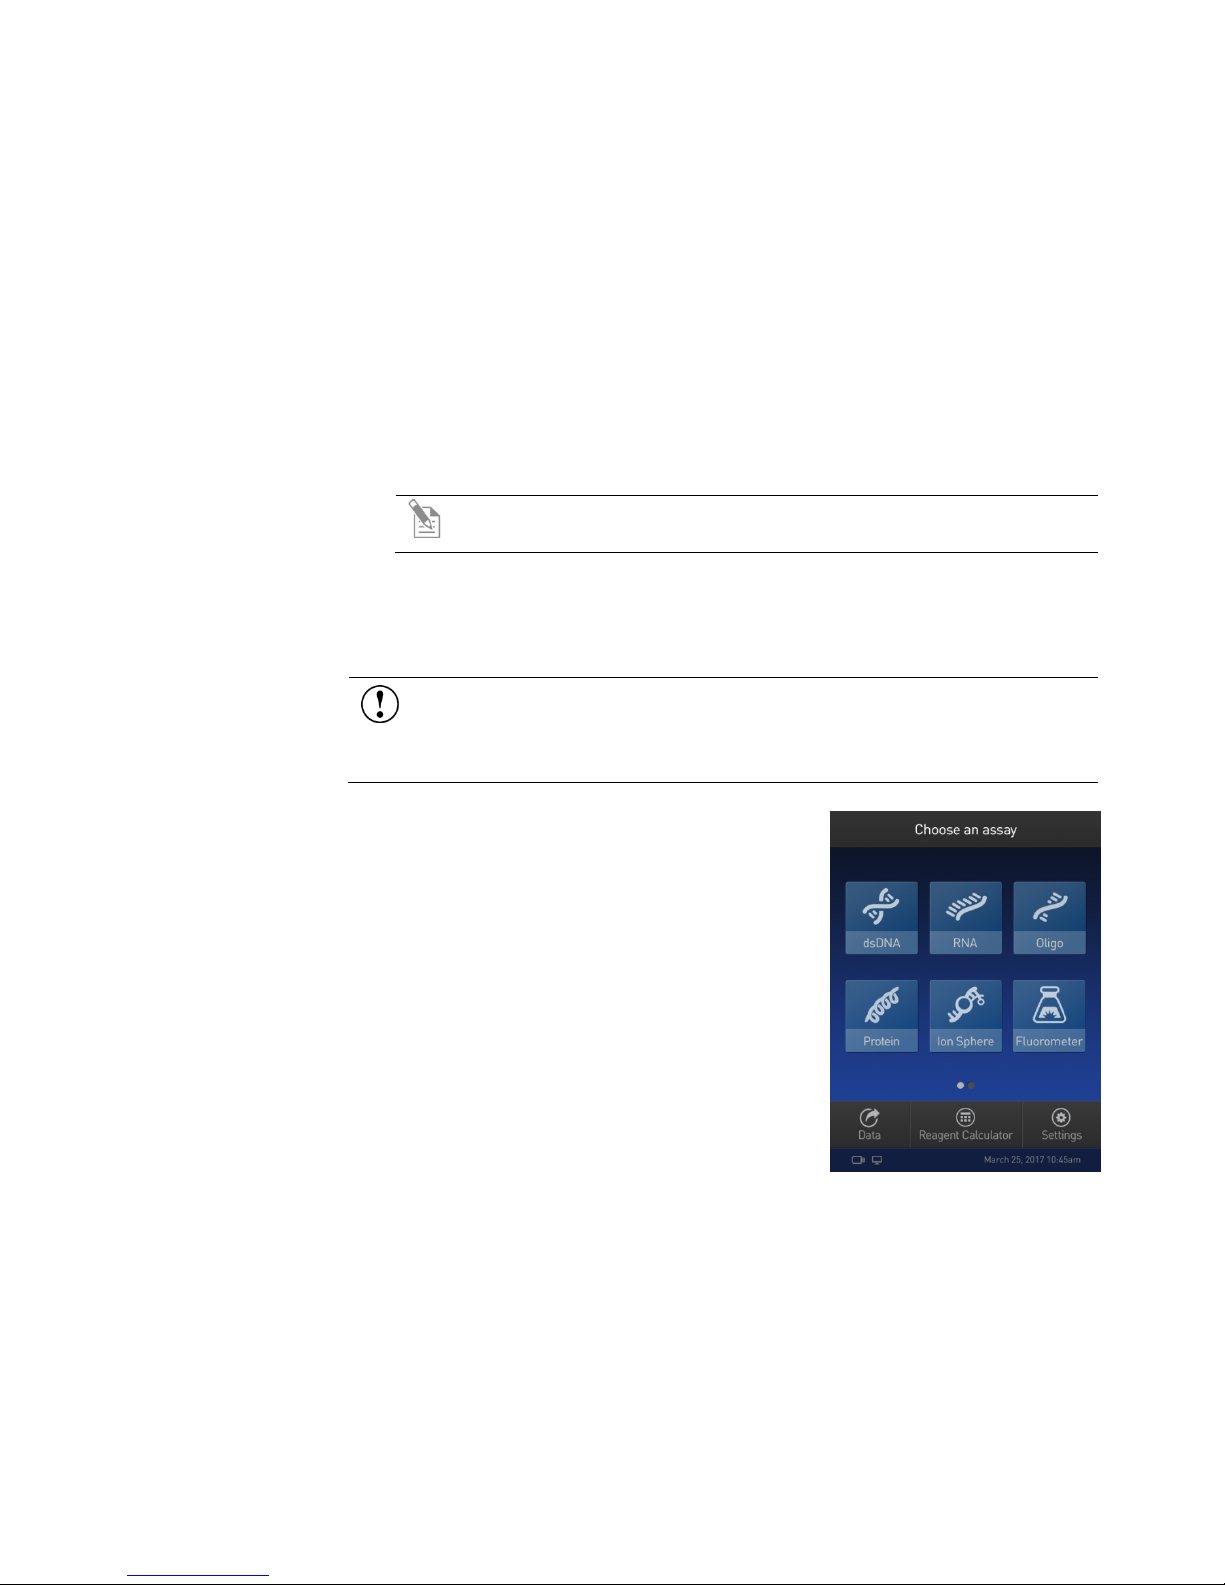
Home screen
When the instrument is powered on, the Home
2. Getting started
Set up the Qubit™ 4 Fluorometer
instrument
connection to a computer.
1. After unpacking the instrument, place the instrument on a flat, level, dry
surface.
2. Plug one end of the supplied power cord into the Qubit
3. Attach the appropriate plug adaptor to the other end of the power cord.
and then the Home screen.
screen is automatically displayed.
From the Home screen, you can:
• Select one of the assays: dsDNA, RNA, oligo
(ssDNA), protein, or Ion Sphere
• Select the Fluorometer mode (the instrument
behaves like a mini-fluorometer).
• Access saved data.
• Configure instrument settings.
• Use the Reagent Calculator to determine the
exact volumes of Qubit
required to prepare the Qubit
solution.
™
4 Fluorometer.
Note: Ensure the plug of power adaptor remains accessible to allow
disconnection.
IMPORTANT! Use the power cord plug adapter supplied with the
instrument that is appropriate for the electrical outlet configuration in your
country. Powering the instrument with an unapproved power cord may
damage the instrument.
™
.
™
buffer and reagent
™
working
Qubit™ 4 Fluorometer User Guide
9
Page 12
About Instrument
screen
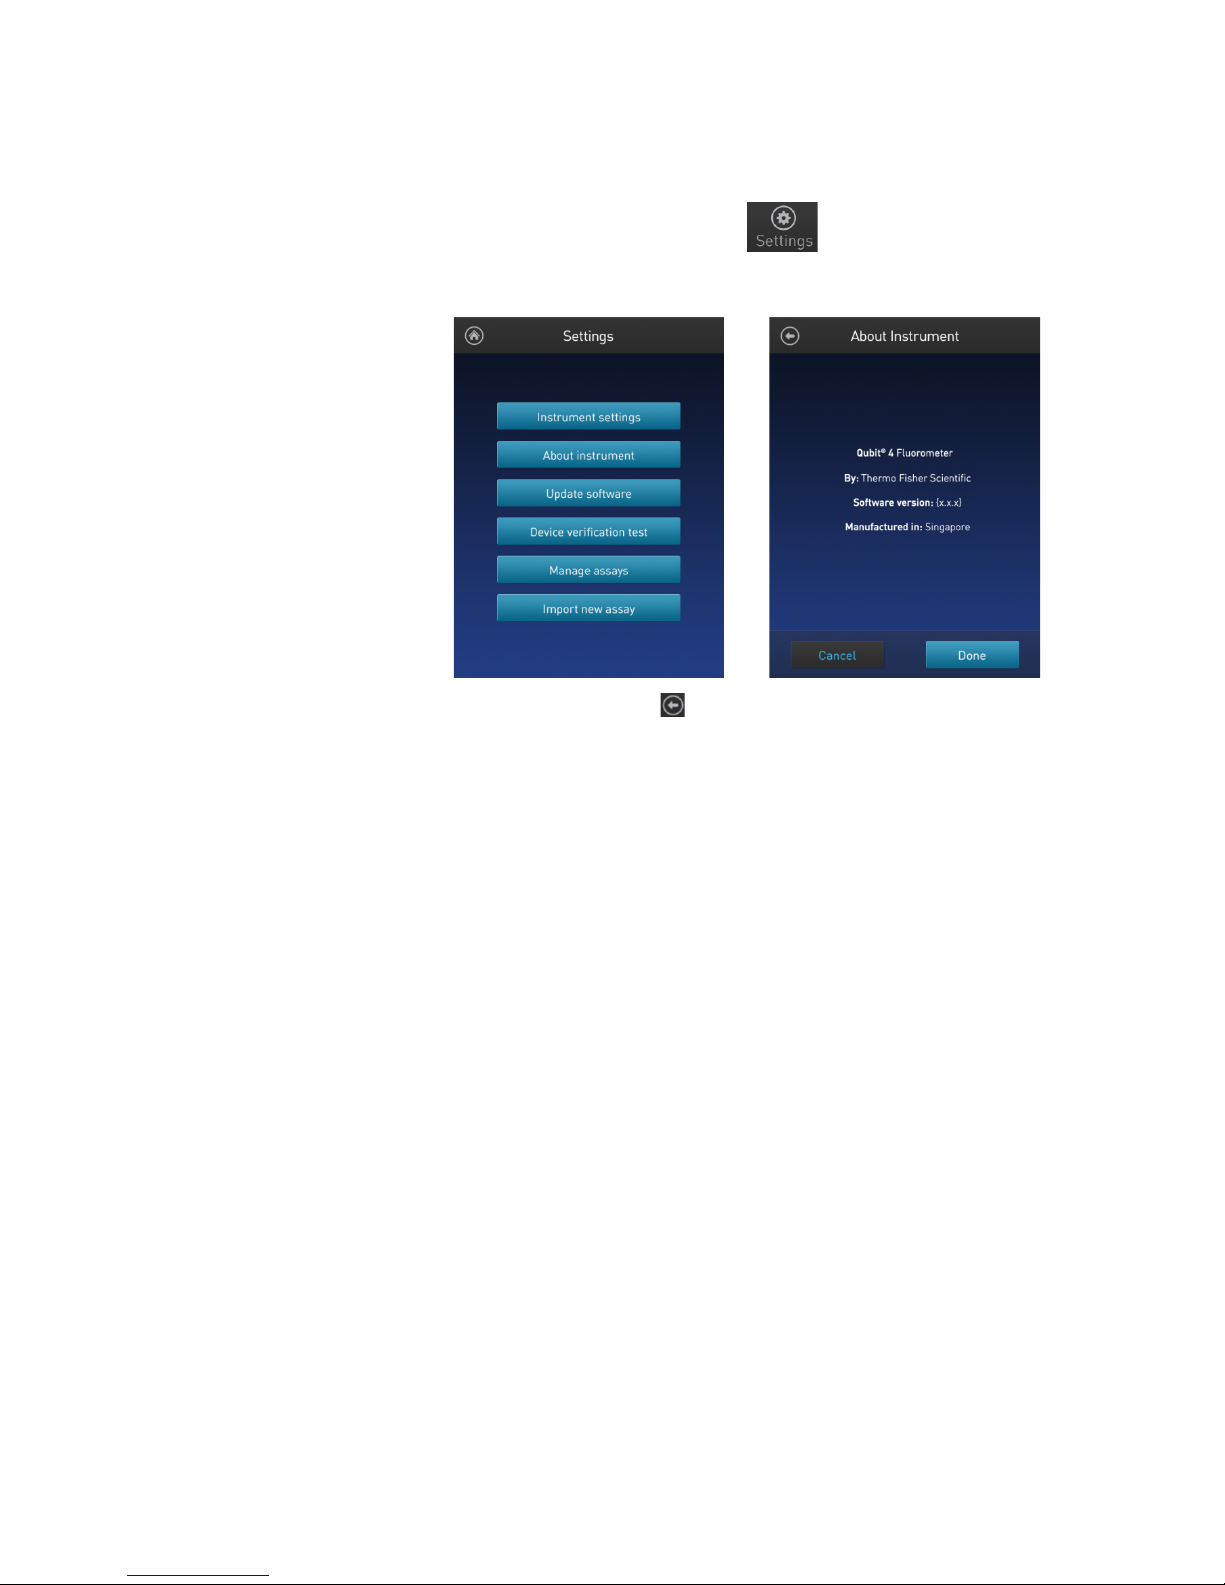
The About Instrument screen displays information about your Qubit™ 4 Fluorometer,
3. Press Done, Cancel, or Back ( ) to return to the Settings screen.
including the currently installed software version. To access the About Instrument
screen:
1. On the Home screen, press Settings.
2. On the Settings screen, press About Instrument to display the About
Instrument screen.
10
Qubit™ 4 Fluorometer User Guide
Page 13

Introduction
You can configure the following instrument settings for the Qubit™ 4 Fluorometer:
Language (page 15)
Access the
1. On the Home screen, press Settings.
Optional
: Configure instrument settings
Instrument settings
screen
• Sleep mode (page 12)
• Brightness (page 12)
• Date/Time (page 13)
• Reset instrument (page 14)
•
2. On the Settings screen, press Instrument settings to display the
Instrument settings screen.
Qubit™ 4 Fluorometer User Guide
11
Page 14

Adjust the sleep
mode
The Qubit™ 4 Fluorometer has a sleep mode (i.e., automatic standby) that is
The
saving the changes.
Adjust screen
1. On the Instrument settings screen (page 11), press Brightness to display the
saving the changes.
triggered by inactivity. The system default is 10 minutes of inactivity before the
instrument goes into sleep mode. To adjust this time:
1. On the Instrument settings screen (page 11), press Sleep mode to display the
Sleep mode screen.
2. Enter the time in minutes allowed before the instrument goes into sleep mode
by pressing the minutes field, then using the number pad to select a value.
software requires a minimum of 1 minute and a maximum of 60 minutes.
3. Press Done to save the changes and return to the Instrument settings screen.
Press Cancel or Back ( ) to return to the Instrument settings screen without
brightness
Brightness screen.
2. Move the slider button up or down to adjust the brightness of the display.
3. Press Done to save the changes and return to the Instrument settings screen.
Press Cancel or Back ( ) to return to the Instrument settings screen without
12
Qubit™ 4 Fluorometer User Guide
Page 15
Adjust the date and
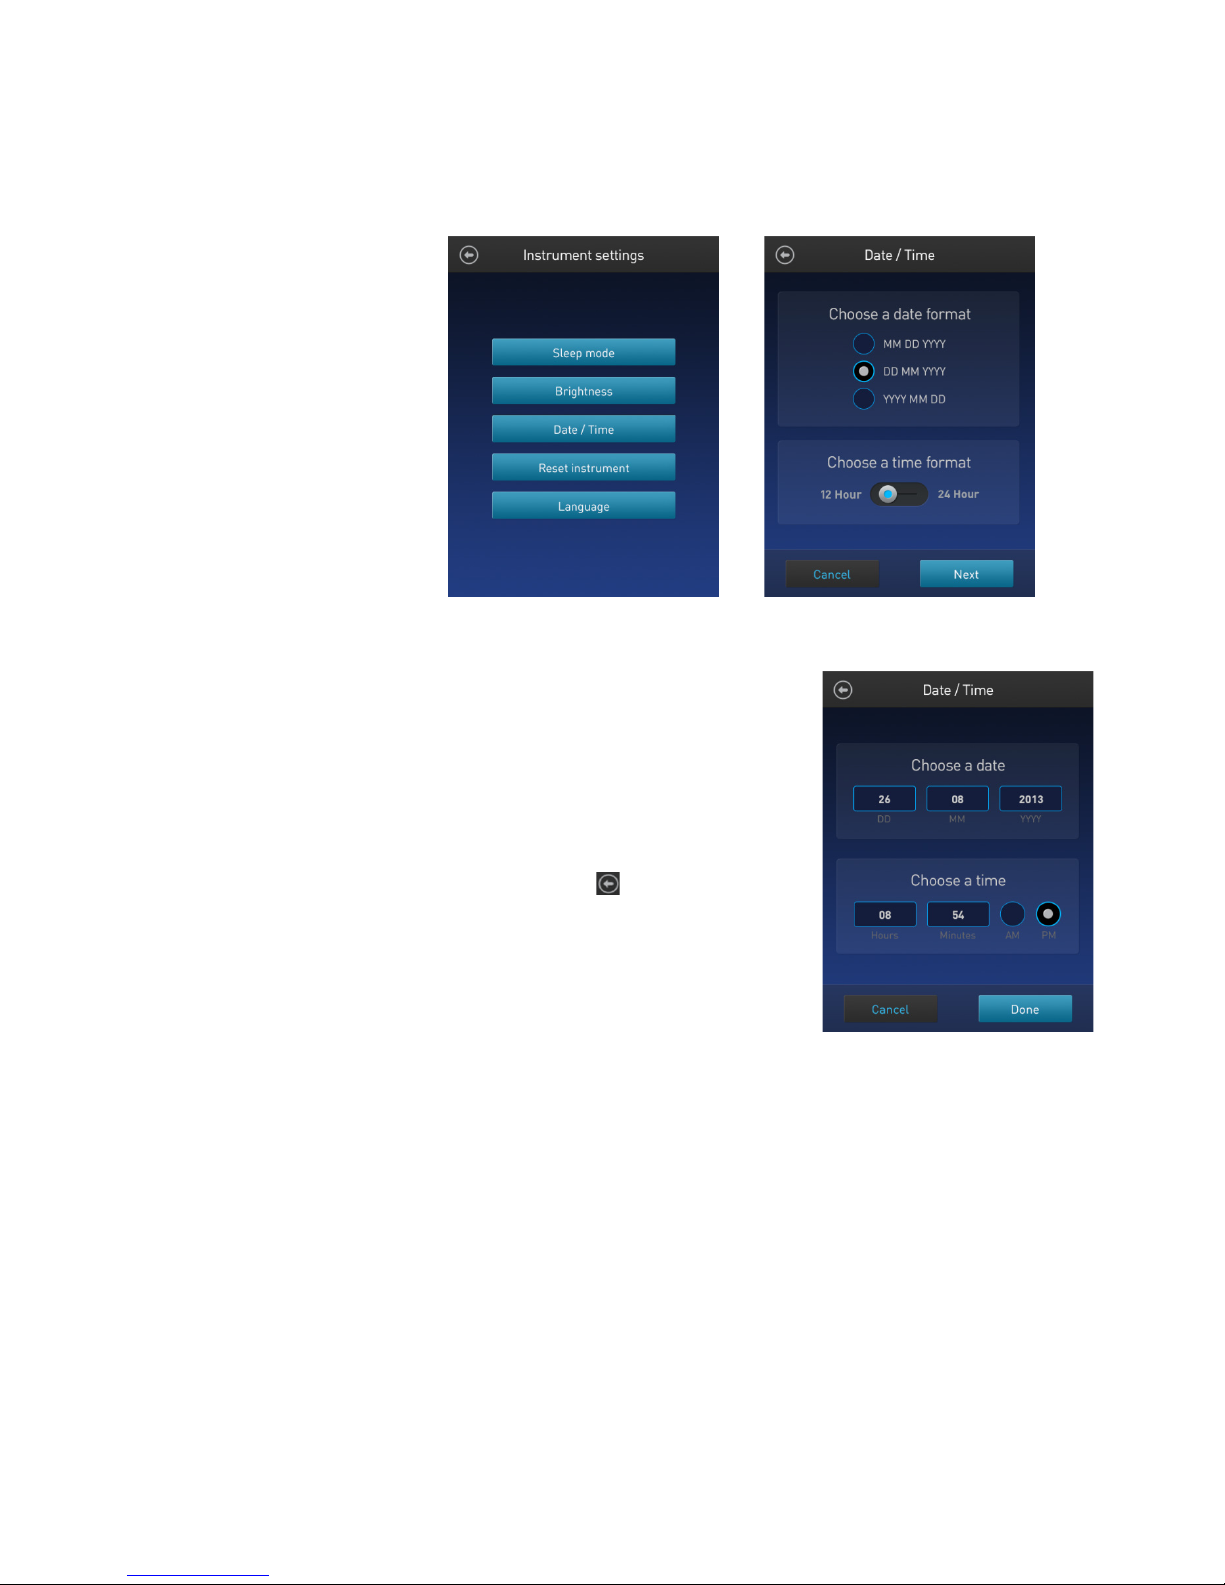
The date and time are preset when you receive the instrument. To adjust the date
time
and time:
1. On the Instrument settings screen (page 11), press Date/Time.
2. Select a date format, select a time format, then press Next.
3. Enter the date and time:
a. Press a date field (day, month, or year),
then use the number pad to select a value.
b. Press a time field (hours or minutes),
then use the number pad to select a value.
c. Select AM or PM.
4. Press Done to save the changes and return to
the Instrument settings screen.
Press Cancel or Back ( ) to return to the
Instrument settings screen without saving the
changes.
Qubit™ 4 Fluorometer User Guide
13
Page 16
Reset function
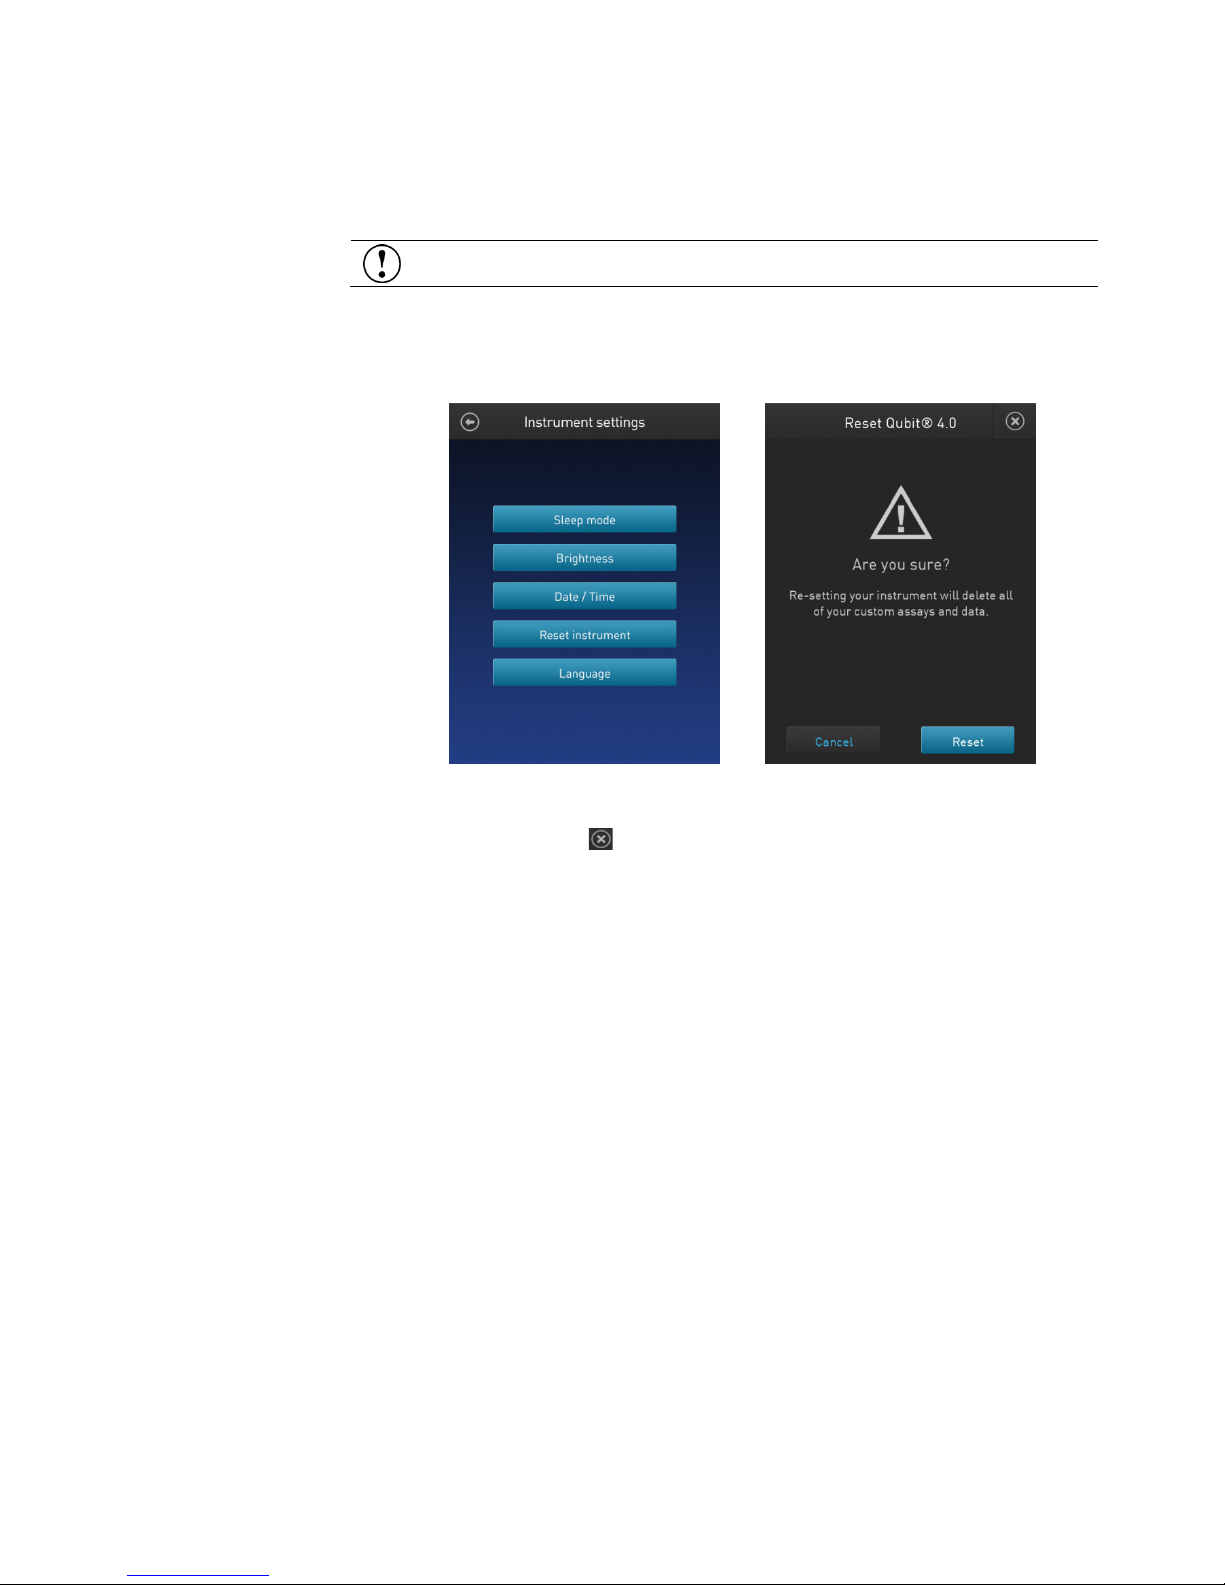
The Reset function returns the Qubit™ 4 Fluorometer to its default factory
settings, erasing all saved data, user–defined instrument settings, and custom
assays.
To return the instrument to its default factory settings:
saving the changes.
IMPORTANT! The reset function is not reversible.
1. On the Instrument settings screen (page 11), press Reset instrument to display
™
the Reset Qubit
4 screen.
2. Press Reset. After the reset is complete, the Home screen is displayed. All
data, user–defined instrument settings, and custom assays are removed.
Press Cancel or Exit ( ) to return to the Instrument settings screen without
14
Qubit™ 4 Fluorometer User Guide
Page 17
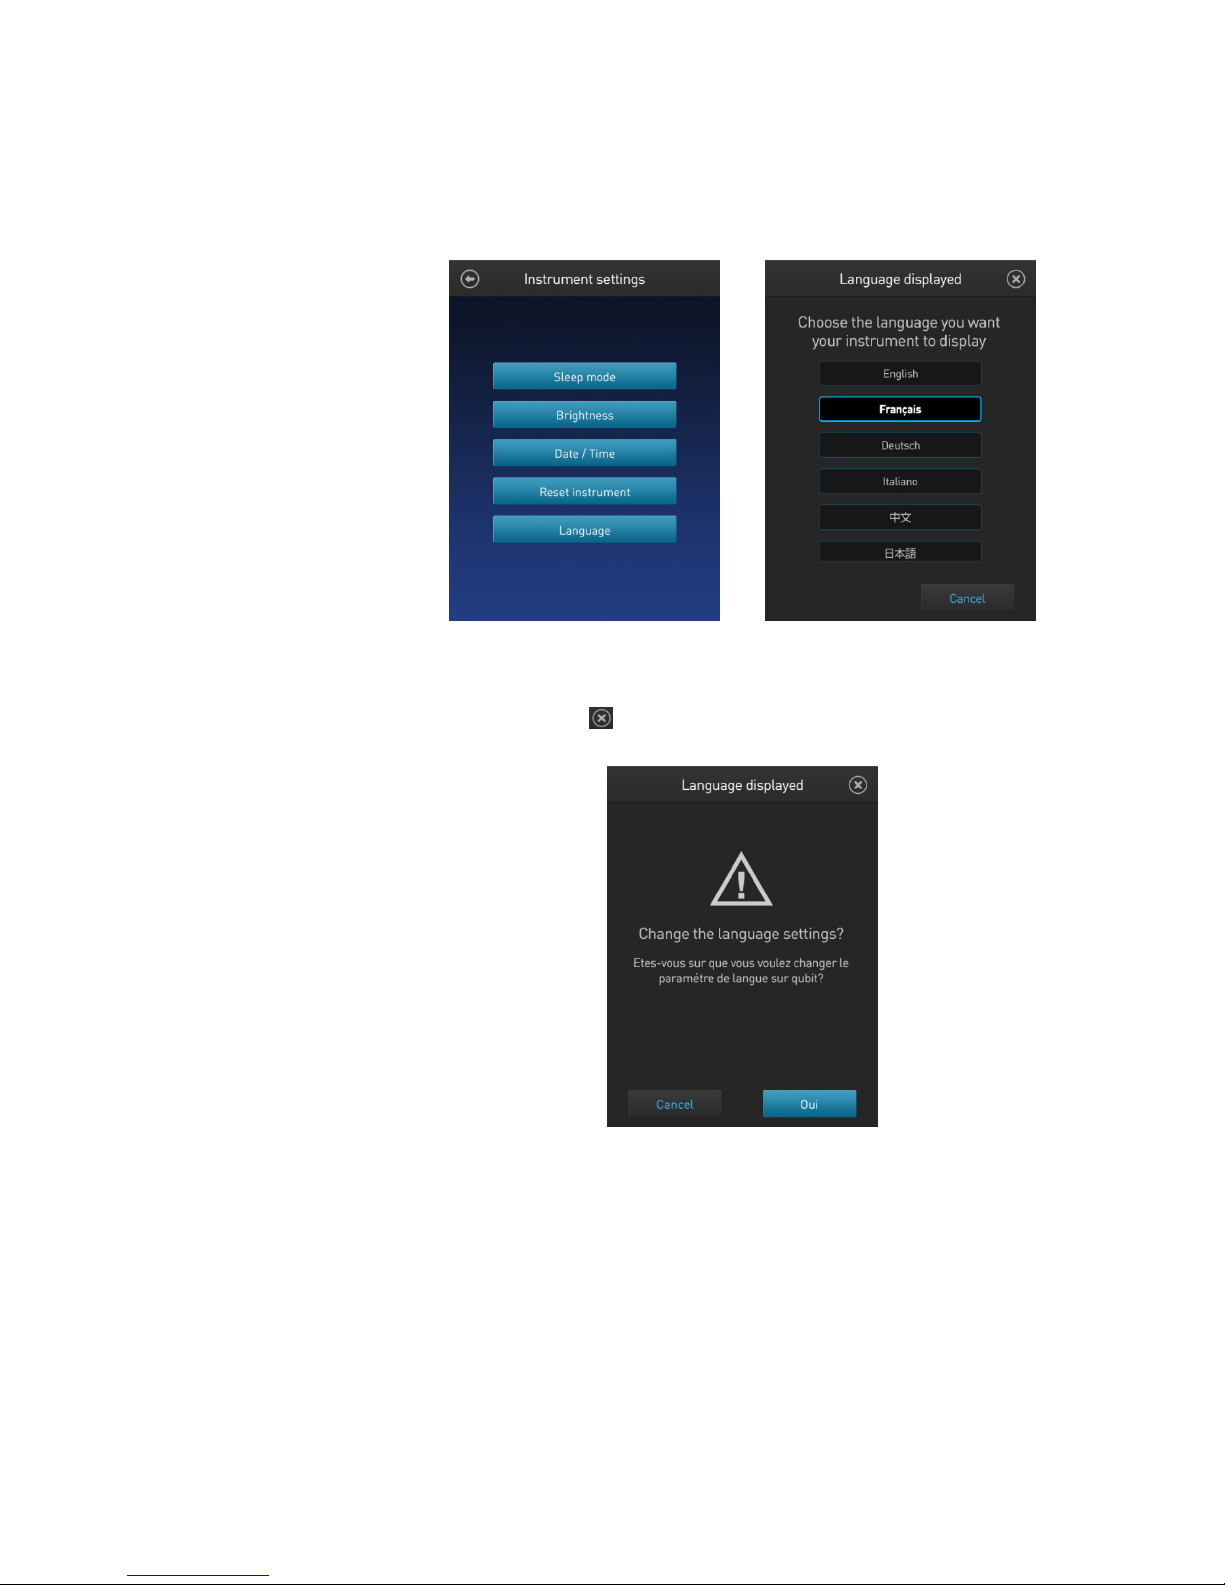
Change the display
language
You can change the language that the Qubit™ 4 Fluorometer displays to English
1. On the Instrument settings screen (page 11), press Language to display the
(default), French, German, Italian, Spanish, simplified Chinese, and Japanese.
Language screen.
2. Select a language, then press Next.
3. Press Yes to confirm the change and return to the Instrument settings screen.
Press Cancel or Exit ( ) to return to the Instrument settings screen without
saving the changes.
Qubit™ 4 Fluorometer User Guide
15
Page 18

Guidelines for using the Qubit™ 4 Fluorometer
Recommendations
To obtain the best results, follow the recommendations below. For more
been tested using the Qubit™ 4 Fluorometer.
Assay tubes for the
Fluorometer
Only thin-wall, clear 0.5-mL PCR tubes are appropriate for use in the Qubit™ 4
information, see “Critical Qubit™ Assay considerations”, page 57.
• Do not operate the instrument in direct sunlight.
• Wear gloves during sample handling.
• Use the instrument at room temperature only (22–28ºC).
• Bring all kit reagents to room temperature and insert all assay tubes into the
instrument only for as much time as it takes for the instrument to measure the
fluorescence.
• Do not hold the assay tubes in your hand before performing a measurement.
• Make sure that you have calibrated the Qubit
appropriate standards.
™
• Incubate the tubes for the Qubit
mixing the sample or standard with the working solution.
• Incubate the tubes for the Qubit
the sample or standard with the working solution.
• If you are performing multiple readings of a single tube, remove the tube
from the instrument and let it equilibrate to room temperature for 30 seconds
before taking another reading.
Note: Multiple readings of RNA samples is not recommended.
• Visit thermofisher.com/qubit
citations, software updates, and a list of validated Qubit
DNA and RNA assays for 2 minutes after
™
protein assays for 15 minutes after mixing
for additional application notes, technical notes,
™
4 Fluorometer using the
™
assays that have
Qubit™ 4
Fluorometer. Acceptable tubes include Qubit™ assay tubes (Cat. No. Q32856,
500 tubes). The minimum assay volume must be 200 µL for an accurate read.
16
Qubit™ 4 Fluorometer User Guide
Page 19
This section provides instructions for using the Reagent Calculator, running new
using a Qubit
assay kit.
Materials needed
•
Appropriate standards for the assay you are performing
instrument or available separately
Overview
3. Perform assays
calibration standards or for using the last calibration, and for reading the samples
™
A Qubit™ assay kit appropriate for quantifying your samples (see page 59 for
™
available Qubit
assay kits and ordering information)
• DNA, RNA, or protein samples
™
• Qubit
assay tubes or other appropriate 0.5-mL assay tubes
•
Note: For instructions on the preparation of these standards, see the
instructions that accompany the assay you are using or the Qubit
™
4
Fluorometer Quick Reference Card (QRC) (Pub. No. MAN0017210).
• (Optional) USB drive or USB cable for data transfer, supplied with the
Qubit™ 4 Fluorometer User Guide
17
Page 20
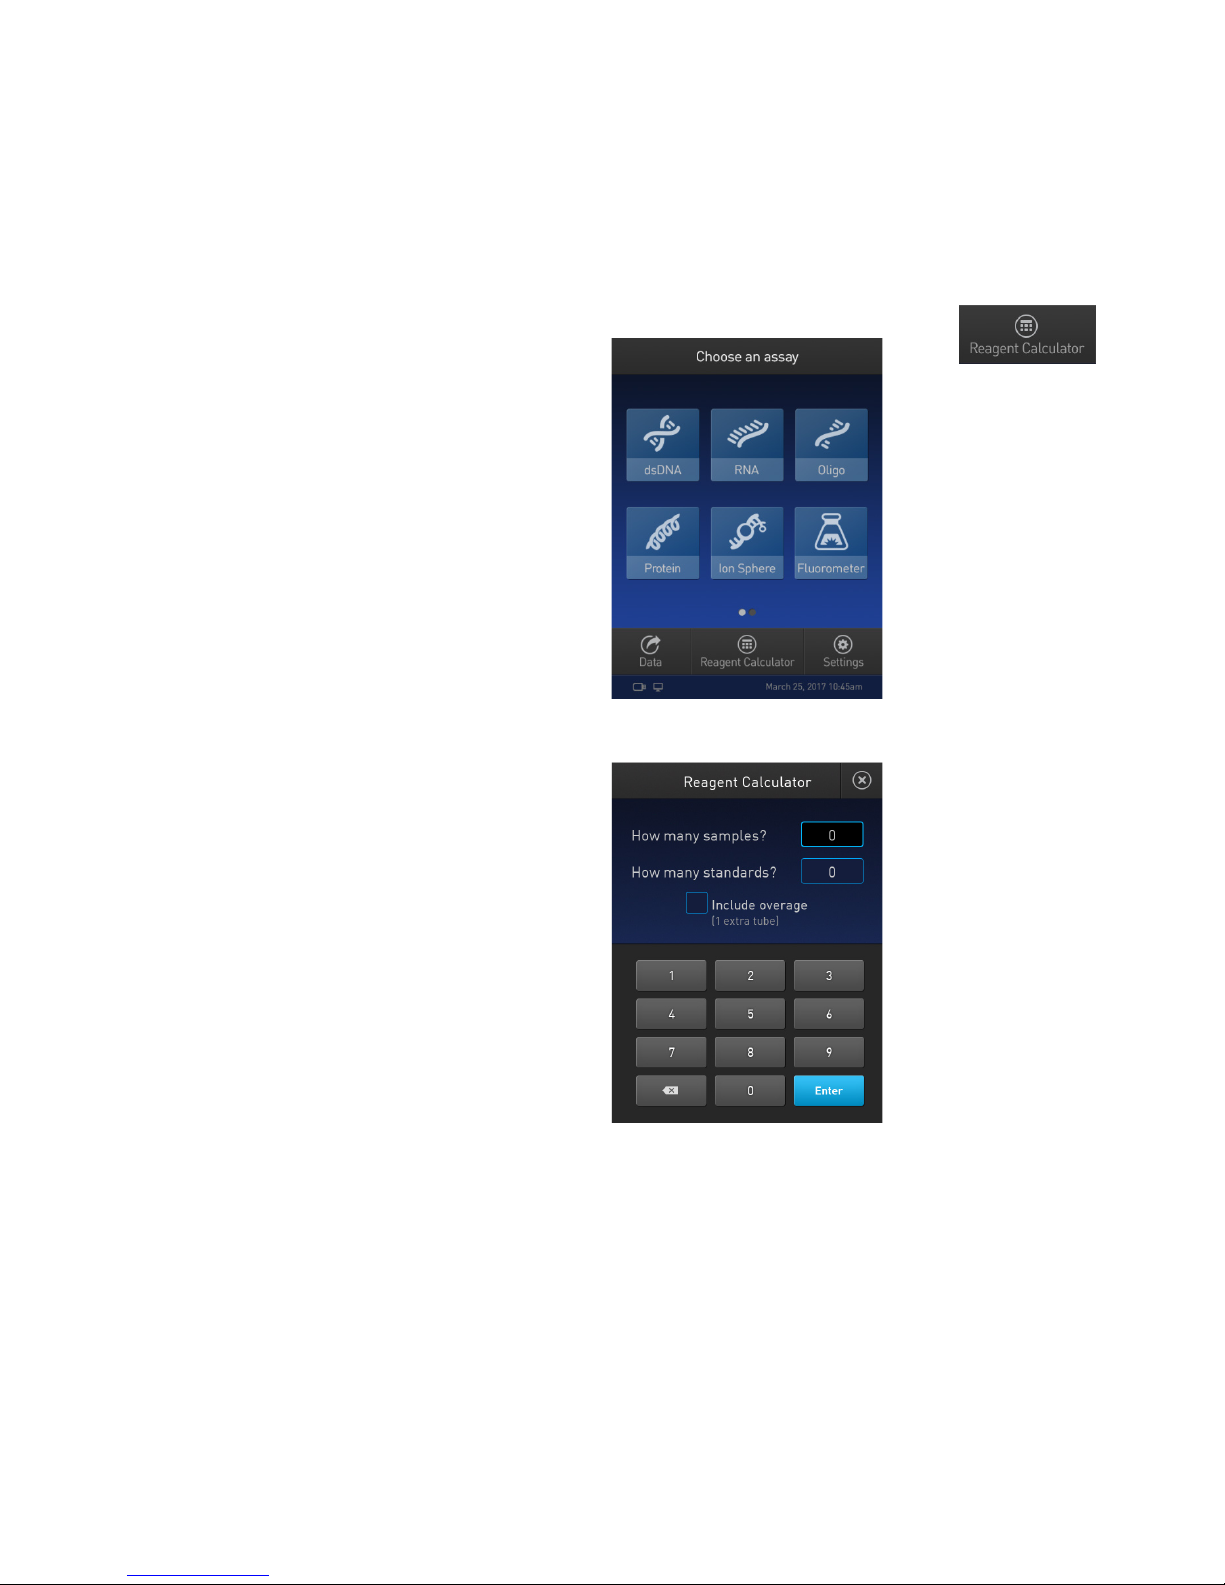
Optional
Introduction
Use the on-board Reagent Calculator to quickly determine the correct amount of
Working Solution required to prepare your samples and standards.
Use the Reagent
1. On the Home screen, press Reagent Calculator.
: Use Reagent Calculator to prepare Qubit™ Working Solution
Qubit™ dye and buffer required to make the appropriate amount of Qubit™
Calculator
2. Enter the total number of samples and standards that you will be running on
the Qubit
™
4 Fluorometer.
3. Optional: Press the check box for overage if you want to include an additional
tube in the total calculated volume.
18
Qubit™ 4 Fluorometer User Guide
Page 21
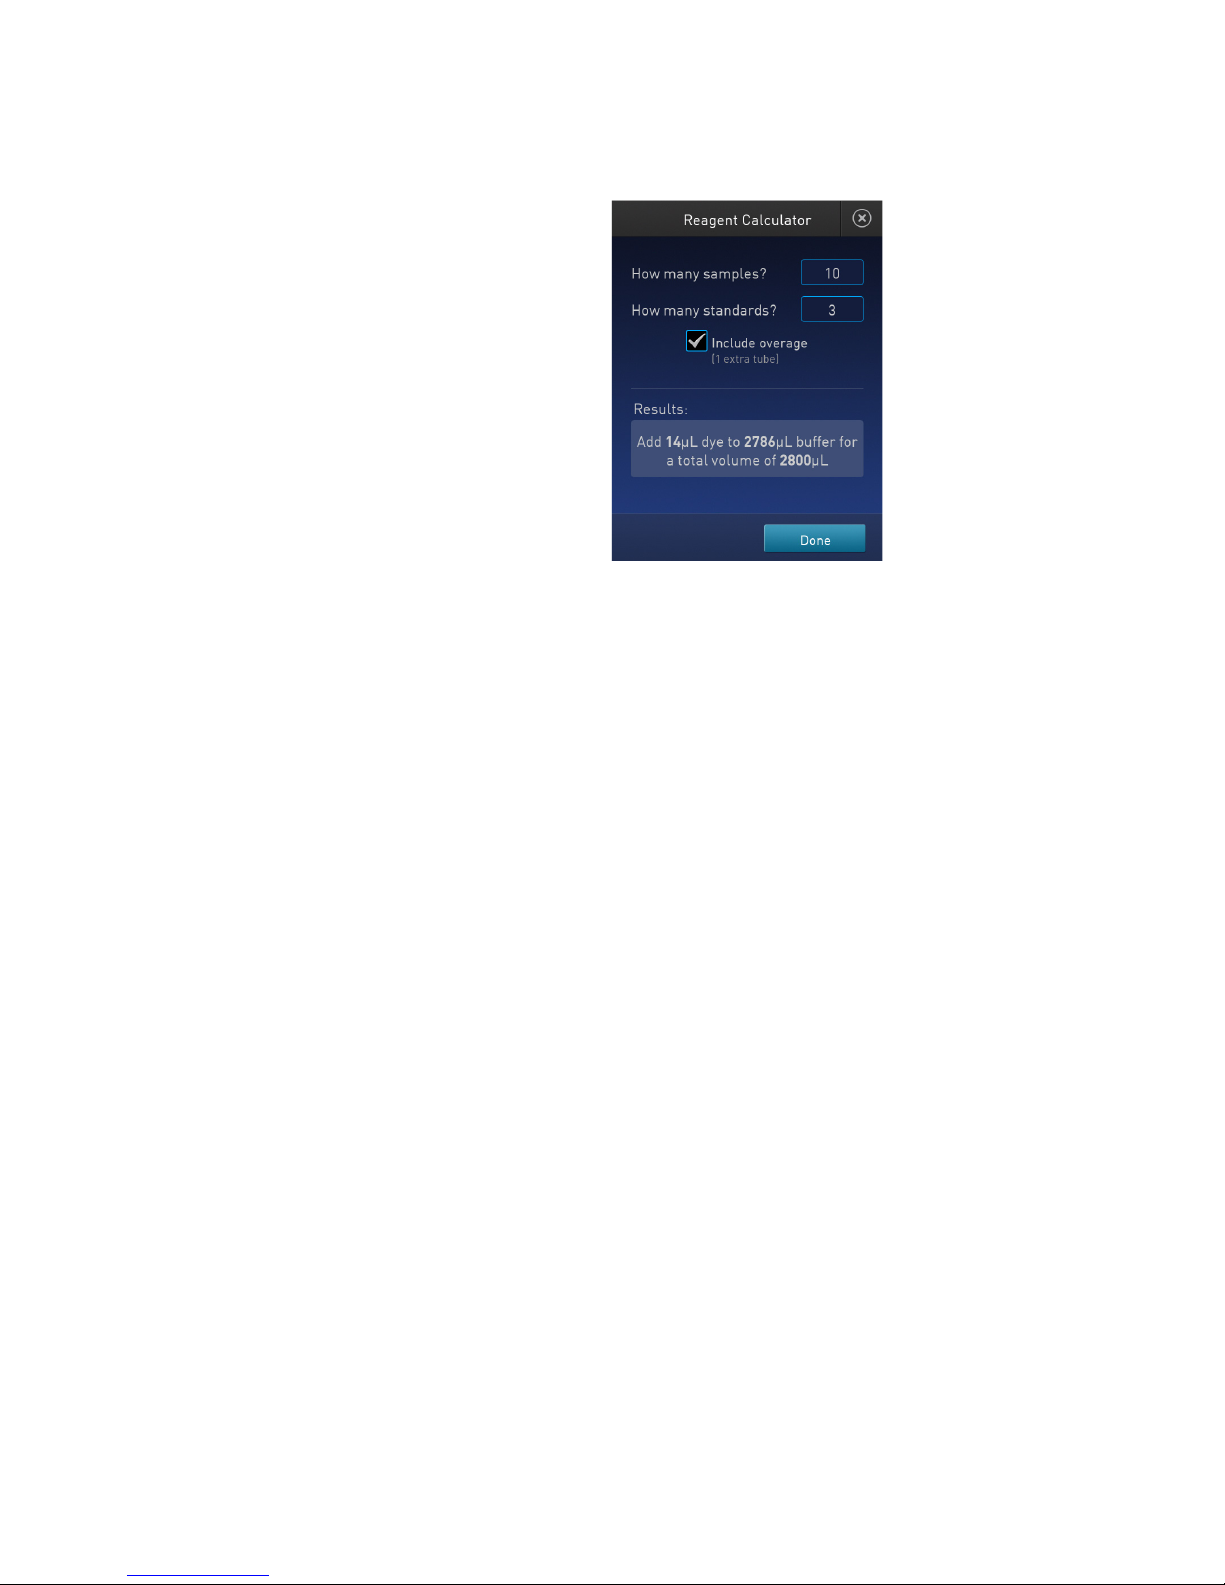
4. Press Enter to calculate the amount of Qubit™ dye and buffer required to
prepare the Qubit™ Working Solution with these inputs.
Note: You can change the total number of tubes that you plan to run or the
overage selection on this screen.
5. Press Done to return to the Home screen to run your Qubit
™
assay.
Qubit™ 4 Fluorometer User Guide
19
Page 22
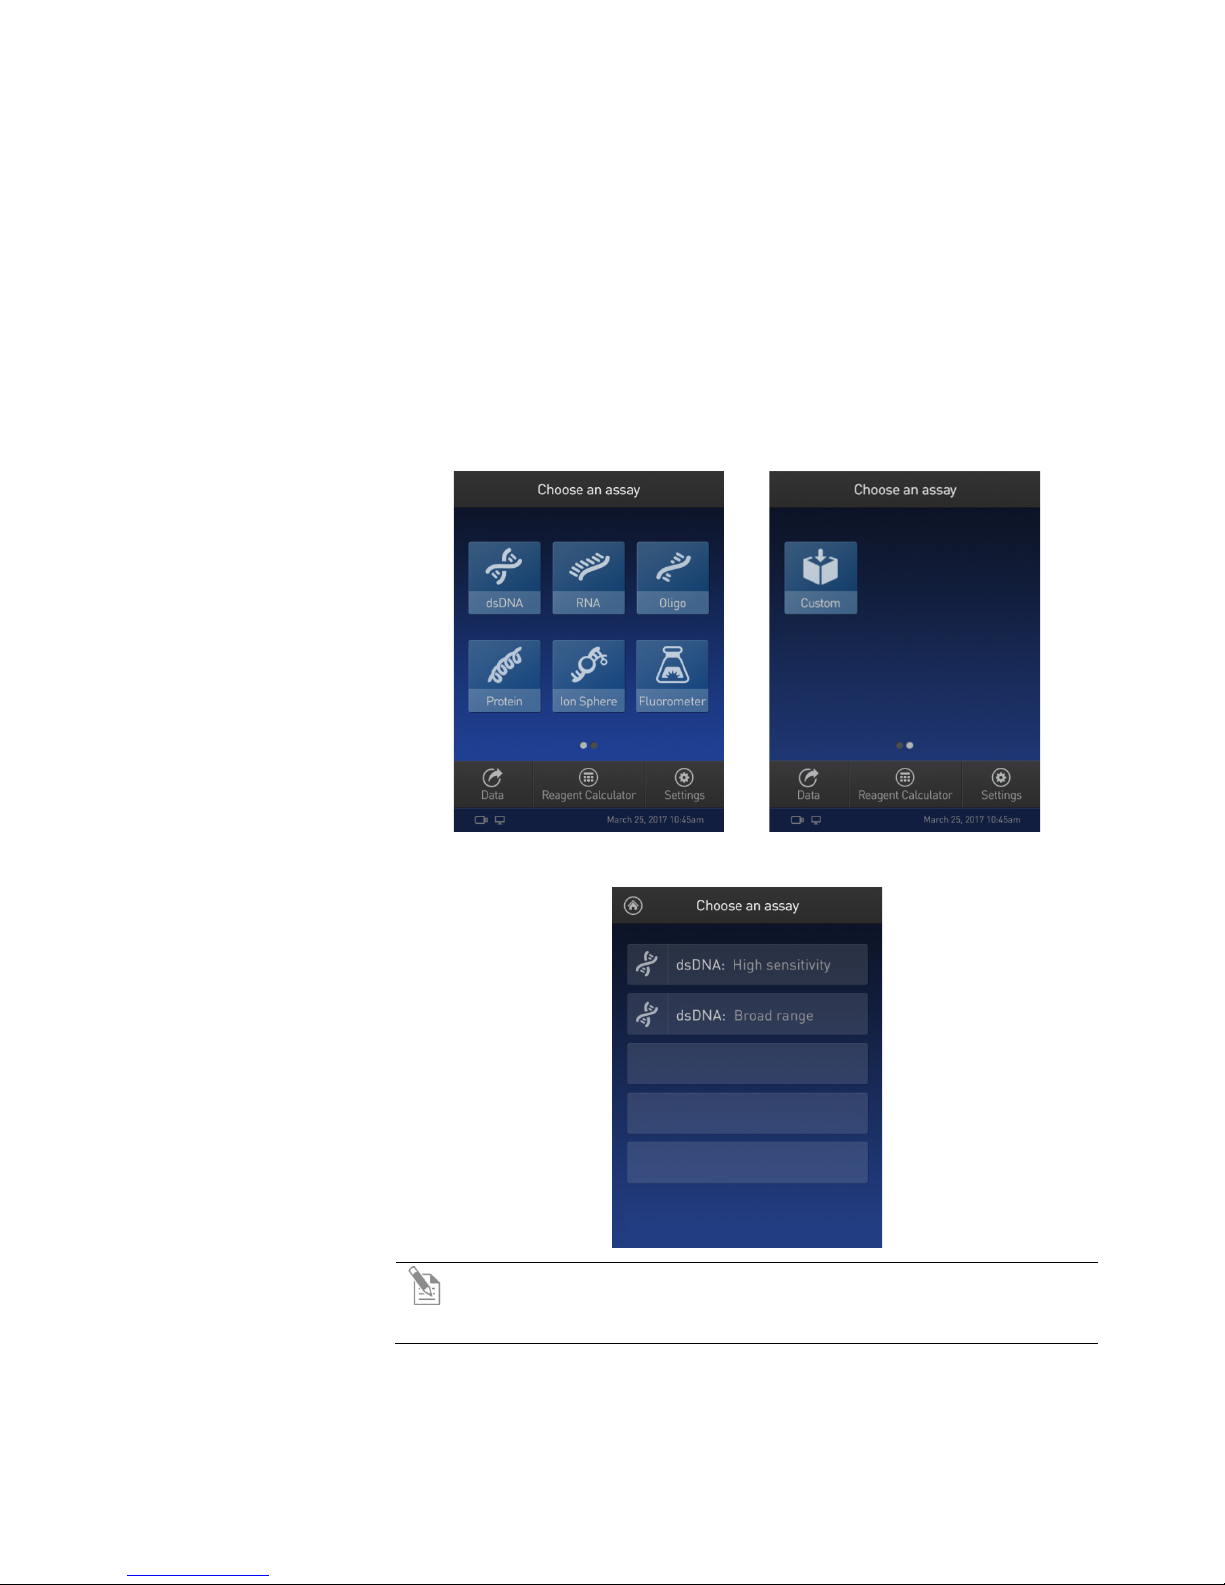
Calibrate assays on the Qubit™ 4 Fluorometer
Introduction
For each assay, you have the choice to run new standards for calibrating the assay
calibration.
Read new
1. On the Home screen, select the assay type for which you wish to read new
2. Select the desired assay.
on the Qubit™ 4 Fluorometer or to use the values from the previous calibration (for
more information, see “
instructions for running new calibration standards and for using the last
Qubit™ 4 Fluorometer”, page 58). This section provides
standards for
calibration
standards.
To go to the second page of available assays, swipe the screen to the right. To
return to the first page, swipe the screen to the left.
Note: The software displays the available assays for the assay type
you selected in step 1. The example in step 2 shows the available
assays for the dsDNA assay type.
20
Qubit™ 4 Fluorometer User Guide
Page 23
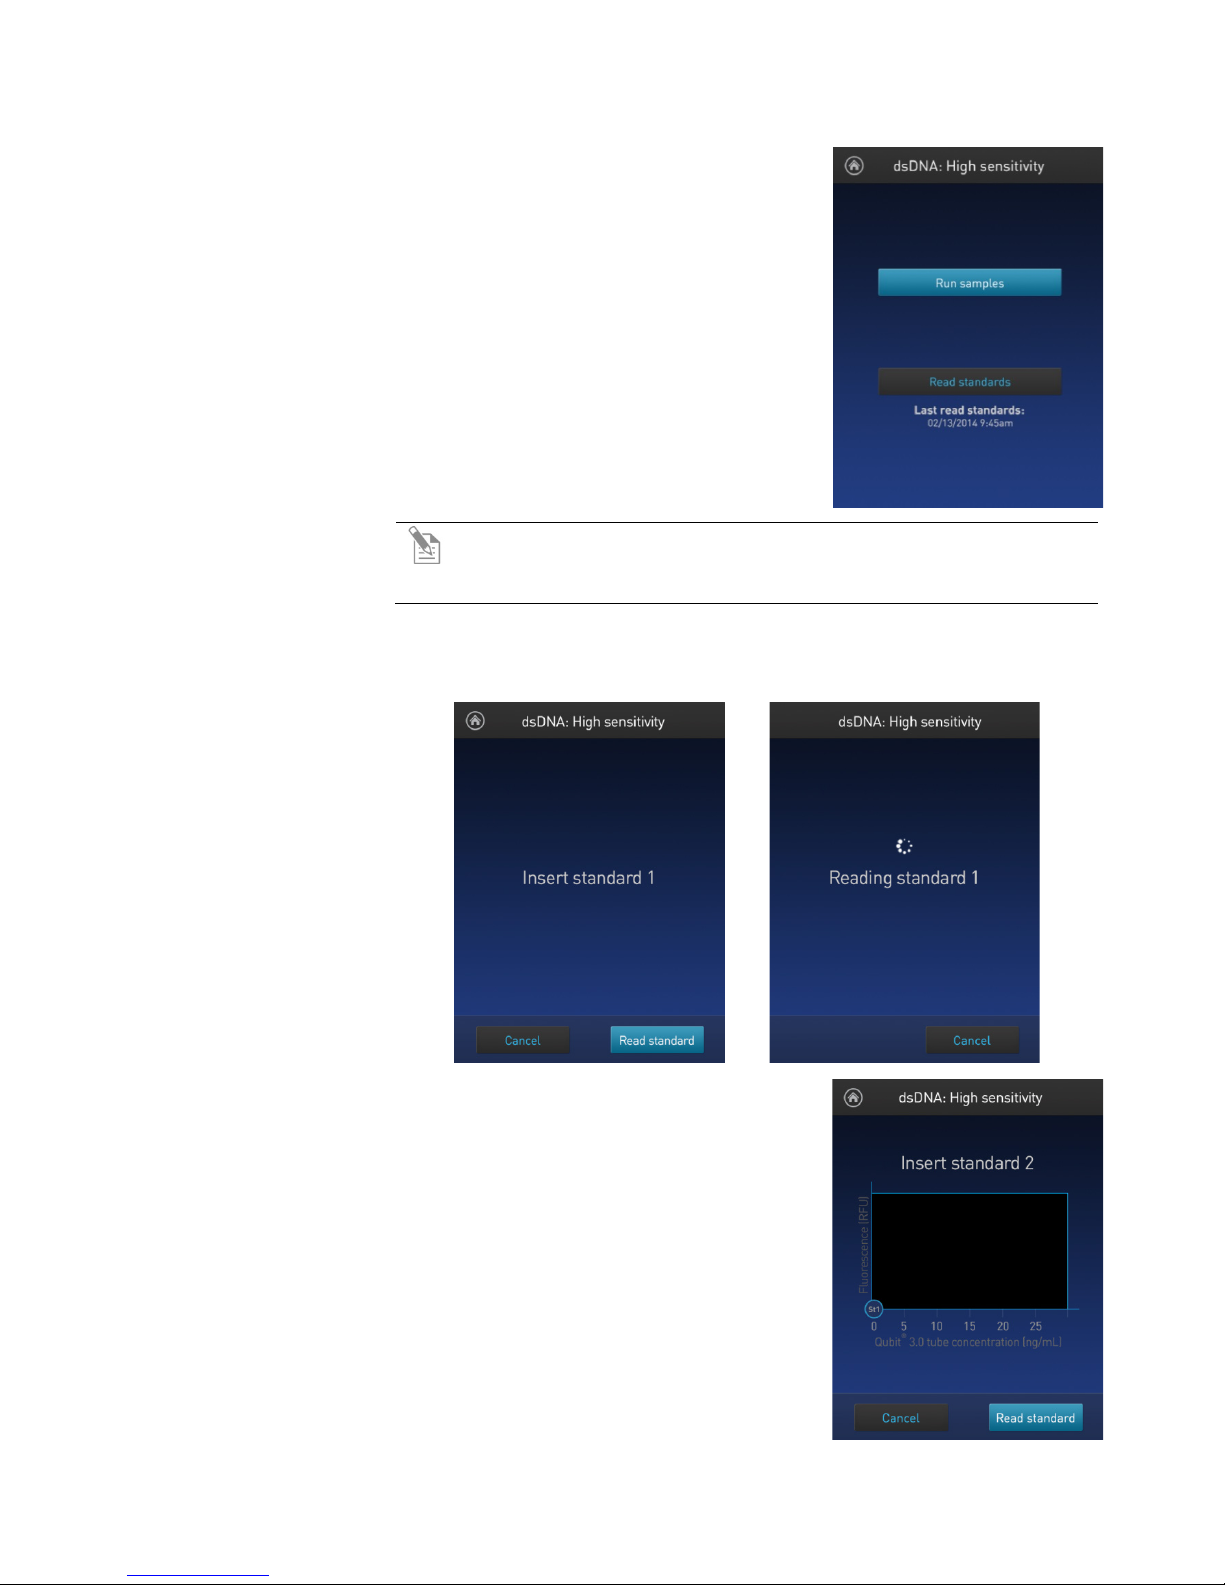
3. If you have already performed a calibration for
5. At the prompt, insert Standard #2 into the
the selected assay, the software prompts you to
choose between reading new standards and
running samples using the previous
calibration. Press Read standards.
Note: To apply the previous calibration to your sample readings,
press Run samples. The software prompts you to insert the assay
tube containing sample. See “Read samples”, page 24.
4. At the prompt, insert Standard #1 into the sample chamber and press Read
standard. Be sure to use the Standard #1 appropriate for the assay you are
performing. The reading takes approximately 3 seconds.
sample chamber and press Read standard.
Be sure to use the Standard #2 appropriate for
the assay you are performing.
6. For Qubit
the prompt, insert Standard #3 into the sample
chamber and press Read standard.
7. The calibration is complete after Standard #2 is
read (or after Standard #3 is read for the
Qubit
software displays the results.
Qubit™ 4 Fluorometer User Guide
21
™
protein and RNA IQ assays only: At
™
protein or RNA IQ assay). The
Page 24
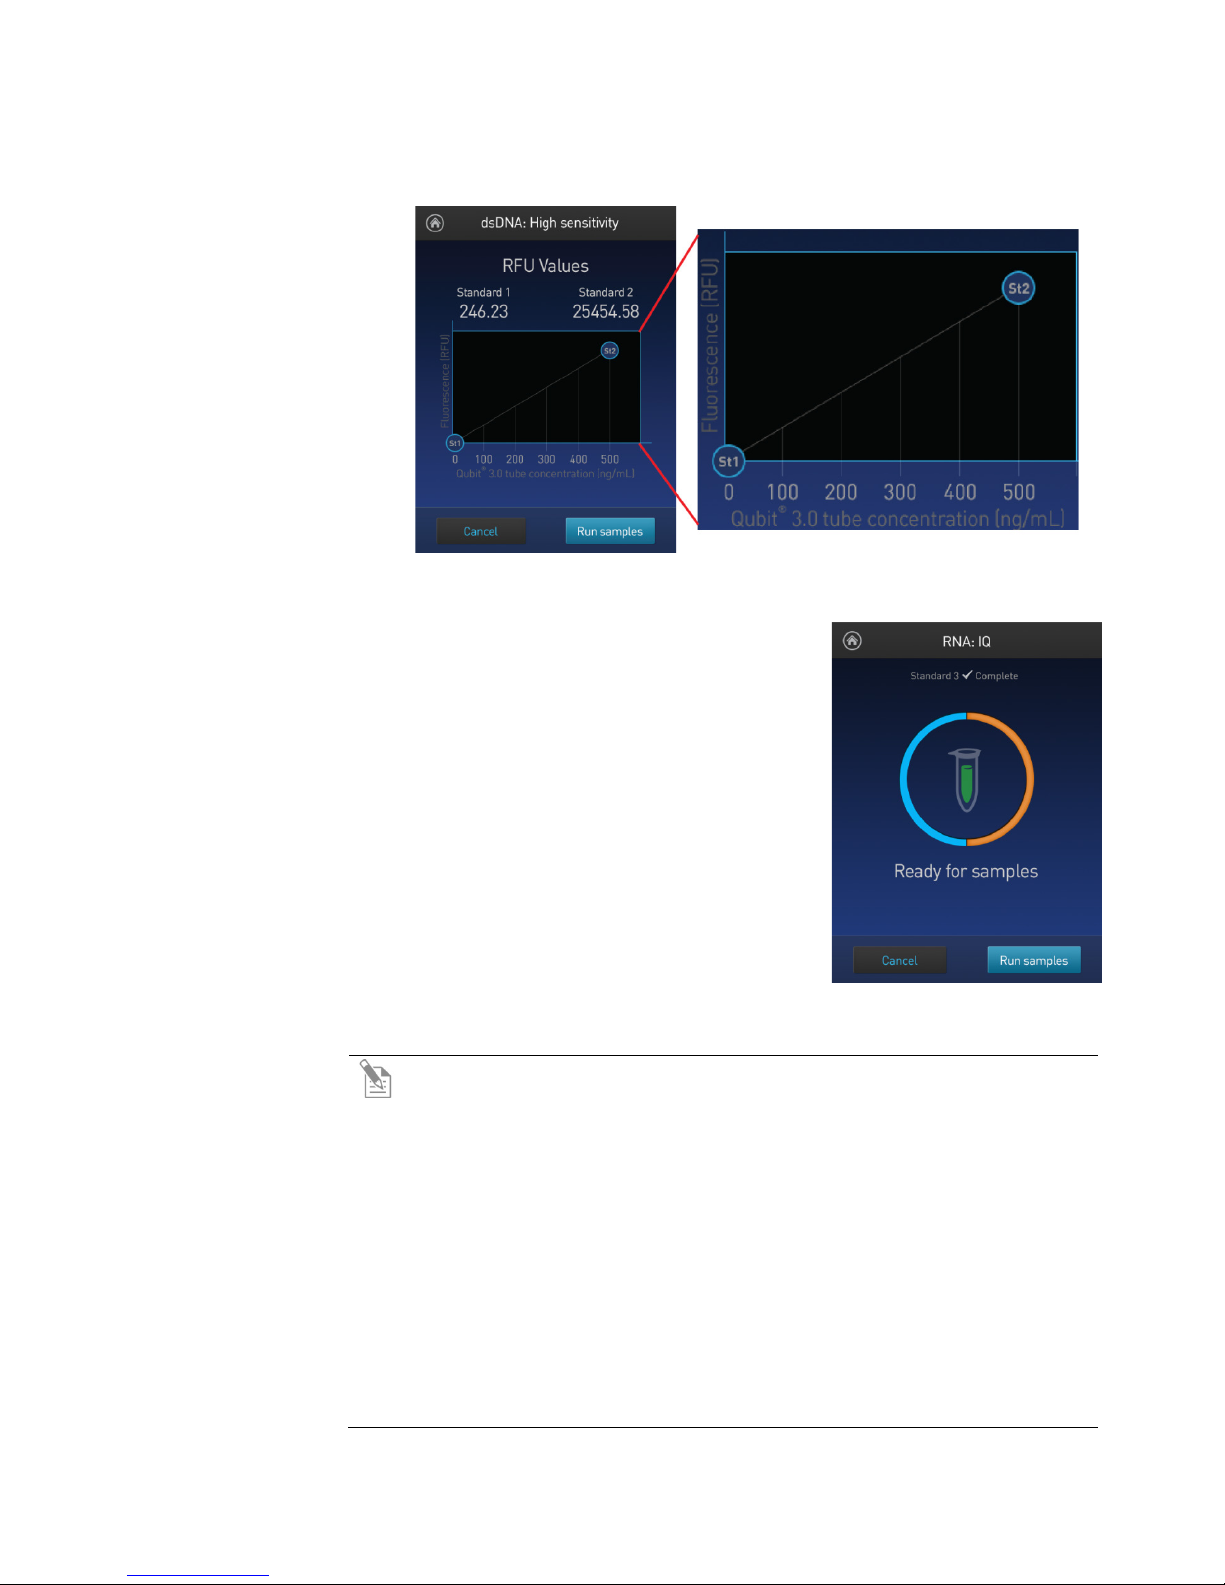
Calibration results
•
message (page 23).
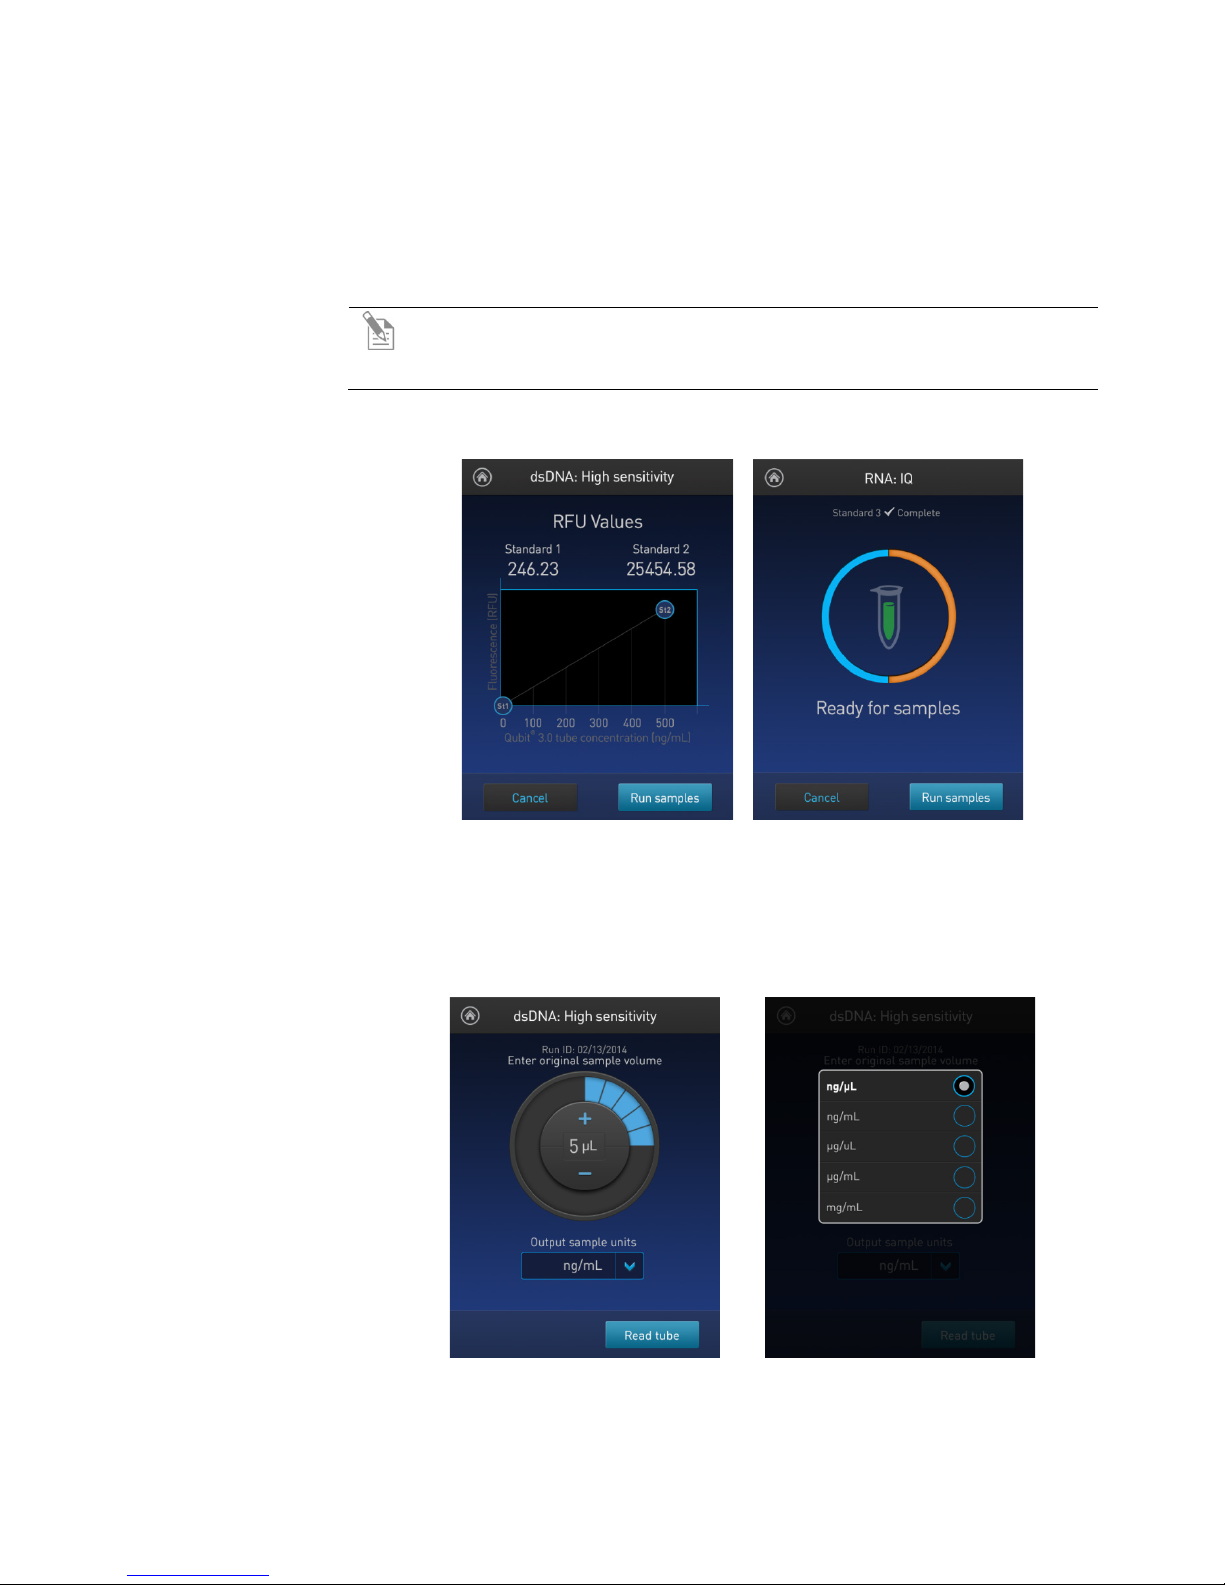
For Qubit™ quantitation assays: If the calibration is successful, the software
displays the Read standard screen with the Fluorescence vs. Concentration graph.
In the Fluorescence vs. Concentration graph, the standard data points are
connected by a line and open circles represent correct standards.
• For the RNA IQ assay: If the calibration is
successful, the software displays the
Ready for samples message.
• If the calibration is not successful, the software displays the Calibration error
Note: The Read standard screen displays the raw fluorescence values for
Standard #1 and Standard #2 (and Standard #3, if applicable). These values
can assist you in making a judgment regarding the calibration results.
For the Qubit
microRNA, Qubit
™
Qubit
™
dsDNA BR, Qubit™ dsDNA HS, Qubit™ ssDNA, Qubit™
™
RNA HS, Qubit™ RNA BR, Qubit™ RNA XR, and
protein assays, the reading given by Standard #2 should be at least
ten times higher than that of Standard #1.
For the Qubit
™
protein assay, the reading given by Standard #3 should be
at least 40% higher than that of Standard #2.
For the Qubit
™
RNA IQ assay, the instrument verifies the calibration
parameters at each stage of the three point calibration process, confirming
the appropriate response of the assay to the standards provided in the kit.
If any issues arise during calibration, the instrument will guide you to
appropriate actions to correct the issue.
22
Qubit™ 4 Fluorometer User Guide
Page 25
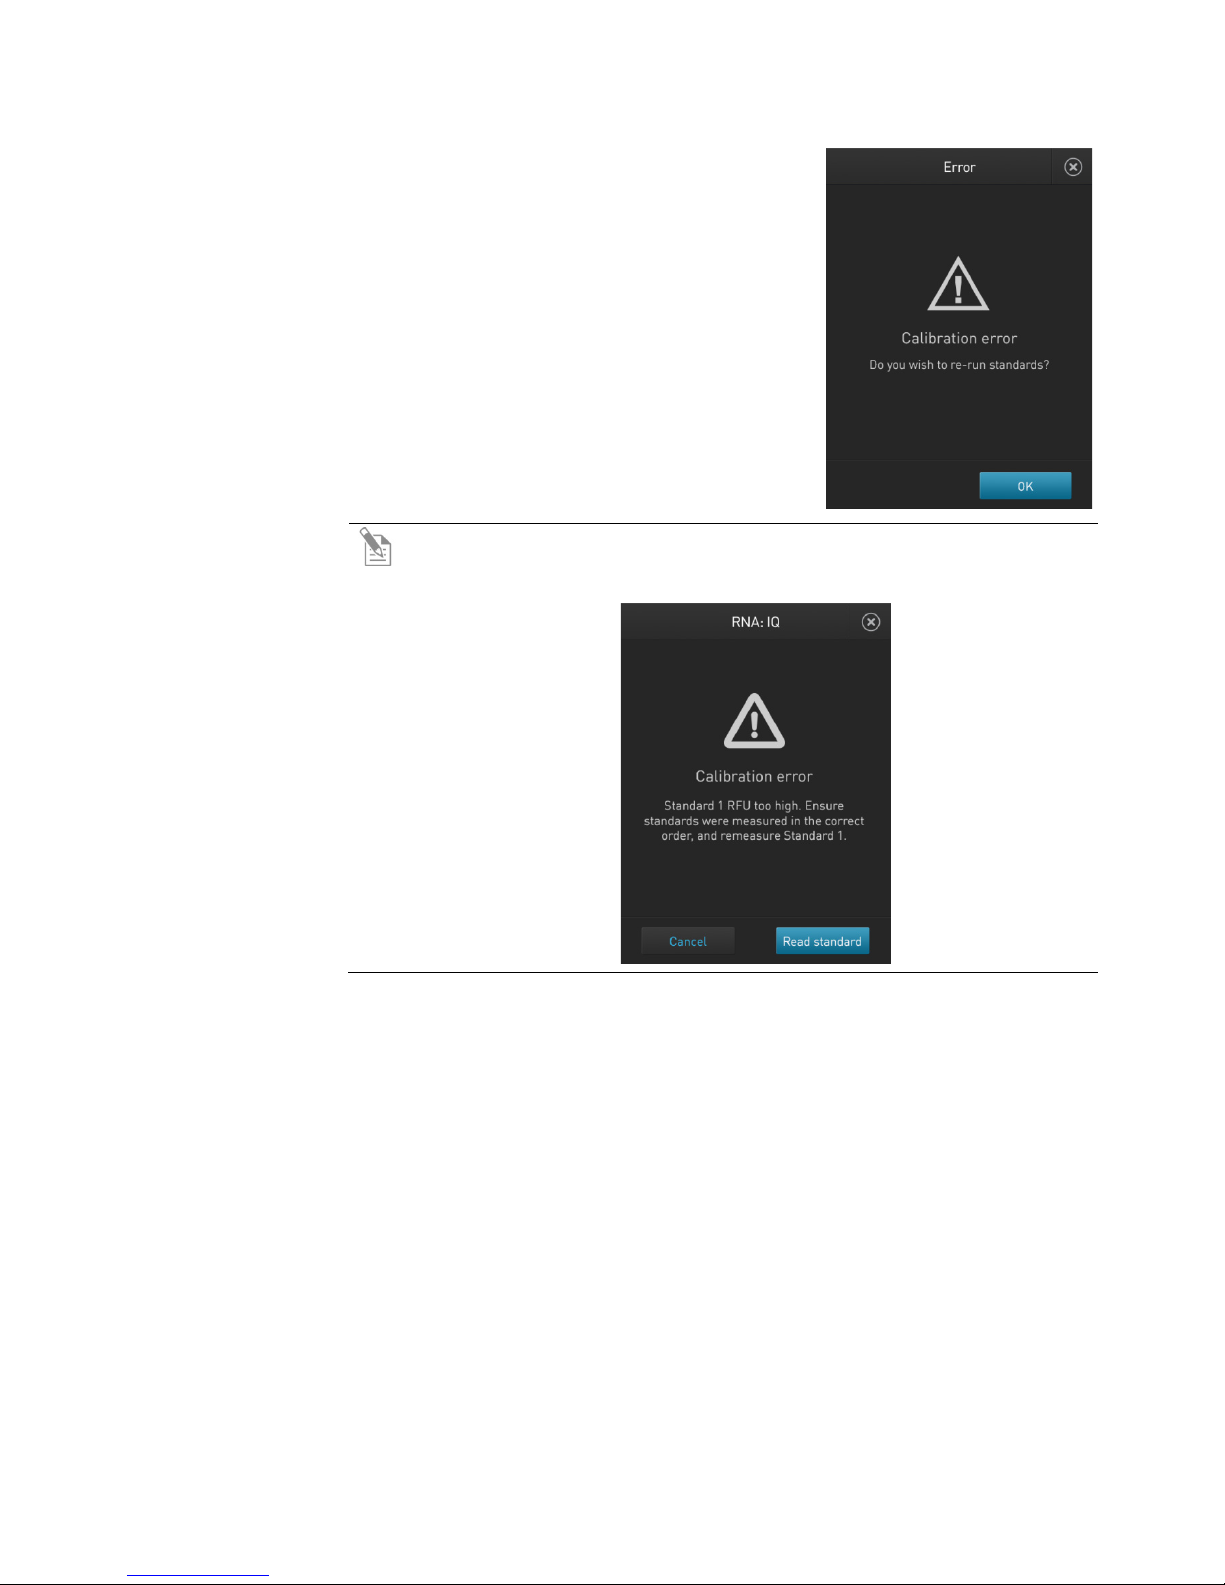
Calibration error
If you receive the “Calibration error” message,
you can re-run the standards:
1. In the Error screen, press OK.
2. Review the Read standard screen (see Note on
page 22).
3. If you wish to re-run the standards, or run
new standards, press Read standards, then
repeat the calibration procedure (beginning
on page 18).
Note: For the RNA IQ assay, specific standards can be re-run depending
on the calibration error. The error message provides guidance on how to
correct the calibration error.
Qubit™ 4 Fluorometer User Guide
23
Page 26
Read samples
Before you begin
•
Prepare the samples. Refer to the instructions provided with the assay.
Read samples
1. In the Read standard (for Qubit™ quantitation assays) or Ready for samples
value (i.e., RNA IQ#) and only sample volume is required.
Calibrate the Qubit™ 4 Fluorometer as described on page 18. (Run the
appropriate standards or accept the values from the previous calibration.)
•
Note: Incubate the samples for the appropriate amount of time after
mixing them with the working solution (2 minutes for the Qubit
and RNA assays, 15 minutes for the Qubit
screen (for Qubit™ RNA IQ assay), press Run samples.
™
protein assay).
™
DNA
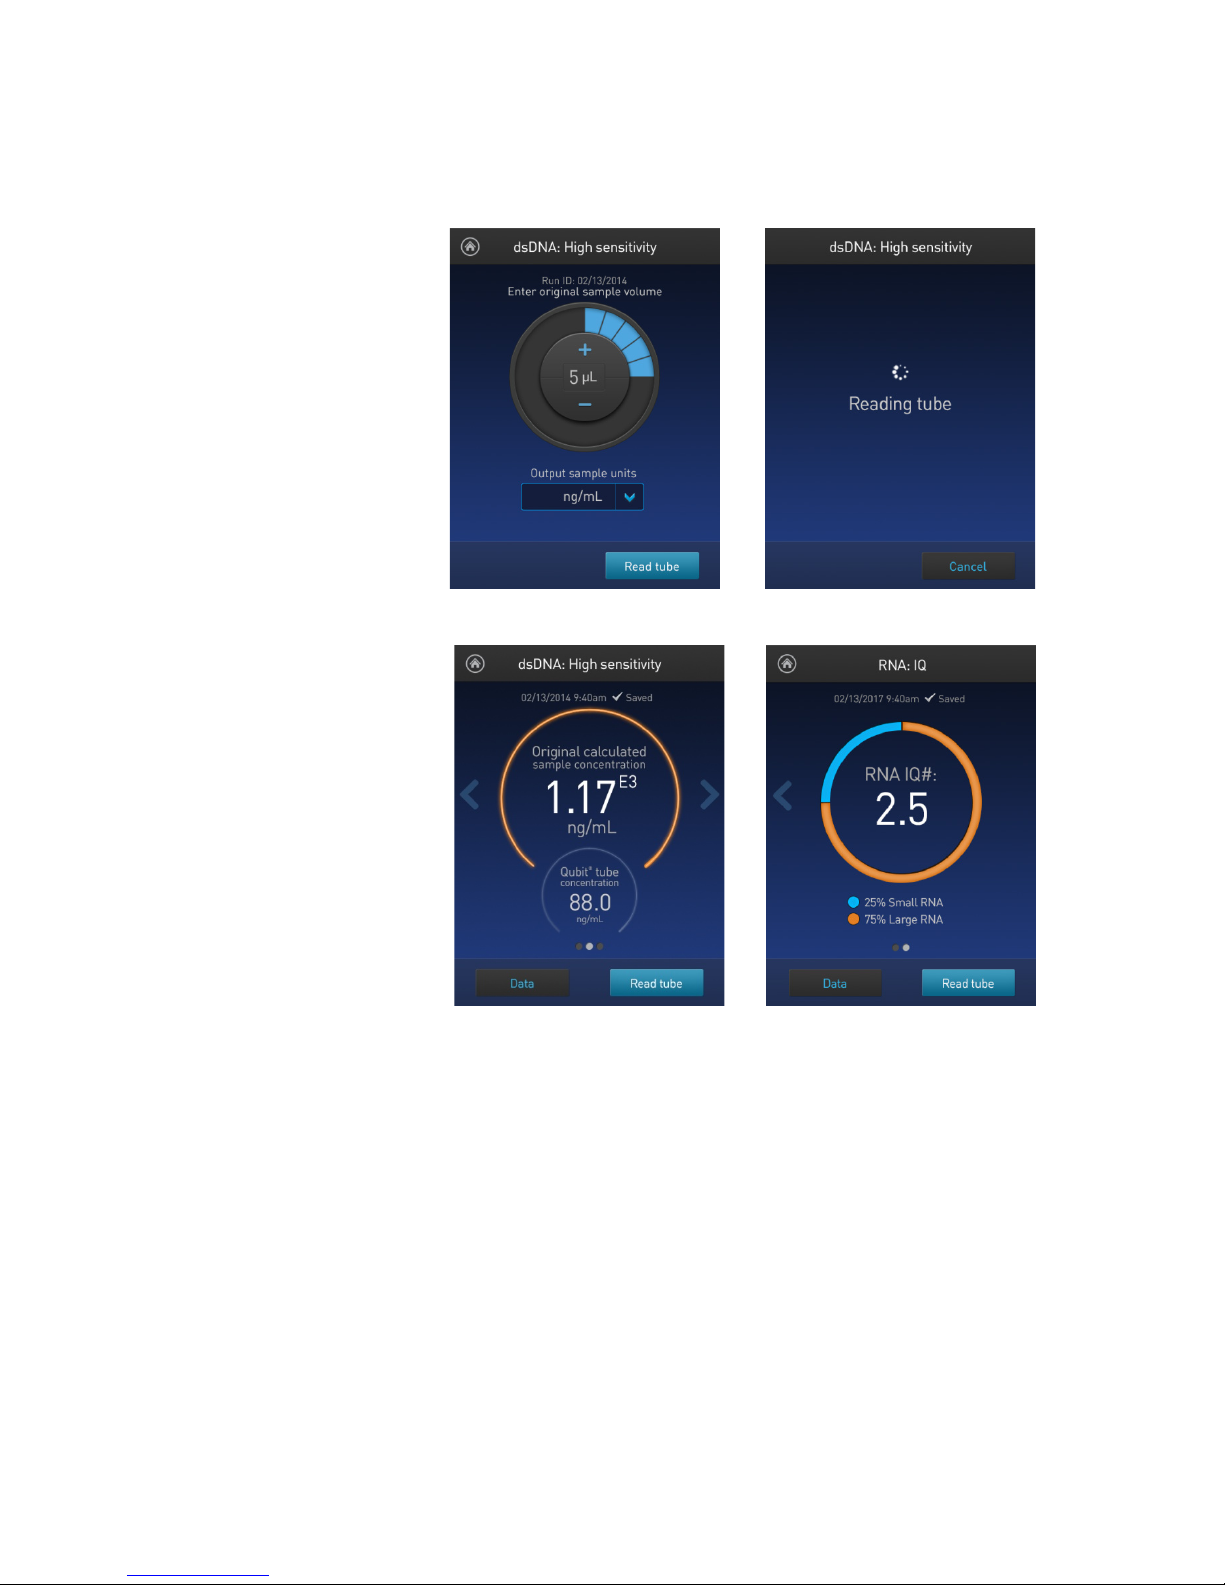
2. In the Sample volume screen, select the sample volume and units for the Qubit
™
quantitation assays or the Qubit
RNA IQ assay:
™
a. Press the + or – buttons on the wheel to select the sample volume added
to the assay tube (between 1 and 20 µL).
b. For the Qubit
™
quantitation assays, select the units for the output sample
concentration from the dropdown menu.
Note: In the RNA IQ assay, there are no units associated with the RNA IQ
24
Qubit™ 4 Fluorometer User Guide
Page 27
3. Insert a sample tube into the sample chamber, close the lid, and then press
assays
assays
Read multiple
To read multiple samples for the same assay:
4. Repeat step 2 (page 24) and step 3 (page 25).
Read tube. The reading takes approximately 3 seconds for the quantitation
assays and approximately 5 seconds for the quality assays.
4. The software displays the results. See “Results screen” on page 26.
Results screen for quantitation
samples
1. Remove the current sample, and insert a new sample.
2. To change the sample volume, swipe right or press the left arrow.
3. Press Read tube.
Results screen for quality
Qubit™ 4 Fluorometer User Guide
25
Page 28
Results
Results screen –
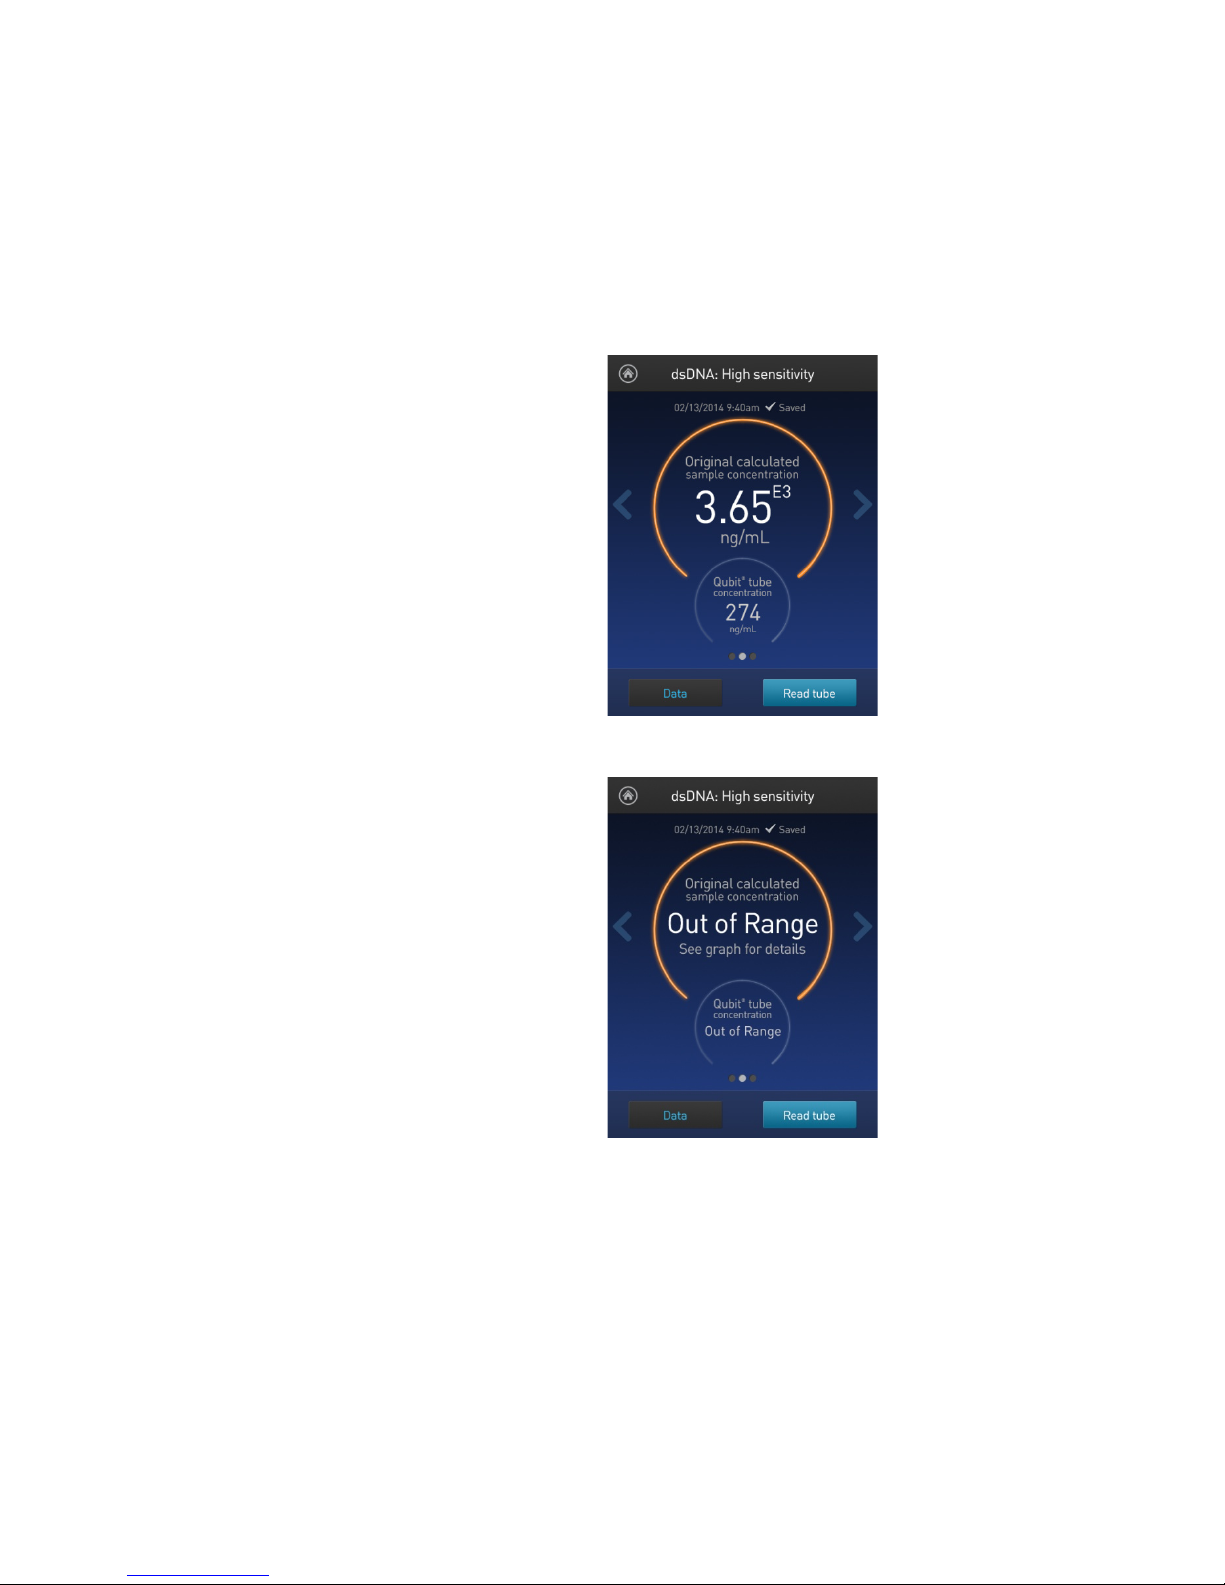
The Results screen displays the results of the sample run.
ithin the assay’s range, the concentration values are displayed.
• To return to the sample volume screen, swipe right or press the left arrow.
Sample
quantitation
• If the results are w
The top value (in large font) is the concentration of the original sample. The
bottom value is the dilution concentration (the concentration of the sample in the
tube inserted into the Qubit™ 4 fluorometer).
• If the results are outside of the assay’s range, an “Out of Range” message is
displayed.
26
Qubit™ 4 Fluorometer User Guide
Page 29
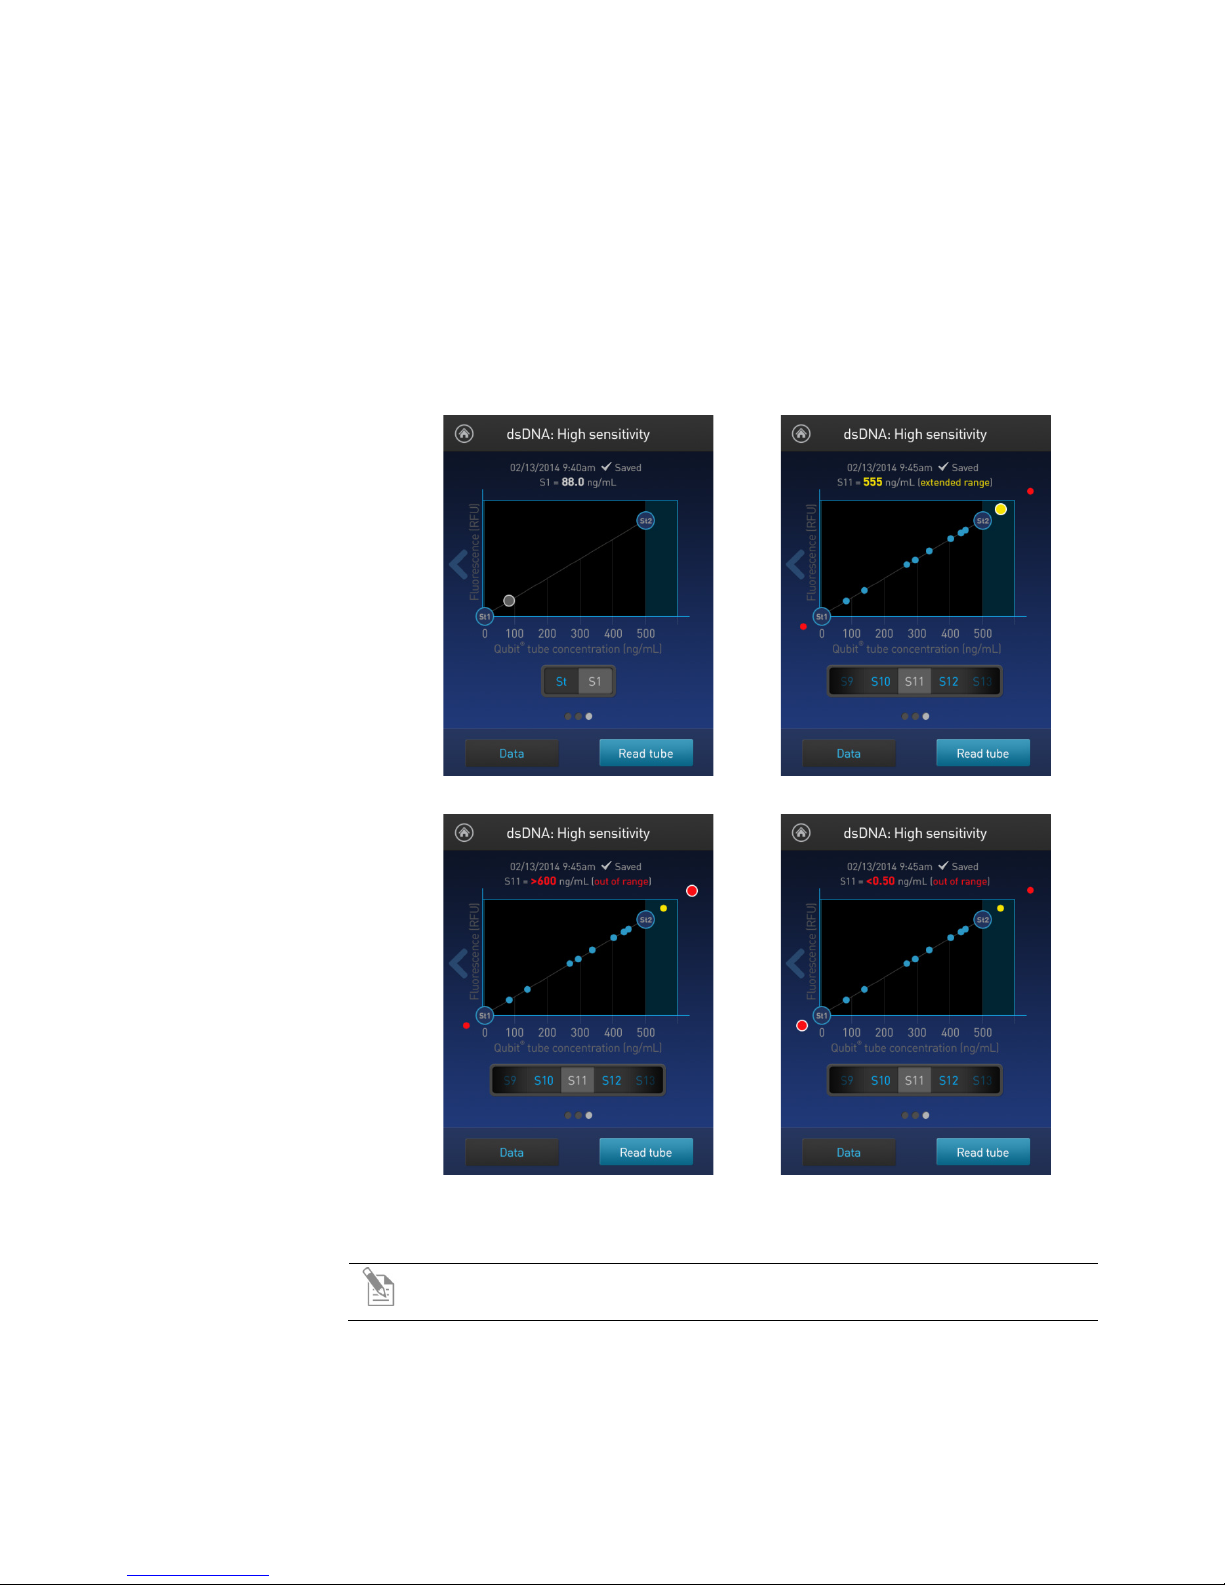
• To view the Fluorescence vs. Concentration graph, swipe left or press the
• To return to the previous screen, swipe right or press the left arrow.
right arrow. In the graph:
Open circles represent correct standards.
The large gray circle represents the most recent sample.
Blue circles represent samples that fall within the assay’s core range.
Yellow circles represent samples that fall within the assay’s extended
range.
Red circles represent samples or standards that fall outside the assay’s
range.
Single sample
Out of range high
Note: The Qubit™ 4 Fluorometer automatically stores numeric data from
all reads, but does not store graphic data.
Multiple samples
Out of range low
Qubit™ 4 Fluorometer User Guide
27
Page 30
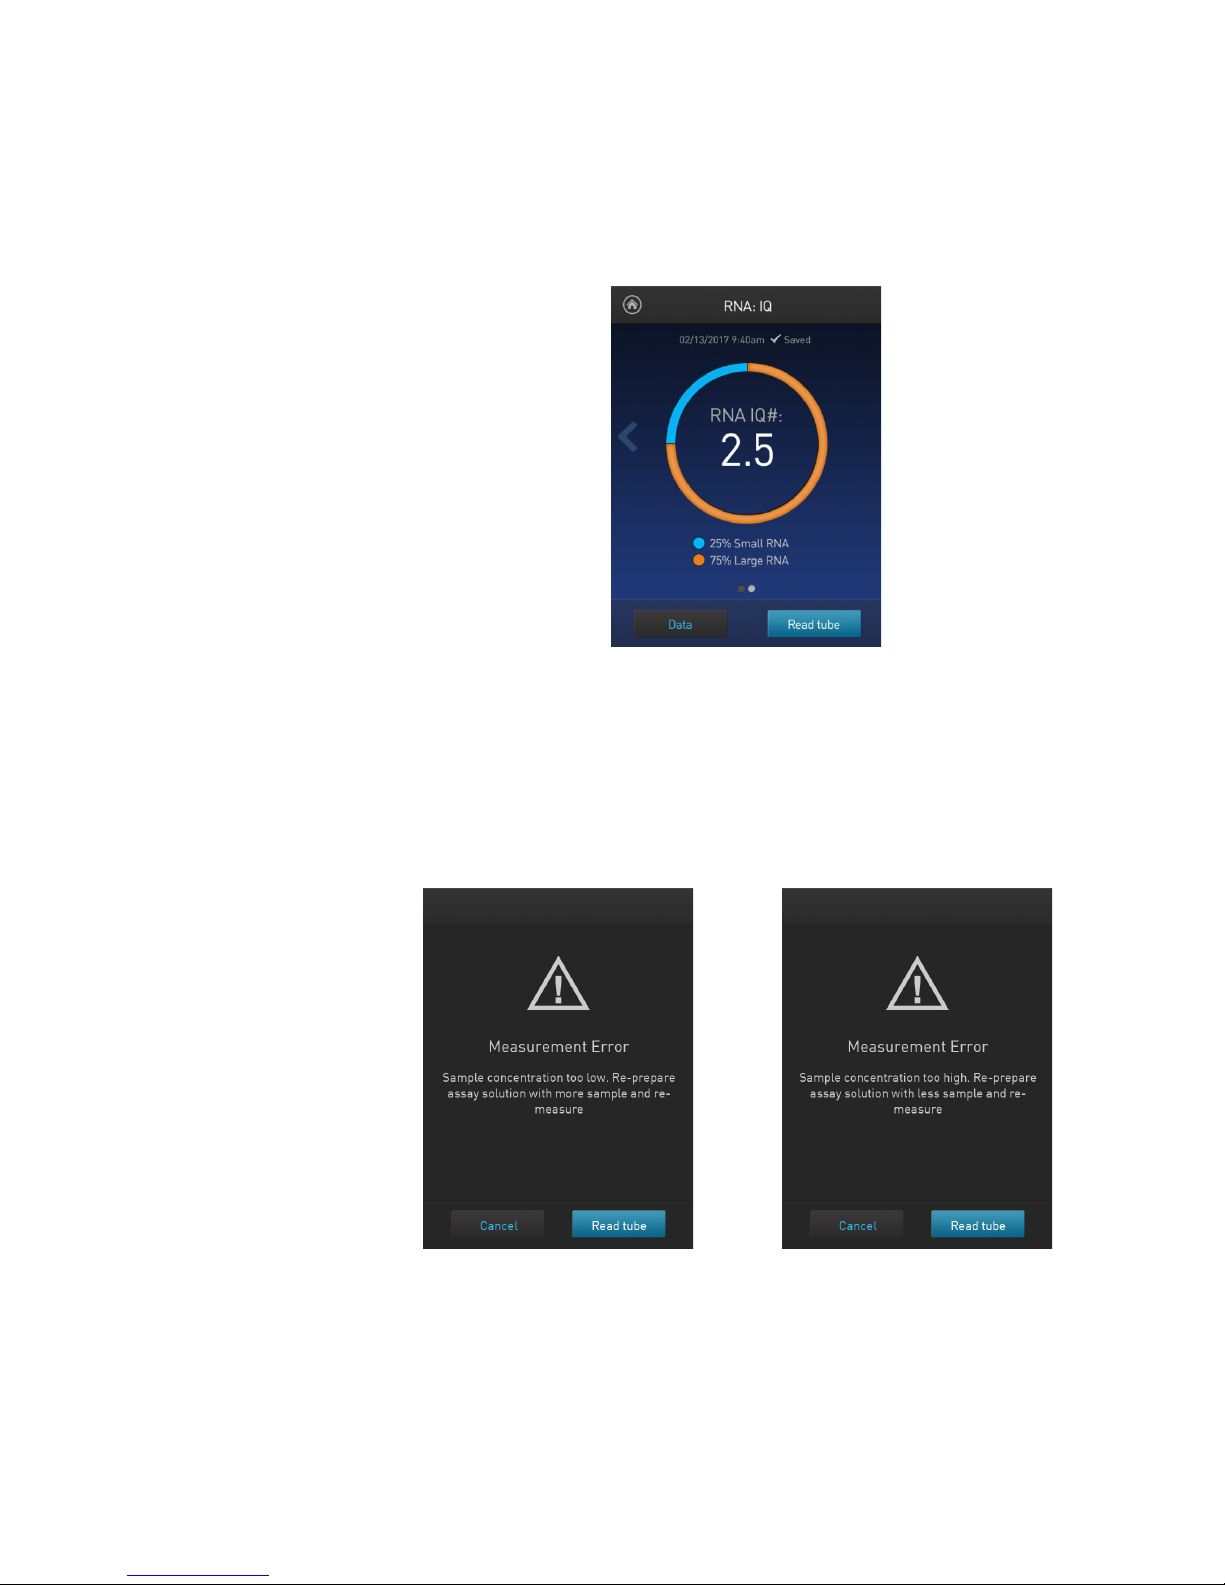
Results screen –
Sample quality
The Results screen displays the results of the sample run.
indicates that the sample is comprised of mainly
the sample are displayed below the RNA IQ#.
Measurement error
If the results are outside of the assay’s range, a “Measurement error” message is
Measurement error – Sample
concentration too low
Measurement error – Sample
concentration too high
• If the results are within the assay’s range, the sample quality values are
displayed. The result presented in the circle (i.e., RNA IQ#) is the total value
for the RNA sample integrity and quality, which is the calculated percentage
of large and small RNA in the sample.
The RNA IQ# is based on a scale of 1–10, similar to other RNA quality scores.
A small RNA IQ# in the assay
small RNA and a larger RNA IQ# indicates that the sample consists of mainly
large RNA or structured RNA (mRNA, tRNA, rRNA).
The actual percentages of small or degraded RNA and large or intact RNA in
displayed.
28
Qubit™ 4 Fluorometer User Guide
Page 31
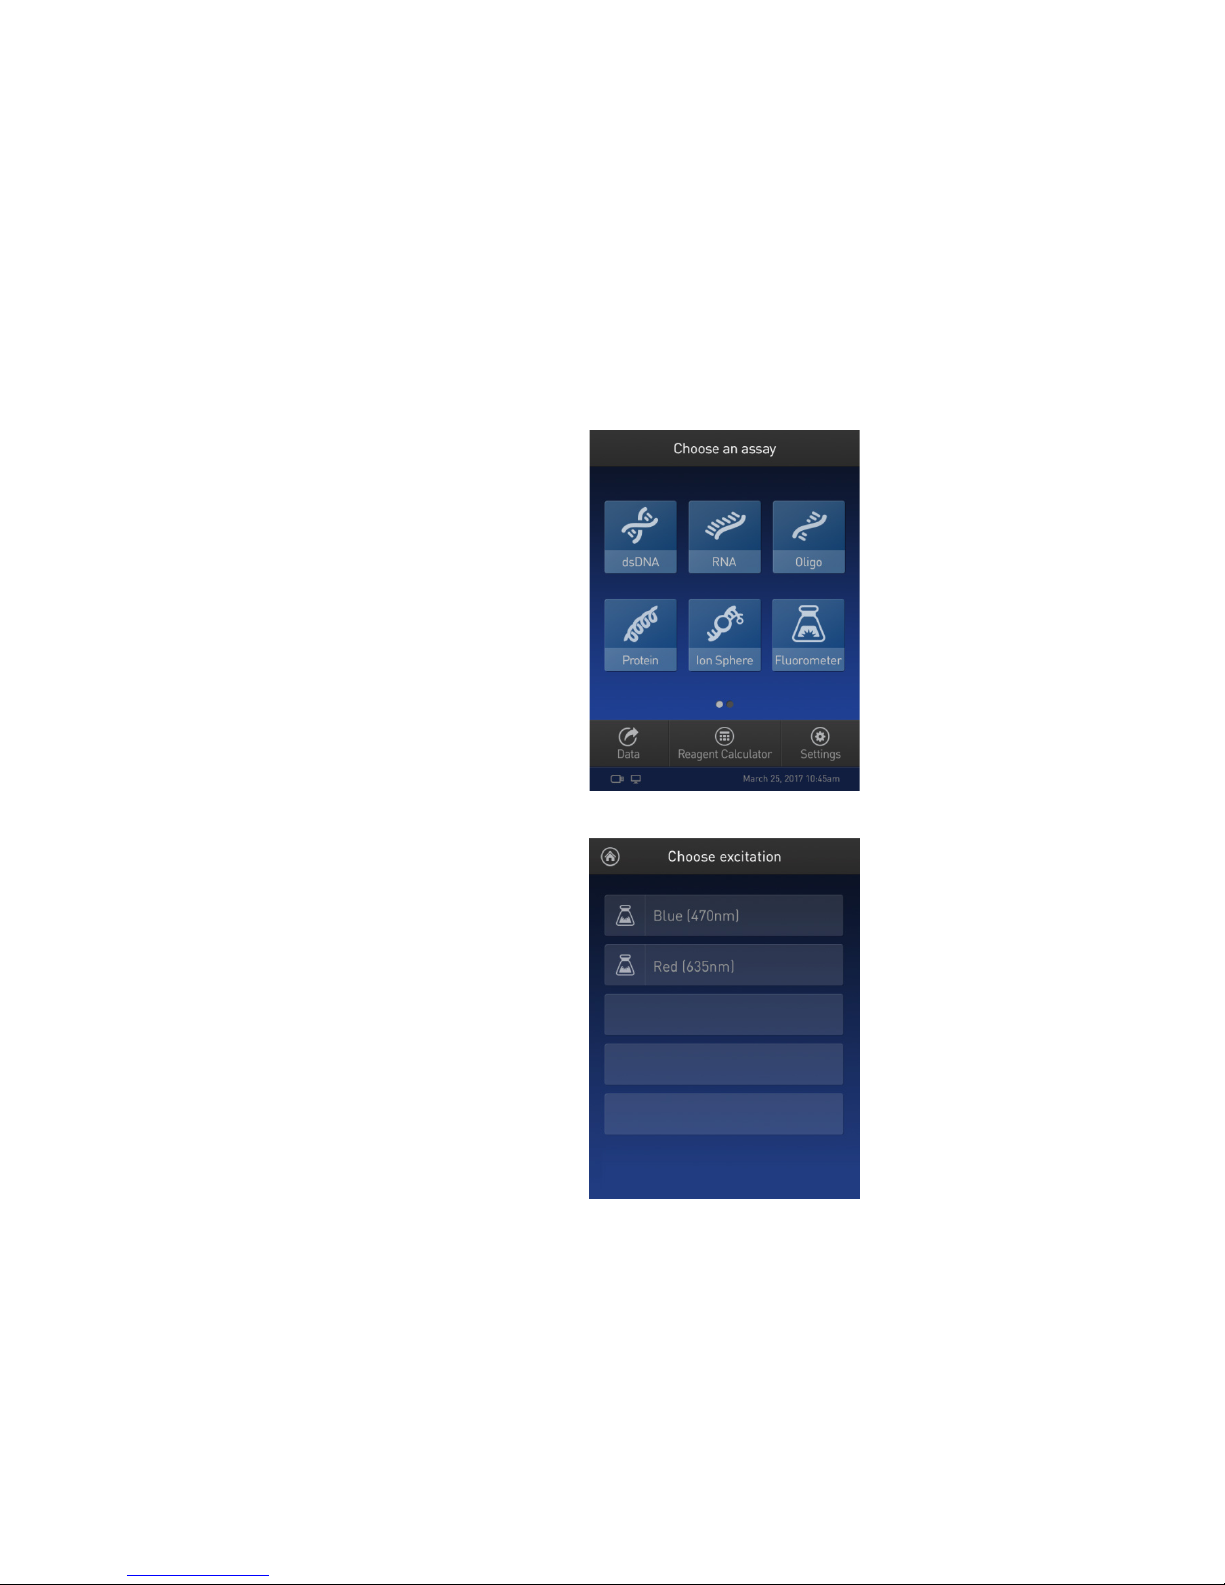
Introduction
You can use the Qubit™ 4 Fluorometer as a mini-fluorometer by selecting the
The reading is in raw fluorescence units (RFU).
Read sample in
1. On the Home screen, press Fluorometer.
Fluorometer mode
Fluorometer mode.
The Fluorometer mode allows you to choose the excitation light source (blue LED
or red LED) while reading fluorescence in both the green and far-red emission
channels (for the blue LED) or in the far-red emission channel only (for the red LED).
Fluorometer mode
2. On the Choose excitation screen, select Blue (470 nm) or Red (635 nm).
Qubit™ 4 Fluorometer User Guide
29
Page 32
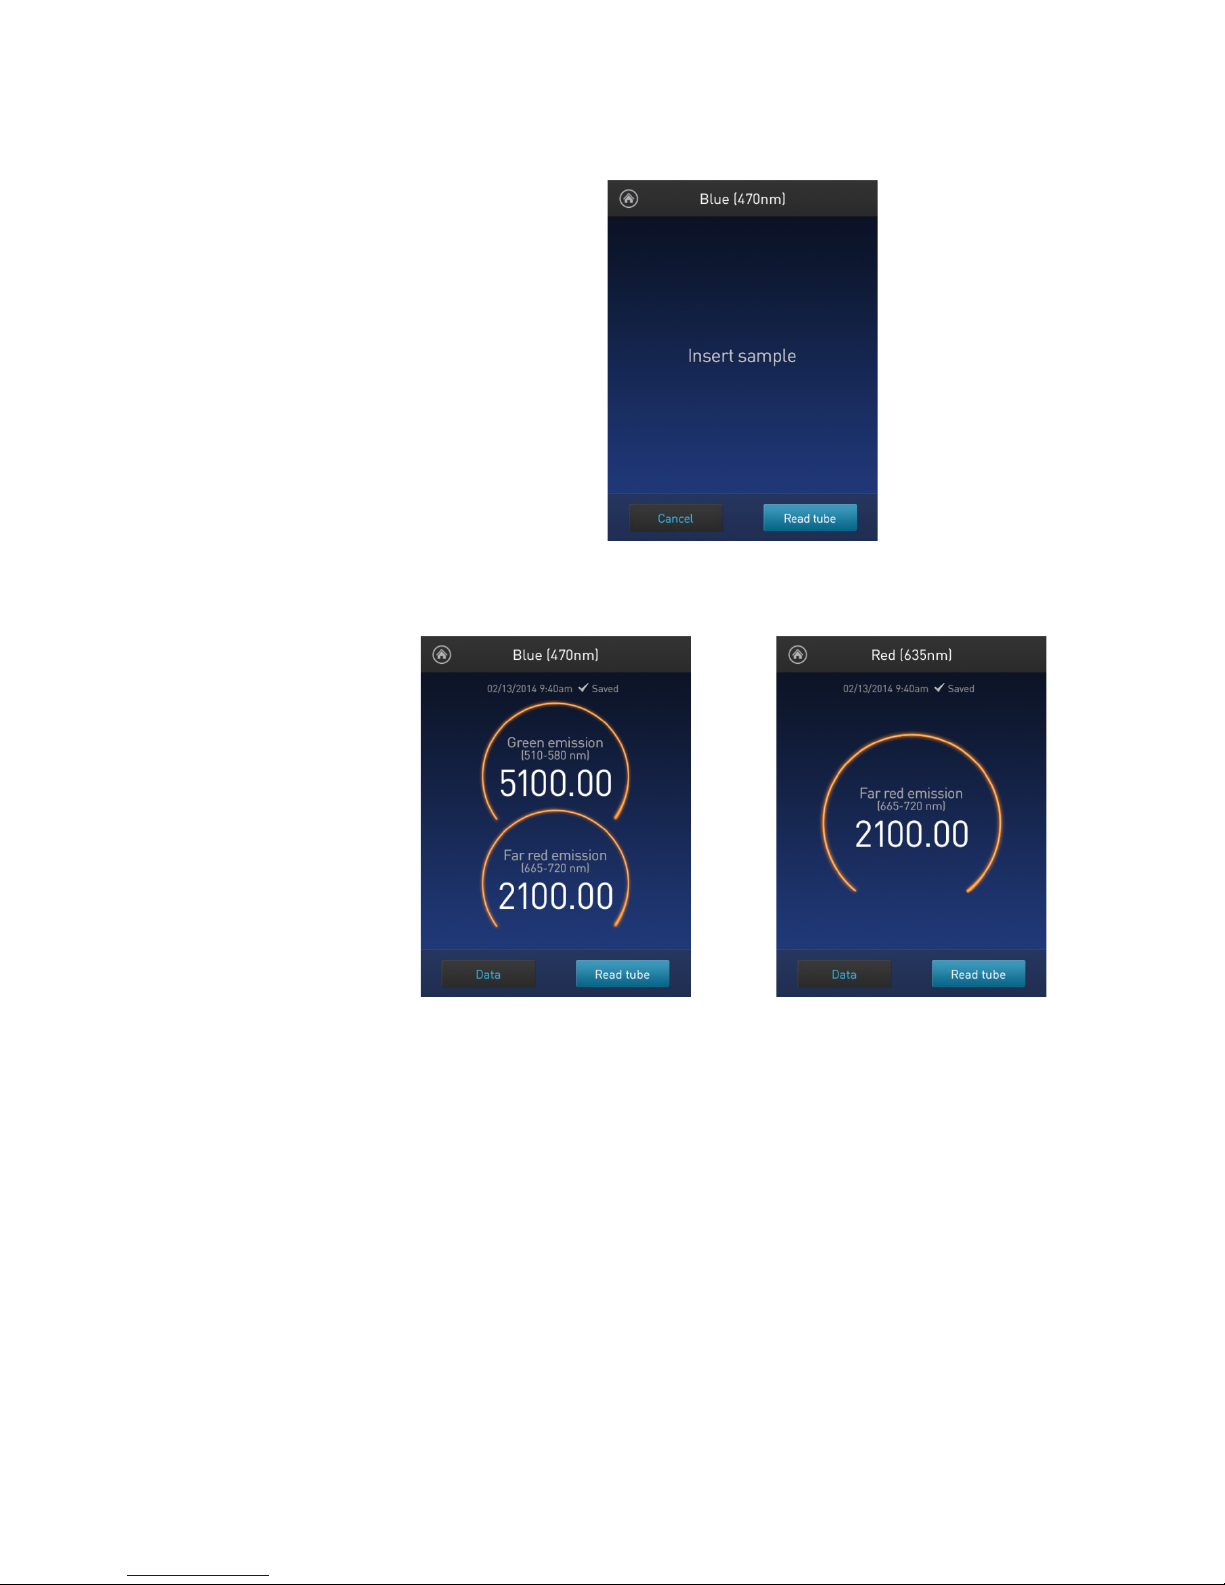
3. Insert the sample, then press Read tube.
Blue (470 nm) excitation
Red (635 nm) excitation
Read multiple
To read multiple samples in the fluorometer mode:
4. For Blue excitation, the Qubit
™
4 Fluorometer displays both the green
emission and the far red emission of your sample. For Red excitation, the
™
Qubit
4 Fluorometer displays only the far red emission of your sample.
samples in
Fluorometer mode
1. Remove the current sample, and insert a new sample.
2. Press Read tube.
30
Qubit™ 4 Fluorometer User Guide
Page 33
Ion Sphere™ Assay
The Ion Sphere™ assay on the Qubit™ 4 Fluorometer enables quick and easy
Particles (ISPs) prior to performing a sequencing run on
saving time and expense during subsequent sequencing.
Ion Sphere™ Assay
assessment of Ion Sphere™
the Ion Personal Genome Machine™ (PGM™) Sequencer using the Ion Sphere™
Quality Control Kit.
All ISPs bind a complimentary, green-fluorescent Alexa Fluor™ 488 dye-labeled
oligonucleotide, whereas only those beads that are template positive bind a
complementary red-fluorescent Alexa Fluor
Qubit
and a Microsoft Excel
positive ISPs from the ratio of the Alexa Fluor
Alexa Fluor
Fluorometer determines the likelihood of a successful sequencing run, ultimately
™
™
4 Fluorometer measures the fluorescence emission of each dye conjugate
™
488 dye signal. This quality-control step using the Qubit™
™
file template is used to calculate the percentage of template-
647 dye-labeled oligonucleotide. The
™
647 dye signal to the
Note: For more information about the Ion Sphere™ Quality Control Kit
(Cat. No. 4468656), go to thermofisher.com and search for the catalog
number.
Qubit™ 4 Fluorometer User Guide
31
Page 34
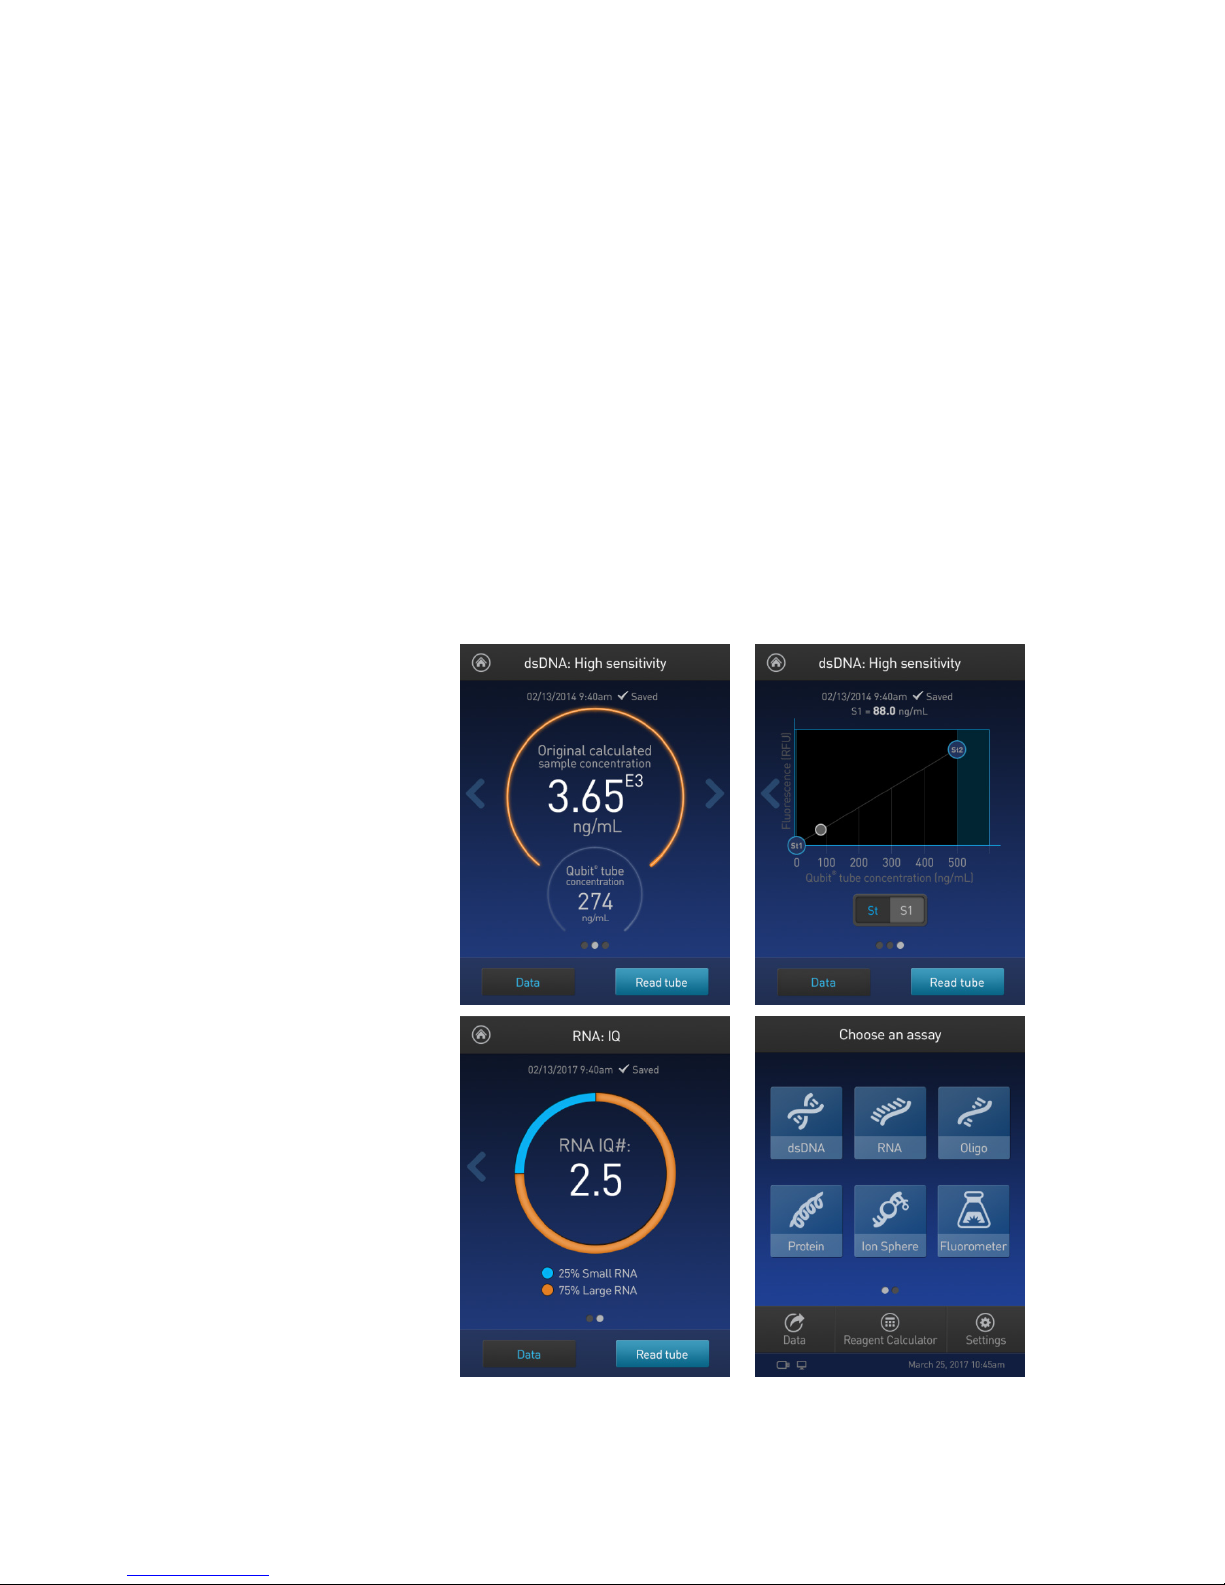
Introduction
The Qubit™ 4 Fluorometer can save data for up to 1000 samples.
Delete data files (page 39)
View detailed
1. From the Concentration, Graph, RNA IQ results, or Home screen, press Data.
For the saved data, the instrument allows you to:
• View detailed data for each sample (page 32).
• Rename data files (page 35).
• Save data as a CSV (comma separated value) file, and export the CSV file to a
USB drive or directly to your computer (page 36).
•
View detailed sample data
sample data
4. Manage data
32
Qubit™ 4 Fluorometer User Guide
Page 35
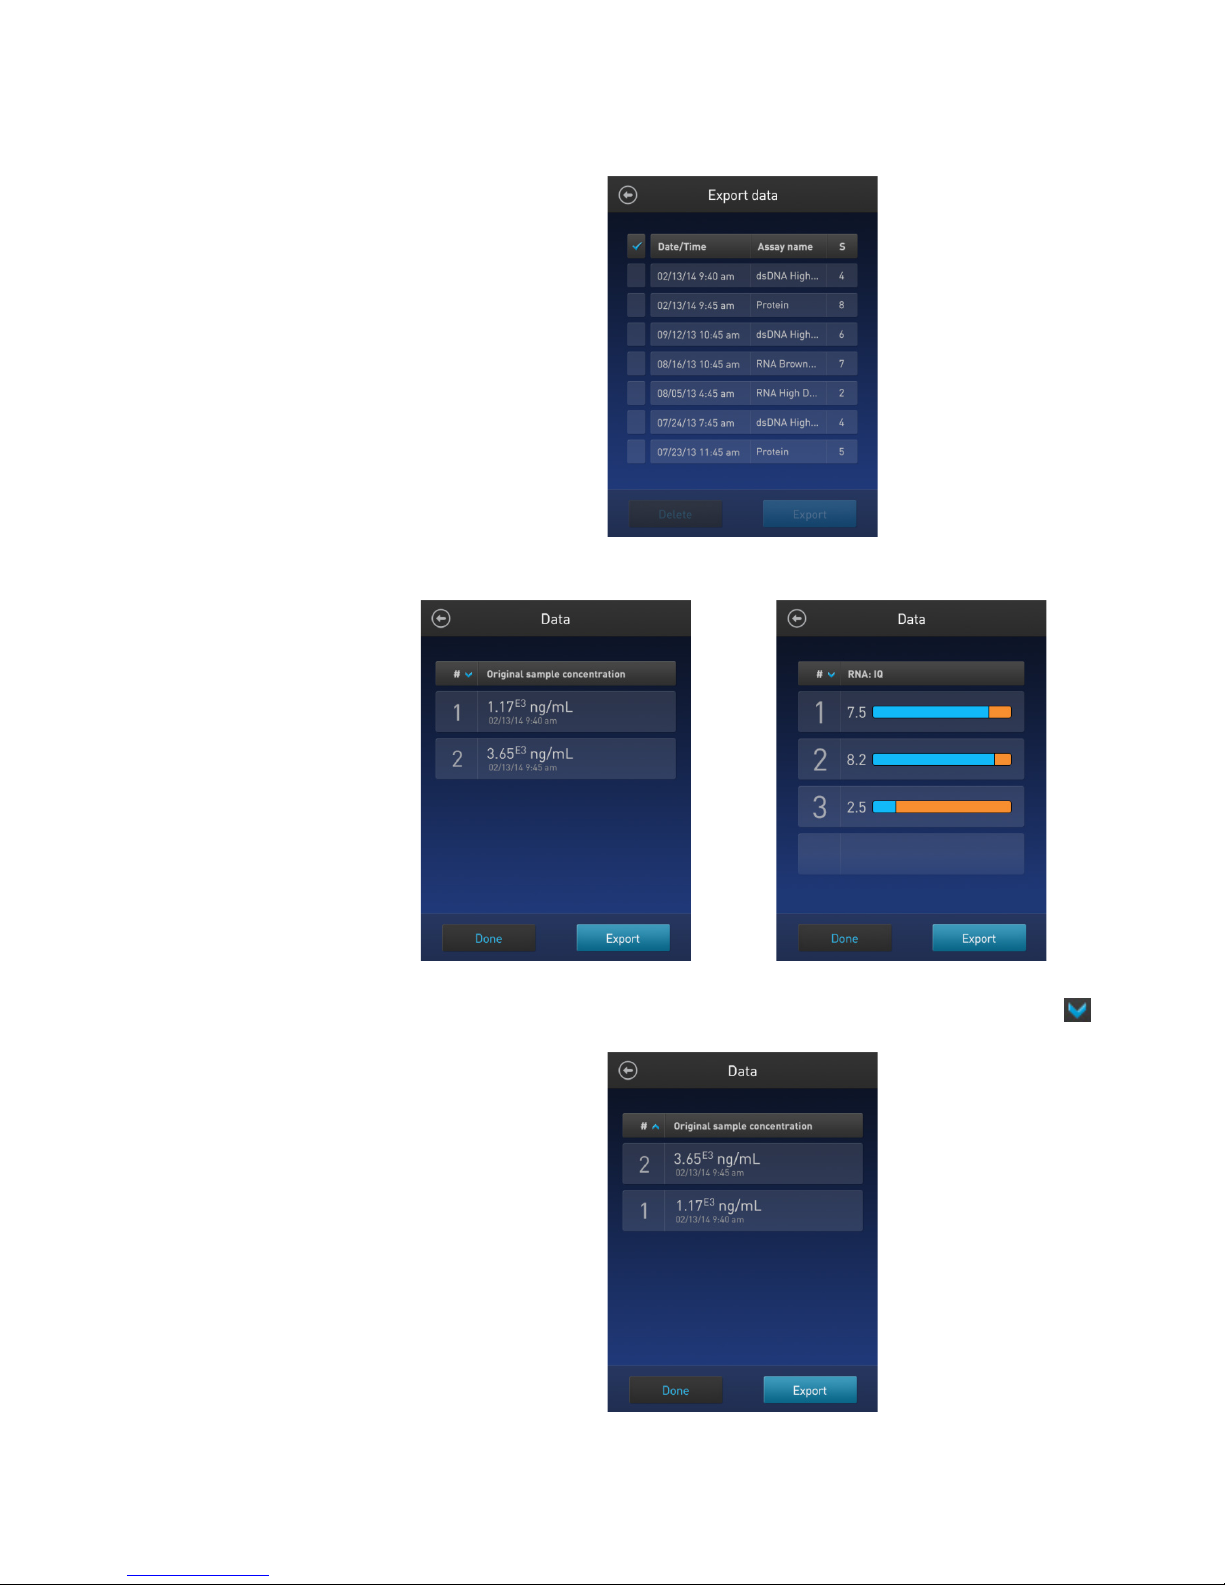
2. On the Export data screen, press the data set of interest.
3. To reverse the order of the data entries, press the blue chevron above the
A Data screen displaying a list of data entries for that data set appears. To
view additional data entries that do not fit in the screen, scroll up or down.
Data screen for quantitation assays Data screen for quality assays
sample number column.
Qubit™ 4 Fluorometer User Guide
33
Page 36
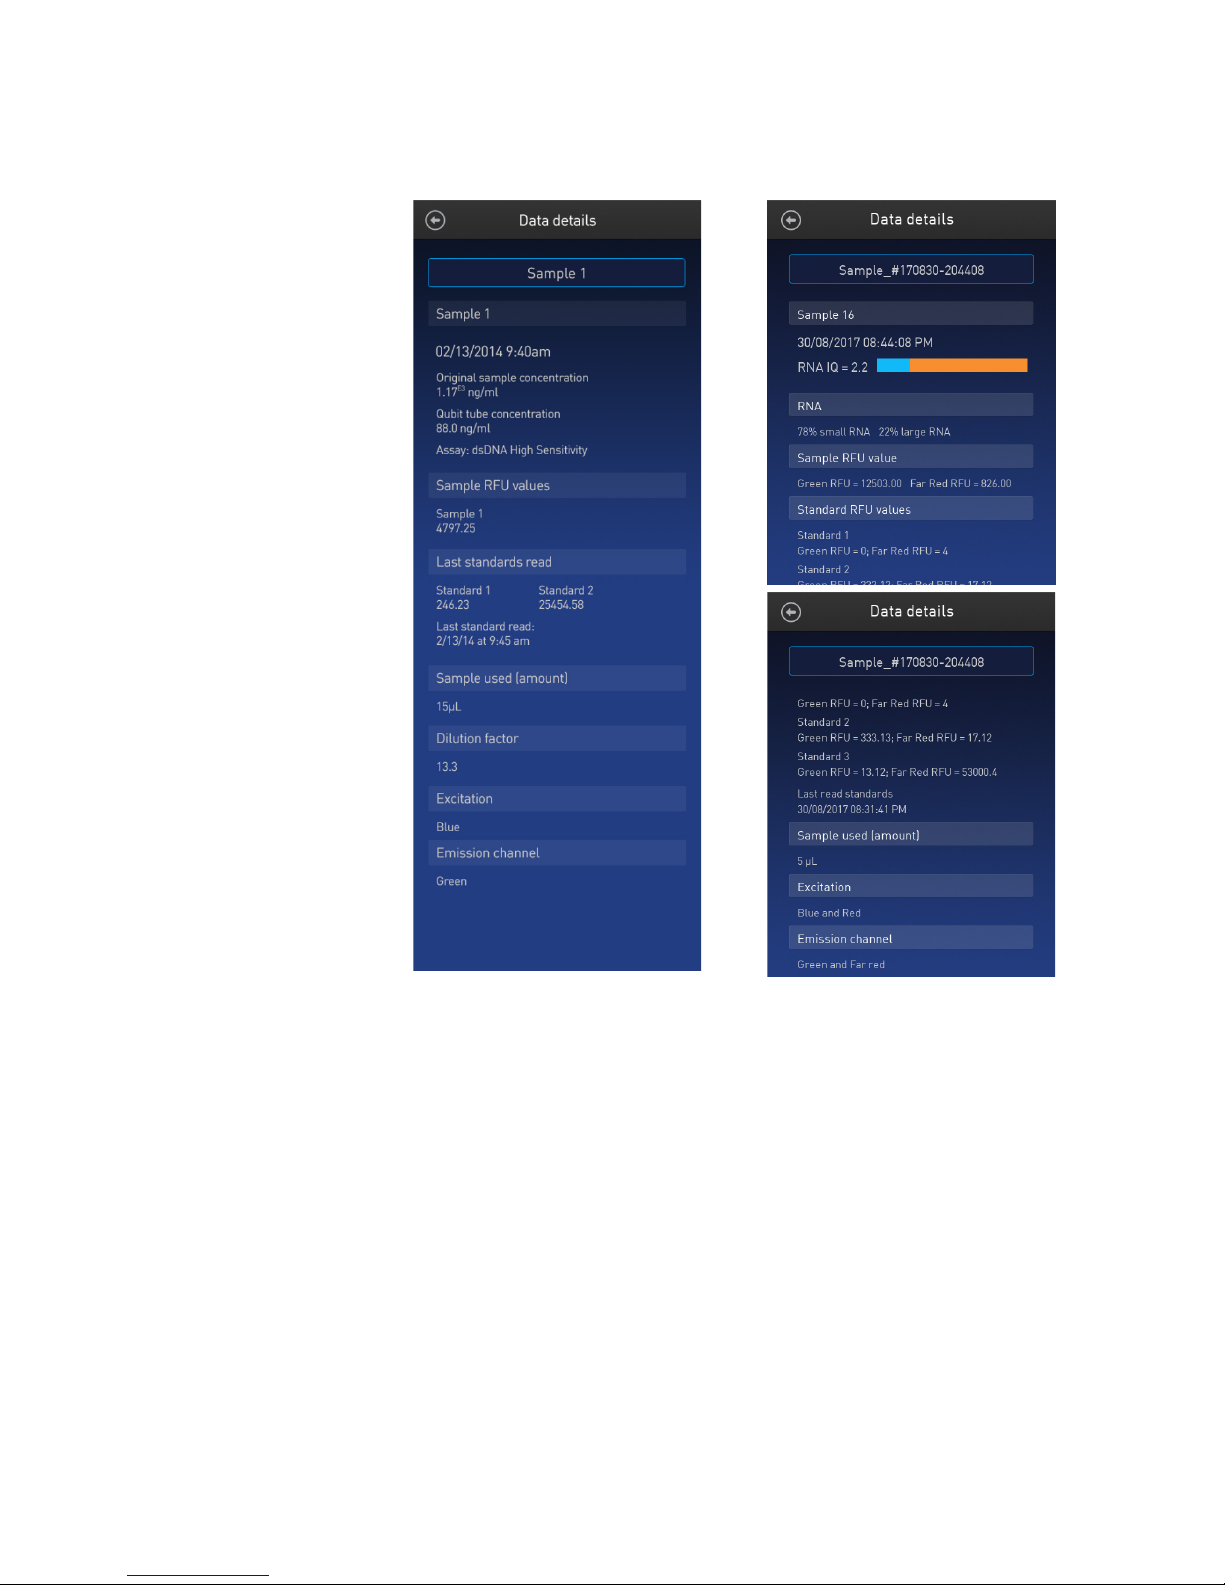
4. To view the sample details, press the sample of interest. A Data details screen
opens.
Data details for quantitation assays
Data details for quality assays
34
Qubit™ 4 Fluorometer User Guide
Page 37
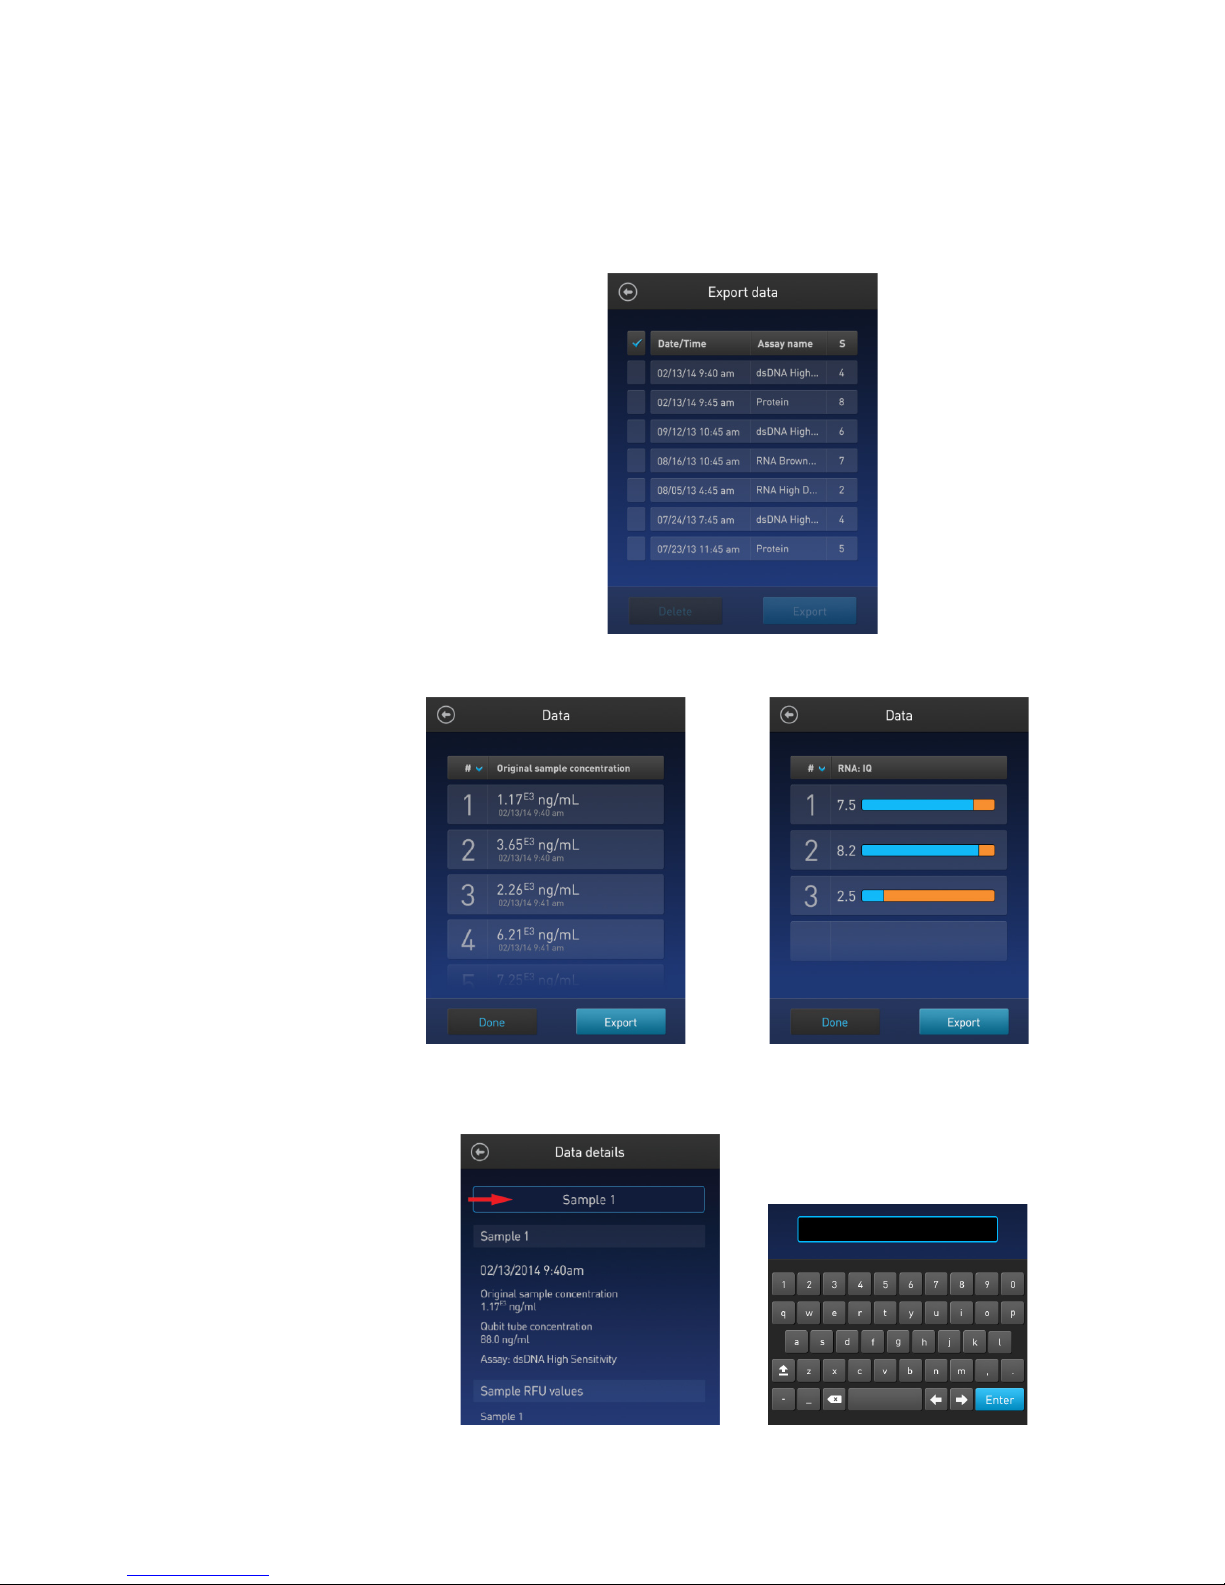
Rename data files
1. On the Concentration, Graph, RNA IQ results, or Home screen, press Data.
4. On the Data details screen, press the Sample # field (indicated by the red
Rename data files
2. On the Export data screen, select the data set of interest.
3. From the list of data entries for the selected data set, press the sample of
interest to open the Data details screen.
Data screen for quantitation assays Data screen for quality assays
Qubit™ 4 Fluorometer User Guide
arrow), enter the new name using the keyboard that appears, then press Enter.
35
Page 38
Export data
Introduction
The Qubit™ 4 Fluorometer is designed for standalone use; it does not require an
import the file into any spreadsheet program.
Export data using
1. Insert the USB drive into the Qubit™ 4 Fluorometer.
external computer. However, to archive data and generate reports, you can export
the numeric data stored in the CSV file to a computer either by using the USB
drive or by saving directly to the computer using the USB cable. You can then
the USB drive
2. On the Concentration, Graph, RNA IQ results, or Home screen, press Data.
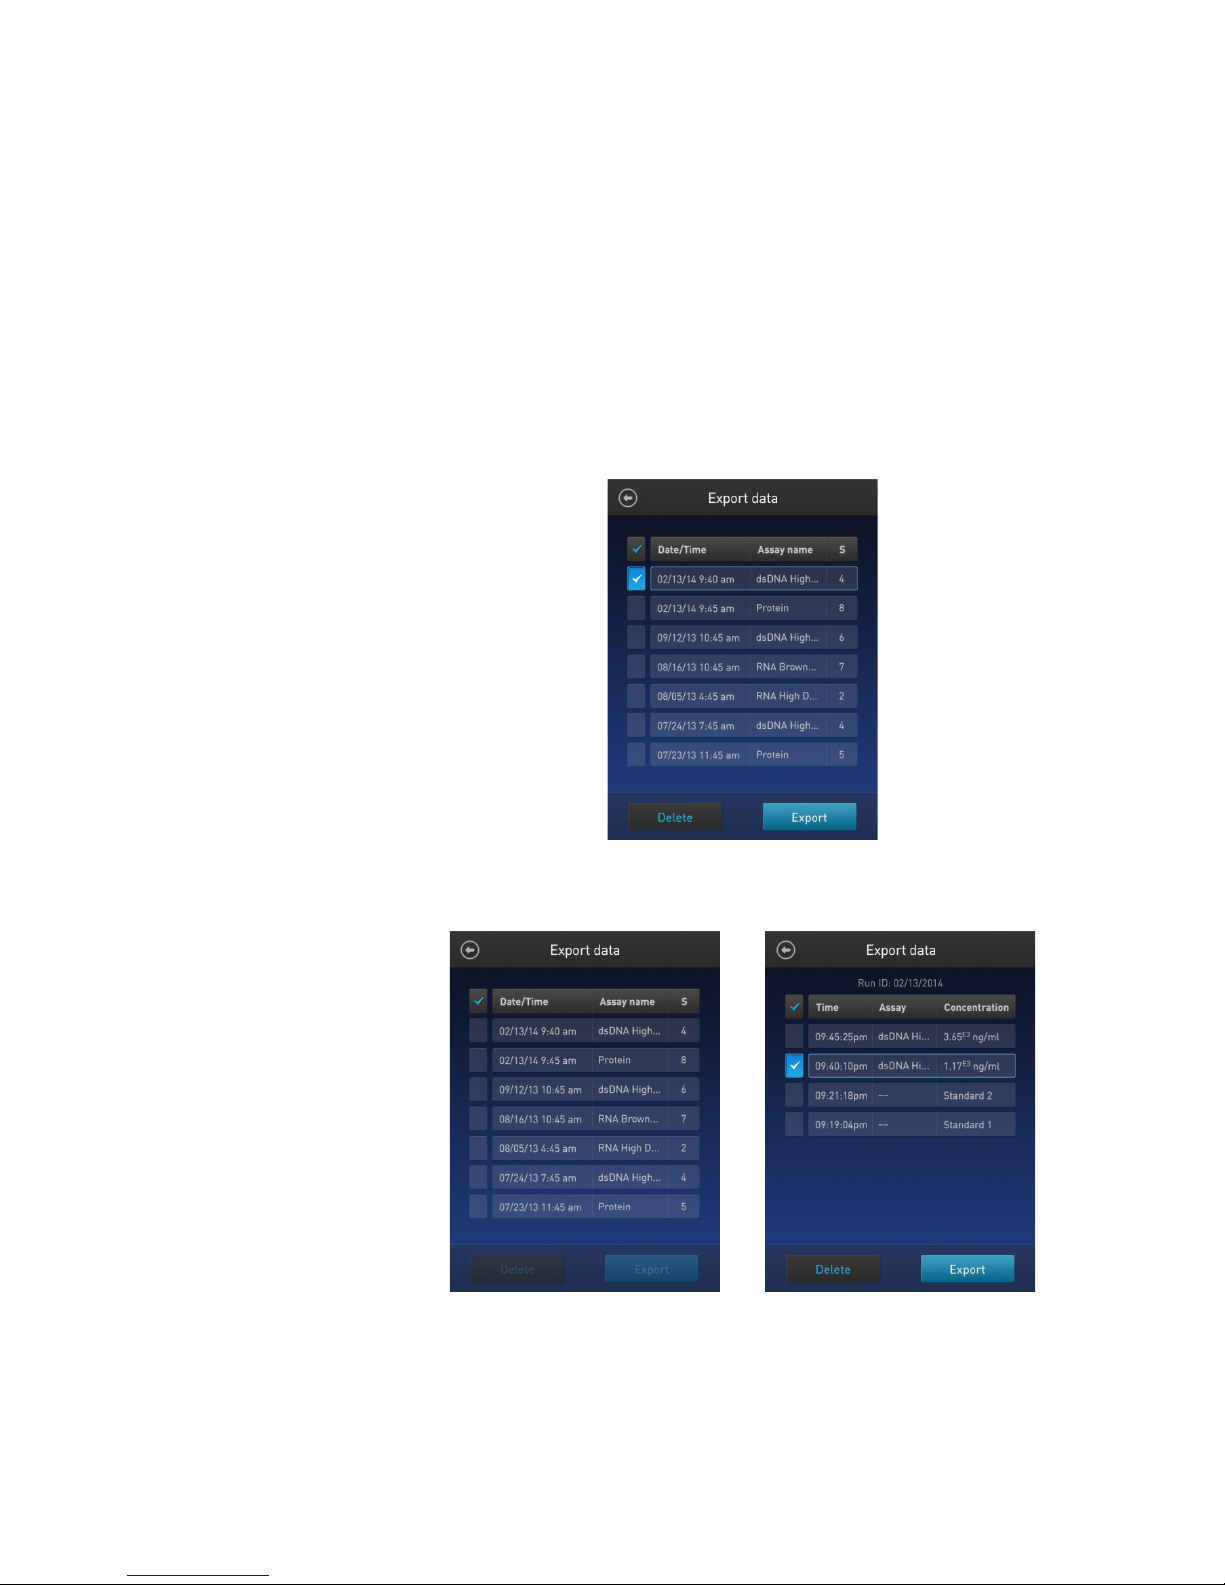
3. On the Export data screen, check the selection box to the left of each data set
you wish to export.
4. To save only individual data entries from a data set, press the data set of
interest, and then check the selection box to the left of the samples you wish
to export.
36
Qubit™ 4 Fluorometer User Guide
Page 39
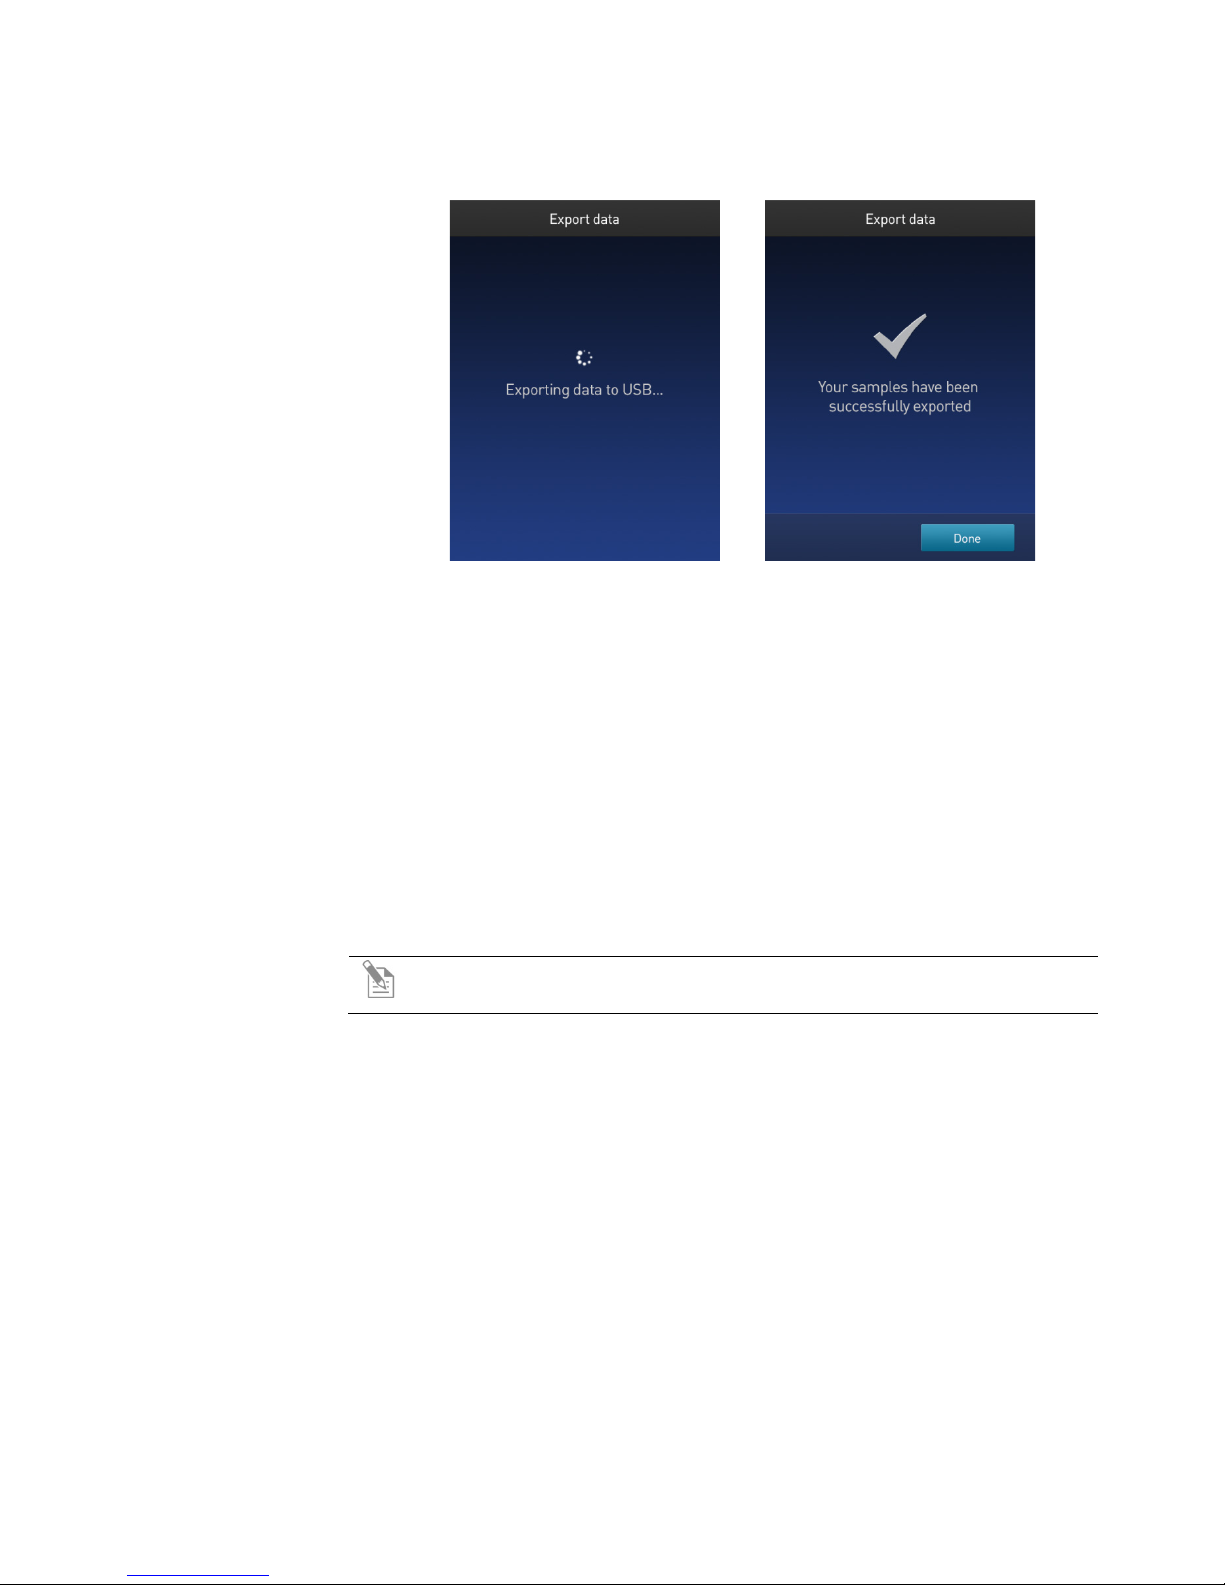
5. Press Export to export the data. The numeric data is automatically saved as a
the CSV file using any spreadsheet program.
Export data directly
Data files may also be exported from the Qubit™ instrument to a computer using a
4. Copy the desired files to the computer.
CSV file.
6. Transfer the USB drive to the USB drive port on your computer. You can open
to a computer
USB cable such as the one provided with the Qubit™ instrument. The USB cable
must remain connected to both the Qubit
this process.
To export data directly to a computer:
1. Connect the Qubit
™
instrument to the computer using the USB cable.
2. From the computer, access the Qubit
3. Access the files saved on the Qubit
™
normal file browsing menus.
Note: Files cannot be exported directly to an external computer using the
Export workflow on the Qubit
™
instrument.
™
instrument and the computer during
™
4 Fluorometer as an external device.
instrument using the operating system’s
Qubit™ 4 Fluorometer User Guide
37
Page 40
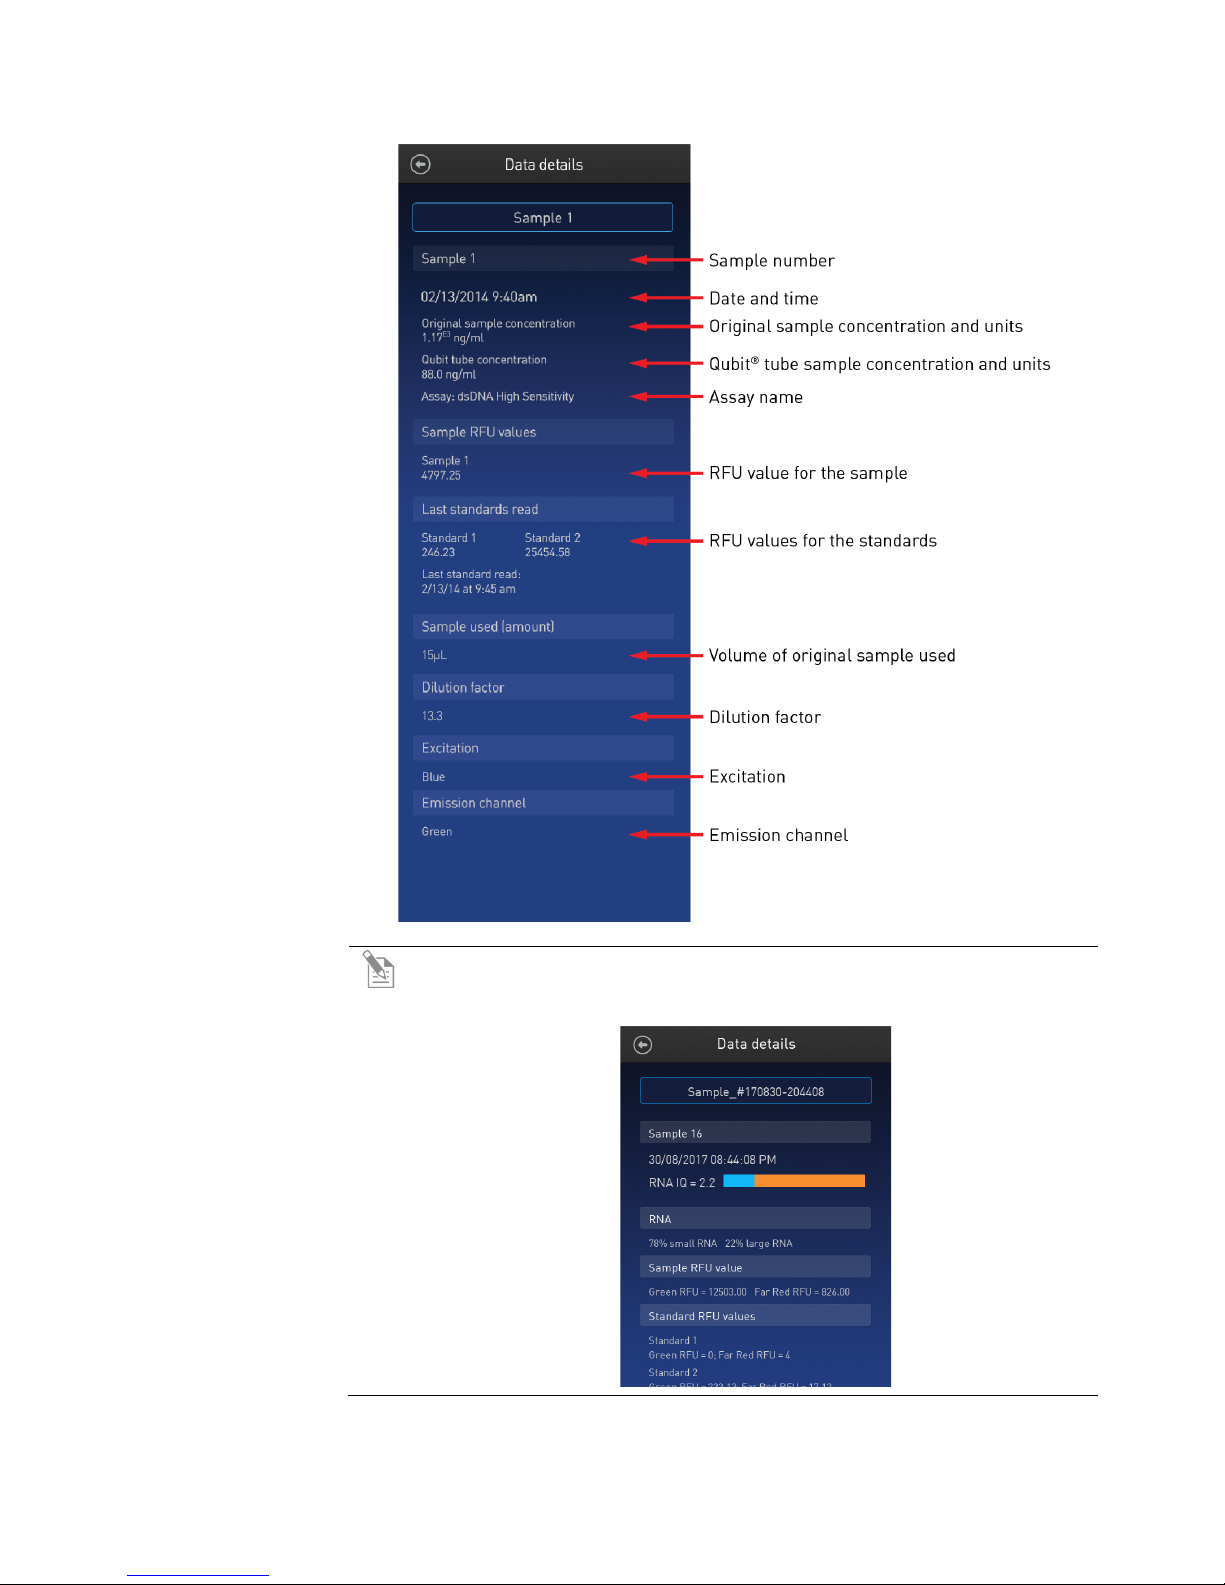
Information saved
to the CSV file
Note: For the RNA IQ assay, there is no original sample concentration,
Qubit
™
tube concentration or dilution factor. Instead, the results file
contains % large and % small RNA information.
38
Qubit™ 4 Fluorometer User Guide
Page 41
Delete data files
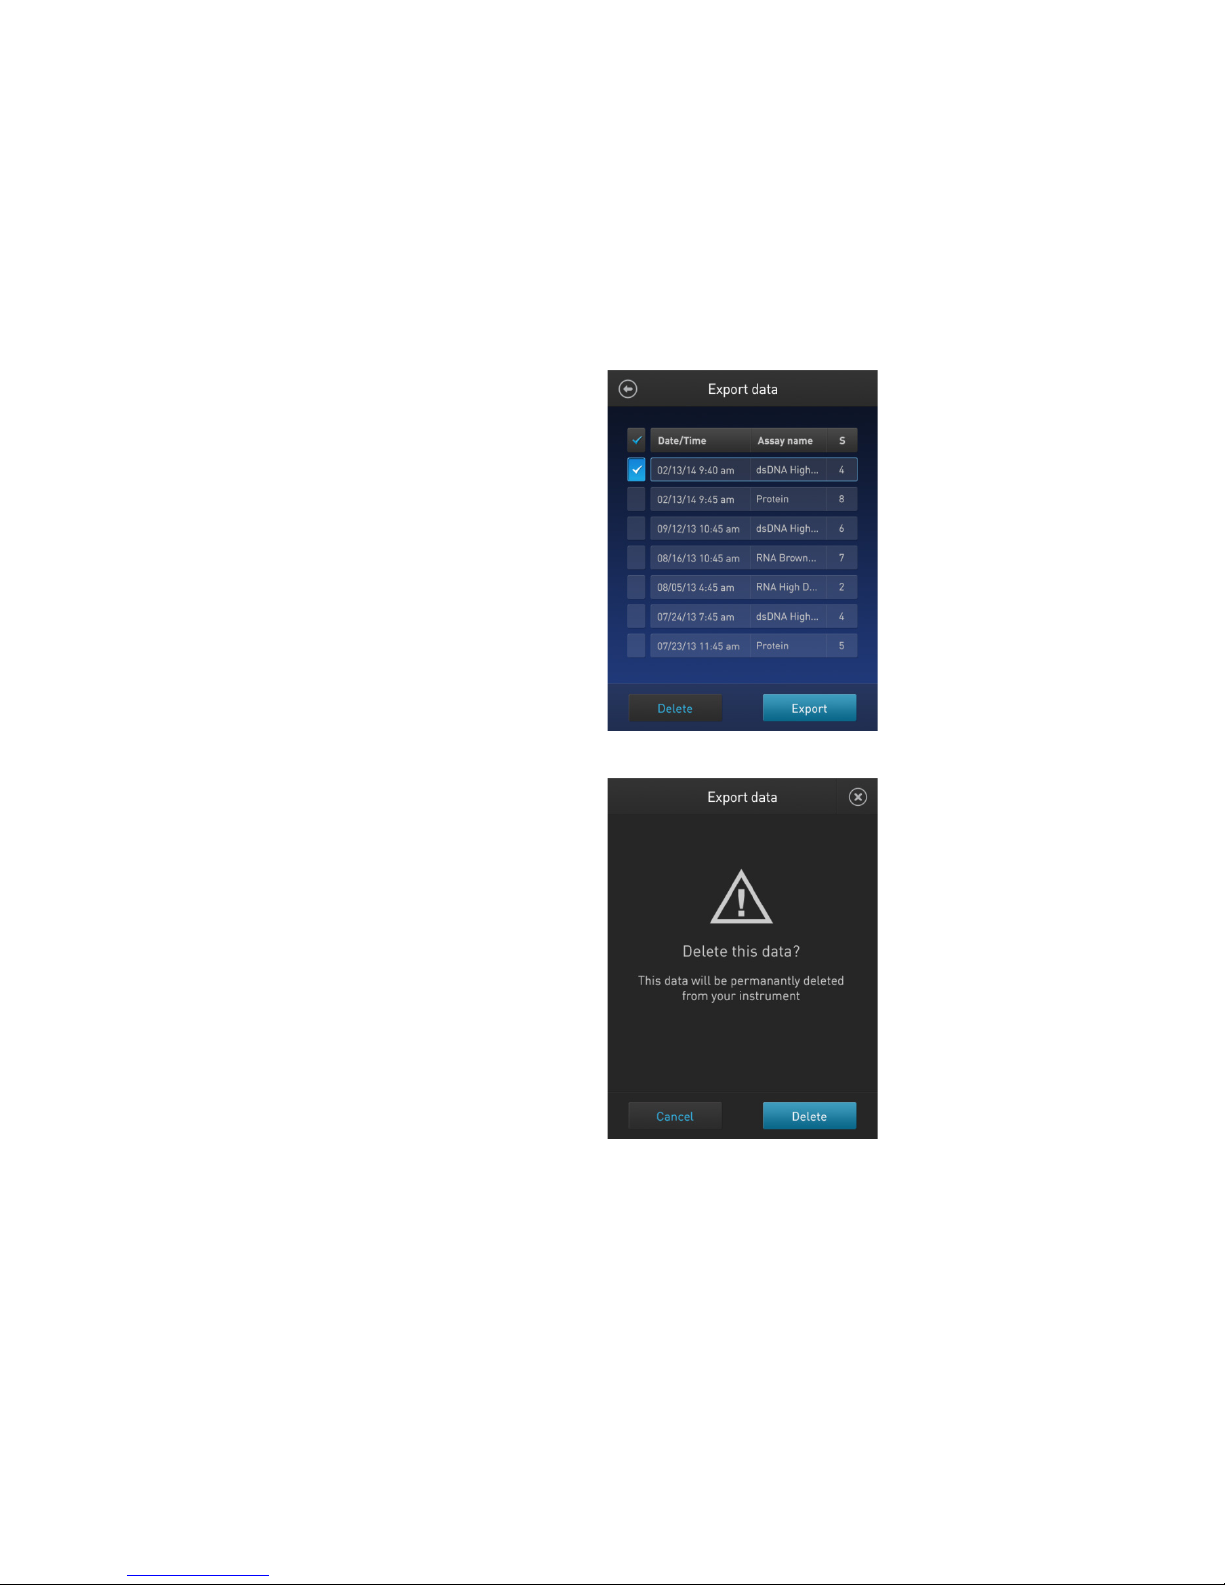
1. On the Concentration, Graph, RNA IQ results, or Home screen, press Data.
data.
Delete data
2. On the Export data screen, check the selection box to the left of each data set
you wish to delete.
To delete only individual data entries from a data set, press the data set of
interest, and then check the selection box to the left of the samples you wish
to delete.
3. Press Delete. A warning screen appears.
4. Press Delete to permanently delete the sample data or data set.
Press Cancel to return to the screen previously viewed without deleting any
Qubit™ 4 Fluorometer User Guide
39
Page 42
5. Manage, import, and create assays
The Qubit™ 4 Fluorometer allows you to personalize the instrument’s user
Manage assays
The Manage assays function allows you to hide and show (unhide) assays or folders
Overview
Manage assays
interface to hide and show (unhide) assays or folders and to move them to
different locations. In addition, you can add custom MyQubit assays by importing
them from our website at
MyQubit software and web tool.
thermofisher.com/qubit or create new assays using the
function
and to move them to different locations.
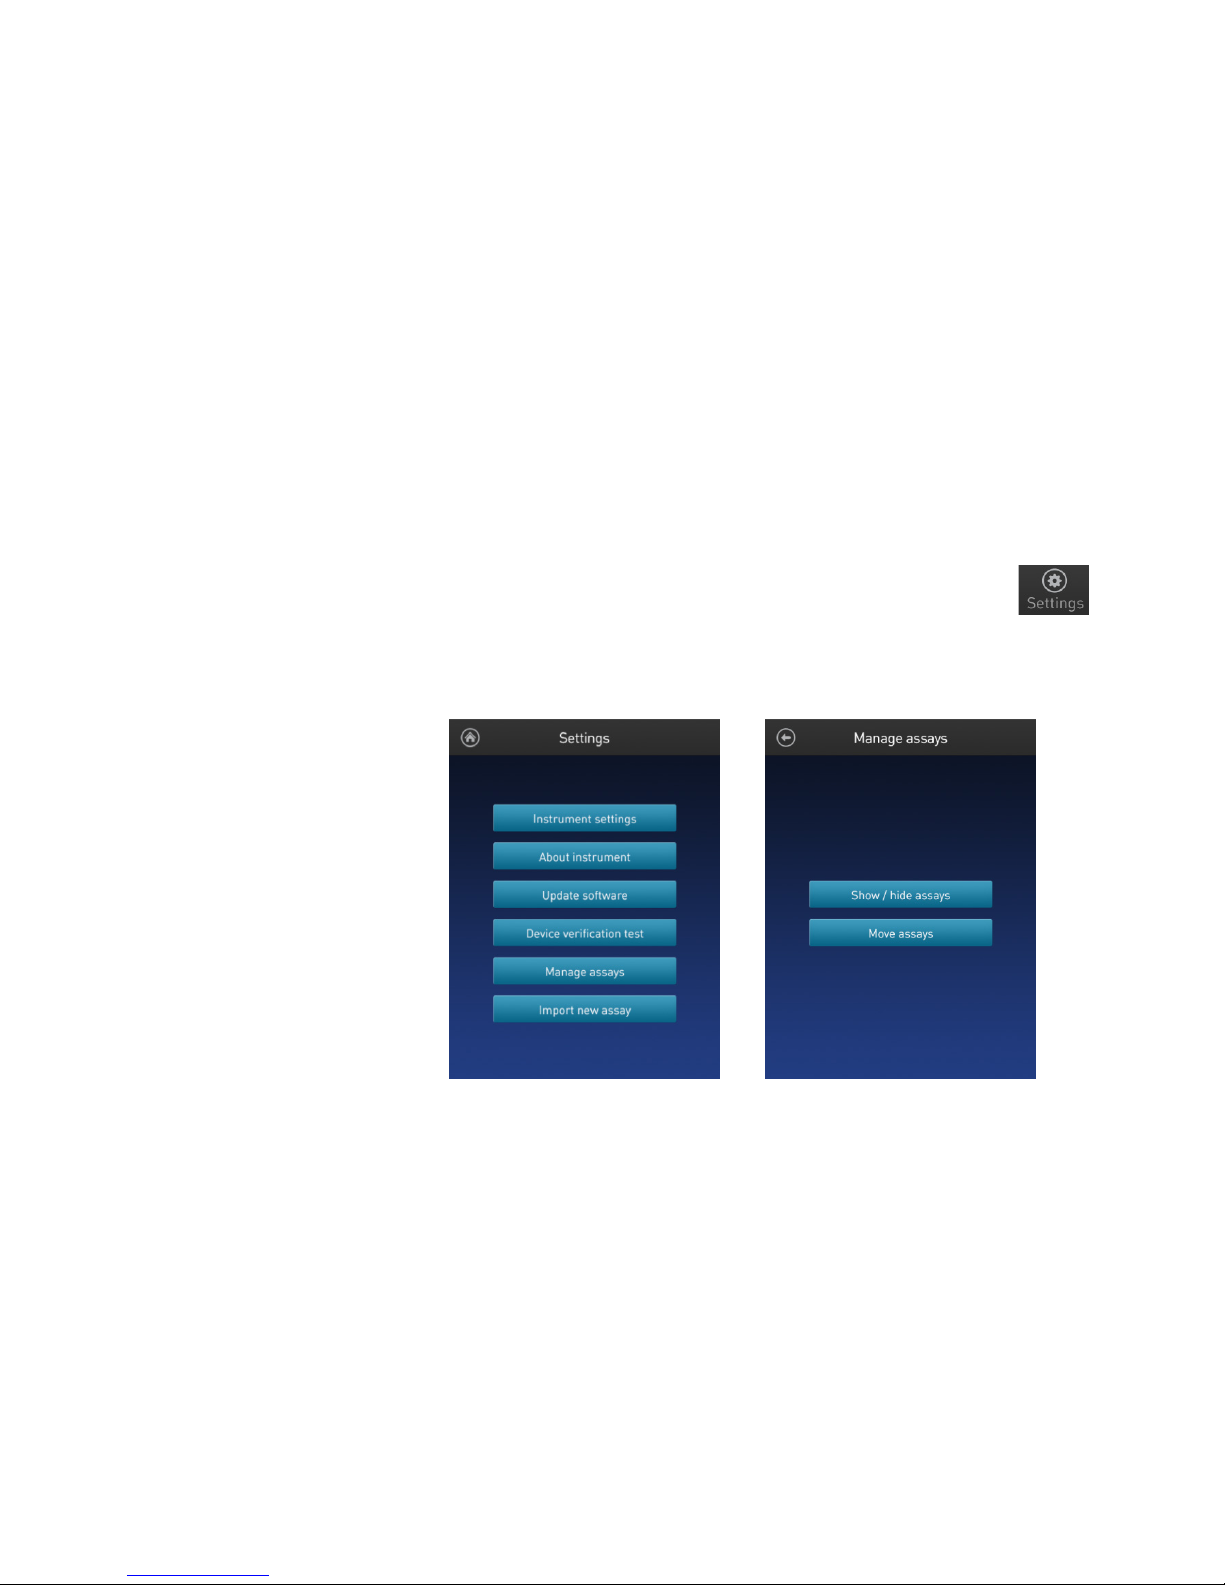
1. To access the Manage assays function, press Settings on the Home
screen.
2. On the Settings screen, press Manage assays to open the Manage assays screen.
From the Manage assays screen, you can select Show/hide assays (page 41) or
Move assays (page 43).
40
Qubit™ 4 Fluorometer User Guide
Page 43
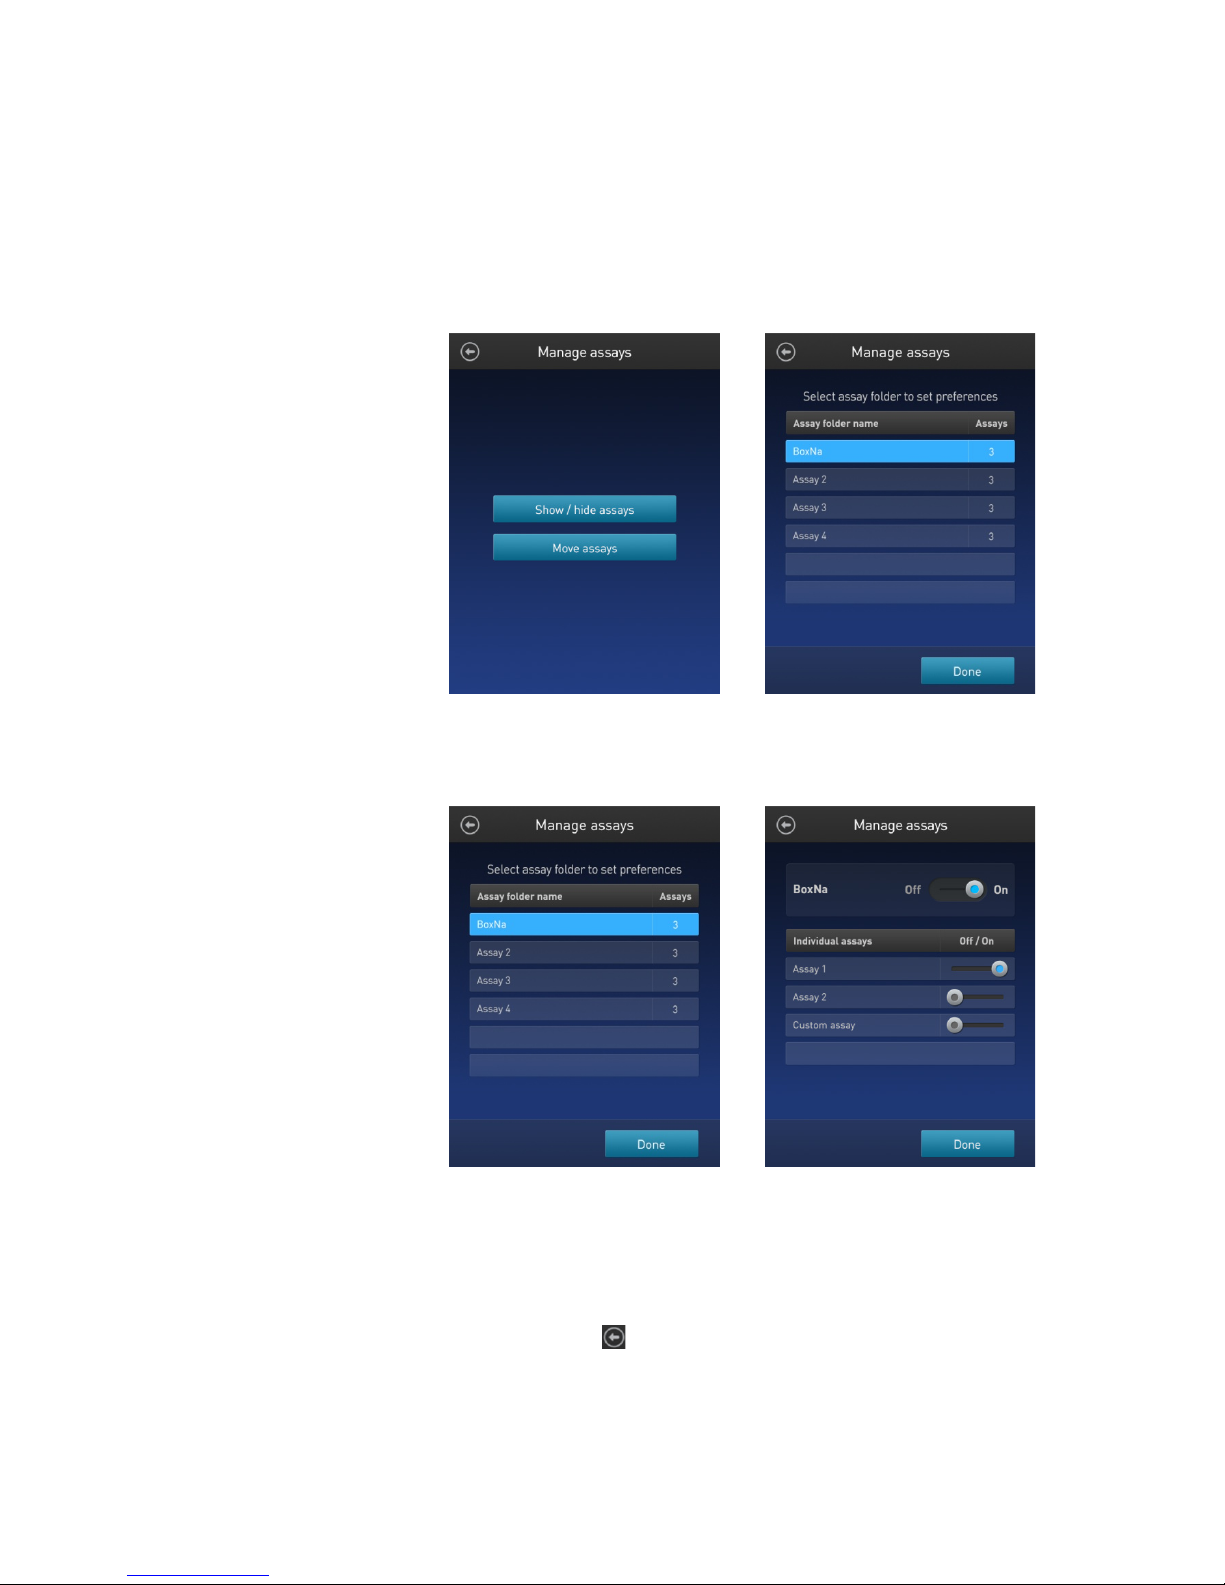
Show/Hide all
1. From the Settings screen, press Manage assays.
3. Select the assay folder containing the assays you wish to show or hide.
screen, or press Done to save the changes and return to the Settings screen.
Show/Hide assays
assays within the
assay folder
2. On the Manage assays screen, press Show/hide assays.
The software displays a list of the existing assay folders available on the
instrument. Each assay folder contains individual assays.
The software displays a list of existing individual assays within the selected
assay folder and the controls for showing and hiding them.
4. To hide all of the assays in the assay folder, swipe the Assay folder On/Off
switch located to the right of the assay folder name to the Off position (to the
left).
To show all of the assays in the assay folder, swipe the Assay folder On/Off
switch to the On position (to the right).
5. Press the Back button ( ) to save the changes and return to the previous
Qubit™ 4 Fluorometer User Guide
41
Page 44
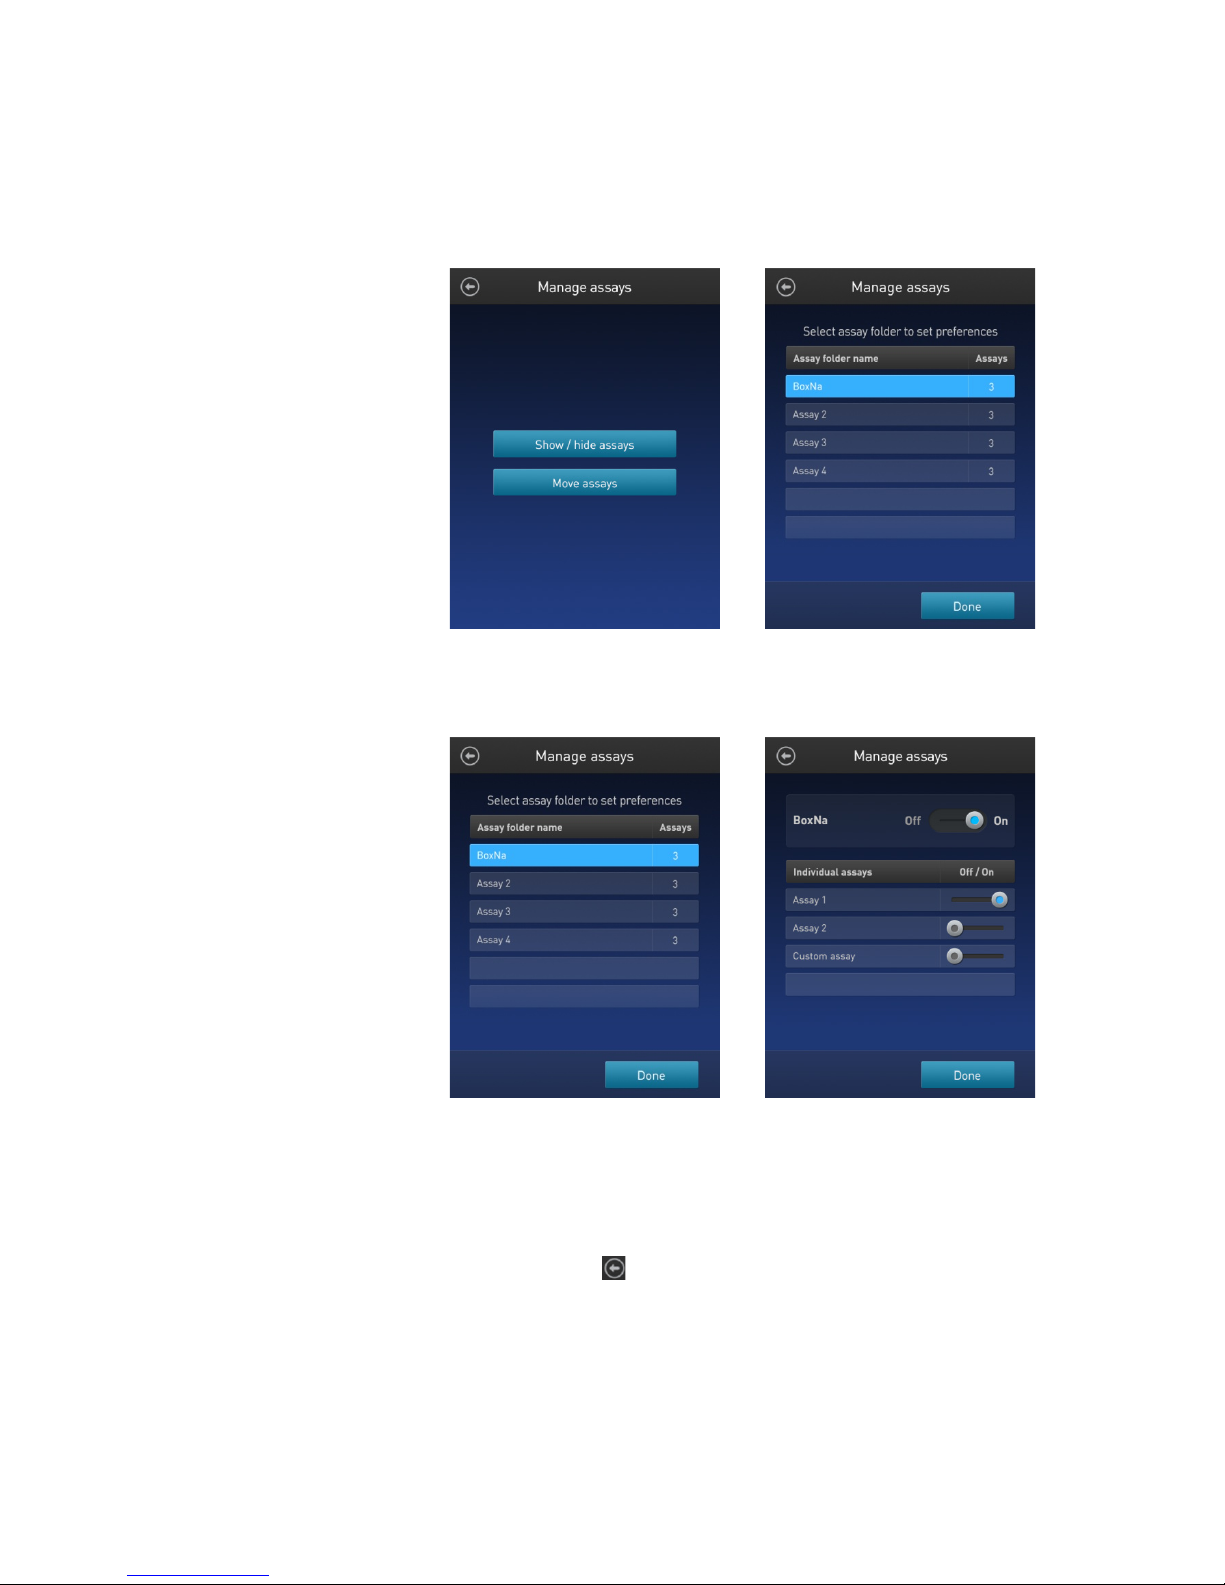
Show/Hide
individual assays
1. From the Settings screen, press Manage assays.
3. Select the assay folder containing the assays you wish to show or hide.
2. On the Manage assays screen, press Show/hide assays.
The software displays a list of the existing assay folders available on the
instrument. Each assay folder contains individual assays.
The software displays a list of existing individual assays within the selected
assay folder and the controls for showing and hiding them.
4. To hide an individual assay, swipe the Assay On/Off switch located to the
right of the assay to the Off position while keeping the Folder On/Off switch
in the On position.
To show an individual assay, swipe the respective Assay On/Off switch to
the On position while keeping the Folder On/Off switch in the On position.
5. Press the Back button ( ) to save the changes and return to the previous
screen, or press Done to save the changes and return to the Settings screen.
42
Qubit™ 4 Fluorometer User Guide
Page 45
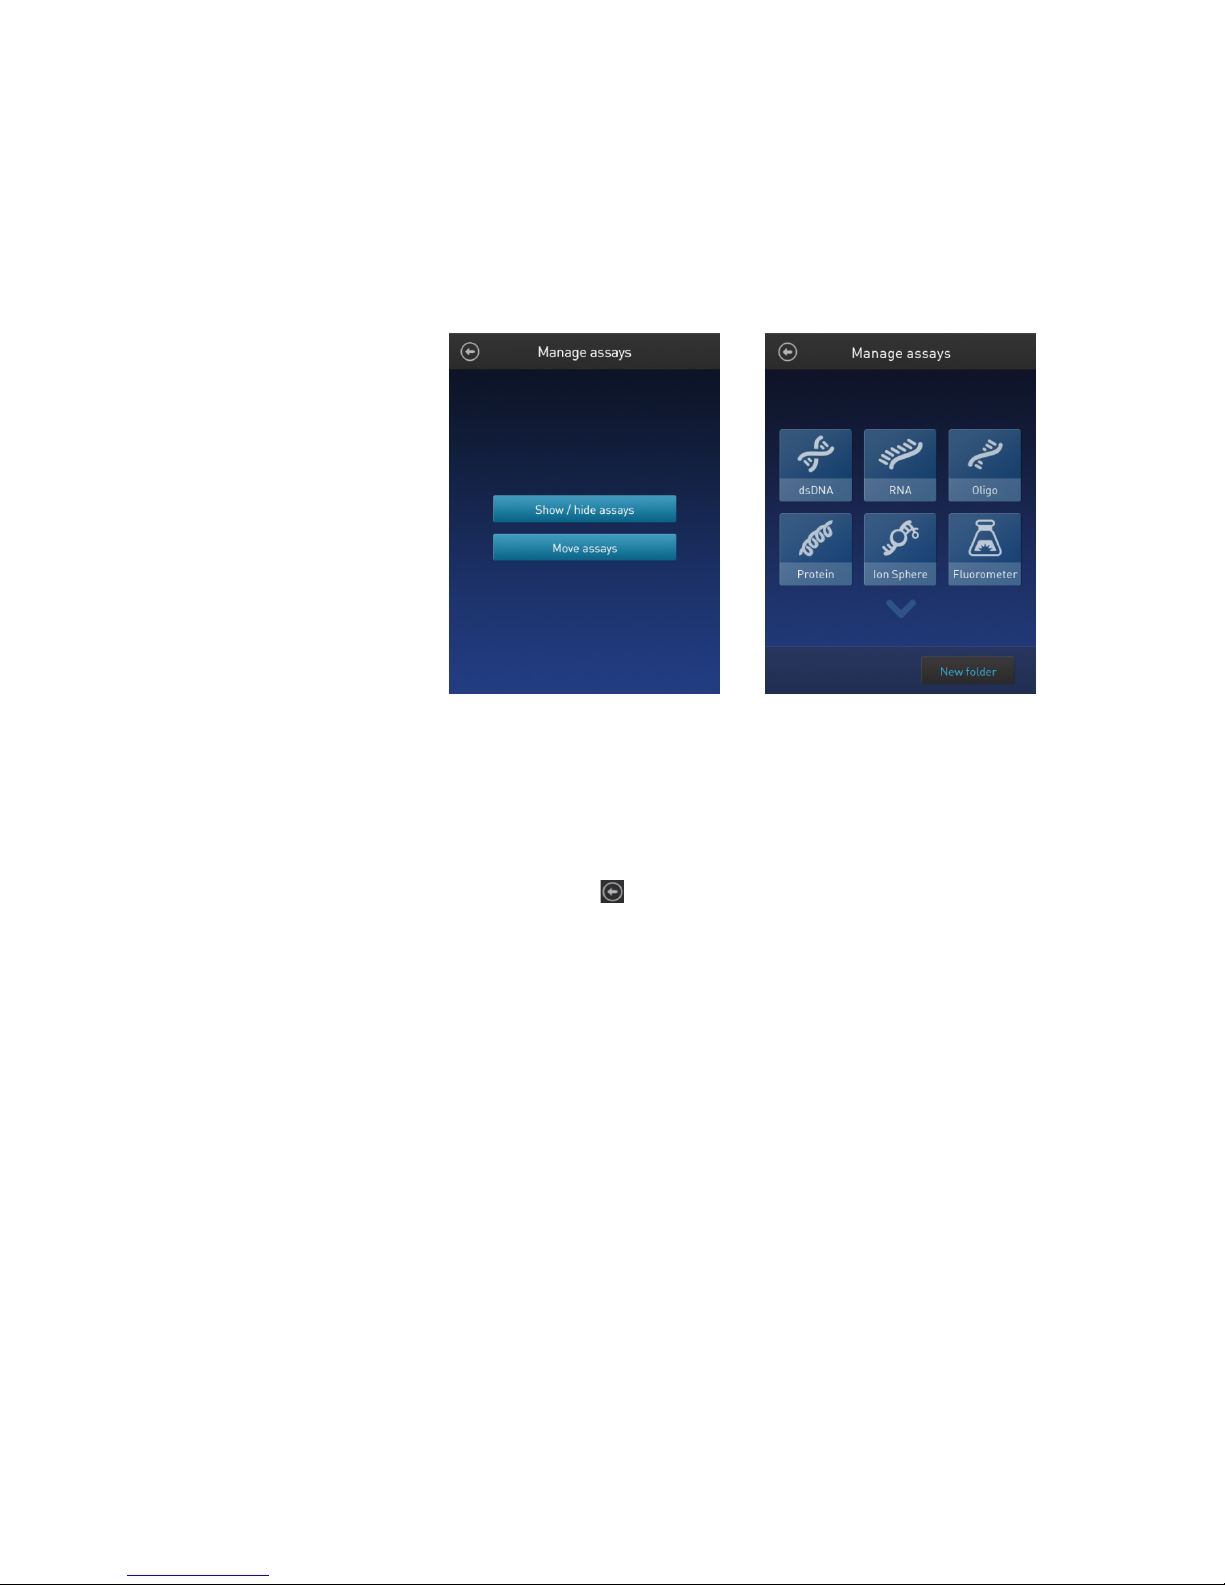
Move assay folders/
1. From the Settings screen, press Manage assays.
assays screen.
Move assays
individual assays on
the Home screen
2. On the Manage assays screen, press Move assays.
The software displays the Manage assays screen with available assay folders
and individual assays, and activates the move function.
3. Press and hold on the desired assay folder or individual assay to detach it
from its current position, then drag it to its new location.
To move the selected object to a different Home screen page, drag it up or
down to the desired screen.
4. Release the drag to drop the selected assay folder or individual assay in its
new location.
5. Press the Back button ( ) to save the changes and return to the Manage
Qubit™ 4 Fluorometer User Guide
43
Page 46
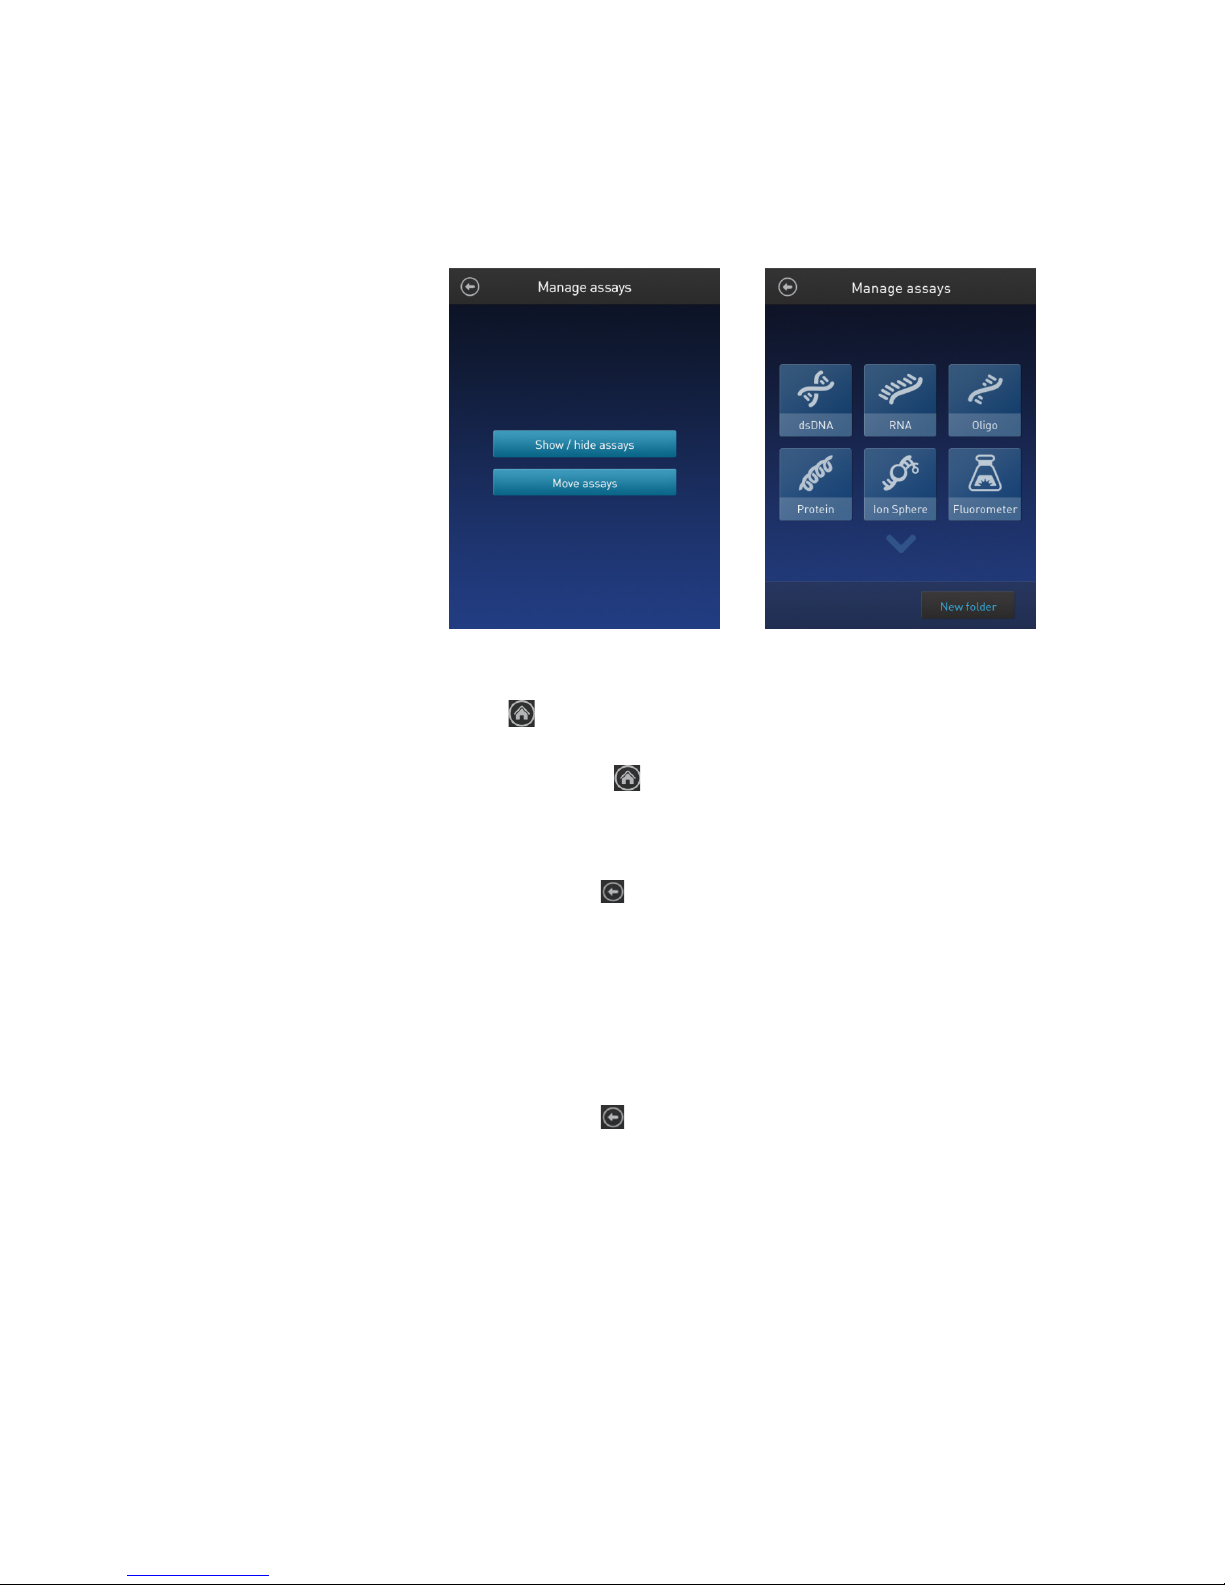
Move assays
between folders
1. From the Settings screen, press Manage assays.
assays screen.
Move assays within
1. From the Settings screen, press Manage assays.
assays screen.
2. On the Manage assays screen, press Move assays.
The software displays the Manage assays screen with available assay folders
and individual assays, and activates the move function.
3. Press the desired assay folder to open the folder’s assay screen.
4. Press and hold the individual assay to detach it and drag it over the Home
screen icon ( ).
5. Release the drag to drop the selected assay to the Home screen.
6. Press the Home button ( ) to return to the Home screen.
In the Home screen, you can press and drag the selected assay to another
assay folder or location as described in “Move assay folders/ individual
assays on the Home screen”, page 43.
7. Press the Back button ( ) to save the changes and return to the Manage
folders
44
2. On the Manage assays screen, press Move assays.
3. Press the desired assay folder to open the folder’s assay screen.
4. Press and hold the individual assay to detach it, and drag and drop it to its
new location in the folder.
5. Press the Back button ( ) to save the changes and return to the Manage
Qubit™ 4 Fluorometer User Guide
Page 47
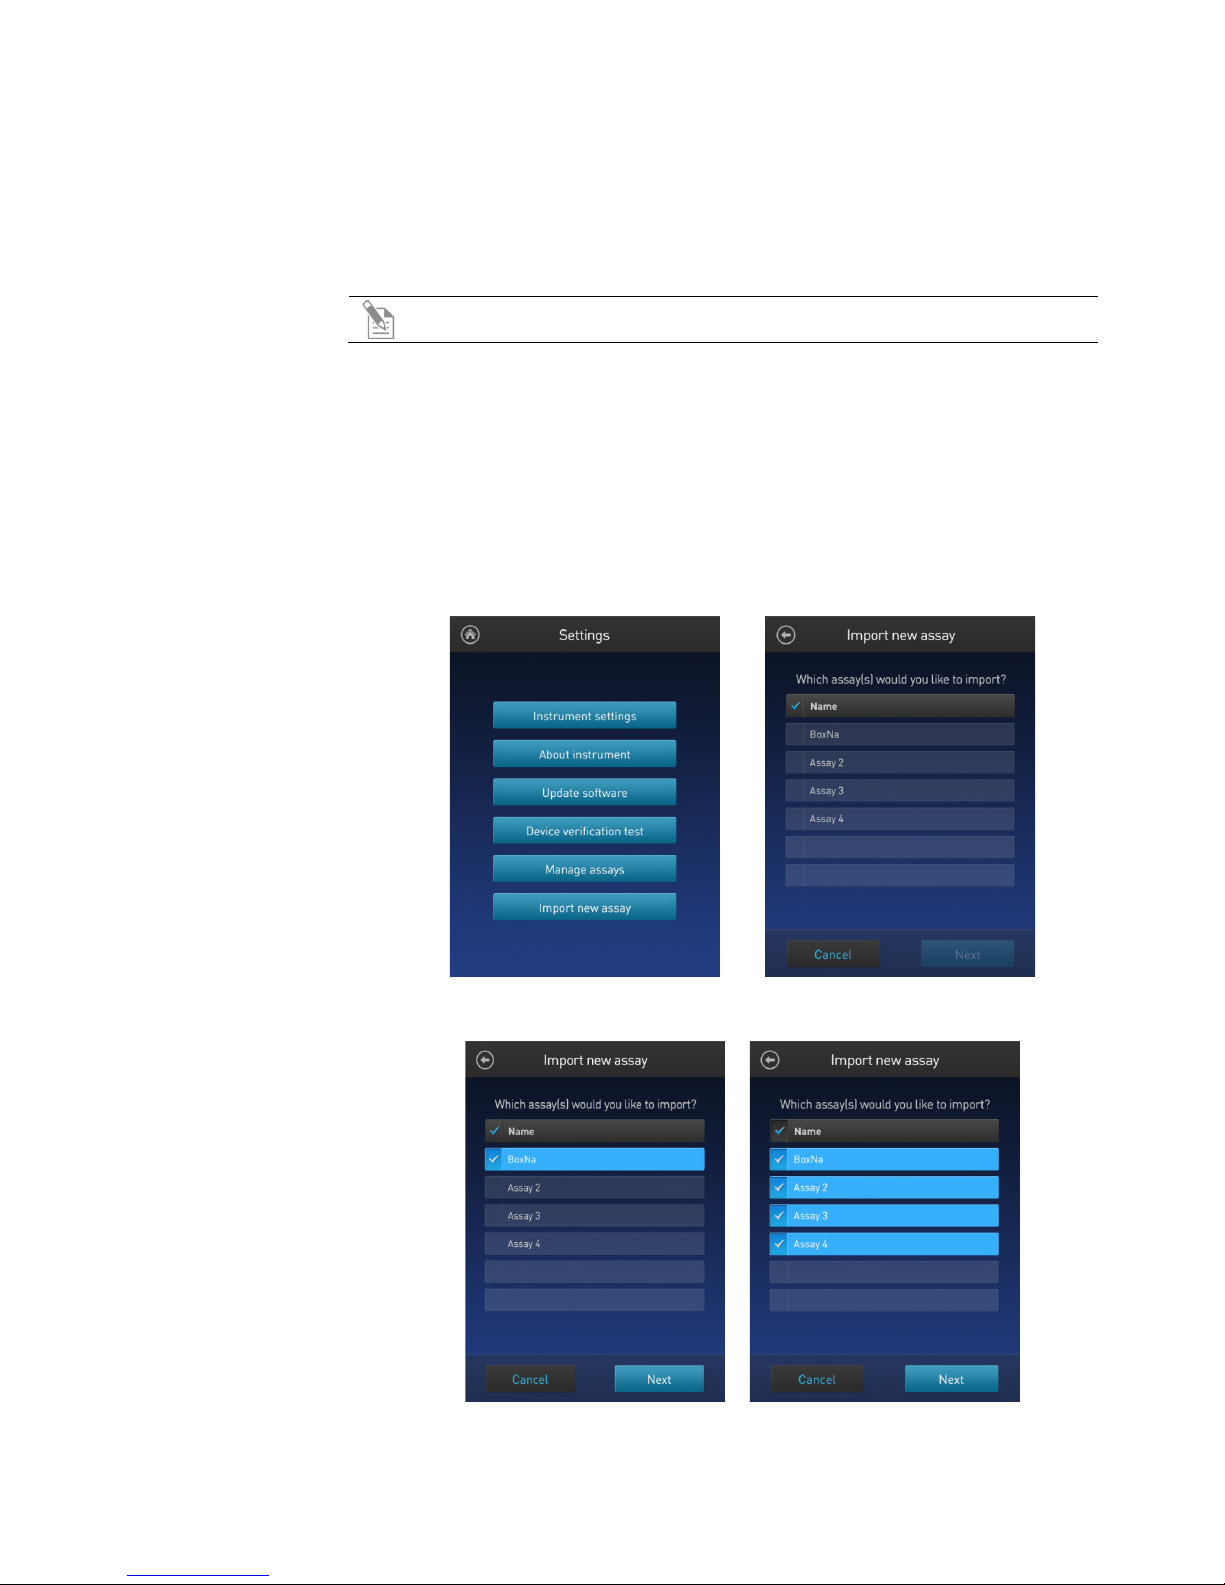
MyQubit assay files
You can add pre-existing MyQubit assays to your Qubit™ 4 Fluorometer by
to the instrument from a USB drive or from an external computer via a USB cable.
Import assays from
1. To import one or more new assays, go to thermofisher.com/qubit and
Import assays
downloading the assay files from thermofisher.com/qubit, then importing the files
Note: MyQubit assay files have the file extension .qbt.
a USB drive
download the MyQubit assay files (.qbt file) you wish to install to the root
directory of a USB drive.
Do not download the .qbt files to a folder in the USB drive.
2. Insert the USB drive containing the new assay files into the USB drive port of
the Qubit
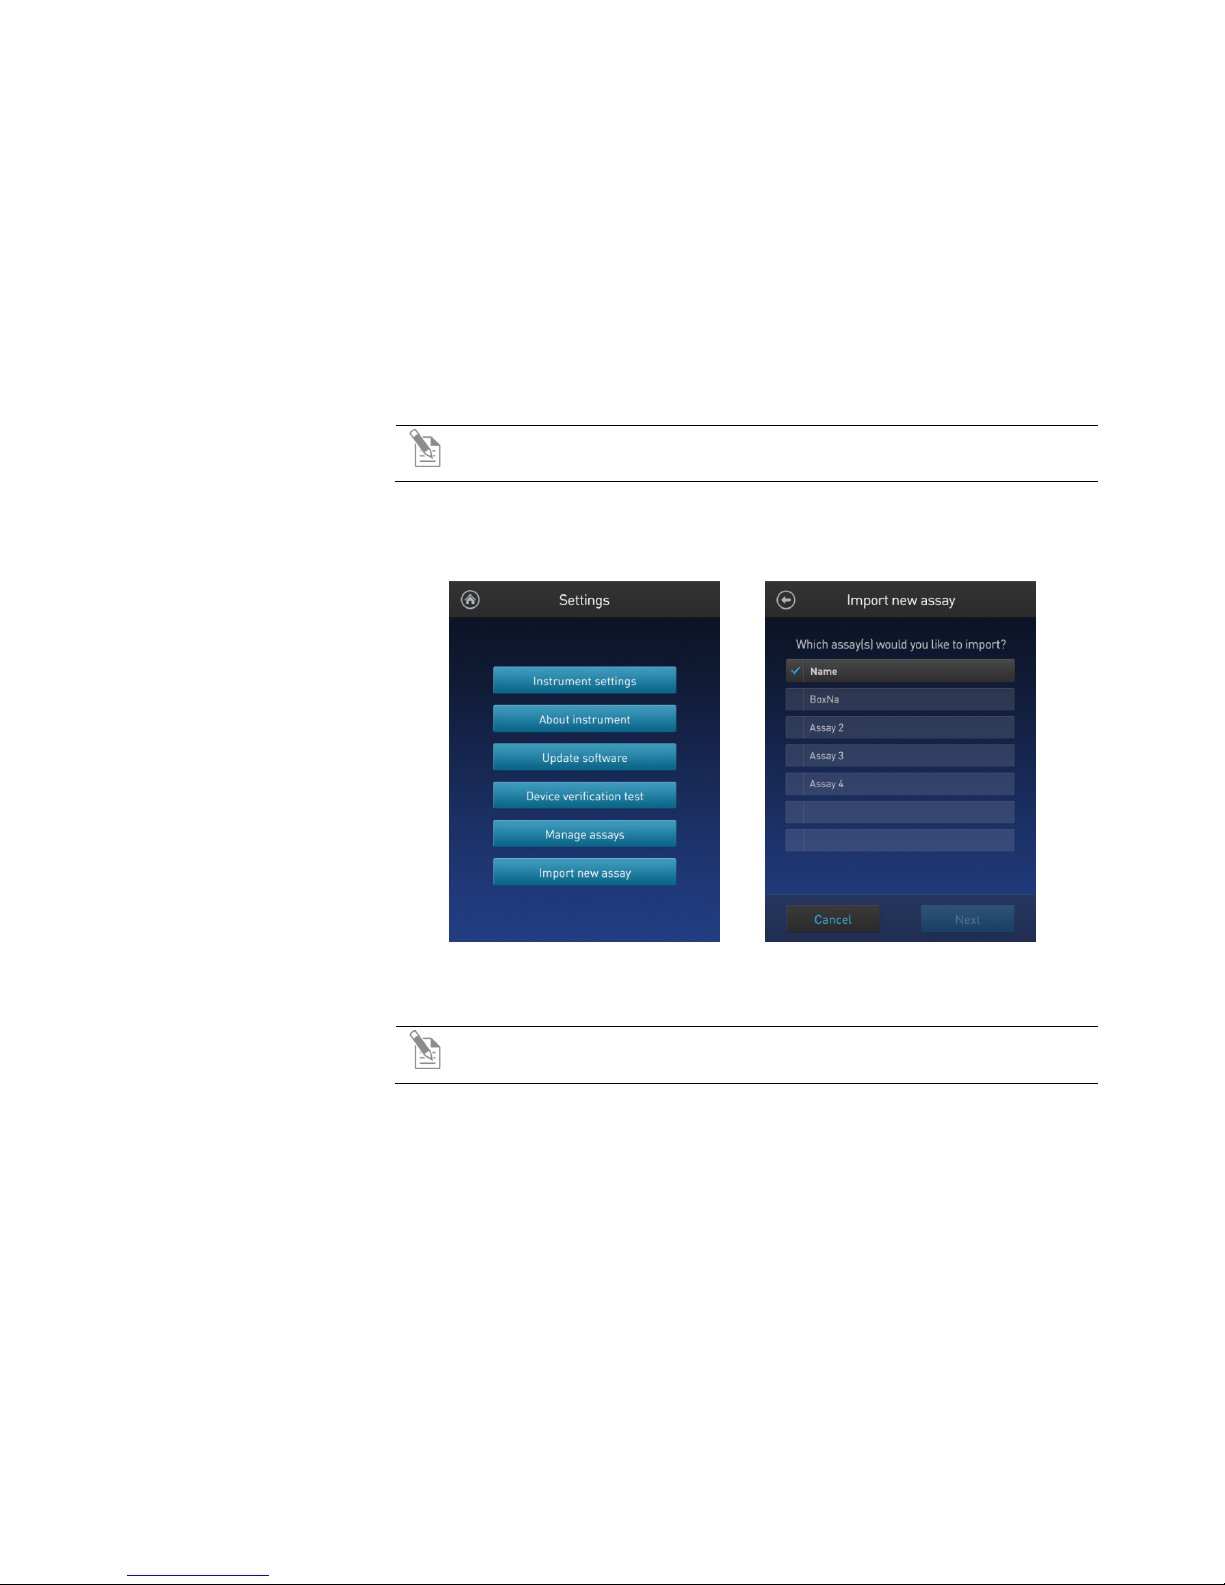
3. Go to the Settings screen and press Import new assay. The instrument
searches the USB drive for assay files and the Import new assay screen displays
™
4 Fluorometer.
the names of the assays found in the USB drive.
4. Press the assays you wish to import to select. Touching the selected assay a
second time deselects it. You can select multiple assays for import.
Qubit™ 4 Fluorometer User Guide
45
Page 48
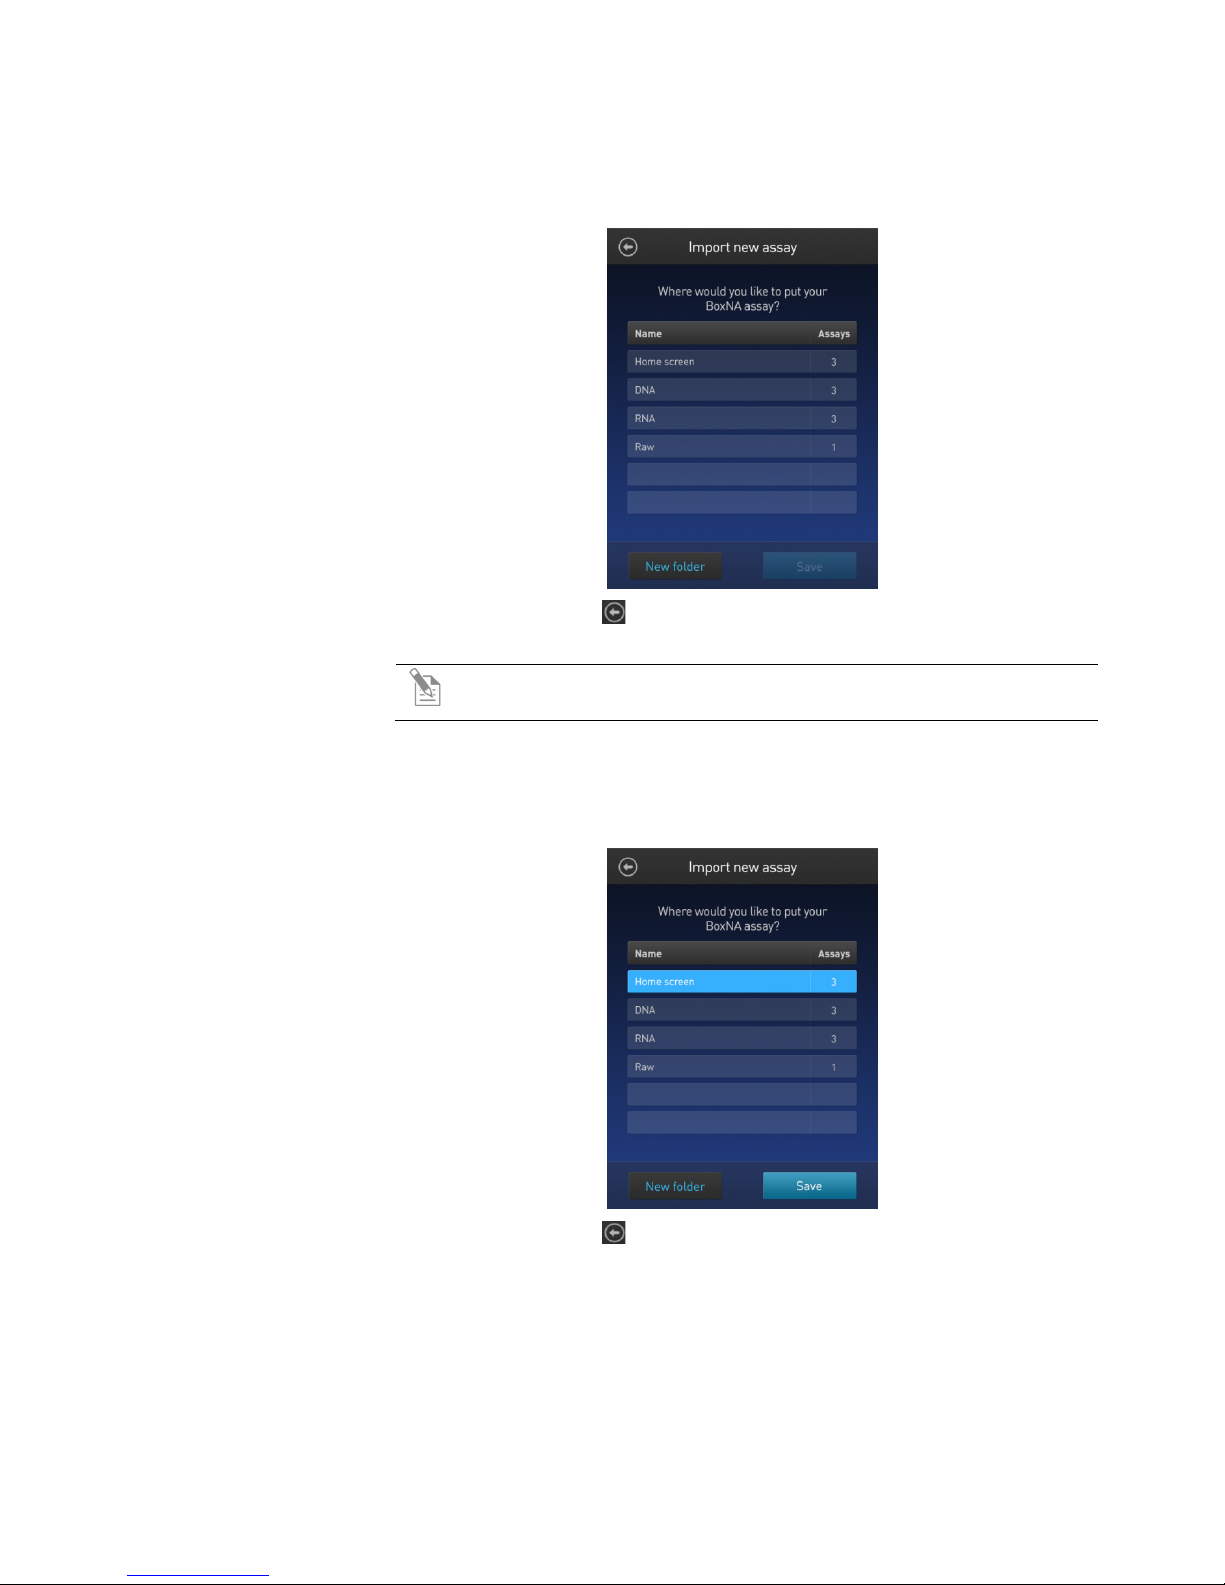
5. Press Next. The Import new assay screen displays the name of the assay being
imported (or the first assay, if multiple assays were selected) and lists the
importing the assays.
6. Select the destination folder for the new assay and press Save. The Verification
destination folders where you can save it.
Press the Back button ( ) or Cancel to return to the Settings screen without
Note: Each assay folder can contain up to 9 individual assays. The
Home screen can contain up to 36 assays or folders.
screen opens (see Step 9, page 47).
Alternatively, press New folder to create a new destination folder (see Step 8,
page 47).
Press the Back button ( ) or Cancel to abort the import process and return to
the Settings screen.
46
Qubit™ 4 Fluorometer User Guide
Page 49
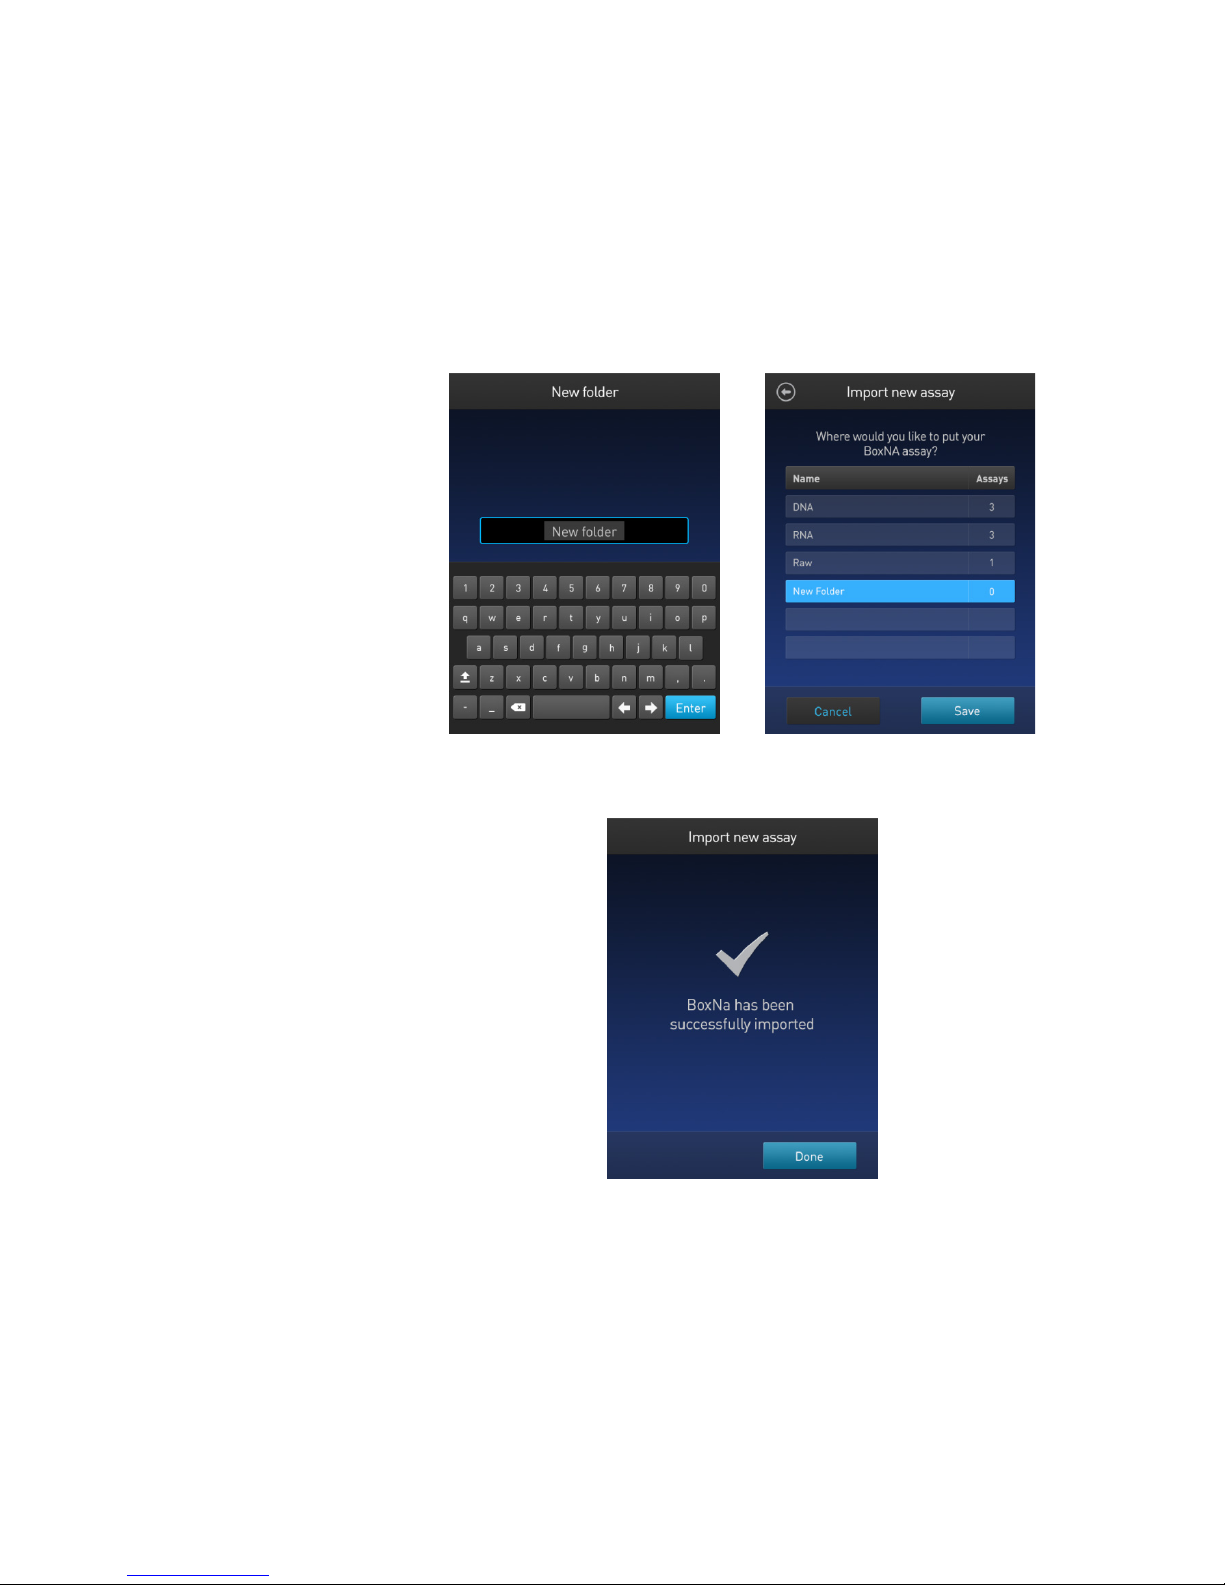
7. In the New folder screen, press the New folder text field. The keyboard opens.
import queue (see Step 10, page 48).
Using the keyboard, enter the name of the new destination folder. You can
use up to 11 characters; spaces at the beginning or the end of the name are not
recognized.
Press Enter, then press Done to return to the Import new assay – Where screen.
The newly created folder will appear on the list of folders.
Select the new destination folder, then press Save. The Verification screen
opens (see Step 9, page 48).
8. In the Verification screen, press Done to complete the import process.
If importing only one assay, you will be returned to the Home screen.
If importing multiple assays, you will be returned to the Import new assay
screen and prompted to select the destination folder for the next assay in your
Qubit™ 4 Fluorometer User Guide
47
Page 50
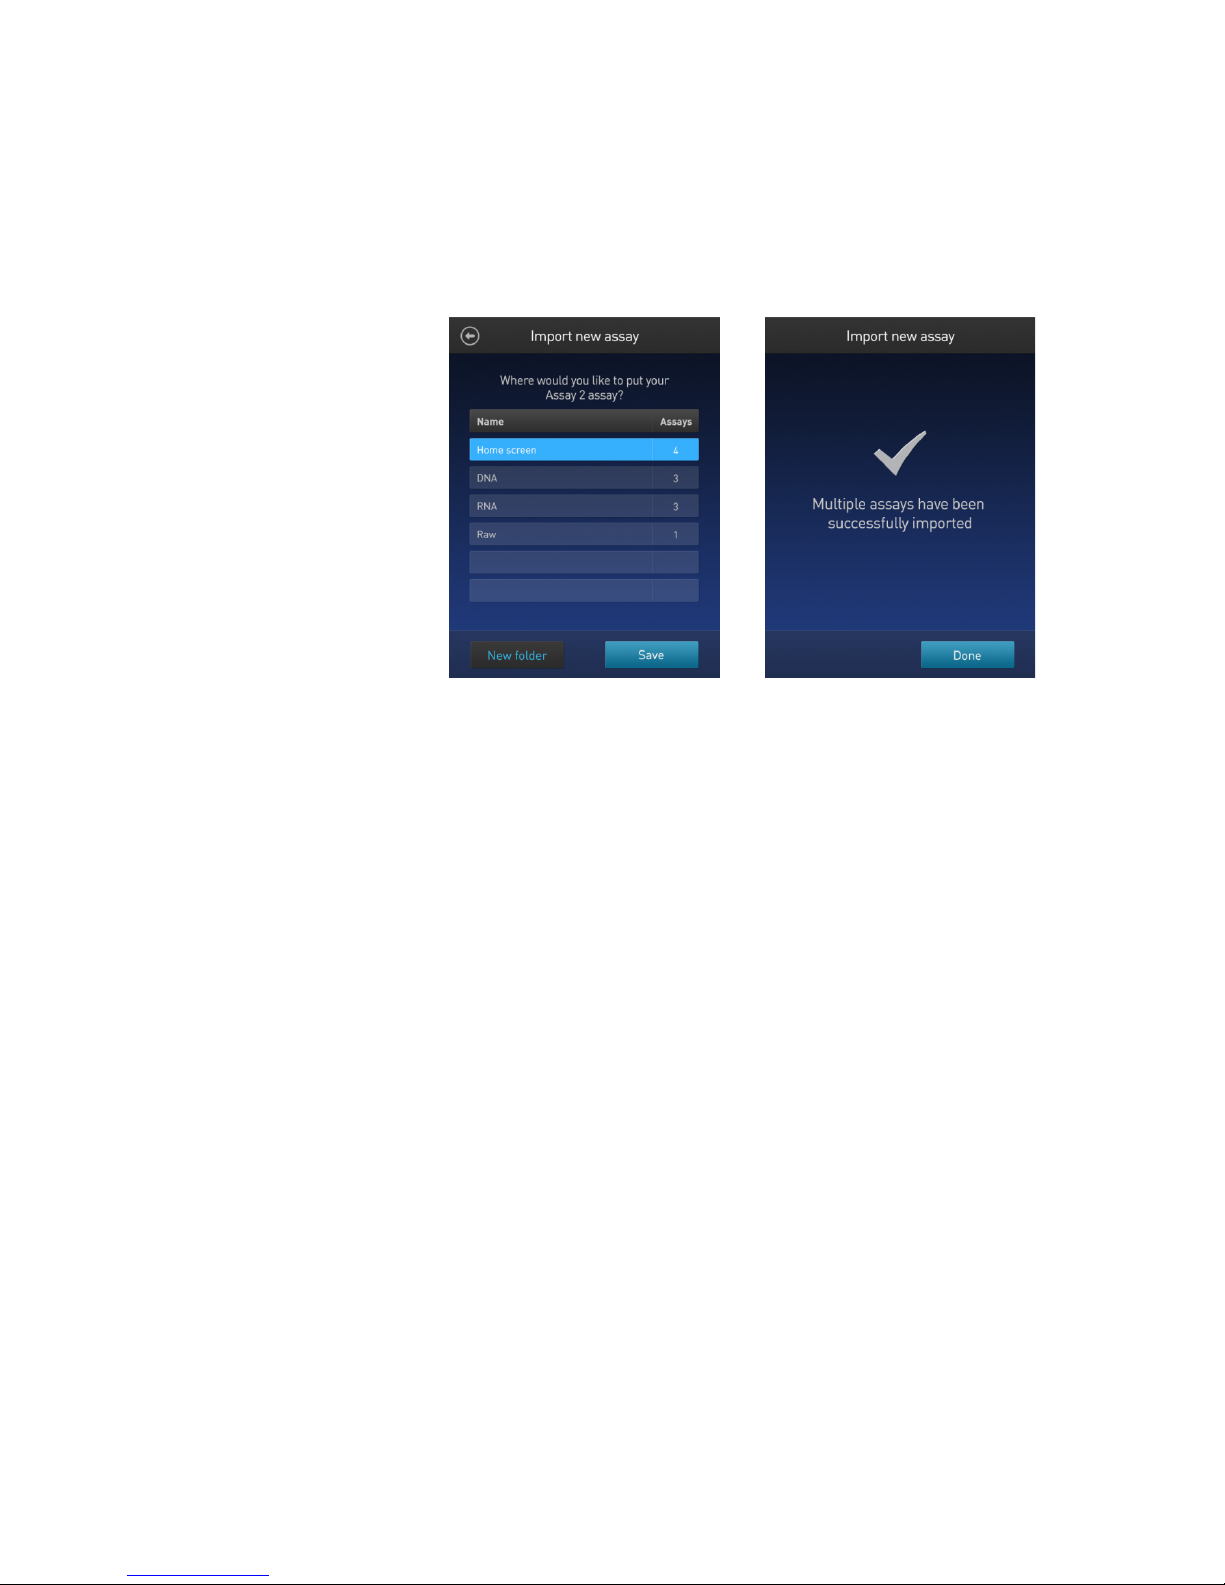
9. Select the destination folder for the next assay in your import queue, then
press Save.
10. Press Done to complete the import process and return to the Home screen.
Repeat this process until you have imported all the assays you have selected
in Step 4 (page 45).
Once all the assays you have selected are imported successfully, the
Verification screen opens.
48
Qubit™ 4 Fluorometer User Guide
Page 51
Import assays from
When the Qubit™ 4 Fluorometer is connected to a computer via a USB cable,
instrument window on your computer.
4. Go to the Settings screen on the Qubit™ 4 Fluorometer and press Import new
a computer
MyQubit .qbt assay files can be transferred directly from the computer to the
instrument.
1. Go to thermofisher.com/qubit and download the MyQubit assay files (.qbt
file) you wish to install.
2. Connect the Qubit
using a mini-B USB cable. The Qubit
™
4 Fluorometer from the USB cable port to the computer
™
4 Fluorometer should be recognized as
an external device by the computer.
3. Copy and paste or click-drag the .qbt files you wish to import to the Qubit™
Note: The assays will not be visible on the Qubit™ 4 Fluorometer until
you perform the next step.
assay. The Import new assay screen displays the names of the assays found on
the computer.
5. Follow Steps 4–11 of the import procedure described in “Import assays from a
USB drive”, page 45.
Note: The USB cable must remain connected to both the Qubit™ 4
Fluorometer and the computer for the assay to be imported.
Qubit™ 4 Fluorometer User Guide
49
Page 52
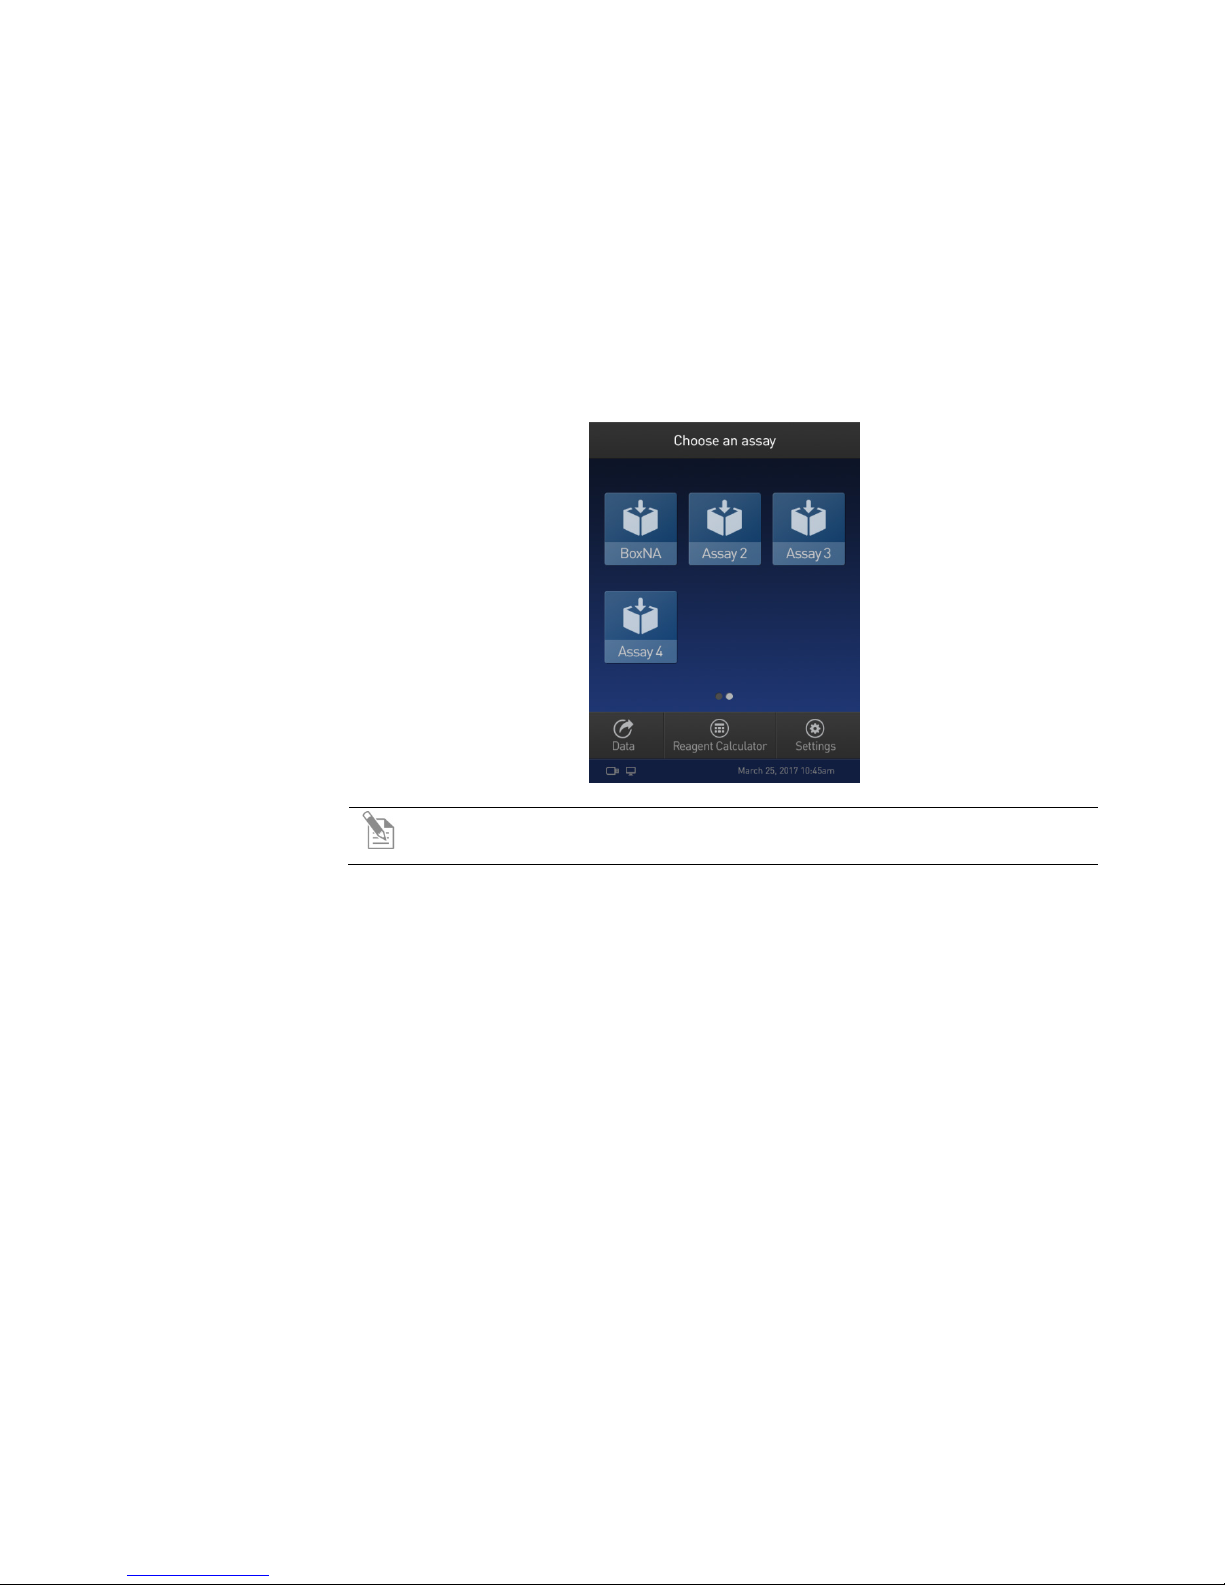
Create your own assay for the Qubit™ 4 Fluorometer
Create a MyQubit
All Qubit™ 4 Fluorometers are pre-loaded with MyQubit software, which allows
assay
you to create new applications for the Qubit™ 4 Fluorometer using parameters
uploaded to the instrument via a USB drive, without changing the existing assays.
Fluorometer mode allows you to use the Qubit™ 4 Fluorometer with any reagent
or assay compatible with the optical settings of the instrument. In this way, the
device can be used as a mini-fluorometer. With the data gathered in the
Fluorometer mode, personalized, custom assays can be created using the guided
webtool and the MyQubit EZGuide available at thermofisher.com/qubit.
Note: For complete instructions on creating your own assay and access to
the web tool, go to thermofisher.com/qubit.
50
Qubit™ 4 Fluorometer User Guide
Page 53
Maintenance
The Qubit™ 4 Fluorometer does not need regular maintenance. To troubleshoot
Do not expose the Qubit™ 4 Fluorometer to direct sunlight.
Clean the Qubit™ 4
We recommend that you clean the Qubit™ 4 Fluorometer periodically to prevent the
6. Instrument maintenance
Maintenance and cleaning
problems with the instrument, contact Technical Support (page 69).
• Do not perform any repairs or service on the Qubit
damaging the instrument.
•
CAUTION! Never disassemble or service the instrument yourself. Do not
remove any covers or parts that require the use of a tool. Unauthorized
repairs may damage the instrument or alter its functionality, which may
void your warranty. Contact your local distributor to arrange for service.
™
4 Fluorometer to avoid
Fluorometer
buildup of dust and dirt that might reduce its performance and cause contamination.
CAUTION! To avoid electrical shock, always disconnect the power cable
before cleaning or decontaminating the instrument.
IMPORTANT! Using a cleaning or decontaminating method other than
that specified by the manufacturer may result in damage to the instrument.
• Clean the surface of the Qubit™ 4 Fluorometer with a damp cloth.
• To clean the touchscreen, disconnect the power cable, and clean the touchscreen
with a soft cloth lightly moistened with LCD (liquid crystal display) cleansing
detergent.
• Cleaning the screen with excessive force can damage the touchscreen. Wipe the
screen dry immediately.
• Do not use abrasive cleaning solutions or material to prevent the touchscreen
from getting scratched.
™
• To disinfect the instrument, disconnect the power cable from the Qubit
4
Fluorometer and clean the instrument, including the touchscreen, with a soft
cloth lightly moistened with 70% ethanol, 70% isopropanol, or 10% bleach
(0.6% sodium hypochlorite).
• The cloth included with the instrument is not recommended for use with
ethanol or isopropanol.
• Ensure that the cleaning solution does not enter the power button, the power
inlet, the sample port, or the USB drive ports.
• Never pour or spray any liquids directly on the instrument to avoid electrical
shock when the instrument is plugged in.
Qubit™ 4 Fluorometer User Guide
51
Page 54
Software updates
Update the
To update the Qubit™ 4 Fluorometer with the latest software from Thermo Fisher
instrument
software
Scientific:
1. Download the latest software to a USB drive or to your computer from
thermofisher.com/qubit.
2. If using a USB drive, insert the USB drive into the instrument.
If using a computer, connect the Qubit
™
USB cable. The Qubit
Fluorometer will be recognized as an external device
by the computer.
Note: The connection between the computer and the Qubit™
must be maintained until the transfer and update (described in the next
steps) are complete.
a. On your computer, find the Qubit™ software update file that you wish to
upload.
b. Copy and paste or click-drag the software file to the Qubit
drive. This saves the software file to the root directory of your Qubit
instrument; however, the software file transfer will not be visible on the
™
Qubit
instrument.
3. On the Home screen, press Settings.
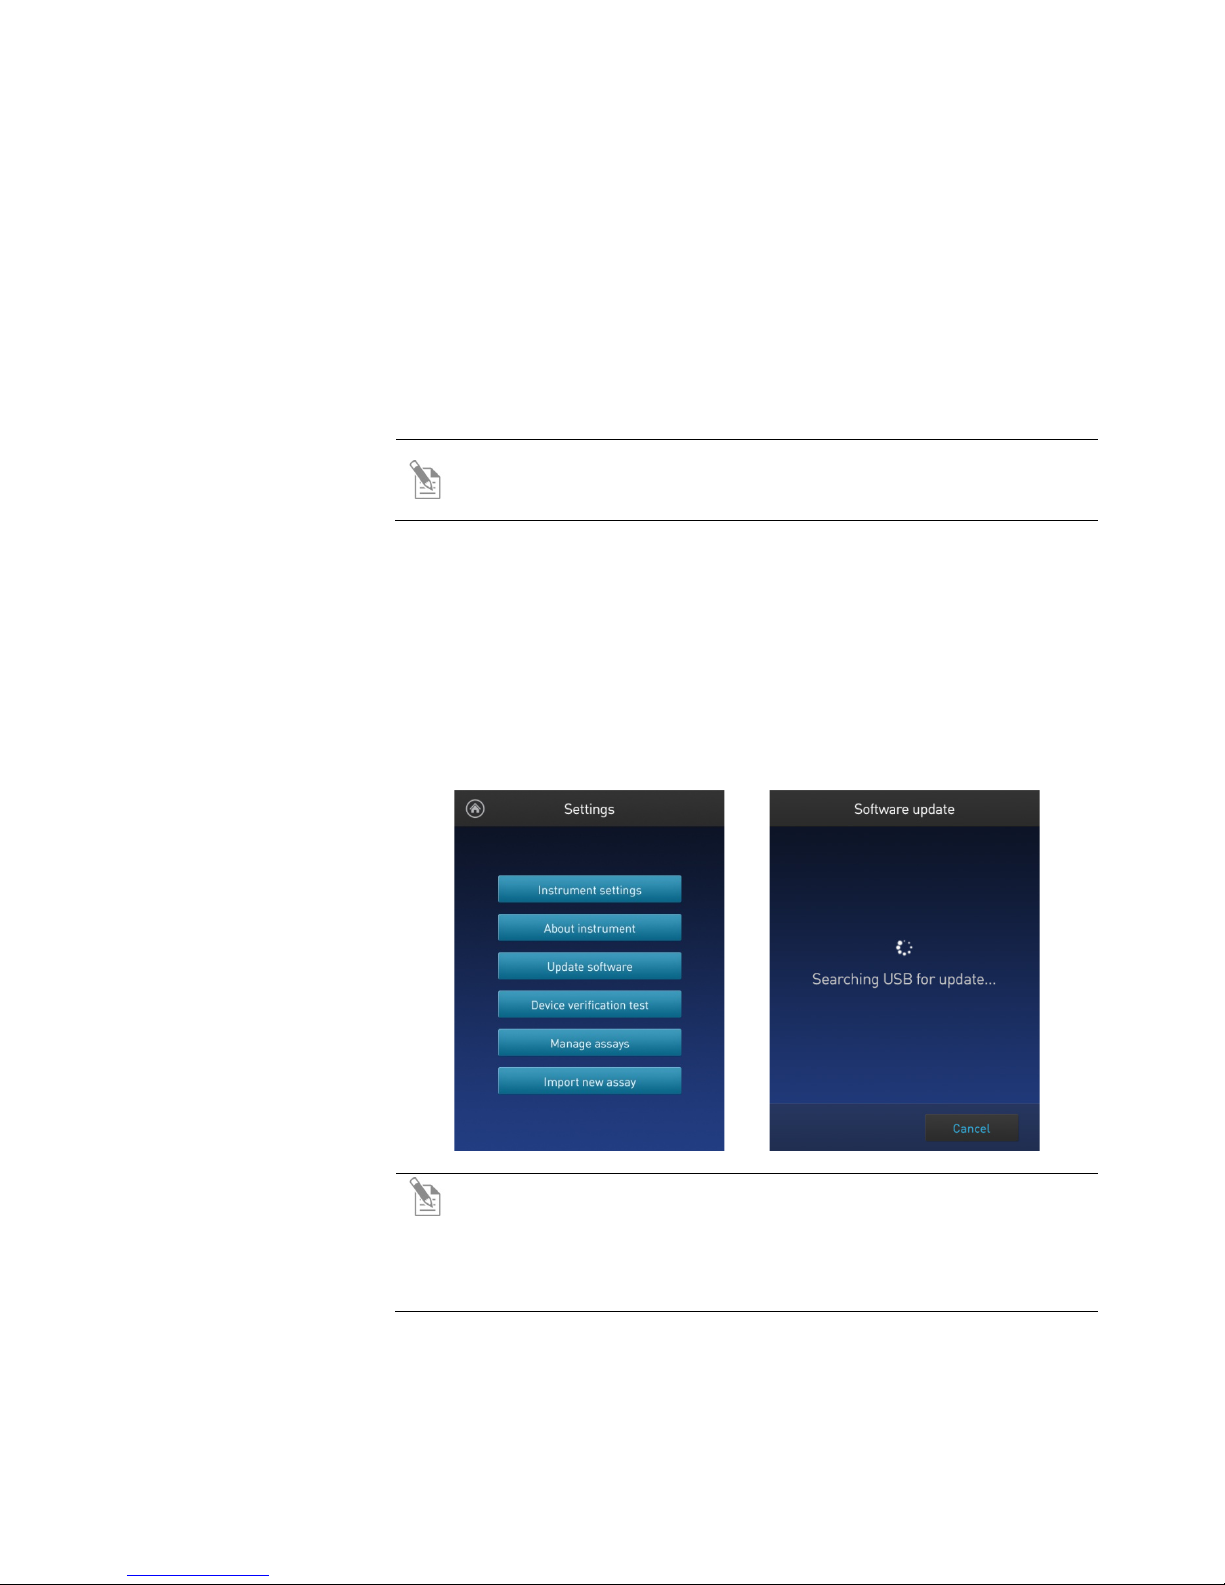
4. On the Settings screen, press Update software. The instrument searches the
USB drive or the computer for the update.
™
instrument to the computer using a
™
instrument
™
52
Note: If the USB drive is not inserted into the USB drive port or the
instrument does not recognize the USB drive, a warning message is
displayed.
To proceed with the software update, insert the correct USB drive into
the instrument, then press Close.
Qubit™ 4 Fluorometer User Guide
Page 55
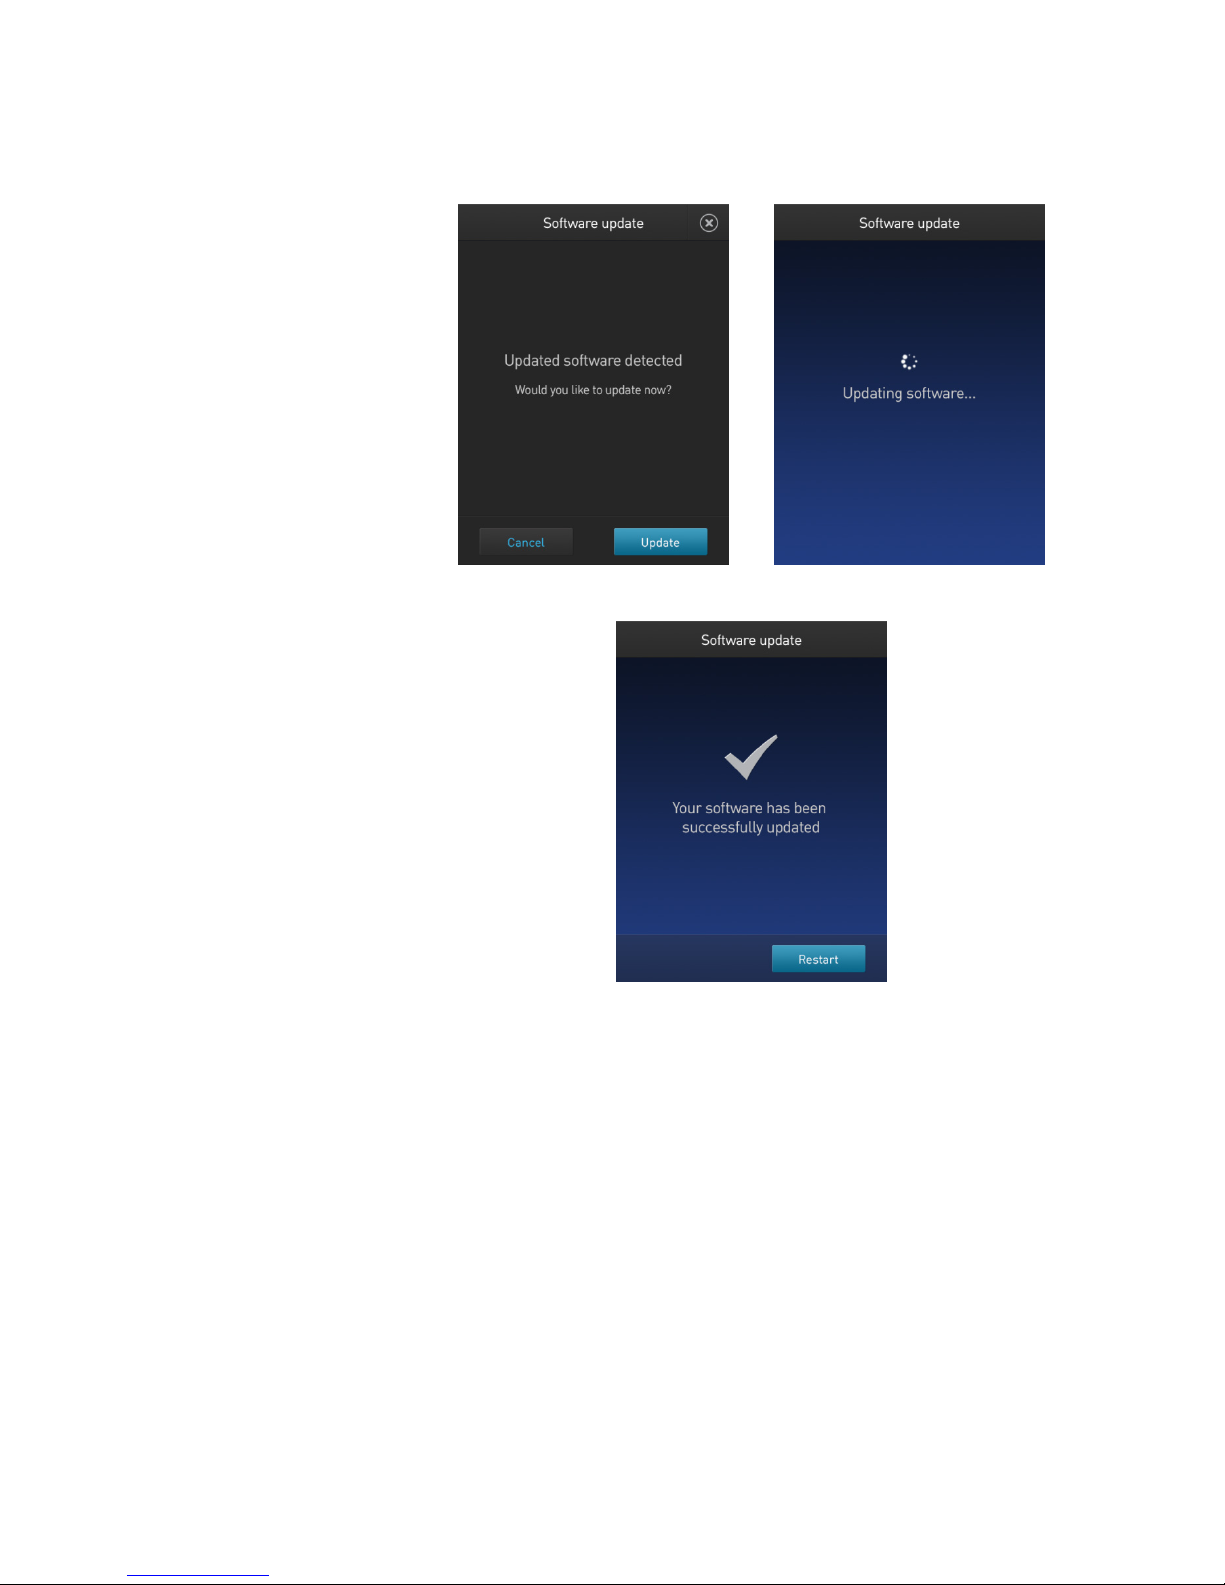
5. When the appropriate files are detected, the Software update screen is
6. When prompted, press Restart to complete the software update.
displayed. Press Update to update the software.
Qubit™ 4 Fluorometer User Guide
53
Page 56
Device verification test
Perform Device
The device verification test checks the internal components of the Qubit™ 4
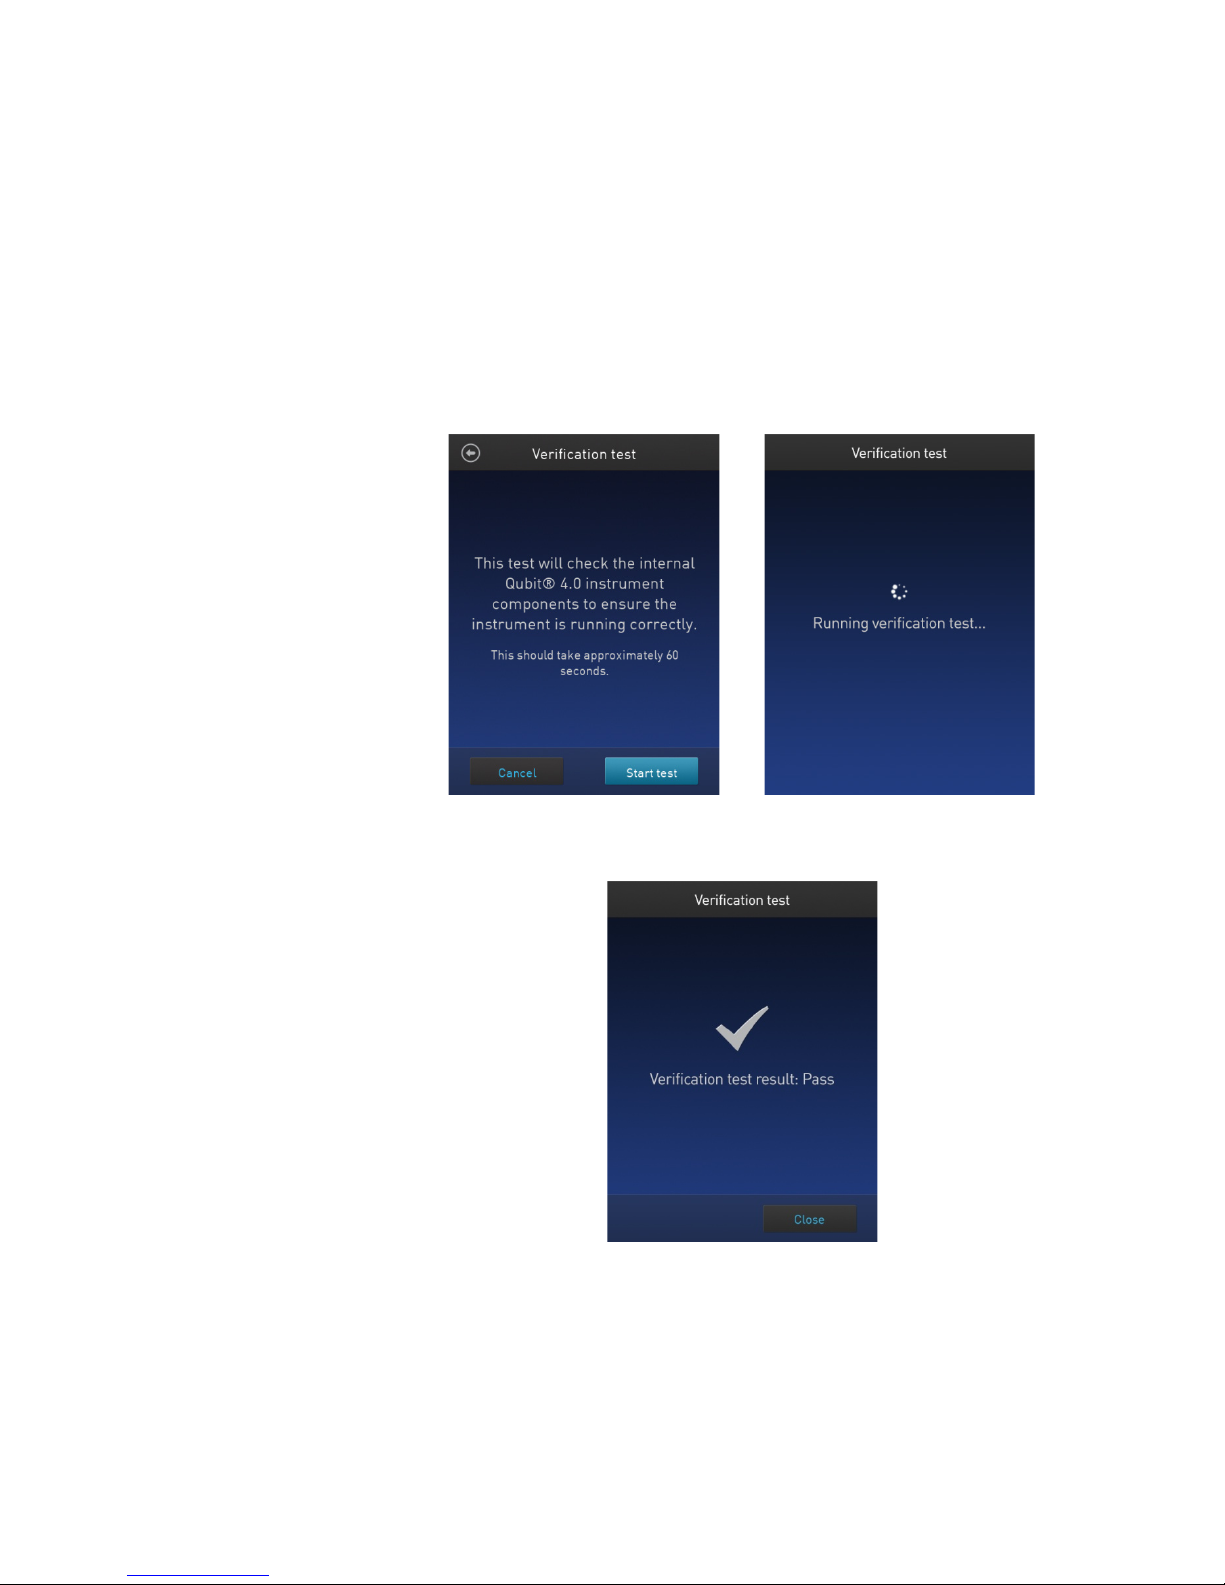
4. When the test is complete, the software displays the error status.
persists with the lid closed, contact Technical Support for help (page 69).
verification test
Fluorometer. Perform the device verification test when a problem with the
instrument is suspected. It is not necessary to perform the verification test on a
regular basis.
1. On the Home screen, press Settings.
2. On the Settings screen, press Device verification test. Verification test screen
opens.
3. On the Verification test screen, press Start test.
• If no errors are found, press Close to return to the Settings screen.
• If errors are found, a Verification test failed message appears. Verify that
the test was run with the lid closed. If the Verification test failed message
54
Qubit™ 4 Fluorometer User Guide
Page 57
Handling samples
•
centrifugation will often help dissipate bubbles.
High reading
•
Troubleshooting
• Ensure that the assay tubes are at room temperature at the time the reading is
• Be careful not to spill sample into the sample chamber. Promptly wipe any
• The Qubit
• The tube must be clean and dry on the outside when taking readings.
• Minute bubbles in samples will cause errors in readings. Be sure not to
Appendix A: Troubleshooting
The calibration standards included in the Qubit™ microRNA, Qubit™ RNA HS,
Qubit™ RNA XR, Qubit™ RNA IQ, and Qubit™ RNA BR Assay Kits are highquality RNA standards. The integrity and concentration of these standards is
critical to the optimal performance of the Qubit
recommend treating the rRNA standards as you would any other precious
RNA. Use appropriate RNAse-free handling techniques, including RNAsefree gloves, pipette tips, and tubes. Keep the tube lids closed whenever
possible; do not press the pipet to the inside wall of the tube when
withdrawing a sample. Return the RNA standards to –80°C as soon as
possible after use.
taken. Do not hold assay tubes in your hand and do not leave assay tubes in
™
the Qubit
4 Fluorometer for longer than it takes to read the fluorescence. See
“Assay temperature”, page 58.
spills.
™
assays are very sensitive and even small amounts of material
from a previous sample may result in errors. Use a clean 0.5-mL PCR tube for
each reading.
Moisture and condensation on the tube surface can lead to reading errors.
introduce bubbles into samples. Slight tapping on the tube wall or brief
™
RNA assays. We highly
Qubit™ 4 Fluorometer User Guide
The sample is out of range. Use a sample that is less concentrated.
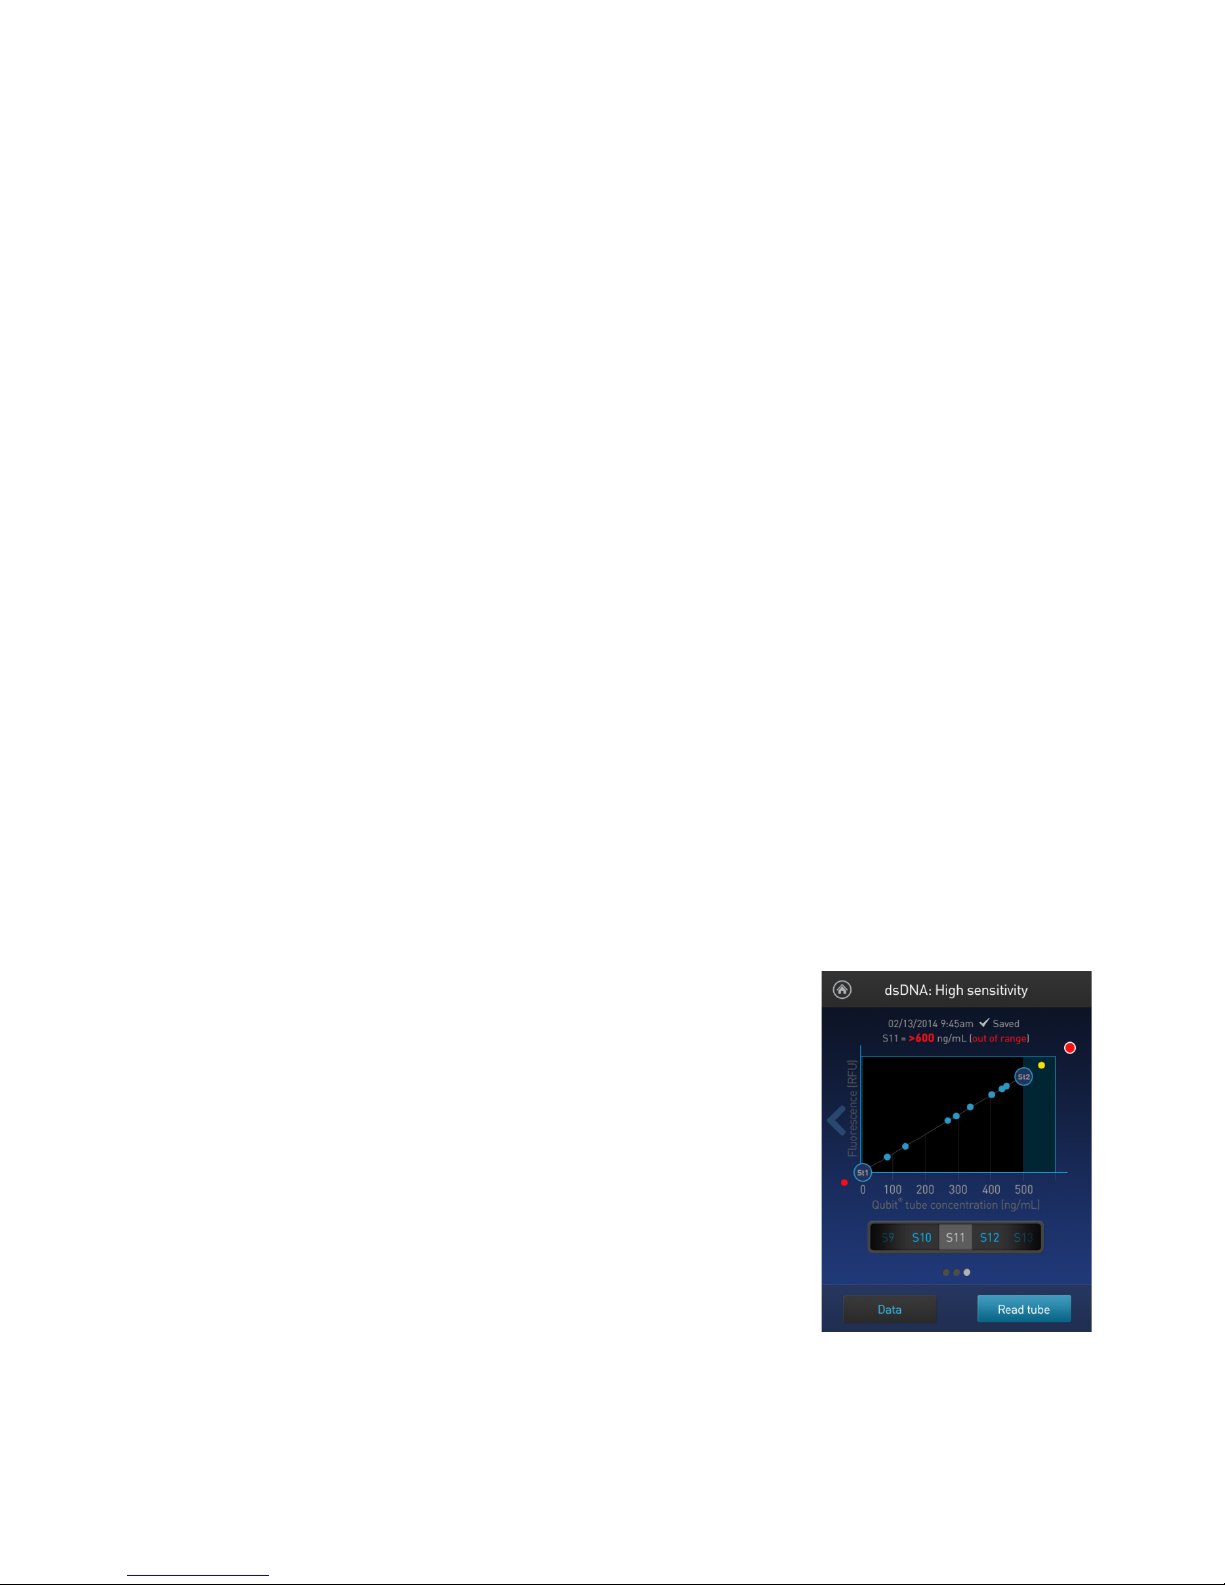
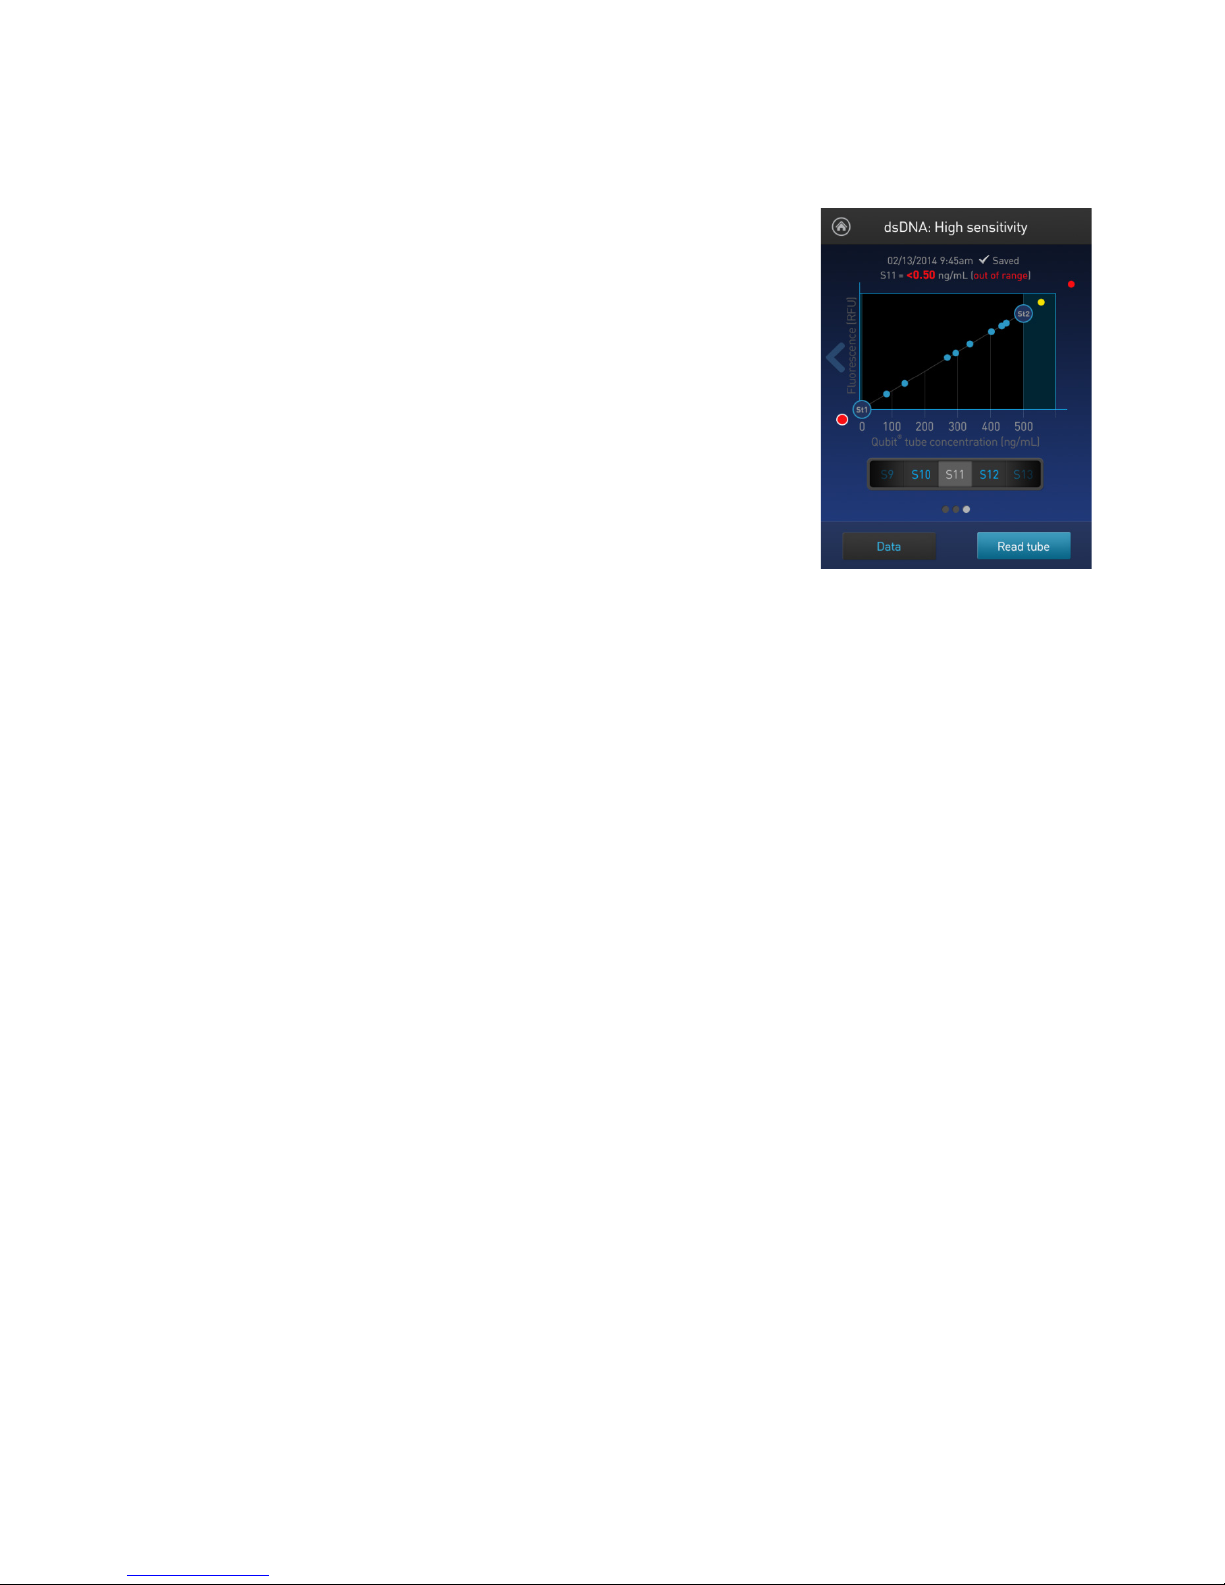
• For Qubit™ quantitation assays, view the
Fluorescence vs. Concentration graph in the
Results screen to confirm that the values for
the samples fall between the values of the
standards (page 27).
• Ensure that the lid is closed while reading
standards and samples.
• Prepare samples and standards according to
™
the instructions in the Qubit
assay kit you
are using.
• Ensure that the assay is performed entirely at
room temperature.
55
Page 58
Low reading
• The sample is out of range. Use a sample that is more concentrated or use a
lower dilution (for example, 20 µL in 180 µL instead of 10 µL in 190 µL).
Ensure that the assay is performed entirely at room temperature.
• For Qubit™ quantitation assays, view the
Fluorescence vs. Concentration graph in the
Results screen to confirm that the values for
the samples fall between the values of the
standards (page 27).
• Ensure that you have prepared the Qubit
working solution correctly (1:200 dilution
using the buffer provided in the kit).
• Ensure that you have prepared the standard
tubes correctly (10 µL of each standard in
190 µL of Qubit
• Ensure that the standard and sample tubes
are filled to 200 µL.
• Protect the Qubit
solutions from light.
• Select the correct Qubit
performing and calibrate the fluorometer correctly. Standards must be used
in the correct order.
•
™
working solution).
™
reagent and working
™
4 Fluorometer assay for the Qubit™ assay you are
™
56
Qubit™ 4 Fluorometer User Guide
Page 59
How the Qubit™ 4
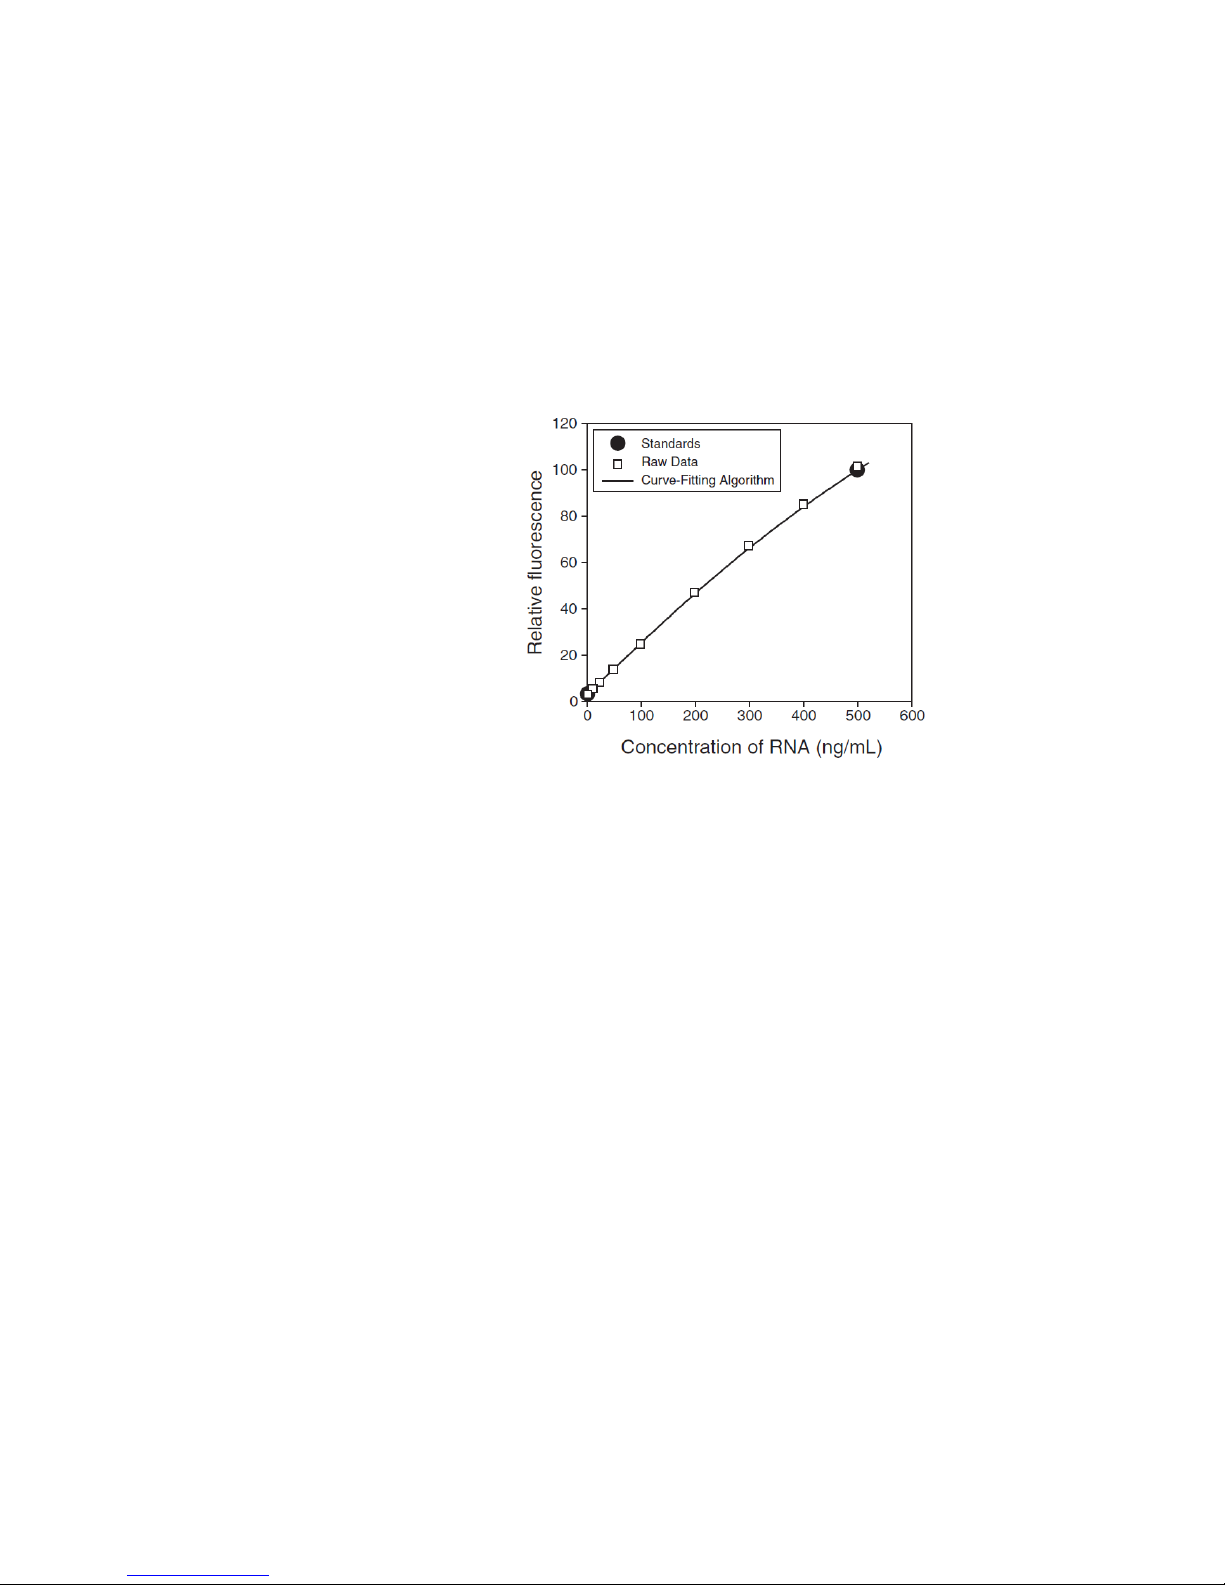
The Qubit™ 4 Fluorometer generates concentration data based on the relationship
Figure 1.
assay. Data for other Qubit™ quantitation assays are generated by similar algorithms.
Incubation time
To allow the Qubit™ assay to reach maximum fluorescence, incubate the tubes for
Photobleaching of
The Qubit™ DNA and protein exhibit high photostability in the Qubit™ 4
equilibrate to room temperature for 30 seconds before taking another reading.
Critical Qubit™ Assay considerations
Fluorometer
calculates
concentration
between the two standards used in calibration (three for the Qubit™ protein
assay). The plot below shows the line corresponding to the curve-fitting
algorithm (a modified Hill plot) used in the calculation of concentration data for
™
the Qubit
RNA HS assay. For reference, the positions of the standards and a set
of data points from an actual experiment are shown superimposed onto the line.
This plot demonstrates that the curve-fitting algorithm gives accurate values for
quantitation.
The curve-fitting algorithm used to determine concentration in the Qubit™ RNA HS
the DNA and RNA assays for 2 minutes after mixing the sample or standard with
the working solution. After this incubation period, the fluorescence signal is stable
for 3 hours at room temperature for all nucleic acid assays except the Qubit
ssDNA assay, which is stable for up to 30 minutes.
The Qubit™ protein assay requires 15 minutes of incubation for a stable signal. For
greatest accuracy in the protein assay, the incubation time of the samples should
be within 10 minutes of the incubation time of the standards.
Qubit™ reagents
Fluorometer, showing <0.3% drop in fluorescence after 9 readings and <2.5%
drop in fluorescence after 40 readings. It is important to remember, however, that
™
if the assay tube remains in the Qubit
4 Fluorometer for multiple readings, a
temporary reduction in fluorescence will be observed as the solution increases in
temperature (see Figure 2 in “
Assay temperature”, page 58). The RNA assays
including the RNA IQ assay should only be read once.
Note that the temperature inside the Qubit™ 4 Fluorometer may be as much as
3°C above room temperature after 1 hour. For this reason, if you want to perform
multiple readings of a single tube, remove the tube from the instrument and let it
™
Qubit™ 4 Fluorometer User Guide
57
Page 60
Assay temperature
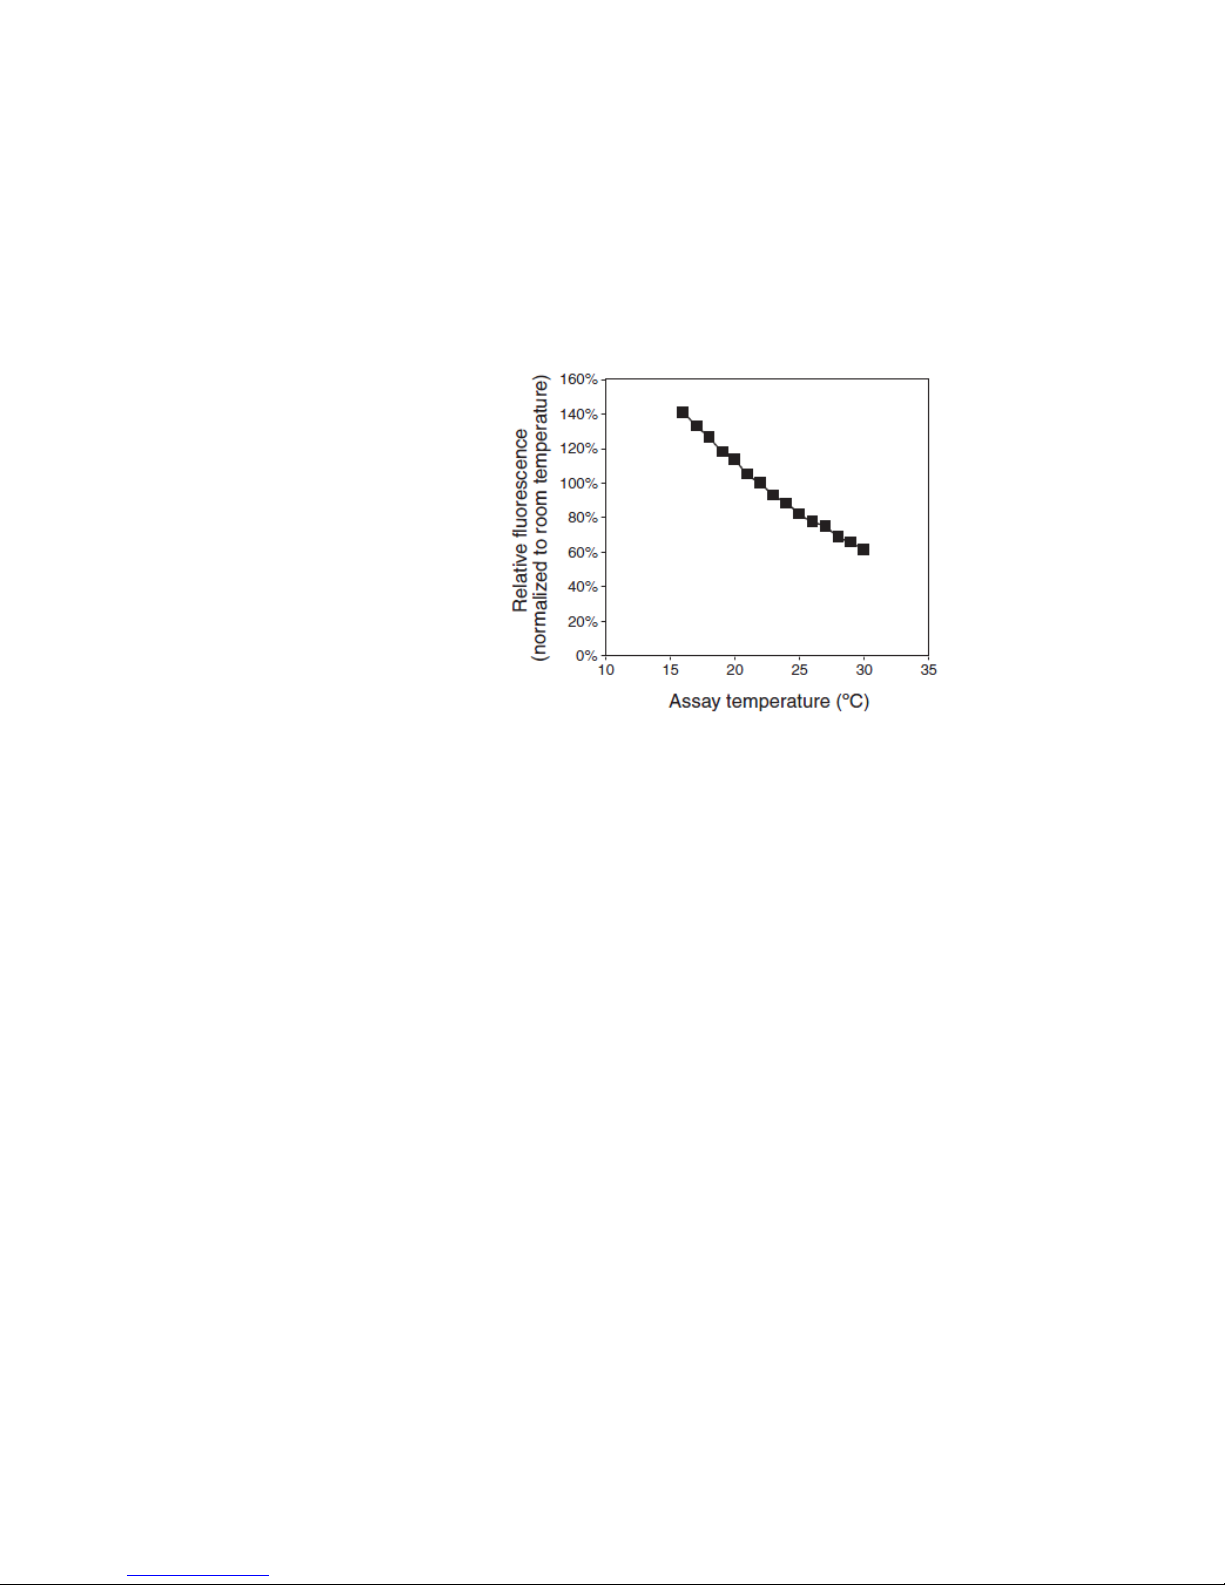
The Qubit™ assays were designed to be performed at room temperature (22–28°C),
and temperature fluctuations can influence the accuracy of the assay.
Figure 2.
similar sensitivities over the same range.
Qubit™ 4
For each assay, you have the choice to run a new calibration or to use the values
generate the quantitation results.
To minimize temperature fluctuations, store all kit reagents at room temperature
™
and insert all assay tubes into the Qubit
it takes for the instrument to measure the fluorescence, because the Qubit
4 Fluorometer only for as much time as
™
4
Fluorometer can raise the temperature of the assay solution significantly, even
over a period of a few minutes. Do not hold the assay tubes in your hand before a
measurement, because holding the tubes warms the solution and results in a low
reading.
Effect of temperature on the Qubit™ dsDNA BR assay. Qubit™ dsDNA HS, Qubit™
ssDNA, Qubit™ RNA HS, Qubit™ RNA XR, Qubit™ RNA IQ, and Qubit™ protein assays show
Fluorometer
calibration
from the previous calibration. As you first use the instrument, you perform a new
calibration each time. As you become familiar with the assays, the instrument,
your pipetting accuracy, and significant temperature fluctuations within your
laboratory, you can determine the level of comfort you have using the calibration
data stored from the last time the instrument was calibrated. Remember also that
the fluorescence signal in the tubes containing the standards and the samples is
stable for not longer than 3 hours. See Figure 1 in “
calculates concentration” (page 57
) for an example of the calibration curve used to
How the Qubit™ 4 Fluorometer
58
Qubit™ 4 Fluorometer User Guide
Page 61
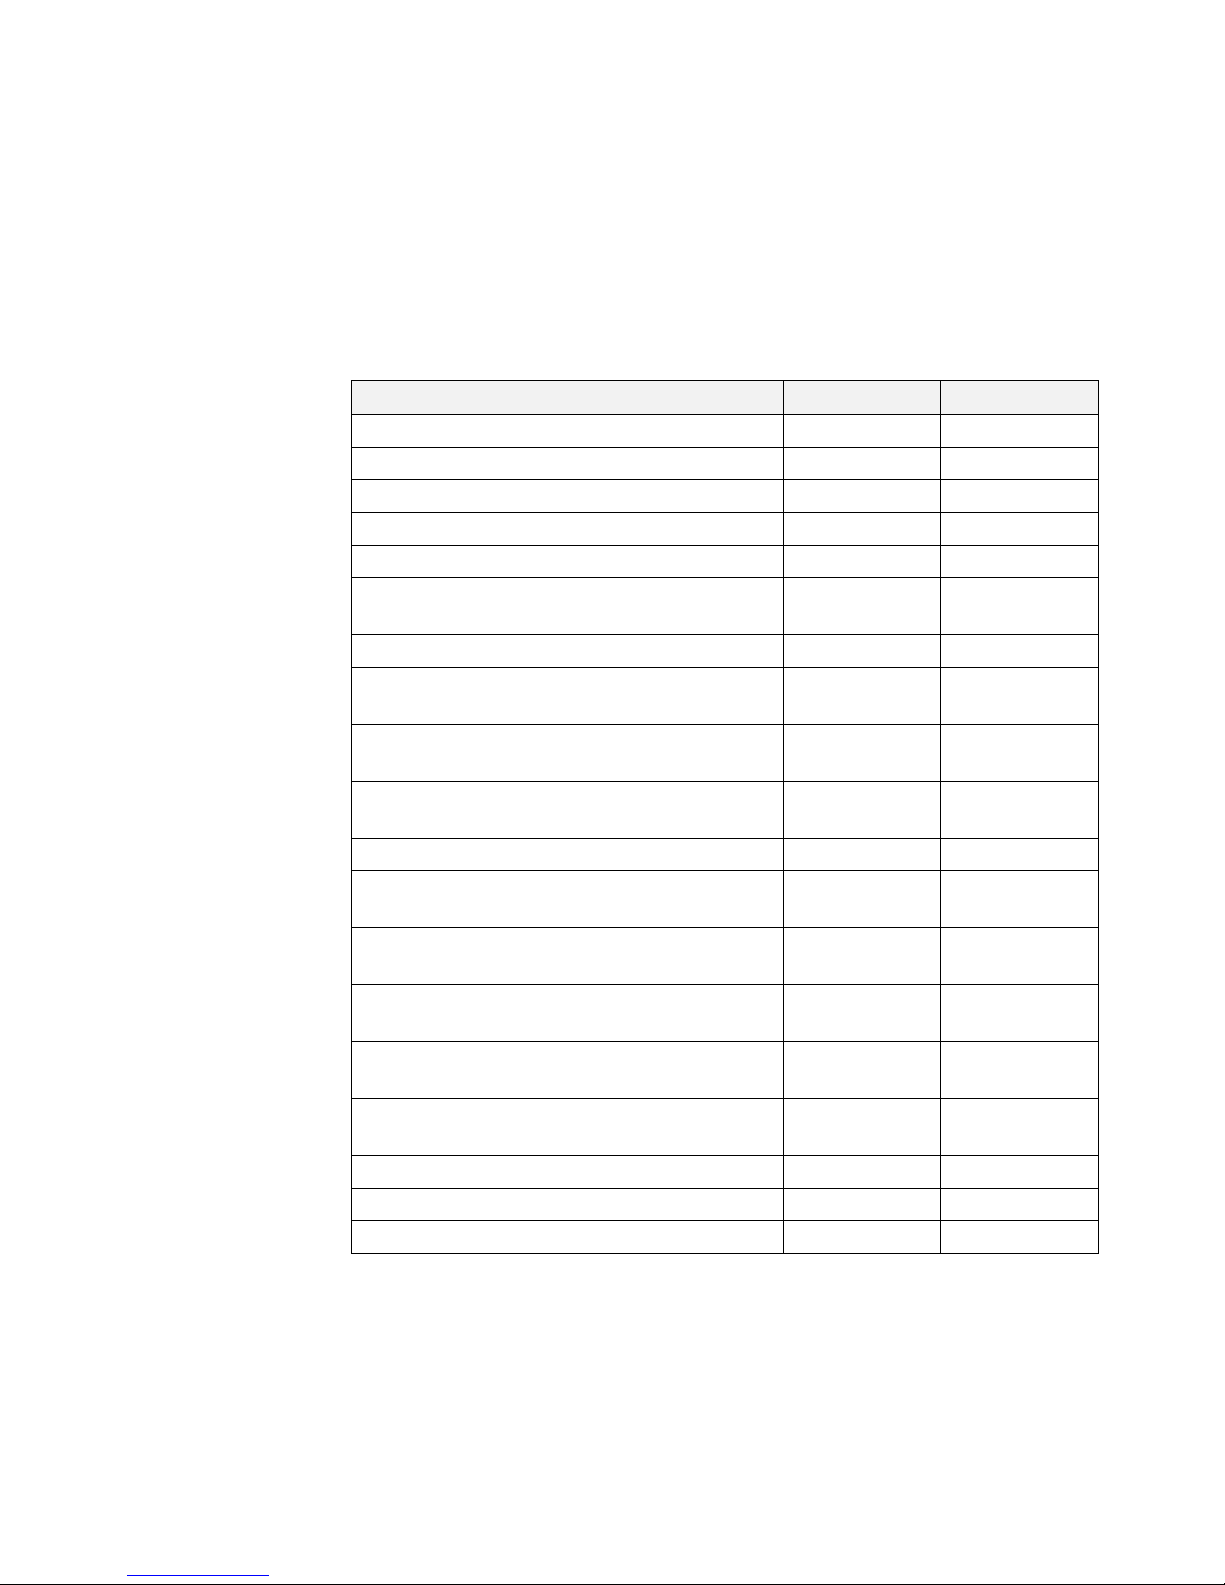
The following products can be used with the Qubit™ 4 Fluorometer and are
Appendix B: Ordering information
Qubit™ 4 Fluorometer and accessories
available separately from Thermo Fisher Scientific. For more information, visit
thermofisher.com or contact Technical Support (page 69).
Product Quantity Cat. No.
Qubit™ 4 Fluorometer 1 each Q33226
Qubit™ 4 Starter Kit 1 kit Q33227
Qubit™ 4 NGS Starter Kit 1 kit Q33228
Qubit™ RNA IQ Starter Kit 1 kit Q33229
Qubit™ 4 USB Flash Drive 1 each Q46009
Qubit™ 4 Fluorometer International Power
Supply (replacement)
Qubit™ Assay Tubes 500 tubes Q32856
Qubit™ RNA IQ Assay Kit 75 assays
Qubit™ RNA XR Assay Kit *20–1,000 ng* 100 assays
Qubit™ RNA HS Assay Kit *5–100 ng* 100 assays
Qubit™ ssDNA Assay Kit *1–200 ng* 100 assays Q10212
Qubit™ dsDNA BR Assay Kit *2–1,000 ng* 100 assays
Qubit™ dsDNA HS Assay Kit *0.2–100 ng* 100 assays
Qubit™ 1X dsDNA HS Assay Kit 100 assays
Qubit™ Protein Assay Kit *0.25–5 µg* 100 assays
Qubit™ microRNA Assay Kit *0.5–100 ng* 100 assays
Qubit™ dsDNA HS Assay - lambda Standard 5 mL Q33233
Qubit™ RNA IQ Assay - RNA Standards 1 set Q33235
Qubit™ RNA XR Assay - RNA Standard 5 each Q33236
1 each Q46018
Q33221
275 assays
500 assays
500 assays
500 assays
500 assays
500 assays
500 assays
500 assays
Q33222
Q33223
Q33224
Q32852
Q32855
Q32850
Q32853
Q32851
Q32854
Q33230
Q33231
Q33211
Q33212
Q32880
Q32881
Qubit™ 4 Fluorometer User Guide
59
Page 62
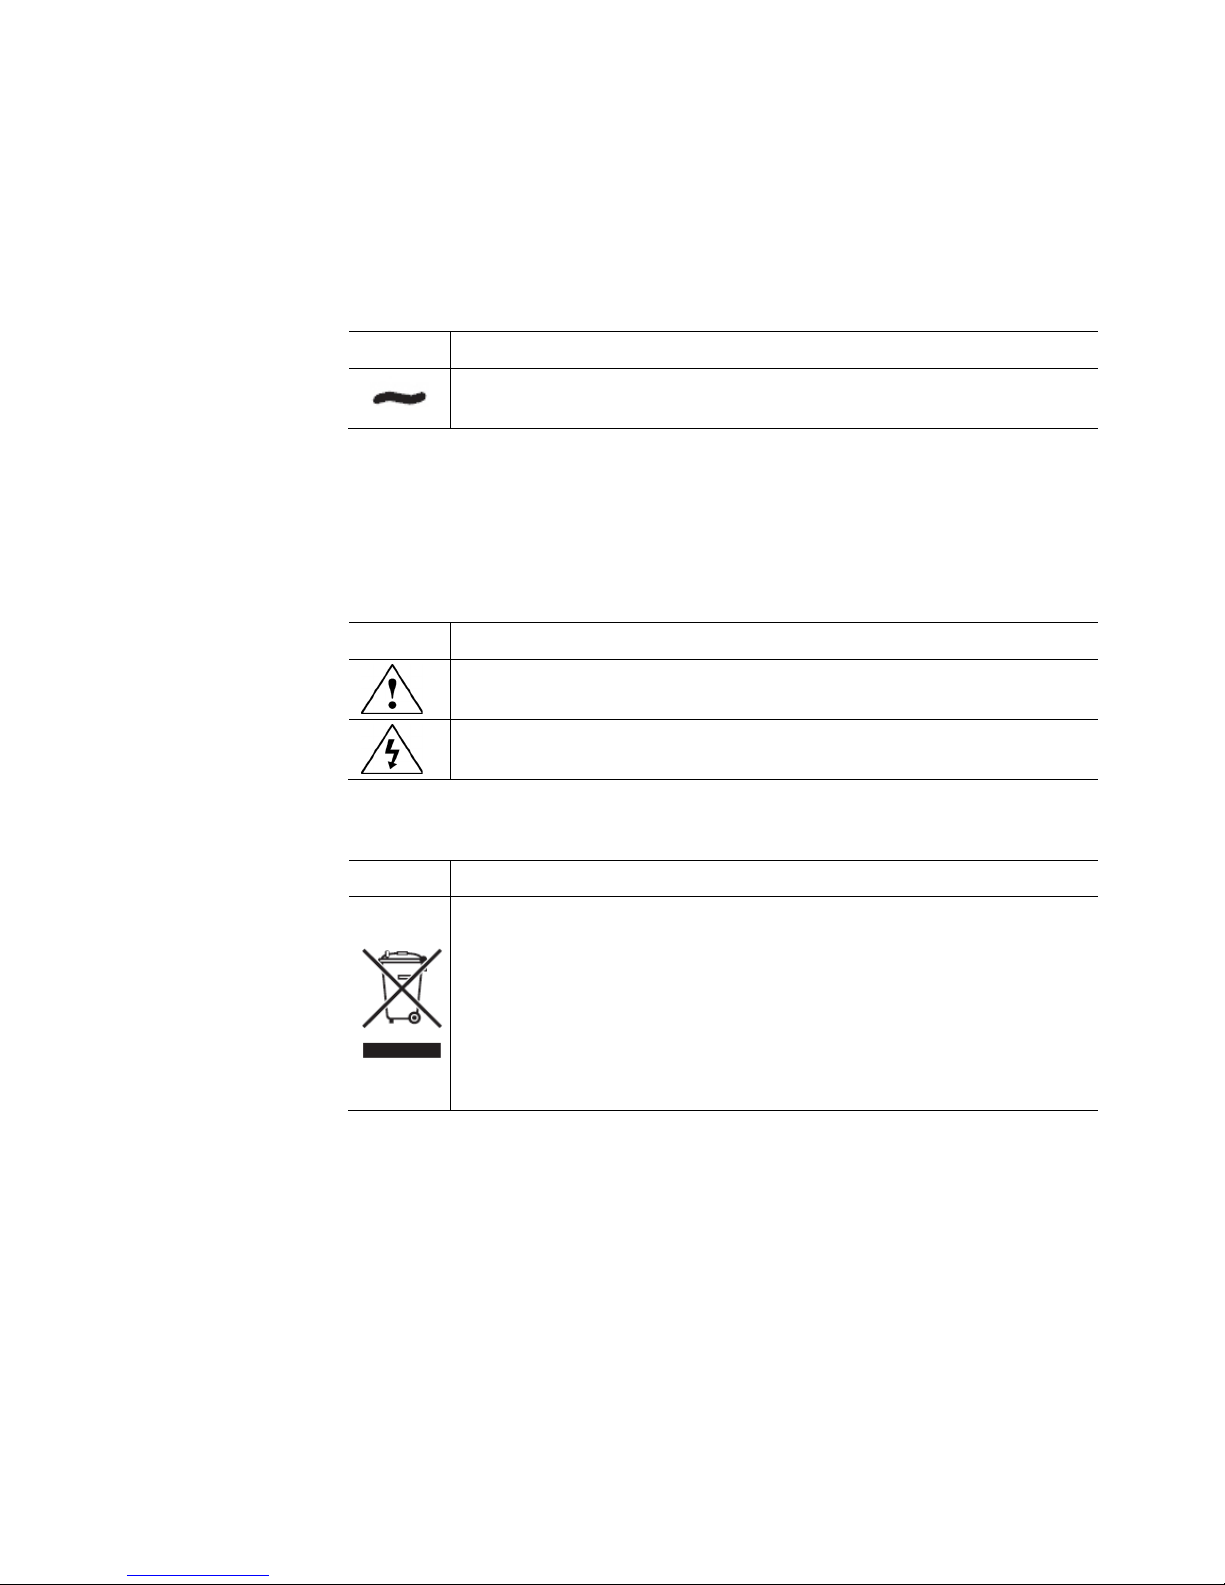
Appendix C: Safety
Electrical symbols
The following table describes the electrical symbols that may be displayed.
Safety symbols
The following table describes the safety symbols that may be displayed. Each
Environmental
The following symbol applies to all Thermo Fisher Scientific electrical and
Symbols on instruments
Symbol Description
Indicates a terminal that can receive or supply alternating current or
voltage.
symbol may appear by itself or in combination with text that explains the relevant
hazard (see “
Safety labels on instruments”). These safety symbols may also appear next to
DANGERS, WARNINGS, and CAUTIONS that occur in the text of this and other
product-support documents.
Symbol Description
Indicates that you should consult the manual for further information
and to proceed with appropriate caution.
Indicates the presence of an electrical shock hazard and to proceed
with appropriate caution.
symbols
electronic products placed on the European market after August 13, 2005.
Symbol Description
Do not dispose of this product as unsorted municipal waste. Follow
local municipal waste ordinances for proper disposal provisions to
reduce the environmental impact of waste electrical and electronic
equipment (WEEE).
European Union customers:
Call your Customer Service representative for equipment pick-up and
recycling. See thermofisher.com for a list of customer service offices in
the European Union.
60
Qubit™ 4 Fluorometer User Guide
Page 63
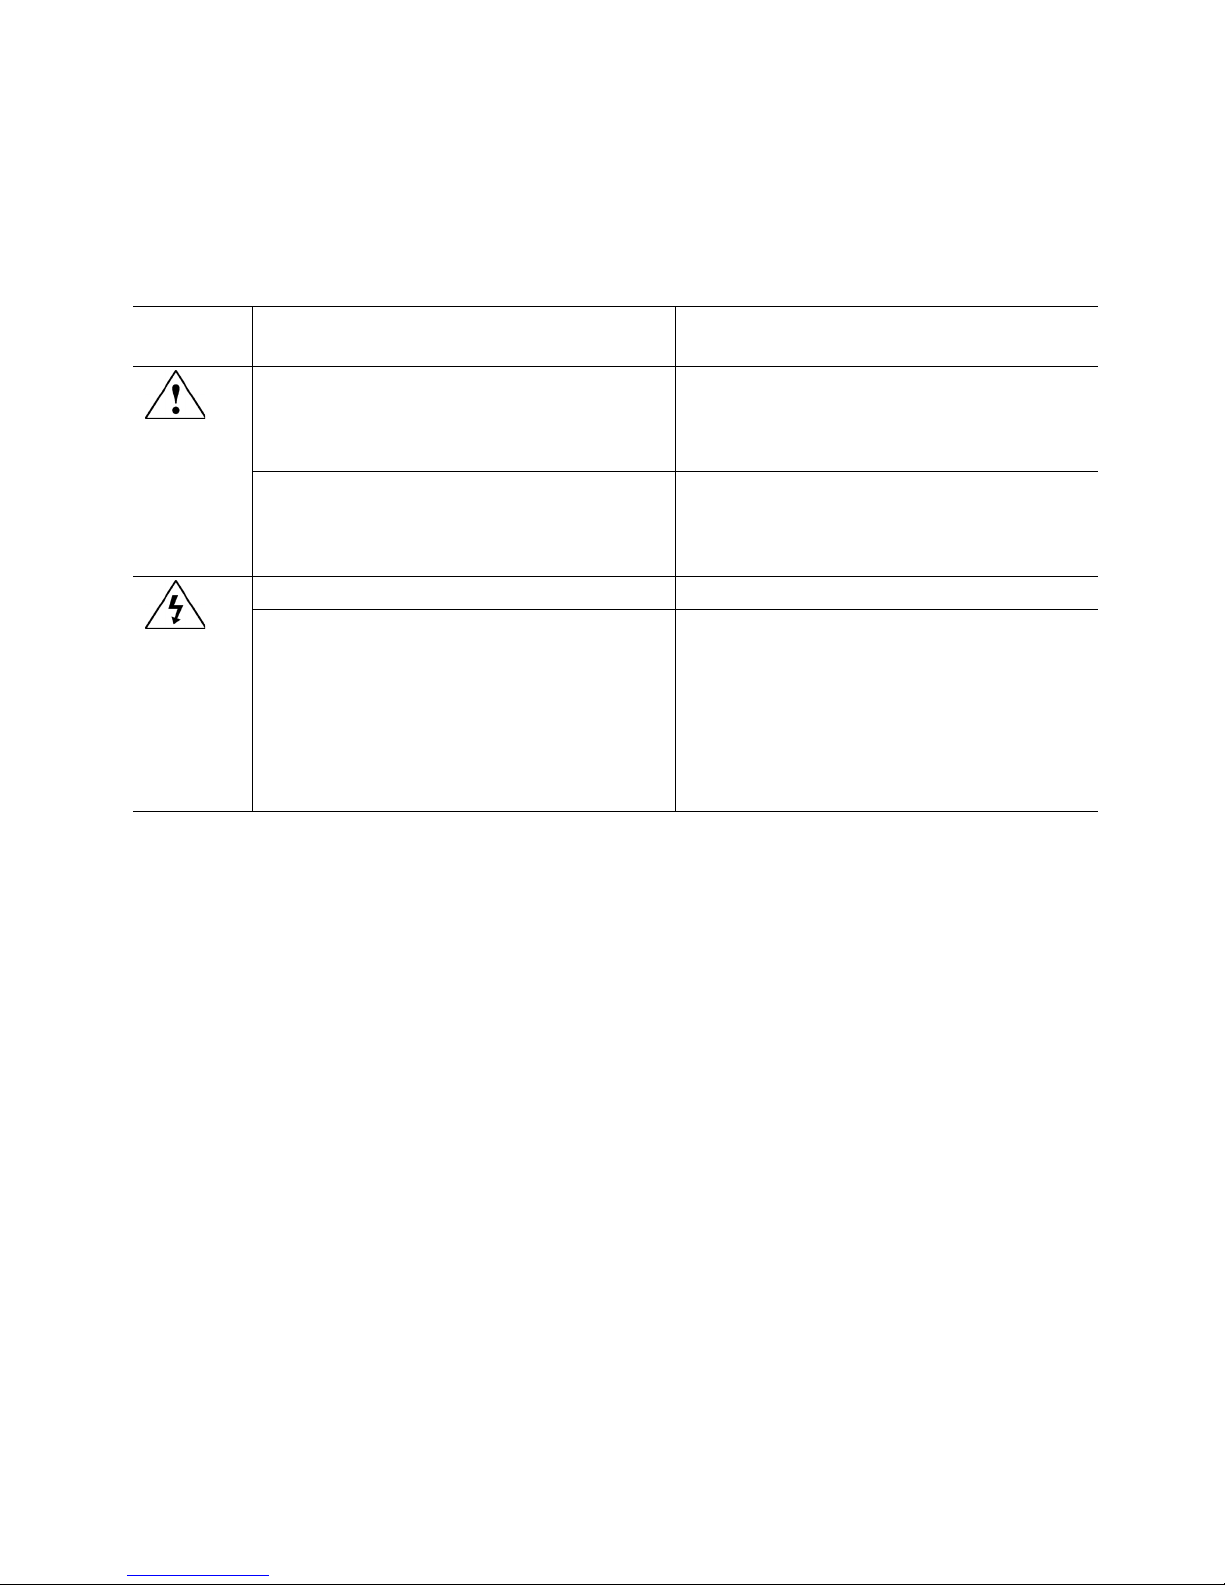
The following CAUTION, WARNING, and DANGER statements may be
symbols described in the preceding section.
Safety labels on instruments
displayed on Thermo Fisher Scientific instruments in combination with the safety
Hazard
symbol
CAUTION! Hazardous chemicals. Read the
Safety Data Sheets (SDSs) before handling.
CAUTION! Hazardous waste. Refer to
SDS(s) and local regulations for handling and
disposal.
DANGER! High voltage. DANGER! Haute tension.
WARNING! To reduce the chance of
electrical shock, do not remove covers that
require tool access. No user-serviceable parts
are inside. Refer servicing to Thermo Fisher
Scientific qualified service personnel.
English Français
ATTENTION! Produits chimiques
dangereux. Lire les fiches techniques de
sûreté de matériels avant toute manipulation
de produits.
ATTENTION! Déchets dangereux. Lire les
fiches techniques de sûreté de matériels et la
régulation locale associées à la manipulation
et l’élimination des déchets.
AVERTISSEMENT! Pour éviter les risques
d’électrocution, ne pas retirer les capots dont
l’ouverture nécessite l’utilisation d’outils.
L’instrument ne contient aucune pièce
réparable par l’utilisateur. Toute intervention
doit être effectuée par le personnel de service
qualifié venant de chez Thermo Fisher
Scientific.
Qubit™ 4 Fluorometer User Guide
61
Page 64
General instrument safety
Operating the
Ensure that anyone who operates the instrument has:
Data Sheets (SDS)”.
Safety precautions
Do not install the instrument in heavy humidity such as a greenhouse or an
and contact technical services.
Cleaning or
Removing covers or
WARNING! PHYSICAL INJURY HAZARD. Use this product only as
specified in this document. Using this instrument in a manner not specified
may result in personal injury or damage to the instrument.
instrument
• Received instructions in both general safety practices for laboratories and
specific safety practices for the instrument.
• Read and understood all applicable Safety Data Sheets (SDSs). See “Safety
incubator to avoid a danger of electric shock. If water or other material enters the
instrument, the adaptor, or power inlet, disconnect the power cord and contact a
service person. For operating environment, refer to “
• Product specifications” (page 8).
• Do not press the main plug or power cord with wet hands.
• Always ensure that the power supply input voltage matches the voltage
available in your location.
• Do not install the instrument on a slant or a place prone to vibrations, which
induces the risk of instrument malfunction or damage of the instrument.
• Plug the power cord firmly into the wall outlet and the instrument.
• To avoid potential shock hazard, make sure that the power cord is properly
grounded.
• Be sure to position the equipment such that it is easy to disconnect the
instrument.
• If the instrument is broken or dropped, disconnect the power cord and contact
technical services. Do not disassemble the instrument.
• Use only authorized accessories (adaptor, power cord, and USB drive).
For operating environment, see “
• Product specifications” (page 8).
• If the instrument emits smoke, disconnect the power cord from the wall outlet
CAUTION! Using cleaning or decontamination methods other than those
decontaminating
the instrument
parts of the
instrument
62
recommended by the manufacturer may compromise the safety or quality
of the instrument.
CAUTION! PHYSICAL INJURY HAZARD The instrument is to be
serviced only by trained personnel or vendor specified in the user guide.
Do not remove any covers or parts that require the use of a tool to obtain
access to moving parts.
Qubit™ 4 Fluorometer User Guide
Page 65
Chemical hazard
General safety
To minimize the hazards of chemicals:
related to chemical storage, handling, and disposal.
Chemical safety
warning
WARNING! CHEMICAL HAZARD. Before handling any chemicals, refer
to the Safety Data Sheet (SDS) provided by the manufacturer, and observe
all relevant precautions.
WARNING! CHEMICAL STORAGE HAZARD. Never collect or store
waste in a glass container because of the risk of breaking or shattering.
Reagent and waste bottles can crack and leak. Each waste bottle should be
secured in a low-density polyethylene safety container with the cover
fastened and the handles locked in the upright position. Wear appropriate
eyewear, clothing, and gloves when handling reagent and waste bottles.
guidelines
• Read and understand the Safety Data Sheets (SDSs) provided by the chemical
manufacturer before you store, handle, or work with any chemicals or
hazardous materials. (See “Safety Data Sheets (SDS)”)
• Minimize contact with chemicals. Wear appropriate personal protective
equipment when handling chemicals (for example, safety glasses, gloves, or
protective clothing). For additional safety guidelines, consult the SDS.
• Minimize the inhalation of chemicals. Do not leave chemical containers open.
Use only with adequate ventilation (for example, fume hood). For additional
safety guidelines, consult the SDS.
• Check regularly for chemical leaks or spills. If a leak or spill occurs, follow the
manufacturer’s cleanup procedures as recommended in the SDS.
• Comply with all local, state/provincial, or national laws and regulations
Qubit™ 4 Fluorometer User Guide
63
Page 66
Chemical waste safety
Chemical waste
hazard
Chemical waste
To minimize the hazards of chemical waste:
environmental and health regulations.
Waste disposal
If potentially hazardous waste is generated when you operate the instrument, you
regulations.
CAUTION! HAZARDOUS WASTE. Refer to Safety Data Sheets (SDSs)
and local regulations for handling and disposal.
safety guidelines
• Read and understand the Safety Data Sheets (SDSs) provided by the
• Provide primary and secondary waste containers. (A primary waste container
• Minimize contact with chemicals. Wear appropriate personal protective
• Minimize the inhalation of chemicals. Do not leave chemical containers open.
• Handle chemical wastes in a fume hood.
• After emptying the waste container, seal it with the cap provided.
• Dispose of the contents of the waste tray and waste bottle in accordance with
must:
• Characterize (by analysis, if necessary) the waste generated by the particular
• Ensure the health and safety of all personnel in your laboratory.
• Ensure that the instrument waste is stored, transferred, transported, and
manufacturers of the chemicals in the waste container before you store,
handle, or dispose of chemical waste.
holds the immediate waste. A secondary container contains spills or leaks
from the primary container. Both containers must be compatible with the
waste material and meet federal, state, and local requirements for container
storage.)
equipment when handling chemicals (for example, safety glasses, gloves, or
protective clothing). For additional safety guidelines, consult the SDS.
Use only with adequate ventilation (for example, fume hood). For additional
safety guidelines, consult the SDS.
good laboratory practices and local, state/provincial, or national
applications, reagents, and substrates used in your laboratory.
disposed of according to all local, state/provincial, and/or national
IMPORTANT! Radioactive or biohazardous materials may require special
handling, and disposal limitations may apply.
64
Qubit™ 4 Fluorometer User Guide
Page 67
‐
Power
Overvoltage rating
The Qubit™ 4 Fluorometer has an installation (overvoltage) category of II, and is
classified as portable equipment.
Electrical safety
DANGER! ELECTRICAL SHOCK HAZARD. Severe electrical shock can
result from operating the Qubit
panels in place. Do not remove instrument panels. High
are exposed when instrument panels are removed from the instrument.
DANGER! ELECTRICAL HAZARD. Grounding circuit continuity is vital
for the safe operation of equipment. Never operate equipment with the
grounding conductor disconnected.
DANGER! ELECTRICAL HAZARD. Use properly configured and
approved line cords for the voltage supply in your facility.
DANGER! ELECTRICAL HAZARD. Plug the system into a properly
grounded receptacle with adequate current capacity.
™
4 Fluorometer without its instrument
voltage contacts
Qubit™ 4 Fluorometer User Guide
65
Page 68

Biological hazard safety
2004_11/en/
WARNING! BIOHAZARD. Biological samples such as tissues, body
fluids, and blood of humans and other animals have the potential to
transmit infectious diseases. Follow all applicable local, state/provincial,
and/or national regulations. Wear appropriate protective eyewear,
clothing, and gloves. Read and follow the guidelines in these publications.
ATTENTION! BIOHAZARD. Les échantillons biologiques tels que les
tissus, les fluides corporels et le sang des humains et d’autres animaux ont
la possibilité de transmettre des maladies infectieuses. Suivre tous les
règlements municipaux, provinciaux/provincial et / ou nationales en
vigueur. Porter des lunettes de protection approprié, des vêtements et des
gants.
In the U.S.:
• U.S. Department of Health and Human Services guidelines published in
Biosafety in Microbiological and Biomedical Laboratories
(stock no. 017-040-00547-4;
www.cdc.gov/OD/ohs/biosfty/bmbl4/bmbl4toc.htm)
• Occupational Safety and Health Standards, Bloodborne Pathogens
(29 CFR§1910.1030;
www.access.gpo.gov/nara/cfr/waisidx_01/29cfr1910a_01.html)
• Your company’s/institution’s Biosafety Program protocols for working
with/handling potentially infectious materials.
• Additional information about biohazard guidelines is available at:
www.cdc.gov
In the EU:
• Check your local guidelines and legislation on biohazard and biosafety
precaution, and the best practices published in the World Health Organisation
(WHO) Laboratory Biosafety Manual, third edition
www.who.int/csr/resources/publications/biosafety/WHO_CDS_CSR_LYO_
66
Qubit™ 4 Fluorometer User Guide
Page 69
This section provides information on:
Australian EMC standards
U.S. and Canadian
Safety Standards
The Qubit™ 4 Fluorometer has been tested to and complies with standard:
U.S. EMC Standard
This instrument has been tested to and complies with standard 47 CFR FCC
- Consult the dealer or an experienced radio/TV technician for help.
European Safety
Safety
Measurement, Control and Laboratory Use – EMC Requirements.”
Safety and Electromagnetic Compatibility (EMC) standards
• U.S. and Canadian safety and EMC standards
• European safety and EMC standards
•
UL 61010-1/CAN/CSA C22.2 No. 61010-1, “Safety Requirements for Electrical
Equipment for Measurement, Control, and Laboratory Use, Part 1: General
Requirements.”
Part 15 “Radio Frequency Devices”; Subpart B “Unintentional Radiators”.
Note: This equipment has been tested and found to comply with the limits for a
Class B digital device, pursuant to part 15 of the FCC Rules. These limits are
designed to provide reasonable protection against harmful interference in a
residential installation. This equipment generates, uses, and can radiate radio
frequency energy and, if not installed and used in accordance with the
instructions, may cause harmful interference to radio communications. However,
there is no guarantee that interference will not occur in a particular installation. If
this equipment does cause harmful interference to radio or television reception,
which can be determined by turning the equipment off and on, the user is
encouraged to try to correct the interference by one or more of the following
measures:
- Reorient or relocate the receiving antenna.
- Increase the separation between the equipment and receiver.
- Connect the equipment into an outlet on a circuit different from that to which
the receiver is connected.
and EMC Standards
Qubit™ 4 Fluorometer User Guide
This instrument meets European requirements for safety (Low Voltage Directive
2006/95/EC). This instrument has been tested to and complies with standards:
IEC/EN 61010-1, “Safety Requirements for Electrical Equipment for
Measurement, Control and Laboratory Use, Part 1: General Requirements.”
IEC/EN 61010-2-081, "Safety requirements for electrical equipment for
measurement, control, and laboratory use - Part 2-081: Particular requirements for
automatic and semi-automatic laboratory equipment for analysis and other
purposes"
EMC
This instrument meets European requirements for emission and immunity (EMC
Directive 2004/108/EC). This instrument has been tested to and complies with
standard IEC/EN 61326 (Group 1, Class B), “Electrical Equipment for
67
Page 70

Australian EMC
standards
This instrument has been tested to and complies with standard AS/NZS CISPR 11,
“Limits and Methods Measurement of Electromagnetic Disturbance Characteristics
of Industrial, Scientific, and Medical (ISM) Radio‐frequency Equipment.”
68
Qubit™ 4 Fluorometer User Guide
Page 71
Technical support
For the latest services and support information for all locations, visit
Download software updates and patches
Safety Data Sheets
(SDS)
Safety Data Sheets (SDSs) are available at thermofisher.com/support.
Limited product
Life Technologies Corporation and/or its affiliate(s) warrant their products as set
at www.thermofisher.com/support.
Obtaining support
thermofisher.com.
At the website, you can:
• Access worldwide telephone and fax numbers to contact Technical Support
• Search through frequently asked questions (FAQs)
• Submit a question directly to Technical Support (thermofisher.com/support)
• Search for user documents, SDSs, vector maps and sequences, application
• Obtain information about customer training
•
Documentation and support
and Sales facilities
notes, formulations, handbooks, certificates of analysis, citations, and other
product support documents
IMPORTANT! For the SDSs of chemicals not distributed by Thermo
Fisher Scientific contact the chemical manufacturer.
warranty
forth in the Life Technologies’ General Terms and Conditions of Sale found on
Life Technologies’ website at
and-conditions.html
. If you have any questions, please contact Life Technologies
IMPORTANT! Wiping the Qubit™ 4 Fluorometer computer (i.e., erasing the
hard drive to remove all programs, files, and the operating system) voids
the product warranty.
www.thermofisher.com/us/en/home/global/terms-
Qubit™ 4 Fluorometer User Guide
69
Page 72

thermofisher.com/support | thermofisher.com/askaquestion
thermofisher.com
05 October 2017
 Loading...