

Invitrogen A25977 Quick Reference
QUICK REFERENCE
Mini Gel Tank
Cat. no. A25977
Publication Part No. 100025990 Publication No. MAN0010862 Rev. C.0
Instructions for using the Mini Gel Tank to perform electrophoresis are described below. For detailed instructions, refer to the manual
available from thermosher.com. See reverse side for protein transfer instructions using the Mini Blot Module.
Before Starting
• Make sure that the power supply is adequate for the number of gels you are going to run.
• If your power supply is not designed for use with covered or retractable power leads, make sure the power supply is off, plug Novex™
Power Supply Adapters into the appropriate leads of the power supply, and secure them with an Allen wrench (see manual for details).
• Select mini gels appropriate for your application.
• Prepare 1X running buffer appropriate for your mini gels. Each chamber requires 400 mL of buffer.
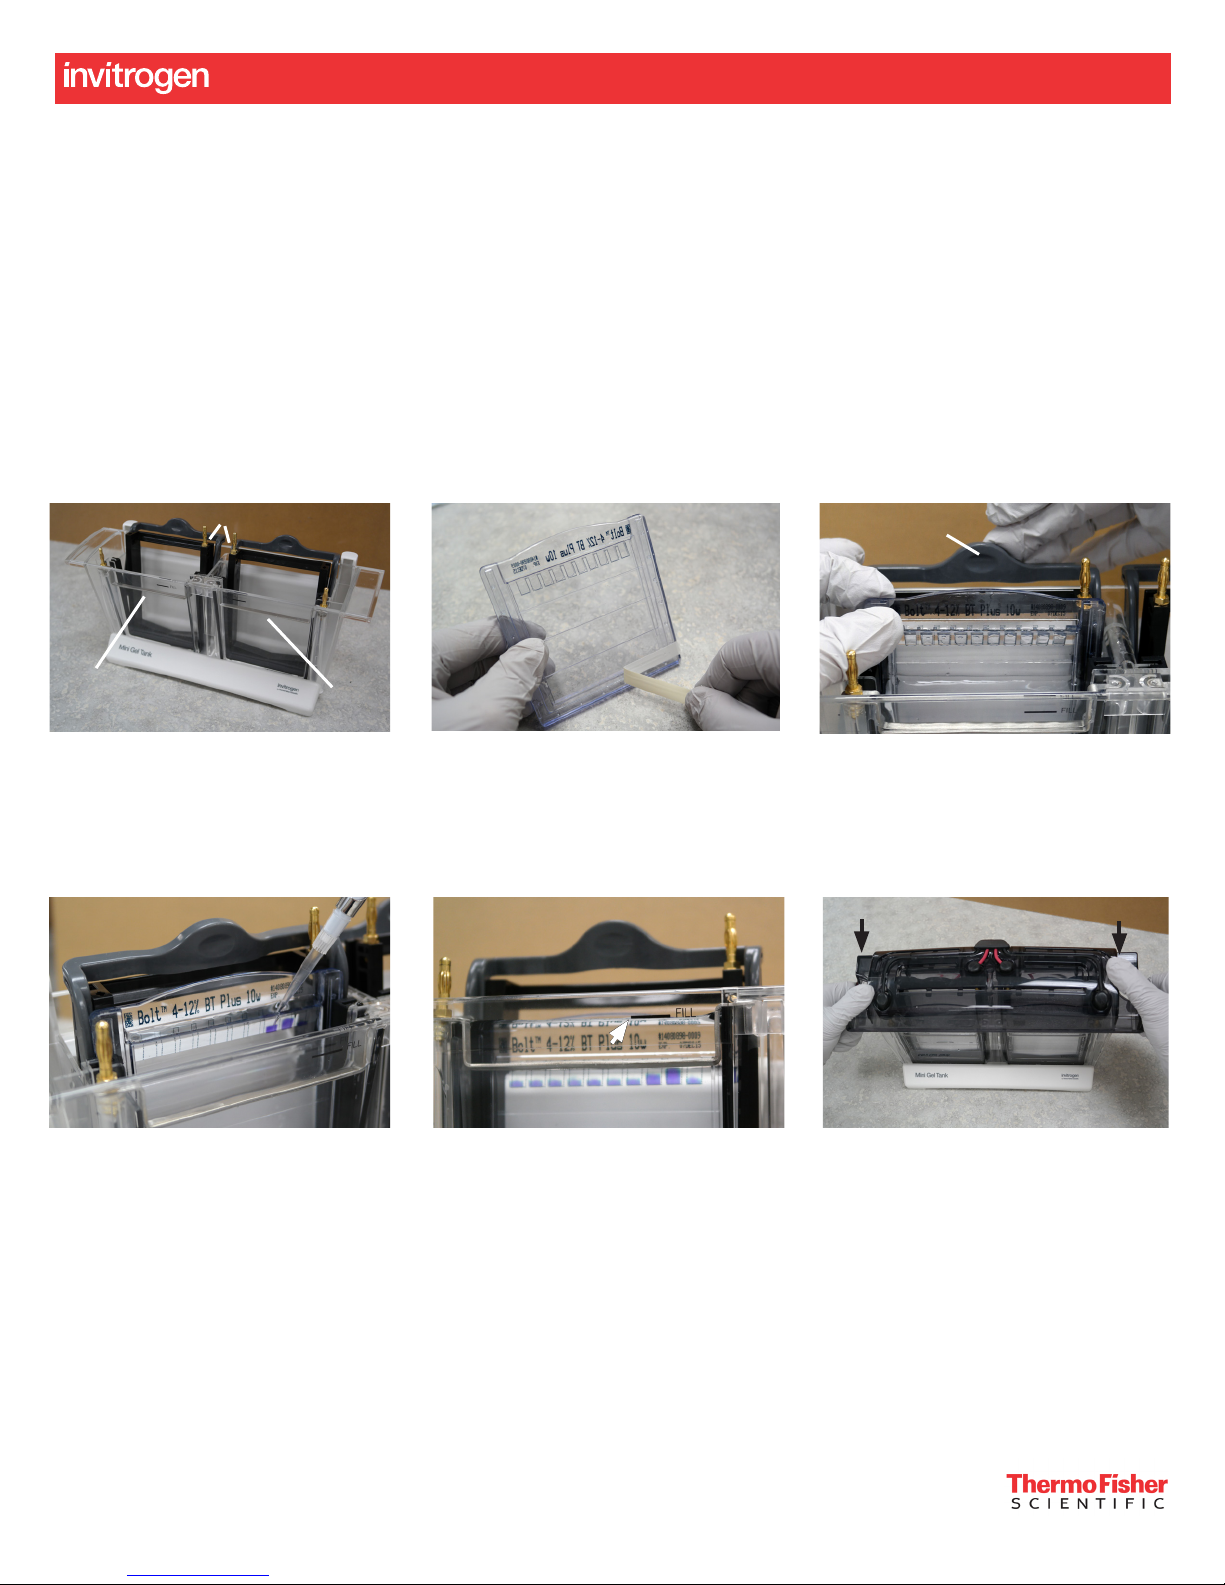
Procedure
1 3
Cathode
1. Snap the electrophoresis tank into the
base, and place the cassette clamp(s)
into the chamber(s) with the anode
connector(s) (+) aligned to the center.
Fill the chamber(s) with 1X buffer to the
level of the cathode.
4
(+) Anode connectors
Cathode
2
2. Remove the comb, and peel away the
tape at the bottom of the gel cassette.
Rinse the wells 3 times with 1X buffer.
5
Cam
Handle
3. Place the cassette in the chamber with
the wells facing towards you.
Hold the cassette in a raised position
and close the clamp by moving the cam
handle forward.
6
4. Make sure the wells are completely
filled with 1X buffer.
Load your samples and markers.
For Research Use Only. Not for use in diagnostic procedures.
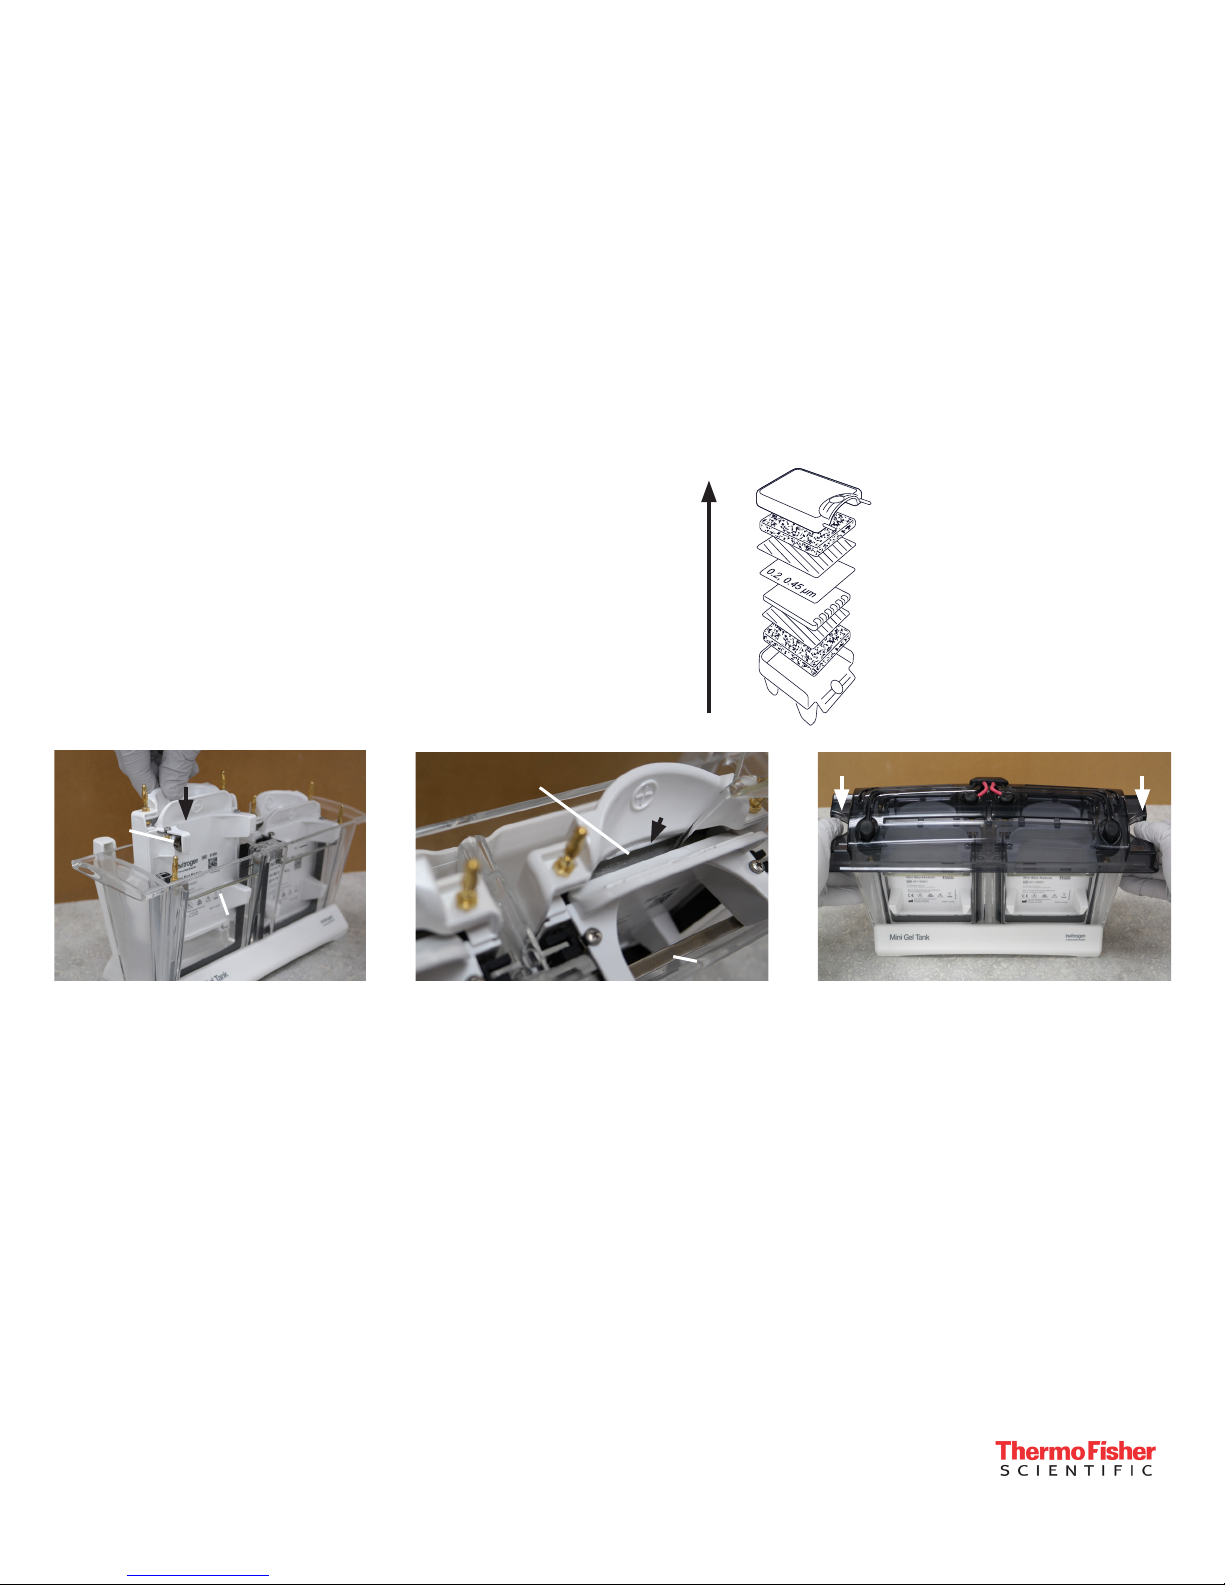
5. Hold the cassette and release the
cassette clamp.
Gently lower the cassette so that it rests
on the bottom of the chamber, and close
the cassette clamp.
Add 1X buffer to the level of the fill line.
6. Make sure the power supply is off.
If only running one gel, remove the
cassette clamp from unused chamber.
Place the lid on the tank and plug the
electrode cords into the power supply.
Turn the power supply on to begin
electrophoresis.
Mini Blot Module
Cat. no. B1000
Instructions for using the Mini Blot Module to transfer proteins onto a membrane are described below. For detailed instructions, refer to the
manual available from thermosher.com. See reverse side for instructions on using the Mini Gel Tank for electrophoresis.
Before Starting
• Select transfer membrane appropriate for your purpose, and prepare it for transfer (refer to Mini Blot Module manual for details).
• Prepare 250 mL of 1X transfer buffer for each transfer.
• Soak two pieces of lter paper briey in 1X transfer buffer.
• Soak two sponge pads thoroughly in 1X transfer buffer. Squeeze submerged pads to ensure that air bubbles are removed.
Note: It is important to use clean sponge pads to avoid protein contamination. (refer to the manual for details on care of sponge pads).
• Trim wells and foot from gel.
Transfer Conditions
Transfer protein (using 1 or 2 blot modules) for 60 min at a constant voltage of 10 V (nitrocellulose) or 20 V (PVDF). Do not exceed 30 V.
Protein Transfer Protocol
1. Place the cathode core (–) on a flat surface, and assemble the
sandwich according to the diagram (right).
• Only one gel can be transferred at a time in a single module.
• Always handle the membrane with the Blotting Tweezers.
• Use the Blotting Roller to remove any bubbles between
layers of the sandwich.
2. Place the anode core (+) on top of the sandwich, and close the
module assembly.
Order of assembly
Anode core (+)
Sponge pad
Filter paper
Membrane
Gel
Filter paper
Sponge pad
Cathode core (–)
3
Electrode
Front
Cathode
3. Make sure any cassette clamps are
removed from the chambers.
Insert the blot module with the
cathode core (–) facing the front.
The blot module should be seated so
Module Core
4
Fill
Chamber
Cathode
4. Add 1X transfer buffer to the module
core if the sandwich is not completely
submerged.
Add deionized water or 1X transfer
buffer (~225 mL) to the chamber up to
the level of the cathode.
5
5. Make sure the power supply is off.
Place the lid on the tank and plug the
electrode cords into the power supply.
Turn the power supply on to begin
transfer.
that the electrode makes contact with
the cathode.
Limited Product Warranty:
Life Technologies Corporation and/or its affiliate(s) warrant their products as set forth in the Life Technologies’ General Terms and Conditions of Sale found on Life Technologies’
website at www.lifetechnologies.com/termsandconditions. If you have any questions, please contact Life Technologies at www.lifetechnologies.com/support.
DISCLAIMER: LIFE TECHNOLOGIES CORPORATION AND/OR ITS AFFILIATE(S) DISCLAIM ALL WARRANTIES WITH RESPECT TO THIS DOCUMENT, EXPRESSED OR IMPLIED, INCLUDING BUT NOT LIMITED TO
THOSE OF MERCHANTABILITY, FITNESS FOR A PARTICULAR PURPOSE, OR NON-INFRINGEMENT. TO THE EXTENT ALLOWED BY LAW, IN NO EVENT SHALL LIFE TECHNOLOGIES AND/OR ITS AFFILIATE(S) BE
LIABLE, WHETHER IN CONTRACT, TORT, WARRANTY, OR UNDER ANY STATUTE OR ON ANY OTHER BASIS FOR SPECIAL, INCIDENTAL, INDIRECT, PUNITIVE, MULTIPLE OR CONSEQUENTIAL DAMAGES IN CONNECTION WITH OR ARISING FROM THIS DOCUMENT, INCLUDING BUT NOT LIMITED TO THE USE THEREOF.
Important licensing information: This product may be covered by one or more Limited Use Label Licenses. By use of this product, you accept the terms and conditions of all applicable Limited Use Label Licenses.
Corporate entity: Life Technologies | Carlsbad, CA 92008 USA | Toll Free in USA 1.800.955.6288
© 2015 Thermo Fisher Scientific Inc. All rights reserved. All trademarks are the property of Thermo Fisher Scientific and its subsidiaries unless otherwise specified.
For support visit thermofisher.com/support or email techsupport@lifetech.com
thermofisher.com
12 December 2015
 Loading...