

Page 1
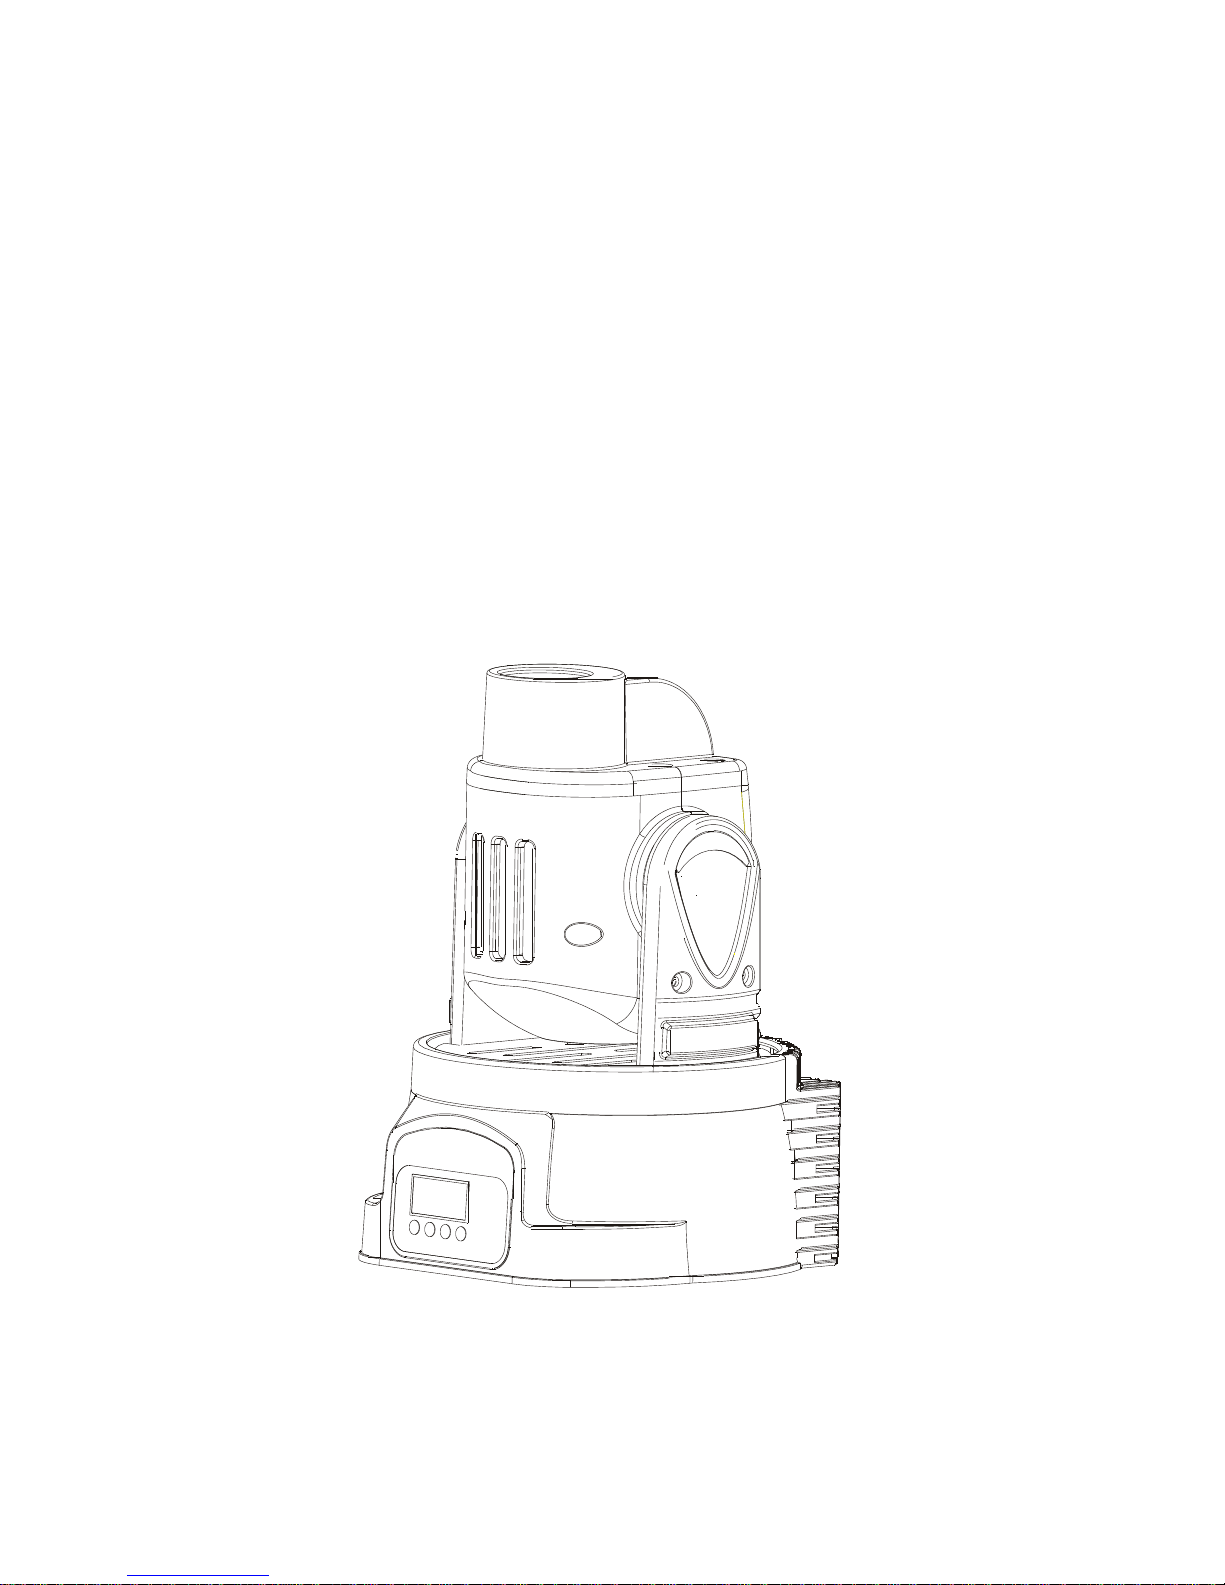
MINIHEAD SPOT
USER MANUAL
Page 2

TABLE OF CONTENTS
1.
BEFORE YOU
BEGIN..............................................................................3
WHAT IS INCLUDED.......................................................................................................................................... 3
UNPACKING INSTRUCTIONS ........................................................................................................................... 3
AC POWER ...................................................................................................................................................... 3
SAFETY INSTRUCTIONS.................................................................................................................................. 4
2.
INTRODUCTION
................................................................................
5
FEATURES....................................................................................................................................................... 5
DMX CHANNEL SUMMARY 13 CHANNEL MODE FOR SPOT................................................................................ 5
DMX CHANNEL SUMMARY 5 CHANNEL MODE FOR SPOT.................................................................................. 6
PRODUCT OVERVIEW ..................................................................................................................................... 6
3.
SETUP
.......................................................................................
7
FUSE REPLACEMENT....................................................................................................................................... 7
FIXTURE LINKING ............................................................................................................................................ 7
Data Cabling .................................................................................................................................................. 7
DMX Data Cable........................................................................................................................................... 7
Cable Connectors ........................................................................................................................................ 8
3-Pin to 5-Pin Conversion Chart .................................................................................................................... 8
SETTING UP A DMX SERIAL DATA LINK ............................................................................................................. 8
MASTER/SLAVE FIXTURE LINKING................................................................................................................... 9
MOUNTING ...................................................................................................................................................... 9
Orientation .................................................................................................................................................. 9
Rigging ....................................................................................................................................................... 9
4.
OPERATING
INSTRUCTIONS.......................................................................10
NAVIGATING THE CONTROL PANEL ................................................................................................................10
MENU MAP......................................................................................................................................................11
USER CONFIGURATIONS ...............................................................................................................................11
USER CONFIGURATIONS ...............................................................................................................................12
To set the pan to inverting or non-inverting: ...................................................................................................12
To set the tilt to inverting or non-inverting:......................................................................................................12
To set the LED Readout to Inverting or Non-Inverting: ....................................................................................12
To set the DMX channel configuration:..........................................................................................................12
To set the maximum pan angle: ....................................................................................................................12
To set the maximum tilt angle: ......................................................................................................................12
Service Functions ..........................................................................................................................................12
To reset the fixture:......................................................................................................................................12
To restore all settings to their factory defaults: ...............................................................................................12
OPERATION...................................................................................................................................................13
Stand-Alone Mode (Sound-Active, Auto Mode): ................................................................................................13
Master/Slave Mode (Master Sound, Master Auto): .............................................................................................13
DMX Mode ....................................................................................................................................................13
DMX CHANNEL VALUES (13 CHANNEL FOR SPOT) ..........................................................................................14
DMX CHANNEL VALUES (5 CHANNEL FOR SPOT) ............................................................................................16
5.
APPENDIX....................................................................................17
TECHNICAL SPECIFICATIONS ........................................................................................................................17
2
Page 3

1. BEFORE YOU BEGIN
What
is included
1 x Mini Spot
User Manual
Unpacking
Instructions
Immediately upon receiving a fixture, carefully unpack the carton, check the contents to ensure that
all parts are present, and have been received in good condition. Notify the shipper immediately and
retain packing material for inspection if any parts appear damaged from shipping or the carton itself
shows signs of mishandling. Save the carton and all packing materials. In the event that a fixture
must be returned to the factory, it is important that the fixture be returned in the original factory box
and packing.
AC
Power
To determine the power requirements for a particular fixture, see the label affixed to the back plate of
the fixture or refer to the fixture’s specifications chart. A fixture’s listed current rating is its average
current draw under normal conditions. All fixtures must be powered directly off a switched circuit and
cannot be run off a rheostat (variable resistor) or dimmer circuit, even if the rheostat or dimmer
channel is used solely for a 0% to 100% switch. Before applying power to a fixture, check that the
source voltage matches the fixture’s requirement. Check the fixture or
device carefully to make sure that if a voltage selection switch exists that it
is set to the correct line voltage you will use.
Figure
1 - AC
Voltage Switch
Warning!
Verify that
the
voltage select switch
on your
unit
matches
the
line voltage applied.
Damage
to
your
fixture
may
result if the
line voltage applied
does not match the
voltage indicated
on
the voltage selector switch.
All
fixtures
must be
connected
to
circuits
with a
suitable Earth Ground.
Not all fixtures have a voltage
select switch. Please be sure to
connect to the proper voltage.
3
Page 4
Safety Instructions
Please read these instructions carefully, it includes important
information about the installation, usage and maintenance of this
product.
Please keep this User Guide for future consultation. If you sell the unit to another user, be sure that
they also receive this instruction booklet.
Always make sure that you are connecting to the proper voltage, and that the line voltage you are
connecting to is not higher than that stated on the decal or rear panel of the fixture.
This product is intended for indoor use only!
To prevent risk of fire or shock, do not expose fixture to rain or moisture. Make sure there are no
flammable materials close to the unit while operating.
The unit must be installed in a location with adequate ventilation, at least 20in (50cm) from adjacent
surfaces. Be sure that no ventilation slots are blocked.
Always disconnect from power source before servicing or replacing fuse and be sure to replace with
same fuse size and type.
Secure fixture to fastening device using a safety chain. Never carry the fixture solely by its head. Use
its carrying handles.
Maximum ambient temperature (Ta) is 104°F (40°C). Do not operate fixture at temperatures higher
than this.
In the event of a serious operating problem, stop using the unit immediately. Never try to repair the
unit by yourself. Repairs carried out by unskilled people can lead to damage or malfunction. Please
contact the nearest authorized technical assistance center. Always use the same type spare parts.
Don’t connect the device to a dimmer pack.
Make sure the power cord is never crimped or damaged.
Never disconnect the power cord by pulling or tugging on the cord.
Avoid direct eye exposure to the light source while it is on.
4
Page 5
2. INTRODUCTION
Features
CONTROL FEATURES
5 or 13-channel DMX-512 LED moving yoke
Pan: 540o / tilt: 270o
RGB color mixing
Gobo wheel
9 gobos + open
Gobo wheel spin effect
Variable electronic strobe
Variable electronic dimmer (0 – 100%)
Vector speed channel for pan/tilt, RGB color mixing and color macros
Built-in movement macros via master/slave or DMX
ADDITIONAL FEATURES
User-selectable basic or advanced operating modes
User-selectable pan/tilt ranges
Pan: 540°, 360°, 180
°
Tilt: 270°, 180°, 90°
Compact and lightweight
LED display menu with invert
Reset to factory settings option
Display auto on/off
Pan/tilt invert option
Fan cooled
DMX
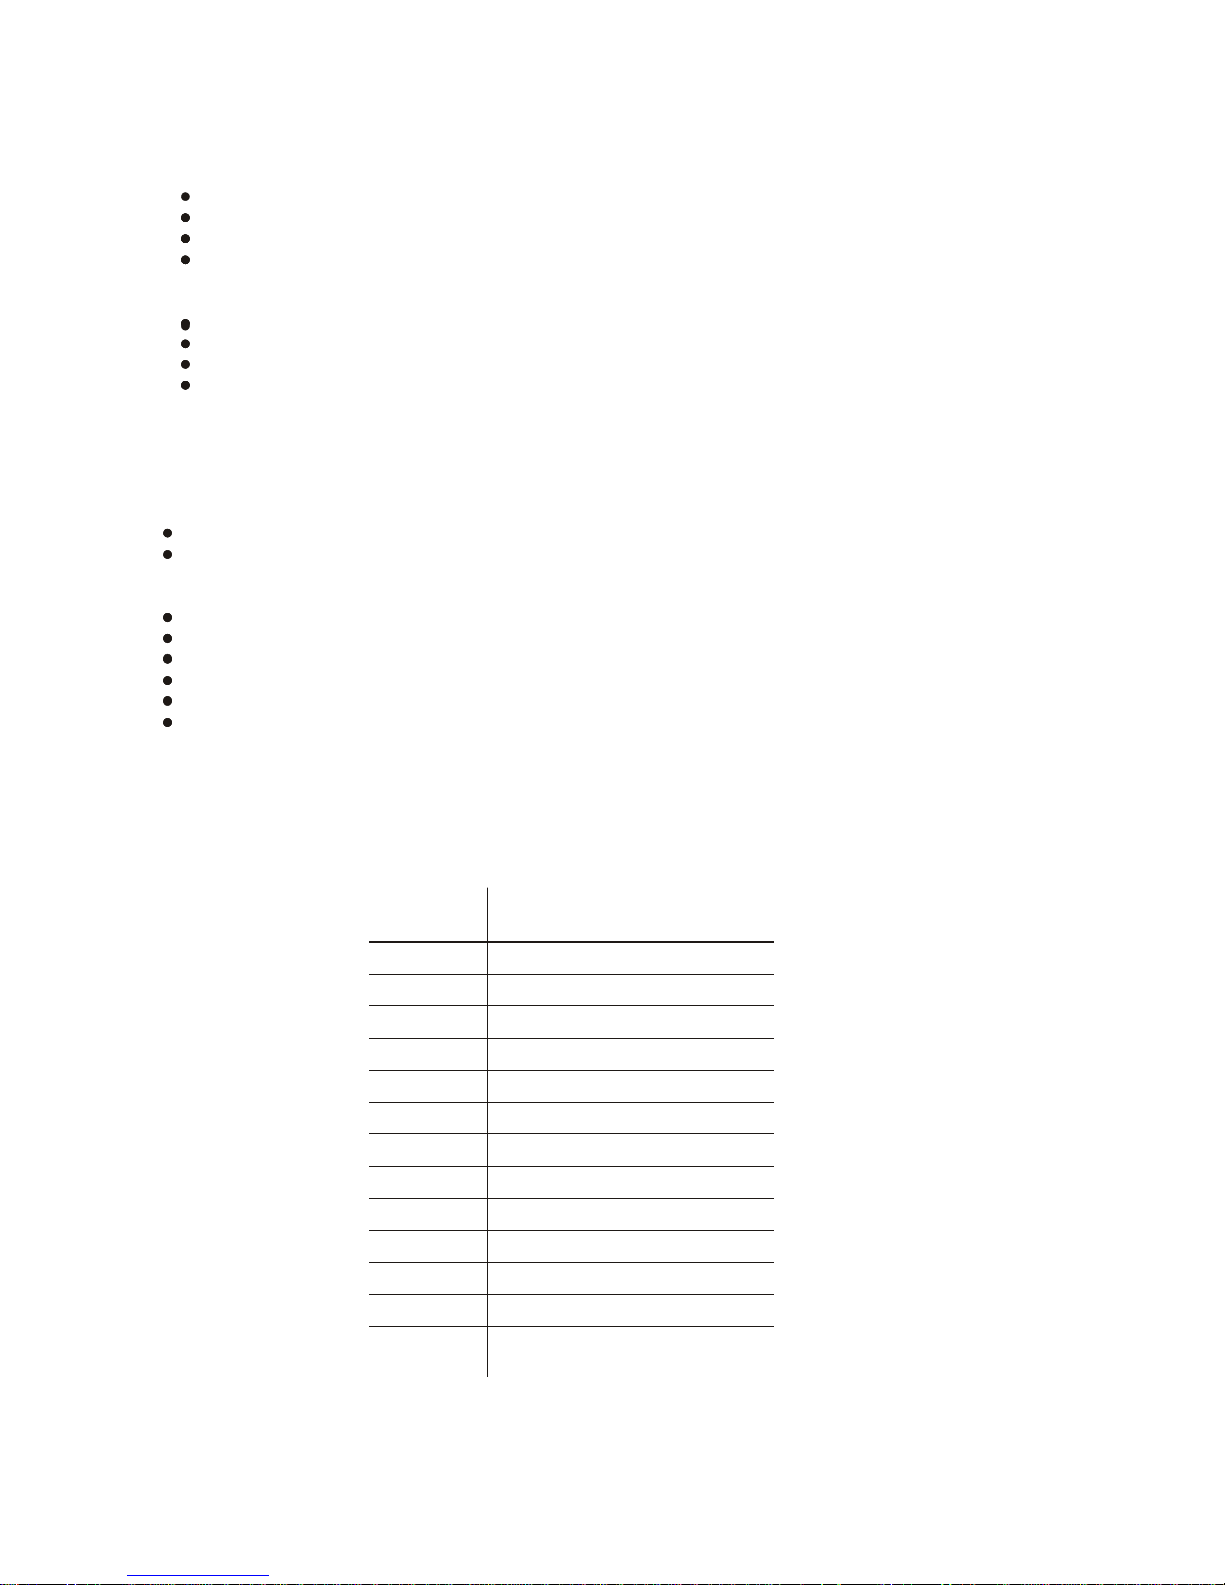
Channel
Summary
- 13 Channel
Mode
for Spot
5
CHANNEL
FUNCTION
1
Pan
2
Pan Fine
3
Tilt 4
Tilt Fine
5 Vector Speed (Pan/Tilt)
6
Dimmer/Strobe
7 Red
8
Green
9 Blue
10 Color Macros
11
Vector Speed (Color)
12 Movement Macros
13
Gobo
Page 6
DMX
Channel
Summary
- 5
Channel
Mode
for Spot
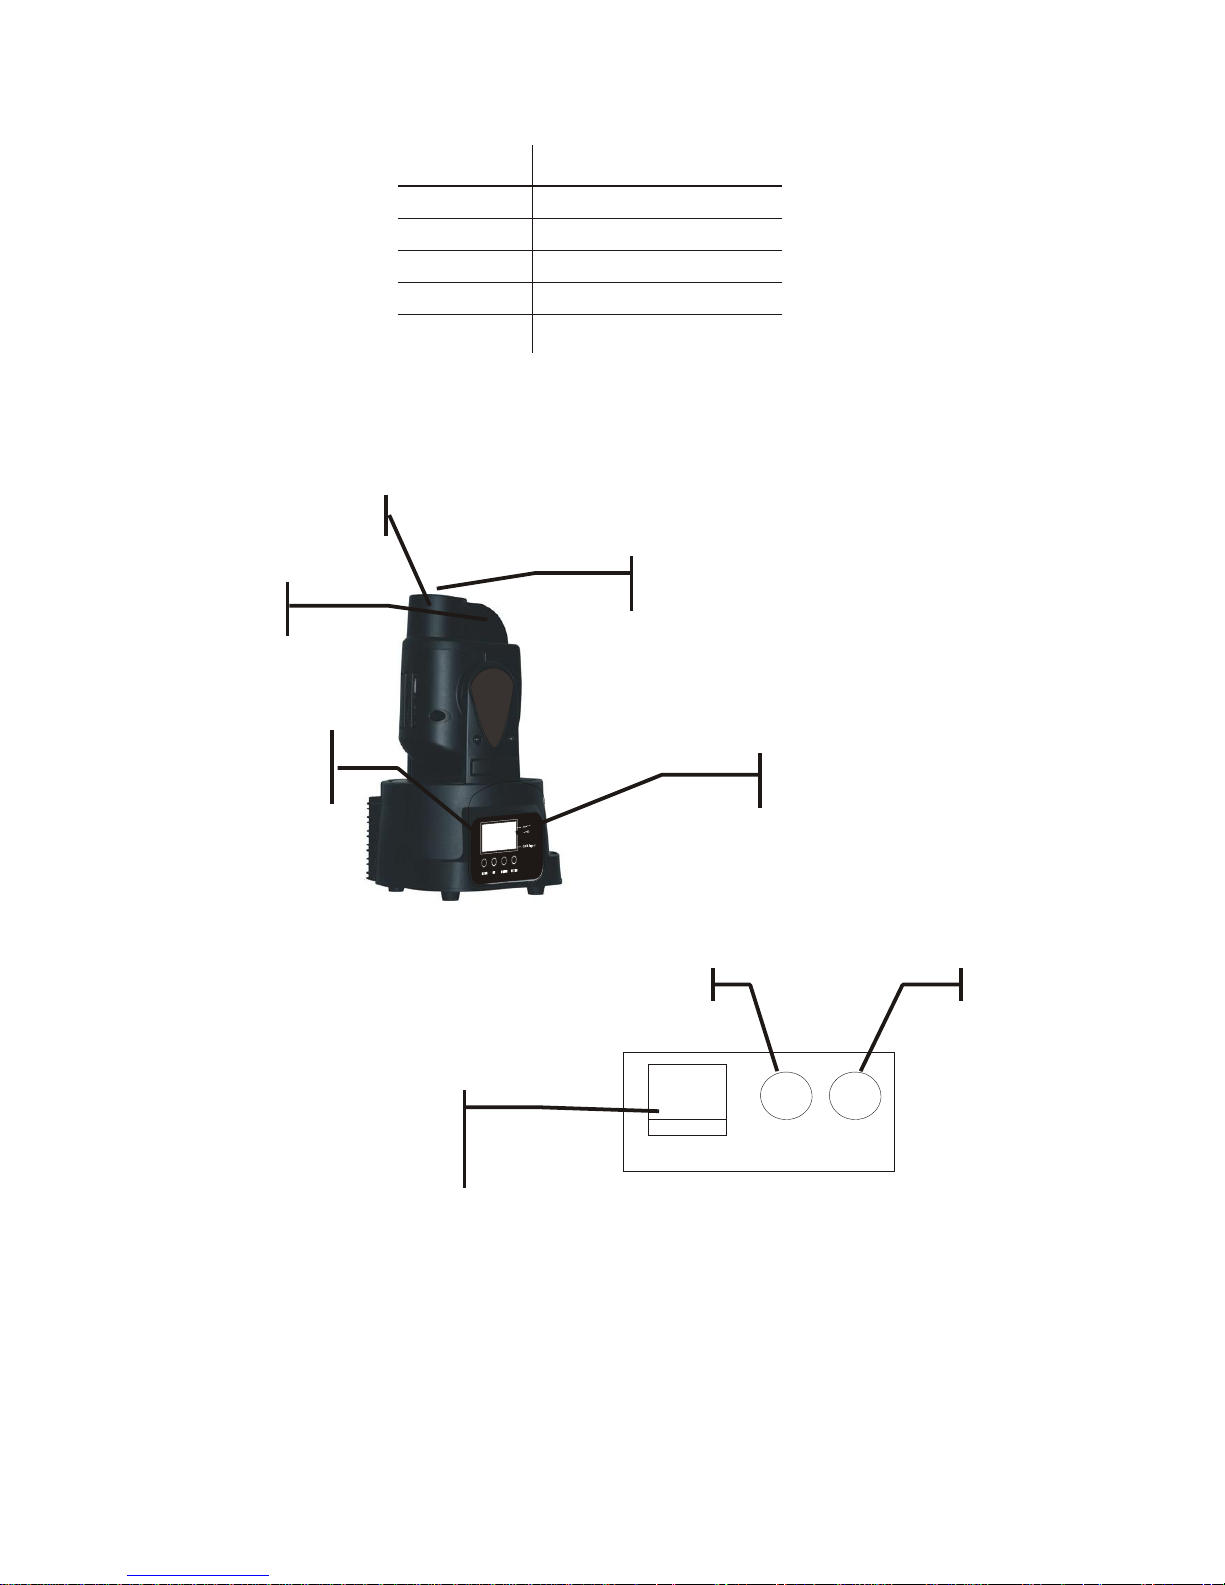
Product Overview
Projector Head
Lens
Focus
Control
Panel
LED Readout
DMX Out
DMX In
IEC Power
Connector with
Fuse holder
(Rear)
6
CHANNEL
FUNCTION
1
Pan
2 Tilt
3
Dimmer/Strobe
4
Color Macros
5
Gobo
Page 7
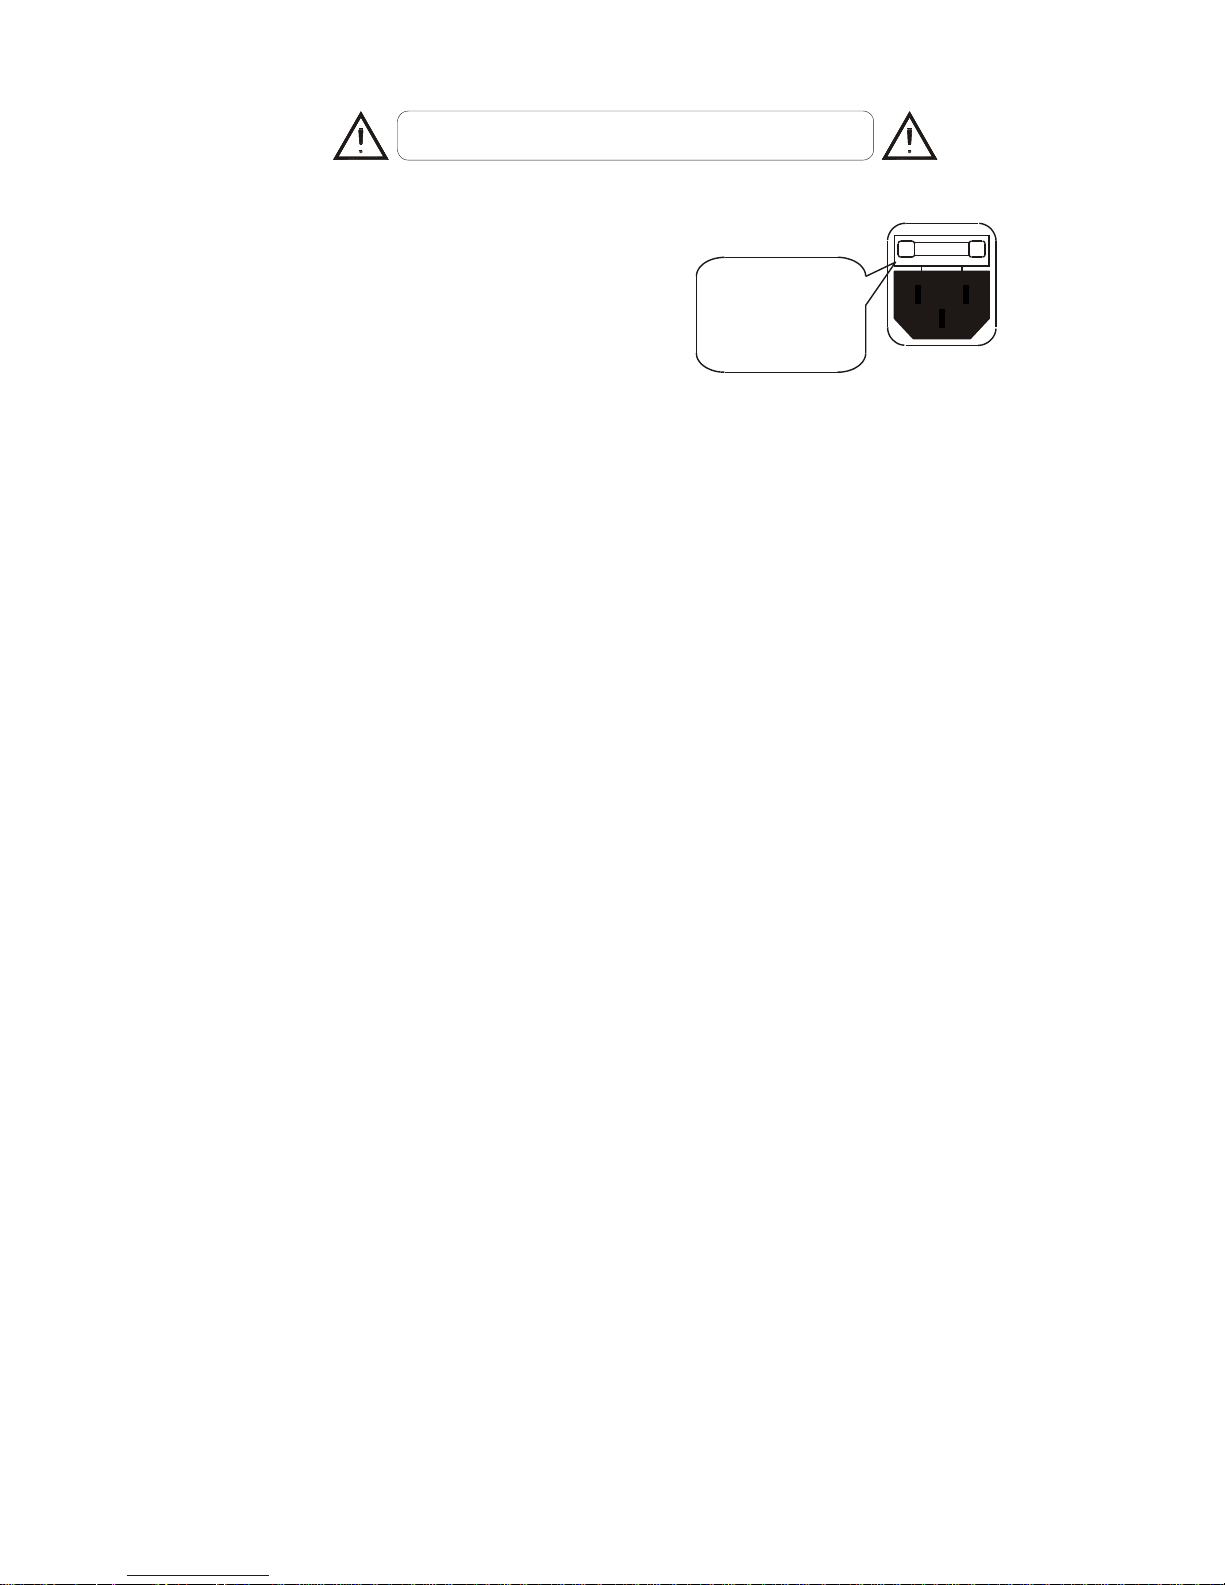
3. SETUP
Disconnect the power cord before replacing a fuse and
always
replace with the same type
fuse.
Fuse
Replacement
With a flat head screwdriver wedge the fuse
holder out of its housing. Remove the damaged
fuse from its holder and replace with exact
same type fuse. Insert the fuse holder back in
its place and reconnect power.
The fuse is located
inside this
compartment.
Remove using a flat
head screwdriver.
Fixture Linking
You will need a serial data link to run light shows of one or more fixtures using a DMX-512 controller
or to run synchronized shows on two or more fixtures set to a master/slave operating mode. The
combined number of channels required by all the fixtures on a serial data link determines the number
of fixtures the data link can support.
Important:
Fixtures on a serial data link must be daisy chained in one single line. To comply with the EIA-485
standard no more than 32 devices should be connected on one data link. Connecting more than 32
fixtures on one serial data link without the use of a DMX optically-isolated splitter may result in
deterioration of the digital DMX signal.
Maximum recommended serial data link distance: 500 meters (1640 ft.)
Maximum recommended number of fixtures on a serial data link: 32 fixtures
Data
Cabling
To link fixtures together you must obtain data cables. If you choose to create your own
cable please use data-grade cables that can carry a high quality signal and are less prone to
electromagnetic interference.
DMX
DATA CABLE
Use a Belden? 9841 or equivalent cable which meets the specifications for EIA RS-485 applications.
Standard microphone cables cannot transmit DMX data reliably over long distances. The cable will
have the following characteristics:
2-conductor twisted pair plus a shield
Maximum capacitance between conductors – 30 pF/ft.
Maximum capacitance between conductor and shield – 55 pF/ft.
Maximum resistance of 20 ohms / 1000 ft.
Nominal impedance 100 – 140 ohms
7
Page 8
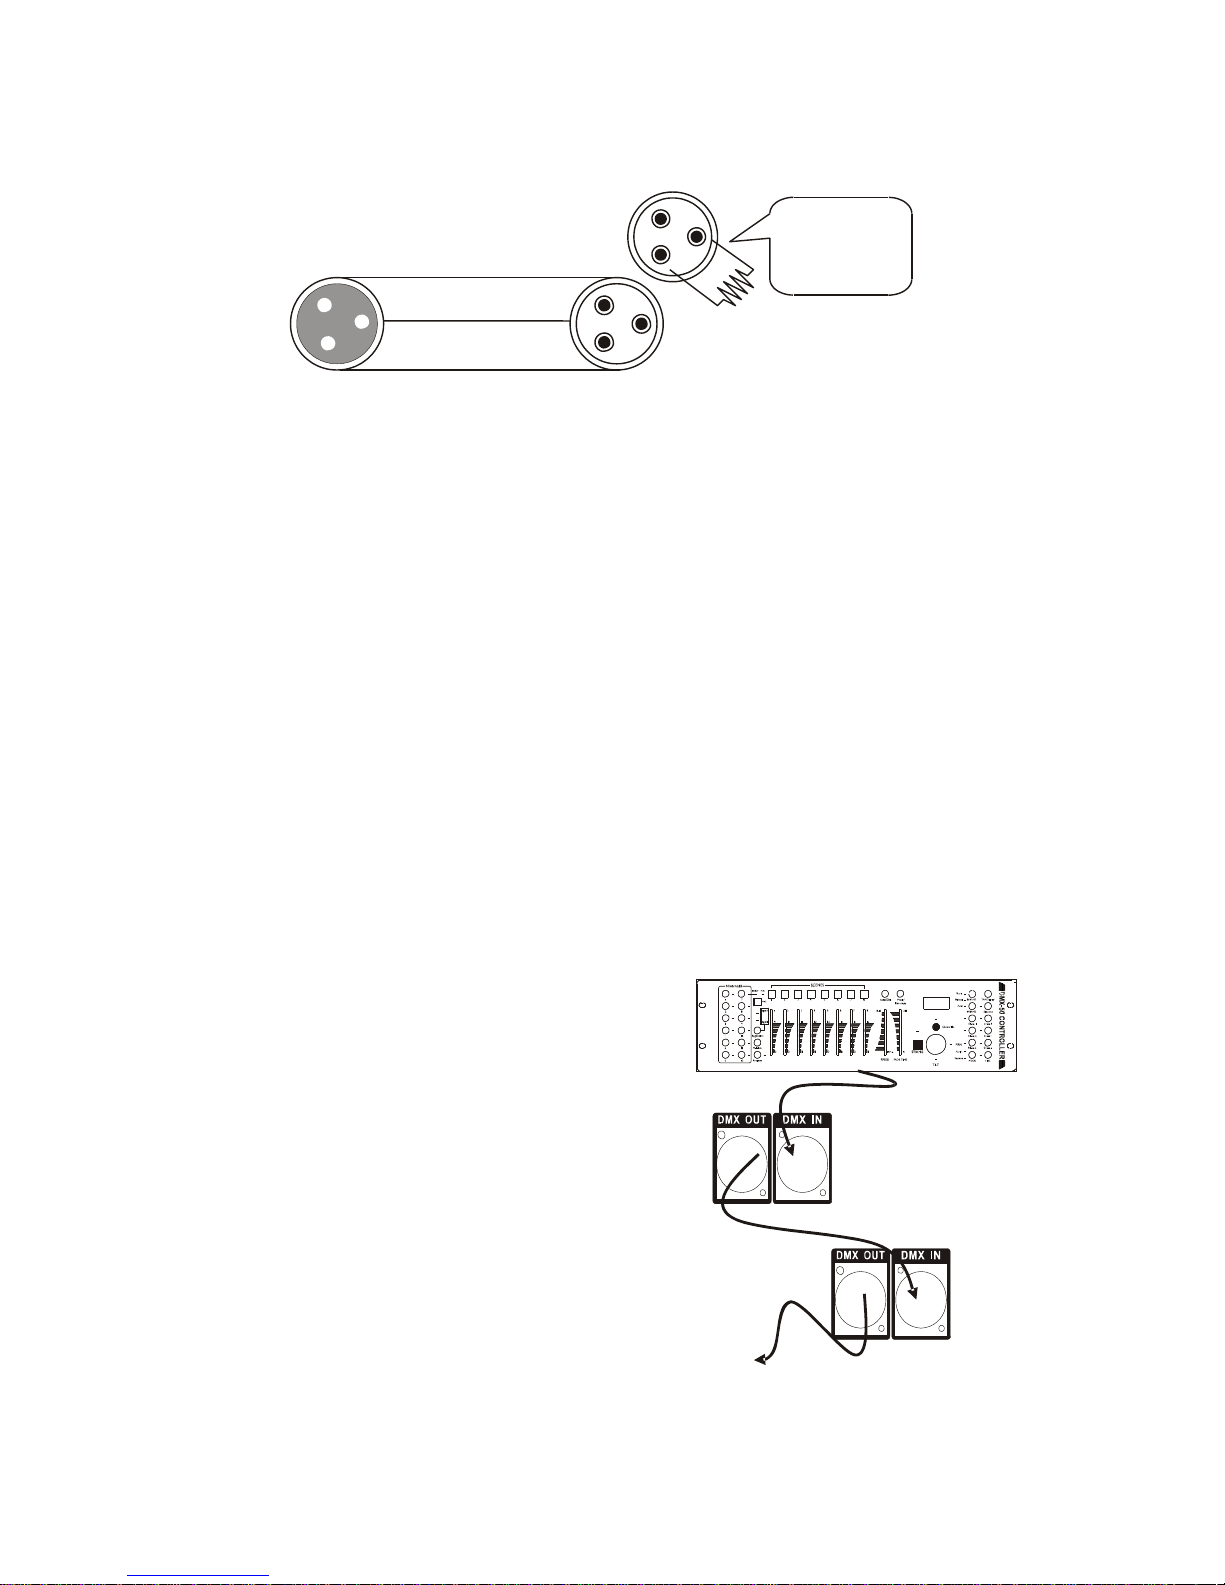
CAB LE C ONN ECTORS
Cabling must have a male XLR connector on one end and a female XLR connector on the other end.
DMX connector configuration
Resistance 120
ohm 1/4w between
pin 2 (DMX -) and
pin 3 (DMX +) of
the last fixture.
1
3
2
COMMON
DMX +
1
3
2
1
3
2
INPUT
OUTPUT
Termination reduces signal errors. To
avoid signal transmission problems
and interference, it is always
advisable to connect a DMX signal
terminator.
DMX -
Do not allow contact between the common and the fixture’s chassis ground. Grounding the common
can cause a ground loop, and your fixture may perform erratically. Test cables with an ohm meter to
verify correct polarity and to make sure the pins are not grounded or shorted to the shield or each other.
CAUTION
3-PIN
TO
5- PIN
CON VE R
SION
CHAR T
Note!
If you use a controller with a 5 pin DMX output connector, you will need to use a 5 pin to 3 pin adapter.
CHAUVET Model No: DMX5M, or DMX5F.
The chart below details a proper cable conversion:
3 PIN TO 5 PIN CONVERSION CHART
3 Pin Female (output)
Pin 1
Pin 2
Pin 3
Do not use
Do not use
5 Pin Male (Input)
Pin 1
Pin 2
Pin 3
Conductor
Ground/Shield
Data ( - ) signal
Data ( + ) signal
Do not use
Do not use
Setting
up a
DMX
Serial
Data
Link
1. Connect the (male) 3 pin connector side of
the DMX cable to the output (female) 3 pin
connector of the controller.
2. Connect the end of the cable coming from
the controller which will have a (female) 3
pin connector to the input connector of the
next fixture consisting of a (male) 3 pin
connector.
Universal DMX Controller
3. Then, proceed to connect from the output
as stated above to the input of the following
fixture and so on.
This drawing provides a
general illustration of the
DMX Input/Output panel of
a lighting fixture
DMX Data Cables
Order Code
DMX1.5
DMX4.5
DMX10
Description
DMX Cable 1.5m/4.9ft
DMX Cable 4.5m/14.8ft
DMX Cable 10m/32.8ft
Continue the link
8
Page 9
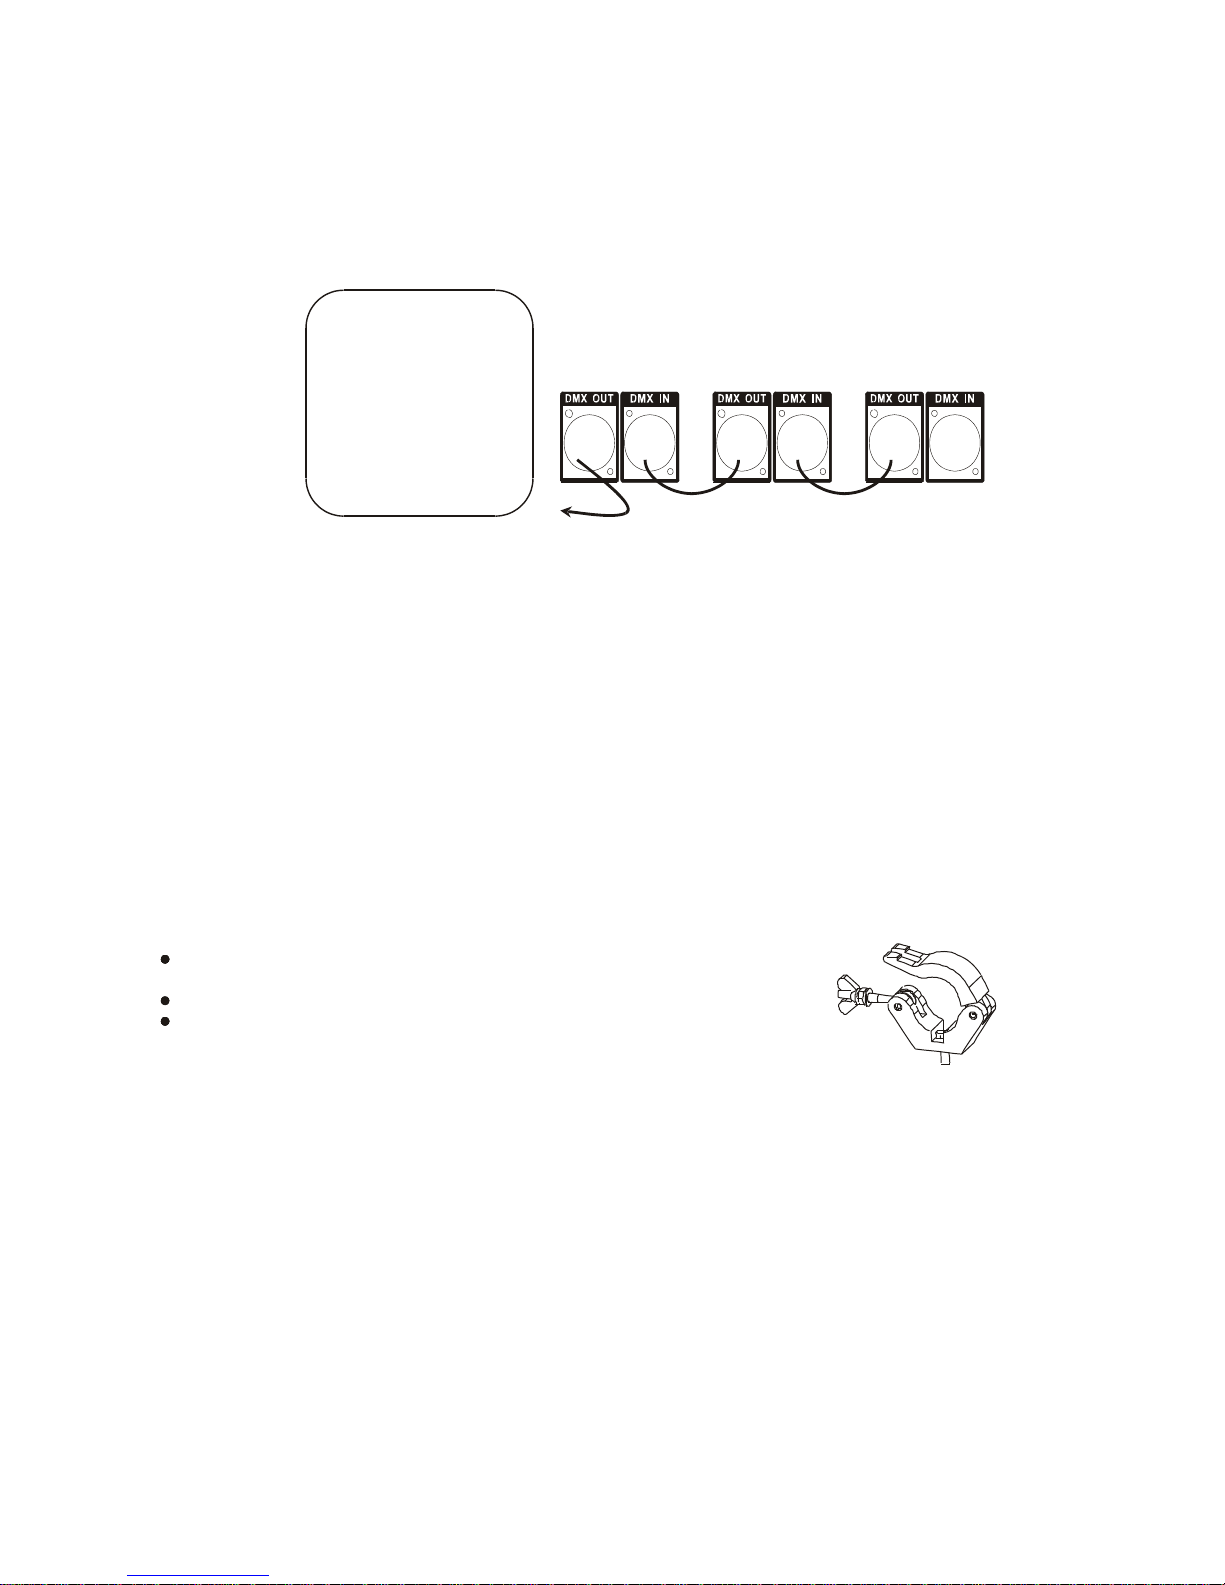
Master/Slave Fixture Linking
1. Connect the (male) 3 pin connector side of the DMX cable to the output (female) 3 pin connector
of the first fixture.
2. Connect the end of the cable coming from the first fixture which will have a (female) 3 pin
connector to the input connector of the next fixture consisting of a (male) 3 pin connector. Then,
proceed to connect from the output as stated above to the input of the following fixture and so on
Often, the setup for
Master-Slave and
Standalone operation requires that
the first fixture in the chain be
initialized for this purpose via eithe
settings in the control panel or DIP-r
switches. Secondarily, the fixtures
that follow may also require a slave
setting. Please consult the
“
Operating Instructions” section in
this manual for complete instructions
for this type of setup and
configuration.
Mounting
ORIENTATION
This fixture may be mounted in any position provided there is adequate room for ventilation.
RIGGING
Hanging Clamp
Note!
Clamp is sold separately.
It is important never to obstruct the fan or vents pathway. Mount the
fixture using, a suitable “C” or “O” type clamp. Adjust the angle of the
fixture by loosening both knobs and tilting the fixture. After finding the
desired position, retighten both knobs.
When selecting installation location, take into consideration lamp
replacement access and routine maintenance.
Safety cables must always be used.
Never mount in places where the fixture will be exposed to rain, high
humidity, extreme temperature changes or restricted ventilation.
9
Page 10
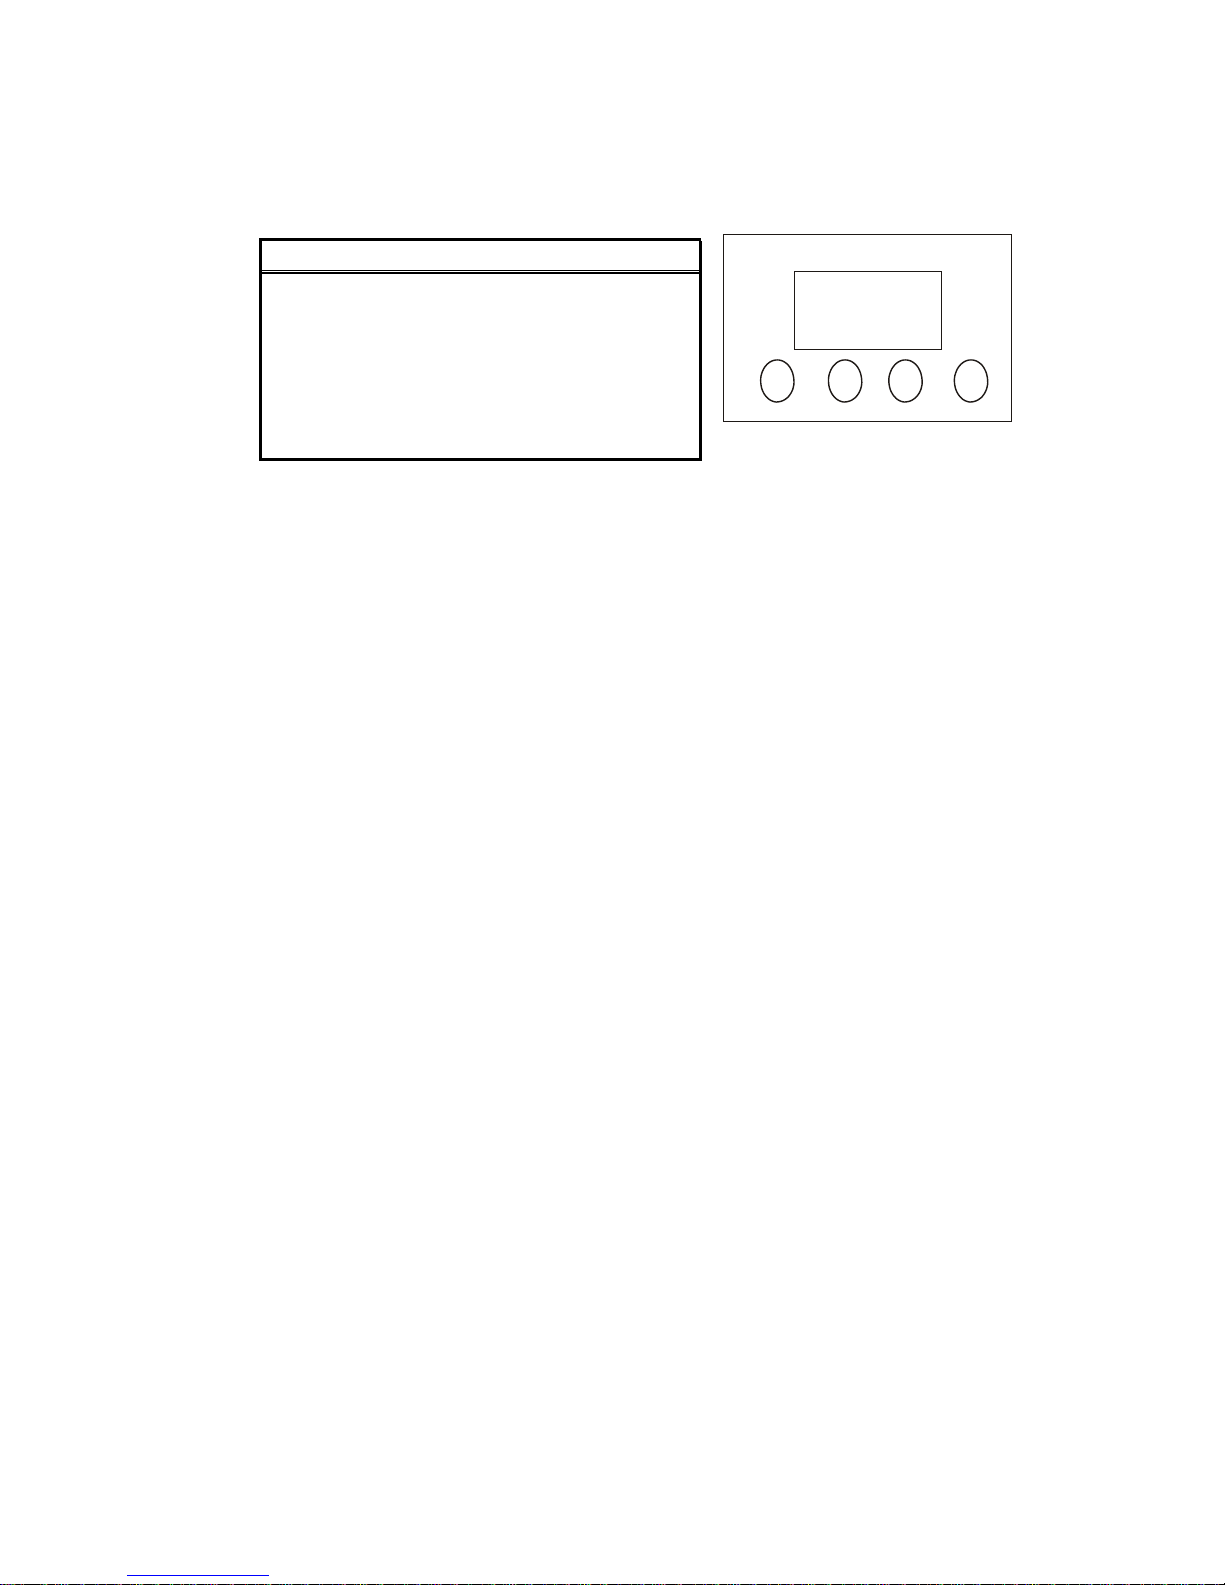
4. OPERATING INSTRUCTIONS
Navigating
the
Control Panel
Access control panel functions using the four panel buttons located directly underneath the LCD
Display.
previous menu option
order
order
<ENTER>
or option within a menu
The Control Panel LED Display shows the menu items you select from the menu map on page #11.
When a menu function is selected, the display will show immediately the first available option for the
selected menu function. To select a menu item, press <ENTER>.
Press the <MODE/ESC> button repeatedly until you reach the desired menu function. Use the <UP>
and <DOWN> buttons to navigate the menu options. Press the <ENTER> button to select the menu
function currently displayed, or to enable a menu option. To return to the previous option or menu
without changing the value, press the <MODE/ESC> button.
10
Button Function
<MODE/ESC>
Used to access the menu or to return to a
<UP>
Scrolls through menu options in ascending
<DOWN>
Scrolls through menu options in descending
Used to select and store the current menu
MODE/ESC UP
DOWN
ENTER
Page 11
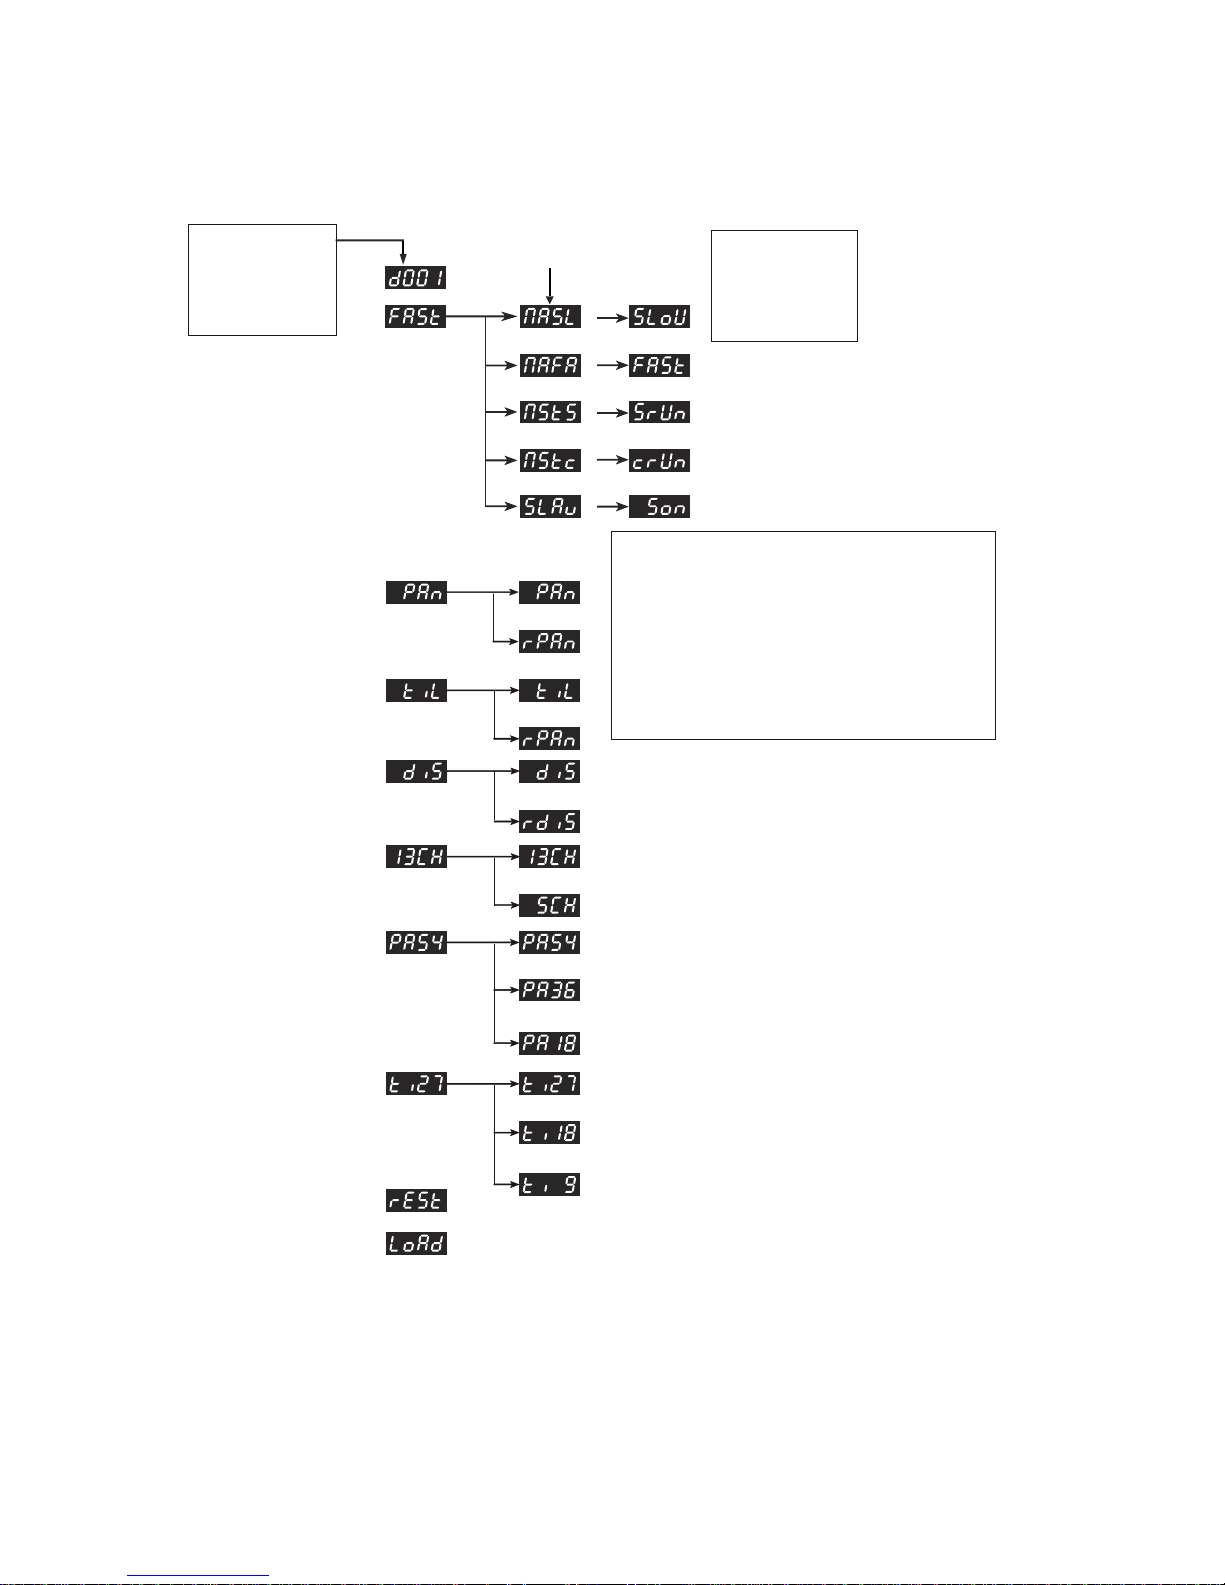
Menu
Map
Use
the
DOWN
button to
move
down.
Use
the
MODE
buton to
move
left, or
items in the
menu
map.
11
When
navigating the menu:
Use
the
UP
button to
move
up.
Use
the
ENTER
button to
move
right.
to scroll through the left-most
Use the <UP>,<DOWN>,
and <ENTER> buttons to
scroll through these menu
items
Use the <MODE/ESC>
button to scroll through
these menu items
Page 12
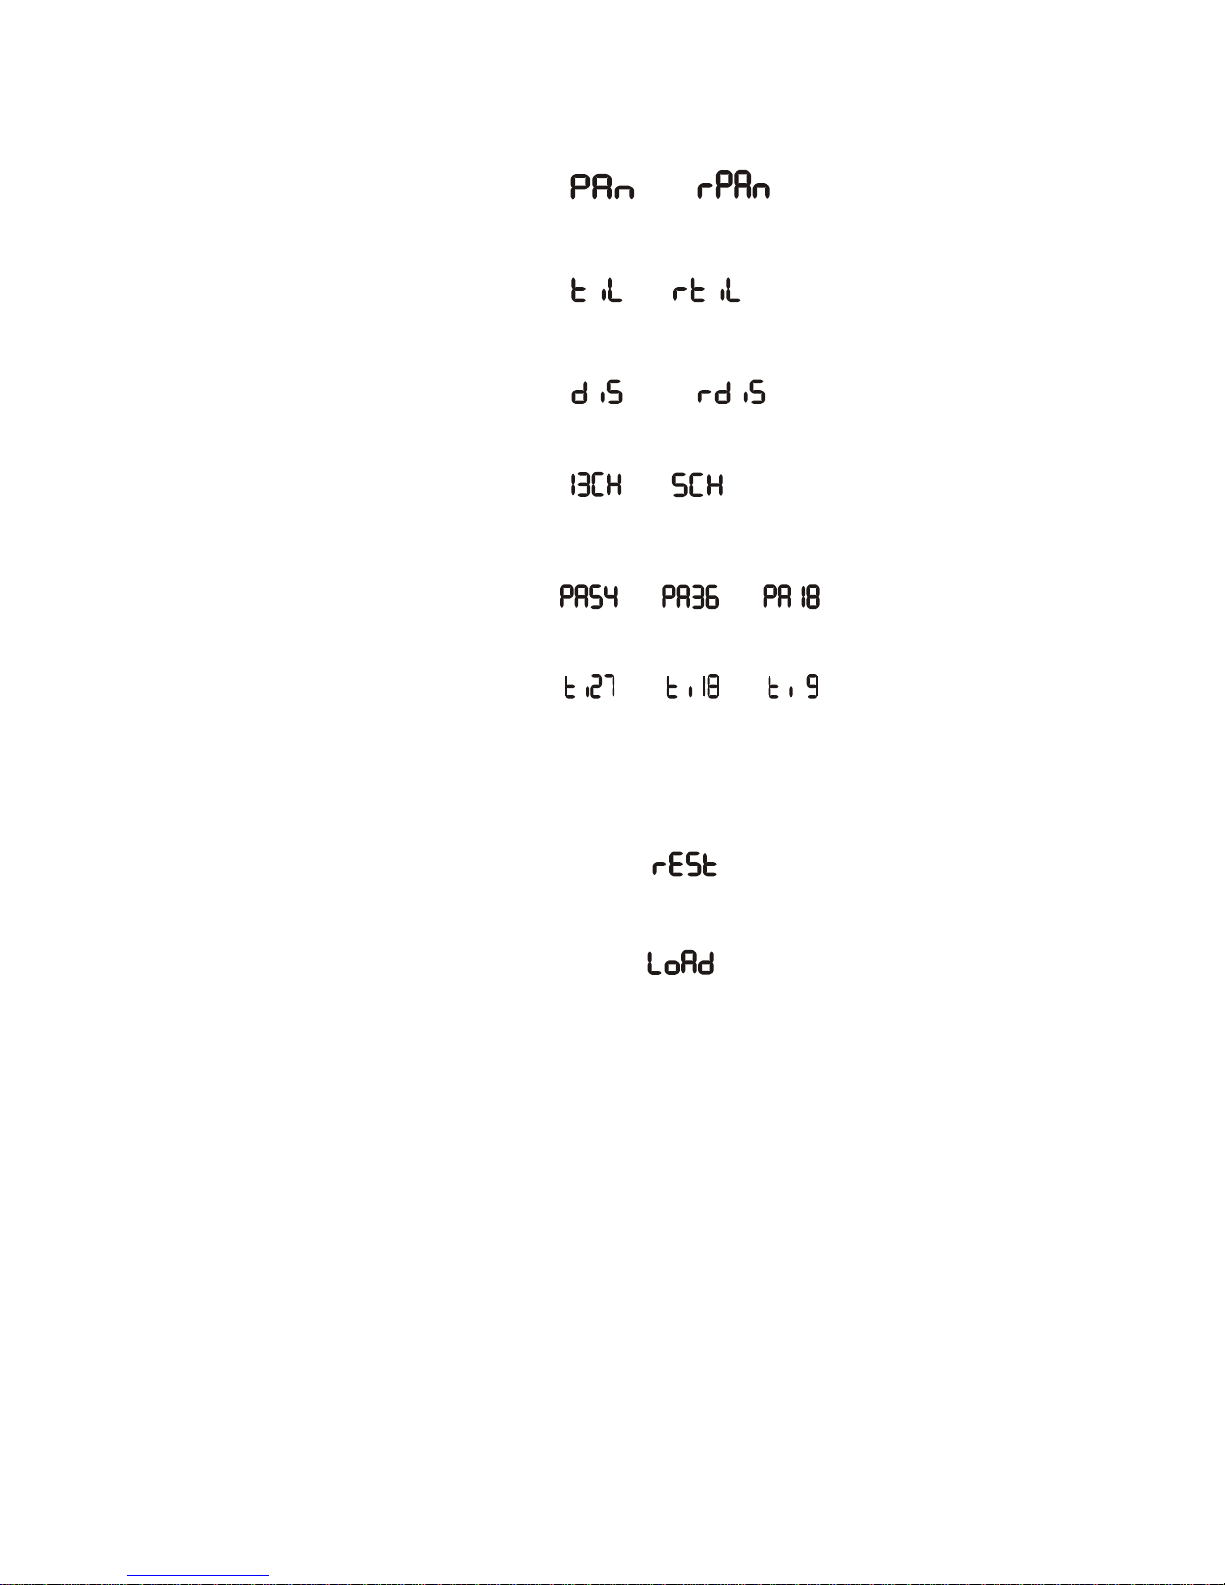
User
Configurations
TO
SET
THE PAN TO INVERTING OR
NON- INVERTING:
1) Press the Mode button until it shows
or
2) Use the Up/Down buttons to set to the desired inversion, press enter to confirm.
TO
SET
THE
TILT
TO INVERTING OR NON-
INVERTING:
1) Press the Mode button until it shows
or
2) Use the Up/Down buttons to set to the desired inversion, press enter to confirm.
TO
SET
THE LED READOUT TO INVERTING OR
NON- INVERTING:
1) Press the Mode button until it shows
or
2) Use the Up/Down buttons to set to the desired inversion, press enter to confirm.
TO
SET
THE DMX CHANNEL
CONFIGURATION:
1) Press the Mode button until it shows
or
2) Use the Up/Down buttons to set to the desired inversion, press enter to confirm.
TO
SET
THE MAX I MUM
PAN ANGLE:
1) Press the Mode button until it shows
or
or
2) Use the Up/Down buttons to set to the desired inversion, press enter to confirm.
TO
SET
THE MA X I MUM
TILT
ANGLE:
1) Press the Mode button until it shows
or
or
2) Use the Up/Down buttons to set to the desired inversion, press enter to confirm.
Service Functions
TO RESET THE FIXTURE:
1) Press the Mode button until the display shows
2) Press enter to confirm your selection.
TO RESTORE ALL SETTINGS TO THEIR FACTORY
DEFAULTS:
1) Press the mode button until the display reads
2)
Press enter to confirm your selection.
12
Page 13
Operation
Stand-Alone
Mode (Auto Mode):
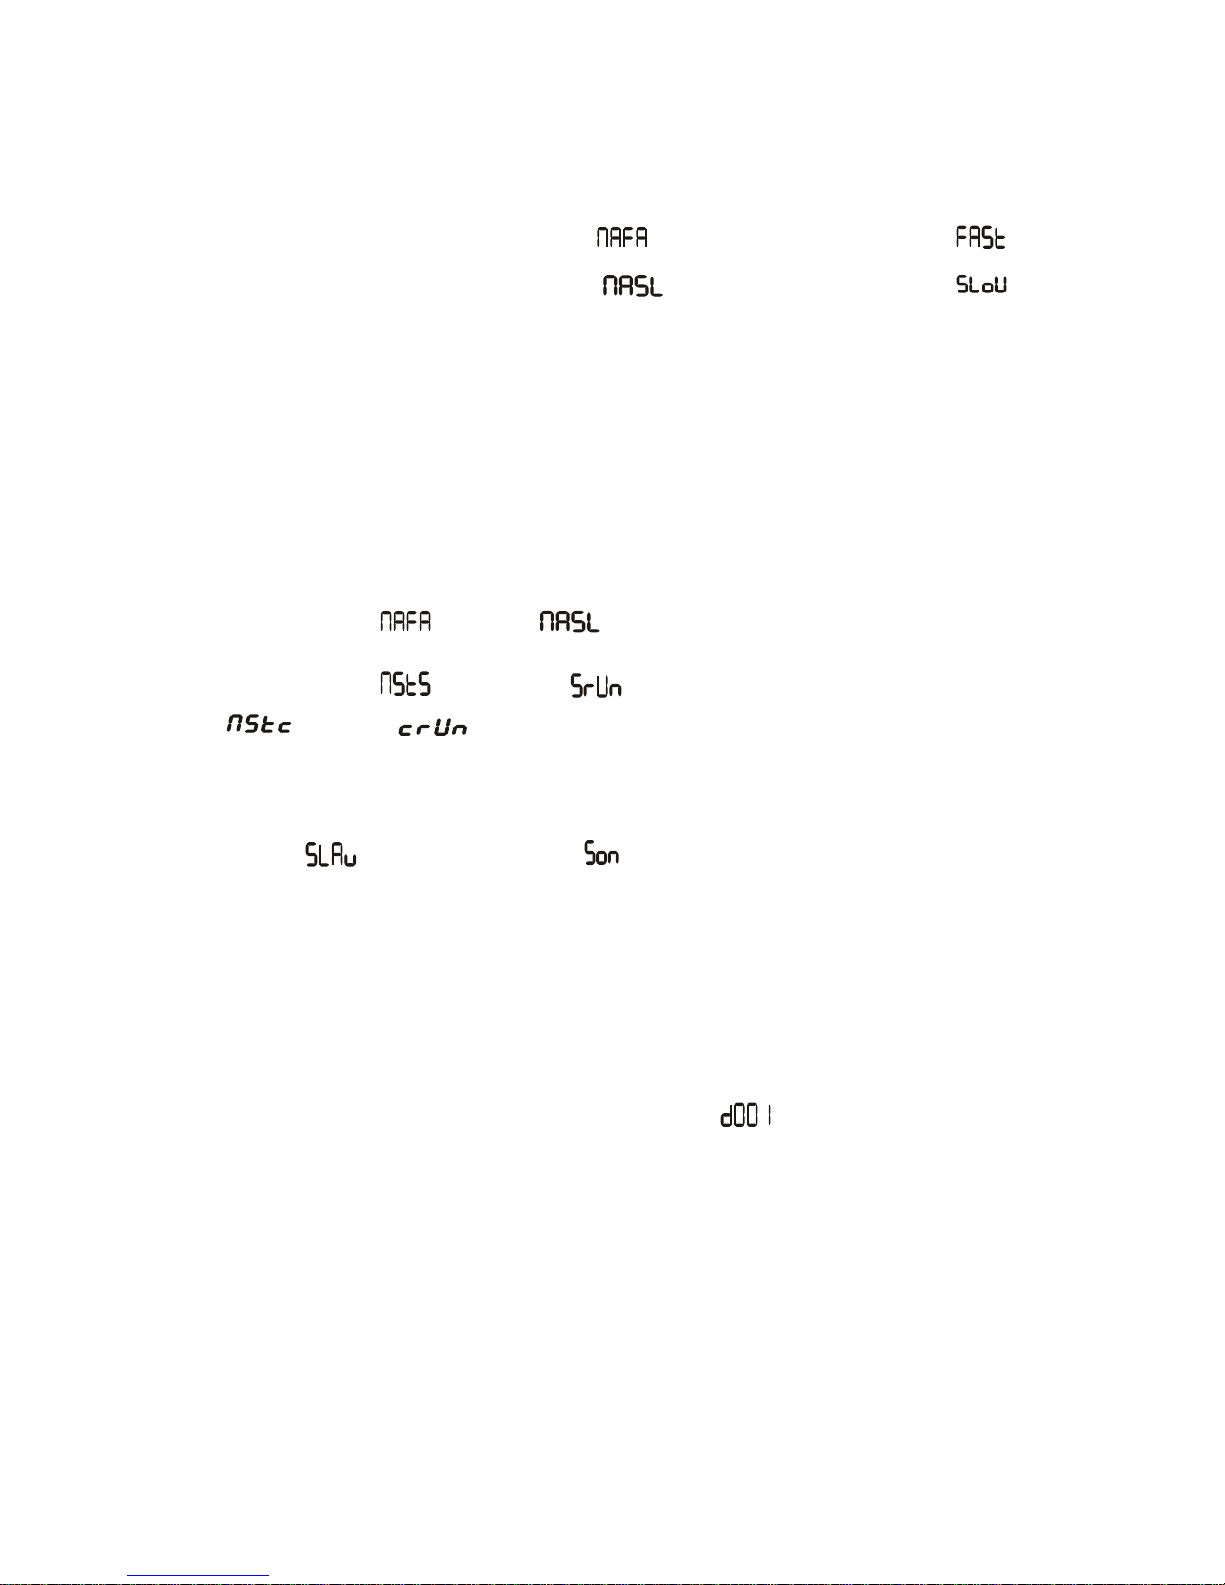
This mode allows a single unit to run to a factory installed program in one of two speeds.
1) To set the fixture in auto mode Fast, select
. Once confirmed the display reads
2) To set the fixture in auto mode Slow, select
Once confirmed the display reads
Master/Slave
Mode
(Master Sound):
This mode will allow you to link up to 32 units together without a controller.
1) Use standard DMX cables to daisy chain your units together via the DMX connector on the rear
of the units. Proper performance it may be necessary to use a terminator at the last fixture. For
more information about terminators, see page 8.
2) Choose a unit to function as the Master. Select NAFA/NASL or NStS (see below for readout)
depending upon which master mode you require. The master unit must be the first unit in line.
Finally, chain the units together using DMX cable.
Master Auto
or
Master Sound
becomes
when confirmed
3)
Becomes
AUTO
checking function
4) Select slave function by using the Up/Down keys to reach SLAv in the Master/Auto menu on the
slave units, and they will react in the same as the Master.
Slave
becomes
when confirmed
DMX Mode
This mode allows the unit to be controlled by any universal DMX controller. If you are unfamiliar with
DMX, please read the DMX Primer on page #19.
1) The default mode for the fixture is DMX, which appears as
on the LED Readout.
13
Page 14
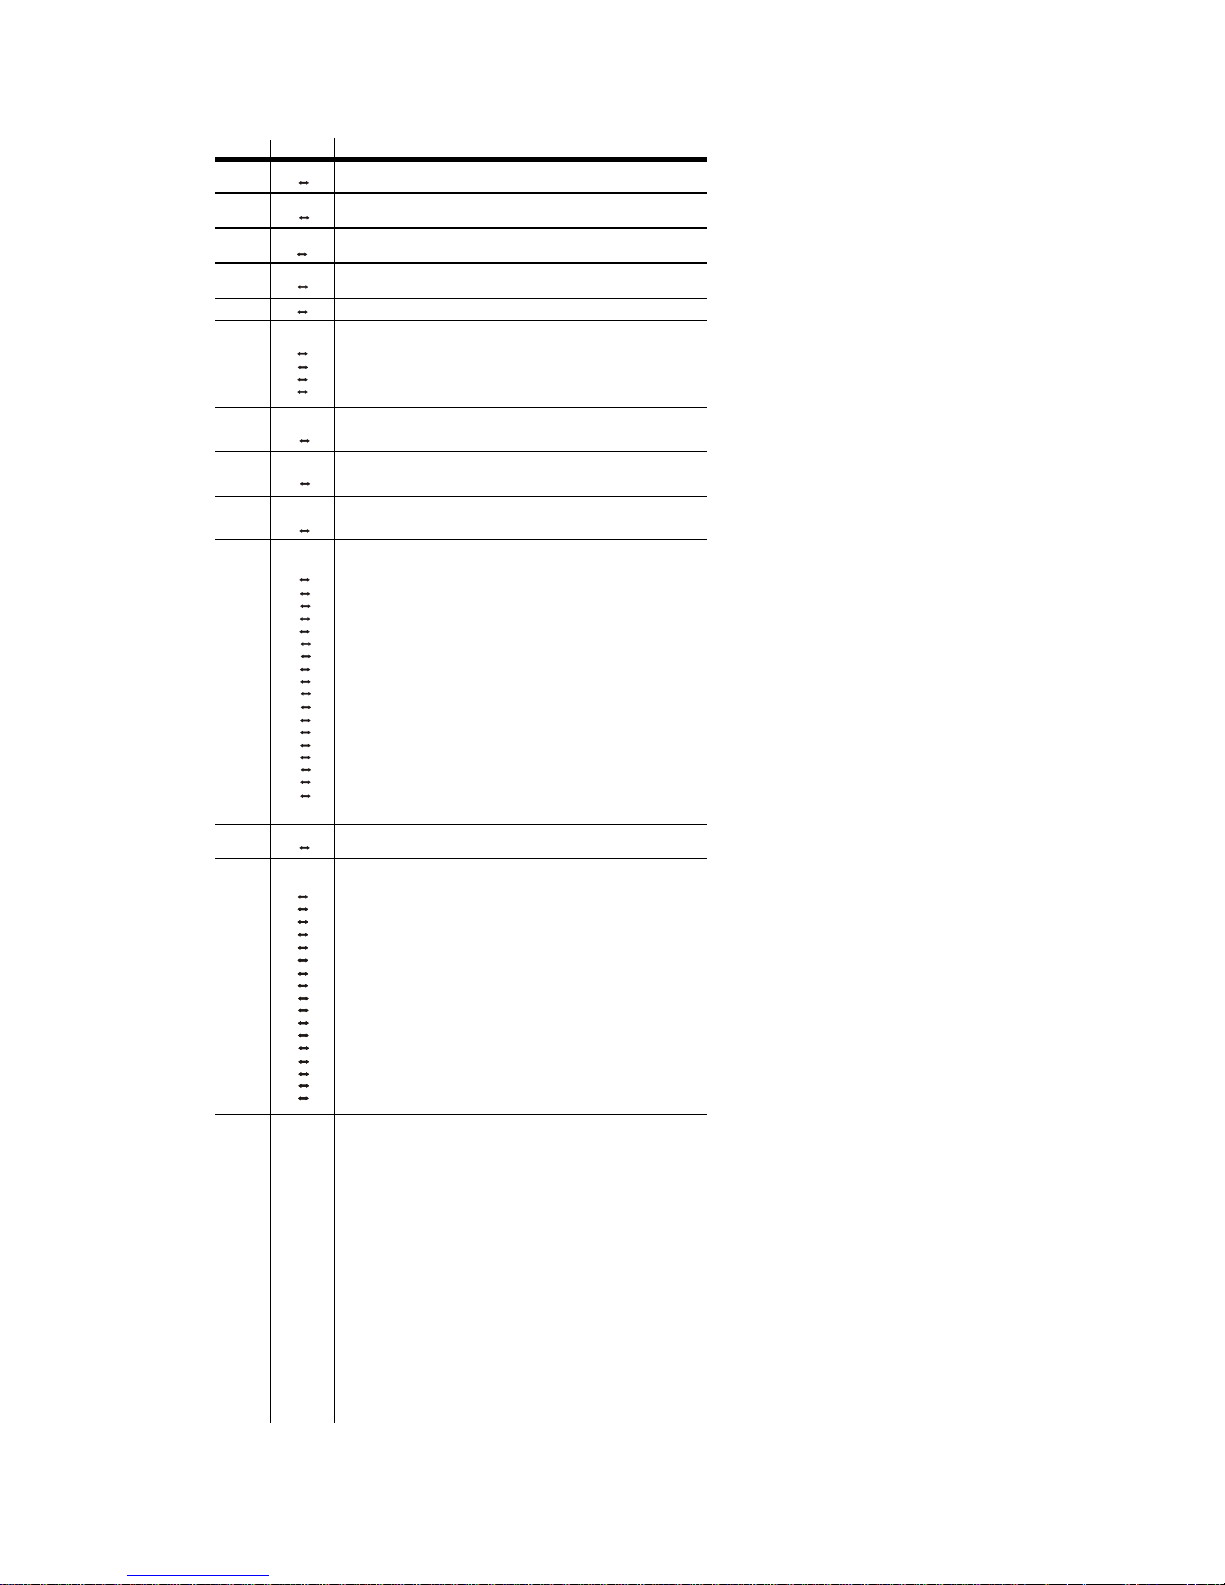
DMX
Channel
Values
(13
Channel)
CHANNEL
14
VALUE
FUNCTION
1
000 255 Pan
2
000 255 Pan Fine
3
000 255 Tilt
4
000 255 Tilt Fine
5
000 255
Vector Speed: (Normal → Slow)
6
000 007
008 134
135 239
240 255
Dimmer/Strobe
Closed
100-0%
Strobe (slow → fast)
Open
7
000 255
Red
0-100%
8
000 255
Green
0-100%
9
000 255
Blue
0-100%
10
000 007
008 021
022 034
036 049
050 063
064 077
078 091
092 105
106 119
120 133
134 147
148 161
162 175
176 189
190 203
204 217
218 231
232 255
Color Macros
No Function
White
Red
Green
Blue
Cyan
Magenta
Yellow
Purple
Orange
Chartreuse
Pink
Brown
Gold
Crimson
Violet
Crape
Color-Change Macro 1
11
000 255 Vector Speed (Color)
12
000 007
008 022
023 037
038 052
053 067
068 082
083 097
098 112
113 127
128 142
143 157
158 172
173 187
188 202
203 217
218 232
233 255
Movement Macros
No Function
Auto Program 1
Auto Program 2
Auto Program 3
Auto Program 4
Auto Program 5
Auto Program 6
Auto Program 7
Auto Program 8
Sound Active1
Sound Active 2
Sound Active 3
Sound Active 4
Sound Active 5
Sound Active 6
Sound Active 7
Sound Active 8
13
80 - 94
95 -109
110 - 124
125 - 139
140 - 154
155 - 169
170 -184
185 - 199
200 - 214
215 - 235
236 - 255
Gobo
WHITE GOBO 1 GOBO 2 GOBO 3
GOBO 4
0~7 8~15 16~23 2 4~31 32~39
GOBO 5 GOBO 6 GOBO 7 GOBO 8
GOBO 9
40~47 48~55 56~63 64~71 72~79
GOBO1 Shake
GOBO2 Shake
GOBO3 Shake
GOBO4 Shake
GOBO5 Shake
GOBO6 Shake
GOBO7 Shake
GOBO8 Shake
GOBO9 Shake
Positive rainbow effect with increasing speed
Negative rainbow effect with increasing speed
Page 15
DMX
Channel
Values
(5 Channel
for
Spot)
16
CHANNEL
VALUE
FUNCTION
1
000 255 Pan
2
000 255
Tilt
3
000 007
008 134
135 239
240 255
Dimmer/Strobe
Closed
100-0%
Strobe (slow → fast)
Open
4
000 007
008 021
022 034
036 049
050 063
064 077
078 091
092 105
106 119
120 133
134 147
148 161
162 175
176 189
190 203
204 217
218 231
232 255
Color Macros
No Function
White
Red
Green
Blue
Cyan
Magenta
Yellow
Purple
Orange
Chartreuse
Pink
Brown
Gold
Crimson
Violet
Crape
Color-Change Macro 1
5
80 - 94
95 -109
110 - 124
125 - 139
140 - 154
155 - 169
170 -184
185 - 199
200 - 214
215 - 235
236 - 255
Gobo
WHITE GOBO 1 GOBO 2 GOBO 3
GOBO 4
0~7 8~15 16~23 2 4~31 32~39
GOBO 5 GOBO 6 GOBO 7 GOBO 8
GOBO 9
40~47 48~55 56~63 64~71 72~79
GOBO1 Shake(from slow to fast)
GOBO2 Shake(from slow to fast)
GOBO3 Shake(from slow to fast)
GOBO4 Shake(from slow to fast)
GOBO5 Shake(from slow to fast)
GOBO6 Shake(from slow to fast)
GOBO7 Shake(from slow to fast)
GOBO8 Shake(from slow to fast)
GOBO9 Shake(from slow to fast)
Positive rainbow effect with increasing speed
Negative rainbow effect with increasing speed
Page 16

5.
APPENDIX
Technical
Specifications
WEIGHT &
DIMENSIONS
Length....................................................................................................................... 6.8 in (173 mm)
Width ........................................................................................................................ 6.8 in (173 mm)
Height ....................................................................................................................... 9.8 in (249 mm)
Weight ........................................................................................................................ 8.3 lbs (3.8 kg)
POWER
Switch-selectable power settings ............................................................100- 230V 50/60Hz
Fuse..................................................................................................... 1A 250V
Power Consumption .............................................................................. 68.1W (0.60A) Max at 120V
Inrush Power ........................................................................................ 83.6W (1.41A) inrush at 120V
Power Factor .......................................................... ..............................0.92
LED................................................................................................................ 1, 14W RGB 50,000hrs
PHOTO
OPTIC
Beam Angle ............................................................................................................ 13°
Illuminance at 1M ......................................................... ...........................................100 fc (1,076 lux)
RANGE
Pan ......................................................................................................................................... 540°
Tilt........................................................................................................................................... 270
°
THERMAL
Maximum ambient temperature................................................................................ .....104°F (40°C)
CONTROL & PROGRAMMING
Data input .......................................................................................... locking 3-pin XLR male socket
Data output ........................................................................................ locking 3-pin XLR female socket
Data pin configuration ..........................................................................pin 1 shield, pin 2 (-), pin 3 (+)
Protocols............................................................................................ DMX-512 USITT
DMX Channels ....................................................................................5 or 13
ORDERING INFORMATION
Mini Spot...............................................................................................................spot
WARRANTY
INFORMATION
Warranty ........................................................................................................ 2-year limited warranty
17
 Loading...