

Page 1
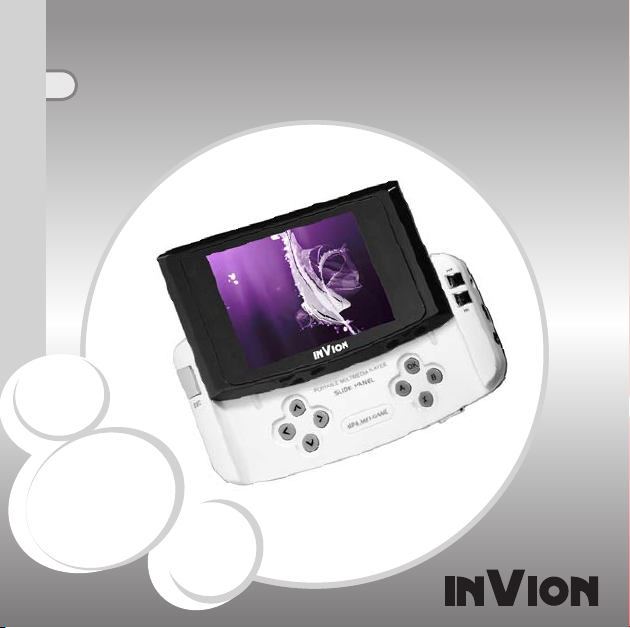
INSTRUCTION MANUAL
Invion Slide PMP
US
US
MP4-MPM02-IUS
Page 2
Congratulations on purchasing your new Invion product.
We are convinced you will be completely satised with
it!
To always guarantee optimal function and performance of
your product, we would ask the following:
Before using the appliance for the rst time, carefully
•
read the operating instructions and adhere to the safety
precautions!
All activities at and with this appliance may only be carried
•
out as described in these operating instructions.
Please be sure to include the operating instructions in
•
case you pass along this product to someone else.
2
English
Page 3
Packaging:
This appliance is delivered in protective packaging to
prevent transportation damage. Packaging materials are raw
materials and can therefore be recycled. Please recycle these
materials.
This device complies with Part 15 of the FCC Rules.
Operation is subject to the following two conditions:
(1) This device may not cause harmful interference, and (2)
this device must accept any interference received, including
interference that may cause undesired operation.
3
Page 4
Content
NOTICE. . . . . . . . . . . . . . . . . . . . . . . . . . . . . . . . . . . . . . . . 7
SYSTEM REQUIREMENTS . . . . . . . . . . . . . . . . . . . . . . . . 9
FEATURES . . . . . . . . . . . . . . . . . . . . . . . . . . . . . . . . . . . . 11
PLAYER OVERVIEW . . . . . . . . . . . . . . . . . . . . . . . . . . . . 12
POWERING ON . . . . . . . . . . . . . . . . . . . . . . . . . . . . . . . . 14
POWERING OFF MANUALLY . . . . . . . . . . . . . . . . . . . . . 14
POWERING OFF AUTOMATICALLY . . . . . . . . . . . . . . . . 14
SUBMENU . . . . . . . . . . . . . . . . . . . . . . . . . . . . . . . . . . . . 14
DIRECTION BUTTONS . . . . . . . . . . . . . . . . . . . . . . . . . . 15
4
English
Page 5
CONNECTING AND DOWNLOADING. . . . . . . . . . . . . . . 15
Connecting player to PC . . . . . . . . . . . . . . . . . . . . . . . . . . 15
USB-disk driver setup (Windows 98 users only) . . . . . . . . 16
Removable USB-disk . . . . . . . . . . . . . . . . . . . . . . . . . . . . 18
SD Slot . . . . . . . . . . . . . . . . . . . . . . . . . . . . . . . . . . . . . . . 18
Download / Upload / Delete Files . . . . . . . . . . . . . . . . . . . 19
Connecting to the computer . . . . . . . . . . . . . . . . . . . . . . . 20
Checking for DRM . . . . . . . . . . . . . . . . . . . . . . . . . . . . . . . 22
Downloading les (music, video, e-books, photo) . . . . . . . 25
Copying audio tracks to the player from the computer . . . 29
Format memory . . . . . . . . . . . . . . . . . . . . . . . . . . . . . . . . . 30
Disconnecting from the computer . . . . . . . . . . . . . . . . . . . 31
MANAGING THE BATTERY. . . . . . . . . . . . . . . . . . . . . . . 33
Recharging the battery . . . . . . . . . . . . . . . . . . . . . . . . . . . 33
MAIN MENU . . . . . . . . . . . . . . . . . . . . . . . . . . . . . . . . . . . 34
The interface of the main menu. . . . . . . . . . . . . . . . . . . . . 34
Video Player . . . . . . . . . . . . . . . . . . . . . . . . . . . . . . . . . . . 34
Audio Player . . . . . . . . . . . . . . . . . . . . . . . . . . . . . . . . . . . 37
5
Page 6
Picture View. . . . . . . . . . . . . . . . . . . . . . . . . . . . . . . . . . . . 42
Camera . . . . . . . . . . . . . . . . . . . . . . . . . . . . . . . . . . . . . . . 45
DV (Digital Video) . . . . . . . . . . . . . . . . . . . . . . . . . . . . . . . 48
AudioRec (Record) . . . . . . . . . . . . . . . . . . . . . . . . . . . . . . 51
Games. . . . . . . . . . . . . . . . . . . . . . . . . . . . . . . . . . . . . . . . 54
Learning. . . . . . . . . . . . . . . . . . . . . . . . . . . . . . . . . . . . . . . 56
Tool . . . . . . . . . . . . . . . . . . . . . . . . . . . . . . . . . . . . . . . . . . 59
Settings (System Setup) . . . . . . . . . . . . . . . . . . . . . . . . . . 62
SOFTWARE GUIDE . . . . . . . . . . . . . . . . . . . . . . . . . . . . . 64
Installing the transcoding tool (conversion software). . . . . 64
Converting a video/audio/image le . . . . . . . . . . . . . . . . . 64
Update. . . . . . . . . . . . . . . . . . . . . . . . . . . . . . . . . . . . . . . . 67
TECHNICAL SPECIFICATIONS. . . . . . . . . . . . . . . . . . . . 67
TROUBLESHOOTING . . . . . . . . . . . . . . . . . . . . . . . . . . . 71
CLAIMS & WARRANTIES . . . . . . . . . . . . . . . . . . . . . . . . 85
6
English
Page 7
Notice
Note: Our company does not assume responsibility for
errors or omissions in this manual or make any commitment
to upgrade the information contained herein when there are
software upgrades.
* Some of the images in the manual may be different from
the player’s interface, but the functions will remain the
same.
We make no representation for the data or music les lost
•
on the player.
Trademarks of products mentioned in this user’s manual are
•
owned by their respective companies or organizations.
Before powering the player, please plug in the earphone to
•
avoid damaging the earphone as well as the player. Turn
off the player when not in use.
7
Page 8
Do not place the player near heat sources or subject it to
•
direct sunlight, dust, humidity or rain.
Do not use the product in cold, hot, dusty or wet
•
environments.
Hard impacts may cause damage to the housing or
•
hardware of the player.
To prevent the product from being severely damaged,
•
switch off the power of the player when inserting or
removing the SD card.
Keep this device away from children.
•
Do not open the housing of the device.
•
To avoid electrostatic discharge (ESD), do not use this
•
product in extremely dry environments.
Hold the product steady with both hands when using camera
•
mode or DV mode to avoid having blurred images.
Please make sure that the player will not be disconnected
•
during the process of formatting, uploading, or downloading
to avoid program mistakes.
When the player is used as a mobile disc, make sure to
•
read and write les with the correct method. Any improper
operation may lead to the loss of data.
8
English
Page 9
Please Backup Your Files! We will not be liable for the loss
•
of data caused by damaged products or damage resulting
in unreadable memories or drives.
Please note that the player does not work with les that are
•
encoded with Windows Media® digital rights management
(DRM).
This device contains a built-in battery. Please ensure that
•
it is disposed of in accordance with local environmental
legislation.
Recharge the battery when the battery icon ashes to
•
show empty, when the player turns off automatically, or
when the player fails to power-on.
Make sure that the battery is fully charged before rst
•
use.
System Requirements
PC running Microsoft® Windows® 2000 / Windows® XP with
USB connection/port and CD-ROM drive.
Using movie / video conversion will require a PC with:
A Pentium® processor with a speed of at least 100 MHz
•
9
Page 10
10
Operating system Microsoft® Windows® 2000 / Windows®
•
XP
USB port
•
CD-ROM drive
•
Minimum of 15 MB free space on hard drive
•
Minimum of 32 MB free space on RAM
•
Note:
Depending on your media player and the type of media
•
you want to play, your media player may have additional
hardware requirements, such as: minimum RAM, minimum
processor speed, minimum free disk space, video adapter
type, sound adapter type, etc. For details please check the
help function of your media player, or its documentation.
Not supported on 64-bit versions of the operating systems
•
(OS).
Supported as an external USB memory device on 32-bit
•
versions of the Windows Vista® operating systems (OS).
English
Page 11
Features
Ultra-thin, trendy plastic housing
•
Camera and DV image capture with 0.3 megapixels
•
2.8” LCD with truecolor
•
Support for movie / video les with 320 x 240 pixels at 30
•
fps in the following formats: 3GP, ASF, AVI and MP4 with
MPEG4 data stream
Support for the following digital-music formats: MP3,
•
WMA
Supports the JPEG picture format
•
AV-out jack
•
Calendar
•
E-book support
•
Support for multiple languages
•
Support for external memory SD card
•
Built-in lithium battery
•
Dual loudspeakers
•
Line-in support
•
11
Page 12
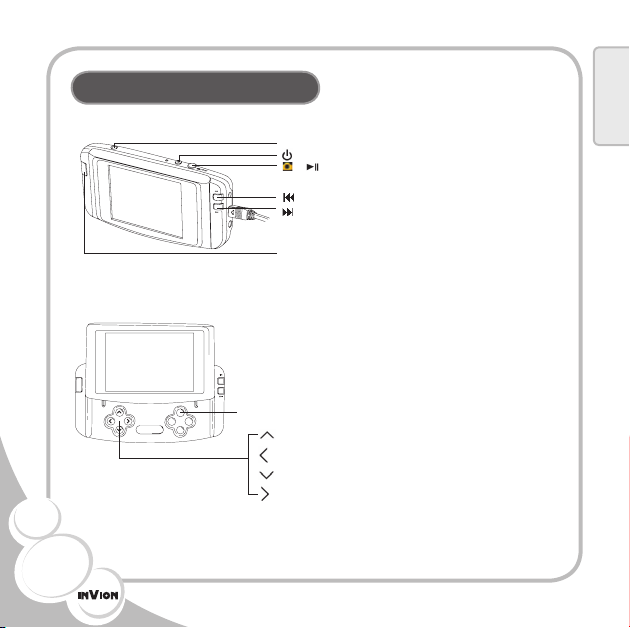
Player Overview
ESC
�
OK
X
A
B
PORTABLE MULTIMEDIA PLAYER
ESC
MP4.MP3.G AME
SLIDE PANEL
(Jack for earphones and AV-out)
(Button for power-on/-off)
/
(Button for enter/capture/record/
play/pause)
(Button for previous/left/rewind)
(Button for next/right/fast-forward)
English
ESC (Button for cancel/exit)
Elevation view : When the screen is
moved upwards to reveal the buttons
underneath.
OK (Button for enter/capture/record/play/pause)
(Button for volume (increase) and up)
(Button for previous/left/rewind)
(Button for volume (decrease) and down)
(Button for next/right/fast-forward)
12
Page 13
1GB
FM
DC
I
N 5V
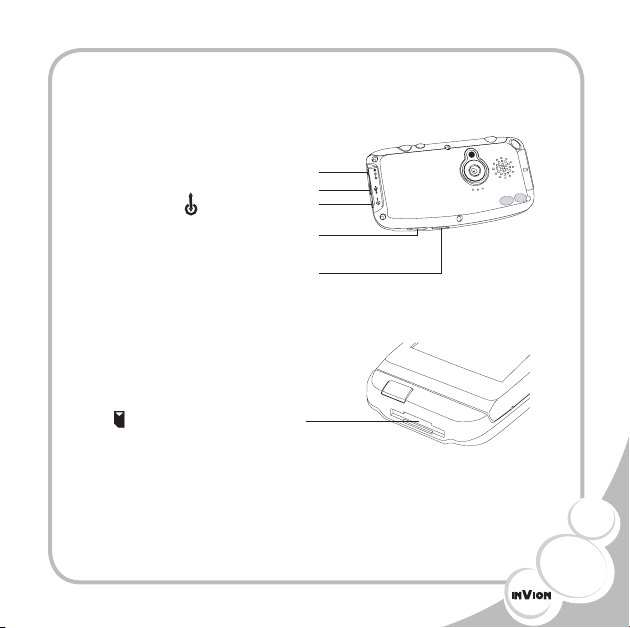
DC-IN (Jack for DC recharge)
ESC
(Switch to lock/unlock all buttons)
RESET (Button for system reset)
(SD card slot for SD card)
USB port
(Jack for Line-in)
HOLD
13
Page 14
Powering On
When the player is in the off status, press and hold continuously
the
button to power-on the player. If there is an SD card in
the SD card slot, the LCD may icker during power-on as the
SD card is being checked.
Powering Off Manually
When the player is in the on status, press and hold continuously
the
button to power-off the player.
Powering Off Automatically
The player will power-off automatically when there is no
operation within 3 minutes or when the battery is low. In the
system settings, if you set “Auto Off” as “Never”, the player will
not power-off automatically.
Submenu
When the player is in the on status, press the OK or
button to enter the submenu.
14
English
/
Page 15
Direction Buttons
ESC
Briey press the
/
/
/
/
/
buttons to choose
different functions/selections.
Connecting and Downloading
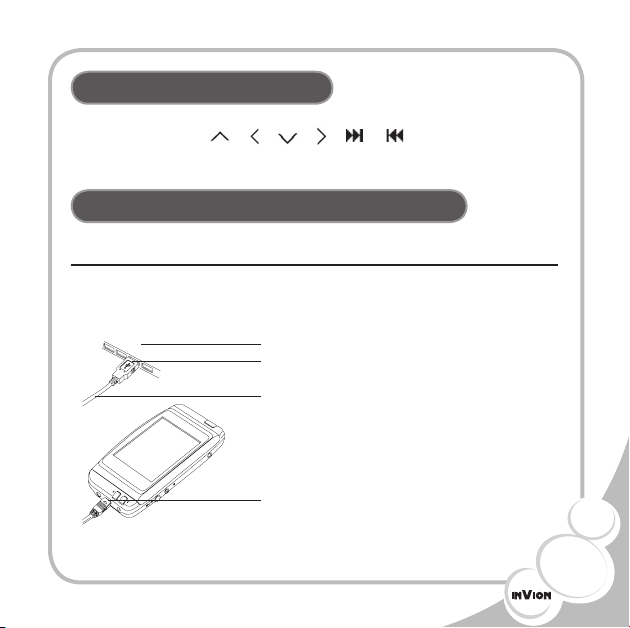
Connecting player to PC
Connect the product to the PC as shown in the following
image:
PC (Personal Computer) – Not included
USB port on your PC
USB cable
USB port
15
Page 16
USB-disk driver setup (Windows 98 users only)
This product is supported by the operating systems Microsoft®
Windows® 2000 / Windows® XP. For the operating system
Windows 98 software drivers must be installed. For users with
Windows 98, to install the drivers please follow these steps:
1. Put the included CD into the CD-ROM drive of your PC.
Please open the CD-ROM drive in “My Computer” and open
the folder “win98 driver.” Double click (press the left-mouse
button twice quickly) the install le (installation), and follow the
instructions on the screen. After the installation is complete
remove the CD from the CD-ROM. Switch on the power of the
player and then connect it to the PC using the USB cable. You
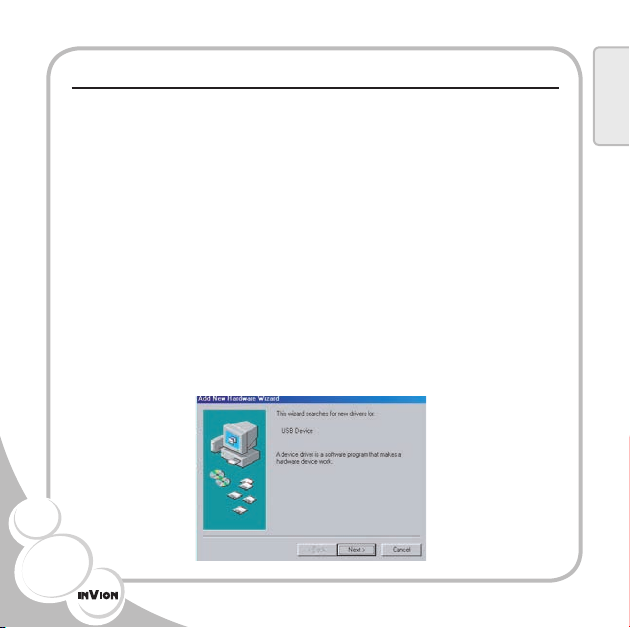
will be asked to setup the USB driver as seen in the following
image:
16
English
Page 17
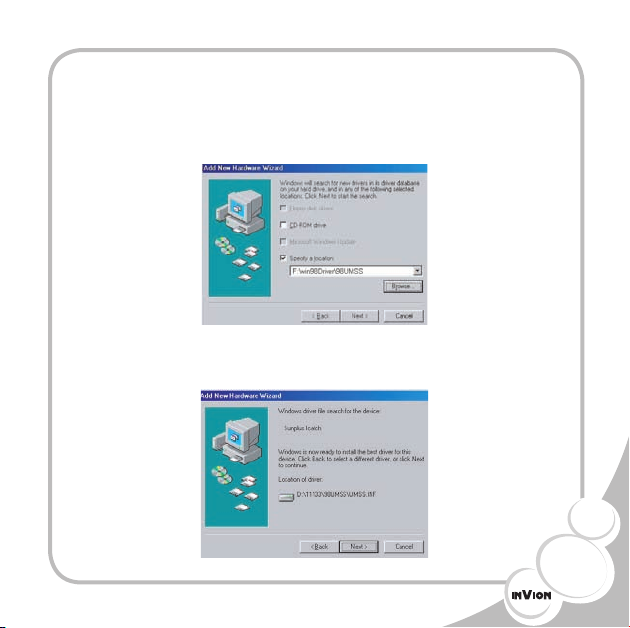
Please click over the “Next” button until a window appears with
the “Browse” button, as seen in the following image. Click over
the “Browse” button and select the following path (location)
“c:\program les\usb driver Win98 driver.”
Click over the “Next” button, the computer will automatically
nd the player’s driver and the following window will appear:
17
Page 18
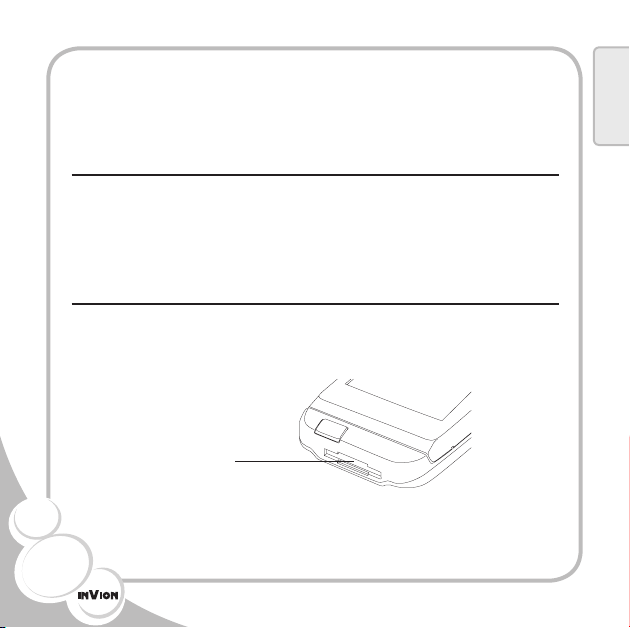
Complete the installation, and then reboot the PC. Connect
ESC
the player with the PC again and there will appear a portable
disk in “My Computer.”
Removable USB-disk
When the player is ON (if the player cannot be turned on, try
recharging the battery) and connected to the PC with the USB
cable it acts as a removable USB-disk.
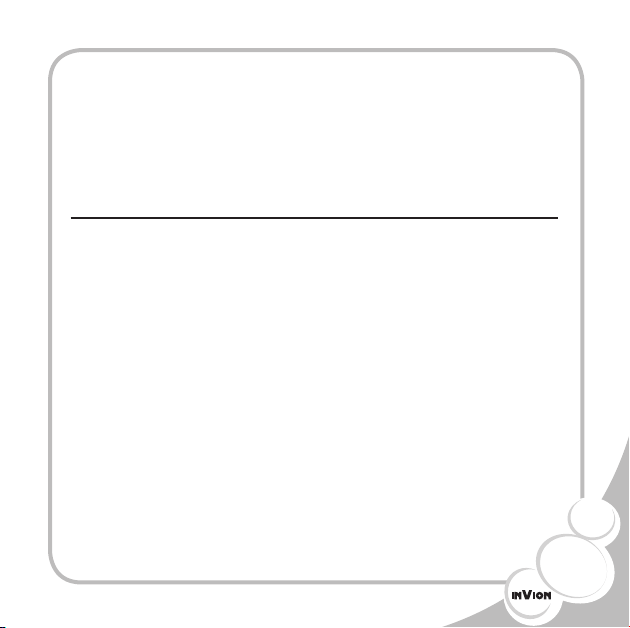
SD Slot
This product supports SD cards using the card slot shown in
the following image:
SD card slot
18
English
Page 19
When an SD card is inserted into the SD card slot the default
player’s memory storage is “Flash.” Set the parameter in the
player’s memory settings to “SD” so that you can use the
memory on the SD card (memory settings can be found in tool
mode, refer to tool mode on page 59).
Download / Upload / Delete Files
When the player is connected to a PC, the computer will
recognize the player as a removable disk. As a removable
disk connected to the PC, the les stored on the player can
be seen and managed (move/delete/copy/cut/paste) on the
computer normally just like other les on the computer. When
the player is connected to the computer, les from the Internet
can be directly copied to the player’s memory and there is no
need to rst copy the les to the hard drive of the computer.
Warning: Do not disconnect the player from the computer
when downloading or uploading because this action will
damage the player.
19
Page 20
If you are using Windows® 2000 or Windows® XP, properly
disconnect the player from the computer using the step by
step process found in the section “Disconnecting from the
computer” on page 31, to prevent damaging the player.
Connecting to the computer
Connect the player to the computer using the included
•
USB cable.
Note: Do not use a USB hub or USB extended line.
The computer will detect “New hardware” and start to install
•
the driver automatically. If needed, wait for the computer to
nish the installation.
If the following screen appears, please click the “Cancel”
•
button.
20
English
Page 21
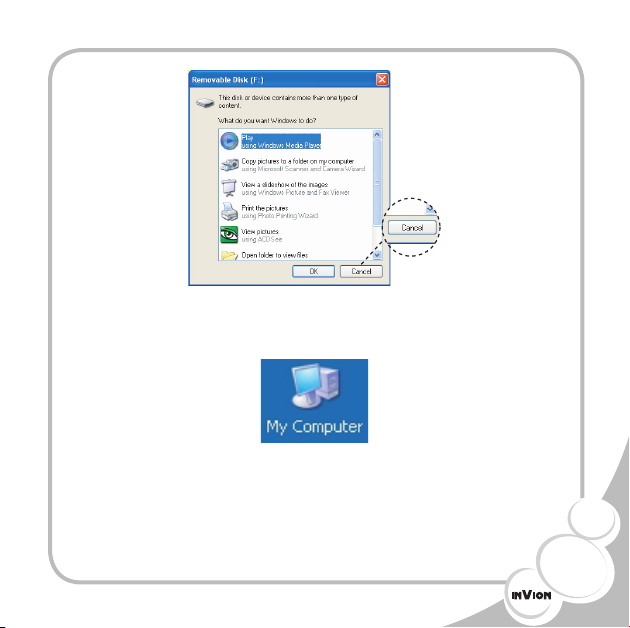
Double-click (press the left computer-mouse button twice
•
quickly) the “My Computer” icon on the desktop of your
computer screen, as seen in the following image:
Two new “Removable Disks” will appear, as seen in the
•
following image:
21
Page 22
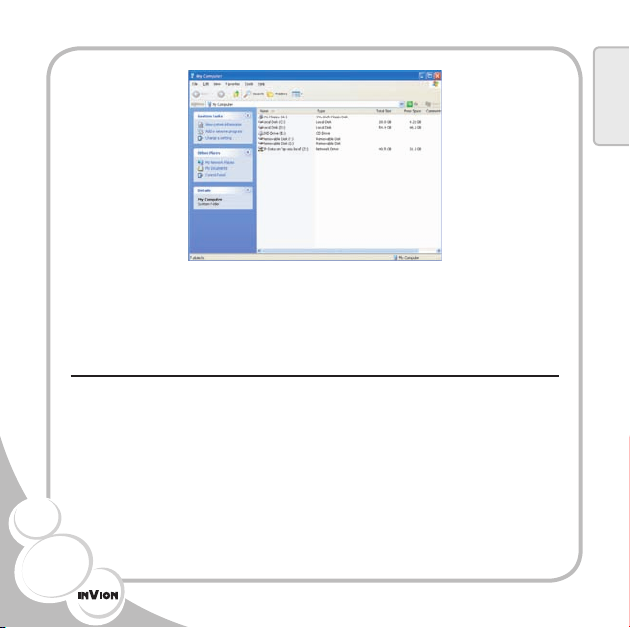
One is for the internal memory card and one is for the SD
•
card. The removable disk for the SD card is only available
when an SD card is inserted into the player.
Checking for DRM
Please note the player does not work with music/video les that
are encoded with Windows Media® digital rights management
(DRM). To make sure that your music/video le does not have
DRM and can be played by the player, please follow these
steps:
22
English
Page 23
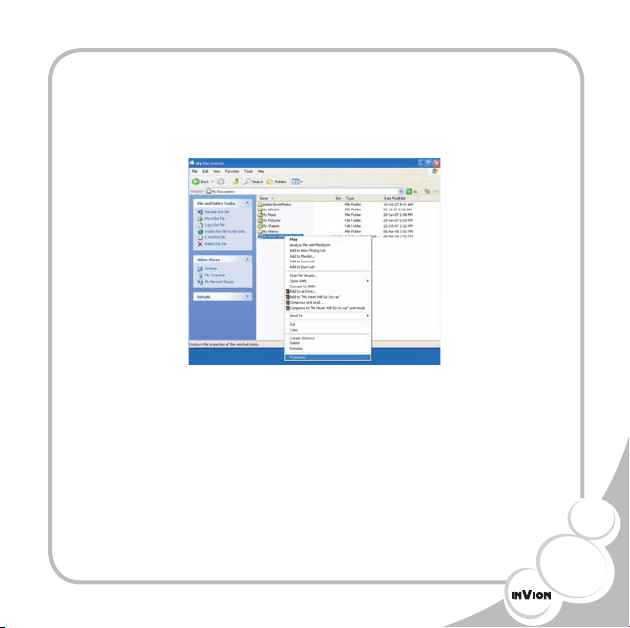
Right-click (press the right button on the computer mouse)
1.
over the music / video le.
Select “Properties” from the menu that appears, as seen in
2.
the following image:
3. Another window will appear, as seen in the following
image. Click (press the left button on the computer mouse)
over the “License” tab, as seen in the following image. If
there is no “License” tab then the music/video le does not
have DRM and the music/video le can be played with the
player; otherwise, please see step 4.
23
Page 24
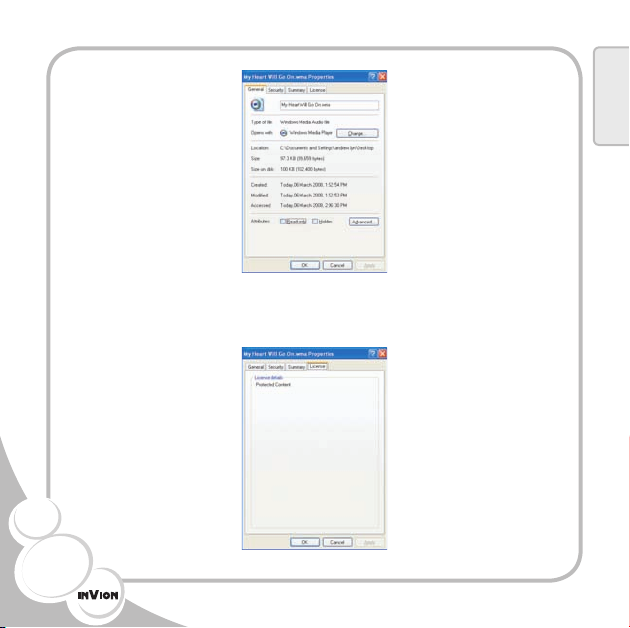
4. If you see “Protected Content” under the “License details”
heading, as seen in the following image, then your le has
DRM and cannot be played by the player.
24
English
Page 25
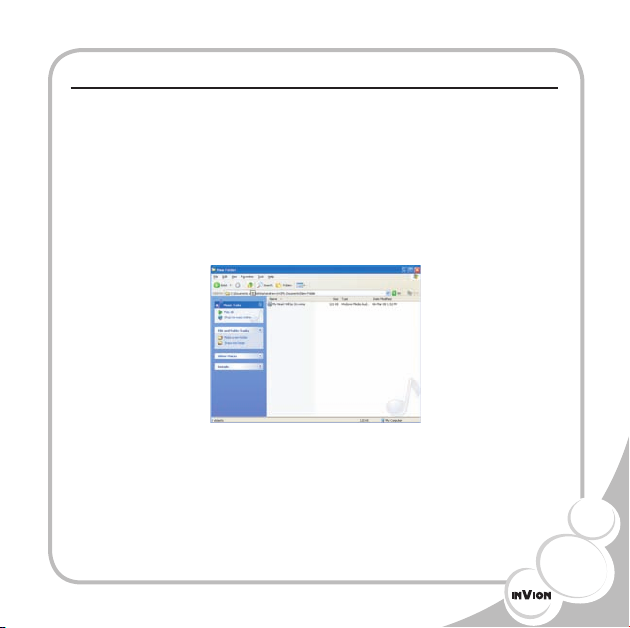
Downloading les (music, video, e-books, photo)
Files are downloaded to the player from your computer by
copying / moving the les from your computer to the player.
a) If you are currently viewing the les inside the folder,
press the “folder-up” button as seen in the following
image, so that you can right-click the folder.
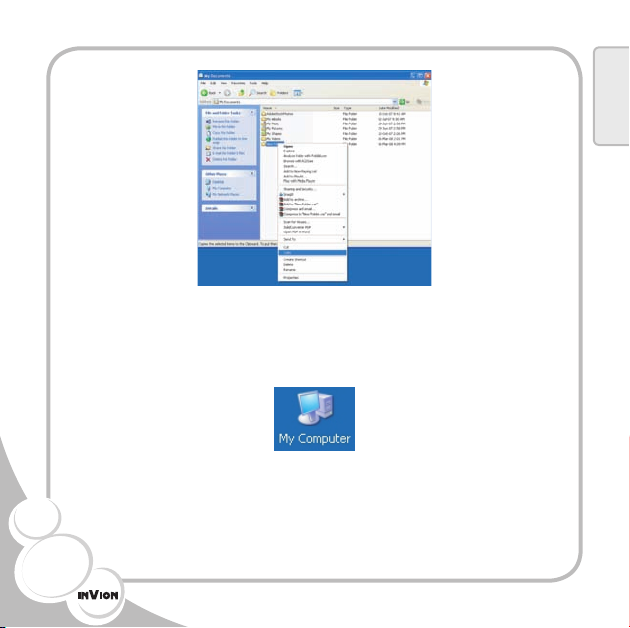
b) Right-click (press the right computer-mouse button)
over the new folder. Select “Copy” from the menu that
appears, as seen in the following image:
25
Page 26
26
English
c) Double-click (press the left computer-mouse button
twice quickly) the “My Computer” icon on the desktop
of your computer screen, as seen in the following
image:
d) Two new “Removable Disks” will appear, as seen in
the following image:
Page 27
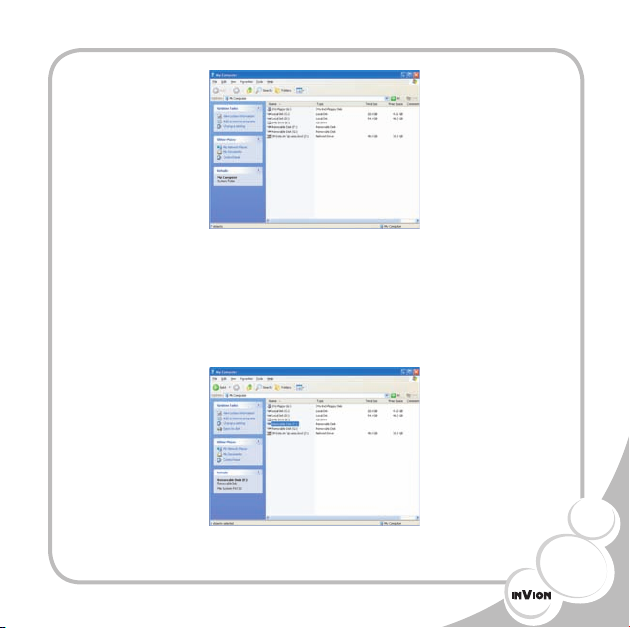
e) One is for the internal memory card and one is for the
SD card. The removable disk for the SD card is only
available when an SD card is inserted into the player.
Double-click (press the left computer-mouse button
twice quickly) one of the “Removable Disks,” as seen
in the following image:
27
Page 28
28
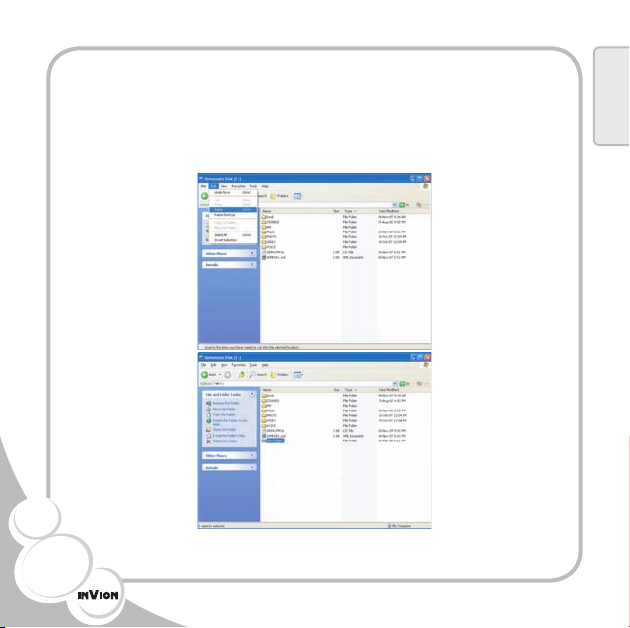
f) In the window that appears are the les on the internal
memory card or SD card of the player. From the window
select “Paste” from the window toolbar menu, as seen
in the following images:
English
Page 29
On Windows® 2000 and Windows® XP, music should be
transferred by Windows Media® Player version 9.0, 10.0 or
newer (version 10.0 and newer are for Windows® XP only) to
the MP3 player.
Copying audio tracks to the player from the computer
Find your favorite MP3 or WMA music les in “My
•
Computer.”
Use the mouse to select the music les that you want
•
to copy to the MP3 player, click (press) the right mouse
button over the le and choose “Copy.”
Find the “Removable Drive” (MP3 player) in “My Computer”
•
and double-click it to open it. Click the right mouse button
and choose “Paste” to paste the copied music les onto
the “Removable Drive” (MP3 player).
Caution: Do not disconnect the MP3 player from the computer
during data transfer! This could damage the MP3 player.
29
Page 30
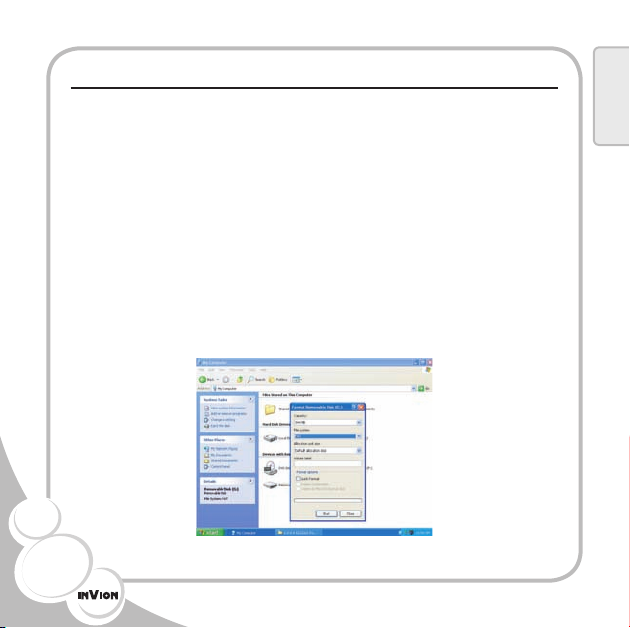
Format memory
When connected to the PC if you want you can format the
player’s memory. Formatting the memory will delete all les
and folders from the player. To format the player’s memory
rst double-click (press the left computer-mouse button twice
quickly) the “My Computer” icon on your computer desktop
and the “My Computer” window will appear. Next right-click
(press the right computer-mouse button) over the removable
disk (for the player) found in the “My Computer” window, and
choose the “Format” option from the menu that appears. A
window will appear. Select “FAT” from the pop-up window to
start the formatting and then press the “Start” button.
30
English
Page 31
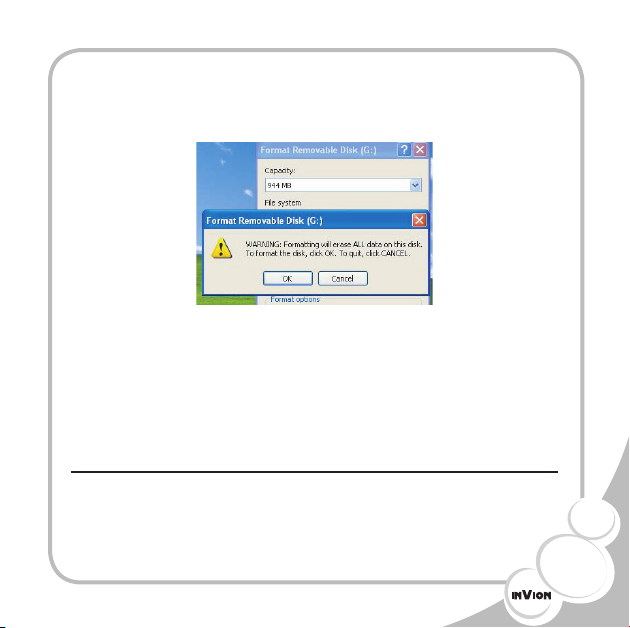
A warning window will appear. If you are sure you want to
format this removable disk select the “Yes” button to begin
formatting.
Warning:
Select the proper formatting type (“FAT”) before starting the
format, to avoid damaging the player.
Do not disconnect/remove the USB cable during a memory
format.
Disconnecting from the computer
After the download (copying) is complete, disconnect the
•
player from the computer by following these steps.
31
Page 32
32
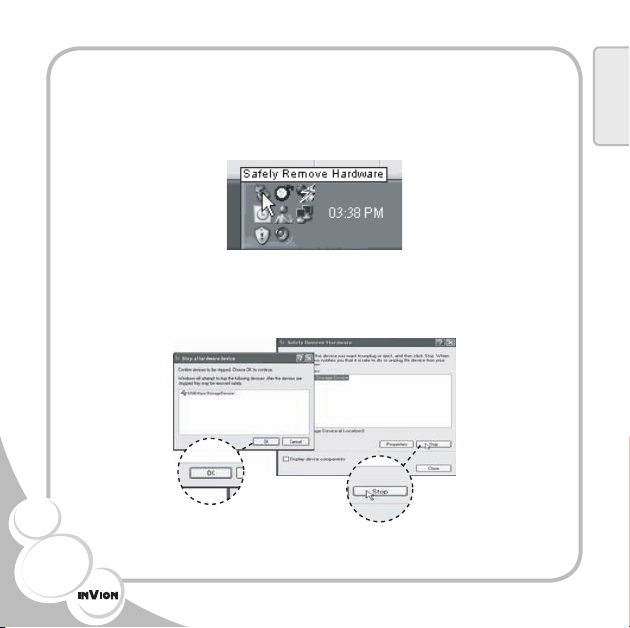
Double-click the “Safely Remove Hardware” icon found
•
in the system tray (bottom right corner of a Windows®
screen). In the image below, this icon is found where the
arrow is currently located.
After selecting the USB device, click the “Stop” button.
•
When you see the “Stop a Hardware device” window, click
“OK” and then unplug the USB cable.
English
Page 33
Managing the Battery
Recharging the battery
Take the USB cable from the packaging, and connect it to the
player and PC. One end of the USB cable can be connected
to the player’s USB port and the other end can be connected
to your PC. When the battery is charging an icon for charging
is displayed on the LCD and when charging is completed
another icon is displayed on the LCD. A fully-charged battery
will last for about 5 hours when playing music or about 2 hours
when watching a video (or playing games).
Note:
During the rst three times the player is used, the player’s
•
battery should be charged over 12 hours but not more
than 24 hours.
If you do not use the player for a long period of time, please
•
fully charge the battery every 2 or 3 months.
33
Page 34
The player can be charged in both on- and off-status. If
•
charged in the off-status the player’s battery maintains a
better condition.
Main Menu
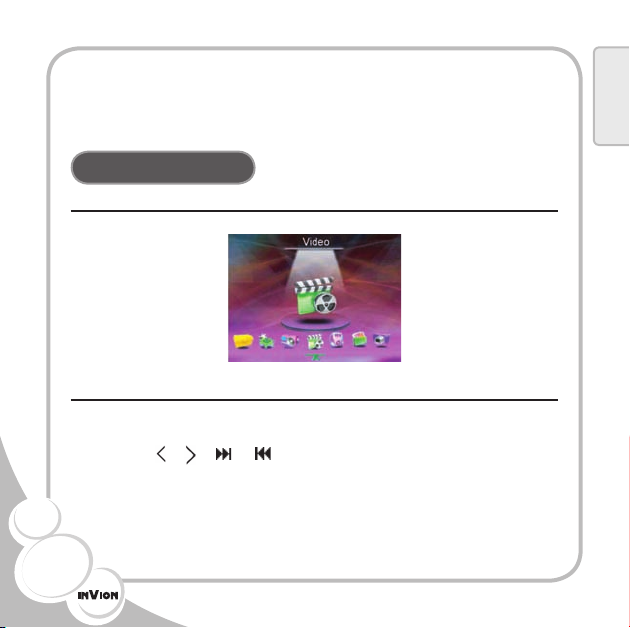
The interface of the main menu
Video Player
1. Enter video mode.
Using the
mode from the main menu as shown in the following image:
/
/
/
buttons, choose the icon for video
34
English
Page 35
Then press the OK or
2. Video options.
A brief press of the “A” button will display the video options.
The options are described in the following table:
Disp Mode List
Loop Mode
File Protect Lock
/
button to enter video mode.
Thumbnail
Current
All
Random
Unlock
35
Page 36
Del File (Delete File) Current
All
LCD Output
TV Output
Exit
NTSC Output
PAL Output
English
Using the
triangle shown on right side of the option, then there is a
submenu. Briey press the
and then use the
press the OK or
Press the ESC button to exit the video options.
Note: In the video list a preview of the video will be shown
using the rst frame of the video. If the rst frame is a black
screen, then the preview will be a black screen.
3. Playing a video.
Using the
/
buttons, select an option. If there is a small
button to enter the submenu,
button to return from the submenu. Briey
/
button to make a selection and exit.
/
buttons, select the video le you want to
36
Page 37
play from the video list, and then briey press the OK or
button to play it.
When playing a video, a brief press of the OK or
can pause or resume play. While watching a video, press and
hold continuously the
hold continuously the
the OK or
Briey press the
press the
press the
Press the ESC button to return to the video list.
4. Exit video mode.
When viewing the video list, press the ESC button to return
back to the main menu.
Audio Player
1. Enter audio mode.
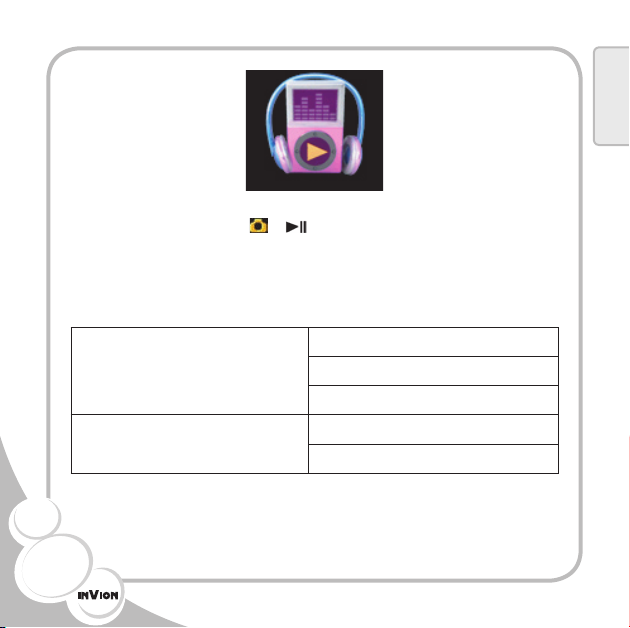
Using the
mode from the main menu as shown in the following image:
/
/
/
/
/
button to fast-forward or press and
/
button to rewind. A brief press of
button will return playback to normal speed.
/
button to move to the next le or briey
button to move to the previous le. Briey
buttons to increase/decrease the volume.
/
/
buttons, choose the icon for audio
/
button
/
37
Page 38
English
Then press the OK or
2. Audio options.
A brief press of the “A” button will display the audio options.
The options are described in the following table:
Loop Mode
File Protection Lock
/
button to enter audio mode.
Current
All
Random
Unlock
38
Page 39
Del File (Delete File) Current
All
Normal
DBB
EQ mode
Exit
Rock
Jazz
Pop
Live
Using the
triangle shown on the right side of the option, then there is a
submenu. Briey press the
and then use the
press the OK or
Press the ESC button to exit the audio options.
/
buttons, select an option. If there is a small
button to enter the submenu,
button to return from the submenu. Briey
/
button to make a selection and exit.
39
Page 40
3. LCD shutdown mode (power mode).
LCD shutdown mode (power mode) is only available when
listening to music (audio mode) for power saving purposes.
In the system settings, the setting for power mode determines
the time from when the last button is pressed to when the LCD
will shutdown.
4. Playing audio.
Using the
play from the music list, and then briey press the OK or
button to play it.
When playing audio, a brief press of the OK or
can pause or resume play. While playing music, press and
hold continuously the
6x/8x speed or press and hold continuously the
to rewind at 2x/4x/6x/8x speed. A brief press of the OK or
/
button will return playback to normal speed. Briey press
the
/
/
button to move to the previous le. Briey press the
buttons to increase/decrease the volume. Press the ESC
button to return to the music list.
/
buttons, select the audio le you want to
/
/
button to fast-forward at 2x/4x/
/
button to move to the next le or briey press the
40
English
/
button
button
/
Page 41
Note:
The LCD will show ID3 information of the current audio
le.
This player supports LRC les in version 2.0 format for
displaying lyrics. This means that if there is an LRC le
with the same name (except the extension) as the audio
le in the same folder on the player, then the lyrics will be
displayed on the LCD when the audio le is played. The
number of characters in the lyrics le has a limit of 500
characters.
5. Exit audio mode.
When viewing the music list, press the ESC button to return
back to the main menu.
41
Page 42
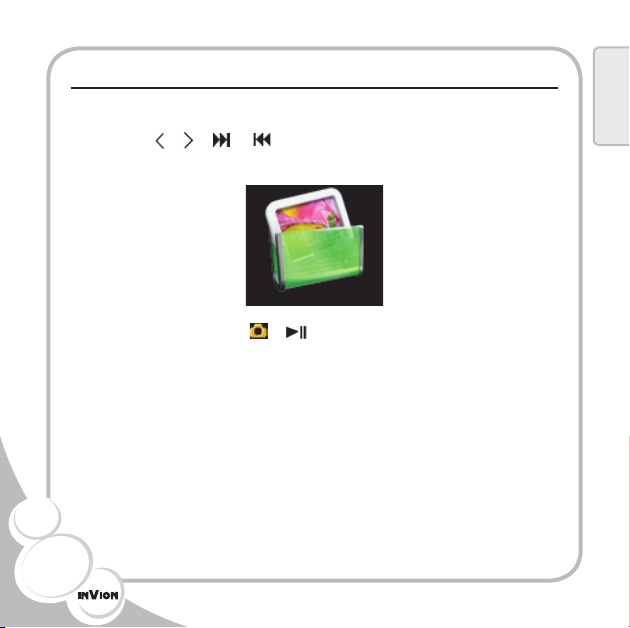
Picture View
1. Enter photo mode.
Using the
mode from the main menu as shown in the following image:
Then press the OK or
2. Photo options.
A brief press of the “A” button will display the picture options.
The options are described in the following table:
/
/
/
buttons, choose the icon for photo
/
button to enter picture mode.
42
English
Page 43
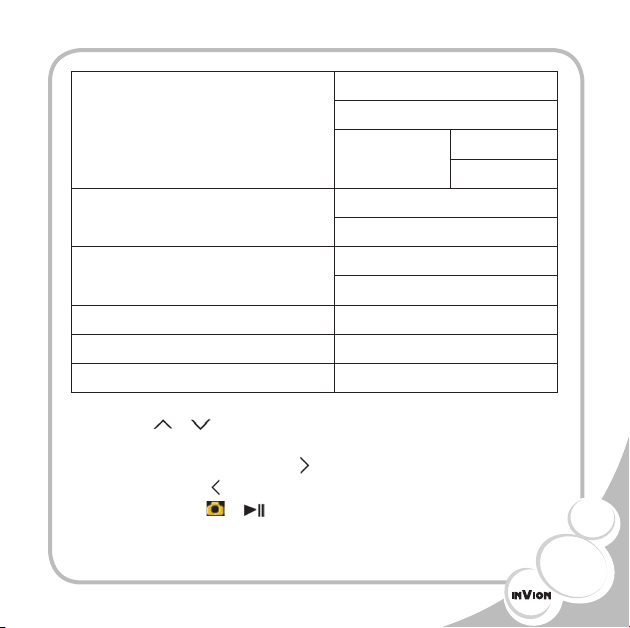
Thumbnail
Disp Mode (Display Mode)
Slide
File Protect Lock
Del File (Delete File) Current
Wall Paper
Off Menu
Exit
List
1s
2s
Unlock
All
Using the
triangle shown on the right side of the option, then there is a
submenu. Briey press the
and then use the
press the OK or
/
buttons, select an option. If there is a small
button to enter the submenu,
button to return from the submenu. Briey
/
button to make a selection and exit.
43
Page 44
Press the ESC button to exit the photo options.
3.View photo show.
There are three display modes in photo options: thumbnail, list
and slide mode.
In thumbnail mode, use the
left / right / upper / lower photos and briey press the OK or
/
button to view a photo.
In list mode, use the
photo le from the photo list. Use the
between rst and last photos, and briey press the OK or
button to view a photo.
In slide mode, the slideshow will play automatically and stop
after any button is pressed.
Press the ESC button to return to the photo list.
Note: This player only supports the JPEG picture format.
4. Exit photo mode.
When viewing the photo list, press the ESC button to return
back to the main menu.
/
/
/
buttons to select the
/
buttons to select the upper / lower
/
buttons to alternate
44
English
/
Page 45
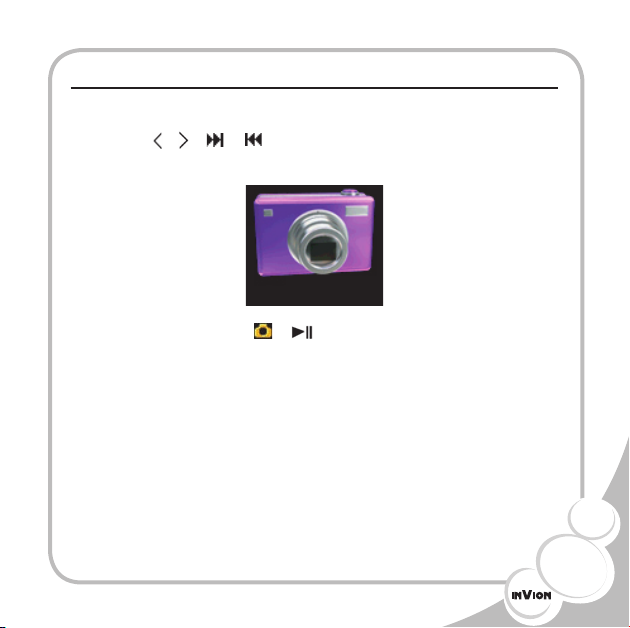
Camera
1. Enter camera mode.
Using the
mode from the main menu as shown in the following image:
/
/
/
buttons, choose the icon for camera
Then press the OK or
The LCD acts as a viewnder (previewing the photo) with the
top-left area displaying the status and photo size, the bottomleft area displaying the number of photos that can be taken
(using the free ash memory space), and the bottom-right
area is used for zoom.
2. Camera options.
A brief press of the “A” button will display the camera options.
The options are described in the following table:
/
button to enter camera mode.
45
Page 46
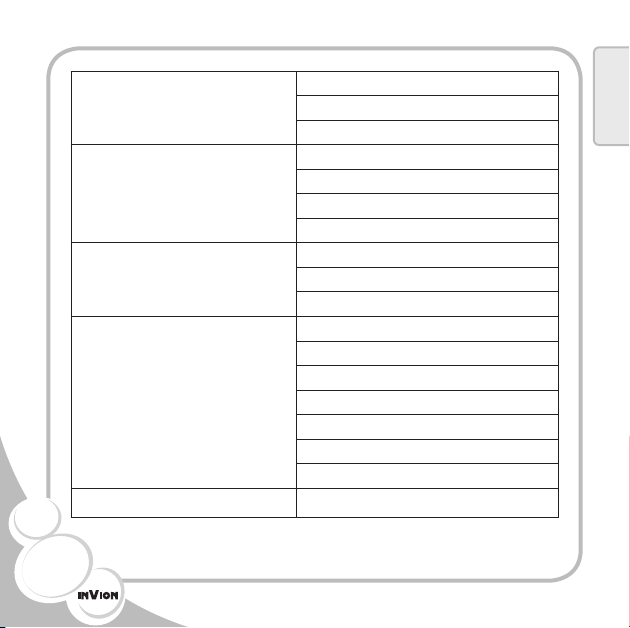
46
Mode
Size
Quality
Effect
Exit
Single
Continuous
Self
320 x 240
640 x 480
1280 x 960
1600 x 1200
High
Middle
Low
Normal
Negative
Solaris
Relief
Binaries
Sepia
Black & White
English
Page 47
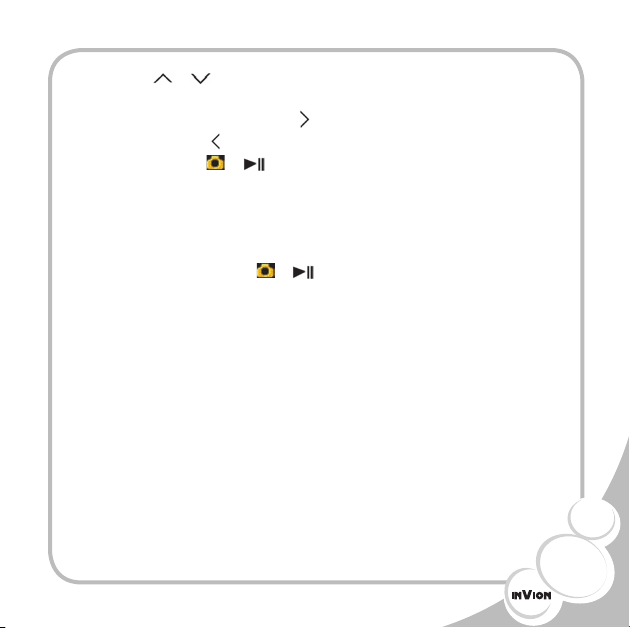
Using the
triangle shown on the right side of the option, then there is a
submenu. Briey press the
and then use the
press the OK or
Press the ESC button to exit the camera options.
3. Taking a photo.
Hold the player with both hands to avoid shaking, and then
briey press the OK or
4. Exit camera mode.
When in camera mode, press the ESC button to return back
to the main menu.
5. Reviewing the photo.
Exit camera mode, then enter photo mode and you will be
able to view the photo you just took.
/
buttons, select an option. If there is a small
button to enter the submenu,
button to return from the submenu. Briey
/
button to make a selection and exit.
/
button to take a photo.
47
Page 48
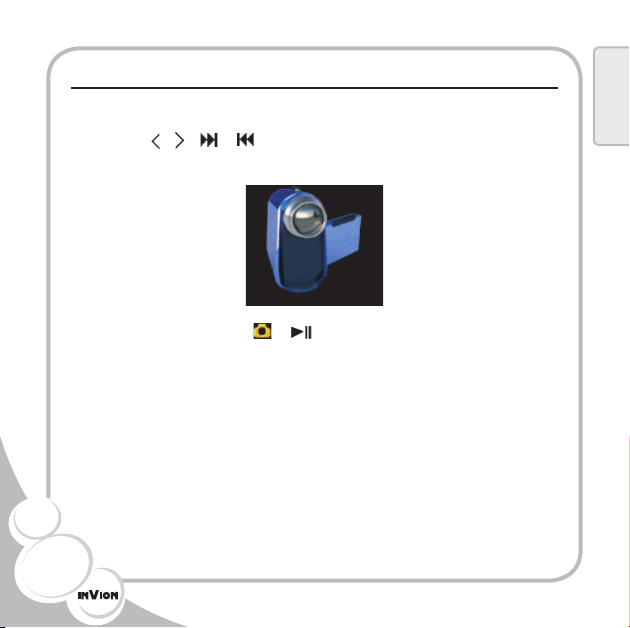
DV (Digital Video)
1. Enter DV mode.
Using the
from the main menu as shown in the following image:
Then press the OK or
LCD display acts as a viewnder (previewing the video) with
the top-left area displaying the status and video size, the
bottom-left area displaying the amount of video time that can
be taken (using the free ash memory space), and the bottom-
right area is used for zoom. The video time is an approximation
(1 minute equaling 5MB of free space) of the amount of video
that can be taken and should not be considered a precise time.
When the ash memory is full, the message “memory full” will
/
/
/
buttons, choose the icon for DV mode
/
button to enter DV mode. The
48
English
Page 49
appear in the top-right area of the LCD display and the current
video le under encoding will be stopped and stored.
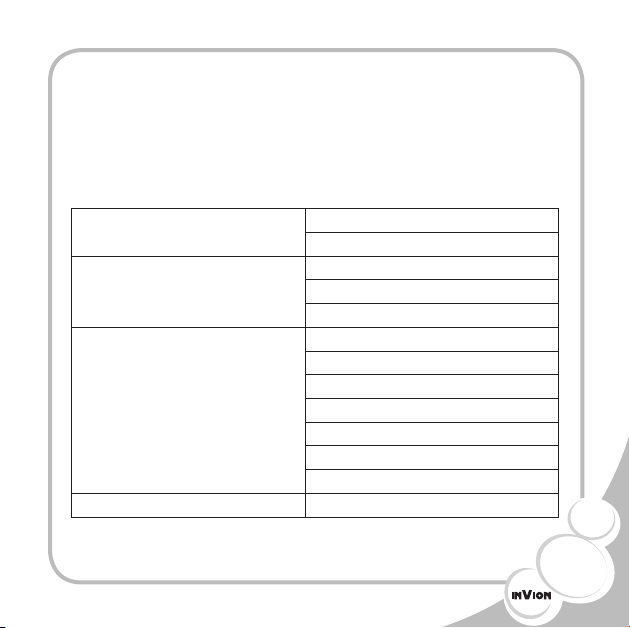
2. DV options.
A brief press of the “A” button will display the DV options. The
options are described in the following table:
Video Size 160 x 128
320 x 240
High
Quality
Effect
Exit
Middle
Low
Normal
Negative
Solaris
Relief
Binaries
Sepia
Black & white
49
Page 50
Using the
triangle shown on the right side of the option, then there is a
submenu. Briey press the
and then use the
press the OK or
Press the ESC button to exit the DV options. Between 1x to
2x, press the
button to decrease the zoom.
3. Taking a DV.
Hold the player with both hands to avoid shaking, and then
briey press the OK or
microphone will also start recording. Briey press the OK or
/
4. Exit DV mode.
When in DV mode, press the ESC button to return back to the
main menu.
5. Reviewing the DV.
Exit DV mode, then enter video mode and you will be able to
view the video you just took.
/
buttons, select an option. If there is a small
button to enter the submenu,
button to return from the submenu. Briey
/
button to make a selection and exit.
button to increase the zoom and press the
/
button to start taking DV. The
button again to stop and store the current DV.
50
English
Page 51
AudioRec (Record)
1. Enter record mode.
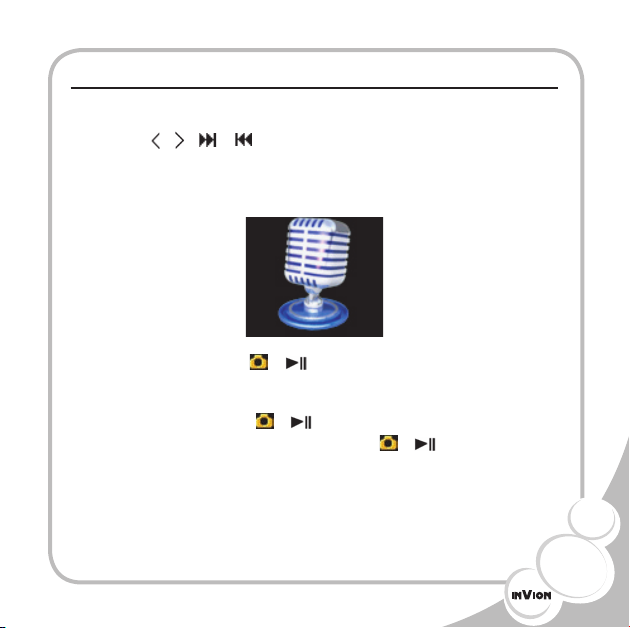
Using the
(record) mode from the main menu as shown in the following
image:
/
/
/
buttons, choose the icon for AudioRec
Then press the OK or
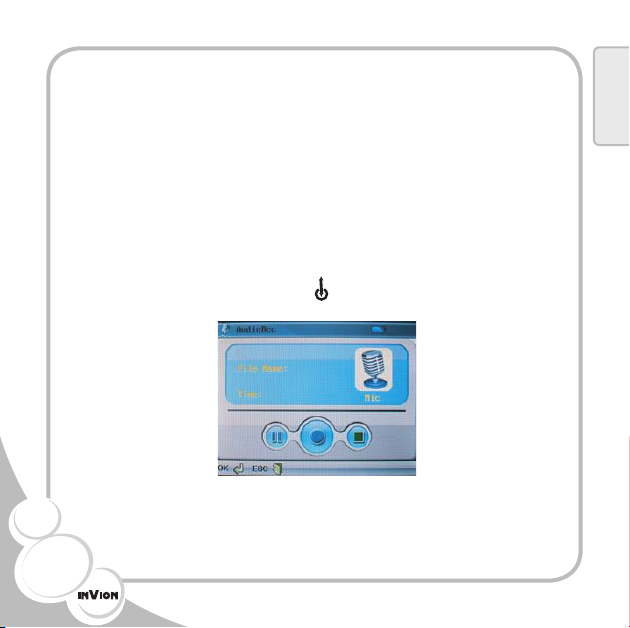
2. Make a recording.
Briey press the OK or
start recording. Briey press the OK or
pause or resume recording. Press the ESC button to stop and
store the current recording.
/
button to enter record mode.
/
button and the microphone will
/
button again to
51
Page 52
3. Exit record mode.
When in record mode, press the ESC button to return back to
the main menu.
4. Listening to the recording.
Exit record mode, then enter audio mode and you will be able
to listen to the recording you just made.
5. Microphone or line-in recording.
After entering record mode, you can record easily by
microphone (I) or by using the (Line-in) jack (II).
52
English
Page 53
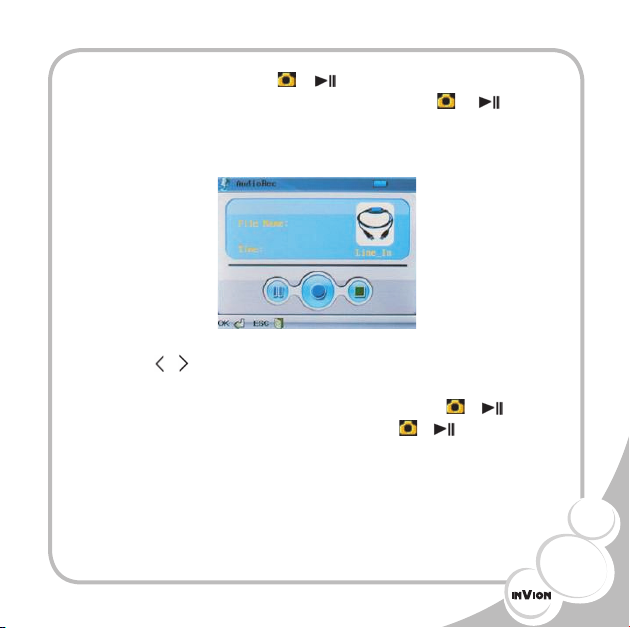
I. Briey press the OK or
will start recording. Briey press the OK or
again to pause or resume recording. Press the ESC button to
stop and store the current recording.
/
button and the microphone
/
button
II. Use the
the PMP to another audio device, such as a MP3 player, PC,
another PMP, etc., then briey press the OK or
to start recording. Briey press the OK or
to pause or resume recording. Press the ESC button to stop
and store the current recording.
/
buttons to select the icon for “Line-in.” Connect
/
/
button again
button
53
Page 54
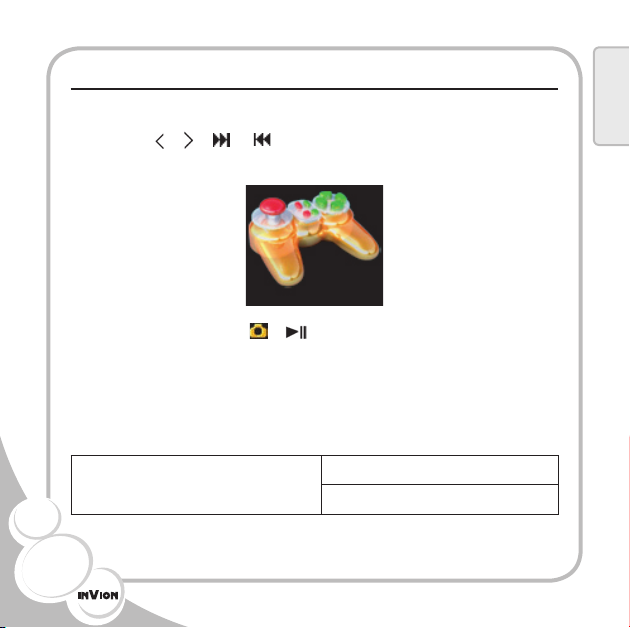
Games
1. Enter game mode.
Using the
mode from the main menu as shown in the following image:
Then press the OK or
2. Game options.
A brief press of the “A” button will display the game options.
The options are described in the following table:
/
/
/
buttons, choose the icon for game
/
button to enter game mode.
File Protect Lock
Unlock
54
English
Page 55
Delete File Current
All
Exit
Using the
triangle shown on the right side of the option, then there is a
submenu. Briey press the
and then use the
press the OK or
Press the ESC button to exit the game options.
3. Play a game.
Using the
from the games list, and then briey press the OK or
button to play it. To pause or resume play press the OK or
/
button.
Use the
and “B” buttons are for jump, shoot,
game.
/
buttons, select an option. If there is a small
button to enter the submenu,
button to return from the submenu. Briey
/
button to make a selection and exit.
/
buttons, select the game you want to play
/
/
/
/
buttons for left / right / up / down, “A”
button for exiting the
55
Page 56
4. Exit game mode.
Press the
press the ESC button to return back to the main menu.
Note: For Nintendo games, if you have any questions about
the intellectual property rights please go to the following URL
on the Internet: http://www.nintendo.com/corp/legal.jsp.
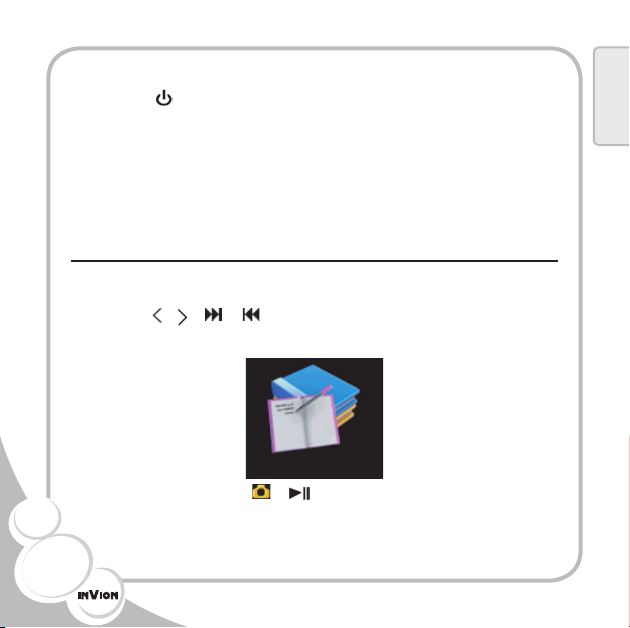
Learning
1) Enter learning mode.
Using the
mode from the main menu as shown in the following image:
button to exit the game. When in game mode,
/
/
/
buttons, choose the icon for learning
English
Then press the OK or
56
/
button to enter learning mode.
Page 57
There are two choices in learning mode, the Dict (dictionary)
or TxT (TXT e-books).
Dict TxT
Using the
TxT (TXT e-books) and then press the OK or
to enter the selection.
2. Look-up a word in dictionary mode.
A keyboard will be displayed. Use the
for left / right / up / down. Use the OK or
select a letter. When the whole word is entered, press the “X”
button to search for it in the dictionary. Press the OK or
button to conrm the input type selected. Press the ESC
button to return to learning mode choices.
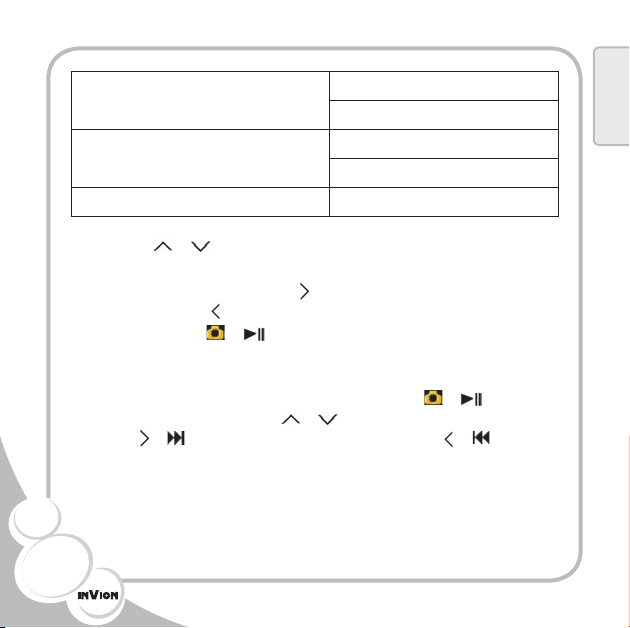
3. E-book mode.
A brief press of the “A” button will display the e-book options.
The options are described in the following table:
/
/
/
buttons, choose Dict (dictionary) or
/
button
/
/
/
buttons
/
button to
/
57
Page 58
File Protect Lock
Unlock
Delete File Current
All
Exit
English
Using the
triangle shown on the right side of the option, then there is a
submenu. Briey press the
and then use the
press the OK or
Press the ESC button to exit the learning options.
From the e-book list briey press the OK or
select an e-book. Use the
Use the
for page up. Press the ESC button to return to the e-book list.
Press the ESC button again to go to learning mode choices.
/
buttons, select an option. If there is a small
button to enter the submenu,
button to return from the submenu. Briey
/
button to make a selection and exit.
/
buttons to move up / down.
/
buttons for page down and the
/
/
58
button to
buttons
Page 59
4. Exit learning mode.
When in learning mode, press the ESC button to return back
to the main menu.
Tool
1. Enter tool mode.
Using the
mode from the main menu as shown in the following image:
/
/
/
buttons, choose the icon for tool
Then press the OK or
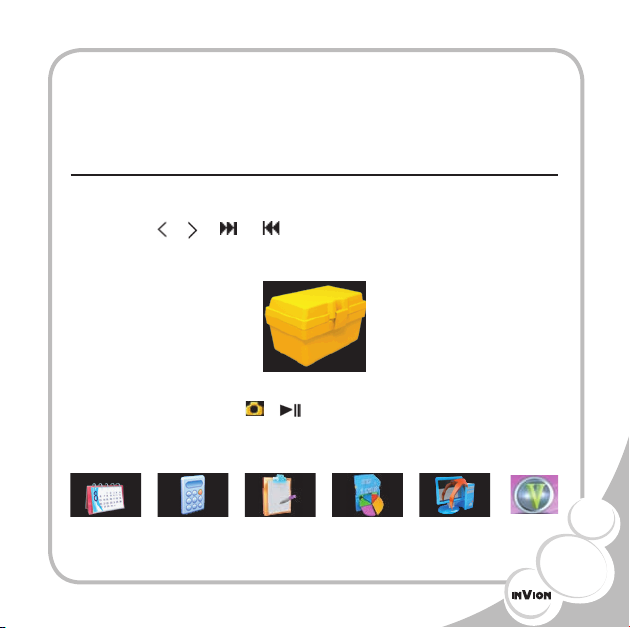
are six choices in tool mode: Calendar, Cacl. (Calculator),
NotePad, Memory, Upgrade and Version.
Calendar Cacl. NotePad Memory Upgrade Version
/
button to enter tool mode. There
59
Page 60
Using the
press the OK or
2. Calendar settings.
Use the
the “X” button to enter the current date and use the OK or
button to conrm the date. Press the ESC button to return
to the tool mode.
3. Calculator mode.
Use the
and use the OK or
the ESC button to return to the tool mode.
4. NotePad mode.
Use e-book mode to read the TXT les created in notebook
mode. Press the ESC button to return to the tool mode. Once
the keyboard appears in notebook mode, the operation is the
same as in dictionary mode.
Note: This player only supports TXT les less than 64 KB. For
les larger than 64 KB an overload or error message will be
displayed.
/
/
/
buttons, choose an option and then
/
button to enter the selection.
/
/
/
buttons for left / right / up / down. Press
/
/
/
buttons to choose a number or symbol
/
button to conrm the input. Press
60
English
/
Page 61
5. Memory settings.
This mode displays the memory options for le storage. Use
the
/
/
/
buttons to choose “FLASH” or “SD.” Press
the ESC button to return to the tool mode.
6. Upgrade mode.
Use the
the system (“FLASH” or “SD”). Press the ESC button to return
to the tool mode.
7. Version mode.
This mode displays the system’s software version and should
be checked before and after the upgrades. Press the ESC
button to return to the tool mode.
8. Exit tool mode.
When in tool mode, press the ESC button to return back to
the main menu.
/
/
/
buttons to choose the path for updating
61
Page 62
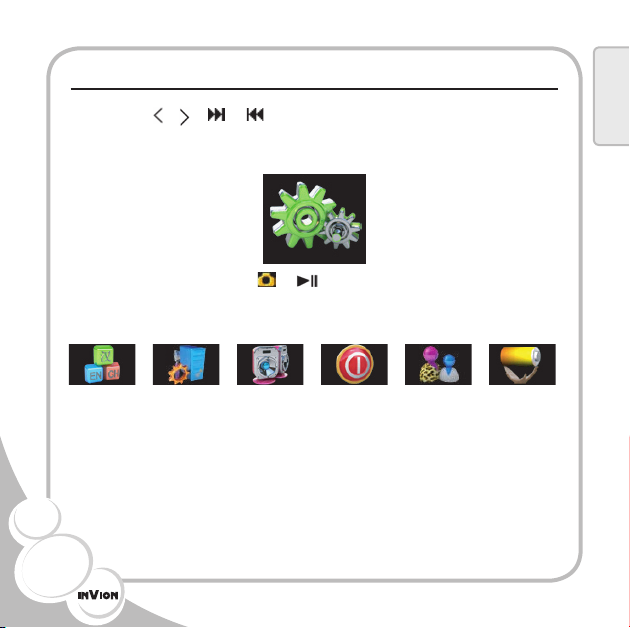
Settings (System Setup)
Using the
setup mode from the main menu as shown in the following
image:
Then press the OK or
mode. There are six choices in system setup mode: Language,
Default, Sound, Auto Off, Style, and Power mode.
Language Default Sound Auto Off Style Power mode
/
/
/
buttons, choose the icon for system
/
button to enter system setup
62
English
Page 63
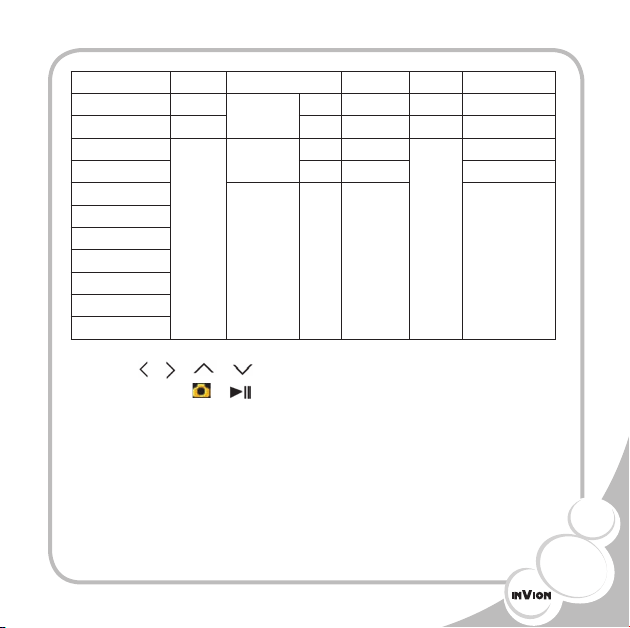
Language Default Sound Auto Off Style Power Mode
English Yes
Chinese No Off 3 min Pretty Half a minute
Trad. Chinese
Japanese Off 60 min Three minutes
Korean
French
German
Spanish
Portuguese
Italian
Russian
Speaker
KeyTone
On Never Lovely Never
On 15 min One minute
Use the
use the OK or
/
/
/
buttons for left / right / up / down, and
/
button to conrm the selection. Press
the ESC button to return to the main menu.
63
Page 64
Software Guide
Installing the transcoding tool (conversion software)
Note: To install the “transcoding tool” please refer to the
details described in the enclosed CD’s user-guide.
Converting a video/audio/image le
This player only supports certain video formats, audio formats
and image formats. Video/audio/image les in other formats
can be played after they have been converted to the proper
video/audio/image format using the “transcoding tool” software
found on the CD included.
After installing the “transcoding tool” you can convert video/
audio/image les to the proper formats. To convert a le:
1. Open the “transcoding tool” by selecting it from the “All
Programs” menu option found in the Windows® desktop “Start”
menu, as seen in the following image:
64
English
Page 65
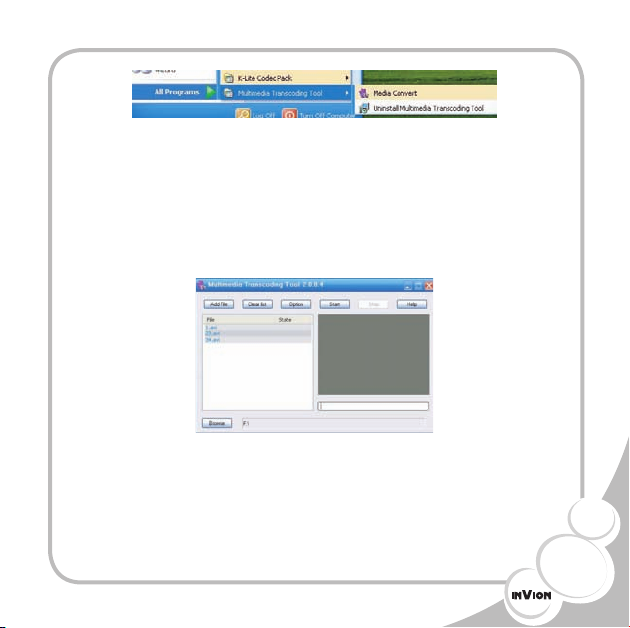
2. Find the les you want to convert on your computer by
clicking (press the left mouse button) the “Browse” button as
seen in the following image: (To see VCD/DVD les, you need
to rst put the CD/DVD into the CD/DVD ROM drive and then
nd the les by clicking the “Browse” button.)
3. Click (press the left mouse button) over the “Option” button
to change the parameters of the music/video/image. An
“Option” window will appear as seen in the following image:
65
Page 66
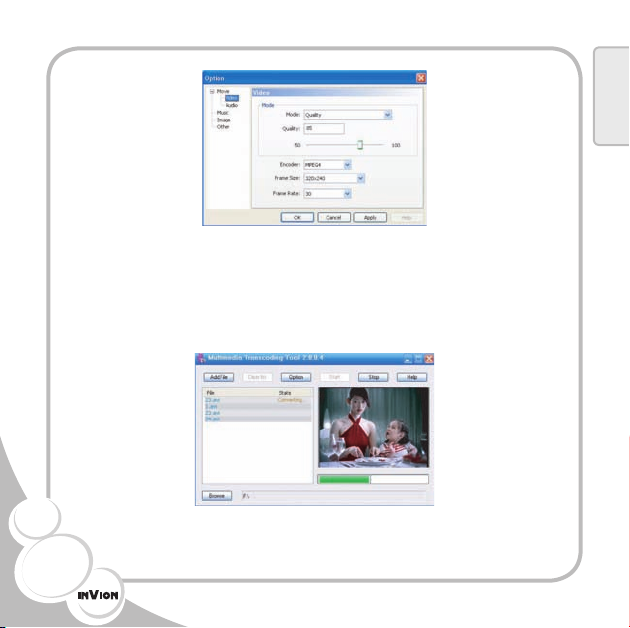
4. Click (press the left mouse button) over the “OK” button
after setting the parameters to the desired settings. Click
(press the left mouse button) the “Start” button, the le format
conversion will begin and the progress of the conversion will
be shown as seen in the following image:
66
English
Page 67
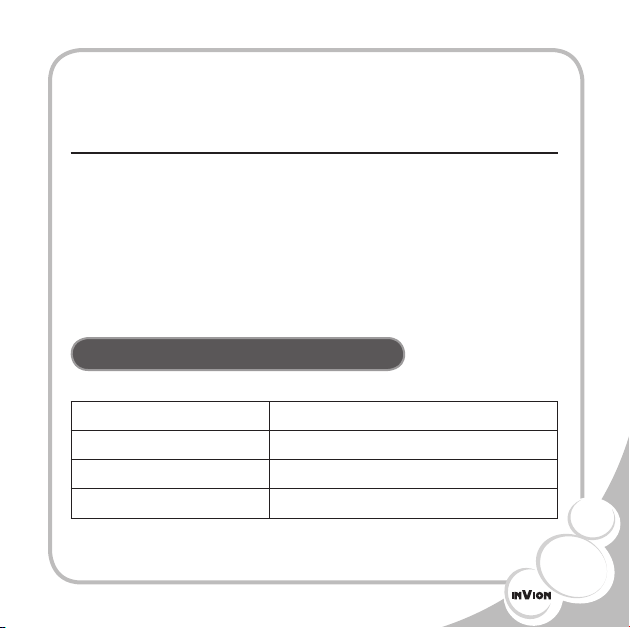
5. After the conversion has been completed, click the “End”
button to exit the software.
Update
The update info is described in the attached CD user guide.
The most important point: before update, the “A” button
must be pressed continuously until the connection to PC
is complete. Then the software will show there is a device
needing an update. The update is only available when in PC
Cam while it will eld in MSDC.
Technical Specications
Music format MP3, WMA, AMR, AAC-LC, WAV
Video format 3GP, ASF, MP4, AVI
Photo format JPEG
E-Book format TXT
67
Page 68
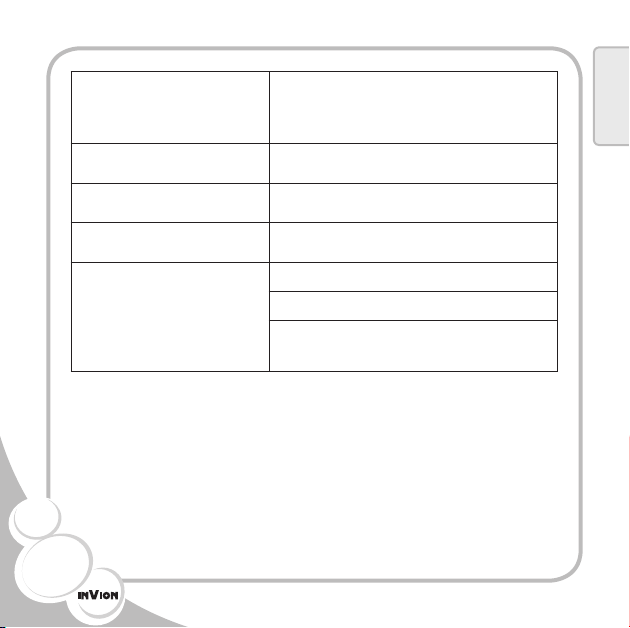
Storage capacity SD supported 128MB / 256MB
/ 512MB / 1GB (Depending on
model)
Display 2.8” LCD
Resolution 320 x 240 pixels
Frame frequency NTSC 30 fps, PAL 25 fps
Record Format: AMR
Length: 53 Hours (128 MB)
Line-in encoding: 8 KHz, 4.75~12.2
Kbps
68
English
Page 69
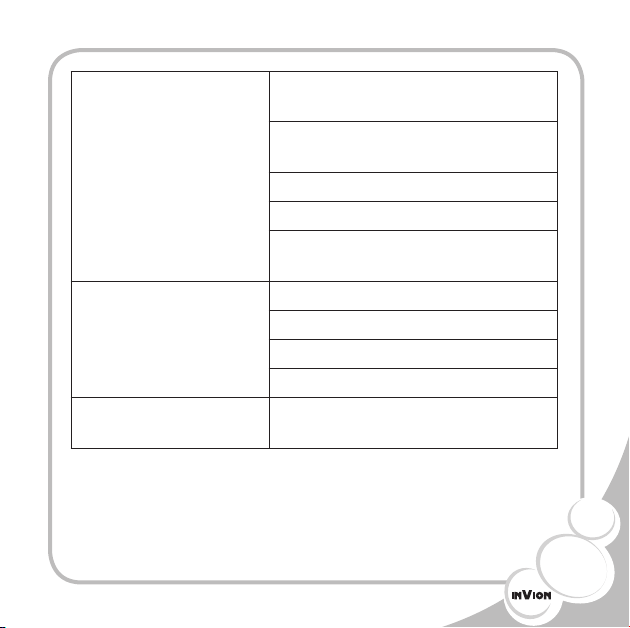
MP3 and WMA Compression rate:
32 Kbps – 384 Kbps
Frequency response:
20 Hz – 20 KHz
Th-D: < 0.1%
SNR: > 85 dB
Audio power:
5 mW+5 mW ( 32 Ω )
CMOS camera Pixel: 0.3 Megapixels
Frame rate: 30 fps
Color bits: 24-bit
Focus: 1 x to 2x
Size 90 x 60 x 14 mm
(length x width x thickness)
69
Page 70
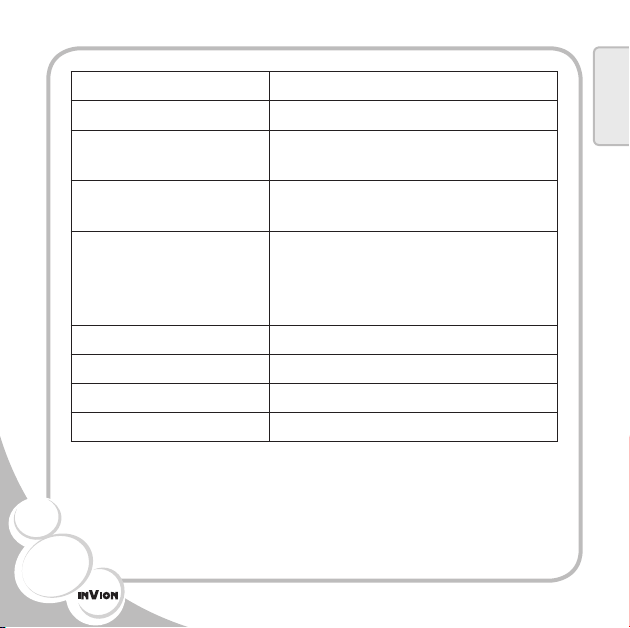
Battery specications Built-in 500 mAh lithium battery
PC slot USB 1.1
Transfer rate Read > 700 Kbps
Write > 500 Kbps
Battery life 5 hours – Music
2 hours – Video or games
Playing time * Music – up to 460 songs (Each
music le 4 MB in MP3 format)
* Photo – up to 9120 pictures (Each
picture 0.2 MB in JPEG format)
AV-out format 3 GP
AV-out voltage >/=1V (VPP)
Temperature 23 ˚F to 104 ˚F
Weight 100 g
* Playing time is based on using all capacity of memory.
70
English
Page 71
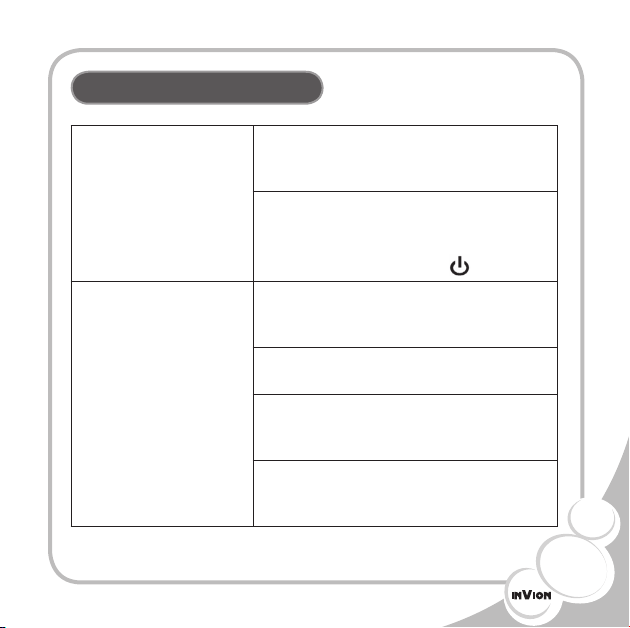
Troubleshooting
The player does not
turn on.
The player is connected
to the computer, but I do
not see the removable
disk in the “My
Computer” window.
Check 1 – Is the battery dead?
Recharge the battery (Refer to section
Managing the Battery on page 33).
Check 2 – Was an illegal operation
performed?
Press the RESET button and then press
and hold continuously the
Check 1 – Is the battery dead?
Recharge the battery (Refer to section
Managing the Battery on page 33).
Check 2 – Is the USB cable damaged?
Replace the USB cable.
Check 3 – Is the USB cable connected
properly?
Try connecting the USB cable again.
Check 4 – Are there problems with the
PC?
Reboot the computer and try again.
button.
71
Page 72
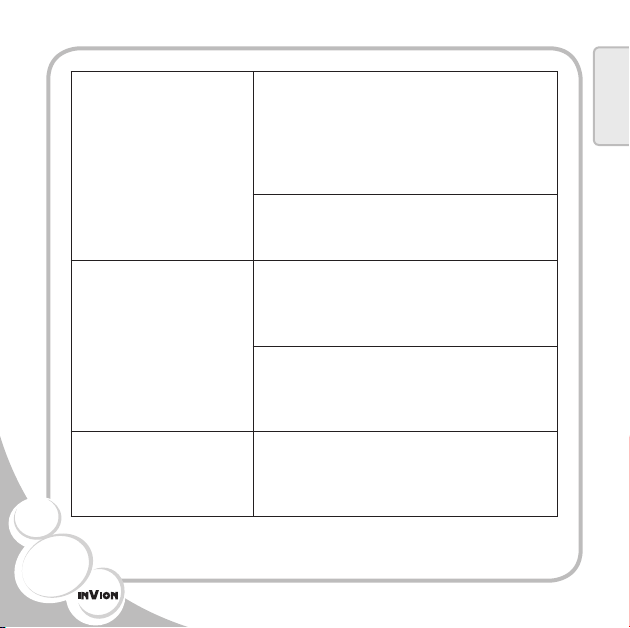
Saving of a le did not
work.
Words displayed look
abnormal.
Every time I press
a button, the player
makes a sound.
72
Check 1 – Is there free memory on the
play?
Delete some les from the player (Refer to
“Download / Upload / Delete Files” under
the section Connecting and Downloading
on page 19).
Check 2 – Is the save location/path
wrong?
Use the proper save location/path.
Check 1 – Is the language setting
correct?
Set the proper language setting (Refer to
the section System Setup on page 62).
Check 2 – Is the language supported?
See language settings for more
information (Refer to the section System
Setup on page 62).
Check 1 – Is the keytone feature on?
See sound settings for more information
(Refer to the section System Setup on
page 62).
English
Page 73
I’m getting a “FORMAT
ERROR” or the le will
not play.
No display on the LCD. Check 1 – Is the battery dead?
Check 1 – Does the le you are trying
to play have DRM?
DRM les cannot be played by the player.
To check if the le has DRM please refer
to “Checking for DRM” under the section
Connecting and Downloading on page
22.
Recharge the battery (Refer to section
Managing the Battery on page 33).
Check 2 – Is the player on?
Turn on the player (Refer to the section
Powering On on page 14). Press the
button for one second or longer to turn
on the player.
Check 3 – Are the display settings
automatically turning off the player?
Set the display settings to “Never” (Refer
to “Auto Off” under the section Settings
on page 62).
73
Page 74
Recording is disabled. Check 1 – Is there free memory on the
player?
Delete some les from the player (Refer to
“Download / Upload / Delete Files” under
the section Connecting and Downloading
on page 19).
Check 2 – Is the battery dead?
Recharge the battery (Refer to section
Managing the Battery on page 33).
Playing is disabled. Check 1 – Is the player locked?
Unlock the player (Refer to section Player
Overview on page 12).
Check 2 – Is the battery dead?
Recharge the battery (Refer to section
Managing the Battery on page 33).
74
English
Page 75
No sound is heard from
the loudspeaker.
Check 1 – Is the volume set to ‘0’?
Increase the volume of the player by
pressing the button.
Check 2 – Are the earphones plugged
into the player?
Unplug the earphones.
Check 3 – Does the le you are trying
to play have DRM?
DRM les cannot be played by the player.
To check if the le has DRM please refer
to “Checking for DRM” under the section
Connecting and Downloading on page
22.
Check 4 – Is the speaker turned off?
See sound settings for more information
(Refer to the section System Setup on
page 62).
75
Page 76
No sound is heard
from the earphones.
76
Check 1 – Is the volume set to ‘0’?
Increase the volume of the player by
pressing the button.
Check 2 – Are the earphones correctly
plugged into the player?
Plug-in the earphones correctly.
Check 3 – Does the le you are trying
to play have DRM?
DRM les cannot be played by the player.
To check if the le has DRM please refer
to “Checking for DRM” under the section
Connecting and Downloading on page
22.
Check 4 – Are the earphones broken?
Try another pair of earphones.
Check 5 – Was the player formatted
not in the correct format?
Format using the correct format (Refer
to “Format memory” under the section
Connecting and Downloading on page
30).
English
Page 77
The player keeps
turning off.
Is the player DRM
capable?
Does the player work
with a Macintosh
computer?
Does the player work
with iTunes®?
Check 1 – Are the display settings
automatically turning off the player?
Set the display settings to “Never” (Refer
to “Auto Off” under the section Settings
on page 62).
Check 2 – Is the battery dead?
Recharge the battery (Refer to section
Managing the Battery on page 33).
No. DRM les cannot be played by the
player. To check if the le has DRM
please refer to “Checking for DRM” under
the section Connecting and Downloading
on page 22.
No. The player is not compatible with a
Macintosh computer.
iTunes® cannot be used to sync with the
player. iTunes® can be used to rip CDs
into MP3 format. The MP3 les will then
be stored on your hard drive in the “My
Music” folder.
77
Page 78
I have Windows Vista
or Windows XP, do I
need to use the Driver
CD included with the
player?
If I have songs stored
on my computer’s
hard drive, can I
transfer them to my
player without using
Windows Media Player,
iTunes® or other media
programs?
78
No, this player is “plug and play”. The
driver is for Windows® 2000 or earlier.
English
Yes. You simple locate the songs using the
nd “search” feature on your computer.
Once you have located your music on
your hard drive you would pull up your
MP3 player (removable storage device)
under “My Computer” and nd “Devices
with removable storage” then right-click
and open. Once the MP3 player is open
you would drag the songs from the hard
drive and drop them into the player. For
best functioning of the player, please limit
your songs to 100 songs per folder on
the root le of the units. This means you
need to organize your songs into folders
of no more than 100 songs per folder.
Please refer to the section Connecting
and Downloading on page 15.
Page 79
What types of les are
compatible with the
player?
How do I delete
information from the
player?
What is on the CD? A copy of the user guide (manual) in PDF
Music: MP3, WMA, WAV
Movie / Video: AVI. Other les (RM / VOB
/ DAT / RMVB / MPG / MPEG / MP / ASF
/ WMV / MKV) must be converted into
AVI format. Please refer to “Converting
a video/audio/image le” in the section
Software Guide on page 64.
Photo: JPEG
E-Book: TXT
Delete some les from the player (Refer to
“Download / Upload / Delete Files” under
the section Connecting and Downloading
on page 19).
format and the video convert tool that you
need to convert videos to the appropriate
format for use on the player. For the video
convert tool, please refer to “Installing
the transcoding software” in the section
Software Guide on page 63).
79
Page 80
How do I charge my
player?
How do I use the
convert tool supplied
on the CD to convert
my movies?
How do I make voice
recordings?
I lost my user guide
(manual) or I cannot
access it on my CD.
What do I do?
What are the buttons
on my player?
80
The player charges via USB port. Please
refer to section Managing the Battery on
page 33).
Please refer to “Installing the transcoding
software” in the section Software Guide
on page 65.
Please refer to the section Record on
page 51.
Copy and paste the link below into an
internet browsers:
http://www.invionusa.com/manuals/
to download it in PDF format.
Please refer to the section Player
Overview on page 12.
English
Page 81
When do I use the reset
button on the player?
My screen always goes
black or turns off. How
do I change my LCD
settings?
How do I use the
convert tool supplied
on the CD to convert
my movies?
You would use the reset button when you
need to reset your device. For example
if the player freezes you can use this
button to reset the player. To use the
reset button use a paper clip. Please
DO NOT use a sharp object such as a
needle or pin to reset the device as it may
damage your player.
Please refer to “Power Mode” in the
section Settings on page 62.
Please refer to “Converting a video/
audio/image le” in the section Software
Guide on page 65.
81
Page 82
How do I sync this
device with Windows
Media® Player?
What accessories come
with my player?
82
Rip your CDs onto the latest version of
Windows Media® Player which can be
downloaded here:
ht tp: // www. micro so ft. co m/w in dow s/
pro g duc t s /wi n fam i ly/ m e dia c ent e r/
defaults.mspx
Once the music is on Windows Media®
Player, in the upper right hand corner
of the Windows Media® Player program
click “Sync.” This feature will only sync all
of your music if it is less than 2 GB. You
can also create a play list by choosing
“edit play list” then click on the songs you
would like to include. Then press “Sync.”
USB cable (used for charging and
downloading music), earphones, CD,
and quick start guide.
English
Page 83
I’m getting a “FORMAT
ERROR” or I cannot
add any additional
songs to my player,
what’s causing this?
How do I x it?
Many things can cause a format error,
it is easily xed by REFORMATTING
the player, follow the steps below to x
this issue, once you have formatted it
all the information will be dong and you
will need to upload your Play lists/Songs
from Windows Media® Player again.
A. Plug the USB cable into the player,
and the computer.
B. Go to the green “Start” menu on the
lower left hand side of your screen.
C. Go to “My Computer.”
D. Go to “Devices with Removable
Storage” (approx. 3 rows down).
E. Go to the appropriate “Removable
Disk” that is your player (it will
appear only after it is plugged in).
F. Right-click on the “Removable Disk”
that is your player and select
“Format” from the drop-down menu.
83
Page 84
84
G. A box will pop-up asking if you want
to format and erase all of the data
on the disk, choose “Start” then
click “OK” when the warning box
pops up.
H. Once you have formatted the player
re-sync your player or download
the les back to the player. Please
refer to the section Connecting and
Downloading on page 15.
English
Page 85
Claims & Warranties
In case of possible product defects, please contact the dealer
from whom you purchased the device. For this reason we
recommend you save your purchase receipt.
Service: For technical questions, information about our
products, and for spare part orders, our service team is
available as follows:
Website: www.invionusa.com
E-mail: [email protected]
Phone: 800-984-3270
Important note: Please do not send your device to our
address without having been requested to do so by our
service team. The costs and the risk of loss for unsolicited
mailings will be borne by the sender. We reserve the right to
refuse the acceptance of unsolicited mailings or to return the
corresponding merchandise to the sender carriage forward,
that is, at the sender’s expense.
85
Page 86
Warranty: If for any reason the registered product does not
function as it should due to factory defects, it can be serviced
within 90 days from the date of purchase.
This warranty does not cover failures due to abuse, misuse,
accident, or unauthorized alterations or repairs.
In no event will SupportPlus be liable for any incidental,
special, indirect, or consequential damages resulting from the
use, misuse, or inability to use this product.
86
English
Page 87
 Loading...