

Page 1

INSTRUCTION MANUAL AND WARRANTY
Page 2

THANK YOU
1
FOR CHOOSING AN INVICTA TIMEPIECE
IMPORTANT THINGS TO KNOW
Long ago, we set out to continue Invicta’s original 1837 mission – to offer
magnificent Swiss timepieces at modest prices. In doing so, we gave birth
to a movement in the watch industry that is turning the balance of power
over to the consumer.
We hope you enjoy your new timepiece and carefully read the easy-to-use
instructions pertaining to it. By doing so, you will help give it a long life and
keep it operating at the high quality standards by which it was crafted.
These timepieces have been tested for water resistance. In order to maintain
the water resistance, be sure to always close the crown tightly after setting.
We also recommend having your timepiece checked every year by a certified
watchmaker to ensure the gaskets are in proper condition. This will help to
assure the precise operation and longevity of the piece. Please refer to our
Service Center information on our web site www.invictawatch.com.
Screw Down Crowns: Many Invicta watches are equipped with a screw
down crown to help prevent water infiltration. This is most common on our
Diver models. In order to adjust the date and/or time on such a watch,
you must first unscrew the crown before you can gently pull it out to its
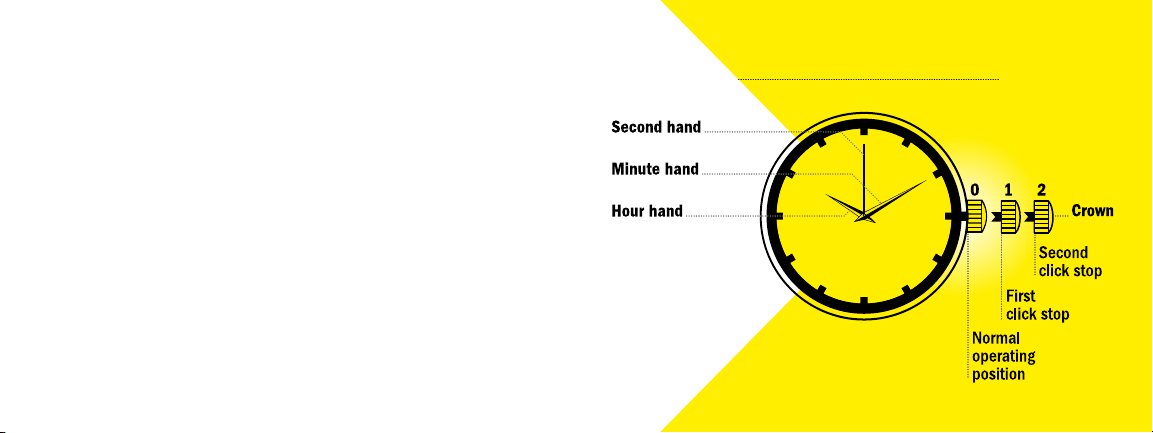
first or second click stop position (page 3). To do this, simply rotate the
crown counterclockwise until it springs open. When you have finished
setting the watch, the crown must then be pushed in and screwed back
in tightly. Not doing so will cancel the water resistance of the watch
and will void all warranties from the manufacturer. Overall, this process
should not require a lot of effort or force.
Tritnite® Luminous Markers: Tritnite® is an environmentally friendly
luminous material used exclusively by Invicta. Tritnite® requires 4 –5 hours
of exposure to light for it to glow brightly in the dark. It will continue to
perform with regular exposure to light.
Page 3
QUARTZ, AUTOMAT IC,
2
3
AND MANUAL WIND WATCHES
A Quartz Watch is battery powered and does not require winding.
Eventually the batter y will need to be replaced.
An Automatic Watch is a mechanical watch that winds itself and does
not require a battery. When worn daily, the movement of your wrist causes
the mainspring to wind progressively, eliminating the need for additional
winding. To start your automatic, you can hand wind it by rotating the
crown clockwise a number of turns while in its normal operating position
(screw down crowns will need to be unscrewed first), or by swinging it side
to side for 30 seconds. We recommend housing an automatic in a watch
winder box.
A Manual Wind Watch is a mechanical watch that does not require a
battery, but can only be wound by hand. To wind it, turn the crown clockwise while it is in its normal operating position until you feel resistance.
This type of watch should be wound daily.
QUARTZ, AUTOMAT IC, AND MANUAL WIND WATCHES
Display Elements Control Buttons
Page 4

WHAT DOES THIS INDICATE?
4
5
WHAT DOES THIS INDICATE?
Many Invicta watches are equipped with features that go beyond the
telling of time and date. These functions are displayed on what are called
subdials, indicators, counters or zones. Your watch may have one or more
of these. Knowing them will be useful when identifying which instructions
pertain to your watch.
! PLEASE NOTE . Since dial designs and shapes var y, not all subdials
are perfectly round, or positioned in the same place.
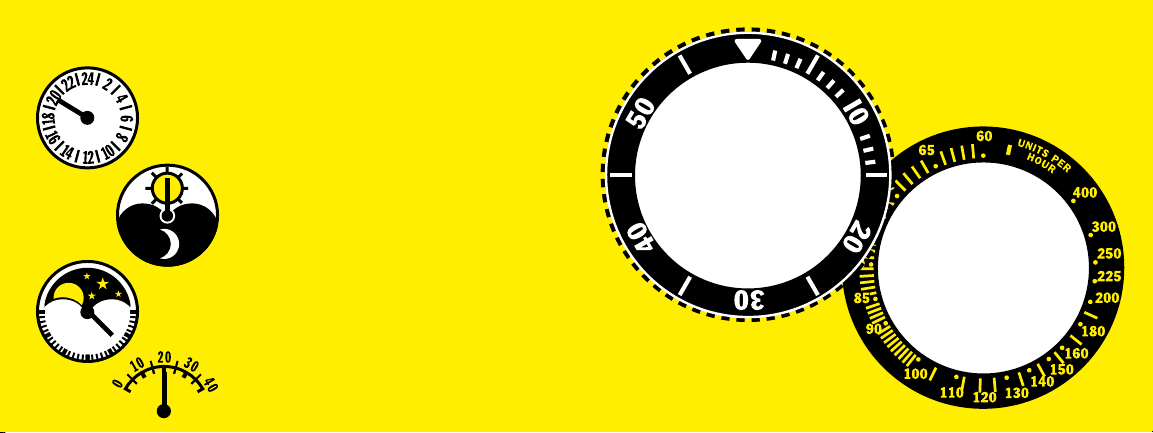
Small Seconds: an alternate to the sweeping center
second hand, this counter makes a continuous rotation,
measuring out 60-seconds.
Hours: a chronograph function that displays
hours elapsed, often in 12 one-hour intervals.
Minutes: a chronograph function that displays minutes
elapsed, often in 30 one-minute intervals (sometimes 60).
Tenths of a Second: a chronograph function
that displays tenths of a second elapsed.
Page 5
WHAT DOES THIS
6
7
INDICATE?
24-Hour : often called a GMT or second time zone indicator,
the hand of this counter makes a full rotation in a 24-hour
period, thereby also indicating whether it is a.m. or p.m.
It is often coupled with a Sun/Moon display.
Sun/Moon: indicates a.m. or p.m. through the
display of the sun or moon. It is often coupled
with a 24-hour indicator.
Moonphase: this display assures near perfect
synchronization with the lunation period, and only
needs adjusting every two and a half years, should
the watch never stop in that time.
Power Reserve: found on automatic watches,
this zone displays the hours of autonomy
remaining of a movement after it has reached
its winding peak.
WHAT DOES THIS INDICATE?
Diver’s Scale:
mainly found on the
turning bezel of a diver
watch, it allows a diver to
preset the time submerged in
minutes. It is sometimes found
beneath the watch cr ystal, and
can be turned by a pusher
at the 9 o’clock
position.
Tachymeter:
also called a
tachometer, it allows to
measure the speed of travel
over a given distance.
It is frequently used to
determine the speed of a
car over a measured
distance.
Page 6

WHICH INSTRUCTIONS SHOULD I READ?
8
9
Invicta crafts many styles of watches using a variety of fine movements
and complications. To find the instructions for your particular timepiece,
simply look at it and answer one of the following questions:
Does it tell time only? ........................................................................10
Does it tell time and date? ............................................................... 12
Does it tell time, day and date? ......................................................14
Does it have an alarm? ......................................................................16
Is it a chronograph? ........................................................................22
Is it a chronograph with big date and day? ..................................32
Is it a chronograph with date, day and month? ............................42
Warranty Information ........................................................................ 50
w w w. inv ictaw atch.com
Shipping Information ........................................................................ 54
Page 7

WATCHES WITH TIME ONLY
10
11
Setting the Time
1. Pull out the crown to position 1. The watch stops.
2. Turn the crown until the correct time appears.
3. Push the crown back into position 0. The watch will begin running again.
Display Elements
WATCHES WITH TIME ONLY
Control Buttons
Page 8
WATCHES WITH TIME AND DATE
12
13
Setting the Time and Date
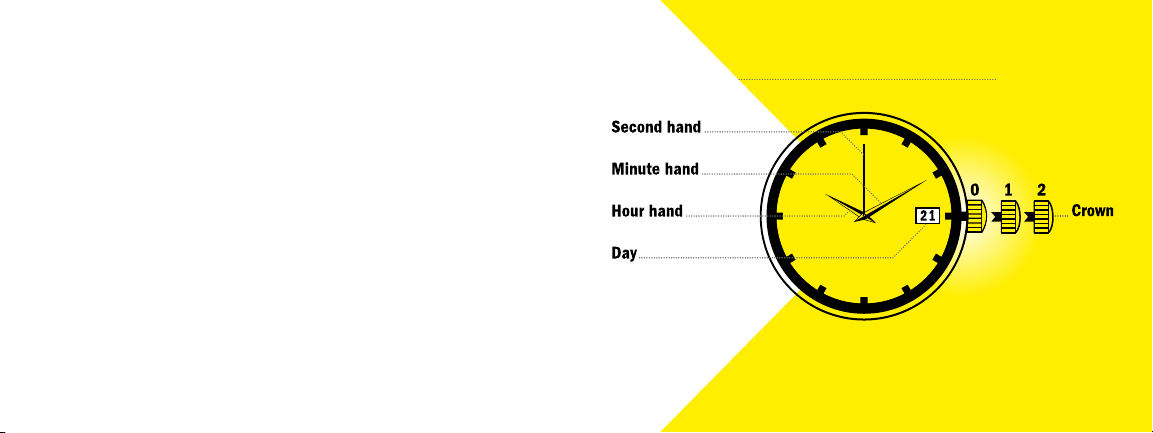
1. Pull out the crown to position 1. The watch stops.
2. Turn the crown until you reach the correct date.
3. Pull out the crown to position 2.
4. Turn the crown until you reach the correct time.
5. Push the crown back into position 0. The watch will begin running again.
Display Elements
WATCHES WITH TIME AND DATE
Control Buttons
Page 9
WATCHES WITH TIME, DAY AND DATE
14
15
Setting the Time, Day and Date
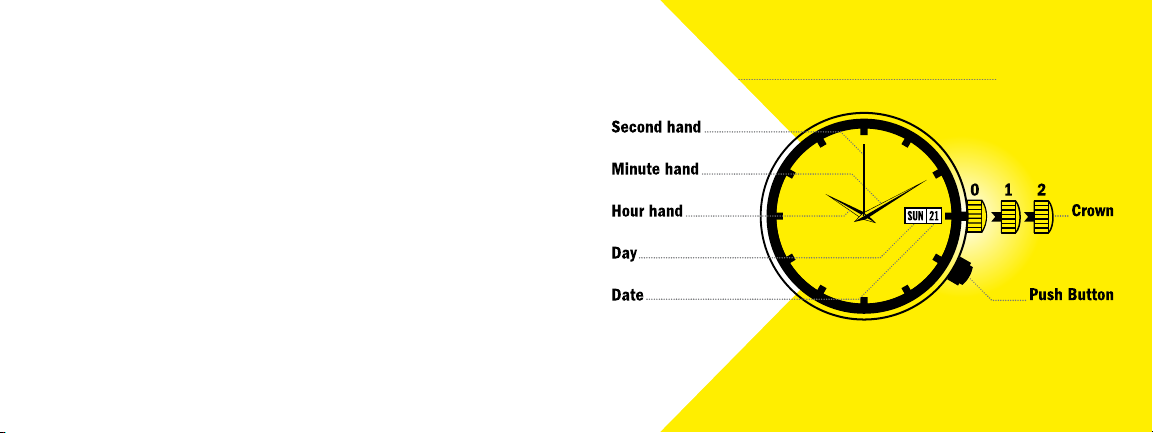
1. Pull out the crown to position 1.
2. Turn the crown clockwise until you reach the correct day.
3. Turn the crown counter clockwise until you reach the correct date.
4. Pull out the crown to position 2.
5. Turn the crown until you reach the correct time.
6. Push the crown back into position 0. The watch will begin running again.
Display Elements
WATCHES WITH TIME, DAY AND DATE
Control Buttons
Page 10
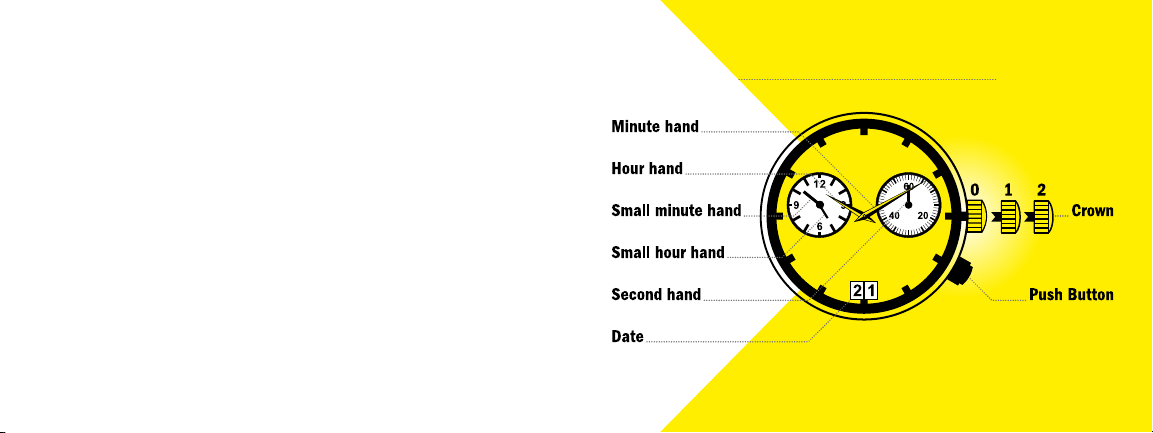
WATCHES WITH ALARM
16
17
Setting the Time and Date
1. Pull out the crown to position 1. The watch continues to run.
2. Turn the crown until yesterday’s date appears.
3. Pull out the crown to position 2. The second hand stops. The display
changes from alarm time to reference time.
4. Turn the crown until the correct date appears. Observe AM/PM clock
rhythm.
5. Continue to turn the crown until the correct time appears.
6. Push the crown back into position 0. The display changes from
reference to alarm time.
! PLEASE NOTE . Resetting the time also requires the identical correction of
the reference time. Please refer to “setting the reference time”.
WATCHES WITH ALARM
Display Elements
Control Buttons
Page 11

WATCHES WITH ALARM
18
19
Setting the Reference Time
WATCHES WITH ALARM
Setting the Reference Time
Parallel to the current time, the reference time runs in the background: the
alarm time refers itself to this reference time. Thus, resetting the time also
requires the identical correction of the reference time.If the reference time
is not synchronized with the current time, this results in the alarm signal
being emitted at a different time than the set alarm time.
1. Pull out the crown to position 2. The second hand stops. The display
changes from alarm time to reference time. To set your watch to the
exact
second, the crown must be pulled out when the second hand is
in position 0.
2. Press the push-button for at least 2 seconds. Until the small minute
hand jumps forward one minute and setting mode is activated.
Short pressing: Less than 1 second:
The reference time is moved forward by the minute.
Medium pressing: 1-2 seconds:
The reference time is moved forward by the hour.
Long pressing: Longer than 2 seconds:
The reference time is moved forward until the push-button is released.
3. Push the crown back into position 0. To set it to the exact second,
the crown must be pushed back into position 0 at the exact second.
The display changes from reference time to alarm time. A signal indicates
that the alarm is switched off.
Page 12

WATCHES WITH ALARM
20
21
Setting the Alarm
WATCHES WITH ALARM
Setting the Date . Quick Mode
1. Press the push-button for at least 2 seconds. Until the small minute
hand jumps forward one minute and setting mode is activated.
Short pressing: Less than 1 second:
The reference time is moved forward by the minute.
Medium pressing: 1-2 seconds:
The reference time is moved forward by the hour.
Long pressing: Longer than 2 seconds:
The reference time is moved forward until the push-button is released.
2. Switch alarm ON/OFF: Press the push-button briefly.
2 beeps: Alarm switched ON
1 beep: Alarm switched OFF
1. Pull out the crown to position 1. The watch continues to run.
2. Turn the crown until you reach the correct date. If you are setting the
date between 9pm and 12pm, the date must be set to the following
day as dates set between these hours do not automatically change at
midnight.
3. Push the crown back into position 0. The display changes from reference to alarm time.
! PLEASE NOTE . Setting the date too quickly in quick mode can result in
the incorrect date being displayed. Switching the date between 01 and
31 restores the synchronization.
Page 13
CHRONO
22
23
GRAPHS
Built-in stopwatch feature
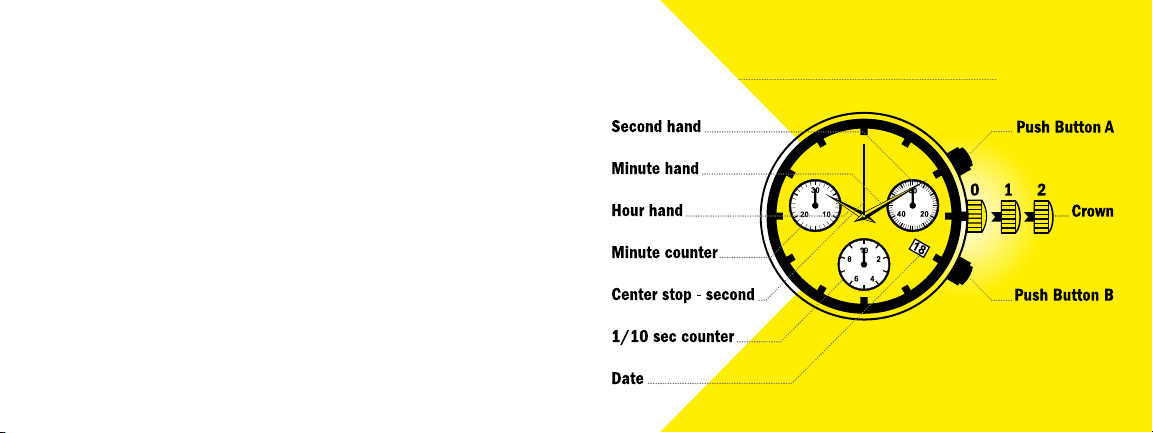
A chronograph is a timepiece with a built-in stopwatch feature. With few
exceptions, Invicta chronographs tell the time, date and include three
subsidiary dials. These dials are often referred to as sub-dials, indicators,
counters, eyes or zones. Typically, they measure minutes, seconds and
tenths of a second.
The sub-dials that measure minutes and tenths of a second are part of the
stopwatch feature. The sub-dial that measures 60 seconds is in a constant
rotation and is also known as the small seconds.
Display Elements
CHRONOGRAPHS
Control Buttons
Page 14

CHRONO
24
25
GRAPHS
Setting the Time and Date . After a Battery Change
CHRONOGRAPHS
Basic Function . Start/Stop/Reset
1. Pull out the crown to position 1. The watch continues to run.
2. Turn the crown until you reach yesterday’s date. If you are setting the
date between 9pm and 12pm, the date must be set to the following day as
dates set between these hours do not automatically change at midnight.
3. Pull out the crown to position 2. To set the time to the exact second,
it must be pulled out when the second hand is in position 0. The watch
stops.
4. Turn the crown until you reach the correct date.
5. Continue to turn the crown until you reach the correct time.
6. Push the crown back into position 0. To set the time to the exact second,
it must be pushed back into position 0 at the exact second.
Before using the chronograph functions, please ensure that the crown is
in position 0 and the 4 chronograph hands are precisely at zero position
following activation of push-button B. Should this not be the case, the
positions of the hands must be adjusted.
1. Start: Press push-button A.
2. Stop: Press push-button A again and read the three chronograph hands.
3. Reset: Press push-button B. The chronograph hands will be reset to
their zero positions.
Page 15

CHRONOGRAPHS
26
27
Adjusting the Chronograph Hands to Zero Position
CHRONOGRAPHS
Adjusting the Chronograph Hands to Zero Position
1. Pull out the crown to position 2. All three chronograph hands are in
their correct or incorrect zero position.
2. Keep push-button A and B depressed simultaneously for at least 2
seconds. The center stop-second rotates 360º and corrective mode is
activated.
Adjusting the center stop second
Single step: Press push-button A 1 x short
Continuous: Press push-button A 1 x long
To adjust the next hand: Press push-button B.
Adjusting the 1/10 sec counter hand (position 6h)
Single step: Press push-button A 1 x short
Continuous: Press push-button A 1 x long
To adjust the next hand: Press push-button B.
Adjusting the minute counter hand (position 9h)
Single step: Press push-button A 1 x short
Continuous: Press push-button A 1 x long
3. Push the crown back into position 0.
Termination of the chronograph
adjustment can be carried out at any time.
Page 16

CHRONO
28
29
GRAPHS
Measuring Accumulated Time
CHRONOGRAPHS
Measuring Intermediate Time
1. Start: Press push-button A. Start timing.
2. Stop: Press push-button A.
3. Restart: Press push-button A. Timing is resumed.
4. Stop: Press push-button A. Final time is displayed. Accumulation of
timing can be continued by pressing push-button A.
5. Reset: Press push-button B. The chronograph hands will be reset to their
zero positions.
1. Start: Press push-button A. Start timing.
2. Display interval: Press push-button B. Timing continues in the
background.
3. Making up the measured time: Press push-button B. The three
chronograph hands are quickly advanced to the ongoing measured
time. Further intervals can be displayed by pressing push-button B.
4. Stop: Press push-button A. Final time is displayed.
5. Reset: Press push-button B. The chronograph hands will be reset to
their zero positions.
Page 17

CHRONO
30
31
GRAPHS
Setting the Time
CHRONOGRAPHS
Setting the Date . Quick Mode
1. Pull out the crown to position 2.
To set the time to the exact second, it must be pulled out when the second
hand is in position 0. The watch stops.
2. Turn the crown until you reach the correct time.
3. Push the crown back into position 0.
To set the time to the exact second, it must be pushed back into position
0 at the exact second.
1. Pull out the crown to position 1.
The watch continues to run.
2. Turn the crown until you reach the correct date.
3. Push the crown back into position 0.
To set the time to the exact second, it must be pushed back into
position 0 at the exact second.
! PLEASE NOTE . If you are setting the date between 9pm and 12pm, the
date must be set to the following day.
Page 18
CHRONO
32
33
GRAPHS WITH BIG DATE AND DAY
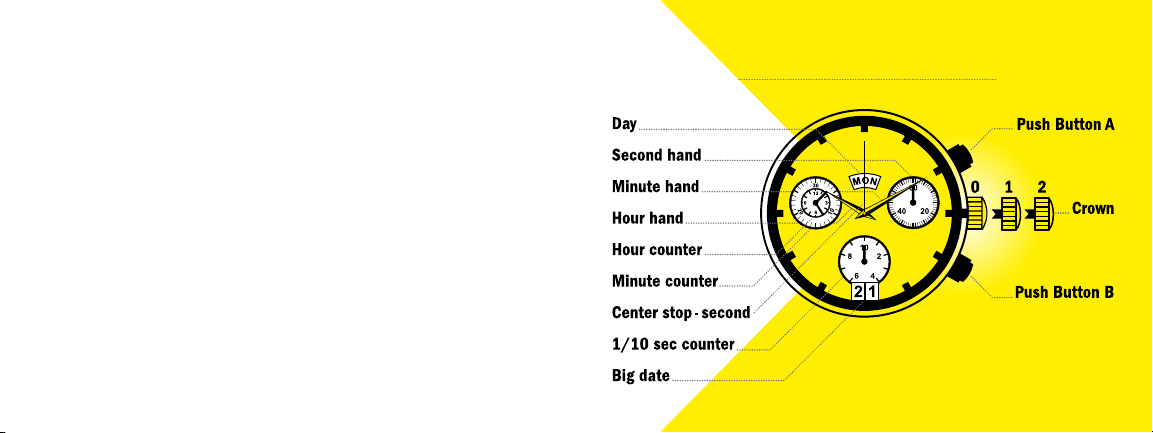
Invicta is one of the first companies to use the Swiss-made Star tech
5050.C, the world’s first big date and day chronograph with three eyes. It
features small seconds at 3 o’clock, tenths of a second at 6 o’clock, and
30 minutes and, in some, 12 hours at 9 o’clock.
Display Elements
CHRONOGRAPHS WITH BIG DATE AND DAY
Control Buttons
Page 19

CHRONO
34
35
GRAPHS WITH BIG DATE AND DAY
Setting the Time, Day and Date
CHRONOGRAPHS WITH BIG DATE AND DAY
Basic Function . Start/Stop/Reset
1. Pull out the crown to position 1.
2. Turn the crown until you reach the correct date. If you change the date
between 9:00pm and 12:00pm, it must be set to the following day as
dates set between these hours do not automatically change at midnight.
3. Pull out the crown to position 2.
4. Turn the crown clockwise until you reach the correct time.
5. Turn the crown counterclockwise until you reach the correct day.
6.
Push the crown back into position 0.
The watch will begin running again.
Before using the chronograph functions, please ensure that the crown is
in position 0 and the 4 chronograph hands are precisely at zero position
following activation of push-button B. Should this not be the case, the
positions of the hands must be adjusted.
1. Start: Press push-button A.
2. Stop: Press push-button A again and read the 3 chronograph counters.
3. Reset: Press push-button B. The three chronograph hands will be reset
to their zero positions.
Page 20

CHRONO
36
37
GRAPHS WITH BIG DATE AND DAY
Adjusting the Chronograph Hands to Zero Position
CHRONOGRAPHS WITH BIG DATE AND DAY
Adjusting the Chronograph Hands to Zero Position
Before using the chronograph functions, please ensure that the crown is
in position 0 and the 4 chronograph hands are precisely at zero position
following activation of push-button B. Should this not be the case, the
positions of the hands must be adjusted.
1. Pull out the crown to position 1. All three chronograph hands are in
their correct or incorrect zero position.
2. Keep push-button A and B depressed simultaneously for at least 2
seconds. The center stop-second rotates 360º and corrective mode is
activated.
Adjusting the center stop second
Single step: Press push-button A 1 x short
Continuous: Press push-button A 1 x long
To adjust the next hand: Press push-button B.
Adjusting the 1/10 sec counter hand (position 6h)
Single step: Press push-button A 1 x short
Continuous: Press push-button A 1 x long
To adjust the next hand: Press push-button B.
Adjusting the minute counter hand (position 9h)
Single step: Press push-button A 1 x short
Continuous: Press push-button A 1 x long
3. Push the crown back into position 0. Termination of the chronograph
adjustment can be carried out at any time.
Page 21

CHRONO
38
39
GRAPHS WITH BIG DATE AND DAY
Measuring Elapsed Time
CHRONOGRAPHS WITH BIG DATE AND DAY
Measuring a Second Time
1. Start: Press push-button A. The center sweep hand will begin measuring
seconds.
2. Stop: Press push-button A and read how much time has elapsed.
3. Reset: Press push-button B. The chronograph hands will be reset to their
zero positions.
! PLEASE NOTE . The center sweep hand should be used only as a function
of the chronograph and should not be kept running constantly in place
of the small seconds.
To measure two consecutive times (e.g. the finish times of two runners).
1. Start: Press push-button A. The center sweep hand will begin measuring
seconds.
2.
At the arrival of the first runner: Press push-button B. The hands will stop.
3. At the arrival of the second runner : Press push-button A. Your chrono-
graph memorizes the second time.
4. To read the time of the first runner: Simply look at where the chronograph hands are stopped.
5. To read the time of the second runner:
Press push-button B
and the
hands will advance to that time.
6. Reset: Press push-button B. The chronograph hands will be reset to
their zero positions.
Page 22

CHRONO
40
41
GRAPHS WITH BIG DATE AND DAY
Measuring Accumulated Time
CHRONOGRAPHS WITH BIG DATE AND DAY
Measuring Intermediate Time
1. Start: Press push-button A. The center sweep hand will begin measuring
seconds.
2. Stop: Press push-button A. Read the 3 chronograph counters.
3. Resume timing: Press push-button A again.
4. Stop: Press push-button A. Read the 3 chronograph counters.
5. Repeat this process as many times as needed.
6. Reset: Press push-button B. The chronograph hands will be reset to their
zero positions.
1. Start: Press push-button A. The center sweep hand will begin measuring
seconds.
2. Stop: Press push-button B. This will indicate intermediate time.
3. Start again: Press push-button B again.The hands will turn at a much
faster speed until they measure the time elapsed since the chronograph
was first started. They will then continue to move at a normal speed.
4. A further intermediate time can be measured by repeating this
procedure.
5. Stop: Press push-button A and read the 3 chronograph counters.
6. Reset: Press push-button B. The chronograph hands will be reset to
their zero positions.
Page 23
CHRONO
42
43
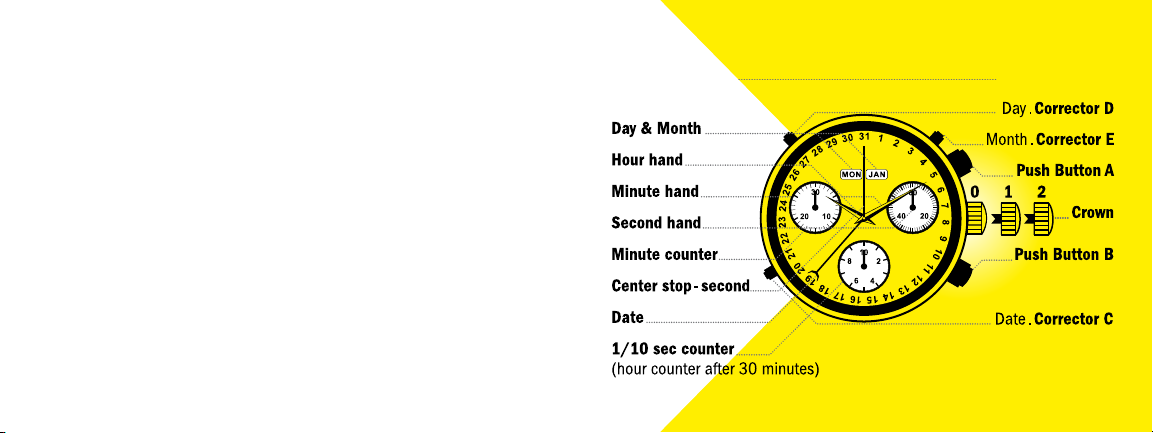
GRAPHS WITH DATE, DAY AND MONTH
Setting the Time, Date, Day and Month
1. Pull out the crown to position 1. The watch stops.
2. Turn the crown until you reach the correct time.
3. Push the crown back into position 0. To set the time to the exact
second, it must be pushed back in at the exact second. Please observe
AM/PM clock rythm. The watch will begin running again.
4. Press the corrector C until you reach the correct date. If you change
the date between 9:00pm and 12:00pm, it must be set to the following
day as dates set between these hours do not automatically change at
midnight.
5. Press the corrector D until you reach the correct day.
6. Press the corrector E until you reach the correct month.
Display Elements
CHRONOGRAPHS WITH DATE, DAY AND MONTH
Control Buttons
Page 24

CHRONO
44
45
GRAPHS WITH DATE, DAY AND MONTH
Setting the Time, Date and Day
CHRONOGRAPHS WITH DATE, DAY AND MONTH
Basic Function . Start/Stop/Reset
1. Pull out the crown to position 1.
2. Turn the crown until you reach the correct date. If you change the date
between 9:00pm and 12:00pm, it must be set to the following day as
dates set between these hours do not automatically change at midnight.
3. Pull out the crown to position 2.
4. Turn the crown clockwise until you reach the correct time.
5. Turn the crown counterclockwise until you reach the correct day.
6.
Push the crown back into position 0.
The watch will begin running again.
Before using the chronograph functions, please ensure that the crown is
in position 0 and the 4 chronograph hands are precisely at zero position
following activation of push-button B. Should this not be the case, the
positions of the hands must be adjusted.
1. Start: Press push-button A.
2. Stop: Press push-button A again and read the 3 chronograph counters.
3. Reset: Press push-button B. The three chronograph hands will be reset
to their zero positions.
Page 25

CHRONO
46
47
GRAPHS WITH DATE, DAY AND MONTH
Adjusting the Chronograph Hands to Zero Position
CHRONOGRAPHS WITH DATE, DAY AND MONTH
Adjusting the Chronograph Hands to Zero Position
Before using the chronograph functions, please ensure that the crown is
in position 0 and the 4 chronograph hands are precisely at zero position
following activation of push-button B. Should this not be the case, the
positions of the hands must be adjusted.
1. Pull out the crown to position 1. All three chronograph hands are in
their correct or incorrect zero position.
2. Keep push-button A and B depressed simultaneously for at least 2
seconds. The center stop-second rotates 360º and corrective mode is
activated.
Adjusting the center stop second
Single step: Press push-button A 1 x short
Continuous: Press push-button A 1 x long
To adjust the next hand: Press push-button B.
Adjusting the 1/10 sec counter hand (position 6h)
Single step: Press push-button A 1 x short
Continuous: Press push-button A 1 x long
To adjust the next hand: Press push-button B.
Adjusting the minute counter hand (position 9h)
Single step: Press push-button A 1 x short
Continuous: Press push-button A 1 x long
3. Push the crown back into position 0. Termination of the chronograph
adjustment can be carried out at any time.
Page 26

CHRONO
48
49
GRAPHS WITH DATE, DAY AND MONTH
Measuring Accumulated Time
CHRONOGRAPHS WITH DATE, DAY AND MONTH
Measuring Intermediate Time
1. Start: Press push-button A. Start timing.
2. Stop: Press push-button A.
3. Restart: Press push-button A. Timing is resumed.
4. Stop: Press push-button A. Final time is displayed. Accumulation of
timing can be continued by pressing push-button A.
5. Reset: Press push-button B. The three chronograph hands will be reset
to their zero positions.
1. Start: Press push-button A. Start timing.
2. Display interval: Press push-button B. Timing continues in the
background.
3. Making up the measured time: Press push-button B. The three
chronograph hands are quickly advanced to the ongoing measured
time. Further intervals can be displayed by pressing push-button B.
4. Stop: Press push-button A. Final time is displayed.
5. Reset: Press push-button B. The three chronograph hands will be reset
to their zero positions.
Page 27

WARRANTY
50
51
INFORMATION
WARRANTY INFORMATION
Your Invicta timepiece is backed by a comprehensive 1-year Warranty from
date of purchase. This covers repairs due to failure or breakdown of the
movement and all its components, as well as the crown, dial, markers, hands
and water resistant pressure. It does not cover scratches to the crystal, case,
metal band, leather, microfiber, or rubber straps or any damage that results
from normal wear and tear.
You also have the option of purchasing our Invicta Platinum Plan extended
4-year Warranty. The information for both warranties can be found in your
gift box or by calling 1-866-INVICTA.
Each genuine Invicta timepiece purchased from an Elite Invicta Retailer is
in its original and tested condition and should only be serviced by qualified
professionals at the place of purchase or at the Invicta Ser vice Center in
accordance with the terms of the Invicta Warranties.
If Invicta timepieces are purchased from sources other than retailers recognized as Elite Invicta Retailers or are serviced or repaired by unqualified
third parties, they may be subject to alterations from their original condition that are beyond the control of Invicta Watch Group.
As Invicta Watch Group cannot guarantee the quality standards of an
altered timepiece, neither of the above-mentioned Invicta Warranties will
be valid. In such cases the purchaser has to rely on the seller’s warranty.
Should you choose not to extend the 1-year warranty and/or in the event
of warranty expiration, it is recommended that you have your manual wind
and automatic watches serviced at least once a year at the Invicta Service
Center. This will assure the precise operation and longevity of the piece.
Invicta strives to manufacture timepieces of superior quality. This is
reflected in the accuracy of the watches, the attention to detail in the
assembly of the individual cases and movements, and in the life expectancy of an Invicta. Whereas many wristwatches fail the test of time,
Page 28

WARRANTY
52
53
INFORMATION
WARRANTY INFORMATION
Invicta watches are designed to withstand the most demanding conditions
for a ver y long time. Every care is taken to ensure that your watch meets
the highest standards before it leaves the workshop.
Should you discover that, despite our rigorous attempts to achieve this level
of quality your watch is not functioning properly during the warranty period
or after, simply send it to our Service Center for correction of the problem.
Although our main concern lies in minimizing the time that a watch is in
service, it is important for our clients to understand that every watch sent in for
service is thoroughly inspected for faults in craftsmanship, material damage,
movement-related irregularities, as well as other factors that could have an
impact on the overall appearance and performance of the watch.
When all apparent problems are sorted out, your watch will enter a
two-week
testing period, during which the accuracy of the movement is
observed and recorded day by day. Should your watch function properly at the
conclusion of the testing period, it will be sent to you immediately. Should the
technician designated to repair or overhaul your watch find it necessary to
re-submit the watch into observation, your watch will be tested and observed
for one more week.
Experience shows that the first testing phase is sufficient for most watches.
However, some watches need a little special attention. Should your watch
be among those few, please understand that we are only concerned with the
performance of your watch once you receive it back. We ask for both your
understanding and patience in this case.
In case your watch cannot be repaired because of market availability or key
components, Invicta reserves the right to exchange for a product of same or
higher value.
Page 29

SHIPPING
54
55
INFORMATION
! PLEASE NOTE:
If you are sending your watch to the Invicta Service Center and it has an
exotic strap, you must remove the strap first, or we cannot accept the
shipment. It will be returned to you.
The strict laws of the U.S. Government Fish and Wildlife Ser vice prohibit
the shipping of exotic species without proper documentation. This includes
alligator, crocodile, snake, Ostrich, and fish, such as stingrays or Salmon.
Please note that genuine leather straps, synthetic straps, leather embossed
straps, and metal bands are excluded from this policy and you may keep
those straps attached.
Your watch may be forwarded to one of many Invicta Service Centers around
the world according to the origin of your watch. In order to avoid any delays
we request that you REMOVE ANY EXOTIC STRAPS and MAIL ONLY THE
WATCH CASE FOR SERVICE.
SHIPPING INFORMATION
! PLEASE NOTE:
1. We do not ship to P.O. Box addresses.
2.
Do not send your Gift Box when shipping for service. It will not be returned.
3. Include a Copy of your warranty card showing the date of your purchase.
4. Include a Copy of your purchase invoice with the date on it.
5. Include a $25 money order issued to Invicta Service Center for S&H.
6. Include a note describing the malfunction.
7. Include a return address and daytime telephone number.
8. Be sure to insure the watch with the shipper.
9. We warrant each repair for one year, which applies to that repair only.
10. If your watch is not under INVICTA warranty, you will be charged for
the repair cost.
11. Prices do not include sales tax.
12. Failure to make prior payment arrangements (money order, check or
credit card) will result in your item being sent back COD.
Page 30

SHIPPING INFORMATION
56
! PLEASE NOTE:
The owner will be responsible for shipping the watch to and from us for
service. A flat rate of $25 will be charged, which should be submitted as a
money order.
MAIL TO:
Invicta Service Center
1 Invicta Way (3069 Taft St.)
Hollywood Florida, 33021
U.S.A.
As part of our commitment to superior service, once your watch is received,
we will mail you a postcard advising you of your service case number.
This will give you the ability to refer to your particular case, as well as track
the progress online at www.invictawatch.com.
Didn’t find the information you were looking for?
Visit our website.
w w w. inv ictaw atch.com
Page 31

w w w. inv ictaw atch.com
© Invicta Watch Company of America, Inc., 2008. All rights reserved.
 Loading...