

Page 1

Sample to Insight__
Quick-Start Protocol February 2021
Investigator® 24plex QS Kit
All of the components of the Investigator 24plex QS Kit should be stored at –30 to –15°C. Avoid
repeated thawing and freezing. The primer mix, allelic ladder, and DNA Size Standard must be
stored protected from the light. DNA samples and post-PCR reagents (allelic ladder and DNA
size standard) should be stored separately from the PCR reagents. Under these conditions, the
components are stable until the expiration date indicated on the kit.
Further information
Investigator 24plex QS Handbook
Safety Data Sheets: www.qiagen.com/safety
Technical assistance: support.qiagen.com
Notes before starting
Set up all the reaction mixtures in an area separate from that used for DNA isolation and
PCR product analysis (post-PCR).
Use disposable tips with hydrophobic filters to minimize cross-contamination risks.
Before opening the tubes, thaw PCR components, vortex, and then centrifuge briefly to
collect the contents at the bottom of the tubes.
The recommended amount of DNA under standard conditions is 0.5 ng. Internal
validations demonstrated robust and balanced results with 0.2–2 ng DNA, and reliable
results with < 0.1 ng DNA.
: www.qiagen.com/HB-1860
Procedure
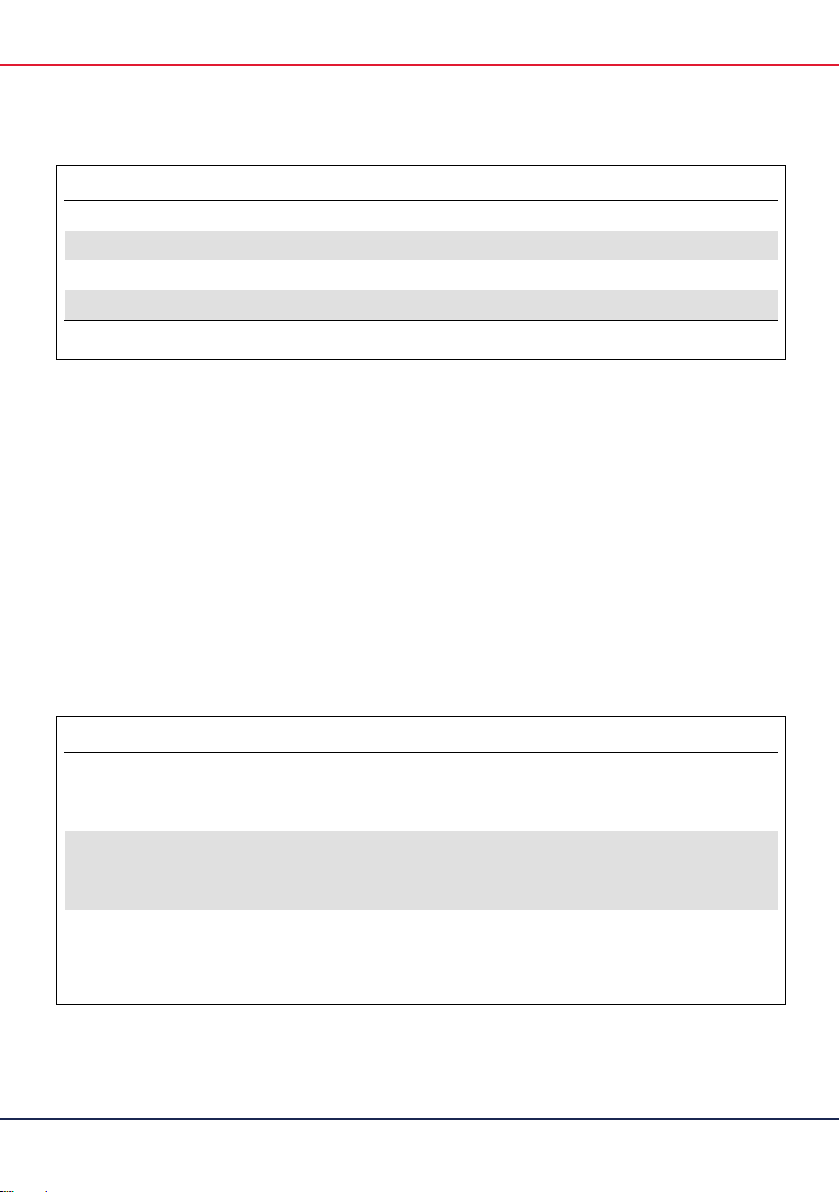
1. Prepare a master mix according to Table 1. As some loss of reagents can occur during
transfers, prepare the mix with additional reactions included. Also include positive and
negative control reactions. The master mix contains all of the
components needed for PCR except the template (sample) DNA and
nuclease-free water.
Page 2
2
Investigator 24plex QS Kit Quick-Start Protocol 02/2021
Table 1. Reaction setup
Component Volume per reaction
Fast Reaction Mix 2.0 7.5 µl
Primer Mix 2.5 µl
Nuclease-free water (added in step 4) Variable
Template DNA (added in step 4) Variable
Total volume 25 µl
2. Vortex thoroughly and dispense appropriate volumes into PCR tubes or the wells of a
PCR plate.
3. Add template DNA and nuclease-free water to give a final sample volume of 25 µl.
4. Prepare the negative control (nuclease-free water) and positive control, which should be
5 µl of the Control DNA 9948 (0.1ng/µl).
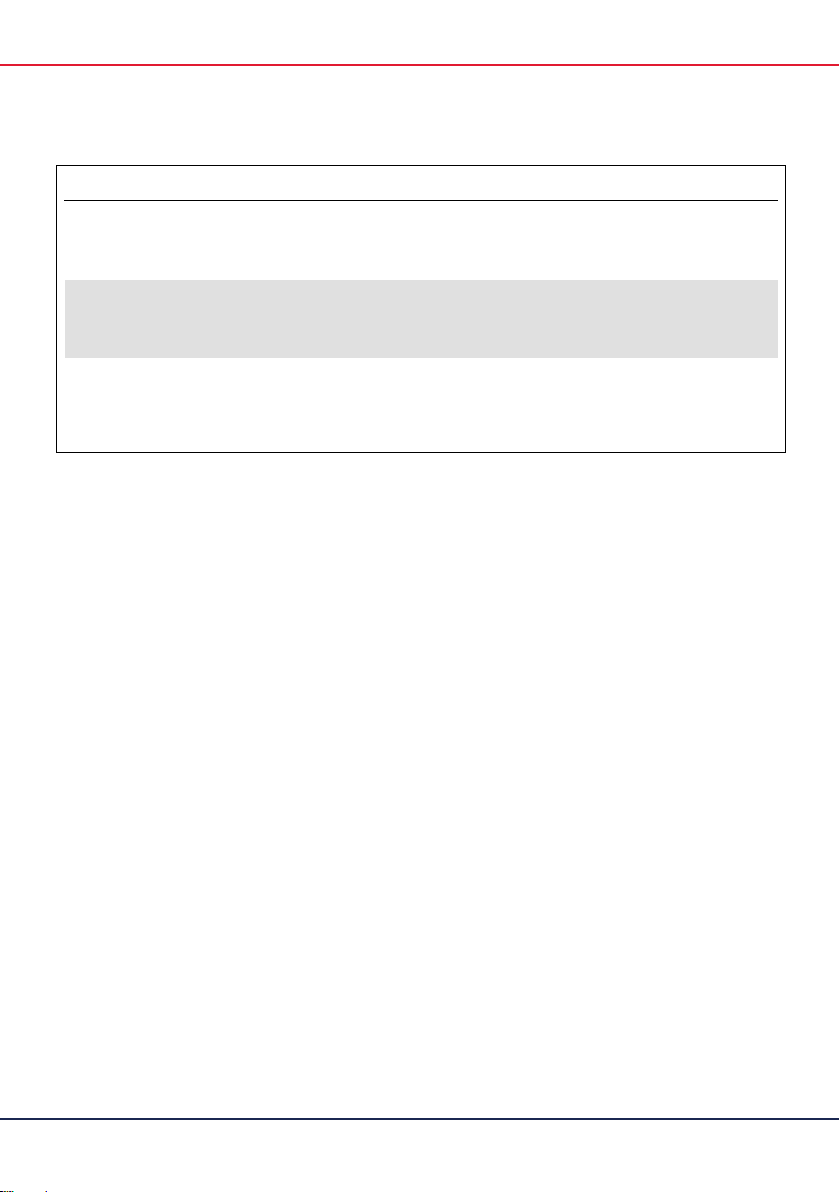
5. Program the thermal cycler according to the manufacturer’s instructions, using the
conditions outlined in Table 2.
Note: If using the GeneAmp 9700 thermal cycler with an Aluminum block, use “Std
Mode”. With a Silver block or Gold-plated Silver block, use “Max Mode”. Do not use
“9600 Emulation Mode”.
Table 2a. Standard cycling conditions
Temperature Time Number of cycles
98°C* 30 s
64°C 55 s 3 cycles
72°C 5 s
96°C 10 s
61°C 55 s 27 cycles
72°C 5 s
68°C 5 min –
60°C 5 min –
10°C ∞ –
* Hot-start to activate DNA polymerase.
Page 3
Investigator 24plex QS Kit Quick-Start Protocol 02/2021
3
Table 2b. Optional cycling conditions
Temperature Time Number of cycles
98°C* 30 s
64°C 55 s 3 cycles
72°C 5 s
96°C 10 s
61°C 55 s 27 cycles
72°C 5 s
68°C 2 min –
60°C 2 min –
10°C ∞ –
* Hot-start to activate DNA polymerase.
Table 2b details previously published cycling conditions, which may continue to be used
if incomplete adenylation is not visible within the electropherograms.
6. After the cycling protocol is completed, store samples at –30 to –15°C protected from
light, or proceed directly with running the electrophoresis.
Sample preparation for capillary electrophoresis
Before conducting DNA fragment size analysis, it is necessary to perform a spectral calibration
for each analyzer with the six fluorescent labels: 6-FAM™, BTG, BTY, BTR2, BTP, and BTO.
The calibration procedure creates a matrix that is used to correct for the overlapping of the
dye fluorescence-emission spectra. Detailed protocols for using the Applied Biosystems
3500/3500XL Genetic Analyzers are provided in the
Investigator 24plex QS Handbook
Protocol
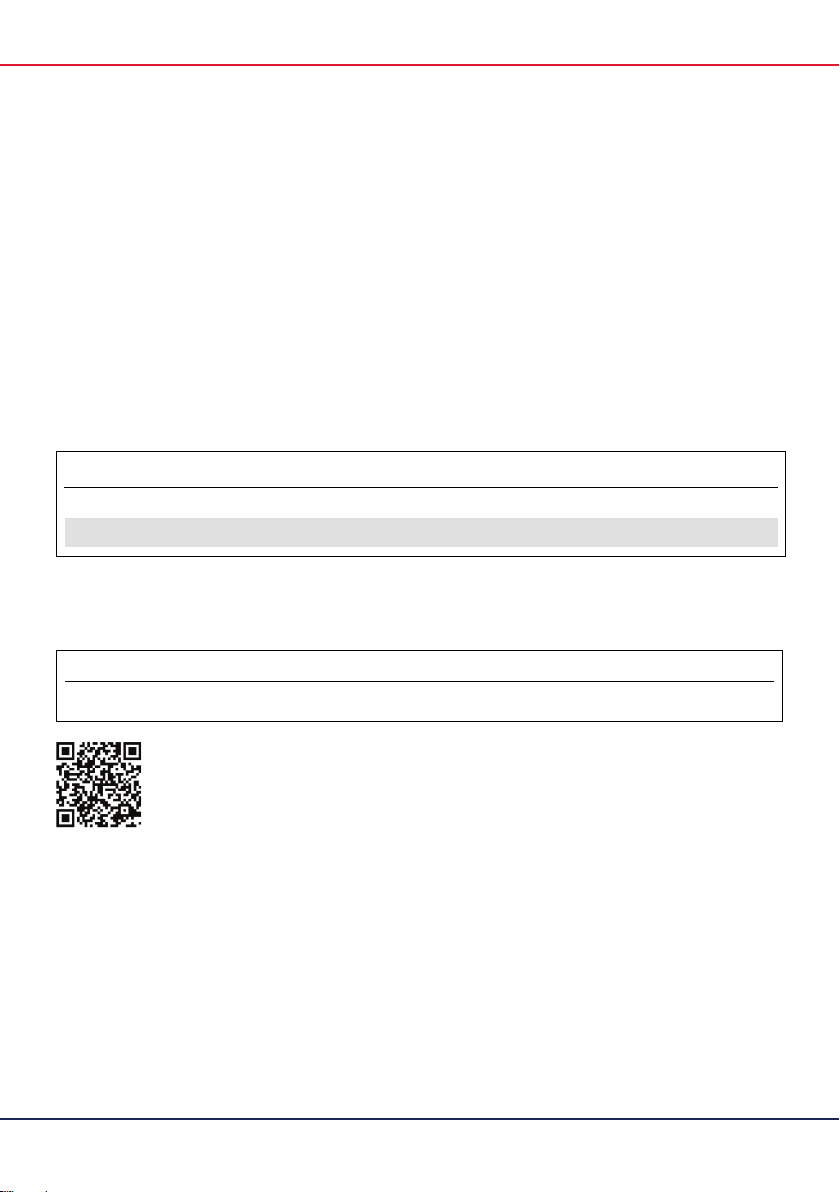
1. Set up a mixture of formamide and DNA size standard according to Table 3.
2. For each sample to be analyzed, aliquot 12 µl of the mixture to a tube.
3. Add 1 µl PCR product or allelic ladder (diluted, if necessary).
4. Denature for 3 min at 95°C.
®
.
Page 4
4
Investigator 24plex QS Kit Quick-Start Protocol 02/2021
Scan QR code for handbook.
For up
specific disclaimers, see the respective
QIAGEN kit handbook or user manual.
Trademarks: QIAGEN
s
Corporation). Registered names, trademarks, etc. used in this document, even when not specifically marked as such, are not to
1123590 02/2021 HB-1843-005 © 2021 QIAGEN, all rights reserved.
Ordering www.qiagen.com/shop | Technical Support support.qiagen.com | Website www.qiagen.com
5. Snap freeze by placing the plate on ice for 3 min.
Alternatively, a thermal cycler set to 4°C may be used to cool the plate.
6. Load the samples on the Genetic Analyzer tray and start the run.
Please check the
Investigator 24plex QS Handbook
for detailed information on the run
module settings (e.g., injection time, injection voltage, and run time).
7. After the run is finished, data can be analyzed using suitable software, such as Applied
®
Biosystems GeneMapper
24plex QS Handbook
Table 3. Setup of formamide and DNA size standard mixture
Component Volume per sample
Hi-Di™ Formamide 12.0 µl
DNA size standard 550 0.5 µl
ID-X Software. For more information, refer to the
and corresponding software user guides.
Investigator
Document Revision History
Date Changes
02/2021 Table 2 is split into Tables 2a and 2b. Editorial and styling changes.
-to-date licensing information and product-
®
, Sample to Insight®, Investigator® (QIAGEN Group); Applied Biosystems®, FAM™, GeneAmp®, GeneMapper®, Hi-Di™ (Life Technologie
be considered unprotected by law.
 Loading...