

Page 1
User manual
Page 2

Page 3

Índice
1. Safety instructions ................................................................................ 3
2. Introduction ........................................................................................... 4
2.1. Features .............................................................................................. 4
2.2. List of accessories ............................................................................... 5
2.3. Component description ....................................................................... 6
3. Device preparation ................................................................................ 7
3.1. Installing feeding plate. ........................................................................ 7
3.2. Installing the receiving Steel bracket. .................................................. 7
3.3. Connecting the power source. ............................................................. 8
3.4. Battery charging (optional) .................................................................. 8
4. Operating device placement. ............................................................... 9
4.1. Desktop mode (typical). ....................................................................... 9
4.2. Slant mode. ......................................................................................... 9
4.3. Wall-mounted. ................................................................................... 10
5. Operation. ............................................................................................ 11
5.1. Switching ON/OFF the device. .......................................................... 11
5.2. Detection. .......................................................................................... 12
5.3. REP/CLR button. ............................................................................... 13
5.4. Power saving mode ........................................................................... 13
5.5. Battery status message ..................................................................... 14
5.6. Software updating ............................................................................. 15
6. Troubleshooting .................................................................................. 20
6.1. Self-test error code display ................................................................ 20
6.2. Detection error codes display ............................................................ 21
6.3. Important notices. .............................................................................. 21
7. Maintenance ......................................................................................... 22
8. Technical specifications ..................................................................... 23
Page 4
Secureuro Plus – User manual
EN
!
Página 3
1. Safety instructions
To avoid damage to the machine and personal injury, please read all
warnings and cautions carefully before first use!.
• When cleaning the device don´t use spray with
inflammable gases.
• If the machine is exposed to cold for a long time, it is
necessary to sustain it at room temperature about two
hours before using it.
• Don´t let flammable material or metal objects fall over the
unit.
• To prevent shock hazard, do not disconnect the plug of
the AC/DC adapter when hands are wet.
• To prevent fire or short circuit, unplug the unit if you want
to place it to another position.
• Don´t pull out the plug strongly in order to avoid damaging
the power cord. Avoid placing heavy objects on the cord.
• The unit should be connected to a power supply by using
the same type of AC/DC as provided.
• The battery storage shall de in the clean and dry
ventilation room at the temperature of -5ºC-35ºC, and
shall be keep out of fire or heat and avoid touching
corrosion elements.
• When the battery is unused for a long time, please take it
out from the device, we recommend you to charge it every
6 months.
• When the battery level is low, it will take 10 hours to be
fully charged.
Page 5

Secureuro Plus – User manual
EN
!
Página 4
2. Introduction
Secureuro Plus is a reliable and easy-operated banknote detector. It
can tell counterfeit banknotes from genuine ones. With rechargeable
battery inside, it can be brought to anywhere when needed. The
features of currency detection include magnetism, infrared, image,
paper quality, etc.
2.1. Features
• Small size, convenient to portable usage.
• It can be paced flat, or slant, or hanging on the Wall when
working.
• Distinguish currency type and denomination automatically
(Only Euro currency).
• Displays number of sheets for banknotes and total value of
each currency type.
• Feed banknote at any side and in any position to the feeding
entrance.
• Optionally can include rechargeable battery with a capacity
from 120 to 150 minutes.
• Provided with sound-light alarm function.
• Can update the software and charge the battery trough USB
port.
• Software and hardware design is more excellent. Auto
adjustable technology is adopted on sensors and it is easy to
maintenance.
• Pass authentication of CE, REACH y ROHS.
• The Bank of Spain has certified this product.
Page 6
Secureuro Plus – User manual
EN
!
Página 5
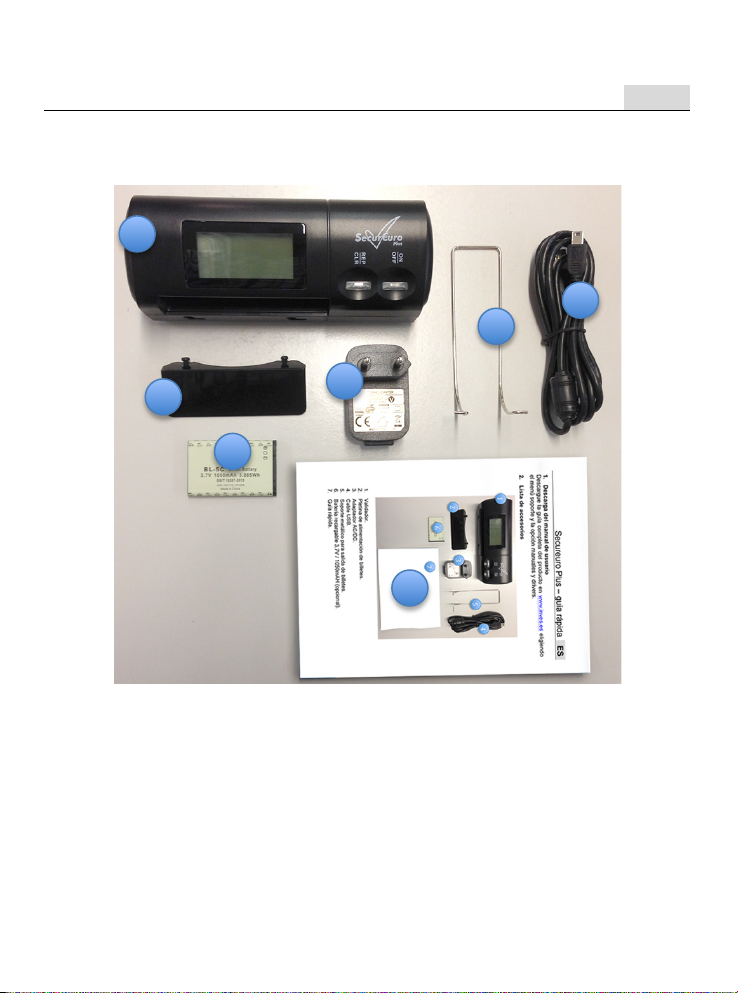
2.2. List of accessories
1. Counterfeit detector.
2. Feeding plate.
3. AC/DC adapter (with USB connection).
4. USB cable.
5. Receiving steel bracket.
6. 3.7V / 1050mAH rechargeable battery (optional).
7. Quick user guide.
2!1!3!4!5!6!7!
Page 7

Secureuro Plus – User manual
EN
!
Página 6
2.3. Component description
1. Feeding plate.
2. Banknote feeding sensor and rollers.
3. LCD screen.
4. REP/CLR button (allows to see the different type of banknotes
inserted or to set counter to “0”).
5. ON/Off button.
6. Receiving Steel bracket.
7. USB port.
8. Slot for micro SD cards.
9. Display rotation switch.
10. Battery compartment cover.
11. Wall-mount (hole for hang).
12. Underprop foot.
1!2!3!
4!
5!
6!
7!
8!
9!
10!
11!
11!
12!
12!
12!
Page 8
Secureuro Plus – User manual
EN
!
Página 7
3. Device preparation
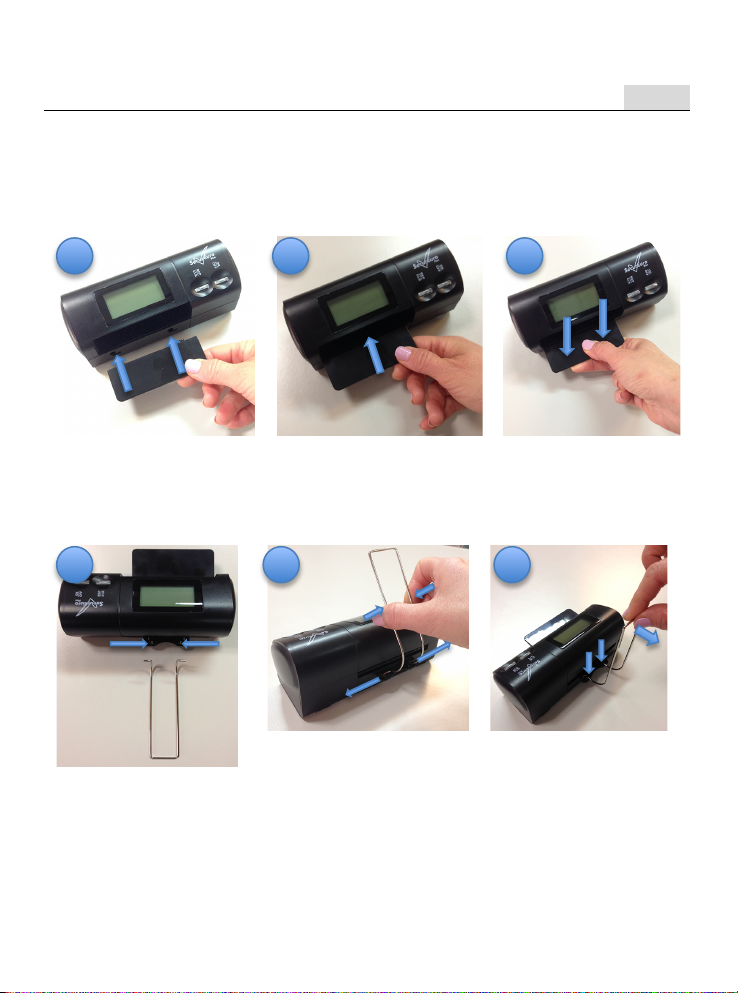
3.1. Installing feeding plate.
!
!!!
• Align the feeding plate
with the Wall-mount
holes.
• Putt he plate into the
holes.
• Pull it down.
3.2. Installing the receiving Steel bracket.
!
!
!
• Align the Steel
bracket with the
device holes.
• Press both sides inside
and release it when
the trims will be align
with the device holes.
• Pull the Steel bracket
back, make the
plastic tracks hold
the steel bracket.
1!2!3!1!2!
3!
Page 9
Secureuro Plus – User manual
EN
!
Página 8
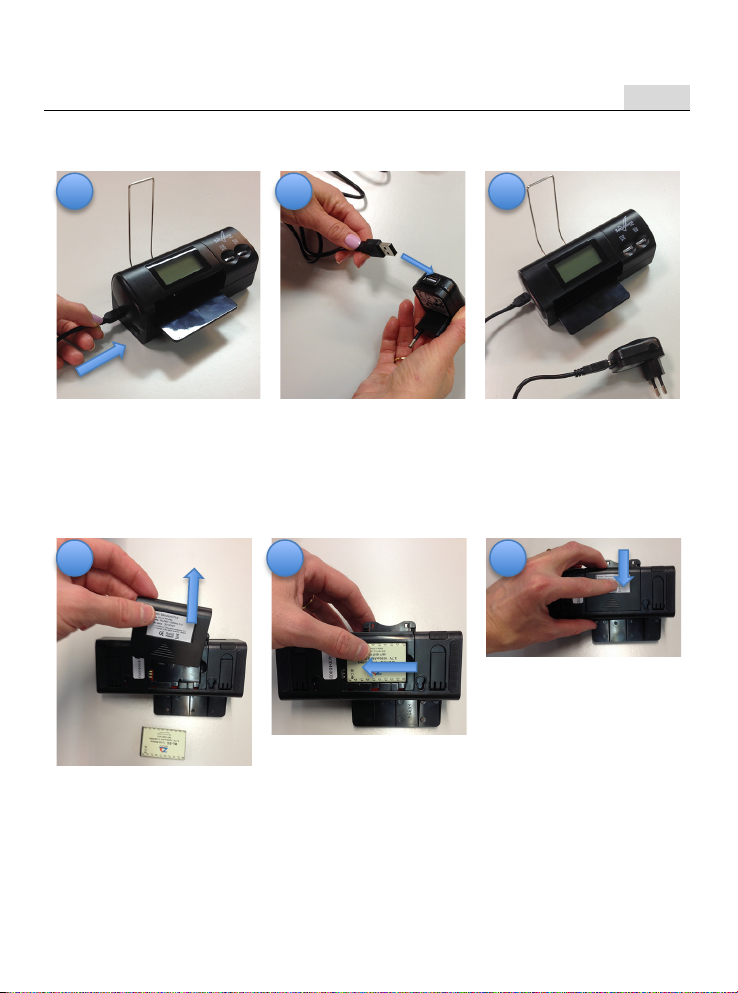
3.3. Connecting the power source.
!!!
• Connect the USB
cable to the device.
• Connect the other
side of the USB
cable to the PC USB
port or to the
adapter USB port.
• If you are using the
adapter, plug in to the
nearest socket.
3.4. Battery charging (optional)
!
!
!
• Open the battery
compartment cover.
• Put he battery inside
the compartment,
make sure the
connectors are in the
right way.
• Put the cover back
again.
1!2!3!
1!2!3!
Page 10
Secureuro Plus – User manual
EN
!
Página 9
4. Operating device placement.
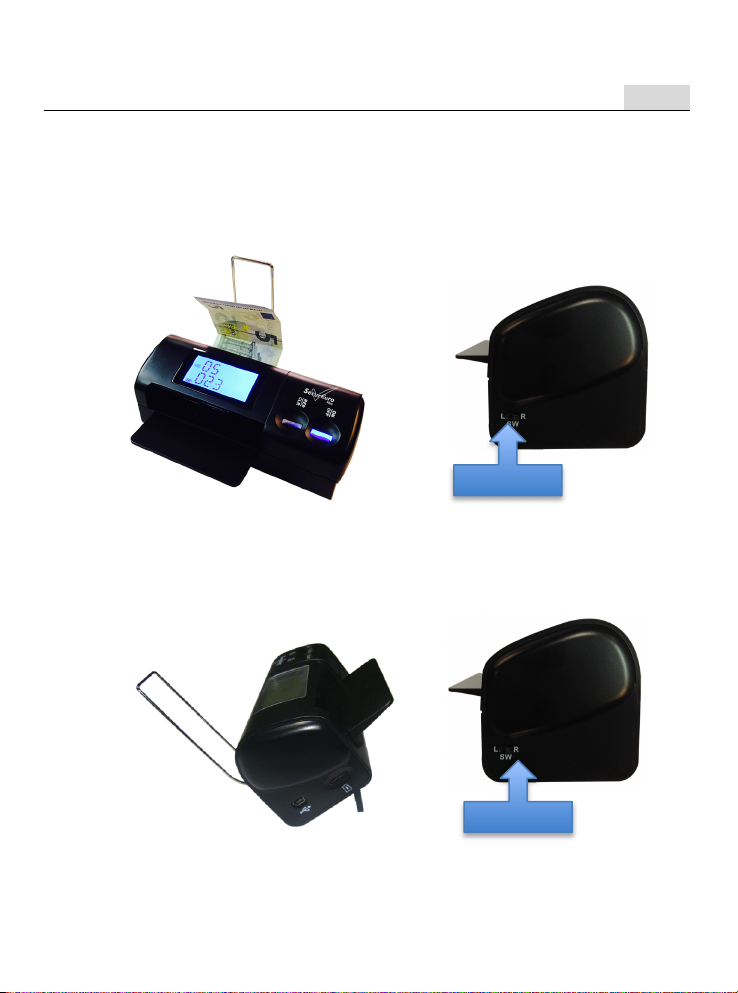
The machine can be placed flat, or slant, or hanging on the wall while
working, user can choose it according to own needs.
4.1. Desktop mode (typical).
!
!
!
Set the screen rotation switch to “L”.
!
4.2. Slant mode.
Open the underprop foot, then set the screen rotation switch to “R”.!
!
!
L position
R position
Page 11
Secureuro Plus – User manual
EN
!
Página 10
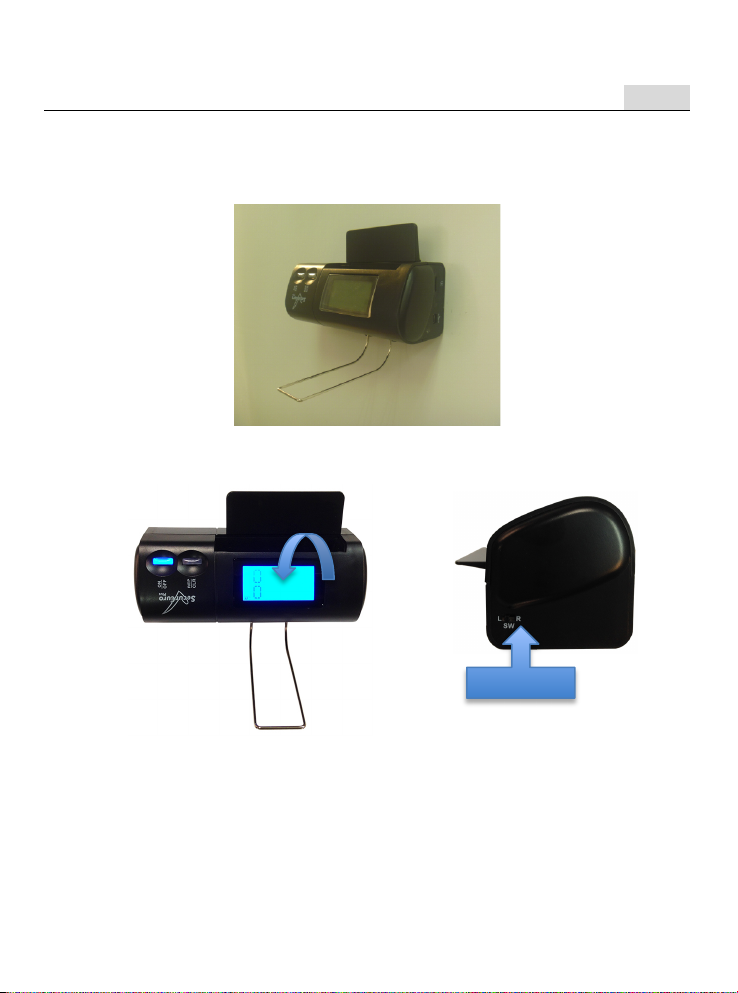
4.3. Wall-mounted.
Hang the machine on the wall first by holding on the holes of the
bottom.
!
Set the screen rotation switch to “R”.
!
!
R position
Page 12
Secureuro Plus – User manual
EN
!
Página 11
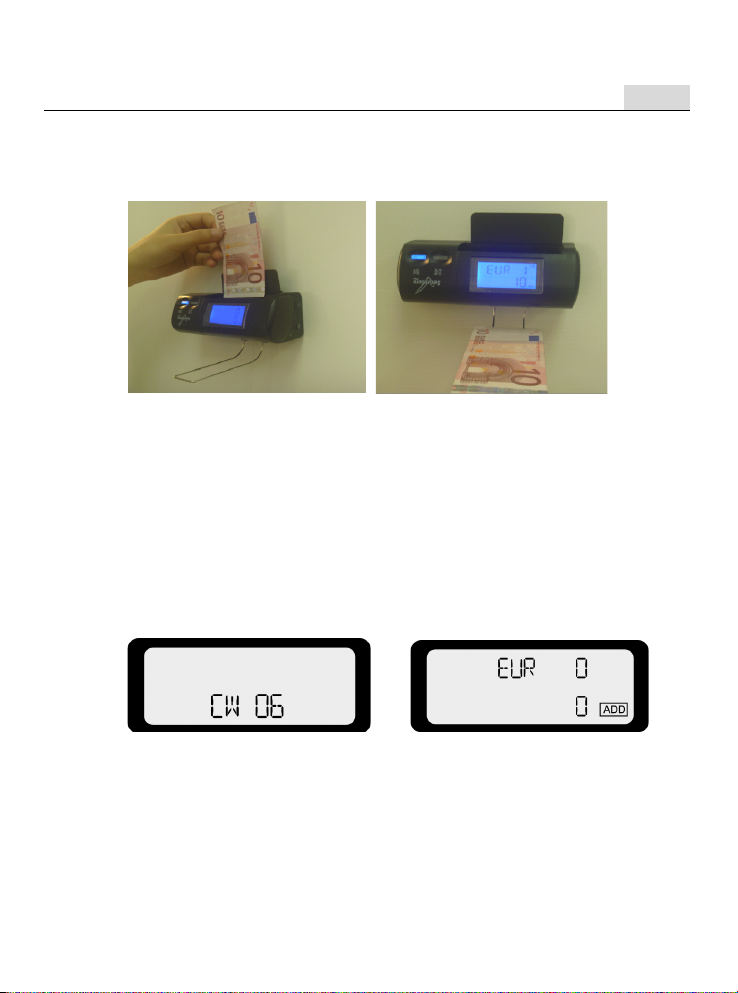
After detection, the banknote will fall onto the receiving steel bracket.
This mode is helpful for saving space for the user.
!
5. Operation.
!
5.1. Switching ON/OFF the device.
By pressing “ON/OFF” button and holding on for about 2 seconds,
the user can turn ON/OFF the machine. The ON/OFF indicator
lights up and self-test will start after turning on the detector. If the
self-test is successful, the display window will display the software
version (see the left picture bellow). Next the symbol of Euro
banknote “EUR” and two “0” will be displayed (See right the picture
bellow).
! !
! !
Page 13
Secureuro Plus – User manual
EN
!
Página 12
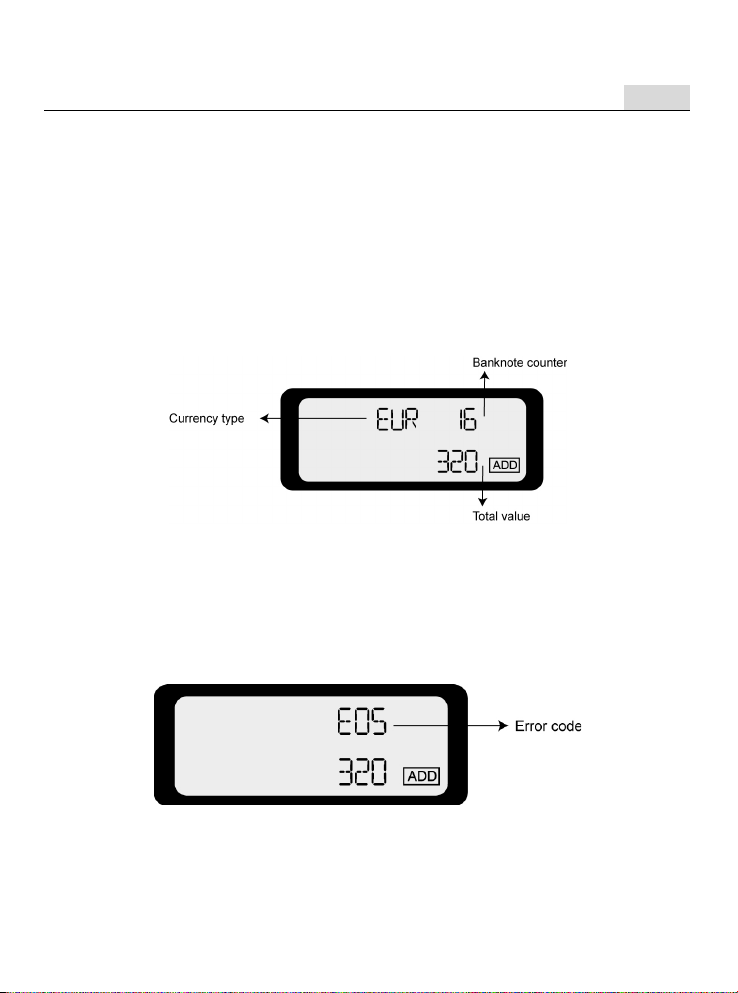
5.2. Detection.
When you pass a banknote, please keep it vertical to the feeding
port, when the machine detects an insertion of a banknote in the
feeding port, it will automatically display the currency type. If the
banknote is a genuine one, the number of sheets will be increased
by one and the total value will be added with the current value, then
the banknote will go out at the exit. When the number of sheets is
beyond 99 or the total value is beyond 99999, the data will be
automatically set to zero.
!
!
!
If the banknote is a suspicious one, it will go out at exit with 3
beeps, and at the same time the red light of “ON/OFF” button will
glint, corresponding error code will be displayed on the display
window (see the picture bellow). The error codes are listed at the
troubleshooting section (number 4).
!
!
! !
Page 14
Secureuro Plus – User manual
EN
!
Página 13
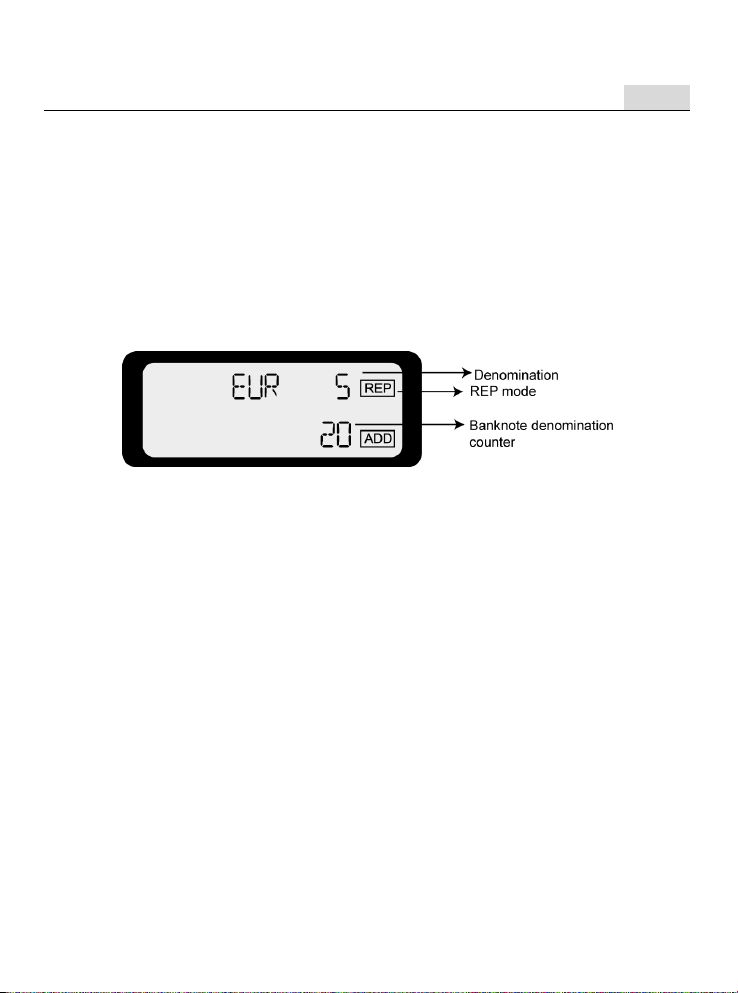
5.3. REP/CLR button.
After finishing detection, press “REP/CRL” key to enter to report
mode. When checking the banknotes detection record, it is possible
to press “REP/CRL” button again and again to display records for
different denomination and its pieces by turns. When checking the
record, if you feed a banknote, the detector will automatically exit
the report condition.
Press “REP/CRL” button and hold it for 2 seconds to clear records.
5.4. Power saving mode
• The detector will enter power sleep mode after 5 minutes
of idling to save power. The information on the display
window will turn off and only the blue ON/OFF indicator
glint once every 5 seconds.
• If the detector is connected to the external power supply,
it will keep in sleep mode all the way.
• The machine can be waken up and return to working
mode by touching any button or feeding a banknote.
• When the detector is idle for more than 15 minutes with
only built-in battery, it will power off automatically to save
power.
Page 15

Secureuro Plus – User manual
EN
!
Página 14
5.5. Battery status message
• The battery status is displayed on the battery information
indicator. A solid symbol means the battery is full and an
empty symbol means low battery warning to remind the
user that the battery needs to be charged or the user
should turn off the banknote detector. If the battery is too
low, “pwrlo” will be displayed on the display window and
the detector will turn off automatically.
• Connecting the detector to the external power supply or
PC, it will be charged automatically, when the symbol is
flashing and changing from empty to solid, it means the
battery is being charged.
• If the detector doesn´t have the built-in battery status
won´t be displayed.
Note.-The battery lasting time (fully charged) in continuous
working mode is from 120 to 150 minutes. Estimated battery
life 300 charges approximately. 10 hours charging time
approximately (with the battery totally discharged.
Page 16
Secureuro Plus – User manual
EN
!
Página 15
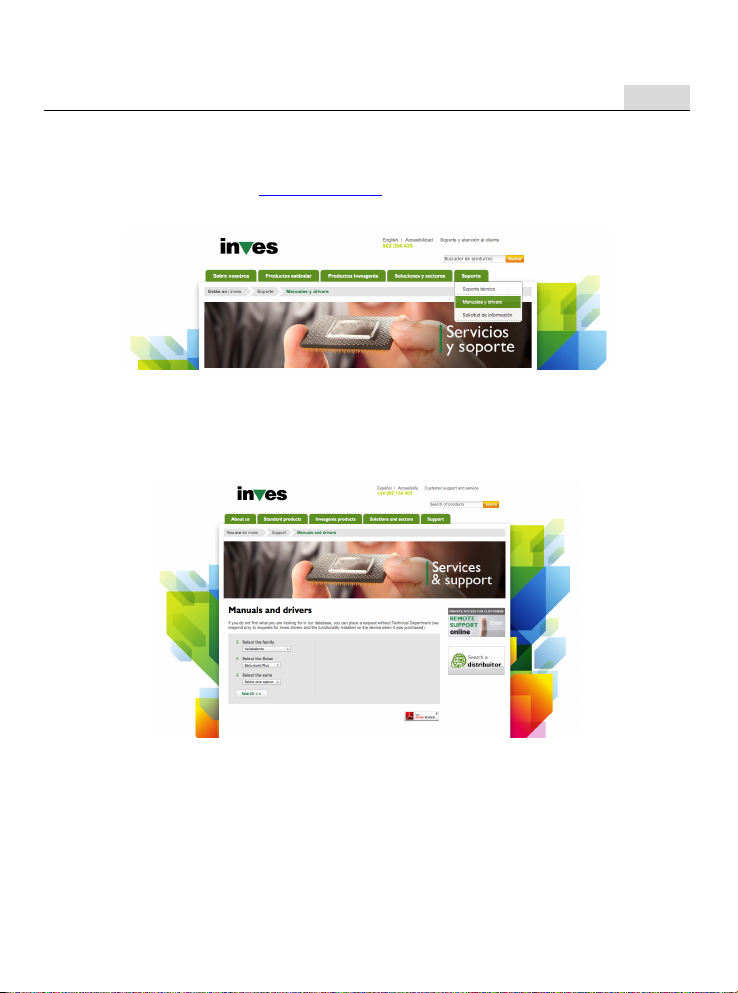
5.6. Software updating
1. Visit the url www.inves.es select the support/manuals &
drivers menu option.
2. In the family combo box choose “validadores” and in the scale
combo box select “Secureuro Plus”, Then press the “Search”
button. The latest firmware version will be displayed in order
to be downloaded.
3. Download the compressed updating package and
decompress it.
Page 17
Secureuro Plus – User manual
EN
!
Página 16
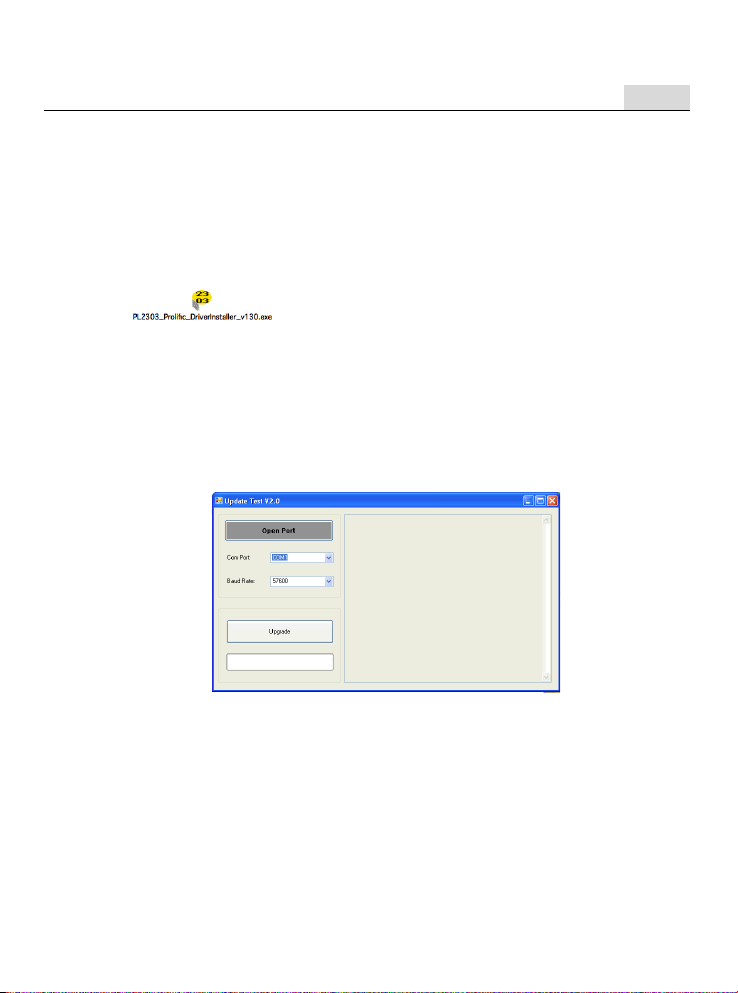
4. Open the file “PL2303_Prolific_DriverInstaller_v130.exe”
included in the updating package (as long as you hadn´t
installed in previous occasions), this file installs the driver to
make the operating system capable of recognise and
communicate with the device connected to the PC to the USB
port (with Windows operating system).
5. Make sure the device has been turned off, then connect the
device to the PC USB port (with the cable included). The
device will be detected after a few seconds and will keep
installed in a communication port.
6. Open the file Update TestV2.0.exe, the following window will
be displayed.
Page 18
Secureuro Plus – User manual
EN
!
Página 17
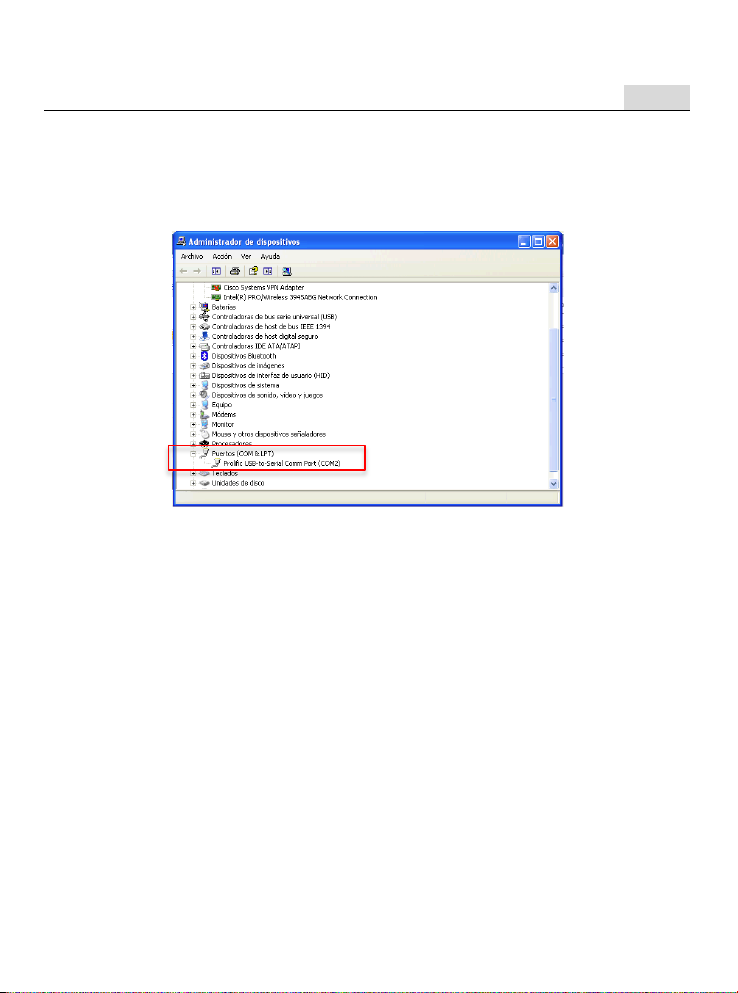
7. Check through the control panel menu / hardware item the
port where the device has been installed (the example shows
the device installed in the COM2 port).
Page 19
Secureuro Plus – User manual
EN
!
Página 18
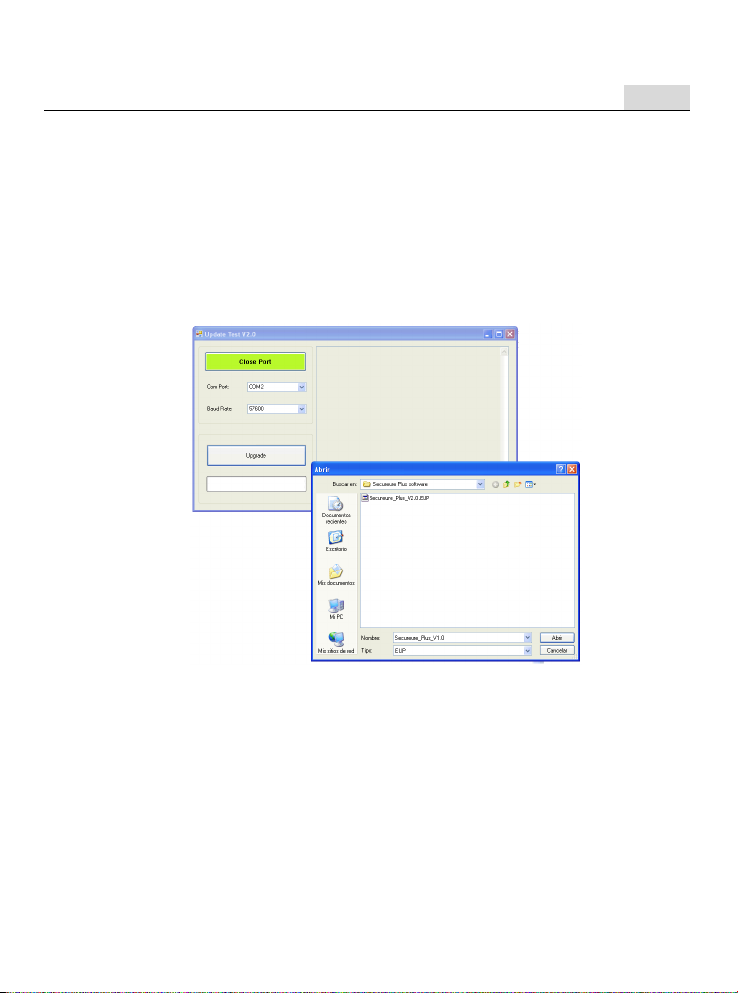
8. Select the COM port where the device has been installed (if
the selected port is the correct one the button will light in
green colour), after pressing the “Upgrade” button, select the
downloaded firmware update version (the file has the EUP
extension, the version in the example may have nothing to do
with the downloaded one, in the website you will find the latest
version available).
Page 20
Secureuro Plus – User manual
EN
!
Página 19
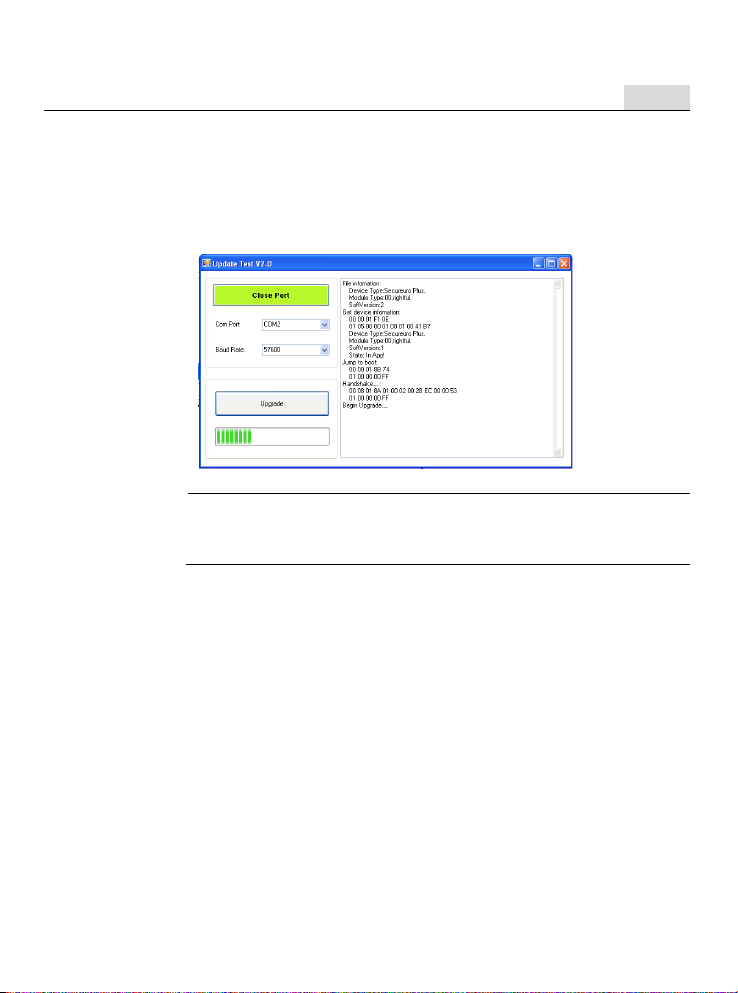
9. Press the button “Upgrade” the firmware version will be
installed and ready to work in a few seconds, every time the
device will be turned on the screen will show the firmware
new version.
Note.
The downloaded package will include a txt file with the
installation instructions.
Page 21

Secureuro Plus – User manual
EN
!
Página 20
6. Troubleshooting
6.1. Self-test error code display
The detector automatically performs a self-test after power
on. If one of the following error messages is displayed on the
display window it is probable that the sensor is blocked by
banknotes or dust. Please use a soft brush or a piece of soft
cloth to clean the dust on the sensor or remove the
banknotes, and then restart the machine.
Error codes list during the post.
Error message
display
Error type
P01
Top left sensor failure.
P02
Top right sensor failure.
P03
Bottom left sensor failure.
P04
Bottom right sensor failure.
P05
Feeding sensor failure.
P06
Banknote size sensor failure.
P09
Banknote left passing sensor failure.
P10
Banknote right passing sensor failure.
P11
Banknote middle passing sensor failure.
P12
System parameter failure.
Page 22

Secureuro Plus – User manual
EN
!
Página 21
6.2. Detection error codes display
If one of the following error codes is displayed on the display
Windows during the course of detection, you can handle
them as per the error type after the device is stopped.
Error codes list during the detection.
Error message
display
Error type
E01
Paper length error.
E02 / E03
Magnetic feature error.
E04 / E05
IR (infrared) feature error.
E06
Paper thickness error.
E07
Slant Banknote error.
E08
Hologram error.
E09 / E10 / E11 / E12
Paper quality error.
E20
Banknote passing error.
6.3. Important notices.
If the machine keeps alarm or Works abnormally, check the
following:
• Whether the main power supply is within specified range
(AC 100V-240V / 50-60Hz).
• Whether the DC output is within specified range: DC
5V+/- 5%
• Whether the supply plug is well connected.
• Whether the built-in battery is sufficient to work.
• Keep away from strong magnetic affection.
Page 23

Secureuro Plus – User manual
EN
!
Página 22
Please smooth the banknote before detecting, and the
obverse of the banknote must be put straight while it is being
inserted.
7. Maintenance
This device is a precise financial detecting equipment that need
periodic maintenance.
• Periodically check the voltage of the power supply to ensure
that the voltage is within the specified range.
• Keep the banknote detector in ventilated place and beyond
insolating and magnetic field.
• Do not attempt to disassemble the detector by yourself.
• To extend the battery life (optional) you must charge it
completely before using it.
Page 24

Secureuro Plus – User manual
EN
!
Página 23
8. Technical specifications
Detection methods:
Magnetism, infrared, Image, paper
quality, paper thickness.
Dimensions:
70 (depth) x 166 (width) x 65mm
(height).
Power:
AC100V-240V 50/60Hz or DC5V/1.0A.
Operating temperature:
0-40ºC.
Storage temperature:
-20-65ºC.
Battery (optional):
Rechargeable Lithium 3.7V/1050mAH.
Battery capacity 120-150 minutes
approximately, in continuous working
state. Charging time 10 hours
approximately.
Consumption:
<5W.
Banknote validation speed:
<0.5sec/banknote.
Weight:
305g.
*The specifications are subject to change without further notice.
Page 25

Secureuro Plus – User manual
EN
!
Página 24
If the product doesn´t work properly after following the pieces of
advice included in this guide, please get in touch with the customer
service.
Phone.: +34 902 193 291
Send us your doubts and questions to the following email address:
Customer service timetable: from Monday to Friday,
from 8:00 to 20:00, excluding national holiday (Spanish
time zone).
You can look up or download the latest product information and
download the latest firmware updating by visiting
www.inves.es/secureuroplus.
Page 26

Page 27

Page 28
www.inves.es/secureuroplus
 Loading...