

Inverto Volks, VolksBox, IDL 6640n User Manual
IDL 6640n Essential
Hybrid HD+ Receiver
TM

LANGUAGE
English
German
1
25

Hybrid HD+ Receiver
User Manual
IDL 6640n Essential

En
1
Table of Contents
Notices 2
Before using the product 4
Remote Control 6
Setup 7
The Installation Wizard 8
Basic Operation 10
The Main Menu 13
HbbTV Applications 14
Connecting external USB devices 14
Program Guide (EPG) 14
Control Panel 15
Channel Lists Editing 19
Technical Specications 20
Troubleshooting 22
Warranty, service and support 23
2
COPYRIGHT (Copyright © 2011 Inverto Digital Labs )
Not to be copied, used or translated in part or whole without Inverto prior consent in writing except approval of
ownership of copyright and copyright law.
WARRANTY
This warranty does not cover parts which may become defective due to misuse of the information contained in
this manual.
Read this manual carefully and make sure you understand the instructions provided. For your safety, be aware of
the following precautions.
WARNING! IMPORTANT SAFETY INSTRUCTIONS
CAUTION: TO REDUCE THE RISK OF ELECTRIC SHOCK, DO NOT REMOVE COVER (OR BACK). NO
USER SERVICEABLE PARTS INSIDE. REFER SERVICING TO QUALIFIED SERVICE PERSONNEL.
WARNING
To reduce the risk of re or electric shock, do not expose this apparatus to rain or moisture.•
Batteries shall not be exposed to excessive heat such as sunshine, re or the like.•
CE MARK FOR EUROPEAN HARMONISED STANDARDS
The CE mark which is attached to these products means it conforms to EMC Directive (89/336/EEC) and
Low Voltage Directive (73/23/EEC).
WEEE CONSUMER NOTICE
The Inverto Digital Labs S.a.r.l. product you have purchased is subject to Directive 2002/96/EC of
the European Parliament and the Council of the European Union on waste electrical and electronic
equipment (WEEE) and, in jurisdictions adopting that Directive, is marked as being put on the
market after August 13, 2005, and should not be disposed of as unsorted municipal waste. Please
utilize your local WEEE collection facilities in the disposition of this product and otherwise observe
all applicable requirements. For further information on how to properly dispose of your product
and for information specic to your country, please contact your vendor or visit the "Support" section of our
website: www.inverto.tv/support
OPEN SOURCE SOFTWARE NOTICE
the product uses certain open source operating system software distributed pursuant to GNU GENERAL PUBLIC
LICENSE version 2 and GNU LESSER GENERAL LICENSE version 2.1 each as dened and published by the free
software foundation, inc. the following gpl and lgpl software source codes used in this product can be provided.
GPL software
linux kernel
busybox
gzip
libgcc, libstdc++
LGPL software
wedison, cairo
ffmpeg
visit our website - www.inverto.tv - to view the full terms of the GNU GENERAL PUBLIC LICENSE (GPL) and the
GNU LESSER GENERAL PUBLIC LICENSE (LGPL).
WEB and Internet-based Applications
Web content and Internet-based services and applications are provided by third parties and can be terminated at
any time without any notice.
IMPORTANT INFORMATION
Should you experience a problem with this unit, please refer to the trouble shooting section of this user •
manual.
Please retain the original packaging, should it be necessary at some stage to return the unit.•
Disposal of Old Electrical and Electronic Equipment (Applicable in the European Union and other European
countries with separate collection systems)
This symbol on the product or on its packaging indicates that this product shall not be treated as household waste.
Instead it shall be handed over to the applicable collection point for the recycling of electrical and electronic
equipment. By ensuring this product is disposed of correctly, you will help prevent potential negative consequences
for the environment and human health, which could otherwise be caused by inappropriate waste handling of this
product. The recycling of materials will help to conserve natural resources. For more detailed information about
recycling of this product, please contact your local Civic Ofce, your household waste disposal service, or the shop
where you purchased the product.
Notices

En
3
COPYRIGHTS
Television programmes, movies, video tapes, discs, and other materials may be copyrighted. Unauthorized
recording of copyrighted material may be against the copyright laws in your region. Also, use of this product with
cable television transmissions may require authorization from the cable television operator or transmitter/owner.
CAUTION: PREVENTION OF SCREEN BURN-IN
Continuous display of still images and graphics, such as on-screen displays, stock market tickers, and other
xed (non-moving) patterns can cause permanent damage to the television. Plasma screen displays, projection
televisions, and CRT televisions are especially susceptible to this.
ABOUT THIS MANUAL
Instructions in this manual describe the operation using the controls on the remote. You can also use •
the corresponding controls on the front panel with the same markings.
The on-screen display illustrations used in this manual may not match the graphics displayed on your •
television exactly.
TRADEMARKS
Manufactured under license from Dolby Laboratories. ‘Dolby’ and the ‘double-D’ symbol are trademarks of Dolby
Laboratories.
SAFETY PRECAUTIONS
This digital video receiver has been manufactured in accordance with international safety standards. For your own
safety, you should read the notes on safety precautions carefully, and take note of them, before operating your new
receiver. For your own safety, please be sure to follow these safety precautions.
This product is for indoor use in moderate climates only.•
This product contains no user serviceable parts. The unit should only be opened or repaired by qualied •
service personnel.
The supplied AC power cable must be used to power this product. If the power cord becomes damaged, •
it must be replaced. Always refer to qualied personnel.
Check to make sure operating voltage of the product is identical with your local power supply, prior to •
connecting it to the power socket.
To prevent re or shock hazard:•
- Do not expose the apparatus to dripping or splashing.
- Do not place objects lled with liquids, such as vases, on the apparatus.
Install the product so the AC power cable can be unplugged from power socket immediately, in the •
event of a problem.
The unit should not be placed near sources of open ame. No open ame sources, such as candles, •
should be placed on the unit.
Should any solid object or liquid fall into the cabinet, unplug the product and have it checked by qualied •
personnel before operating it any further.
Proper grounding: For protection from lightning and static discharge the antenna connected to this •
receiver must be connected to earth ground. The proper grounding can be achieved by connection to
the earth ground system of your house/building, or by a qualied installer.
VENTILATION
Do not expose the product to high temperatures, such as placing it on top of other product that produce •
heat or in places exposed to direct sunlight or spot lights.
The ventilation slots on top of the product must be left uncovered to allow proper airow into the unit. •
Do not stand the product on soft furnishings or carpets. Do not stack electronic equipments on top of
the product.
Do not place the product in a location subject to extreme changes in temperature. The temperature •
gradient should be less than 10 degrees C/hour.
Place the product in a location with adequate ventilation to prevent the build-up of heat inside the •
product. The minimum ventilation space around the unit should be 7 cm. The ventilation should not
be impeded by covering the ventilation openings with items, such as newspapers, table cloth, curtains,
etc.
POWER SOURCES
The product is not disconnected from the AC power source (mains) as long as it is connected to the •
power outlet or wall socket, even if the product is turned off.
If the product will not be used for a long period of time, disconnect it from the AC power outlet or wall •
socket.
4
Before using the product
This chapter provides detailed description of the product and its accessories.
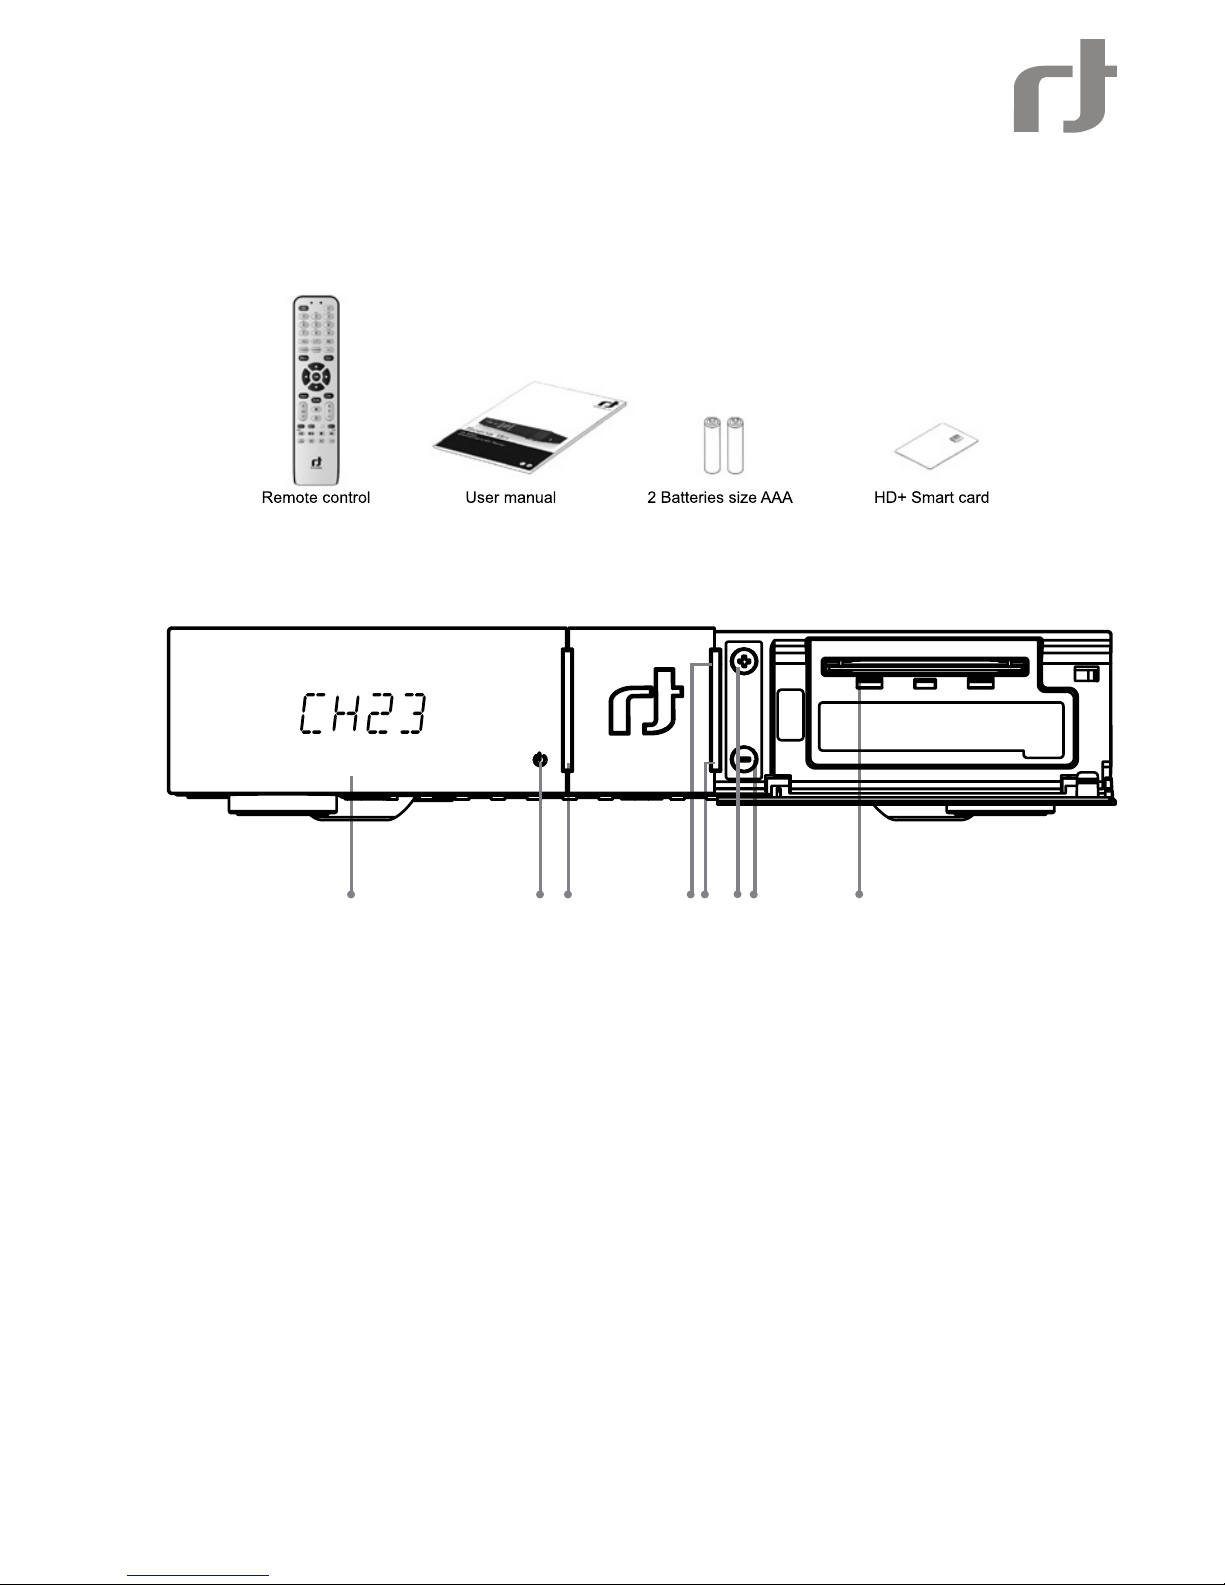
PACKAGE CONTENT
FRONT PANEL
1. 4-character LED display
2. Standby indication LED
3. Standby key - Switches between operation and standby modes.
4. Channel Up key
5. Channel Down key
6. Channel Up indication LED
7. Channel Down indication LED
8. CA Interface - A slot for one smart card
1 3 4 5 7
8
2
6
Menu
Exit
En
5
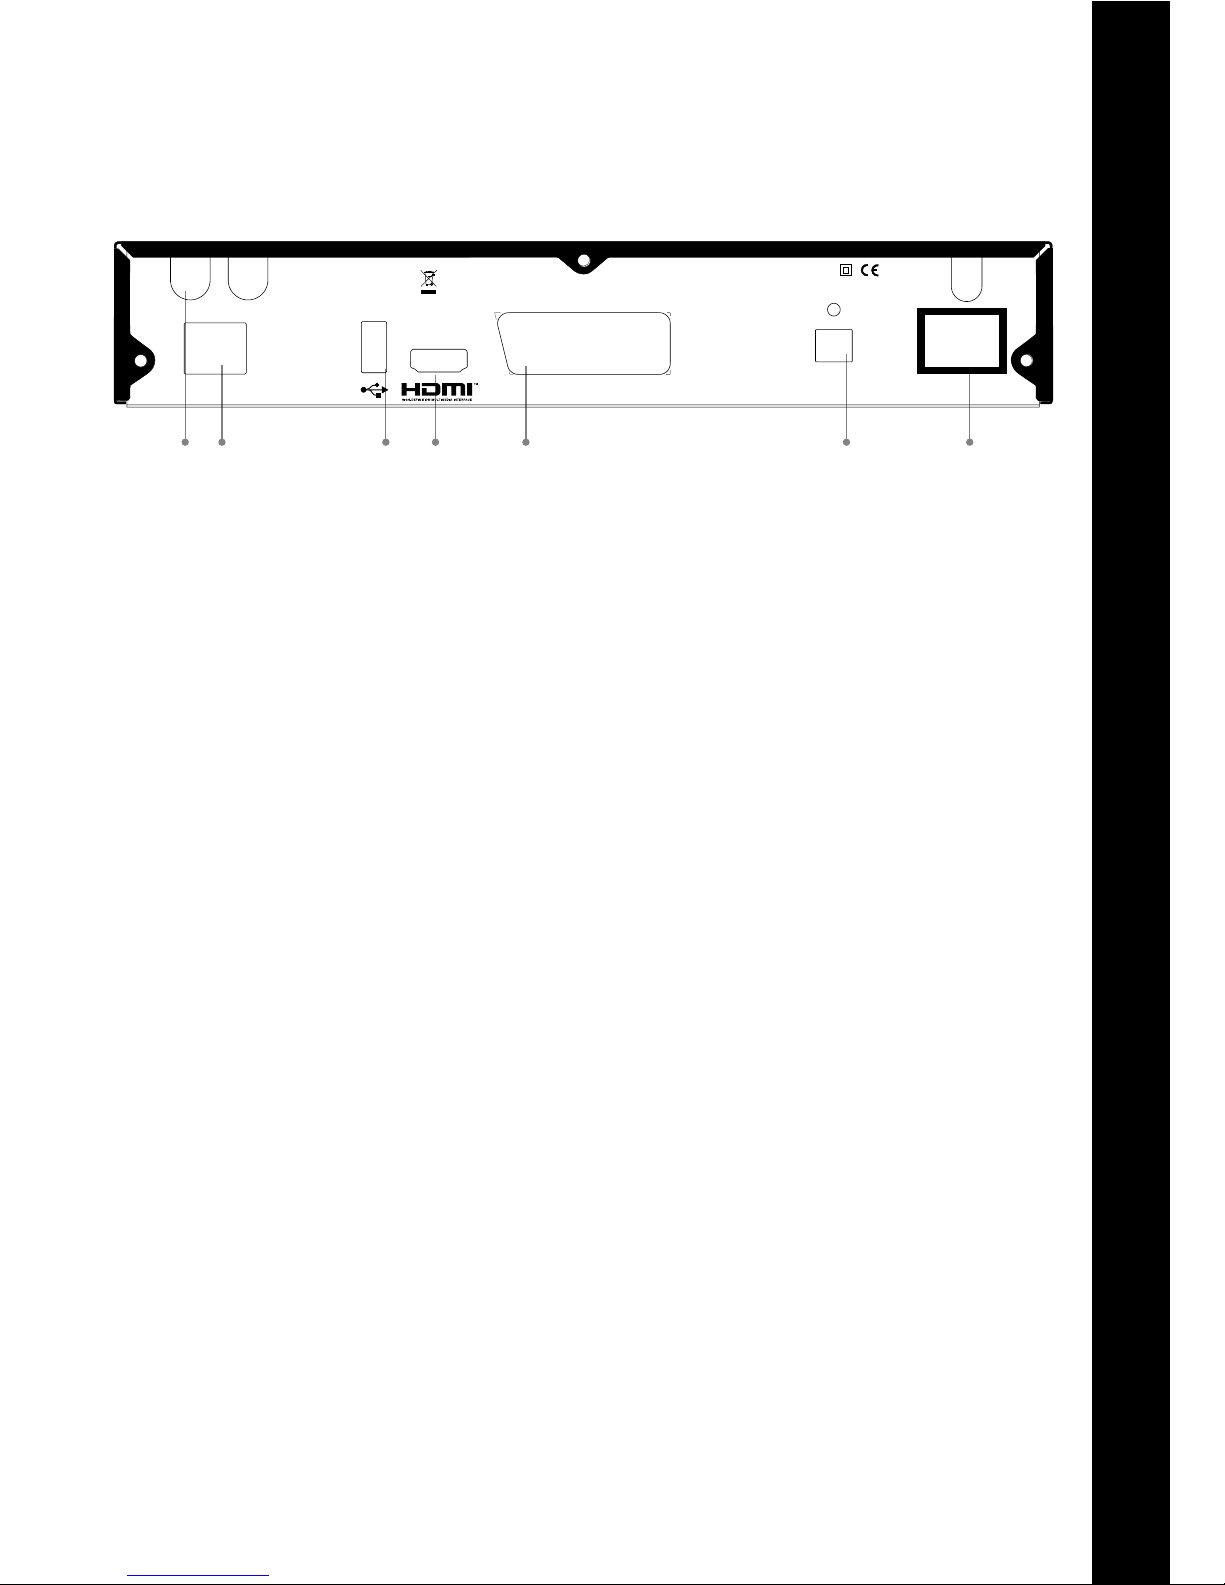
REAR PANEL
12 45 673
TV
LNB
Out
LNB In
AC 230V~
50-60Hz
30W Max.
950-2150Mhz
13/18V
Max. 400mA
22Khz
Off On
Electrical shock hazard! Do not open! Elektroschock-Gefahr! Nicht öffnen !
Made in China
SPDIF
Optical
LAN
Manufactured under license from Dolby Laboratories. Dolby and the
double-D symbol are trademarks of Dolby Laboratories.
1. LNB In and LNB Out
LNB In Connects to the satellite antenna cable. LNB Out allows to connect to another digital receiver.
2. LAN (RJ45)
Connection to Local Area Network (LAN) at home.
3. USB Host
Connects to a USB devices.
4. HDMI
Connects to the TV using HDMI cable for High Denition signals.
5. TV SCART
Connects to a TV SCART cable. This connection supports Standard Denition TV resolutions only.
6. Digital audio, SPDIF optical output
Outputs digital audio signals (S/PDIF) for home cinema connection over optical connector.
7. On/Off switch
Powers on/off the receiver.
Note: The image shown may differ from the actual product
6
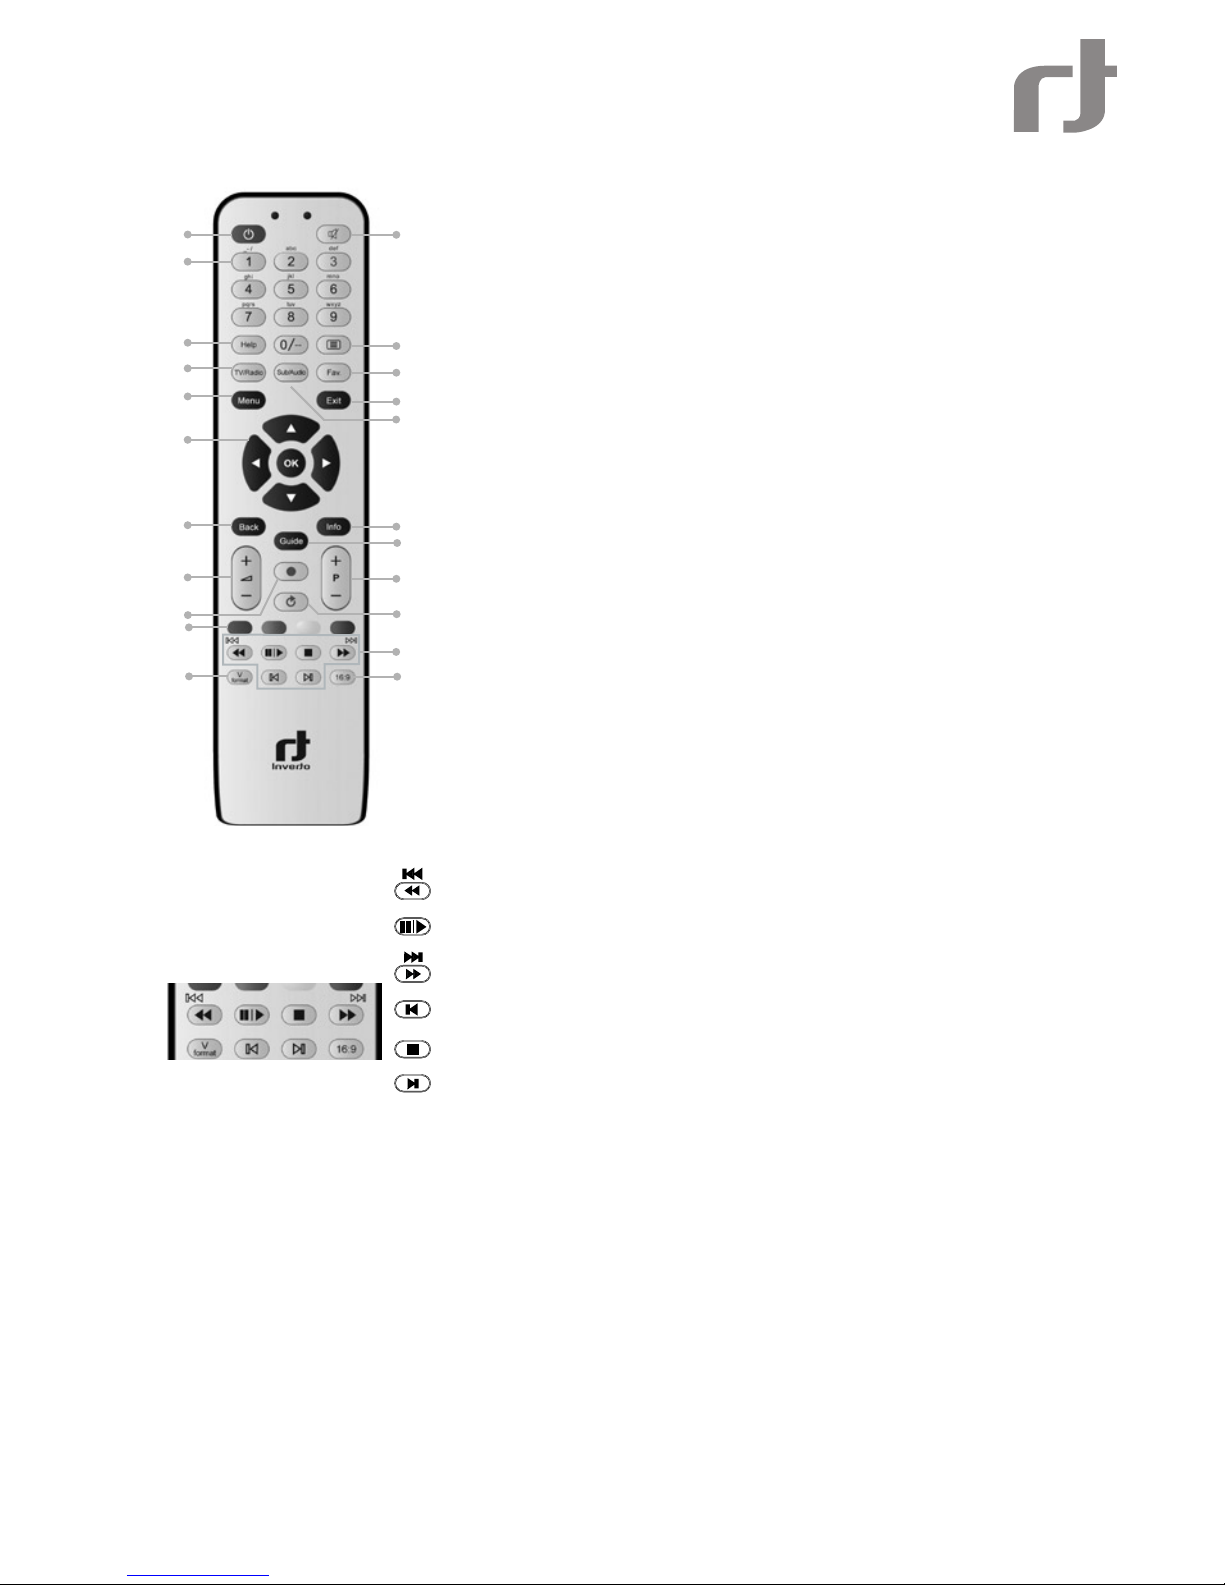
- Fast Rewind / Slow motion - press to change the speed
- Pause / Play - Pause during playback or live TV (Time shift)
- Fast Forward / Slow motion - press to change the speed
- Jumps backward during playback
- Stop
- Jumps forward during playback
BAT T E RIES
Batteries are required to operate the remote control (supplied with the unit). To insert the batteries, open the
battery compartment cover on the rear of the remote control. Insert the batteries (AAA size, 2 x 1.5V), by
matching the (+) and (-) markings on the batteries to the markings inside the battery compartment. Close the
compartment cover.
Notes
Spent batteries should not be discarded in your domestic refuse. In most countries, you are legally •
obliged to ensure spent batteries are properly recycled.Use the batteries correctly to avoid possible
leakage and corrosion. Do not touch the liquid with bare hands, should leakage occur.
Do not use a new battery with an old battery, or batteries of different manufacturers.•
Do not attempt to recharge the supplied batteries•
If battery leakage occurs, wipe out any liquid inside the battery compartment and insert new batteries.•
Using the Remote Control
For best results, point the remote control directly at the receiver while pressing keys•
Do not place the receiver in a location exposed to direct sunlight or bright uorescent lighting, as this •
may interfere with the receiver and cause it not to respond to the remote.
1 Standby – switches the receiver into standby mode
2 Mute – mutes the audio outputs of the receiver
3 Keypad – for user’s inputs
4 Teletext – launches the teletext browser
5 Help*
6 Fav* – selects the favorite list the user wants to be active
7 TV/Radio - displays the TV/Radio channel list
8 Exit – leaves the menu currently on screen
9 Menu – brings up the Main Menu on the screen
10 Subtitles/Audio – displays the list of available subtitle or soundtrack languages
11 Up, Down, Left, Right and OK – navigation and select keys
12 Info – displays detailed program information
13 Back - toggles through recently watched channels
14 Guide – displays the TV program guide
15 Volume up/down
16 Channel up/down
17 Record
18 Instant replay – replays the last 30 seconds (during playback or time-shift) also displays
content of connected USB storage device).
19 Color keys used for selection in On-Screen-Display menus
20 Playback navigation keys (see details below)
21 V-Format – selects the picture resolution
22 16:9 – sets the picture format to 16:9
*The functionality of this key is congurable under Preferences section of the Control Panel.
Remote Control
1
3
5
7
9
11
13
15
19
2
4
6
8
12
16
10
14
17
18
20
22
21

En
7
Setup
This section explains the most important functions to ensure that you can directly watch television with your new
digital receiver. Please note, additional adjustments may be required.
Note: Do not connect the digital receiver to the main power yet.
Connecting the Antenna and LNB (Low Noise Block) to the digital satellite receiver input
Connect the LNB on the satellite dish antenna directly to the digital receiver using the “LNB in” connector of the
receiver, by means of a coaxial cable. You may use the loop-through connector to connect to a second receiver.
Connecting the TV set
The digital receiver and TV set can be connected by means of a SCART cable (not supplied) or HDMI cable (not
supplied).
Simply connect the two ends of the cable you select to use in connecting the receiver to the TV set. The SCART
connection ensures that audio and video signals are transmitted to the TV set in optimum quality.
The HDMI connection is recommended for HD TV. In case the TV has a HDMI input connector, a special all-digital
interface that provides the highest picture quality, connect the product to the TV with the HDMI cable.
Connecting the Network
The receiver connects to the internet through the internet router or DSL/cable modem in your home. The receiver
can connect to the router or DSL/cable modem via the Ethernet interface or a dedicated USB Wi-Fi dongle adaptor
(not supplied) depending on the interfaces supported by your router or DSL/cable modem equipment.
1. Connecting via the Ethernet port:
Connect one end of the Ethernet cable to the receiver and the other end to the LAN port at the router or DSL/
cable modem.
2. Connecting via the USB Wi-Fi dongle adaptor
Set the options for the wireless connection settings under the Network section of the Control Panel (available
only when the USB WiFi dongle is connected):
Network Name (SSID): Select the network name of your Wi-Fi access point from the list.•
Security Type (WEP, WPA, WPA2): The receiver supports WEP 40/128bit ASCII, WEP 40/128bit HEX, •
WPA and WPA2. The settings of the security type of the Wi-Fi and the receiver shall be the same.
Password: When using the security type, you must set the password. Enter the same password in the •
Wi-Fi setting menu.
Note: To improve quality of service, keep the distance between the Wi-Fi access point and the receiver close.
Connection to a DVD recorder or video recorder
The DVD recorder or video recorder may be connected to the receiver via a SCART connection.
Note: The A/V output of the DVD recorder or VCR needs to be connected to the TV directly and cannot be
connected to the receiver.
Connection to a hi- system
The audio quality of digital TV and radio programmes can be enjoyed even more when reproduced through a hi-
audio system.
The receiver is equipped with an optical digital output. If your hi- system is equipped with an optical audio input,
you may use an optical cable to connect your hi- system to your digital receiver.
Connection to main power supply
After all the connections are done you can connect your digital receiver to power. Just before plugging a power
cable into the wall connector put the power switch, on the rear panel, in position 0 (off).
8
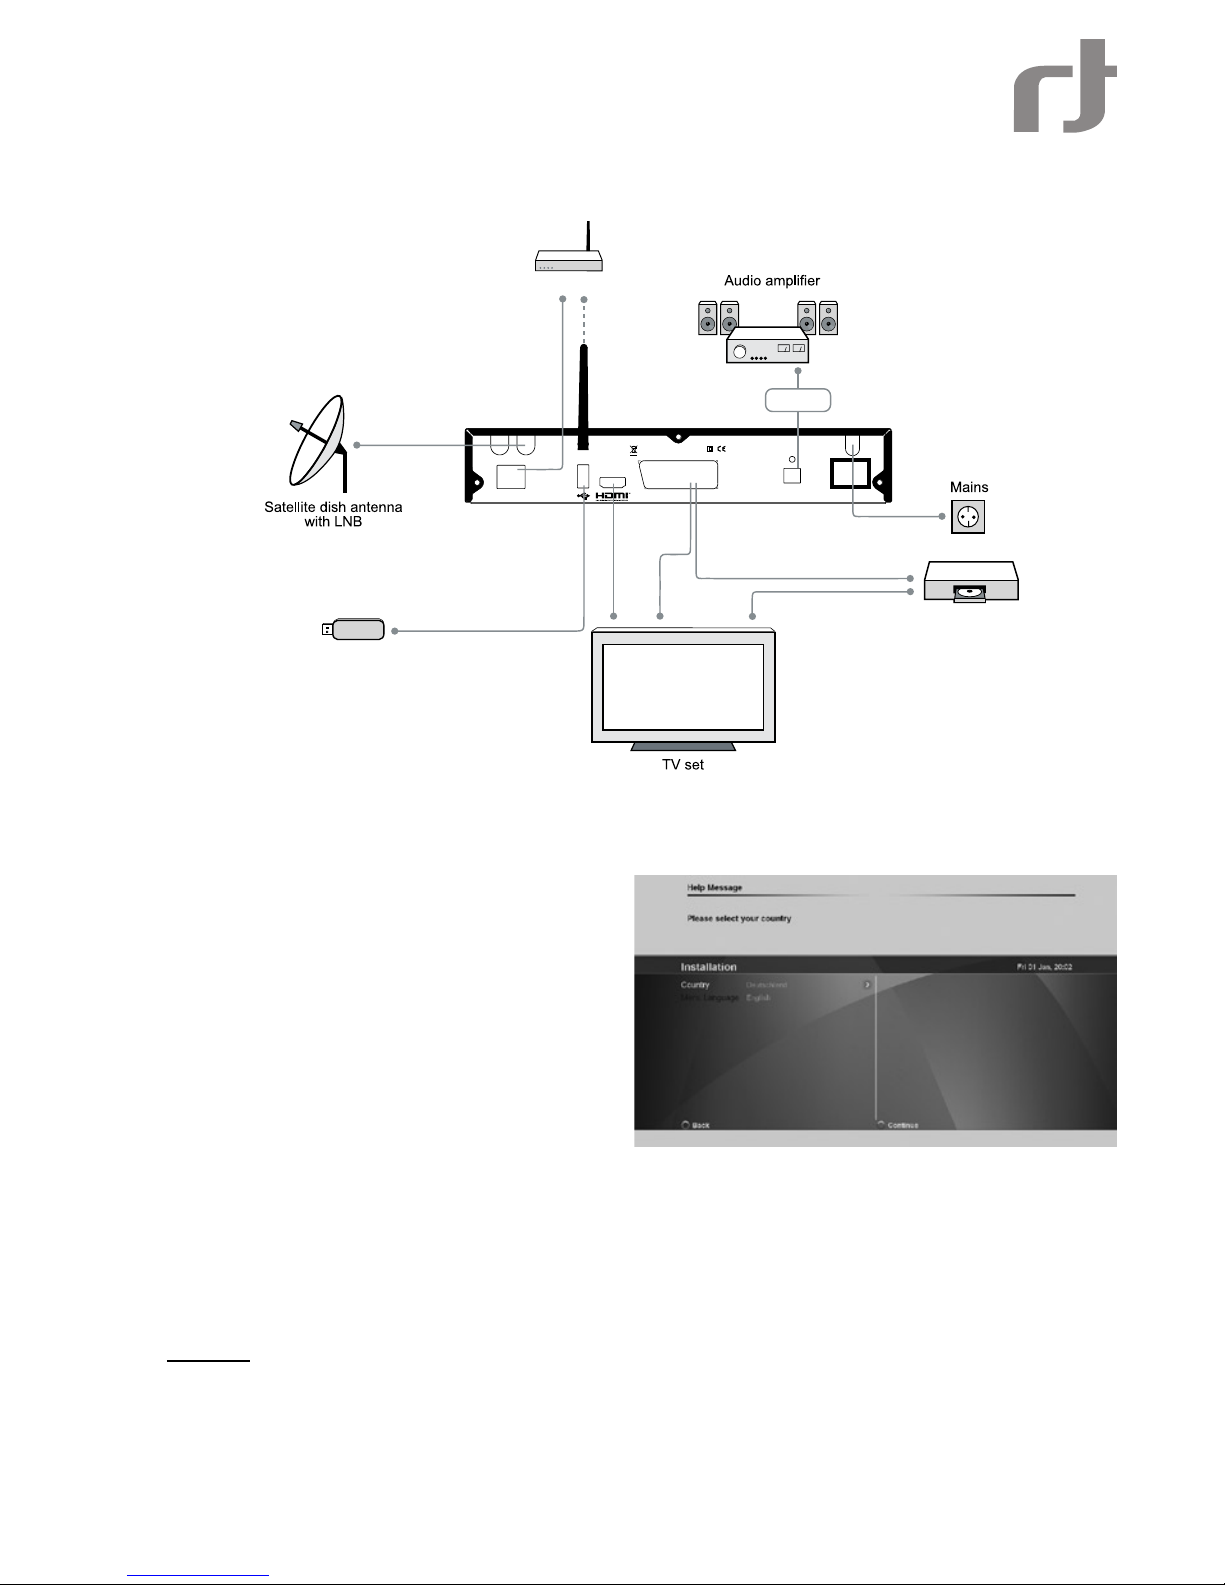
CONNECTION DIAGRAM
The Installation Wizard
The rst time you turn on the receiver, a “Quick Start
Guide” menu will be open to assist you with the initial
settings. This menu will also appear after you do a
Factory Reset.
Use the Green and Red keys on the remote control
to navigate forward or back through the wizard steps.
Press the OK button to edit a parameter and select its
value from the drop list that will appear on the right
side of the screen.
COUNTRY AND MENU LANGUAGE
This is where you can set your country and the menu language related parameters of your digital receiver. Select
the language to be used for all menus.
Note: This does not change the language for information about programs shown in the EPG.
Press the Green key on the remote control to continue to Antenna settings.
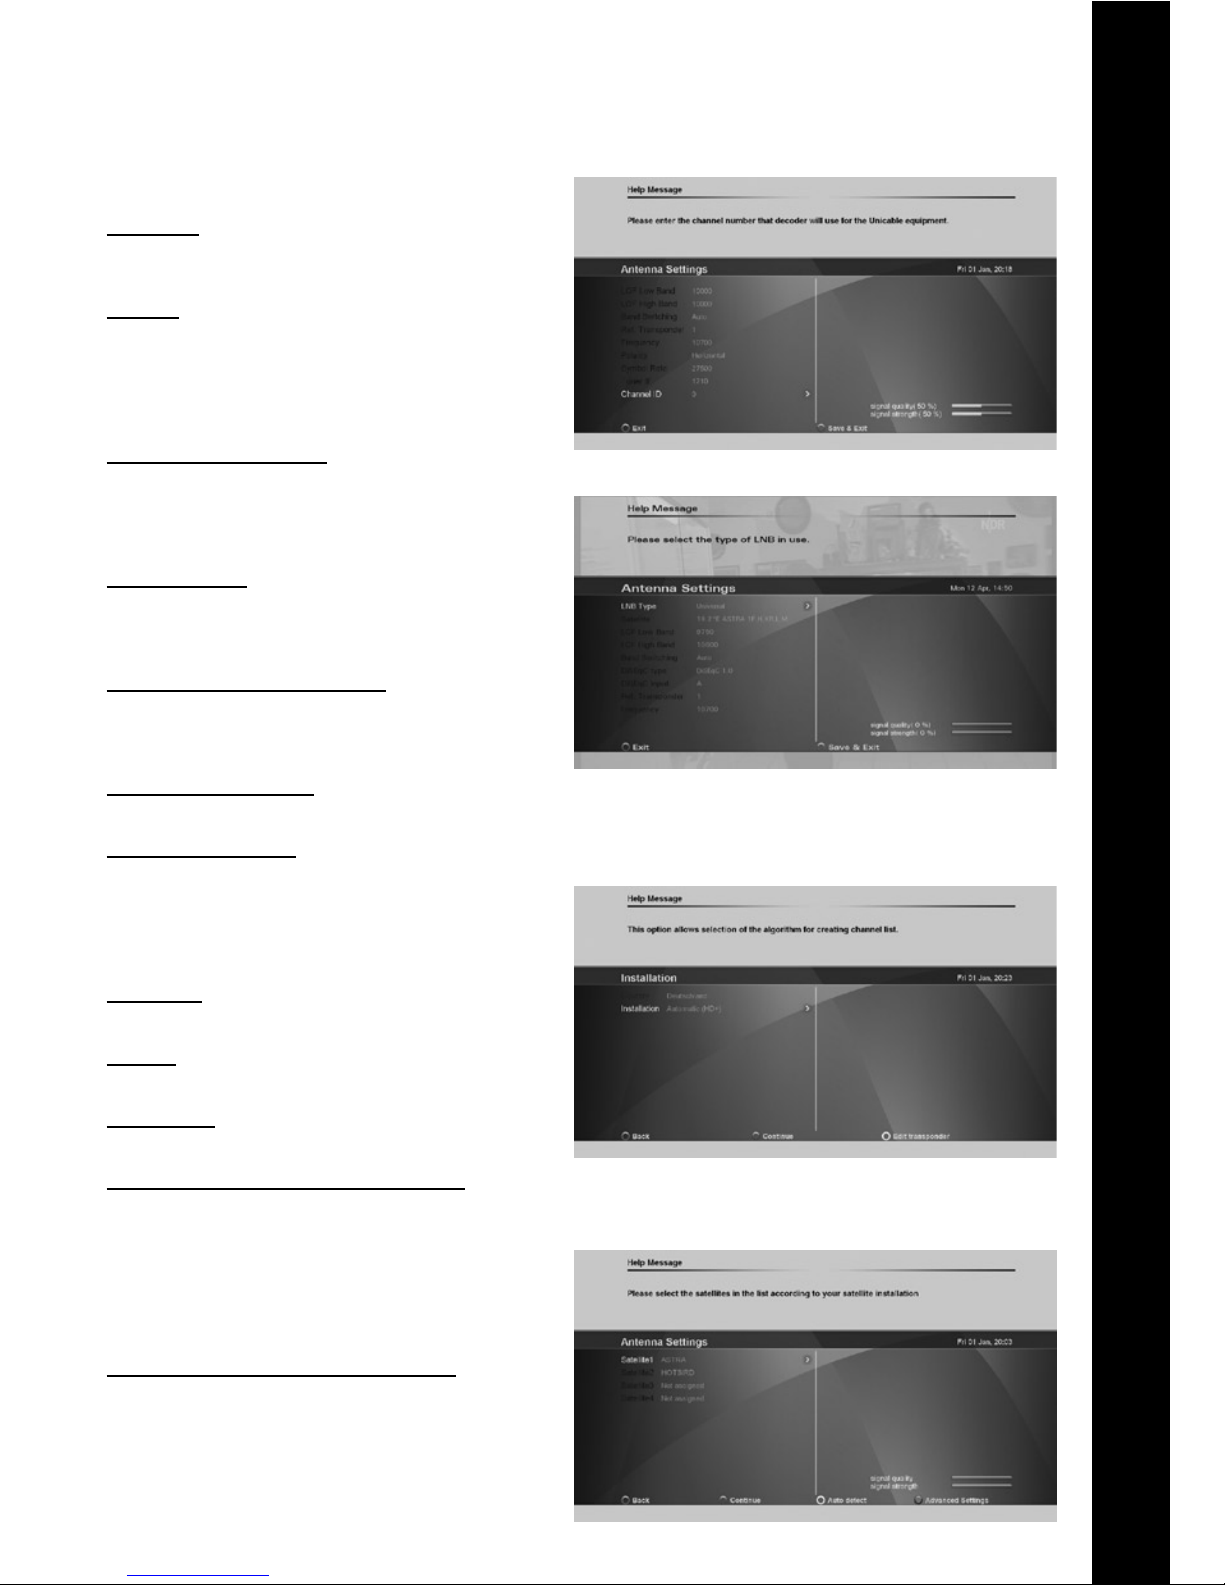
ANTENNA SETTINGS
Satellites
To set up the receiver for the type of antenna connected, follow the instructions below.
Select the satellites you wish to receive with the receiver. Each of the satellites in the built-in satellite list is
congured with predened default parameters. You may press the Blue button - Advanced settings - to edit these
values. See below details of the Advanced Settings.
TV
LNB
Out
LNB In
AC 230V
50-60Hz
30W Max.
Electrica l sh ock h azar d! Do not open !
Elektrosc hock -Gefa hr! Nicht öffnen !
950-2150Mhz
13/18V
Max. 400mA
22Khz
Off On
Made in China
SPDIF
Optical
WiFi
LAN
Home Network
USB devices
VCR/DVD recorder
Digital Audio
En
9
ADVANCED SATELLITE
SETTINGS
LNB Type Select Universal for most standard LNBs,
or Unicable if you have a Unicable LNB or Unicable
multiswitch.
Satellite
Use this option to select the satellite for which you
would like to set the position. Use the color keys on
the remote control, as shown at the bottom of the
screen, to delete or add a satellite from the satellite
list and set their individual settings.
LOF Low and High Band
The LOF (Local Oscillator Frequency) of the
LNB is usually printed on the LNB itself or in its
documentation. You can set the High and Low LOF
frequencies to match the LNB here.
Band switching
The receiver uses a 22kHz signal to control the band
of the LNB. If you do not know if your LNB supports
this feature, set the option to Auto.
DiSEqC type and DiSEqC input
You can connect up to two cascadable DiSEqC
switches to the receiver. This option allows you to set
the type and input port for each switch.
Reference transponder
This option allows you to set which transponder is used as the reference.
Transponder number
Use this option to select a transponder from the builtin transponder list. Once selected from the list, the
Frequency, Polarity and Symbol rate elds will be
updated accordingly. Alternatively you can set these
elds manually.
Frequency
Set the frequency of the reference transponder.
Polarity
Set the polarity of the reference transponder.
Symbol rate
Set the symbol rate of the reference transponder.
Tuner IF and Channel ID (Unicable only)
This option allows you to select the Unicable Tuner
IF frequency (also known as User Band frequency)
and the channel ID for the receiver. In a typical
Unicable installation, you are able to connect multiple
receivers to a single LNB or Multiswitch output, with
each receiver set to connect to a different Unicable
user band and channel ID.
Signal strength and signal quality bars
In two level bar meters, on the right side of the screen,
the user can see the strength and quality of the signal
coming from the antenna dish to the tuners. These
two meters can be used while doing a ne-tuning of
the antenna position. The antenna has to be adjusted
to have maximum possible signal strength and signal
quality.

10
CHANNEL SEARCH
In order to view video programs, you must rst do a
channel search. Select the search scheme you wish
the wizard to follow:
Select Automatic (HD+) to search for channels •
on HD+’s bouquets.
Select Satellite search to search for channels •
on all transponders for the selected satellite
Select Predened List to restore a predened •
channel list associated with the the Country you
have selected earlier. For some countries, a
default channel list is shared.
Finding and storing the channels
Once the options are set, press the “Green” key on the remote control to start the channel search. Once a channel
search is started, a progress bar and list of channels found will be displayed. At any time, you may stop the search
by pressing Exit on the remote control. After the channel search is complete, press the “Green” function key on the
remote control to save the channel list and exit.
Basic Operation
PROGRAM NAVIGATION
You can use the numeric keys on your remote control.•
You can use the directional keys “Up” and “Down” on your remote control or on the front panel of the •
receiver.
You can use the P+ and P- keys on your remote control•
Select your viewing list by pressing the “TV/Radio” or “FAV” key, select with the navigation key ”Left” or •
”Right” the programme list, and conrm the selection with “OK” key.
VOLUME CONTROL
Volume Control allows you to adjust the audio volume.
1. Press the Volume +/- key to adjust the audio volume.
2. Press the MUTE key to stop the audio temporarily.
Note: The mute function remains set while you switch channels.
PROGRAM INFORMATION (INFO-BANNER)
En
11
Program information is always displayed for a certain period of time whenever you switch channels. You can
view the program information by pressing the Info key while watching a program. Press the Exit key to hide the
info-banner.
1. Channel number and name
2. Use the Up and Down arrow keys of the remote control to change channels
3. Current program name and timeline
4. HbbTV web service notication - The icon appears when a web-based service is available along the
broadcast on this channel. Press the red color key on the remote control to launch the service on screen
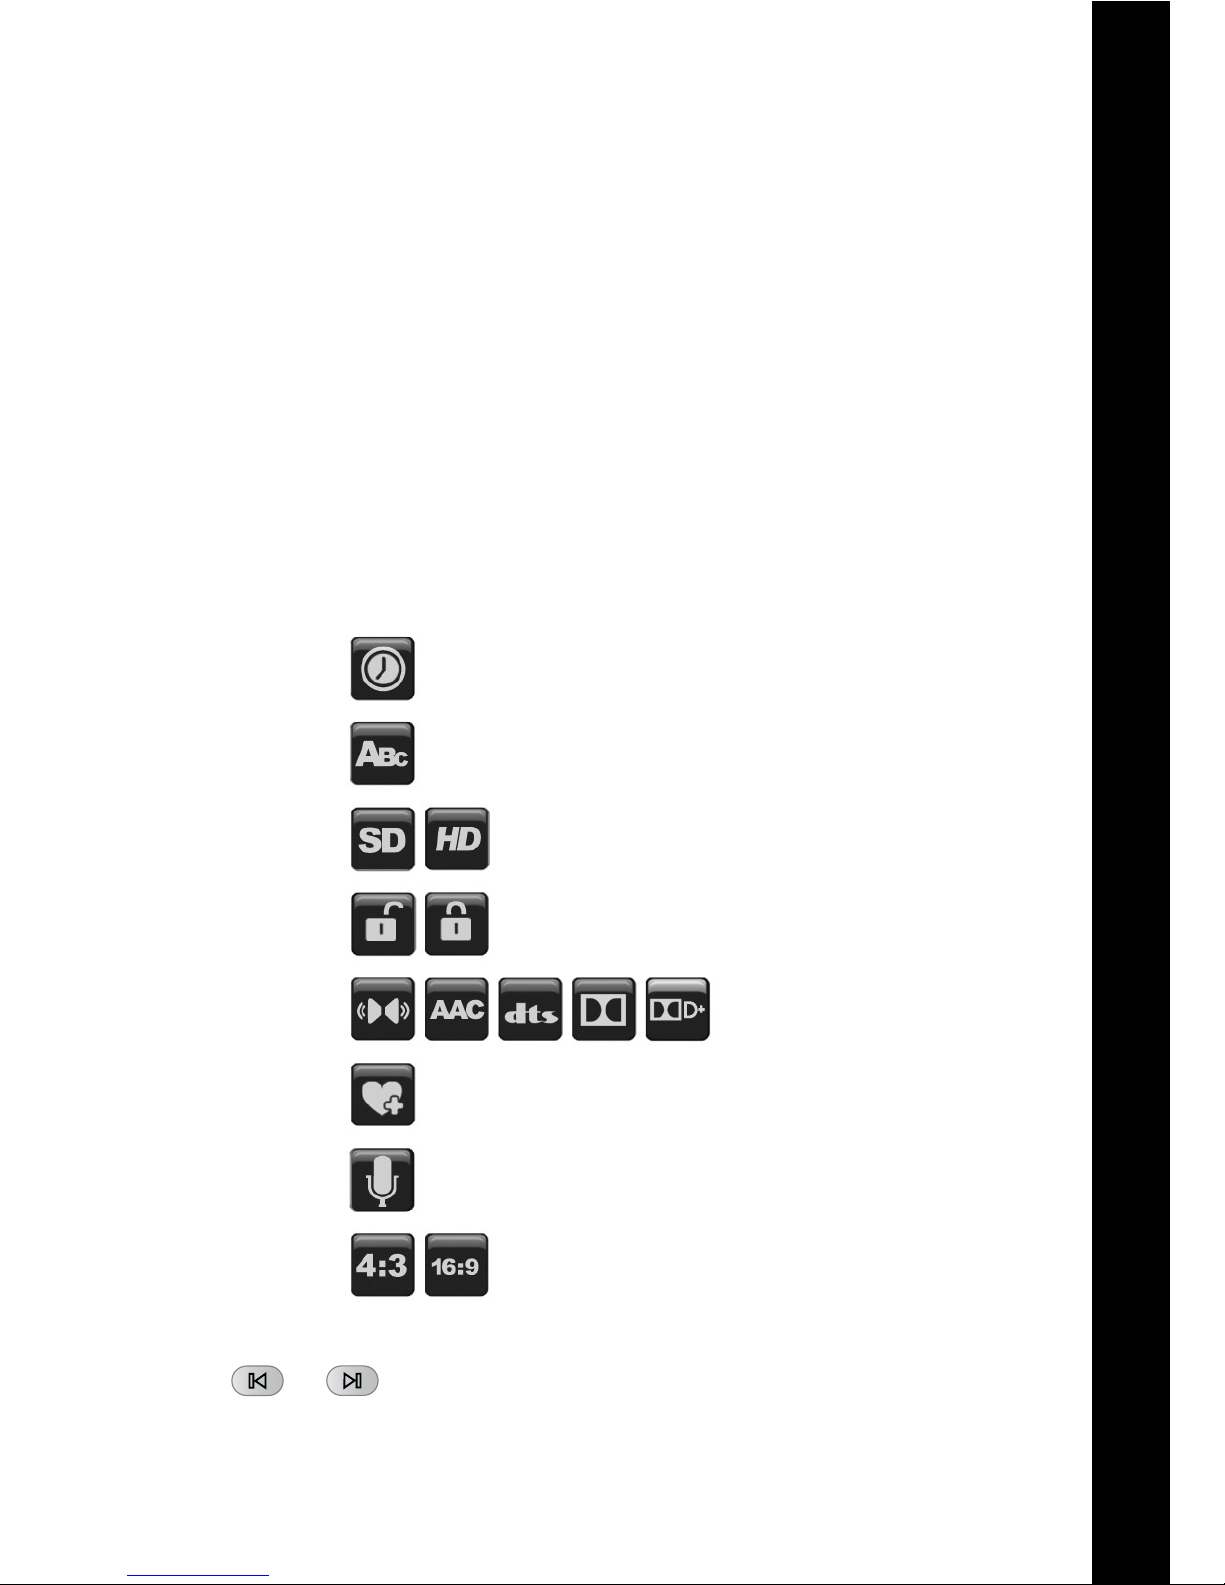
5. Use the Left arrow key of the remote control to scroll through valid options for the current channel and
program. The icons on the right side describe the options - see below detailed description for each icon.
6. Parental rating information (displayed if available with the program broadcast)
7. Satellite signal quality bar
8. Program encryption information
9. Teletext information (displayed if available with the program broadcast)
10. Program timeline information
11. Active recording notication
12. Volume
13. Current time and date.
14. Name and schedule of the next program
15. Use the Right arrow key of the remote control to scroll through program information, mini TV Guide, Full
TV Guide and event scheduling.
Sleep timer
Subtitles
Resolution
Parental control
Audio format
Add to favorite
Soundtrack
Format
Note: Use the
and buttons of the remote control to display information of following programs.

12
ADD TO FAVOURITE
Scroll left with the Left arrow button when the Info-banner is displayed. Add the current channel to one of the
available favourite lists.
SUBTITLES AND SOUNDTRACKS
Some TV broadcasters provide several audio
channels (Soundtracks) or subtitles information,
carrying commentary in various European languages,
to accompany the TV image.
Press the ’’Audio/Subtitles” key on your remote control
or scroll left with the Left arrow key when the Infobanner is displayed until the Subtitle or Soundtracks
titles are displayed with the available subtitling or
audio languages. Use the directional keys on the
remote control to make a selection.\
ASPECT RATIO
When the info-banner is displayed, scroll left with the
Left arrow key until the Aspect ratio title is displayed.
Press the Down arrow key and use the arrow keys to
set the picture aspect ratio.
RESOLUTION
Resolution allows you to set the video resolution of the picture.
1. Press the V-Format key.
2. The current resolution will be displayed.
3. Each time you press the V-Format key, the resolution changes in the following sequence: 576i/p -> 720p ->
1080->1080p -> original. Alternatively, scroll left with the Left arrow key till TV Resolution title is displayed.
Press the Down key to set the resolution.
AUDIO FORMAT
When the program info-banner is displayed, scroll left with the Left arrow key until the Audio format banner is
displayed. Press the Down arrow key and use the arrow keys to select the audio format over the digital audio
outputs of the receiver.
Notes: Dolby
TM
Digital and DolbyTM Digital Plus transmissions are down mixed to stereo signals or looped through
“as is” over the digital audio output.
Some Dolby (TM) broadcasts contain stereo or stereo+center audio data and not complete 5.1 audio channels.
SLEEP TIMER
You can use the Sleep timer to specify a time (e.g.
at night) at which the receiver is to switch to standby
mode. This is particularly useful if there is no person
available at this time to manually switch the receiver
to the standby mode. Scroll left with the Left arrow
key until the Sleep Timer title s displayed and set the
time for automatic switch into standby mode.
Note: When switching to standby mode, the receiver
is also able to switch off some TV sets with “Slow
Blanking” on the SCART connector.
TELETEXT
If teletext information is available on the current
channel, the
symbol will be shown in the
channel information banner. You can press
the
on the remote control to display this
information. You can use the numeric keys 0-9,
on the remote control, to enter a three-digit page
number.

En
13
STANDBY MODE
You can put the receiver in standby mode to reduce the power consumption while the unit is not in use. The
standby mode turns off some parts of the receiver, but does not fully turn off the receiver, allowing it to start up
again very quickly when the unit is turned on. If Economic is set (see User Preferences section), the receiver will
enter a deep sleep energy saving mode when switched to standby mode. When in standby mode, the standby LED
indication will be shown on the front panel.
The Main Menu
Besides the programme that is received from the
TV station, your digital receiver is able to display
different information on your TV screen like: Volume
bar, Menu, Pop-ups… All those things are used as
an interface between the receiver and the user (also
called GUI - Graphical User Interface or OSD - On
Screen Display). The actual GUI display generated
by your receiver may differ slightly from those shown
on the picture, as continuous updates of the software
may alter the appearance or even the structure of the
menus.
Navigation within the GUI display is effected by the
four directional keys and “OK” key, which is used
to conrm a selection, as well as in some cases by
means of the coloured function keys.
To enter into main menu, press “Menu” on your remote control. Being in a menu and pressing “Menu” key you will
completely exit from all the open menu pages. Using “Exit” key you will exit only from the last open menu page.
TV
* Select “Live TV” to watch live TV from the default channel list.
GUIDE (EPG)
There are two types of Guides - Full Guide and mini Guide. This entry provides direct access to full TV and Radio
listing (Full Guide) of a specic day within the coming week.
The EPG (Electronic Program Guide) gives you information about current broadcasted programmes as well as the
schedule and information for future programmes. The mini Guide is accessible through the program info-banner.
See detailed description on the Full and mini Guides in the Program Guide chapter.
Note: In order for the EPG to function properly, the time and date must be set correctly.
MEDIA
This entry provides various lters allowing direct access to pre-dened media folders:
- Select “All” to view the list of all media les available on the storage device.
- Select “Movies” to view a list of all the movie les on your storage device
- Select “Music” to view a list of all the music les on your storage device i.e. .mp3 les.
- Select “Photos” to view a list of all the photo les on your storage device i.e. .jpg or. bmp les.
- Select “Home videos” to view a list of all the home video les on your storage device i.e. .avi les from your
video camcoder.
WEB
This entry provides direct access to the third-party internet-based applications and services:
- Web videos
- Web radio
- Web applications
and more.
Note: Internet-based services and applications are provided by third parties, are not under Inverto’s control and
can be terminated at any time without any notice.
RADIO
* Select “Live Radio” to listen to live Radio from the web or radio channel list.
* Select “Edit Radio list” to edit or create Radio channel lists. Editing and managing Radio channel lists are
performed in the same way TV channel lists are edited and managed as explained earlier in the document.
CONTROL PANEL
To access “Control panel” , press “Menu” and scroll down to select “Control panel”. You may select the a settings
category using the navigation keys.
Please see the Control Panel chapter later in this manual for a detailed description of all settings and their
options.
14
HbbTV Applications
Your Volksbox receiver supports HbbTV - hybrid reception of content from satellite and from the internet (HbbTV
= Hybrid Broadcast and Broadband TV).
HbbTV services and applications may be available over the satellite broadcasts or over a broadband internet
connection solely depending on the service providers (broadcasters).
Through HbbTV, you will be able to access new services from leading broadcasters and online services and
application providers – including Catch-Up TV, Interactive advertising, additional content as well as programmerelated services such as digital text and EPGs.
The HbbTV services are provided and signalled to the receiver by the broadcasters (i.e. ARD, ZDF, RTL etc.).
As soon as you tune to channel, the receiver will identify the HbbTV service of the channel (if available) and will
launch it through its built-in web browser. When the HbbTV service is launched, some keys of the remote control
will have new functionality. Follow the instructions on the screen to navigate and operate the service accordingly.
Pressing the EXIT key of the remote control will leave the HbbTV service and will return to you the full control of
the receiver.
The HbbTV services may be disabled, launched automatically or provide on-screen notication - please see
more details on HbbTV settings under the User Preferences section of the Control Panel.
Note: Some HbbTV services rely on your internet connection and therefore performance depends on the speed
of your connection.
Note: HbbTV services are provided by the broadcasters, are not under Inverto’s control and can be terminated
at any time without any notice.
Connecting external USB devices
Your digital receiver is equipped with a USB port at the back panel.
When you connect a mass storage class device, the receiver will automatically initialize the device and will
display an indication that the device is connected.
Notes: - Supported le systems - Fat16, Fat32, Ext2
- Format Device requires entering the PIN code (default ‘0000’).
Program Guide (EPG)
The following sections provide detailed description of the two types of program guides - Full Guide and mini
Guide.
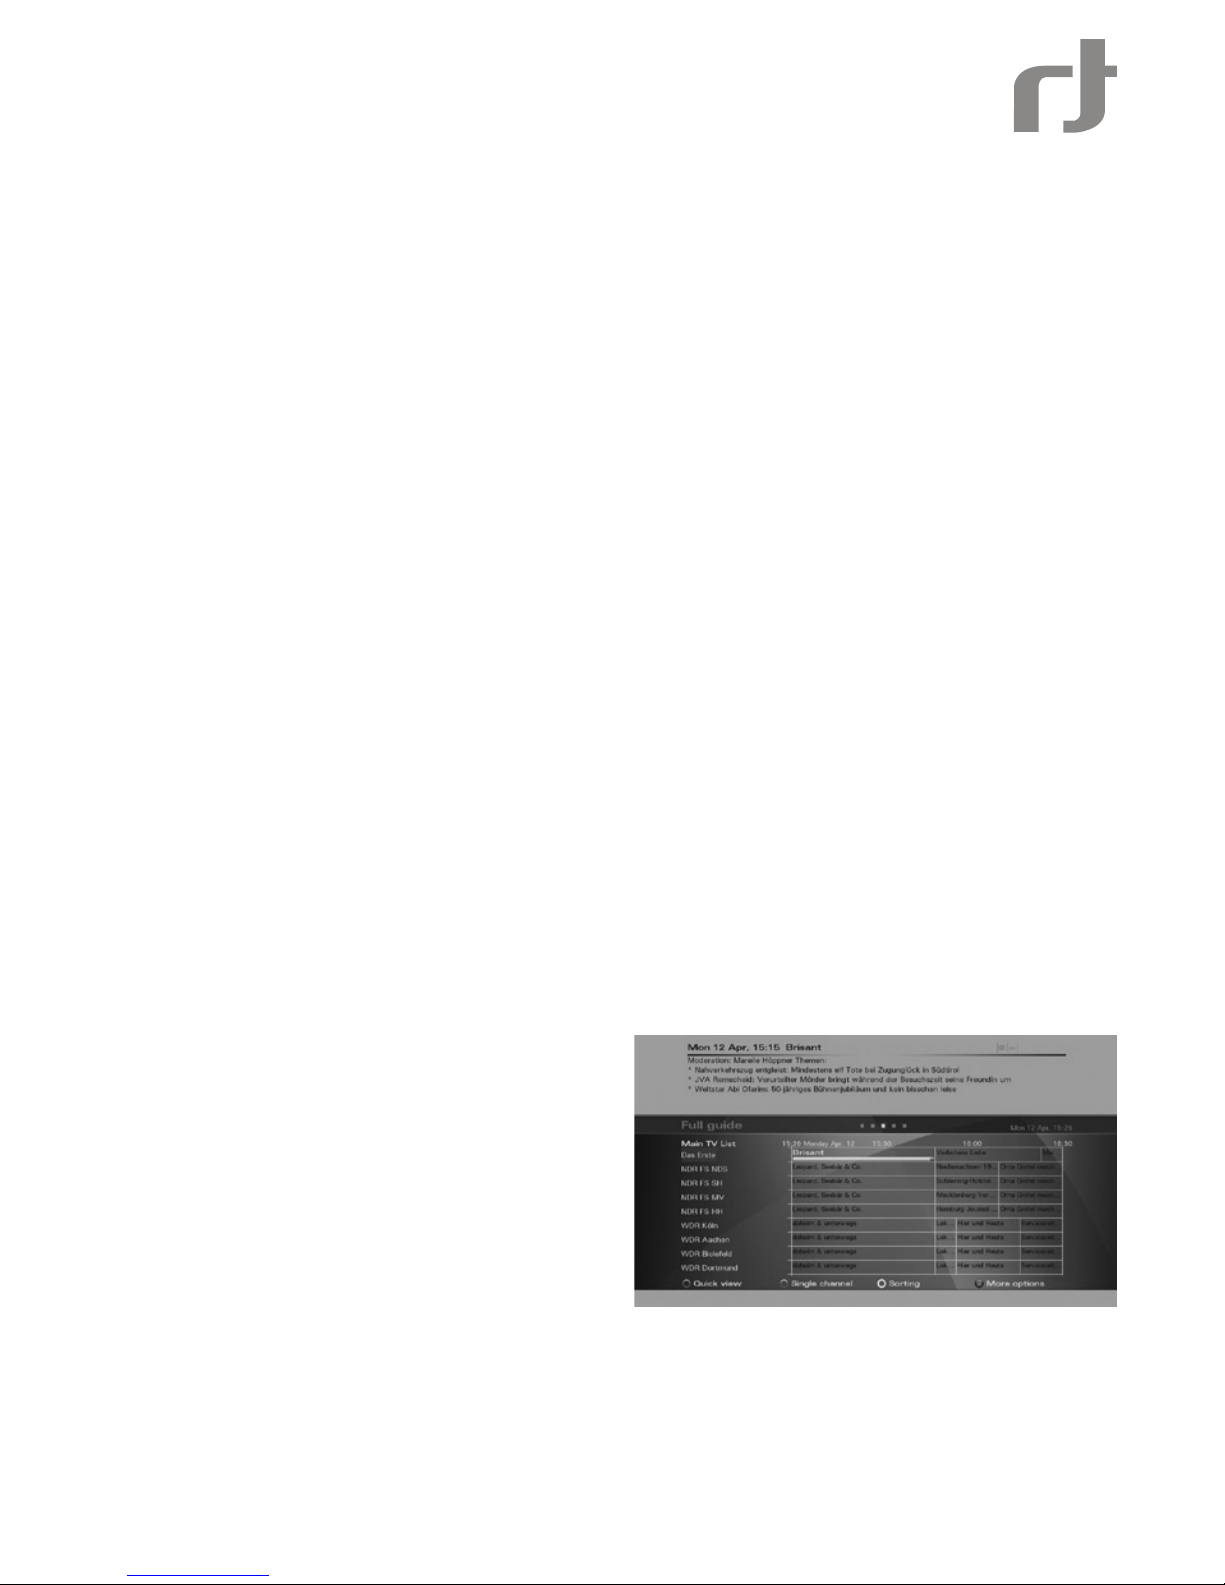
FULL GUIDE - GRID VIEW
The Guide grid view can be displayed by pressing
the Guide key , selecting the Guide entry in the Main
menu or by scrolling right with the Right arrow key
when program info-banner is displayed.The Guide
data is provided by the TV broadcast channels. The
receiver will display the EPG data that is available
for each channel. However, the receiver can only
display what is provided by the broadcast and has
no inuence on the quality or reliability of the data.
While you are watching TV, the data will be loaded
and displayed while you using the Guide.
Note: The message «No EPG Information» means
that the data is not provided by the channel, or the data is not yet received.
The receiver is able to display the programs available on the channel currently selected, indicating the current
programme as well as all following programs. This allows you to quickly obtain an overview of programs being
broadcasted that day, and possibly those of the next several days as well, depending on the availability of the EPG
data from the broadcaster. You can use the directional keys “Up” and “Down” to select specic channels and the
directional keys “Right” and “Left” to search forward and backwards in the programme schedule. The synopsis of
the programs you navigate through is displayed above the grid view. Use the Red key on the remote control to
toggle between Full Guide grid view and Quick View (see below).Use the Green key on the remote control to toggle
between Full Guide grid view and a Single Channel View (see below).
En
15
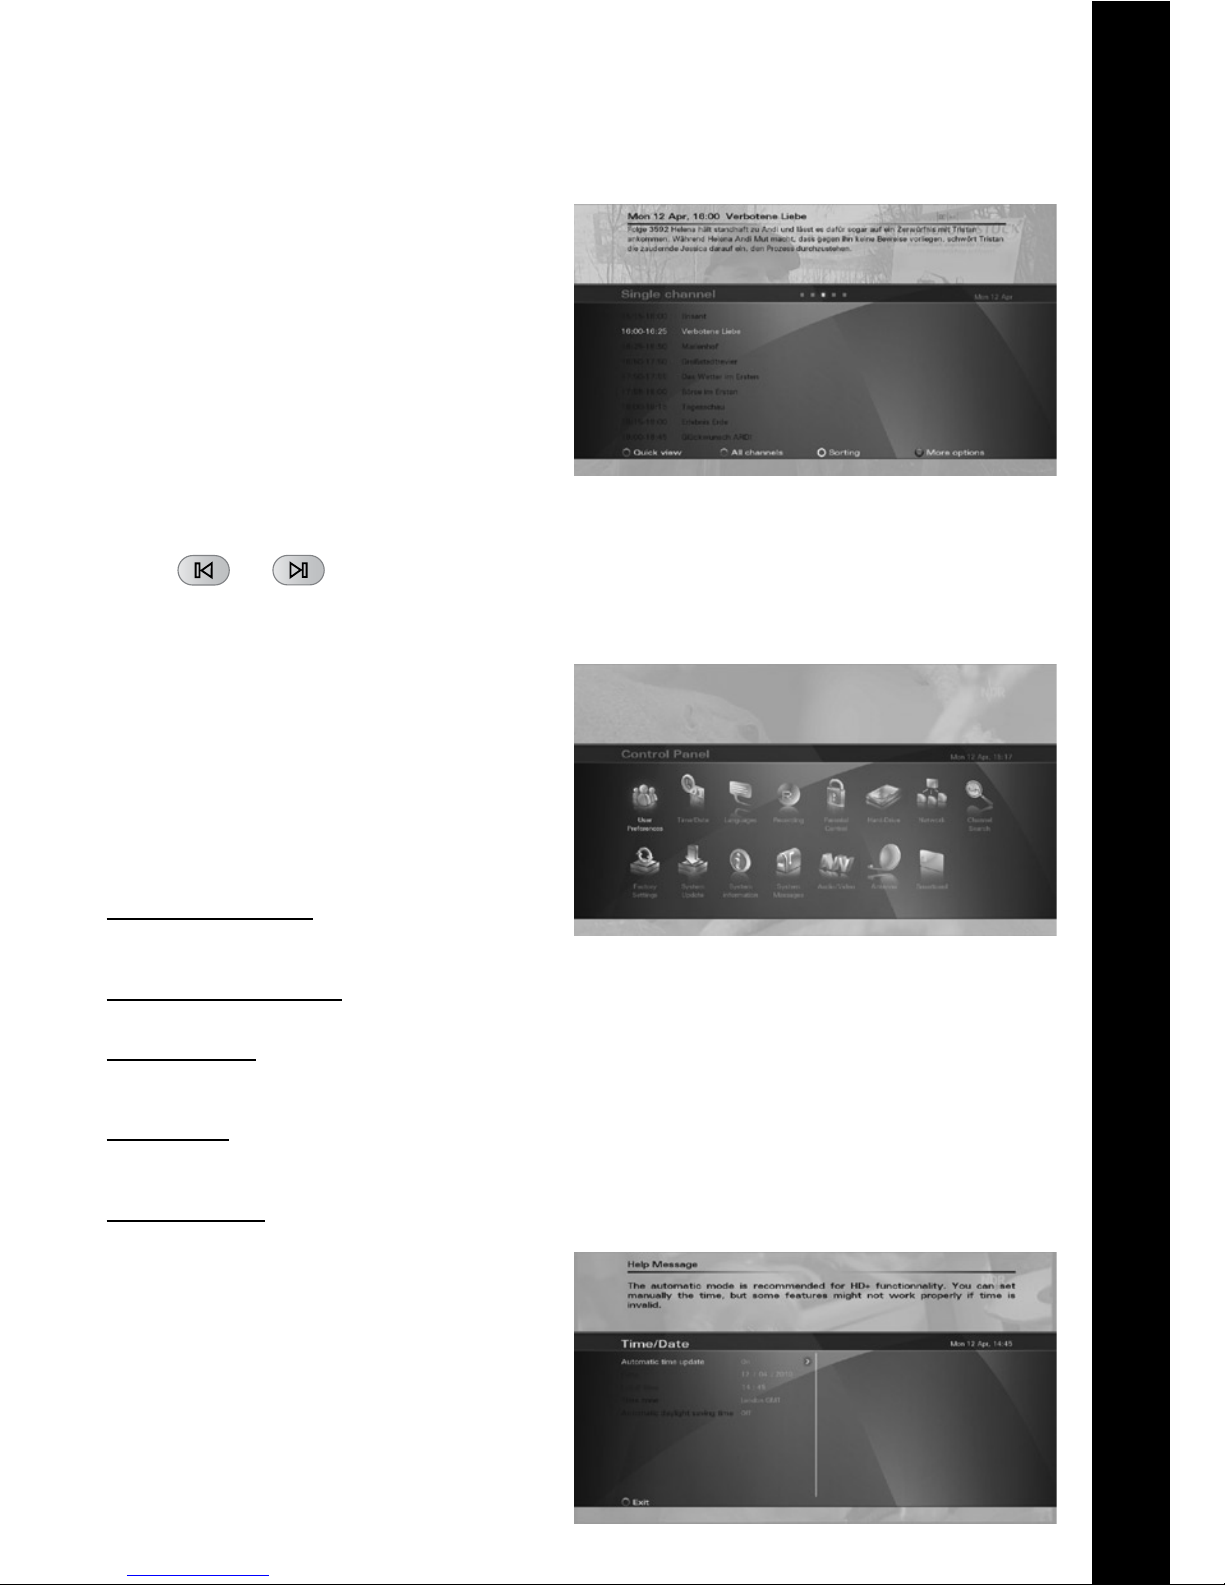
SINGLE CHANNEL VIEW
Press the “Green” function key on your remote
control to toggle between the Full Guide grid view
and the Single channel view. The Single channel view
makes it easier to see an overview of programs or
an individual channel, e.g. to search for repeats of a
movie or to control the timer for a specic channel.
MINI GUIDE
When the program info-banner is displayed, scroll
right with the Right arrow key to the mini-Guide banner. The program synopsis will be displayed above
the banner. Press the Down arrow key and navigate
with the arrow keys through the programs listed on
the mini Guide banner. The synopsis of each program
is displayed and you may set a reminder for future
programs by pressing the OK key on the remote.
Press the info button of the remote control in order to scroll through the detailed program information displayed.
Use the
and buttons of the remote control to jump +/-24 hours inside the guide.
Control Panel
In this chapter, all options of the Control Panel menu
will be described.
In each of the settings screens, use the Right arrow
key to view the available options for each parameter
on the right side of the screen, press OK to effect a
selection and the Left arrow key to go back to the
parameter list on the left side of the screen.
USER PREFERENCES
This is where you can set the basic parameters of
your digital receiver.
Default TV Channel list
Select the TV channel list that will be used by default
when operating the receiver.
Default Radio Channel list
Select the Radio channel list that will be used by default when operating the receiver.
Pop-up Timeout
When switching between programmes, for instance, a message is briey displayed with programme information
(Now/Next EPG). The duration that this message is displayed can be set, from 1 to 9 seconds.
History depth
You can set the history of previously selected programmes from 1-5, and then use the “Back” key on the remote
control to switch between them.
Software updates
Automatic software update:• When set
to “On” your receiver will be automatically
updated while in stand-by, according to the
settings in the sub-menu “Software update
behavior”. By choosing “Off” updates will not
be performed automatically.
Software update behavior:• By choosing
“Notify”, you will receive a pop-up message
when a new update is available. By choosing
“Download and notify”, you will receive a
pop-up message when a new update is
downloaded. By choosing “Download and
Auto-install”, any update will be automatically
installed.
 Loading...