

Page 1
SPY LANTERN SURVEILLANCE CAMERA
Invent plus
TM
All rights reserved 2015
User Guide
Page 2

User Guide
Copyright notice
Copyright © 2015 Invent plusTM. All rights reserved.
Disclaimer
This document might include technical inaccuracies and is subject to correction
and other revision without notice. This document can be also updated upon
camera improvements.
Technical support: [email protected]
Page 3
User Guide
Please consider your local laws and regulations regarding the usage
of products of this type and ensure that you will not violate them.
Keep the 12V 1A power supply adapter and its connection jack
connected indoors only.
Gently wipe the lantern panels using a clean dry microfiber cloth to
prevent permanent scratches.
Prevent water penetration through the bottom of the camera. It’s
weatherproof only in an upright vertical position. Do not install the
camera near a lawn sprinkler (closer than 2 ft).
To reduce the risk of electrical shock, do not open the camera case.
Make sure to use only 12V (1A or more) power supply adapters.
Using any other adapter may cause damage to the product, electric
shock, or fire.
Securely plug the power cord into the camera body socket.
Do not leave the camera powered off for a long time in freezing
conditions without powering.
Do not leave the SD card slot open for a long time to protect it
from humidity penetration.
Read before use
Technical support: [email protected]
Page 4

User Guide
Spy Lantern Surveillance Camera
1 pc
1 ft. lantern pole
1 pc
Ground spike
1 pc
100ft/200ft extension power cable
1 pc
12V 1A adapter
1 pc
5.5 2.1 mm male-female jacks
1 pair
Screwdriver
1 pc
Rubber feet
4 pc
*Canon and PowerShot are registered trademarks of Canon Inc. The Spy Lantern Surveillance
Camera is a third party product and its possible faults are not related to the Canon brand.
Product Description
Spy Lantern Surveillance Camera is a standalone outdoor hidden surveillance
camera that looks like a landscape decoration or lighting feature. The product is
based on a 16 MP Canon* PowerShot* camera that provides superior image
quality over long range of shooting distances. Moreover, it has a wide variety of
user-defined functions including time-lapse photography.
Significant Features and Parameters
16 Megapixel Canon* PowerShot* camera
5 – 12mm focal length (zooming)
Up to 200 ft distance of face or license plate identification
Sensitive motion detection
Day-night automatic switching mode
Infinite loop recording mode (automatically delete older pictures)
Flexible user defined shooting options and time-lapse photography
Weatherproof design
Standalone plug and play operation
Operating temperatures: -15 to 40°C (5 to 104°F)
Measures: 6×6×9.5 inches without stake and 28 inches height with stake
2.5 W LED lighting
128 GB SD card included
100ft/200ft power extension cable and 12V 1A power supply adapter
included
Package Contents
Technical support: inventplusts@gmail.com
Page 5

User Guide
128 GB SD card (inside the camera)
1 pc
Acrylic glass surface wipe
1 pc
SD card reader
1 pc
User guide
1 pc
Getting Started
To start the camera, plug it into the power outlet via the 12V 1A adapter. The
default operation mode takes a series of motion detected pictures in the daytime
and video at night. The camera deletes older files, automatically making room for
new ones after the SD card is full. The camera stops working if the power is off
and resumes functioning automatically when it regains power.
To connect extension cables, first put the extension wire through the stake and
then fasten the power jacks with the help of a screwdriver.
SD Memory Card Usage
The camera has an SD card slot located at the bottom of the lantern. The slot is
protected by the SD slot cover (plug). Take the following precautions when
working with the SD card:
1. The included SD card contains the special driver, files and folders needed
for the correct functioning of the camera. No other SD cards will work
without special preparation.
2. The lock-unlock protector switch has been removed from the card on
purpose for correct functioning of the camera.
3. The pictures and movies are stored in the DCIM folder and its subfolders.
4. You can modify the UserDefinedOptions.txt file to setup your own
operation functions. Modification of other files can cause the firmware to
fail.
5. The SD card can be read or modified with the help of the provided SD card
reader or other readers without lock-unlock switcher protection.
6. You should disconnect the power supply (DC adapter) from the camera
before removing the SD card. Reconnect the power supply after inserting
the SD card back into the camera.
Technical support: [email protected]
Page 6
User Guide
Changing Options with the UserDefinedOptions.txt File
The file UserDefinedOptions.txt must be located in the root of the SD card (not in
any folder or subfolder) and contains parameters and options that can be
modified to affect user preferences.
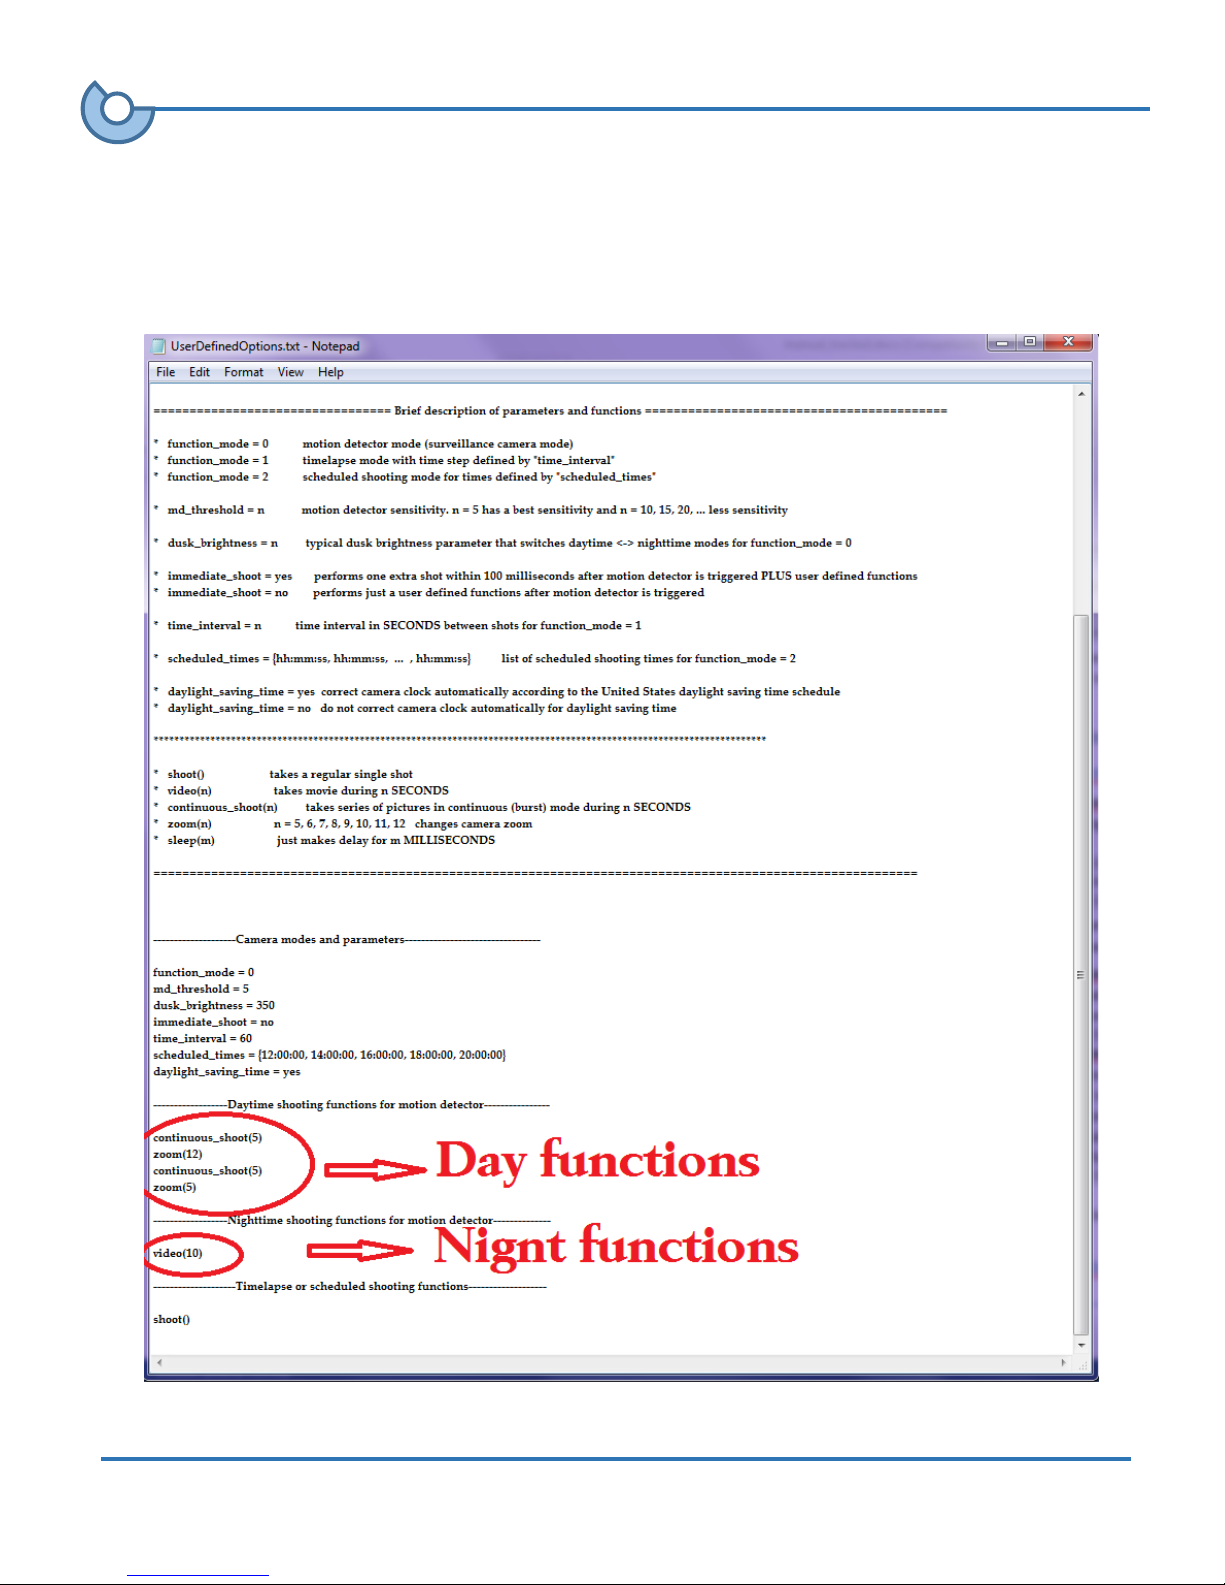
Default UserDefinedOptions.txt file
Technical support: [email protected]
Page 7

User Guide
The file contains a brief memo and description of options. Only modify
parameters and options followed by the following title lines:
------------------Camera modes and parameters---------------------------------
------------------Daytime shooting functions for motion detector----------------
------------------Nighttime shooting functions for motion detector--------------
------------------Timelapse or scheduled shooting functions-------------------
The title lines should not be modified. A spare copy of the file is stored in the
CHDK folder in case of accidental loss or corruption of the working file.
UserDefinedOption.txt Parameters and Functions
function_mode
function_mode = 0 defines motion activated mode (surveillance camera).
The triggered motion calls a list of functions in daytime followed by the
line:
------------------Daytime shooting functions for motion detector----------------
And a list of functions at nighttime followed by the line:
------------------Nighttime shooting functions for motion detector--------------
You can compose different sets of functions in a different sequence below
the lines.
function_mode = 1 defines time-lapse mode. The camera takes pictures at
intervals defined by the time_interval parameter. The time-lapse shooting
functions are defined below the line:
--------------------Timelapse or scheduled shooting functions-------------------
function_mode = 2 defines scheduled shooting mode. This means that the
camera takes pictures at predefined times, much like an alarm clock. The
list of shooting times is defined by the scheduled_times list of times that
can contain any number of predefined times in 24-hour time. The
scheduled shooting functions are defined below the line that included timelapse functions:
--------------------Timelapse or scheduled shooting functions-------------------
It can be composed in a different sequence.
Technical support: [email protected]
Page 8
User Guide
md_threshold
This parameter defines sensitivity of the motion detector for function_mode = 0.
md_threshold = 5 defines the most sensitive setting of the motion detector.
Setting this to a number less than 5 is not recommended as it can cause false
triggering without actual motion in front of the camera. The following undesirable
effects can activate the motion detector of the camera and take pictures:
Moving branches and leaves of the tree in the wind
Flying birds, insects
Flying clouds shading the sun that cause sudden brightness change
Flags, garden flags, wind spinners, holographic features
Blinking Christmas lights, other blinking lights
Shaking of the camera (if the motions are strong enough)
Rain, snow, fallen leaves (these are the biggest false triggers)
Lower sensitivity is useful when taking pictures of objects that are nearby, such as
surveillance of an entrance door. For less sensitivity it is recommended to
increase the parameter with increments of 5 (5, 10, 15, etc.) until the desired
sensitivity is achieved after trials.
dusk_brightness
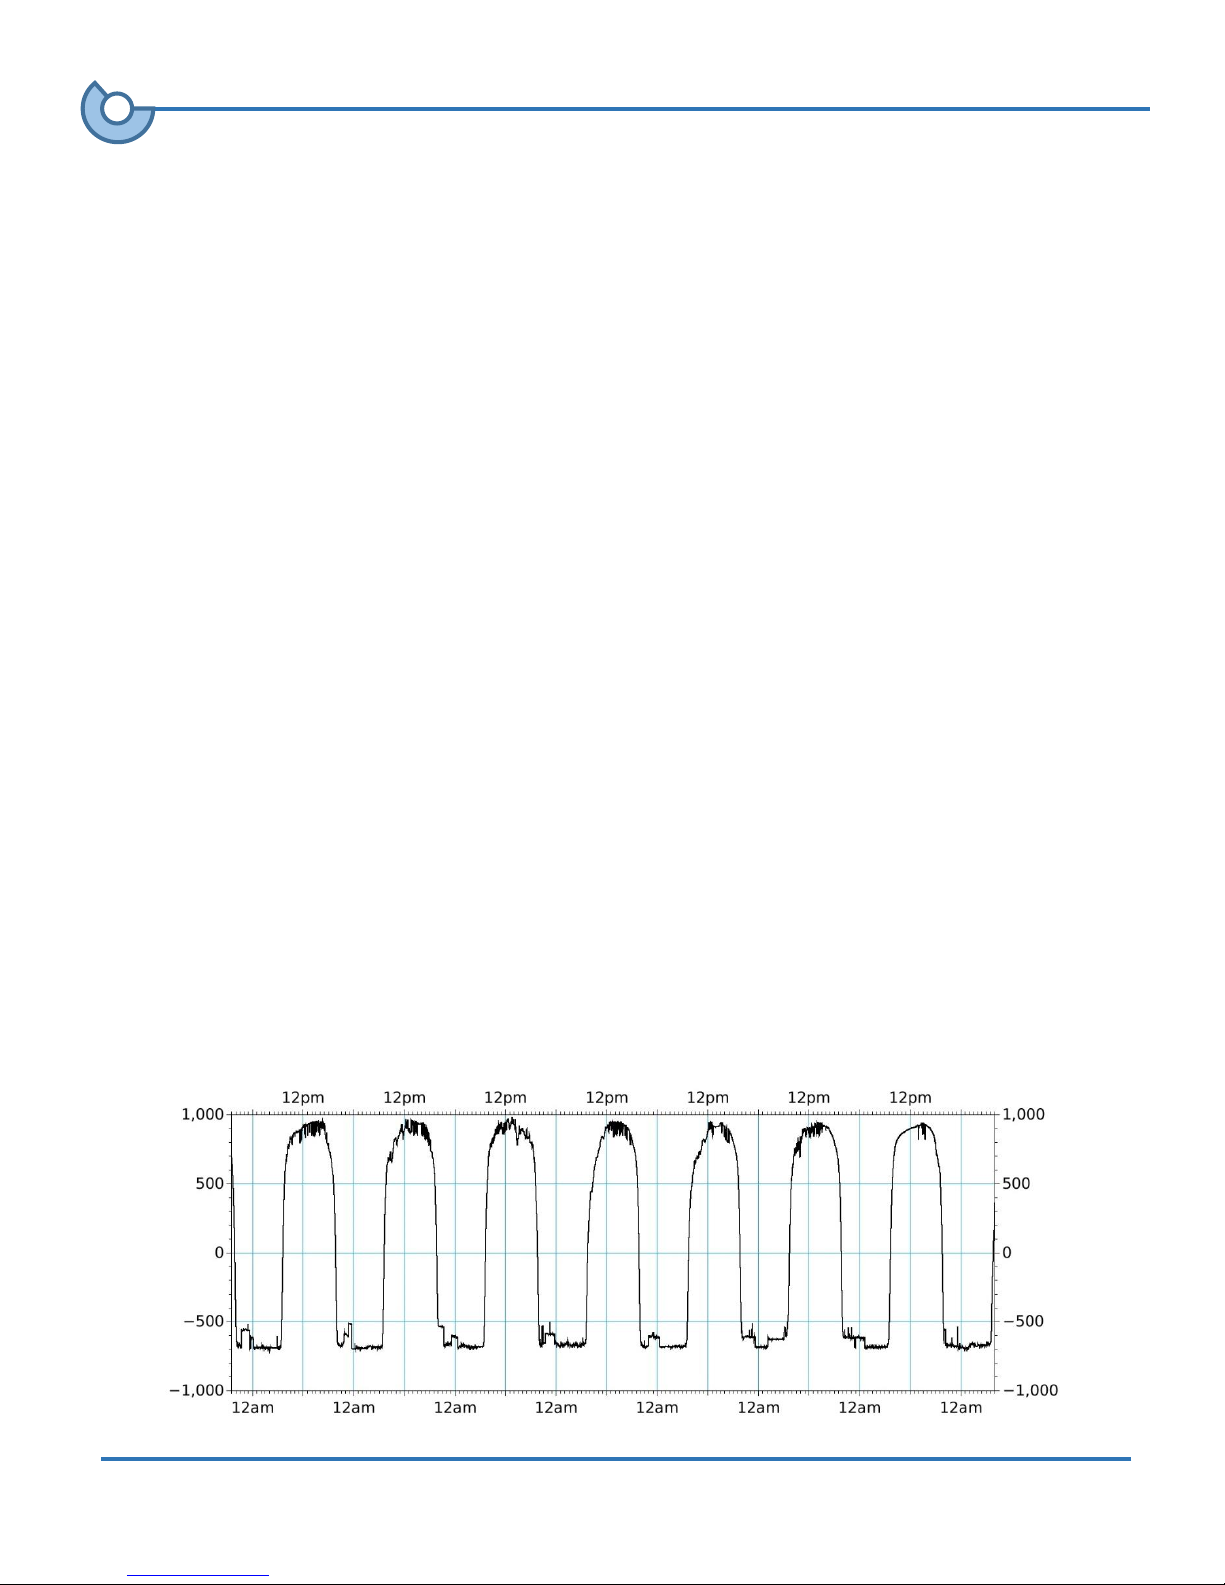
This parameter defines the threshold of ambient brightness for switching
between daytime and nighttime mode for function_mode = 0. The daytime and
nighttime modes correspond with the “P” and “Low light” mode of the Canon
camera. A sample record of ambient brightness over seven days is shown in the
following picture:
Technical support: [email protected]
Page 9

User Guide
The parameter varies from -1000 to 1000 approximately. The default duck
brightness is chosen to be duck_brightness = 350. The nighttime mode is
characterized with more ISO sensitivity and less picture resolution. Setting the
parameter to duck_brightness = -1000 or +1000 will keep the camera in daytime
or nighttime mode without switching.
immediate_shoot
The immediate_shot = yes parameter makes the camera take ultrafast pictures
within 100 ms after motion is triggered in addition to other shooting functions
defined by the user.
When set to immediate_shot = no the camera performs only user defined
functions. The difference between immediate shot and shoot() is that the last one
performs focusing that can take a second before shooting.
time_interval
This parameter defines the time interval in seconds between pictures for the
timelapse mode function_mode = 1. The real time step will differ depending on
the length of exposure. For example, if the time interval is set to 1 second. If each
image capture takes 2 seconds, then the actual time step will be closer to 3
seconds.
scheduled_times
This parameter defines a list of shooting times every day for function_mode = 2.
In other words, the camera works like an alarm clock for the list of predefined
times in format scheduled_times = {hh:mm:ss, hh:mm:ss, …, hh:mm:ss}. Any
number of events can be scheduled, but must be separated by commas and
enclosed in the brackets.
Camera clock setting
The camera has date and time settings for the correct timing of pictures and
movies. The camera sets up its date/time as the modification date of the
UserDefinedOptions.txt file plus one minute. The user can change or correct
date/time setting by saving the file on a computer. The camera will set up its
Technical support: [email protected]
Page 10

User Guide
shoot()
Performs a single shot with preliminary autofocusing that
can take up to 1 second.
video(n)
Takes movie during n seconds. If n > 1500 (25 minutes) then
the movie gets split into multiple 25-minute files.
continuous_shot(n)
Continuous shooting (burst mode) of the camera during n
seconds. Continuous shooting takes pictures with a high
frequency of about 1 fps (it can vary). It focuses only once
and then takes a series of pictures.
zoom(n)
Changes the focal length (zoom) from n = 5mm to n =
12mm.
sleep(n)
Creates a delay for n milliseconds without doing anything. It
can be useful for example when you need to delay a shot
after motion is detected.
clock only once and will not do it anymore until the file is modified and “Saved”
again or just “Saved” without modification.
daylight_saving_time
The setting daylight_saving_time = yes will correct time automatically twice per
year according to the US schedule (the second Sunday in March and the first
Sunday in November). Set daylight_saving_time = no to disable the function of
moving the clock forward or back.
Shooting functions
The shooting functions can be applied in any number and any sequence. The table
below explains the usage of different functions.
Samples
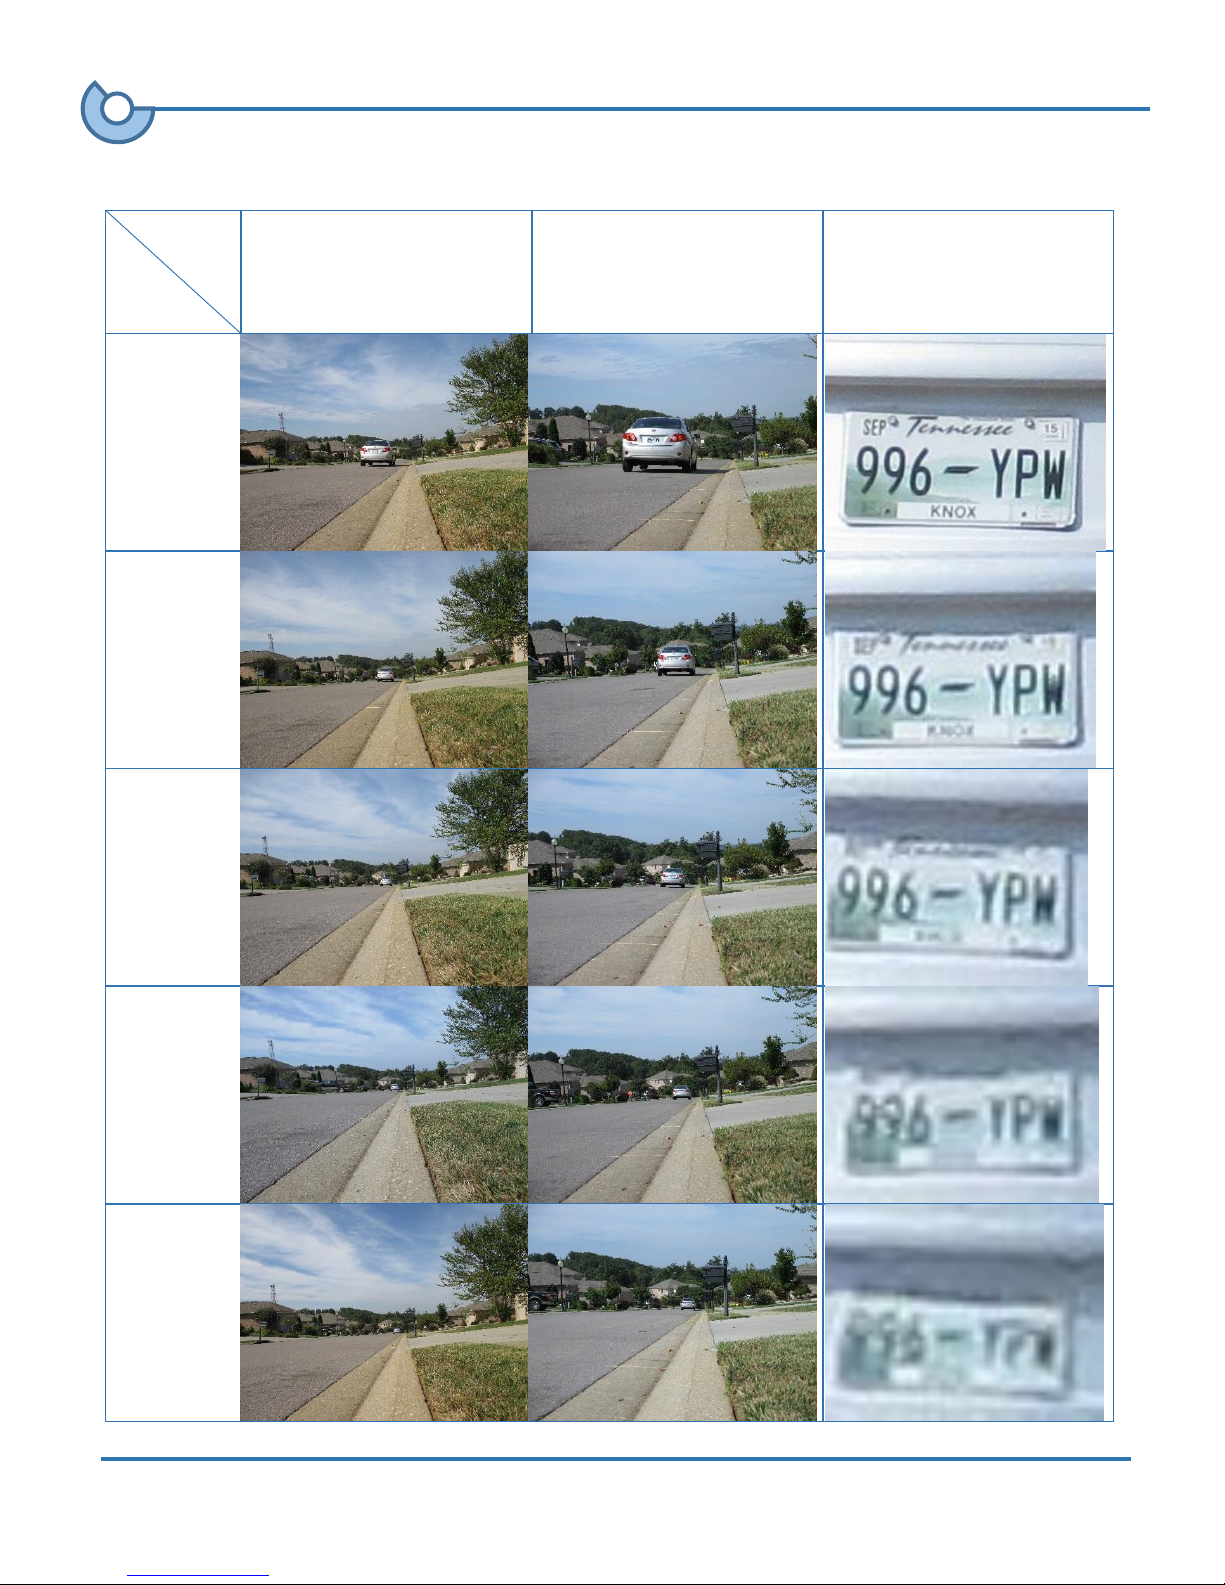
The biggest application of the camera would be to aid in the identification of
persons (faces) and license plates at long distances. The following test shows
pictures of a license plate taken on a sunny clear day at different distances using
different zoom settings. The last column represents just a picture crop of the
12mm picture. The test shows a reliable number identification up to a distance of
200 ft.
Technical support: [email protected]
Page 11
User Guide
Focal length
(zoom)
distance
5 mm
12 mm
12 mm crop
40 ft
80 ft
120 ft
160 ft
200 ft
Technical support: [email protected]
Page 12

User Guide
Useful Tips
Single shot pictures have a higher resolution and better quality as
compared to movies.
Minor lighting, for example street lighting, is needed to take night pictures
and videos.
Night mode has more light sensitivity and lower resolution so it is
recommended to use movie mode, or at least continuous shooting, for the
reliable identification of events.
The 5mm focal length has a smaller observation distance and a bigger angle
of view while the 12mm has a longer observation distance and a smaller
angle of view (see the sample images above).
The more shooting functions you use for a single triggered motion – the
smaller recorded history you will have.
Try to avoid direct sunlight falling on the camera lens through the front
panel of the camera.
Use an uninterrupted power supply (UPS) for uninterrupted camera
function even if the power goes off.
Please consider the issue of wind when using the rubber feet instead of the
ground spike.
For best recognition of license plates and faces, install the camera close to a
road with the direction of view along the road.
Technical support: [email protected]
Page 13

User Guide
If you have read this manual and still cannot resolve an issue you are having,
please email your questions to [email protected]
Technical support: [email protected]
Page 14

Contact Information
Invent plus
TM
1532 Crescent Oaks Lane, TN 37772
Phone: 865-220-8781
Technical Support: [email protected]
 Loading...