

P6MVI-09WFR/P6MVO-09
P6MVI-12WFR/P6MVO-12
P6MVI-18WFR/P6MVO-18
P6MVI-24WFR/P6MVO-24
AR1MVI-09WFR/AR1MVO-09
AR1MVI-12WFR/AR1MVO-12
AR1MVI-18WFR/AR1MVO-18
AR1MVI-24WFR/AR1MVO-24
Μοντέλα:
Σας ευχαριστούμε
φορητό κλιματιστικό INVENTOR.
που επιλέξατε το
Για
τη σωστή χρήση της μονάδας
παρακαλούμε διαβάστε προσεκτικά το
παρόν εγχειρίδιο και φυλάξτε το για
αναφορά στο μέλλον.
Thank you for choosing INVENTOR air
conditioning system. For correct use of
this unit, please read this manual
carefully and keep it for future
reference.
English/Ελ /Românăληνικά
Κ
Λ
Ι
Μ
Α
Τ
Ι
Σ
Τ
Ι
Κ
Α
Σ
Υ
Σ
Τ
Η
Μ
Α
Τ
Α
Εγχειρίδιο Χρήσης
User’s Manual
Remote Controller
Manual de utilizare
Telecomanda
Ασύρματο Τηλεχειριστήριο
1
C O N T E N T S
2
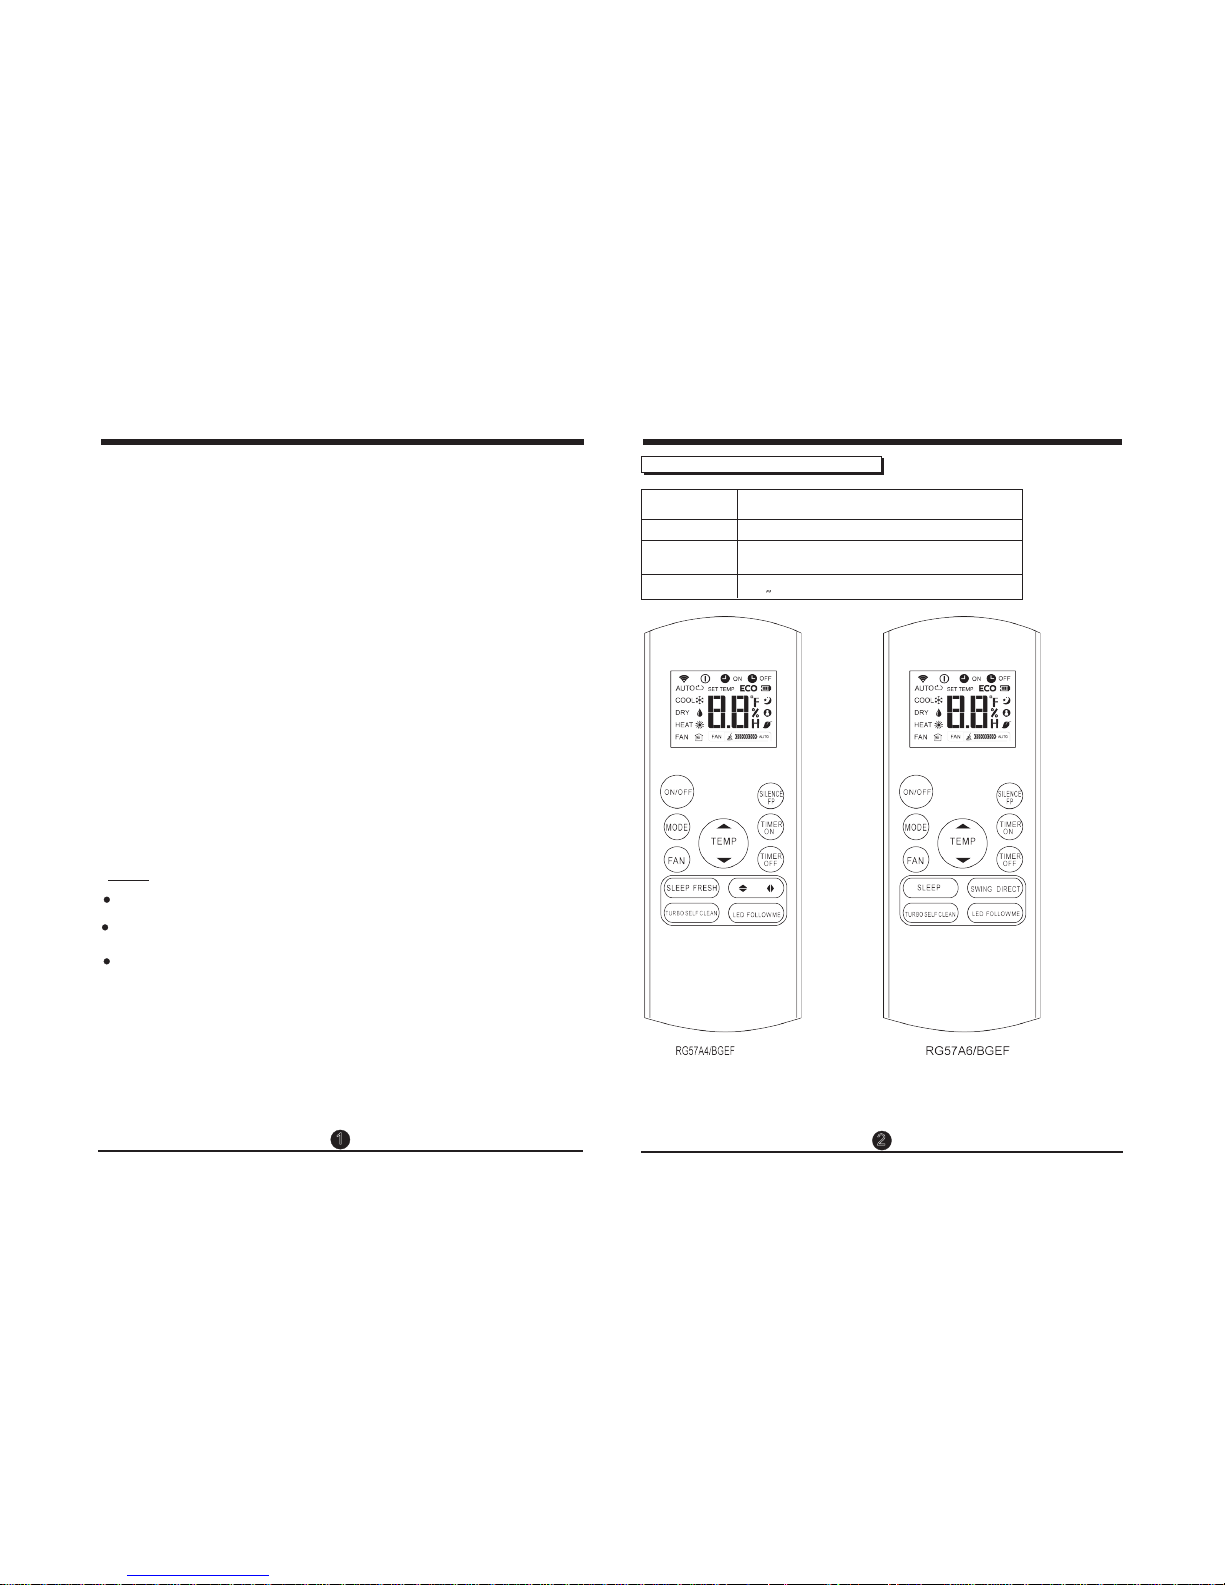
Model
Rated Voltage
8m
3.0V(Dry batteries R03/LR03×2)
RG57A4/BGEF,RG57A6/BGEF
R emote Controller Specications
Environment
Signal Receiving
Range
。 。
-5C 60C
~
NOTE:
Buttons design is based on typical model and might be slightly different from the
actual one you purchased,the actual shape shall prevail.
All the functions described are accomplished by the unit. If the unit has no this
feature, there is no corresponding operation happened when press the relative
button on the remote controller.
When there are wide differences between Remote controller Illustration and
USER'S MANUAL on function description, the description of USER'S MANUAL
shall prevail.
,,
,,
,,
,,
,,
,,
2
3
6
7
7
7
8
9
13
Handling the remote controller ...........................................................
Remote controller Specications..........................................................
Operation buttons ...................................................................................
Indicators on LCD .......................................................................................
How to use the buttons ..........................................................................
Auto operation..............................................................................................
Cooling/Heating/Fan operation............................................................
Dehumidifying operation .......................................................................
Timer operation..........................................................................................
3
4
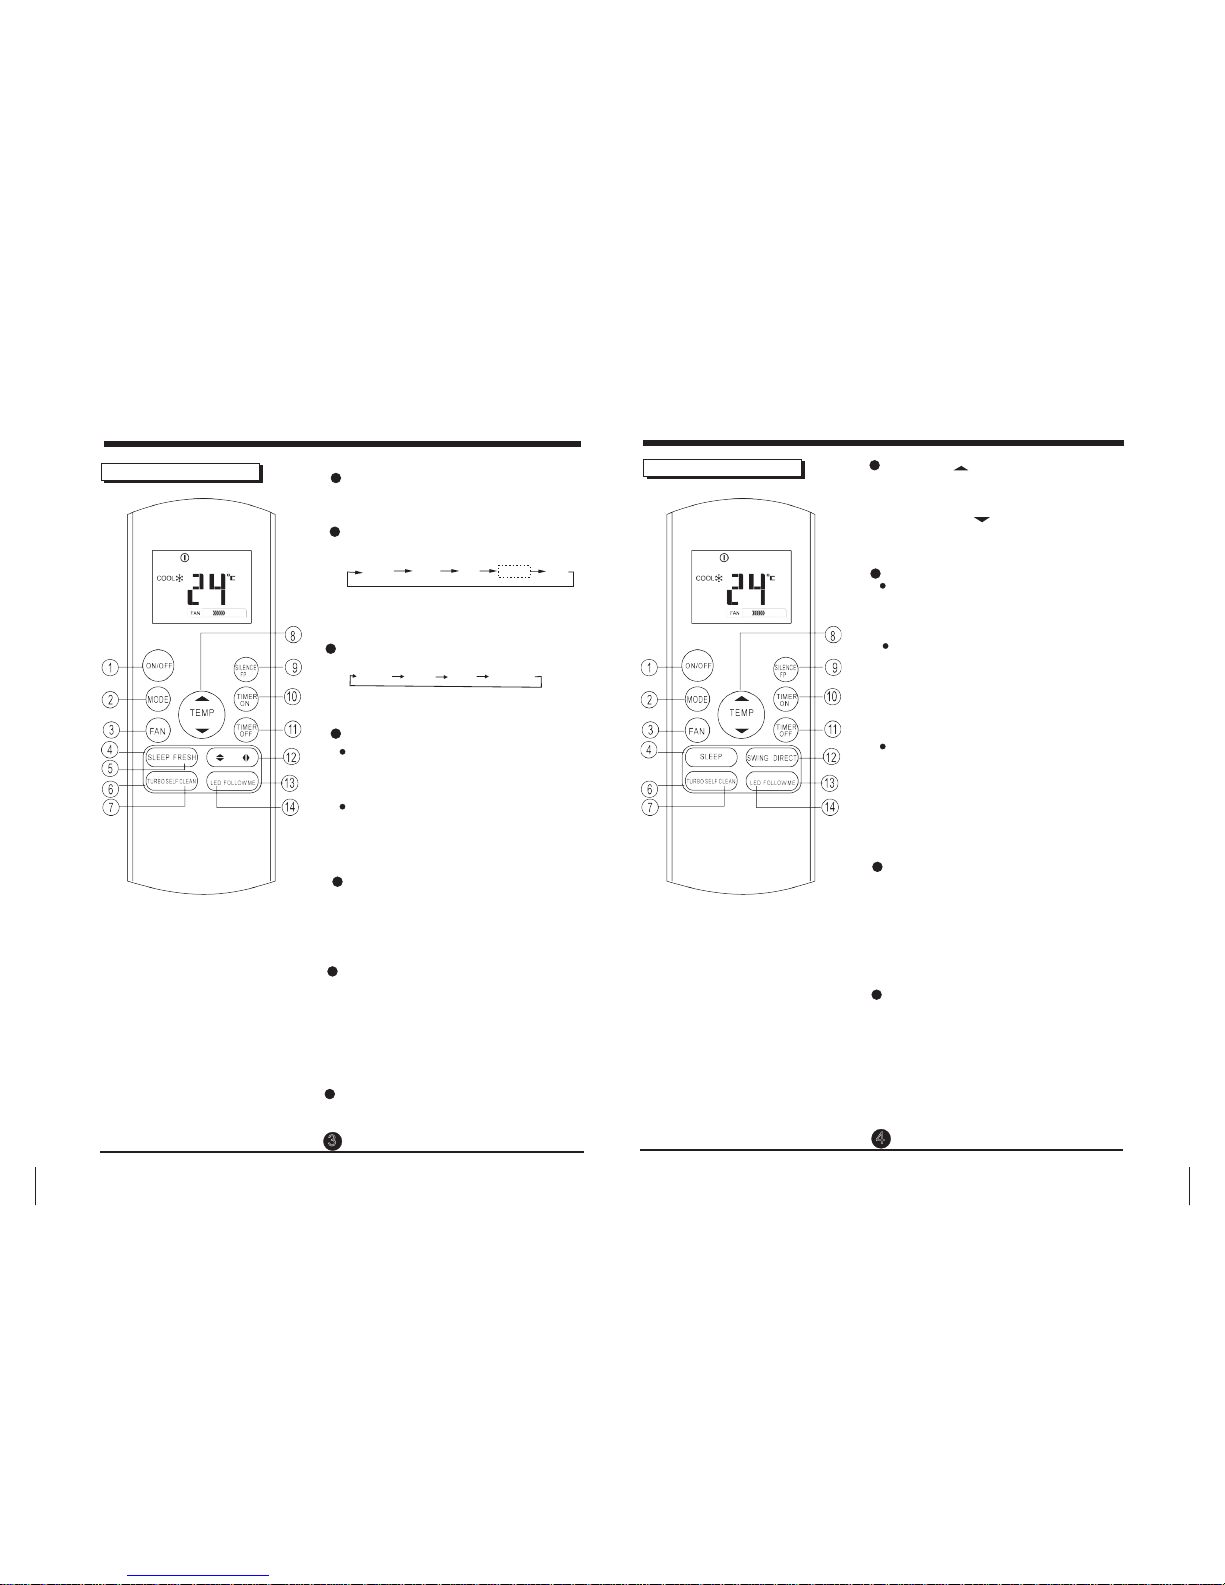
1
2
Press this button to modify the air conditioner
mode in a sequence of following:
3
MODE Button
4
5
ON/OFF Button
This button turns the air conditioner ON
and OFF.
AUTO
COOL
DRY
HEAT
FAN
Used to select the fan speed in four steps:
AUTO LOW MED HIGH
FAN Button
SLEEP Button
FRESH Button
(applicable to RG57A4/BGEF)
NOTE: While the unit is running under SLEEP
mode, it would be cancelled if MODE, F AN
SPEED or ON/OFF button is pressed.
Active/Disable sleep function. It can
maintain the most comfortable temperature
and save energy. This function is available
on COOL, HEAT or AUTO mode only .
Active/Disable When the
FRESH function is initiated, the Ionizer/
Plasma Dust Collector(depending on
models) is energized and will help to
remove pollen and impurities from the air.
FRESH function.
For the detail, see sleep operation in
USER S MANUAL.
,
,,
,,
,,
,,
NO T E :P le as e d o no t s ele ct H E AT m o de i f the
ma ch ine y ou p urc ha s ed i s c ool ing o nly t ype .
He a t mode i s n o t su ppor ted b y the c oo ling o nly
ap plia nc e.
NOTE: You can not switch the fan speed in
AUTO or DRY mode.
7
SELF CLEAN Button (applicable to RG57A4/BGEF)
Active/Disable Self Clean function
Oper a tion of buttons
TIMER ON Button
TIMER OFF Button
UP Button( )
Push this button to decrease the indoor
o o
temperature setting in 1 C increments to 17 C.
DOWN Button( )
8
10
11
9
Press this button to initiate the auto-on
time sequence. Each press will increase
the auto-timed setting in 30 minutes
increments. When the setting time displays
10.0, each press will increase the autotimed setting 60 minutes increments.
To cancel the auto-timed program, simply
adjust the auto-on time to 0.0.
Press this button to initiate the auto-off time
sequence. Each press will increase the auto
-timed setting in 30 minutes increments.
When the setting time displays 10.0, each
press will increase the auto-timed setting
60 minutes increments. To cancel the autotimed program, simply adjust the auto-off
time to 0.0
Push this button to increase the indoor
o o
temperature setting in 1 C increments to 30 C.
Oper a tion of buttons
6
TURBO Button
Active/Disable Turbo function. Turbo function
enables the unit to reach the preset temperature at cooling or heating operation in the
shortest time(if the indoor unit does not
support this function, there is no
corresponding operation happened when
pressing this button.)
RG57A4/BGEF RG57A6/BGEF
,
,
,
,
,
SILENCE/FP Button
Active/Disable SILENCE function. If pushing
more than 2 seconds, the FP function will
be activated, pushing more than 2 seconds
again to disable.
When the Silence function is activated, the
compressor will operate at low frequency
and the indoor unit will bring faint breeze,
which will reduce the noise to the lowest
level and creat a quiet and comfortable room
for you. Due to low frequency operation of
compressor, it may result in insufficient
cooling and heating capacity.
The FP function can only be activated
during the heating operation(only when the
setting mode is HEAT). The unit will operate
O
at a setting temperature of 8 C.The display
window of indoor unit will display FP .Press
the buttons of ON/OFF, SLEEP, FP, MODE,
FAN SPEED,UP or DOWN while operating
will cancel the FP function.
,
,
,
12
14
13
FOLLOW ME Button
Push this button to initiate the Follow Me
feature, the remote display is actual
temperature at its location. The remote
control will send this signal to the air
conditioner every 3 minutes interval until
press the Follow Me button again. The air
conditioner will cancel the Follow Me feature
automatically if it does not receive the signal
during any 7 minutes interval.
Operation of buttons
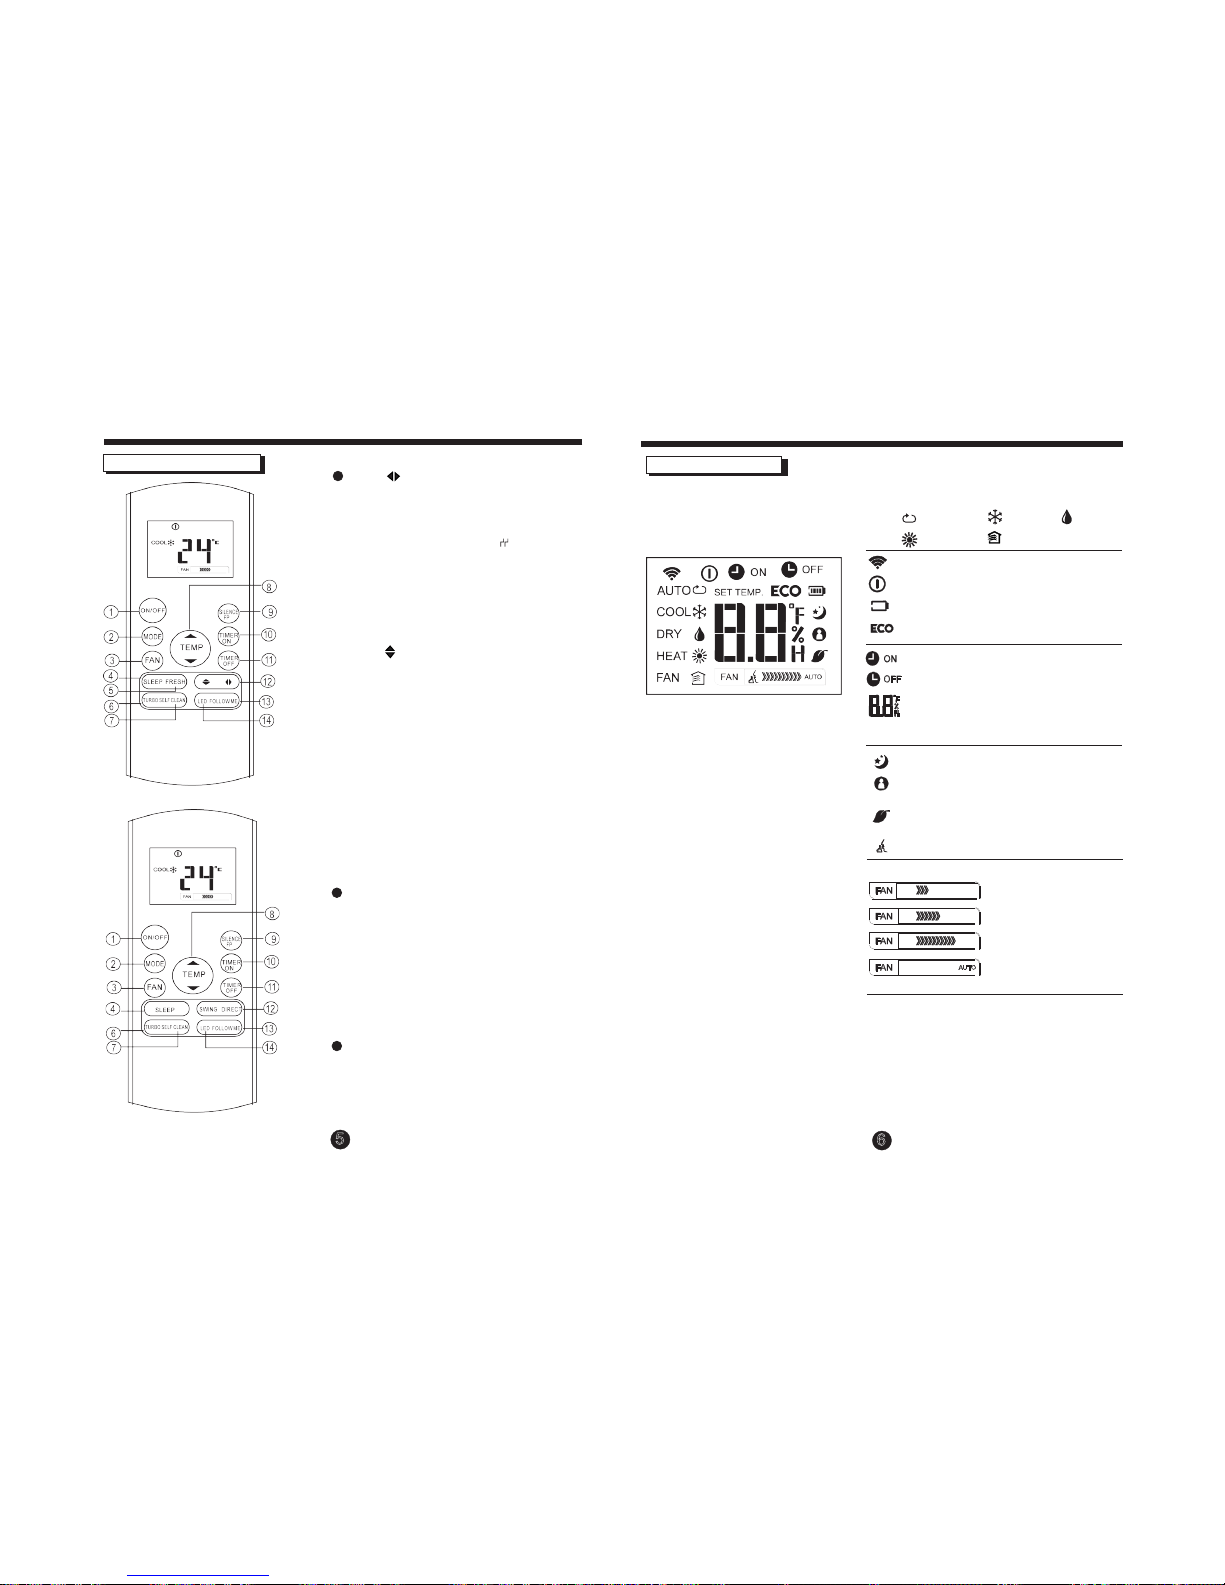
Swing Button
(applicable to RG57A4/BGEF)
Swing Button
(applicable to RG57A4/BGEF)
Used to stop or start horizontal louver movement or set the desired up/down air flow
direction. The louver changes 6 degree in
angle for each press. If keep pushing more
than 2 seconds, the louver will swing up and
down automatically.
Used to stop or start vertical louver movement
and set the desired left/right air flow direction.
The vertical louver changes 6 degree in angle
for each press. And the temperature display
area of indoor unit displays for one
second. If keep pushing more than 2 seconds,
the vertical louver swing feature is activated.
And the display area of indoor unit displays
, flashes four times, then the tempera-
IIII
ture setting reverts back. If the vertical louver
swing feature is stopped, it displays LC and
remains on for 3 seconds.
,
,
,
,
,
,
LED Button
Disable/Active indoor screen Display. When
pushing the button, the indoor screen display
is cleared, press it again to light the display.
Indicators on LCD
F an speed indica tion
Mode display
Information are displayed when
the remote controller is powered
up.
Displayed when data transmitted.
Displayed when remote controller is ON.
Battery display(low battery detection)
Not available for this unit
Not available for this unit
Low speed
Medium speed
High speed
Auto fan speed
Note:
of clear presentation. But during the actual operation
only the relative functional signs are shown on the
display window .
All indicators shown in the gure are for the purpose
Displayed when TIMER ON time is set.
Displayed in Sleep Mode operation.
Indicated that the air conditioner is
operating in Follow me mode
Not available for this unit
Displayed when TIMER OFF time is set.
Show set temperature or room
temperature, or time under TIMER
setting.
AUTO
HEAT FAN
COOL DRY
5
6
SWING Button (applicable to RG57A6/BGE)
DIRECT Button
(applicable to RG57A6/BGE)
Used to change the louver movement and set
the desired up/down air flow direction.
O
The louver changes 6 in angle for each press.
Used to stop or start horizontal louver auto
swing feature.
RG57A6/BGE
RG57A4/BGEF
7
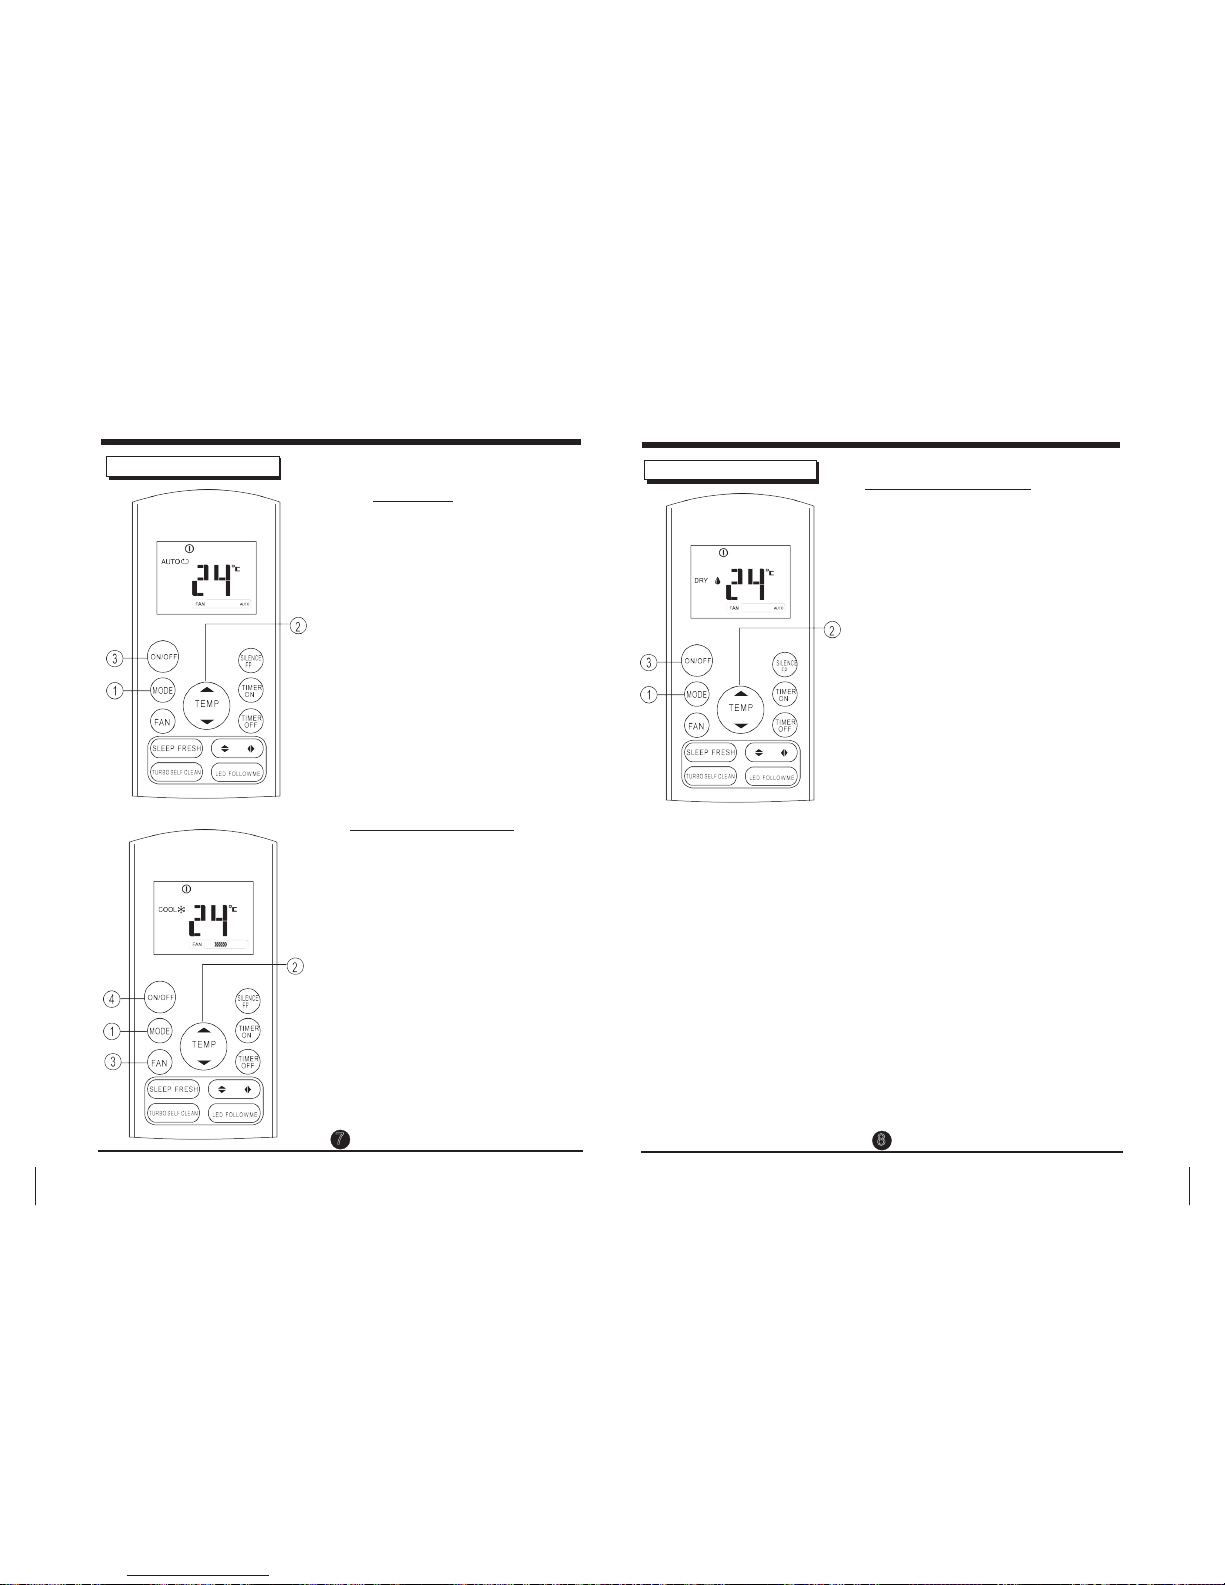
How to use the buttons
Cooling /Heating/Fan operation
Ensure the unit is plugged in and power is
available.
1. Press the M OD E button to select COOL,
HEAT(cooling & heating models only) or
FAN mode.
2. Press the U P /DO W N buttons to set the
desired temperature. The temperature can
O O O
be set within a range of 17 C~ 30 C in 1 C
increments.
3. Press the FA N button to select the fan speed
in four steps- Auto, Low, Med,or High.
4. Press the O N/O F F button to start the air
conditioner.
In the F AN mode, the setting temperature is not
displayed in the remote controller and you are not
able to control the room temperature either . In this
case, only step 1, 3 and 4 may be performed.
NOTE
Auto operation
Ensure the unit is plugged in and power is
available. The OPERATION indicator on the
display panel of the indoor unit starts flashing.
1. Press the M OD E button to select Auto.
2. Press the U P /DO W N button to set the
desired temperature. The temperature can
O O O
be set within a range of 17 C~ 30 C in 1 C
increments.
3. Press the O N/O F F button to start the air
conditioner.
1. In the Auto mode, the air conditioner can logically
choose the mode of Cooling, Fan, and Heating
by sensing the dierence between the actual
ambient room temperature and the setting
temperature on the remote controller.
2. In the Auto mode, you can not switch the fan speed.
It has already been automatically controlled.
3. If the Auto mode is not comfortable for you , the
desired mode can be selected manually.
NOTE
Dehumidifying oper ation
Ensure the unit is plugged in and power is
available. The OPERATION indicator on the
display panel of the indoor unit starts flashing.
1. Press the M OD E button to select DRY mode.
2. Press the U P /DO W N buttons to set the
desired temperature. The temperature
O O
can be set within a range of 17 C~ 30 C
O
in 1 C increments.
3. Press the O N/O F F button to start the air
conditioner.
In the Dehumidifying mode, you can not switch the
fan speed. It has already been automatically controlled.
NOTE
How to use the buttons
7
8

T i m er o p er a t io n
Press the TIMER ON button can set the auto-on
time of the unit. Press the TIMER OFF button
can set the auto-off time of the unit.
1. Press the TIMER ON button. The remote
controller shows TIMER ON, the last Auto-on
setting time and the signal "H" will be shown on
the LCD display area. Now it is ready to reset
the Auto-on time to START the operation.
2. Push the TIMER ON button again to set desired
Auto-on time. Each time you press the button,
the time increases by half an hour between 0
and 10 hours and by one hour between 10 and
24 hours.
3. After setting the TIMER ON ,there will be a one
second delay before the remote controller
transmits the signal to the air conditioner. Then,
after approximately another 2 seconds, the
signal "h" will disappear and the set temperature
will re-appear on the LCD display window.
To set the Auto-on time.
To set the Auto-o time.
1. Press the TIMER OFF button. The remote
controller shows TIMER OFF, the last Auto-off
setting time and the signal "H" will be shown on
the LCD display area. Now it is ready to reset
the Auto-off time to stop the operation.
2. Push the TIMER OFF button again to set
desired Auto-off time. Each time you press the
button, the time increases by half an hour
between 0 and 10 hours and by one hour
between 10 and 24 hours.
3. After setting the TIMER OFF ,there will be a
one second delay before the remote controller
transmits the signal to the air conditioner. Then,
after approximately another 2 seconds, the
signal "H " will disappear and the set temperature
will re-appear on the LCD display window.
When you select the timer operation, the remote controller automatically transmits the
timer signal to the indoor unit for the specified time. Therefore, keep the remote
controller in a location where it can transmit the signal to the indoor unit properly.
The effective operation time set by the remote controller for the timer function
is limited to the following settings: 0.5, 1.0, 1.5, 2.0, 2.5, 3.0, 3.5, 4.0, 4.5, 5.0,
5.5, 6.0, 6.5, 7.0, 7.5, 8.0, 8.5, 9.0, 9.5, 10, 11, 12, 13, 14, 15,16,17, 18, 19, 20,
21, 22, 23 and 24.
CAUTION
!
E x a m p le o f t i m er s e t t in g
(Auto-on Operation)
The TIMER ON feature is useful when you want
the unit to turn on automatically before you return
home. The air conditioner will automatically start
operating at the set time.
To start the air conditioner in 6 hours.
1. Press the TIMER ON button, the last setting
of starting operation time and the signal "H"
will show on the display area.
2. Press the TIMER ON button to display "6.0H "
on the TIMER ON display of the remote
controller.
3. Wait for 3 seconds and the digital display
area will show the temperature again. The
"TIMER ON" indicator remains on and this
function is activated.
TIMER ON
Example:
9
10
11
12
Stop
On
Set 10 hours later
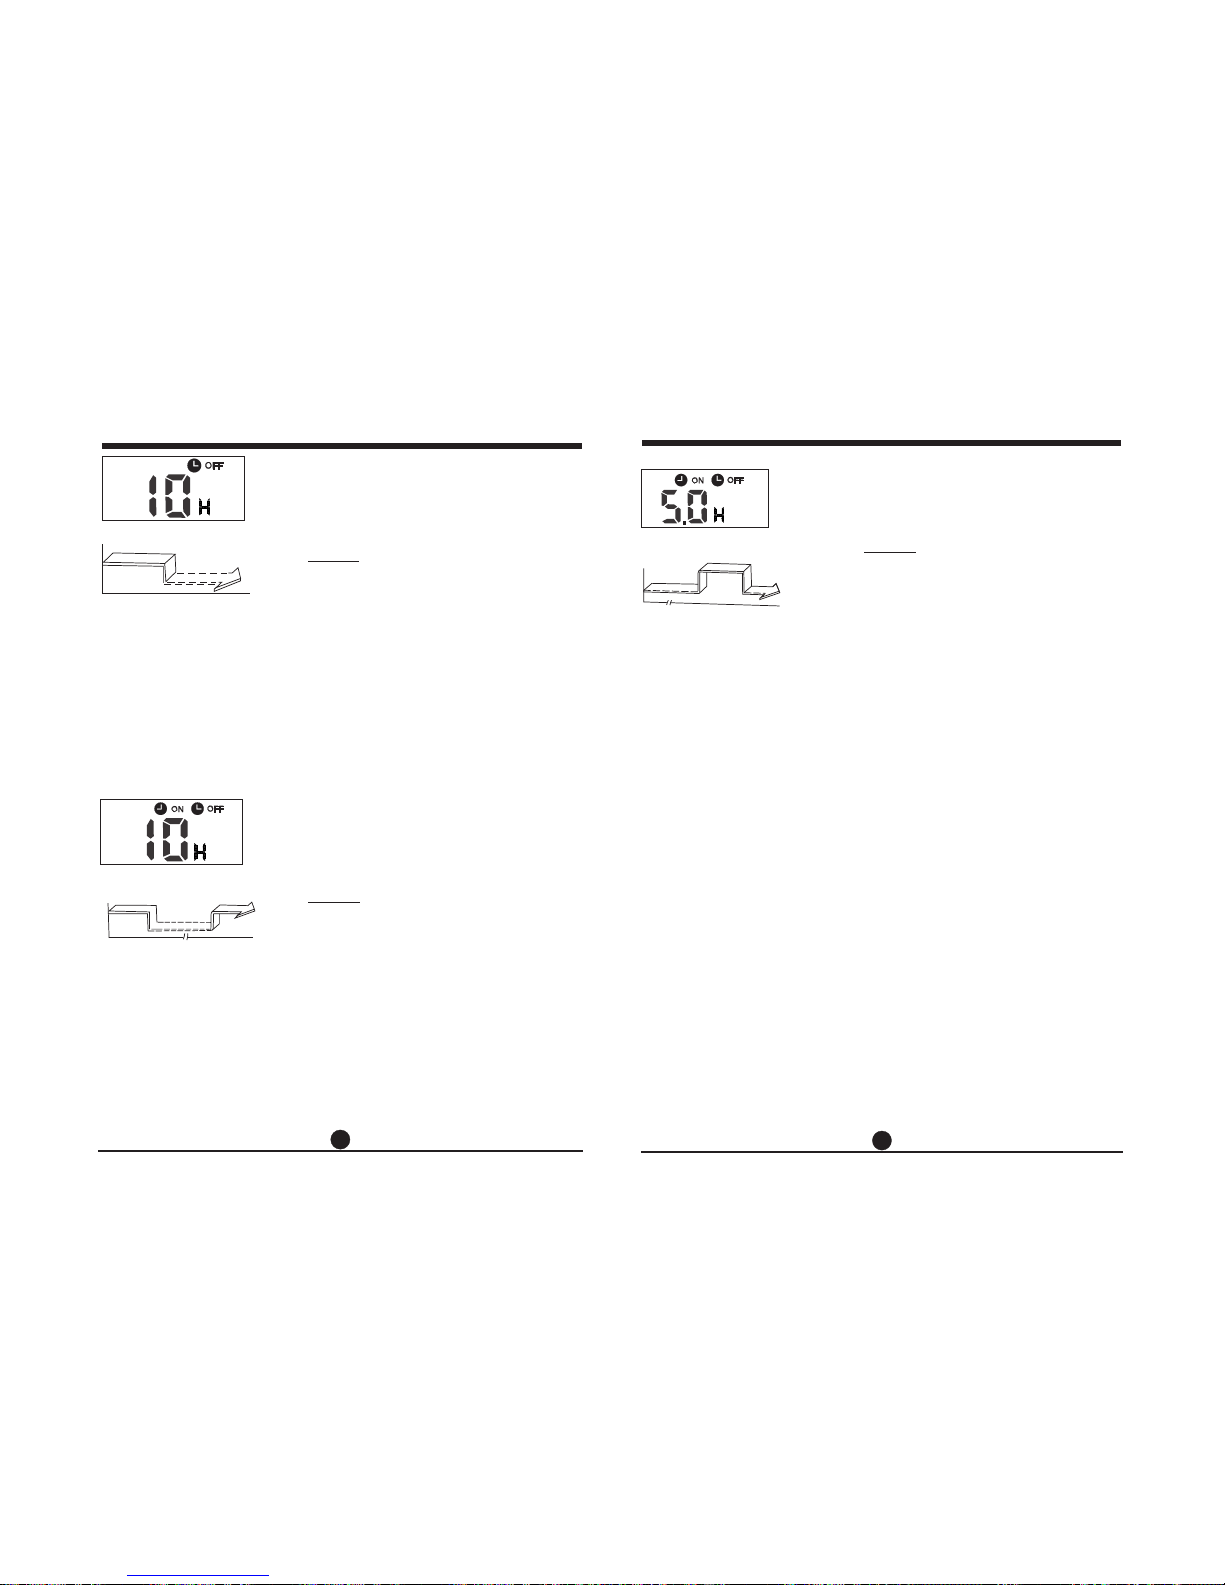
(Auto-off Operation)
The TIMER OFF feature is useful when you want the
unit to turn off automatically after you go to bed. The
air conditioner will stop automatically at the set time.
To stop the air conditioner in 10 hours.
1. Press the TIMER OFF button, the last setting of
stopping operation time and the signal "H" will
show on the display area.
2. Press the TIMER OFF button to display "10H " on
the TIMER OFF display of the remote controller.
3. Wait for 3 seconds and the digital display area
will show the temperature again. The "TIMER
OFF" indicator remains on and this function is
activated.
TIMER OFF
Example:
On
Stop
2 hours later
after setting
Set
To stop the air conditioner 2 hours after setting and
start it again 10 hours after setting.
1. Press the TIMER OFF button.
2. Press the TIMER OFF button again to display
2.0H on the TIMER OFF display.
3. Press the TIMER ON button.
4. Press the TIMER ON button again to display 10H
on the TIMER ON display .
5. Wait for 3 seconds and the digital display area
will show the temperature again. The "TIMER
ON OFF" indicator remains on and this function is
activated.
TIMER OFF → TIMER ON
(On → Stop → Start operation)
This feature is useful when you want to stop the air
conditioner after you go to bed, and start it again in
the morning when you wake up or when you return
home.
Example:
COMBINED TIMER
(S both ON and OFF )etting timers simultaneously
Start
10 hours later
after setting
Example:
TIMER ON → TIMER OFF
(Off → Start → Stop operation)
This feature is useful when you want to start
the air conditioner before you wake up and
stop it after you leave the house.
To start the air conditioner 2 hours after setting,
and stop it 5 hours after setting.
1. Press the TIMER ON button.
2. Press the TIMER ON button again to display
2.0H on the TIMER ON display.
3. Press the TIMER OFF button.
4. Press the TIMER OFF button again to display
5.0H on the TIMER OFF display .
5. Wait for 3 seconds and the digital display area
will show the temperature again. The "TIMER
ON & TIMER OFF" indicator remains on and
this function is activated.
Off
Stop
Start
2 hours later
after setting
5 hours later
after setting
Set
11
12
8m
MODE
SWING
TEMP
SHORTCUT
FAN
SPEED
TIMER
OFF
RESET LOCK
LED
FOLLOW ME
TIMER
ON
TURBO
SELF CLEAN
DIRECT
SLEEP
FRESH
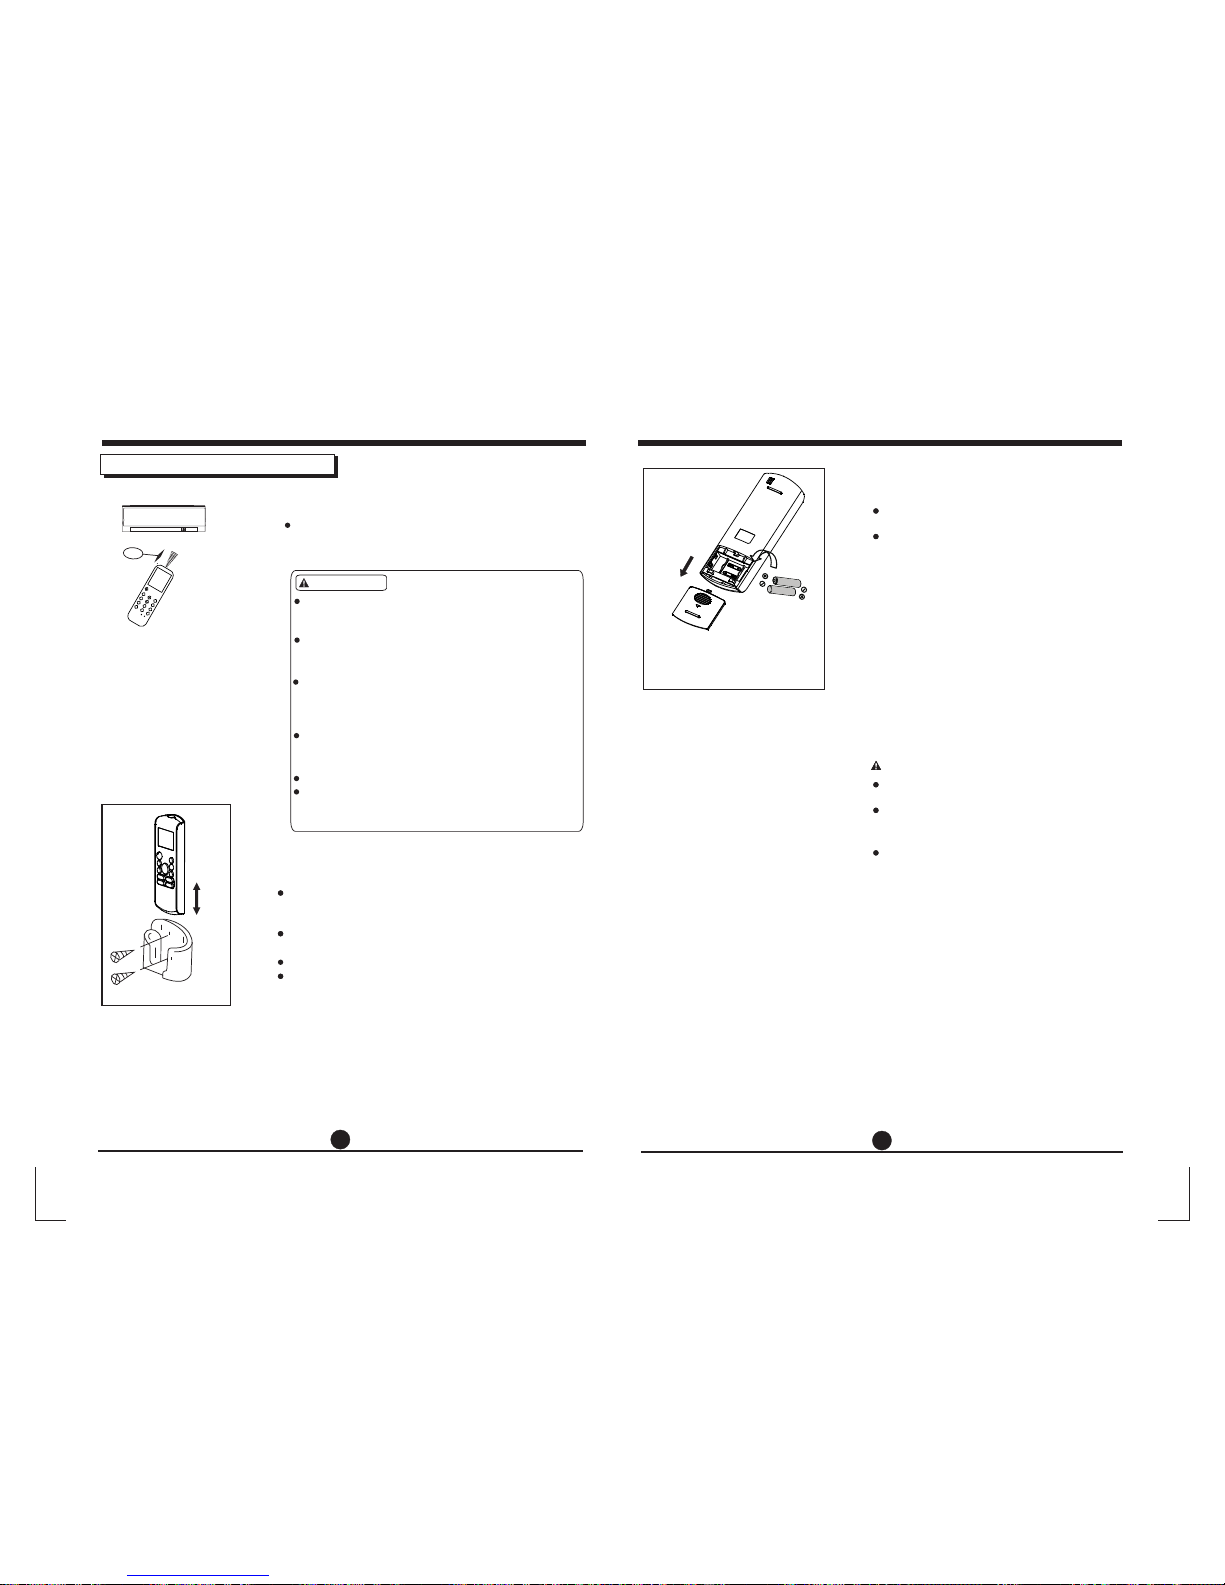
Use the remote controller within a distance of 8
meters from the appliance, pointing it towards the
receiver. Reception is confirmed by a beep.
The remote controller can be attached to a wall or pillar
by using a remote controller holder(not supplied,
purchased separately).
Before installing the remote controller, check that the
air conditioner receives the signals properly.
Install the remote controller with two screws.
For installing or removing the remote controller, move
it up or down in the holder.
The following cases signify exhausted batteries.
Replace old batteries with new ones.
Receiving beep is not emitted when a signal
is transmitted.
Indicator fades away.
Location of the remote contr oller.
Using the remote controller holder(optional)
The remote controller is powed by two dry
batteries (R03/LR03X2) housed in the back rear
part and protected by a cover.
(1) Remove the cover in the rear part of the
remote controller.
(2) Remove the old batteries and insert the new
batteries,placing the(+) and (-) ends correctly.
(3) Install the cover back on.
NOTE: When the batteries are removed, the
remote controller erases all programming. After
inserting new batteries, the remote controller
must be reprogrammed.
Replacing batteries
CAUTIONS
The air conditioner will not operate if curtains,
doors or other materials block the signals from
the remote controller to the indoor unit.
Prevent any liquid from falling into the remote
controller. Do not expose the remote controller
to direct sunlight or heat.
If the infrared signal receiver on the indoor unit
is exposed to direct sunlight, the air conditioner
may not function properly. Use curtains to
prevent the sunlight from falling on the receiver.
If other electrical appliances react to the remote
controller, either move these appliances or
consult your local dealer.
Do not drop the remote controller. Handle with care.
Do not place heavy objects on the remote controller,
or step on it.
CAUTIONS
Do not mix old and new batteries or batteries
of different types.
Do not leave the batteries in the remote
controller if they are not going to be used for
2 or 3 months.
Do not dispose batteries as unsorted
municipal waste. Collection of such waste
separately for special treatment is necessary.
Handling the remote controller
13
14

NOTES:

1
ΠΕΡΙΕΧΟΜΕΝΑ
2
Μοντέλο
Ονομαστική Τάση
Εύρος Θερμοκρασίας
περιβάλλοντος
8m
3.0V
(Μπαταρίες στεγνού τύπου R03/LR03 2)
RG57A4/BGEF,RG57A6/BGEF
Χαρακτηριστικά Ασύρματου Τηλεχειριστηρίου
Εμβέλεια Σήματος
Λήψης
-5 C 60C
•
Σημείωση:
Χαρακτηριστικά του Ασύρματου Τηλεχειριστηρίου .............................
Λειτουργίες Πλήκτρων ........................................................................
Ενδείξεις στην LCD Οθόνη ................................................................
Χρήση των πλήκτρων ........................................................................
Αυτόματη Λειτουργία ..........................................................................
Λειτουργίες Ψύξης/Θέρμανσης/Ανεμιστήρα ......................................
Λειτουργία Αφύγρανσης .....................................................................
Λειτουργία Timer ................................................................................
Χειρισμός του Ασύρματου Τηλεχειριστηρίου ......................................
2
3
6
7
7
7
8
9
13
Ο σχεδιασμός των πλήκτρων μπορεί να διαφέρει ελαφρά από αυτό που
έχετε αγοράσει
Όλες οι λειτουργίες που περιγράφονται στο παρόν εγχειρίδιο
υποστηρίζονται από την μονάδα. Αν η μονάδα δεν υποστηρίζει κάποιο
χαρακτηριστικό, όταν πιέζετε το αντίστοιχο κουμπί στο τηλεχειριστήριο
δεν θα υπάρχει αντίστοιχη λειτουργία.
Οταν υπάρχουν ουσιαστικές διαφορές μεταξύ του παρόντος εγχειριδίου
και του εγχειριδιου χρήσης. Υπερισχύει η ανάλυση λειτουργίων τους
εγχειριδιου χρήσης της κλιματιστικής μονάδας.

3
4
1
2
3
4
5
AUTO
(Αυτόματο)
COOL
(Ψύξη)
DRY
(Αφύγρανση)
HEAT
(Θέρμανση)
FAN
(Ανεμιστήρας)
AUTO LOW MED HIGH
Πλήκτρο SLEEP
Πλήκτρο FRESH
(εφαρμόζεται στο
RG57A4/BGEF)
7
Πλήκτρο SELF CLEAN (εφαρμόζεται στο
RG57A4/BGEF)
Λειτουργίες Πλήκτρων
Πλήκτρο TIMER ON
Πλήκτρο TIMER OFF
Πλήκτρο ( )
Πλήκτρο ( )
8
10
11
9
6
Πλήκτρο TURBO
Πλήκτρο SILENCE/FP
Πλήκτρο ON/OFF
Με αυτό το πλήκτρο γίνεται η εκκίνηση και η
διακοπή της λειτουργίας της κλιματιστικής
μονάδας.
Πιέστε αυτό το κουμπί για να αυξήσετε την
εσωτερική ρύθμιση της θερμοκρασίας σε βήματα
1°C έως 30 °C.
Πιέστε αυτό το κουμπί για να μειώσετε την
εσωτερική ρύθμιση της θερμοκρασίας σε βήματα
1°C έως 17°C.
Ενεργοποιεί/ Απενεργοποιεί τη λειτουργία SILENCE.
Αν πατηθεί παραπάνω από 2 δευτερόλεπτα, η "FP"
λειτουργία θα ενεργοποιηθεί και πατώντας παραπάνω
από 2 δευτερόλεπτα ξανά, απενεργοποιείται.
Όταν η λειτουργία Silence είναι ενεργοποιημένη, ο
συμπιεστής θα λειτουργεί σε χαμηλές στροφές και η
εσωτερική μονάδα θα φέρνει ελαφρό αέρα, ελαχιστοποιώντας το θόρυβο στο χαμηλότερο επίπεδο και
δημιουργώντας ένα ήσυχο και άνετο περιβάλλον.
Εξαιτίας των χαμηλών στροφών λειτουργίας, μπορεί
να μην υπάρξει επαρκής ψύξη και θέρμανση.
H "FP" λειτουργία μπορεί να ενεργοποιηθεί μόνο κατά
τη διάρκεια της λειτουργίας θέρμανσης (μόνο όταν
υπάρχει ρύθμιση λειτουργίας HEAT). Η μονάδα θα
λειτουργεί σε ρύθμιση θερμοκρασίας στους 8C. Η
οθόνη της εσωτερικής μονάδας θα εμφανίσει την
ένδειξη "FP". Εάν πατήσετε τα κουμπιά ON/OFF,
SLEEP, FP, MODE, FAN SPEED, UP or DOWN η
λειτουργία "FP" θα ακυρωθεί.
Πιέστε αυτό το πλήκτρο για να ενεργοποιήσετε την
ρύθμιση της αυτόματης ενεργοποίησης. Κάθε
φορά που πιέζετε αυτό το πλήκτρο η ρύθμιση της
ώρας αυξάνεται κατά μισή ώρα έως τις 10ώρες και
κατά 1ώρα εως τις 24 ώρες. Για να ακυρώσετε τη
ρύθμιση, πιέστε το πλήκτρο μέχρι η ένδειξη της
ώρας να γίνει 0.0.
Πιέστε αυτό το πλήκτρο για να ενεργοποιήσετε την
ρύθμιση της αυτόματης απενεργοποίησης. Κάθε
φορά που πιέζετε αυτό το πλήκτρο η ρύθμιση της
ώρας αυξάνεται κατά μισή ώρα έως τις 10ώρες και
κατά 1 ώρα έως τις 24 ώρες. Για να ακυρώσετε τη
ρύθμιση, πιέστε το πλήκτρο μέχρι η ένδειξη της
ώρας να γίνει 0.0.
ΣΗΜΕΙΩΣΗ: Η λειτουργία του έλεγχου της
θερμοκρασίας δεν είναι διαθέσιμος σε λειτουργία
ανεμιστήρα.
Πλήκτρο MODE
Με αυτό το πλήκρο ρυθμίζετε την λειτουργία της
κλιματιστικής μονάδας όπως παρακάτω:
Πλήκτρο FAN
Με αυτό το πλήκτρο μπορείτε να επιλέξετε την
ταχύτητα του ανεμιστήρα όπως παρακάτω:
Σημείωση: Η ρύθμιση της ταχύτητας του
ανεμιστήρα ισχύει μόνο για τις λειτουργίες AUTO
και DRY.
Η λειτουργία διατηρεί ευχάριστη την ατμόσφαιρα
και συνεισφέρει στην εξοικονόμηση ενέργειας.
Η ενεργοποίηση της συγκεκριμένης λειτουργίας
ειναι διαθέσιμη μόνο κατα την λειτουργία της
ψύξης, θέρμανσης και στην Αυτόματη λειτουργία
της κλιματιστικής μονάδας.
Για περισσότερες λεπτομέρειες ανατρέξτε στο
εγχειρίδιο λειτουργίας χρήσης
ΣΗΜΕΙΩΣΗ: Όταν η μονάδα λειτουργεί σε
κατάσταση SLEEP αν πιέσετε τα πλήκτρα MODE,
FAN, SPEED ή ON/OFF η λειτουργία θα
απενεργοποιηθεί.
Οταν ενεργοποιείτε την λειτουργία FRESH, ο
Ιονιστής και το καινοτόμο σύστημα καθαρισμού
αέρα βοηθάνε να απομακρυνθούν επιβλαβή
στοιχεία από τον αέρα.
Η λειτουργία Turbo επιτρέπει στη μονάδα να
φτάσει την προκαθορισμένη θερμοκρασία
σε λειτουργία ψύξης ή θέρμανσης στο
συντομότερο χρόνο.
Ενεργοποιήση / απενεργοποίηση της λειτουργίας
αυτοκαθαρισμού
Σημείωση: Η λειτουργία Θέρμανσης δεν ισχύει για
τις μονάδες που είναι μόνο για Ψύξη.
Λειτουργίες Πλήκτρων
RG57A4/BGEF
RG57A6/BGEF

12
14
13
Πλήκτρο FOLLOW ME
Λειτουργίες Πλήκτρων
Πλήκτρο Swing
Πλήκτρο Swing
Πλήκτρο LED
Σημείωση:
Ενδείξεις στην LCD οθόνη
5
6
Με αυτό το πλήκτρο επιλέγετε την εκκίνηση
(εφαρμόζεται στο RG57A4/BGEF)
Πλήκτρο SWING
Πλήκτρο DIRECT
(εφαρμόζεται στο RG57A6/BGE)
ή διακοπή της κίνησης της κάθετης
περσίδας ή ρυμθίζετε την επιθυμητή θέση
των περσίδων και την διάχυση αέρα.
Οι περσίδες αλλάζουν θέση κατα 6μοίρες
καθε φορά που πιέζετε το πλήκτρο. Αν
κρατήσετε πατημένο το πλήκτρο για
περισσότερο από 2 δευτερόλεπτα οι
περσίδες θα κινηθουν αυτόματα δεξία και
αριστέρα.
Χρησιμοποιείται για να διακόψει ή να
εκκινήσει την αυτόματη λειτουργία
αλλαγής θέσης της οριζόντιας
περσίδας
(εφαρμόζεται στο RG57A6/BGE)
Χρησιμποιείται για να αλλάξει τη κίνηση
της περσίδας και να ρυθμίσει την επιθυμητή θέση για τη διάχυση του αέρα. Η
περσίδα αλλάζει 6 μοίρες υπό γωνία με
κάθε πάτημα του κουμπιού.
Πιέστε αυτό το πλήκτρo για να
ενεργοποιήσετε την λειτουργία FOLLOW
ME, στην οθόνη του τηλεχειριστηρίου
εμφανίζεται η πραγματική θερμοκρασία στη
θέση που βρίσκεται. Το τηλεχειριστήριο θα
στείλει αυτό το μήνυμα στο κλιματιστικό σε
κάθε χρονικό διάστημα 3 λεπτών έως ότου
πατήσετε ξανά το κουμπί Follow Me. ο
αέρας στο κλιματιστικό θα ακυρώσει τη
λειτουργία Follow Me αυτόματα αν δεν λάβει
το σήμα μέσα σε διάστημα 7 λεπτών.
Οι ενδείξεις που περιγράφονται στο παρόν
εγχειρίδιο είναι αναφορικές. Κατά την
πραγματική λειτουργία στην οθόνη
θα εμφανίζονται οι πραγματικές ενδείξεις
Απενεργοποίηση /Ενεργοποιήση
εσωτερικής οθόνης. Πιέζοντας αυτό το
πλήκτρο, η οθόνη απενεργοποιείται,
πατήστε το ξανά για να ανάψει η οθόνη.
Οι ενδείξεις εμφανίζονται όταν το
τηλεχειριστήριο ειναι ενεργοποιημένο
Ενδείξεις λειτουργιών
Ενδείξεις ταχύτητας ανεμιστήρα
Ένδειξη μετάδοσης εντολων
Εμφανίζεται όταν το TIMER ON έχει ρυθμιστεί
Εμφανίζονται κατά τη λειτουργία SLEEP
Εμφανίζεται όταν το TIMER OFF έχει ρυθμιστεί
Ένδειξη μπαταρίας (ανίχνευση χαμηλής μπαταρίας)
Δεν είναι διαθέσιμο σε αυτή τη μονάδα
Δεν είναι διαθέσιμο σε αυτή τη μονάδα
Δεν είναι διαθέσιμο σε αυτή τη μονάδα
Εμφανίζεται όταν το τηλεχειριστήριο ειναι
ενεργοποιημένο
Εμφανίζεται η θερμοκρασία που έχει οριστεί ή η
θερμοκρασία του δωματίου ή εμφανίζεται ο
χρόνος όταν ρυθμίζετε το TIMER
Εμφανίζεται όταν το κλιματιστικό είναι
σε κατάσταση λειτουργίας FOLLOW ΜΕ
Χαμηλή ταχύτητα
Μεσαία ταχύτητα
Υψηλή ταχύτητα
Αυτόματη ταχύτητα
(εφαρμόζεται στο RG57A4/BGEF)
Χρησιμοποιείται για τη διακοπή ή την εκκίνηση
της κάθετης περσίδας ή ρυθμίζει την επιθυμητή
αριστερή/δεξιά διάχυση του αέρα. Η κάθετη
περσίδα αλλάζει 6 μοίρες σε κάθε πάτημα του
κουμπιού. Και η ένδειξη θερμοκρασίας εσωτερικής μονάδας εμφανίζεται ” “ για
ένα δευτερόλεπτο. Αν το κρατήσετε πατημένο
για παραπάνω απο 2 δευτερόλεπτα η ενεργοποιείται η αλλαγή θέσης της κάθετης περσίδας.
” “, αναβοσβήνει τέσσερις φορές, τότε η
επανέρχεται η ρύθμιση της θερμοκρασίας. Αν
η ρύθμιση αλλαγή θέσης της κάθετης περσίδας
διακοπεί, εμφανίζεται η ένδειξη (LC) και
παραμένει ενεργοποιημένη για 3 δευτερόλεπτα.
IIII
RG57A6/BGE
RG57A4/BGEF

7
Χρήση των πλήκτρων
7
8
Χρήση των πλήκτρων
Αυτόματες λειτουργίες Λειτουργία Αφύγρανσης
Λειτουργίες Ψύξης/θέρμανσης/ανεμιστήρα
Βεβαιωθείτε πως η κλιματιστική μονάδα είναι συνδεδεμένη
με την παροχή ρεύματος. Η ενδεικτική λυχνία OPERATION
(λειτουργίας) στην οθόνη της εσωτερικής μονάδας είναι
αναμμένη.
1. Πιέστε το πλήκτρο MODE και επιλέξτε Auto.
2. Πιέστε το πλήκτρο UP/DOWN για να ορίσετε την
επιθυμητή θερμοκρασία. Η θερμοκρασία μπορεί να
ρυθμιστεί εντός του εύρους 17
ο
C-30οC με αύξηση κατά 1οC.
3. Πιέστε το πλήκτρο ON/OFF για να ξεκινήσει η
λειτουργία της κλιματιστικής μονάδας.
Βεβαιωθείτε πως η κλιματιστική μονάδα είναι
συνδεδεμένη με την παροχή ρεύματος . Η ενδεικτική
λυχνία OPERATION (λειτουργίας) στην οθόνη της
εσωτερικής μονάδας θα είναι αναμμένη.
1. Πιέστε το πλήκτρο MODE για να επιλέξετε την
λειτουργία DRY.
2. Πιέστε το πλήκτρο UP/DOWN για να επιλέξετε την
επιθυμητή θερμοκρασία. Η θερμοκρασία μπορεί να
ρυθμιστεί εντός του εύρους 17
ο
C-30οC με αύξηση κατά 1οC.
3. Πιέστε το πλήκτρο ON/OFF για να ξεκινήσει η
λειτουργία της κλιματιστικής μονάδας
ΣΗΜΕΙΩΣΗ
Κατά τη λειτουργία αφύγρανσης, δεν μπορείτε να
επιλέξετε ταχύτητα ανεμιστήρα. Έχει επιλεγεί αυτόματα.
ΣΗΜΕΙΩΣΗ
1. Όταν έχετε επιλέξει την κατάσταση AUTO, η
κλιματιστική μονάδα επιλέγει αυτόματα τη λειτουργία
ψύξης, θέρμανσης, ανεμιστήρα και αφύγρανσης
ανάλογα με τη διαφορά θερμοκρασίας μεταξύ της
θερμοκρασίας χώρου και της επιλεγμένης θερμοκρασίας.
2. Κατά την λειτουργία AUTO δεν μπορείτε να επιλέξετε
την ταχύτητα του ανεμιστήρα, έχει επιλεγεί αυτόματα.
3. Εάν η λειτουργία AUTO δεν είναι η κατάλληλη για εσάς,
μπορείτε να επιλέξετε χειροκίνητα την επιθυμητή
κατάσταση λειτουργίας.
ΣΗΜΕΙΩΣΗ
Κατά τη λειτουργία FAN(ανεμιστήρας), δεν θα
εμφανίζεται στο τηλεχειριστήριο η επιλεγμένη
θερμοκρασία και δεν θα μπορείτε να ελέγξετε τη
θερμοκρασία του χώρου. Σε αυτή την περίπτωση μπορείτε
να ακολουθήσετε τα βήματα 1,3 και 4.
Βεβαιωθείτε πως η κλιματιστική μονάδα είναι συνδεδεμένη
με την παροχή ρεύματος.
1. Πιέστε το πλήκτρο MODE για να επιλέξετε τη
λειτουργία ψύξης, θέρμανσης ή ανεμιστήρα.
2. Πιέστε το πλήκτρο UP/DOWN για να ορίσετε την
επιθυμητή θερμοκρασία. Η θερμοκρασία μπορεί να
ρυθμιστεί εντός του εύρους 17
ο
C-30οC με αύξηση κατά 1οC.
3. Πιέστε το πλήκτρο FAN για να επιλέξετε την ταχύτητα
του ανεμιστήρα.
4. Πιέστε το πλήκτρο ON/OFF για να ξεκινήσει η
λειτουργία της κλιματιστικής μονάδας.

0.5, 1.0, 1.5, 2.0, 2.5, 3.0, 3.5, 4.0, 4.5, 5.0,
5.5, 6.0, 6.5, 7.0, 7.5, 8.0, 8.5, 9.0, 9.5, 10, 11, 12, 13, 14, 15,16,17, 18, 19, 20,
21, 22, 23 and 24.
ΠΡΟΣΟΧΗ
!
Παράδειγμα της ρύθμισης του Timer
9
10
Λειτουργία TIMER
Με το πλήκτρο TIMER ON μπορείτε να ρυθμίσετε
την αυτόματη ενεργοποίηση της μονάδας και με το
πλήκτρο TIMER OFF την αυτόματη
απενεργοποίηση της μονάδας.
Ρύθμιση της ώρας της αυτόματης
ενεργοποίησης της μονάδας.
1. Πιέστε το πλήκτρο TIMER ON. Στην οθόνη του
ασύρματου τηλεχειριστηρίου θα εμφανιστεί η
ένδειξη TIMER ON, η προηγούμενη ρύθμιση της
ώρας που είχε γίνει και η ένδειξη "H". Τώρα
μπορείτε να ρυθμίσετε την νέα ώρα αυτόματης
ενεργοποίησης της μονάδας.
2. Πιέστε άλλη μια φορά το πλήκτρο TIMER ON
για να ορίσετε την επιθυμητή ώρα της αυτόματης
ενεργοποίησης της μονάδας. Κάθε φορά που
πιέζετε το συγκεκριμένο πλήκτρο η ώρα θα
αυξάνεται κατά 30λεπτά έως τις 10ώρες και έπειτα
κατά 1 ώρα εώς τις 24 ώρες.
3. Αφού ολοκληρώσετε τη ρύθμιση του TIMER ON,
θα υπάρξει μια χρονοκαθυστέρηση ενάμιση
δευτερολέπτου για την μετάδοση της εντολής από
το ασύρματο τηλεχειριστήριο στην εσωτερική
μονάδα. Μετά από άλλα 2 δευτερόλεπτα θα
εξαφανιστεί η ένδειξη "Η" από την οθόνη
και θα επανεμφανιστεί η επιλεγμένη θερμοκρασία.
Ρύθμιση της ώρας της αυτόματης
απενεργοποίησης της μονάδας.
1. Πιέστε το πλήκτρο TIMER OFF. Στην οθόνη του
ασύρματου τηλεχειριστηρίου θα εμφανιστεί η
ένδειξη TIMER OFF, η προηγούμενη ρύθμιση της
ώρας που είχε γίνει και η ένδειξη "Η". Τώρα
μπορείτε να ρυθμίσετε την νέα ώρα αυτόματης
απενεργοποίησης της μονάδας.
2. Πιέστε άλλη μια φορά το πλήκτρο TIMER OFF
για να ορίσετε την επιθυμητή ώρα της αυτόματης
απενεργοποίησης της μονάδας. Κάθε φορά που
πιέζετε το συγκεκριμένο πλήκτρο η ώρα θα
αυξάνεται κατά 30λεπτά εώς τις 10 ώρες και έπειτα
κατά 1 ώρα εώς τις 24 ώρες.
3. Αφού ολοκληρώσετε τη ρύθμιση του TIMER
OFF, θα υπάρξει μια χρονοκαθυστέρηση ενάμιση
δευτερολέπτου για την μετάδοση της εντολής από
το ασύρματο τηλεχειριστήριο στην εσωτερική
μονάδα. Μετά από άλλα 2 δευτερόλεπτα θα
εξαφανιστεί η ένδειξη "Η" από την οθόνη
και θα επανεμφανιστεί η επιλεγμένη θερμοκρασία.
Οταν επιλέξετε την λειτουργία TIMER, το τηλεχειριστήριο μεταδίδει αυτόματα το σήμα
χρονδιακόπτη στην εσωτερική μονάδας για το καθορισμένο χρόνο. Ως εκ τούτου το
τηλεχειριστήριο θα πρέπει να βρίσκεται σε θέση όπου μπορεί να μεταδίδει το σήμα στην εσωτερική
μονάδα σωστά.
Οι ρυθμίσεις που μπορούν να γίνουν στο ασύρματο τηλεχειριστήριο για τη λειτουργία του
χρονοδιακόπτη είναι οι παρακάτω:
TIMER ON
(Αυτόματη ενεργοποίηση της μονάδας)
Η λειτουργία TIMER ΟΝ είναι χρήσιμη όταν θέλετε η
μονάδα να ενεργοποιηθεί αυτόματα πριν επιστρέψετε
σπίτι. Η κλιματιστική μονάδα θα εκκινήσει αυτόματα
την λειτουργία την ώρα που έχει επιλεγεί.
Ενεργοποίηση της κλιματιστικής μονάδας σε 6 ώρες.
1. Πιέστε το πλήκτρο TIMER ON. Στην οθόνη του
ασύρματου τηλεχειριστηρίου θα εμφανιστεί η ένδειξη
TIMER ON, η προηγούμενη ρύθμιση της ώρας που
είχε γίνει και η ένδειξη "Η".
2. Πιέστε το πλήκτρο TIMER ON μέχρι να εμφανιστεί
στην οθόνη του ασύρματου τηλεχειριστηρίου η ένδειξη
"6:0Η".
3. Μετά από 3 δευτερόλεπτα θα επανεμφανιστεί στην
οθόνη η επιλεγμένη θερμοκρασία.
Τώρα έχει πλέον
ενεργοποιηθεί η λειτουργία.
Παράδειγμα:

11
12
Τερματισμός
λειτουργίας
Τερματισμός
λειτουργίας
Τερματισμός
λειτουργίας
Τερματισμός
λειτουργίας
Εκκίνηση
Εκκίνηση
Εκκίνηση
Εκκίνηση
Ρύθμιση
Ρύθμιση
Ρύθμιση
10 ώρες αργότερα
(Αυτόματη απενεργοποίηση της μονάδας)
TIMER OFF
Ταυτόχρονη ρύθμιση TIMER ON και TIMER OFF
Παράδειγμα:
2 ώρες
μετά την
ρύθμιση
2 ώρες
μετά την
ρύθμιση
5 ώρες
μετά την
ρύθμιση
10 ώρες αργότερα
11
12
Η λειτουργία TIMER OFF είναι χρήσιμη όταν θέλετε
να απενεργοποιηθεί η μονάδα όταν πέσετε για
ύπνο. Η κλιματιστική μονάδα θα απενεργοποιηθεί
αυτόματα την ώρα που έχει επιλεγεί.
Διακοπή λειτουργίας της κλιματιστικής μονάδας
μετά από 10ώρες.
1. Πιέστε το πλήκτρο TIMER OFF. Στην οθόνη του
ασύρματου τηλεχειριστηρίου θα εμφανιστεί η
ένδειξη TIMER OFF, η προηγούμενη ρύθμιση της
ώρας που είχε γίνει και η ένδειξη "H".
2. Πιέστε το πλήκτρο TIMER OFF μέχρι να
εμφανιστεί στην οθόνη του ασύρματου
τηλεχειριστηρίου η ένδειξη "10h".
3. Μετά από 3 δευτερόλεπτα θα επανεμφανιστεί
στην οθόνη η επιλεγμένη θερμοκρασία. Τώρα έχει
πλέον ενεργοποιηθεί η λειτουργία.
Παράδειγμα:
Διακοπή λειτουργίας της κλιματιστικής μονάδας 2
ώρες μετά την ρύθμιση και εκκίνηση λειτουργίας της
μονάδας 10 ώρες μετά την ρύθμιση.
1. Πιέστε το πλήκτρο TIMER OFF.
2. Πιέστε το πλήκτρο TIMER OFF μέχρι να
εμφανιστεί στην οθόνη η ένδειξη 2.0H.
3. Πιέστε το πλήκτρο TIMER ON.
4. Πιέστε το πλήκτρο TIMER ON μέχρι να
εμφανιστεί στην οθόνη η ένδειξη 10H.
5. Περιμένετε μέχρι να εμφανιστεί στην οθόνη η
επιλεγμένη θερμοκρασία.
Παράδειγμα:
Ενεργοποίηση της κλιματιστικής μονάδας 2 ώρες
μετά τη ρύθμιση και διακοπή λειτουργίας 5 ώρες
μετά την ρύθμιση.
1. Πιέστε το πλήκτρο TIMER ON.
2. Πιέστε το πλήκτρο TIMER ON μέχρι να
εμφανιστεί στην οθόνη η ένδειξη 2.0Η.
3. Πιέστε το πλήκτρο TIMER OFF.
4. Πιέστε το πλήκτρο TIMER OFF μέχρι να
εμφανιστεί στην οθόνη η ένδειξη 5.0Η.
5. Περιμένετε μέχρι να εμφανιστεί στην οθόνη η
επιλεγμένη θερμοκρασία.
Διακοπή λειτουργίας -> Εκκίνηση λειτουργίας
Αυτή η ρύθμιση είναι χρήσιμη όταν θέλετε η
κλιματιστική μονάδα να διακόψει τη λειτουργία της
όταν ξαπλώσετε το βράδυ και να ενεργοποιηθεί η
λειτουργία της όταν ξυπνήσετε το πρωί ή όταν
επιστρέφετε στο σπίτι.
Εκκίνηση λειτουργίας -> Διακοπή λειτουργίας
Αυτή η λειτουργία είναι χρήσιμη όταν θέλετε η
κλιματιστική μονάδα να ενεργοποιηθεί πριν
ξυπνήσετε και να διακόψει τη λειτουργία της όταν
φύγετε από το σπίτι.

8m
ΠΡΟΣΟΧΗ
Χειρισμός του Ασύρματου Τηλεχειριστηρίου
13
14
Θέση του Ασύρματου Τηλεχειριστηρίου
Χρησιμοποιώντας τη θήκη τηλεχειριστηρίου (προαιρετικό)
Να χρησιμοποιείτε το ασύρματο τηλεχειριστήριο εντός
8μ από την κλιματιστική μονάδα στοχεύοντας στον
δέκτη σήματος. Η αποδοχή της εντολής συνοδεύεται
από ένα ήχο.
Η κλιματιστική μονάδα δεν θα λειτουργεί αν
εμποδίζονται οι εντολές του ασύρματου
τηλεχειριστηρίου προς την εσωτερική μονάδα από
κουρτίνες, πόρτες ή άλλα αντικείμενα.
Αποφύγετε την εισροή νερού στο ασύρματο
τηλεχειριστήριο. Βεβαιωθείτε πως δεν είναι
εκτεθειμένο σε ηλιακή ακτινοβολία ή σε πηγή
θερμότητας.
Εάν ο υπέρυθρος δέκτης εντολής της εσωτερικής
μονάδας είναι εκτεθειμένος στην ηλιακή
ακτινοβολία, η κλιματιστική μονάδα μπορεί να μην
λειτουργεί σωστά. Χρησιμοποιήστε τις
κουρτίνες για να αποφύγετε την απευθείας ηλιακή
ακτινοβολία στον δέκτη της μονάδας.
Εάν άλλες συσκευές επηρρεάζουν τη λειτουργία του
ασύρματου τηλεχειριστηρίου, απομακρύνετε
αυτές τις συσκευές ή συμβουλευτείτε τον
προμηθευτή σας.
Το τηλεχειριστήριο μπορεί να προσαρτηθεί στο τοίχο
ή σε κολώνα χρησιμοποιώντας μια ειδική θήκη (δεν
παρέχεται, θα πρέπει αγοραστεί ξεχωριστά).
Πριν εγκαταστήσετε το τηλεχειριστήριο, βεβαιωθείτε
ότι η κλιματιστικό λαμβάνει σωστά τα σήματα
Τοποθετήστε την θήκη του τηλεχειριστήριου με δύο
βίδες
Για την εγκατάσταση ή την αφαίρεση του
τηλεχειριστηρίου, κίνηση προς τα πάνω ή προς τα
κάτω προς στην υποδοχή.
Αντικατάσταση μπαταριών
ΠΡΟΣΟΧΗ
Αντικαταστήστε τις μπαταρίες όταν δεν
ακούτε τον αντίστοιχο ήχο από την
εσωτερική μονάδα ή όταν η ένδειξη εντολής
στο ασύρματο τηλεχειριστήριο δεν ανάβει.
Το ασύρματο τηλεχειριστήριο χρειάζεται 2
ξηρού τύπου μπαταρίες(R03/LR03X2) που
βρίσκονται στην πίσω πλευρά του.
(1) Αφαιρέστε το κάλυμα.
(2) Αφαιρέστε τις παλίες μπαταρίες και
τοποθετήστε τις νέες με σωστή φορά των
άκρων (+) και (-).
(3) Επανατοποθετήστε το κάλυμα.
Σημείωση: Όταν αφαιρείτε τις μπαταρίες, το
τηλεχειριστήριο διαγράφει όλους τους
προγραμματισμούς. Μετά την
επανατοποθέτηση των μπαταριών, πρέπει να
το ρυθμίσετε ξανά.
Μην τοποθετείτε τις παλιές μπαταρίες μαζί με
τις νέες ή με άλλου τύπου.
Εάν δεν πρόκειται να χρησιμοποιήσετε το
ασύρματο τηλεχειριστήριο για 2 με 3 μήνες να
αφαιρείτε τις μπαταρίες.
Να απορρίπτετε τις παλιές μπαταρίες σε
ειδικά δοχεία που υπάρχουν σε καταστήματα.

Σημειώσεις:

1
CUPRINS
2
Model
Tensiune nominală
8m
3.0V(Dry batteries R03/LR03 2)
RG57A4/BGEF,RG57A6/BGEF
RG57A4/BGEF RG57A6/BGEF
Specificatiile Telecomenzii
Mediu ambiental
Interval primire
semnal
-5C 60C
•
NOTA:
2
3
6
7
7
7
8
9
13
Fixarea de perete a telecomanzii ........................................................
Specificatiile telecomanzii ..................................................................
Tastele de functionare .......................................................................
Indicatiile afisajului .............................................................................
Cum sa folosim tastele ........................................................................
Functionarea Auto ................................................................................
Racire / Incalzire / Ventilare .................................................................
Functia de dezumidificare ....................................................................
Functia de programare ........................................................................
Design-ul tastelor se bazează pe modelul de tipic și pot fi ușor diferite
față de cel real pe care l-ați achiziționat. Forma actuala va prevala.
Toate funcțiile descrise sunt realizate de către aparat. Dacă unitatea nu
are această functie, nu va exista nici o operațiune corespunzătoare
atunci când apăsați tasta de pe telecomandă.
Atunci când există diferențe mari între Manual Telecomenzii și Manualul
de Utilizare pe descrierea functiei, descrierea din MANUALUL DE
UTILIZARE prevalează.

3
4
1
2
3
4
5
AUTO RACIRE
DEZUMIDIFICARE
INCALZIRE
VENTILARE
AUTO MICA MEDIE MARE
Tasta SLEEP
Tasta FRESH
(se aplică pentru RG57A4/BGEF)
7
Functiile tastelor
8
10
11
9
Functiile tastelor
6
Tasta PORNIT/OPRIT
Aceasta tasta porneste sau opreste aparatul
de aer conditionat.
Apăsați aceasta tasta pentru a mări setarea
temperaturii interioare în trepte cu 1°C pana
la 30°C.
Apăsați aceasta tasta pentru a scadea setarea
temperaturii interioare în trepte cu 1°C pana la
17°C.
NOTA: Controlul temperaturii nu este disponibil
in Modul Ventilare
Tasta SILENȚIOS/FP
Activează/Dezactivează funcția SLEEP. Dacă
apăsați mai mult de 2 secunde, funcția "FP" se
va activa iar apăsând mai mult de 2 secunde o
va dezactiva.
Când funcția SILENȚIOASĂ este activată,
compresorul va funcționa la o frecvență minimă
și unitatea interioară va sufla aerul încet ceea
ce va reduce nivelul de zgomot la cel mai mic
posibil și va crea o atmosferă liniștită pentru
dumneavoastră. Datorită frecvenței reduse a
compresorului, capacitatea de încălzire sau
răcire poate să fie insuficientă.
Funcția "FP" poate fi activată numai în funcția
de încălzire (când modul setat este ÎNCĂLZIRE).
Aparatul va funcționa la o temperatură presetată
de 8 grade C. Pe afișajul de la unitatea interioară
se va afișa "FP". Apăsând în timpul funcționării
una din tastele ON/OFF, SLEEP, FP, MODE,
FAN SPEED, UP sau DOWN va anula funcția "FP".
Tasta PORNIRE PROGRAMARE
Apăsați acesta tasta pentru a iniția pornirea
programata. Fiecare apăsare va mări setarea în
trepte de 30 minute. Când timpul de setare
afiseaza 10.0, fiecare apăsare va crește timpul
de auto setare 60 minute in trepte. Pentru a
anula pornirea programata, pur și simplu apasati
pana se afiseaza la timp 0.0.
Tasta OPRIRE PROGRAMARE
Apăsați acesta tasta pentru a iniția oprirea
programata. Fiecare apăsare va mări setarea în
trepte de 30 minute. Când timpul de setare
afiseaza 10.0, fiecare apăsare va crește timpul
de auto setare 60 minute in trepte. Pentru a
anula oprirea programata, pur și simplu apasati
pana se afiseaza la timp 0.0.
Tasta SUS ( )
Tasta SUS ( )
NOTĂ: Vă rugăm să nu selectați modul
INCALZIRE dacă aparatul achiziționat este doar cu
mod de RACIRE. Modul de INCALZIRE nu este
susținut de acest model de aparat.
Tasta VENTILARE
Folositi unul din urmatorii pasi pentru a selecta
viteza ventilatorului:
NOTA: Nu puteti modifica viteza ventilatorului in
modul AUTO sau DEZUMIDIFICARE
Activeaza / Dezactivare funcția SLEEP. In acest
mod se poate menține temperatura optima cu o
economie de energie. Această funcție este
disponibilă doar pe modul AUTO, RACIRE sau
INCALZIRE.
Pentru detalii, consultati " Functia SLEEP" din
Manualul Utilizatorului.
NOTĂ: În timp ce aparatul funcționează în modul
SLEEP, se anuleaza aceasta functie dacă se
apasă MODE, FAN SPEED sau butonul ON / OFF.
Activeaza / Dezactiveaza funcția IMPROSPATARE.
Când funcția de IMPROSPATARE este inițiată,
Ionizatorul / colectorul de praf cu plasma (în funcție
de model) este activat și va contribui la eliminarea
polenului și a impurităților din aer.
Tasta TURBO
Activeaza / Dezactiveaza funcția Turbo. Aceasta
funcție permite unității sa atinga temperatura
presetată la de răcire sau de încălzire în cel mai
scurt timp (în cazul în care unitatea interioară nu
acceptă această funcție, nu există nici o alta
operație corespunzătoare atunci când apăsati
aceasta tasta).
Tasta AUTOCURATARE (se aplică pentru
RG57A4/BGEF)
Activeaza / Dezactiveaza functia de
AUTOCURATARE.
Apasati aceasta tasta pentru a modifica
modul de functionare al aparatului dupa cum
urmeaza:
RG57A6/BGEF
RG57A4/BGEF

12
14
13
Functiile tastelor
Tasta AFISAJ
Indicatori pe afisaj
Indicator viteza ventilator
Indicator viteza ventilator
Viteza medie
Viteza mare
Viteza Auto
AUTO
INCALZIRE VENTILARE
RACIRE DEZUMIDIFICARE
5
6
Tasta de miscare a flapsurilor stanga
dreapta
(aplicabil pentru RG57A4/BGEF).
Se folosește pentru a porni sau opri mișcarea
verticală a flapsurilor și pentru a seta direcția
aerului stânga/dreapta. Unghiul vertical al
flapsurilor se schimbă cu 6 grade la fiecare
apăsare și pe afișajul unității în locul
temperaturii este afișat " " timp de o secundă.
Dacă continuați să apăsați mai mult de 2
secunde, funcția de mișcare verticală a
flapsurilor este activată și pe afișajul unității
apare " " care pâlpâie de patru ori, și apoi
temperatura setată reapare. Dacă funcția de
mișcare verticală a flapsurilor este oprită, pe
afișaj timp de 3 secunde apare "LC".
Tasta de miscare a flapsurilor sus jos
Folosit pentru a opri sau a porni mișcarea
(se aplică pentru RG57A4/BGEF).
verticala a flapsurilor sau setarea in stanga sau
in dreapta a direcției fluxului de aer. Flapsul isi
schimbă pozitia cu un unghi de 6 grade la
fiecare apăsare. Dacă țineți apăsat acest buton
mai mult de 2 secunde, flapsurile se vor misca
in stanga și în dreapta în mod automat.
Tasta de mișcare a flapsurilor
(se aplică pentru RG57B/BGE). Se folosește
pentru a porni sau opri mișcarea automată pe
orizontală a flapsurilor.
Tasta DIRECT (se aplică pentru RG57B/BGE).
Se folosește pentru a schimba mișcarea
flapsurilor și pentru a seta direcția fluxului
de aer sus/jos. Flapsurile se schimbă cu
6 grade la fiecare apăsare.
Indicatorii sunt afisati cand telecomanda
este activata.
Mod afisaj
Tasta FOLLOW ME (se aplică pentru
RG57(A2)A3/BGEF)
Apăsați acest buton pentru a iniția funcția
Follow Me, iar temperatura afisata pe
telecomanda este cea reala unde este aceasta
amplasata. Telecomanda va trimite semnal la
aparatul de aer conditionat la fiecare interval
de 3 minute, până apăsați butonul Follow Me
din nou. Instalația de aer condiționat va anula
autmat functia Follow Me dacă nu primește
semnal în interval de 7 minute.
Activeaza / Dezactiveaza afisajul de la unitatea
interioara. Cand se apasa, afisajul dispare iar
pentru a se aprinde iar, mai apasati o data.
Se afiseaza cand se trimite semnalul.
Se afiseaza cand telecomanda este pornita
Afisaj baterie (detectare baterie descarcata)
Nu este disponibil pentru acest aparat
Se afiseaza cand Pornirea Programata este
activata.
Se afiseaza cand Oprirea Programata este
activata.
Se afiseaza cand Oprirea Programata este
activata.
Se afiseaza in timpul Modului Sleep
Indica faptul ca aparatul functioneaza in
Modul Follow Me.
Indica faptul ca aparatul functioneaza in
Modul Follow Me.
Nu este disponibil pentru acest aparat
Notă:
Toți indicatorii prezentati în desen sunt în scopul de a
avea o prezentare clară. Dar în timpul funcționarii
reale numai semnele relative funcționale sunt
afișate.
IIII
RG57A4/BGEF
RG57A6/BGE

7
Cum sa folositi tastele
Functionare auto
Cum sa folositi tastele
7
8
Asiguraț i-vă că aparatul este conectat și
alimentat cu energie electrica. Indicatorul de
funcț ionare de pe panoul de afișaj al unității
interioare începe să clipească.
1. Apăsaț i butonul MODE pentru a selecta
Auto.
2. Apăsaț i butonul sus / jos pentru a seta
temperatura dorită. Temperatura poate fi
setată într-un interval de 17
o
C ~ 30oC în
trepte 1oC.
3. Apăsaț i butonul ON / OFF pentru a porni
aparatul de aer conditionat.
Functionarea i n Dezumidificare
Asiguraț i-vă că aparatul este conectat și
alimentat cu energie electrica. Indicatorul de
funcț ionare de pe panoul de afișaj al unității
interioare începe să clipească.
1. Apăsaț i butonul MODE pentru a selecta
modul DEZUMIDIFICARE.
2. Apăsaț i tastele sus / jos pentru a seta
temperatura dorită.
3. Apăsaț i butonul PORNIT / OPRIT pentru a
porni aparatul de aer conditionat.
Temperatura poate fi setată într-un interval
de 17
o
C ~ 30oC în trepte de 1oC.
Asiguraț i-vă că aparatul este conectat și
alimentat cu energie electrica.
1. Apăsaț i butonul MODE pentru a selecta
modul RACIRE sau INCALZIRE (pentru
modelele cu răcire și încălzire) sau
VENTILARE.
2. Apăsaț i butoanele sus / jos pentru a seta
temperatura dorită.
3. Apăsaț i butonul VENTILARE pentru a
selecta viteza ventilatorului în patru trepte Auto, Mica, Medie sau Mare.
4. Apăsaț i butonul PORNIT / OPRIT pentru a
porni aparatul de aer conditionat.
Temperatura poate fi setată într-un interval
de 17
o
C ~ 30oC în trepte de 1oC.
NOTA:
In modul de VENTILARE< temperatura setata nu
este afisata pe telecomanda si nici nu o puteti
ajusta. In acest caz, puteti parcurge pasii 1.3 si 4.
NOTA:
În modul de Dezumidificare, nu puteț i schimba
viteza ventilatorului. Acesta a fost deja controlată
automat.
NOTA
1. În modul Auto, aparatul de aer conditionat
poate alege în mod logic modul de răcire,
ventilatore, încălzire și prin detectarea
diferenței dintre temperatura actuală
ambiantă și temperatura setata pe
telecomanda.
2. În modul Auto, nu puteți schimba viteza
ventilatorului. Acesta a fost deja controlată
automat.
3. Dacă modul Auto nu este confortabil
pentru tine, modul de functionare dorit poate
fi selectat manual.
Racire / Incalzire / Ventilare

ATENȚIE
!
Exemplu de programre
9
10
Functia de Programare
Apăsați tasta TIMER ON si aceasta poate seta
programarea auto in timp a unității. Apăsați butonul
TIMER OFF si aceasta poate seta oprirea
programarea a unității.
Setare pornirii programate
1. Apăsați tasta TIMER ON. Telecomanda va afisa
TIMER ON, si ultima programare Auto și semnalul
"H" va fi afișat pe LCD. Acum este gata pentru a
reseta programarea Auto pentru a începe
operațiunea.
2. Apăsați iar tasta TIMER ON pentru a seta timpul
dorit. De fiecare dată când apăsați tasta, timpul
crește cu o jumătate de oră între 0 și 10 ore și cu o
oră între 10 și 24 de ore.
3. După setarea TIMER ON, va exista o întârziere de
o secundă înainte de a se transmite semnalu de la
telecomanda la aparatul de aer conditionat. Apoi,
după inca aproximativ 2 secunde, semnalul "h" va
dispărea, iar temperatura setata va re-apărea pe
afișaj LCD.
Setare opririi programate
1. Apăsați tasta TIMER OFF. Telecomanda va afisa
TIMER OFF, si ultima programare Auto și semnalul
"H" va fi afișat pe LCD. Acum este gata pentru a
reseta programarea Auto pentru a începe
operațiunea.
2. Apăsați iar tasta TIMER OFF pentru a seta timpul
dorit. De fiecare dată când apăsați tasta, timpul
crește cu o jumătate de oră între 0 și 10 ore și cu o
oră între 10 și 24 de ore.
3. După setarea TIMER OFF, va exista o întârziere
de o secundă înainte de a se transmite semnalu de la
telecomanda la aparatul de aer conditionat. Apoi,
după inca aproximativ 2 secunde, semnalul "h" va
dispărea, iar temperatura setata va re-apărea pe
afișaj LCD.
Exemplu:
Pentru a porni aparatul de aer conditionat in 6 ore.
1. Apăsați tasta TIMER ON, si ultima setare impruna
cu semnalul "H" va apărea pe zona de afișare.
2. Apăsați tasta TIMER ON pentru a afișa "6.0H" pe
cronometrul telecomenzii.
3. Așteptați timp de 3 secunde, iar zona de afișare
digitală va afișa din nou temperatura. Indicatorul
"TIMER ON" rămâne afisat și această funcție este
activată.
Functia TIMER ON este utilă atunci când doriți ca
aparatul să pornească automat, înainte de a reveni
acasă. Aparatul de aer conditionat va porni automat
la ora setată.
Când selectați operațiunea timer, telecomanda transmite automat semnalul de
programare la unitatea interioară pentru timpul specificat. Prin urmare, plasati
telecomanda într-un loc în care sa poata sa transmita semnalul la unitatea interioară
in mod corect.
Timpul efectiv de funcționare stabilit de telecomanda pentru funcția de programare
este limitat la următoarele setări: 0,5, 1,0, 1,5, 2,0, 2,5, 3,0, 3,5, 4,0, 4,5, 5,0, 5,5, 6,0,
6,5, 7,0, 7,5, 8,0, 8,5, 9,0, 9,5, 10, 11, 12, 13, 14, 15,16,17, 18, 19, 20, 21, 22, 23 și
24.
PORNIRE PROGRAMATA
(Pornire Auto)

11
12
Oprit
Oprit
Setare
2 ore mai tarziu
dupa setare
10 ore mai
tarziu dupa
setare
Setare 2 ore mai tarziu
dupa setare
5 ore mai
tarziu dupa
setare
Pornire
Pornit
Setare 10 ore mai tarziu
(Oprire Auto)
OPRIRE PROGRAMATA
Exemplu:
Exemplu:
OPRIRE
PROGRAMATA
PORNIRE
PROGRAMATA
(Pornit Oprit Pornire functionare)
TIMP COMBINAT
(Setarea pornirii si opririi in acelasi timp)
Oprit
Oprit
Pornire
11
12
Functia TIMER OFF este utilă atunci când doriți ca
aparatul să pornească automat, dupa ce va culcati.
Aparatul de aer conditionat se va opri automat la ora
setată.
Pentru a opri aparatul de aer conditionat in 10 ore.
1. Apăsați tasta TIMER OFF, si ultima setare impruna cu
semnalul "H" va apărea pe zona de afișare.
2. Apăsați tasta TIMER OFF pentru a afișa "10.0H" pe
cronometrul telecomenzii.
3. Așteptați timp de 3 secunde, iar zona de afișare
digitală va afișa din nou temperatura. Indicatorul "TIMER
OFF" rămâne afisat și această funcție este activată.
Această caracteristică este utilă atunci când doriți să
opriți aparatul de aer conditionat dupa ce a mergti la
culcare, și sa il porniți din nou în dimineața când va
treziti sau atunci când vă întoarceți acasă.
PORNIRE
PROGRAMATA
OPRIRE
PROGRAMATA
(Oprit Pornire Oprire functionare)
Această caracteristică este utilă atunci când doriți să
porniti aparatul de aer conditionat, înainte de a vă trezi
și sa se opreasca după ce ieșiti din casă.
Pentru a opri aparatul de aer conditionat la 2 ore după
setare și pornirea din nou, 10 ore de la setare.
1. Apăsați tasta TIMER OFF.
2. Apăsați butonul TIMER OFF inca odata pentru a afișa
pe ecran 2.0H la TIMER OFF.
3. Apăsați tasta TIMER ON.
4. Apăsați TIMER ON butonul din nou pentru a afișa
10H pe cronometrul de afișare.
5. Așteptați timp de 3 secunde, iar pe zona de afișare
digitală va afișa din nou temperatura."TIMER ON OFF"
indicatorul rămâne afisata și această funcție este
activată.
Exemplu:
Pentru a porni aparatul de aer conditionat la 2 ore după
setare, și sa se opreasca la 5 ore după setare.
1. Apăsați tasta TIMER ON.
2. Apăsați iar tasta TIMER ON pentru a afișa 2.0H pe
cronometrul de afișare.
3. Apăsați tasta TIMER OFF.
4. Apăsați iar tasta TIMER OFF pentru a afișa 5.0H pe
ecranul TIMER OFF.
5. Așteptați timp de 3 secunde, iar zona de afișare
digitală va afișa din nou temperatura. Indicatorul "TIMER
ON & TIMER OFF" rămân afisate și această funcție este
activată.

8m
Pozitionarea telecomenzii
Inlocuirea bateriilor
ATENȚIE
Manevrarea telecomenzii
13
14
Instalația de aer condiționat nu va funcționa dacă sunt
perdele, uși sau alte materiale care blocheaza semnalul
de la telecomandă la unitatea interioară.
Preveniti varsarea de orice lichid pe telecomandă. Nu
expuneți telecomanda la lumina directă a soarelui sau la
căldură.
Dacă receptorul de semnal infraroșu de la unitatea
interioară este expus la lumina directă a soarelui, exista
posibilitatea ca aparatul de aer condiționat să nu
funcționeze corespunzător. Utilizați perdele pentru a
evita lumina soarelui să cadă pe receptor.
Dacă alte aparate electrice reacționează la telecomanda
aparatului de aer conditionat, fie mutați aceste aparatele
sau consultați distribuitorul local.
Nu scăpați telecomanda. Manevrați-o cu grijă.
Nu așezați obiecte grele pe telecomandă, sau nu calcati
pe ea.
Folositi telecomanda de la o distanta maxima de 8 m de
aparatul de aer conditionat, indreptand-o spre acesta.
Receptarea semnalului este confirmata de un beep sonor.
Următoarele simptome indica baterii consumate.
Înlocuiți bateriile vechi cu unele noi.
Nu este emis un semnal sonor atunci când un
semnal este transmis catre unitatea interioara.
Afisajul de pe telecomanda dispare.
Telecomanda este alimentata de două baterii (R03
/ LR03X2) asezate în partea din spate a
telecomenzii și protejate de un capac.
(1) Scoateți capacul din partea din spate a
telecomenzii.
(2) Scoateți bateriile vechi și introduceți noile
baterii, plasarea (+) și (-) se va face in mod corect.
(3) Instalați capacul din spate pe telecomanda.
NOTĂ: Atunci când bateriile sunt scoase,
telecomanda isi pierde toate setarile. După
introducerea bateriilor noi, telecomanda trebuie
reprogramată.
ATENȚIE
Nu amestecați baterii sau acumulatori de diferite
tipuri sau vechi cu noi.
Nu lăsați bateriile în telecomandă, dacă acestea nu
vor fi utilizate pentru 2 sau 3 luni.
Nu aruncați bateriile la gunoiul municipal nesortat.
Colectarea acestor deșeuri se face doar separat
pentru un tratament special.
Folosirea suportului de telecomanda (optional)
Telecomanda poate fi asezata pe un perete sau stâlp cu
ajutorul unui suport de telecomanda (nu este furnizat,
achiziționat separat).
Înainte de a instala suportul telecomenzii, verificați dacă
aparatul de aer condiționat primește semnalele corect.
Montați suportul pentru telecomanda cu două șuruburi.
Pentru instalarea sau scoaterea telecomanzii din suport,
se trage în sus sau în jos în suport.
 Loading...