

Dehumidifier
User’s Manual
Αφυγραντήρας
Εγχειρίδιο Χρήστη
ENG | GR | RO | DE | FR | IT | ESP
Σας ευχαριστούμε που επιλέξατε τον
αφυγραντήρα της INVENTOR. Για τη
σωστή χρήση της μονάδας,
παρακαλούμε διαβάστε προσεκτικά το
παρόν εγχειρίδιο και φυλάξτε το για
αναφορά στο μέλλον.
Thank you for choosing INVENTOR
unit, please read this manual carefully
and keep it for future reference.
PR1-ION30XL
Η
Λ
Ε
Κ
Τ
Ρ
Ι
Κ
Ε
Σ
Σ
Υ
Σ
Κ
Ε
Υ
Ε
Σ
E
L
E
C
T
R
I
C
A
P
P
L
I
A
N
C
E
S

SO C IA B L E R E M A RK
DISPOSAL: Do not dispose this product as unsorted municipal waste. Collection
of such waste separately for special treatment is necessary.
It is prohibited to dispose of this appliance in domestic household waste.
For disposal, there are several possibilities:
A) The municipality has established collection systems, where electronic waste can
be disposed of at least free of charge to the user.
B) When buying a new product, the retailer will take back the old product at least
free of charge.
C) The manufacture will take back the old appliance for disposal at least free of
charge to the user.
D) As old products contain v
aluable resources, they can be sold to scrap metal
dealers.
Wild disposal of waste in forests and landscapes endangers your health when
hazardous substances leak into the ground-water and find their way into the food
chain.
When using this dehumidifier in the European countries, the following information
must be followed:
CONTE NTS
SAFETY PRECAUTIONS
Warning ........... ........... ..................... ...................................... ................... ......................................2
Caution .......... ................... ....... ........................ .................... ........................... ......... .......................2
Electrical in formation .. ................... ........... ....... ............................... ............. ................... ........... .....3
OPERATING THE UNIT
When u sing the unit ............. .................... ................... .................... ........... .................. ............ ......7
Removing t he co llected w ater .... ..................... .................................. ........ ................... ..................8
CARE AND MAINTENANCE
Care and cleaning of th e dehumi difier .. ........................ ............. ..................... ...............................9
TROUBLESHOOTING TIPS
Troubleshoo ting tips ................ ...................... ......... ................. ............ .......................... ............. ..10
CONTROL PADS ON THE DEHUMIDIFIER
Control pads............ .................. ....................... .................................... ......................... ..................4
Other f eatures..... ......................... ............ ............. .................... ....................... ............... ......... ......5
IDENTIFICATION OF PARTS
Identific ation of parts .......... ......... .................... ............ ............................... ........... ....... ..................6
Positioning the unit ....... .......................... ...............................
............ ................... ................... .......7
Inside you will find many helpful hints on how to use and maintain your dehumidifier
properly. Just a little preventive care on your part can save you a great deal of time
and money over the life of your dehumidifier. You'll find many answers to common
problems in the chart of troubleshooting tips. If you review our chart of Troubleshooting
Tips first, you may not need to call for service at all.
Read This Manual
CAUTION
This appliance can be used by children aged from 8 years and above and persons
with reduced physical, sensory or mental capabilities or lack of experience and
knowledge if they have been given supervision or instruction concerning use of the
appliance in a safe way and understand the hazards involved. Children shall not play
the appliance. Cleaning and user maintenance shall not be made by children without
supervision. ( be applicable for the European Countries )
This appliance is not intended for use by persons (including child
ren) with reduced
physical ,sensory or mental capabilities or
the authorised service technician for repair or maintenance of this unit.
lack of experience and knowledge, unless
they have been given supervision or instruction concerning use of the appliance by a
person responsible for their safety. (be applicable for other countries except the
European Countries )
Children should be supervised to ensure that they do not play with the appliance.
If the supply cord is damaged, it must be replaced by the manufacturer, its service
agent or similarly qualified persons in order to avoid a hazard.
The applianceshall be installed in accordance with national wiring regulations.
The appliance with electric heatershall haveat least 1 meter space to the combustible
materials.
Contact
!

SAFETY PRECAUTIONS SAFETY PRECAUTIONS
Do not exceed the rating
of the power outlet or
connection device.
Do not operate or stop the
unit by switching on or off
the power.
Do not damage or use an
unspecified power cord.
Do not modify the power cord
length or share the outlet
with other appliances.
Disconnect the power if
strange sounds, smell, or
smoke comes fromit.
Do not use the machine near
flammable gas or combustibles, such
as gasoline, benzene, thinner, etc.
Otherwise, it may cause electric
shock or fire due to excess heat
generation.
It may cause electric shock or
fire due to heat generation.
It may cause fire and electric
shock.
It may cause electric shock or fire
due to heat generation.
It may cause electric shock.
It may cause failure of the
machine or electric shock.
It contains contaminants and
could make you sick.
It may cause electric shock or fire.
Plastic parts may melt and cause
a fire.
It may cause electrical shock or
injury.
It may cause an explosion or fire.
Do not insert or pull out
the plug with wet hands.
You should never try to take
apart or repair the unit by
yourself.
Do not drink or use the
water drained fromthe unit.
Before cleaning, turn off
the power and unplug the
unit.
Do not place the unit near
a heat source.
CAUTION
Lack of ventilation can cause
overheating and fire.
Water may enter the unit and
degrade the insulation. It may
cause an electric shock or fire.
If the unit falls over, it may
cause water to spill and
damage belongings, or
cause electrical shock or
fire.
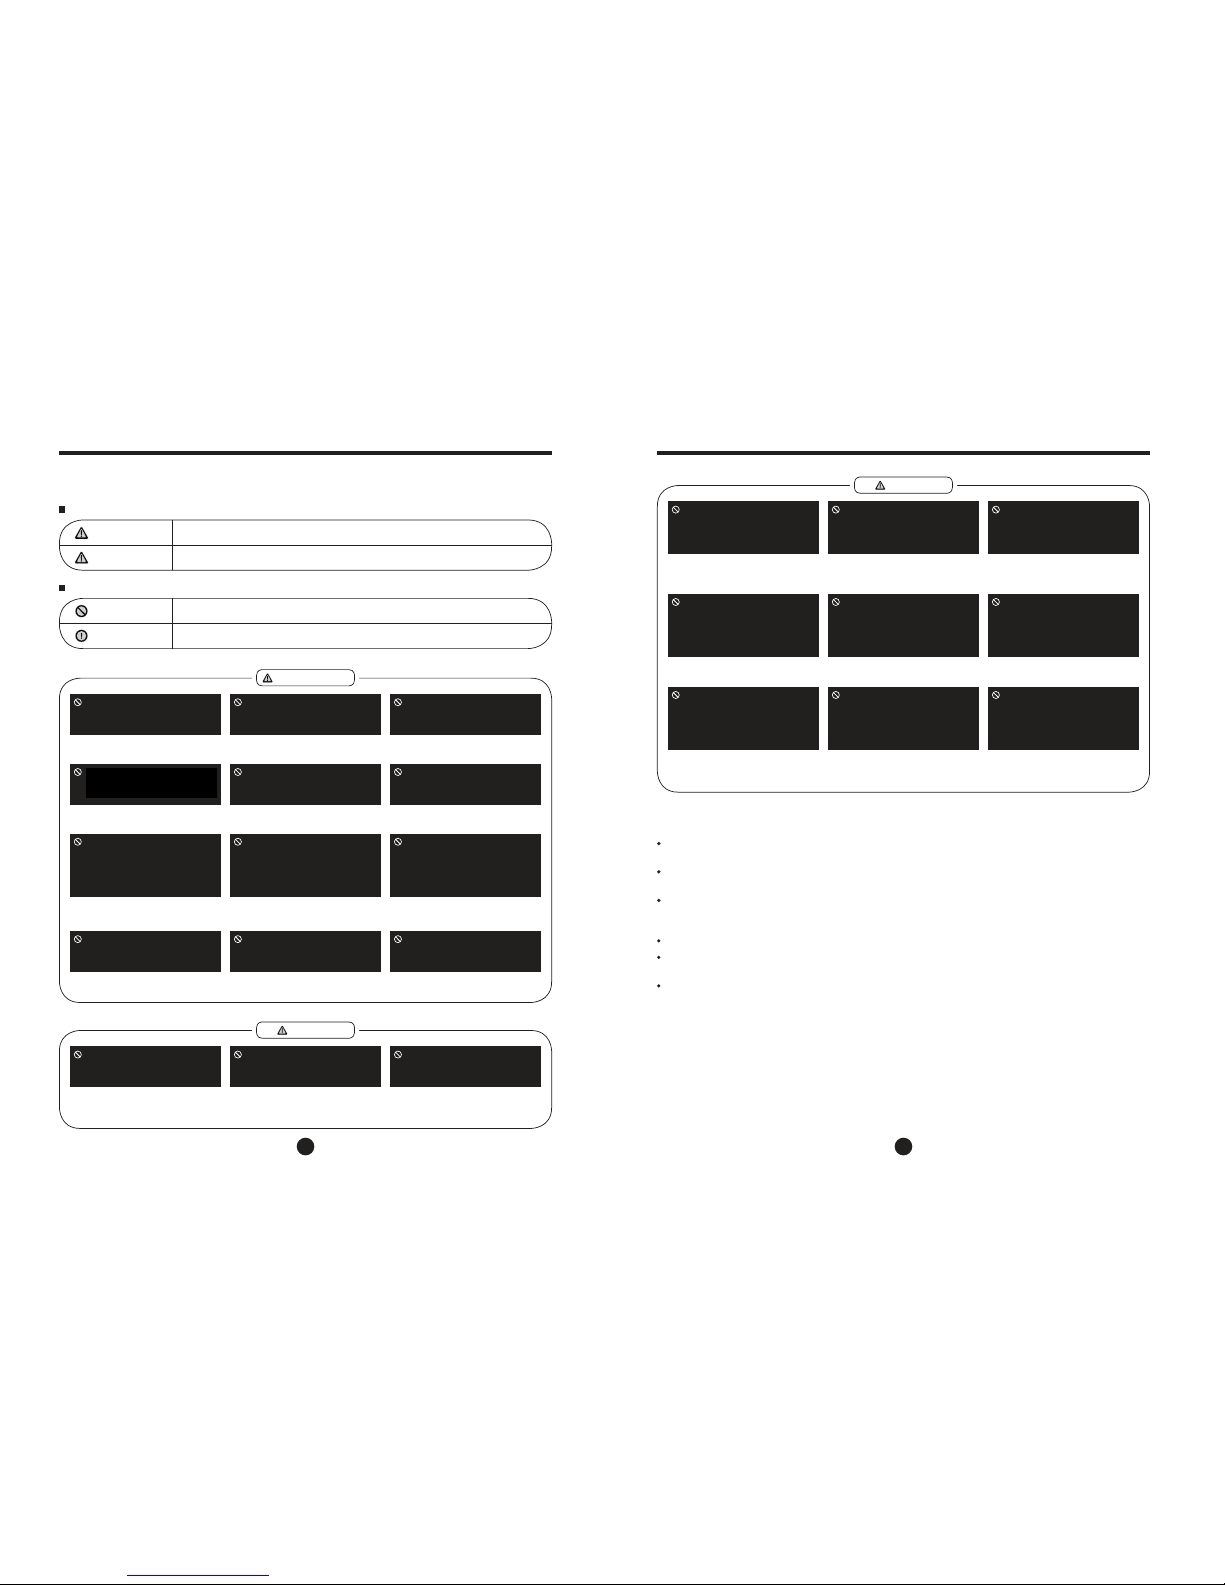
To prevent injury to the user or other people and property damage, the following instructions must be
followed. Incorrect operation due to ignoring of instructions may cause harmor damage.
The seriousness is classified by the following indications.
Meanings of symbols used in this manual are as shown below.
This symbol indicates the possibility of death or serious injury.
This symbol indicates the possibility of injury or damage to property.
Always do this.
Never do this.
WARNING
CAUTION
WARNING
The water from the full bucket
may cause electric shock.
A lack of air flow can lead
to overheating and fire.
It may cause electric shock
or failure of appliance.
Operation without filters
may cause failure.
It may cause failure of the appliance
or an accident.
Water may spill inside the
unit, causing insulation
failure and electrical
shock or fire.
There is danger of fire or
electric shock.
You may be injured if you
fall or if the unit falls over.
Infants, children, elderly people,
and people not senstive to
humidity.
This will cause the unit to
deteriorate due to
chemicals and solvents
dissolved in the air.
CAUTION
The manufactures nameplate is located on the rear panel of the unit and contains electrical and other
technical data specific to this unit.
Be sure the unit is properly grounded. To minimize shock and fire hazards, proper grounding is important.
The power cord is equipped with a three-prong grounding plug for protection against shock
hazards.
Your unit must be used in a properly grounded wall receptacle. If the wall receptacle you intend to use is
not adequately grounded or protected by a time delay fuse or circuit breaker, have a qualified electrician
install the proper receptacle.
Ensure the receptacle is accessible after the unit installation.
Do not use extension cords or an adapter plugs with this unit.However, if it is necessary to use an
extension cord, use an approved Dehumidifier extension cord only (available at most local hardware
stores).
To avoid the possibility of personal injury, always disconnect the power supply to the unit, before installing
and/or servicing.
Electrical Information
Do not take the water bucket
out during operation.
Do not use the unit in small
spaces.
Do not put in places where
water may splash onto the
unit.
Place the unit on a
level, sturdy section
of the floor.
Do not cover the intake or
exhaust openings with
cloths or towels.
Never insert your finger or
other foreign objects into grills
or openings. Take special care
to warn children of these
dangers.
Always insert the filters
securely. Clean filter
once every two weeks.
If water enters the unit, turn
the unit off and disconnect the
power , contact a qualified
service technician.
Do not place flower
vases or other water
containers on top of
the unit.
Care should be taken when
using the unit in a roomwith
the following persons:
Do not place heavy objects on
the power cord and take care
so that the cord is not
compressed.
Do not climb up on
or sit on the unit.
Do not use in areas
where chemicals are
handled.
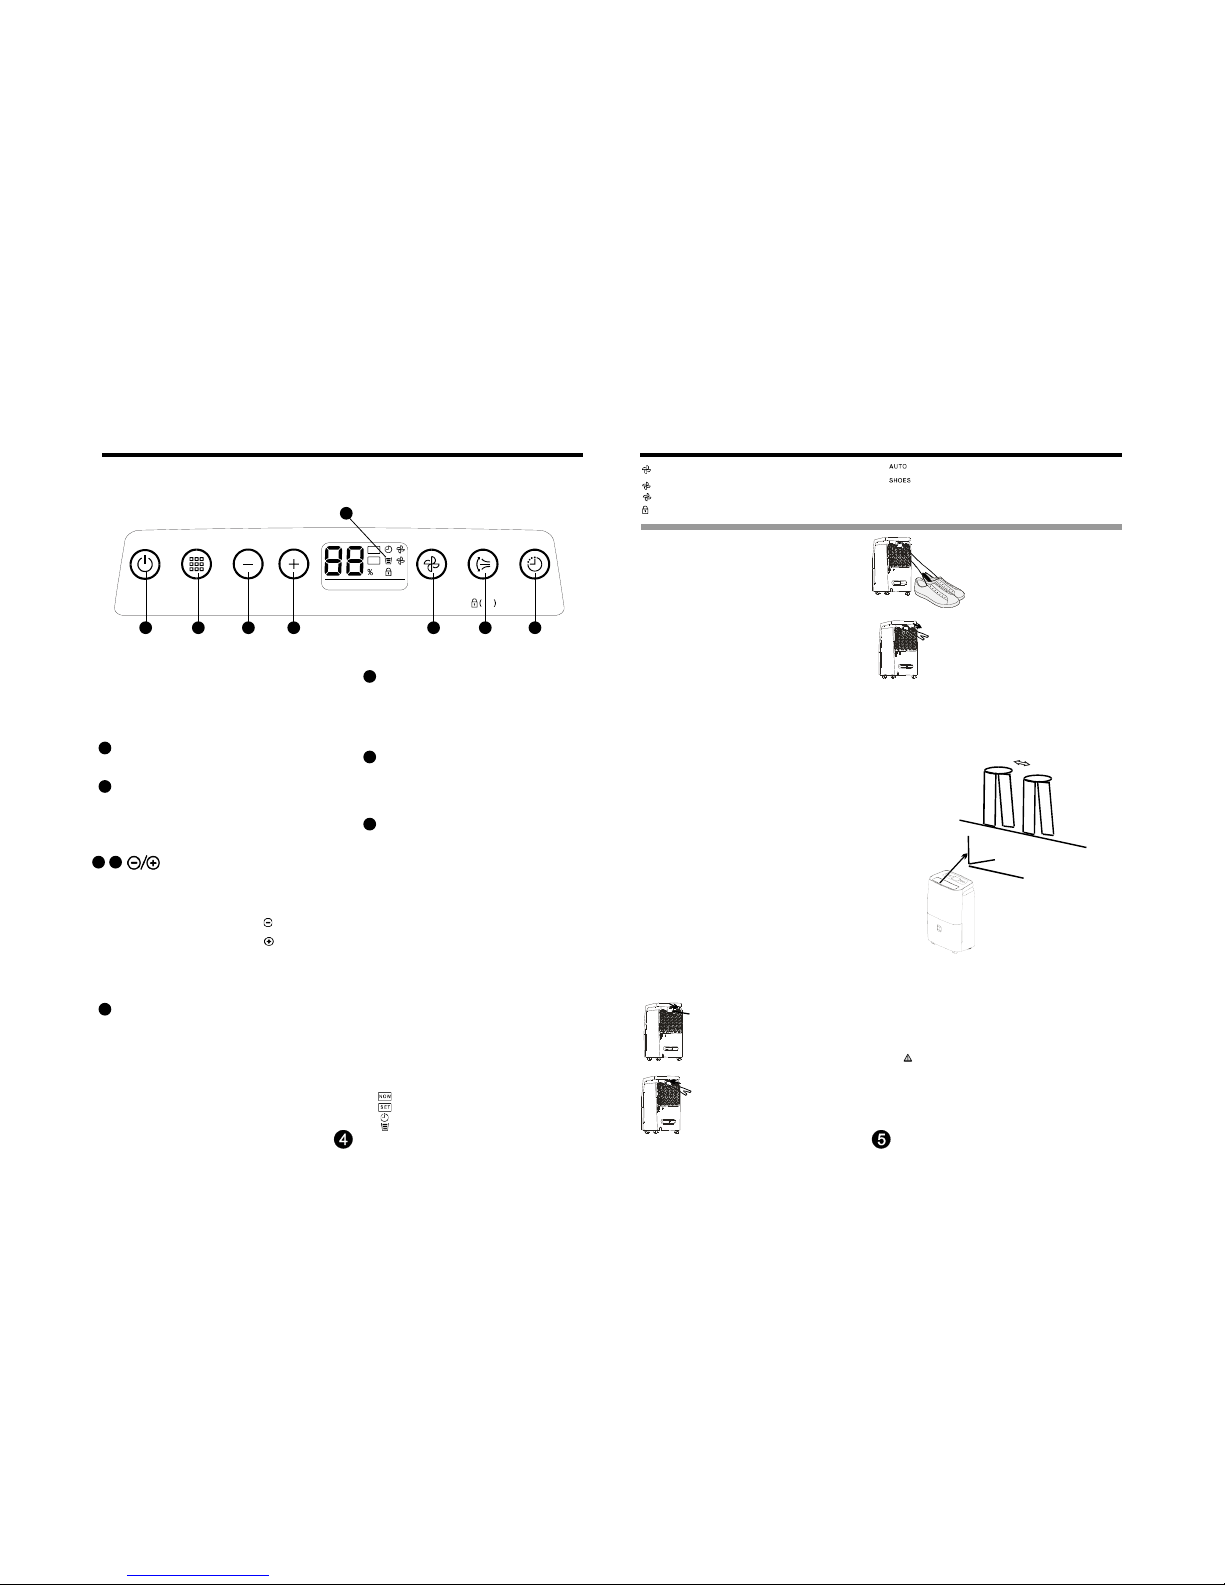
CON T R O L PA D S ON TH E D E H U M I DI F I ER
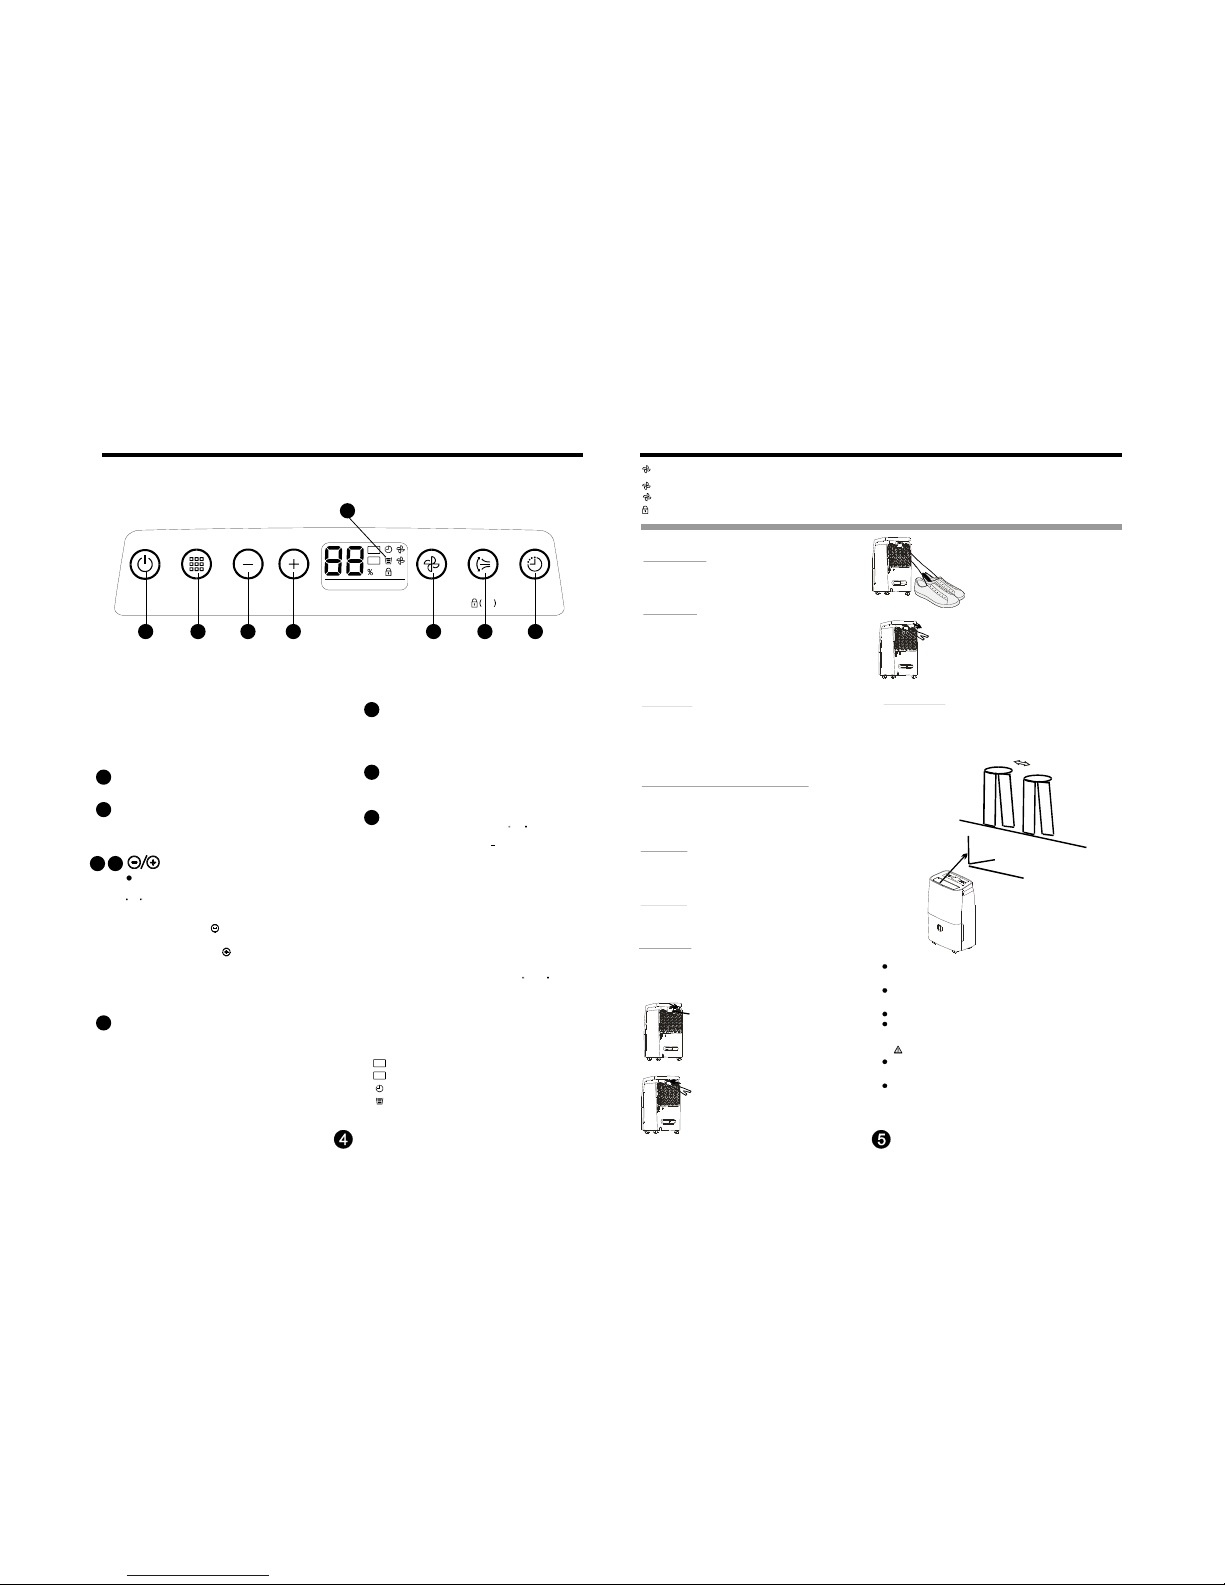
Control pads
Whe n you pu sh th e butt on to chan ge
opera ti on mo des , the un it wi ll ma ke
a beep s o un d to ind ic ate that it is
ch ang in g mod es.
NOT E: The c on tro l pan el of th e uni t you pur ch as ed ma y be slig ht ly di fferen t acc ordi ng to th e
mod els .
Fig. 1
Humidity Set Control Pads
: Dow n/U p Pad s
The humidity level can be set within a range of
CO (Re lative Humidity) to 70%RH(Relative
Humidity) in 5% increments.
For drier air, press the pad and set to a lower
percent value(%).
For damper air, press the pad and set a higher
percent value(%).
CON T R OL PADS ON T H E DE H U M I DI F I ER
Other features
Ful l Wate r Lig ht
Glo ws whe n the bucket i s read y to be
emp ti ed, or wh en the bu ck et is remov ed
or not re pla ced i n the pro pe r position.
Whe n fros t bui lds u p on the ev ap o rat or coil s, the
com pre ssor wil l cyc le off an d the fan w ill continu e
to run un til the fro st dis ap pe ars .
NOTE:W he n A uto de frost in g oper ation ,th e uni t may
mak e a voic e of ref ri ger ant f low ing ,i t is normal .
Aut o Def rost
Wai t 3 m inu tes b efo re res um ing op era ti on
Aft er th e unit ha s stoppe d, it can no t b e rest ar t
ope rt at ion in the f irs t 3 m in ut es. Thi s is to pro tec t
the u nit . Ope ra tio n wil l automa tic al ly sta rt af ter
3 minu tes.
TIMER Pad
Press to initiate the Auto stop feature. Press the
Timer Pad to set the Auto stop time from 0.0 to
8 in 1 hour increments.
Aut o Shut Of f
The shu ts off when th e b u cket is ful l,
or whe n the bucket is remo ved or n ot replaced in
the pr ope r pos iti on .Wh en th e settin g h um idity is
reac he d, th e u nit wil l be s hu t off aut oma ti cal ly.
For some mod els ,t he fa n m ot or will con tinue
ope rat in g.
de humi di fi er
Auto-Restart
If the unit breaks off unexpectedly due to the power cut,
it will restart with the previous function setting a utoma-
tically when the power resumes.
POWER Pad
Press to turn the dehumidifier on and off.
MODE P ad
Press to select the desired operation mode from
ATUO, SHOES and CLOTHES.
NOTE: SH OES mode is optional.
FAN Pad
SWING Pa d
Press to initiate the auto swing feature or lock the
lorver at the desired position. Press this pad for 3
seconds to initiate the lock/unlock feature. All other
pads are inavailable under lock feature.
Control the fan speed. Press to select either High
or Low fan speed. Set the fan control to High for
maximum moisture removal. When t he humidity has
been re
duced and quiet operation is preferred, set
the fan control to Low.
POW ER
MODE
SWING
FAN
TIM ER
3S
NOW
SET
AUTO SHOES CL O THES
NOTE: The fan speed is High speed in SHOES and
CLOTHES modes automatically.
Display
Shows the set % humidity level from CO to 70% or auto
stop time (0~8) while setting, then shows the ac tual
( 5% accuracy) room % humidity level in a range of
- Tube temperature sensor error--Unplug the unit
and p lug it back in. If error repeats, call f or service.
- Room temperature sensor and humidity sensor
error-- Unplug the unit and pl ug it back in. If error repeats,
call f or service.
+
30% RH(Relative Humidity) to 90%RH(Relative Humidity).
- Main control boar d fa ult parameters error-- Unplug
the unit and plug it back in. If err or repeats, call for service.
- Refrigerant leakage detection-- With this new
technology, the display area w ill appear E554 when
the unit detects refrigerant leakage ,call for service.
Error Codes :
E122
E142
E163
E554
NOTE: The humdity level can not be set in SHOES
and CLOTHES modes.
NOTE: Error Codes is displayed HIGH TWO codes
(ex. EI ) for 1 second, then displayed LOW TWO codes
(ex. 22 ) for 1 second circlely.
Indicator lights Display:
NOW
- a ctual humidity level indicator light.
SET
- setting humidity level indicator light.
- au to s top indicator light.
- f ull water indicator light.
- low fan speed indicator light.
- hi gh fan speed indicator light.
- lock f eature indicator light.
AUTO
SHOES
CLOTH ES
- SHOES mode indicator light.
- CLOTHES mode indicator light.
- AUTO mode indicator light.
AUTO mode
The un it can be set des ir ed hum idity le vel , fan sp eed
and lo uve r swi ng fea tu re.
SHOES mode
The un it can ma ke the MAX deh um idificat io n func ti on
whe n it is unde r the SH OES mo de. Th e fan speed is f ix ed
at hig h fan spe ed an d the lou ve r will stop sw ing . The unit
wil l qui t SH OE S mode af te r a m axi mum 2 h our s' ope ratio n.
COLTHES mode
The un it can ma ke th e MAX de hum idi ficat io n func ti on
whe n it is und er the CL OT HES mo de. Th e fan spe ed is fi xed
at hig h fan spe ed an d the swi ng feature ca n be set.
30~50cm
30~50cm
Airflow
Fig.A
Wet clo thes
Allo w 3 0~ 50cm of distance
on the to p a nd right side of
the unit to the we t clothes.
NOT E:
The Dr yer mo de mu st be op era ted i n a cl os e room,d o not
ope n the doo r and w in dow.
To m a ke th e best e ffe ct ive de hum idi fi catio n ,ple as e first
deh yd rat e the wet clot hes.
Mak e sure to d ire ct airfl ow at th e wet clo thes (Se e Fig. A) .
For th ic k and he a vy we t c lo thes may no t get the best
eff ec t iv e dehu mi dif ic ati on.
CAU TIO N
Do not co ve r the air ou tl et of the un it wi th clo th es. It ma y
cau se exces si ve hea t, fi re or fai lur e of uni t.
Do not pl ace the wet c lo the s on the to p of the uni t and do
not ma ke the w ate r dro p into th e unit . It may ca use
ele ct ric sh ock,c reepa ge or failu re of unit.
Take dow n the SHOES d ryer c ove r.
Put the SHO ES drye r pi pe to the sh oes
Ins tal l the SHOES dry er pip e to the u n it.
Aft er usi ng , take do wn th e SHO ES dry er pi pe.
1
1
2
2
3 4
3 4
5
5
8
8
6
6
7
7

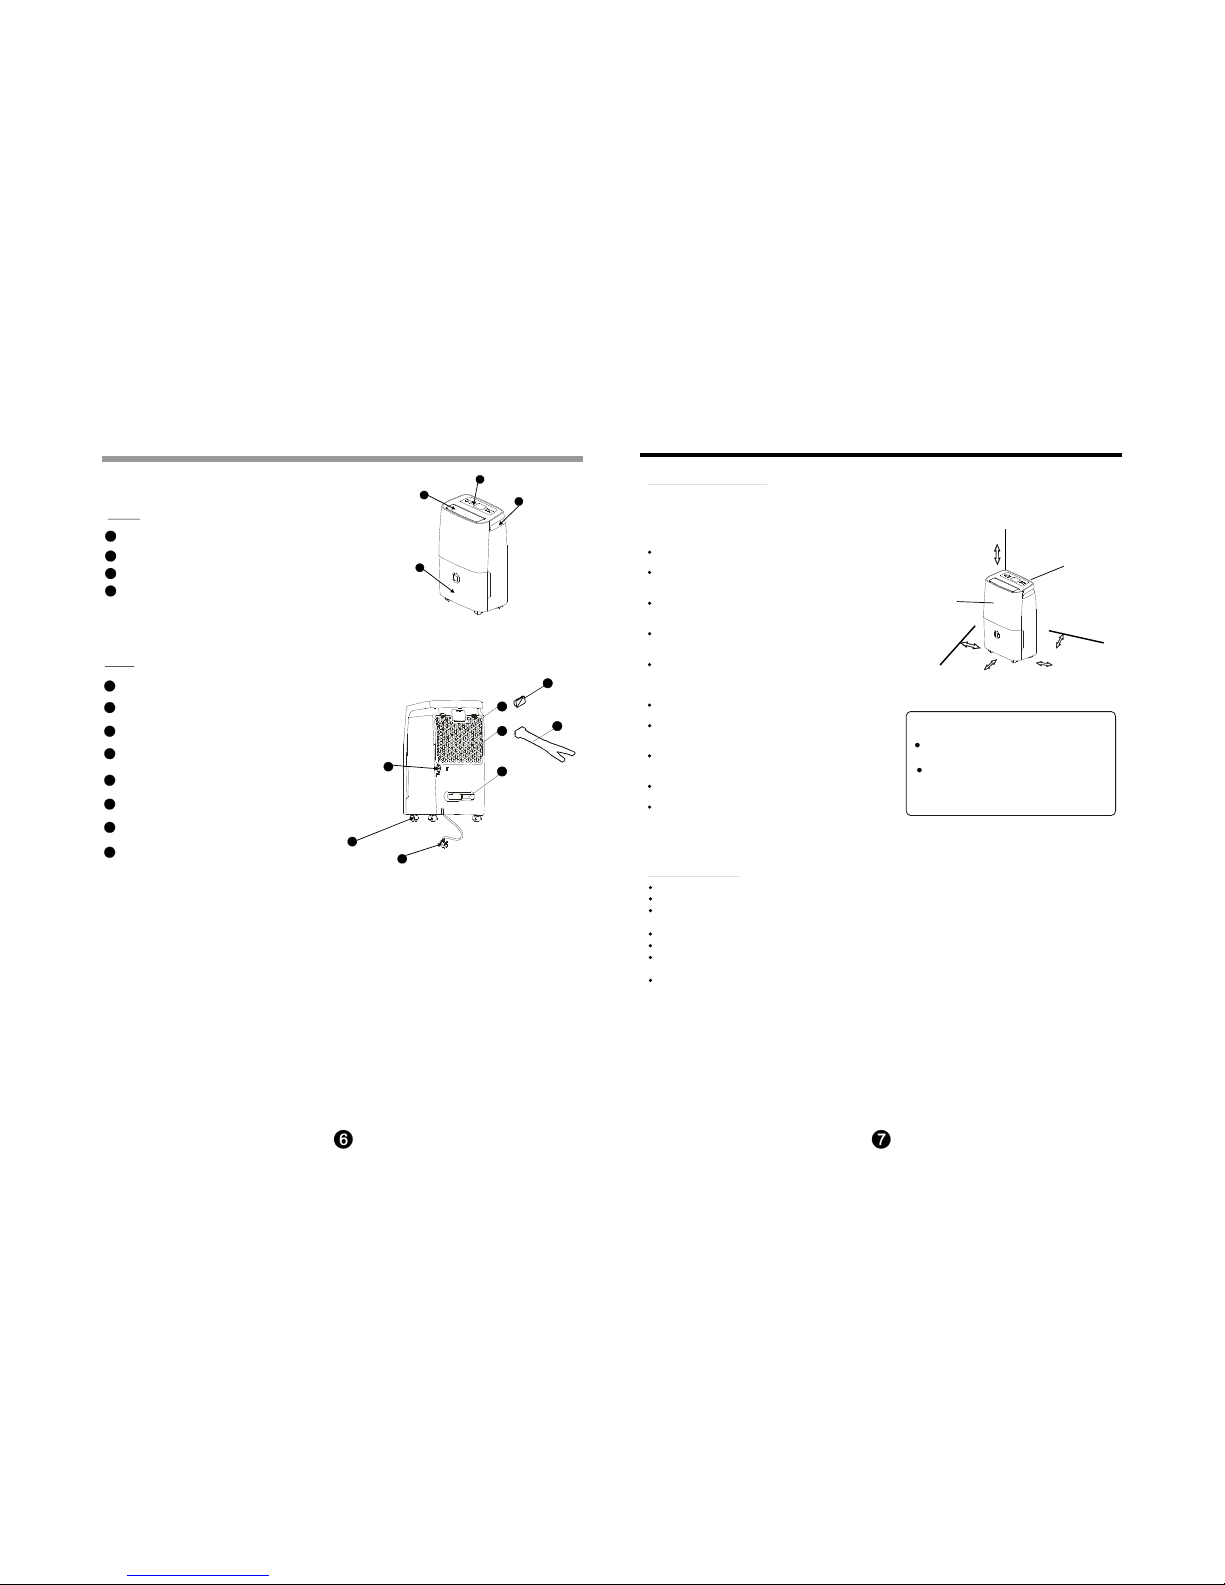
IDENTIFICATION O F PA R TS
Power Cord and plug
Drain hose outlet
Air intake grille
Air filter (behind the grill)
Front
Rear
Air outlet grille
Caster
I dentif i cati on of parts
Fig.2
Fig.3
Water bucket
Control panel
Handle (both sides)
1
2
3
4
1
2
3
4
N O TE: All th e pic tur es in th e man ua l are
for ex pl ana ti on pu rpo se s onl y. T he ac tual
sha pe of th e uni t you pu rch as ed ma y be
sli gh tly di ff er ent , but th e ope rat io ns an d
fun ct ion s are th e sam e.
OPE RAT I NG TH E UNIT
W hen usi ng the unit
When first using the dehumidifier, operate the unit
continuously 24 hours.
This unit is designed to operate with a working
environment between 5 C/41 F and 35 C/95 F.
If the unit has been switched off and needs to be
switched on again quickly, allow approximately
three minutes for the correct operation to resume.
Do not connectthe dehumidifier to a multiple socket
outlet, which is also being used for other electrical
appliances.
Select a suitable loc
ation, making sure you have easy
access to an electrical outlet.
Plug the unit into a electrical socket-outlet with earth
connection.
Make sure the Water bucket is correctly fittedotherwise
the unit will not operate properly.
When the water in the bucket reaches to a certain
level,please be careful to move the machine to avoid it
falling down.
O O O O
NOTE:
Casters(At four points on the bottom of unit)
Casters can move freely.
Do not force casters to move over carpet,
nor move the unit with water in the b ucket.
(The unit may tip over and spill water.)
A dehumidifier operating in a basement will have little or no effect in dryingan adjacent enclosed
storagearea, such as a closet, unless thereis adequate circulation of air in and out of the area.
Air outlet g rille
Air intake
grille
20cm or m ore
20cm or mo re
20cm or m ore
20cm or m ore
40cm or
more
Posi tioning the uni t
Do not use outdoors.
This dehumidifer is intended for indoor residential
applications only. This dehumidifier should not be used
for commercial or industrial applications.
Place the dehumidifier on a smooth, level floor strong
enough to support the unit with a full bucket of water.
Allow at least 20cm of air space on all sides of the unit
for good air circulation.
Place the unit in an area where the temperature will not
fall below 5 C(41 F). The coils can become covered with
frost at tempe
ratures below 5 C(41 F), which may reduce
performance.
Place the unit away from the clothes dryer, heater or radiator.
Use the unit to prevent moisture damage anywhere books
or valuables are stored.
Use the dehumidifier in a basement to help prevent
moisture damage.
The dehumidifiermust be operated in an enclosed
area to be most effective.
Close all doors, windows and other outside openings
to the room.
Fig.4a
5
1
3
2
4
1
2
3
6
5
4
7
Power Cord buckle
6
7
Shoes dryer cover
8
Shoes dryer pipe
8

R emoving the coll ec ted wate r
1. Pu ll out the b ucket a little.
2. Ho ld both sides of the bucket
with even strength, and pull it
out from the unit.
3. Pour the water out.
There are two ways to remove collected water.
1. Use the bucket
When the unit is off,if the bucket is full, the unit will
beep 8 times and the Full Water indicator light will flash.
When the unit is on,if the bucket is full, the compressor
turns off and the fan turns off after 30 seconds for drying
the water of the condenser, then the unit will beep 8
times and the
Full Water indicator light will flash.
Slowly pull out the bucket. Grip the left and right
handles securely, and carefully pull out straight so
water does not spill. Do not put the tank on the floor
because the bottom of the bucket is uneven. Otherwise
the bucket will fall and cause the water to spill.
Throw away the water and replace the bucket. The
bucket must be in place and securely sea ted for the
dehumidifier to operate.
The m achine will re-start when the bucket is restored
in its correc
t position.
NOTES:
When you remove the bucket, do not touch any parts
inside of the unit. Doing so may damage the product.
Be sure to push the bucket gently all the way into the
unit. Banging the bucket against anything or failing to
push it in securely may c ause the unit not to operate.
When you remove the bucket,if there is some water in
the unit you must dry it .
Fig.5
Fig .6
OPE R AT IN G T HE UN IT
3. C l eanthe air filter
Fig. 8
After turning off the unit, wait one day before emptying
the bucket.
Clean the main unit, water bucket and air filter.
Cover the unit with a plastic bag.
Store the unit upright in a dry, well-ventilated place.
4. W hen not usingthe unit for longtime periods
CA R E A N D M AIN T E NA N CE
C are and c leaning of the dehumi difi er
Turn the dehumidifier off andremove theplug
from the wall outlet before cleaning.
1. Clean theG rill e and Case
Use water and a mild detergent. Do not use bleach
or abrasives.
Do not splash water directly onto the main unit. Doing
so may cause an electrical shock, cause the insulation
to deteriorate, or cause the unit to rust.
The air intake and outlet g rilles get soiled easily, so use
a vacuum attachment or brush to clean.
2. C l eanthe bucket
Every few weeks, clean the bucket to prevent growth of mold,
mildew and bacteria. Partially fill the bucket with clean water
and add a little mild deterg ent. Swish it around in the bucket,
empty and rinse.
Do not use a dishwasher to clean the bucket.
After clean, the bucket must be in place and securely
seated for the dehumidifier to operate.
NOTE:
2. Continuous draining
Fig.7
NOTE: When the continuous drain feature
is not being used,remove the drain hose
from the outlet.
Attach the hose
to the drain
hose outlet.
Remove the
rubber plug
Wate r can be au to mat icall y emptied int o a f lo or
dra in by at tac hing th e unit wi th a wat er hos e
(no t inc luded ) .
Rem ove the rub be r plug fr om the bac k drai n
hos e outlet . Atta ch a drain hos e(I D= 15 mm)
and le ad it to th e flo or dra in or a sui table
dra ina ge fa cil it y( see Fi g. 7).
Make sure the hose is secure so there are no leaks.
Direct the hose toward the drain,making sure that
there are no kinks that will stop the warter flowing.
Place the end of the hose into the drain and make sure
the end of the hose
is level or down to let the water flow
smoothly.Do never let it up.
Select the desired humidity setting and fan speed
on the unit for continuous draining to start.
Fig. 9
Fig. 10
The air filter behind the front grille should be
checked and cleaned at least every 30 days
or more often if necessary.
Grip the tab on the filter and pull it outward, then
pull it up as shown in Fig.8.
Clean the filter with warm, soa py water. Rinse and
let the filter dry before replacing it. Do not clean the
filter in a dishwasher.
Insert the air filter into the unit from underside to
upside. See Fig.10.
DO NOT operate the dehumidifier without a filter
because dirt and lint will clog it and r
educe
performance.
NOTE: DO NOT RINSE OR PUT THE FILTER
IN AN AUTOMATIC DISHWASHER.
To remove:
To attach:
CAUTION:
TROUBLESHOOTING TIPS
Before calling for service, review the chart below.
Problem
What to check
Unit does not start
Make sure the dehumidifier's plug is pushed completely into the
outlet.
Check the house fuse/circuit breaker box.
Dehumidifier has reached its preset level or bucket is full.
Water bucket is not in the proper position.
Dehumidifier does not
dry the air as it should
Did not allow enough time to remove the moisture.
Make sure there are no curtains, blinds or furniture blocking the
front or back of the dehumidifier.
The humidity control may not be set low enough.
Check that all doors, windows and other openings are securely
closed.
Room temperature is too low, below 5ºC(41ºF).
There is a kerosene heater or something giving off water vapor
in the room.
,
The unit makes a loud
noise when operating
The air filter is clogged.
The unit is tilted instead of upright as it should be.
The floor surface is not level.
Frost appears on the
coils
This is normal. The dehumidifier has an Auto defrost feature.
Water on floor
Hose to connector or hose connection may be loose.
Intended to use the bucket to collect the water, but the back
drain plug is removed.
E122, E142, E163, E554
in the display
These are error codes and protection codes. See the
CONTROL PADS ON THE DEHUMIDIFIER section.
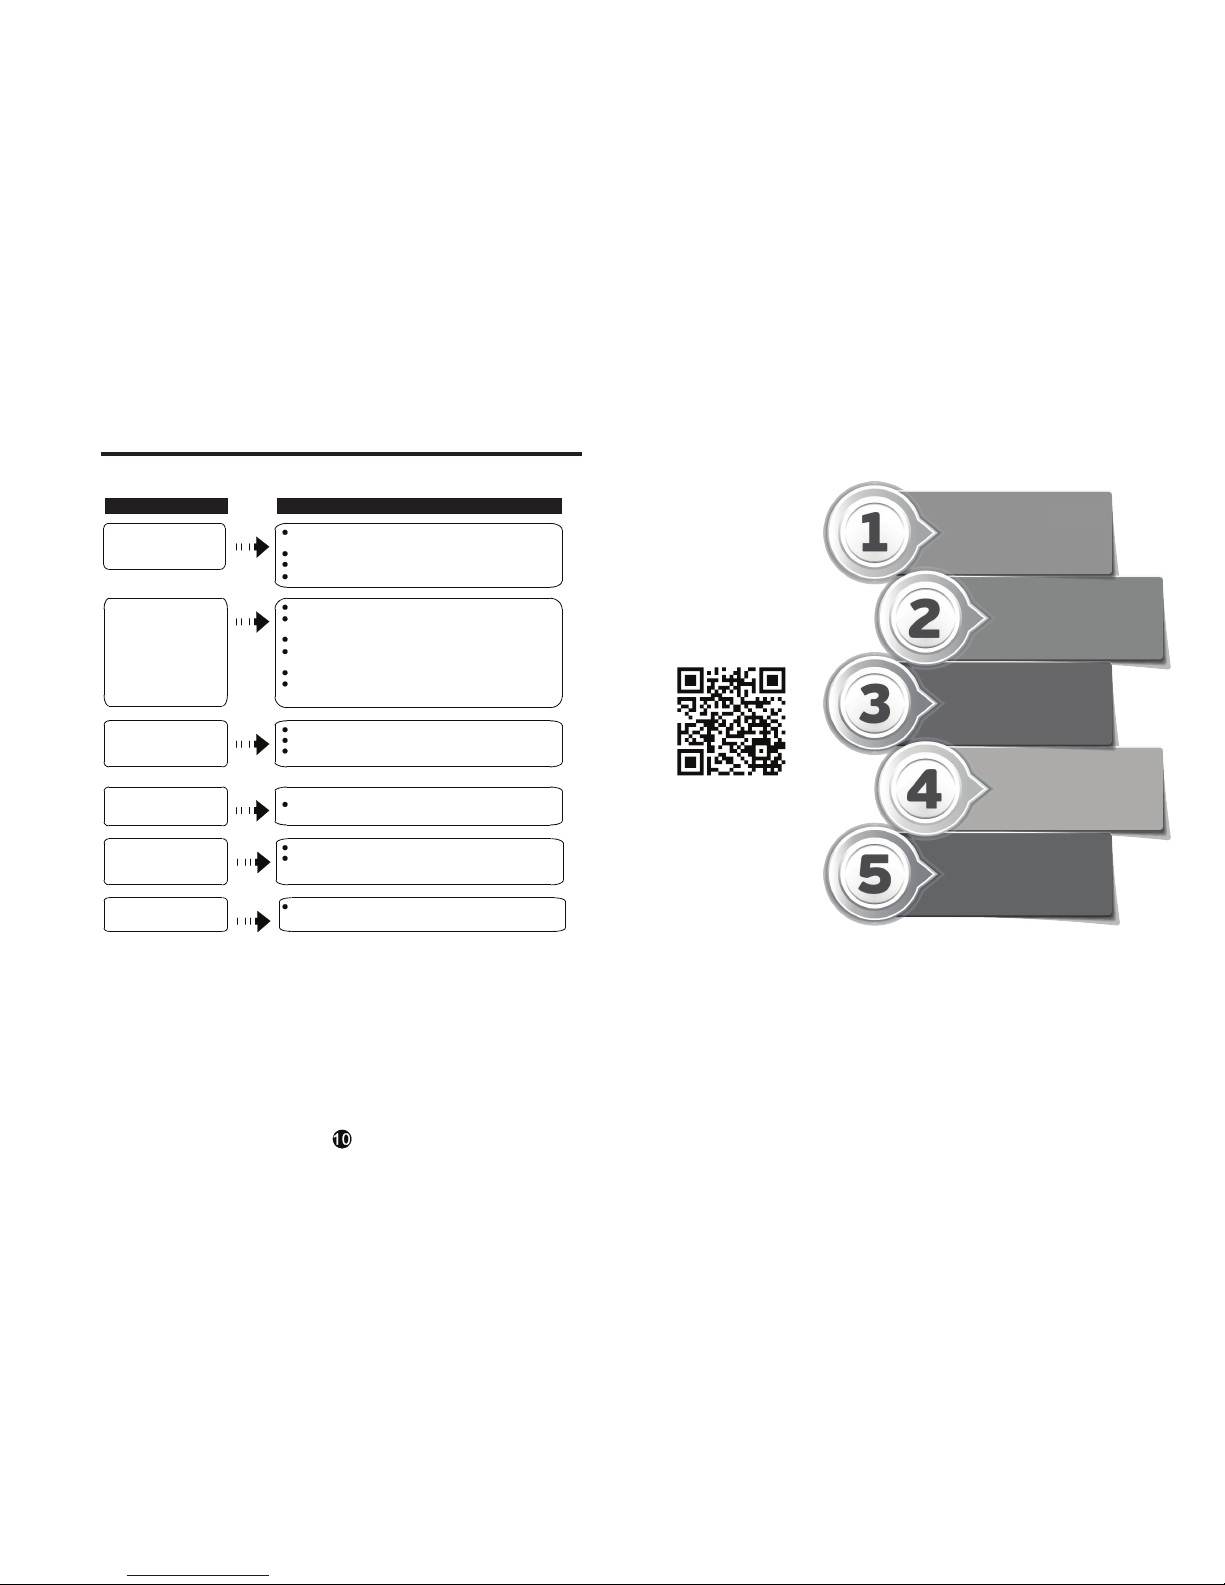
Activate your warranty.....
in
5
simple
steps!
For the electronic
warranty submission
please use the following link
https://www.inventorappliances.com/warranty-card
Scan here for the
warranty form
https://www.inventorappliances.com/
warranty-card
Select the product type
(airconditioner or appliance) for
which the warranty will be activated
Choose the warranty that
corresponds to your product
purchase
Fill in the required information
(owner, retailer and appliance)
and press send
You will receive a confirmation
e-mail for the activation of
your warranty
Connect to the following link
ΓΕΝΙΚΕΣ ΠΑΡΑΤ ΗΡΗΣΕΙΣ
ΑΠΟΡΡΙΨΗ:
1
ΠΕΡΙΕΧΟΜΕΝΑ
ΟΔΗΓΙΕΣ ΑΣΦΑΛΕ ΙΑΣ
Προειδοπ οίηση ...............................................................................................................................................................................
Προσοχή ...................................................................................................................... ......................................................................
Ηλεκτρικ ά χαρακτηριστ ικά ..........................................................................................................................................................
ΛΕΙΤΟΥΡ ΓΙΑ ΤΗΣ ΜΟΝΑΔ ΑΣ
Χρήση τη ς μονάδας .................................................................................................................................................................... ...
Αφαίρεση του νερού ............................................................................................................ ..........................................................
ΦΡΟΝΤΙΔΑ ΚΑ Ι ΣΥΝΤΗΡΗΣΗ
Φροντίδα και καθαρισμ ός του αφυγρα ντήρα ...................................................................................................................... .
ΑΝΤΙΜΕΤΩΠΙΣΗ ΠΡ ΟΒΛΗΜΑΤΩΝ
Αντιμετώ πιση προβλημ άτων ........................................ ............................................................................................................ ..
ΠΛΗΚΤΡΑ ΤΟΥ ΑΦΥΓΡΑΝ ΤΗΡΑ
Πλήκτρα .................................................................................................................... ........................................................................
Άλλες λειτουρ γίες ...........................................................................................................................................................................
ΠΕΡΙΓΡΑ ΦΗ ΤΩΝ ΕΠΙΜΕΡΟΥ Σ ΕΞΑΡΤΗΜΑΤΩ Ν
Περιγραφή των επιμέρους εξ αρτημάτων ............................................................................................................................. ...
Τοποθέτησ η της μονάδα ς ............................................................................................................................................................
Διαβ άστε το παρόν εγχ ειρίδιο
ΠΡΟΣ ΟΧΗ
!
Για την χρήση του αφυγραντήρα σε χώρες της Ευρωπαϊκής Ένωσης θα πρέπει να
ακολουθούνται οι παρακάτω οδηγίες:
Η απόρριψή σε δάση και πεδιάδες μπορεί να βλάψει την υγεία σας λόγω των επιβλαβών
ουσιών που μεταφέρονται μέσω του υδροφόρου ορίζονται στην τροφική αλυσίδα
Στο παρόν εγχειρίδιο θα βρείτε χρήσιμες συμβουλές για τη σωστή χρήση και συντήρηση του
αφυγραντήρα. Η Προληπτική φροντίδα από μέρους σας μπορεί να σας εξοικονομήσει χρόνο
και χρήματα και να επιμηκύνει τη ζωή του αφυγραντήρα σας. Θα βρείτε πολλές απαντήσεις
σε συνήθη προβλήματα και μπορεί να μην χρειαστεί να επικοινωνήσετε με τεχνικό
προσωπικό.
Η συσκευή μπορεί να χρησιμοποιηθεί από παιδιά άνω των 8 ετών και άτομα με ειδικές
ανάγκες ή έλλειψη γνώσης μόνο εφόσον επιβλέπονται από άτομα υπεύθυνα για την
ασφάλειά τους. Τα παιδιά δεν επιτρέπεται να παίζουν με τη συσκευή. Ο καθαρισμός δεν
πρέπει να γίνεται από παιδιά χωρίς επίβλεψη. (Εφαρμογή στις Ευρωπαϊκές χώρες)
Η συσκευή δεν πρέπει να χρησιμοποιείται από παιδιά και άτομα με ειδικές ανάγκες ή
από άτομα με έλλειψη γνώσης ή εμπειρίας, εκτός αν επιβλέπονται από άτομα υπεύθυνα
για την ασφάλειά τους (Εφαρμογή σε χώρες εκτός Ευρωπαϊκής Ένωσης).
Τα παιδιά θα πρέπει να επιβλέπονται ώστε να μην παίζουν με τη μονάδα.
Εάν φθαρεί το καλώδιο τροφοδοσίας η αντικατάσταση θα πρέπει να γίνει από
εξειδικευμένο προσωπικό για την αποφυγή τραυματισμού.
Η συσκευή θα πρέπει να εγκατασταθεί σύμφωνα με τους εθνικούς κανονισμούς.
Συσκευή με ηλεκτρική αντίσταση θα πρέπει να τοποθετηθεί τουλάχιστον σε 1m
απόσταση από εύφλεκτα υλικά.
Για την συντήρηση ή επισκευή της συσκευής επικοινωνήστε με εξειδικευμένο
προσωπικό.
Απαγορεύεται η απόρριψη του συγκεκριμένου προϊόντος μαζί με τα αστικά λύμματα.
Για την απόρριψή υπάρχουν αρκετές επιλογές
:
Α) Έ χουν συσταθεί ειδικά συστήματα περισυλλογής ηλεκτρονικών αποβλήτων όπου μπορούν
να απορριφθούν χωρίς επιβάρυνση.
Β) Κατά την προμήθεια ενός νέου προϊόντος μπορείτε να επιστρέψετε στον προμηθευτή σας
το παλιό χωρίς επιβάρυνση.
Γ) Ο κατασκευαστής μπορεί να παραλάβει την παλιά συσκευή προς απόρριψη χωρίς
επιβάρυνση
Δ) Μπορούν να πωληθούν σε επαγγελματίες που εκμεταλλεύονται τα μεταλλικά εξαρτ
ήματα
των παλιών προϊόντων.
Μην απορρίπτετε το συγκεκριμένο προϊόν στα αστικά λύμματα, χρειάζεται
ειδική περισυλλογή και επεξεργασία.
2
2
3
4
5
6
7
7
8
9
10
2
ΟΔΗΓΙΕΣ ΑΣΦΑΛΕΙΑΣ
Για την αποφυγή τραυματισμού και φθοράς της μονάδας θα πρέπει να ακολουθήσετε τις παρακάτω
οδηγίες. Η Λανθασμένη λειτουργία λόγω αγνόησης των οδηγιών μπορείς να προκαλέσει βλάβη ή ζημιά.
Η κατηγοριοποίηση γίνεται σύμφωνα με τις παρακάτω ενδείξεις
Η σημασία των συμβόλων που εμφανίζονται στο παρόν εγχειρίδιο φαίνονται παρακάτω
Αυτό το σύμβολο υποδεικνύει πιθανότητα θανάτου ή σοβαρού τραυματισμού.
Απογορεύεται
ΠΡΟΕΙΔΟΠΟΙΗΣΗ
ΠΡΟΕΙΔΟΠΟΙΗΣΗ
Αυτό το σύμβολο υποδεικνύει την πιθανότητα τραυματισμού ή φθορά της μονάδας.
Βεβαιωθείτε πως ακολουθείτε τις παρακάτω οδηγίες
ΠΡΟΣΟΧΗ
ΠΡΟΣΟΧΗ
ΠΡΟΕΙΔΟΠΟΙΗΣΗ
Συνδέστε σωστά
το καλώδιο
τροφοδοσίας.
Μην τροποποιείτε το μήκος του καλωδίου
τροφοδοσίας και μην χρησιμοποιείτε την
ίδια πρίζα και για άλλες συσκευές.
Αν ακουστούν περίεργοι θόρυβοι ή
αν εξέρχεται κάποια περίεργη οσμή
ή καπνός, απενεργοποιήστε αμέσως
τη μονάδα και αποσυνδέστε την από
την παροχή ρεύματος.
Η μονάδα δεν πρέπει να βρίσκεται
κοντά σε εύφλεκτα ή εκρηκτικά αέρια,
όπως βενζίνη, διαλυτικά κ.α.
Μην ενεργοποιείτε ή απενεργοποιείτε τη λειτουργία της μονάδας
μέσω του ασφαλειοδιακόπτη.
Μην χρησιμοποείτε την μονάδα με
βρεγμένα χέρια και μην τη λειτουργείτε σε
χώρο με υψηλή υγρασία.
Μην επιχειρήσετε να
επισκευάσετε την μονάδα
μόνοι σας.
Μην πίνετε από το νερό
που συλλέγεται στη
μονάδα.
Μην φθείρετε το καλώδιο
ή χρησιμοποείτε μη προδιαγεγραμμένο καλώδιο.
Μην τοποθετείτε τη
μονάδα κοντά σε πηγή
θερμότητας.
Πριν τον καθαρισμό
απενεργοποιήστε την
μονάδα και αποσυνδέστε
την από την παροχή
ρεύματος.
Μην αφαιρείτε το δοχείο
νερού κατά τη λειτουργία
της μονάδας.
Σε αντίθετη περίπτωση μπορεί να
προκληθεί ηλεκτροπληξία ή πυρκαγιά.
Μπορεί να προκληθεί ηλεκτροπληξία
ή πυρκαγιά.
Μπορεί να προκληθεί ηλεκτροπληξία
ή πυρκαγιά.
Μπορεί να προκληθεί έκρηξη ή
πυρκαγιά.
Μπορεί να προκληθεί ηλεκτροπληξία
ή πυρκαγιά.
Μπορεί να προκληθεί ηλεκτροπληξία.
Μπορεί να προκληθεί βλάβη ή
ηλεκτροπληξία.
Περιέχει συστατικά που μπορεί να
βλάψουν την υγεία σας.
Μπορεί να προκληθεί ηλεκτροπληξία
ή πυρκαγιά.
Μπορεί να λιώσουν τα πλαστικά μέρη
και να
προκληθεί πυρκαγιά.
Μπορεί να προκληθεί ηλεκτροπληξία ή
τραυματισμός.
Θα ενεργοποιηθεί η αντίστοιχη προστασία
και μπορεί να προκληθεί ηλεκτροπληξία.
ΠΡΟΣΟΧΗ
Μην χρησιμοποιείτε
τη μονάδα σε μικρούς
χώρους.
Μην τοποθετείτε τη μονάδα σε
μέρος όπου μπορεί να πέσει
πάνω της νερό.
Τοποθετήστε τη μονάδα
σε επίπεδο και σταθερό
έδαφος.
Έλλειψη αερισμού μπορεί να
προκαλέσει υπερθέρμανση και
πυρκαγιά.
Μπορεί να εισέλθει νερό και να φθαρεί
η μόνωση. Μπορεί να προκληθεί
ηλεκτροπληξία ή πυρκαγιά.
Εάν η μονάδα πέσει μπορεί να
βραχούν τα έπιπλα ή να προκληθεί
ηλεκτροπληξία ή πυρκαγιά.
3
ΟΔΗΓΙΕΣ ΑΣΦΑΛΕΙΑΣ
Μην καλύπτετε τις
εισόδους και εξόδους
του αέρα.
Θα πρέπει να δίνεται ιδιαίτερη
προσοχή όταν η μονάδα
χρησιμοποιείται σε χώρο που
υπάρχουν τα παρακάτω άτομα:
Μην χρησιμοποιείτε
τη μονάδα σε χώρους
όπου υπάρχουν χημικά.
Μην εισάγετε τα δάχτυλά
σας ή άλλα αντικείμενα στα
ανοίγματα ή στις περσίδες.
Προειδοποιήστε τα παιδιά για
αυτούς τους κινδύνους.
Να εισάγετε προσεκτικά
τα φίλτρα και να τα
καθαρίζετε κάθε 15 μέρες.
Βεβαιωθείτε πως το
καλώδιο τροφοδοσίας
δεν συμπιέζεται.
Εάν εισέλθει νερό στην
μονάδα απενεργοποιήστε
την, αποσυνδέστε την παροχή
ρεύματος και επικοινωνήστε
με εξειδικευμένο τεχνικό.
Μην ανεβαίνετε και
μην κάθεστε πάνω
στη μονάδα.
Μην τοποθετείτε βάζα
ή άλλα δοχεία με νερό
πάνω στη μονάδα.
Η Έλλειψη ροής του αέρα μπορεί
να προκαλέσει υπερθέρμανση
και πυρκαγιά.
Μπορεί να προκληθεί ηλεκτροπληξία ή
δυσλειτουργία της μονάδας.
Λειτουργία χωρίς φίλτρα μπορεί
να προκαλέσει δυσλειτουργία της
μονάδας.
Βρέφη, παιδιά, ηλικιωμένοι και άτομα
με ευαισθησία στην υγρασία.
Υπάρχει κίνδυνος πυρκαγιάς ή
ηλεκτροπληξίας.
Υπάρχει κίνδυνος βλάβης της μονάδας
ή ατυχήματος.
Θα προκληθεί φθορά στη μονάδα
εξαιτίας των χημικών και των διαλυμάτων
που υπάρχουν στην ατμόσφαιρα.
Μπορεί να προκληθεί τραυματισμός
εάν πέσετε ή εάν πέσει η μονάδα.
Μπορεί να εισέλθει νερό στη μονάδα
προκαλώντας φθορά στην μόνωση
και ηλεκτροπληξία ή πυρκαγιά.
ΠΡΟΣΟΧΗ
Ηλεκτρικά χαρακτηριστικά
Η πινακίδα που βρίσκεται στο πίσω μέρος της μονάδας περιέχει ηλεκτρικά και άλλα τεχνικά
χαρακτηριστικά της μονάδας.
Βεβαιωθείτε πως η μονάδα είναι σωστά γειωμένη, για την αποφυγή ηλεκτροπληξιών και πυρκαγιών.
Το καλώδιο τροφοδοσίας είναι εφοδιασμένο με γείωση για προστασία έναντι ηλεκτροπληξίας.
Θα πρέπει να χρησιμοποιηθεί πρίζα γειωμένη. Εάν η πρίζα που πρόκειται να χρησιμοποιήσετε δεν
είναι κατάλληλα γειωμένη ή προστατευμένη από ασφάλεια ή διακόπτη απευθυνθείτε σε εξειδικευμένο
ηλεκτρολόγο για να εγκαταστήσει την κατάλληλη πρίζα.
Βεβαιωθείτε πως η πρίζα θα είναι προσβάσιμη μετά την εγκατάσταση.
Μην χρησιμοποιείτε μπαλαντέζα ή πολύπριζα. Αν όμως χρειαστεί να χρησιμοποιήσετε μπαλαντέζα,
χρησιμοποιήστε μόνο ειδικό καλώδιο για αφυγραντήρα (Διαθέσιμα σε αρκετά καταστήματα)
Πριν την συντήρηση ή επισκευή να αποσυνδέεται πάντα το καλώδιο τροφοδοσίας για την αποφυγή
τραυματισμού.
ΠΛΗΚΤΡΑ ΠΑΝΩ ΣΤΟΝ ΑΦΥΓΡΑΝΤΗΡΑ ΠΛΗΚΤΡΑ ΠΑΝΩ ΣΤΟΝ ΑΦΥΓΡΑΝΤΗΡΑ
Πλήκτρα Ελέγχου
Πλήκτρο POWER
Πιέστε αυτό το πλήκτρο για να ενεργοποιήσετε
και να απενεργοποιήσετε την μονάδα.
: Πλήκτρα ΠΑΝΩ/ΚΑΤΩ
Πλήκτρο MODE
Πιέστε αυτό το πλήκτρο για να επιλέξετε την επιθυμητή
λειτουργία από τις ακόλουθες: Αυτόματη, Στέγνωμα
Παπουτσιών και Στέγνωμα Ρούχων
ΣΗΜΕΙΩΣΗ: Η λειτουργία στεγνώματος παπουτσιών
είναι προαιρετική.
• Πλήκτρα ρύθμισης επιθυμητής υγρασίας
Η υγρασία μπορεί να ρυθμιστεί σε εύρος από
“CO” (Σχετική Υγρασία έως 70%RH (Σχετική
Υγρασία) με βήμα 5%.
Για ξηρότερο αέρα πιέστε το πλήκτρο και
ρυθμίστε ένα χαμηλότερο ποσοστό υγρασίας.
Για υγρότερο αέρα, πιέστε το πλήκτρο και
ρυθμίστε ένα υψηλότερο ποσοστό υγρασίας.
ΣΗΜΕΙΩΣΗ: Το ποσοστό υγρασίας δεν μπορεί
να ρυθμιστεί κατά τις λειτουργίες Στεγνώματος
παπουτσιών/ρούχων.
Πλήκτρο Ανεμιστήρα
Έλεγχος της ταχύτητας του ανεμιστήρα. Πιέστε
για να επιλέξετε υψηλή ή χαμηλή ταχύτητα.
Ορίστε την Υψηλή ταχύτητα για την μέγιστη απομάκρυνση υγρασίας. Όταν η υγρασία έχει μειωθεί και
προτιμάτε μια ήσυχη λειτουργία, ορίστε την χαμηλή
ταχύτητα.
ΣΗΜΕΙΩΣΗ: Η υψηλή ταχύτητα επιλέγεται αυτόματα
κατά τις λειτουγίες στεγνώματος παπουτσιών/ρούχων.
Πλήκτρο SWING
Πιέστε για να ξεκινήσει η αυτόματη κίνηση της
περσίδας ή για να επιλέξετε την επιθυμητή θέση
της περσίδας. Κρατήστε το πατημένο για 3 δευτερόλεπτα για να ενεργοποιήσετε/απενεργοποιήσετε
την λειτουργία κλειδώματος. Κατά την λειτουργία
κλειδώματος, όλα τα άλλα πλήκτρα δεν λειτουργούν.
- ένδειξη χαμηλής ταχύτητας ανεμιστήρα.
- ένδειξη υψηλής ταχύτητας ανεμιστήρα.
- ένδειξη λειτουργίας κλειδώματος.
Ένδειξη πληρότητας δοχείου νερού.
Ανάβει όταν το δοχείο νερού έχει γεμήσει και πρέπει
να αδειάσει, ή όταν το δοχείο έχει αφαιρεθεί και
δεν έχει τοποθετηθεί σωστά.
Αυτόματη απενεργοποίηση
Ο αφυγραντήρας απενεργοποιείται όταν το
δοχείο νερού γεμίσει ή όταν το δοχείο αφαιρεθεί
και δεν επανατοποθετηθεί σωστά. Όταν επιτευχθεί
το επιθυμητό ποσοστό υγρασίας, η μονάδα απενεργοποιείται αυτόματα. Για ορισμένα μοντέλα ο
ανεμιστήρας συνεχίζει να λειτουργεί.
Αυτόματη Αποπάγωση
Όταν συσσωρευθεί πάγος στο στοιχείο, ο συμπιεστής
θα σταματήσει να λειτουργεί και ο ανεμιστήρας θα
συνεχίσει να λειτουργεί έως ότου να απομακρυνθεί ο
πάγος. ΣΗΜΕΙΩΣΗ: Κατά την αυτόματη αποπάγωση,
μπορεί να ακουστεί από την μονάδα θόρυβος από την
ροή του ψυκτικού. Είναι φυσιολογικό.
Αναμονή 3 λεπτών πρίν την επανεκκίνηση
Μετά την παύση λειτουργίας της μονάδας, δεν μπορεί
να επανεκκινηθεί για 3 λεπτά. Αυτό συμβαίνει για την
προστασία της μονάδας. Η λειτουργία θα επανέλθει αυτόματα μετά από 3 λεπτά.
Αυτόματη Επανεκκίνηση
Εάν η μονάδα σταματήσει απροσδόκητα λόγω διακοπής
ρεύματος, θα επανέλθει σε λειτουργία με τις προηγούμενες
ρυθμίσεις όταν επανέλθει το ρεύμα.
Αυτόματη Λειτουργία
Μπορούν να ρυθμιστούν η επιθυμητή υγρασία, η ταχύτητα
του ανεμιστήρα και η λειτουργία κίνησης της περσίδας.
Λειτουργία στεγνώματος παπυτσιών
Η μονάδα μπορεί να λειτουργεί στο μέγιστο όταν βρίσκεται σε
λειτουργία στεγνώματος παπουτσιών. Η ταχύτητα του
ανεμιστήρα είναι σταθερά ρυθμισμένη υψηλή και η περσίδα
δεν θα κινείται. Η λειτουργία στεγνώματος παπουτσιών θα
σταματήσει αυτόματα μετά από 2 ώρες λειτουργίας.
Λειτουργία στεγνώματος ρούχων.
Η μονάδα μπορεί να λειτουργεί στο μέγιστο όταν βρίσκεται
σε λειτουργία στεγνώματος ρούχων. Η ταχύτητα του
ανεμιστήρα είναι σταθερά ρυθμισμένη υψηλή και μπορεί να
οριστεί η κίνηση της περσίδας.
Άλλα Χαρακτηριστικά
- ένδειξη αυτόματης λειτουργίας.
- ένδειξη λειτουργίας στεγνώματος παπουτσιών.
- ένδειξη λειτουργίας στεγνώματος ρούχων.
Αφαιρέστε το κάλυμμα του εξαρτήματος
στεγνώματος παπουτσιών.
Τοποθετήστε τον εύκαμπτο σωλήνα
στεγνώματος παπουτσιών.
Τοποθετήστε τον εύκαμπτο σωλήνα
στεγνώματος παπουτσιών μέσα στα
παπούτσια.
Βρεγμένα ρούχα
Μετά την χρήση αφαιρέστε τον εύκαμπτο σωλήνα
στεγνώματος παπουτσιών.
Πλήκτρο TIMER
Πιέστε για να εκκινήσετε την λειτουργία
αυτόματης απενεργοποίησης. Πιέστε το
πλήκτρο για να ορίσετε τον χρόνο αυτόματης απενεργοποίησης, από 0 έως 8
ώρες, με αύξηση 1 ώρας.
Όταν πιέζετε ένα πλήκτρο για να αλλάξετε
το πρόγραμμα λειτουργίας, ακούγεται ένας
χαρακτηριστικός ήχος από την μονάδα για
να υποδείξει οτι η λειτουργία άλλαξε.
ΣΗΜΕΙΩΣΗ: Το πάνελ χειρισμού του αφυγραντήρα που έχετε προμηθευτεί πιθανόν να παρουσιάζει
μικρές διαφορές, ανάλογα το μοντέλο.
Εικ.1
POW ER
MODE
SWI NG
FAN
TIM ER
3S
NOW
SET
AUTO SHOES CL O THES
Οθόνη
Αναγράφει το ρυθμισμένο % υγρασίας από “CO”
έως 70% ή τον χρόνο αυτόματης απενεργοποίησης,
και το % της πραγματικής υγρασίας του χώρου (με
5% ακρίβεια) σε εύρος 30%RH έως 90%RH.
Κωδικοί Σφαλμάτων:
Ε122 - Σφάλμα στον αισθητήρα θερμοκρασίας του
στοιχείου- Αποσυνδέστε και επανασυνδέστε την
μονάδα στο ρεύμα. Εάν το σφάλμα επαναλαμβάνεται
καλέστε το τμήμα επισκευών.
Ε142 - Σφάλμα στον αισθητήρα θερμοκρασίας και
υγρασίας του χώρου - Αποσυνδέστε και επανασυνδέστε την μονάδα στο ρεύμα. Εάν το σφάλμα επαναλαμβάνεται καλέστε το τμήμα επισκευών.
Ε163 - Σφάλμα στην κεντρική πλακέτα ελέγχου Αποσυνδέστε και επανασυνδέστε την μονάδα στο
ρεύμα. Εάν το σφάλμα επαναλαμβάνεται καλέστε το
τμήμα επισκευών.
Ε554 - Ανίχνευση διαρροής ψυκτικού υγρού - Χάρη
σε αυτή τη νέα τεχνολογία, εάν ανιχνευθεί διαρροή
ψυκτικού, στην οθόνη θα εμφανιστεί ο κωδικός Ε554.
Καλέστε το τμήμα επισκευών.
ΣΗΜΕΙΩΣΗ: Οι κωδικοί σφάλματος Αναγράφονται
σε 2 τμήματα
(π.χ. Εl) για ένα δευτερόλεπτο.
(π.χ. 22) για ένα δευτερόλεπτο κυκλικά.
Ενδείξεις της οθόνης:
- ένδειξη πραγματικής υγρασίας του χώρου.
- ένδειξη ρυθμισμένης θερμοκρασίας.
- ένδειξη αυτόματης απενεργοποίησης.
- ένδειξη πλήρωσης του δοχείου νερού.
CLOTH ES
30~50cm
30~50cm
Εικ.Α
8
8
1
1
2
2
3 4
3
4
5
5
6
6
7
7
Αφήστε απόσταση 30 ~ 50cm
Ροή αέρα
από το επάνω και δεξί μέρος
της μονάδος μέχρι τα βρεγμένα
ρούχα.
ΣΗΜΕΙΩΣΗ:
• Η λειτουργία στεγνώματος πρέπει να γίνει σε κλειστό χώρο,
μην ανοίγετε τα παράθυρα και τις πόρτες.
• Για να έχετε την αποδοτικότερη αφύγρανση, τα ρούχα πρέπει
να έχουν στεγνώσει αρχικά.
• Βεβαιωθείτε ότι η ροή του αέρα είναι στραμμένη προς τα ρούχα
(βλέπε Εικ. Α)
• Για χοντρά και πολύ βραγμένα ρούχα μπορεί να μην έχετε την
αποδοτικότερη αφύγρανση.
ΠΡΟΣΟΧΗ
• Μην καλύπτετε την μονάδα με ρούχα, μπορεί να προκληθεί
υπερθέρμανση, πυρκαγιά ή βλάβη της μονάδας.
• Μην τοποθετείτε τα βραγμένα ρούχα πάνω στην μονάδα και
μην επιτρέψετε να στάζει το νερό στη μονάδα. Μπορεί να
προκληθεί ηλεκτροπληξία, πυρκαγιά ή βλάβη στη μονάδα.
Μπροστά
Πίσω
Εικ.2
Εικ.3
Πάνελ ελέγχου
Έξοδος αγωγού αποστράγγισης
Ροδάκια
Καλώδιο και βύσμα
Εξάρτημα πρόσδεσης καλωδίου
Γρίλια εισαγωγής αέρα
Φίλτρο αέρα (πίσω από τη γρίλια)
Κάλυμμα εξόδου στεγνώματος παπουτσιών
Εύκαμπτη σωλήνα στεγνώματος παπουτσιών.
ΣΗΜΕΙΩΣΗ: Όλες οι εικόνες στο εγχειρίδιο είναι ενδεικτικές.
Το πραγματικό σχήμα της μονάδας που αγοράσατε μπορεί
να διαφέρει ελαφρώς, αλλά οι λειτουργίες και τα χαρακτηριστικά
παραμένουν ίδια.
Λαβή (και στις δύο πλευρές)
Γρίλια εξόδου αέρα
Δοχείο νερού
1
2
3
4
1
2
3
4
Εικ.4α
5
1
3
2
4
1
2
3
6
5
4
7
6
7
8
8
ΠΕΡΙΓΡΑΦΗ ΤΩΝ ΕΠΙΜΕΡΟΥΣ ΕΞΑΡΤΗΜΑΤΩΝ
ΛΕΙΤΟΥΡΓΙΑ ΤΗΣ ΜΟΝΑΔΑΣ
Περιγραφή εξαρτημάτων
Εάν ένας αφυγραντήρας λειτουργεί σε
υπόγειο δεν θα μπορεί να αφυγράνει κάποιο
διπλανό χώρο, εκτός αν υπάρχει επαρκής
κυκλοφορία του αέρα μέσα και έξω.
Μην λειτουργείτε τον αφυγραντήρα σε εξωτερικούς
χώρους.
Ο αφυγραντήρας είναι σχεδιασμένος για εσωτερική
οικιακή χρήση. Δεν πρέπει να χρησιμοποιείται σε
επαγγελματικούς ή βιομηχανικούς χώρους.
Τοποθετήστε τον αφυγραντήρα σε επίπεδο και
σταθερό έδαφος το οποίο μπορεί να αντέξει τη
μονάδα με γεμάτο το δοχείο νερού.
Για την επαρκή κυκλοφορία του αέρα ο ελεύθερος
χώρος γύρω από τον αφυγραντήρα πρέπει να
είναι τουλάχιστον 20cm.
Μην τοποθετείτε το αφυγραντήρα σε μέρος όπου η
θερμοκρασία μπορεί να πέσει κάτω από τους 5°C,
διότι μπορεί να σχηματιστεί πάγος στο στοιχείο του
και να μειωθεί η απόδοσή του.
Βεβαιωθείτε πως δεν είναι τοποθετημένος κοντά
σε στεγνωτήριο, θερμαντική συσκευή ή καλοριφέρ.
Μπορείτε να χρησιμοποιήσετε τη μονάδα για να
προστατέψετε από την υγρασία βιβλία ή πολύτιμα
αντικείμενα.
Μπορείτε να χρησιμοποιήσετε τον αφυγραντήρα
σε υπόγειο για την αποφυγή φθοράς εξαιτίας της
υγρασ
ίας.
Για την καλύτερη απόδοση του αφυγραντήρα θα
πρέπει να χρησιμοποιείται σε κλειστούς χώρους.
Κλείστε όλες τις πόρτες, τα παράθυρα ή
οποιοδήποτε άλλο άνοιγμα.
Τοποθέτηση της μονάδας
Κατά την πρώτη λειτουργία της μονάδας, θα πρέπει να την αφήσετε να λειτουργήσει συνεχόμενα για 24 ώρες.
Η μονάδα είναι σχεδιασμένη να λειτουργεί σε περιβάλλον 5οC με 35οC.
Εάν έχετε απενεργοποιήσει τη μονάδα και χρειαστεί να την ενεργοποιήσετε αμέσως, αφήστε
να περάσουν πρώτα 3 λεπτά.
Μην συνδέετε τον αφυγραντήρα σε πολύπριζο το οποίο χρησιμοποιείται ήδη για άλλες συσκευές.
Επιλέξτε μια θέση έυκολα προσβάσιμη.
Χρησιμοποιήστε πρίζα με γείωση 220-240V, 50Hz (ανατρέξτε στην πινακίδα χαρακτηριστικών
που βρίσκεται στο πλαϊνό ή πίσω μέρος της μονάδας)
Βεβαιωθείτε πως το δοχείο νερού είναι σωστά τοποθετημένο, διότι σε αντίθετη περίπτωση
ο αφυγραντήρας δεν θα λειτουργεί ομαλά.
Χρήση της μονάδας
ΣΗΜΕΙΩΣΗ: Όταν το νερό δοχείο νερού είναι σχετικά γεμάτο, παρακαλώ προσέξτε
τις μετακινήσεις της συσκευής προς αποφυγή ανατροπής της.
Τουλάχιστον 20cm
Τουλάχιστον 20cm
Τουλάχιστον 20cm Τουλάχιστον 20cm
Τουλάχιστον
40cm
Γρίλια εσόδου
αέρα
Γρίλια εξόδου αέρα
Τα ροδάκια μπορούν να κινηθούν
ελεύθερα.
Μην κινείτε τα ροδάκια σε χαλί ή όταν το
δοχείο νερού είναι γεμάτο. (Μπορεί να
αναποδογυρίσει η μονάδα και να χυθεί το
νερό)
Ροδάκια (Σε τέσσερα σημεία στη βάση της
μονάδας)

Εικ.5
Εικ.6
ΧΡΗΣΗ ΤΗΣ ΜΟΝΑΔΑΣ ΦΡΟΝΤΙΔΑ ΚΑΙ ΣΥΝΤΗΡΗΣΗ
Εικ.8
Εικ.9
Εικ.10
Εικ.7
Άδειασμα του νερού
Υπάρχουν 2 τρόποι να αδειάσετε το νερό από το δοχείο.
1. Χρησιμοποιήστε το δοχείο
Όταν η μονάδα είναι κλειστή αλλά ο κάδος νερού είναι γεμάτος,
θα ακουστεί ο ήχος «μπιπ» για 8 φορές, η αντίστοιχη ενδεικτική
λυχνία θα αναβοσβήνει.
Αν η μονάδα είναι ανοιχτή και ο κάδος είναι γεμάτος, ο
συμπιεστής σταματάει να λειτουργεί και ο ανεμιστήρας
σταματάει μετά από 30 δευτερόλεπτα, ώστε να στεγνώσει το
στοιχείο της συσκευής. Θα ακουστεί ο ήχος «μπιπ» για 8 φορές, η
αντίστοιχη ενδεικτική λυχνία θα αναβοσβήνει.
Τραβήξτε προσεκτικά το δοχείο κρατώντας το από την
αριστερή και δεξιά λαβή. Μην ακουμπήσετε το δοχείο
στο έδαφος διότι δεν είναι επίπεδο και θα χυθεί το νερό.
Αδειάστε το νερό και επανατοποθετήστε το δοχείο σωστά
στη θέση του για την ομαλή λειτουργία του αφυγραντήρα.
Ο αφυγραντήρας θα επανέλθει σε λειτουργία όταν
το δοχείο επανατοποθετηθεί στη σωστή του θέση.
Σημείωση:
Μην αγγίζετε τα εσωτερικά μέρη της συσκευής, αφού έχετε
αφαιρέσει το δοχείο. Μπορεί να προκαλέσετε βλάβη της
συσκευής.
Τοποθετήστε ομαλά το δοχείο πίσω στη συσκευή. Εάν το
χτυπήσετε ή δεν το πιέσετε σωστά στη θέση του θα προκληθεί
δυσλειτουργία της συσκευής.
Όταν βγάζετε το δοχείο παρατηρήστε εάν υπάρχει νερό στη
συσκευή, εάν ναι καθαρίστε το.
Συνεχής αποστράγγιση
Υπάρχει η δυνατότητα συχεχούς απορροής του
νερού συνδέοντας έναν αγωγό αποστράγγισης
(Φ15mm) (Δεν περιλαμβάνεται στην συσκευασία)
Αφαιρέστε το επιστόμιο από το πίσω μέρος της μονάδας
και φυλάξτε το σε ασφαλές μέρος.
Τοποθετήστε τον αγωγό στην έξοδο αποστράγγισης στο
πίσω μέρος της μονάδας, όπως φαίνεται στην Εικ.7.
Βεβαιωθείτε πως δεν υπάρχει διαρροή νερού στο σημείο
σύνδεσης.
Οδηγήστε τον αγωγό αποστράγγισης είτε στην
αποχέτευση είτε σε κάποιο άλλο κατάλληλο χώρο
αποχέτευσης. Η αποχέτευση θα πρέπει να είναι
χαμηλότερα από την έξοδο αποστράγγισης της μονάδας.
Βεβαιωθείτε πως ο αγωγός αποστράγγισης έχει καθοδική
κλίση για την ομαλή απορροή του νερού.
Επιλέξτε το επιθυμητό ποσοστό υγρασίας και την ταχύτητα του
ανεμιστήρα ώστε να ξεκινήσει.
ΣΗΜΕΙΩΣΗ: Όταν δε σκοπεύετε να χρησιμοποιήσετε την
λειτουργία της συνεχούς αποστράγγισης, αποσυνδέστε τον
αγωγό από την έξοδο και επανατοποθετήστε το επιστόμιο.
1. Τραβήξτε ελαφρά το δοχείο
3. Αδειάστε το νερό
Εισάγετε τον αγωγό στην
έξοδο αποστράγγισης
Αφαιρέστε το
επιστόμιο
2. Κρατήστε το δοχείο και από τις 2
λαβές και τραβήξτε το προσεκτικά
από την μονάδα.
Φροντίδα και καθαρισμός του αφυγραντήρα
Χρησιμοποιήστε νερό και ουδέτερο απορρυπαντικό. Μην
χρησιμοποιείτε λευκαντικά και στιλβωτικά.
Μην ρίχνετε νερό στον αφυγραντήρα. Μπορεί να
προκληθεί ηλεκτροπληξία, φθορά στη μόνωση ή σκουριά.
Το πλέγμα εισόδου και εξόδου αέρα χρειάζονται συχνά
καθαρισμό. Μπορείτε να τα καθαρίζετε είτε με ηλεκτρική
σκούπα είτε με μαλακή βούρτσα.
Το δοχείο πρέπει να καθαρίζεται σε τακτά χρονικά
διαστήματα για την αποφυγή δημιουργίας μούχλας και
βακτηριδίων. Καθαρίστε το δοχείο με καθαρό νερό και
ουδέτερο απορρυπαντικό και ξεβγάλτε με καθαρό νερό.
ΣΗΜΕΙΩΣΗ: Μην πλένετε το δοχείο σε πλυντήριο πιάτων.
Μετά τον καθαρισμό επανατοποθετήστε το δοχείο στη
σωστή θέση του.
Το φίλτρο αέρα θα πρέπει να καθαρίζεται τουλάχιστον
κάθε 30 μέρες ή και συχνότερα αν είναι απαραίτητο.
ΣΗΜΕΙΩΣΗ: ΜΗΝ ΧΡΗΣΙΜΟΠΟΙΕΙΤΕ ΓΙΑ
ΤΟΝ ΚΑΘΑΡΙΣΜΟ ΤΟΥ ΦΙΛΤΡΟΥ ΠΛΥΝΤΗΡΙΟ
Εισάγετε στο φίλτρο στη μονάδα, όπως φαίνεται στην
Εικ.10.
ΜΗΝ λειτουργείτε τη μονάδα χωρίς φίλτρο. Υπάρχει
κίνδυνος να φράξει λόγω ακαθαρσιών και να μειωθεί
η απόδοσή της.
Αφού απενεργοποιήσετε τη μονάδα, περιμένετε 1 μέρα
πριν αδειάσετε το δοχείο.
Καθαρίστε το δοχείο, το φίλτρο και τα υπόλοιπα μέρη του
αφυγραντήρα.
Τυλίξτε το καλώδιο και δέστε το με ταινία.
Καλύψτε τον αφυγραντήρα με μια πλαστική σακούλα.
Αποθηκεύστε τον αφυγραντήρα σε όρθια θέση, σε ξηρό
και επαρκώς αεριζόμενο χώρο.
1. Καθαρίστε το πλέγμα και το πλαίσιο
2. Καθαρισμός του δοχείου
3. Καθαρισμός του φίλτρου αέρα
Αφαίρεση φίλτρου
:υορτλίφ υοτ ησητέθοποταναπΕ
ΠΡΟΣΟΧΗ:
4. Όταν η μονάδα δεν θα χρησιμοποιηθεί
για αρκετό χρονικό διάστημα
Αφαιρέστε το φίλτρο τραβώντας το προς τα πάνω και
μετά προς τα έξω όπως φαίνεται στην Εικ.8.
Καθαρίστε το φίλτρο με χλιαρό σαπουνοδιάλυμμα και
αφήστε το να στεγνώσει πριν το εγκαταστήσετε στη
συσκευή. Μην το πλένετε σε πλυντήριο πιάτων.
Πριν τον καθαρισμό απενεργοποιήστε τον
αφυγραντήρα και αποσυνδέστε το φις από την πρίζα.

ΑΝΤΙΜΕ ΤΩΠΙΣΗ ΠΡΟΒΛΗΜΑΤΩΝ
10
Πριν επικοινωνήσετε με τεχνικό προσωπικό, ελέγξτε τα παρακάτω
Πρόβλημα
Έλεγχος
Ο αφυγραντήρας
δεν ξεκινάει
Δεν αφαιρείται επαρκώς
η υγρασία από τον χώρο
Βεβαιωθείτε πως το φις είναι σωστά τοποθετημένο στην πρίζα.
Ελέγξτε την ασφάλεια/τον διακόπτη στον πίνακα του σπιτιού σας.
Ο αφυγραντήρας έχει επιτύχει το επιθυμητό ποσοστό υγρασίας
ή το δοχείο είναι γεμάτο.
Το δοχείο βρίσκεται στη σωστή θέση.
,
Δεν έχει λειτουργήσει ο αφυγραντήρας για αρκετή ώρα.
Βεβαιωθείτε πως δεν υπάρχουν εμπόδια μπροστά ή πίσω από
τον αφυγραντήρα.
Δεν έχει γίνει σωστή ρύθμιση.
Βεβαιωθείτε πως όλες οι πόρτες και τα παράθυρα είναι κλειστά.
Η θερμοκρασία του χώρου είναι κάτω από 5
ο
C.
Λειτουργεί στον χώρο σόμπα κυροζίνης ή κάποια άλλη συσκευή
που αυξάνει την υγρασία στον χώρο.
Ο αφυγραντήρας παράγει
δυνατό θόρυβο κατά
τη λειτουργία
Το φίλτρο είναι φραγμένο.
Η μονάδα δεν βρίσκεται σε όρθια θέση.
Το δάπεδο δεν είναι επίπεδο.
Σχηματίζεται πάγος
στο στοιχείο
Δεν είναι πρόβλήμα. Ο αφυγραντήρας διαθέτει λειτουργία
αυτόματης αποπάγωσης.
Νερό στο δάπεδο
Ελέγξτε τη σύνδεση του αγωγού με την έξοδο αποστράγγισης.
Ενώ χρησιμοποιείτε το δοχείο για την συλλογή του νερού, έχει
αφαιρεθεί το επιστόμιο της εξόδου αποστράγγισης στο πίσω μέρος
του αφυγραντήρα.
Ε122, Ε142, Ε163, Ε554
εμφανίζονται στην οθόνη
Αυτοί είναι κωδικοί βλάβης και προστασίας της συσκευής.
Ανατρέξτε στο κεφάλαιο ΠΛΗΚΤΡΑ ΤΟΥ ΑΦΥΓΡΑΝΤΗΡΑ
Ενεργοποιήστε την εγγύηση σας...
σε
5
απλά
Συνδεθείτε στο site της
στον ακόλουθο σύνδεσµο
http://www.inventoraircondition.gr/
egiisi-inventor/
Επιλέξτε τον τύπο του προϊόντος
(κλιµατιστικό ή συσκευή) για το
οποίο θα ενεργοποιηθεί η εγγύηση
Συµπληρώστε τα απαιτούµενα
στοιχεία (κατόχου, εµπόρου και
συσκευής) και πατήστε αποστολή
Επιλέξτε την εγγύηση
που αντιστοιχεί στο προϊόν
που έχετε στην κατοχή σας
Θα λάβετε επιβεβαιωτικό
µήνυµα στο e-mail σας για
την ενεργοποίηση της εγγύησης
Για την υποβολή
ηλεκτρονικών εγγυήσεων
πληκτρολογήστε
την παρακάτω διεύθυνση
https://www.inventoraircondition.gr/egiisi-inventor
Σκανάρετε εδώ
για τα έντυπα
των εγγυήσεων
Inventor

OBSERVAŢIE SOCIALĂ
1
CUPRINS
ATENȚIE
!
Când utilizați acest aparat în țările europene, este necesar să urmați indicațiile de mai jos:
DEPOZITARE: Nu depozitați acest produs ca deșeu municipal nesortat. Este necesară
colectarea acestui deșeu separat pentru un tratament special.
Este interzisă depozitarea acestui dispozitiv împreună cu deșeurile casnice.
Există mai multe posibilități cu privire la depozitare:
de către utilizator.
B) Când achiziționați un produs nou, comerciantul va primi produsul vechi gratuit.
C) Producătorul va primi gratuit de la utilizator aparatul vechi pentru depozitare.
comercianților de metale.
Depozitarea deșeurilor în păduri si în natură va pune în pericol sanatatea atunci când substanțele
periculoase se scurg în apa subterană și ajung în lanțul alimentar.
MĂSURI DE SIGURANȚĂ
Avertisment ......................................................................................................................................
Atenție ................................................................................................................................................
Informații electrice .........................................................................................................................
BUTOANE DE CONTROL PE DEZUMIDIFICATOR
Butoane de control .........................................................................................................................
Alte caracteristici .............................................................................................................................
IDENTIFICAREA PIESELOR
Poziționarea aparatului .................................................................................................................
UTILIZAREA APARATULUI
Când se utilizează aparatul ..........................................................................................................
Eliminarea apei colectate .............................................................................................................
ÎNGRIJIRE ȘI ÎNTREȚINERE
DISFUNCȚII
Disfuncții ............................................................................................................................................
2
2
3
4
5
6
7
7
8
9
10
Citiți acest manual
În interior, veți găsi multe sugestii utile cu privire la modul de utilizare al acestui aparat. Puteți
economisi timp și bani pe durata de viață a aparatului dacă acordați atenție preventivă în
necesar să apelați la service.
supravegheați sau li se acordă instruire cu privire la folosirea aparatului în siguranță și dacă
înțeleg pericolele pe care le implică. Copiii nu trebuie să se joace cu aparatul. Mentenanța
uzuală și curățarea nu se vor face de către copii fără supraveghere. (aplicabil pentru țările
europene)
reduse, senzoriale sau mentale, sau lipsite de experienţă şi cunoştinţe, cu excepţia cazului în
care acestea au fost supravegheate şi instruite cu privire la utilizarea aparatului de către o
persoană responsabilă pentru siguranţa lor. (aplicabil pentru alte țări cu excepția țărilor
europene)
- Copiii trebuie supravegheaţi pentru a vă asigura că nu se joacă cu acest aparat.
- În cazul în care cablul de alimentare este deteriorat, acesta trebuie înlocuit de către
- Acest aparat cu radiator electric va avea cel puțin 1 metru distanță față de materiale
combustibile.
- Contactaţi un tehnician de service autorizat pentru reparaţia sau întreţinerea acestui aparat.

2
3
MĂSURI DE SIG URANŢĂ
! !
ATENŢIE
!
Gravitatea este evaluată în baza următoarelor indicaţii
ATENŢIE
AVERTISMENT
AVERTISMENT
MĂSURI DE SIGURANŢĂ
!
!
ATENŢIE
!
Informaţii electrice
Pentru a preveni rănirea utilizatorului sau a altor persoane şi prejudicierea proprietăţii, trebuie respectate
următoarele instrucţiuni. Utilizarea incorectă ca urmare a nerespectării instrucţiunilor poate provoca rănire sau
distrugere
Acest simbol indică riscul de deces sau rănire gravă
Nu procedaţi niciodată aşa
Acţionaţi întotdeauna aşa
Acest simbol indică riscul de rănire sau distrugere a proprietăţii
Nu depăşiţi capacitatea prizei de
curent electric sau a dispozitivului
de legătură
electric şi nu utilizaţi priza pentru
alte aparate
Deconectaţi de la sursa de curent
dacă generează sunete ciudate,
mirosuri sau fum
Când utilizaţi în cabinete sau în alte
spaţii mici, asiguraţi-vă că lăsaţi
uşile deschise
Nu utilizaţi aparatul în apropiere de gaz
gazolină, benzen, diluant etc
Nu se recomandă să încercaţi să
desfaceţi sau să reparaţi unitatea
personal
Nu consumaţi şi nu utilizaţi apa
scursă din aerul condiţionat.
Nu aşezaţi în locuri în care unitatea
Nu introduceţi şi nu trageţi cablul
cu mâinile umede.
Nu aşezaţi unitatea lângă o sursă de
căldură
Înainte de a curăţa, opriţi curentul şi
deconectaţi unitatea
Nu deschideţi unitatea în timpul
funcţionării
Aşezaţi unitatea la înălţime,
pe o secţiune rigidă pe
podea
Nu porniţi şi nu opriţi unitatea prin
pornirea sau oprirea curentului
Nu deterioraţi şi nu utilizaţi un
cablu electric necorespunzător
evacuare cu cârpe sau prosoape
Când curăţaţi unitatea, deconectaţi
şi opriţi întrerupătorul
două săptămâni
Atenţie când utilizaţi unitatea într-o
persoane:
Nu aşezaţi obiecte grele pe cablu şi
strangulat
Dacă apa pătrunde în unitate, opriţi
unitatea şi deconectaţi de la sursa de
curent, contactaţi un tehnician
Nu utilizaţi în zone în care se
folosesc substanţe chimice.
Nu vă urcaţi şi nu vă aşezaţi
pe unitate
recipiente cu apă pe unitate
În caz contrar, există risc de şoc
electric sau incendiu datorită
generării de căldură în exces
Există risc de şoc electric sau
incendiu datorită generării de
căldură în exces
Există risc de incendiu sau
electrocutare
Lipsa aerisirii poate provoca
supraîncălzire şi incendiu
Apa poate pătrunde în unitate şi
afecta izolarea. Poate cauza şoc
electric sau incendiu.
Dacă unitatea cade, apa se
poate împrăştia şi prejudicia
bunurile sau provoca şoc
electric sau incendiu
Există risc de explozie sau incendiu Conţine contaminanţi şi vă puteţi
îmbolnăvi
Există risc de şoc electric
Există risc de defectare a aparatului
sau şoc electric
Există risc de şoc electric sau rănire
Există risc de şoc electric Piesele din plastic se pot topi şi pot
provoca un incendiu.
Există risc de şoc electric sau
incendiu datorită generării de
căldură în exces
Există risc de şoc electric sau
incendiu
Lipsa aerului poate conduce la
supraîncălzire şi incendiu
Nu curăţaţi unitatea când este
alimentată cu curent pentru că se
poate provoca un incendiu şi
provoca o disfuncţie
Bebeluşi, copii, persoane mai în
vârstă şi persoane care nu sunt
sensibile la umiditate
Există risc de incendiu sau şoc
electric
Există riscul de defectare a unităţii
sau risc de accident
substanţele chimice şi de
solvenţii dizolvaţi în aer
Există risc de rănire în cazul
în care cădeţi sau dacă
unitatea cade
Apa poate pătrunde în
interiorul unităţii, provocând
defectarea izolaţiei şi şoc
electric sau incendiu.
Asiguraţi-vă că aerul condiţionat este împământat corespunzător. Pentru a reduce riscurile de electrocutare
şi incendiu, este importantă împământarea corespunzătoare.
Aerul condiţionat trebuie conectat la o priză de perete împământată corespunzător. Dacă priza de perete pe
care intenţionaţi să o utilizaţi nu este împământată corespunzător sau protejată prin amorsă cu întârziere
Asiguraţi-vă că priza este accesibilă după instalarea unităţii.
prelungitor, folosiţi doar prelungitor aprobat pentru „aer condiţionat” (disponibil în majoritatea magazinelor
locale hardware).
Pentru a evita posibilitatea unei prejudicieri personale, deconectaţi întotdeauna unitatea de la sursa de
alimentare înainte de instalare şi/sau reparare.

TASTELE DE CONTROL ALE DEZUMIDIFICATORULUI TASTELE DE CONTROL ALE DEZUMIDIFICATORULUI
Taste de control
Fig.1
Buton BALANS
Buton PROGRAMARE
Afișaj
Buton SUS/JOS
Buton PORNIRE
Apăsați pentru a porni și opri dezumidificatorul.
Buton MOD DE FUNCȚIONARE
Apăsați pentru a selecta modul de funcționare
dorit din AUTO, Încălțăminte și Îmbrăcăminte.
NOTĂ: Modul Încălțăminte este opțional.
Butonul de setare al controlului umidității
Nivelul de umiditate poate fi stabilit într-un interval
de CO (umiditate relativă) până la 70% RH (umiditate
relativă) în trepte de 5%.
Pentru aer uscat, apăsați butonul și setați la o
valoare procentuală mai mică (%).
Pentru aer mai umed, apăsați butonul și setați o
valoare procentuală mai mare (%).
Butonul VENTILATOR
Controlează viteza ventilatorului. Apăsați pentru a
selecta fie viteza Mare sau Mică a ventilatorului.
Reglați comanda ventilatorului la viteza Mare pentru
îndepărtarea rapidă a umezelii. Atunci când umiditatea
a fost îndepărtată și se preferată o funcționare
silențioasă, setați comanda ventilatorului la viteză
Mică.
NOTĂ: Viteza ventilatorului este Mare în Modul
Încălțăminte și Îmbrăcăminte.
Apăsați pentru a activa caracteristica de balans
automat sau de a bloca flapsurile în poziția dorită.
Apăsați pe acest buton timp de 3 secunde pentru
a iniția caracteristica de blocare / deblocare.
Toate celelalte butoane sunt inaccesibile în modul
de blocare activat.
Apăsați pentru a activa funcția de oprire automată.
Apăsați butonul de programare pentru a seta
oprirea automată și cronometrul 0.0 - 8 în trepte
de câte 1 oră.
Afișează nivelul de umiditate setat % din CO până
la 70% sau timpul de oprire automată (0 ~ 8), apoi
afișează umiditatea din cameră (± 5% acuratețe),
nivelul de umiditate într-un interval de 30% RH
(umiditate relativă), până la 90% RH (umiditate
relativă).
Coduri de eroare:
E122 - Eroare senzor de temperatură -. Scoateți
aparatul din priză și conectați-l din nou în cazul în
care eroarea se repetă, apelați la un centru service.
E142 - Eroare senzor de temperatura al camerei și
a senzorului de umiditate - Scoateți aparatul din
priză și conectați-l din nou în cazul în care eroarea
se repetă, apelați la un centru service.
E 163 - Eroare a plăcii principale de control al
parametrilor - Scoateți aparatul din priză și conectați-l
din nou în cazul în care eroarea se repetă, apelați
la un centru service.
E554 - Detectare a scurgerilor de agent frigorific Cu aceasta noua tehnologie, pe zona de afișare va
apărea E554 atunci când unitatea detectează scăpări
de agent frigorific, apelați la un centru service.
NOTĂ: Codurile de eroare sunt afișate SUS două
coduri (ex EI.) Timp de 1 secundă, apoi afișate JOS
codurile timp de 1 al doilea (ex-22.).
Ledurile indicatoare:
- ledul indicator al nivelul de umiditate actual
- ledul indicator al nivelului de umiditate setat
- led indicator de oprire automată.
- led indicator de rezervor plin.
- led indicator de viteză mică a ventilatorului.
- led indicator de viteză mare a ventilatorului.
- led indicator luminos de blocare a tastelor.
- led indicator al modului AUTO.
- led indicatorul al modului încălțăminte.
- led indicator al modului îmbrăcăminte.
Led indicator pentru rezervor plin
Atunci când se aprinde rezervorul trebuie golit, sau
se aprinde când rezervorul este îndepărtat sau nu
este așezat în poziția corectă.
Alte caracterisitici:
Oprire automată
Dezumidificatorul se oprește atunci când rezervorul
este plin, sau când acesta este îndepărtat sau nu se
afla în poziția corectă. Când nivelul setat de umiditate
este atins, aparatul se va oprit automat. La unele
modele, motorul ventilatorului va continua să funcționeze.
Auto degivrare
Atunci când se acumulează gheață pe vaporizator,
compresorul se va opri și ventilatorul va continua să
funcționeze până când gheața dispare.
NOTĂ: Atunci când aparatul este în degivrare, acesta
poate face un zgomot de agent frigorific care se scurge.
Acest zgomot este normal.
Așteptați 3 minute până la reluarea funcționării
După ce aparatul s-a oprit, acesta nu poate fi repornit în
primele 3 minute. Acest lucru protejează aparatul.
Funcționarea va porni automat după 3 minute.
Auto Restart
În cazul în care aparatul se oprește în mod neașteptat din
cauza întreruperii curentului electric, acesta va reporni
automat cu aceeași funcție atunci când alimentarea cu
curent electric se reia.
Mod AUTO
Aparatul poate fi setat la nivelul de umiditate dorit, la viteza
ventilatorului dorită și a poziției flapsurilor.
Mod ÎNCĂLȚĂMINTE
Unitatea poate face funcția de dezumidificare MAX când se
află în modul de pantofi. Viteza ventilatorului este fixată la
maxim, iar flapsurile se vor opri din balans. Unitatea va ieși
din modul de operare INCALTAMINTE după un maxim de 2 ore.
Modul Îmbrăcăminte
Unitatea poate face funcția de dezumidificare MAX când
se află în modul Îmbrăcăminte. Viteza ventilatorului este
fixată la viteza mare și flapsurile se pot seta în poziția
dorită.
Îndepărtați capacul uscător INCALTAMINTE.
Instalați furtunul uscător INCALTAMINTE
la aparat.
Puneți furtunul uscător INCALTAMINTE la
pantofi.
După utilizare, îndepărtați furtunul uscător
INCALTAMINTE.
Haine ude
Atunci când apăsați butonul pentru a schimba
modurile de funcționare, aparatul va emite un
sunet pentru a indica faptul că acesta își schimbă
modul de funcționare.
NOTĂ: Panoul de control al aparatului pe care l-ați cumpărat poate fi ușor diferit în funcție de model.
POW ER
MODE
SWI NG
FAN
TIM ER
3S
NOW
SET
AUTO SHOES CL O THES
CLOTH ES
0~ 0cm
0~ 0cm
Fig.Α
2
2
4
4
6
6
Se lasă 30 ~ 50 cm distanță în partea
de sus și în partea dreapta a aparatului
până la hainele ude.
Flux de aer
NOTĂ:
• Modul de uscare trebuie să funcționeze într-o cameră de închisă,
nu se deschide ușa sau fereastra.
• Pentru a face cele mai bune efecte de uscare eficiente, vă rugăm
să stoarceți mai întâi hainele ude.
• Asigurați-vă că direcționați fluxul de aer înspre hainele umede
(A se vedea Fig.A).
• Pentru haine groase, grele și umede eficiența uscării nu este cea
mai bună.
ATENȚIE:
• Nu acoperiți cu haine orificiul de evacuare a aerului. Acest lucru
poate provoca căldură excesivă, incendii sau defectarea unității.
• Nu așezați hainele ude de pe partea de sus a aparatului și aveți
grijă să nu picure apă în aparat. Acest lucru poate provoca șoc
electric sau defectarea unității.

Fronta l
Spate
Fig .2
Εικ .3
Panel control
Furtun de scurgere
Roți
Cablu alimentare cu ștecher
Catarama cablu de alimentare
Grila admisie aer
Filtru aer (în spatele grilei)
Capac uscare pantofi
Furtun uscare pantofi
NOTĂ: Toate imaginile din manual sunt numai în scop explicativ.
Forma actuală a aparatului cumpărat poate sa fie ușor diferită,
dar operațiile și funcțiile sunt aceleași.
Mâner (pe ambele părți)
Grila refulare aer
Rezervor
1
2
3
4
1
2
3
4
5
1
3
2
4
1
2
3
6
5
4
7
6
7
8
8
IDENTIFICAREA PĂRȚILOR
IDENTIFICAREA PĂRȚILOR
identificarea părților
Aşezarea aparatului
Nu folosiţi în exterior
scop comercial sau industrial.
poate susţine aparatul cu cupa de apă plină.
Lăsaţi cel puţin 20 cm spaţiu pentru aer în toate direcţiile
aparatului pentru o bună circulaţie a aerului.
Aşezaţi aparatul într-o zonă în care temperatura nu va scădea
temperatură sub 50C (410F),
5
0
C (410F)
ceea ce poate afecta
funcţionarea.
Aşezaţi aparatul departe de uscătorul de haine, încălzitor sau
radiator.
Folosiţi aparatul pentru a împiedica umezeala să afecteze
cărţile sau lucrurile de valoare.
prejudiciile cauzate de umezeală.
Închideţi toate uşile, ferestrele şi toate celelalte deschideri
exterioare din cameră.
minim 40 cm
minim 20 cm
minim 20 cm minim 20 cm
minim 20 cm
Admisie aer
Evacuare aer
Fig.4a
Roțile (se instalează în cele patru puncte de la baza
aparatului)
Roțile se pot învârti liber în orice direcție se
dorește.
Nu forțați să mutați aparatul peste covor și nici cu
rezervorul plin cu apă (aparatul se poate răsturna și
vărsa apa)
Când se utilizează aparatul
utilizaţi aparatul continuu 24 de ore.
Acest aparat este creat pentru a funcţiona într-un mediu de
lucru cuprins între 5
0
C şi 410C.
imediat, lăsaţi aproximativ trei minute pentru reluarea unei
funcţionări corecte.
utilizată şi pentru alte aparate electrice.
Alegeţi o locaţie adecvată, asigurându-vă că aveţi acces uşor la
priza electrică.
Conectaţi aparatul la o priză electrică cu împământare (220V
50Hz).
Asiguraţi-vă că este corect montată cupa de apă, în caz
contrar, aparatul nu va funcţiona corect.
NOTĂ: Când nivelul apei din cupă ajunge la un anumit nivel,
evitați mutarea aparatului pentru a evita răsturnarea
aparatului.

Fig.5
Fig.6
fig.8
fig.9
fig.10
Fig.7
Eliminarea apei colectate
2. Golire continuă
Când aparatul este oprit și cupa este plină, aparatul va emite de
8 ori un semnal sonor și indicatorul luminos Full se aprinde
intermitent - pe ecran apare P2.
Când aparatul este pornit, iar cupa este plină, compresorul se va
opri iar ventilatorul se va opri după 30 de secunde pentru a
elimina condensul, aparatul va emite de 8 ori un semnal sonor și
indicatorul luminos Full se aprinde intermitent - pe ecran apare
P2.
Scoateţi uşor cupa. Prindeţi mânerul cupei în siguranţă şi
scoateţi cu atenţie pentru a nu vărsa apa. Nu puneţi cupa pe
podea pentru că fundul cupei nu este plat. În caz contrar, cupa
va cădea, iar apa se va împrăştia.
Aparatul va reporni atunci când cupa este aşezată în poziţia
corectă.
NOTE:
Când scoateţi cupa, nu atingeţi părţile interioare ale aparatului.
Altfel aţi putea prejudicia produsul.
Asiguraţi-vă că împingeţi cupa uşor în aparat. Lovirea cupei de
ceva sau neîmpingerea sa în siguranţă poate cauza disfuncţia
aparatului.
Atunci cand scoateți cupa, stergeți apa și din interiorul
aparatului.
atașarea unui furtun de apă (nu sunt incluse).
Scoateți dopul din spatele aparatului. Atașați un furtun de
evacuare (ID = 13,5 mm) și întreptați-l spre scurgerea din
pardoseală sau catre o instalație de drenaj adecvat (vezi Fig. 7).
Asigurați-vă că furtunul este securizat astfel încât să nu existe
scurgeri.
Îndreptați furtunul spre scurgere, asigurându-vă că nu este
Puneți capătul furtunului în scurgere și asigurați-vă că capatul
Să nu îl poziționați în sus.
Selectați valoarea dorită de umiditate și viteza ventilatorului
pentru a începe.
NOTĂ: Dacă funcția de evacuare continuă nu este utilizat,
scoateți furtunul de evacuare de la priză.
1. Trageţi cupa afară puţin.
2. Prindeţi mânerul cupei cu putere şi
trageţi afară din aparat.
3. Scurgeţi apa
Scoateţi dopul de
cauciuc
furtunului de scurgere
UTILIZAREA APAR ATULUI
1. Curăţaţi grilajul şi cutia
Eliminarea apei colectate
Nu vărsaţi apă direct pe unitatea principală. În caz contrar, există risc de
şoc electric, prejudiciere a izolaţiei sau ruginire a aparatului.
aşadar, folosiţi un ataşament de aspirator sau o perie pentru a curăţa.
2. Curăţaţi cupa
La câteva săptămâni, curăţaţi cupa pentru a preveni sporirea
mucegaiului, a ciupercilor şi a bacteriilor. Umpleţi parţial cupa cu apă
spălaţi.
NOTĂ: Nu folosiţi o maşină de spălat vase pentru a curăţa cupa. După
4. Când nu folosiţi aparatul perioade de timp îndelungate
Pentru a înlătura:
Pentru a ataşa:
ATENŢIE:
puţin o dată la 30 de zile sau mai mult dacă este necesar.
NOTĂ: NU CLĂTIŢI ŞI NU PUNEŢI FILTRUL ÎNTR-O MAŞINĂ AUTOMATĂ DE
SPĂLAT VASE.
După ce opriţi aparatul, aşteptaţi o zi înainte de a goli rezervorul.
Acoperiţi aparatul cu o sacoşă din plastic
Aşezaţi aparatul vertical într-un loc uscat şi bine ventilat.
înfunda şi îi vor reduce performanţa.
UTILIZ AREA APARA TULUI

SFATUR I PENTRU DEP ANARE
Problemă
Aparatul nu pornește
10
Înainte de a apela service-ul, consultați tabelul de mai jos pentru a vedea ce puteți rezolva singuri.
usucă aerul așa cum ar
trebui
Aparatul scoate un
zgomot mare când
funcționează
Se formează gheață pe
bobine
Apare apă pe podea
E122, E142, E163, E554
aprinde pe Display.
este plin.
Recipientul nu este așezat în poziția corectă.
Nu a fost permis destul timp pentru îndepărtarea umezelii.
Asigurați-vă ca nu există perdele, jaluzele sau mobilă care să blocheze
Temperatura camerei este prea mică, sub 5°C(41°F).
Există un radiator cu gaz lampant sau altceva ce emană vapori de apă în
încăpere.
Filtrul de aer este înfundat.
Aparatul este înclinat și nu drept, în picioare, cum ar trebui.
Suprafața podelei nu este dreaptă
Aceasta este normală. Aparatul are funcție automată de dezghețare.
Acestea sunt coduri de protecție și de eroare. Vezi secțiunea BUTOANE
DE CONTROL PE DEZUMIDIFICATOR.
Furtunul de legătură este slăbit, sau legătura furtunului este slăbită.
Vreți să folosiți recipientul pentru golirea apei dar ați uitat dopul de
cauciuc din spate detașat.
Activati-va garantia...
in
5
Pasi
simpli!
Pentru inregistrarea
electronicaa garantiei, va rugam sa
accesati link-ul de mai jos :
https://www.inventoraerconditionat.ro/certificatul-de-garantie-inventor-aer-conditionat-si-electrocasnice
Scanati codul QR pentru
a obtine formularul de garantie.
Alegeti tipul de produs pentru
care vreti sa activati garantia
(aparat de aer conditionat, alt
aparat electrocasnic).
Alegeti tipul de garantie
corespunzator produsului
achizitionat.
Completati formularul cu
informatiile cerute (numele
proprietarului, magazinul,
produsul) si apasati SEND.
Veti primi care va confirma
activarea garantiei.
Accesati link-ul de mai jos:
https://www.inventoraerconditionat.ro/
certificatul-de-garantie-inventoraer-conditionat-si-electrocasnice

FREUNDLICHER HINWEIS INHALT
ENTSORGUNG: Dieses Produkt nicht im unsortierten Gemeindeabfall entsorgen. Die getrennte
Sammlung dieser Art von Abfall ist für eine kontrollierte Aufbereitung erforderlich.
Es ist verboten, dieses Gerät über den Hausmüll zu entsorgen. Für die Entsorgung gibt
esunterschiedliche Möglichkeiten:
A) Die Gemeinde hat ein Sammelsystem etabliert, wodurch Elektroschrott für den
Nutzer kostenfrei zu entsorgen ist.
B) Wenn Sie ein neues Produkt kaufen, wird der Einzelhändler ihr Altgerät kostenlos
übernehmen.
C) Der Hersteller wird das Altgerät für den Nutzer kostenfrei zur Entsorgung
zurücknehmen.
D) Da alte Produkte wertvolle Rohstoffe enthalten, können diese an
Altmetallhändlerverkauft werden.
Wilde Müllentsorgung in Wäldern und der freien Natur gefährdet Ihre Gesundheit, wenn
schädliche Substanzen in das Grundwasser sickern und so in die Nahrungsmittelkette
gelangen.
Wenn Sie diesen Luftentfeuchter in den europäischen Ländern verwenden, müssen die
folgenden Informationen beachtet werden:
SICHERHEITSHINWEISE
Warnung........................................................................................................................
Vorsicht.........................................................................................................................
Elektrische Information .................................................................................................
BEDIENTASTEN DES ENTFEUCHTERS
Bedientasten..................................................................................................................
Weitere Merkmale..........................................................................................................
BEZEICHNUNG DER BAUTEILE
Bezeichnung der Bauteile .............................................................................................
Aufstellen des Geräts ....................................................................................................
BETRIEB DES GERÄTS
Inbetriebnahme des Geräts...........................................................................................
Entfernen des Kondenswassers ...................................................................................
PFLEGE UND WARTUNG
Pflege und Reinigung des Entfeuchters .......................................................................
TIPPS ZUR FEHLERBEHEBUNG
Tipps zur Fehlerbehebung ...........................................................................................
2
2
3
4
5
6
7
7
8
9
10
Im Inneren finden Sie eine Menge nützlicher Hinweise, wie Sie Ihr luftentfeuchter richtig
bedienen und warten. Mit wenigen Vorsorgemaßnahmen können Sie während der Nutzung
Ihres luftentfeuchter viel Zeit und Geld sparen. Sie werden in der Tabelle zur Fehlerbehebung
zahlreiche Antworten für gängige Probleme finden. Wenn Sie zuerst die Tipps für die
Fehlerbehebung lesen, müssen Sie vielleicht den Service‐Dienst gar nicht anrufen.
Lesen Sie diese Bedienungsanleitung
VORSICHT
• Dieses Gerät darf nur von Kindern ab einem Alter von 8 Jahren und von Personen mit
eingeschränkten physischen, sensorischen oder mentalen Fähigkeiten oder mit mangelnden
Erfahrungen und Wissen benutzt werden, wenn in Bezug auf die sichere Benutzung des
Geräts eine Beaufsichtigung und Unterweisung stattgefunden hat und wenn die
einhergehenden Gefahren bekannt sind. Kinder dürfen nicht mit dem Gerät spielen.
Reinigung und Wartung darf nicht von Kindern ohne Aufsicht durchgeführt werden.
(gilt für die europäischen Länder)
• Dieses Gerät ist nicht zur Verwendung durch Personen (einschließlich Kindern)
mit eingeschränkten körperlichen, sensorischen oder mentalen Fähigkeiten oder
durch Personen ohne entsprechende Erfahrung oder Kenntnisse vorgesehen,
es sei denn, diese werden von einer Person, die für ihre Sicherheit
verantwortlich ist, beaufsichtigt oder haben von dieser zuvor Anweisungen zum
Gebrauch des Geräts erhalten. (gilt für andere Länder außerhalb der europäischen
Länder).
• Es empfiehlt sich, die Kinder zu beaufsichtigen, um sicherzustellen, dass sie nicht
mit dem Gerät spielen.
• Ein beschädigtes Netzkabel muss vom Hersteller, dessen
Kundendienstvertretung oder von ähnlich qualifizierten Personen
ausgetauscht werden, um Gefahrenquellen zu vermeiden.
• Die Installation des Geräts muss in Übereinstimmung mit den nationalen Elektronormen
erfolgen.
• Geräte mit elektrischen Heizungen müssen mindestens 1 Meter Abstand zu den
brennbaren Materialien haben.
• Kontaktieren Sie den autorisierten Servicetechniker für die Reparatur und die
Wartung dieses Geräts.
!

SICHERHEITSHINWEISE SICHERHEITSHINWEISE
Überlasten Sie die Steckdose und
die Zuleitung nicht.
Setzen Sie das Gerät nicht in oder
außer Betrieb, indem Sie das
Netzkabel ein- oder ausstecken.
Verwenden Sie kein ungeprüftes
oder beschädigtes
Anschlusskabel.
Verändern Sie die Länge des
Anschlusskabels nicht oder verwenden
Sie die Steckdose nicht zusammen mit
anderen Geräten.
Stecken Sie das Gerät ab, wenn
seltsame Geräusche, Gerüche, oder
Rauch aus dem Gerät austreten.
Verwenden Sie das Gerät nicht in der
Nähe von brennbaren Gasen oder
Brennstoffen, wie Benzin, Benzol,
Lösungsmittel, usw.
Andernfalls besteht die Möglichkeit
eines elektrischen Schlags oder Feuers
durch übermäßige Hitzeentwicklung.
Es besteht die Möglichkeit eines elektrischen
Schlags oder Feuers durch übermäßige
Hitzeentwicklung
Dies kann Feuer und elektrischen
Schlag verursachen.
Dies kann eine Explosion oder Feuer
verursachen.
Mangelnde Lüftung kann eine Überhitzung
und Feuer verursachen.
Es enthält Verunreinigungen und könnte
Sie krank machen.
Dies kann "Behälter voll" auslösen oder
einen elektrischen Schlag verursachen.
Dies kann einen elektrischen Schlag
verursachen.
Kunststoffteile können schmelzen und
ein Feuer verursachen.
Es besteht die Möglichkeit eines elektrischen
Schlags oder Feuers durch übermäßige
Hitzeentwicklung.
Dies kann Fehlfunktion oder elektrischen
Schlag verursachen.
Dies kann elektrischen Schlag oder
Verletzung verursachen.
Dies kann elektrischen Schlag oder Feuer
verursachen.
Stecken oder ziehen Sie Stecker
nicht mit nassen Händen.
Versuchen Sie niemals das Gerät
selbst zu zerlegen oder zu
reparieren.
Trinken oder verwenden Sie das Wasser
nicht, das vom Gerät abgeschieden wird.
Vor der Reinigung, schalten Sie bitte
das Gerät aus und ziehen Sie den
Netzstecker.
Stellen Sie das Gerät nicht in der
Nähe von Wärmequellen auf.
VORSICHT
Wasser könnte in das Gerät eindringen
und die Isolierung beeinträchtigen. Dies kann
elektrischen Schlag oder Feuer verursachen.
Wenn das Gerät umkippt, kann
Wasser austreten und Ihr Eigentum
beschädigen, oder einen elektrischen
Schlag oder Feuer verursachen.
Die folgenden Hinweise müssen beachtet werden, um eine Verletzung von Menschen oder Schäden am
Eigentum zu verhindern. Falsche Bedienung wegen Nichtbeachtung der Bedienungsanleitung kann
Verletzungen oder Schäden hervorrufen.
Der Grad der Schwere wird durch folgende Hinweise angegeben
Die Bedeutung der in der Anleitung verwendeten Symbole sind wie nachfolgend dargestellt
Dieses Symbol weist auf eine tödliche Gefahr oder auf das Risiko ernster
Verletzungen hin.
Dieses Symbol weist auf die Gefahr der Verletzung und der Beschädigung
des Geräts hin.
Machen Sie das immer.
Machen Sie das nie.
WARNUNG
VORSICHT
WARNUNG
Eine behinderte Luftführung kann zu
Überhitzung und Feuer führen.
Dies kann elektrischen Schlag oder eine
Fehlfunktion verursachen.
Es besteht die Gefahr von Feuer und
elektrischem Schlag.
Sie können sich beim Sturz oder
beim Umkippen des Geräts
verletzen.
Kleinkinder, Kinder, alte Personen, und
Menschen, die der Luftfeuchtigkeit
gegenüber empfindlich sind.
Dies verursacht Schäden am
Gerät durch in der Luft gelöste
Chemikalien und Lösungsmittel.
Ein Betrieb ohne Filter kann Störungen
verursachen.
Dies kann Fehlfunktion des Geräts oder
Unfall verursachen.
Wasser könnte in das Innere des
Geräts dringen und einen Kurzschluss,
elektrischen Schlag oder
Feuer verursachen.
• Das Typenschild des Herstellers befindet sich am rückseitigen Paneel des Geräts und beinhaltet die
elektrischen und anderen technischen Daten der Einheit.
• Stellen Sie sicher, dass das Gerät richtig geerdet ist. Um die Gefahr von elektrischen Schlägen und
von Feuer zu minimieren, ist die korrekte Schutzerdung entscheidend. Das Stromversorgungskabel ist
zum Schutz vor elektrischen Schlägen mit einem dreipoligen Schutzkontaktstecker ausgestattet.
• Das Gerät ist mit einer richtig geerdeten Wandsteckdose zu verwenden. Sollte die Wandsteckdose
nicht entsprechend geerdet sein oder über eine träge Schmelzsicherung oder Sicherungsautomaten
abgesichert sein, lassen Sie bitte vom Elektrofachmann eine geeignete Schutzkontaktsteckdose
montieren.
• Stellen Sie sicher, dass die Steckdose nach Aufstellen des Geräts zugänglich bleibt.
• Verwenden Sie keine Verlängerungskabel oder Zwischenstecker für dieses Gerät. Allerdings, wenn
es erforderlich ist ein Verlängerungskabel zu benutzen, verwenden Sie bitte ein geprüftes
Feuchtraum-Verlängerungskabel (erhältlich in den meisten Elektrofachmärkten).
• Bitte trennen Sie immer die Stromversorgung vom Gerät vor Installations- und/oder Servicetätigkeiten,
um mögliche Verletzungen zu vermeiden.
Elektrische Information
Nehmen Sie den Wasserbehälter
nicht während des Betriebs heraus.
Verwenden Sie das Gerät nicht in
kleinen Räumen.
Verwenden Sie das Gerät nicht an
Orten, wo Wasser auf das Gerät spritzen
kann.
Stellen Sie das Gerät auf
einem ebenen und stabilen
Untergrund auf.
Decken Sie die Ansaug- oder Ausblasöffnungen nicht mit Kleidern oder
Tüchern ab.
Stecken Sie niemals Ihre Finger oder
irgendwelche Objekte in die Gitter
oder Öffnungen. Warnen Sie besonders
Kinder vor diesen Gefahren.
Setzen Sie die Filter immer richtig ein.
Reinigen Sie die Filter alle zwei Wochen.
Ist Wasser in das Gerät eingedrungen,
schalten Sie das Gerät aus und trennen
Sie das Gerät vom Netz und kontaktieren
Sie einen qualifizierten Servicetechniker.
Stellen Sie keine Blumenvasen
oder andere Wasserbehälter
auf das Gerät.
Stellen Sie keine schweren Objekte auf
das Netzkabel, das Anschlusskabel darf
nicht zusammengedrückt werden.
Setzen Sie sich nicht oder
klettern Sie nicht auf das Gerät.
Besondere Vorsicht ist geboten, wenn
das Gerät in einem Raum mit folgenden
Personen verwendet wird:
Verwenden Sie das Gerät nicht
in Bereichen, wo mit Chemikalien
hantiert wird
VORSICHT

BEDIENTASTEN DES ENTFEUCHTERS BEDIENTASTEN DES ENTFEUCHTERS
Bedientasten
POWER-Taste
Drücken Sie, um den Entfeuchter ein- und ausgeschalten.
: Unten/Auf-Tasten
MODUS-Taste
Drücken Sie, um die gewünschte Betriebsart zwischen
AUTO (Automatisch), SHOES (Schuhen) und CLOTHES
(Kleidung) auszuwählen. HINWEIS: Der SHOES-Modus
ist optional.
• Feuchtigkeitseinstellung - Bedientasten
Der Feuchtigkeitsgrad kann im Bereich zwischen
"CO" (Relative Feuchte RF) und 70% RH (Relative
Feuchte RF) in 5% Schritten eingestellt werden.
Für trockenere Luft, die Taste '' - '' drücken und einen
geringeren
Prozentwert (%) auswählen.
Für eine feuchtere Luft, die Taste '' + '' drücken und
einen höheren Prozentwert (%) auswählen.
HINWEIS: Der Feuchtigkeitsgrad kann unter die SHOES
und CLOTHES-Modi nicht eingestellt werden.
Ventilator (Fan)-Taste
Damit kontrollieren Sie die Ventilatorgeschwindigkeit. Drücken
Sie, um entweder eine höhere oder niedrigere
Ventilatorgeschwindigkeit auszuwählen. Stellen Sie die
Ventilatorkontrolle auf ''Hoch'' für eine maximale Entfernung
der Feuchtigkeit ein. Wenn die Feuchtigkeit reduziert wurde
und geräuscharmer Betrieb bevorzugt wird, stellen Sie die
Ventilatorkontrolle auf niedrig ein.
HINWEIS: Die Ventilatorgeschwindigkeit wird unter
SHOES-und CLOTHES-Modus automatisch auf
Hohe-Geschwindigkeit eingestellt.
SWING-Taste
Drücken Sie um die Auto-Swing-Funktion zu initiieren
oder fixierenden Lüftungsschlitz auf die gewünschte
Position. Drücken Sie diese Taste für 3 Sekunden um
die Sperren / Entsperren-Funktion zu initiieren. Alle
anderen Tasten sind unter die Lock-Funktion nicht
verfügbar.
- Niedrige Ventilator-Geschwindigkeit-Kontrollleuchte.
- Hohe Ventilator-Geschwindigkeit-Kontrollleuchte.
- Lock- Sperrfunktion Kontrollleuchte.
Voller Wassertank-Leuchte
Leuchtet, wenn der Tank bereit zum entleeren ist,
oder wenn der Tank entfernt oder nicht in der
richtigen Position wieder eingesetzt wurde.
Automatische Abschaltung
Der Entfeuchter wird automatisch ausgeschaltet, wenn
der Wassertank voll ist, oder wenn der Tank entfernt
oder nicht in der richtigen Position wieder eingesetzt
wurde. Wenn die vorgewählte Luftfeuchtigkeit erreicht
ist, wird das Gerät automatisch abgeschaltet. Bei
einigen Modellen wird auch dann der Ventilatormotor
weiterhin arbeiten.
Automatisches Abtauen
Wenn sich Frost an den Entfeuchtungsspulen gebildet
hat, schaltet der Kompressor ab und der Ventilator
läuft weiter, bis der Frost abgetaut ist.
HINWEIS: Während des automatischen Abtaubetriebs,
könnte vom Gerät aus ein Geräusch aufgrund des
Kältemittelflußes kommen, was normal ist.
Vor Wiederaufnahme des Betriebs 3 Minuten warten Wenn
das Gerät ausgeschaltet hat, kann es in den ersten
3Minuten nicht wieder in Betrieb gesetzt werden. Dies
dient zum Schutz des Geräts. Das Gerät startet nach
3 Minuten automatisch.
Automatischer Neustart
Wenn das Gerät unerwartet durch eine Stromunterbrechung
den Betrieb abbricht, startet das Gerät neu mit der vorgewählten
Einstellung, sobald die Stromversorgung wieder aufrecht ist.
AUTO-Modus
Beim Gerät kann die gewünschte Funktion zwischen
Luftfeuchtigkeits, Ventilatorgeschwindigkeit und
Lüftungsschlitz-Swing eingestellt werden.
SCHUHEN-Modus
Das Gerät kann unter die MAX-Entfeuchtungsfunktion laufen,
wenn es auf SCHUHEN-Modus eingestellt ist. Die
Ventilatorgeschwindigkeit ist auf hohe Ventilatorgeschwindigkeit festgelegt und der Lüftungsschlitz wird stoppen zu
Schwingen. Das Gerät wird aufhören unter SHOES-Modus
zu arbeiten nachdem ein Betrieb von maximal 2 Stunden
erreicht ist.
KLEIDER-Modus
Das Gerät kann unter die MAX-Entfeuchtungsfunktion laufen,
wenn es auf KLEIDER-Modus eingestellt ist. Die Ventilatorgeschwindigkeit ist auf hohe Ventilatorgeschwindigkeit festgelegt
und die Lüftungsschlitz-Schwingenfunktion kann eingestellt
werden.
Weitere Merkmale
- AUTO-Modus Kontrollleuchte.
- Schuhen-Modus Kontrollleuchte.
- KLEIDER-Modus Kontrollleuchte
Entfernen Sie die Decke des SHOES-Trockners.
Montieren Sie den SHOES-Rohrtrockner
am Gerät.
Setzen Sie das Rohr des SHOES-Trockners
an den Schuhen
Nasse Kleidung
Nach dem Gebrauch entfernen Sie das Rohr
des SHOES-Trockners.
TIMER-Taste
Drücken Sie um die Auto-Stopp-Funktion zu initiieren.
Drücken Sie wiederholt die TIMER Taste, um die
Auto-Stopp-Zeit zwischen 0.0 und 8 Stunden in
Schritten von 1 Stunde einzustellen.
Wenn Sie die Taste drücken, um die Betriebsarten
zu ändern, wird das Gerät ein Piepton ausgeben,
um anzuzeigen, dass es den Betriebs-Modus
wechselt.
ANMERKUNG: Das Bedienfeld des Geräts, das Sie gekauft haben, kann leicht je nach den Modellen
abweichen.
Εικ.1
POW ER
MODE
SWI NG
FAN
TIM ER
3S
NOW
SET
AUTO SHOES CL O THES
Anzeigen
Zeigt den eingestellten % Feuchtigkeitsgrad zwischen
"CO" und 70% oder die Auto-Start / Stopp-Zeit (0-8),
während der Einstellung, dann zeigt den tatsächlichen
(plus/minus 5% Genauigkeit) Feuchtigkeitsgrad % im
Raum in einem Bereich zwischen 30% RH (Relative
Feuchte RF) und 90% RH (Relative Feuchte RF).
Fehlercodes:
E122-Rohrtemperatursensorfehler-Trennen Sie das
Gerät vom Netz und schließen Sie es wieder an.
Wenn der Fehler weiterhin auftritt, rufen Sie bitte den
Kundendienst.
E142- Raumtemperatursensor-und Feuchtesensorfehler
- das Gerät vom Netz abtrennen und es dann wieder
anschliessen. Wenn der Fehler weiterhin auftritt, rufen
Sie bitte den Kundendienst.
E163- Fehlerparameter bei der Hauptsteuerplatine Trennen Sie das Gerät vom Netz und schließen Sie
es wieder an. Wenn der Fehler weiterhin auftritt, rufen
Sie bitte den Kundendienst.
E554- Kältemittelleckerkennung- Mit dieser neuen
Technologie, der Anzeigebereich zeigt "E554", wenn
das Gerät ein Kältemittelleck erkennt. Sie sollten dann
den Kundendienst anrufen.
HINWEIS: Bei Fehlercodes werden ZWEI Codes
auf HOCH (z. B. El) für 1 Sekunde angezeigt, und
dann ZWEI Codes auf NIEDRIG (z. B. 22) für 1
Sekunde abwechselnd angezeigt.
Anzeigen der Kontrollleuchten:
- Kontrollleuchte für den tatsächlichen
Feuchtigkeitsgrad HD
- Kontrollleuchte für die eingestellte Luftfeuchtigkeit.
- Auto-Stop-Kontrollleuchte.
- Voller Wassertank-Kontrollleuchte.
CLOTH ES
30~50cm
30~50cm
Abb.A
8
8
1
1
2
2
3 4
3
4
5
5
6
6
7
7
Lassen Sie 30 ~ 50cm Abstand auf
der oberen und rechten Seite des
Geräts zu der nassen Kleidung.
Luftstrom
HINWEIS:
• Der Trockner-Modus muss in einem geschlossenen
Raum betrieben werden. Tür und Fenster nicht öffnen.
• Um die möglichst effektivste Entfeuchtung zu erreichen,
dehydrieren Sie bitte zuerst die nassen Kleider.
• Stellen sie sicher, dass der Luftstrom direkt an die
nassen Kleider gerichtet ist (siehe Abb. A).
• Für dicke und schwere nasse Kleidung werden Sie
möglicherweise nicht die effektivste Entfeuchtung
bekommen.
VORSICHT
• Bedecken Sie nicht den Luftauslass des Geräts mit
Kleidern. Es kann zu übermäßigen Hitze, Feuer oder
Ausfall der Anlage führen.
• Platzieren Sie nicht die nasse Kleidung auf der Oberseite
des Gerätes und lassen Sie kein Wasser in das Gerät
hineintropfen. Es kann zu einem elektrischen Schlag,
Kriechstrom oder Ausfall des Geräts führen.

Vorderseite
Rückseite
Abb.2
Abb.3
Abb.4a
Bedienfeld
Auslass des Ablaufschlauchs
Rollen
Stromversorgungskabel und Stecker
Haken für Stromversorgungskabel
Lufteinlassgitter
Luftfilter (hinter dem Gitter)
Decke des SHOES-Trockners
Rohr des Shoes-Trockners
ANMERKUNG: Alle Abbildungen in dieser Anleitung dienen
lediglich zur Erläuterung. Das Gerät, das Sie erworben haben,
kann davon leicht abweichen. Die Bedienung und Funktionen
sind jedoch identisch.
Griff (beide Seiten)
Luftauslassgitter
Wassertank
1
2
3
4
1
2
3
4
5
1
3
2
4
1
2
3
6
5
4
7
6
7
8
8
BEZEICHNUNG DER BAUTEILE
Bezeichnung der Bauteile
BETRIEB DES GERÄTS
20cm
Lufteinlassgitter
Luftauslassgitter
oder mehr
oder mehr
oder mehr
oder mehr
oder mehr
20cm
20cm
20cm
40cm
Inbetriebnahme des Geräts
- Wenn Sie den Entfeuchter zum ersten Mal in Betrieb nehmen, lassen Sie das Gerät 24 Stunden im
Dauerbetrieb laufen.
- Das Gerät ist so konstruiert, dass es zwischen 5°C (41° F) und 35°C (95°F) betrieben werden kann. Wenn das
Gerät ausgeschaltet wurde und schnell wieder in Betrieb gehen soll, warten Sie bitte etwa drei Minuten, bevor
das Gerät den korrekten Betrieb wieder aufnehmen kann.
- Stecken Sie den Entfeuchter nicht an einem Mehrfachstecker zusammen mit anderen Elektrogeräten an.
- Wählen Sie eine passende Stelle, so dass die Steckdose leicht zu erreichen ist.
- Stecken Sie das Gerät an eine Steckdose mit Erdungsanschluss ein.
- Stellen Sie sicher, dass der Wasserbehälter korrekt eingesetzt ist, sonst arbeitet das Gerät nicht richtig.
ANMERKUNG: Wenn das Wasser im Behälter ein bestimmtes Niveau erreicht hat, bitte seien Sie vorsichtig,
wenn Sie die Maschine bewegen, um zu vermeiden, dass es runter fällt.
Rollen (an den vier Ecken am Boden des Geräts)
• Die Rollen können frei bewegt werden.
• Schieben Sie die Rollen nicht über
Teppiche und bewegen Sie das Gerät nicht
mit vollem Wasserbehälter.
(Das Gerät könnte umkippen und Wasser
ausfließen)
Ein Luftentfeuchter, der in einem Keller betrieben wird, der hat wenig oder keine Wirkung beim Trocknen
von einem benachbarten lufteingeschlossenen In- und Außenbereich des Speicherraums, wie zum
Beispiel einem Schrank, es sei denn, es ist ausreichende Luftzirkulation vorhanden
- Nicht im Außenbereich verwenden.
- Dieser Entfeuchter ist nur zur privaten
Anwendung in Innenräumen bestimmt.
- Stellen Sie den Entfeuchter auf einen
geraden, ebenen Untergrund auf, der
stark genug ist, den Entfeuchter samt
vollem Wasserbehälter zu tragen.
- Lassen Sie zumindest 20 cm Platz auf
allen Seiten des Geräts, um eine freie
Luftzirkulation zu gewährleisten.
- Stellen Sie das Gerät in einem Bereich
auf, wo die Temperatur nicht unter 5°C (41° F)
fallen kann. Bei Temperaturen unter 5°C (41°F)
können die Spulen vereisen, was die Leistung
reduzieren kann.
- Stellen Sie das Gerät nicht in die Nähe von
Wäschetrocknern, Heizgeräten oder Radiatoren auf.
- Verwenden Sie das Gerät um Feuchteschäden
an Büchern oder anderen wertvollen Gegenständen
zu vermeiden.
- Verwenden Sie den Entfeuchter im Keller um
Feuchteschäden zu vermeiden.
- Der Entfeuchter sollte in einem geschlossenen
Raum verwendet werden, um in bestmöglicher
Effizienz zu arbeiten.
- Schließen Sie alle Türen, Fenster und anderen
Öffnungen nach außen.
Aufstellen des Geräts

1. Ziehen Sie den Behälter ein Stück
heraus.
Abb.5
2. Halten Sie den Behälter mit beiden
Händen fest und ziehen Sie ihn aus
dem Gerät heraus.
Abb.6
3. Gießen Sie das Wasser aus.
Abb. 8
Abb. 9
Abb. 10
Entfernen Sie den
Gummistopfen.
Schliessen Sie den Schlauch
mit dem Auslass des
Ablaufschlauchs.
Abb.7
Eliminación del agua almacenada
Es gibt drei Möglichkeiten das gesammelte Wasser zu entfernen.
1. Verwendung des Wasserbehälters
-Während das Gerät ausgeschaltet ist, wenn der Wasserbehälter
voll ist, wird das Gerät 8 Pieptöne ertönen und der "Behälter voll"
Leuchtmelder leuchtet, P2 erscheint auf der Digitalanzeige.
-Während das Gerät eingeschaltet ist, wenn der Wasserbehälter
voll ist, der Kompressor und der Ventilator werden nach 30 Sekunden
ausgeschaltet um das Wasser des Kondensators auszutrocknen, und
der "Behälter voll"-Leuchtmelder leuchtet, P2 erscheint auf der
Digitalanzeige.
-Ziehen Sie den Behälter vorsichtig heraus. Fassen Sie den linken
und rechten Griff fest und ziehen Sie den Behälter vorsichtig heraus,
damit kein Wasser verschüttet wird. Stellen Sie den Behälter nicht auf
den Boden, da die Unterseite des Behälters uneben ist. Andernfalls,
würde der Behälter umkippen und das Wasser ausfließen.
-Gießen Sie das Wasser weg und setzen Sie den Behälter wieder ein.
Der Behälter muss korrekt und sicher eingesetzt sein, da der
Luftentfeuchter sonst nicht arbeitet.
-Das Gerät beginnt wieder zu arbeiten, sobald der Behälter sich in der
korrekten Position befindet.
ANMERKUNGEN:
-Während Sie den Behälter abnehmen, berühren Sie keine Teile im
Inneren des Geräts. Andernfalls könnte das Gerät beschädigt werden.
-Achten Sie darauf, den Behälter sanft und vollständig in das Gerät
hinein zu schieben. Wenn der Behälter verklemmt oder nicht vollständig
eingesetzt ist, wird das Gerät nicht arbeiten.
-Während Sie den Behälter entfernen, wenn es etwas Wasser im Gerät ist,
müssen Sie es trocknen.
2. Kontinuierlicher Kondensatablauf
-Das Wasser kann auch dauernd in einen Bodenablauf abgeleitet werden,
wenn das Gerät (nicht im Lieferumfang) mit einem Wasserschlauch
(nicht im Lieferumfang enthalten) angeschlossen wird.
-Entfernen Sie den Gummistopfen hinten am Kondensatauslass. Dann
schließen Sie einen Ablaufschlauch (ID=13.5mm) an und führen Sie ihn
zu einer geeigneten Ablassöffnung. (siehe Abb.7)
- Stellen Sie sicher, dass der Schlauch fest ist, so dass es keine Lecks gibt.
-Führen Sie den Schlauch zum Ablauf und vermeiden Sie Schlaufen, damit
der Wasserablauf nicht behindert wird.
- Montieren Sie den Ausgang des Schlauchs in den Ablauf hinein und stellen
Sie sicher, dass der Ausgang waagerecht oder nach unten steht, damit das
Wasser reibungslos ausfließen kann. Nie nach oben lassen.
-Wählen Sie die gewünschte Luftfeuchtigkeits- Einstellung und
Ventilator-Geschwindigkeit auf dem Gerät um den kontinuierlichen
Kondensatablauf zu starten.
ANMERKUNG: Wenn der kontinuierliche Kondensatablauf nicht verwendet wird,
entfernen Sie bitte den Ablaufschlauch vom Auslass.
BETRIEB DES GERÄTS PFLEGE UND WARTUNG
Pflege und Reinigung des Entfeuchters
Schalten Sie vor der Reinigung den Entfeuchter aus und entfernen Sie den Netzstecker.
1. Reinigung des Gitters und des Gehäuses.
• Verwenden Sie Wasser und ein mildes Reinigungsmittel.
Verwenden Sie keine Bleich-oder Scheuermittel.
• Achten Sie darauf, dass kein Wasser in das Gerät eindringt.
Andernfalls könnte ein elektrischer Schlag
ausgelöst werden, die Isolierung Schaden nehmen, oder Rost
im Gerät entstehen.
• Die Einlass- und Auslass-Gitter verschmutzen leicht.
Verwenden Sie einen Staubsauger oder eine Bürste für die Reinigung.
2. Reinigung des Wasserbehälters
Alle paar Wochen sollte der Wasserbehälter gereinigt werden, damit
sich keine Algen, Schimmel und Bakterien bilden. Füllen Sie den Tank
teilweise mit Wasser und setzen Sie ein mildes Reinigungsmittel zu.
Reinigen, leeren und spülen Sie den Behälter.
ANMERKUNG: Geben Sie den Behälter nicht in die Geschirrspülmaschine.
Nach der Reinigung muss der Behälter für einen korrekten Betrieb wieder
richtig in den Entfeuchter eingesetzt werden.
3. Reinigung des Luftfilters
Der Luftfilter hinter dem vorderen Gitter sollte mindestens alle 30 Tage
oder öfter, falls erforderlich, überprüft und gereinigt werden.
HINWEIS: NICHT ABSPÜLEN ODER DEN FILTER IN DER
SPÜLMASCHINE REINIGEN.
Um den Filter zu entfernen:
- Fassen Sie die Klappe auf dem Filter und ziehen Sie sie nach oben,
dann herausziehen, wie in Abb.8 gezeigt wird.
- Reinigen Sie den Filter mit warmem Seifenwasser. Abspülen und den
Filter trocknen lassen bevor Sie ihn wieder einbauen. Reinigen Sie den
Filter nicht in der Spülmaschine.
Um ihn einzubauen:
Setzen Sie den Luftfilter in das Gerät von der Unterseite nach oben ein.
Siehe Abb.10.
VORSICHT:
Betreiben Sie den Entfeuchter NIEMALS OHNE Luftfilter, denn Staub und
Schmutz verstopfen das Gerät und reduzieren die Leistung.
4. Wenn Sie das Gerät längere Zeit nicht benutzen
• Nachdem Sie das Gerät ausgeschaltet haben, warten Sie einen Tag bevor
Sie den Wasserbehälter leeren.
Reinigen Sie das Hauptgerät, den Wasserbehälter und den Luftfilter.
• Decken Sie das Gerät mit einer Plastiktüte ab.
• Verwahren Sie das Gerät aufrecht stehend an einem trockenen und gut
belüfteten Platz.

TIPPS ZUR FEHLERBEHEBUNG
Bevor sie den Kundendienst rufen, überprüfen Sie bitte zuerst das folgende Diagramm selbst.
Problema
Was sollte man überprüfen
Das Gerät startet nicht
Stellen Sie sicher, dass der Stecker des Entfeuchters richtig in der
Steckdose steckt. Überprüfen Sie im Sicherungskasten die
Haussicherung/den Sicherungsautomaten.
Der Entfeuchter hat die vorgewählte Luftfeuchtigkeit erreicht oder der
Wasserbehälter ist voll.
Der Wasserbehälter ist nicht in der richtigen Position.
•Die Zeit hat für die Entfeuchtung nicht ausgereicht.
Stellen Sie sicher, dass keine Vorhänge, Jalousien oder Möbel die
Frontoder Rückseite des Entfeuchters blockieren.
• Feuchteregelung ist nicht niedrig genug eingestellt.
Überprüfen Sie, ob alle Fenster und anderen Öffnungen sicher
verschlossen sind.
• Die Raumtemperatur ist zu niedrig, unter 5°C (41°F).
Es befindet sich ein Petroleumheizgerät oder etwas anderes im Raum,
das Wasserdampf abgibt.
Der Luftfilter ist verstopft.
Das Gerät ist gekippt und nicht aufrecht wie es sein sollte.
Die Bodenfläche ist nicht eben.
Der Entfeuchter trocknet
die Luft nicht so wie er
sollte
Das Gerät macht ein
lautes Geräusch beim
Betrieb
Frost erscheint auf
den Spulen
Das ist normal. Der Entfeuchter verfügt über eine automatische
Abtau-Funktion.
Die Schlauchverbindung ist locker oder der Schlauch ist undicht.
Sie beabsichtigen den Wasserbehälter zu benutzen, um das
Wasser zu sammeln, aber der Gummistopfen am Auslass ist
entfernt.
Dies sind die Fehlercodes und die Schutzcodes. Siehe den
Abschnitt BEDIENTASTEN DES ENTFEUCHTERS.
Wasser auf dem Boden
E122, E142, E163, E554
erscheinen auf dem
Anzeigefeld
Registrieren Sie Ihre Garantie...
in
5
einfachen
Schritten!
Für die elektronische
Garantieregistrierung benutzen
Sie bitte den folgenden Link
http://www.inventorappliances.com/garantie
Hier scannen -
Garantieformular
Wählen Sie das Produkt für die
Garantieregistrierung aus
(Klimaanlagen oder
Haushaltsgeräte)
Wählen Sie die Garantie aus,
die Ihrem Kauf entspricht
Bitte füllen Sie alle erforderlichen
Felder aus (Besitzer, Einzelhändler
und Gerät) und drücken senden
Sie erhalten eine Bestätigungs
E-Mail über die Registrierung
Ihrer Garantie
Klicken Sie auf den folgenden Link:
http://www.inventorappliances.
com/garantie

REMARQUE SOCIABLE
Contenu
Lorsque vous utilisez ce déshumidificateur dans les pays européens, les informations
suivantes doit être suivi:
ÉLIMINATION: Ne pas jeter ce produit avec les ordures ménagères. Collection de ces
ordures pour un traitement spécial est nécessaire.
Il est interdit de disposer de cet appareil dans les ordures ménagères.
Pour l'élimination, il y a plusieurs de possibilités:
A) La municipalité a mis en place des systèmes de collecte, où les déchets électroniques
peuvent être disposé d'au moins gratuitement à l'utilisateur.
B) Lors de l'achat d'un nouveau produit, le détaillant reprendra au moins l'ancien produit
gratuit.
C) La fabrication reprendra l'ancien appareil pour l'élimination au moins libre de facturer
à l'utilisateur.
D) Comme les anciens produits contiennent des ressources précieuses, ils peuvent être
vendus à la ferraille concessionnaires.
Elimination des déchets sauvages dans les forêts et les paysages met en danger votre
santé lorsque substances dangereuses fuites dans le sol à l'eau et à trouver leur
chemin dans la nourriture chaîne.
PRÉCAUTIONS DE SÉCURITÉ
Attention ...........................................................................................................................2
Prudence ..........................................................................................................................2
informations électriques ....................................................................................................3
PLAQUETTES DE CONTRÔLE SUR LE DÉSHUMIDIFICATEUR
Contrôle pads.....................................................................................................................4
Autre traits ................................................................................................................ 5
IDENTIFICATION DES PIÈCES
Identification des pièces ....................................................................................................6
Positionnement de l'unité ..................................................................................................7
FONCTIONNEMENT DE L'UNITÉ
Lorsque vous utilisez l'unité ..............................................................................................7
Retrait de l'eau recueillie ...................................................................................................8
SOINS ET ENTRETIEN
Entretien et nettoyage du déshumidificateur ............................................ .......................10
CONSEILS DE DÉPANNAGE
Conseils de dépannage ....................................................................................................11
A l'intérieur, vous trouverez de nombreux conseils utiles sur la façon d'utiliser et à entretenir
votre déshumidificateur correctement. Juste un peu de soins préventifs de votre part peut
vous faire économiser beaucoup de temps et de l'argent sur la durée de votre
déshumidificateur. Vous trouverez de nombreuses réponses à commun problèmes dans le
tableau des conseils de dépannage. Si vous vu notre tableau de dépannage. Conseils d'abord,
vous ne pouvez pas besoin d'appeler pour le service du tout. Lire ce manuel.
PRUDENCE
• Cet appareil peut être utilisé par des enfants âgés de 8 ans et plus et des personnes
avec des capacités physiques, sensorielles ou mentales réduites ou un manque d'expérience
et connaissances si elles ont été supervisées ou des instructions concernant l'utilisation du
appareil d'une manière sûre et de comprendre les risques encourus.
• Les enfants ne doivent pas jouer l'appareil. Nettoyage et entretien de l'utilisateur ne
doivent pas être faites par des enfants sans surveillance. (Applicable pour les pays européens)
• Cet appareil n'a pas destiné à être utilisé par des personnes (y compris les enfants)
avec les capacités physiques, sensorielles ou mentales ou le technicien de service autorisé
pour la réparation ou l'entretien de cet appareil. manque d'expérience et de connaissances,
à moins que ils ont été supervisées ou des instructions concernant l'utilisation de l'appareil
par unpersonne responsable de leur sécurité. (Applicable pour les autres pays à l'exception
de la Pays européens )
• Les enfants doivent être surveillés afin qu'ils ne jouent pas avec l'appareil. Si le
cordon d'alimentation est endommagé, il doit être remplacé par le fabricant, son service un agent
ou une personne qualifiée afin d'éviter tout danger.L'appareil doit être installé conformément aux
réglementations de câblage nationales. L'appareil avec chauffage électrique doit avoir au moins
1 place de mètres au combustible matériaux. Contactez le technicien de service autorisé pour la
réparation ou l'entretien de cet appareil.
!

PRÉCAUTIONS DE SÉCURITÉ PRÉCAUTIONS DE SÉCURITÉ
Ne pas dépasser la cote
de la prise de courant ou
dispositif de connexion.
Ne pas utiliser ou d'arrêter la
unité par la mise sous tension
ou hors tension le pouvoir.
Ne pas endommager ou
utiliser un non spécifié
cordon d'alimentation.
Ne pas modifier le cordon
d'alimentation ou partager la
longueur ou la sortie avec
d'autres appareils
Déconnectez la puissance si
de sons étranges, de l' odeur,
ou de la fumée vient d'elle.
Ne pas utiliser la machine à proximité
De substances inflammables ou
combustibles, telles comme l'essence,
le benzène, diluant, etc.
Dans le cas contraire, Il peut
provoquer un choc électrique ou
d'incendie, en raison de l'excès
de chaleur.
Il peut provoquer un choc électrique
ou d'incendie, en raison de l'excès
de chaleur.
Il peut provoquer un choc électrique
ou d'incendie, en raison de l'excès
de chaleur.
Il peut provoquer un choc
électrique.
Il peut provoquer un choc
électrique ou de feu.
Il peut provoquer un choc
électrique.
Les pièces en plastique peuvent
fondre et provoquer un feu.
Il peut provoquer une défaillance
de la machine ou de choc électrique.
Il peut provoquer un choc électrique
ou de blessure.
Il contient des contaminants et ils
pourrait vous rendre malade.
Il peut provoquer une explosion
ou un incendie.
Ne pas insérer ou retirer la
fiche avec des mains
mouillées.
Vous ne devriez jamais essayer
de prendre démonter ou réparer
l'appareil par vous-même.
Ne pas boire ou utiliser le
eau évacuée de l'unité.
Avant le nettoyage, éteignez
l'alimentation et débranchez
l'unité
Ne pas placer l'appareil à
proximité d'une source de
chaleur.
Le manque de ventilation peut
causer la surchauffe et d'incendie.
L'eau peut entrer dans l'unité et
dégrader l'isolation. Cela pourrait
provoquer un choc électrique ou
d'incendie.
Si l'appareil tombe, il peut
l'eau risque de déborder et
biens endommagés, ou
provoquer un choc électrique
ou d'incendie.
Pour éviter toute blessure à l'utilisateur ou d'autres personnes et les dommages matériels, les instructions
suivantes doivent être suivi. Une opération incorrecte en raison de l'ignorance des instructions peut
entraîner des dommages corporels ou matériels.
La gravité est signalée par les indications suivantes.
Les significations des symboles utilisés dans ce manuel sont indiquées ci-dessous.
Ce symbole indique la possibilité de la mort ou des blessures graves.
Ce symbole indique la possibilité de blessures ou de dommages à la propriété
Toujours faire
Ne jamais faire cela.
ATTENTION
ATTENTION
PRUDENCE
Il peut provoquer de seau d' eau
protéger des l'appareil et provoquer
un choc électrique.
Un manque de débit d'air peut
entraîner à une surchauffe et d'incendie.
Il peut provoquer un choc électrique
ou l'échec de l'appareil.
Fonctionnement sans filtres
peut provoquer une panne.
l peut provoquer une défaillance de
appareil ou accident.
L'eau peut être renversé à
l'intérieur de l'unité, l'isolation
provoquant échec et
électrique électrocution
ou d'incendie.
Il y a risque d'incendie ou
choc électrique.
Vous pourriez vous blesser
si vous tomber ou si
l'appareil tombe.
Les nourrissons, les enfants, les
personnes âgées, et les personnes
non sensibles à l'humidité.
Cela entraînera l'unité
la détérioration due à
produits chimiques et les
solvants dissous dans l'air.
• La fabrique plaque signalétique se trouve sur le panneau arrière de l'appareil et contient électriques
et autres données techniques spécifiques à cet appareil.
• Assurez-vous que l'appareil est correctement mis à la terre. Pour minimiser les risques d'électrocution
et d'incendie, mise à la terre est importante. Le cordon d'alimentation est équipé d'une prise de terre à
trois broches pour la protection contre les chocs dangers.
• Votre appareil doit être utilisé dans une prise murale correctement mise à la terre. Si la prise murale
que vous comptez utiliser Nn' est pas de manière adéquate à la terre ou protégé par un fusible de
temporisation ou d'un circuit, un électricien qualifié installer le récipient approprié.
• Vérifiez que le récipient est accessible âpres l' installation de l'unité.
• Ne pas utiliser de rallonges ou une fiche d 'adaptation avec cet appareil. Cependant, s'il est nécessaire
d'utiliser un rallonge, utilisez un "déshumidificateur" rallonge approuvée seulement (disponible dans les
magasins locaux ).
• Pour éviter les risques de blessures, débranchez toujours l'alimentation de l'appareil, avant
d'installeret / ou l'entretien.
INFORMATIONS ELECTRIQUES
Ne pas prendre le seau d'eau
pendant la fonctionnement.
Ne pas utiliser l' unité dans
de petites espaces.
Ne mettez pas dans des
endroits où l'eau peut
éclabousser sur le unité.
Placez l'appareil sur une
niveau, solide du
plancher.
Ne couvrez pas l'admission ou
les ouvertures d'échappement avec
des vêtements ou des serviettes.
Ne jamais insérer votre doigt ou
d'autres objets étrangers dans les
filles ou des ouvertures.
Faites attention pour avertir les
enfants de ceux-ci dangers.
Toujours insérez les filtres
en toute sécurité. Nettoyez le filtre
une fois chaque deux semaines.
Si l'eau pénètre dans l'appareil, mettez
l'appareil hors tension et débranchez
le puissance, contactez un
professionnel qualifié technicien
de service.
Ne placez pas de fleurs
vases ou autres eaux
récipient au-dessus de
l'unité
Des précautions doivent être prises
lors de l'unité en utilisant dans une
chambre avec les per
sonnes
suivantes:
Ne placez pas d'objets lourds sur la
le cordon d'alimentation et de prendre
soin de telle sorte que le cordon ne
soit pas comprimé.
NE pas monter sur ou
assis sur l'unité.
Ne pas utiliser dans les zones
où les produits chimiques sont
manipulés.
ATTENTION
ATTENTION

LE TABLEAU DE COMMANDE (CONTROL PADS) DU DEHUMIDIFICATEUR ΠΛΗΚΤΡΑ ΠΑΝΩ ΣΤΟΝ ΑΦΥΓΡΑΝΤΗΡΑ
Tableau de commande
BOUTON /COMMANDE MARCHE
Appuyez sur le bouton pour allumer ou éteindre le
déshumidificateur.
: COMMANDE DIMINUER/AUGMENTER
BOUTON MODE
Appuyez pour sélectionner le mode d’opération souhaité
parmi AUTO, CHAUSSURES et VETEMENTS
REMARQUE : le mode pour les chaussures est facultatif.
Tableau de commande de l’humidité.
Le taux d’humidité peut être fixé dans une proportion
de « CO » (humidité relative) à une augmentation de 5%.
Au cas d’air plus sec, appuyez sur le bouton (-) et fixez
sur une valeur en pourcentage plus bas (%).
Au cas d’air plus humide, appuyez sur le bouton (+) et
fixez sur une valeur en pourcentage plus élevée (%).
REMARQUE : Le taux d’humidité ne peut pas être
sélectionné et fixé dans le cas de mode d’opération
pour les chaussures et les vêtements.
BOUTON FAN
Fixer/Contrôler la vitesse du ventilateur. Appuyer pour
sélectionner soit une vitesse élevée, soit basse. Fixer
la console fan à Haut/Elevé pour éliminer au maximum
l’humidité. Quand l’humidité est réduite et l’opération
silencieuse est souhaitée, fixez le ventilateur à être en
bas.
REMARQUE : La vitesse du ventilateur est fixée en
haut automatiquement pour les CHAUSSURES et en
bas pour les VETEMENTS.
BOUTON/COMMANDE : ROTATION DES
PERSIENNES
Appuyez sur le bouton pour déclencher automatiquement ou bloquer la fonction « auto-swing »
(rotation automatique) à la position souhaitée.
Appuyez sur ce bouton pour 3 seconds afin de
déclencher la fonction de verrouillage et de
déverrouillage. Tout autre commande n’est pas
disponible.
- témoin lumineux de vitesse inférieure du ventilateur
- témoin lumineux de vitesse supérieure du ventilateur
- témoin lumineux de la fonction de verrouillage
Témoin Lumineux de control de l’eau.
Il s’allume quand la benne est en train de se vider
ou quand la benne est évacuée ou pas remplacée
dans la position correcte et convenable.
Fermeture automatique
Le déshumidificateur ferme quand la benne est pleine
ou quand la benne est évacuée ou pas remplacée
dans la position convenable. Quand le réglage de
l’humidité est atteint, l’appareil cesse automatiquement.
Dans le cas de certains modèles, le moteur du
ventilateur continue à s’opérer.
Dégivrage automatique
Pendant la formation de givre sur les serpentins
évaporateurs, le compresseur présente un fonctionnement
cyclique et le ventilateur continue à s’opérer jusqu’au
moment où le givre s’est disparu.
REMARQUE : Pendant l’opération de dégivrage
automatique, il est normal que l’appareil puisse sonner
pour indiquer l’écoulement du réfrigérant.
Attendez 3 minutes avant de se remettre en marche
Après l’arrêt de l’appareil, celle-ci ne peut pas se remettre
en marche pendant les premiers trois minutes. Cela a pour
but la protection de l’appareil. Elle se remettra en marche
après 3 minutes.
Redémarrage automatique
Dans le cas où l’appareil se rompt subtilement à cause de la
panne d’électricité, il se remettra en marche automatiquement
en maintenant les modes antérieures de configuration, quand
le courant revient.
Mode automatique
L’appareil peut fixer les taux de l’humidité, la vitesse du
ventilateur souhaitée et la fonction de rotation de persiennes.
Mode convenable pour les CHAUSSURES
L’appareil peut s’opérer au maximum de déshumidification
quand elle marche au mode convenable pour les chaussures.
La vitesse du ventilateur est fixée au niveau supérieur et la
persienne cesse à se roter. L’appareil quitte la fonction
convenable pour les chaussures après une opération
maximale de 2 heures.
Mode convenable pour les VETEMENTS
L’appareil peut s’opérer au maximum de déshumidification
quand il marche au mode pour les vêtements. La vitesse
du ventilateur est fixée au niveau supérieur et la rotation
des persiennes peut être aussi fixée.
Autres caractéristiques
– témoin lumineux de mode/fonction automatique
– témoin lumineux de la fonction appropriée aux
chaussures
– témoin lumineux de la fonction appropriée aux
vêtements
Repliement du couvercle de séchoir pour
les chaussures.
Installer la pipe du séchoir pour les chaussures
sur l’appareil.
Appliquez la pipe du séchoir aux chaussures.
Vêtements mouillés
Après l’usage, enlevez la pipe du séchoir
COMMANDE : FIXER LA DUREE/MINUTERIE
Appuyez pour déclencher la fonction d’arrêt
automatique. Appuyez sur le bouton minuterie
pour fixer le moment/l’heure d’arrêt automatique
de 0.0 à 8, heure par heure.
Quand vous pressez le bouton pour changer le
mode d’opération, l’appareil émettra un bip pour
vous indiquer que les modes d’opération changent.
REMARQUE : Le tableau de commande de l’appareil que vous achetez, peut être légèrement différent
selon le modèle.
Fig.1
POW ER
MODE
SWI NG
FAN
TIM ER
3S
NOW
SET
AUTO SHOES CL O THES
ECRAN
Là, c’est indiqué le taux % de l’humidité de CO
à 70% ou l’heure d’arrêt automatique (0-8) pendant
la fixation et après il indique le taux % actuel
d’humidité (± 5% de précision) dans une proportion
de 30% HR (Humidité Relative) à 90% HR
(humidité relative).
Codes d’erreur :
E122 – Erreur : capteur de température de cellule
– Débranchez l’appareil et après
rebranchez -le. Si l’erreur persiste, contactez le
représentant de service.
E142 – Erreur : capteur de température ambiante
et capteur d’humidité – Débranchez l’appareil et
après rebranchez -le. Si l’erreur persiste, contactez
le représentant de service.
E163 – Erreur : Paramètres de la carte de contrôle
principale - Débranchez l’appareil et après
rebranchez -le. Si l’erreur persiste, contactez le
représentant de service.
E554 – Détection au cas de fuite de réfrigérant
– La nouvelle technologie de la zone de visualisation
indiquera E554, quand l’appareil détecte la fuite de
réfrigérant, contactez le représentant de service.
REMARQUE : Les codes et les messages d’erreur
apparaissent DEUX CODES EN HAUT (ex. EI) pour
1 second, après apparaissent DEUX CODES EN BAS
(ex. 22) pour 1 second en cercle.
Ecran : témoins lumineux :
- témoin lumineux de taux actuel d’humidité
- témoin lumineux de fixation du taux actuel
- témoin lumineux d’arrêt automatique
- témoin lumineux de control total de l’eau
CLOTH ES
30~50cm
8
8
1
1
2
2
3 4
3
4
5
5
6
6
7
7
Maintenir une distance de 30-50cm
sur la partie supérieure et la partie
droite de l’appareil pour les
vêtements mouillés.
Fig.A
30-50cm
Ecoulement d’air
REMARQUE :
• Le mode de séchoir doit se mettre en marche dans une
chambre fermée, veillez ne pas ouvrir la porte et la fenêtre.
• Afin que la déshumidification soit plus efficace, veillez tout
d’abord de déshydrater les vêtements mouillés.
• Veillez assurer qu’on dirige l’écoulement d’air vers les
vêtements mouillés (voir Fig.A)
• Pour les vêtements épais et lourds, peut-être on n’aura
pas la déshumidification efficace souhaitée.
PRECAUTION
• Veillez ne pas couvrir la sortie d’air de l’appareil. Il y a
un risque de chaleur excessive, feu ou de la défaillance de
l’appareil.
• Veillez ne pas mettre les vêtements mouillés à la partie
supérieure de l’appareil et ne pas mettre des gouttes d’eau
dans l’appareil. Il y a un risque de choc électrique, de la fuite
ou de défaillance de l’appareil.

Devant
Arrière/Verso
Fig.2
Fig.3
Tableau de control
Sortie du tuyau
Roulette
Câble et fiche d’alimentation
Boucle du câble d’alimentation
Grille d’aspiration
Filtre à air (derrière la grille)
Housse de séchoir pour les chaussures
Pipe de séchoir pour les chaussures
REMARQUE : Toutes les images du manuel ont seulement un
but explicatif. La forme actuelle de l’appareil, que vous achetez,
peut être légèrement différente mais les opérations et les fonctions
sont les mêmes.
Manche (deux parties)
Grille de sortie d’air
Réservoir d’eau
1
2
3
4
1
2
3
4
5
1
3
2
4
1
2
3
6
5
4
7
6
7
8
8
IDENTIFICATION DES PIECES
Identification des pièces
FONCTIONNEMENT DE L'UNITE
Sortie d'air grille
Prise d'air
Lorsque vous utilisez l'unité
• Lors de la première utilisation du déshumidificateur, de faire fonctionner l'unité en continu 24 heures. Assurez-vous
que le couvercle en plastique sur la sortie continue du tuyau de vidange installer correctement fermement donc
il n'y a pas de fuites.
• Cet appareil est conçu pour fonctionner avec un travail environnement entre 5 ° C / 41 ° C et 35 ° C / 95 ° C.
• Si l'appareil a été éteint et doit être allumé rapidement, permettre à environ trois minutes pour le bon fonctionnement
de reprendre.
• Ne branchez pas le déshumidificateur à une prise multiple sortie, qui est également utilisé pour d'autres équipements
électriques Électroménager.
• Sélectionnez un emplacement approprié, vous assurant que vous avez facile l'accès à une prise électrique.
• Branchez l'appareil dans une prise de courant électrique avec la terren connexion.• Assurez-vous que le seau d'eau
est correctement installé autrement l'unit ne fonctionnera pas correctement. NOTE Lorsque l'eau dans le seau atteint
un certain niveau, s'il vous plaît soyez prudent de déplacer la machine pour l'éviter tomber.
Roulettes (en quatre points sur le fond de l'unité)
Roulettes peuvent se déplacer librement
Ne pas forcer roulettes pour se déplacer sur le tapis,
ni déplacer l'appareil avec de l'eau dans le seau.
(L'unité peut basculer et renverser d'eau.)
Un déshumidificateur opérant dans un sous-sol aura peu ou pas d'effet dans un séchage adjacent fermé
la zone de stockage, tel qu'une armoire, à moins qu'il existe une bonne circulation de l'air dans et hors de
la région.
20cm
20cm
20cm
20cm
40cm
ou plus
ou plus
ou plus
ou plus
ou plus
Positionnement de l'unité
• Ne pas utiliser à l'extérieur.
• Ce déshumidificateur est destiné à intérieur résidentiel
applications seulement. Ce déshumidificateur ne doit pas être utilisé
pour des applications commerciales ou industrielles.
• Placer le déshumidificateur sur un sol lisse, fort niveau
assez pour soutenir l'unité avec un seau plein d'eau.
• Laissez au moins 20cm de l'espace aérien sur tous les côtés
de l'unité pour une bonne circulation de l'air (au moins 40cm de
l'espace aérien sur sortie d'air).
• Placer l'appareil dans une zone où la température ne sera pas
tomber en dessous de 5°C (41°F). Les bobines peuvent devenir
couverte avec gel à des températures inférieures à 5°C (41°F),
ce quipeut réduire performance.
• Placer l'appareil loin de la sécheuse, chauffe-eau ou radiateur.
• Utilisez l'appareil pour éviter les dommages d'humidité partout livres
ou des objets de valeur sont stockées.
• Utilisez le déshumidificateur dans un sous-sol pour aider à prévenir
des dommages d'humidité.
• Le déshumidificateur doit être utilisé dans un espace zone à être le
plus efficace.
• Fermez toutes les portes, fenêtres et autres ouvertures à
l'extérieur dans la chambre.
Fig .4a

Retrait de l'eau recueillie
1. Retirez le seau
Vider l'eau
Retirer le couvercle
de caoutchouc
Fixer le tuyau à la sortie
du tuyau de vidange
Tenir les deux côtés du seau,
même avec force, et retirez-la
de l'unité
2.
3.
Il y a deux façons d'éliminer l'eau recueillie.
1. Utilisez le seau
• Lorsque l'appareil est éteint, si le seau est plein,
l'indicateur complet se allume la lumière.
• Lorsque l'appareil est allumé, si le seau est plein,
le compresseur et le ventilateur éteint, et le voyant
plein s'allume, l'affichage numérique montre P2.
• Tirez doucement sur le seau. Grip gauche et à
droite poignées en toute sécurité, et retirez
soigneusement droite afin l'eau ne se déverse pas.
Ne pas mettre le seau sur le plancher parce que le
fond du godet est inégale. Autrement le seau va
tomber et causer l'eau à déborder.
• Jeter l'eau et remplacer le seau. le seau doit être
en place à droite et en toute sécurité assis pour la
déshumidificateur pour fonctionner.
• La machine redémarre lorsque le godet est restauré
dans sa position correcte.
NOTES:
• Lorsque vous retirez le seau, ne pas toucher les
parties à l'intérieur de l'appareil. Cela pourrait
endommager le produit.
• Assurez-vous de pousser le seau doucement tout le
chemin dans la unité. Frappant le seau contre quoi que
ce soit ou de ne pas pousser en toute sécurité peut
entraîner l'unité de ne pas fonctionner.
• Lorsque vous retirez le seau, s'il y a un peu d'eau dans
l'unité, vous devez le sécher.
2. Drainage Continu
L'eau peut être vidée automatiquement dans un planche
régoutter en fixant l'appareil avec un tuyau d'eau
(Id> <1) 5/16 ", non inclus).
• Si le tuyau de la pompe diminue lorsque vous retirez le
seau (Voir Fig.7), vous devez réinstaller le tuyau de la
pompe correctement à l'unité avant de remplacer le seau
dans l'unité (Voir Fig.8).
• Lorsque l'appareil est allumé, si le seau est enlevé, le
compresseur et le ventilateur se éteint, l'appareil émet un
signal sonore 8 fois et l'affichage numérique montre Eb.
• Lorsque l'appareil est éteint, si le seau est retiré, l'unité
émet un signal sonore 8 fois et l'affichage numérique
montre Eb.
REMARQUE: Sur certains modèles, la femelle filetée
fin est inclus
Fig .5
Fig .6
FONCTIONNEMENT DE L'UNITÉ SOINS ET ENTRETIEN
3. Nettoyer le filtre d' air
• Après avoir mis l'appareil hors tension, attendez un jour avant
la vidange le seau.
• Nettoyez l'unité principale, un seau d'eau et filtre à air.
• Couvrir l'appareil avec un sac en plastique.
• Rangez l'appareil à la verticale dans un endroit sec et bien ventilé.
4. Quand ne pas utiliser l'appareil pendant de longues périodes
Entretien et nettoyage du déshumidificateur
Désactiver la dehumldlfier et retirez la fiche de la
prise murale avant de le nettoyer.
1. Nettoyer la grille et Case
• Utiliser de l'eau et un détergent doux. Ne pas utiliser l'eau de Javel ou abrasifs.
• Ne pas éclabousser l'eau directement sur l'unité principale. Faire risque de
provoquer un choc électrique, provoquer l'isolation de se détériorer, ou faire
l'unité à la rouille.
• Grilles d'admission d'air et de sortie sont sales facilement, donc utiliser un
attachement à vide ou d'une brosse pour nettoyer.
2. Nettoyez le seau
Toutes les quelques semaines, nettoyer le seau pour empêcher la croissance
de moisissures, la moisissure et les bactéries. Remplir partiellement le seau
avec de l'eau propre et ajouter un peu de détergent doux. Agitez autour du
godet,vider et rincer.
Remarque: Ne pas utiliser un lave-vaisselle pour nettoyer le seau. Après le
nettoyage, le seau doit être en place et en toute sécurité assis pour le
déshumidificateur de fonctionner.
Fig. 7
Le filtre à air derrière la grille avant doit être vérifié
et nettoyé au moins tous les 30 jours ou plus souven
si nécessaire.
NOTE: NE PAS RINCER OU OUT LE FILTRE
DANS UN LAVE AUTOMATIQUE
• Pour retirer le filtre, tirez le filtre vers l'extérieur (voir Fig.8).
• Laver le filtre avec de l'eau propre puis séchez.
• Re-installer le filtre, remplacer le seau
NE PAS faire fonctionner le déshumidificateur sans filtre,
car la saleté et les peluches se bouchent et réduire les
performances
Prudence
Fig. 8
Fig. 9
Fig. 10

10
CONSEILS DE DÉPANNAGE
Avant d'appeler, vérifiez le tableau ci-dessous vous d'abord.
L'appareil ne
démarre pas
Déshumidifier ne
sécher l'air comme
il se doit
Problème
Ce qu'il faut vérifier
• Assurez-vous que la fiche du déshumidificateur est poussé
complètement dans le sortie.
• Vérifiez la boîte de disjoncteur maison fusible / circuit.
• Déshumidifier a atteint son niveau préréglé ou un seau est plein.
• un seau d'eau se trouve pas dans la bonne position.
N'a pas laisser suffisamment de temps pour éliminer l'humidité.
• Assurez-vous qu'il n'y a pas de rideaux, des stores ou des
meubles bloquant la avant ou arrière du déshumidificateur.
• Le contrôle de l'humidité ne peut pas être réglé assez bas.
• Vérifiez que toutes les portes, fenêtres et autres ouvertures
sont solidement fermé.
• La température ambiante est trop faible, inférieure à 5 °C (41 °F).
• Il y a un chauffage au kérosène ou quelque chose dégageaient
la vapeur d'eau dans la pièce.
• Le filtre à air est encrassé.
• L'appareil est incliné au lieu de droite comme il se doit.
• La surface du sol est pas de niveau.
• Tuyau au connecteur ou raccord de tuyau peut être lâche.
• L'intention d'utiliser le seau pour recueillir l'eau, mais le dos
le bouchon de vidange est retiré.
C'est normal. Le déshumidificateur a Auto fonction dégivrage
L'appareil fait un bruit
lors du fonctionnement
Gel apparaît sur
les bobines
De L'eau sur le plancher
E122, E1142, E163, E554
apparaissent à l'écran
Ce sont des codes d'erreur et le code de protection. Voir le
section.
CONTRÔLE PADS SUR LE DÉSHUMIDIFICATEUR
Activez votre plan de garantie…
à
5
pas
simples!
Pour soumettre la fiche de garantie
Veillez à cliquer le lien suivant :
http://www.inventorappliances.com/produits-garantie
Scannez ici pour
la fiche de garantie
Choisissez le type de produit
(air condition ou appareil) pour
lequel la garantie sera activée
Choisissez la garantie qui
correspond à votre produit
Complétez les informations
demandées (propriétaire,
détaillant et appareil) et
cliquez « Envoi »
Vous recevrez un mél de
confirmation concernant
l’activation de votre garantie.
Suivez le lien suivant :
http://www.inventorappliances.
com/produits-garantie

OSSERVAZIONI GENERALI SOMMARIO
SMALTIMENTO:
Non smaltire il condizionatore tra i rifiuti urbani indifferenziati. Questo rifiuto va raccolto
separatamente affinché sia trattato in modo specifico.
É vietato smaltire questo apparecchio insieme ai rifiuti domestici. Per lo smaltimento l'utente
ha a disposizione diverse possibilità:
A) Il Comune ha istituito sistemi di raccolta per lo smaltimento dei rifiuti elettronici senza
spese per l'utente.
B) Al momento dell'acquisto di un nuovo prodotto, il rivenditore ritirerà il vecchio prodotto
gratuitamente.
C) Il produttore s'impegna a ritirare il vecchio apparecchio destinato allo smaltimento a titolo
gratuito per l'utente.
D) Poiché i vecchi prodotti contengono componenti preziosi, possono essere venduti a chi
rottama componenti metallici.
Quando si utilizza questo deumidificatore nei paesi europei, le seguenti istruzioni
devono essere seguite:
MISURE DI SICUREZZA
Avvertimento ...................... ....... ........ ............................ .............. ........ ....... .............. ........................2
Attenzione........ ............. ......... ............... ............. ........... ......................................... ........ ................ ..2
Informazioni Elettriche ...... ........ ............. ............................. ....... ........ ............... ................ .............. ..3
FUNZIONAMENTO DELL’UNITÀ
Quando si utilizza l'unità ............ ............................ ......... .......................... ......... ...... ........ ..................7
Rimozione dell'acqua raccolta . ........... ... .............. ........................... ......... ............. ..............................8
CURA E MANUTENZIONE
Cura e pulizia del deumidificatore .... ............. . ...... ........................... ......... ..................... ..................... .9
MALFUNZIONAMENTO
Suggerimenti relativi alla soluzione dei problemi.............. .................... ....... ......... ...... .......................10
PANELLO DI CONTROLLO
Tasti di controllo. ........... ............... ......... .............. ....... ....... ...................... ..................... ....... .............. 4
Altre caratteristiche ............. .............. ....... ......... .................... .............. ....... ......... ...... ......... ......... ......5
IDENTIFICAZIONE DELLE PARTI
Identificazione delle parti ........................... ........ .............. ......... ............. ............. ......... ...... ......... ......6
Posizionamento dell’unità ................................... ................. ....... ..................
....... ......... ...... ........ ...... .7
Al suo interno troverete molti suggerimenti utili su come utilizzare correttamente e mantenere
efficiente il deuhidificatore. Basterà da parte Vostra un po’ di attenzione per prevenire il
verificarsi di problemi e farVi risparmiare molto tempo e denaro nell'arco di vita del prodotto.
Troverete molte risposte ai più comuni problemi nella tabella dei suggerimenti relativi ai
guasti. Se in presenza di un problema date un’occhiata alla Tabella di Individuazione Guasti
potrete talora evitare di chiamare il Servizio Assistenza.
Leggi questo manuale
AVVISO
• Questo apparecchio può essere utilizzato da bambini dagli 8 anni in su e da persone
con ridotte capacità siche, sensoriali o mentali o con mancanza di esperienza o
conoscenza se a loro é stata assicurata un’adeguata sorveglianza oppure se hanno
ricevuto istruzioni circa l’uso in sicurezza dell’apparecchio e hanno compreso i pericoli
correlati. I bambini non devono giocare con l’apparecchio. Le operazioni di pulizia e di
manutenzione non devono essere effettuate da bambini a meno che non abbiano più
di 8 anni e siano sorvegliati. (Applicabile per i paesi europei)
• L'apparecchio non é stato progettato per essere usato da bambini o persone che non
siano in pieno possesso delle proprie facoltà fisiche o mentali. Potrebbero esserne
compromesse le funzioni fisiche e si potrebbero creare danni alla salute.
• I bambini vanno sorvegliati per evitare che giochino con l'unità o con il telecomando.
Un uso improprio da parte di bambini potrebbe compromettere le funzioni fisiche e
nuocere alla salute
• Se il cavo di alimentazione é danneggiato, esso deve essere sostituito dal costruttore
o dal suo Servizio Assistenza Tecnica o comunque da una persona con qualifica
similare, in modo da prevenire ogni rischio
• L' installazione deve essere eseguita in conformità con le norme nazionali sui cablaggi
• L'apparecchio con elettrico deve avere almeno 1 metro di distanza da materiali
combustibili.
• Contattare il tecnico di assistenza autorizzato per la riparazione o la manutenzione
di questa unità
!

MISURE DI SICUREZZA MISURE DI SICUREZZA
Effettuare correttamente il
collegamento alla rete.
Non avviare o fermare
l’apparecchiatura inserendo o
togliendo il cavo di alimentazione.
Non danneggiare il cavo di
alimentazione e non usare
un cavo non adatto.
Non modificare la lunghezza del
cavo di alimentazione e non usare
la presa anche per altre
apparecchiature.
Scollegare l'alimentazione, se
dall’ apparecchio derivano strani
suoni, odori, o fumo.
Non usare l’ apparecchio in
prossimità di gas infiammabili
o combustibili, come benzina,
benzene, diluenti, ecc
• In caso contrario, si possono verificare
scosse elettriche o un incendio dovuto
ad un’eccessiva produzione di calore.
•Si possono provocare scosse elettriche
o incendio a causa di generazione di calore.
• Si possono provocare incendi e scosse
elettriche.
• Ciò potrebbe causare un'esplosione
o un incendio.
• La mancanza di ventilazione può causare
surriscaldamento e fuoco.
• Contiene sostanze contaminanti e potete
ammalarsi.
• Si possono provocare scosse elettriche.
• Si possono provocare scosse elettriche. • Le parti in plastica possono fondere e
provocare fuoco.
• In caso contrario, si possono verificare
scosse elettriche o un incendio dovuto
ad un’eccessiva produzione di calore.
• Ciò potrebbe causare il malfunzionamento
dell’ apparecchio e scosse elettriche.
• Può provocare scosse elettriche o lesioni.
• Può provocare scosse elettriche o incendio.
Non inserire o estrarre la spina con
le mani bagnate.
Non si deve mai cercare di
smontare o riparare l’ apparecchio
da soli.
Non bere o utilizzare l’ acqua
della condensa.
Prima della pulizia, spegnere
l'alimentazione e staccare
l’ apparecchio dalla corrente.
Non mettere l’ apparecchio
vicino ad una fonte di calore.
ATTENZIONE
• L'acqua può entrare nell’ apparecchio e
deteriorare il suo isolamento. Esso può
causare scosse elettriche o incendi.
• Se l’ apparecchio cade, si può
avere fuoriuscita di acqua e quindi
danni alle cose circostanti, scosse
elettriche o fuoco.
Per evitare lesioni all’utente o ad altre persone e danni alle cose, si devono seguire le seguenti istruzioni.
Il funzionamento improprio senza il rispetto delle istruzioni può provocare lesioni o danni.
I simboli che seguono ne indicano la gravità
I simboli usati in questo manuale hanno il significato sotto riportato:
Questo simbolo indica la possibilità di morte o lesioni gravi.
Questo simbolo indica la possibilità di lesioni o danni materiali
Fatelo sempre
Non farlo mai.
PERICOLO
ATTENZIONE
PERICOLO
• Mancanza di ventilazione Può provocare
un incendio dovuto a surriscaldamento.
• Può provocare scosse elettriche o fallimento
dell’ apparecchio.
• Vi é il pericolo di incendio o scossa elettrica
• Potete subire lesioni se voi o
l’ apparecchio cade.
• Neonati, bambini, persone anziane e gente
non sensibile all’umidità.
• Questo provocherà deterioramento
dell’ apparecchio dovuto ai prodotti
chimici e ai solventi disciolti in aria.
• Funzionamento senza filtri può causare
danni all’ apparecchio.
• Ciò potrebbe causare il danneggiamento
dell’ apparecchio oppure un accidente.
•L'acqua potrebbe fuoriuscire
dall’ apparecchio, provocando
danneggiamento del suo isolamento,
scosse elettriche o incendi.
• La targhetta del fabbricatore si trova sul pannello posteriore dell'unità e contiene dati elettrici e tecnici,
specifici per questa unità.
• Assicurarsi che l'unità sia collegata a terra. Per ridurre al minimo di urto e di incendio, la corretta messa
a terra é importante. Il cavo di alimentazione é dotato di una spina di messa a terra a tre poli per la
protezione contro pericoli di scosse
• L'unità deve essere collegata in una presa a muro con messa a terra. Se la presa al muro che si intende
utilizzare non é adeguatamente messa a terra o protetta da un interruttore fusibile temporizzato o un
interruttore a circuito, chiedete a un elettricista qualificato di installare la corretta presa.
• Assicurarsi che la presa sia accessibile dopo la installazione dell'unità.
• Non utilizzare prolunghe o un adattatore di alimentazione con questa unità. Tuttavia, se é necessario
utilizzare una prolunga, utilizzare un cavo di prolunga solo classificato come «Deumidificatore»
(disponibile presso la maggior parte dei negozi hardware locali).
• Per evitare la possibilità di lesioni personali, scollegare sempre l'alimentazione dall'unità prima della
installazione e / o la manutenzione.
Informazioni elettriche
Non estrarre la tanica durante il
funzionamento dell’ apparecchio.
Non utilizzare l'unità in spazi
piccoli.
Non posizionare in luoghi dove
dell’ acqua può schizzare sull’ unità.
Posizionare l'unità su un
pavimento piatto e robusto.
Non coprire l' ingresso o l’ uscita
di aria con vestiti o asciugamani.
Non inserire mai le dita o altri
oggetti nelle griglie o aperture.
Fare attenzione di mettere in
guardia degli pericoli i bambini.
Inserire sempre i filtri in modo
sicuro. Pulire il filtro una volta
ogni due settimane.
Se entra nell'unità dell'acqua, girare
l'unità lateralmente, scollegare
l’ alimentazione e contattare un
tecnico qualificato.
Non posizionare vasi con
fiori o altri recipienti
d’ acqua sull’ apparecchio.
Non posizionare oggetti pesanti
sull’ apparecchio e prendere
cura in modo che il cavo di
alimentazione non sia compresso.
Non salire e non sedersi
sull’ apparecchio.
Si deve prestare attenzione quando
si utilizza l'unità in una stanza dove
si trovano i seguenti :
Non usare in zone dove si
sta lavorando su sostanze
chimiche.
ATTENZIONE

TASTI DI CONTROLLO SUL DEUMIDIFICATORE TASTI DI CONTROLLO SUL DEUMIDIFICATORE
Tasti di controllo
Tasto Power
Premere per accendere o spendere il deumidificatore.
: Tasti down / up
Tasto Modalità
Premere per selezionare la modalità di funzionamento
desiderata: Auto, scarpe e vestiti.
NOTA: La modalità scarpe é opzionale.
Gruppo di tasti per la impostazione dell’ umidità
Il livello di umidità può essere impostato in un intervallo
di umidità CO (umidità relativa) al 70% di RH (umidità
relativa) in incrementi del 5%.
Per un’ atmosfera più secca premere il tasto «-» e impostare
un minore valore percentuale (%).
Per un’ atmosfera più umida premere il tasto «+» e impostare
un maggiore valore percentuale (%)
NOTA: Il livello di umidità non può essere impostato in
modalità scarpe e modalità di vestiti.
Tasto FAN
Controlla la velocità della ventola. Premere per selezionare
alta (High) o bassa (Low) velocità della ventola. Impostare la
velocità della ventola a «High» per una rimozione di umidità
massima. Quando l'umidità é stata ridotta e si preferisce un
funzionamento silenzioso, impostare il controllo della ventola
a «Low».
NOTA: La velocità del ventilatore é automaticamente alta
nelle modalità SCARPE e VESTITI.
Tasto SWING (oscillazione)
Premere per avviare la funzione di auto swing o
bloccare le griglie alla posizione desiderata. Premere
questo pad per 3 secondi per avviare la funzione di
blocco / sblocco. Tutti gli altri tasti non possono operare
a funzione di blocco.
- Spia bassa velocità della ventola
-Spia alta velocità della ventola
-Spia funzione di blocco
Spia Tanica Piena
Si illumina quando la tanica deve essere svuotata, o
quando é rimossa e non rimessa in posizione corretta.
Spegnimento automatico
L'interruttore di controllo del livello dell'acqua spegne
il deumidificatore quando la tanica é piena o quando
é rimossa e non rimessa in posizione corretta.
Quando l'umidità impostata viene raggiunta, l'unità si
spegne automaticamente. In alcuni modelli, il motore
della ventola continuerà a funzionare.
Sbrinamento automatico
Quando sulle batterie evaporanti si accumula gelo, il
compressore starà spento e il ventilatore continuerà a
funzionare fino a quando il gelo scompara.
NOTA: Quando l’ apparecchio funziona in modalità di
sbrinamento automatico l' unità può emmettere un
rumore di refrigerante che scorre. É normale.
Attendere 3 minuti prima di riprendere il funzionamento
Dopo che l’ unità sia spenta, per la sua protezione, devono
passare 3 minuti prima che essa cominci di funzionare di
nuovo. Il funzionamento si avvierà automaticamente dopo
3 minuti.
Auto-Restart
Se l’ unità si ferma improvvisamente a funzionare a causa
di un «black out» elettrico, al ripristino della corrente elettrica,
riparte di nuovo con le ultime impostazioni memorizzate.
Modalità automatica (AUTO)
All’ unità può essere impostato il desiderato livello di umidità,
velocità del ventilatore e modalità di «swing» griglie.
Modalità SCARPE
L’ unità funziona al massimo della sua capacità di
deumidificazione quando funziona alla modalità SHOES.
La velocità della ventola é alta e le griglie fermano ad oscillare.
L'unità esce dalla modalità SHOES dopo un’ operazione di
massimo di 2 ore.
Modalità VESTITI
L’ unità funziona al massimo della sua capacità di
deumidificazione quando funziona alla modalità VESTITI.
La velocità della ventola é alta e la funzione di oscillazione
può essere impostato.
Altre caratteristiche
- Spia modalità AUTO.
- spia modalità SHOES
- spia modalità CLOTHES
Rimuovere il coperchio dell’ essicatore
delle scarpe.
Inserire il tubo per l’ essicazione delle scarpe
nell’ unità.
Inserire il tubo per l’ asciugatura delle scarpe
nelle scarpe.
vestiti umidi
Dopo l’ uso rimuovere il tubo.
Tasto TIMER
Premere per avviare la funzione di arresto automatico.
Premere il tasto timer per impostare il tempo di arresto
automatico da 0,0-8 in incrementi di 1 ora.
Premendo un tasto per cambiare modalità di
funzionamento, l'unità emmeterà un segnale
acustico per indicare che sta cambiando
modalità.
NOTA: Il pannello di controllo dell’unità acquistata potrebbe essere leggermente diverso a secondo
dei modelli.
Fig.1
POW ER
MODE
SWI NG
FAN
TIM ER
3S
NOW
SET
AUTO SHOES CL O THES
Display
Durante l'impostazione indica il livello% di umidità
impostato da CO al 70% o il tempo di arresto automatico
(0 ~ 8), poi indica il livello attuale dell’ umidità dell’
ambiente (± 5% di precisione) in una gamma da 30% RH
(umidità relativa) fino al 90% RH (umidità relativa).
Codici di errore:
E122- Errore del sensore di temperatura del tubo Scollegare l'unità e ricollegarla. Se l’ indicazione «ERROR»
si ripete, chiamare l'assistenza tecnica.
E142- Errore del sensore di temperatura dell’ ambiente e
del sensore di umidità -- Scollegare l'unità e ricollegarla.
Se l’ indicazione «ERROR» si ripete, chiamare l'assistenza
tecnica..
E163- Errore dei parametri di guasto nella scheda principale
di controllo— Scollegare l'unità e ricollegarla. Se l’ indicazione
«ERROR» si ripete, chiamare l'assistenza tecnica.
E554- Intentificazione di perdite di refrigerante Con questa
nuova tecnologia, il display visualizzerà E554 se ci sono
perdite di refrigerante. Chiamare l'assistenza tecnica.
Nota: i codici di errore vengono visualizzati HIGH TWO codici
(Es. EI) per 1 secondo, quindi visualizzato LOW TWO codici
(Es. 22) per 1 secondo a ciclo.
Spie
- Spia che indica il livello di umidità attuale
- Spia che indica il livello di umidità impostata
- Spia arresto automatico
- Spia tanica piena
CLOTH ES
30~50cm
30~50cm
8
8
1
1
2
2
3 4
3
4
5
5
6
6
7
7
Lasciare 30 ~ 50 cm di distanza alla
parte superiore e destra dell'unità
per i vestiti bagnati.
Fig.A
Aria
NOTA:
• La modalità Dryer deve essere gestita in una stanza chiusa,
non aprire porte e finestre.
• Per sfruttare la migliore possibile deumidificazione efficace,
i vestiti bagnati devono essere disidratati.
• Assicurarsi che ci sia un flusso d'aria diretta ai vestiti bagnati
(vedi Fig. A).
• Per vestiti bagnati spessi e pesanti si potrebbe non ottenere
la migliore deumidificazione possibile.
ATTENZIONE
• Non coprire l'uscita d’ aria dell' unità con dei vestiti. Esso può
causare eccessivo calore, incendi o danneggiamento dell’ unità.
• Non mettere vestiti bagnati sulla parte superiore dell'unità e
non lasciare che l’acqua cadda nell'unità. Una cosa tale può
causare scosse elettriche, o danneggiamento dell’ unità.

Parte anteriore
Parte posteriore
Fig.2
Fig.3
Pannello di controllo
Uscita tubo di scarico
Rotelle
Cavo di alimentazione e spina
Cavo di alimentazione fibbia
Griglia ingresso d’ aria
Filtro dell'aria (dietro la griglia)
Copertura asciugatrice scarpe
Tubo asciugatrice scarpe
NOTA: Tutte le immagini contenute nel manuale hanno solo
uno scopo esplicativo. La forma attuale dell’ unità acquistata
può essere leggermente diversa, ma le operazioni e le funzioni
sono le stesse.
Maniglia (entrambi i lati)
Griglia uscita aria
Tanica d’ acqua
1
2
3
4
1
2
3
4
5
1
3
2
4
1
2
3
6
5
4
7
6
7
8
8
IDENTIFICAZIONE DELLE PARTI
20cm
o più
Aspirazione aria
Uscita dell'aria
o più
o più
o più
o più
20cm
20cm
20cm
40cm
FUNZIONAMENTO DELL'APPARECCHIO
Quando si utilizza l’apparecchio
• Al primo utilizzo del deumidificatore, lasciare funzionare
continuamente per 24 ore.
• Questo apparecchio é progettato per funzionare in un
ambiente di lavoro tra i 5 ° C (41 ° F) e i 35 ° C (95 º F)
• Se l’ unità é stata spenta si devono passare 3 minuti
prima che riprenda di nuovo.
• Non collegare il deumidificatore ad una presa multipla
che viene anche utilizzata per altri apparecchi elettrici.
• Selezionare una posizione adatta, facendo in modo che
la presa elettrica sia facilmente accessibile.
• Collegare l'unità in una 115V ~ 60 Hz / 220 ~ 240V 50Hz
(Riferirsi alla targhetta posta sul lato / parte posteriore dell’ unità)
presa a muro con messa a terra.
• Assicurarsi che la tanica d'acqua sia montata correttamente,
altrimenti l'unità non funzionerà come si deve.
NOTA: Quando l'acqua nella tanica raggiunge un certo livello,
si prega di muovere l'unità con attenzione, altrimenti può rovesciare.
Rotelle (Installare ai quattro punti alla base
dell’ apparecchio)
• Le rotelle possono muoversi solo lateralmente.
• Non forzare le rotelle di muoversi sul tappeto né
spostare l'unità quando c’ é acqua nella tanica.
(L'unità può ribaltarsi e l’ acqua essersi sversata.)
Un deumidificatore che funziona in un seminterrato avrà poco o nessun effetto di essiccazione in una
zona chiusa adiacente, (per esempio un armadio), a meno che vi sia un'adeguata circolazione di aria
dentro e fuori della zona.
Posizionamento dell'unità
• Non utilizzare all'esterno.
• Questo deumidificatore é destinato solo ad uso domestico
e non per luoghi commerciali o industriali.
• Posizionare il deumidificatore su un pavimento liscio e piatto,
abbastanza robusto per sostenere l'unità con una tanica piena
d'acqua.
• Lasciare almeno 20 cm di spazio attorno a tutti i lati dell' unità
per la buona circolazione di aria.
• Posizionare l'unità in un posto dove la temperatura non
scenderà al di sotto dei 5 ° C (41 º F). Le batterie possono
coprirsi di gelo a temperature inferiori dai 5 ° C (41 º F), un
fatto che può ridurre le prestazioni del sistema.
• Posizionare l' unità lontano da asciugatrici, stufe o radiatori.
• Utilizzare l' unità per prevenire danni provocati dall’umidità
ovunque vengono immagazzinati libri o oggetti preziosi.
• Usare il deumidificatore in un seminterrato per prevenire
danni causati dall’ umidità.
• Il deumidificatore per essere più efficace, deve funzionare
in un ambiente chiuso.
• Nella camera dove funziona il deumidificatore, chiudere tutte
le porte, finestre e ogni tipo di apertura esterna.
Fig .4a

1. Estrarre un’ po’ la tanica
2. Tenere le due estremità della
tanica con la stessa forza ed
estrarla dall’ apparecchio.
3. Lascia che l’ acqua fuoriesca.
Fig .5
Fig .6
Fig. 8
Fig. 7
Estrarre il tapo
di gomma
Inserire il tubo all’
uscita di scarico.
Fig. 9
Fig. 10
RIMUOVERE L' ACQUA DI CONDENSA
Ci sono due modi per rimuovere acqua raccolta
1. Utilizzare la tanica
• Quando l'unità é spenta, se la tanica é piena, l'unità emette
8 volte un beep e l'indicatore luminoso lampeggia. Il display
digitale indica P2.
• Quando l'apparecchio é acceso, se la tanica é piena, il
compressore si spegne e dopo 30 secondi si spegne anche
il ventilatore per essiccare l'acqua del condensatore, quindi
l'unità emette un segnale acustico 8 volte e la spia lampeggia
Il display digitale indica P2.
• Estrarre delicatamente la tanica impugnando in modo sicuro
le due maniglie e stando attenti che l’acqua non fuoriesca.
Non lasciare la tanica sul pavimento perché il suo fondo é
irregolare. In caso contrario potrebbe rovesciars.i
• Buttare via l'acqua per mezzo dell’ uscita (vedi Fig.7) e mettere
la tanica al suo posto. La tanica deve essere posizionata in
modo sicuro purché il deumidificatore possa funzionare.
• L’ apparecchio si riavvia quando la tanica viene correttamente
ripristinata alla sua posizione.
NOTE:
• Quando si rimuove la tanica, non toccare le parti all'interno
dell’ apparecchio. Ciò potrebbe danneggiarlo.
• Assicurarsi di spingere la tanica delicatamente fino al fondo
dell’ apparecchio. Se la tanica si sbatte contro qualsiasi cosa
o se non si posiziona in modo sicuro, può causare arresto del
funzionamento dell’ apparecchio.
• Quando si rimuove la tanica, se c'é un po’ d'acqua nell’ unità
si deve asciugare.
2. Drenaggio continuo
L' acqua può essere svuotata automaticamente in uno scarico
a pavimento collegando l'apparecchio con un tubo d’ acqua
(non incluso).
• Rimuovere il tappo di gomma dalla parte posteriore dell’
apparecchio.Collegare un tubo di scarico (Diametro= 13,5
millimetri) e condurre alla scarico a pavimento o ad un idoneo
impianto di scarico (vedi Fig.7).
• Assicurarsi che il tubo sia sicuro e non ci siano perdite.
• Dirigere il tubo verso lo scarico, facendo in modo che non ci
siano pieghe che possono bloccare l’ acqua.
• Posizionare l'estremità del tubo nello scarico e assicurarsi che
l'estremità del tubo sia allo stesso a livello o più in basso per far
scorrere l'acqua agevolmente. Non alzare verso l’ alto.
• Selezionare l'impostazione di umidità desiderata e la velocità
del ventilatore per iniziare il drenaggio continuo.
NOTA: Quando la modalità di drenaggio continuo non é a utilizzata,
rimuovere il tubo di scarico dall’ uscita e fissare il tappo di gomma
di nuovo alla uscita di scarico.
FUNZIONAMENTO DELL'APPARECCHIO CURA E MANUTENZIONE
Cura e pulizia del deumidificatore
Spegnere il deumidificatore e staccare la spina dalla presa a muro prima della pulizia.
1. Pulire la griglia e la cassa
• Utilizzare acqua e un detergente delicato. Non usare
candeggina o abrasivi.
• Non spruzzare acqua direttamente sull' unità principale.
Questo potrebbe provocare una scossa elettrica, danneggiare
l'isolamento o causare problemi di ruggine.
• Le griglie di ingresso e uscita d' aria si sporcano facilmente.
Usare un’ aspirapolvere o una spazzola per pulire.
2. Pulire la tanica
Ogni poche settimane, pulire la tanica per evitare la crescita
di muffa, funghi e batteri. Riempire parzialmente la tanica con
acqua pulita e aggiungere un po di detergente delicato.
Distribuirlo nella tanica, svuotare e risciacquare.
NOTA: non utilizzare la lavastoviglie per pulire la tanica.
Dopo essersi pulita, la tanica deve essere messa a posto in
modo sicuro, altrimenti l’ apparecchio non funziona.
3. Pulire il filtro dell'aria
Il filtro dell' aria dietro la griglia anteriore deve essere controllato
e pulito almeno ogni 30 giorni o più spesso se necessario.
NOTA: Non risciacquare o mettere il filtro in una lavastoviglie
automatica.
Rimuovere
• Afferrare la linguetta sul filtro e tirare verso l’ alto, dopo tirare
come si indica in Fig.8
• Pulire il filtro con acqua calda e sapone. Sciacquare e lasciare
asciugare prima di ripristinarlo. Non pulire il filtro nella lavastoviglie.
Fissare:
• Inserire il filtro nell’ apparecchio da sotto verso sopra (Vedi Fig.10)
ATTENZIONE:
NON utilizzare il deumidificatore senza filtro perché la sporcizia lo
otturerà riducendo le prestazioni dell’ apparecchio.
4. Quando non si utilizza l'unità per lunghi periodi di tempo.
• Dopo aver spento l'unità, attendere un giorno prima di svuotare
la tanica.
• Pulire l’unità principale, tanica e filtro.
• Coprire l'apparecchio con un sacchetto di plastica
• Conservare l’ apparechio in posizione verticale in un
luogo asciutto e ben ventilato.

SUGGERIMENTI PER LA RISOLUZIONE DEI PROBLEMI
Prima di richiedere l’intervento del servizio assistenza effettuare i controlli illustrati di seguito
Problema
Verificare
L'unità non si avvia
• Assicurarsi che la spina del deumidificatore é spinta completamente
nella presa.
• Controllare la scatola dell'interruttore automatico/scatola fusibili
• Il deumidificatore ha raggiunto il livello prestabilito o la tanica é piena
• La tanica non é nella posizione corretta.
• Non ha passato il tempo sufficiente per rimuovere l'umidità
• Assicurarsi che non ci siano tende o mobili che ostruiscono la parte
anteriore o posteriore del deumidificatore
• Il livello impostato di umidità potrebbe non essersi abbastanza basso.
• Verificare che tutte le porte, finestre e altre aperture sono chiuse.
• La temperatura dell’ ambiente é troppo bassa, inferiore dei 5°C(41°F).
• C' é una stufa a cherosene o qualcosa che emana vapori nella stanza.
• Il filtro dell'aria é otturato.
• L'unità é inclinata anziché verticale come dovrebbe essersi.
• La superficie del pavimento non é piatta.
Il deumidificatore non
deumidifica l'aria come
dovrebbe
L'unità emette un forte
rumore durante il
funzionamento
Gelo appare sulla
spira
• E 'normale. L’ apparecchio tiene una modalità di sbrinamento
automatico.
• Il tubo al connettore o il raccordo del tubo potrebbero essere
allentati.
• Il tappo di scarico é stato rimosso e la tanica non può
raccogliere l'acqua.
Si tratta di codici di errore e di protezione. Leggere il capitolo sui
tasti del panello di controllo.
Acqua sul pavimento
E122, E142, E162, E554
visualizzano sul
DISPLAY
Attivare la vostra garanzia.....
in
5
passi
facilli!
Per la presentazione
della garanzia elettronica
si prega di utilizzare il seguente link
http://www.inventorappliances.com/garanzia
Effetuare uno scan
qui per la vostra garanzia
Selezionare il tipo di prodotto
(condizionatori d'aria o apparecchio)
per il quale sarà attivata la garanzia
Selezionare la garanzia che
corrisponde al prodotto che
avete comprato
Completare le informazioni
richieste (proprietario, rivenditore
e apparecchio) e premere “send”
Riceverete una conferma email
per l’ attivazione della vostra
garanzia
Collegarsi al seguente link
http://www.inventorappliances.com
/garanzia

COMENTARIO SOCIABLE ÍNDICE
DISPOSICIÓN
No deseche estos productos como residuos municipales sin clasificar. Colección de este tipo
de desechos por separado para el tratamiento especial es necesaria.
No debe eliminarse este aparato mezclado con los residuos domésticos
Para la eliminación, existen varias posibilidades:
A) El municipio ha establecido sistemas de recogida, donde los desechos electrónicos pueden
ser eliminados de manera gratuita para el usuario.
B) cuando se compra un nuevo producto, el minorista tomará el producto viejo de manera
gratuita.
C) El fabricante tomará el aparato viejo para su eliminación de forma gratuita para el usuario.
D) Como los productos viejos contienen valiosos recursos, se pueden vender a los
comerciantes de chatarra.
La eliminación de los desechos en los bosques y paisajes pone en peligro su salud cuando
sustancias peligrosas entren en las aguas subterráneas y llegan a la cadena alimentaria.
Cuando se utiliza este deshumidificador en los países europeos, se debe prestar
atención a la siguiente información
PRECAUCIONES DE SEGURIDAD
Advertencia ..................... ........ .............. ...................... ...................... .............. ............. ........ ..........2
Precaución............. ........ .................................... .......... ...... .................................... ................. ..........2
Información Eléctrica ........................... ............. .................................... .............. .................. ..........3
FUNCIONAMIENTO DE LA UNIDAD
Funcionamiento de la unidad ....... ......... ............. ...................... ...... ........ ........................... ......... ...... .7
Eliminación del agua almacenada ........ ...... ........ ....................... ............. ............. ........ ....... ......... ......8
CUIDADO Y MANTEAMIENTO
Cuidado y limpieza del deshumidificador ....... ...... ........................... ......... .......................................... .9
SOLUCIÓN DE PROBLEMAS
Solución de problemas......................................... ............. ....... ..................... ........ .............. .......... ....10
PANEL DE CONTROL DEL DESHUMIDIFICADOR
Teclas ........... ..................... .. ....... ................ ............................... ............. ........................................ ..4
Otras características......... ...................... ................... ........ .............. ......... ...... ....... ............. . . ..............5
IDENTIFICACIÓN DE LAS PARTES
Identificación de las partes ....... ......... ...... ........ ...... ..................... ......... ...... ........ ............................. .6
Ubicación adecuada de la unidad ........... .............. .......... .............. ...................... ............. .....
....... ......7
En su interior encontrará muchos consejos útiles sobre la utilización y el mantenimiento
adecuado de su deshumidificador. Una simple atención preventiva por su parte puede
ahorrarle mucho tiempo y dinero a lo largo de la vida de su deshumidificador.
Encontrará muchas respuestas a los problemas más comunes en el cuadro de consejos
para la solución de problemas. Si en primer lugar revisa nuestro cuadro de consejos para
la solución de problemas, es posible que no tenga necesidad de llamar al servicio técnico.
LEA ESTE MANUAL
ATENCIÓN
• Este aparato puede ser utilizado por niños de 8 años y mayores y por personas con
capacidad física , sensorial o mental reducida o con poca experiencia y conocimientos
a menos que, se les someta a supervisión o se les instruya respecto al uso del aparato
de forma segura y a condición de que entiendan los peligros existentes . Los niños no
deben jugar con el aparato. Limpieza y mantenimiento no puede hacerse por los niños
sin supervisión (se aplican en países europeos)
• El aparato no está diseñado para que lo utilicen sin supervisión niños o personas con
las facultades mentales mermadas. o con poca experiencia y conocimientos a menos
que, se les someta a supervisión o se les instruya respecto al uso del aparato por una
persona responsable de su propia seguridad. (se aplican en otros países a excepción de
los europeos.
• Debe vigilarse a los niños para asegurarse de que no jueguen con el deshumidificador
• Si el cable de alimentación está dañado, debe ser sustituido por el fabricante, su
concesionario, o personas cualificadas para evitar que se produzcan peligros.
• El aparato debe ser instalado de conformidad con los reglamentos escritos.
• La aplicación con el calentador eléctrico debe tener un espacio de 1 metro como mínimo
desde los materiales combustibles.
• Póngase en contacto con un técnico del servicio autorizado para las reparaciones o el
mantenimiento de esta unidad
!

PRECAUCIONES DE SEGURIDAD PRECAUCIONES DE SEGURIDAD
No exceda la potencia de la
toma de corriente o del aparato
de conexión
No encienda ni apague la unidad
insertando o retirando la clavija.
No dañe el cable ni utilice un
cable de alimentación no
especificado.
No modifique la longitud del cable
de alimentación.
Desenchufe la unidad si emite un
sonido extraño, olores o humo.
Apague el aparato y el diferencial
primero al limpiar la unidad
De lo contrario se puede producir un
incendio o descarga eléctrica debido
a la excesiva generación de calor.
Causará una descarga eléctrica o incendio.
De lo contrario, puede ocasionar un
incendio o una descarga eléctrica.
Podría causar una descarga eléctrica o
lesiones.
Falta de ventilación puede causar
sobrecalentamiento e incendio.
Podría producirse una explosión o incendio Contiene contaminantes y puede hacer que
se enferme.
De lo contrario se puede producir un incendio
o descarga eléctrica debido a la excesiva
generación de calor.
Las partes de plástico pueden fundirse y
producir un incendio.
Causará una descarga eléctrica o incendio
debido a la excesiva generación de calor.
Causará una descarga eléctrica o incendio.
Puede causar uno fallo de la machina o una
descarga eléctrica.
Podría producirse una descarga eléctrica o
incendio.
No Inserte ni retire el enchufe con
las manos mojadas.
Antes de limpiar, apague la
alimentación y desenchufe
la unidad.
No utilice la máquina cerca de
gases inflamables o combustibles,
tales como gasolina, benceno,
disolvente, etc.
No desmonte ni modifique los
productos.
No coloque el cable de
alimentación cerca de una
fuente de calor.
ATENCIÓN
El agua podría introducirse en la unidad y
degradar el aislamiento. Podría producirse
una descarga eléctrica o incendio.
Si la unidad se cae, puede causar
derrame en agua y danos a la
propiedad.
Para evitar lesiones al usuario o a otras personas y daños materiales, debe seguir las siguientes
instrucciones. El uso incorrecto ocasionado al ignorar las instrucciones puede causar lesiones o daños.
La gravedad se clasifica mediante las siguientes indicaciones.
A continuación se muestran los significados de los símbolos utilizados en este manual.
Este símbolo indica la posibilidad de muerte o lesiones graves.
Este símbolo indica la posibilidad de lesiones o daños sólo materiales.
Siempre haga esto
No lo haga.
ADVERTENCIA
ATENCIÓN
ADVERTENCIA
La falta de flujo de aire puede conducir a
sobrecalentamiento e incendio.
Tenga cuidado especial para advertir a los
niños de estos los peligros
Podría causar una descarga eléctrica o fallo
en el aparato.
Existe el peligro de una descarga eléctrica
o incendio
Puede lesionarse si se cae o si la
unidad se cae.
Bebés, niños, persones mayor, y personas
que no son sensibles a la humedad.
Esto causará el deterioro de la
unidad debido a los productos
químicos y disolventes disueltos
en el aire.
La utilización sin filtros podría producir un mal
funcionamiento
Causará fallo de la maquina o descarga
eléctrica.
El agua puede derramarse dentro de
la unidad, provocando la falla de
aislamiento y una descarga eléctrica
o incendio.
• La placa de características del fabricante se encuentra en el panel posterior de la unidad y contiene
eléctricos y otros datos técnicos específicos para esta unidad.
• Asegúrese de que la unidad esté correctamente conectada a tierra. Para minimizar el riesgo de
descarga eléctrica, utilice la clavija con un enchufe con toma de tierra estándar de tres ranuras para
protección contra la descarga eléctrica.
• La unidad debe ser utilizado en un receptáculo de pared debidamente conectado a tierra Si el
receptáculo de pared que va a utilizar no está adecuadamente conectado a tierra o está protegido
por un fusible de acción retardada o disyuntor, solicite a un electricista calificado para instalar el
receptáculo adecuado.
• Asegúrese de que el receptáculo sea accesible después de la instalación de la unidad.
• No utilice alargadores ni adaptadores para enchufes. Sin embargo, si es necesario utilizar un
alargador utilice un aprobad alargador solamente para deshumidificadores.
• Para evitar la posibilidad de lesiones personales, siempre desconecte la alimentación de la unidad,
antes de la instalación y/o mantenimiento.
Información eléctrica
No utilice el agua acumulara en
la cubeta para beber.
No utilice la unidad en pequeños
espacios.
No colocar en lugares donde agua
puede salpicar en la unidad
Instale el deshumidificador
correctamente sobre el
suelo, una mesa o una
estantería suficientemente
nivelada y fuerte.
No cubra las aberturas de entrada
o las aberturas de salida con
paños o toallas.
Nunca inserte su dedo u otros
objetos extraños en las rejillas o
aberturas.
Inserte siempre el filtro
correctamente. Límpielo una vez
cada dos semanas.
Si observa que entra agua en el
producto, apague el interruptor de
contacto del deshumidificador.
Después de retirar la clavija del
enchufe, póngase en contacto con
el centro de servicio técnico.
No coloque floreros u otro
recipiente del agua sobre
la unidad
No coloque objetos pesados sobre
el cable de alimentación y
compruebe que el cable de
alimentación no se ha presado.
No se siente ni se suba en
la unidad
Tendrá cuidado cuando utiliza la
unidad con las siguientes
personas:
No utilice en lugares donde
se manipulen productos
químicos
ATENCIÓN

CONTROL DE PANEL DEL DESHUMIDIFICADOR ΠΛΗΚΤΡΑ ΠΑΝΩ ΣΤΟΝ ΑΦΥΓΡΑΝΤΗΡΑ
Teclas
Tecla de encendido/apagado (Power )
Pulse este botón para encender/apagar el
deshumidificador.
Teclas de aumento y disminución
Tecla de modo
Pulse para seleccionar el modo de funcionamiento deseado
del deshumidificador AUTO, ZAPATOS Y ROPA
NOTA: El modo para zapatos es opcional
Teclas humidity set control
La humedad deseada puede seleccionarse en un rango
del CO (humedad relativa) al 70% de humedad relativa,
en incrementos del 5%.
Para el aire más seco, presione la tecla y establecer un
menor valor del porcentaje (%).
Para el amortiguador de aire, pulse la tecla y establece
mayor valor del porcentaje (%)
NOTA: El nivel de humedad no puede ser establecido
en modos para zapatos y ropa
Tecla VENTILADOR
Controlar la velocidad del ventilador. Presione para seleccionar
velocidad de ventilador alta o baja. Ajuste el control del
ventilador en alta velocidad para una eliminación de la
humedad máxima. Cuando la humedad se ha reducido y
un funcionamiento silencioso es preferido, ajuste el control
del ventilador en baja velocidad.
NOTA: La velocidad del ventilador es alta en modos de
ZAPATOS Y ROPAS automáticamente.
Tecla OSCILACIÓN (SWING)
Pulse para iniciar la función de oscilación automática
o bloquear las rejillas en la posición deseada. Pulse
esta tecla durante 3 segundos para iniciar la función
de bloqueo / desbloqueo. Todos los demás teclas no
están disponibles bajo la función de bloqueo.
Luz indicadora para velocidad baja del ventilador
Luz indicadora para velocidad alta del ventilador
Luz indicadora de función de bloqueo
Indicador BUCKET FULL --- CUBETA LLENA
Este piloto se ilumina cuando la cubeta está llena y
es necesario vaciarla. También se ilumina cuando
la cubeta no está colocada correctamente.
Auto Apagado (Auto Shut-Off)
El deshumidificador se apagará automáticamente
cuando la cubeta esté llena, cuando la cubeta está
retirada o no se coloque en la posición correcta.
Cuando el ajuste de humedad es alcanzado, la
unidad se apagará automáticamente. En algunos
modelos, el motor del ventilador seguirá funcionando.
Descongelación Automática
Cuando la escarcha se acumula en los serpentines
de evaporador, el compresor se apagará y el ventilador
continuará funcionando hasta que la escharcha
desaparece.
Nota: En la función de descongelación automático, la
unidad puede emitir un sonido de refrigerante que fluye,
algo que es normal.
Espere 3 minutos antes de reanudar la operación
Después de que la unidad se haya detenido, no puede
ser reiniciado en los primeros 3 minutos. Su propósito
es proteger la unidad. La operación se iniciará
automáticamente después de 3 minutos.
Reinicio Automático (Auto-Restart )
Si la unidad se apaga inesperadamente debido a interrupción
de corriente eléctrica, se reiniciará automáticamente con el
ajuste de función anterior cuando vuelva la energía eléctrica.
Modo automático
La unidad se puede ajustar a la función de nivel de humedad
deseado, velocidad del ventilador y en la función de oscilación
de rejillas
Modo para ZAPATOS
La unidad puede realizar la función de deshumidificación
MÁXIMA cuando está bajo el modo para zapatos. La velocidad
del ventilador es fija a alta y la rejilla se detendrá de oscilar.
La unidad sale del modo para ZAPATOS después de un
máximo funcionamiento de 2 horas.
Modo para ROPAS
La unidad puede realizar la función de deshumidificación
MÁXIMA cuando está bajo el modo para ropas. La velocidad
del ventilador se fija a alta y la función de oscilación (Swing)
puede ser establecida.
Otras características
Luz indicadora de modo automático
Luz indicadora del modo para zapatos
Luz indicadora de modo para ropa
Retire la tapa del secador para zapatos.
Instale el tubo del secador para zapatos
a la unidad.
Ponga el tubo del secador para zapatos a
los zapatos
Ropa Mojada
Tras la utilización retire el tubo del secador para
zapatos
Tecla Timer (Temporizador)
Pulse para iniciar la función del paro automáticoPresione la tecla temporizador para fijar la hora
parada automática de 0.0 al 8 en incrementos de
1 hora.
Cuando pulse la tecla para cambiar los modos
de operación la unidad hará un pitido para
indicar que los modos están cambiando.
NOTA: El panel de control de la unidad que ha adquirido puede ser ligeramente diferente según los
modelos.
Fig.1
POW ER
MODE
SWI NG
FAN
TIM ER
3S
NOW
SET
AUTO SHOES CL O THES
Visualización
Muestra el nivel de humedad deseado% del CO
al 70% o la hora del paro automático (0 ~ 8)
aunque se establece luego, muestra el nivel actual
(con una precisión del ±5%) de la humanidad en
la habitación en un rango de 30% HR (Humedad
Relativa) al 90% de HR (humedad relativa).
Códigos de error
E122 Error en el tubo del sensor de humedad
- Desenchufe la unidad y vuelva a conectarla. Si el
error se repite, llame al servicio técnico.
E142 Error en el sensor de la temperatura ambiente
y sensor de humedad- Desenchufe la unidad y vuelva
a enchufarlo Si el error se repite, llame al servicio
técnico.
E163 Error en los parámetros de falla de la tarjeta de
control principal- Desenchufe la unidad y vuelva a
conectarla. Si el error se repite, llame al servicio técnico.
E554 Detección de fuga de refrigerante -- Con esta
nueva tecnología, la área de visualización aparecerá
E554 cuando la unidad detecta una fuga de refrigerante,
llame al servicio técnico.
NOTA: Los códigos de error se muestra dos códigos
ALTA
(Ej. IE) durante 1 segundo, luego se muestran dos
códigos BAJOS
(Ej. 22) durante 1 segundo cíclicamente.
Visualización de Luces indicadoras
Luz indicadora de humedad actual
Luz indicadora de configuración del nivel de humedad
Luz indicadora de paro automático
Luz indicadora de agua completa
CLOTH ES
30~50cm
30~50cm
Fig.Α
8
8
1
1
2
2
3 4
3
4
5
5
6
6
7
7
Distancia de 30-50 cm en la parte
superior y a la dereja de la unidad,
de la ropa mojada.
ujo de aire
NOTA:
• El modo secador debe ser operado en una habitación cerrada,
no abrir la puerta y la ventana.
• Para lograr la mejor deshumidificación posible, por favor
deshidratar primero la ropa mojada.
• Asegúrese de dirigir el flujo de aire en la ropa mojada
(ver Figura. A).
• Para ropa mojada gruesa y pesada es posible que no obtenga
la mejor deshumidificación posible.
ATENCIÓN
• No cubra la salida de aire de la unidad con la ropa. Puede
provocar calor excesivo, incendio o fallo de la unidad.
• No coloque ropa mojada encima de la unidad y no derrame
agua en la unidad puede causar una descarga eléctrica, fugas
o fallo de la unidad.

Frente
Posterior
Fig.2
Fig.3
Panel de control
Manguera de desagüe
Rueda
Cable de alimentación y clavija
Hebilla del cable de alimentación
Rejilla de entrada de aire
Filtro de aire (detrás de la rejilla)
Tapa del secador para zapatos
Tubo del secador para zapatos
NOTA: Todas las fotos en el manual son solo con fines explicativos.
La forma real de la unidad que ha adquirido puede ser ligeramente
diferente, pero las operaciones y las funciones son las mismas.
Asa (ambos partes)
Rejilla de salida de aire
Cubeta de agua
1
2
3
4
1
2
3
4
Εικ.4 α
5
1
3
2
4
1
2
3
6
5
4
7
6
7
8
8
IDENTIFICACIÓN DE LAS PARTES
FUNCIONAMIENTO DE LA UNIDAD
Identificación de las partes
Ubicación adecuada de la unidad
20cm
o superior
20cm
o superior
20cm
o superior
20cm
o superior
40cm
o superior
Rejilla de entrada
de aire
Rejilla de salida de aire
Un deshumidificador que funciona en un sótano tendrá poco o ningún efecto en deshumidifique una área
de almacenamiento encerrada contigua tal como un armario, a menos que haya circulación adecuada de
aire dentro o fuera del área.
• No lo use al aire libre.
• Este deshumidificador está diseñado solo para fines
interiores residenciales.
• Este deshumidificador no debe utilizarse para fines
comerciales o industriales.
• Coloque el deshumidificador en un suelo suave nivelado
suficiente para sostener la unidad la cubeta de agua llena.
• Deje al menos un espacio de aire de unos 20 cm en
ambos lados de la unidad. para una buena circulación
de aire.
• Coloque la unidad en una zona donde la temperatura no
descenderá a menos de 5 ºC (41 ºF).
• Coloque la unidad lejos de la secadora de ropa, el calentador
o el radiador.
• Utilice la unidad para evitar que la humanidad dañe los lugares
que guardan libros y otros objetos de valor.
• Utilice el deshumidificador en un sótano para prevenir daños
de humedad
• El deshumidificador se debe operar en una área cerrada
para ser más efectivo.
• Cerrar todas las puertas, ventanas y otras aberturas en
la habitación.
Ruedas (en cuatro puntos de la parte inferior
de la unidad)
• Ruedas pueden moverse libremente.
• No haga que las ruedas mueven sobre la
alfombra, ni mover la unidad con agua en la
cubeta .
Cuando se utiliza la unidad
• Cuando utilice el deshumidificador por primera vez, operar la unidad continuamente durante 24 horas.
• Esta unidad está diseñada para operar con un trabajo ambiente entre 5 ºC/41 ºF y 35 ºC/95 ºF.
• Si la unidad se ha sido apagado y es necesario reencenderla rápidamente, espere aproximadamente tres minutos
para que el funcionamiento correcto se reanude.
• No conectar el deshumidificador a una regleta con cajas de enchufe que está usando también para otros
aparatos eléctricos.
• Seleccione un lugar adecuado, asegurándose de que usted tiene fácil acceso a una toma de corriente.
• Enchufe la unidad a un tomacorriente conectado a tierra.
• Asegúrense de que la cubeta de agua esté colocada correctamente de lo contrario la unidad no funcionará
correctamente.

Fig.5
Fig.6
FUNCIONAMIENTO DE LA UNIDAD CUIDADO Y MANTENIMIENTO
Fig.8
Fig.9
Fig.10
Fig.7
Eliminación del agua almacenada
Hay dos maneras de quitar el agua recogida.
1. Utilice la cubeta
• Cuando la unidad está apagada, si la cubeta está llena, la
unidad se emite un pitido 8 veces y la luz del indicador que
significa lleno) parpadeará La pantalla digital muestra P2.
• Cuando la unidad está encendida, si la cubeta está llena,
el compresor se apaga y el ventilador se apaga después de
30 segundos para sacar el agua del condensador, la unidad
emitirá un pitido 8 veces y la luz del indicador que significa
lleno parpadeará. La pantalla muestra P2.
• Tire lentamente la cubeta. Agarre la izquierda y la derecha
asa firmemente y sáquela derecha con cuidado para que el
agua no se derrame. No coloque el depósito en el suelo
porque la parte inferior de la cubeta es desigual. De lo contrario
la cubeta se caerá y provocar que el agua se derrame.
• Quite el agua y coloque la cubeta. La cubeta debe estar
colocada en su sitio y sellada de manera segura para que
funcione el deshumidificador.
• La máquina se reiniciará cuando la cubeta está restaurada
en su posición correcta.
Notas
• Cuando se quita la cubeta, no toque ninguna pieza dentro de
la unidad. Si lo hace puede dañar el producto.
• Asegúrese de presionar suavemente la cubeta en la unidad.
Golpeando la cubeta contra cualquier cosa o incapacidad de
empujarlo de forma segura puede causar que la unidad no funcione.
• Cuando se quita la cubeta, si hay agua en la unidad asegúrese
de secarlo.
2. Drenaje Continuo
• El agua se puede vaciar automáticamente en un desagüe del
selo uniendo la con una manguera de agua (no incluido).
• Retire el tapón de goma de la salida posterior de la manguera
de desagüe. Coloque una manguera de desagüe (D=13.5mm)
y conducirla al desagüe del selo o a una instalación de drenaje
adecuada (ver Fig.7).
• Asegúrese de que la manguera esté segura para que no haya
fugas.
• Dirija la manguera hacia el desagüe, asegurándose de que existan
torceduras que se detendrán el flujo de agua .
• Coloque el extremo de la manguera en el desagüe y asegúrese
de que el extremo de la manguera sea nivelado o abajo para que
deje el flujo de agua sin problemas. Nunca deje para arriba.
• Seleccionar el ajuste de humedad deseado y la velocidad del
ventilador en la unidad para el comienzo del drenaje continuo.
1. Retire la cubeta un poco
2. Mantenga ambos lados
de la cubeta con la misma fuerza
y retirela de la unidad.
3. Verter el agua
Retire el tapón
de goma
Conectar la manguera
a la salida de la
manguera de drenaje
Cuidado y manteamiento del deshumidificador
Apague el deshumidificador y quite la clavija de la pared antes de limpiarlo
1. Limpie la rejilla y caja
• Use agua y un detergente suave. No utilice lejía ni abrasivos.
• No tire agua directamente en la unidad principal. de este modo
puede causar una descarga eléctrica y causar un deterioro del
aislamiento o roya en la unidad.
• Las rejillas de entrada y salida de aire se ensucian fácilmente, use
una aspiradora o un cepillo para limpiar.
2. Limpiar la cubeta
Cada pocas semanas, limpie la cubeta para evitar el crecimiento de
moho y bacterias. Parcialmente llena la cubeta con agua limpia y añadir
un poco de detergente suave. Limpie alrededor de la cubeta, vaciar y enjuagar.
Nota: No use el lavavajillas para limpiar la cubeta.
Después de limpiar, la cubeta debe estar colocada y sellada de manera
segura para que funcione el deshumidificador.
3. Limpiar el filtro de aire
El filtro de aire detrás de la rejilla frontal debería ser checado y limpiado
por lo menos cada 30 días o más a menudo si es necesario.
Nota: No enjuague ni poner el filtro en un lavavajillas automático.
Para retirar:
• Agarre la ventana del filtro y tire hacia arriba, luego retírelo
como se muestra en la Fig.8.
• Limpie el filtro con agua limpia con jabón. Enjuague y Deje el filtro
secar antes de colocarlo. No limpie el filtro en un lavavajillas.
Para colocar
• Inserte el filtro de aire en la unidad de la parte de abajo a arriba.
Ver Fig.10.
Fissare:
• Inserire il filtro nell’ apparecchio da sotto verso sopra (Vedi Fig.10)
ADVERTENCIA:
NO UTILICE el deshumidificador sin un filtro porque la suciedad
y la pelusa se obstruirá la unidad y empeorar el funcionamiento.
4. Si no utilizará el deshumidificador durante un
período de tiempo prolongado,
• Después de apagar la unidad, esperar un día antes de vaciar
la cubeta.
• Limpie la unidad principal, el filtro de aire y la cubeta de agua.
• Cubra la unidad con una bolsa de plástico.
• Guarde la unidad de forma vertical en un lugar fresco y seco.

SOLUCIÓN DE PROBLEMAS
Antes de llamar al técnico, consulte la tabla para intentar solucionar los problemas.
Problema
¿Qué hacer?
El deshumidificador
no se enciende
• Asegúrese de que la clavija del deshumidificador esté completamente
insertada en el enchufe.
• Compruebe los fusibles o el cuadro del interruptor automático.
• El deshumidificador se apaga automáticamente cuando esto ocurre.
Vacíe la cubeta.
• La cubeta no está colocada correctamente.
• No ha habido suficiente tiempo para eliminar la humedad.
• Asegúrese de que no hay cortinas, persianas o mobiliario que
bloquean la parte frontal o posterior del deshumidificador
• El control de humedad no está ajustado a humedad baja
• Compruebe que todas las puertas, ventanas y otras aberturas
están cerradas completamente.
• La temperatura de la habitación es demasiado baja inferior
a 5 ºC(41ºF).
• Hay un calentador de queroseno o algo que emite vapor de agua
en la habitación.
• El filtro de aire está obstruido.
• La unidad está inclinada en lugar de vertical como debería ser.
• La superficie de suelo no está nivelado.
El deshumidificador no
seca el aire como
debiera
La unidad hace un
ruido fuerte cuando
se funciona
Aparece escarcha en
los serpentines
• Es normal el deshumidificador tiene modo de deshumidificador
• La conexión de la manguera de drenaje esté suelta.
• Tiene la intención de utilizar la cubeta para recoger el agua,
pero el tapón de drenaje ha sido movido de su sitio.
Estos son los códigos de error y los códigos de protección. Ver el
sección PANEL DE CONTROL del deshumidificador- teclas
Hay agua en el suelo
E122, E142, E163, E554
aparecen en la
pantalla
Activa su garantía.....
en
5
pasos
simples!
Para la presentación
electrónica de la garantía
por favor pincha en el siguiente enlace
http://www.inventorappliances.com/garantia
Analícelo aquí para
el formulario de garantía
Elegir el tipo de producto
(aire acondicionado o aparato para
el cual se activará la garantía
Elegir la garantía que
corresponde a su compra de
producto
Ingrese la información requerida
(propietario minorista aparato)
y pulse enviar
Recibirá un correo electrónico
de confirmación de la activación
de su garantía.
Conecte en el siguiente enlace
http:www.inventorappliances.com/
garantia
 Loading...