

Page 1
REFRIGERATOR
BAR
• USER’S MANUAL
• ΕΓΧΕΙΡΙΔΙΟ ΧΡΗΣΗΣ
• MANUALUL UTILIZATORULUI
• BEDIENUNGSANLEITUNG
• MANUEL D’UTILISATEUR
MODELS:
INVMS67A
INVMS67A-BS
INVMS67AB-BS
FRENCH
Page 2
Contents
1. SAFETY WARNINGS ............................................................................................................ 1
2. INSTALLTION ...................................................................................................................... 1
2.1 Loca on ...................................................................................................................... 2
2.2 Reversing the Door Swing .......................................................................................... 2
2.3 Door Space Requirements .......................................................................................... 3
2.4 Leveling the Unit ....................................................................................................... 3
2.5 Cleaning Before Use ................................................................................................... 4
2.6 Before Using Your Unit ............................................................................................... 4
2.7 Interior Accessories .................................................................................................... 4
3. PRODUCT OVERVIEW ........................................................................................................ 4
4. OPERATION ........................................................................................................................ 5
4.1 Adju g the Temperature ........................................................................................ 5
4.2 Noises Inside the Unit! ............................................................................................... 5
4.3 Food Storage Tips ...................................................... ................................................ 5
5. CLEANING .......................................................................................................................... 6
5.1 Defro ................................................................................................................... 6
5.2 Cleaning the Interior and the Exterior of the Unit ..................................................... 6
5.3 Cleaning Tips .............................................................................................................. 6
6. MAINTENANCE .................................................................................................................. 6
6.1 Care When Handling / Moving Your Unit ................................................................... 6
6.2 Servicing ..................................................................................................................... 6
6.3 Turning the Unit Off for Extended Periods of Time ................................................... 7
7. ......................................................................................................... 7
7.1 Notes: ......................................................................................................................... 7
8. ENERGY SAVING TIPS ........................................................................................................ 7
9. DISPOSAL ........................................................................................................................... 8
9.1 Correct Disposal of this product ................................................................................. 8
Page 3
1. SAFETY WARNINGS
1) WARNING -
WARNING -
2)
3) WARNING - Do not damage the cooling circuit.
WARNING - Do not use any electrical devices inside the refrigerator unless they are approved
4)
by the manufacturer.
5) This appliance should be unplugged before any maintenance is performed or when it is not in use.
6) It is not advised for children under 8 to use this appliance. Please make sure children 8 and above
hazards involved. The above persons without proper supervision should not perform Cleaning and
maintenance.
7) If the supply cord is damaged, it must be replaced by the manufacturer, its service agent or
similarly qualified persons in order to avoid a hazard.
and flammable gases.
9) Please remove all doors before disposal to prevent children from becoming trapped inside.
- Workplace staff areas or break rooms
- Farmhouses
for use
- Bed and breakfast environments
11) Do not store explosive substances such as aerosol cans, which contain flammable propellants in this
appliance.
IT IS HAZARDOUS FOR ANYONE OTHER THAN AUTHORIZED SERVICE PERSONNEL TO
CARRY OUT ANY SERVICING OR REPAIRS WHICH INVOLVE THE REMOVAL OF COVERS.
TO AVOID THE RISK OF AN ELECTRICAL SHOCK DO NOT ATTEMPT REPAIRS YOURSELF.
1
Page 4
2. INSTALLATION
2.1 Location
ambient temperatures may cause the unit to operate improperly. This unit is not designed for use in
When installing the unit be sure to allow enough open area around all sides (20 cm from the top, 15cm
from the back and 40 cm from the sides). This will allow air to circulate around the wine cooler and
fully.
2.2 Reversing the Door Swing
Tools Required: Phillips head screwdriver / Slot head screwdriver / Hexagonal spanner
◆ If you want to have the door swing reversed, we recommend that you contact a
qualified technician. You should only try to reverse the door yourself if you believe that
you are qualified to do so.
◆ Ensure the unit is unplugged and empty.
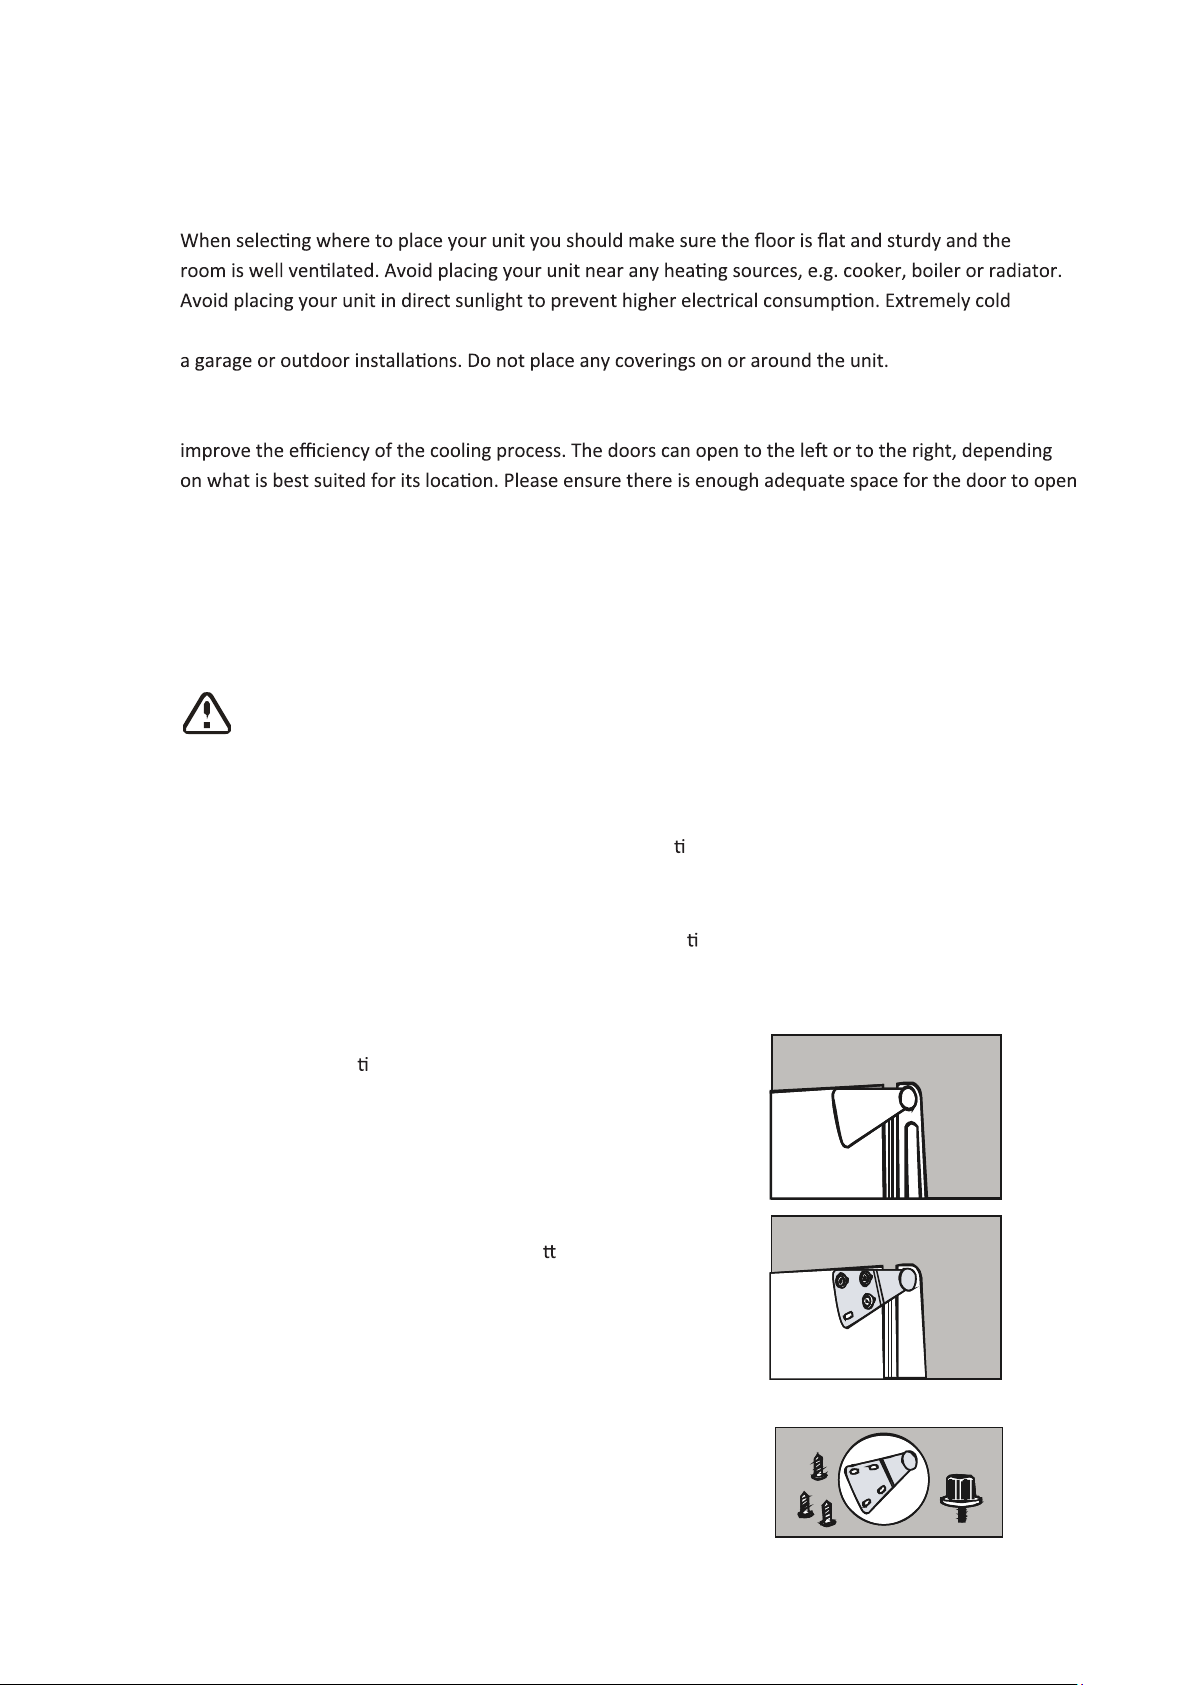
◆ Adjust the two leveling feet to their highest posi
◆ Tilt the unit slightly backwards to take the door off.
something solid so that it will not slip during the door reversing process.
◆ All parts removed must be saved for the reinstalla
◆ Do not lay the unit flat as this may damage the coolant system.
◆ We recommend that 2 people handle the unit during assembly.
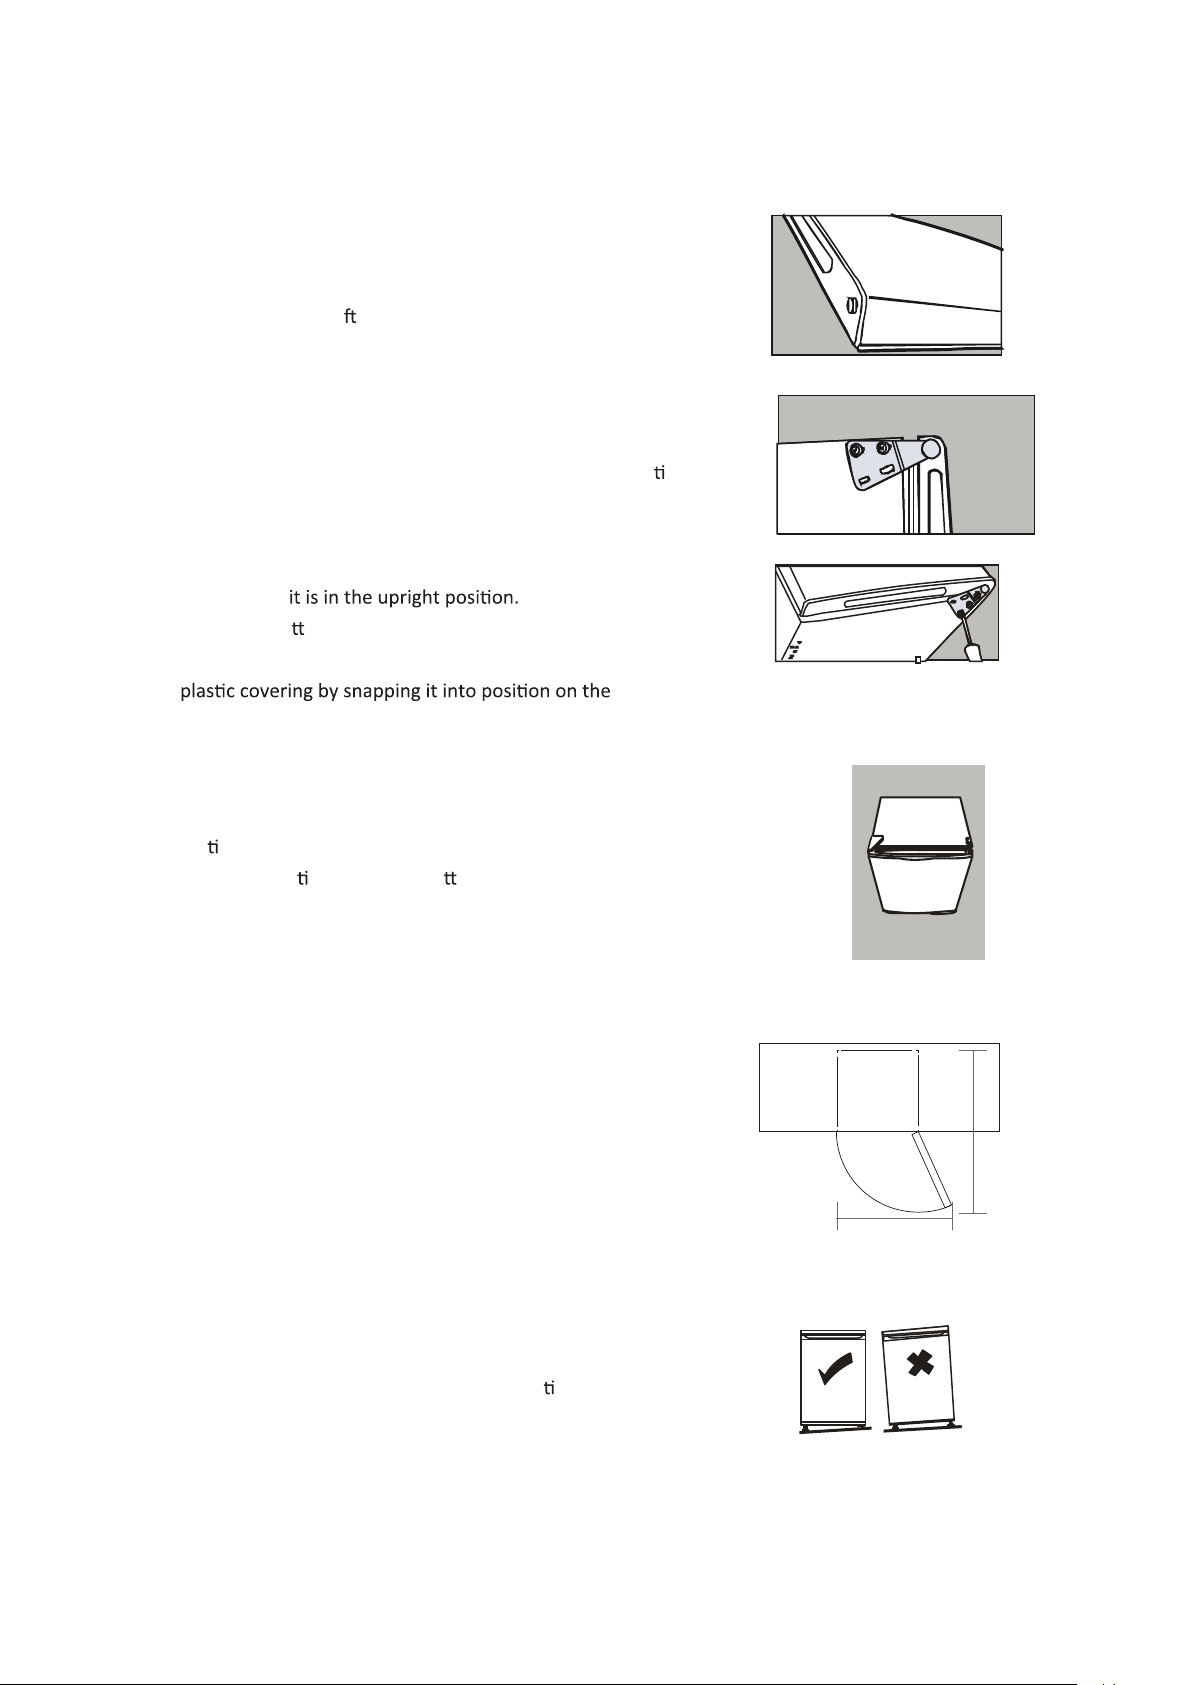
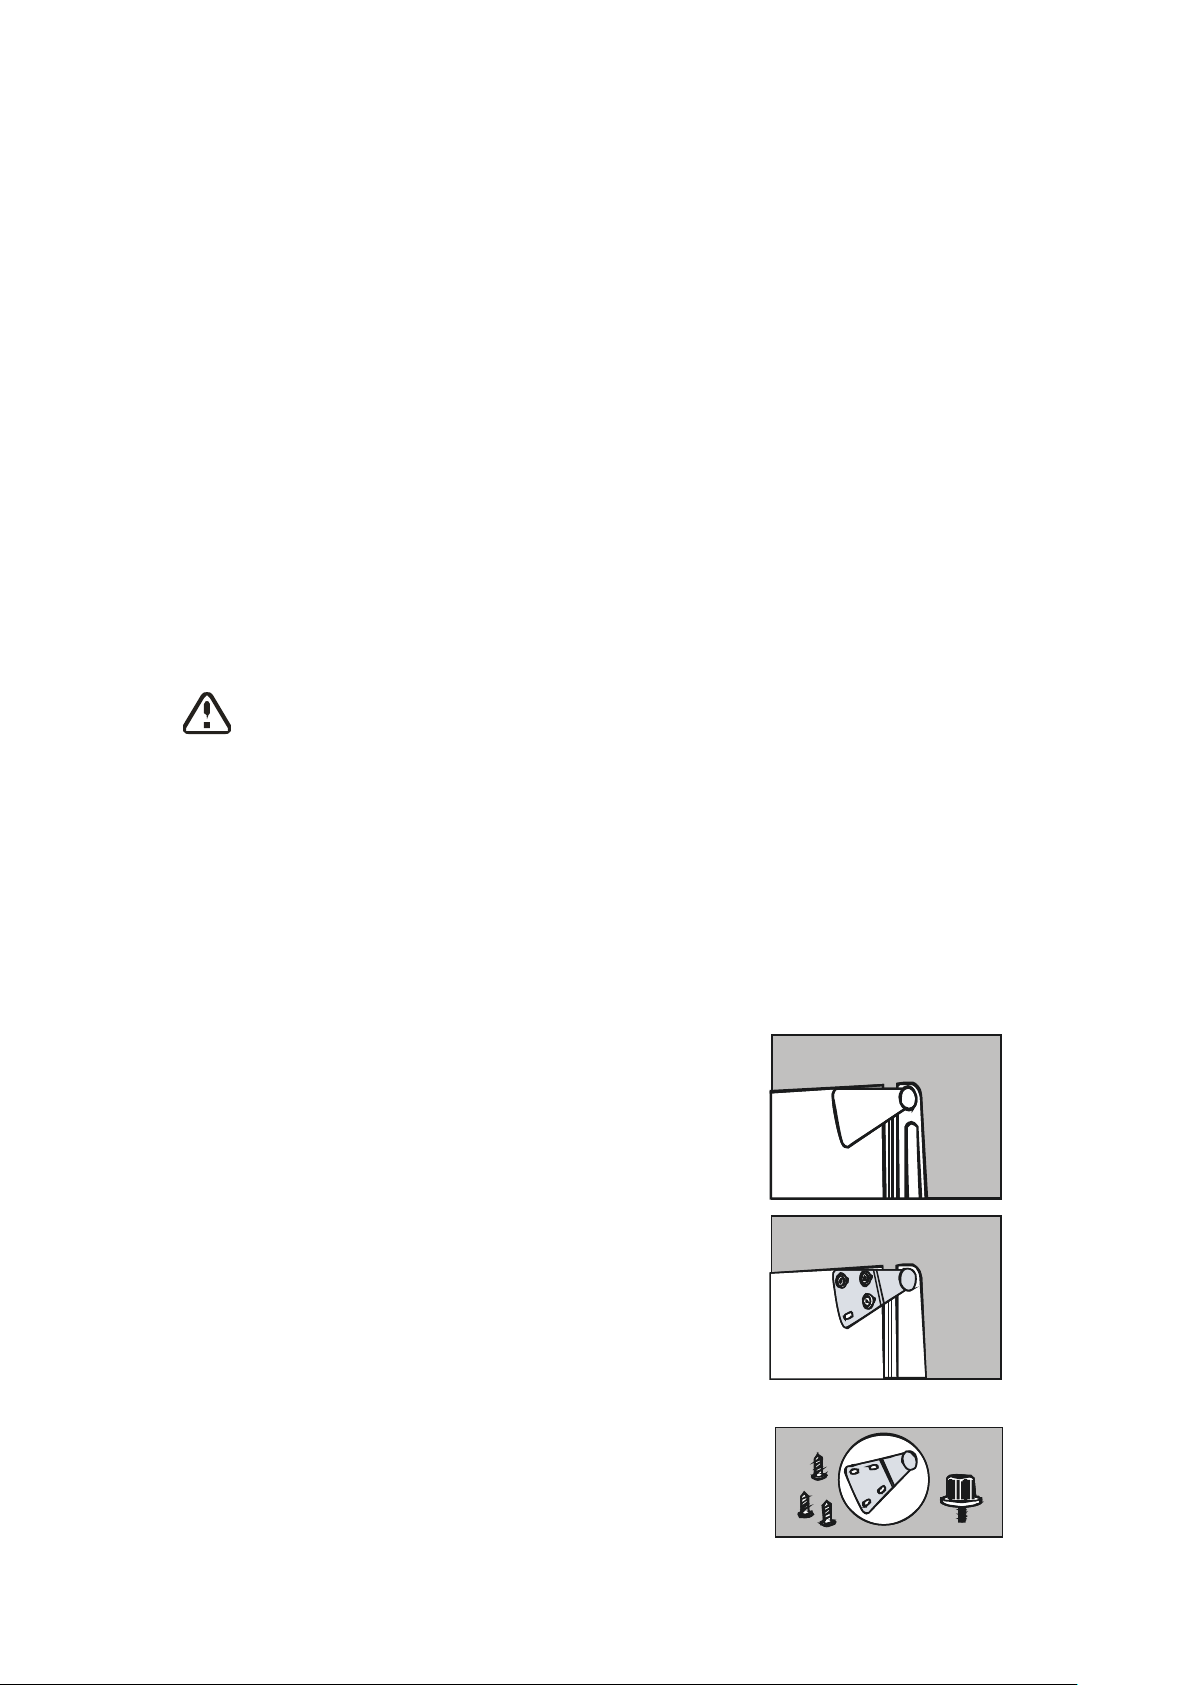
1) Remove the plas
2) Unscrew the three screws from the bo
Remove the foot from the opposite
3) Place parts aside.
c covering from the top door hinge.
om bracket.
side.
on.
You should rest the unit on
on of the door.
2
Page 5
8 8 0
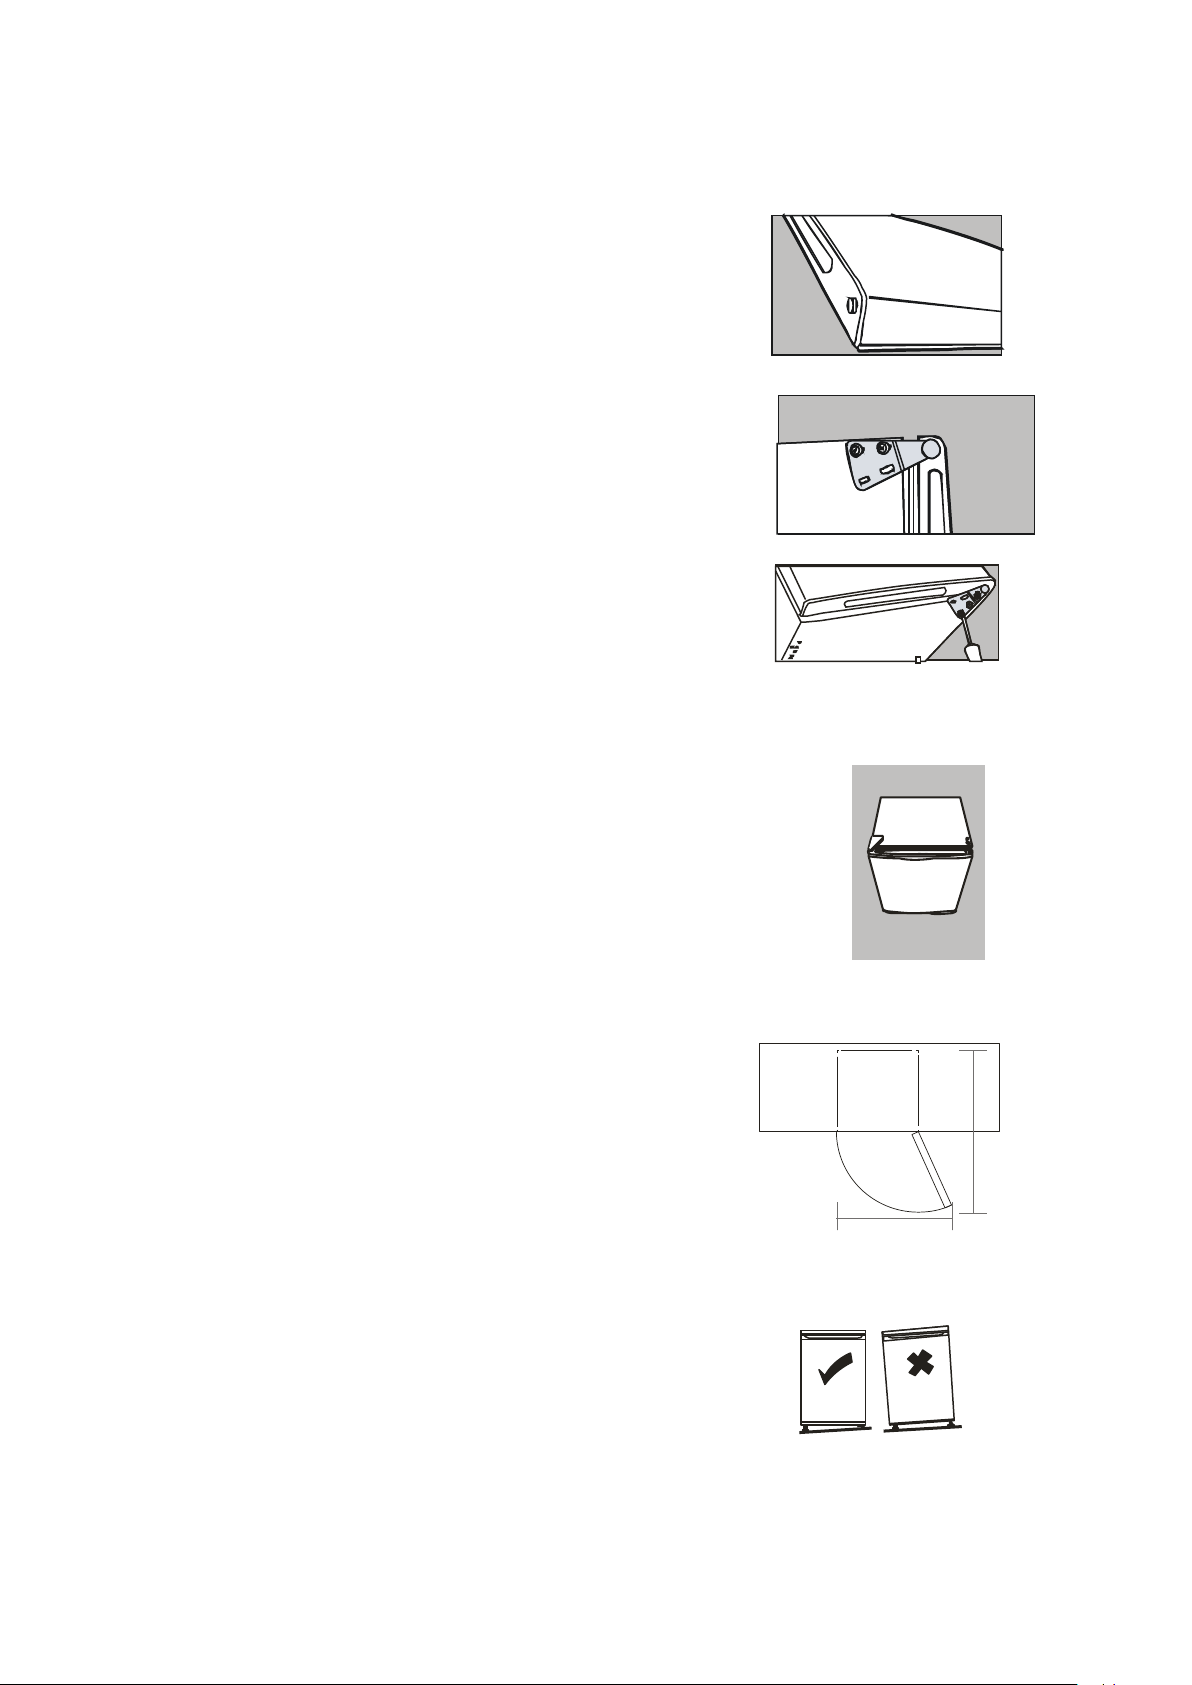
4) Slide the appliance door down about 15cm and off the
top hinge pin and li
away from the appliance.
5) Remove the two screws from top bracket and replace
on the other side. You will need to first remove the plas
c caps
from the other side.
6) Slide the appliance door back on to the Top hinge,
making sure
Screw the bo
om hinge into place on the new side.
Replace the other foot on the other side. Replace the
door hinge.
7) Check that the door is aligned horizontally and
ver
cally and that the seals are closed on all s
before finally
ghtening the bo om hinge.
ides
Re-adjust the leveling feet.
2.3 Door Space Requirements
The unit's door must be able to open fully as shown.
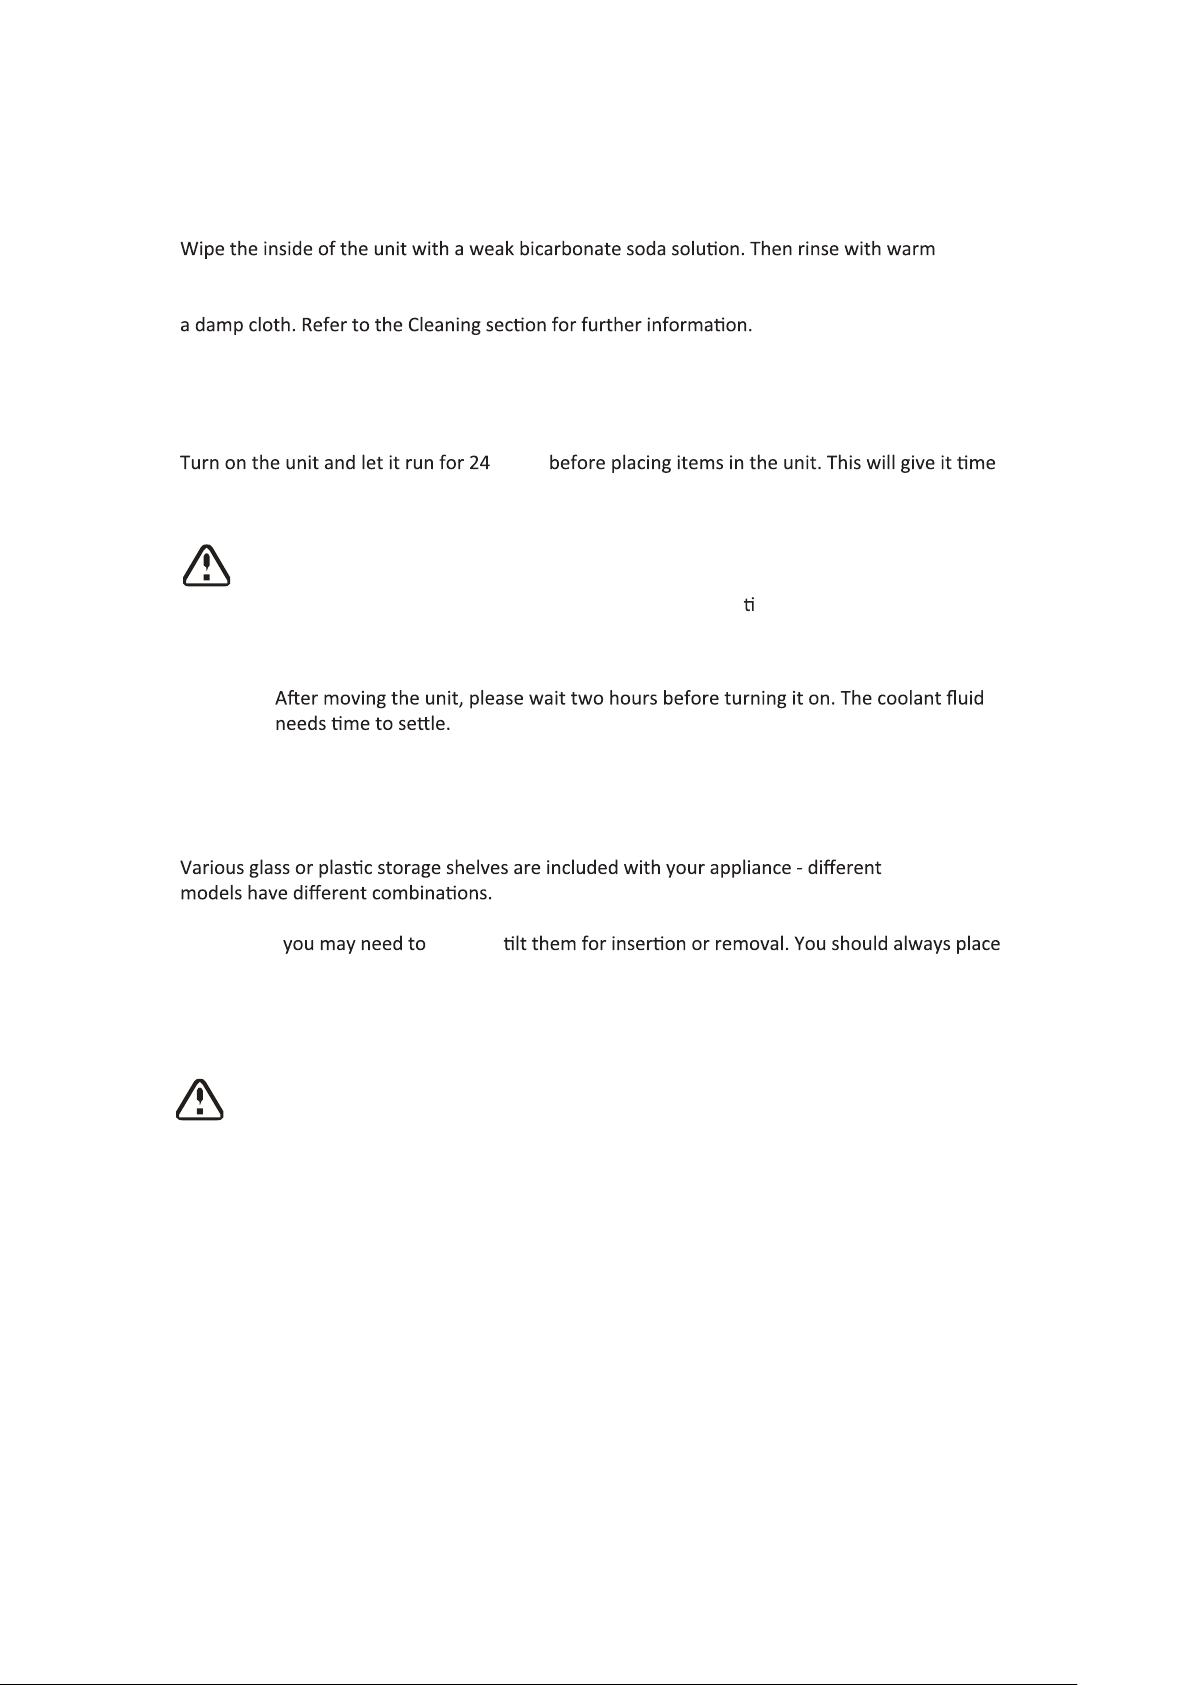
2.4 Leveling the Unit
To do this, adjust the two leveling feet at the front of the unit.
If the unit is not level, the door and magne
will not be covered properly.
c seal alignments
3
800
Page 6
2.5 Cleaning Before Use
water using a damp sponge or cloth. The shelves and salad bin can be washed with warm soapy
water, be sure they are completely dry before replacing. Clean the exterior of the unit with
2.6 Before Using Your Unit
hours
to reach the correct temperature and ensure that it is running properly. Do not overfill the unit
with items.
◆ Before Plugging in
You must check that you have a socket, which is compa
with the unit.
◆ Before Turning On!
ble with the plug supplied
2.7 Interior Accessories
Shelves can be inserted or removed by sliding them in or out of the different level slide guides.
Somemes slightly
the full size glass shelf directly above the bin.
User's can remove shelves or drawers, depending on their daily use needs, to maximize the
volume of the food and freezer compartments.
4
Page 7
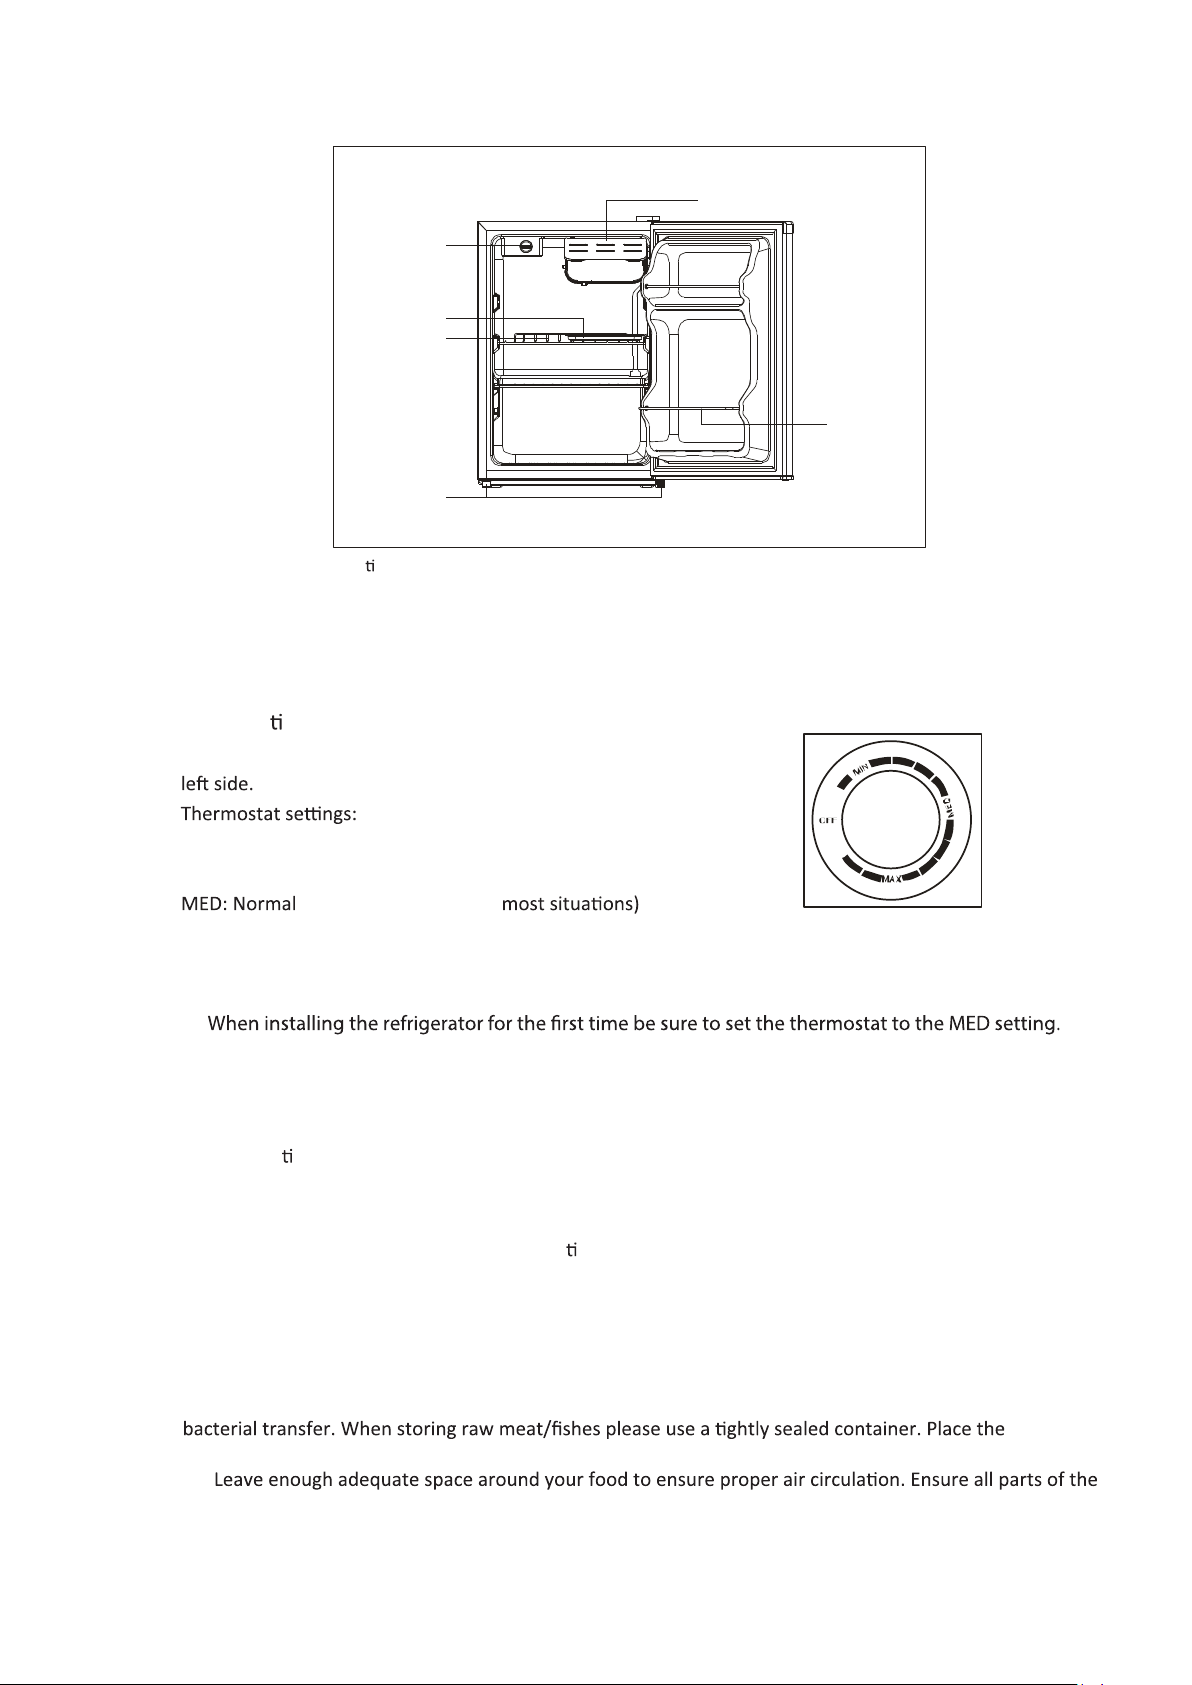
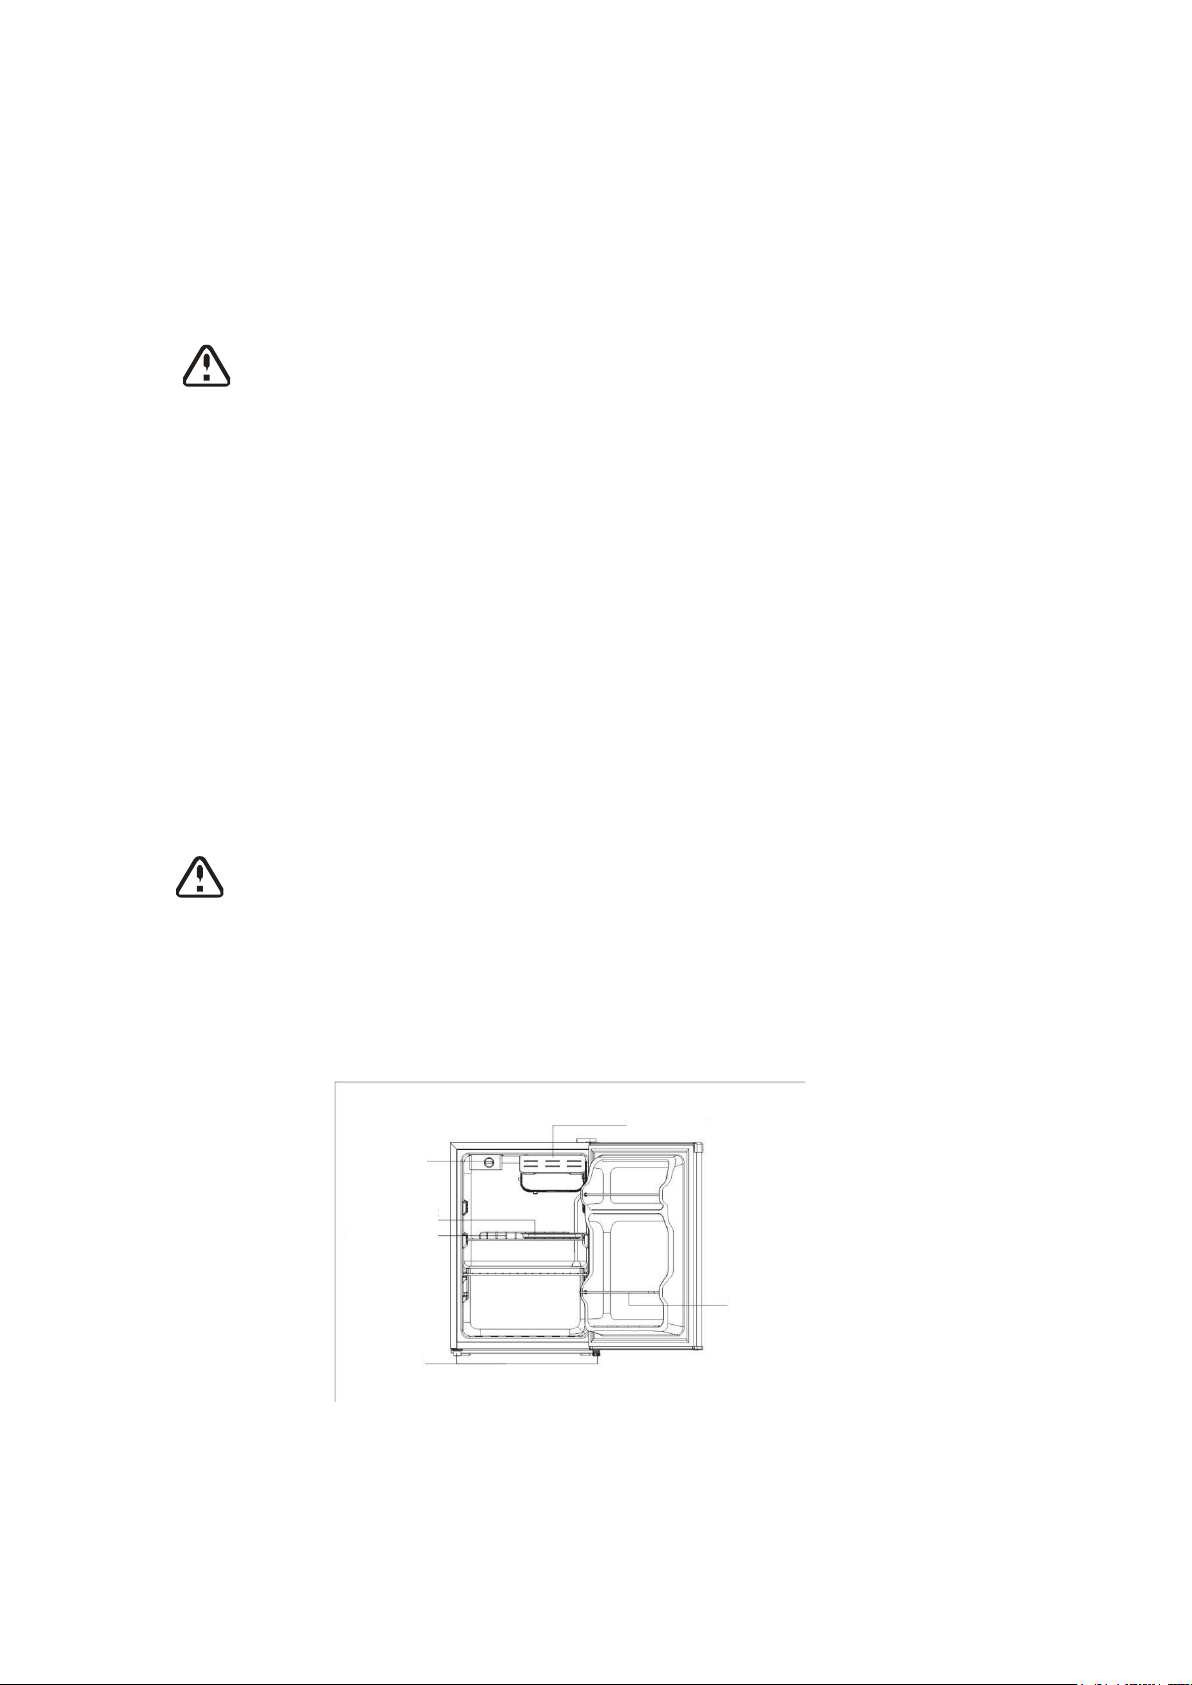
3. PRODUCT OVERVIEW
Small door
Thermostat
Pan dr
ain
Steel wire shelf
*All images in this instruc on manual are for explanatory purposes only, please refer to your individual unit for details.
,
Wi re steel bar
Leveling feet
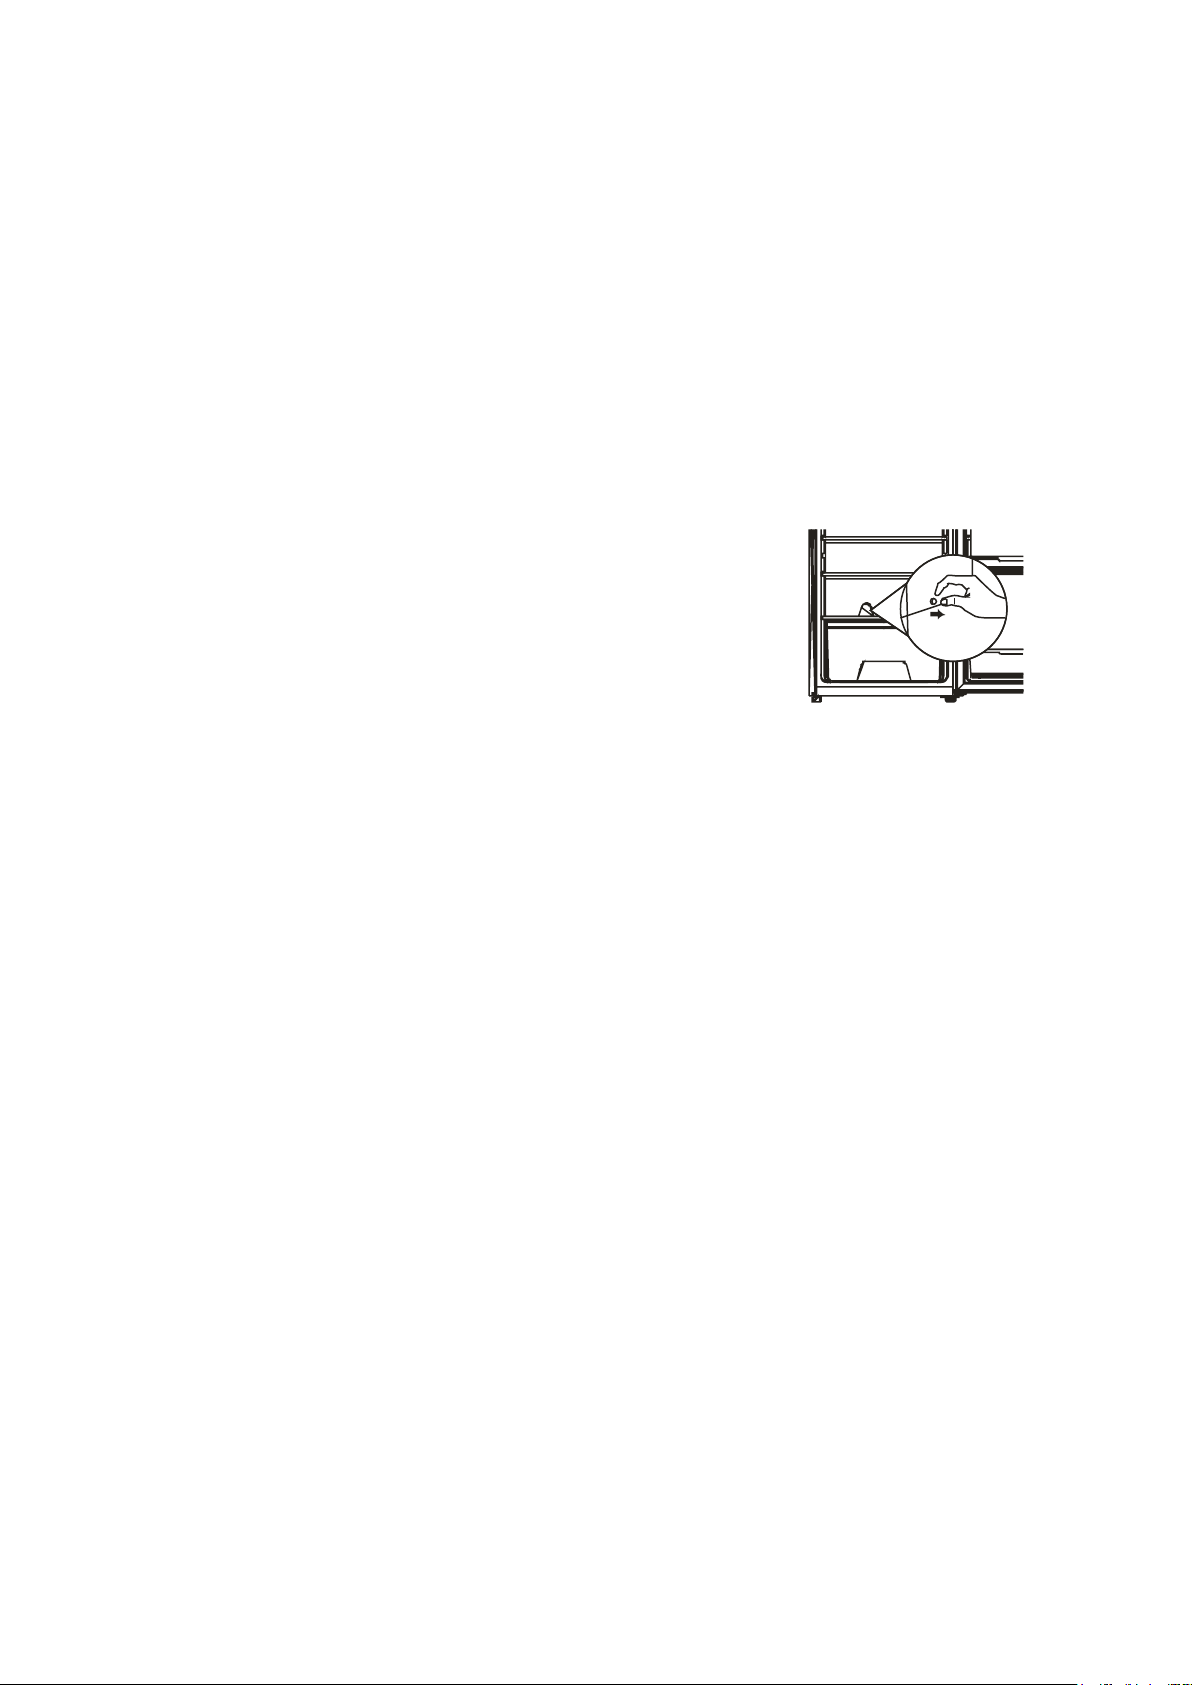
4. OPERATION
4.1 Adjus ng the Temperature
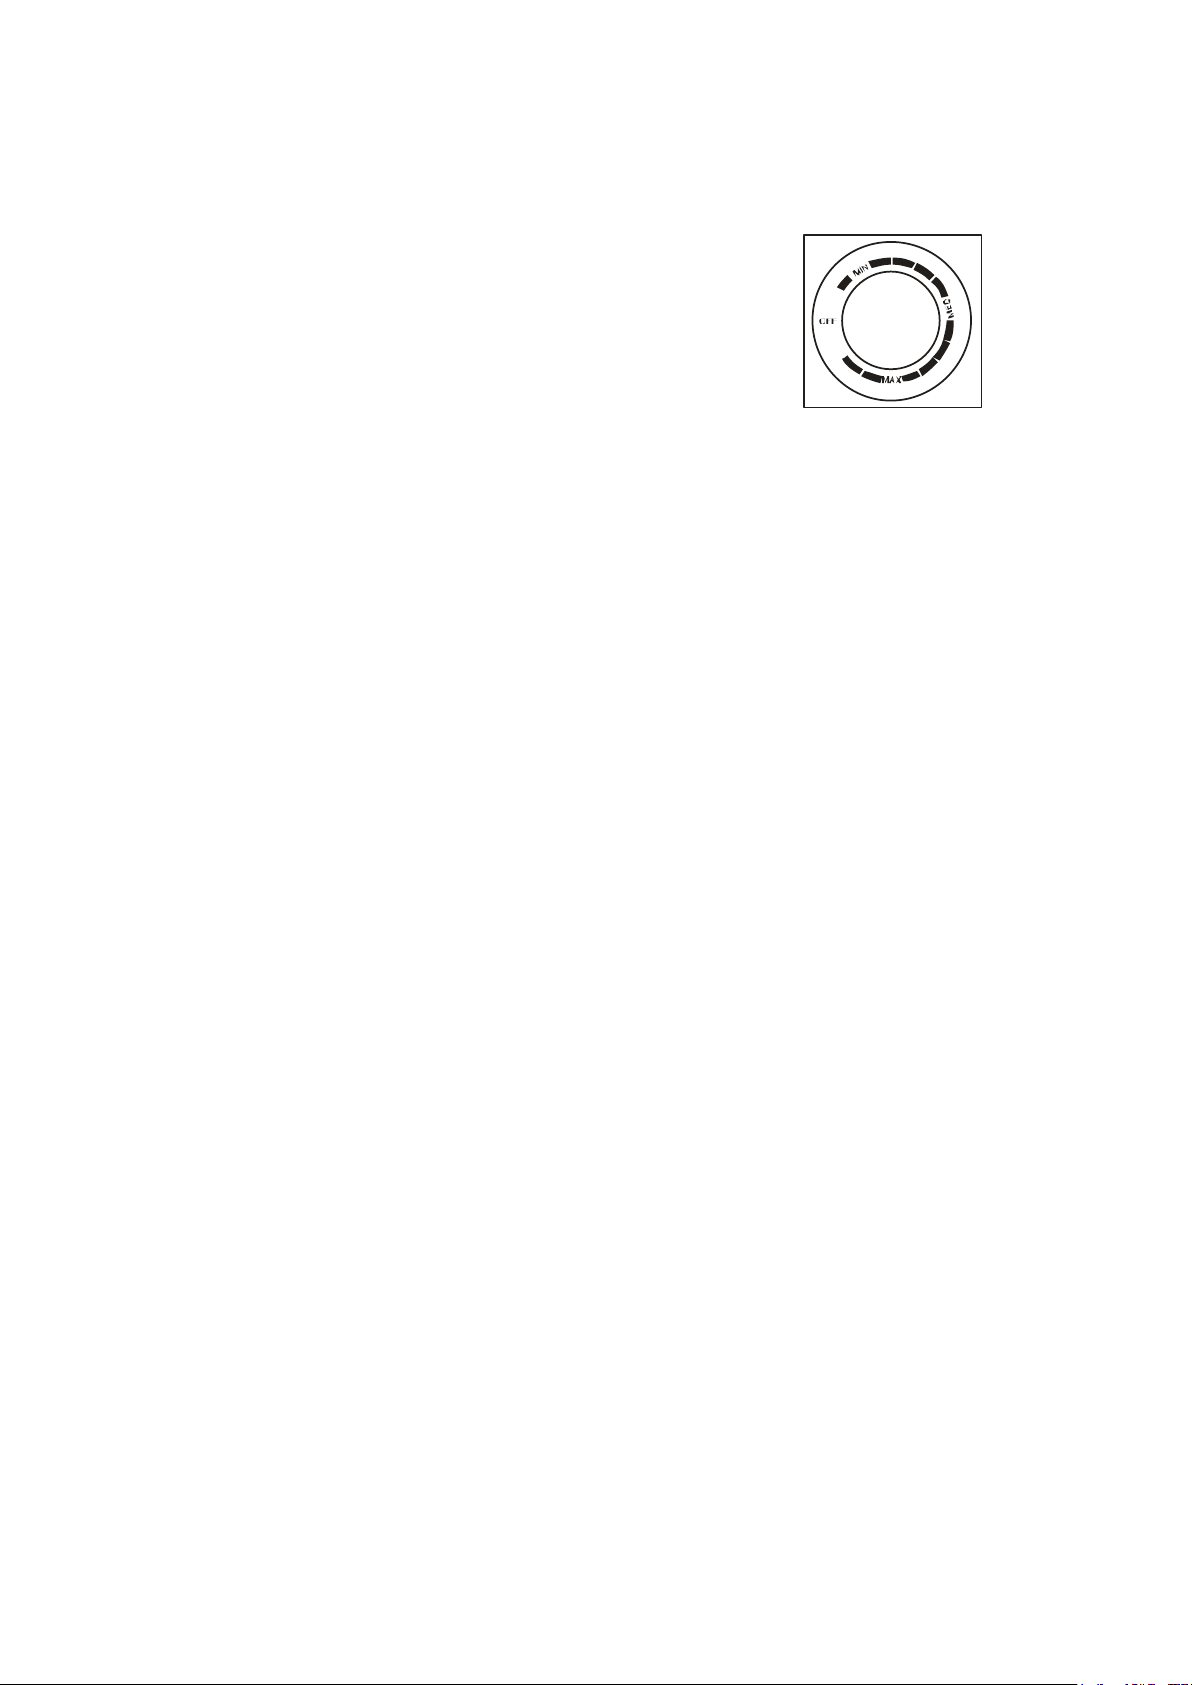
The thermostat is located in the interior of the refrigerator on the
◆
OFF: Cooling stops
MIN: Minimal cooling
cooling (adequate for
MAX: Maximal cooling
It may be necessary to set the thermostat to maximal cooling (MAX) when there are high
◆
ambient temperatures. During maximal cooling the compressor may run continuously.
◆
It is advised to wait 24 hours before placing items inside.
4.2 Noises Inside the Unit!
You may no ce that your unit makes some unusual noises. Most of these are perfectly normal,
but you should be aware of them!
The circulaon of the refrigerant liquid causes these noises in the cooling system.
become more pronounced since the introdu
affect the performance of your unit. This is the compressor motor working, as it pumps the
refrigerant around the system.
on of CFC free gases. This is not a fault and will not
c
4.3 Food Storage Tips
◆◆ Cooked meats/fishes should always be stored on a shelf above raw meats/fishes to avoid
container on the lowest shelf.
5
Page 8
unit are kept cool.
To keep foods flavorful and fresh store them in separate sealed containers. Fruits and vegetables
◆
do not need to be sealed. Fruit and vegetables do not need to be wrapped.
Always let cooked food cool down before placing them in the unit. This will help to maintain
◆
the internal temperature of the unit.
Avoid frequently opening the door to prevent the cool air from escaping. We recommend that
◆
you only open the door when you need to put food in or take food out.
5. CLEANING
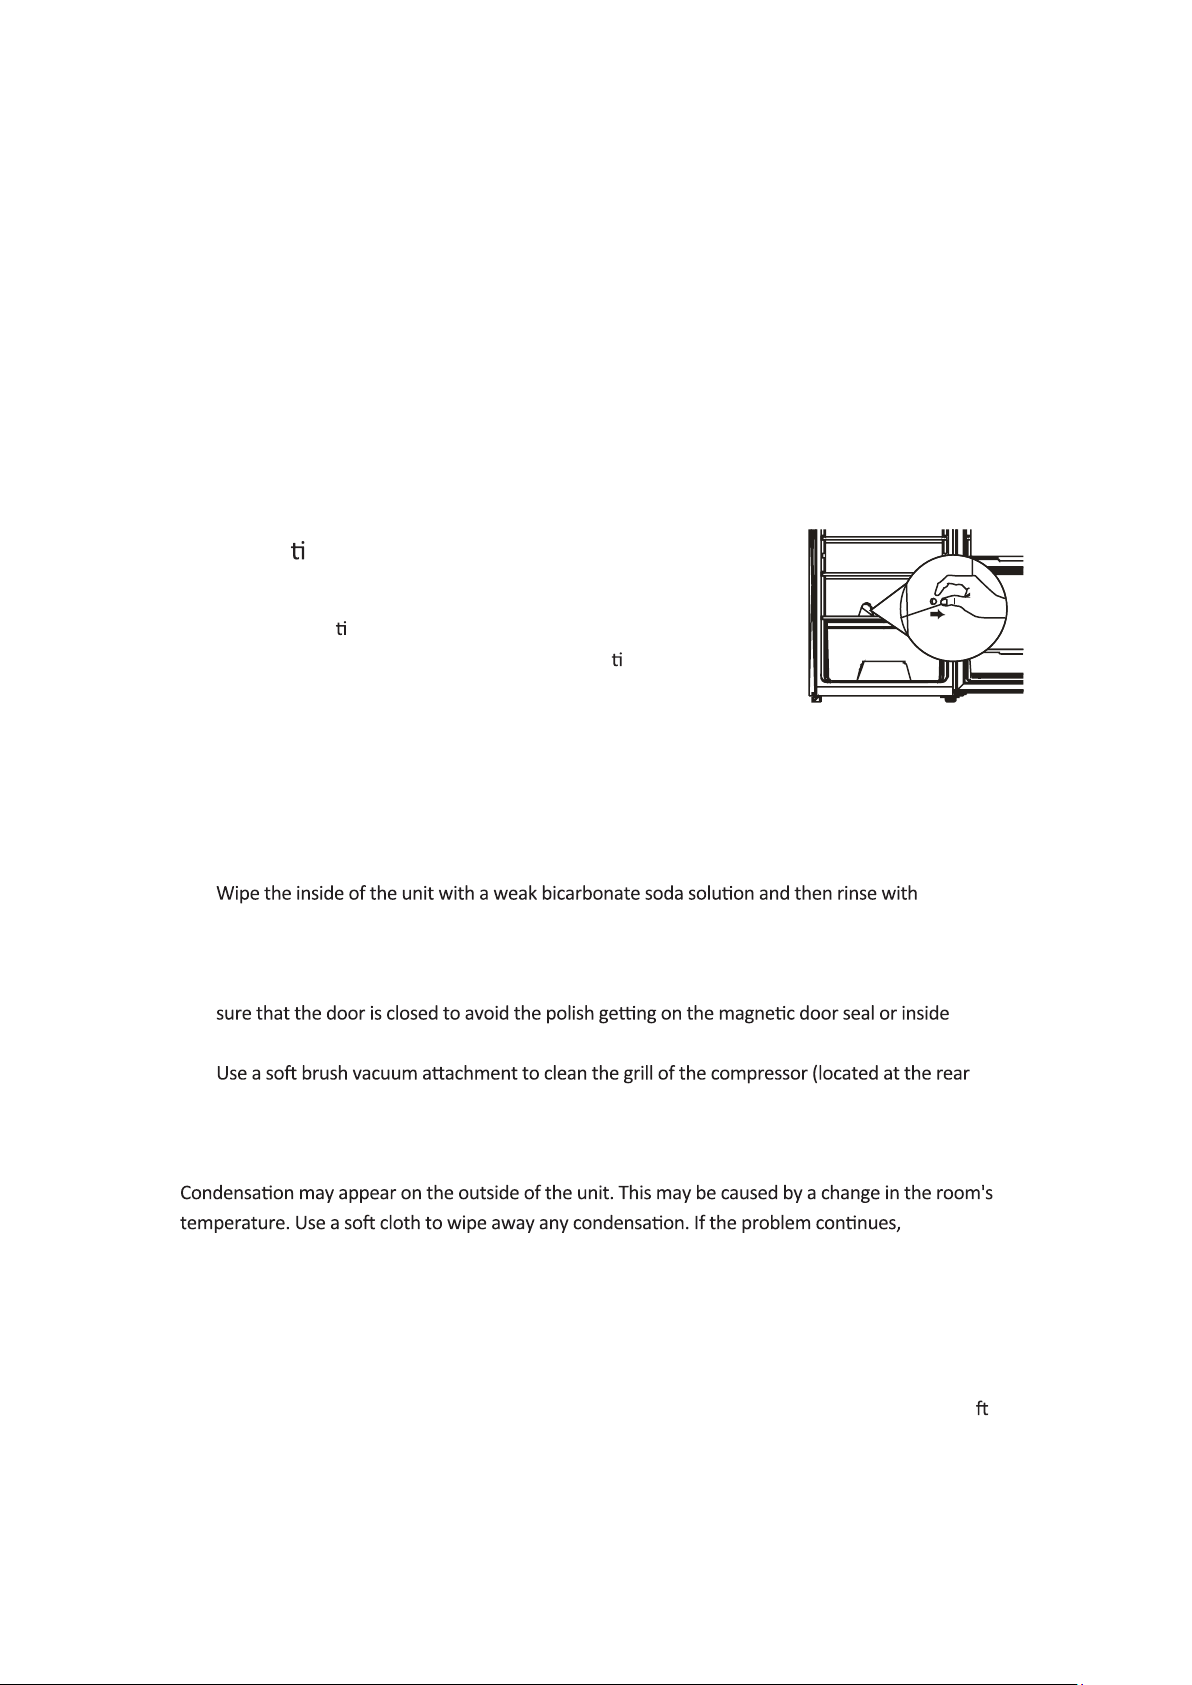
5.1 Defros ng
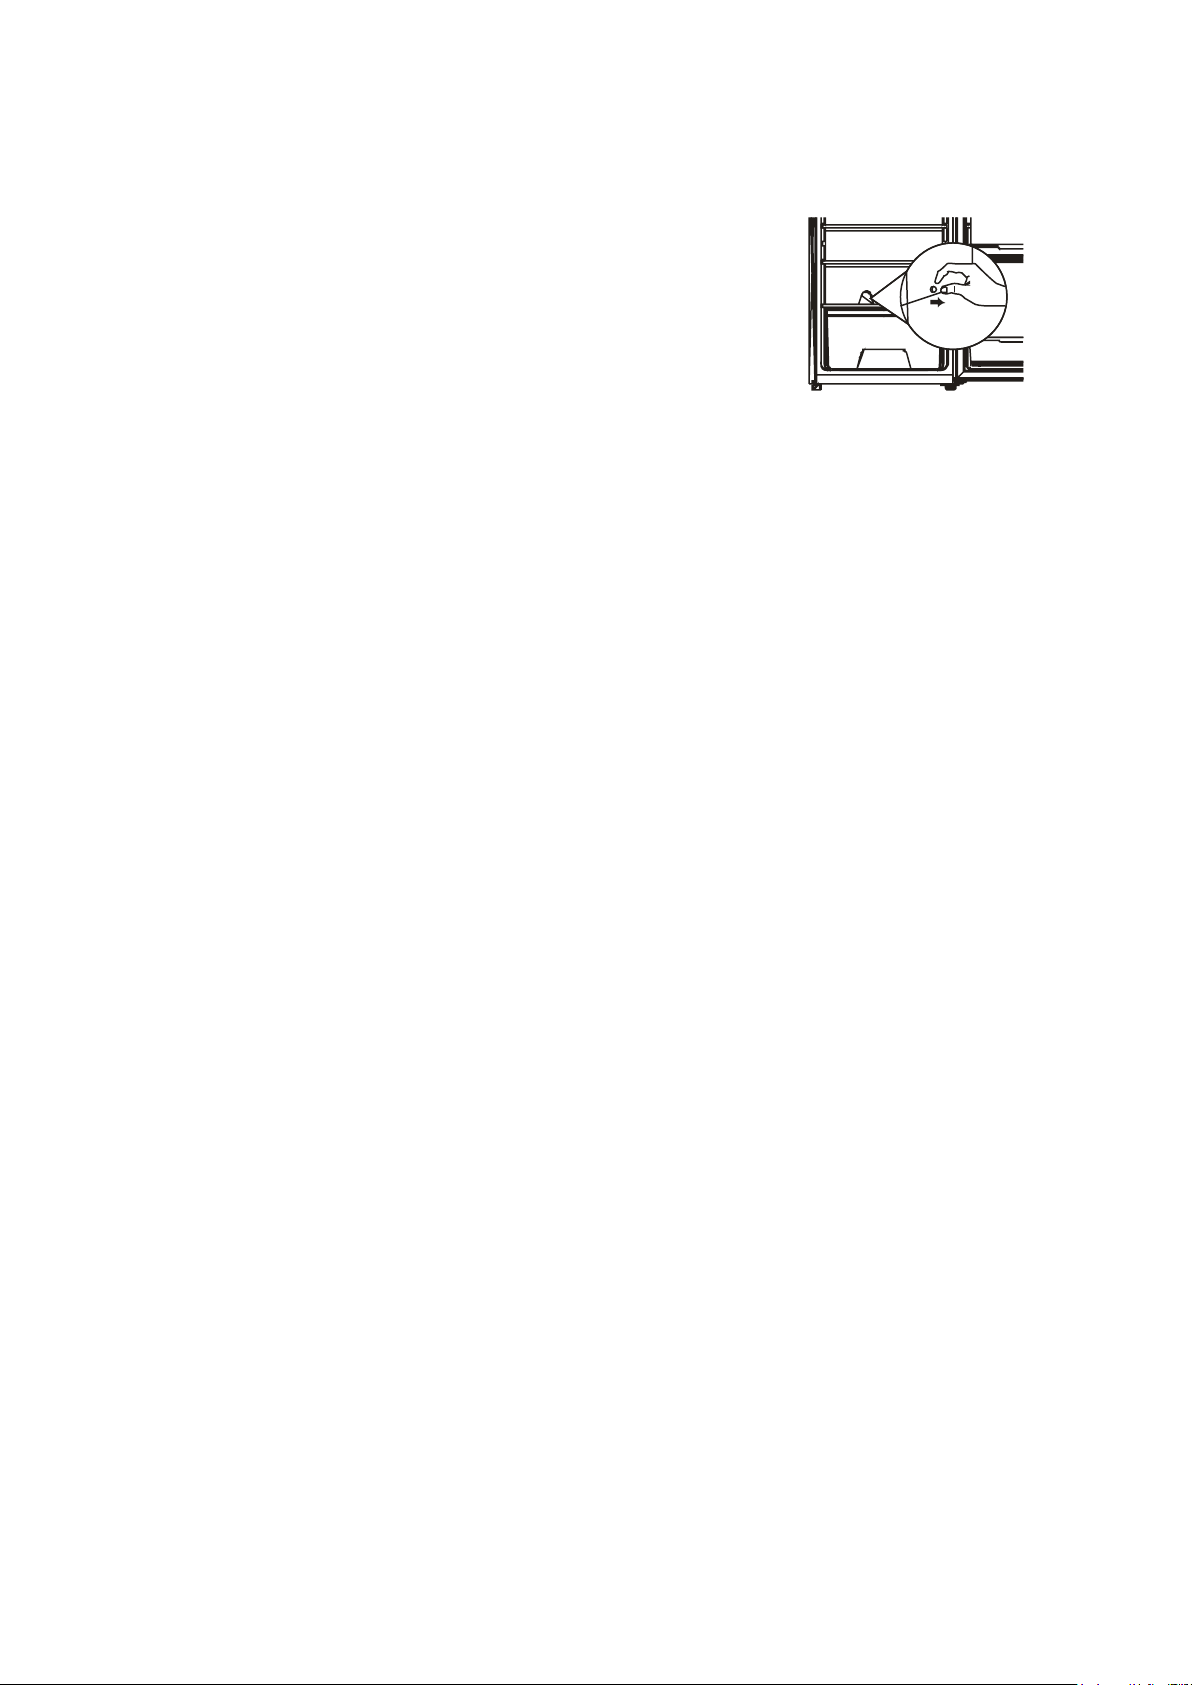
Frost may accumulate on the inner rear surface of the appliance
which will automa
Water is channeled via the drain hole to the collec
compressor where it will evaporate.
Please ensure the drain hole is checked and cleaned on a regular basis
so water can exit the storage compartment.
cally defrost during the of cycle of the compressor.
on tray above the
5.2 Cleaning the Interior and the Exterior of the Unit
Remove all the shelves and the salad bin. To remove the salad bin, first remove the lower
◆
door shelf.
◆
warm water using a damp sponge or cloth. Make sure the shelves and salad bin are completely
dry before replacing them.
Use a damp cloth to clean the exterior, and then wipe with a standard furniture polish. Make
◆
the unit.
◆
of the unit).
5.3 Cleaning Tips
please contact a qualified technician for assistance.
6. MAINTENANCE
6.1 Care When Handling / Moving Your Unit
Hold the unit around its sides or base when moving it. Under no circumstances should it be li ed
by holding the edges of the top surface.
6.2 Servicing
An authorized engineer should service the unit and only genuine spare parts should be
6
Page 9
technician.
It is normal
shine
6.3 Turning the Unit Off for Extended Periods of Time
Disconnect the unit from the power outlet. Remove all the items and clean the unit. Be sure to
leave the door ajar to prevent unpleasant odors.
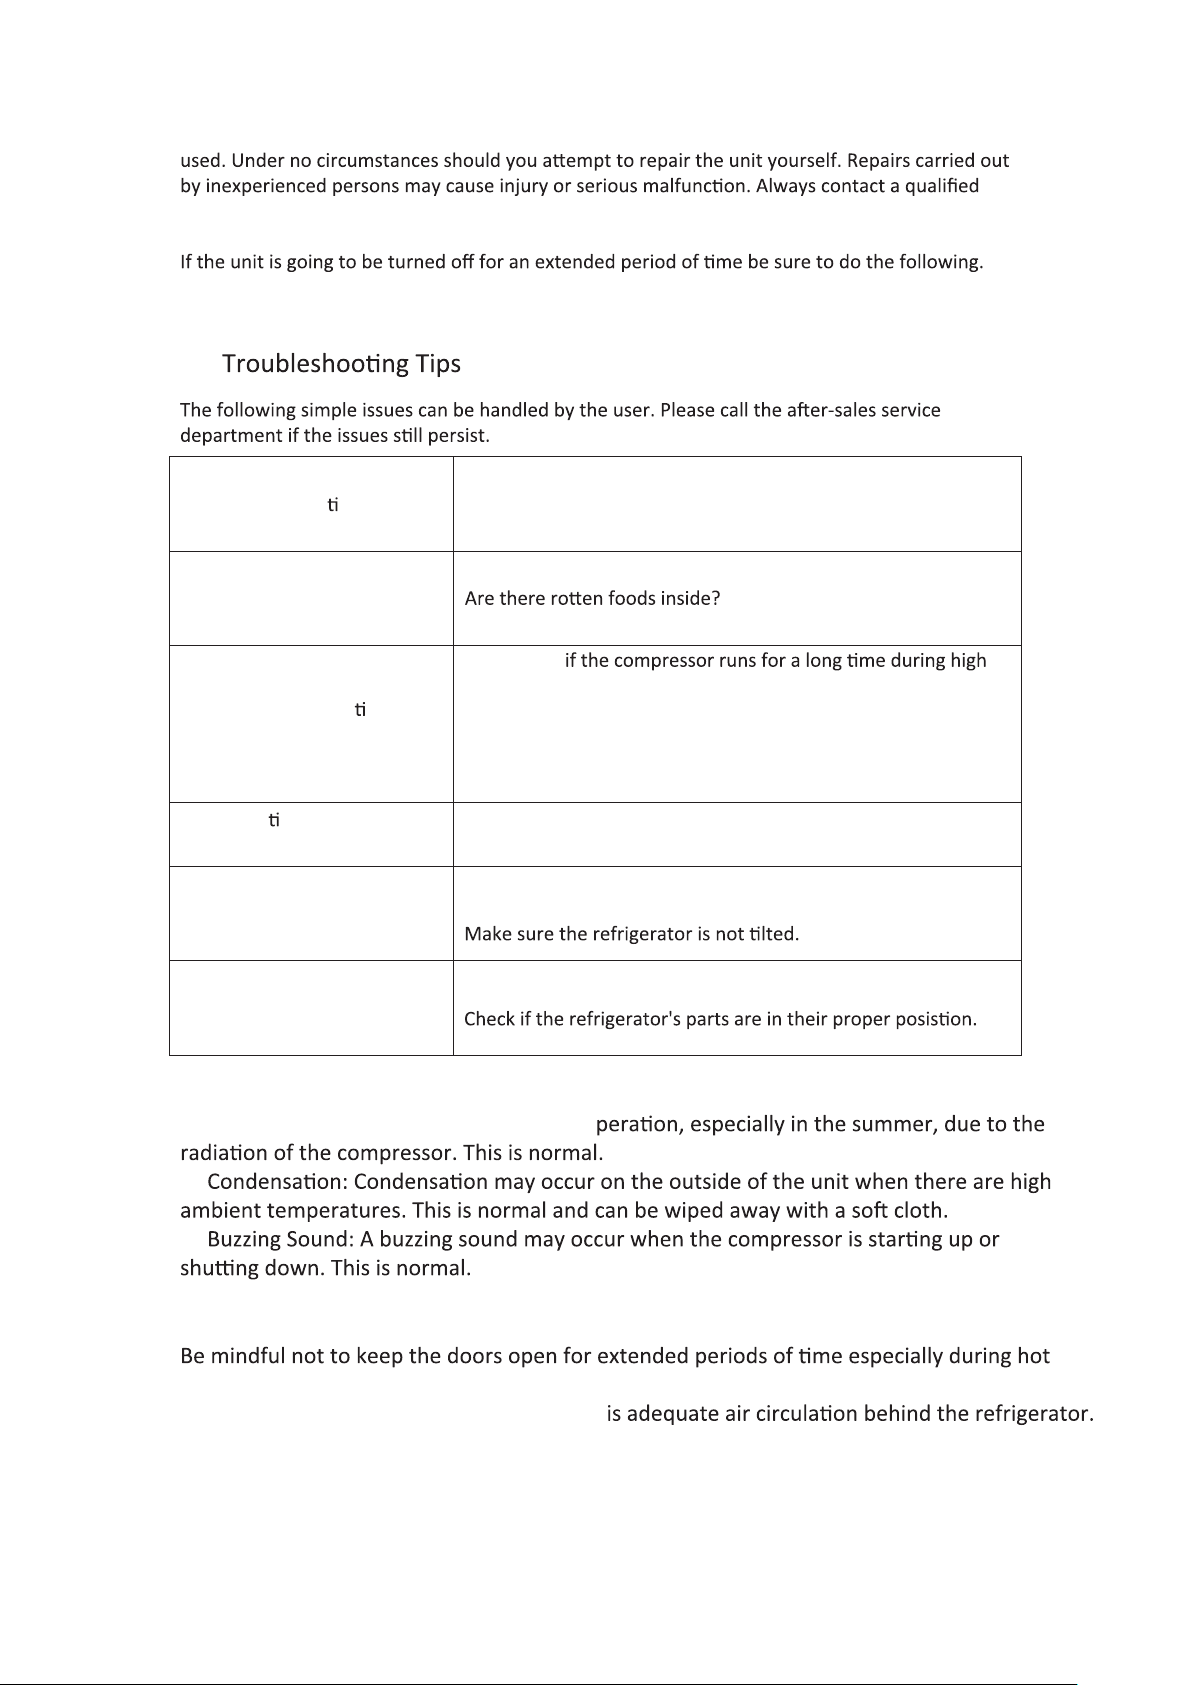
7.
Inopera
Long-term opera on of
compressor
Illumina ng light does not
on
Odor
Is there electrical current being supplied to the outlet?
Is the outlet equipped to handle the required voltage?
Has the fuse burnt out on the circuit breaker?
Are foods stored in sealed containers?
Does the interior need to be cleaned?
ambient temperatures.
Avoid overfilling the refrigerator.
Wait for hot foods to cool before placing them in the
refrigerator.
Avoid frequently opening the refrigerator dorr.
Make sure the refrigerator is plugged in.
Check to see if the light is damaged.
The refrigerator door can not
be properly closed.
Loud noises
7.1 Notes:
The refrigerator may emit heat during o
◆
◆
◆
Make sure food items are not blocking the door.
Make sure the refrigerator is not overfilled.
Make sure the refrigerator is level and balanced.
8. Energy Saving Tips
and humid weather.
Remember to occasionally check that there
7
Page 10
Allow freshly cooked hot foods to come to an ambient temperature before placing them in the
refrigerator.
consumpon
Be sure the wall behind the refrigerator remains dirt and dust free, especially for units equipped
with an outer condenser.
energy
◆ The appliance should be placed in the coolest area of the room. Avoid placing in direct sunlight
◆ Avoid overfilling the refrigerator as it forces the compressor to run more than needed.
◆ Be sure to store foods in dry, sealed containers.
This cuts down on frost build-up inside the appliance.
◆ The salad bin should not be lined with aluminum foil, wax paper, or paper towels.
◆
Try to remove all the items you need with one door opening.
frequently
9. DISPOSAL
materials used in refrigerators require special disposal procedures. Consult your local council office
When disposing of an old unit, break off any old locks or latches and remove the door as a safeguard.
9.1 Correct Disposal of this product
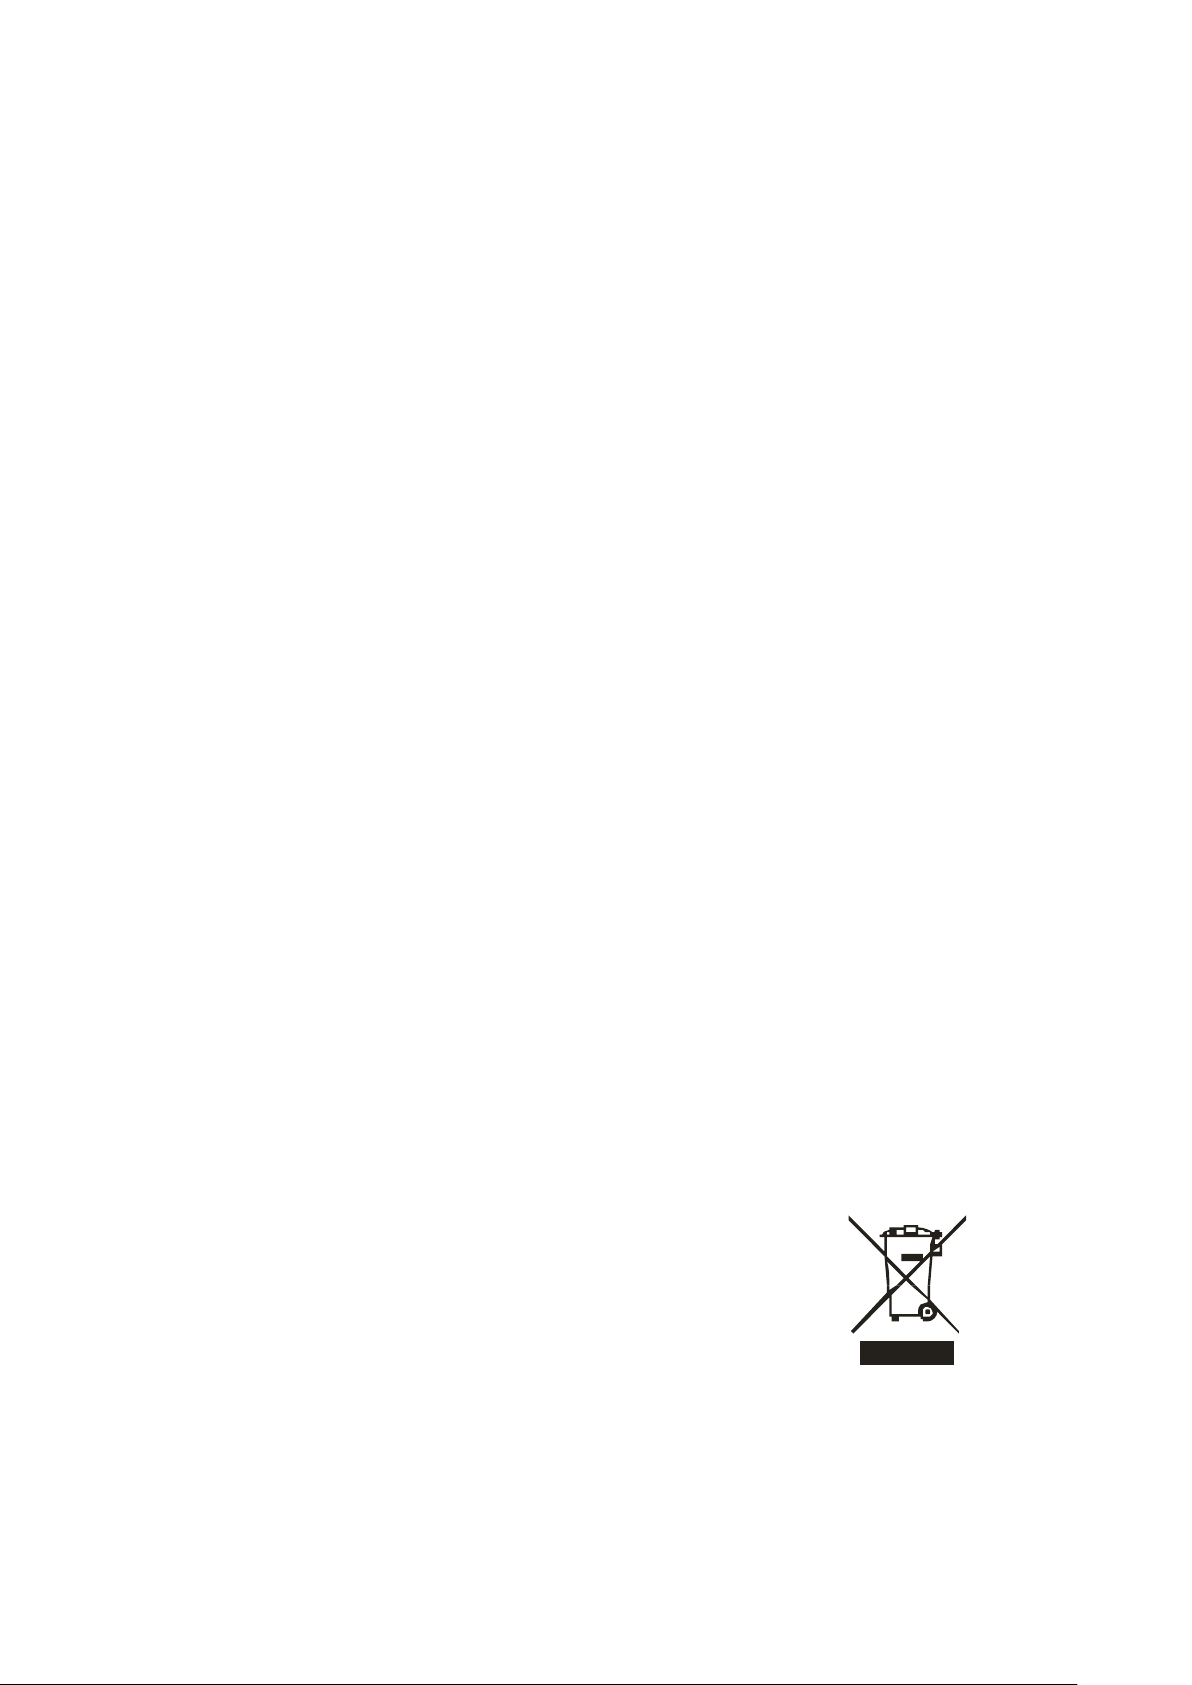
This marking indicates that this product should not be disposed with
other household wastes throughout the EU. To prevent possible
harm to the environment or human health from uncontrolled
waste disposal, recycle it responsibly to promote the sustainable
reuse of material resources. To return your used device, please use
the return and collec
pro
duct was purchased. They can take this product for environmental
safe recycling.
For more informa
the product.
on systems or contact the retailer where the
on, please contact your local authority or the retailer where you purchased
8
Page 11
in
5
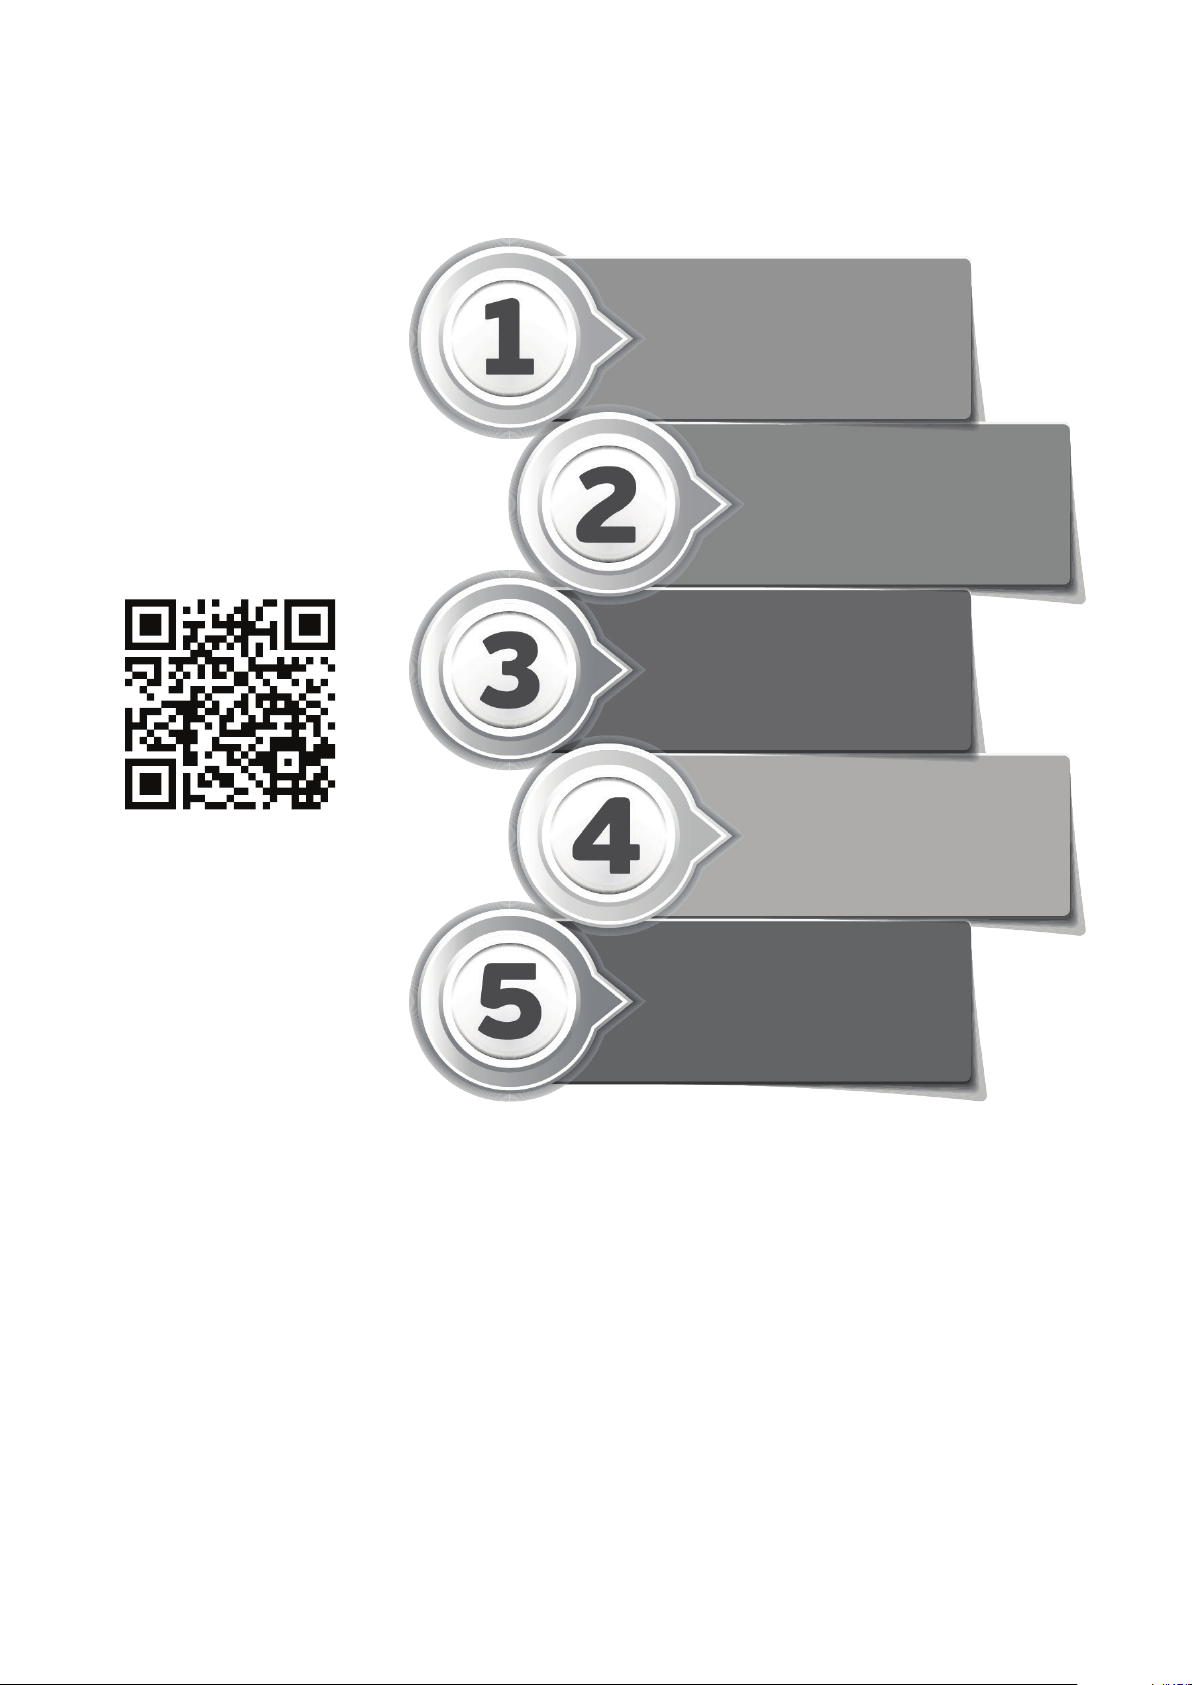
Activate your warranty.....
Connect to the following link
https://www.inventorappliances.com/
warranty-card
simple
steps!
Scan here for the
warranty form
Select the product type
(airconditioner or appliance) for
which the warranty will be activated
Choose the warranty that
corresponds to your product
purchase
Fill in the required information
(owner, retailer and appliance)
and press send
You will receive a confirmation
e-mail for the activation of
your warranty
For the electronic
warranty submission
please use the following link
https://www.
inventorappliances.com/
warranty-card
Page 12

Περιεχόμενα
1. ΟΔΗΓΙΕΣ ΑΣΦΑΛΕΙΑΣ.................................................................................................
2. ΕΓΚΑΤΑΣΤΑΣΗ............................................................................................................
2.1 Τοποθεσία.......................................................................................................
2.2 Αλλαγή φοράς πόρτας....................................................................................
2.3 Εγκατάσταση..................................................................................................
2.4 Ευθυγράμμιση της συσκευής..........................................................................
2.5 Καθαρισμός πριν τη χρήση.............................................................................
2.6 Πριν χρησιμοποιήσετε το ψυγείο....................................................................
2.7 Εσωτερικά εξαρτήματα...................................................................................
3. ΠΕΡΙΓΡΑΦΗ ΣΥΣΚΕΥΗΣ.............................................................................................
4. ΧΡΗΣΗ..........................................................................................................................
4.1 Ρυθμιση της θερμοκρασίας.............................................................................
4.2 Θόρυβος μέσα στη συσκευή...........................................................................
4.3 Συμβουλές για την σωστή διατήρηση των τροφίμων......................................
5. ΚΑΘΑΡΙΣΜΟΣ..............................................................................................................
1
2
2
2
3
3
3
4
4
4
5
5
5
5
6
5.1 Απόψυξη.........................................................................................................
5.2 Εσωτερικός και εξωτερικός καθαρισμός της συσκευής...................................
5.3 Συμβουλές για σωστό καθαρισμό...................................................................
6. ΣΥΝΤΗΡΗΣΗ................................................................................................................
6.1 Φροντίδα κατά τη χρήση/μετακίνηση της συσκευής........................................
6.2 Επισκευή.........................................................................................................
6.3 Μη χρήση της συσκευής για μεγάλο χρονικό διάστημα..................................
7. ΠΡΟΒΛΗΜΑΤΑ ΚΑΙ ΑΝΤΙΜΕΤΩΠΙΣΗ..........................................................................
7.1 Συμβουλές.......................................................................................................
8. ΣΥΜΒΟΥΛΕΣ ΓΙΑ ΕΞΟΙΚΟΝΟΜΗΣΗ ΕΝΕΡΓΕΙΑΣ......................................................
9. ΑΠΟΡΡΙΨΗ...................................................................................................................
9.1 Σωστή απόρριψη του προϊόντος.....................................................................
6
6
6
6
6
6
6
7
7
7
8
8
Page 13
1. ΟΔΗΓΙΕΣ ΑΣΦΑΛΕΙΑΣ
1) ΠΡΟΕΙΔΟΠΟΙΗΣΗ - Αφήστε αρκετά ανοίγματα για τον σωστό εξαερισμό της συσκευής.
2) ΠΡΟΕΙΔΟΠΟΙΗΣΗ - Μην χρησιμοποιείτε μηχανικές διατάξεις ή άλλα μέσα για να
Μην χρησιμοποιείτε ηλεκτρικές συσκευές στο εσωτερικό του
επιταχύνετε την διαδικασία απόψυξης του ψυγείου, εκτός αυτών που προτείνονται από τον
κατασκευαστή του.
3) ΠΡΟΕΙΔΟΠΟΙΗΣΗ - Μην προκαλείτε αλλοιώσεις στο κύκλωμα ψύξης.
4) ΠΡΟΕΙΔΟΠΟΙΗΣΗ - Μην χρησιμοποιείτε ηλεκτρικές συσκευές στο εσωτερικό του
θαλάμου ψύξης, εκτός και αν αυτές προτείνονται από τον κατασκευαστή.
5) Πριν προχωρήσετε στην συντήρηση της συσκευής, αποσυνδέστε την από το ρεύμα.
6) Αυτή η συσκευή μπορεί να χρησιμοποιηθεί από παιδιά ηλικίας 8 ετών και άνω και από άτομα
με μειωμένη κινητική, νοητική ή ικανότητα, ή χωρίς την απαραίτητη εμπειρία και γνώση,
εάν βρίσκονται υπό επίβλεψη ή εάν τους έχουν δοθεί οδηγίες για την ασφαλή χρήση της
συσκευής και έχουν κατανοήσει τους πιθανούς κινδύνους. Τα παιδιά δεν πρέπει να παίζουν με
τη συσκευή. Ο καθαρισμός και η συντήρηση της συσκευής δεν πρέπει να εκτελούνται από
παιδιά χωρίς την απαραίτητη επίβλεψη.
7) Για την αποφυγή κινδύνου, σε περίπτωση που το καλώδιο τροφοδοσίας ρεύματος υποστεί
ζημία, θα πρέπει να αντικατασταθεί άμεσα, από τον κατασκευαστή ή το επίσημο κέντρο
τεχνικής εξυπηρέτησης πελατών ή από σχετικό ειδικευμένο τεχνικό.
8) Κατά την απόρριψη της συσκευής, ακολουθήστε την ισχύουσα νομοθεσία. Η συσκευή
περιέχει εύφλεκτο ψυκτικό μέσο και προωθητικό αέριο.
9) Πριν την απόρριψη της συσκευής, αφαιρέστε την πόρτα από την συσκευή, για την αποφυγή
πιθανού εγκλεισμού παιδιού μέσα σε αυτή.
10) Η συσκευή προορίζεται για οικιακή χρήση ή παρόμοια χρήση όπως παρακάτω:
– κουζίνες προσωπικού σε καταστήματα, γραφεία και παραμφερείς επαγγελματικούς χώρους.
– αγροκτήματα και από πελάτες σε ξενοδοχεία, πανδοχεία και λοιπά τουριστικά καταλύματα.
– σε χώρους που προσφέρουν υπηρεσίες ύπνου και πρωινού.
– Σε τροφοδοσίες και παρόμοιες εφαρμογές που δεν έχουν αντικείμενο την λιανική πώληση.
11) Μην αποθηκεύετε μέσα στη συσκευή εκρηκτικές ύλες με εύφλεκτα προωθητικά αέρια (π.χ.
σπρέι).
ΟΠΟΙΑΔΗΠΟΤΕ ΕΠΙΣΚΕΥΗ ΤΗΣ ΣΥΣΚΕΥΗΣ ΠΟΥ ΑΠΑΙΤΕΙ ΑΦΑΙΡΕΣΗ ΚΑΛΥΜΜΑΤΩΝ
ΠΡΕΠΕΙ ΝΑ ΕΚΤΕΛΕΙΤΑΙ ΑΠΌ ΕΞΟΥΣΙΟΔΟΤΗΜΕΝΟ ΤΕΧΝΙΚΟ ΠΡΟΣΩΠΙΚΟ.
ΜΗΝ ΕΠΙΧΕΙΡΗΣΕΤΕ ΝΑ ΕΠΙΣΚΕΥΑΣΕΤΕ ΜΟΝΟΙ ΣΑΣ ΤΗ ΣΥΣΚΕΥΗ. ΥΠΑΡΧΕΙ ΣΟΒΑΡΟΣ
ΚΙΝΔΥΝΟΣ ΗΛΕΚΤΡΟΠΛΗΞΙΑΣ.
1
Page 14
2. ΕΓΚΑΤΑΣΤΑΣΗ
2.1 Τοποθεσία
Επιλέξτε ένα χώρο καλά αεριζόμενο με σταθερό και σκληρό πάτωμα. Μην τοποθετείτε τη
συσκευή δίπλα σε πηγές θερμότητας όπως φούρνους, καυστήρες και καλοριφέρ. Μην εκθέτετε
τη συσκευή απευθείας σε ηλιακό φως. Πολύ χαμηλή εξωτερική θερμοκρασία μπορεί να
προκαλέσει δυσλειτουργία της συσκευής. Η συσκευή δεν είναι κατάλληλη για χρήση σε
εξωτερικούς χώρους, γκαράζ κτλ. Μην σκεπάζετε τη συσκευή με κάποιο κάλυμα.
Κατά την εγκατάσταση της συσκευής, αφήστε ελεύθερο χώρο 40 cm και από τις 2 πλευρές, 15cm
από το πίσω μέρος και 20cm από το πάνω. Αυτό θα επιτρέψει τον ψυχρό αέρα να κυκλοφορεί
γύρω από τη συσκευή και θα βελτιώσει την απόδοση της ψύξης. Η πόρτα μπορεί να ανοίγει
προς τα αριστερά ή προς τα δεξιά. Βεβιαωθείτε ότι υπάρχει αρκετός ελεύθερος χώρος ώστε η
πόρτα να μπορεί να ανοίγει επαρκώς.
2.2 Αλλαγή φοράς πόρτας
Απαραίτητα εργαλεία: Σταυροκατσάβιδο / Ίσιο κατσαβίδι / Γερμανικό κλειδί
• Είναι προτιμότερο να καλέσετε έναν ειδικευμένο τεχνικό για την αλλαγή. Προχωρήστε
στην διαδικασία μόνοι σας, μόνο σε περίπτωση που πραγματικά πιστεύετε ότι
μπορείτε να τα καταφέρετε σωστά.
• Βεβαιωθείτε ότι η συσκευή είναι αποσυνδεμένη από το ρεύμα και άδεια.
• Ρυθμίστε τα ρυθμιζόμενα πόδια στο μέγιστο ύψος.
• Για να βγάλετε τη πόρτα θα πρέπει να γείρετε το ψυγείο προς τα πίσω. Βεβαιωθείτε
ότι το ψυγείο είναι σε σταθερό πάτωμα για να μην γλυστρίσει.
• Συγκεντρώστε ό,τι ανταλλακτικό αφαιρείτε για την επανεγκατάσταση της πόρτας.
• Μην γείρετε τη συσκευή πλήρως. Μπορεί να προκληθεί βλάβη στο σύστημα ψύξης.
• Είναι προτιμότερο να έχετε ένα άτομο για να σας βοηθήσει κατά την διαδικασία.
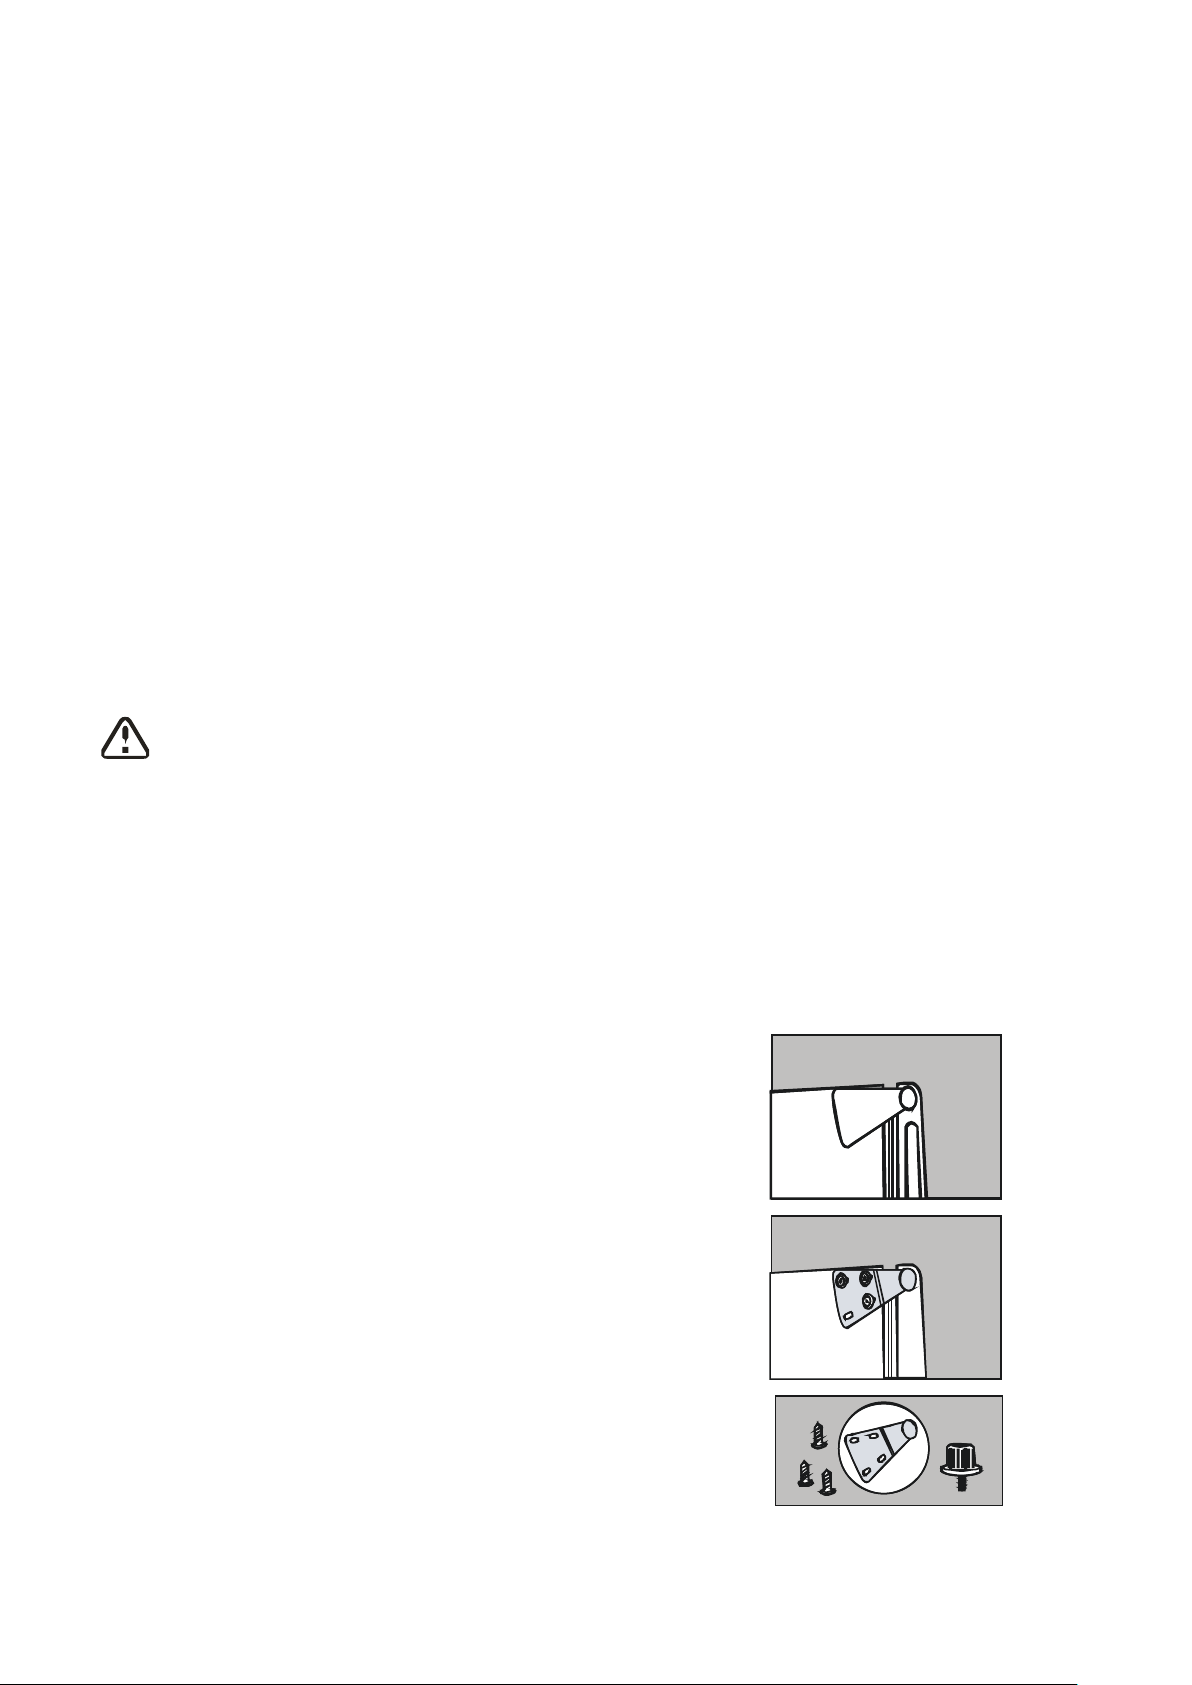
1) Αφαιρέστε το πλαστικό κάλυμα του μεντεσέ.
2) Ξεβιδώστε τις τρεις βίδες από τον κάτω βραχίονα. Αφαιρέστε
τη πόρτα από την αντίθετη πλευρά.
3) Τοποθετήστε στην μία πλευρά.
2
Page 15
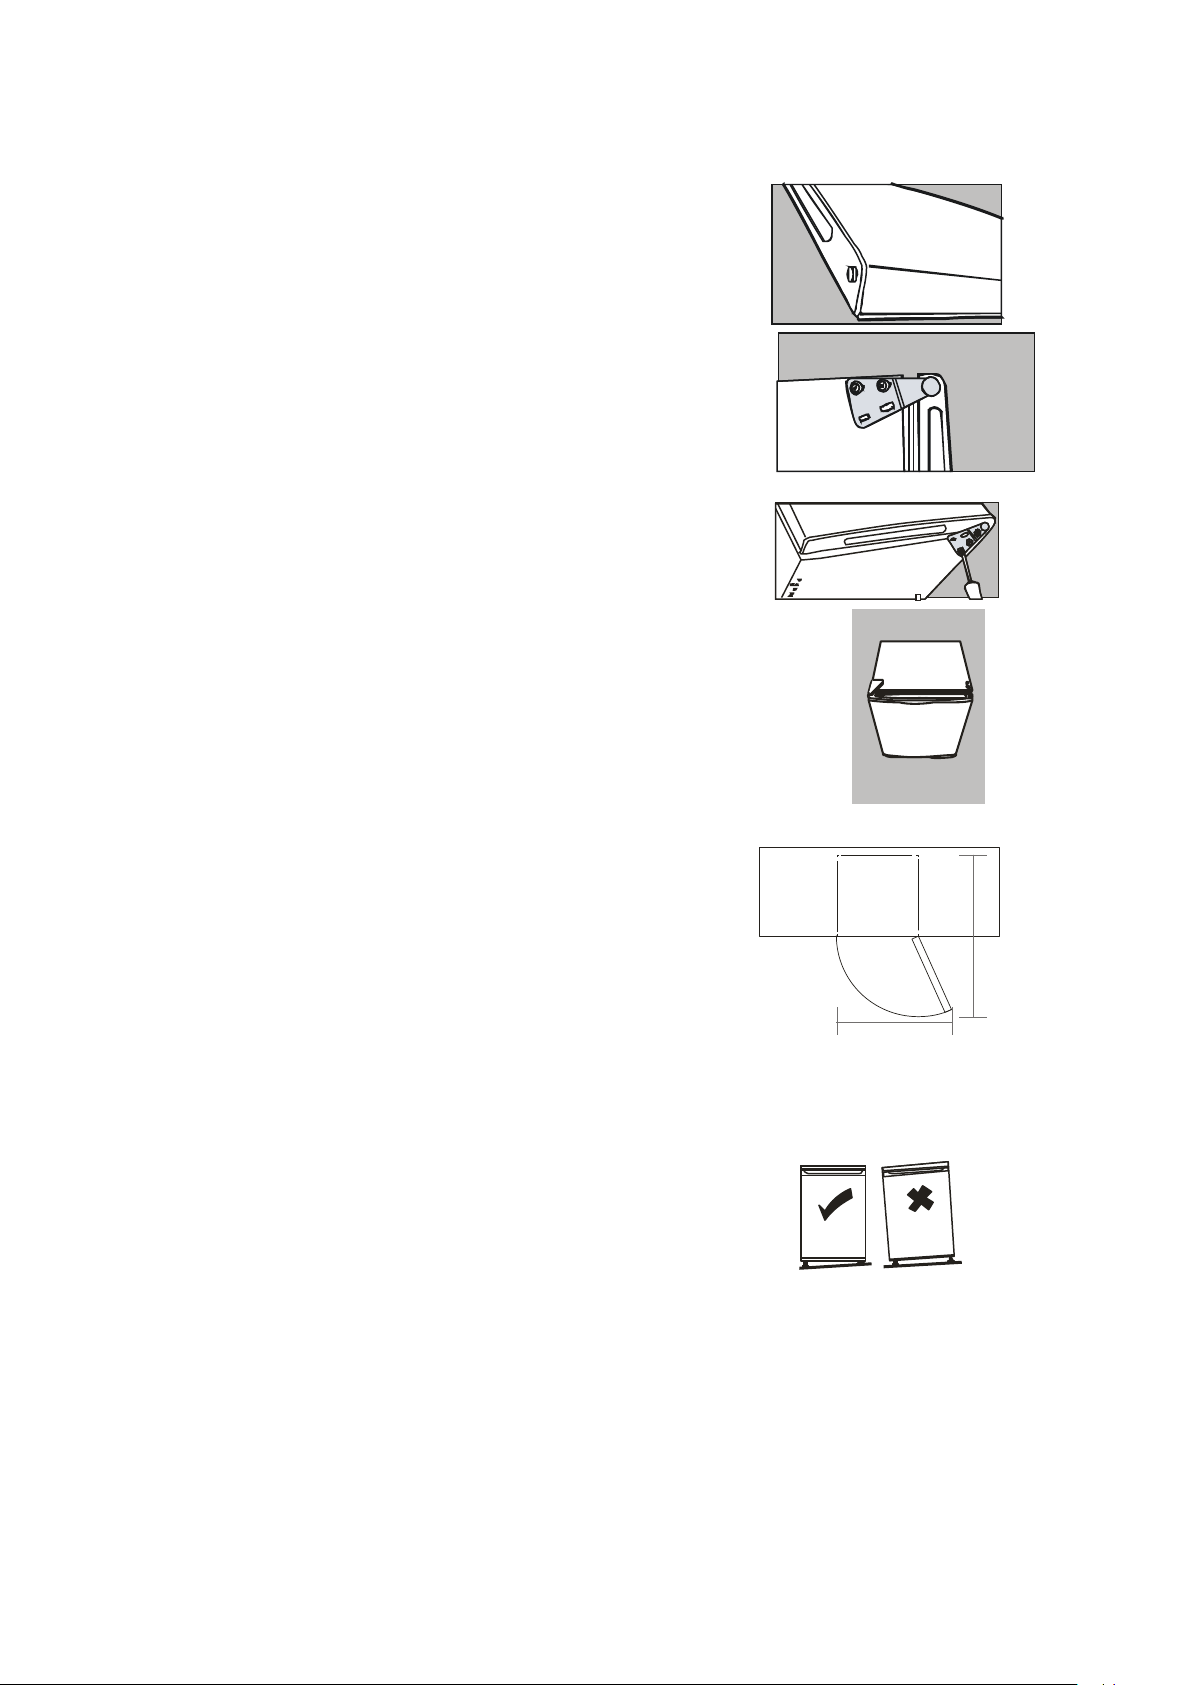
4) Τραβήξτε τη πόρτα προς τα κάτω περίπου 15cm. και αφαιρέστε
8 8 0
τη από τον πάνω μεντεσέ. Βγάλτε τη πόρτα από τη συσκευή.
5) Αφαιρέστε τις 2 βίδες από τον πάνω βραχίονα και τοποθετήστε
τον στην άλλη πλευρά. Πρέπει πρώτα να αφαιρέσετε τα πλαστικά
καλύματα από την άλλη πλευρά.
6) Βάλτε τη πόρτα στον πάνω μεντεσέ, προσέχοντας να είναι με
την σωστή πλευρά προς τα πάνω. Βιδώστε τον κάτω μεντεσέ στην
θέση του στην σωστή πλευρά. Βάλτε το άλλο πόδι στην άλλη
πλευρά. Τοποθετήστε το καπάκι του μεντεσέ στη θέση του.
7) Βεβαιωθείτε ότι η πόρτα είναι σωστά ευθυγραμμισμένη (οριζόντια
και κάθετα) και ότι το λάστιχο της κλείνει σωστά σε όλες τις πλευρές.
Σφίξτε γερά τον κάτω μεντεσέ. Ρυθμίστε ξανά σωστά τα πόδια.
2.3 Εγκατάσταση
Η πόρτα πρέπει να μπορεί να ανοίγει επαρκώς όπως
φαίνεται στο δίπλα σχήμα.
800
2.4 Ευθυγράμμιση της συσκευής
Ευθυγραμμίστε σωστά τη συσκευή με τα 2 ρυθμιζόμενα πόδια στο
μπροστά μέρος της. Αν η συσκευή δεν είναι σωστά ευθυγραμμισμένη
η πόρτα δεν θα κλείνει σωστά.
2.5 Καθαρισμός πριν την χρήση
Καθαρίστε το εσωτερικό της συσκευής με ελαφρύ διάλυμα μαγειρικής σόδας. Ξεβγάλτε με ζεστό
νερό χρησιμοποιώντας ένα σφουγγάρι ή ένα πανί. Καθαρίστε τα ράφια και το συρτάρι με ζεστό
νερό και σαπούνι και στεγνώστε τα καλά πριν τα βάλετε μέσα στη συσκευή.
Καθαρίστε το εξωτερικό του ψυγείου με ένα υγρό πανί.
Για περισσότερες πληροφορίες ανατρέξτε στο τμήμα «Καθαρισμός της συσκευής».
3
Page 16
2.6 Πριν χρησιμοποιήσετε το ψυγείο
Πριν τοποθετήσετε τρόφιμα στο ψυγείο, ενεργοποιήστε το και περιμένετε 24 ώρες για να
βεβαιωθείτε ότι λειτουργεί σωστά ώστε να φτάσει στην κατάλληλη θερμοκρασία. Δεν
πρέπει να βάζετε πολλά τρόφιμα μέσα στο ψυγείο.
Πριν την σύνδεση στο ρεύμα!
◆
Βεβαιωθείτε ότι η πρίζα είναι συμβατή με το φις του ψυγείου.
Πριν την λειτουργία!
◆
Περιμένετε 2 ώρες πριν βάλετε τη συσκευή σε λειτουργία. Το ψυκτικό υγρό
χρειάζεται χρόνο για την ομαλή ροή του.
2.7 Εσωτερικά εξαρτήματα
Το ψυγείο σας πριλαμβάνει ράφια και θήκες από γυαλί ή πλαστικό. Ανάλογα με το μοντέλο
μπορεί να υπάρχουν διάφοροι συνδυασμοί αυτών.
Θα πρέπει να τοποθετήσετε ένα από τα γυάλινα ράφια μεγάλου μεγέθους στο κάτω οδηγό,
ακριβώς πάνω από το καλάθι φρούτων και λαχανικών και να το διατηρήσετε εκεί.
Για να αφαιρέσετε ένα ράφι τραβήξτε το προς τα έξω έως ότου να μπορεί να στραφεί προς τα
πάνω ή προς τα κάτω και να αφαιρεθεί.
Ακολουθήστε την αντίστροφη διαδικασία για να το ξαναβάλετε στη θέση του.
Για να εκμεταλευτείτε στο μέγιστο δυνατό τον αποθηκευτικό χώρο, μπορείτε να αφαιρέσετε
κάποιο ράφι ή θήκη της συσκευής, σύμφωνα με τις πραγματικές σας καθημερινές ανάγκες.
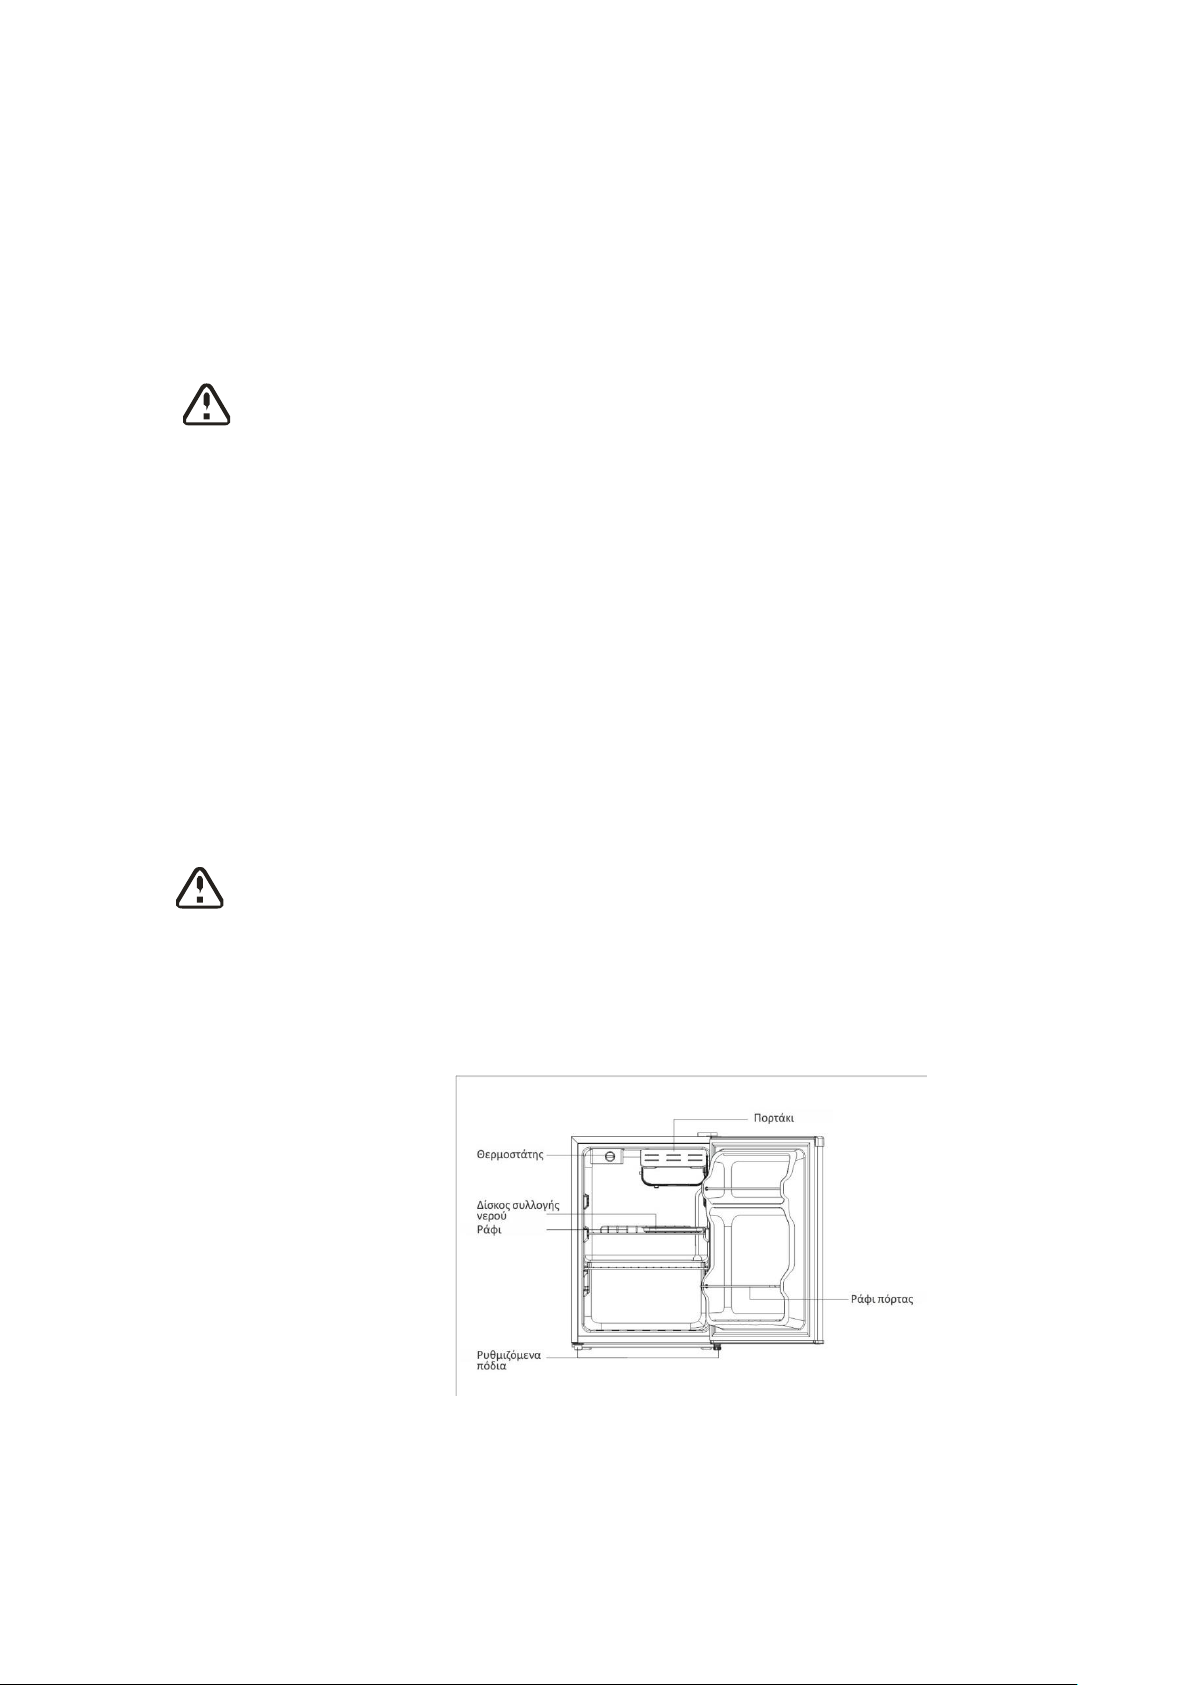
3. ΠΕΡΙΓΡΑΦΗ ΤΗΣ ΣΥΣΚΕΥΗΣ
*Οι φωτογραφίες είναι ενδεικτικές. Δείτε το μοντέλο που αποκτήσατε για λεπτομέρειες.
4
Page 17
4. ΧΡΗΣΗ
4.1 Ρύθμιση της θερμοκρασίας
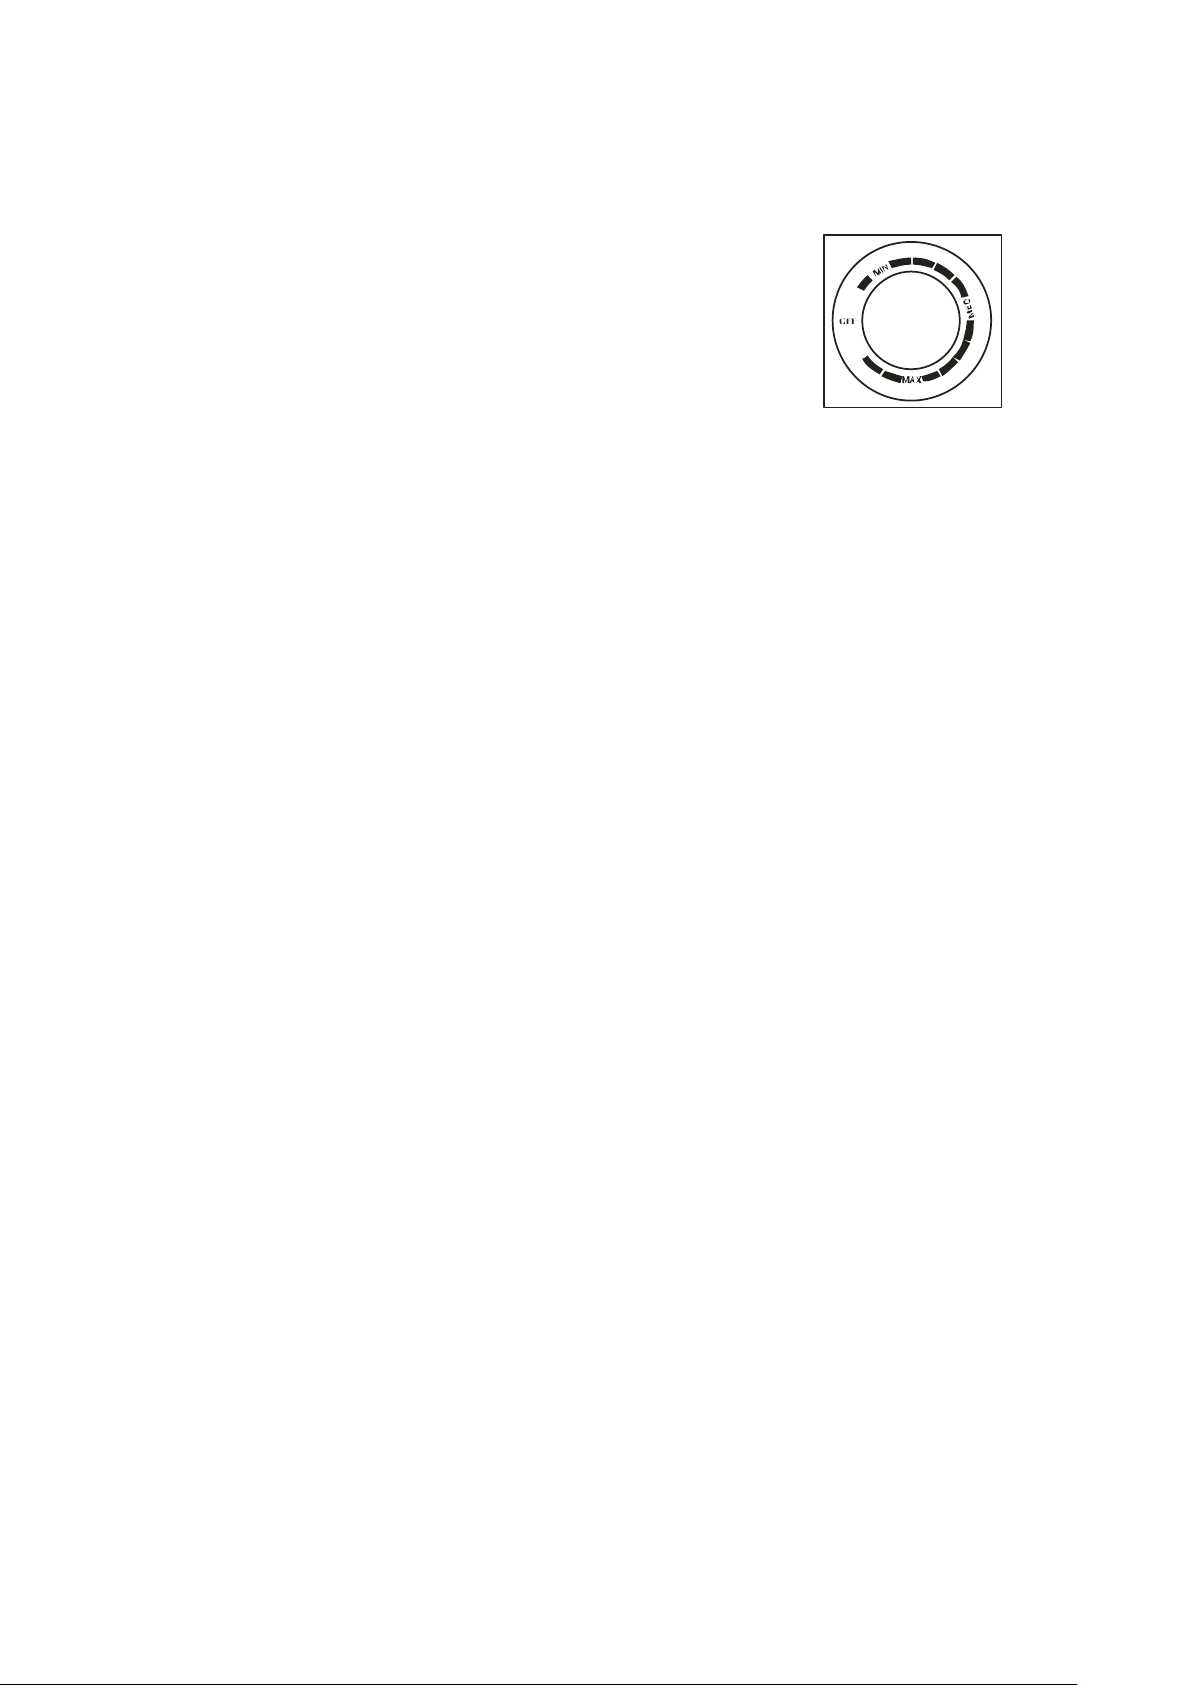
◆ Ο επιλογέας θερμοκρασίας βρίσκεται στο δεξί μέρος του εσωτερικού
του ψυγείου.
Επιλογή “Off” : Κλείνει τη συσκευή
Επιλογή “Min” : Λιγότερο κρύο στο εσωτερικό
Επιλογή “Med”: Κανονική λειτουργία (φυσιολογική χρήση)
Επιλογή “Max” : Περισσότερο κρύο στο εσωτερικό
◆ Όταν η εξωτερική θερμοκρασία είναι υψηλή (π.χ. τις ζεστές καλοκαιρινές μέρες) μπορεί να
χρειαστεί να τοποθετήσετε τον επιλογέα στην θέση “Max”. Σε αυτήν την θέση ο συμπιεστής θα
λειτουργεί συνεχώς για να διατηρεί την θερμοκρασία στο εσωτερικό χαμηλή.
Την πρώτη φορά λειτουργίας του ψυγείου, βάλτε τον επιλογέα στην θέση “Med” και
◆
περιμένετε να κρυώσει το εσωτερικό πριν βάλετε μέσα τρόφιμα. Το καλύτερο είναι να
περιμένετε για 24 ώρες. Ο επιλογέας θερμοκρασίας ελέγχει την θερμοκρασία του ψυγείου.
Βάζοντας τον επιλογέα στη θέση “Off” το ψυγείο δεν θα λειτουργεί.
4.2 Θόρυβος μέσα στη συσκευή!
Μπορεί να ακούσετε κάποιους ασυνήθιστους θορύβους. Οι περισσότεροι από αυτούς είναι
φυσιολογικοί αλλά θα πρέπει να γνωρίζετε για αυτούς! Οι θόρυβοι αυτοί προέρχονται από την
κυκλοφορία του ψυκτικού υγρού μέσα στο κύκλωμα ψύξης. Αυτό είναι πιο αισθητό από την
κυκλοφορία των ψυκτικών χωρίς CFC. Δεν αποτελεί βλάβη και δεν επηρεάζει την λειτουργία
του ψυγείου σας. Προέρχεται από την λειτουργία του κινητήρα του συμπιεστή καθώς αντλεί το
ψυκτικό μέσα στο σύστημα.
4.3 Συμβουλές για την σωστή διατήρηση των τροφίμων
• Μαγειρεμένα κρέατα και ψάρια πρέπει να διατηρούνται πάντα σε διαφορετικό ράφι από τα
ωμά κρέατα και ψάρια για την αποφυγή μεταφοράς των βακτηριδίων. Τα ωμά κρέατα και
ψάρια πρέπει να αποθηκεύονται σε κλειστό δοχείο το οποίο να τοποθετείτε στο κάτω ράφι.
• Αφήστε ελεύθερο χώρο γύρω από τα τρόφιμα σας για να επιτρέπετε την κυκλοφορία του
αέρα μέσα στο ψυγείο. Βεβαιωθείτε ότι όλα τα μέρη του ψυγείου είναι ψυχρά.
• Για την αποφυγή μεταφοράς οσμών και γεύσεων αλλά και αλλοίωσης των τροφίμων, συσκευ-
άστε τα τρόφιμα σε ξεχωριστά δοχεία. Τα φρούτα και τα λαχανικά δεν απαιτούν συσκευασία.
• Πάντα να αφήνετε τα μαγειρεμένα φαγητά να κρυώσουν πριν τα βάλετε στο ψυγείο. Αυτό
θα βοηθήσει στην διατήρηση της σωστής θερμοκρασίας μέσα στη συσκευή.
• Μην ανοίγετε συχνά την πόρτα του ψυγείου για να μην φεύγει ο κρύος αέρας από το
εσωτερικό του ψυγείου. Συνίσταται το άνοιγμα της πόρτας μόνο για την εισαγωγή ή
εξαγωγή τροφίμων σε αυτό.
5
Page 18
5. ΚΑΘΑΡΙΣΜΟΣ
5.1 Απόψυξη
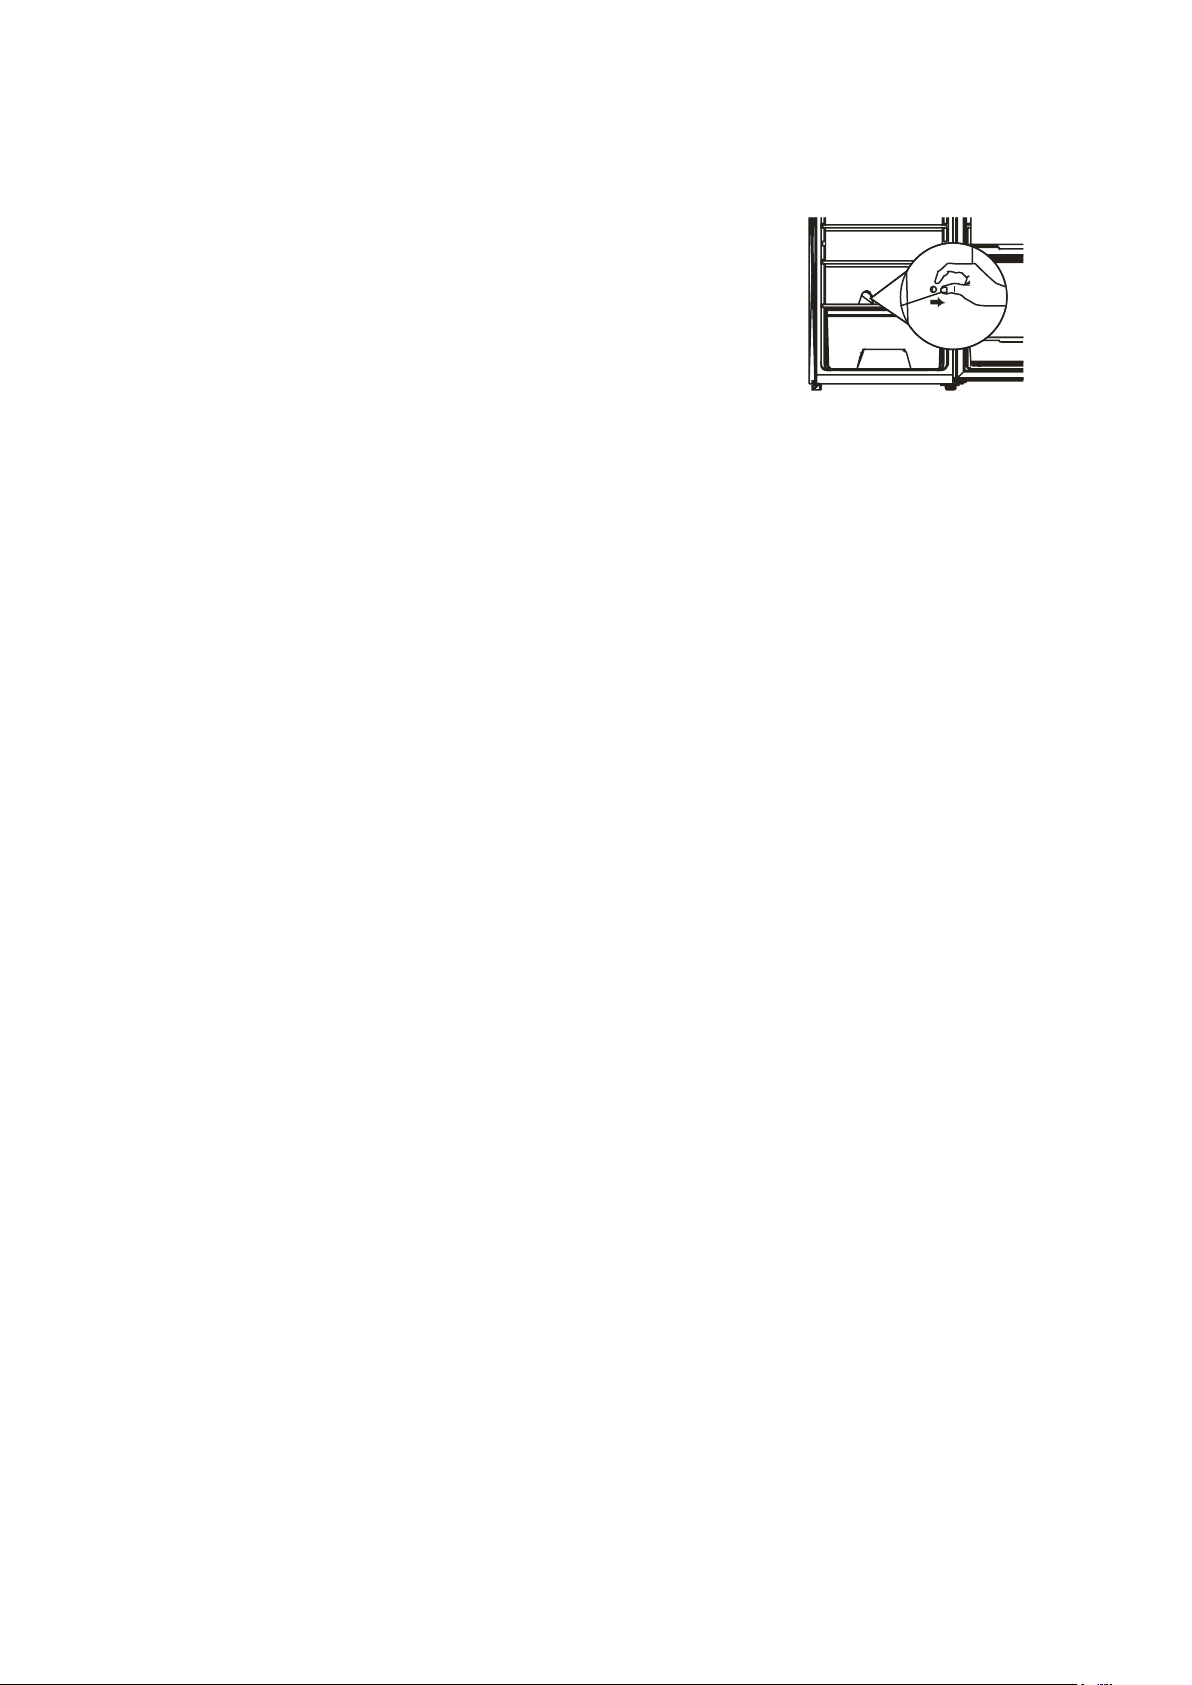
Μπορεί να σχηματιστεί πάγος στο πίσω μέρος του εσωτερικού του
ψυγείου, ο οποίος θα λιώσει αυτόματα κατά την περίοδο κατά την
οποία ο συμπιεστής δεν είναι σε λειτουργία. Το νερό θα μεταφερθεί
μέσω της οπής αποστράγγισης στον δίσκο συλλογής πάνω από τον
συμπιεστή απ’ όπου και θα εξατμιστεί.
5.2 Εσωτερικός και εξωτερικός καθαρισμός της συσκευής
• Αφαιρέστε όλα τα ράφια και το συρτάιο λαχανικών. Για να αφαιρέσετε το συρτάρι πρώτα
αφαιρέστε το κάτι ράφι της πόρτας.
• Καθαρίστε το εσωτερικό της συσκευής με ελαφρύ διάλυμα μαγειρικής σόδας. Ξεβγάλτε με
ζεστό νερό χρησιμποιώντας ένα σφουγγάρι ή ένα πανί. Στεγνώστε καλά πριν βάλετε μέσα
στη συσκευή τα ράφια και το συρτάρι.
• Με ένα υγρό πανί, καθαρίστε καλά το εξωτερικό του ψυγείου και στην συνέχεια σκουπίστε
χρησιμοποιώντας γυαλιστικό επίπλων. Βεβαιωθείτε ότι η πόρτα είναι καλά κλειστή για να
μην εισέλθει το γυαλιστικό στο εσωτερικό του ψυγείου ή στις μαγνητικές ασφάλειες του
λάστιχου πόρτας.
• Η σχάρα του συμπιεστή στο πίσω μέρος της συσκευής και τα παρακείμενα εξαρτήματα
μπορούν να καθαριστούν με ηλεκτρική σκούπα, χρησιμοποιώντας μια μαλακή βούρτσα.
5.3 Συμβουλές για σωστό καθαρισμό!
Στο εξωτερικό του ψυγείου μπορεί να δημιουργηθεί πάχνη η οποία οφείλεται στην αλλαγή της
θερμοκρασίας. Θα χρειαστεί να σκουπίσετε τα όποια υπολλείματα υγρασίας. Αν το πρόβλημα
συνεχίστει, επικοινωνήστε με εξειδικευμένο τεχνικό για βοήθεια.
6. ΣΥΝΤΗΡΗΣΗ
6.1 Φροντίδα κατά την χρήση/μετακίνηση της συσκευής
Κρατήστε τη συσκευή από τις άκρες ή από την βάση της κατά την μετακίνηση της. Σε καμιά
περίπτωση δεν πρέπει να σηκώνετε τη συσκευή κρατώντας την από τις άκρες της πάνω
επιφάνειας.
6.2 Επισκευή
Η επισκευή της συσκευής θα πρέπει να γίνεται μόνο από εξουσιοδοτημένο τεχνικό και μόνο
αυθεντικά ανταλλακτικά θα πρέπει να χρησιμοποιούνται. Δεν πρέπει σε καμιά περίπτωση να
προσπαθήσετε να επισκευάσετε τη συσκευή μόνοι σας. Μπορεί να τραυματιστείτε ή να
προκαλέσετε σοβαρή βλάβη. Εμπιστευτείτε έναν αξιόλογο τεχνικό.
6.3 Μη χρήση της συσκευής για μεγάλο χρονικό διάστημα
Σε περίπτωση που δεν θα χρησιμοποιήσετε τη συσκευή για μεγάλο χρονικό διάστημα,
αποσυνδέστε την από το ρεύμα, αφαιρέστε όλα τα τρόφιμα, καθαρίστε καλά τη συσκευή και
αφήστε την πόρτα λίγο ανοιχτή για την αποφυγή δυσάρεστων οσμών.
6
Page 19
7. ΠΡΟΒΛΗΜΑΤΑ ΚΑΙ ΑΝΤΙΜΕΤΩΠΙΣΗ
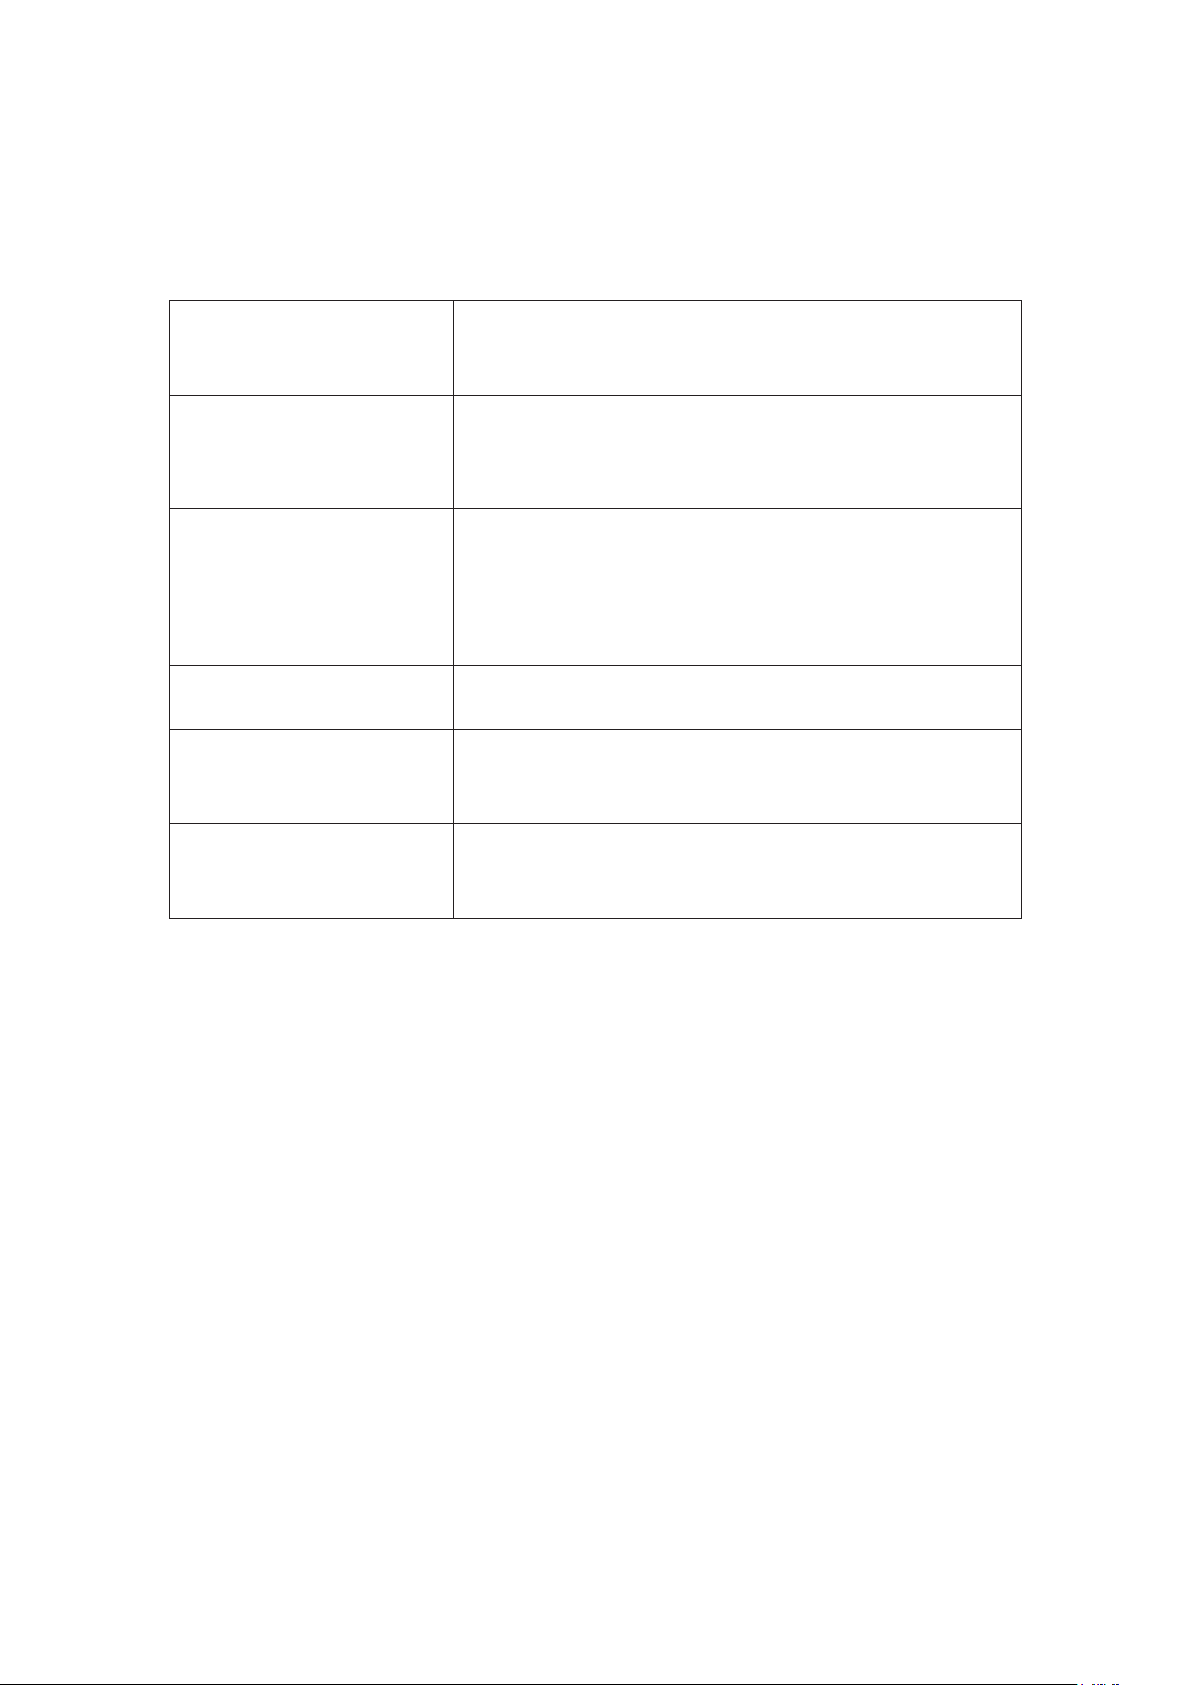
Τα παρακάτω προβλήματα μπορούν να αντιμετωπιστούν από τον χρήστη.
Παρακαλούμε όπως επικοινωνήσετε με το κέντρο εξυπηρέτησης πελατών της εταιρείας μας αν τα
προβλήματα δεν εξαλειφθούν.
• Ελέγξτε αν η συσκευή είναι συνδεδεμένη στο ρεύμα.
Η συσκευή δεν λειτουργεί
Δυσάρεστες οσμές
• Μήπως η τάση ρεύματος δεν είναι η σωστή;
• Μήπως η ασφάλεια είναι καμμένη;
• Τα φαγητά με έντονη οσμή πρέπει να διατηρούνται σε κλειστά
σκεύη.
• Μήπως έχετε χαλασμένα τρόφιμα στο ψυγείο;
• Μήπως το εσωτερικό θέλει καθαρισμό;
Ο συμπιεστής λειτουργεί για
μεγάλο χρονικό διάστημα
Δεν ανάβει η λυχνία
Δεν κλείνει η πόρτα
του ψυγείου
Ισχυροί θόρυβοι
• Το καλοκαίρι που η θερμοκρασία περιβάλλοντος είναι
υψηλότερη, είναι φυσιολογικό.
• Μην βάζετε πολλά τρόφιμα στο ψυγείο την ίδια στιγμή.
• Μην βάζετε ζεστά τρόφιμα στο ψυγείο.
• Μήπως ανοίγετε συχνα την πόρτα του ψυγείου;
• Ελέγξτε αν η συσκευή είναι συνδεδεμένη στο ρεύμα.
• Μήπως η λυχνία είναι καμμένη;
• Η πόρτα μπλοκάρει από τοποθετημένα τρόφιμα.
• Πολλά τρόφιμα μέσα στο ψυγείο.
• Κουνήστε ελαφρά το ψυγείο.
• Ελέγξτε αν το ψυγείο είναι ευθυγραμμισμένο σωστά ή αν τα
τρόφιμα είναι σωστά τοποθετημένα.
• Τα εξαρτήματα του ψυγείου είναι σωστά τοποθετημένα;
7.1 Συμβουλές:
• Η συσκευή μπορεί να εκπέμπει θερμότητα κατά την λειτουργία ειδικά την περίοδο του καλοκαιριού.
Αυτό προέρχεται από τις εκπομπές του συμπιεστή και είναι φυσιολογικό.
• Υδρατμοί/πάχνη: Μπορεί να δημιουργηθεί πάχνη στο εξωτερικό του ψυγείου και στο λάστιχο
της πόρτας, όταν η σχετική υγρασία του χώρου είναι υψηλή. Αυτό είναι φυσιολογικό, σκουπίστε
με ένα στεγνό πανί.
• Θόρυβος : Ο συμπιεστής παράγει θόρυβο, ο οποίος είναι μεγαλύτερος κατά την εκκίνηση και την
παύση της λειτουργίας του.
8. ΣΥΜΒΟΥΛΕΣ ΓΙΑ ΕΞΟΙΚΟΝΟΜΗΣΗ ΕΝΕΡΓΕΙΑΣ
Προσπαθήστε να μήν ανοίγετε συχνά τη πόρτα ειδικά σε περιόδους ζέστης και υγρασίας.
Αποφύγετε το άνοιγμα της πόρτας για πολύ ώρα. Ελέγξτε περιοδικά αν ο εξαερισμός της
συσκευής είναι επαρκής (αρκετή κυκλοφορία αέρα πίσω από την συσκευή).
Σε κανονικές συνθήκες θερμοκρασίας, τοποθετήστε τον θερμοστάτη στην μεσαία θέση.
Πριν τοποθετήσετε τρόφιμα μέσα στο ψυγείο, βεβαιωθείτε ότι αυτά είναι σε θερμοκρασία
περιβάλλοντος.
7
Page 20
Η δημιουργία πάγου αυξάνει την κατανάλωση του ψυγείου. Σε περίπτωση που το στρώμα
πάγου φτάσει σε πάχος τα 3-5mm, καθαρίστε τη συσκευή.
Διατηρείτε το πίσω τμήμα του ψυγείου καθαρό από σκόνη και βρωμιές.
Ακολουθείτε πάντα πιστά τις οδηγίες « Τοποθέτησης » και « Συμβουλές εξοικονόμησης ενέργειας »
για να αποφύγετε την άσκοπη κατανάλωση ρεύματος.
◆ Η συσκευή πρέπει να τοποθετηθεί στο πιο δροσερό μέρος του δωματίου, μακρυά από συσκευές
που παράγουν θερμότητα και όχι σε απευθείας έκθεση στον ήλιο.
◆ Αφήστε τα ζεστά τρόφιμα να κρυώσουν σε θερμοκρασία περιβάλλοντος πρίν τα βάλετε μέσα
στο ψυγείο. Μην υπερφορτώνετε το ψυγείο για να αποφύγετε την συνεχή λειτουργία του συμπιεστή.
Τρόφιμα τα οποία παγώνουν αργά μπορεί να καταστραφούν.
◆ Τυλίξτε τα τρόφιμα σωστά και στεγνώστε τα σκεύη πριν τη τοποθέτηση τους στο ψυγείο. Με
αυτό το τρόπο μειώνεται η δημιουργία πάγου μέσα στη συσκευή.
◆ Μην καλύπτετε τους αποθηκευτικούς χώρους του ψυγείου με αλουμινόχαρτο, χαρτί κουζίνας κ.α.
Αυτά εμποδίζουν τη σωστή κυκλοφορία του αέρα μειώνοντας την απόδοση του ψυγείου.
◆ Οργανώστε σωστά τα τρόφιμα σας και βάλτε ετικέτες με το περιεχόμενο των σκευών για να
μειώσετε τον χρόνο που έχετε ανοιχτή τη πόρτα ψάχνοντας για τα τρόφιμα. Αφαιρέστε όλα τα τρόφιμα που χρειάζεστε σε μια φορά και κλείστε τη πόρτα όσο πιο γρήγορα γίνεται.
9. ΑΠΟΡΡΙΨΗ
Οι παλιές συσκευές έχουν μια εναπομείνουσα αξία. Μια φιλική προς το περιβάλλον μέθοδος
απόρριψης, εξασφαλίζει ότι όλες οι πρώτες ύλες που έχουν κάποια αξία θα χρησιμοποιηθούν
σωστά. Το ψυκτικό μέσο και τα μονωτικά υλικά που έχουν χρησιμοποιηθεί σε αυτό το ψυγείο,
απαιτούν ειδική διαδικασία απόρριψης. Βεβαιωθείτε ότι καμία από τις σωλήνες στο πίσω μερος της συσκευής δεν είναι κατεστραμμένη πρίν απορρίψετε τη συσκευή. Επικοινωνήστε με τα
τοπικά γραφεία για να πληροφορηθείτε σχετικά με τις δυνατότητες απόρριψης της παλιάς σας
συσκευής. Πρίν πετάξετε μια συσκευή σπάστε τις κλειδαριές ή τις ασφάλειες που έχει και αφαιρέστε προληπτικά τη πόρτα.
9.1 Σωστή απόρριψη του προιόντος
Η σήμανση που φέρει αυτή η συσκευή, δηλώνει ότι δεν πρέπει να απορρίπτεται μαζί με τα
οικιακά απόβλητα. Για την αποφυγή πιθανής μολυνσης του περιβάλλοντος
ή να βλάψει την ανθρώπινη υγεία, ανακυκλωστε υπεύθυνα τη συσκευή, για
να εξασφαλίσετε την ανακύκλωση των πρώτων υλών της. Επικοινωνήστε
με τα τοπικά γραφεία ανακύκλωσης ή το κατάστημα από το οποίο αγοράσατε τη συσκευή για να ενημερωθείτε σχετικά με την ασφαλή για το περιβαλλόν, ανακύκλωση του προϊόντος.
ΔΙΑΒΑΣΤΕ ΜΕ ΠΡΟΣΟΧΗ ΤΙΣ ΟΔΗΓΙΕΣ ΧΡΗΣΗΣ ΚΑΙ ΤΟΠΟΘΕΤΗΣΗΣ. ΑΥΤΕΣ ΠΕΡΙΕΧΟΥΝ
ΣΗΜΑΝΤΙΚΕΣ ΠΛΗΡΟΦΟΡΙΕΣ ΓΙΑ ΤΗΝ ΕΓΚΑΤΑΣΤΑΣΗ, ΤΗ ΧΡΗΣΗ ΚΑΙ ΤΗ ΣΥΝΤΗΡΗΣΗ ΤΗΣ
ΣΥΣΚΕΥΗΣ. Ο ΚΑΤΑΣΚΕΥΑΣΤΗΣ ΔΕΝ ΑΝΑΛΑΜΒΑΝΕΙ ΚΑΜΙΑ ΕΥΘΥΝΗ ΓΙΑ ΤΥΧΟΝ ΒΛΑΒΕΣ,
ΑΝ ΔΕΝ ΠΡΟΣΕΧΘΟΥΝ ΟΙ ΥΠΟΔΕΙΞΕΙΣ ΚΑΙ ΠΡΟΕΙΔΟΠΟΙΗΣΕΙΣ ΠΟΥ ΔΙΝΟΝΤΑΙ ΣΤΙΣ ΟΔΗΓΙΕΣ
ΧΡΗΣΗΣ. ΦΥΛΑΞΤΕ ΟΛΑ ΑΥΤΑ ΤΑ ΕΓΓΡΑΦΑ ΓΙΑ ΜΕΤΕΠΕΙΤΑ ΧΡΗΣΗ.
8
Page 21
Ενεργοποιήστε την εγγύηση σας...
σε
5
απλά
Σκανάρετε εδώ
για τα έντυπα
των εγγυήσεων
Συνδεθείτε στο site της
στον ακόλουθο σύνδεσµο
http://www.inventoraircondition.gr/
egiisi-inventor/
Επιλέξτε τον τύπο του προϊόντος
(κλιµατιστικό ή συσκευή) για το
οποίο θα ενεργοποιηθεί η εγγύηση
Επιλέξτε την εγγύηση
που αντιστοιχεί στο προϊόν
που έχετε στην κατοχή σας
Συµπληρώστε τα απαιτούµενα
στοιχεία (κατόχου, εµπόρου και
συσκευής) και πατήστε αποστολή
Inventor
Θα λάβετε επιβεβαιωτικό
µήνυµα στο e-mail σας για
την ενεργοποίηση της εγγύησης
Για την υποβολή
ηλεκτρονικών εγγυήσεων
πληκτρολογήστε
την παρακάτω διεύθυνση
https://www.inventoraircondition.gr/
egiisi-inventor
Page 22

Cuprins
1. Avertizari cu privire la siguranta.................................................................................... 1
Instalarea....................................................................................................................... 2
2.
2.1
Pozitionarea............................................................................................................ 2
2.2 Schimbarea directiei de deschidere a usii.............................................................. 2
2.3 Distante necesare pentru deschiderea usilor.......................................................... 3
2.4 Asezarea la nivel a unitatii...................................................................................... 3
2.5 Curatarea inaintea folosirii...................................................................................... 4
2.6 Inainte de prima utilizare......................................................................................... 4
2.7 Accesoriile interioare............................................................................................... 4
3. Prezentarea produsului.................................................................................................. 5
4. Folosirea produsului....................................................................................................... 5
4.1 Ajustarea temperaturii............................................................................................. 5
4.2 Zgomote in interiorul unitatii.................................................................................... 5
4.3 Sfaturi pentru depozitarea alimentelor..................................................................... 5
5. Curatarea produsului...................................................................................................... 6
5.1 Dezghetarea............................................................................................................ 6
5.2 Curatarea interiorului si exteriorului......................................................................... 6
5.3 Sfaturi cu privire la curatare.................................................................................... 6
6. Mentenanta.....................................................................................................................
6
6.1 Sfaturi cu privire la manipularea/mutarea unitatii.................................................... 6
6.2 Service.................................................................................................................... 6
6.3 Daca aparatul este scos din uz pentru o perioada lunga de timp........................... 7
Depanare........................................................................................................................
7. 7
7.1 Sfaturi cu privire la caldura generata...................................................................... 7
8. Sfaturi de economisire a energiei................................................................................... 7
9. Eliminarea deseurilor...................................................................................................... 8
9.1 Eliminarea corecta a acestui produs....................................................................... 8
Page 23
1. Avertizari cu privire la siguranta
1) Averzare-Gurile de venlae din interiorul sau structura aparatului trebuie mennute libere,
neobstruconate.
2) Averzare - Nu folosi dispozive mecanice sau alte mijloace pentru a accelera procesul de
dezghetare.
3) Averzare - Nu defecta circuitul refrigerantului.
4) Averzare - Nu folosi dispozive electrice in interiorul frigiderului decat daca au fost aprobate
de catre producator.
5) Scoate apartul din priza inainte de orice lucrare de mentenanta.
6) Acest aparat poate fi folosit de persoane fara experienta, copii cu varste de peste 8 ani si persoane cu
dizabilita fizice, mintale sau senzoriale doar sub supraveghere atenta si daca au fost instruite cu privire
la folosirea aparatului si posibilele pericole. Acest aparat nu va fi curatat de catre copii decat sub o atenta
supraveghere.
7) Pentru a inlatura eventualele pericole, in cazul in care cablul de alimentare este deteriorat, acesta va
fi inlocuit doar de catre producator, reprezentantul autorizat de service sau persoane calificate.
8) Acest aparat va conne gaze inflamabile si refrigerant si va trebui eliminat conform normelor locale.
9) Va rugam sa respecta normele locale de eliminare a acestui p produs. Inainte de a arunca acest
aparat, demonta usile pentru a putea inlatura posibilitatea blocarii unui copil in interior.
10) Acest aparat este desnat uzului casnic sau in alte locai similare :
- zone comune sau pentru pauze ale angajalor;
- ferme;
- Hoteluri, moteluri, pensiuni si alte spai rezidenale;
- Firme de catering sau alte medii non rezidenale.
11) Nu depozita materiale explozive precum recpiente cu aerosoli, in interiorul aparatuluil.
Pentru a evita aparaa pericolelor, orice intervene de service ce implica demontarea carcasei
exterioare, se va face doar de catre personal autorizat.
Nu incerca sa repara acest aparat. Pericol de electrocutare.
1
Page 24
2. Instalarea
2.1 Amplasarea
Atunci cand va alegeti locul unde va fi pozitionat aparatul, asigurati-va ca podeaua este dreapta
si ca incaperea este bine ventilata. Evitati pozitionarea aparatului langa surse de caldura (aragaz,
boiler, radiator, etc.). Pozitionarea aparatului in contact direct cu lumina soarelui poate creste
consumul de energie electrica. Temperaturile foarte scazute din incaperea in care este pozitionat
aparatul pot cauza, de asemenea, o functionare necorespunzatoare. Acest aparat nu este conceput
pentru a fi utilizat intr-un garaj sau in mediu exterior. Nu acoperiti aparatul. Atunci cand instalati
aparatul asigurati un spatiu liber de cel putin 40cm in partile laterale, 15 cm in partea din spate
si 20 cm deasupra aparatului. Aceste distante vor asigura o buna circulatie a aerului in jurul
aparatului si vor creste eficienta procesului de racire. Puteti selecta directia de deschidere a usii in
functie de pozitionarea aparatului. Asigurati spatiul necesar pentru deschiderea completa a usii.
2.2 Schimbarea directiei de deschidere a usii.
Unelte necesare : surubelnita stea, surubelnita dreapta, cheie hexagonala.
Va recomandam ca operatiunea de schimbare a deschiderii usii sa fie facuta de catre un
◆
tehnician calificat.
Asigurati-va ca aparatul este gol si scos din priza.
◆
◆ Reglati piciorusele la cea mai inalta pozitie.
◆ Pentru a putea schimba directia de deschidere a usii, va trebuii sa aplecati aparatul catre
spate si sa il sprijiniti de o suprafata solida. Asigurati-va ca aparatul nu risca sa alunece in
timpul operatiunii.
◆ Asigurati-va ca nu pierdeti piesele care vor fi necesare pentru remontarea usii.
◆ Pentru a nu deteriora sistemul de racire, nu asezati frigiderul pe partea din spate.
◆ Recomandam ca operatiunea sa fie facuta de 2 persoane.
1) Scoate capacul de plastic al balamalei superioare.
Desurubati cele 3 suruburi ale suportului metalic din partea
2)
inferioara. Demontati piciorul din partea opusa.
Puneti piesele deoparte.
3)
2
Page 25
8 8 0
4)
Trageti usa in jos aproximativ 15 cm si apoi ridicati usor
pentru a o scoate.
5) Desurubati suportul superior si montati-l in partea opusa.
Inainte de acest proces, asigurati-va ca ati scos capacele
de plastic din partea in care se va monta usa.
Montati usa in balamaua superioara, asigurandu-va ca
6)
este pozitionata corect. Insurubati balamaua inferioara si
inlocuiti piciorusul din partea opusa. Acoperiti balamaua
folosind capacul din plastic.
Asigurati-va ca usa este aliniata perfect atat orizontal cat
7)
si vertical. De asemenea, garniturile trebuie sa fie fixate
pe toate partile inainte de a insuruba garnitura din partea
inferioara. Dupa terminarea acestui proces, ajustati nivelul
picioruselor.
2.3 Cerinte spatiu deschidere usa
Asigurati-va ca usa se poate deschide complet conform
imaginii alaturate.
2.4 Ajustarea unitatii
800
Ajustarea se face regland cele 2 picioruse reglabile situate in
partea frontala a aparatului. In cazul in care aparatul nu este
drept, usa si sigiliile magnetice nu vor fi complet etanse.
3
Page 26
2.5 Curatarea aparatului inainte de prima utilizare
Stergeti interiorul aparatului cu o solutie cu o concentratie mica de bicarbonat de sodiu. Curatati
folosind o carpa inmuiata in apa calduta. Spalati rafturile si cosul pentru legume in apa calduta cu
sapun si uscati complet inainte de a le reintroduce in frigider. Curatati carcasa exterioara a
aparatului folosind o carpa umeda. Daca aveti nevoie de mai multe informatii, consultati sectiunea
CURATARE.
2.6 Inainte de prima utilizare
Inainte de a depozita mancare in aparat, porniti-l si lasati-l gol timp de 24h pentru a va asigura ca
functioneaza corect. Nu supraaglomerati aparatul.
◆ Inainte de conectarea la priza
Verificati daca priza dumneavoastra este compatibila cu stechereul aparatului.
Inainte de a porni frigiderul
◆
Dupa transport, permiteti lichidului de racire sa se stabilizeze. Asteptati cel putin 2 ore
inainte de a porni aparatul.
2.7 Accesoriile interioare
Aparatul dumneavoastra are incluse in colet diverse rafturi si cosui de stocare. Combinatiile de
rafturi si cosuri difera in functie de model. Asezati unul dintre rafturile de sticla intr-o pozitie inferioara,
de-asupra cosului pentru fructe si legume. Pentru a schimba inaltimea raftului, trageti raftul pana il
puteti scoate in siguranta si pozitionati-l in locul dorit.
Pentru a folosi cat mai eficient spatiile de stocare ale frigiderului/congelatorului, utilizatorul poate
scoate unul sau mai multe rafturi sau cosuri, conform nevoilor zilnice.
4
Page 27
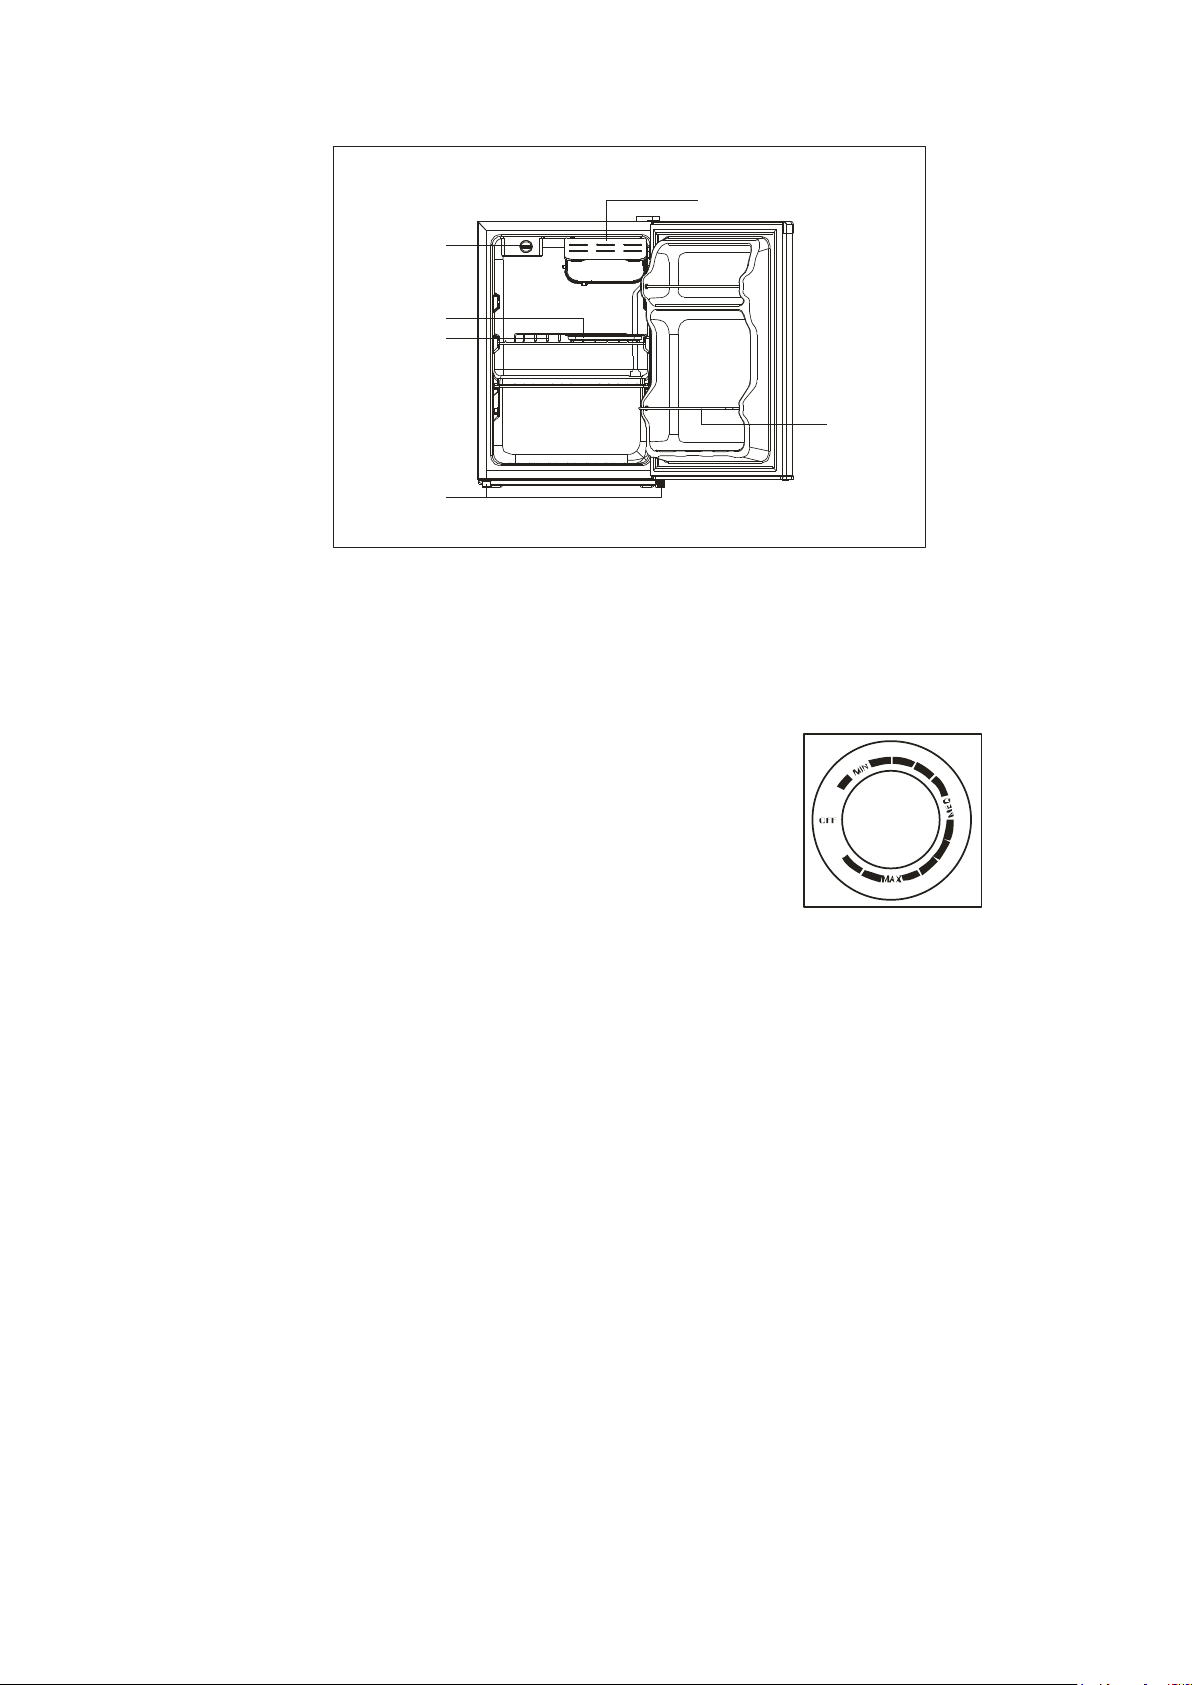
3. Prezentarea generala a produsului
Usa mica
Termostat
Raft metalic
Picioruse
reglabile.
Bara metalica
de sustinere
*Imaginile sunt cu titlu de prezentare generala. Pentru detalii va rugam sa consultati produsul dvs.
4. Operarea frigiderului
4.1 Reglarea temperaturii
Termostatul este pozitionat in interiorul frigiderului in partea
◆
superioara stanga (cum va uitati la produs).
Selectand "Off" : Aparatul se va opri;
Selectand "Min": Putere mica de racire;
Selectand "Med": Conditii normale de folosire (potrivta pentru uz zilnic);
Selectand "Max" : Putere maxima de racire.
In cazul cresterii temperaturii incaperii (zile calduroase de vara), setarea termostatului in pozitia "Max"
◆
ar putea fi necesara. Aceasta setare va mentine compresorul pornit pentru pastrarea unei temperaturi
scazute in interiorul frigiderului.
◆Dupa instalarea produsului, reglati termostatul pe pozitia "Med" si permiteti frigiderului sa se raceasca
in totalitate inainte de a adauga produsele. Va recomandam sa asteptati 24 de ore inainte de a
depozita mancarea. Termostatul controleaza setarile de temperatura. Atunci cand termostatul va fi
pozitionat pe "OFF", frigiderul va fi oprit.
4.2 Zgomote in interiorul unitatii
Veti observa ca, in timpul folosirii, frigiderul va genera anumite zgmote. Majoritatea acestor zgmotoe
sunt perfect normale. Aceste zgmote sunt cauzate de refrigerantul care se deplaseaza prin sistemul
de racire. Aceste zgmote pot fi mai pronuntate datorita folosirii gazelor fara efect de sera. Retineti ca
aceste zgomote nu reprezinta un defect al aparatului si nu afecteaza eficienta produsului.
Compresorul este un motor cu ajutorul caruia refrigerantul este pompat prin sistemul de racire.
4.3 Sfaturi pentru corecta depozitare a mancarii in frigider
◆
Carnea gatita (vita, peste, etc.), trebuie intotdeauna depozitata deasupra carnurilor crude pentru
a evita transferul de bacterii. Carnea cruda trebuie depozitata intr-un container suficient de incapator
incat sa poata colecta si lichidele produse de carne. Acest containter trebuie pozitionat pe raftul inferior.
Lasati spatiu suficient in jurul mancarii dvs pentru a asigura o buna circulatie a aerului.
◆
Asigurati-va ca toate partile sunt reci.
5
Page 28
Pentru a evita uscarea produselor si transferul de arome, impachetati fiecare produs individual.
◆
Fructele si legumele nu trebuiesc impachetate.
Mancarea proaspat gatita trebuie lasata sa se raceasca inainte de a fi depozitata in frigider. In felul
◆
acesta veti mentine temperatura optima in interiorul frigiderului.
Pentru a mentine o temperatura constanta in interiorul frigiderului, va recomandam sa deschideti
◆
usa aparatului doar atunci cand este nevoie.
5. Curatare
5.1 Dezghetarea
Un strat de gheata se poate forma in interior, pe peretele din spatele
aparatului. Acest strat se va dezgheta atunci cand frigiderul este oprit.
Apa rezultata se va scurge in tava de colectare care se afla deasupra
compresorului si se va evapora. Verificati gura de scurgere regulat
pentru a va asigura ca apa se poate scurge din spatiul de stocare.
5.2 Curatarea suprafetelor interioare si exterioare ale aparatului.
Inlaturati toate rafturile si cosul pentru legume. Pentru a inlatura cosul pentru legume trebuie
◆
sa scoateti prima data raftul din partea inferioara a usii.
◆
Stergeti interiorul aparatului cu o solutie cu o concentratie mica de bicarbonat de sodiu.
Curatati folosind o carpa inmuiata in apa calduta si uscati complet inainte de a reintroduce
rafturile si cosul.
Curatati carcasa exterioara a aparatului folosind o carpa umeda si folositi o substanta
◆
standard pentru luciu. Asigurati-va ca usa este inchisa pentru a evita ca substantele folosite
sa se scurga pe sigiliile magnetice.
◆
Grila condensatorului si componentele adiacente pot fi curatate prin aspirare, folosind o
perie fina.
5.3 Sfaturi pentru curatare.
Condensul poate aparea in partea exterioara a aparatului. Acesta poate fi cauzat de o schimbare
a temperaturii in incaperea unde este tinut frigiderul. Stergeti condensul cu o carpa fina.
Daca problema persista, contactati un tehnician de service calificat.
6. Intretinere
6.1 Atentie cand manipulati aparatul
Atunci cand mutati frigiderul, nu prindeti de partea din fata (usi). Frigiderul va fi manipulat/ridicat
numai prinzand din partea din spate sau din laterale.
6.2 Service
Orice lucrare de service se va face doar de catre un inginer autorizati si se vor folosi numai
piese originale.
6
Page 29
Nu incercati sa reparati aparatul de unul singur. Reparatiile facute de persoane fara experienta
pot provoca defectarea produsului sau ranirea persoanelor respective. Contactati un tehnician
autorizat.
6.3 Oprirea aparatului pentru perioade lungi de timp.
In cazul in care nu veti folosi frigiderul pentru o perioada lunga de timp, deconectati-l de la priza,
inlaturati mancarea si curatati interiorul frigiderului. Lasati usa aparatului intredeschisa pentru a
evita aparitia unor mirosuri neplacute.
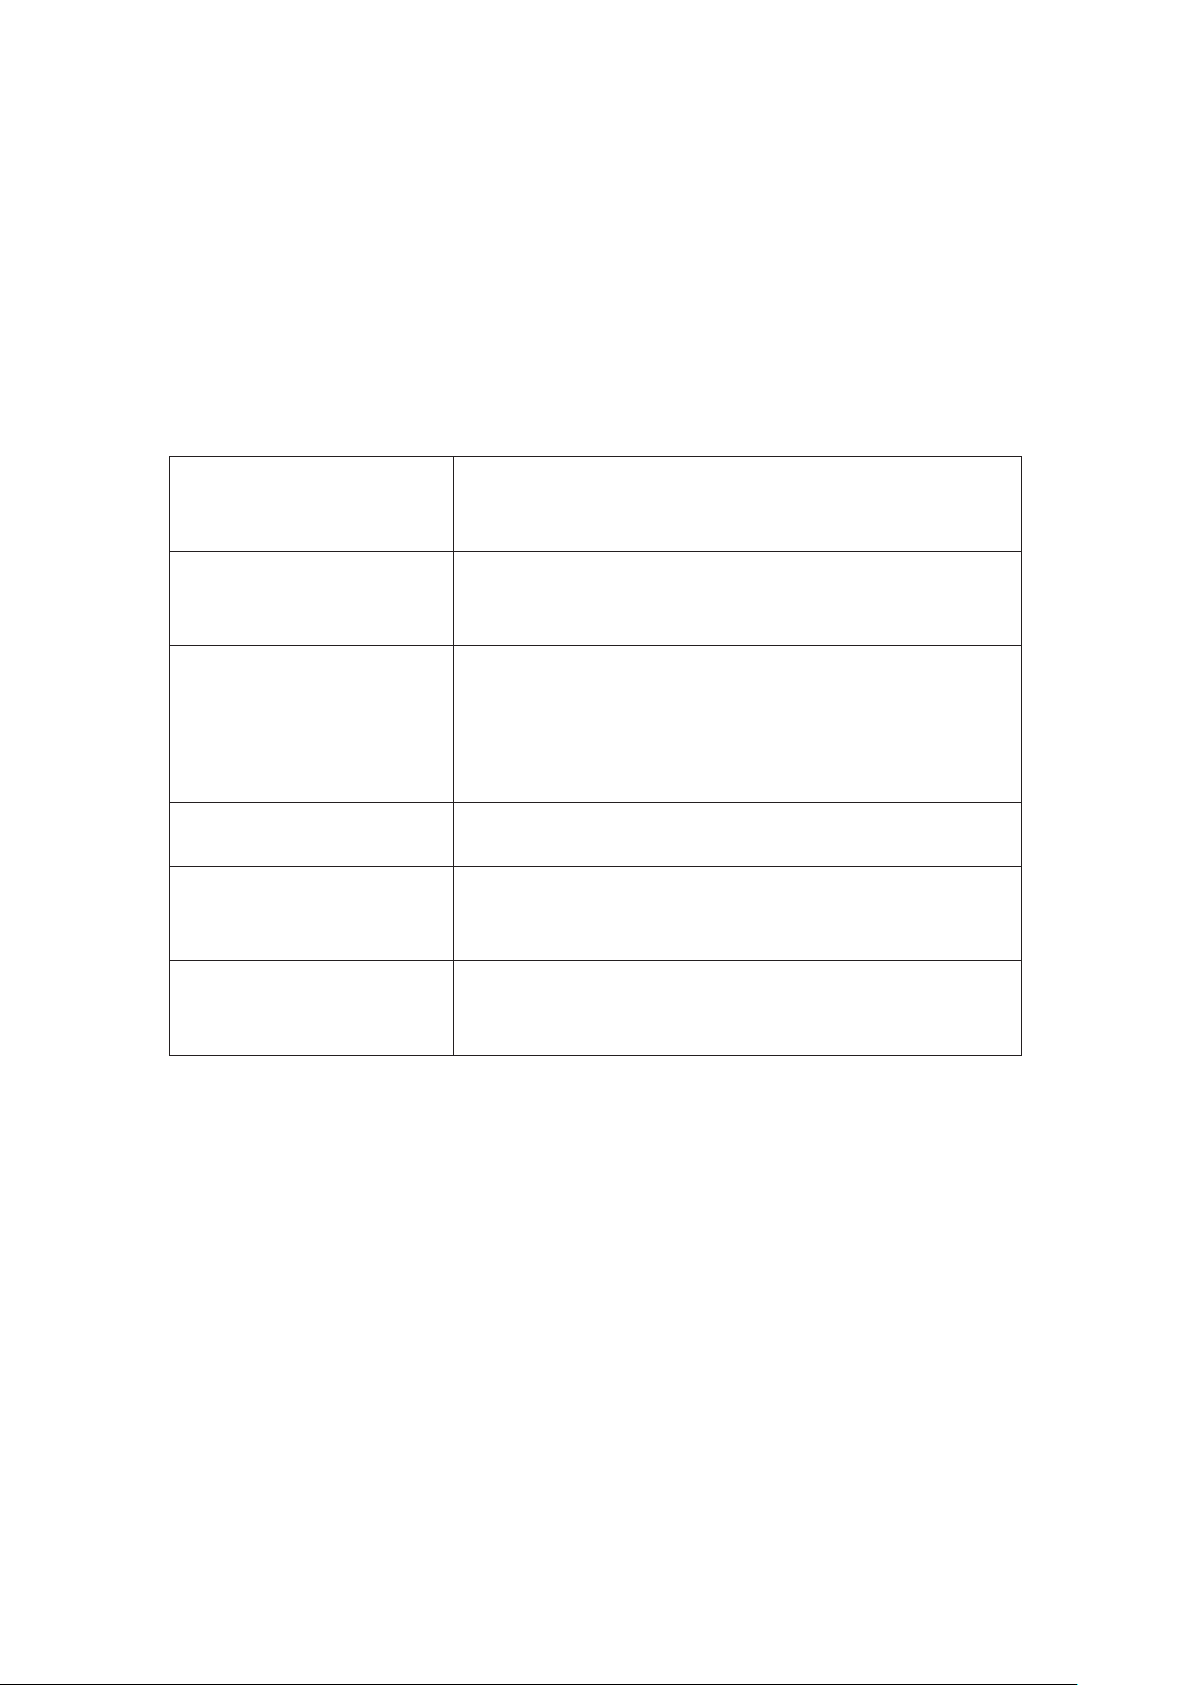
7. Depanarea
Situatiile prezentate mai jos sunt cazuri simple care pot fi rezolvate de catre utilizator. In cazul
in care problemele persista, contactati departamentul de service.
Verificati daca aparatul este conectat la priza.
Aparatul nu
functioneaza
Mirosuri
Functionarea indelungata
a compresorului
Tensiunea electrica este joasa.
Pana de curent sau siguranta este sarita.
Alimentele care pot degaja mirosuri trebuie sa fie bine impachetate.
Alimentele sunt stricate/expirate.
Curatati interiorul frigiderului.
In perioada verii, atunci cand temperatura mediului inconjurator este
crescuta, compresorul va functiona o perioada mai mare de timp.
Nu depozitati prea multa mancare in interiorul frigiderului.
Permiteti alimentelor sa se raceasca inainte de a fi depozitate in
frigider.
Deschideti frecvent usa frigiderului.
Luminile din interior
nu se aprind
Usa nu se inchide corect
Zgomote puternice
Verificati daca frigiderul este conectat la priza.
Verificati daca sistemul de iluminat functioneaza.
Usa nu se poate inchide datorita alimentelor din interior.
Prea multe alimente in interiorul frigiderului.
Frigiderul nu este drept.
Verificati daca frigiderul este drept si echilibrat.
Verificati daca partile componente ale frigiderului sunt asezate corect.
7.1 Sfaturi despre caldura degajata.
Aparatul dumneavoastra poate degaja caldura in timpul functionarii in special vara.
◆
Aceasta caldura este generata de condensator si este o situatie normala.
Condensul poate fi observat pe suprafetele exterioare si sigiliile usilor atunci cand nivelul
◆
umiditiatii din incapere este ridicat. Acest fenomen este unul normal si condensul poate fi sters
cu o carpa uscata.
Un sunet bazait : acest sunet este generat de compresor atunci cand este pornit sau oprit.
◆
8. Sfaturi cu privire la economia de energie.
Incercati sa deschideti usa frigiderului numai cand aveti nevoie, in special in sezonul cald.
O data ce ati deschis usa, inchideti-o cat mai repede. Verificati ocazional daca aparatul este
bine ventilat (in special in partea din spate).
7
Page 30
In conditii normale de temperatura, setati termostatul pe nivelul mediu (MED).
Inainte de depozitarea alimentelor, asigurati-va ca acestea au fost racite la temperatura camerei.
Gheata poate duce la un consum ridicat de energie. Curatati aparatul indata ce stratul de gheata
ajunge la 3-5 mm. In cazul in care aparatul dumneavoastra are un condensator exterior, acesta
trebuie curatat cu regularitate.De asemenea, va rugam sa consultati sectiunea "Amplasare" pentru
a evita un consum crescut de energie electrica.
Pozitionati aparatul in cea mai racoroasa zona a incaperii respective, departe de lumina
◆
directa a soarelui si surse generatoare de caldura.
◆ Permiteti alimentelor fierbinti sa se raceasca inainte de a fi depozitate in frigider. Incarcarea
excesiva cu alimente va face compresorul sa functioneze pentru o perioada mai lunga de timp.
Alimentele care se congeleaza foarte greu isi pot pierde calitatile sau se pot strica.
◆Asigurati-va ca alimentele sunt impachetate corespunzator si ca recipientele sunt uscate inainte
de a fi introduse in frigider. In acest fel veti reduce cantitatea de gheata care se va forma in
interiorul aparatului.
◆ Nu folositi folie de aluminiu, hartie cerata sau prosoape de hartie in interiorul recipientelor
interioare. Acestea afecteaza circulatia aerului rece si scad eficienta aparatului.
Va recomandam sa organizati si sa etichetati alimentele pentru a evita cautarile indelungate si
◆
deschiderile frecvente ale usilor. Scoateti cat mai multe alimente si inchideti usa imediat.
9. Eliminarea produsului
Unitatile vechi sunt inca valoroase. O eliminare cat mai ecologica va asigura refolosirea
anumitor materiale. Refrigerantul folosit in unitatea dumneavoastra si in materialele izolatiei
necesita proceduri speciale de inlaturare. Asigurati-va ca nici una dintre tevile de pe partea
posterioara a frigiderului, nu sunt avariate inainte de a arunca produsul. Consiliul local din
zona dumneavoastra va poatea oferi informatii actualizate asupra celor mai potrivite metode
de a renunta la produsul dumneavoastra. Atunci cand aruncati o unitate veche, demontati
usile si incuietorile.
9.1 Eliminarea corecta a produsului
Simbolul alaturat indica faptul ca, in UE, acest aparat nu trebuie aruncat impreuna cu
deseurile menajere. Pentru a nu dauna mediului inconjurator sau
sanatatii populatiei, acest produs trebuie reciclat intr-un mod responsabil
si trebuie promovata reutilizarea resurselor intr-un mod sustenabil. Puteti
returna un produs folosit in centrele de colectare sau contactand magazinul
de unde ati cumparat produsul. Comerciantul poate prelua produsul
pentru reciclare in siguranta.
Pentru mai multe informatii contactati consiliul local din zona dumneavoastra
sau magazinul din care ati cumparat produsul.
8
Page 31
Activati-va garantia...
in
5
Pasi
simpli!
Scanati codul QR pentru
a obtine formularul de garantie.
Accesati link-ul de mai jos:
https://www.inventoraerconditionat.ro/
certificatul-de-garantie-inventoraer-conditionat-si-electrocasnice
Alegeti tipul de produs pentru
care vreti sa activati garantia
(aparat de aer conditionat, alt
aparat electrocasnic).
Alegeti tipul de garantie
corespunzator produsului
achizitionat.
Completati formularul cu
informatiile cerute (numele
proprietarului, magazinul,
produsul) si apasati SEND.
Veti primi care va confirma
activarea garantiei.
Pentru inregistrarea
electronicaa garantiei, va rugam sa
accesati link-ul de mai jos :
https://www.inventoraerconditionat.ro/certificatul-de-
garantie-inventor-aer-conditionat-si-electrocasnice
Page 32

Inhaltsverzeichnis
1. Sicherheitshinweise..........................................................................................1
2. Installation.........................................................................................................1
2.1 Standort............................................................................................................2
2.2 Umkehren des Türanschlags............................................................................2
2.3 Tür-Platzbedarf.................................................................................................3
2.4 Nivellieren der Einheit.......................................................................................3
2.5 Reinigung vor dem Gebrauch...........................................................................4
2.6 Bevor Sie Ihr Gerät in Betrieb nehmen.............................................................4
2.7 Innenausstattungen..........................................................................................4
3. Produktübersicht...............................................................................................4
4. Betrieb...............................................................................................................5
4.1 Temperatureinstellung......................................................................................5
4.2 Geräusch im Inneren des Gerätes!...................................................................5
4.3 Tipps zum Aufbewahren von Lebensmitteln ....................................................5
5. Reinigung..........................................................................................................6
5.1 Abtauen.............................................................................................................6
5.2 Reinigen des Inneren und des Äußeren ...........................................................6
5.3 Reinigungstipps.................................................................................................6
6. Instandhaltung...................................................................................................6
6.1 Vorsicht beim Umgang mit / Verschieben des Gerätes ....................................6
6.2 Wartung.............................................................................................................6
6.3 Abstellung über einen längeren Zeitraum..........................................................7
7. Fehlerbehebung.................................................................................................7
7.1 Wärme-Tipps:.........................................................................................................7
8. Tipps zur Energieeinsparung.............................................................................7
9. Entsorgung........................................................................................................8
9.1 Korrekte Entsorgung des Gerätes .........................................................................8
Page 33
1. SICHERHEITSHINWEISE
Achten Sie bei der Einbaustruktur darauf, dass Sie die Belüungsöffnung
am Gehäuse des Gerätes frei von Hindernissen lassen.
2) WARNUNG—Verwenden Sie keine mechanischen Vorrichtungen oder andere als die vom
4) WARNUNG—Verwenden Sie keine elektrischen Geräte in den
5) Das Gerät darf während der Reinigung nicht am Stromnetz
angeschlossen sein. Ziehen Sie den Netzstecker vorher aus der Steckdose.
6) Dieses Gerät kann von Kindern ab 8 Jahren, Personen mit beeinträchgten, körperlichen oder
geisgen Fähigkeiten bzw. eingeschränkter Wahrnehmung oder ohne Erfahrung und Kenntnisse benutzt
werden, wenn sie beaufsichgt oder bezüglich des sicheren Gebrauchs des Gerätes unterwiesen wurden.
Bedingung ist hierbei ihre Beaufsichgung und Anleitung hinsichtlich der sicheren Handhabung des Geräts
und das Bewusstsein der damit verbundenen Risiken. Kinder dürfen nicht mit dem Gerät spielen. Eine
Reinigung und Wartung darf nicht von Kindern durchgeführt werden, es sei denn, sie sind über 8 Jahre
alt und werden dabei überwacht.
7) Wenn das Netzkabel beschädigt ist, muss es durch den Hersteller seinen Kundendienst
oder eine ähnlich qualifizierte Person ersetzt werden.
8) Dieses Gerät beinhaltet Brenngase und Treibgas. Das Gerät darf nicht zusammen mit dem
Hausmüll oder Sperrmüll entsorgt werden. Die Isolierung enthält entzündliche Gase: das Gerät muss
gemäß den Gerätevorschrien, die Sie von den lokalen Behörden erhalten können, entsorgt werden.
9) Bevor Sie das Gerät entsorgen, enernen Sie unbedingt die Türen oder machen alle vorhandenen
Schlösser unbrauchbar, um zu verhindern, dass spielende Kinder sich im Gerät einsperren.
- Dieses Gerät ist als Haushaltsgerät oder zur ähnlichen Anwendung wie folgt gedacht:
- Im Küchenbereich von Büroräumen, Geschäen, Büros und anderen Arbeitsumgebungen
- In Gutshäusern, Hotels, Motels, Catering und anderen wohnähnlichen Bereichen.
10) Explosive Stoffe, wie Sprühdosen mit brennbarem Treibmiel nicht in diesem Gerät lagern.
Es ist Gefährlich, dass andere Personen als ein autorisiertes Fachpersonal, Reparaturarbeiten
an dem Gerät durchführen.
Versuchen Sie Reparaturarbeiten nicht selbst auszuführen, da Sie sich damit einer
Stromschlaggefahr aussetzten.
2. INSTALLATION
1
Page 34
2.1 Standort
Wenn Sie eine Position für das Gerät auswählen, so stellen Sie vorher sicher, dass der Boden stabil und
fest ist und der Raum gut belüftet ist. Vermeiden Sie das Gerät in der Nähe einer Wärmequelle,
wie z.B. Kocher, Kessel oder Heizkörper aufzustellen. Vermeiden Sie auch direkte
Sonneneinstrahlung, da sonst der Stromverbrauch erhöht werden könnte. Extrem kalte
Umgebungstemperaturen können das Gerät auch dazu führen nicht ordnungsgemäß zu arbeiten.
Dieses Gerät ist nicht für den Einsatz in einer Garage oder im Außenbereich entwickelt. Decken Sie das
Gerät nicht ab.
Beim Einbau des Geräts stellen Sie sicher, dass 40 cm Freiraum auf beiden Seiten, 15 cm an der
Rückseite und 20 cm an der Oberseite des Gerätes lassen. Dies ermöglicht, dass kalte Luft
um das Gerät zirkuliert und verbessert die Effizienz des Kühlprozesses. Die Tür kann nach rechts oder
links geöffnet werden, je nachdem, was dem Standort des Gerätes besser entspricht. Stellen Sie dazu
bitte sicher, dass genügend Platz vorhanden ist, um die Tür ganz öffnen zu können.
2.2 Umkehren des Türanschlags
Benötigte Werkzeuge: Kreuzschraubendreher / Flachklingen-Schraubendreher /
Sechskantschlüssel
♦ Wenn Sie die Richtung des Türanschlages umkehren möchten, sollten Sie dazu einen qualifizierten
Fachtechniker kontaktieren. Sie sollten den Wechsel nur selber ausführen, wenn Sie glauben,
dass Sie dazu qualifiziert sind.
♦ Achten Sie darauf, dass das Gerät leer ist und der Stecker aus der Steckdose gezogen wurde.
♦ Stellen Sie die beiden Stellfüße in ihre höchste Position ein.
♦ Um die Tür zu entfernen, ist es notwendig, das Gerät nach hinten zu kippen. Sie sollten
das Gerät auf etwas Festes anlegen, so dass es nicht während des Wendevorgangs der
Tür rutschen wird.
♦ Alle entfernten Teile müssen aufbewahrt werden, um den Neueinbau der Tür durchzuführen.
♦ Legen Sie das Gerät nicht flach hin, da dies einen Schaden am Kühlmittelsystem hervorrufen könnte.
♦ Wir empfehlen, dass zwei Personen die Montage des Geräts vornehmen sollten.
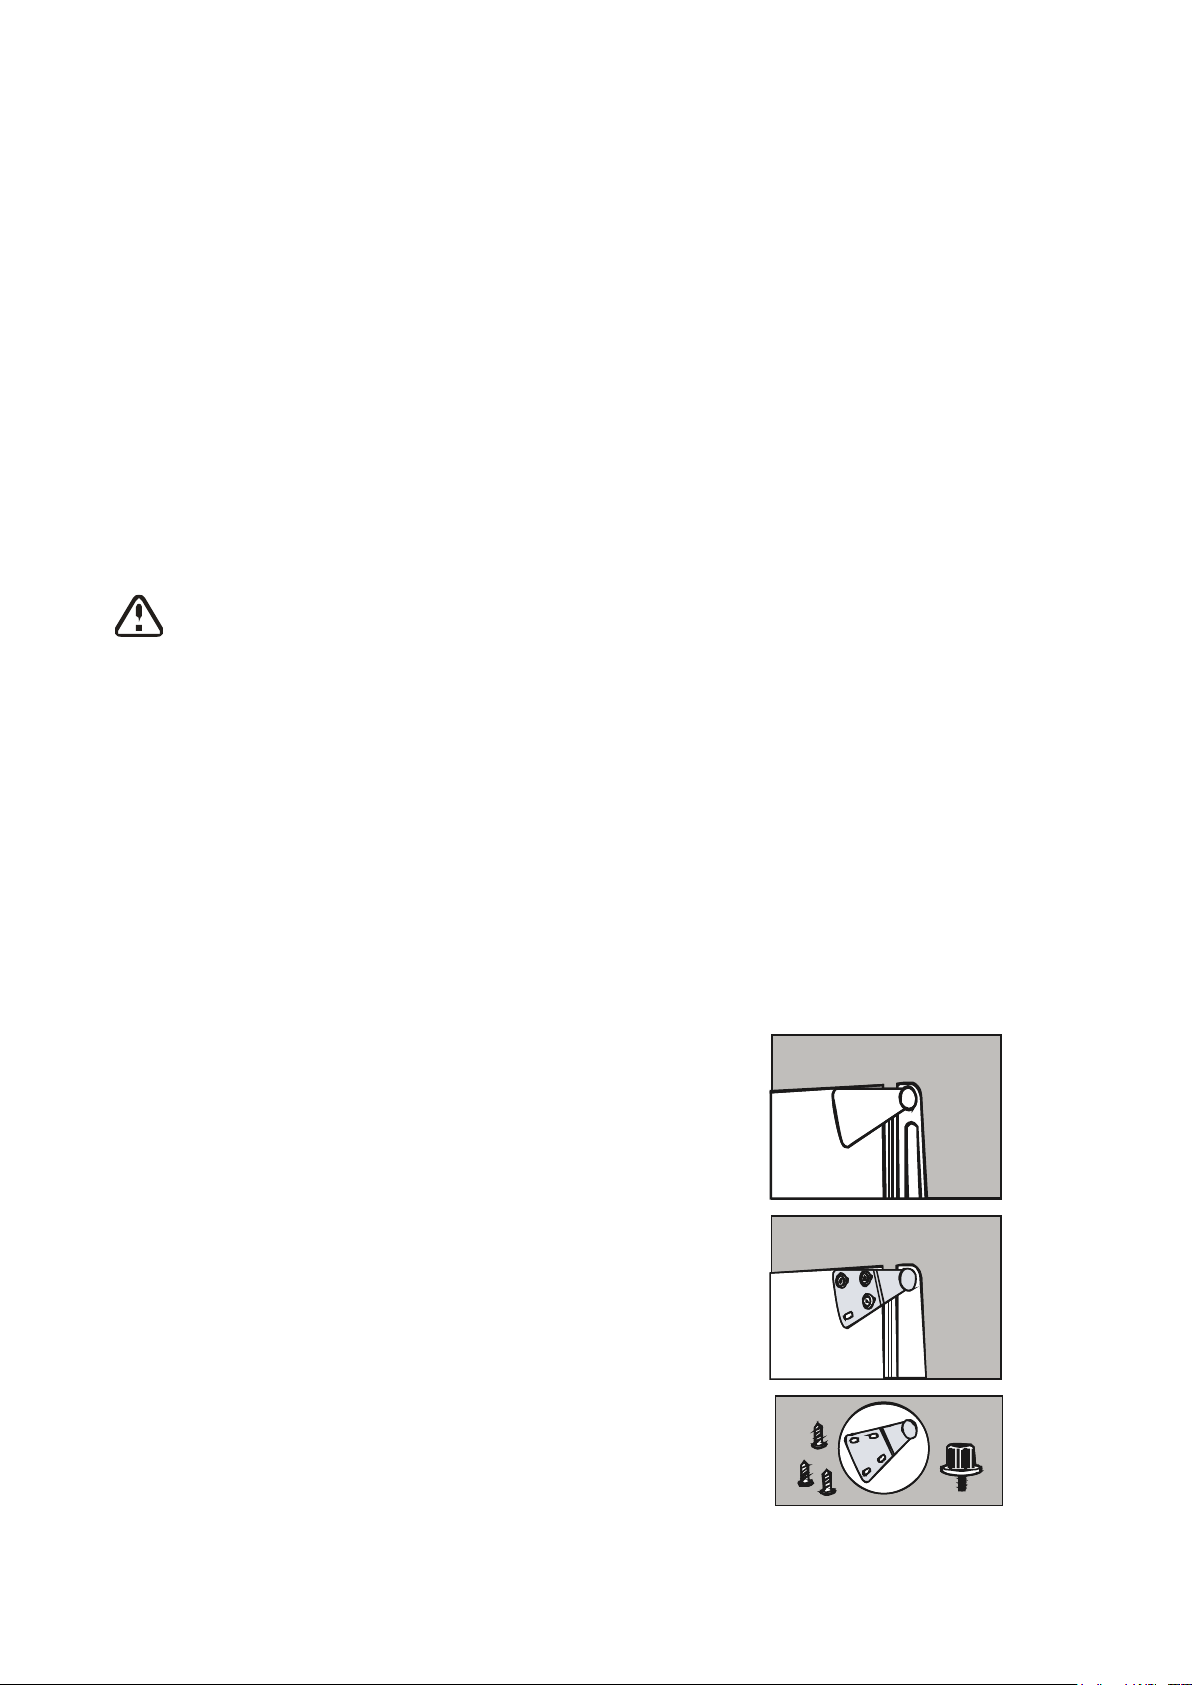
1) Entfernen Sie die Kunststoffabdeckung von dem oberen Türscharnier.
2) Die drei Schrauben aus dem Tretlager abschrauben. Entfernen Sie den Fuß von der
gegenüberliegenden Seite.
3) Stellen Sie es auf eine Seite auf.
1) Entfernen Sie die Kunststoffabdeckung von dem
oberen Türscharnier.
2) Die drei Schrauben aus dem Tretlager abschrauben.
Entfernen Sie den Fuß von der gegenüberliegenden Seite.
3) Stellen Sie es auf eine Seite auf.
2
Page 35
8 8 0
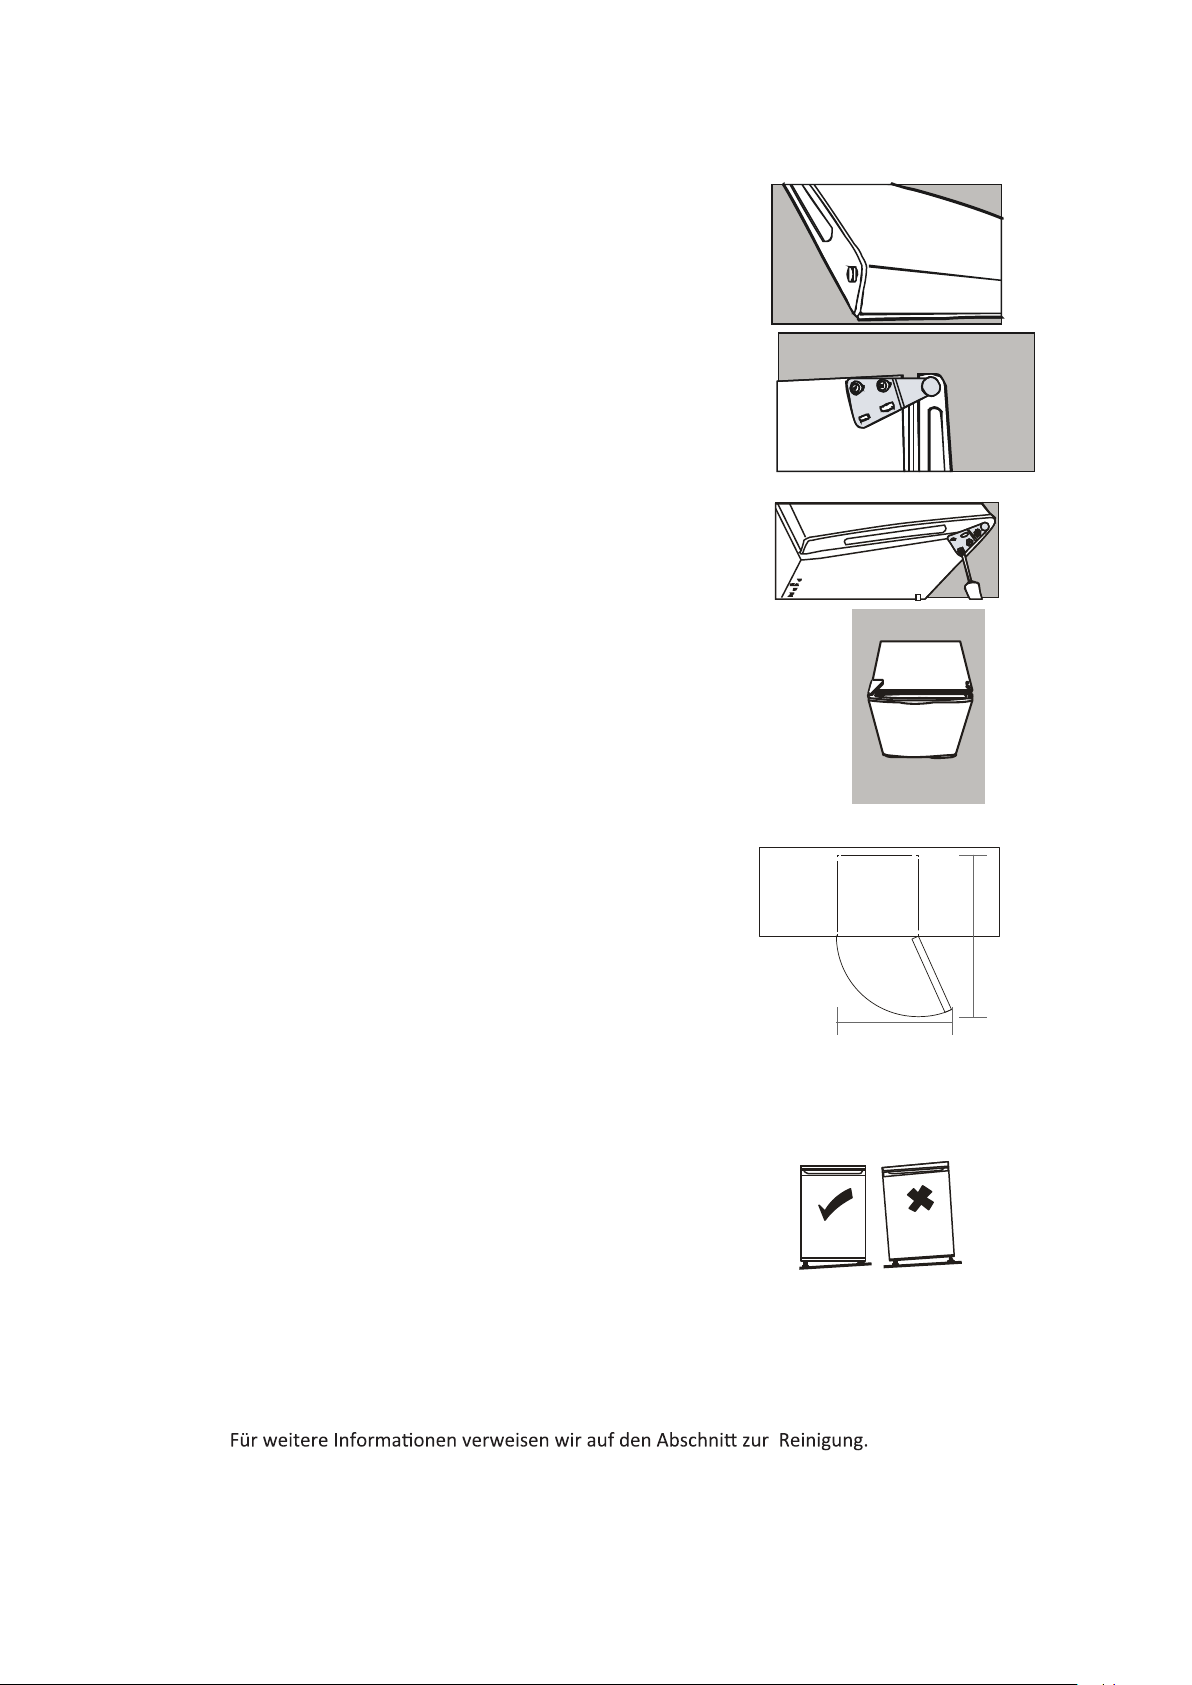
4) Schieben Sie die Gerätetür ca. 15 cm nach unten, entfernen
Sie den oberen Scharnierbolzen und heben Sie ihn weg von
dem Gerät ab.
5) Entfernen Sie die beiden Schrauben von der oberen Halterung
und ersetzen Sie sie auf der anderen Seite. Sie müssen zuerst
die Kunststoffkappen von der anderen Seite entfernen.
6) Schieben Sie die Gerätetür wieder auf das obere Scharnier,
so dass es Sie sicher, dass sie positioniert ist.
Schrauben Sie das untere Scharnier an seinem Platz auf der
neuen Seite. Setzen Sie den anderen Fuß auf der anderen
Seite wieder ein. Setzen Sie die Kunststoffabdeckung wieder
ein, indem Sie sie zurück in die richtige Position auf das
Türscharnier anklicken.
7) Vor dem Festziehen des Scharniers, Stellen Sie sicher,
dass die Tür horizontal und vertikal so ausgerichtet wird,
dass die Dichtungen an allen Seiten geschlossen sind.
2.3 Platzbedarf
Halten Sie genügend Platz zum öffnen der Tür ein.
Siehe Abbildung
800
2.4 Nivellieren des Gerätes
Um dies zu tun passen Sie die beiden Nivellierfüße an der
Vorderseite des Gerätes an. Wenn das Gerät nicht gerade
steht, werden die Türen und die magnetischen Dichtungausrichtungen nicht richtig abgedeckt werden.
2.5 Reinigung vor dem Gebrauch
Das Gerät sowie die Teile der Innenausstaung sind vor Inbetriebnahme gründlich zu
reinigen. Nutzen Sie dazu lauwarmes Wasser mit einem neutralen Reinigungsmiel um den typischen
Geruch des neuen Produkts zu enernen. Reinigen Sie die Aussenseite des Gerätes mit einem feuchten
Tuch.
3
Page 36
2.6 Bevor Sie Ihr Gerät in Betrieb nehmen
Wenn Sie den Kühlschrank zum ersten Mal in Betrieb nehmen, muss er zunächst vollständig leer
arbeiten, bis sich die Betriebstemperatur automatisch eingestellt hat.
• Vor dem Einstecken überprüfen Sie bitte, ob Ihre Steckdose mit dem im Lieferumfang
enthaltenen Stecker kompatibel ist.
• Vor dem Einschalten des Gerätes
Schalten Sie das Gerät erst 2 Stunden nach seiner Aufstellung an, da die Kühlflüssigkeit
einige Zeit braucht, um zurück zu fliessen.
2.7 Innenausstattungen
Verschiedene Glas- oder Kunststoff-Abstellflächen sind in ihrem Gerät enthalten - Die
verschiedenen Modelle haben unterschiedliche Kombinationen.
Sie sollten immer eine der Glas-Abstellflächen für Große Objekte in der untersten Reihe
über die Obst- und Gemüsebehälter schieben und in dieser Position halten. Um dies zu
tun, ziehen Sie die Abstellfläche nach vorn, bis sie nach oben oder unten geschwenkt
und entfernt werden kann.
Bitte tun Sie das gleiche nochmal, um das Regal in einer anderen Höhe einzufügen.
Um den Raum des Frischkühlfachs und des Gefriergut-Lagerfachs so gut wie möglich
nutzbar zu machen, kann der Benutzer ein oder mehrere Regale, Schubladen aus dem
Gerät je nach dem täglichen Gebrauch entfernen.
3. PRODUKTÜBERSICHT
Kleine Tür
Thermostat
Pfanne, Abfluss,
Stahldraht-Regal
Stahldrahtgeflecht
Nivelierer, Fuß
* Alle Bilder in dieser Bedienungsanleitung dienen nur als Referenz; für weitere Einzelheiten verweisen wir auf Ihre eigene Einheit.
4
Page 37
4. BETRIEB
4.1 Einstellen der Temperatur
◆ Der Temperaturwahlknopf befindet sich auf der inneren rechten
Seitenwand des Kühlschranks Einstellung "Off": schaltet das
Gerät aus
Einstellung "Min": vermindert die Kühlung der Temperatur
Einstellung "Med": Normalbetrieb (ausreichend für die meisten
Bedingungen)
Einstellung "Max": maximale Kühlung der Temperatur
Bei hohen Umgebungstemperaturen, z.B. an heißen Sommertagen, könnte es notwendig sein,
◆
◆
den Thermostat auf die kühlste Einstellung (Position "Max") einzustellen. Dies kann dazu führen,
dass der Kompressor kontinuierlich arbeitet, um eine niedrige Temperatur in dem Gehäuse zu
halten.
Bei der Erstinstallation ihres Kühlschranks, sollten Sie den Thermostatknopf auf "Med" einstellen.
Geben Sie Ihrem Kühlschrank die Zeit vollständig abzukühlen, bevor Sie Lebensmittel hinzufügen.
Das Beste wäre 24 Stunden zu warten, bevor Sie Lebensmittel hinzufügen. Der Temperaturknopf
regelt die Temperatur. Wenn der Temperaturregler-Knopf auf OFF gesetzt ist, wird der Kühlschrank
nicht arbeiten.
4.2 Geräusch im Inneren des Gerätes!
Sie werden feststellen, dass Ihr Gerät einige ungewöhnliche Geräusche macht. Die meisten von
ihnen sind völlig normal, aber man sollte darüber in Kenntnis gesetzt werden!
Diese Geräusche werden durch die Zirkulation der Kühlflüssigkeit in dem Kühlsystem verursacht.
Sie haben seit der Einführung der FCKW-freien Gase weiter zugenommen. Dies ist keine Störung
und wird die Leistung des Geräts nicht beeinflussen. Dies ist der Kompressormotor der läuft und
das Kühlmittel um das System pumpt.
4.3 Tipps zum Aufbewahren von Lebensmitteln in der Einheit
• Gekochtes Fleisch/ Fisch sollte immer auf einem Regal über rohem Fleisch/Fisch gelagert werden,
um eine Bakterienübertragung zu vermeiden. Halten Sie rohes Fleisch/Fisch in einem Behälter, der gross
genug ist, um Flüssigkeiten zu sammeln und decken Sie diesen richtig ab. Stellen Sie den Behälter auf
das unterste Regal.
• Lassen Sie Raum um Ihre Nahrung, damit die Luft im Inneren des Gerätes zirkulieren kann.
Stellen Sie sicher, dass alle Teile der Einheit kalt bleiben.
• Um die Übertragung von Geruch und das Austrocknen zu vermeiden, verpacken oder decken Sie
Lebensmittel separat ab. Obst und Gemüse brauchen nicht verpackt zu werden.
• Lassen Sie vorgekochte Lebensmittel immer abkühlen, bevor Sie sie in das Gerät setzen. Dadurch
wird die Innentemperatur der Einheit aufrechterhalten.
• Um den Verlust von kalter Luft zu vermeiden, versuchen Sie das Öffnen der Tür zu begrenzen.
Wir empfehlen hierbei, die Tür nur zu öffnen, wenn Sie Lebensmittel hineinstellen oder herausnehmen möchten.
5
Page 38
5. REINIGUNG
5.1 Abtauen
Frost kann sich auf der inneren Rückseite des Gerätes ansammeln, der
automatisch während des Zyklus des Kompressors aufgetaut wird.
Das Wasser wird über das Ablaufloch in die Auffangwanne über dem
Kompressor geleitet, wo es verdunstet wird.
Stellen Sie sicher, dass das Ablaufloch regelmäßig überprüft und gereinigt
wird, damit das Wasser in das Ablagefach austreten kann.
Entfernen Sie alle Regale und das Salatfach. Um das Salatfach entfernen zu können, müssen Sie vorab
das untere Türregal entnehmen.
♦
Reinigen Sie das Gerät, einschließlich Innenausstattung, am besten nur mit einem Lappen und lauwarmem
Wasser. Verwenden Sie keine scheuernden Reinigungsmittel. Nach der Reinigung mit klarem Wasser nach
wischen und gut trockenreiben. Danach die Regale und das Salatfach wieder einsetzen.
♦ Um das Äussere zu reinigen, verwenden Sie ein feuchtes Tuch. Zum Abwischen benutzen Sie bitte ein
einfaches Poliermittel. Stellen Sie dabei immer sicher, dass die Tür vollkommen geschlossen ist, so dass das
Poliermittel nicht auf die Magnetdichtung oder ins Innere des Gerätes gelangt.
♦ Das Gitter des Kondensators an der Rückseite des Gerätes und die angrenzenden Bauteilen können mit
einem weichen Bürstenaufsatz abgesaugt werden.
5.2 Reinigen des Inneren und des Äußeren der Einheit
5.3 Reinigungstipps
Auf der Außenseite des Kühlschranks kann es durch Temperaturänderungen zu Raureif kommen. Wischen
Sie jegliche Feuchtigkeitsrückstände ab. Sollte das Problem weiterhin bestehen, wenden Sie sich bitte an
einen qualifizierten Fachtechniker um Hilfe.
6. INSTANDHALTUNG
6.1 Vorsicht beim Umgang/Verschieben des Gerätes. Halten Sie das Gerät um seine Seiten oder Unterteil,
wenn Sie es bewegen. Unter keinen Umständen sollten Sie es an den Ecken oder Oberfläche gehoben werden.
6.2 Wartung
Das Gerät sollte von einem autorisierten Fachmann und nur mit Original-Ersatzteilen gewartet werden.
Unter keinen Umständen sollten Sie versuchen, das Gerät eigenhändig zu reparieren. Reparaturen, die
von unerfahrenen Personen durchgeführt werden, könnten zu Verletzungen oder schweren
Funktionsstörungen führen. Kontaktieren Sie einen qualifizierten Techniker.
6.3 Ausschalten für einen längeren Zeitraum
Wenn das Gerät für eine lange Zeit aus dem Betrieb genommen wird, trennen Sie es vom Stromnetz ab,
entleeren Sie es von allen Lebensmitteln und reinigen Sie das Gerät und lassen Sie die Tür halb offen
um unangenehme Gerüche zu vermeiden.
6
Page 39
7. Fehlerbehebung
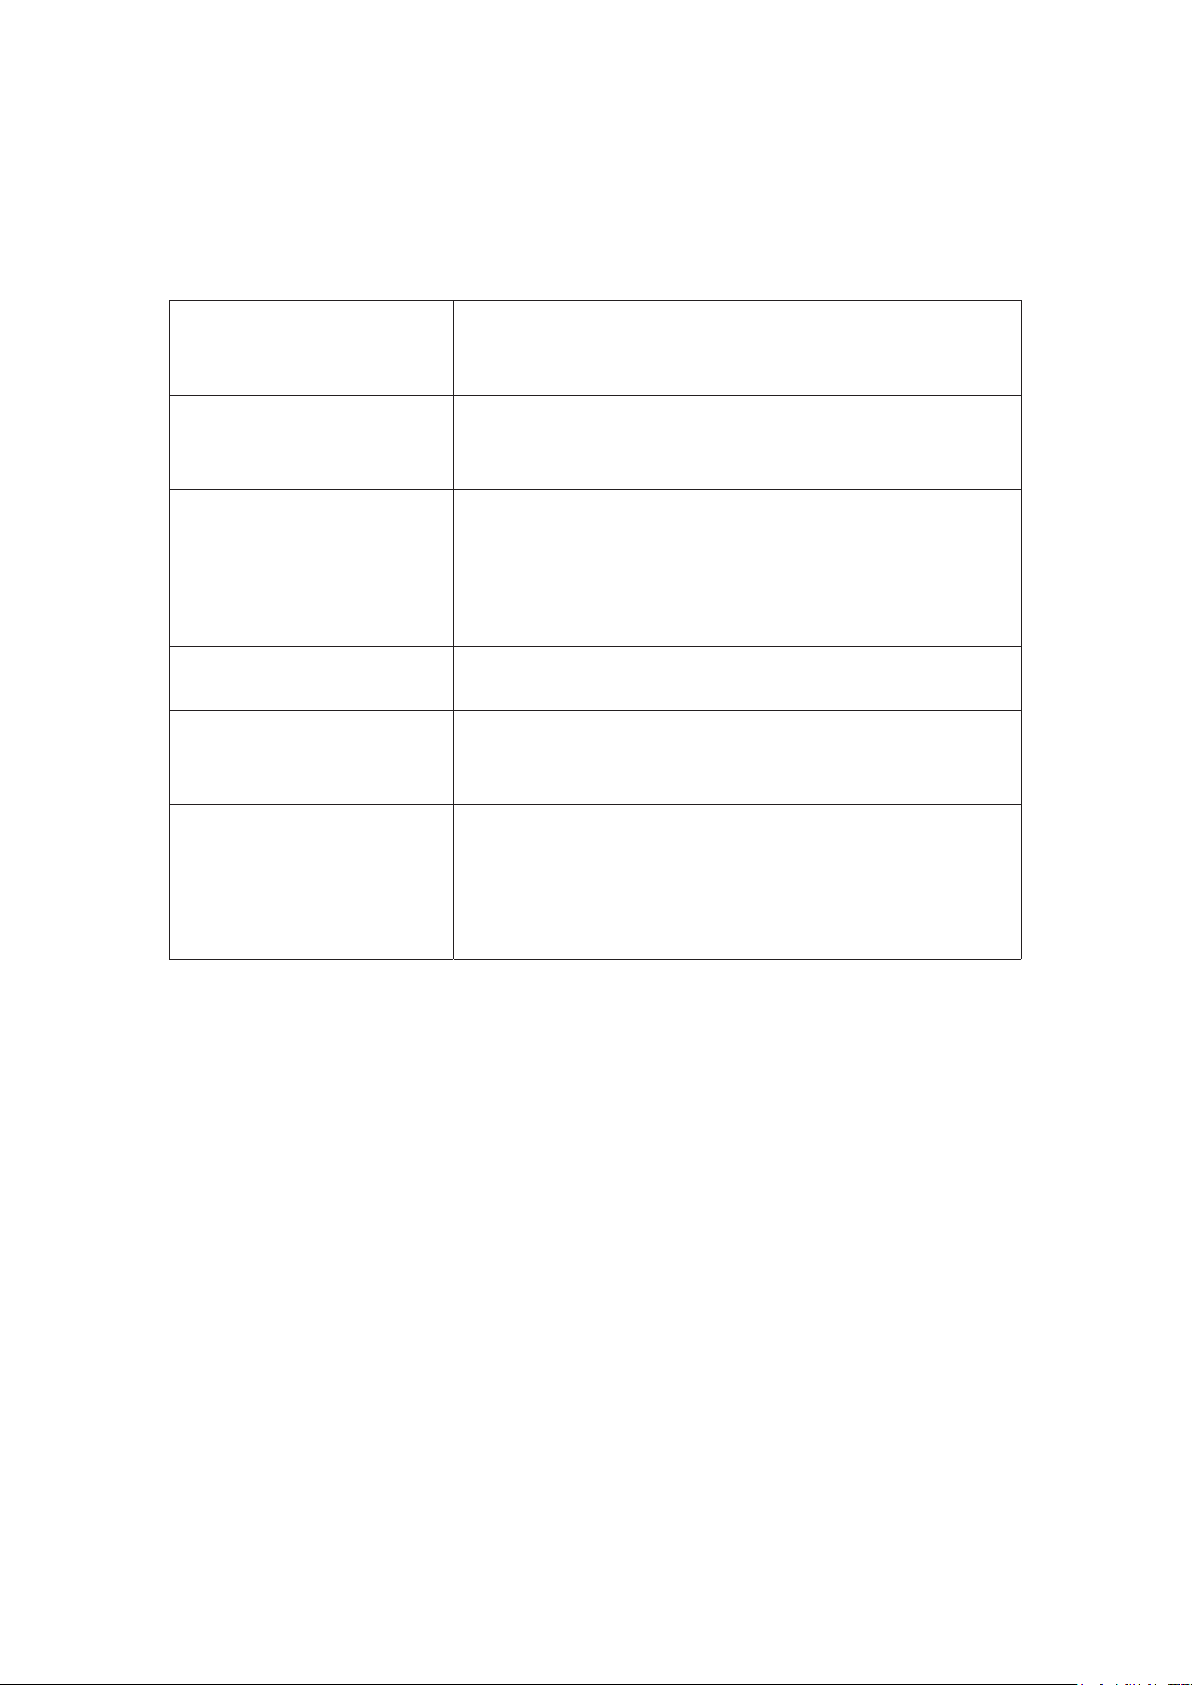
Die folgenden einfachen Probleme können durch den Benutzer gehandhabt werden. Bitte rufen
Sie die Kundendienstabteilung, wenn die Probleme nicht gelöst werden.
Kein Betrieb
Geruch
Langzeitbetrieb des
Kompressors
Beleuchtung leuchtet nicht
Die Kühlschranktür kann nicht
richtig geschlossen werden.
Laute Geräusche
Prüfen Sie, ob das Gefriergerät angeschlossen ist und mit
Strom versorgt wird;
Niederspannung;
Stromausfall oder Auslöseschaltung
Riechende Lebensmittel sollten gut verschlossen gelagert werden.
Prüfen Sie, ob die Lebensmittel verdorben sind. Prüfen Sie, ob das
Innere des Gerätes eventuell gereinigt werden muss.
Im Sommer, wenn die Raumtemperatur
höher ist, ist dies normal.
Legen Sie nicht zu viele Lebensmittel auf einmal in den Kühlschrank.
Legen Sie keine warmen Lebensmittel in den Kühlschrank.
Zu häufiges Öffnen der Kühlschranktür.
Prüfen Sie, ob das Gerät am Strom angeschlossen ist (Steckdose)
und ob eventuell das Beleuchtungslicht beschädigt ist.
Eventuell blockieren Lebensmittelverpackungen das Schliessen
oder das Gerät ist gekippt.
Gerät steht nicht gerade. Stellen Sie die Füße neu ein.
Das Gerät berührt die Wand oder andere Objekte. Verschieben Sie
das Gerät ein wenig.
Ein Bauteil, beispielsweise ein Rohr auf der Rückseite des Gerätes
berührt einen anderen Teil des Geräts oder die Wand.
Falls notwendig, biegen Sie den Bauteil sorgfältig aus dem Weg
7.1 Wärme-Tipps:
• Das Gerät kann während seines Betriebes in den Sommermonaten Wärme abstrahlen.
Diese kommt vom Kompressor und ist normal.
• Wasserdampf /Raureif. Kondensationserscheinigungen können auf der Außenseite des Kühlschranks und
der Türdichtung auftreten, wenn die Luftfeuchtigkeit hoch ist. Dies ist normal und kann mit einem trockenen
Tuch abgewischt werden.
• Geräusche: Der Kompressor erzeugt beim Starten und Stoppen Geräusche.
8. TIPPS FÜR ENERGIEEINSPARUNG
Versuchen Sie nicht allzu oft die Tür zu öffnen, vor allem, bei nassem und heißem Wetter. Sobald Sie die
Tür geöffnet haben, schließen Sie sie so schnell wie möglich wieder.
Überprüfen Sie hin und wieder, ob das Gerät ausreichend belüftet wird (eine ausreichende Luftzirkulation
hinter dem Gerät).
Bei normalen Temperaturverhältnissen, stellen Sie bitte den Thermostat auf die mittlere Einstellung.
Bevor Sie das Gerät mit Paketen von frischen Lebensmitteln beladen, stellen Sie sicher, dass sie auf
Umgebungstemperatur abgekühlt sind.
Eis- und Frostschichten erhöhen den Energieverbrauch, daher sollten Sie das Gerät sofort reinigen,
sobald die Schicht 3 bis 5 mm dick ist.
7
Page 40
Im Falle des äußeren Kondensators sollte der Rückwand immer sauber und frei von Staub oder
Verunreinigungen sein. Beachten Sie immer die Anweisungen, die in den Abschnitten zur
"Aufstellung und Energiespartipps" angegeben sind, da sonst der Energieverbrauch wesentlich
höher sein könnte.
♦ Das Gerät sollte sich im kühlsten Bereich des Raumes befinden, weit weg von Wärme erzeugenden
Geräten oder Heizungsrohren, und fern von direkter Sonneneinstrahlung.
♦ Lassen Sie heiße Lebensmittel auf Raumtemperatur abkühlen, bevor Sie diese in das Gerät einlegen.
Die Überlastung des Geräts zwingt den Kompressor länger zu arbeiten. Lebensmittel, die zu langsam
einfrieren könnten ihre Qualität verlieren oder verderben.
♦ Achten Sie darauf, die Lebensmittel richtig einzupacken und die Behälter trocken zu wischen, bevor
Sie diese in das Gerät legen. Dies reduziert die Frostbildung im Inneren des Gerätes.
♦ Das Lage fach/Behälter des Gerätes sollte nicht mit Aluminiumfolie, Wachspapier oder Papiertuch
ausgelegt werden. Auslegungen oder Auskleidungen beeinträchtigen die Kalt Luftzirkulation.
♦ Organisieren und markieren Sie Lebensmittel um Türöffnungen und andauernde Suche zu reduzieren.
Entnehmen Sie so viele Sachen wie nötig auf einmal, und schließen Sie die Tür so schnell wie möglich.
9. ENTSORGUNG
Alte Geräte haben noch einigen Restwert. Durch ein umweltfreundliches Verfahren zur Entsorgung wird
sichergestellt, dass wertvolle Rohstoffe wieder gewonnen und verwendet werden. Das Kältemittel, das in
Ihrem Gerät und den Isolationsmaterialien verwendet wird, erfordert ein besonderes Entsorgungsverfahren.
Stellen Sie sicher, dass keine der Leitungen auf der Rückseite der Einheit vor der Entsorgung beschädigt ist.
Aktuelle Informationen
können Sie von Ihrer Gemeindeverwaltung erhalten.
Vor der Entsorgung eines alten Gerätes, entfernen Sie vorab alle vorhandenen Schlösser oder Verriegelungen
und entfernen zur Sicherheit auch die Tür.
9.1 Korrekte Entsorgung dieses Produkts
Das Symbol auf dem Produkt oder seiner Verpackung weist darauf hin,
dass dieses Produkt nicht als Hausmüll behandelt werden darf. Stattdessen
sollte es zu einer entsprechenden Sammelstelle für das Recycling
von elektrischen und elektronischen Geräten gebracht werden. Durch die
Gewährleistung einer ordnungsgemäßen Entsorgung dieses Produkts helfen Sie,
potenzielle Umwelt- und Gesundheitsschäden zu verhindern, die sonst durch eine
unsachgemäße Entsorgung dieses Geräts verursacht werden könnten. Für weitere
Informationen über das Recycling dieses Produkts kontaktieren Sie bitte Ihre
örtlich zuständige Behörde, Ihr Müllabfuhr-Unternehmen oder das Geschäft, in
dem Sie das Produkt erworben haben.
über die Möglichkeiten der Entsorgung Ihres alten Gerätes und der Verpackung,
8
Page 41
Registrieren Sie Ihre Garantie...
in
Klicken Sie auf den folgenden Link:
http://www.inventorappliances.
com/garantie
5
einfachen
Schritten!
Hier scannen -
Garantieformular
Wählen Sie das Produkt für die
Garantieregistrierung aus
(Klimaanlagen oder
Haushaltsgeräte)
Wählen Sie die Garantie aus,
die Ihrem Kauf entspricht
Bitte füllen Sie alle erforderlichen
Felder aus (Besitzer, Einzelhändler
und Gerät) und drücken senden
Sie erhalten eine Bestätigungs
E-Mail über die Registrierung
Ihrer Garantie
Für die elektronische
Garantieregistrierung benutzen
Sie bitte den folgenden Link
http://www.
inventorappliances.com/
garantie
Page 42

Sommaire
1. NOTE DE SECURITE ............................................................................................................ 1
2. INSTALLATION ................................................................................................................... 1
2.1 Emplacement – Localisaon ...................................................................................... 2
2.2 Inversement de la direcon des portes ..................................................................... 2
2.3 Besoins en espace ....................................................................................................... 3
2.4 Nivellement de l’unité ................................................................................................ 3
2.5 Neoyage avant l’ulisaon ................ ...................................................................... 4
2.6 Avant d’uliser l’unité ............................................................................................... 4
2.7 Accessoires intérieurs ................................................................................................. 4
3. PRESENTATION DU PRODUIT ............................................................................................ 4
4. OPERATION ........................................................................................................................ 5
4.1 Ajustement de la température .................................................................................. 5
4.2 Bruits à l’intérieur de l’unité .................................................................................... 5
4.3 Conseils relafs à l’entreposage des aliments .......................................................... 5
5. NETTOYAGE ....................................................................................................................... 6
5.1 Dégivrage ................................................................................................................... 6
5.2 Neoyage de l’intérieur et de l’extérieur de l’unité .................................................. 6
5.3 Conseils de neoyage ............................................................................................... 6
6. MAINTENANCE – ENTRETIEN
............................................................................................ 6
6.1 Précauons pendant le traitement/le déplacement de l’unité ................................ 6
6.2 Entreen ..................................................................................................................... 6
6.3 Eteindre l’unité pour des longues périodes de temps .............................................. 7
CONSEILS DE DEPANNAGE
7. .............................................. .................................................. 7
7.1 Notes: ......................................................................................................................... 7
8. CONSEILS SUR LES ECONOMIES D’ENERGIE ................................. ... ................................. 7
9. ELIMINATION ..................................................................................................................... 8
9.1 Eliminaon appropriée du produit .............. .............................................................. 8
Page 43
1. NOTES DE SECURITE
1) ALERTE – Gardez toutes les ouvertures de venlaon libres d’obstacles.
2) ALERTE – N’ulisez pas de disposifs mécaniques ou d’instruments pour accélérer le processus
de dégivrage sans consulter premièrement le fabricant.
3) ALERTE – Ne détruisez pas le circuit de refroidissement.
4) ALERTE – N’ulisez pas de disposifs électriques à l’intérieur de réfrigérateur sauf s’ils sont
approuvés par le fabricant.
5) Cet appareil doit être débranché avant d’effectuer n’importe quelle maintenance ou quand il n’est
pas ulisé.
6) Il n’est pas proposé aux enfants âgés de moins de 8 ans d’uliser cet appareil. Veillez à s’assurer
que les enfants âgés de moins de 8 ans et les personnes à capacités physiques, sensorielles ou
mentales soient surveillées ou informées sur son ulisaon et sur les dangers opéraonnels. Le
neoyage et la maintenance ne doivent pas être effectués par les personnes susmenonnées sans
surveillance.
7) Si le cordon d’alimentaon est détruit, il doit être remplacé par le fabricant, l’agent de service ou
des personnes similaires qualifiées afin d’éviter le risque.
8) Veillez à suivre les règlements locaux lors d’éliminaon puisqu’il conent des réfrigérants et des gaz
inflammables.
9) Veillez à rerer toutes les portes avant l’éliminaon pour prévenir que les enfants ne soient pas
piégés à l’intérieur.
10) Cet appareil est desné à être ulisé dans des résidences ou aux autres applicaons similaires
telles que :
- Milieux de travail, zones pour le personnel et salles de pause
- Maisons de ferme
- Hôtels, motels et environnements résidenels
- Chambres à coucher et dans tous les types de milieux de pet-déjeuner
- Dans les lieux et les locaux d’alimentaon et dans des autres lieux similaires pas résidenels
11) N’entreposez pas dans cet appareil de substances explosives telles que bombes aérosol qui
conennent des propulseurs inflammables.
Il est dangereux pour qui que ce soit sauf le personnel de service autorisé d’effectuer
des services ou des réparaons qui nécessitent le recouvrement.
Pour éviter le risque d’un choc électrique, n’effectuez pas de réparaons par vous-mêmes.
1
Page 44
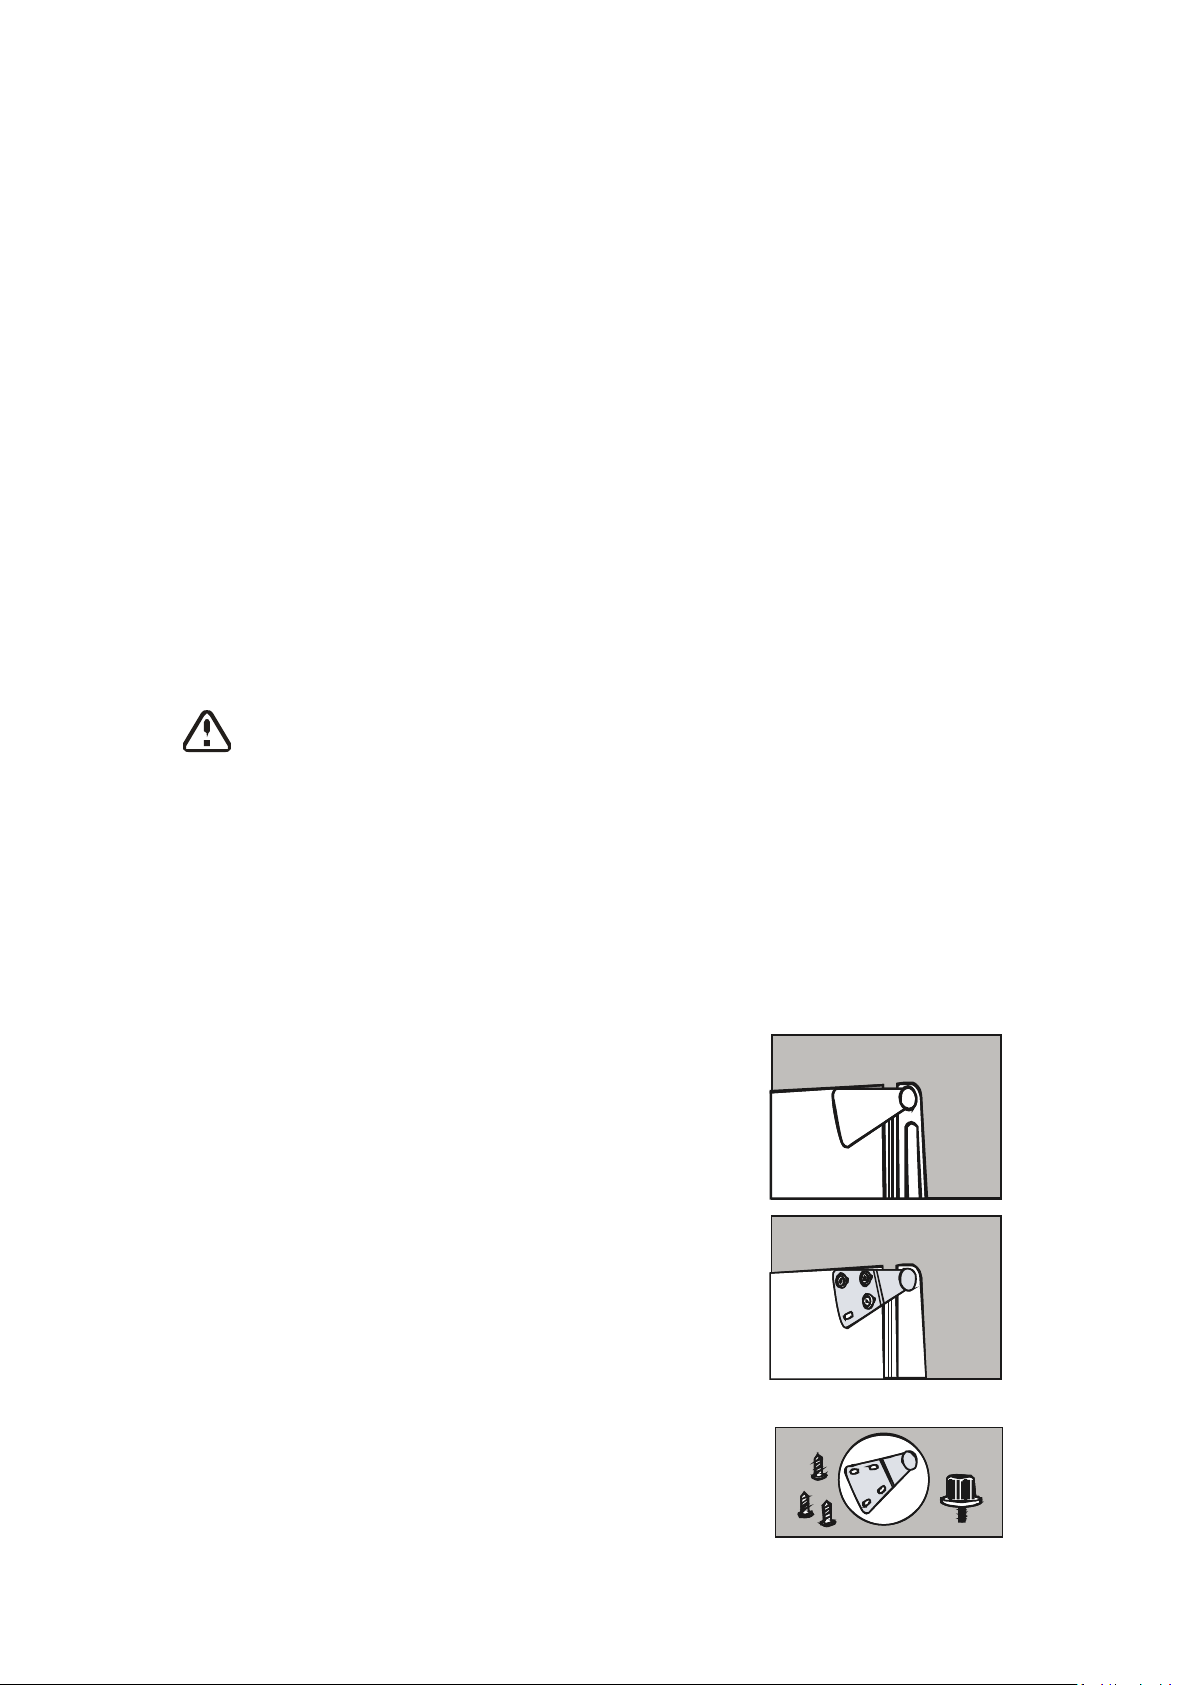
2. INSTALLATION
2.1 Emplacement – Localisation
Quand vous séleconnez le lieu où vous placez votre unité, vous devez s’assurer que le sol est plat et solide
et que la chambre est bien venlée. Evitez de placez votre unité près de sources de chauffage, telles que
cuiseur, chaudière ou radiateur. Evitez d’exposer directement votre unité à la lumière de soleil pour
prévenir la consommaon électrique élevée. Des températures ambiantes extrêmement froides peuvent
causer le fonconnement inapproprié de l’unité. Cee unité n’est pas conçue pour être ulisée dans des
milieux tels que les garages ou les installaons externes. Ne placez pas de recouvrements sur ou autour de
l’unité. Pendant l’installaon de l’unité, assurez-vous de laisser assez l’espace libre autour de tous les côtés
(20cm au-dessus de sommet, 15cm de l’arrière et 40 cm de chaque côté). Cela permet à l’air froid de
circuler autour de refroidisseur de vin et améliore l’efficacité de processus de refroidissement. Les portes
peuvent s’ouvrir vers la gauche ou vers la droite, en foncon de ce qui convient à sa localisaon. Veillez à
s’assurer qu’il y a assez d’espace adéquate à l’ouverture totale des portes.
2.2 Inversement de la direction des portes
Outils nécessaires : tournevis cruciforme Phillips/tournevis à lame plate/un clé à six pans
1) Rerez le couvrant plasque de la charnière
2) Dévissez les trois vis de tranches de fond. Rerez
• Si vous voulez inverser la direcon des portes, il est recommandé de contacter un
technicien qualifié. Vous pouvez les inverser par vous-même seulement si vous pensez
que vous êtes qualifiés.
• Assurez – vous que l’unité est débranchée et vide.
• Ajustez les deux pieds de nivellement à leur posion la plus élevée.
• Inclinez légèrement l’unité en arrière pour enlever la porte. Vous devez placer l’unité
dans une surface solide de telle manière qu’elle ne soit pas glissée pendant le processus
d’inversement de la porte.
• Ne posez pas l’unité à plat parce que de cee manière il y a le risque de détruire le
système de refroidissement.
• Il est recommandé que deux personnes traitent l’unité pendant le montage.
supérieure de la porte.
les pieds du côté
3) Placez les pièces à part.
2
Page 45
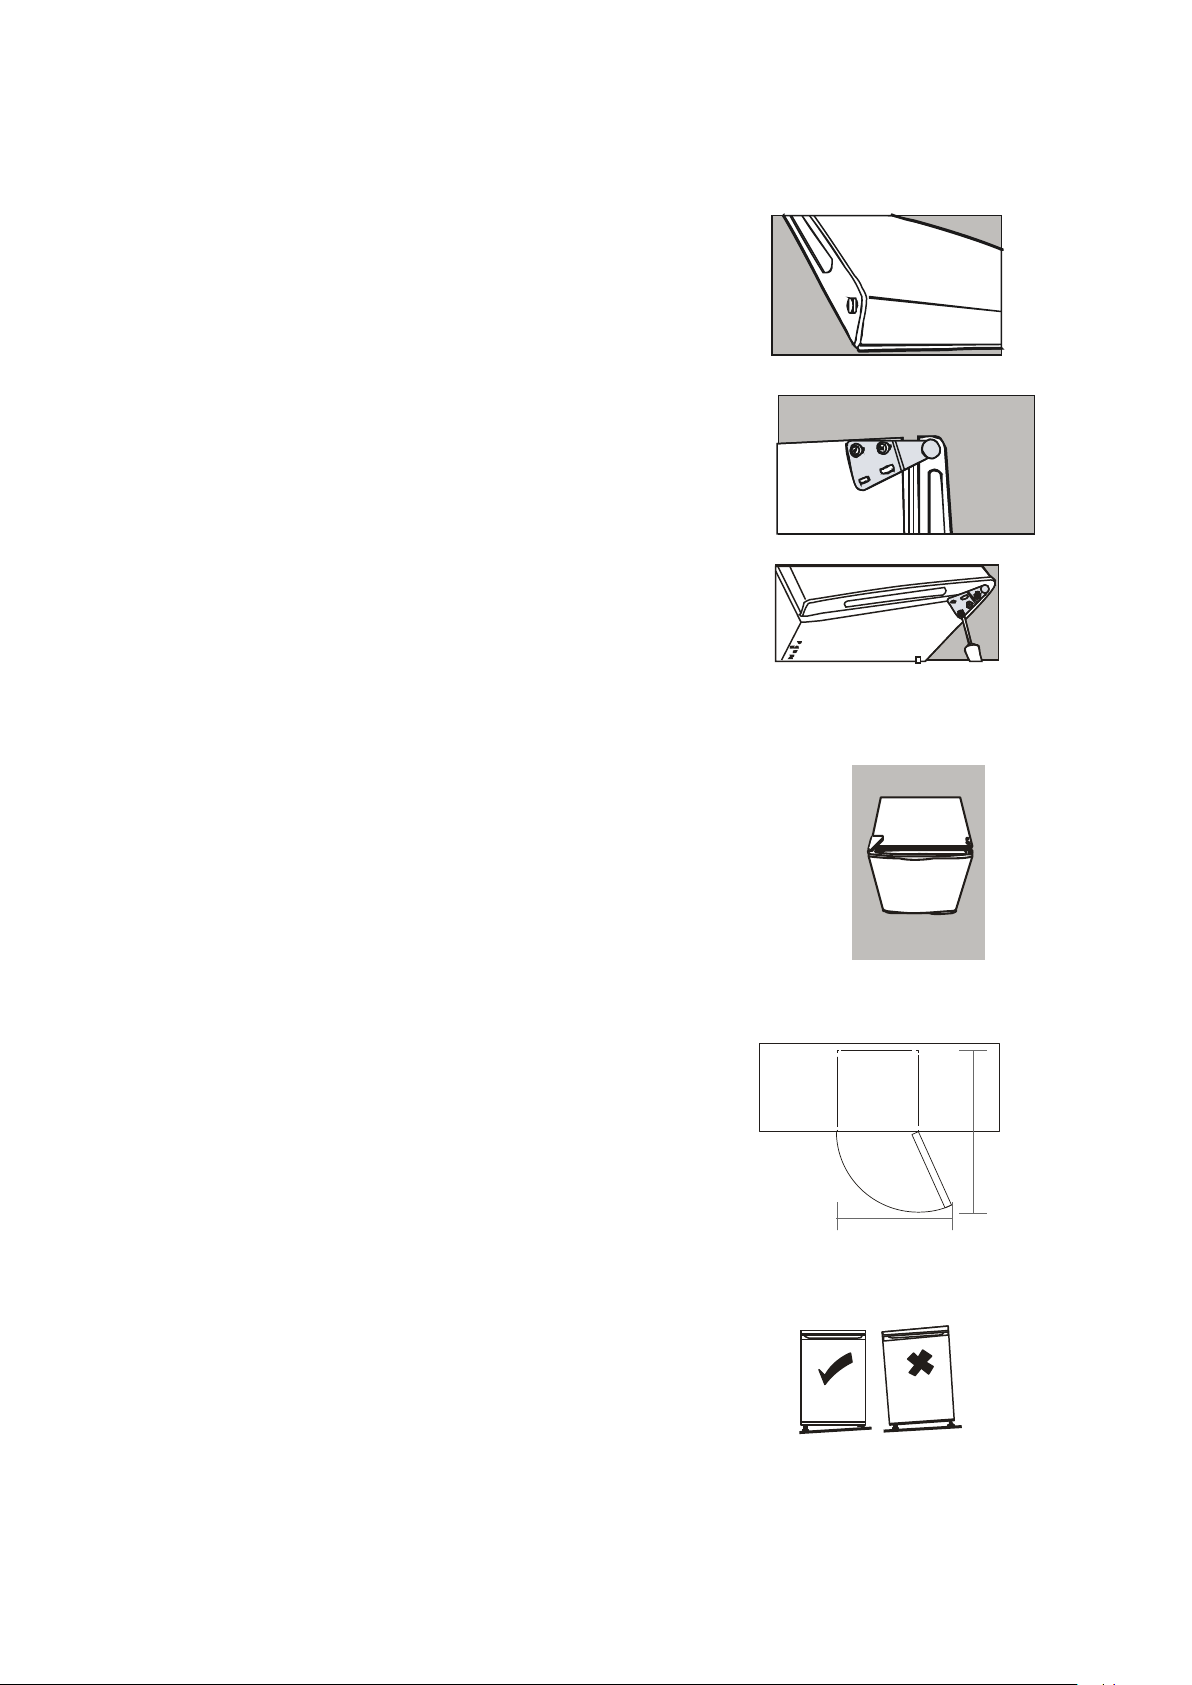
8 8 0
4) Glissez la porte d’appareil environ 15cm vers le bas et
rerez la fiche de charnière supérieure. Rerez la porte
de l’appareil.
5) Rerez les deux vis de tranche supérieure et replacez –
les à l’envers. D’abord, vous nécessiterez de rerer
les capuchons plasques à l’envers.
6) Replacez à nouveau la porte de l’appareil dans la charnière
supérieure et assurez-vous qu’il est à la posion vercale.
Vissez la charnière inférieure en place au côté nouveau.
Replacez l’autre pied à l’envers. Replacez le couvrant plasque
en le meant en place dans la charnière de porte.
Vérifiez que la porte est alignée horizontalement et vercalement
7)
et que les joints sont fermés dans tous les côtés avant de serrer
finalement la charnière inférieure.
Réajustez les pieds de nivellement.
2.3 Besoin en espace
La porte de l’unité doit être capables de s’ouvrir complétement
tel qu’indiqué.
2.4 Nivellement de l’unité
Pour le nivellement de l’unité, ajuster les deux pieds de
nivellement devant l’unité. Si l’unité n’est pas nivelée, la porte
et les alignements de joint magnéques ne seront
pas proprement couverts.
800
3
Page 46
2.5 Nettoyage avant l’utilisation
2.6 Avant d’utiliser l’unité
les objets dans l’unité. Cela lui permet à arriver à la température correcte et vous permet à
◆ Avant de la brancher
◆ Avant de la mettre en marche
2.7 Accessoires intérieurs
des modèles différents ont des combinaisons différentes.
niveau différents. Parfois, vous pouvez nécessiter de les incliner légèrement pour les insérer ou les
boîte.
4
Page 47
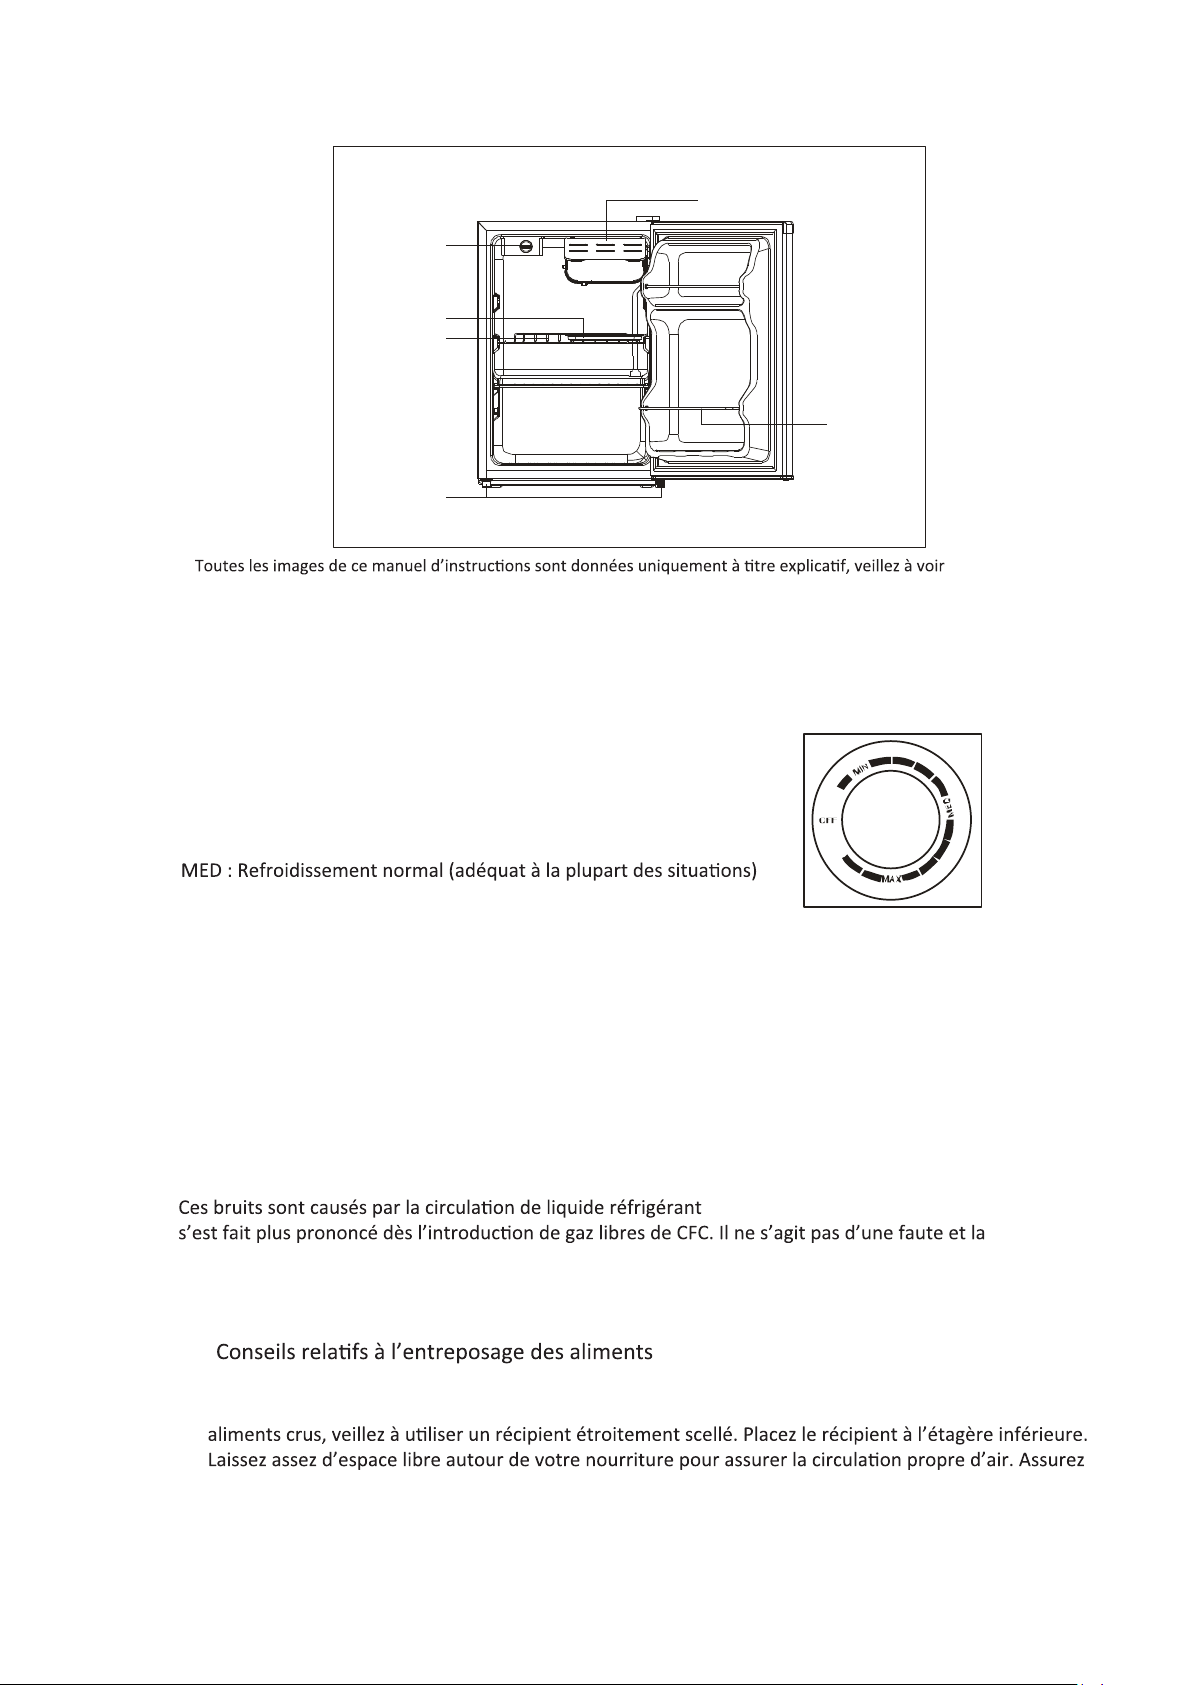
3. PRESENTATION DE PRODUIT
Thermostat
Bac de vidange
Etagère en
fil d’acier
Pied
*
votre unité individuelle pour plus de détails.
Petite porte
Bar de fil
métallique
4.
OPERATION
4.1 Ajustement de la température
Le thermostat est situé à l’intérieur de réfrigérateur au côté gauche.
◆
Réglages du thermostat :
OFF : Le refroidissement s’arrête
MIN : Refroidissement minimal
MAX : Refroidissement maximal
Il peut être nécessaire de régler le thermostat au refroidissement maximal (MAX) quand
◆
il y a des températures ambiantes élevées. Pendant le refroidissement maximal le compresseur
peut être en fonctionnement permanent.
Pendant la première installation de réfrigérateur, assurez-vous que le thermostat soit réglé au
◆
réglage MED. Il est recommandé d’attendre pour un délai de 24 heures avant de placez les
objets à l’intérieur.
4.2 Bruits à l’intérieur de l’unité!
Vous probablement observez que votre unité fait des bruits inhabituels. La plupart de ces bruits sont
complétement normaux mais vous devez les connaître !
dans le système de refroidissement. Il
performance de votre unité ne sera pas affectée. Cela se passe parce que le compresseur s’opère et il
pompe le réfrigérant autour de système.
4.3
◆
La viande et les poissons cuisinées doivent être toujours entreposées sur une étagère au-dessus de
l’étagère de la viande et des poissons crues pour éviter le transfert bactérien. Pour l’entreposage des
◆
vous que les pièces de l’unité sont maintenues refroidies.
5
-
Page 48
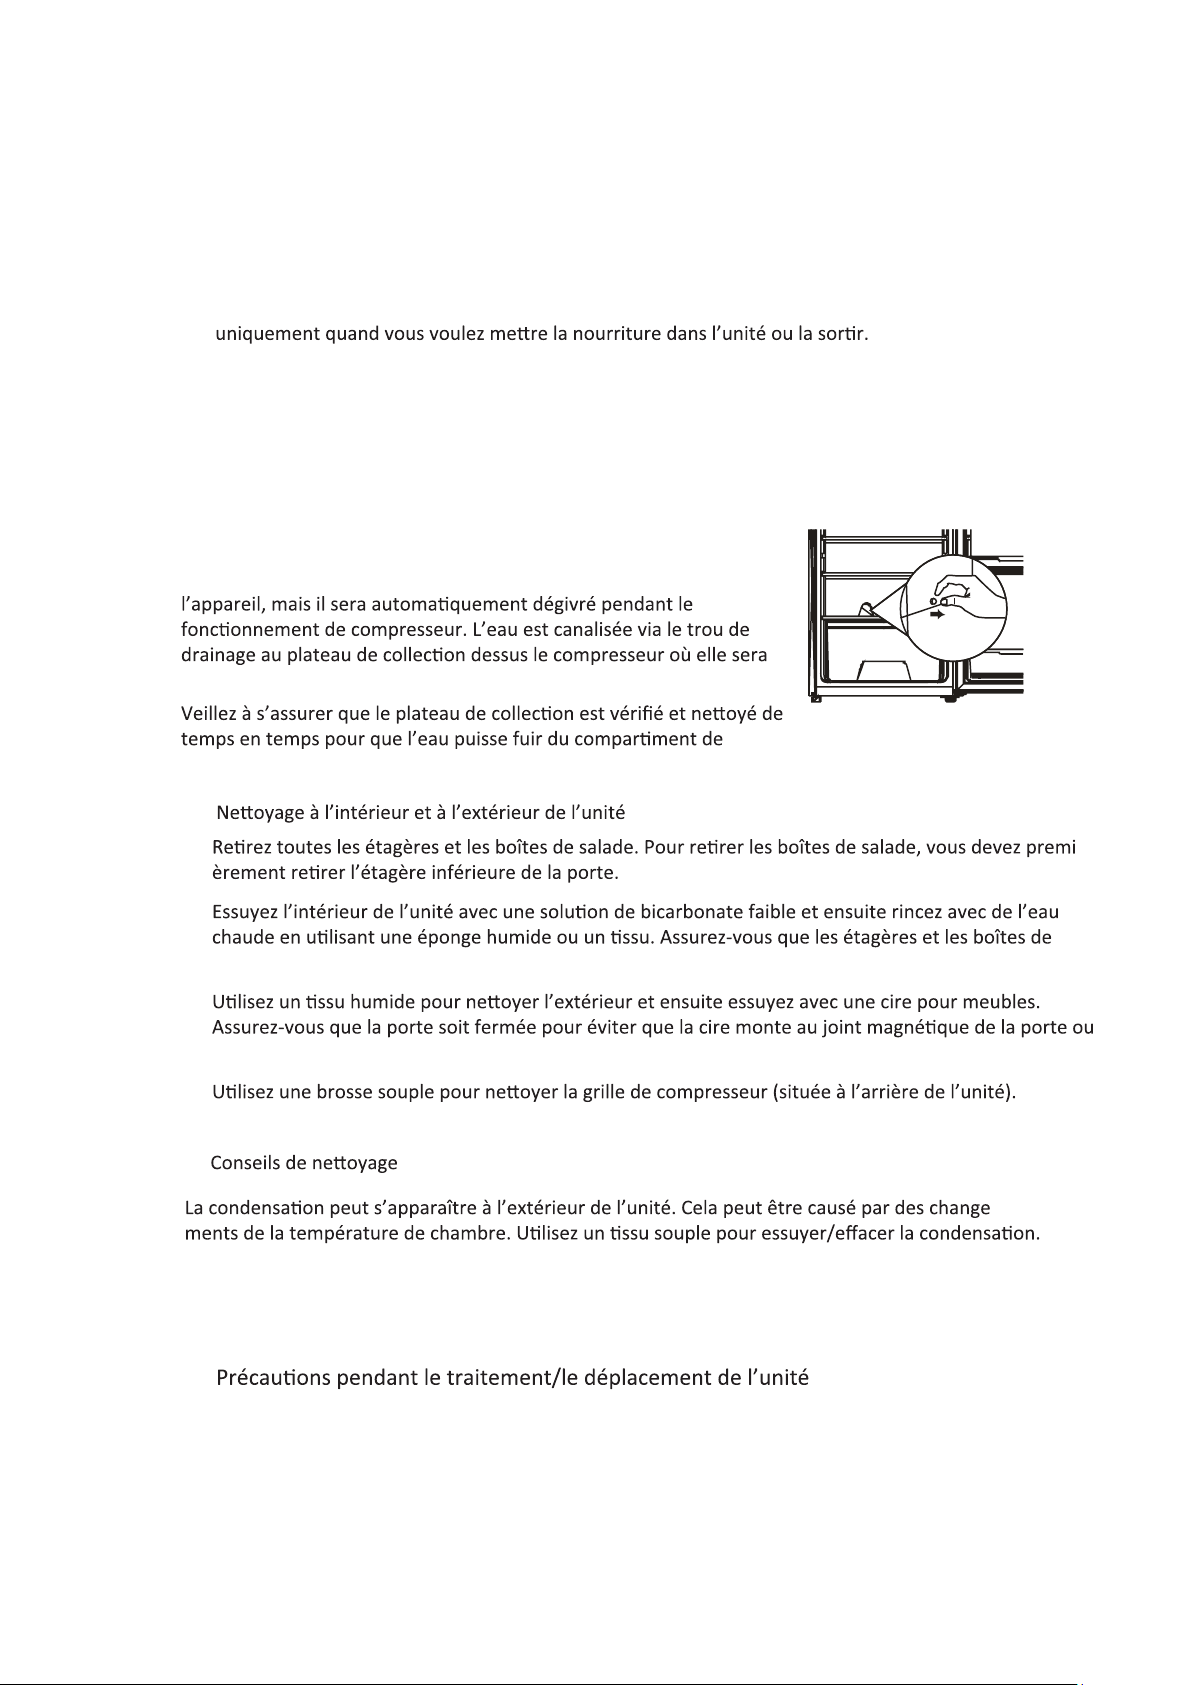
Pour garder les aliments frais et savoureux, entreposez-les dans un récipient scellé séparé. Les
◆
fruits et les légumes ne nécessitent pas d’être scellés et emballés.
Laissez la nourriture cuisinée à se refroidir avant de les placez dans l’unité. Cela contribue à la
◆
maintenance de la température interne de l’unité.
Evitez d’ouvrir souvent la porte pour protéger l’air frais. Il est recommandé d’ouvrir la porte
◆
5. NETTOYAGE
5.1 Dégivrage
Le givre peut s’accumuler sur la surface intérieure à l’arrière de
évaporée.
stockage.
5.2
◆
◆
salade sont complétement sèches avant de les replacer.
◆
à l’intérieur de l’unité.
◆
5.3
Si le problème persiste, veillez à contacter un technicien qualifié pour vous aider.
6. MAINTENANCE
6.1
-
-
Tenez l’unité autour de ses côtés ou sa base pendant le déplacement. En aucun cas elle ne doit pas
élevée en tenant les bords de la surface supérieure.
6
Page 49
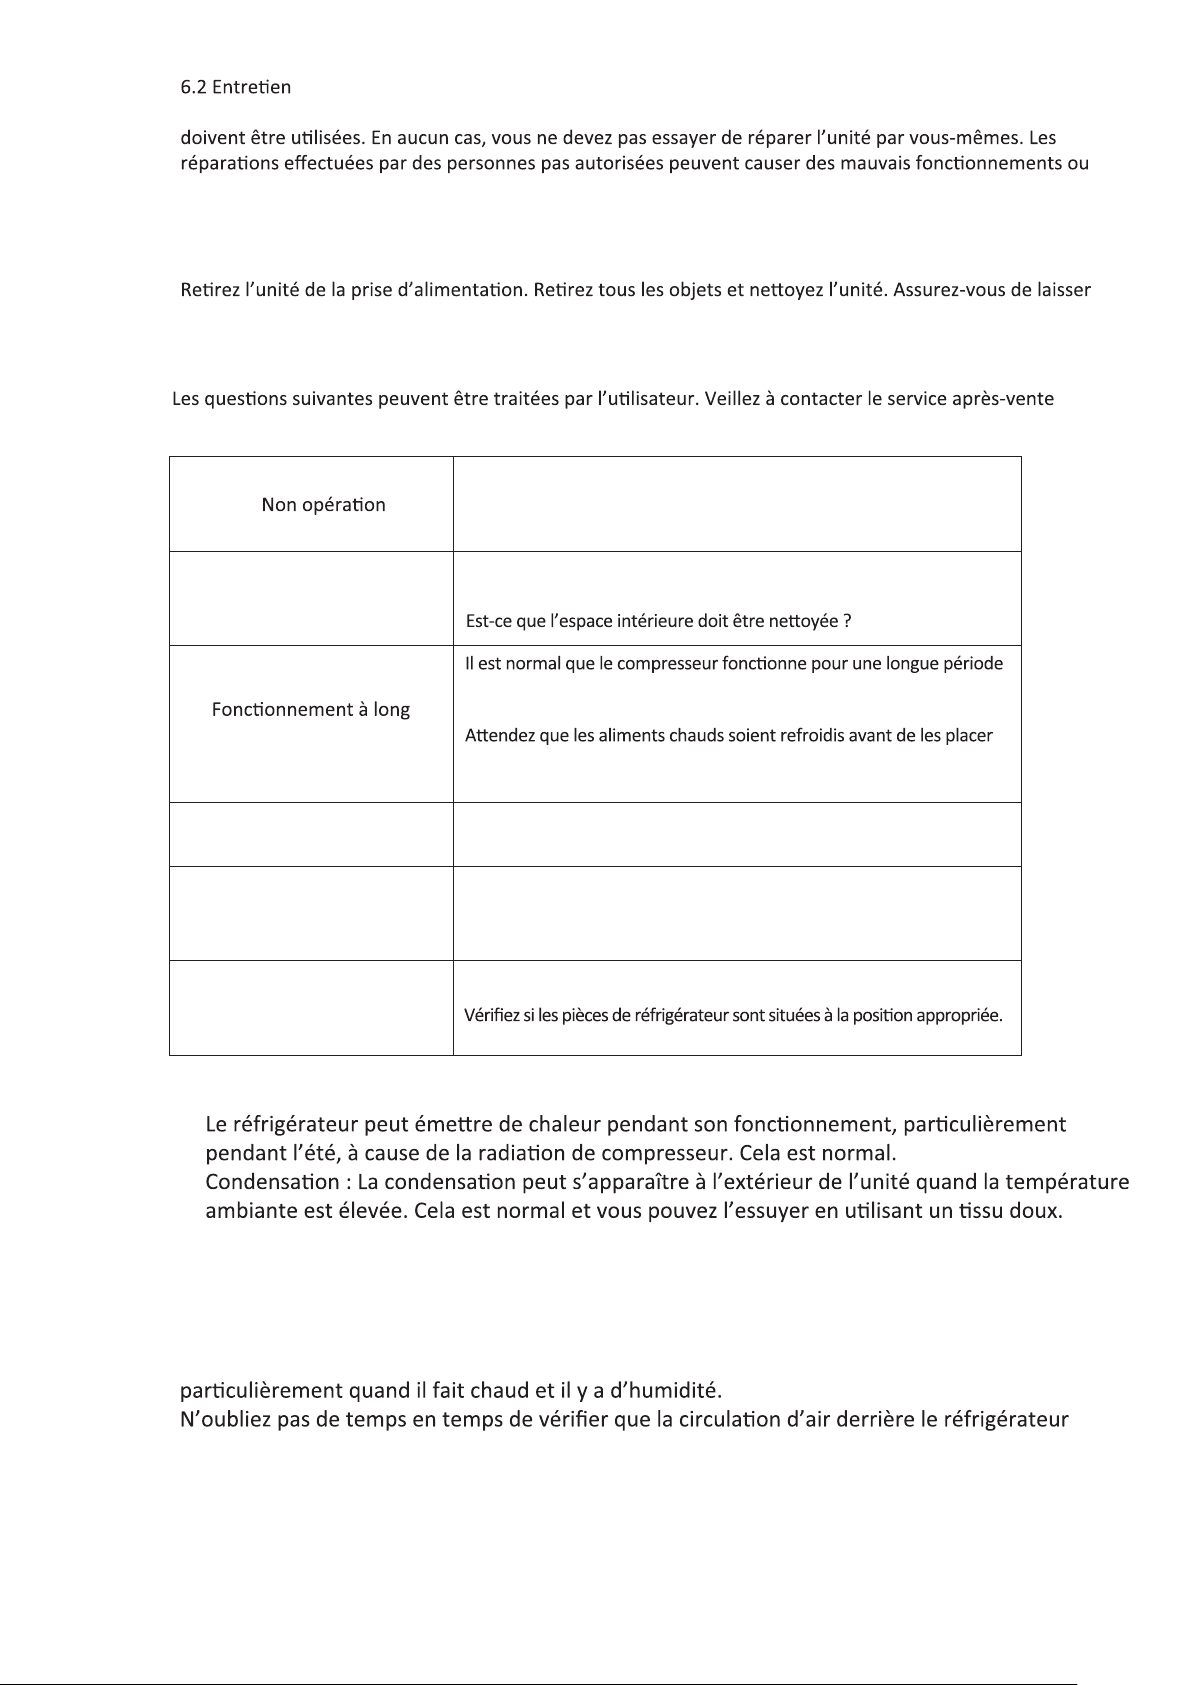
L’unité doit être maintenue par un ingénieur autorisé et seulement les pièces de rechange d’origine
des blessures. Contactez toujours un technicien qualifié.
6.3 Unités débranchées pour des longues périodes de temps
Si l’unité va être débranché pour des longues périodes de temps, assurez-vous de faire les suivants.
la porte entrouverte pour prévenir les odeurs désagréables.
7. Conseils de dépannage
au cas où le problème persiste.
Est-ce que le courant électrique est fourni à la prise ?
Est-ce que la prise est équipée de gérer la tension nécessaire ?
Est-ce que le fusible sera consommé dans le disjoncteur ?
Est-ce que les aliments sont entreposés dans des récipients scellés ?
Odeur
terme de compresseur
Il y a de nourriture avariée à l’intérieur ?
aux températures ambiantes élevées.
Eviter de remplir excessivement le réfrigérateur.
dans le réfrigérateur.
Evitez d’ouvrir souvent les portes de réfrigérateur.
La lampe d’éclairage
n’éclaire pas
La porte de réfrigérateur
n’est pas proprement fermée
Bruits fortes
Assurez-vous que le réfrigérateur soit branché
Vérifiez si la lampe est détruite.
Assurez-vous que des objets ou des aliments n’empêchent pas la porte.
Assurez-vous que le réfrigérateur n’est pas excessivement rempli.
Assurez-vous que le réfrigérateur n’est pas incliné.
Assurez-vous que le réfrigérateur est nivelé et équilibré.
7.1 Notes :
◆
◆
◆
de bourdonnement : Un son de bourdonnement peut se passer quand le compresseur se met
en marche ou s’arrête. Il est normal.
8. Conseils sur les économies d’énergie
N’oubliez pas de ne pas garder les portes ouvertes pour des longues périodes de temps,
Son
est adéquate.
7
Page 50
Laissez les aliments chauds frais cuisinés à arriver à la température ambiante avent de les placer dans
le réfrigérateur.
dans le cas des unités équipées d’un compresseur externe.
basse d’énergie pour cet appareil.
L’appareil doit être placée dans l’endroit le plus froid de la chambre. Evitez de l’exposer
◆
directement à la lumière de soleil ou près de sources ou d’appareil de chauffage.
Eviter de remplir excessivement le réfrigérateur parce que cela forcerait le compresseur de
◆
Assurez-vous d’entreposer les aliments dans des récipients secs et scellés. Cela empêche le
◆
givre à être créé à l’intérieur de l’appareil.
◆
La boîte de salade ne doit pas être chemisée de papier alu, ciré ou d’essuie-tout. Les
l’appareil.
◆
souhaités en ouvrant une fois la porte.
9. ELIMINATION
9.1
Ce marquage indique que ce produit ne doit pas être éliminé, en même
temps avec des autres déchets ménagers dans toute l’UE. Pour que la
décharge non contrôlée de déchets ne nuise pas à l’environnement
ou à la santé humaine, veillez à le recycler de manière responsable afin
rentrée ou à contacter le commerçant, duquel vous avez acquis le produit.
Celui-ci recevra votre vieil appareil pour le recycler sans dépenses. Pour savoir
avez acheté le produit.
8
Page 51
Activez votre plan de garantie…
à
Suivez le lien suivant :
http://www.inventorappliances.
com/produits-garantie
5
pas
simples!
Scannez ici pour
la fiche de garantie
Choisissez le type de produit
(air condition ou appareil) pour
lequel la garantie sera activée
Choisissez la garantie qui
correspond à votre produit
Complétez les informations
demandées (propriétaire,
détaillant et appareil) et
cliquez « Envoi »
Vous recevrez un mél de
confirmation concernant
l’activation de votre garantie.
Pour soumettre la fiche de garantie
Veillez à cliquer le lien suivant :
http://www.inventorappliances.
com/produits-garantie
Page 52
REFRIGERATOR
BAR
 Loading...