

INVENTOR G3INV-20DTW 2.000W ALB, G3INV-20DTB 2.000W ALB, G3INV-20DTW, G3INV-20DTB User Manual

English/Ελληνικά/ Română
USER MANUAL
ΕΓΧΕΙΡΙΔΙΟ ΧΡΗΣΗΣ
MANUALUL UTILIZATORULUI
GLASS PANEL HEATER
ΓΥΑΛΙΝΟ ΘΕΡΜΑΝΤΙΚΟ ΠΑΝΕΛ
ÎNCĂLZITOR ELECTRIC CU PANOU STICLĂ TERMOREZISTENTĂ
Model/ Μοντέλο: G3INV-20DTW 2.000W/1.000W
G3INV-20DTΒ 2.000W/1.000W
WHITE/BLACK - ΛΕΥΚΟ/ΜΑΥΡΟ - ALB/NEGRU
Thank you for choosing inventor® Glass Panel Heater.
Please read this manual carefully and keep it for
future reference.
Ευχαριστούμε που επιλέξατε γυάλινο θερμαντικό
πάνελ της inventor®. Παρακαλούμε διαβάστε
προσεκτικά αυτό το εγχειρίδιο χρήσης και φυλάξτε το
για μελλοντική αναφορά.
Vă mulțumim că ați ales încălzitorul electric
inventor®. Ci
ți cu atenție acest manual și păstrați-l
pentru referințe ulterioare.
E
L
E
C
T
R
I
C
A
P
P
L
I
A
N
C
E
S
Η
Λ
Ε
Κ
Τ
Ρ
Ι
Κ
Ε
Σ
Σ
Υ
Σ
Κ
Ε
Υ
Ε
Σ

2
GLASS PANEL HEATER WITH MECHANICAL CONTROL
ΓΥAΛΙΝΟ ΘΕΡΜΑΝΤΙΚΟ ΠΑΝΕΛ ΜΕ ΜΗΧΑΝΙΚΟ ΧΕΙΡΙΣΜΟ
ÎNCĂLZITOR CU PANOU STICLĂ TERMOREZISTENTĂ
(CU CONTROL MECANIC)
MODEL/ΜΟΝΤΕΛΟ: G3INV-20DT W/B 1000W/2000W
(WHITE-ΛΕΥΚΟ-ALB/BLACK-ΜΑΥΡΟ-NEGRU)
Please read and save these instructions!
Οδηγίες χρήσης
Παρακαλούμε διαβάστε και φυλάξτε αυτές τις οδηγίες
Vă rugăm citiți și păstrați aceste instrucțiuni!
3
BEFORE FIRST USE
Read and follow all the Instru ons in this "User Manual” even if you feel you are familiar with the
product, and find a place to keep it handy for future reference.
For your convenience record the complete model number (located on the product iden fi on
plate) and the date you received the product, together with your purchase receipt and a
ach to the
warranty and service inform
on. Retain in the event that warranty service is required.
NOTE: The r ng of this product (as marked on the product iden fica on plate) is based on specific
loading tests. Normal use or the use of other recommended a
achments may draw significantly less
power.
IMPORTANT SAFEGUARDS
When using any electrically powered product, basic safety precau ons should always be followed,
including the following:
PLEASE READ ALL INSTRUCTIONS CAREFULLY BEFORE USING THE PRODUCT.
WARNING - to reduce the risk of fire, electrical shock or injury to persons or property:
• Read all instru ons before using this appliance and keep them for future reference.
• Use only the voltage specified on the ra g plate of the heater.
• Do not cover or restrict airflow to the inlet or exhaust grilles in any manner as the appliance
may overheat and become a fire risk.
• Do not cover grilles, block entry or exhaust of airflow by placing appliance against any surface.
Keep all objects at least 1 meter from the front, side and rear of the appliance.
• Do not place the appliance close to a radiant heat source.
• Do not operate in areas where gasoline, paint or other flammable liquids are used or stored.
• This appliance heats up when in use. To avoid burns, do not let bare skin touch hot surface.
Switch off and let the appliance cool down before moving.
• Do not use the appliance to dry clothes.
• Do not insert or allow foreign objects or metal utensils to enter any ven on or exhaust
opening, as this may cause an electric shock, fire or damage to the appliance.
• Do not immerse in liquid or allow any liquid to run into the interior of the appliance, as this could
create an electrical shock hazard.
• Do not reach for an appliance that has fallen into water. Switch of at supply and unplug
immediately.
• Do not operate any appliance with a damaged cord, plug or a er
has been dropped or damaged in any manner. Refer to a qualified electrician for
examin
on, electrical or mechanical adjustment, service or repair.
• Do not operate appliance with wet hands.
• The most common cause of overhe
ng is deposits of dust or fluff in the appliance. Ensure
these deposits are removed regularly by unplugging the appliance and vacuum cleaning air
vents and grilles.
• Do not use this appliance near a window as rain may cause electric shock.
malfuncon of the appliance or
4
• Do not use an abrasive cleaning product on this appliance. Clean with a damp cloth (not wet)
rinsed in hot soapy water only. Always remove plug from the mains supply before cleaning.
• Do not connect the appliance to the mains voltage un
l completely assembled and adjusted.
• This appliance is not intended for use in outdoor lo ons.
• Do not use this appliance in the immediate surrounds of a bath, a shower or a swimming pool or
other liquids.
• Always operate upright.
• Switch off and let the appliance cool down before moving.
• Do not operate with cord set coiled up as a build-up of heat is likely, which could be sufficient to
become a hazard.
• The use of an extension cord with this appliance is not recommended.
• Do not remove plug from power socket un the appliance has been switched off.
• Do not remove plug from power socket by pulling the supply cord-always grip plug.
• Always unplug appliance when not in use.
• CAUTION: This product is NOT suitable to be used on long pile carpets or Flok ugs.
• Do not allow cord to come in contact with heated surface during oper on.
• Do not run cord under carpe g, throw rugs or runners etc. Arrange cord away from traffic
areas so that it will not be tripped over.
• Do not twist, kink or wrap the cord around the appliance, as this may weaken and split the
lways ensure that all cord has been removed from any cord storage area.
• Do not use outdoors or whilst standing on a damp floor.
• Do not store appliance while it is s hot.
• This appliance is not intended for use by young children or infirm persons without supervision.
• Young children should be supervised to ensure they do not play with the appliance.
• The appliance must not be located immediately below a socket-outlet.
• Do not use this appliance with another programmer, mer or any other device that switches the
heater on autom
lly, since a fire risk exists if the appliance is covered or posi oned
incorrectly.
• All covers of this appliance are intended to prevent direct access to the he ng elements and
must be in place when the appliance is in use.
• "WARNING : In order to avoid overloading, do not cover the heater."
• To reduce the risk of electric shock, do not immerse or expose the product or flexible cord to
rain, moisture or any liquid other than those necessary for correct oper
on of the product.
• The fireguard does not give full prote
on for young children and for infirm persons.
• If the supply cord is damaged, it must be replaced by a qualified electrician in order to avoid
a hazard.
• Do not use this appliance outdoor
s, or on wet surfaces. Avoid spilling liquid on the appliance.
• "CAUTION: In order to avoid a hazard due to inadvertent rese
g of the thermal cutout, this
appliance must not be supplied through an external switching device, such as a
mer,
or connected to a circuit that is regularly on and off by the u
lity."
• Use this appliance only as described in this manual. Any other use is not recommended by the
manufacturer and may cause fire, electric shock or injury.
• This appliance is intended for household use only and no
t for commercial or industrial use.
5
Air Outlet Control Unit
Switch
Castor Wheel Stand
Heat ing eleme nt
KSD th ermostat KSD thermo stat
Temper ature sen sor
Swit ch
Tip over switc h
G3INV-20DTW / G3INV-20DTΒ
Model Number
Rated Power
Rated Voltage
Dimensions
(mm)
1000W/2000W
220V-240V~50Hz
832*97*400
Gene rator
the use of
6
1. Opera
on Guide
1. 1 STARTING
1.1.1 Take out the heater from the carton carefully. Please save the carton for off – season
storage.
1.1.2 Make sure the convector heater is OFF posi
on before switching on.
1.1.3 Assemble / Fix the convector steadily according to the moun
ng instruc ons.
1.1.4 It is be
er not to use the same electric outlet with other high w ge electrical
appliances in order to avoid overloading your circuit.
1.2 TURN ON
room temperature is displayed. The temperature light is on and the default - factory set
temperature is 35
o
C.
1.3
1.4
1.5
TEMPERATURE CONTROL
14
S et
IO N
10
1
2
IO N
3
4
5
6
7
8
9
11121314
15
2
3
4
5
6
7
15
13
on
, unl the power indicator light is off.
2. Safety feature
The unit is equipped with a high limit switch; the heater will automa cally shut down if it is in an
over-hea
ng condi on.
It will automa cally come back to work when it cools down.
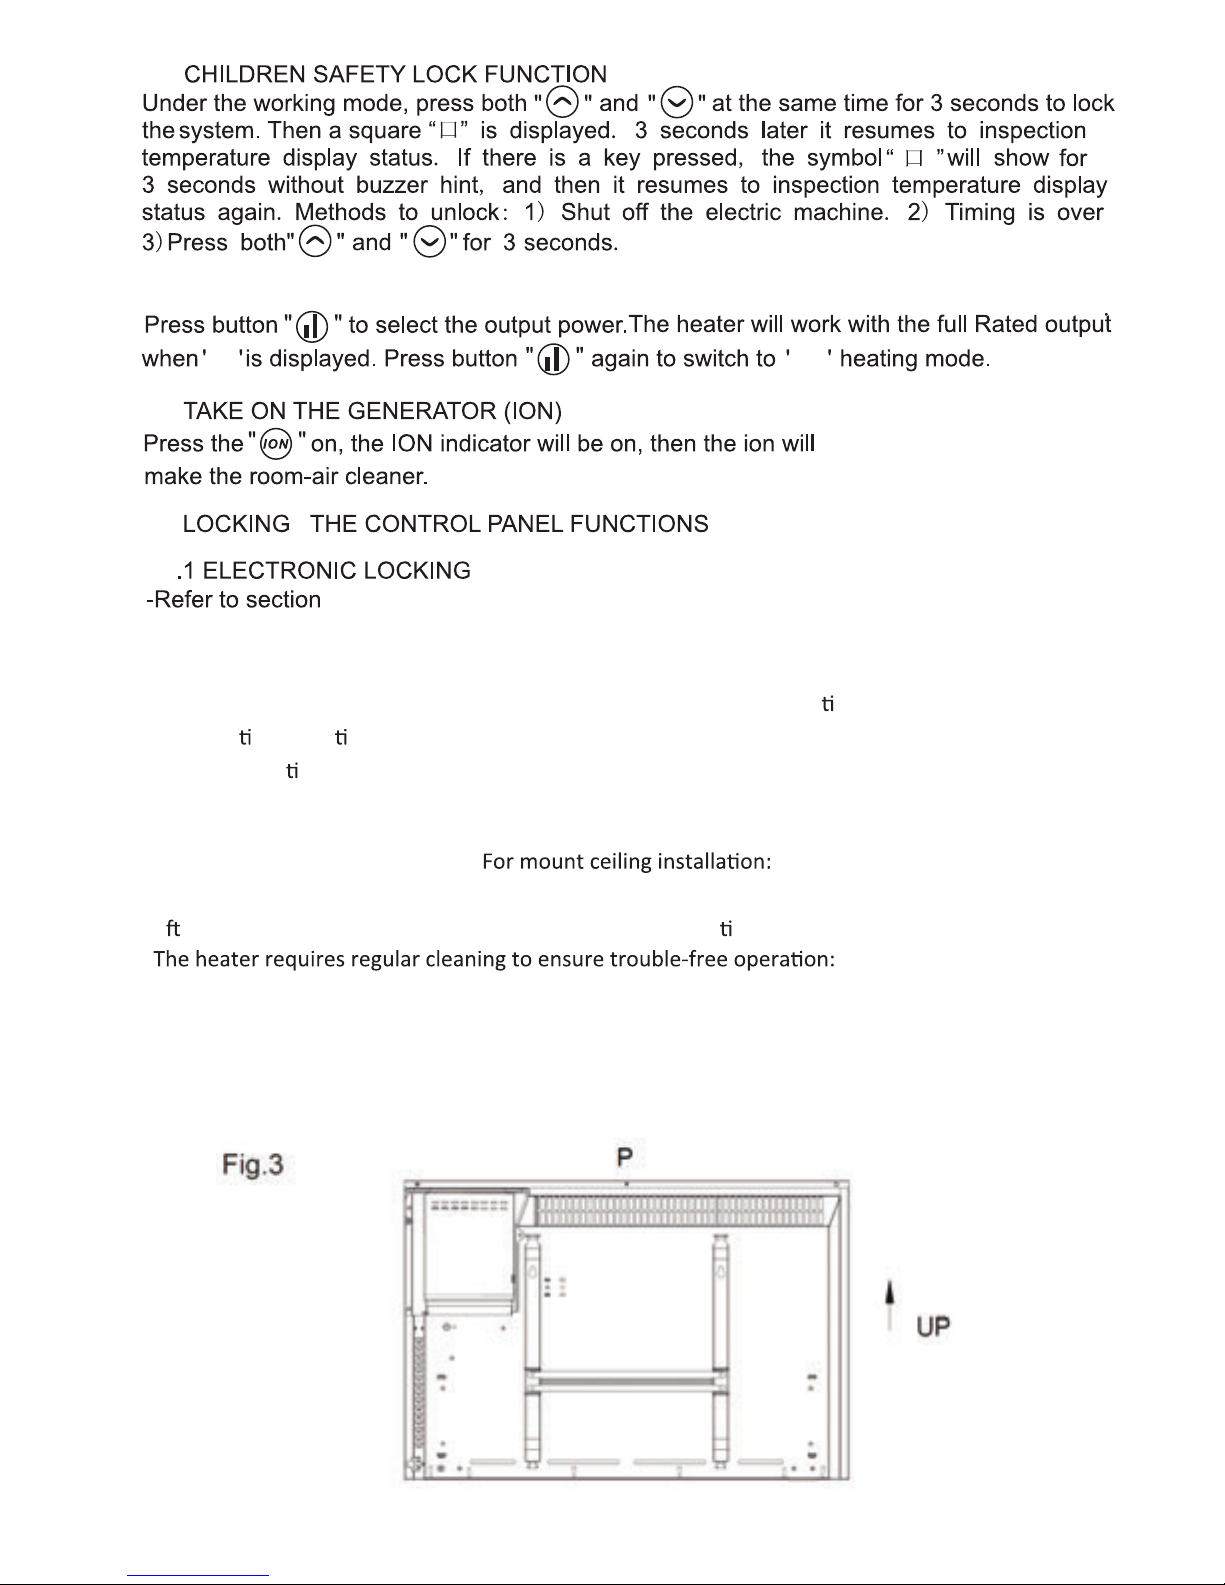
3. Cleaning behind the heater
It is very easy to clean behind it. Hold two sides of the heater,
thpull the unit upwards and then forward,
Unplug the heater from the mains supply before cleaning.
Ensure that the heater has cooled down completely before cleaning.
Use a damp cloth (not wet) to wipe the exterior of the heater, so as to remove dust and dirt.
Use a vacuum, cleaner to remove dust and fluff around the grilles.
Ensure the heater is dry before plugging back into the mains supply.
en you can clean behind.
A er cleaning, the heater must be fixed in the normal posi on.
1.7
1.8
1.9
1.6
1.9
7
1.6
POWER SELECTION
HI LO
start operating, which can

8
4. Warning
Do not cover the heater in order to prevent a fire.
5. Service
If you require a service, contact your local dealer or a qualified electrical appliance
maintenance company.
6. In case of any claim, your statutory rights are offended, contact your
supplier
REPLACEMENT OF SUPPLY CORD
If the supply cord is damaged, it must be replaced by a service agent or equivalent qualified
person otherwise it may cause a hazard.
SUPERVISION OF CHILDREN
Young children or infirm persons should not use the heater without supervision.
For Conservatories
A robust and praccal choice for conservatories
The heater offers an energy efficient heang soluon for conservatories. Built to a high
specificaon, the heater provides the perfect heang soluon for conservatories where a
stylish yet robust appearance is required, and energy/cost control is demanded.
Stylishly constructed and elegantly finished in white, the heater, which is maintenance free,
will enhance every locaon.
T
he heate
r works in harmony with the Air Condioning unit creang a perfect environment.
Features:
Simple and efficient usable controls
Space saving installaon
Fixed economy temperature
Pre-set maximum comfort to 24° C
Tamperproof capability
Low capital cost
Maintenance free
Suitable For:
CONSERVATORIES HOTELS
PROPERTY DEVELOPMENT COMMERCIAL
STUDENT ACCOMMODATION
9
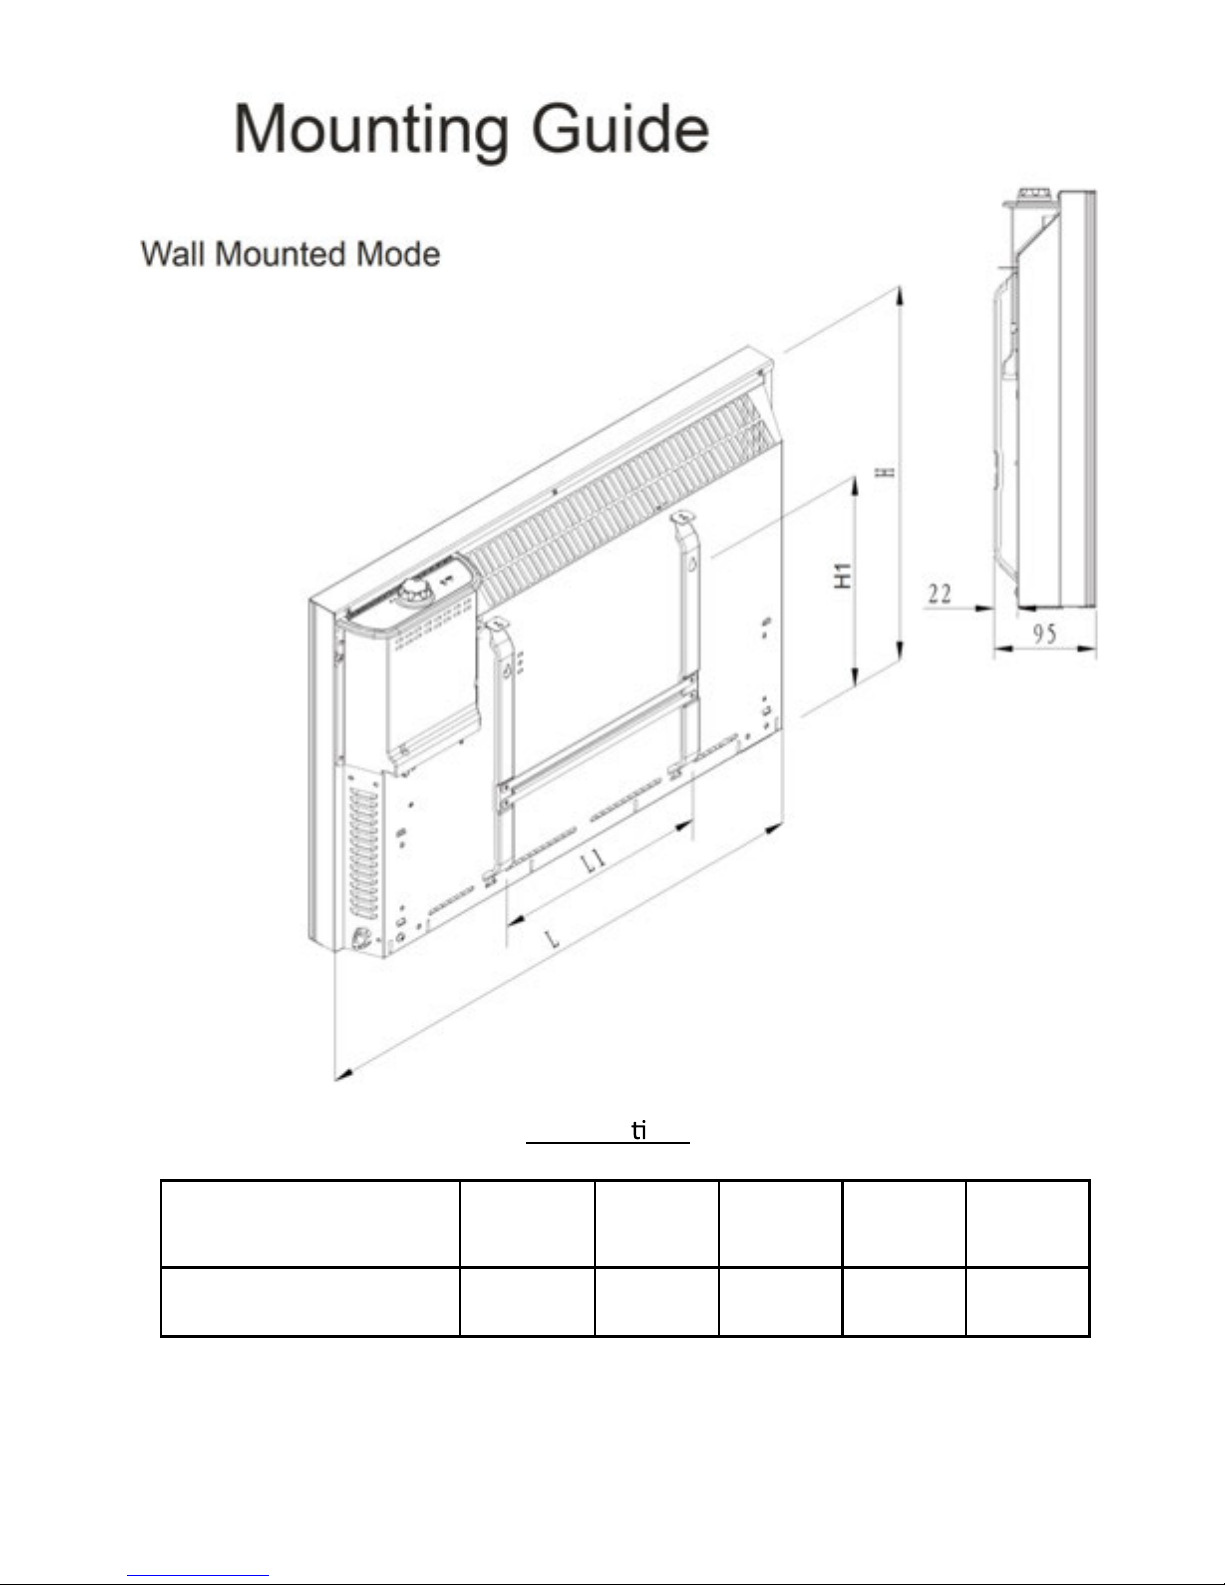
Specifica
ons:
MODEL
POWER L H L1 H1
(W) mm mm mm mm
G3INV-20DTW / G3INV-20DTΒ
BLACK/WHITE
2000/1000 832 400 250 254
10
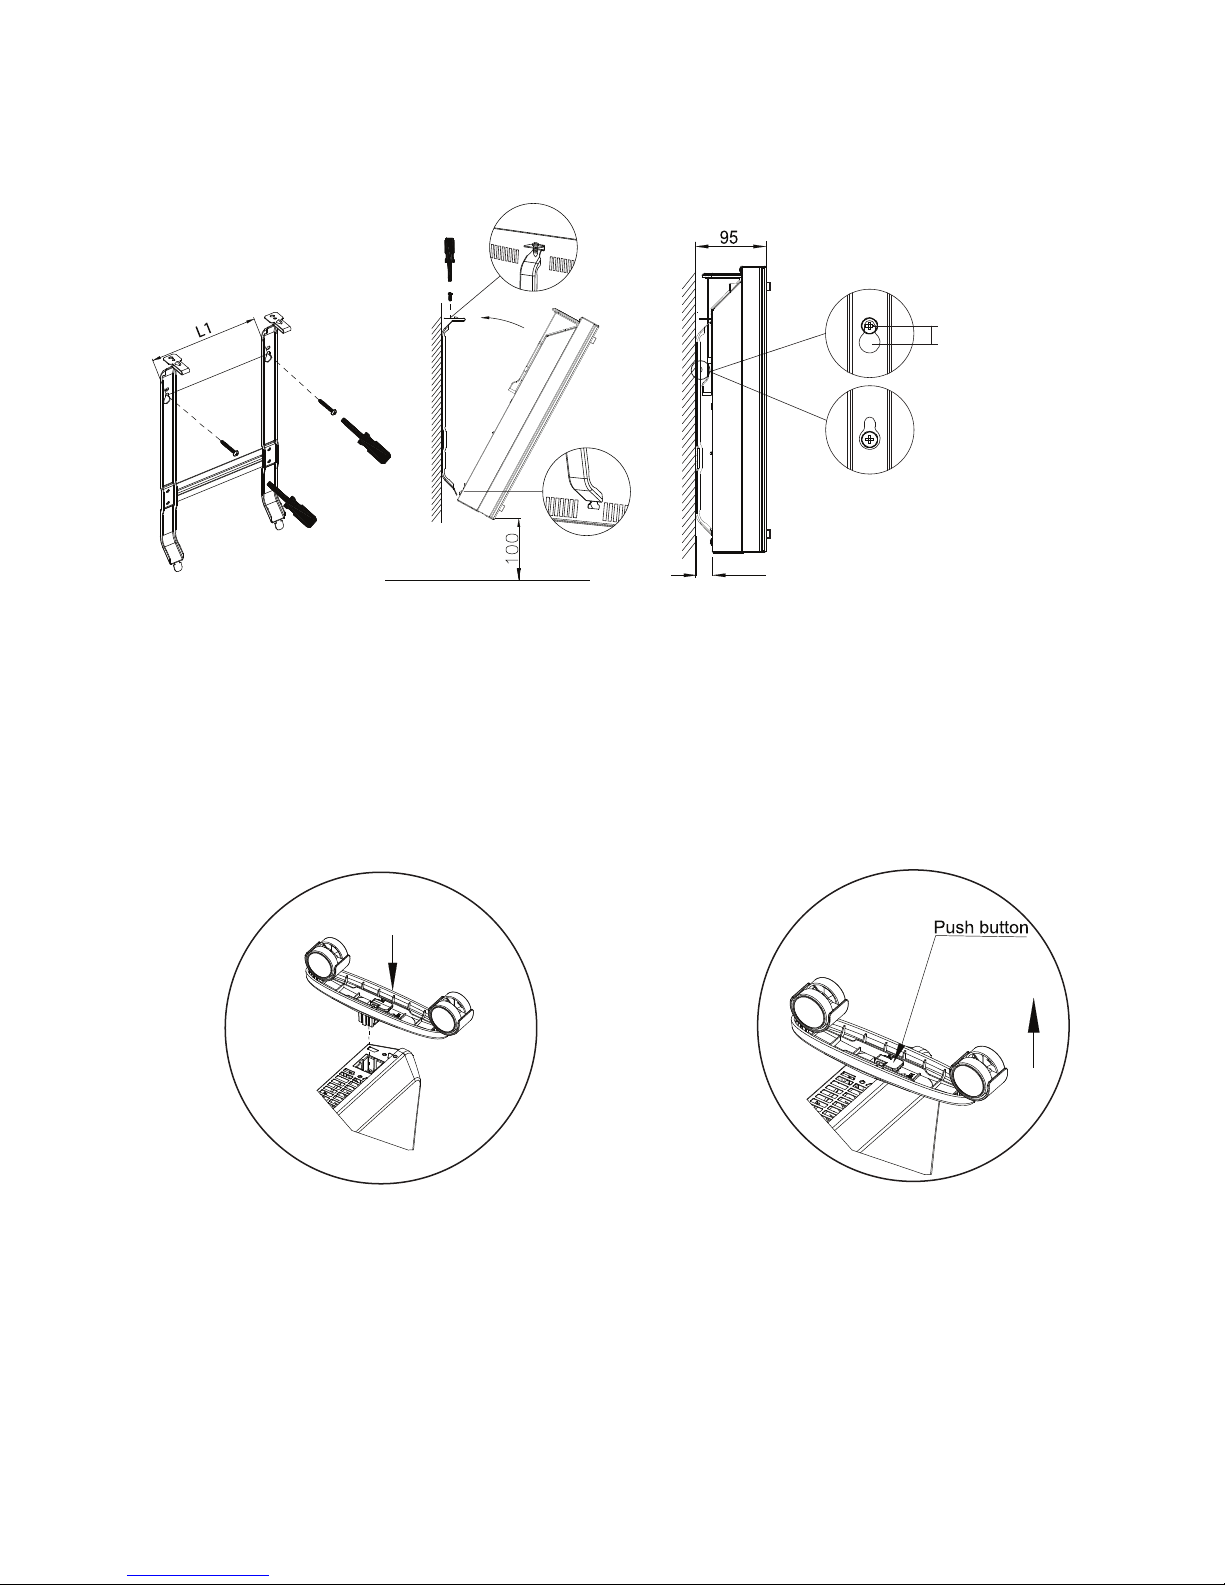
if the installation is complete,
press the button up,
take down the caster
When the installation is complete, you will hear a "click" sound.
Wall mounted mode
Take down the heater from wall
Pull up the heater 10mm
then take down the heater
10mm
22
you will hear a "click" sound.

11
SAFETY GUARD
1.
2. The heater is to be installed so that the controls cannot be touched by a person
using a bath or shower.
3.
The heater must not be installed directly under a socket outlet.
4.
When the heater is working in free standing mode with the foot set, please do
not use it in the vicinity of bath, shower, or swimming pool.
5.
When the heater is working on wall mounted mode, do not touch the control
unit when using it in the vicinity of bath, shower or swimming pool.
6.
Consult a qualified electrician or service technician if the power cord is damaged.
7.
DO NOT cover the heater when it is working.
8.
Always store the heater when not in use.
9. Make sure the heater has cooled down before storing.
10. This heater is not equipped with a device to control the room temperature. Do not
use this heater in small rooms when they are occupied by persons not capable of
leaving the room on their own, unless constant supervision is provided.

12
Πριν από τη πρώτη χρήση
Διαβάστε και ακολουθήστε όλες τις οδηγίες από το παρόν εγχειρίδιο χρήσης, ακόμα και στην περίπτωση
που θεωρείτε ότι είστε εξοικειωμένος με αυτό το προϊόν και κρατήστε τις για μελλοντική αναφορά.
Για λόγους διευκόλυνσης, σημειώστε τον πλήρη αριθμό του μοντέλου (ο οποίος βρίσκεται στην
αναγνωριστική πινακίδα του προϊόντος), την ημερομηνία παραλαβής του προϊόντος, επισυνάψτε τα μαζί
Διατηρήστε τα σε περίπτωση που απαιτηθεί η χρήση της εγγύησης.
Σημείωση: Η απόδοση αυτού του προϊό
ντος (όπως αναφέρεται στην αναγνωριστική πινακίδα του
προϊόντος) βασίζεται σε ειδικές δοκιμές . Η μη κανονική χρήση ή χρήση άλλων εξαρτημάτων εκτός των
συστημένων μπορεί να μειώσουν τη λειτουργική απόδοση.
ΣΗΜΑΝΤΙΚΕΣ ΣΗΜΕΙΩΣΕΙΣ ΑΣΦΑΛΕΙΑΣ
Κατά τη χρήση οποιουδήποτε προϊόντος ηλεκτρικής τροφοδοσίας πρέπει να ακολουθείτε πάντα
βασικά μέτρα ασφάλειας, συμπεριλαμβανομένων των παρακάτω: ΠΑΡΑΚΑΛΟΥΜΕ ΔΙΑΒΑΣΕΤΕ
ΠΡΟΣΕΚΤΙΚΑ ΟΛΕΣ ΤΙΣ ΟΔΗΓΙΕΣ ΠΡΙΝ ΑΠΟ ΤΗ ΧΡΗΣΗ ΤΟΥ ΠΡΟΪΟΝΤΟΣ.
ΠΡΟΣΟΧΗ – για τη με
ίωση του κ
ινδύνου πυρκαγιάς, ηλεκτροπληξίας ή ατυχημάτων και ζημιών:
• Διαβάστε όλες τις οδηγίες πριν να χρησιμοποιήσετε αυτή τη συσκευή και φυλάξτε τις για
μελλοντική αναφορά.
• Χρησιμοποιήστε μόνο τη τάση που αναφέρεται στην ονομαστική πινακίδα του πάνελ.
• Μην καλύπτετε και μην παρεμποδίζετε την ροή εισόδου και εξόδου του αέρα επειδή η
συσκευή μπορεί να υπερθερμανθεί και να δημιουργηθεί κίνδυνος πυρκαγιάς.
• Μην καλύπτετε τις γρίλιες, μην παρεμποδίζετε την είσοδο ή την έξοδο του αέρα τοποθετώντας
τ
η συσκευή
πάνω σε οποιαδήποτε επιφάνεια. Κρατήστε άλλα αντικείμενα σε τουλάχιστον 1
μέτρο απόσταση από τα μπροστινά, πλαινά και οπίσθια μέρη της συσκευής.
• Μην τοποθετείτε την συσκευή κοντά σε άλλη πηγή θερμότητας.
• Μη χρησιμοποιείτε τη συσκευή σε περιοχές όπου αποθηκεύονται ή χρησιμοποιούνται
εύφλεκτα υγρά όπως η βενζίνη, βαφή και άλλα.
• Αυτή η συσκευή θερμαίνεται κατά τη χρήση. Προς αποφυγή εγκαυμάτων αποφύγετε την επαφή
του δέρματος με την κ
αυτή επιφάνεια. Κλείστε την και αφήστε να κρυώσει
πριν τη μετακίνηση.
• Μη χρησιμοποιήστε τη συσκευή για να στεγνώσετε ρούχα.
• Μην τοποθετείτε και μην αφήνετε ξένα ή μεταλλικά αντικείμενα να εισέλθουν στις εισόδους και
εξόδους του αέρα, καθώς μπορεί να προκληθεί ηλεκτροπληξία, πυρκαγιά ή φθορά της
συσκευής.
• Μη βυθίζετε τη συσκευή σε υγρά και μην επιτρέψετε τη διαρροή υγρών μέσα στη συσκευή
καθώς μπορεί να προκληθεί ηλεκτροπληξία.
• Μη πιάνετε μια συσκευή η οποία έπεσε σε νερό. Διακόψετε το ηλεκτρικό ρεύμα και βγάλτε
αμέσως από την πρίζα.
• Μη χρησιμοποιήστε καμιά συσκευή με φθορές, με φθαρμένο καλώδιο τροφοδοσίας, σε
φθαρμένες πρίζες ή αφού έπεσε ή υπέστη βλάβες. Επισκεφτείτε έναν εγκεκριμένο ηλεκτρολόγο
για έλεγχο, ηλεκτρική ή μηχανική ρύθμιση, επισκευές ή service.
• Μη χρησιμοποιείτε τη συσκευή με βρεγμένα χέρια.
με την απόδειξη αγοράς και κρατήστε τα με την εγγύηση και το τεχνικό εγχειρίδιο.

13
• Η πιο κοινή αιτία υπερθέρμανσης είναι η συσσώρευση της σκόνης ή χνουδιού στη συσκευή.
Εξασφαλίστε τον τακτικό καθαρισμό αφού βγάλετε από την πρίζα τη συσκευή και
χρησιμοποιήστε μια ηλεκτρική σκούπα για τον καθαρισμό των εισόδων/εξόδων αέρα και τις
γρίλιες.
• Μη χρησιμοποιήστε αυτή τη συσκευή κοντά σε παράθυρο επειδή η βροχή μπορεί να
προκαλέσει ηλεκτροπληξία.
• Μη χρησιμοποιείτε σκληρά καθαριστικά προϊόντα. Καθαρίστε με
έ
να νωπό πανί (όχι
βρεγμένο) που το έχετε βυθίσει σε ζεστό νερό με σαπούνι. Πάντα να αποσυνδέετε τη συσκευή
από την πρίζα πριν τον καθαρισμό.
• Μη συνδέσετε τη συσκευή στο ηλεκτρικό δίκτυο μέχρι να ολοκληρωθεί η πλήρης
συναρμολόγηση και προσαρμογή.
• Αυτή η συσκευή δεν προορίζεται για χρήση σε εξωτερικούς χώρους.
• Μη χρησιμοποιείτε τη συσκευή κοντά σε μπανιέρα, ντους, πισίνα ή άλλα υγρά.
• Πάντα να λειτουργείτε τ
η μονάδα σ
ε όρθια θέση.
• Κλείστε και αφήστε τη συσκευή να κρυώσει πριν τη μετακίνηση.
• Μη χρησιμοποιείτε τη συσκευή με τυλιγμένο καλώδιο αφού μπορεί να προκληθεί συσσώρευση
θερμότητας.
• Δεν συστήνεται η επέκταση καλωδίου με αυτή τη συσκευή.
• Μη αφαιρείτε το βύσμα από την πρίζα πριν την απενεργοποίηση της συσκευής .
• Μη αφαιρείτε το βύσμα από την πρίζα τραβώντας από το καλώδιο, πάντα κρατάτε το βύσμα.
• Όταν δεν χρησιμοποιείτε τη συσκευή να την αποσυνδέετε από την πρίζα.
• ΠΡΟΣΟΧΗ: Αυτό το προϊόν ΔΕΝ χ
ρησιμοποιείται σε μοκέτες και χαλιά
τύπου φλοκάτη
• Μην επιτρέψετε στο καλώδιο να έρθει σε επαφή με τη θερμαινόμενη επιφάνεια κατά τη
λειτουργία.
• Μην περάστε το καλώδιο κάτω από το χαλί, μοκέτα κτλ.. Τοποθετήστε το καλώδιο με τέτοιο
τρόπο ώστε να μην παρεμποδίζει τα άτομα που βρίσκονται στον χώρο.
• Μη στρίβετε, δένετε ή τυλίγετε το καλώδιο γύρω από την συσκευή αφού μπορεί να προκαλέσει
φθορά της μόνωσης. Πάντα
βεβαιωθείτε ότι όλο το καλώδιο έχει απομακρυνθεί από την
π
εριοχή.
• Μη χρησιμοποιείτε τη μονάδα σε εξωτερικούς χώρους ή ενώ στέκεστε σε υγρό πάτωμα.
• Μη αποθηκεύετε τη συσκευή όταν είναι ακόμα ζεστή.
• Αυτή η συσκευή δεν προορίζεται για χρήση από μικρά παιδιά ή άτομα με ειδικές ανάγκες
χωρίς επίβλεψη.
• Τα παιδιά θα πρέπει να επιβλέπονται προκειμένου να διασφαλιστεί ότι δεν παίζουν µε τη
συσκευή.
• Η συσκευή δεν θα π
ρέπει να τοποθετείται κάτω ακριβώς από πρίζα
• Μη χρησιμο
ποιείτε αυτή τη συσκευή με άλλο χειριστήριο , χρονόμετρο ή κάθε άλλη συσκευή
που ενεργοποιεί αυτόματα το σύστημα θέρμανσης, αφού υπάρχει κίνδυνος πυρκαγιάς εάν η
συσκευή δεν καλύπτεται ή δεν τοποθετείται σωστά.
• Όλα τα καλύμματα της συσκευής προορίζονται για την πρόληψη της άμεσης πρόσβασης στο
θερμαντικό στοιχείο και πρέπει να βρίσκονται στη θέση τους κατά τη λειτουργία
της συσκευής .
• «ΠΡΟΣΟΧΗ: Για την αποφυγή της υπερθέρμανσης, μην κα
λύπτετε τη συσκευή.»

14
• Για τη μείωση του κινδύνου ηλεκτροπληξίας, μην έχετε εκτεθειμένη τη συσκευή ή το εύκαμπτο
καλώδιο σε βροχή, υγρασία ή άλλα υγρά εκτός αυτών που είναι απαραίτητα για τη σωστή
λειτουργία του προϊόντος.
• Η προστασία έναντι πυρκαγιάς δεν προσφέρει πλήρη προστασία για παιδιά και άτομα με
ειδικές ανάγκες
• Στην περίπτωση που το καλώδιο τροφοδοσίας έχει υποστεί βλάβη, πρέπει να αντικατασταθεί
από έναν εγκεκριμένο ηλεκτρολόγο γι
α
την αποφυγή κινδύνων.
• Μη χρησιμοποιείτε τη συσκευή σε εξωτερικούς χώρους ή σε υγρές επιφάνειες. Αποφύγετε να
ρίξετε υγρά στη συσκευή.
• "ΠΡΟΣΟΧΗ : Για την αποφυγή κινδύνων λόγω της τυχαίας επαναρρύθμισης του θερμικού
διακόπτη, αυτή η συσκευή δεν πρέπει να τροφοδοτηθεί μέσω εξωτερικού διακόπτη, όπως
χρονομέτρου, ή να συνδεθεί σε ένα κύκλωμα που τακτικά ενεργοποιείται ή απενεργοποιείται
ανάλογα με την περίπτωση."
• Χρησιμο
ποιήστ
ε αυτή τη συσκευή μόνο σύμφωνα με την περιγραφή από το παρόν εγχειρίδιο.
Κάθε άλλη χρήση δεν συστήνεται από τον κατασκευαστή και μπορεί να προκαλέσει πυρκαγιά,
ηλεκτροπληξία ή τραυματισμό.
• Αυτή η συσκευή
Αυτό το πάνελ ελέγχου έχει σχεδιαστεί για τη χρήση της συγκεκριμένης μόνο συσκευής. Παρέχεται
πλήρως συναρμολογημένο και μπορεί να αντικατασταθεί από εξουσιοδοτημένο τεχνικό. Το
θερμαντικό θα πρέπει να είναι κλειστό κατά την εγκατάσταση. Το πάνελ ελέγχου περιλαμβάνει ένα
ηλεκτρονικό θερμοστάτη ακριβείας.
π
ροορίζεται για οικιακή χρήση, όχι για εμπορική ή βιομηχανική χρήση.
Γενική περιγραφή της συσκευής
Εικόνα 2
Εικόνα 1
Πάνελ ελέγχου
Έξοδος Αέρα
Χειριστήριο
Βάση Στήριξης
G3INV-20DTW / G3INV-20DTΒ
1000 W/ 2000W
220V- 24 0V~50Hz
832* 97 *400
Ονομαστική Ισχύς
Μοντέλο
Χαρακτηριστικά
Ονομαστική Τάση
Διαστάσεις (mm)
Θερμαντικό στοιχείο
Ιονιστής
Θερμοστάτης
ασφαλείας KSD
Θερμοστάτης
ασφαλείας KSD
Aισθητήρας δωματίου
Διακόπτης
Διακόπτης ασφαλείας
Διάγραμμα κυκλώματος

15
1. Ο
Λειτουργίες Πλήκτρων
δηγίες Λειτουργίας
1. 1 Εκκίνηση
1.1.1 Βγάλτε με προσοχή το θερμαντικό πάνελ από τη συσκευασία. Φυλάξτε τη συσκευασία
για αποθήκευση όταν δεν θα λειτουργήσει για αρκετό διάστημα.
1.1.2 Βεβαιωθείτε ότι η θέση του διακόπτη είναι στη θέση OFF (απενεργοποιημένος) πριν
την ενεργοποίηση.
1.1.3 Στερεώσετε καλά το θερμαντικό πάνελ σύμφωνα με τις οδηγίες τοποθέτησης.
1.1.4 Συστήνεται να μην χρησιμοποιηθεί η ίδια πρίζα για άλλες ηλεκτρικές
συσκευές μεγάλης
ισχύος για την αποφυγή της υπερφόρτισης του κυκλώματος.
1.2 Έλεγχος λειτουργίας
Τοποθετήστε το θερμαντικό πάνελ στην πρίζα, η ενδεικτική λυχνία λειτουργίας ανάβει μετά
1.3 Έλεγχος της θερμοκρασίας
από ένα σύντομο ήχο. Πιέστε το " " για να ενεργοποιήσετε τη συσκευή - εμφανίζεται η
θερμοκρασία δωματίου. Η ενδεικτική λυχνία θερμοκρασίας ανάβει και η προεπιλεγμένη
θερμοκρασία είναι 35
ο
C.
Πιέστε το " " και πάλι για να ρυθμίσετε τη θερμοκρασία, η ένδειξη "88" και η ένδειξη της
θερμοκρασίας "
ο
C" θα αρχίσουν να αναβοσβήνουν. Πιέστε τα βελάκια " " ή " " για να
αυξήσετε ή να μειώσετε τη θερμοκρασία κατά 1
ο
C. Η μέγιστη ρύθμιση θερμοκρασίας είναι
45
ο
C και η ελάχιστη 5οC.
ΡΥΘΜΙΣΗ ΤΗΣ ΛΕΙΤΟΥΡΓΙΑΣ TIMER (ΧΡΟΝΟΔΙΑΚΟΠΤΗΣ)
"+" / "-" για να αυξομειώσετε κατά 1 ώρα, το έυρος ρύθμισης είναι από 0 έως 24 ώρες.
Συνεχίστε να πιέζετε "+" / "-" για να αυξομειώσετε ανά 0.5 δεύτερα. Η προεπιλεγμένη ρύθμιση
είναι 0 ώρες. Όταν ανάψει η ενδεικτική λυχνία, η συσκευή εκκινεί σύμφωνα με την τελευταία
ρύθμιση, εάν δε δοθεί άλλη εντολή εντολή εντός 5 δευτερολέπτων. Κάθε φορά που πιέζεται τις
με τη νέα ρύθμιση, ή με την εργοστασιακή ρύθμιση μέχρι και τον προκαθορισμένο χρόνο, μετά
κλείνει και σταματάει να λειτουργεί. Η συσκευή κλείνει χωρίς ένδειξη ήχου όταν τελειώσει ο
χρόνος ρύθμισης.
S et
IO N
10
1
2
IO N
3
4
5
6
7
8
9
11121314
15
2
3
4
5
6
7
1. Λυχνία ένδειξης ενεργοποιημένης/απενεργοποιημένης
συσκευής
2. Πλήκτρο ενεργοποίησης/απενεργοποίησης συσκευής
3. Πλήκτρο αύξησης ( + )
4. Πλήκτρο επιλογής ρυθμίσεων
5. Πλήκτρο μείωσης ( - )
6. Επιλογέας υψηλής/χαμηλής λειτουργίας
7. Πλήκτρο ενεργοποίησης ιονιστή (Ionizer)
8. Ένδειξη προγραμματισμού
9. Αριθμητική ένδειξη LED
10. Ένδειξη ( oC) Θερμοκρασίας
11. Ένδειξη λειτουργίας θέρμανσης
12. Ένδειξη υψηλής λειτουργίας
13. Ένδειξη χαμηλής λειτουργίας
14. Ένδειξη λειτουργίας ιονιστή (Ionizer)
15. Διακόπτης ενεργοποίησης/απενεργοποίησης συσκευής

2. Διακόπτης ασφαλείας
Η μονάδα διαθέτει έναν διακόπτη υπερθέρμανσης. Η λειτουργία διακόπτεται αυτόματα εάν
η συσκευή υπερθερμανθεί και θα επανέλθει σε κατάσταση λειτουργίας όταν κρυώσει.
3. Καθαρισμός στο πίσω μέρος της συσκευής
Είναι πολύ εύκολο να καθαρίσετε το πίσω μέρος της συσκευής.
ΑΠΕΝΕΡΓΟΠΟΙΗΣΗ
Πιέστε παρατεταμένα " " για να απενεργοποιήσετε τη συσκευή, έως ότου σβήσει η
ενδεικτική λυχνία.
ΠΑΙΔΙΚΟ ΚΛΕΙΔΩΜΑ ΑΣΦΑΛΕΙΑΣ
Κατά τη λειτουργία της συσκευής, πιέστε συγχρόνως " " και " " για 3 δεύτερα, για να
κλειδώσετε τη συσκευή. Εμφανίζεται στην οθόνη ένα τετράγωνο " " ενώ 3 δεύτερα
αργότερα η οθόνη επανέρχεται στην κατάσταση ελέγχου θερμοκρασίας. Εάν πιέσετε
οποιοδήποτε πλήκτρο, το σύμβολο " " θα εμφανιστεί για 3 δεύτερα, χωρίς ενδεικτικό ήχο
και μετά θα επανέλθει και πάλι στην κατάσταση ελέγχου θερμοκρασίας.
Για να ξεκλειδώσετε: 1. απενεργοποιήστε τη συσκευή, 2. Ξεκλειδώνει μετά το πέρας του
ρυθμισμένου από το χρονοδιακόπτη χρόνου. 3. πιέστε συγχρόνως " " και " " για 3
δεύτερα.
ΒΗΜΑΤΑ ΑΠΟΔΟΣΗΣ
Πιέστε " " για τ
ην επιλογή απόδοσης. Η συκευή λειτουργεί με τη μέγιστη απόδοση όταν
εμφανίζεται η ένδειξη "HI". Πιέστε " " και πάλι για να αλλάξετε σε "LO" χαμηλή λειτουργία
θέρμανσης.
ΛΕΙΤΟΥΡΓΕΙΑ ΙΟΝΙΣΤΗ
Πιέστε " ", η ένδειξη ΙΟΝ θα εμφανιστεί και ο ιονιστής θα ενεργοποιηθεί και θα κάνει τον
αέρα του χώρου πιο καθαρό.
ΓΙΑ ΝΑ ΚΛΕΙΔΩΣΕΤΕ ΤΟ ΠΑΝΕΛ ΕΛΕΓΧΟΥ
Ηλεκτρονικό κλείδωμα:
Ομοίως με το "Παιδικό κλείδωμα ασφαλείας"
Κρατήστε τις δύο πλευρές του θερμαντικού πάνελ, μετά τραβήξτε το προς τα πάνω και μπρόστα
για να καθαρίσετε το πίσω μέρος.
16
Για την επίτοιχη τοποθέτηση:
Η συσκευή απαιτεί συχνό καθαρισμό ώστε να δουλεύει σωστά και ελεύθερα από σκόνες:
Πάντα να βγάζετε τη συσκευή από την πρίζα, πριν την καθαρίσετε.
Να επιβεβαιώνετε ότι η συκευή έχει κρυώσει τελείως πριν τον καθαρισμό.
Χρησιμοποιείστε ένα υγρό πανί (όχι βρεγμένο) για να καθαρίσετε το θερμαντικό εξωτερικά
από σκόνες και βρωμιά.
Χρησιμοποιήστε ηλεκτρική σκούπα για να καθαρίσετε σκόνη και χνούδι γύρω από τις γρίλιες.
Επιβεβαιώστε ότι το θερμαντικό είναι εντελώς στεγνό πριν το συνδέσετε στην πρίζα.
Μετά τον καθαρισμό, τοποθετήστε το θερμαντικό πάνελ σε κανονική θέση.

17
Εικόνα 3
4. Προσοχή
Μην καλύψετε το θερμαντικό πάνελ για την αποφυγή πυρκαγιάς.
5. Service
Εάν θα χρειαστείτε υπηρεσίες service, επικοινωνήστε με τον τοπικό εκπρόσωπο ή με
εγκεκριμένη εταιρεία συντήρησης των ηλεκτρικών συσκευών.
6. Η εγγύηση καλής λειτουργίας είναι 2 έτη. Για περισσότερες πληροφορίες, παρακαλούμε να
επικοινωνήσετε με τον προμηθευτή σας.
Αντικατάσταση του καλωδίου τροφοδοσίας
Εάν το καλώδιο τροφοδοσίας φθαρεί, πρέπει να αντικατασταθεί από έναν εξειδικευμένο
τε
χνικό , σε αντίθετη περίπτωση μπορεί να προκληθεί τραυματισμός.
Επίβλεψη των παιδιών
Τα μικρά παιδιά και τα άτομα με ειδικές ανάγκες δεν πρέπει να χρησιμοποιούν το θερμαντικό
πάνελ χωρίς επίβλεψη.
Χαρακτηριστικά:
Απλός και εύκολος χειρισμός
Εργονομικός σχεδιασμός
Διατήρηση σταθερής θερμοκρασίας
Προκαθορισμένη μέγιστη άνεση σε 24° C
Λειτουργία έναντι εσφαλμένου χειρισμού
Χαμηλό κόστος
Δεν απαιτεί συντήρηση

18
Κατάλληλο για
Ξενοδοχεία
Οικίες
Επαγγελματικούς χώρους
Φοιτητικές εστίες
Οδηγίες τοποθέτησης
Τοποθέτηση στον τοίχο
Χαρακτηριστικά:
ΜΟΝΤΕΛΟ
Ισχύς
L H L1 H1
(W) mm mm mm mm
G3INV-20DTW / G3INV-20DTΒ
ΛΕΥΚΟ/ΜΑΥΡΟ
2000/1000 832 400 250 254

19
Τοποθέτηση στο δάπεδο
Τοποθέτηση βάσης
Όταν η βάση έχει στερεωθεί θα ακούσετε ένα κλικ.
Ανασηκώστε το θερμαντικό
10mm και κατεβάστε το.
10mm
22
Πιέστε το πλήκτρο

20
Σημαντικές οδηγίες ασφαλείας
1. Τοποθετήστε σωστά το θερμαντικό πάνελ στον τοίχο ή στο δάπεδο.
2. Βεβαιωθείτε πως το θερμαντικό πάνελ έχει τοποθετηθεί με τέτοιο τρόπο ώστε
άτομα τα οποία βρίσκονται σε μπάνια ή ντουζιέρες να μην έρχονται σε επαφή
με τους διακόπτες της συσκευής
3. Το θερμαντικό πάνελ δεν πρέπει να τοποθετείται κάτω ακριβώς από πρίζα.
4. Όταν τοποθετείται στο δάπεδο, παρακαλούμε να μην λειτουργείτε τη συσκευή
κοντά σε μπανιέρα, ντους ή πισίνα.
5. Όταν τοποθετείται στον τοίχο, μη αγγίξετε τους διακόπτες
6. Συμβουλευτείτε έναν εγκεκριμένο ηλεκτ
ρολόγο ή έναν εξειδικευμένο τεχνικό
εάν το ηλεκτρικό καλώδιο έχει υποστεί φθορά.
7. ΜΗΝ Κ
ΑΛΥΠΤΕΤΕ το θερμαντικό πάνελ κατά τη λειτουργία.
8. Πάντα αποθηκεύετε το θερμαντικό πάνελ όταν δεν το χρησιμοποιείτε.
9. Εξασφαλίστε ότι το θερμαντικό πάνελ έχει κρυώσει εντελώς πριν από την
αποθήκευση.
10. Αυτό το θερμαντικό σώμα δεν είναι εξοπλισμένο με διακόπτη ελέγχου
θερμοκρασίας του χώρου . Μη χρησιμοποιείτε το θερμαντικό πάνελ σε μικρά
δωμάτια όταν βρίσκονται μέσα άτομα τα οποία δεν μπορούν να
εγκαταλείψουν το δωμάτιο χ
ωρίς υποστήριξη, εκτός της περίπτωσης που
εξασφαλίζεται μόνιμη επίβλεψη.
αφού
έχετε εξέλθει από μπάνιο, ντους ή πισίνα.

21
ÎNAINTE DE PRIMA UTILIZARE
Ciți și urmați toate instrucțiunile în cadrul acestui manual de ulizare, deși considerați că sunteți
familiarizat cu acest p de produs, și păstrați-l la îndemână pentru referințe viitoare.
Pentru ușurință, notați numărul complet al modelului (localizat pe plăcuța de idenficare a
produsului) și data recepționării produsului, împreună cu dovada achiziționării și atașați garanției și
informațiilor de service. Păstrați în cazul în care este necesar serviciul de garanție.
NOTĂ: cotarea acestui produs (după cum este marcată pe plăcuța de idenficare a produsului) este
bazată pe teste specifice de încărcare. Ulizarea normală sau ulizarea altor accesorii recomandate
pot scădea puterea de funcționare.
ELEMENTE IMPORTANTE DE SIGURANȚĂ
La folosirea oricărui produs cu alimentare electrică, trebuie întotdeauna urmate precauții de
siguranță de bază, inclusiv următoarele:
VĂ RUGĂM CITIȚI TOATE INSTRUCȚIUNILE CU ATENȚIE ÎNAINTE DE FOLOSIREA PRODUSULUI
• Ciți toate instrucțiunile înainte de folosirea acestui aparat și păstrați-le pentru
referințe viitoare.
• Folosiți doar voltajul specificat pe plăcuța de cotare a radiatorului.
• Nu acoperiți și nu reduceți aportul de aer către grătarul de evacuare în niciun fel
deoarece aparatul se poate supraîncălzi și poate crea un risc de incendiu.
• Nu acoperiți grilajele, nu blocați intrările sau evacuarea aerului prin placarea aparatului
pe orice fel de suprafață. Țineți orice obiect la cel puțin 1 metru față de părțile din față,
laterale și din spate ale aparatului.
• Nu așezați aparatul aproape de o sursă emițătoare de căldură.
• Nu îl folosiți în zone unde sunt depozitate sau folosite lichide inflamabile ca benzină,
lacuri sau altele.
• Acest aparat se încălzește în mpul folosirii. Pentru a evita arsurile, nu permiteți pielii
neacoperite să angă suprafața fierbinte a acestuia. Opriți-l și lăsați-l să se răcească
înainte de a-l muta.
• Nu folosiți acest aparat pentru a usca haine.
• Nu inserați sau nu permiteți introducerea de obiecte sau ustensile metalice în orice
deschidere pentru venlație sau evacuare, deoarece acestea pot cauza electrocutări,
incendii sau daune aparatului.
• Nu scufundați în lichide și nu permiteți scurgerea de lichid în interiorul aparatului
pentru că poate crea pericol de electrocutare.
• Nu vă înndeți după aparatul căzut în apă. Opriți curentul și scoteați-l din priză imediat
• Nu puneți în funcțiune niciun aparat cu cablu de alimentare avariat, în prize avariate
sau după ce aparatul a căzut sau a fost avariat în orice fel. Mergeți cu el la un electrician autorizat pentru control, ajustare electrică sau mecanică, reparație sau service.
• Nu folosiți aparatul cu mâinile ude.
• Cea mai întâlnită cauză a supraîncălzirii sunt depunerile de praf sau puf în aparat.
Asigurați-vă că aceste depuneri sunt îndepărtate regulat prin scoaterea aparatului din
priză și folosirea unui aspirator pe venlatoare și grilaje
ATENȚIE – pentru a reduce riscul de incendiu, electrocutare sau accidente și daune

22
• Nu folosiți acest aparat lângă o fereastră deoarece ploaia poate provoca electrocutare.
• Nu folosiți produse de curățat abrazive pe acest aparat. Curățați cu o cârpă umedă (nu
curățare.
• Nu conectați aparatul la rețeaua electrică până ce nu este complet montat și reglat.
înot sau a altor lichide.
• Opriți și lăsați să se răcească înainte de a muta.
care ar putea fi suficientă pentru a deveni un pericol.
• Nu scoateți mufa din priza electrică până când aparatul nu a fost oprit.
• Nu scoateți mufa din priza electrică trăgând de cablu, întotdeauna prindeți de mufă.
• Scoateți întotdeauna aparatul din priză atunci când nu este folosit.
• ATENȚIE: Acest produs NU este potrivit pentru a fi folosit pe covoare cu fir lung sau
• Nu treceți cablul pe sub covor, mochete sau cuiere, etc. Aranjați cablul departe de
• Nu răsuciți, înnodați sau înfășurați cablul de alimentare în jurul aparatului, deoarece
acest lucru poate duce la slăbirea izolației și ruperea ei. Întotdeauna asigurați-vă că
toate cablurile au fost înlăturate din orice zonă de depozitare a cablului.
fără supraveghere.
• Copiii trebuie supravegheați pentru a nu se juca cu aparatul.
• Aparatul nu trebuie să fie amplasat chiar sub o priză.
comută sistemul de încălzire în mod automat, deoarece există un risc de incendiu dacă
aparatul este acoperit sau poziționat incorect.
de încălzire și trebuie să fie la loc atunci când aparatul este în funcțiune.
• "ATENȚIE: Pentru a evita supraîncălzirea, nu acoperiți radiatorul."
• Pentru a reduce riscul de electrocutare, nu scufundați sau expuneți produsul sau cablul
flexibil la ploaie, umezeală sau orice alt lichid altele decât cele necesare pentru
funcționarea corectă a produsului
• Protecția la incendii nu oferă protecție completă pentru copii și pentru persoanele cu
dizabilități.

23
• În cazul în care cablul de alimentare este avariat, acesta trebuie înlocuit de un
electrician calificat pentru evitarea unui pericol.
pe aparat.
• "ATENȚIE: Pentru a se evita orice pericol datorită resetării accidentale a releului termic,
fi un temporizator, sau conectat la un circuit care este în mod regulat pornit și oprit în
este recomandată de către producător și poate provoca incendiu, electrocutare sau
rănire.
G3INV-20DTW / G3INV-20DTΒ
1000W/2000W
220V-240V~50Hz
832*97*400
Gener at or
Evacuare aer Unitatea de control
Buton de pornire
Set mod în picioare
Model
Putere
Tensiune
Dimensiuni (mm)
Imagine generală aparat
Specificații
Diagrama de circuit
1. Modulul de funcții
Acest modul este proiectat pentru utilizarea cu Convectorul de Încălzire. Este
furnizat complet asamblat și poate fi înlocuit de către un tehnician autorizat.
Încălzitorul trebuie să fie oprit în timpul instalării. Modulul de funcții conține un
termostat electronic precis
Întrerupător
Întrerupător tip-over
Termostat KSD
Element de încălzire
Senzor de temperatură
Termostat KSD

S et
IO N
10
1
2
IO N
3
4
5
6
7
8
9
11121314
15
2
3
4
5
6
7
Explicații taste panou de control
1 – Indicator funcționare
2 - Tastă pornire
3 – Tastă sus
4 – Tastă setări
5 – Tastă jos
6 – Selector încălzire maximă/minimă
7 – Tastă activare ionizare (ION)
8 – Indicator programare
10 – Indicator pentru
temperaturi
grade C
11 – Indicator încălzire
12 – Indicator încălzire maximă
13 – Indicator încălzire minimă
14 – Indicator funcționare ionizare
(ION)
15 – Tastă pornire
2. Ghid operare
2. 1. PORNIREA
2.1.1. Scoateți atent radiatorul din ambalaj. Vă rugăm păstrați ambalajul pentru
depozitare în afara folosirii.
2.1.2. Asigurați-vă că poziția convectorului (15) este pe OFF (oprit) înainte de
pornire.
2.1.3. Fixați convectorul bine conform instrucțiunilor de montare.
2.1.4. Este indicat să nu se folosească aceiași priză ca cea în care aveți alte
aparate electrice cu putere mare pentru a evita supraîncărcarea circuitului.
2.2. FUNCȚIONAREA
Conectați aparatul la priză, iar indicatorul pentru funcționare se va aprinde
după un scurt sunet. Apăsați tasta „set” pentru a porni aparatul, iar pe ecran se
iar temperatura setată din fabrică este de 35 grade Celsius.
2.3. SETAREA TEMPERATURII
si jos pentru a crește sau scade cu câte un grad Celsius. Temperatura maximă ce
Celsius.
2.4. PROGRAMAREA APARATULUI
ore. Pentru a reduce/scade cu oră trebuie ținut apăsat 0.5 secunde. Din fabrica
oprește fără sa facă nici un sunet.
24

25
2.5. OPRIREA APARATULUI
Țineți apăsat butonul de oprire până când ecranul se închide iar indicatorul luminos
va rămâne aprins.
2.6. FUNCȚIA DE SIGURANȚĂ
În timpul funcționării aparatului, țineți apăsate simultan pentru 3 secunde tastele
secunde tas
minus
tele plus si minus.
2.7. SELECTAREA PUTERII DE ÎNCĂLZIRE
Apăsați tasta 6 pentru a seta puterea maximă (HI) sau minimă (LO).
2.8. PORNIRE IONIZARE (ION)
display. Această funcție curăța aerul din încăpere.
2.9. BLOCAREA TASTELOR DE PE PANOUL DE CONTROL
2.9.1. BLOCAREA ELECTRONICĂ
- A se vedea secțiunea 2.6.
3. Elementul de siguranță
Unitatea este echipată cu un comutator cu limită, radiatorul se va opri automat dacă
este în stare de supraîncălzire. Acesta va reîncepe să funcționeze atunci când se
răcește.
4. Sfaturi pentru folosire
INSTRUCȚIUNI DE CURĂȚARE
Curățarea din spatele radiatorului
Este foarte ușor de curățat în spatele acestuia. Țineți de marginile laterale ale
radiatorului, apoi trageți radiatorul în sus și în față pentru a curăța în spatele lui.
Aparatul necesită curățare pentru o funcționare fără probleme:
Deconectați aparatul de la sursă înainte de curățare.
Lăsați aparatul să se răcească înainte de a începe curățarea.

26
Folosiți o cârpă uscată pentru a șterge exteriorul încălzitorului de praf și
murdărie.
Folosiți aspiratorul pentru a aspira praful de la grilele aparatului.
5. AVERTISMENTE
1. Fixați corect încălzitorul pe perete și așezați în poziție corectă pe podea.
sau au făcut baie.
5. Nu operați aparatul în vecinătatea băilor, pișcinelor, dușurilor.
6. În cazul în care cablul de alimentare este întrerupt, apelați la un electrician
autorizat.
7. Nu acoperiți radiatorul pentru a preveni un incendiu.
8. Dacă nu folosiți aparatul păstrați-l într-un loc special de depozitare (cămară).
9. Asigurați-vă că aparatul s-a răcit complet înainte de a-l depozita.
6. Service
Dacă aveți nevoie de service, contactați reprezentantul local sau o companie
ÎNLOCUIREA CABLULUI DE ALIMENTARE
Dacă există avarii la cablul de alimentare, acesta trebuie înlocuit de un reprezen-
poate provoca daune.
7. Depozitare
Dacă nu folosiți aparatul pentru perioade lungi de timp, este recomandat ca
original.

27
Ghid montare
Modul de montare pe perete
Specificații:
MODEL
PUTERE L H L1 H1
(W) mm mm mm mm
NEGRU/ALB
2000/1000 832 400 250 254
G3INV-20DTW / G3INV-20DTΒ

28
10mm
22
Ridicați aparatul 10 mm iar
apoi îl puteți da jos de pe
perete
Cum se dă jos aparatul de pe perete
Apăsați butonul
Modul de montare pe perete
La montare se va auzi un click. Apăsați butonul și scoateți roțile

29
IMPORTANȚĂ ȘI SIGURANȚĂ
1. Fixarea radiatorului drept pe perete sau așezarea lui în poziție dreaptă.
2. Radiatorul se va instala asel încât panoul de control să nu poată fi ans de o
persoană ce folosește cada sau dușul.
3. Radiatorul se va instala asel încât să nu fie așezat direct sub o priză.
4. Atunci când radiatorul funcționează plasat pe suportul cu picioare, vă rugăm nu
îl folosiți în apropierea căzii, dușului sau a piscinei.
5. Atunci când radiatorul funcționează în poziția montat pe per
ete, nu
angeți
panoul de control atunci când este folosit în apropierea căzii, dușului sau
piscinei.
6. Consultați un electrician calificat sau un tehnician de la service dacă este avariat
cablul electric.
7. NU ACOPERIȚI radiatorul în mp ce funcționează.
8. Depozitați întotdeauna radiatorul când nu îl folosiți.
9. Asigurați-vă că radiatorul s-a răcit complet înainte de a-l depozita.
10. Acest radiator nu este echipat cu dispoziv de control a temperaturii camerei.
Nu folosiți acest radiator în camere mici atunci când sunt ocupate de persoane
care nu
pot părăsi camera fără asistență, ci doar dacă se asigură supraveghere
constantă.

30
____________________________________________________________
____________________________________________________________
____________________________________________________________
____________________________________________________________
____________________________________________________________
____________________________________________________________
____________________________________________________________
____________________________________________________________
____________________________________________________________
____________________________________________________________
____________________________________________________________
____________________________________________________________
____________________________________________________________
____________________________________________________________
____
________________________________________________________
____________________________________________________________
____________________________________________________________
____________________________________________________________
____________________________________________________________
____________________________________________________________
____________________________________________________________

 Loading...