

INVENTOR EPC-09, EPC-09BS User Manual
MODELS:
AIR CONDITIONING SYSTEMS
PORTABLE
EPC-09
EPC-09BS
• USER’S MANUAL
• ΕΓΧΕΙΡΙΔΙΟ ΧΡΗΣΗΣ
• MANUAL UTILIZATORULUI
• BEDIENUNGSANLEITUNG
• MODE D'EMPLOI
• MANUALE DELL’ UTENTE
• MANUAL DEL PROPIETARIO

Read This Manual
Inside you will nd many helpful hints on how to use and maintain your air conditioner properly. Just a little
preventive care on your part can save you a great deal of time and money over the life of your air conditioner. You’ll nd many answers to common problems in the chart of troubleshooting tips. If you review our
chart of Troubleshooting Tips rst, you may not need to call for service at all.
• It is not advised for children under 8 to use this appliance. Please make sure children 8 and above and
persons with physical, sensory or mental capabilities are supervised and understand the use and hazards involved. Children should not play the appliance. Children should not perform cleaning and maintenance without supervision. (Applicable for the European Countries)
• This appliance is not intended for use by persons (including children) with reduced physical, sensory or
mental capabilities or lack of experience and knowledge, unless they have been given supervision or
instruction concerning the use of the appliance by a person responsible for their safety. (Applicable for
non-European countries)
• Children should be supervised to ensure that they do not play with the appliance.
• If the supply cord is damaged, the manufacturer, its service agent or similarly qualied persons must
replace it, in order to avoid a hazard.
• The appliance should be installed in accordance with national wiring regulations.
• Do not operate your air conditioner in a wet room such as a bathroom or laundry room.
• The appliance with an electric heater should have at least one meter of space away from any
combustible materials.
• Contact your authorized service technician for repair or maintenance of this unit.
• Contact your authorized installer for installation of this unit.
• If there are major differences between the “USER’S MANUAL” and the “Remote controller illustration” on
function description, please use the description in the “USER’S MANUAL”.
• If the air conditioner is knocked over during use, turn off the unit and unplug it from the main power
supply immediately. Visually inspect the unit to ensure there is not any damage.
• If you suspect the unit has been damaged, contact a technician or customer service agent for assistance.
• During a thunderstorm, ensure the power is turned off to avoid damage to the unit due to lightning.
• Avoid using this conditioner with any solid-state speed control devices, to reduce the risk of re or
electric shock.
• Do not place the cord under any carpeting. Do not cover the cord with throw rugs, runners, or other sim-
ilar coverings. Do not place the cord under furniture or appliances. Avoid placing the cord in high trafc
areas to prevent accidents due to tripping.
!
CAUTION

3
CONTENTS
SOCIABLE REMARK
Sociable remark ..............................................................................................................4
SAFETY PRECAUTIONS
Safety rules ....................................................................................................................5
Operating conditions ......................................................................................................5
Electrical information .....................................................................................................6
IDENTIFICATION OF PARTS
Accessories ....................................................................................................................6
Name of parts ..................................................................................................................7
AIR CONDITIONER FEATURES
Electronic control operating instructions .........................................................................8
OPERATING INSTRUCTIONS
Operating instructions......................................................................................................9
INSTALLATION INSTRUCTIONS
Location ........................................................................................................................11
Window kit installation .................................................................................................. 11
Exhaust hose installation ..............................................................................................14
Water drainage .............................................................................................................15
CARE AND MAINTENANCE
Care and maintenance .................................................................................................16
TROUBLESHOOTING TIPS
Troubleshooting ............................................................................................................17
NOTE
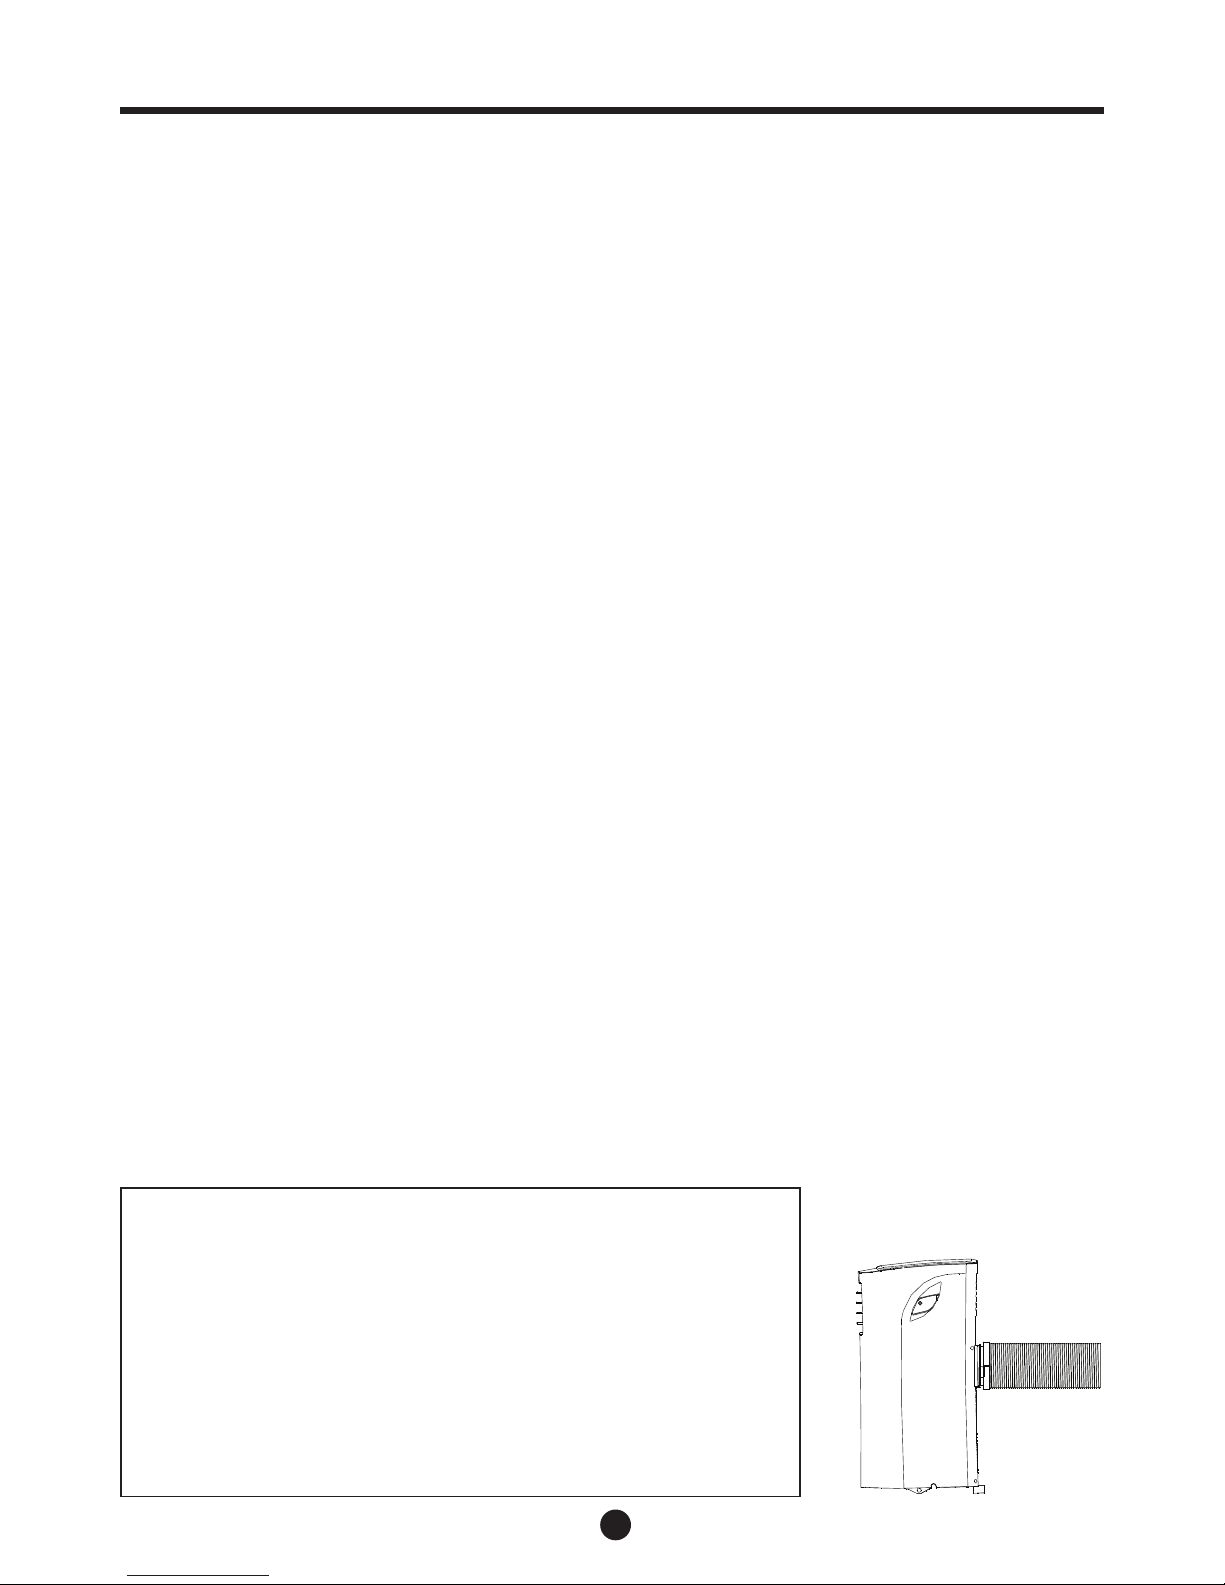
The rating data indicated on the energy label is based on the testing
condition of installing the un-extended air exhaust duct without adaptor A & B (The duct and the adaptor A & B are listed in the accessories chart of the Instruction Manual). See the right gure. At the same
time, the unit must be operated on the COOL MODE and HIGH FAN
SPEED with the remote control.
4
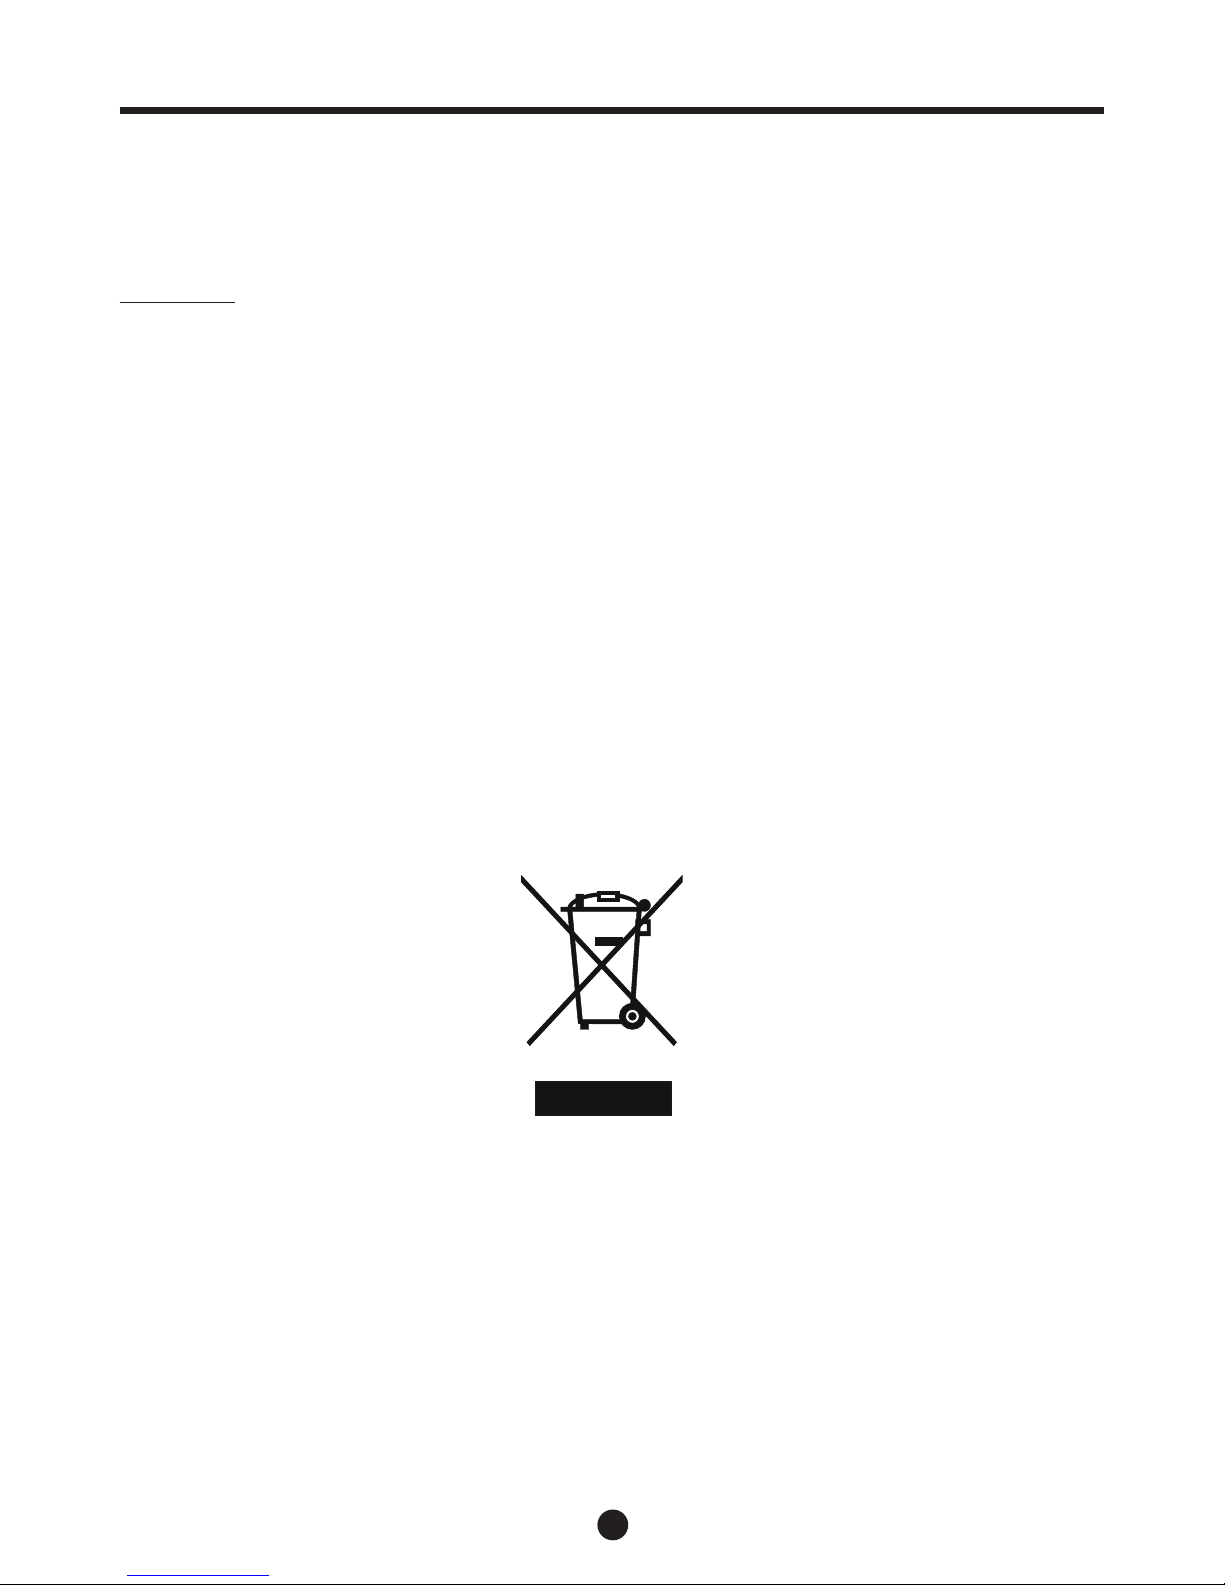
DISPOSAL: Do not dispose this product as unsorted municipal waste. This appliance requires special
treatment for disposal.
It is prohibited to dispose of this appliance in domestic household waste.
There are several possibilities for disposal:
A. Your local municipality has established free collection systems for electronic waste.
B. Your local retailer will take back the old product with the purchase of a new product.
C. The manufacture will take back the old appliance for disposal.
D. The old products contain valuable resources and sometimes can be sold to scrap metal dealers.
Do not dispose this product randomly into the environment. The hazardous substances can leak
into the ground-water supply and nd their way into the food chain, endangering your health and
the environment.
SOCIABLE REMARK
The following information must be followed when using this air conditioner in European countries.
5
SAFETY PRECAUTIONS
Safety rules
Please comply with the following instructions to avoid injury or property damages. Incorrect operation or
non-compliance of these instructions may cause harm or damage.
• Your air conditioner should be protected from
moisture, e.g. condensation, splashed water, etc.
Do not place or store your air conditioner where it
can fall into water or other liquids. Unplug immediately if it occurs.
• When moving the air conditioner ensure it is in
a vertical position. Always place the unit on a
stable, level surface.
• Turn off the unit when it is not in use.
• Always contact a qualied technician for repairs.
If the power cord becomes damaged it must be
replaced from the product manufacturer and
never repaired.
• Make sure to leave at least 30cm of empty space
around the unit from walls, furniture and curtains.
• If the air conditioner is knocked over during use,
turn off the unit and unplug it immediately.
• Always use the switch on the control panel.
• Do not operate your air conditioner in a wet room
such as a bathroom or laundry room.
• Do not touch the unit with wet or damp hands or
when barefoot.
• Do not press the buttons on the control panel with
anything other than your ngers.
• Do not remove any xed covers. Never use this
appliance if it is not working properly, or if it has
been dropped or damaged.
• Never use the plug to start and stop the unit.
• Do not cover or obstruct the inlet or outlet grills.
• Do not use hazardous chemicals to clean the unit.
• Do not use the unit near ammable substances or
vapors such as alcohol, insecticides, petrol, etc.
• Do not allow children to operate the unit unsuper-
vised.
• Do not use this product for functions other than
those described in this instruction manual.
• Use the unit in the recommended room size.
• Place the unit where furniture cannot obstruct the airow.
• Keep blinds/curtains closed during the sunniest part of the day.
• Keep the lters clean.
• Keep doors and windows closed to keep cool air in and warm air out
(heating mode) or keep warm air in and cool air out(heating mode).
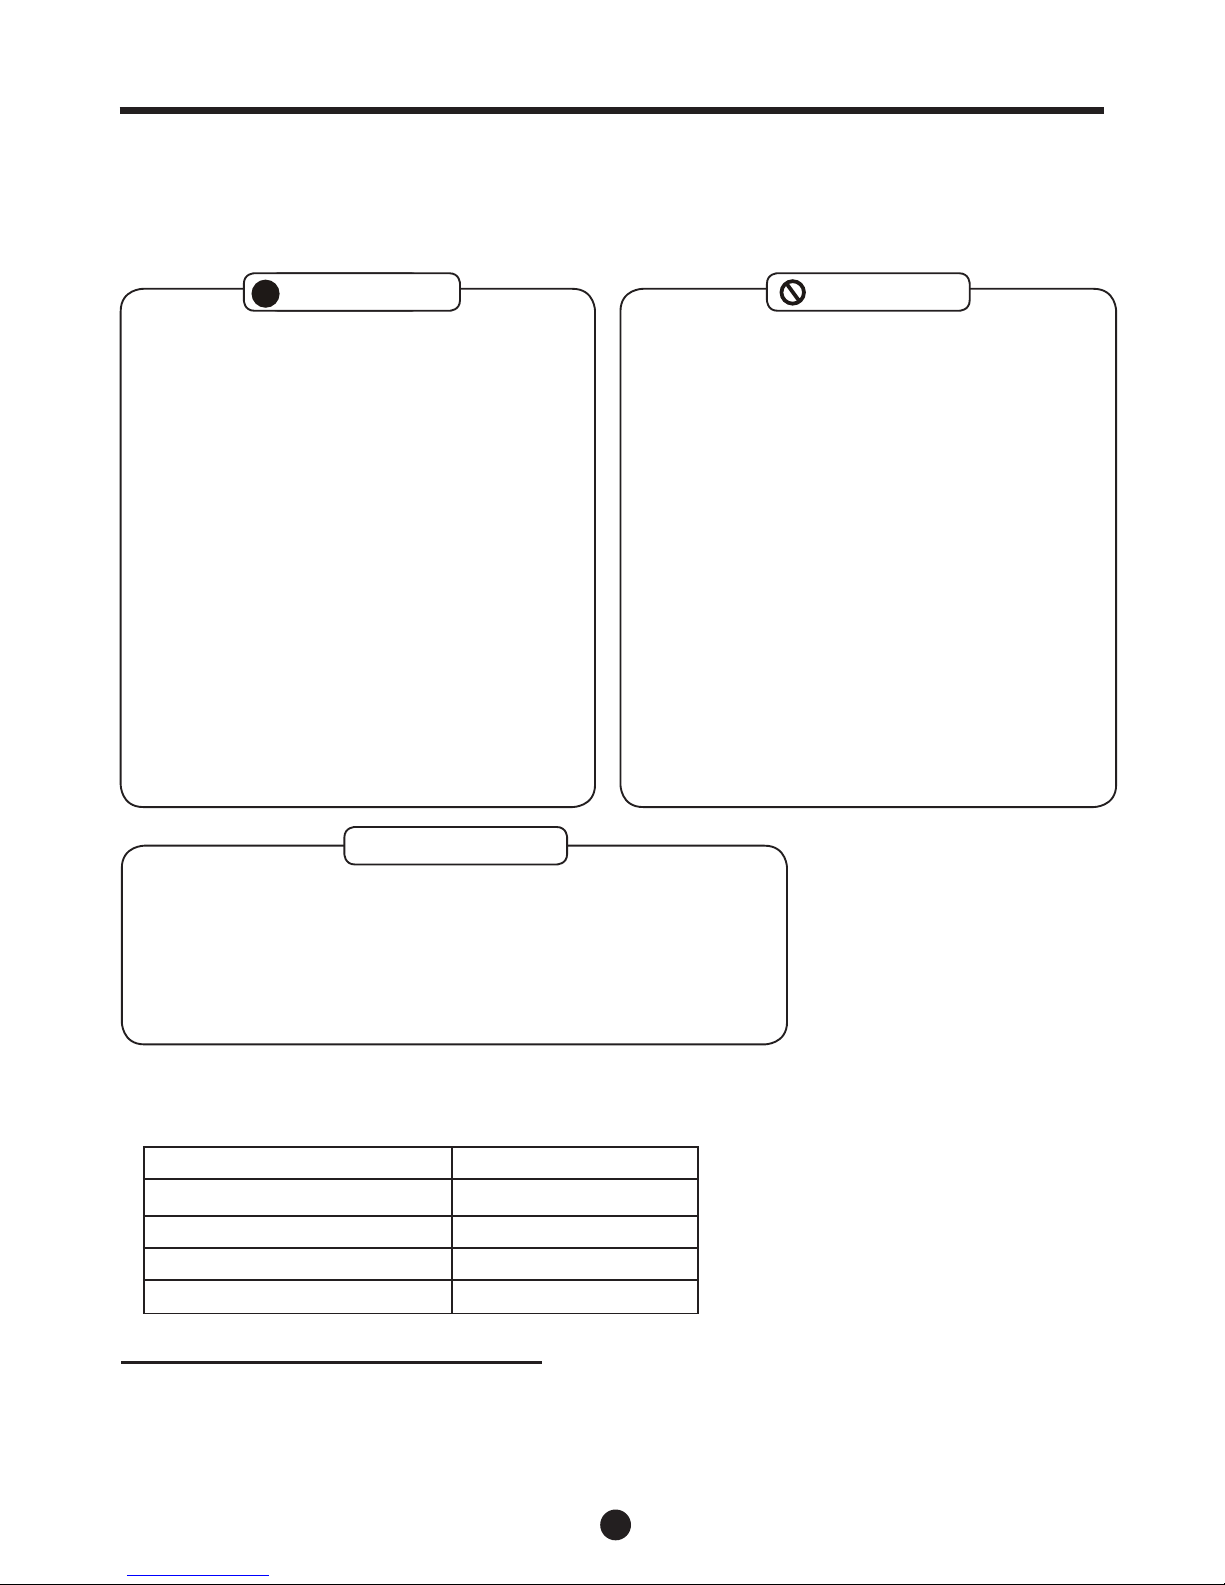
Energy Saving Tips
Always do this Never do this
!
Operating Conditions
• The air conditioner must be operated within the temperature range indicated below:
Suggested tools for window kit installation
1. Screwdriver (medium sized Phillips)
2. Tape measurer or ruler
3. Knife or scissors
4. Saw (In the event that the window kit needs to be cut down in size because the window is too
narrow for direct installation)
MODE ROOM TEMPERATURE
COOL
17°C(62°F)~35°C(95°F)
DRY
13°C(55°F)~35°C(95°F)
HEAT (heat pump type)
5°C(41°F)~30°C(86°F)
HEAT (electrical heat type) £30°C/86°F

6
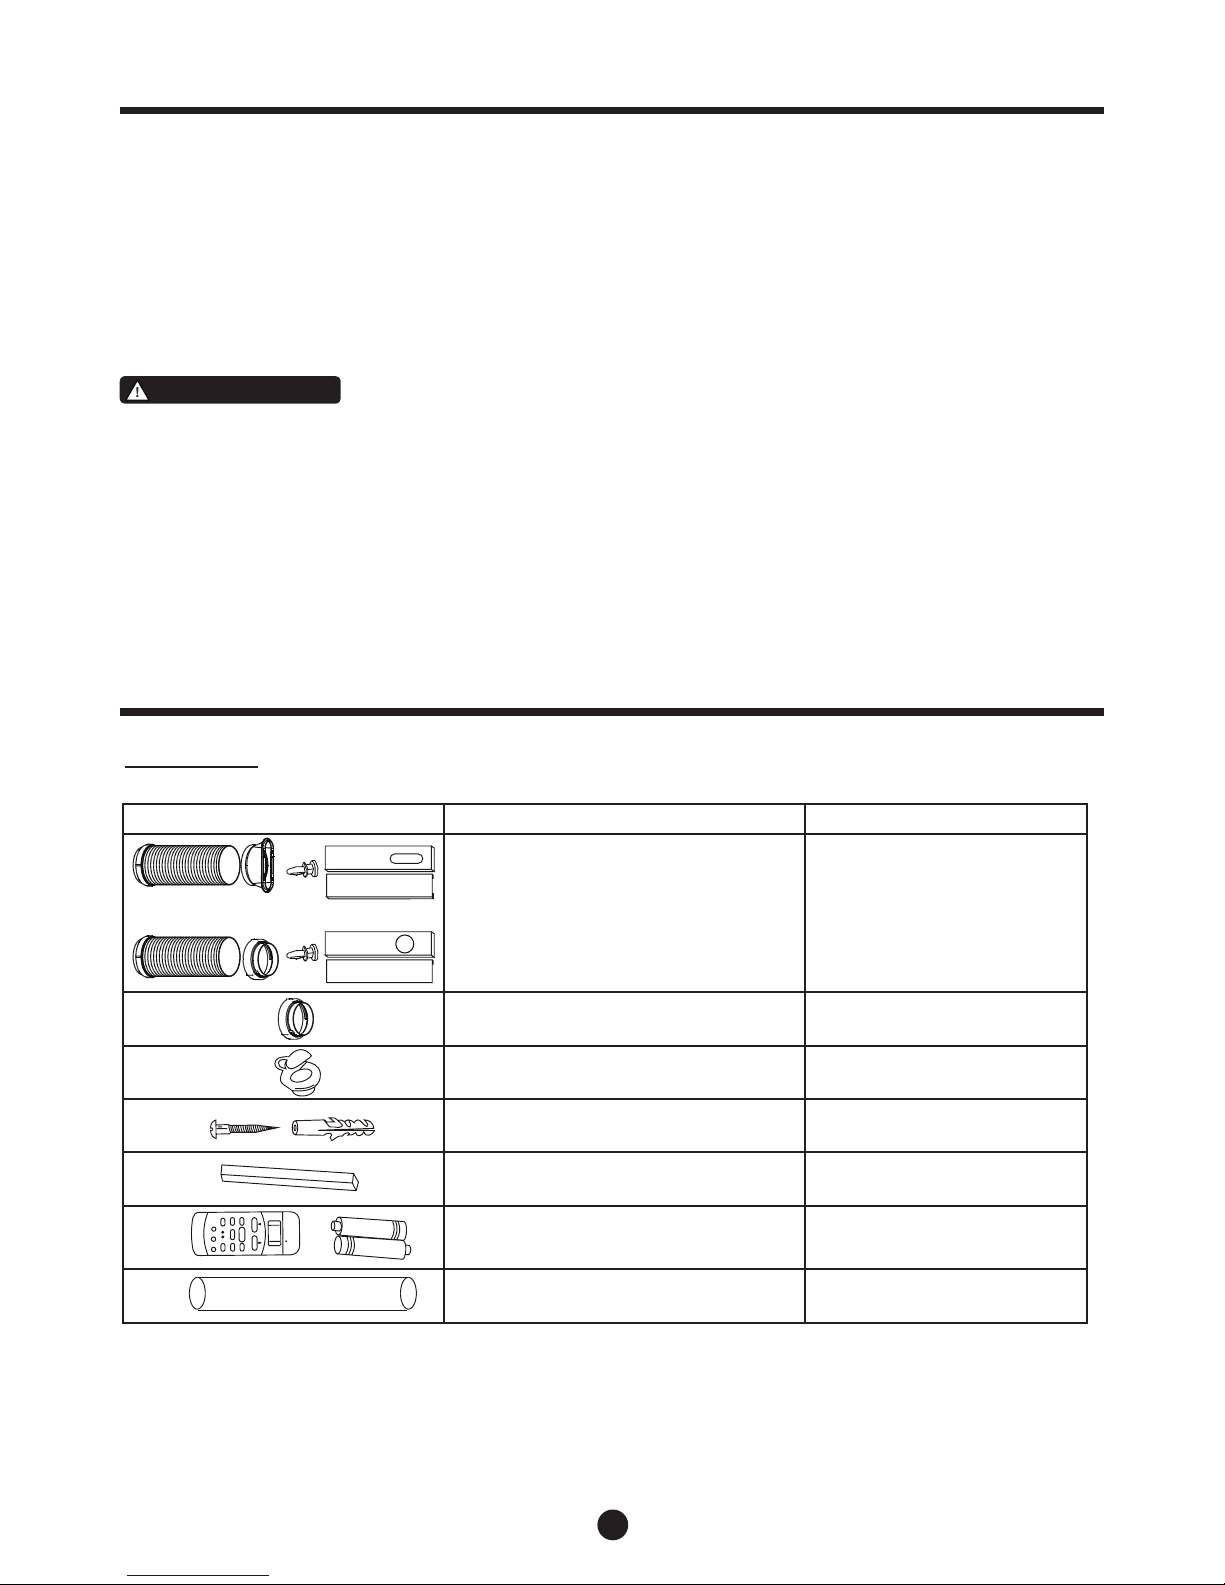
NOTE: Optional parts (*), some models without.
• Check that all the accessories are included and please refer to the installation instructions for their usage.
NOTE: All the illustrations in this manual are for explanatory purposes only. Your air conditioner may be
slightly different. The actual shape and size may vary.
IDENTIFICATION OF PARTS
For your safety
• Do not store or use gasoline or other ammable vapors and liquids in the vicinity of this or any other
appliance.
• Avoid re hazard or electric shock. Do not use an extension cord or an adaptor plug. Do not remove any
prong from the power cord.
WARNING Electrical Information
• Be sure the electrical service is adequate for the model you have chosen. This information can be found on the
serial plate, which is located on the side of the unit, behind the grill.
• Be sure the air conditioner is properly grounded. To minimize shock and re hazards, proper grounding is im-
portant. The power cord is equipped with a three-prong grounding plug for protection against shock hazards.
• Your air conditioner must be used in a properly grounded wall outlet. If the wall outlet you intend to use is not
adequately grounded or protected by a time delay fuse or circuit breaker, have a qualied electrician install the
proper outlet.
• Ensure the outlet is accessible after the unit installation.
Accessories
PARTS PARTS NAME: QUANTITY :
Exhaust hose (supplied), adapter
B (round mouth or at month: depending on models) and Window
Slider Kit and bolt (*)
1 set
Adaptor B (round mouth) (*) 1 set
Wall Exhaust Adaptor A ( *) 1 pc
Expansion Plug and wooden
screw (*)
4/ pc
Foam seal (*) 3/pc
Remote Controller and Battery
(For remote control models only)
1set
Drain hose 1pc
or
TEMP
AU
TO
C
OO
L
D
RY
H
EA
T
AF
N
H
G
I
H
M D
E
OL
W
MODE
A
F NS EP DE
W
S NI G
IT M
R
E
O
N
C
E ONO
MY
ONO/ F
F
I
TM
RE O F
F
E
R ES
T OL
K
C
E
S T E
T
M
EP R TAUR (
E
C
)
F O
LLO
W
M
E
L
DE
D
S
I L
P
YA
OI
N
TU
RBO

7
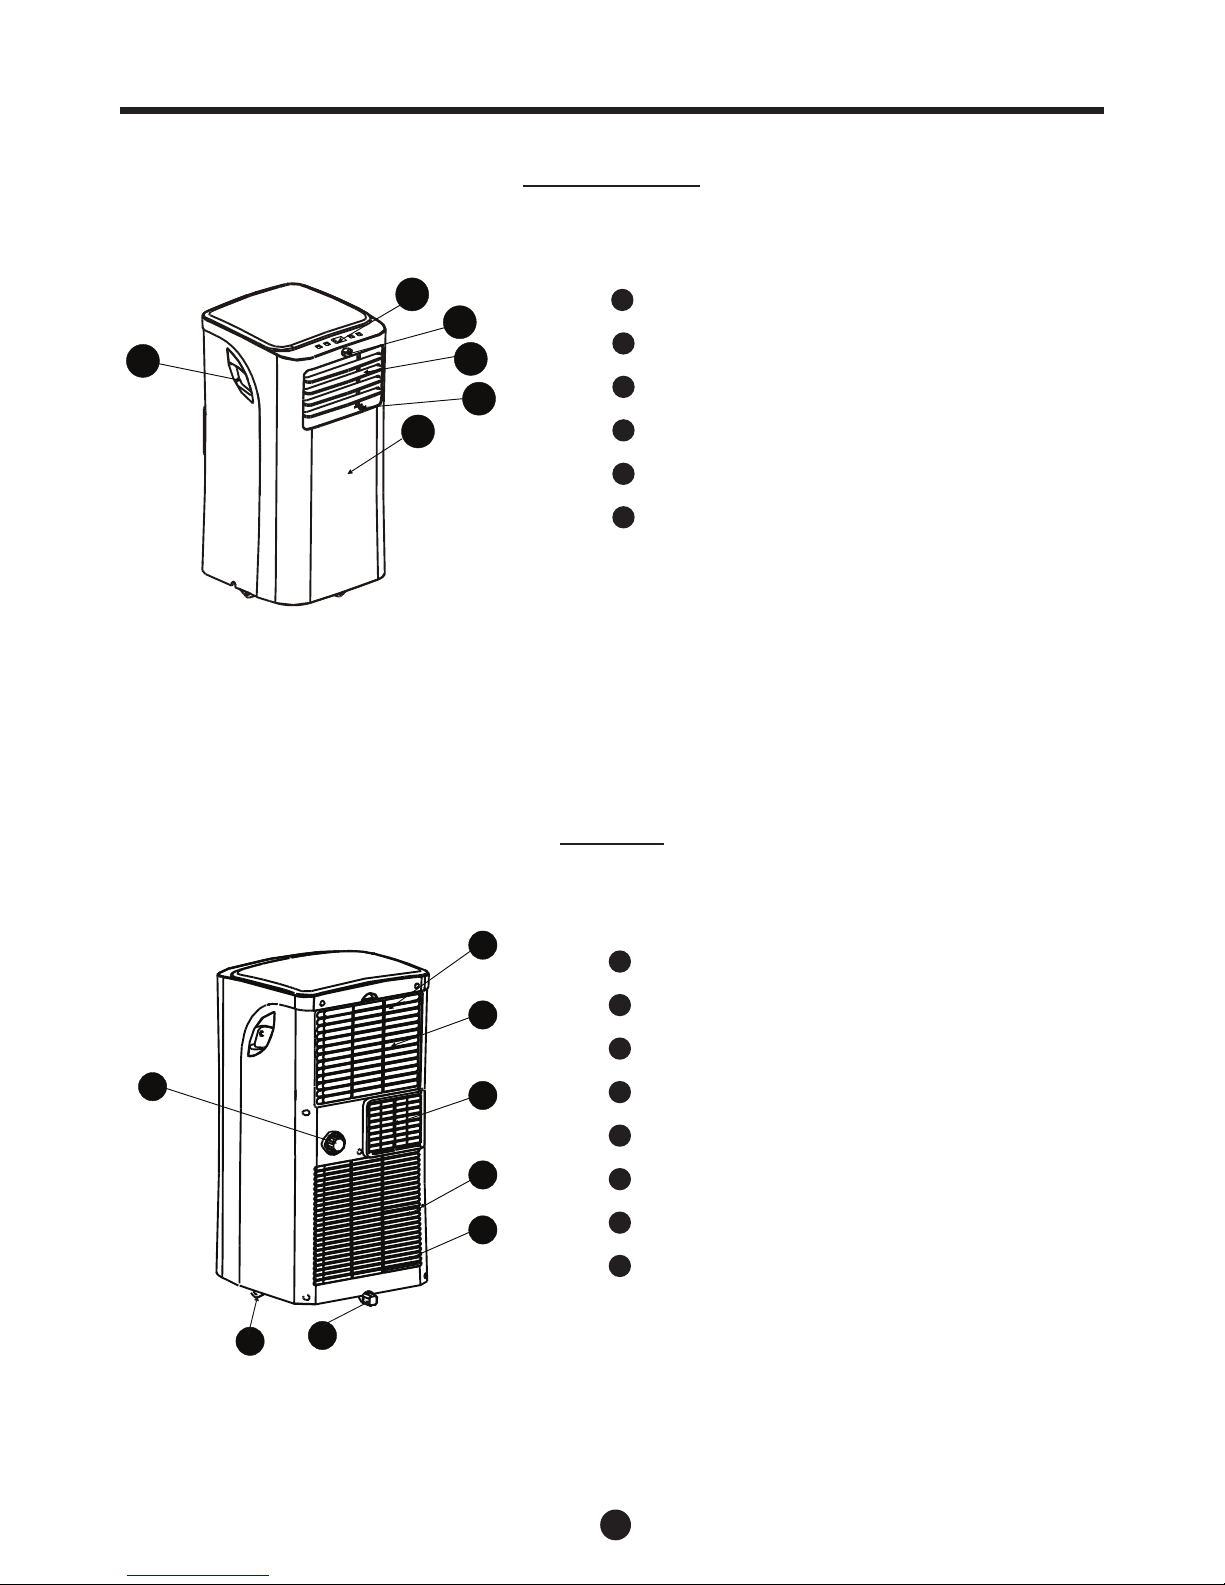
IDENTIFICATION OF PARTS
NAME OF PARTS
Front
1
2
6
5
3
4
1 Operation Panel
2 Remote Control Signal
3 Horizontal Louver Control Lever (adjust manually)
4 Vertical Louver Control Lever (adjust manually)
5 Panel
6 Carrying Handles (both sides)
Rear
Fig.1
8
7
9
12
13
14
10
11
7 Upper Air Filter (Behind the grill)
8 Air Intake
9 Air Outlet
10 Lower Air Filter (Behind the grill)
11 Air Intake
12 Bottom tray drain outlet
13 Wheels
14 Drain Outlet
Fig.2
8
AIR CONDITIONER FEATURES
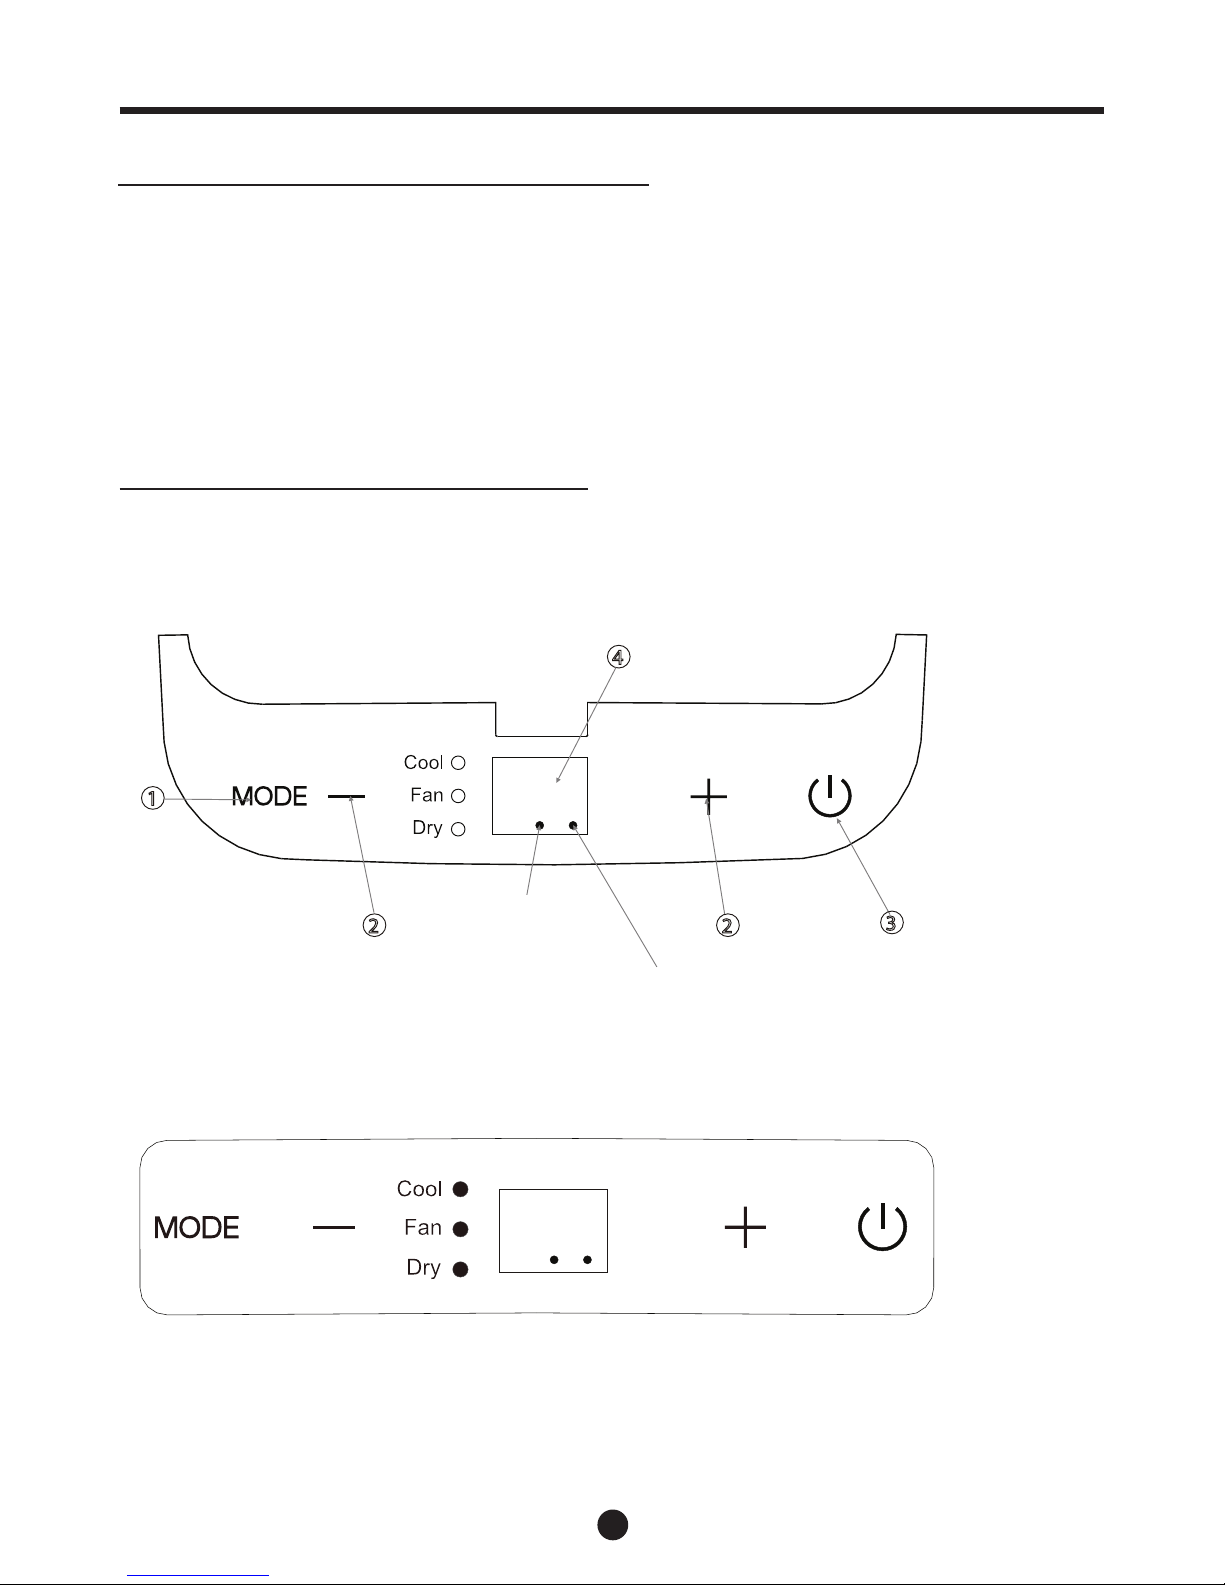
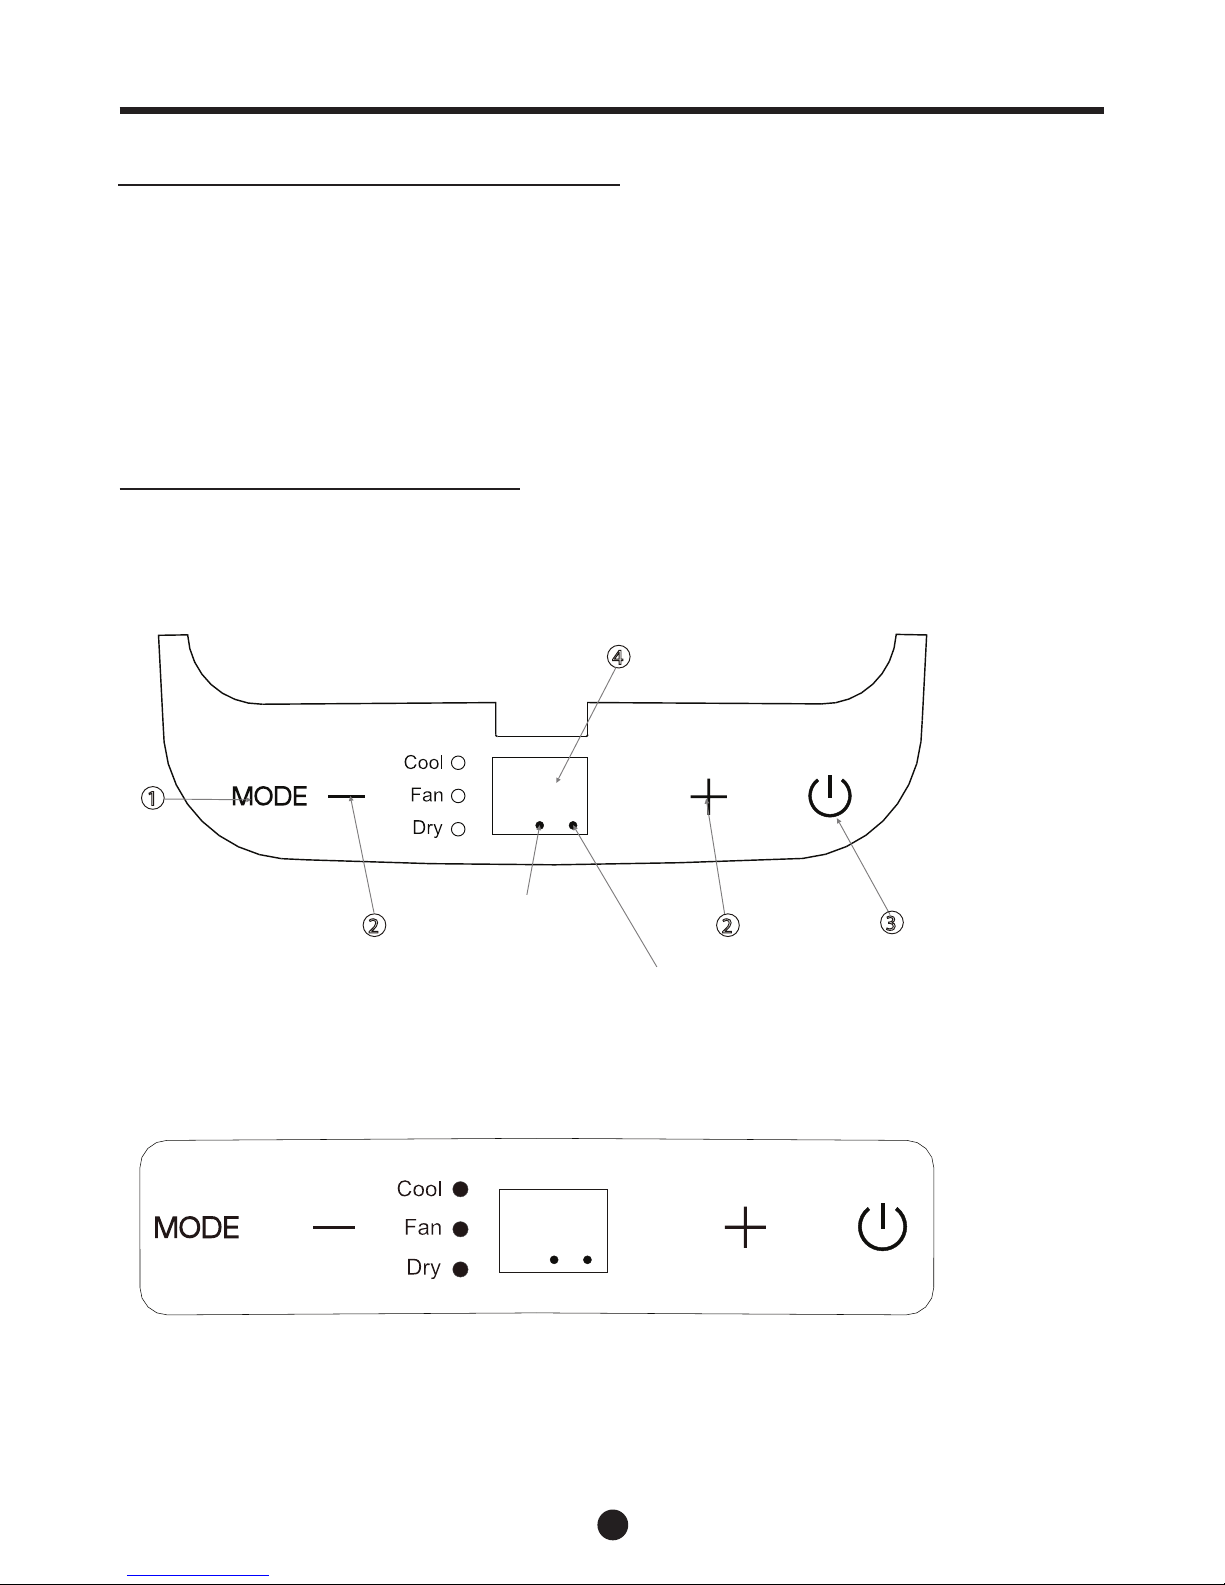
ELECTRONIC CONTROL OPERATING INSTRUCTIONS
Before you begin, thoroughly familiarize yourself with the control panel, the remote control and all
its functions. Use the appropriate symbol for your desired function.
The unit control panel can control the unit or you can use the remote control.
NOTE: This manual does not include the remote control operations, refer to the «Remote
Control Instructions» packed with this unit for details.
OPERATION PANEL OF THE AIR CONDITIONER
1
2
3
4
2
MODEL A
MODEL B
Power indicator light
Timer mode indicator light
(set only by the remote
control)
9
DRY operation
- Press the “MODE” button until the “DRY” indicator
light comes on.
- Under this mode, you cannot select a fan speed or
adjust the temperature.
- Keep windows and doors closed for optimal dehumidication.
- Do not connect the duct to a window.
FAN operation
- Press the “MODE” button until the “FAN “ indicator
light comes on. The unit will automatically set the
fan speed. The temperature cannot be adjusted
on fan mode.
- Press the “FAN” button on the remote control to
choose the fan speed.
- Do not connect the duct to a window.
SLEEP operation
This feature can ONLY be activated from the
remote control.
When the SLEEP feature is activated, the set
temperature will increase by 1°C/2°F(or 1°F) in 30
minutes. The set temperature will then increase
by another 1°C/2°F(or 1°F) after an additional 30
minutes. This new temperature will be maintained
for 7 hours before it returns to the originally selected temperature. This ends the Sleep mode and
the unit will continue to operate as originally programmed.
NOTE: This feature is not available under FAN or
DRY modes.
FOLLOW ME operation (on selected models)
This feature can be activated from the remote
control ONLY. The remote control serves as a
remote thermostat allowing for the precise temperature control at its location.
To activate the Follow Me feature, point the
remote control towards the unit and press the
Follow Me button. The light will illuminate on the
unit indicating it received the signal. If the unit
does not receive the Follow Me signal during
any 7 minutes interval, the unit will beep to indicate the Follow Me mode has been deactivated. The display on the remote control indicates
the temperature at the remote control’s location.
OPERATING INSTRUCTIONS
1 MODE select button
Selects the appropriate operating mode. Each
time you press the button, a mode is selected
in a sequence that goes from COOL, FAN and
DRY .The mode indicator light illuminates under
the different mode settings.
NOTE: On the above modes, the unit will automatically set the fan speed. You can only set
the fan speed by using the remote control on
COOL and FAN modes.
2 UP( + ) and DOWN( - ) button
Used to adjust (increasing/decreasing) temperature settings in fC/2°F(or 1°F) increments
in a range of 17°C/62°F to 30°C/88°F(or 86°F).
NOTE: The control is capable of displaying
temperature in Fahrenheit or Celsius. To convert from one to the other, press and hold the
Up and Down buttons at the same time, for 3
seconds.
3 ON-OFF button
Turns the unit on/off.
4 LED Display
Shows the set temperature during cool mode.
During DRY and FAN modes, it shows the room
temperature.
Error codes:
El- Room temperature sensor error- Unplug the
unit and plug it back in. If error repeats, call for
service.
E2- Evaporator temperature sensor error- Unplug
the unit and plug it back in. If error repeats, call
for service.
E4- Display panel communication error- Unplug the
unit and plug it back in. If error repeats, call for
service.
EC- Refrigerant leakage detection (on some mod-
els)- Call for service.
Protection codes:
PI- Bottom tray is full - Connect the drain hose to
drain the collected water. If error repeats, call
for service.
Operating Instructions
COOL operation
- Press the “MODE” button until the “COOL” indicator light comes on. The unit will automatically set
the fan speed.
- Press the ADJUST buttons “▲” or “▼” to select
your desired room temperature. The temperature
can be set within a range of 17°C-30°C/62°F88°F(or 86°F).
- Press the “FAN” button on the remote control to
choose the fan speed.

10
Other features
Auto-Restart
If the unit turns off unexpectedly due to a power
outage, it will automatically restart with the previous
function settings when the power resumes.
Wait 3 minutes before resuming operation
After the unit has stopped, it cannot restart operation
for 3 minutes. This is to protect the unit. Operation will
automatically start after 3 minutes.
POWER MANAGEMENT feature (on selected
models)
When the ambient temperature is lower than the
setting temperature, the unit will automatically operate
the power management feature. The compressor and
fan motor will stop.
When the ambient temperature is higher than the
setting temperature, the unit will automatically quit the
power management feature. The compressor and/or
fan motor will run.
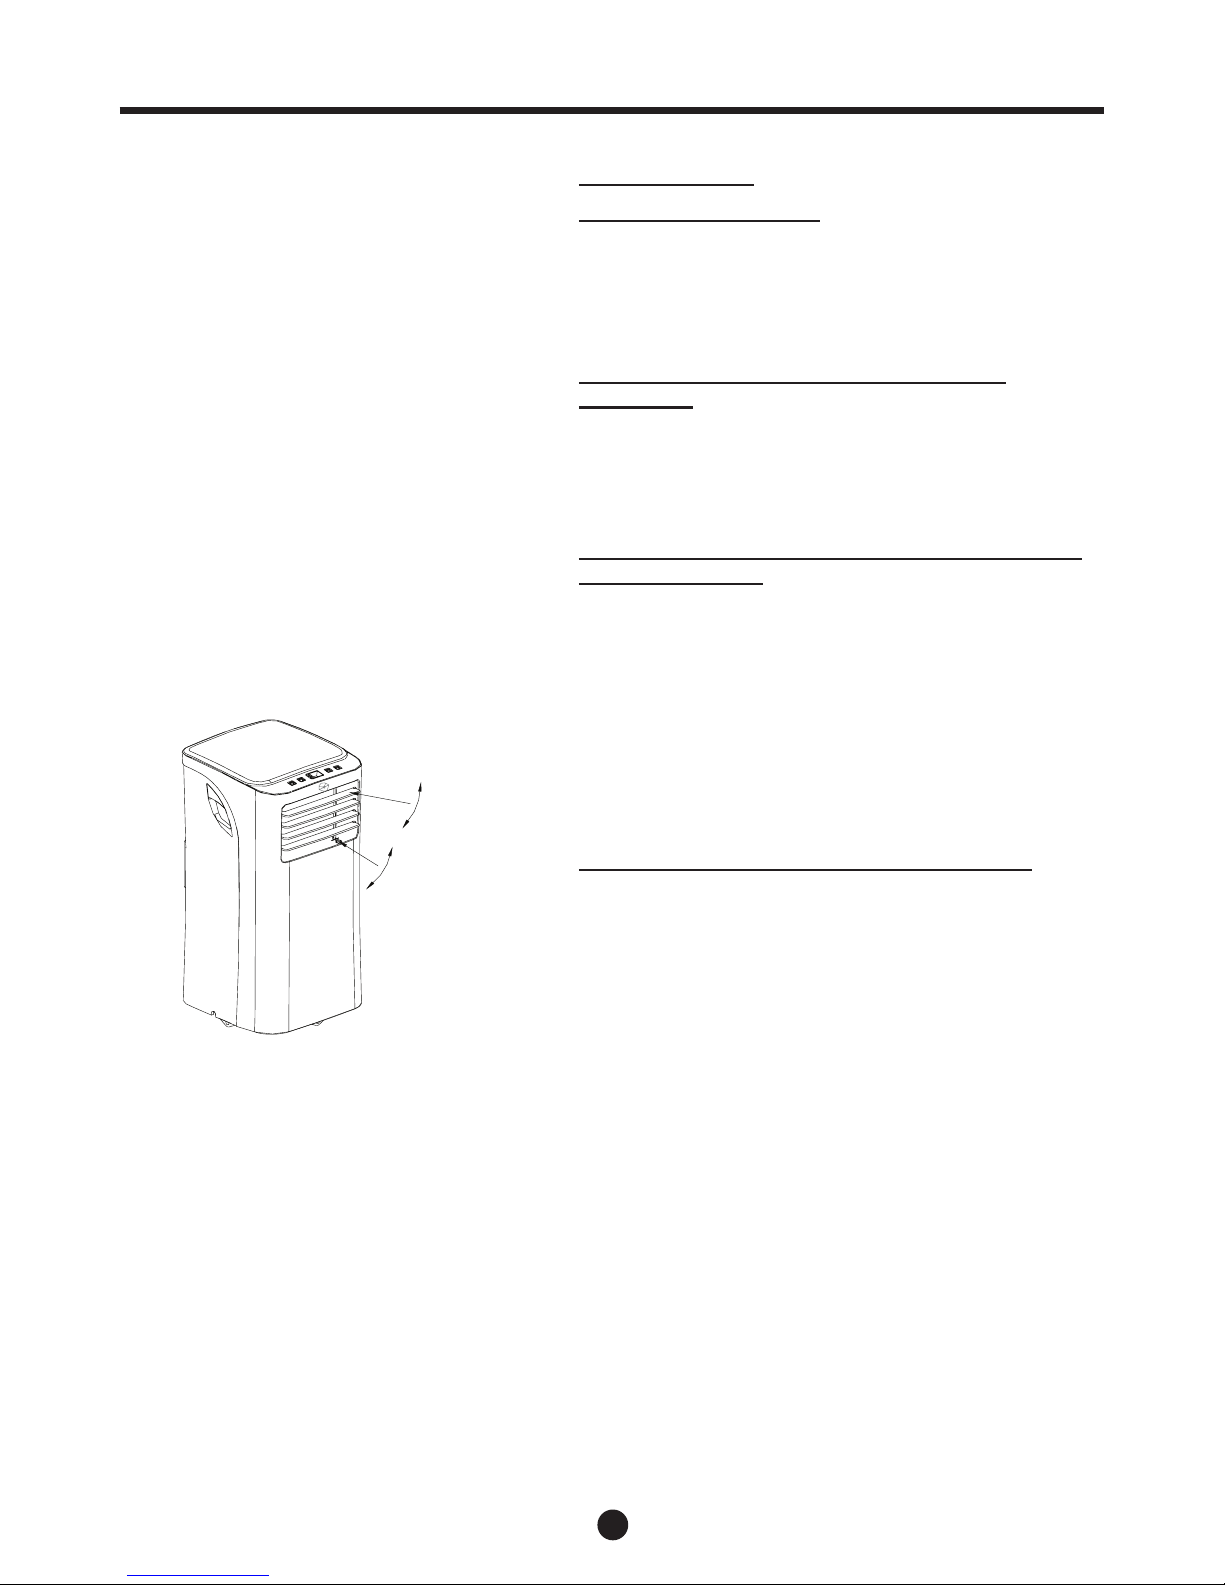
Adjusting the airow direction
Adjust the airow direction manfully (Fig. 4):
• The louver can be manually set to the desired posi-
tion.
• Do not place any heavy objects on the louver, this
may cause damage to the unit.
• Ensure that the louver is fully opened during
operation.
OPERATING INSTRUCTIONS
Adjust
manually
Adjust
manually
Fig. 4
Adjust
manually
Adjust
manually

11
INSTALLATION INSTRUCTIONS
Location
• The air conditioner should be placed on a rm
foundation to minimize noise and vibration. For
safe and secure positioning, place the unit on a
smooth, level oor strong enough to support the
unit.
• The unit has casters to aid with placement, but it
should only be rolled on smooth, at surfaces. Use
caution when rolling on carpeted surfaces. Do not
attempt to roll the unit over objects.
• The unit must be placed near a properly rated
grounded outlet.
• Never obstruct the air inlet or outlet of the unit.
• Allow at least 30cm of space from the wall for ef-
cient air-conditioning.
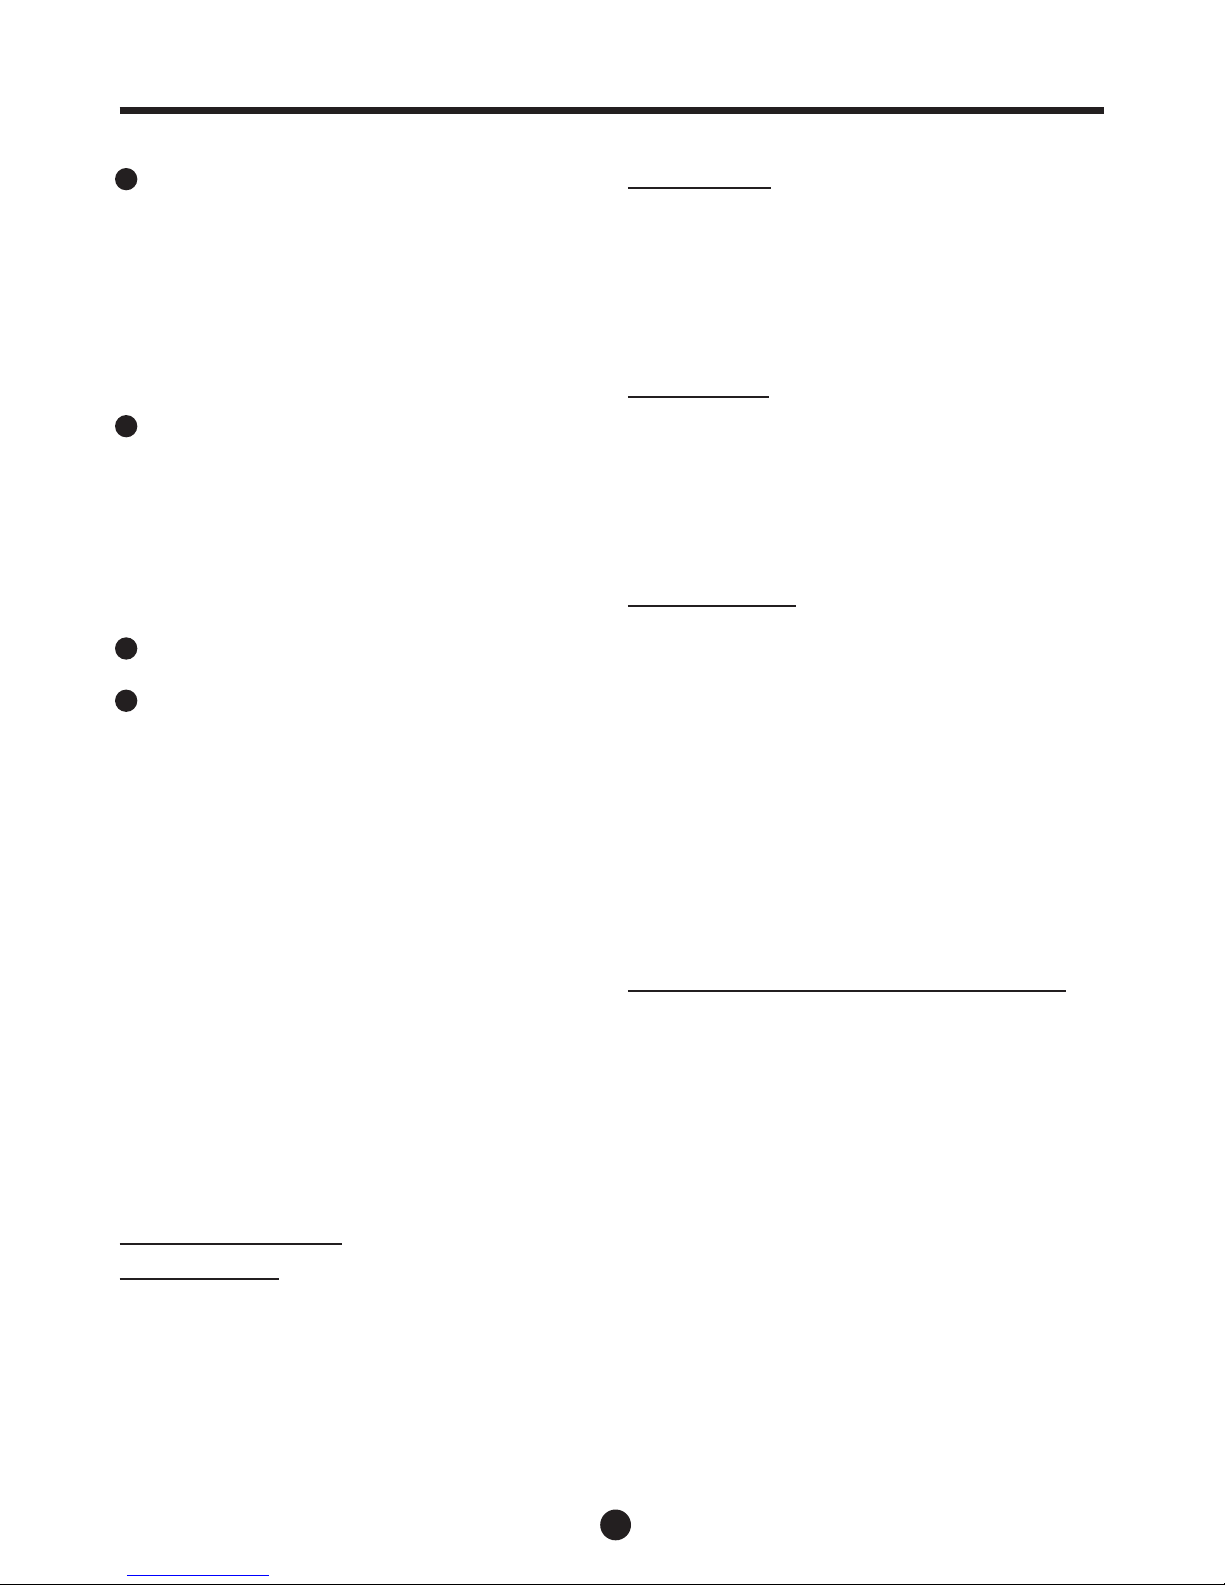
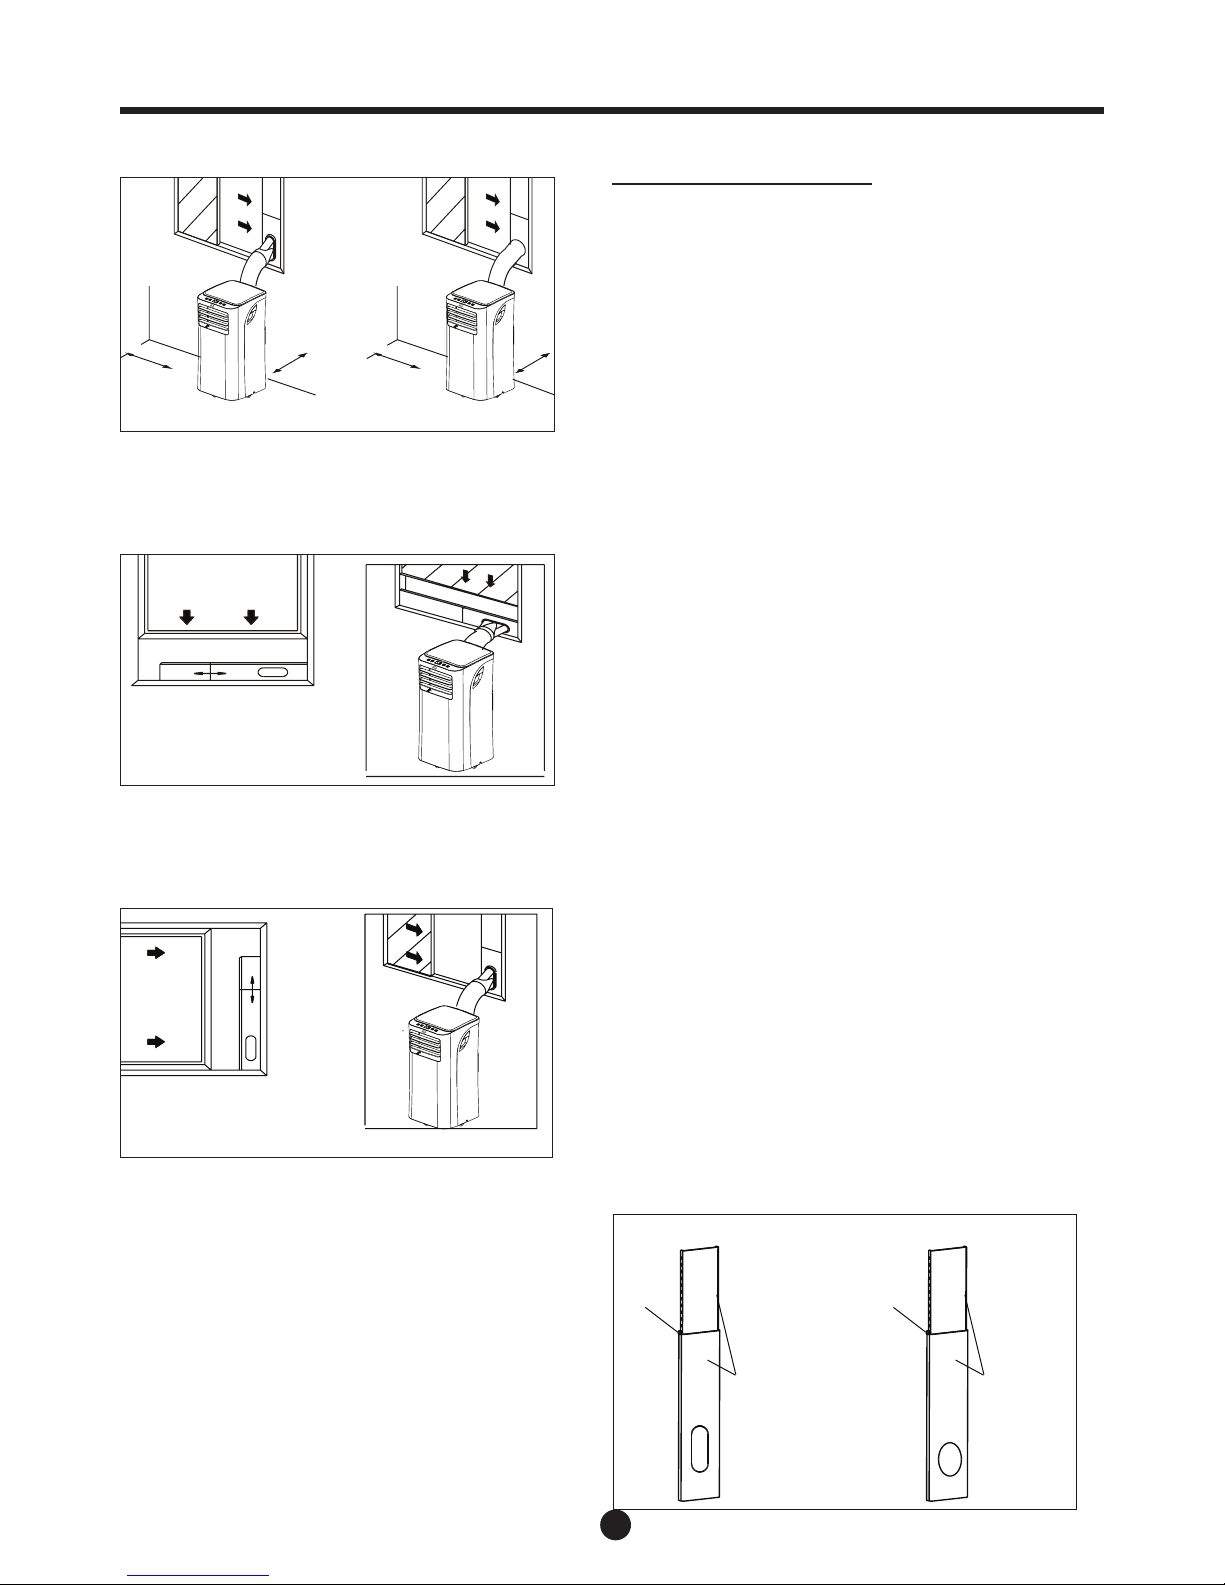
Window Slider kit Installation
Your window slider kit has been designed to t most
standard “Vertical” and “Horizontal” window applications. However, it may be necessary for you to
improvise/modify some aspects of the installation
procedures for certain types of windows. Please refer
to Fig. 6 & Fig. 7 for minimum and maximum window
openings. Use the bolt to secure the window slider kit
(see Fig. 7a).
Note: If the window opening is less than the mentioned minimum length of the window slider kit, you
can shorten it by cutting it to t the window opening.
Be sure to never cut off the hole in the window slider
kit.
INSTALLATION INSTRUCTIONS (optional)
or
Fig.7 a
Window sliderkit
Window sliderkit
bolt bolt
Horizontal
window
Window Slider Kit
Minimum:67.5cm(2.22ft).
Maxmum:123cm(4.04ft).
Fig. 6
Horizontal
window
Window Slider Kit
Minimum:67.5cm(2.22ft).
Maxmum:123cm(4.04ft).
Fig. 7
Fig. 5
30cm
Fig.5
30cm
30cm
or
3
0cm

12
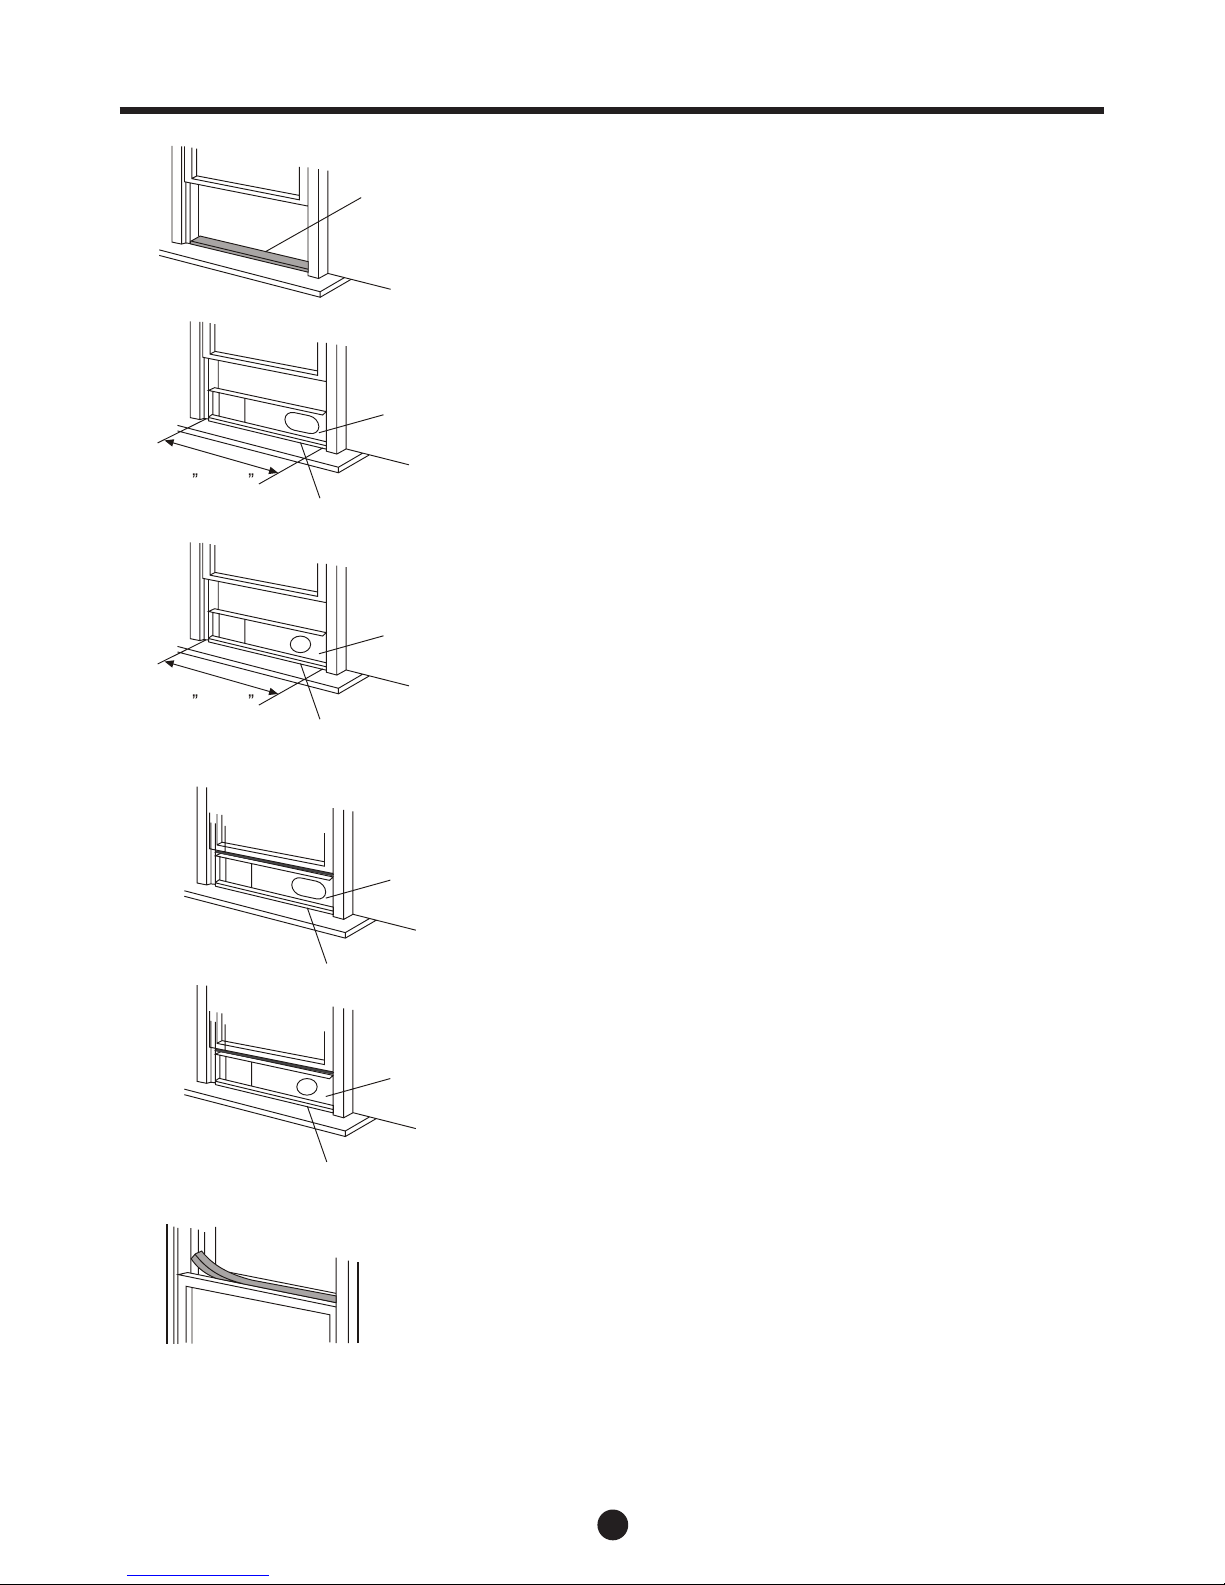
Installation in a double-hung sash window
1. Cut the foam seal (adhesive type) to the proper length
and attach it to the window sill. Fig.8
2. Attach the window slider kit to the window sill.
3. Adjust the length of the window slider kit according to
the width of window, shorten the adjustable window kit
if the width of window is less than 26.5 inches. Open
the window sash and place the window slider kit on the
window sill. See Fig.9.
4. Cut the foam seal (adhesive type) to the proper length
and attach it on the top of the window. Shown as in
Fig.10.
5. Close the window sash securely against the window.
6. Cut the foam seal to the appropriate length and seal
the open gap between the top window sash and outer
window sash. See Fig. 11.
INSTALLATION INSTRUCTIONS (optional)
Fig.8
Fig.9
Fig.10
Fig.11
or
or
26.5 ~ 48.0
26.5 ~ 48.0
Foam seal A
(adhesive type)
Window sill
Window sill
Window sill
Window sill
Window kit
Window kit
Window kit
Window kit
Foam seal
13
INSTALLATION INSTRUCTIONS (optional)
Installation in a sliding sash window
1. Cut the foam seal (adhesive type) to the proper length
and attach it to the window frame. See Fig. 12.
2. Attach the window slider kit to the window sill.
3. Adjust the length of the window slider kit according to
the width of window, shorten the adjustable window kit
if the width of window is less than 26.5 inches. Open
the window sash and place the window slider kit on the
window sill. See Fig. 13.
4. Cut the foam seal (adhesive type) to the proper length
and attach it on the top of the window.
See Fig. 14.
5. Close the sliding sash securely against the window.
6. Cut the foam seal to an appropriate length and seal
the open gap between the top window sash and outer
window sash. See Fig. 15
Foam seal A
(adhesive type)
Window.
panel
Window.
panel
or
Foam seat
Fig.12
Fig.13
Fig.14
Fig.15
or
26.5 ~ 48.0
26.5 ~ 48.0
14
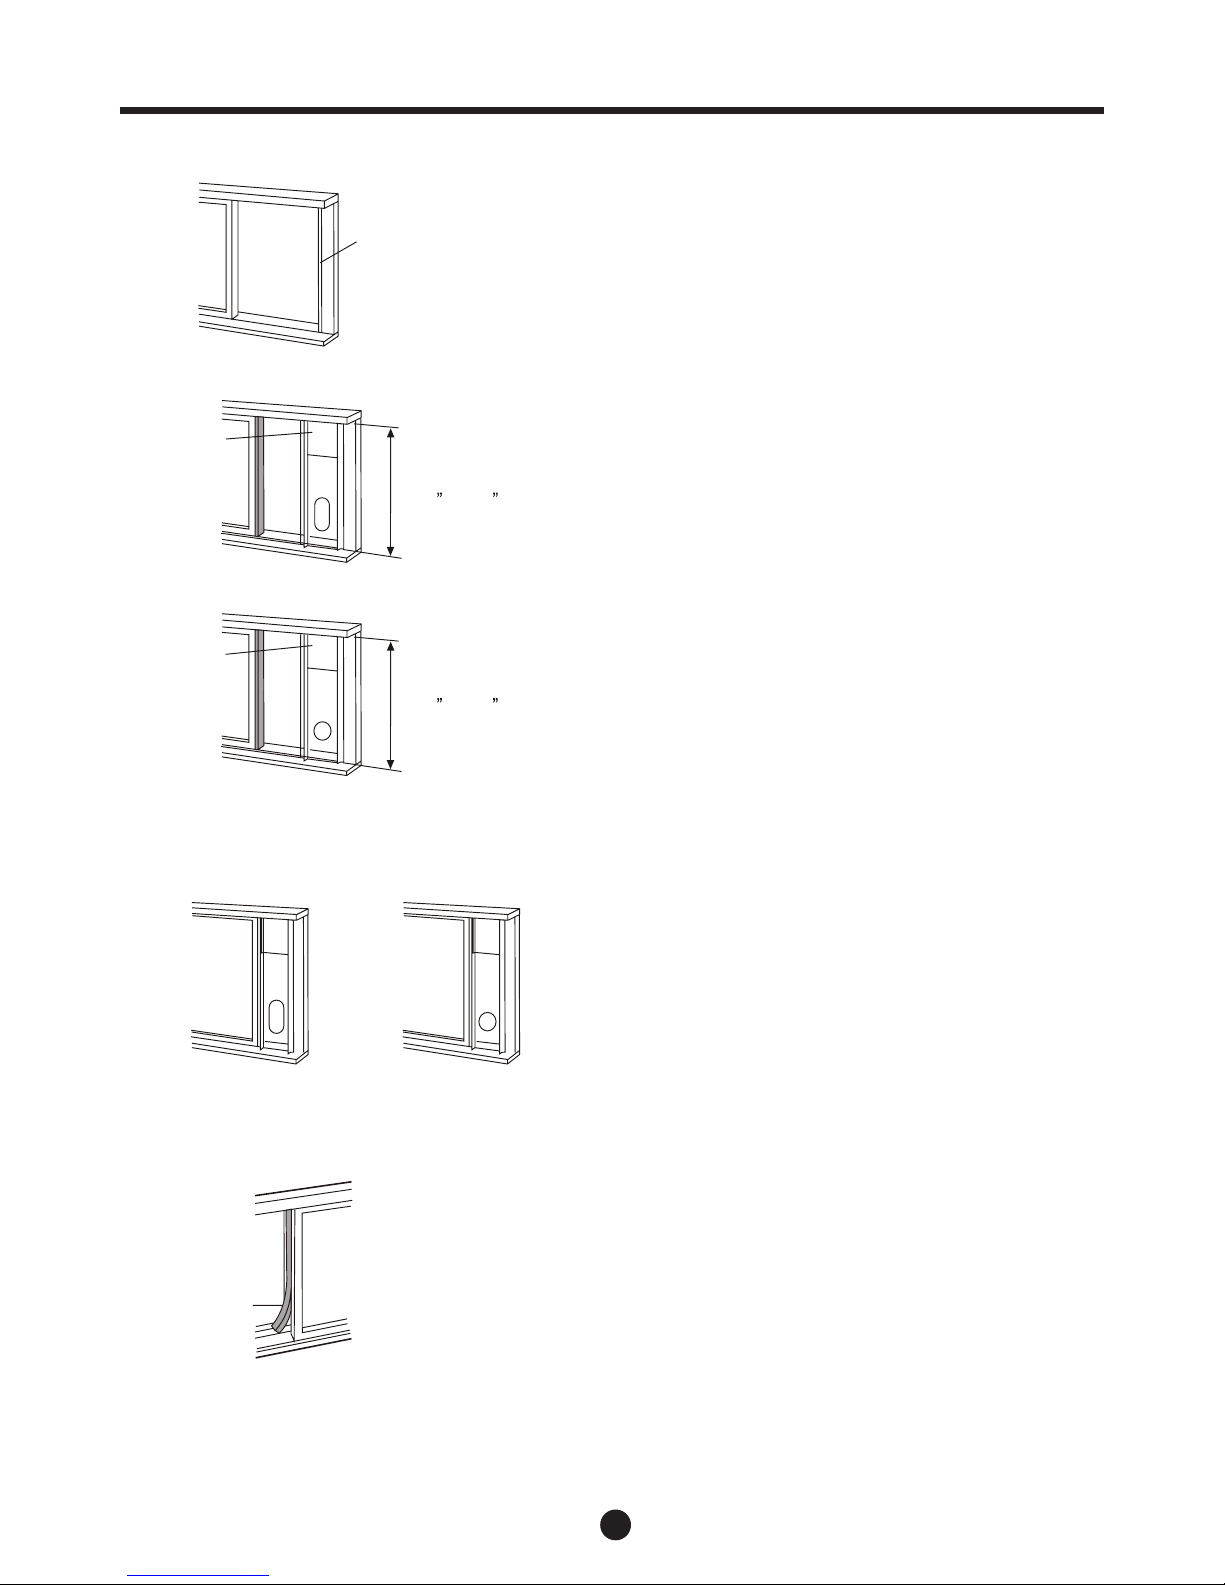
The exhaust hose can be installed into the wall
(Not applicable to the units without adaptor A, expansion plugs and wooden screws of Accessories).
1. Prepare a hole in the wall. Install the wall Exhaust adaptor A onto the wall (outside) by using the 4 expansion
plugs and wooden screws, be sure to secure properly.
(See Fig.19)
2. Attach the Exhaust hose installed adaptor B (round
mouth) to wall Exhaust adaptor A.
Note:
IMPORTANT: Use the adaptor cap to cover the hole
when not in use.
The duct can be compressed or extended according
to the installation requirements, but it is best to keep
the duct length to a minimum.
DO NOT OVER BEND THE DUCT (SEE Fig.20)
CAUTION:
Make sure there are no obstacles around the air
outlet of the exhaust hose (in the range of 500mm) to
ensure the exhaust system works properly.
INSTALLATION INSTRUCTIONS (optional)
Exhaust hose installation:
The exhaust hose and adaptor must be installed or
removed in accordance with the usage mode.
COOL, AUTO mode Install
FAN, DEHUMIDIIFY mode Remove
1. Install the window Exhaust adaptor B onto the exhaust
hose as shown in Fig.16. or Fig.17. Refer to the previous pages for window kit installation.
2. Push the Exhaust hose into the air outlet opening using
the arrow direction (See Fig. 18).
Fig.17
Fig.20
Fig.19
Fig.16
Fig.18
max 120CM
max 30CM
Expansion plug
position
Adaptor A
Adaptor
cap
!

15
Fig.21
Fig.22
Fig.23
Water drainage:
- During dehumidifying modes, remove the drain plug
from the back of the unit; install the drain connector (5/8” universal female mender) with 3/4” hose
(locally purchased). For the models without drain
connector, just attach the drain hose to the hole.
Lead the open end of the hose to the desired
drainage receptacle. Please refer to Fig. 21 & 22.
- When the water level of the bottom tray reaches
a predetermined level, the unit beeps 8 times; the
digital display area shows “PI”. At this time the air
conditioning/dehumidication process will immediately stop. However, the fan motor will continue to
operate (this is normal). Carefully move the unit to
a drain location, remove the bottom drain plug and
let the water drain (Fig.23). Re-install the bottom
drain plug and restart the machine until the “PI”
symbol disappears. If the error repeats, call for
service.
NOTE: Be sure to reinstall the bottom drain plug
before using the unit.
INSTALLATION INSTRUCTIONS
Bottom drain
plug
Remove the ‘drain plug
Continuous
drain hose
16
CARE AND MAINTENANCE
IMPORTANT:
1. Be sure to unplug the unit before cleaning or servicing.
2. Do not use gasoline, thinner or other chemicals to clean
the unit.
3. Do not wash the unit directly under a tap or using a
hose as it may cause electrical shock.
4. If the power cord becomes damaged it must be replaced from the product manufacturer and never
repaired.
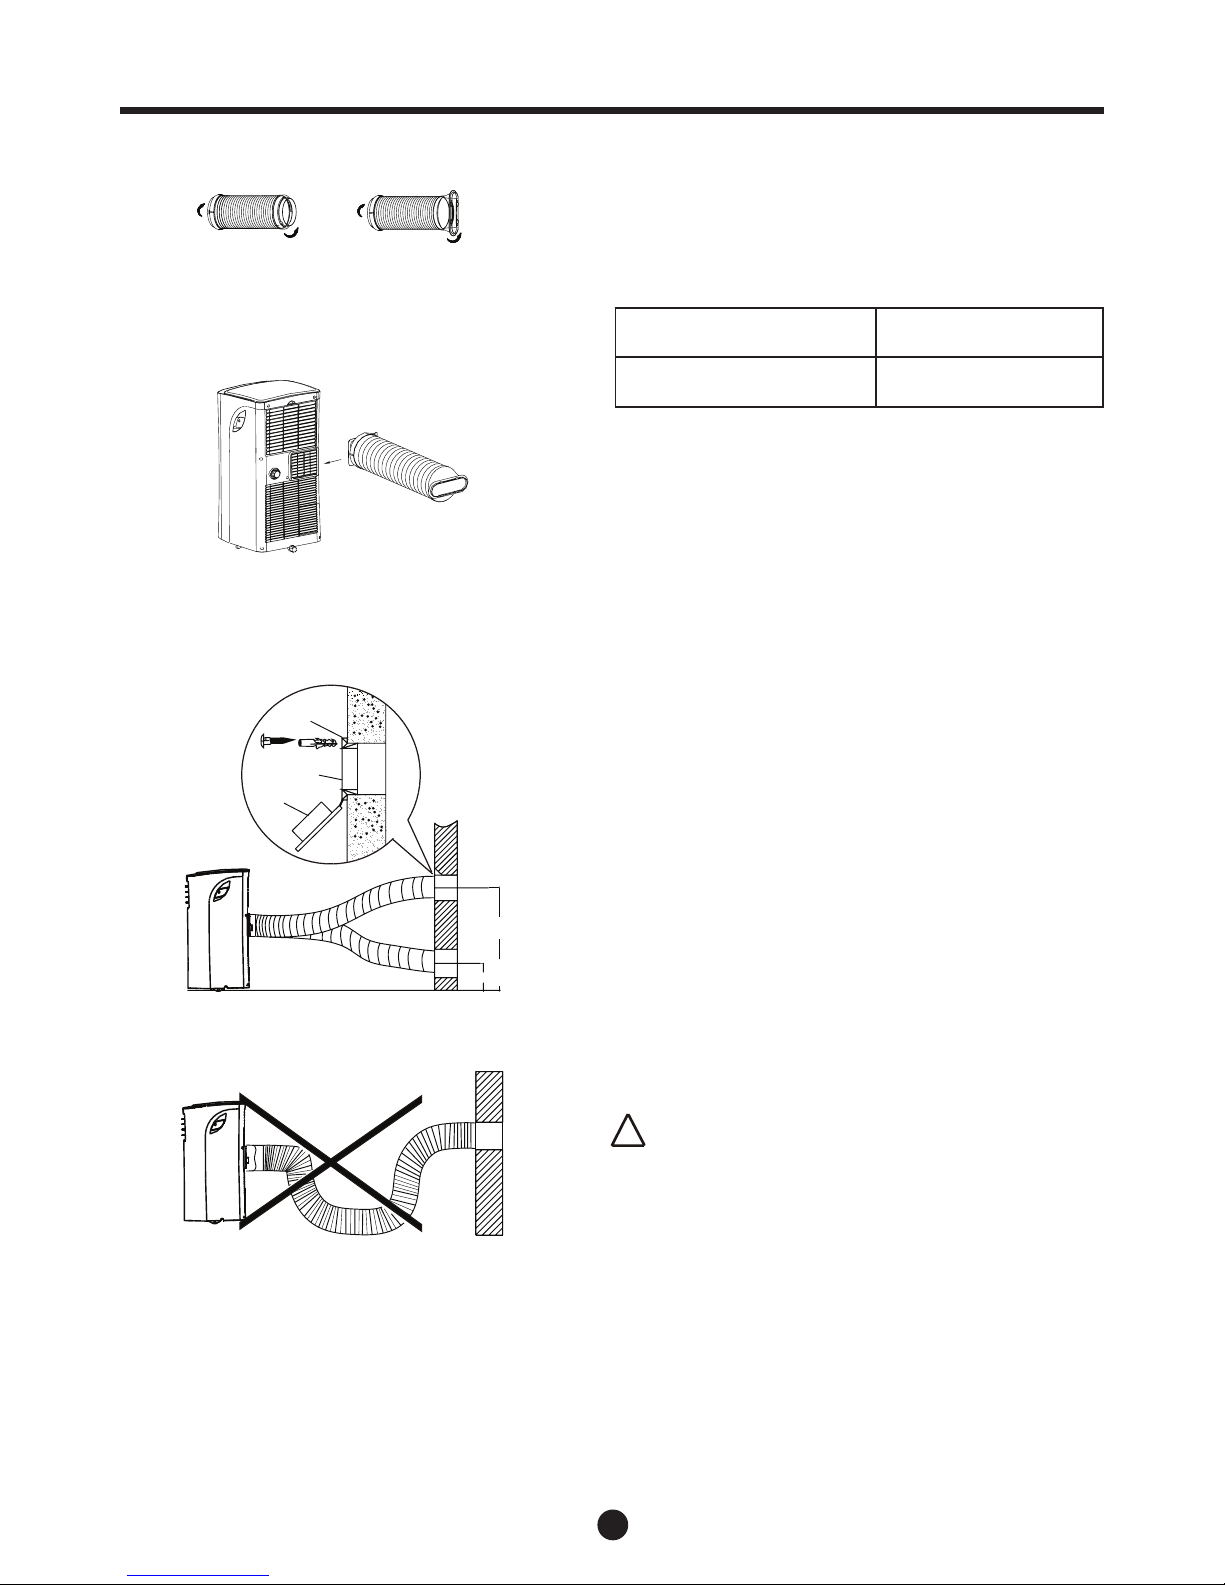
1. Air lter
- Clean the air lter every two weeks to prevent
inferior fan operation due to dust.
- Removal
Take the air lter out using the arrow direction
(Fig.24).
- Cleaning
Wash the air lter by immersing it in warm soapy
water (about 40°C/104°F) using a mild detergent.
Rinse the lter and dry it in a shady place.
- Mounting
Install the air lter after cleaning (see Fig.25).
NOTE: The grill and the air lter are connected and
can be separated.
2. Unit enclosure
- Use a lint-free cloth and soapy water (using a mild
detergent) to clean the unit enclosure. Dry with a
clean cloth.
3. Storing or not using the unit for extended
periods of time
- Remove the rubber plug at the back of the unit and
attach a hose to the drain outlet. Lead the open
end of the hose to the desired drainage receptacle
(See Fig.22 & 23).
- Remove the plug from the bottom drain outlet;
allowing the water in the bottom tray to drain out
(See Fig.24).
- Keep the appliance running on FAN mode for half a
day in a warm room to dry the inside of the appliance, preventing mold.
- Turn off the appliance and unplug it, wrap the cord
and bundle it with the tape. Remove the batteries
from the remote control.
- Clean the air lter and reinstall it.
CARE AND MAINTENANCE
Air lter
(install)
Air lter (take
out)
Fig.24
Fig.25
17
TROUBLESHOOTING
TROUBLESHOOTING TIPS
ISSUES POSSIBLE CAUSES SUGGEST REMEDIES
1. Unit does not Start when
Pressing on/off Button
- PI appears in the display
window
Drain the water in the bottom
tray.
- Room temperature is lower
than the set temperature.
(Cooling mode)
Reset the temperature.
2. Not cool enough
- The windows or doors in the
room are not closed.
Make sure all the windows and
doors are closed.
- There are heat sources inside
the room.
Remove the heat sources if
possible.
- Exhaust air duct is not connected or blocked.
Connect the duct and make
sure it can function properly.
- Temperature setting is too
high.
Decrease the set temperature.
- Air lter is blocked by dust. Clean the air lter.
3. Noise or vibrations
- The ground is not level or not
at enough.
Place the unit on a at, level
ground if possible.
4. Gurgling sound
- The sound comes from the
owing of the refrigerant inside the air-conditioner.
It is normal.

Activate your warranty.....
in
5
simple
steps!
For the electronic
warranty submission
please use the following link
https://www.inventorappliances.com/warranty-card
Scan here for the
warranty form
https://www.inventorappliances.com/
warranty-card
Select the product type
(airconditioner or appliance) for
which the warranty will be activated
Choose the warranty that
corresponds to your product
purchase
Fill in the required information
(owner, retailer and appliance)
and press send
You will receive a confirmation
e-mail for the activation of
your warranty
Connect to the following link


Διαβάστε το Εγχειρίδιο Χρήσης
Σε αυτό το εγχειρίδιο θα βρείτε χρήσιμες πληροφορίες για την σωστή χρήση και συντήρηση του
κλιματιστικού. Μερικές προληπτικές ενέργειες για την φροντίδα του κλιματιστικού, μπορούν να σας
εξοικονομήσουν πολύ χρόνο και χρήμα κατά την διάρκεια ζωής του κλιματιστικού. Στο κεφάλαιο
αντιμετώπισης προβλημάτων θα βρείτε τις απαντήσεις για τα πιο κοινά προβλήματα. Εάν διαβάσετε το
κεφάλαιο αντιμετώπισης προβλημάτων, μπορεί να μην χρειαστεί να καλέσετε το τμήμα επισκευών.
• Σε περίπτωση που η μονάδα χτυπηθεί κατά τη διάρκεια της λειτουργίας της, απενεργοποιήστε τη μονάδα
και αποσυνδέστε την από την πρίζα αμέσως. Εξετάστε αν υπάρχει κάποια φθορά.
• Αν παρατηρήσετε κάποια φθορά, επικοινωνήστε με εξουσιοδοτημένο τεχνικό ή αντιπρόσωπο σέρβις.
• Σε περίπτωση καταιγίδας, αποσυνδέστε τη μονάδα από το ρεύμα προς αποφυγή βλάβης.
• Για την αποφυγή ηλεκτροπληξίας, μην χρησιμοποιείτε τον ανεμιστήρα με οποιονδήποτε ή κανέναν
ρυθμιστή στροφών.
• Μην τοποθετείτε το καλώδιο τροφοδοσίας κάτω από χαλιά, έπιπλα και άλλα παρόμοια μέρη.
!
ΠΡΟΣΟΧΗ
3
ΠΕΡΙΕΧΟΜΕΝΑ
ΚΟΙΝΩΝΙΚΗ ΣΗΜΕΙΩΣΗ
Κοινωνική Σημείωση .......................................................................................................2
ΟΔΗΓΙΕΣ ΑΣΦΑΛΕΙΑΣ
Κανόνες ασφαλείας .......................................................................................................3
Συνθήκες λειτουργίας ....................................................................................................3
ΕΠΕΞΗΓΗΣΗ ΕΞΑΡΤΗΜΑΤΩΝ
Εξαρτήματα .....................................................................................................................6
Ονοματολογία εξαρτημάτων ............................................................................................7
ΛΕΙΤΟΥΡΓΙΕΣ ΦΟΡΗΤΟΥ ΚΛΙΜΑΤΙΣΤΙΚΟΥ
Οδηγίες λειτουργίας ηλεκτρονικού ελέγχου ....................................................................8
ΟΔΗΓΙΕΣ ΛΕΙΤΟΥΡΓΙΑΣ
Οδηγίες λειτουργίας .........................................................................................................9
ΟΔΗΓΙΕΣ ΕΓΚΑΤΑΣΤΑΣΗΣ
Τοποθεσία .....................................................................................................................11
Εγκατάσταση kit παραθύρου ........................................................................................11
Εγκατάσταση αγωγού εξάτμισης ..................................................................................14
Αποστράγγιση νερού .....................................................................................................15
ΦΡΟΝΤΙΔΑ ΚΑΙ ΣΥΝΤΗΡΗΣΗ
Φροντίδα και συντήρηση ..............................................................................................16
ΑΝΤΙΜΕΤΩΠΙΣΗ ΠΡΟΒΛΗΜΑΤΩΝ
Σφάλματα .....................................................................................................................17
ΣΗΜΕΙΩΣΗ
Τα δεδομένα κατηγοριοποίησης που αναγράφονται στο ταμπελάκι
ενέργειας, βασίζονται σε ελέγχους που έγιναν με την προσάρτηση
του μη επεκταμένου αγωγού αέρα χωρίς τους αντάπτορες Α&Β.
(Ο αγωγός και οι αντάπτορες Α & Β αναγράφονται στην λίστα των
παρελκόμενων του εγχειριδίου εγκατάστασης). Δείτε τη δεξιά εικόνα.
Ταυτόχρονα, η μονάδα θα πρέπει να βρίσκεται σε λειτουργία ψύξης
και να έχει ρυθμιστεί από το τηλεχειριστήριο σε Υψηλή Ταχύτητα
Ανεμιστήρα.
4
ΑΠΟΡΡΙΨΗ: Μην απορρίψετε τη συσκευή σε κοινούς κάδους απορριμμάτων. Αυτά τα απορρίμματα
απαιτούν ξεχωριστή συλλογή και επεξεργασία.
Απαγορεύεται η απόρριψη σε κοινούς κάδους απορριμμάτων. Για την απόρριψη, υπάρχουν αρκετές
επιλογές:
Α) Ο δήμος διαθέτει σημεία συλλογής ηλεκτρικών συσκευών, για την ασφαλή απόρριψη χωρίς κάποια
χρέωση.
Β) Όταν αγοράζετε ένα νέο προϊόν, ο προμηθευτής σας μπορεί να πάρει την παλιά συσκευή χωρίς
επιπλέον χρέωση.
Γ) Ο κατασκευαστής θα πάρει πίσω την παλιά σας συσκευή για απόρριψη χωρίς κάποια χρέωση.
Δ) Καθώς τα παλαιά προϊόντα περιέχουν πολύτιμα υλικά, μπορούν να πωληθούν σε μάντρες
μετάλλων.
Η απόρριψη σε δάση και πεδιάδες μπορεί να βλάψει την υγεία σας λόγω των επιβλαβών ουσιών που
μεταφέρονται μέσω του υδροφόρου ορίζονται στην τροφική αλυσίδα
ΚΟΙΝΩΝΙΚΗ ΣΗΜΕΙΩΣΗ
Όταν χρησιμοποιείται η συσκευή σε Ευρωπαϊκές Χώρες, πρέπει να τηρηθούν οι ακόλουθες οδηγίες:
5
ΟΔΗΓΙΕΣ ΑΣΦΑΛΕΙΑΣ
6
ΣΗΜΕΙΩΣΗ: Προαιρετικά εξαρτήματα (*), ορισμένα μοντέλα δεν τα διαθέτουν.
• Ελέγξτε ότι όλα τα εξαρτήματα εμπεριέχονται στη συσκευασία και ανατρέξτε στο εγχειρίδιο εγκατάστασης
για την σωστή χρήση τους.
ΣΗΜΕΙΩΣΗ: Όλες οι εικόνες του εγχειριδίου έχουν μόνο επεξηγηματικό σκοπό. Το κλιματιστικό σας μπορεί
να διαφέρει ελαφρώς. Ισχύει το πραγματικό μοντέλο.
ΕΠΕΞΗΓΗΣΗ ΕΞΑΡΤΗΜΑΤΩΝ
Για την ασφάλειά σας
• Μην χρησιμοποιείτε βενζίνη ή άλλα εύφλεκτα υλικά κοντά σε αυτή ή αλλή ηλεκτρική συσκευή.
• Αποφύγετε τον κίνδυνο πυρκαγιάς ή ηλεκτροπληξίας. Μην χρησιμοποιείτε μπαλαντέζα ή πολύπριζο, μην
επηρεάζετε το καλώδιο τροφοδοσίας.
ΠΡΟΕΙΔΟΠΟΙΗΣΗ Ηλεκτρολογικές πληροφορίες
• Βεβαιωθείτε ότι η παροχή ρεύματος είναι κατάλληλη για τη συσκευή σας. Αυτές οι πληροφορίες
βρίσκονται στο ενεργειακό ταμπελάκι που βρίσκεται στο πλάι της συσκευής πίσω από τη γρίλια.
• Βεβαιωθείτε ότι το κλιματιστικό είναι γειωμένο επαρκώς. Για την ελαχιστοποίηση του κινδύνου πυρκαγιάς
ή ηλεκτροπληξίας η σωστή γείωση είναι πολύ σημαντική. Το καλώδιο είναι εξοπλισμένο με βύσμα
γείωσης για την προστασία ενάντια στην ηλεκτροπληξία.
• Το κλιματιστικό πρέπει να είναι σωστά γειωμένο σε υποδοχή στον τοίχο. Εάν η πρίζα που θα
χρησιμοποιήσετε δεν είναι επαρκώς γειωμένη, χρησιμοποιήστε μια ασφάλεια ή ασφαλειοδιακόπτη,
απευθυνθείτε σε εξειδικευμένο ηλεκτρολόγο για την εγκατάσταση της σωστής πρίζας.
• Βεβαιωθείτε ότι η πρίζα είναι προσβάσιμη μετά την εγκατάσταση.
Παρεκλόμενα
ΕΞΑΡΤΗΜΑΤΑ
ΟΝΟΜΑΤΟΛΟΓΙΑ ΕΞΑΡΤΗΜΑΤΩΝ
ΠΟΣΟΤΗΤΑ
Αγωγός αέρα (παρέχεται), αντάπτορας Β
(Επίπεδη ή κυκλική εισαγωγή εξαρτάται
από το μοντέλο),
Βάση παραθύρου και Βίδες.
1 σετ
Αντάπτορας Β (κυκλική εισαγωγή) (*)
1 σετ
Αντάπτορας Α αγωγού για τον τοίχο (*)
1 τεμ.
Βύσμα προέκτασης και βίδες ξύλου (*)
4 τεμ.
Μονωτικός αφρός (*) 3 τεμ.
Τηλεχειριστήριο και μπαταρίες
(Μόνο για τα μοντέλα με τηλεχειριστήριο)
1 σετ
Αγωγός αποστράγγισης 1 τεμ.
or
TEMP
AU
TO
C
OO
L
D
RY
H
EA
T
AF
N
H
G
I
H
M D
E
OL
W
MODE
A
F NS EP DE
W
S NI G
IT M
R
E
O
N
C
E ONO
MY
ONO/ F
F
I
TM
RE O F
F
E
R ES
T OL
K
C
E
S T E
T
M
EP R TAUR (
E
C
)
F O
LLO
W
M
E
L
DE
D
S
I L
P
YA
OI
N
TU
RBO
7
ΟΝΟΜΑΤΟΛΟΓΙΑ ΕΞΑΡΤΗΜΑΤΩΝ
ΜΠΡΟΣΤΙΝΗ ΟΨΗ
1
2
6
5
3
4
1 Πάνελ χειρισμού
2 Σήμα τηλεχειριστηρίου
3 Οριζόντια περσίδα (κινείται χειροκίνητα)
4 Κάθετη περσίδα (κινείται χειροκίνητα)
5 Πάνελ
6 Λαβή μεταφοράς (και στις δυο πλευρές)
ΠΙΣΩ ΌΨΗ
8
7
9
12
13
14
10
11
7 Πάνω φίλτρο αέρα (πίσω από τη γρίλια)
8 Πάνω εισαγωγή αέρα
9 Εξαγωγή αέρα
10 Κάτω φίλτρο αέρα (πίσω από τη γρίλια)
11 Κάτω εισαγωγή αέρα
12 Κάτω έξοδος αποστράγγισης
13 Ροδάκια
14 Έξοδος αποστράγγισης
Σχ. 1
Σχ. 2
8
ΛΕΙΤΟΥΡΓΙΕΣ ΦΟΡΗΤΟΥ ΚΛΙΜΑΤΙΣΤΙΚΟΥ
ΟΔΗΓΙΕΣ ΛΕΙΤΟΥΡΓΙΑΣ ΗΛΕΚΤΡΟΝΙΚΟΥ ΕΛΕΓΧΟΥ
Πριν ξεκινήσετε, εξοικειωθείτε με το πάνελ ελέγχου και το τηλεχειριστήριο και όλες τις λειτουργίες
τους, έπειτα χρησιμοποιήστε τα σύμβολα για την λειτουργία που επιθυμείτε.
Αυτή η μονάδα μπορεί να ελεγχθεί από το πάνελ ελέγχου ή και με το τηλεχειριστήριο.
ΣΗΜΕΙΩΣΗ: Αυτό το εγχειρίδιο δεν περιέχει τις λειτουργίες του τηλεχειριστηρίου, ελέγξτε το
«Εγχειρίδιο Χρήσης Τηλεχειριστηρίου» το οποίο βρίσκεται στη συσκευασία.
ΠΑΝΕΛ ΧΕΙΡΙΣΜΟΥ ΤΟΥ ΚΛΙΜΑΤΙΣΤΙΚΟΥ
1
2
3
4
2
ΜΟΝΤΕΛΟ A
Φωτεινή ένδειξη
λειτουργίας
Φωτεινή ένδειξη ρύθμισης
χρονοδιακόπτη (ρυθμίζεται μόνο από
το τηλεχειριστήριο)
ΜΟΝΤΕΛΟ B
9
- Πιέστε τα πλήκτρα ρύθμισης + & - για να επιλέξετε
την επιθυμητή θερμοκρασία. Η θερμοκρασία μπορεί
να ρυθμιστεί σε εύρος από 17°C έως 30°C/62°F 88°F.
- Πιέστε το πλήκτρο “FAN SPEED” για να επιλέξετε
την ταχύτητα του ανεμιστήρα.
Λειτουργία Αφύγρανσης
- Πιέστε το πλήκτρο MODE ώστε να ανάψει η ένδειξη
του “DRY”.
- Κατά αυτή τη λειτουργία δεν μπορείτε να επιλέξετε
την ταχύτητα του ανεμιστήρα ή την θερμοκρασία.
Ο ανεμιστήρας θα λειτουργεί σε χαμηλή ταχύτητα.
- Κρατήστε τα παράθυρα και τις πόρτες κλειστά ώστε
να έχετε το καλύτερο αποτέλεσμα αφύγρανσης.
- Μην βάλετε την αγωγό στο παράθυρο.
Λειτουργία Ανεμιστήρα
- Πιέστε το πλήκτρο MODE ώστε να ανάψει η ένδειξη
του “FAN”. Η μονάδα αυτόματα θα ρυθμίσει τη
λειτουργία ανεμιστήρα. Η θερμοκρασία δεν μπορεί να
ρυθμιστεί σε λειτουργία ανεμιστήρα.
- Πιέστε το πλήκτρο FAN SPEED για να επιλέξετε
την επιθυμητή ταχύτητα.
- Μην βάζετε τον αγωγό στο παράθυρο.
Λειτουργία SLEEP
Αυτή η λειτουργία μπορεί να ρυθμιστεί μόνο από
το τηλεχειριστήριο.
Πιέστε αυτό το πλήκτρο, και η ρυθμισμένη
θερμοκρασία θα ανεβαίνει (ψύξη) κατά
1°C/2°F ανά 30 λεπτά. Η θερμοκρασία θα ανέβει
(ψύξη) κατά 1°C/2°F μετά από άλλα 30 λεπτά. Αυτή
η νέα θερμοκρασία θα διατηρηθεί για τις επόμενες 7
ώρες πριν επιστρέψει στην αρχικά επιλεγμένη
θερμοκρασία. Αυτό τερματίζει την λειτουργία SLEEP
και η μονάδα θα λειτουργεί σύμφωνα με το αρχικά
επιλεγμένο πρόγραμμα λειτουργίας.
ΣΗΜΕΙΩΣΗ: Αυτή η λειτουργία δεν είναι διαθέσιμη
κατά την λειτουργία ανεμιστήρα ή αφύγρανσης.
Λειτουργία FOLLOW ME(για ορισμένα μοντέλα)
Σημείωση: Αυτή η λειτουργία μπορεί να ενεργοποιηθεί
μόνο από το τηλεχειριστήριο. Το τηλεχειριστήριο
λειτουργεί σαν κινητός θερμοστάτης επιτρέποντας
τον ακριβή έλεγχο της θερμοκρασίας στη θέση που
βρίσκεται το τηλεχειριστήριο.
Για να ενεργοποιήσετε αυτή τη λειτουργία , στρέψτε το
τηλεχειριστήριο προς τη μονάδα και
πιέστε το πλήκτρο Follow me. Η ένδειξη θα ανάψει
στη μονάδα επιβεβαιώνοντας ότι έλαβε το σήμα.
Εάν η μονάδα δεν λάβει σήμα για 7 λεπτά θα υπάρξει
ήχος ειδοποίησης για να αναδείξει ότι η λειτουργία Follow me τερματίστηκε. Η οθόνη του τηλεχειριστηρίου
θα αναγράφει την θερμοκρασία στο σημείο το οποίο
βρίσκεται.
ΟΔΗΓΙΕΣ ΛΕΙΤΟΥΡΓΙΑΣ
1. Πλήκτρο MODE
Επιλέξτε το κατάλληλο πρόγραμμα λειτουργίας.
Κάθε φορά που πιέζετε το πλήκτρο, επιλέγεται ένα
πρόγραμμα με την ακόλουθη σειρά: Ψύξη, Ανεμιστήρα
και Αφύγρανση. Η ένδειξη προγράμματος ανάβει
σύμφωνα με το επιλεγμένο πρόγραμμα.
ΣΗΜΕΙΩΣΗ: Στις παραπάνω ρυθμίσεις, η μονάδα
αυτόματα θα ρυθμίσει τη ταχύτητα ανεμιστήρα. Την
ταχύτητα ανεμιστήρα μπορείτε να τη ρυθμίσετε μόνο
από το τηλεχειριστήριο σε λειτουργία: Ψύξη και
Ανεμιστήρα.
2. Πλήκτρα Πάνω ( + ) και Κάτω ( - )
Χρησιμοποιούνται για να ρυθμίσετε (αύξηση/μείωση)
τη θερμοκρασία με βήματα 1°C/2°F(ή 1°F) σε εύρος
από 17°C/62°F έως 30°C/88°F. Ή τον χρονοδιακόπτη
σε εύρος 0~24 ώρες. Σημείωση: Η οθόνη μπορεί να
αναγράφει τη θερμοκρασία σε °C ή σε °F. Για την
εναλλαγή από το ένα στο άλλο κρατήστε πατημένα τα
δύο πλήκτρα ( + ) ( - ) για 3 δευτερόλεπτα.
3. Πλήκτρο ON-OFF
Ενεργοποίηση/Απενεργοποίηση
4. Οθόνη LED
Αναγράφει την ρυθμισμένη θερμοκρασία σε
κατάσταση ψύξης. Κατά τις λειτουργίες ανεμιστήρα και
αφύγρανσης αναγράφει την θερμοκρασία δωματίου.
Κωδικοί σφαλμάτων και ειδοποιήσεων:
Ε1- Ο αισθητήρας εσωτερικής θερμοκρασίας έχει
σφάλμα. Αποσυνδέστε και επανασυνδέστε τη μονάδα.
Εάν το σφάλμα επαναλαμβάνεται καλέστε το τμήμα
επισκευών.
Ε2- Ο αισθητήρας θερμοκρασίας του συμπυκνωτή
έχει σφάλμα. Αποσυνδέστε και επανασυνδέστε τη
μονάδα. Εάν το σφάλμα επαναλαμβάνεται καλέστε το
τμήμα επισκευών.
Ε4- Σφάλμα επικοινωνίας της οθόνης. Αποσυνδέστε
και επανασυνδέστε τη μονάδα. Εάν το
σφάλμα επαναλαμβάνεται καλέστε το τμήμα
επισκευών.
EC- Διαρροή ψυκτικού υγρού (σε ορισμένα μοντέλα)παρακαλούμε επικοινωνήστε με εξουσιοδοτημένο
τεχνικό.
Κωδικός Προστασίας
P1- Έχει γεμίσει το δοχείο με νερό. - Συνδέστε τον
αγωγό αποστράγγισης και αποστραγγίστε το νερό.
Εάν η ειδοποίηση εμφανίζεται πάλι, καλέστε το τμήμα
επισκευών.
Οδηγίες λειτουργίας
Λειτουργία Ψύξης
- Πιέστε το πλήκτρο MODE ώστε να ανάψει η ένδειξη
του “COOL”. Η μονάδα αυτόματα θα ρυθμίσει τη
λειτουργία ανεμιστήρα.
10
Άλλες λειτουργίες
Αυτόματη επανεκκίνηση
Εάν η λειτουργία της μονάδας σταματήσει απότομα,
λόγω διακοπής ρεύματος, η λειτουργία θα επανέλθει
αυτόματα στο προηγούμενο πρόγραμμα λειτουργίας όταν
επανέλθει το ρεύμα.
Αναμονή 3 λεπτών πριν την επανεκκίνηση
λειτουργίας
Μετά την παύση λειτουργίας της μονάδας, δεν μπορεί να
επαναλειτουργήσει για τα επόμενα 3
λεπτά. Αυτό γίνεται για την προστασία της μονάδας.
Η λειτουργία θα ξεκινήσει αυτόματα μετά από 3 λεπτά.
Λειτουργία διαχείρισης τροφοδοσίας ρεύματος (σε
ορισμένα μοντέλα)
Όταν η θερμοκρασία περιβάλλοντος είναι χαμηλότερη
από τη ρυθμισμένη θερμοκρασία, η μονάδα αυτόματα θα
μπει σε λειτουργία διαχείρισης τροφοδοσίας ρεύματος. Ο
συμπιεστής και ο ανεμιστήρας θα σταματήσουν.
Όταν η θερμοκρασία του περιβάλλοντος είναι υψηλότερη
από τη ρυθμισμένη θερμοκρασία, η μονάδα αυτόματα
θα σταματήσει να λειτουργεί σε κατάσταση διαχείρισης
τροφοδοσίας ρεύματος. Ο συμπιεστής και/ ή ο
ανεμιστήρας θα λειτουργήσουν κανονικά.
Προσαρμογή κατεύθυνσης της ροής του αέρα
Η περσίδα μπορεί να ρυθμιστεί χειροκίνητα (Σχ. 4):
• Ρυθμίστε την κατεύθυνση ροής του αέρα χειροκίνητα
στην επιθυμητή θέση
• Μην τοποθετείτε βαριά αντικείμενα στις περσίδες,
καθώς θα προκληθούν φθορές στη μονάδα.
• Βεβαιωθείτε ότι οι περσίδες είναι πλήρως ανοιχτές
κατά τη λειτουργία.
ΟΔΗΓΙΕΣ ΛΕΙΤΟΥΡΓΙΑΣ
Adjust
manually
Adjust
manually
Χειροκίνητη
ρύθμιση
Χειροκίνητη
ρύθμιση
Σχ. 4
11
ΟΔΗΓΙΕΣ ΕΓΚΑΤΑΣΤΑΣΗΣ
Τοποθεσία
• Το κλιματιστικό πρέπει να τοποθετηθεί σε σταθερό
δάπεδο για να μειωθούν ο θόρυβος και οι
κραδασμοί. Για την σωστή και ασφαλή τοποθέτηση
της μονάδας, τοποθετήστε την σε επίπεδο και
σταθερό δάπεδο ικανό να αντέξει το βάρος της
μονάδας.
• Το κλιματιστικό διαθέτει ροδάκια για εύκολη
τοποθέτηση, αλλά πρέπει να κυλάνε μόνο σε
επίπεδες και λείες επιφάνειες. Προσέξτε ιδιαίτερα
όταν το μετακινείτε πάνω από χαλιά. Μην
προσπαθήσετε να το σπρώξετε πάνω από άλλα
αντικείμενα.
• Η μονάδα πρέπει να τοποθετηθεί σε σημείο με
πρίζα η οποία διαθέτει την κατάλληλη γείωση.
• Μην τοποθετείτε εμπόδια κοντά στις εισαγωγές και
εξαγωγές αέρα της μονάδας.
• Αφήστε χώρο από 30cm έως 100cm μεταξύ των
τοίχων και των πλευρών της μονάδας.
Εγκατάσταση του συρόμενου κιτ παραθύρου
Το συρόμενο κιτ παραθύρου, έχει σχεδιαστεί ώστε
να ταιριάζει στα περισσότερα οριζόντια και κάθετα
παράθυρα, ωστόσο, μπορεί να είναι απαραίτητο να
αυτοσχεδιάσετε/τροποποιήσετε μερικά τμήματα της
διαδικασίας εγκατάστασης για ορισμένα παράθυρα.
Ανατρέξτε στα Σχ. 6 & Σχ. 7 για το ελάχιστο και
το μέγιστο άνοιγμα παραθύρου. Το συρόμενο κιτ
παραθύρου μπορεί να στερεωθεί με μια βίδα (δείτε
Σχ. 7α)
ΣΗΜΕΙΩΣΗ: Εάν το παράθυρο είναι μικρότερο από
το ελάχιστο μήκος που αναφέρεται, κόψτε το τμήμα
που έχει την τρύπα ώστε να χωράει στο άνοιγμα του
παραθύρου. Μην κόψετε το κιτ ώστε να χωράει στο
άνοιγμα το κιτ στο σημείο που βρίσκεται η τρύπα.
ΟΔΗΓΙΕΣ ΕΓΚΑΤΑΣΤΑΣΗΣ (προεραιτικό)
or
Fig.7 a
Συρόμενο κιτ
παραθύρου
Συρόμενο κιτ
παραθύρου
ή
Βίδα Βίδα
Οριζόντιο
παράθυρο
Κιτ παραθύρου
Ελάχιστο: 67,5cm
Μέγιστο: 123cm
Σχ. 6
Κάθετο
παράθυρο
Κιτ παραθύρου
Ελάχιστο: 67,5cm
Μέγιστο: 123cm
Σχ. 7
Σχ. 5
30cm
Fig.5
30cm
30cm
or
3
0cm
Σχ. 7α
12
Οδηγίες εγκατάστασης για κρεμαστό παράθυρο
1. Κόψτε τον μονωτικό αφρό (αυτοκόλλητο) στο
κατάλληλομήκος και προσαρτήστε το στο περβάζι του
παραθύρου Σχ.8
2. Προσαρτήστε το κιτ στο παράθυρο.
3. Ρυθμίστε το μήκος του συρόμενου κιτ σύμφωνα με το
πλάτος του παραθύρου, κόψτε το κιτ του παραθύρου
στο κατάλληλο μήκος εάν το παράθυρο είναι μικρότερο
από 26.5 ίντσες.
4. Κόψτε τον μονωτικό αφρό (αυτοκόλλητο) στο κατάλληλο
μήκος και προσαρτήστε το στο πάνω μέρος του
παραθύρου Σχ.10
5. Κλείστε το παράθυρο πάνω στο κιτ παραθύρου.
6. Κόψτε τον μονωτικό αφρό στο κατάλληλο μήκος και
προσαρτήστε το στο κενό μεταξύ των δυο μερών του
παραθύρου. (Βλέπε Σχ. 11)
ΟΔΗΓΙΕΣ ΕΓΚΑΤΑΣΤΑΣΗΣ (προεραιτικό)
Fig.8
Fig.9
Fig.10
Fig.11
or
or
26.5 ~ 48.0
26.5 ~ 48.0
Μονωτικός αφρός
(αυτοκόλλητο)
Περβάζι
παραθύρου
Περβάζι
παραθύρο
Περβάζι
παραθύρο
Περβάζι
παραθύρο
Κιτ παραθύρου
Κιτ παραθύρου
Κιτ παραθύρου
Κιτ παραθύρου
Μονωτικός
αφρός
Σχ. 8
ή
ή
Σχ. 9
Σχ. 10
Σχ. 11
 Loading...