

Dehumidifier
User’s Manual
Αφυγραντήρας
Εγχειρίδιο Χρήσης
English/Ελληνικά/ Română
Thank you for choosing INVENTOR
dehumidier. For correct use of
this unit, please read this manual
carefully and keep it for future
reference.
DE-MDT10
DE-MDT20
Σας ευχαριστούμε που επιλέξατε
αφυγραντήρα της INVENTOR.
Για τη σωστή χρήση της μονάδας
παρακαλούμε διαβάστε προσεκτικά
το παρόν εγχειρίδιο και φυλάξτε
το για αναφορά στο μέλλον.
E
L
E
C
T
R
I
C
A
P
P
L
I
A
N
C
E
S
Η
Λ
Ε
Κ
Τ
Ρ
Ι
Κ
Ε
Σ
Σ
Υ
Σ
Κ
Ε
Υ
Ε
Σ
SOCIABLE REMARK
DISPOSAL: Do not dispose this product as unsorted municipal waste. Collection
of such waste separately for special treatment is necessary.
It is prohibited to dispose of this appliance in domestic household waste.
For disposal, there are several possibilities:
A) The municipality has established collection systems, where electronic waste can
be disposed of at least free of charge to the user.
B) When buying a new product, the retailer will take back the old product at least
free of charge.
C) The manufacture will take back the old appliance for disposal at least free of
charge to the user.
D) As old products contain valuable resources, they can be sold to scrap metal
dealers.
Wild disposal of waste in forests and landscapes endangers your health when
hazardous substances leak into the ground-water and nd their way into the food
chain.
When using this dehumidier in the European countries, the following information
must be followed:
1
CONTENTS
SAFETY PRECAUTIONS
Warning....................................................................................................................................................................................................... 2
Caution ........................................................................................................................................................................................................ 2
Electric a l i n f o r m a t i o n............................................................................................................................................................................ 3
OPERATIING THE UNIT
When usin g t h e u n i t ..............................................................................................................................................................................6
Removing t h e c o l l e c t e d w a t e r .......................................................................................................................................................... 7
CARE AND MAINTENANCE
Care and c l e a n i n g t h e d e h u m i d i e r ............................................................................................................................................... 8
TROUBLESHOOTING TIPS
Troubles h o o t i n g t i p s ............................................................................................................................................................................. 9
CONTROL PADS ON THE DEHUMIDIFIER
Indicato r l i g h t s ......................................................................................................................................................................................... 4
Control p a d s.............................................................................................................................................................................................. 4
Other fea t u r e s .......................................................................................................................................................................................... 5
IDENTIFICATION OF PARTS
Identic a t i o n o f p a r t s............................................................................................................................................................................ 5
Position i n g t h e u n i t ...............................................................................................................................................................................6
Inside you will nd many helpful hints on how to use and maintain your air co nditioner
properly. Ju st a little preventive ca re o n your pa rt can sav e you a great deal of time
and money over the life of your air conditioner. You'll nd many answers to c ommon
problems in the chart of troubleshooting tips. If you reviewo ur c hart o f T roubles hooting
Tips rst, you may not need to call for service at all.
Re ad Th is Ma nual
CA UT ION
T his appliance can be us ed by children aged from 8 years and above a nd persons
with reduced physical, se nsory or mental capa bilities or lack of experience and
k nowledge if they have been given supervision or instruction concerning use of the
a ppliance in a sa fe way and understand the hazards involved. Ch ildren shall not play
the a ppliance. Cle aning and us er maintenance s hall not be ma de by children without
s upervision. ( be applicable for the Eu ropean Co untries )
T his appliance is n ot intended for us e by pers ons (including ch ildren) with reduced
physical ,se nsory or mental c apabilities or lack of experience and knowledge, unless
they have b
een given supervision or instruction concerning us e of th
e appliance by a
pers on responsible for their saf ety. (b e applicable for other countries ex cept the
E uropean C ountries )
C hildren sh ould be s upervised to ensu re that they do not play with the appliance.
If the su pply cord is damaged, it must be rep lace d by the manufacturer, its s ervice
a gent or sim ilarly qualied persons in order to avoid a h azard.
T he appliance sha ll be ins talled in ac cordance with national wiring regulations.
The a ppliance with electric heater shall have atl eas t 1 m eter s pace t ot he c ombu stible
m aterials.
C ontact the authorised service technician for repair or maintenance of this u nit.
!

2
3
SAFETY PRECAUTIONS
Do not exceed the rating
of the power outlet or
connection device.
Do not modify power cord
length or share the outlet
with other appliances
Disconnect the power if
strange sounds, smell, or
smoke comes from it.
Otherwise, it may cause electric
shock or re due to excess heat
generation.
It may cause electric shock or
re due to heat generation.
It may cause re and electric
shock.
It may cause electric shock or re
due to heat generation.
It may cause electric shock.
It may cause failure of machine
or electric shock.
It contains contaminants and
could make you sick.
It may cause electric shock or re.
Plastic parts may melt and cause
a re.
It may cause electrical shock or
injury.
It may cause an explosion or re.
Do not operate or stop the
unit by switching on or o
the power.
Do not insert or pull out
plug with wet hands.
You should never try to take
apart or repair the unit by
yourself.
Do not drink or use the
water drained from the unit.
Do not damage or use an
unspecied power cord.
Do not place the unit near
a heat source.
Before cleaning, turn o
the power and unplug the
unit.
Do n ot us e the mac hine near
ammable g as or combus tibles, s uch
as g asoline, benzene, thinner, etc.
!
!
CAUTION
Do not use the unit in small
spaces .
Lack of ventilation can cause
overheating and re.
Do not put in places where
water may splash onto the
unit.
Water may en ter the unit and
degrade the insu lation. It may
cause a n electri c shock or re.
Place t he unit on a
level, s turdy se ction
of the floor.
If the unit falls o ver, i t may
cause w ater to s pill and
damage belongings, or
cause e lectrical shock or
re.
!
To prevent injury to the user or other people and property damage, the following instructions must be
followed. Incorrect operation due to ignoring of instructions may cause harm or damage.
The seriousness is classied by the following indications.
This sym bol indicates the possibility of death or se rious inj ury.
Meanings of sym bols use d in this manual are as shown below.
Always do this.
Never do this.
CAU TION
This sym bol indicates the possibility of injury or d amage to property.
WAR NING
WARNING
It may cause bucket full protect of
the unit and cause electric shock.
Do not take the water bucket out during operation.
SAFETY PRECAUTIONS
Do not cover t he intake or
exhaus t openings with
cloths or towels.
A lack of air ow ca n lead
to overheating and r e.
Never inser t your nger or
other foreign obje cts into grills
or openings. T ake s pecia l care
to warn children of these
dangers.
Do not use in areas
where chemicals are
handled.
This will cause t he unit
deterioration due to
chemica ls and s olvents
dissolve d in the air.
Care sh ould be taken when
using the unit in a room with
the following persons:
Infants, children, elderly people,
and people not s enstive to
humidity.
You may be injured if you
fall or if the unit falls ove r.
Water may spill in side th e
unit, causing insula tion
failure and e lectrical
shock or re .
!
!
It may cause failure of
appliance or accident.
There is danger of re or
electric shock.
Do not place heavy object on the
power cord and take care s o that
the cord is not c ompress ed.
Opera tion without lters
may c ause f ailure.
Always insert the lters
securely. Clean lter
once every two weeks.
CAUTION
Do not climb up on
or sit on the unit.
If water enters the unit, turn
the unit o and disconnect the
power , contact a qualied
service technician.
!
Do not place ower
vases or other water
container on top of
the unit.
The ma nufactures name plate is located on the r ear pan el of the unit and contain s electri cal and other
technical data sp ecic to this unit.
Be sure the unit is prop erly grounded. To minimize shoc k and re hazard s, prope r grounding is important.
The pow er cord is equipped with a three -prong grounding plug for protection again st shock
hazards .
Your unit must be us ed in a p roperly grounded wall rec eptacle. If the wall recep tacle you intend to use i s
not adequately grounded or prote cted by a time delay fus e or circ uit breaker, ha ve a qua lied electrician
install the proper receptacle.
Ensure the rece ptacle is access ible after the unit installation.
Do not use ext ension cords o r an ada pter plu gs with this un it. However, if it is nece ssary to use an
extension cord, u se an ap proved Dehumidier e xtension cord on ly (avail able at m ost loca l hardware
stores).
To avoid the possib ility of personal injury, always disconn ect the power su pply to the unit, before in stalling
and/or servicing.
Electrical Information
It may cause electric shock
or failure of appliance.
4
5
CONTROL PADS ON THE DEHUMIDIFIER
11
22
33
55
55
11
22
44
66
66
77
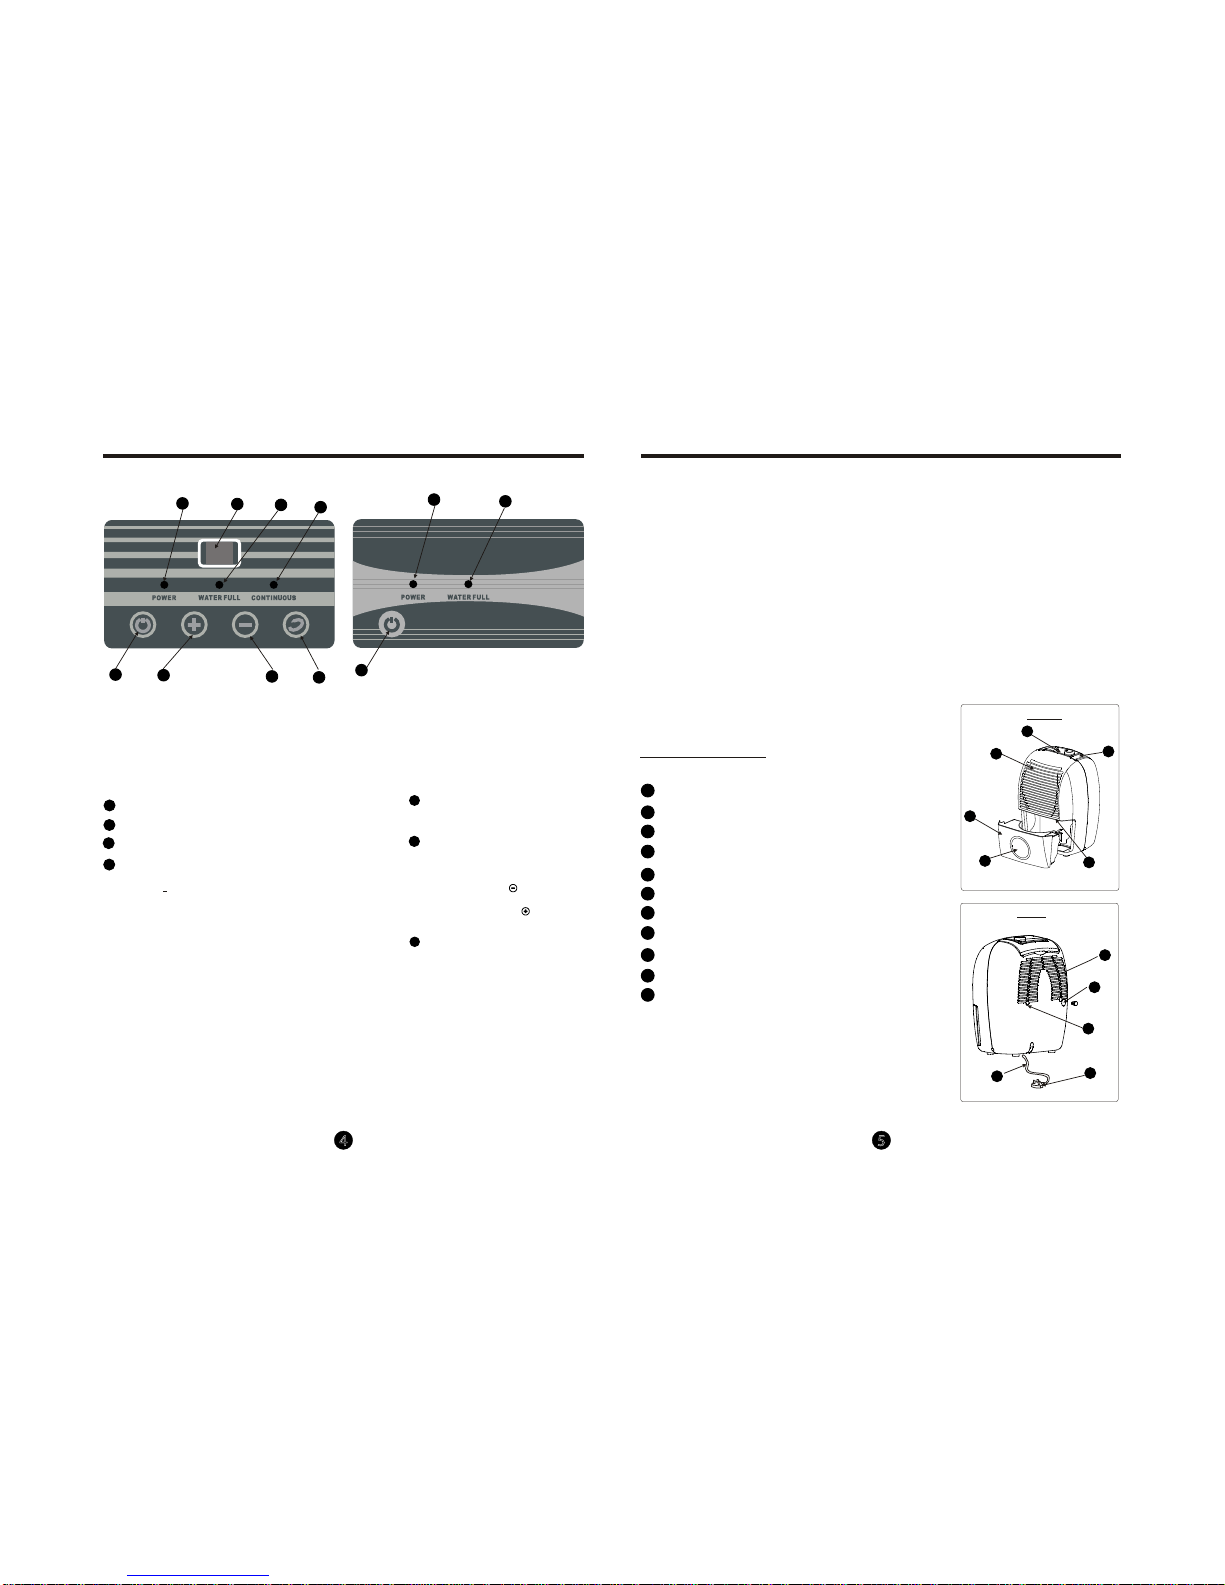
Control panel(1)
Control panel(2)
33
11
22
44
In d ic a t or l ig ht s
Power on indicator light(green)
Continuous operation on indicator light(green)
Bucket full indicator light(red)
Dis play
Shows the s et % humidity level while setting, then shows
the actual(+5% a ccuracy) room % humidity level.
Error C odes:
E1- Humidity s ensor error--Unplug the unit and plug
it back in. If e rror repeats, call for s ervice.
E2- Temperature s ensor error-- Unplug the unit and
plug it back in. If error repeats, call for service.
Protect C odes:
P1- Unit is defrosting-- Allow the unit to automatically
defrost. The portect will clear after the unit self defrosts.
P2- Bucket is f
ull or bucket is not in the right position--
Empty the bucket and replace in the right position.
55
POWE R Pad
Press to turn the dehumidifier on and o.
66
Continue P ad
Select for the dehumidifier to operate
continuously for maximum dehumidification
until the bucket is full. The H umidity s et
control pads c annot be used when
Continuous operation is on.P ress this pad
again to cancel C ontinuous operation.
77
Humidity S et C ontrol Pads
The humidity level can be set within a
range of 35%R H(R elative H umidity) to 80%
RH(R elative Humidity) in 5% increments.
For drier air, pres s the pad and s et to a
lower percent value(%).
For damper air, press the pad and set to
a higher percent value(%).
C on t ro l pa d s
Th e co ntr ol pa nel o f the de hu midif ier yo u purch as ed m ay be lo ok lik e on e of th e fol lowing :
IDENTIFICATION OF PARTS
Identication of parts
O th e r f e a tu re s
Buc ket Full L ig ht
Glows when the bucket is ready to be
emptied, or when the bucket is removed
or not replaced in the proper position.
Auto S hut O
The water level control switch shuts o the
dehumidifier when the bucket is full, or when
the bucket is removed or not replaced in the
proper pos ition. When the s etting humidity
is reached, the unit will be shut o automatically.
When frost builds up on the evaporator coils, the
compressor will cycle o a nd the fan will continue to
run until the frost disappears.
Auto-R es tart(on s ome models )
If the unit breaks o une
xpectedly due to the power cut,
it will restart with the previous function setting automatically when the power resumes .
Auto D efros t
Power Cord
Air Outlet grille
Drain hose outlet (see page 7)
Air lter (behind the air intake grille)
Power Plug
Power cord band (Used only when storing the unit.)
Front
Rear
Control panel
Air intake grille
Water bucket
Water level window
Handle
77
88
66
99
010
55
33
11
22
44
111
99
010
111
77
55
66
88
33
11
22
44
Fig.2
Fig.3
Wa it 3 m inute s befo re r es um ing o pera tio n
After the unit ha s stopped, it ca n not be re s tart
ope rtation in the rs t 3 minutes. T his is to protect
the unit. O peration will automatically s tart after
3 minutes.
NOTE: All the pictures in the manual are
for explanation purposes only.Your unit
may be slightly dierent.The actual shape
shall prevail.The operations and functions
are the same.
Fig.1
6
7
OPERATING THE UNIT
When using the unit
When first usin g the dehumidifier, operate the unit continuously 24 hours.
O O O O
This unit is des igned to operate with a working environment between 5 C(41 F) and 35 C( 95 F).
If the unit has been sw itched o and needs to be s witched on ag ain quickly, allow approximately
three minutes for the c orrect operation to resume.
Do not connect the dehumidifier to a multiple socket outlet, which is a lso being used for other e lectrical appliances.
Se lect a suitable location, making s ure you have eas y a cces s t o a n e lectrical outlet.
Plug the unit into a 115V~ 6 0Hz/220~240V 5 0Hz ( Re fer to the n ameplate located on the si de/rear of the unit ) e lectrical
socket-outlet with ea rth connection.
Make su re the W ater bucket is correctly fitted otherwise the u nit will not operate properly.
A dehumidifier operating in a base ment will have l ittle or no
eect in drying an a djace nt enclose d s torage area, s uch as a
clos et, unles s t here is adequate circulation of air in and out of
the area .
Air outlet grille
Air intake
grille
20cm or more
20cm or more
20cm or more
20cm or more
40cm or
more
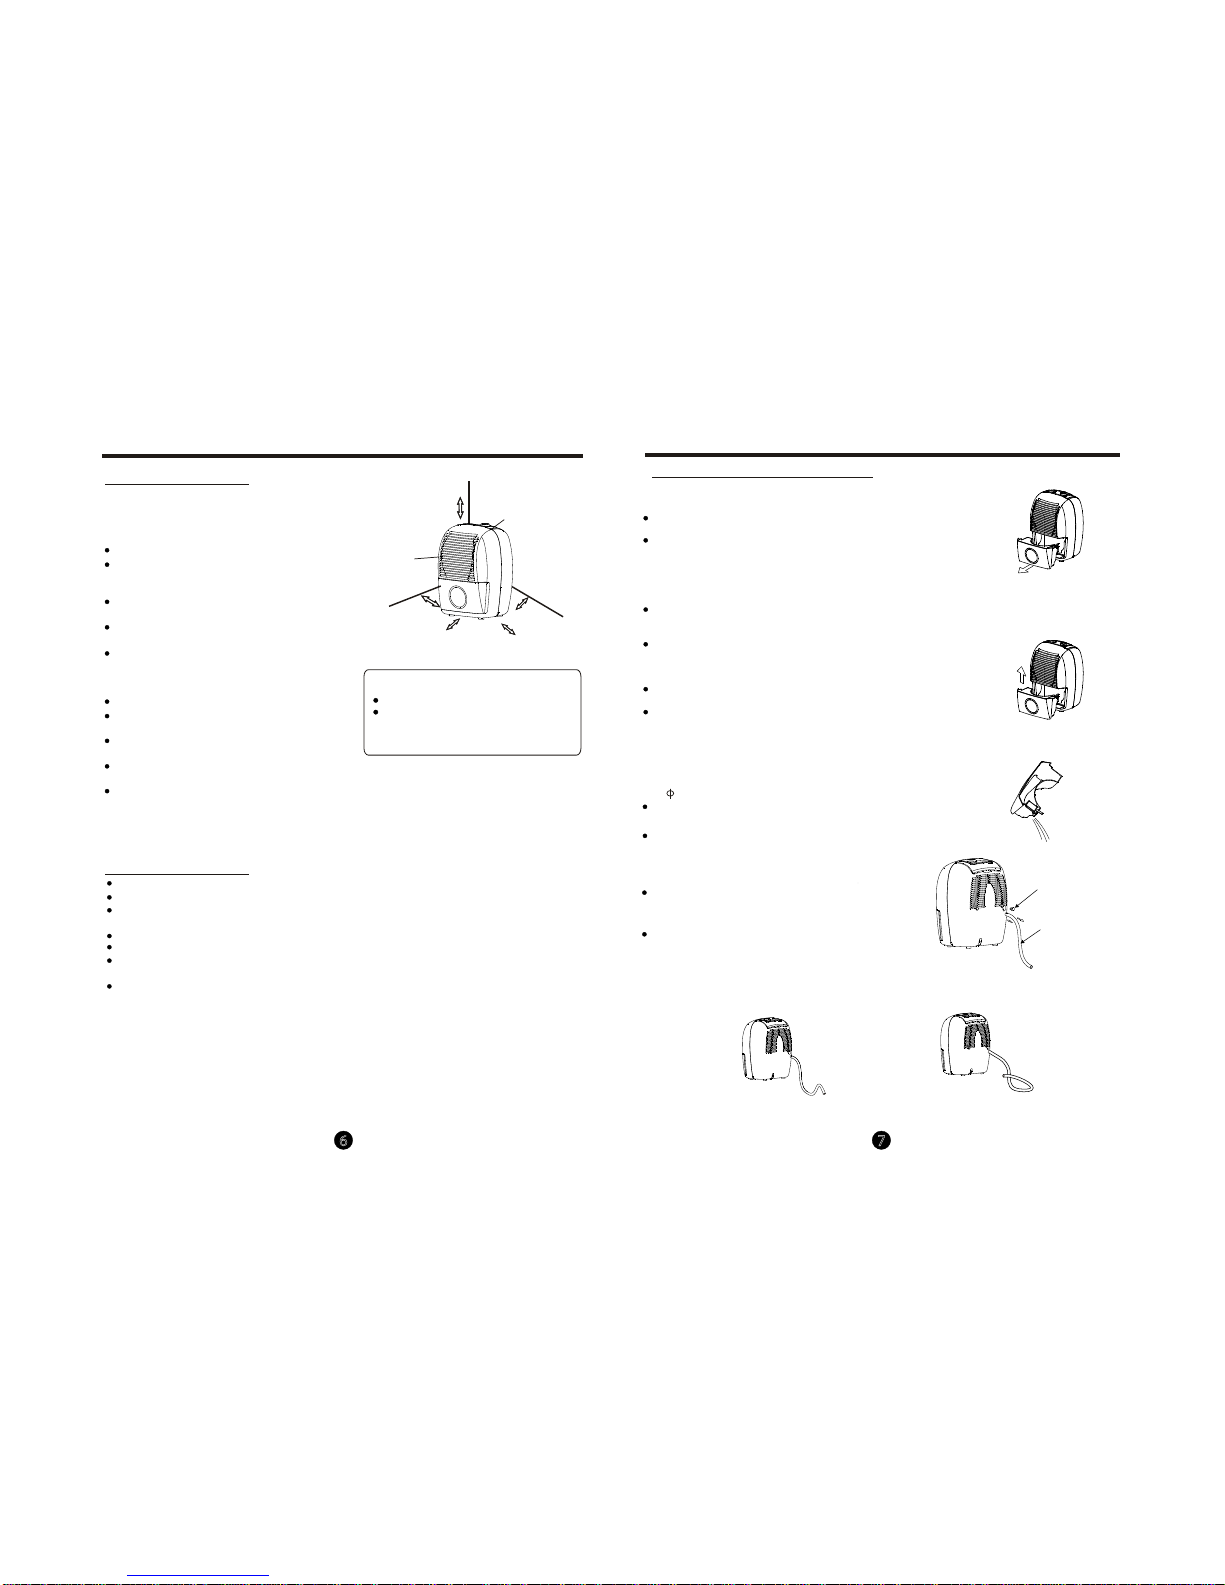
Positioning the unit
Do not use outdoors.
This de humidifer is intended for indoor re sidential
applica tions only. T his dehumidifier sh ould not be used
for commercial or industrial applications.
Place the dehumidifier on a smooth, le vel oor s trong
enough to support the unit with a full bucket of water.
Allow at least 20cm of ai r s pace on al l s ides of the unit
for good air circulation.
Place the unit in a n a rea where the temperature will not
O O
fall below 5 C( 41 F). The co ils ca n become covered with
O O
frost at temperatures below 5 C( 41 F), which may re duce
performance.
Place the unit away from the c lothes dryer, heater or ra diator.
Use the unit to prevent moisture damage a nywhere books
or va luables a re stored.
Use the dehumidier in a basement to help prevent
moisture damage.
The dehumidifier must be o perated in an enclose d
area to be most eective.
Close a ll doors, windows a nd other outside openings
to the room.
Fig.4
Casters(Install at four points on the bottom
of unit)
Casters can only move laterally.
Do not force casters to move over carpet,
nor move the unit with water in the bucket.
(The unit may tip over and spill water.)
NOTE:Casters is optional,some models without.
Removing the collected water
There are two ways to remove collected water.
1. Use the bucket
When the bucket is full, the unit will automatically
stop running, and the Full indicator light will ash.
Slowly pull out the bucket. Grip the left and right
handles securely, and carefully pull out straight so
water does not spill. Do not put the bucket on the oor
because the bottom of the bucket is uneven.
Otherwise the bucket will fall and cause the water
to spill.
Throw away the water and replace the bucket. The
bucket must be in place and securely seated for
the dehumidier to operate.
The machine will re-start when the bucket is restored
in its correct position.
NOTES:
When you remove the bucket, do not touch any parts
inside of the unit. Doing so may damage the product.
Be sure to push the bucket gently all the way into the
unit. Banging the bucket against anything or failing to
push it in securely may cause the unit not to operate.
2. Continuous draining
Fig.5
Fig.6
Fig.7
Fig.8
1. Pull out the bucket a little.
2. Hold both sides of the bucket
with even strength, and pull it
out from the unit.
3. Pour the water out.
Water can be automatically emptied into a oor
drain by attaching the unit with a water hose
(ID 13.5mm) (not included).
NOTE: When the continuous drain feature is not
being used,remove the drain hose from the outlet
and attach the rubber plug back to the drain outlet.
Remove the rubber plug from the ba ck of the u nit and s tore
it in a sa fe location.
Insert the w ater hos e into the unit from the drain outlet in the
back of the unit as sh own in F ig.8. Make su re the co nnec tion
of the water hose a nd the drain hos e o utlet of the unit is tight
and do not let the water leak.
Th en lead the water hose to the oor drain or a s uitable drainage
facility.The d rainage facility should be lower than the drain outlet
of the unit.
Be su re to run the water hose s loping downward and let the
water to ow out smoothly.Do not ins tall the water hose a s
shown F ig.9a and Fig.9b.
Remove the
rubber plug
Insert the hose
from the drain
outlet
OPERATING THE UNIT
Fig.9a
Fig.9b
Do not block water ow by a rise.
Do not block water ow by a retortion.

8
9
After turning o the unit, wait one day before emptying
the tank.
Clean the main unit, bucket and air lter.
Wrap the cord and bundle it with the band(see Fig.12).
Cover the unit with a plastic bag.
Store the unit upright in a dry, well-ventilated place.
Band
Power cord
4. When not using the unit for long time periods
CARE AND MAINTENANCE
Care and cleaning of the dehumidier
Turn the dehumidier o and remove the plug
from the wall outlet before cleaning.
1. Clean the Grille and Case
Use water and a mild detergent. Do not use bleach
or abrasives.
Do not splash water directly onto the main unit. Doing
so may cause an electrical shock, cause the insulation
to deteriorate, or cause the unit to rust.
The air intake and outlet grilles get soiled easily, so use
a vacuum attachment or brush to clean.
2. Clean the bucket
Every few weeks, clean the bucket to prevent
growth of mold, mildew and bacteria. Partially
ll the bucket with clean water and add a little
mild detergent. Swish it around in the bucket,
empty and rinse.
NOTE: Do not use a dishwasher to clean the
bucket. After clean, the bucket must be in place
and securely seated for the dehumidier to operate.
Fig. 9
Fig. 10
Fig. 11
3. Clean the air lter
The air lter behind the front grille should be
checked and cleaned at least every 30 days
or more often if necessary.
NOTE: DO NOT RINSE OR PUT THE FILTER
IN AN AUTOMATIC DISHWASHER.
To remove:
Pull the water bucket out as shown in Fig.9.
Grasp the lower side of the lter and pull it downward,
see Fig.10.
Clean the lter with warm, soapy water. Rinse and
let the lter dry before replacing it. Do not clean the
lter in a dishwasher.
To attach:
Insert the air lter into the unit from the side and push
it upward. See Fig.10.
CAUTION:
DO NOT operate the dehumidier without a lter
because dirt and lint will clog it and reduce performance.
Fig.12
TROUBLESHOOTING TIPS
Before calling for service, review the chart below rst yourself.
Problem
What to check
Unit does not start
Dehumidier does not
dry the air as it should
Make sure the dehumidier s plug is pushed completely into the
outlet.
Check the house fuse/circuit breaker box.
Dehumidier has reached its preset level or bucket is full.
Bucket is not in the proper position.
,
Did not allow enough time to remove the moisture.
Make sure there are no curtains, blinds or furniture blocking the
front or back of the dehumidier.
The humidity selector may not be set low enough.
Check that all doors, windows and other openings are securely
closed.
Room temperature is too low, below 5
o
C(41oF).
There is a kerosene heater or something giving o water vapor
in the room.
The unit makes a loud
noise when operating
The air lter is clogged.
The unit is tilted instead of upright as it should be.
The oor surface is not level.
Frost appears on the
coils
This is normal. The unit has Auto defrost feature.
Water on oor
Hose to connector or hose connection may be loose.
Intend to use the bucket to collect water, but the back
drain plug is removed.
Power indicator light
ashes at 5 times per
second.
Temperature sensor or error. Unplug the unit
and plug it back in.If error repeats, call for service.
Humidity sensor

ΓΕΝΙΚΕΣ ΠΑΡΑΤΗΡΗΣΕΙΣ
ΠΕΡΙΕΧΟΜΕΝΑ
Για την χρήση του αφυγραντήρα σε χώρες της Ευρωπαϊκής Ένωσης θα πρέπει να
ακολουθούνται οι παρακάτω οδηγίες:
ΑΠΟΡΡΙΨΗ: Μην απορρίπτετε το συγκεκριμένο προϊόν στα αστικά λύμματα, χρειάζεται
ειδική περισυλλογή και επεξεργασία.
Απαγορεύεται η απόρριψή του συγκεκριμένου προϊόντος μαζί με τα αστικά λύμματα.
Για την απόρριψή υπάρχουν αρκετές επιλογές:
Α) Έχουν συσταθεί ειδικά συστήματα περισυλλογής ηλεκτρονικών αποβλήτων
όπου μπορούν να απορριφθούν χωρίς επιβάρυνση.
Β) Κατά την προμήθεια ενός νέου προϊόντος μπορείτε να επιστρέψετε
στον προμηθευτή σας το παλιό χωρίς επιβάρυνση.
Γ) Ο κατασκευαστής μπορεί να παραλάβει την παλιά συσκευή προς απόρριψη
χωρίς επιβάρυνση
Δ) Μπορούν να πωληθούν σε επαγγελματίες που εκμεταλλέυονται τα μεταλλικά
εξαρτήματα των παλιών προϊόντων.
Η απόρριψή σε δάση και πεδιάδες μπορεί να βλάψη την υγεία σας λόγω του ότι η
επιβλαβείς ουσίες μεταφέρονται μέσω του υδροφόρου ορίζονται στην τροφική αλυσίδα.
ΟΔΗΓΙΕΣ ΑΣΦΑΛΕΙΑΣ
Προειδοποίηση ............................................................................................................................................. 2
Προσοχή
.......................................................................................................................................................2
Ηλεκτρικά χαρακτηριστικά
............................................................................................................................3
ΠΛΗΚΤΡΑ ΤΟΥ ΑΦΥΓΡΑΝΤΗΡΑ
Ενδεικτικές λυχνίες .......................................................................................................................................4
Πλήκτρα
........................................................................................................................................................4
Άλλες λειτουργίες
.......................................................................................................................................... 5
ΠΕΡΙΓΡΑΦΗ ΤΩΝ ΕΠΙΜΕΡΟΥΣ ΕΞΑΡΤΗΜΑΤΩΝ
Περιγραφή των επιμέρους εξαρτηματων ...................................................................................................... 5
ΛΕΙΤΟΥΡΓΙΑ ΤΗΣ ΜΟΝΑΔΑΣ
Τοποθέτηση της μονάδας .............................................................................................................................6
Χρήση της μονάδας
...................................................................................................................................... 6
Αφαίρεση του νερού
.....................................................................................................................................7
ΦΡΟΝΤΙΔΑ ΚΑΙ ΣΥΝΤΗΡΗΣΗ
Φροντίδα και καθαρισμός του αφυγραντήρα ................................................................................................ 8
ΑΝΤΙΜΕΤΩΠΙΣΗ ΠΡΟΒΛΗΜΑΤΩΝ
Αντιμετώπιση προβλημάτων ........................................................................................................................9
Διαβάστε το παρόν εγχειρίδιο
Στο παρόν εγχειρίδιο θα βρείτε χρήσιμες συμβουλές για τη σωστή χρήση και συντήρηση του
αφυγραντήρα. Προληπτική φροντίδα από μέρους σας μπορεί να σας εξοικονομήσει χρόνο και χρήματα
και να επιμηκύνει τη ζωή του αφυγραντήρα σας. Θα βρείτε πολλές απαντήσεις σε συνήθη προβλήματα και
μπορεί να μην χρειαστεί να επικοινωνήσετε με τεχνικό προσωπικό.
ΠΡΟΣΟΧΗ
1
Η συσκευή μπορεί να χρησιμοποιηθεί από παιδιά άνω των 8 ετών και άτομα με ειδικές ανάγκες ή
έλλειψη γνώσης μόνο εφόσον επιβλέπονται από άτομα υπεύθυνα για την ασφάλειά τους. Τα παιδιά δεν
επιτρέπεται να παίζουν με τη συσκευή. Ο καθαρισμός δεν πρέπει να γίνεται από παιδιά χωρίς επίβλεψη.
(Εφαρμογή στις Ευρωπαϊκές χώρες)
Η συσκευή δεν πρέπει να χρησιμοποιείται από παιδιά και άτομα με ειδικές ανάγκες ή έλλειψη γνώσης
ή εμπειρίας, εκτός αν επιβλέπονται από άτομα υπεύθυνα για την ασφάλειά τους (Εφαρμογή σε χώρες
εκτός Ευρωπαϊκής Ένωσης)
Τα παιδιά θα πρέπει να επιβλέπονται ώστε να μην παίζουν με τη μονάδα.
Εάν φθαρεί το καλώδιο τροφοδοσίας η αντικατάσταση θα πρέπει να γίνει από εξειδικευμένο προσωπικό
για την αποφυγή τραυματισμού.
Η συσκευή θα πρέπει να εγκατασταθεί σύμφωνα με τους εθνικούς κανονισμούς.
Συσκευή με ηλεκτρική αντίσταση θα πρέπει να τοποθετηθεί τουλάχιστον σε 1m απόσταση από εύφλεκτα
υλικά.
Για την συντήρηση ή επισκευή της συσκευής επικοινωνήστε με εξειδικευμένο προσωπικό.

32
ΟΔΗΓΙΕΣ ΑΣΦΑΛΕΙΑΣ ΟΔΗΓΙΕΣ ΑΣΦΑΛΕΙΑΣ
Για την αποφυγή τραυματισμού και φθοράς της μονάδας θα πρέπει να ακολουθηθούν οι παρακάτω
οδηγίες. Λανθασμένη λειτουργία λόγω αγνόησης των οδηγιών μπορεί να προκαλέσει βλάβη ή ζημία.
Η κατηγοριοποίηση γίνεται σύμφωνα με τις παρακάτω ενδείξεις
Η σημασία των συμβόλων που εμφανίζονται στο παρόν εγχειρίδιο φαίνονται παρακάτω
Αυτό το σύμβολο υποδεικνύει πιθανότητα θανάτου ή σοβαρού τραυματισμού.
Απογορεύεται
ΠΡΟΕΙΔΟΠΟΙΗΣΗ
ΠΡΟΕΙΔΟΠΟΙΗΣΗ
Αυτό το σύμβολο υποδεικνύει την πιθανότητα τραυματισμού ή φθορά της μονάδας.
Βεβαιωθείτε πως ακολουθείτε αυτές τις οδηγίες
ΠΡΟΣΟΧΗ
ΠΡΟΣΟΧΗ
ΠΡΟΕΙΔΟΠΟΙΗΣΗ
Συνδέστε σωστά
το καλώδιο
τροφοδοσίας.
Μην καλύπτετε τις
εισόδους και εξόδους
του αέρα.
Μην τροποιείτε το μήκος του καλωδίου
τροφοδοσίας και μην χρησιμοποιείτε την
ίδια πρίζα και για άλλες συσκευές.
Αν ακουστούν περίεργοι θόρυβοι ή
αν εξέρχεται κάποια περίεργη οσμή
ή καπνός, απενεργοποιήστε αμέσως
τη μονάδα και αποσυνδέστε την από
την παροχή ρεύματος.
Η μονάδα δεν πρέπει να βρίσκεται
κοντά σε εύφλεκτα ή εκρηκτικά αέρια,
όπως βενζίνη, διαλυτικά κ.α.
Μην ενεργοποιείτε ή απενεργοποιείτε τη λειτουργία της μονάδας
μέσω του ασφαλειοδιακόπτη.
Θα πρέπει να δίνεται ιδιαίτερη
προσοχή όταν η μονάδα
χρησιμοποιείται σε χώρο που
υπάρχουν τα παρακάτω άτομα:
Μην χρησιμοποείτε την μονάδα με
βρεγμένα χέρια και μην τη λειτουργείτε σε
χώρο με υψηλή υγρασία.
Μην επιχειρήσετε να
επισκευάσετε την μονάδα
μόνοι σας.
Μην πίνετε από το νερό
που συλλέγεται στη
μονάδα.
Μην φθείρετε το καλώδιο
ή χρησιμοποείτε μη προδιαγεγραμμένο καλώδιο.
Μην χρησιμοποιείτε
τη μονάδα σε χώρους
όπου υπάρχουν χημικά.
Μην τοποθετείτε τη
μονάδα κοντά σε πηγή
θερμότητας.
Πριν τον καθαρισμό
απενεργοποιήστε την
μονάδα και αποσυνδέστε
την από την παροχή
ρεύματος.
Μην αφαιρείτε το δοχείο
νερού κατά τη λειτουργία
της μονάδας.
Σε αντίθετη περίπτωση μπορεί να
προκληθεί ηλεκτροπληξία ή πυρκαγιά.
Μπορεί να προκληθεί ηλεκτροπληξία
ή πυρκαγιά.
Μπορεί να προκληθεί ηλεκτροπληξία
ή πυρκαγιά.
Μπορεί να προκληθεί έκρηξη ή
πυρκαγιά.
Μπορεί να προκληθεί ηλεκτροπληξία
ή πυρκαγιά.
Μπορεί να προκληθεί ηλεκτροπληξία.
Μπορεί να προκληθεί βλάβη ή
ηλεκτροπληξία.
Περιέχει συστατικά που μπορεί να
βλάψουν την υγεία σας.
Μπορεί να προκληθεί ηλεκτροπληξία
ή πυρκαγιά.
Μπορεί να λιώσουν τα πλαστικά μέρη
και να προκληθεί πυρκαγιά.
Μπορεί να προκληθεί ηλεκτροπληξία ή
τραυματισμός.
Μην εισάγετε τα δάχτυλά
σας ή άλλα αντικείμενα στα
ανοίγματα ή στις περσίδες.
Προειδοποιήστε τα παιδιά για
αυτούς τους κινδύνους.
Να εισάγετε προσεκτικά
τα φίλτρα και να τα
καθαρίζετε κάθε 15 μέρες.
Βεβαιωθείτε πως το
καλώδιο τροφοδοσίας
δεν συμπιέζεται.
Εάν εισέλθει νερό στην
μονάδα απενεργοποιήστε
την, αποσυνδέστε την παροχή
ρεύματος και επικοινωνήστε
με εξειδικευμένο τεχνικό.
Μην ανεβαίνετε και
μην κάθεστε πάνω
στη μονάδα.
Μην τοποθετείτε βάζα
ή άλλα δοχεία με νερό
πάνω στη μονάδα.
Έλλειψη ροής αέρα μπορεί
να προκαλέσει υπερθέρμανση
και πυρκαγιά.
Μπορεί να προκληθεί ηλεκτροπληξία ή
δυσλειτουργία της μονάδας.
Λειτουργία χωρίς φίλτρα μπορεί
να προκαλέσει δυσλειτουργία της
μονάδας.
Βρέφη, παιδιά, ηλικιωμένοι και άτομα
με ευαισθησία στην υγρασία.
Υπάρχει κίνδυνος πυρκαγιάς ή
ηλεκτροπληξίας.
Υπάρχει κίνδυνος βλάβης της μονάδας
ή ατυχήματος.
Θα προκληθεί φθορά στη μονάδα
εξαιτίας των χημικών και των διαλυμάτων
που υπάρχουν στην ατμόσφαιρα.
Μπορεί να προκληθεί τραυματισμός
εάν πέσετε ή εάν πέσει η μονάδα.
Μπορεί να εισέλθει νερό στη μονάδα
προκαλώντας φθορά στην μόνωση
και ηλεκτροπληξία ή πυρκαγιά.
Θα ενεργοποιηθεί η αντίστοιχη προστασία
και μπορεί να προκληθεί ηλεκτροπληξία.
ΠΡΟΣΟΧΗ
Μην χρησιμοποιείτε
τη μονάδα σε μικρούς
χώρους.
Μην τοποθετείτε τη μονάδα σε
μέρος όπου μπορεί να πέσει
πάνω της νερό.
Τοποθετήστε τη μονάδα
σε επίπεδο και σταθερό
έδαφος.
Έλλειψη αερισμού μπορεί να
προκαλέσει υπερθέρμανση και
πυρκαγιά.
Μπορεί να εισέλθει νερό και να φθαρεί
η μόνωση. Μπορεί να προκληθεί
ηλεκτροπληξία ή πυρκαγιά.
Εάν η μονάδα πέσει μπορεί να
βραχούν τα έπιπλα ή να προκληθεί
ηλεκτροπληξία ή πυρκαγιά.
ΠΡΟΣΟΧΗ
Ηλεκτρικά χαρακτηριστικά
Η πινακίδα που βρίσκεται στο πίσω μέρος της μονάδας περιέχει ηλεκτρικά και άλλα τεχνικά
χαρακτηριστικά της μονάδας.
Βεβαιωθείτε πως η μονάδα είναι σωστά γειωμένη, για την αποφυγή ηλεκτροπληξιών και πυρκαγιών.
Το καλώδιο τροφοδοσίας είναι εφοδιασμένο με γείωση για προστασία έναντι ηλεκτροπληξίας.
Θα πρέπει να χρησιμοποιηθεί πρίζα γειωμένη. Εάν η πρίζα που πρόκειται να χρησιμοποιήσετε δεν
είναι κατάλληλα γειωμένη ή προστατευμένη από ασφάλεια ή διακόπτη απευθυνθείτε σε εξειδικευμένο
ηλεκτρολόγο για να εγκαταστήσει την κατάλληλη πρίζα.
Βεβαιωθείτε πως η πρίζα θα είναι προσβάσιμη μετά την εγκατάσταση.
Μην χρησιμοποιείτε μπαλαντέζα ή πολύπριζα. Αν όμως χρειαστεί να χρησιμοποιήσετε μπαλαντέζα,
χρησιμοποιήστε μόνο ειδικό καλώδιο για αφυγραντήρα (Διαθέσιμα σε αρκετά καταστήματα)
Πριν την συντήρηση ή επισκευή να αποσυνδέεται πάντα το καλώδιο τροφοδοσίας για την αποφυγή
τραυματισμού.

54
ΠΛΗΚΤΡΑ ΠΑΝΩ ΣΤΟΝ ΑΦΥΓΡΑΝΤΗΡΑ ΠΕΡΙΓΡΑΦΗ ΤΩΝ ΕΠΙΜΕΡΟΥΣ ΕΞΑΡΤΗΜΑΤΩΝ
Το πάνελ χειρισμού του αφυγραντήρα που έχετε προμηθευτεί θα μοιάζει με κάποιον από τα παρακάτω:
Ενδεικτική λυχνία γεμάτου δοχείου
Ανάβει όταν πρέπει να αδειάσετε το δοχείο νερού
ή όταν έχει μετακινηθεί το δοχείο ή δεν έχει
τοποθετηθεί σωστά.
Αυτόματη απενεργοποίηση
Το φλοτέρ απενεργοποεί τον αφυγραντήρα όταν
το δοχείο είναι γεμάτο, έχει μετακινηθεί ή δεν έχει
τοποθετηθεί σωστά. Όταν το ποσοστό υγρασίας
φτάσει το επιθυμητό η μονάδα θα απενεργοποιηθεί
αυτόματα.
Περιμένετε 3 λεπτά πριν επανεκκινήσετε
τον αφυγραντήρα.
Αν απεργοποιήσετε τον αφυγραντήρα δεν μπορείτε
να τον επανεκκινήσετε για τα επόμενα 3 λεπτά.
Είναι για την προστασία της μονάδας. Η λειτουργία
θα ξεκινήσει αυτόματα μετά από 3 λεπτα.
Περιγραφή των επιμέρους εξαρτηματων
Πάνελ χειρισμού
Πλέγμα εισόδου αέρα
Δοχείο νερού
Δείκτης στάθμης νερού
Λαβή
Φίλτρο αέρα (πίσω από το πλέγμα
εισόδου αέρα)
Πλέγμα εξόδου αέρα
Έξοδος αγωγού αποστράγγισης
(ανατρέξτε στην σελ.7)
Σημείο πρόσδεσης καλωδίου
τροφοδοσίας (Χρησιμοποιείται μόνο όταν
θέλετε να αποθηκεύσετε τη μονάδα)
Καλώδιο τροφοδοσίας
Φις
ΣΗΜΕΙΩΣΗ: Όλες οι εικόνες στο παρόν εγχειρίδιο
είναι αναφορικές. Η μονάδα που έχετε προμηθευτεί
μπορεί να διαφέρει. Οι λειτουργίες παραμένουν ίδιες.
Άλλες λειτουργίες
Αυτόματη αποπάγωση
Όταν εμφανιστεί πάγος στο στοιχείο, ο συμπιεστής
θα σταματήσει να λειτουργεί και ο ανεμιστήρας θα
συνεχίσει να λειτουργεί μέχρι να λιώσει ο πάγος.
Αυτόματη Επανεκκίνηση (σε ορισμένα μοντέλα)
Σε περίπτωση διακοπής ρεύματος, η μονάδα
θα επανέλθει σε λειτουργία διοατηρώντας τις
προηγούμενες ρυθμίσεις.
1
2
3
5
5
1
2
4
6
6
7
Πάνελ χειρισμού (2)Πάνελ χειρισμού (1)
Ένδεξη λειτουργίας (πράσινο)
Ένδειξη γεμάτου δοχείου νερού (κόκκινο)
Ένδειξη συνεχούς λειτουργίας (πράσινο)
Οθόνη
Κατά την ρύθμιση εμφανίζεται το %
επίπεδο υγρασίας και έπειτα το ποσοστό
υγρασίας (ακρίβεια +-5%) του χώρου.
Κωδικοί σφαλμάτων:
Ε1-Σφάλμα του αισθητήρα υγρασίας.
Αποσυνδέστε το φις από την πρίζα και
επανατοποθετήστε το. Αν το σφάλμα
παραμένει επικοινωνείστε με τεχνικό.
Ε2-Σφάλμα του αισθητήρα θερμοκρασίας.
Αποσυνδέστε το φις από την πρίζα και
επανατοποθετήστε το. Αν το σφάλμα
παραμένει επικοινωνείστε με τεχνικό.
Κωδικοί προστασίας:
Ρ1- Αποπάγωση. Μην κάνετε κάποια
ενέργεια. Μόλις ολοκληρωθεί η διαδικασία
αποπάγωσης ο κωδικός θα εξαφανιστεί.
Ρ2- Το δοχείο νερού είναι γεμάτο ή δεν
βρίσκεται στη σωστή θέση. Αδειάστε το
δοχείο και επανατοποθετήστε το στη σωστή
θέση.
Ενδεικτικές λυχνίες
Πλήκτρο Power
Πιέστε το συγκεκριμένο πλήκτρο
για να ενεργοποιήσετε και να
απενεργοποιήσετε τον αφυγραντήρα.
Πλήκτρο ρύθμισης της υγρασίας
Το ποσοστό υγρασίας μπορεί να οριστεί
από 35%RH (Σχετική Υγρασία) εώς
80%RH (Σχετική Υγρασία) με αύξηση
ανά 5%. Για ξηρότερο αέρα πιέστε το
πλήκτρο (-) για να επιλέξετε μικρότερη
ρύθμιση.
Για υγρό αέρα πιέστε το πλήκτρο (+) και
επιλέξτε μεγαλύτερη ρύθμιση.
Πλήκτρο συνεχούς λειτουργίας
Με αυτό το πλήκτρο μπορείτε να
επιλέξετε την συνεχή λειτουργία του
αφυγραντήρα μέχρι να γεμίσει το δοχείο.
Όταν επιλέξετε τη συνεχή λειτουργία δεν
θα λειτουργεί κανένα πλήκτρο. Για να
ακυρώσετε τη συνεχή λειτουργία πιέστε
άλλη μια φορά το ίδιο πλήκτρο.
Πλήκτρα
Εικ.1
5
6
7
11
22
33
44
5
6
7
8
9
10
11
Μπροστά
Πίσω
7
8
6
9
10
5
3
1
2
4
11
Εικ.2
Εικ.3

76
ΛΕΙΤΟΥΡΓΙΑ ΤΗΣ ΜΟΝΑΔΑΣ ΛΕΙΤΟΥΡΓΙΑ ΤΗΣ ΜΟΝΑΔΑΣ
Εάν ένας αφυγραντήρας λειτουργεί σε
υπόγειο δεν θα μπορεί να αφυγράνει κάποιο
διπλανό χώρο, εκτός αν υπάρχει επαρκής
κυκλοφορία του αέρα μέσα και έξω.
1. Χρησιμοποιήστε το δοχείο
2. Συνεχής αποστράγγιση
ΣΗΜΕΙΩΣΕΙΣ:
Όταν γεμίσει το δοχείο νερού, η μονάδα θα σταματήσει
αυτόματα και η αντίστοιχη ενδεικτική λυχνία θα
αναβοσβήνει.
Τραβήξτε προσεκτικά το δοχείο κρατώντας το από την
αριστερή και δεξιά λαβή. Μην ακουμπήσετε το δοχείο
στο έδαφος διότι δεν είναι επίπεδο και θα χυθεί το νερό.
Αδειάστε το νερό και επανατοποθετήστε το δοχείο σωστά
στη θέση του για την ομαλή λειτουργία του αφυγραντήρα.
Ο αφυγραντήρας θα επανέλθει σε λειτουργία όταν
το δοχείο επανατοποθετηθεί στη σωστή του θέση.
Υπάρχει η δυνατότητα συχεχούς απορροής του
νερού συνδέοντας έναν αγωγό αποστράγγισης
(Φ35mm) (Δεν περιλαμβάνεται)
Αφαιρέστε το επιστόμιο από το πίσω μέρος της μονάδας
και φυλάξτε το σε ασφαλές μέρος.
Τοποθετήστε τον αγωγό στην έξοδο αποστράγγισης στο
πίσω μέρος της μονάδας, όπως φαίνεται στην Εικ.8.
Βεβαιωθείτε πως δεν υπάρχει διαρροή νερού το σημείο
σύνδεσης.
Οδηγήστε τον αγωγό αποστράγγισης είτε στην
αποχέτευση είτε σε κάποιο άλλο κατάλληλο χώρο
αποχέτευσης. Η αποχέτευση θα πρέπει να είναι
χαμηλότερα από την έξοδο αποστράγγισης της μονάδας.
Βεβαιωθείτε πως ο αγωγός αποστράγγισης έχει καθοδική
κλίση για την ομαλή απορροή του νερού.
Μην τοποθετείτε τον αγωγό αποστράγγισης όπως
φαίνεται στις Εικ.9α και Εικ.9β.
ΣΗΜΕΙΩΣΗ: Όταν δε σκοπεύετε να χρησιμοποιήσετε
τη η συνεχής αποστράγγιση, αποσυνδέστε τον αγωγό
από την έξοδο και επανατοποθετήστε το επιστόμιο.
Μην εμποδίζετε τη ροή του νερού ανυψώνοντας τον αγωγό. Μην παρεμποδίζετε τη ροή του νερού τσακίζοντας τον αγωγό.
Όταν αφαιρείτε το δοχείο μην αγγίζετε τα εσωτερικά μέρη
του αφυγραντήρα, διότι μπορεί να προκληθεί φθορά.
Όταν απομακρύνετε το δοχείο να είστε ιδαίτερα
προσεκτικοί ώστε να μην προκληθεί φθορά στον
αφυγραντήρα, διότι μπορεί να προκληθεί δυσλειτουργία.
Κατά την πρώτη λειτουργία της μονάδας, θα πρέπει να την αφήσετε λειτουργήσει συνεχόμενα για 24 ώρες.
Η μονάδα είναι σχεδιασμένη να λειτουργεί σε περιβάλλον 5C με 35C.
Εάν έχετε απενεργοποιήσει τη μονάδα και χρειαστεί να την ενεργοποιήσετε αμέσως, αφήστε
να περάσουν πρώτα 3 λεπτά.
Μην συνδέετε τον αφυγραντήρα σε πολύπριζο το οποίο χρησιμοποιείται ήδη για άλλες συσκευές.
Επιλέξτε μια θέση έυκολα προσβάσιμη.
Χρησιμοποιήστε πρίζα με γείωση 220-240V, 50Hz (ανατρέξτε στην πινακίδα χαρακτηριστικών
που βρίσκεται στο πλαϊνό ή πίσω μέρος της μονάδας)
Βεβαιωθείτε πως το δοχείο νερού είναι σωστά τοποθετημένο, διότι σε αντίθετη περίπτωση
ο αφυγραντήρας δεν θα λειτουργεί ομαλά.
Μην λειτουργείτε τον αφυγραντήρα σε εξωτερικούς
χώρους.
Ο αφυγραντήρας είναι σχεδιασμένος για εσωτερική
οικιακή χρήση. Δεν πρέπει να χρησιμοποοιείται σε
επαγγελματικούς ή βιομηχανικούς χώρους.
Τοποθετήστε τον αφυγραντήρα σε επίπεδο και
σταθερό έδαφος το οποίο μπορεί να αντέξει τη
μονάδα με γεμάτο το δοχείο νερού.
Για την επαρκή κυκλοφορία του αέρα ο ελέυθερος
χώρος γύρω από τον αφυγραντήρα πρέπει να
είναι τουλάχιστον 20cm.
Μην τοποθετείτε το αφυγραντήρα σε μέρος όπου η
θερμοκρασία μπορεί να πέσει κάτω από τους 5C,
διότι μπορεί να σχηματιστεί πάγος στο στοιχείο του
και να μειωθεί η απόδοσή του.
Βεβαιωθείτε πως δεν είναι τοποθετημένος κοντά
σε στεγνωτήριο, θερμαντική συσκευή ή καλοριφέρ.
Μπορείτε να χρησιμοποιήσετε τη μονάδα για να
προστατέψετε από την υγρασία βιβλία ή πολύτιμα
αντικείμενα.
Μπορείτε να χρησιμοποιήσετε τον αφυγραντήρα
σε υπόγειο για την αποφυγή φθοράς εξαιτίας της
υγρασίας.
Για την καλύτερη απόδοση του αφυγραντήρα θα
πρέπει να χρησιμοποιείται σε κλειστούς χώρους.
Κλείστε όλες τις πόρτες, τα παράθυρα ή
οποιοδήποτε άλλο άνοιγμα.
Τοποθέτηση της μονάδας Άδειασμα του νερού
Χρήση της μονάδας
Ροδάκια (Τοποθετήστε τα στην βάση της μονάδας)
Τα ροδάκια μπορούν να κινηθούν μόνο πλευρικά.
Μην κινείτε τα ροδάκια σε χαλί ή όταν το δοχείο νερού
είναι γεμάτο. (Μπορεί να αναποδογυρίσει η μονάδα και να
χυθεί το νερό)
ΣΗΜΕΙΩΣΗ: Τα ροδάκια είναι διαθέσιμα σε ορισμένα μοντέλα.
Πλέγμα
εξόδου αέρα
Πλέγμα
εισόδου αέρα
Τουλάχιστον
20cm
Τουλάχιστον 20cm
Τουλάχιστον 20cm
Τουλάχιστον
20cm
Τουλάχιστον
40cm
Εικ.4
Εικ.9α
Εικ.9β
Εικ.5
Εικ.6
Εικ.7
Εικ.8
1. Τραβήξτε ελαφρώς το δοχείο
2. Κρατήστε το δοχείο και από
τις 2 λαβές και αφαιρέστε
το από τη μονάδα.
3. Αδειάστε το νερό
Αφαιρέστε
το επιστόμιο
Εισάγετε τον αγωγό
στη έξοδο
αποστράγγισης

98
ΦΡΟΝΤΙΔΑ ΚΑΙ ΣΥΝΤΗΡΗΣΗ ΑΝΤΙΜΕΤΩΠΙΣΗ ΠΡΟΒΛΗΜΑΤΩΝ
Πριν τον καθαρισμό απενεργοποιήστε τον
αφυγραντήρα και αποσυνδέστε το φις από την πρίζα.
Φροντίδα και καθαρισμός του αφυγραντήρα
Πριν επικοινωνήσετε με τεχνικό προσωπικό, ελέγξτε τα παρακάτω
Χρησιμοποιήστε νερό και ουδέτερο απορρυπαντικό. Μην
χρησιμοποιείτε λευκαντικά και στιλβωτικά.
Μην ρίχνετε νερό στον αφυγραντήρα. Μπορεί να
προκληθεί ηλεκτροπληξία, φθορά στη μόνωση ή σκουριά.
Το πλέγμα εισόδου και εξόδου αέρα χρειάζονται συχνά
καθαρισμό. Μπορείτε να τα καθαρίζετε είτε με ηλεκτρική
σκούπα είτε με μαλακή βούρτσα.
Το δοχείο πρέπει να καθαρίζεται σε τακτά χρονικά
διαστήματα για την αποφυγή δημιουργίας μούχλας και
βακτηριδίων. Καθαρίστε το δοχείο με καθαρό νερό και
ουδέτερο απορρυπαντικό και ξεβγάλτε με καθαρό νερό.
ΣΗΜΕΙΩΣΗ: Μην πλένετε το δοχείο σε πλυντήριο πιάτων.
Μετά τον καθαρισμό επανατοποθετήστε το δοχείο στη
σωστή θέση του.
Το φίλτρο αέρα θα πρέπει να καθαρίζεται τουλάχιστον
κάθε 30 μέρες ή και συχνότερα αν είναι απαραίτητο.
ΣΗΜΕΙΩΣΗ: ΜΗΝ ΧΡΗΣΙΜΟΠΟΙΕΙΤΕ ΓΙΑ
ΤΟΝ ΚΑΘΑΡΙΣΜΟ ΤΟΥ ΦΙΛΤΟΥ ΠΛΥΝΤΗΡΙΟ
Αφαιρέστε το δοχείο όπως φαίνεται στην Εικ.9.
Αφαιρέστε το φίλτρο τραβώντας το προς τα κάτω από την
λαβή, όπως φαίνεται στην Εικ.10.
Καθαρίστε το φίλτρο με χλιαρό σαπουνοδιάλυμμα και
αφήστε το να στεγνώσει σε σκιερό μέρος.
Εισάγετε στο φίλτρο στη μονάδα, όπως φαίνεται στην
Εικ.11.
ΜΗΝ λειτουργείτε τη μονάδα χωρίς φίλτρο. Υπάρχει
κίνδυνος να φράξει λόγω ακαθαρσιών και να μειωθεί
η απόδοσή της.
Αφού απενεργοποιήσετε τη μονάδα, περιμένετε 1 μέρα
πριν αδειάσετε το δοχείο.
Καθαρίστε το δοχείο, το φίλτρο και τα υπόλοιπα μέρη του
αφυγραντήρα.
Τυλίξτε το καλώδιο και δέστε το με ταινία.
Καλύψτε τον αφυγραντήρα με μια πλαστική σακούλα.
Αποθηκεύστε τον αφυγραντήρα σε όρθια θέση, σε ξηρό
και επαρκώς αεριζόμενο χώρο.
1. Καθαρίστε το πλέγμα και το πλαίσιο.
2. Καθαρισμός του δοχείου
3. Καθαρισμός του φίλτρου αέρα
Αφαίρεση φίλτρου
Επανατοποθέτηση του φίλτρου:
ΠΡΟΣΟΧΗ:
4. Όταν η μονάδα δεν θα χρησιμοποιηθεί
για αρκετό χρονικό διάστημα
Ταινία
Καλώδιο τροφοδοσίας
Εικ.9
Εικ.10
Εικ.11
Εικ.12
Πρόβλημα
Έλεγχοσ
Ο αφυγραντήρας
δεν ξεκινάει
Δεν αφαιρείται επαρκώς
η υγρασία από τον χώρο
Βεβαιωθείτε πως το φις είναι σωστά τοποθετημένο στην πρίζα.
Ελέγξτε την ασφάλεια/τον διακόπτη στον πίνακα του σπιτιού σας.
Ο αφυγραντήρας έχει επιτύχει το επιθυμητό ποσοστό υγρασίας
ή το δοχείο είναι γεμάτο.
Το δοχείο βρίσκεται στη σωστή θέση.
,
Δεν έχει λειτουργήσει ο αφυγραντήρας για αρκετή ώρα.
Βεβαιωθείτε πως δεν υπάρχουν εμπόδια μπροστά ή πίσω από
τον αφυγραντήρα.
Δεν έχει γίνει σωστή ρύθμιση.
Βεβαιωθείτε πως όλες οι πόρτες και τα παράθυρα είναι κλειστά.
Η θερμοκρασία του χώρου είναι κάτω από 5
ο
C.
Λειτουργεί στον χώρο σόμπα κυροζίνης ή κάποια άλλη συσκευή
που αυξάνει την υγρασία στον χώρο.
Ο αφυγραντήρας παράγει
δυνατό θόρυβο κατά
τη λειτουργία
Το φίλτρο είναι φραγμένο.
Η μονάδα δεν βρίσκεται σε όρθια θέση.
Το δάπεδο δεν είναι επίπεδο.
Σχηματίζεται πάγος
στο στοιχείο
Δεν είναι πρόβλήμα. Ο αφυγραντήρας διαθέτει λειτουργία
αυτόματης αποπάγωσης.
Νερό στο δάπεδο
Ελέγξτε τη σύνδεση του αγωγού με την έξοδο αποστράγγισης.
Ενώ χρησιμοποιείτε το δοχείο για την συλλογή του νερού, έχει
αφαιρεθεί το επιστόμιο της εξόδου αποστράγγισης στο πίσω μέρος
του αφυγραντήρα.
Η ενδεικτική λυχνία
λειτουργίας αναβοσβήνει
5 φορές ανά δευτερόλεπτο
Σφάλμα του αισθητήρα θερμοκρασίας ή υγρασίας. Αποσυνδέστε
το φις από την πρίζα και επανατοποθετήστε το. Αν το πρόβλημα
παραμένει επικοινωνήστε με τεχνικό.

OBSERVAŢIE SOCIALĂ
DEPOZITARE: Nu depozitaţi acest produs ca deşeu municipal nesortat. Este necesară
colectarea acestui deşeu separat pentru un tratament special.
Este interzisă depozitarea acestui dispozitiv împreună cu deşeurile casnice.
Există mai multe posibilităţi cu privire la depozitare:
A) Municipalitatea a îninţat sisteme de colectare unde se pot depozita deşeurile electronice
gratuit de către utilizator.
B) Când achiziţionaţi un produs nou, comerciantul va primi produsul vechi gratuit.
C) Producătorul va primi gratuit de la utilizator aparatul vechi pentru depozitare.
D) Având în vedere că produsele vechi conţin resurse valoroase, pot vândute bucăţi
comercianţilor de metale.
Depozitarea deşeurilor în păduri şi în natură vă pune în pericol sănătatea atunci când substanţele
periculoase se scurg în apa subterană şi ajung în lanţul alimentar.
Când utilizaţi acest aparat în ţările europene, este necesar să urmaţi următoarele indicaţii:
1
CUPRINS
MĂSURI DE SIGURANŢĂ
Avertisment..................................................................................................................................................................................................2
Atenţie ............................................................................................................................................................................................................2
Informaţ i i e l e c t r i c e ....................................................................................................................................................................................3
BUTOANE DE CONTROL PE DEZUMIDIFICATOR
Indicato a r e l u m i n o a s e .............................................................................................................................................................................4
Butoane d e c o n t r o l ................................................................................................................................................................................... 4
Alte cara c t e r i s t i c i........................................................................................................................................................................................ 5
IDENTIFICAREA PIESELOR
Identic a r e a p i e s e l o r................................................................................................................................................................................5
Poziţion a r e a a p a r a t u l u i ........................................................................................................................................................................... 6
UTILIZAREA APARATULUI
Când se ut i l i z e a z ă a p a r a t u l....................................................................................................................................................................6
Eliminar e a a p e i c o l e c t a t e .......................................................................................................................................................................7
ÎNGRIJIRE ŞI ÎNTREŢINERE
Îngrijir e a ş i c u r ă ţ a r e a d e z u m i d i c a t o r u l u i......................................................................................................................................8
DISFUNCŢII
Disfuncţii........................................................................................................................................................................................................9
În interior, veți găsi multe sugestii utile cu privire la modul de utilizare al acestui aparat. Puteți
economisi timp și bani pe durata de viață a aparatului dacă acordați atenție preventivă în îngrijirea
aparatului. Veți găsi multe răspunsuri la problemele comune în gracul de sfaturi de depanare. Dacă
examinați diagrama noastră de sfaturi de depanare în primul rând, nu va necesar să apelați la service.
Citiți acest manual
ATENȚIE
Acest aparat poate folosit de copii peste 8 ani și de persoanele cu capacități zice, senzoriale sau
mentale reduse sau lipsa de experiență și cunoștințe în cazul în care acestea au fost supravegheate
și instruite cu privire la utilizarea acestui aparat și să înțeleagă pericolele implicate. Copiii nu trebuie
să se joace aparatul. Curățare și întreținere nu se fac de către copii nesupravegheați.
(Se aplică pentruțările europene)
Acest aparat nu este destinat utilizării de către persoane (inclusiv copii) cu capacități zice, senzoriale
sau mentale reduse sau lipsă de experiență și cunoștințe, cu excepția cazului în care acestea au fost
supravegheate și instruite cu privire la utilizarea aparatului de către o persoană responsabilă pentru
siguranța lor. (se aplica pentru alte țări cu excepția țărilor europene)
Copiii trebuie supravegheați pentru a se asigura că nu se joacă cu aparatul.
În cazul în care cablul de alimentare este deteriorat, acesta trebuie înlocuit de către producător,
agentul său de service sau de persoane calicate, pentru a evita un pericol.
Aparatul trebuie să e instalat în conformitate cu reglementările naționale de cablare.
Aparatul de încălzire electrică trebuie să aibă spațiu de cel puțin 1 metru față de materialele
combustibile.
Contactați tehnicianul de service autorizat pentru reparații sau întreținere a acestui aparat.
!

2
3
MĂSURI DE SIGURANŢĂ
Nu depăşiţi capacitatea prizei
de curent electric sau
a dispozitivului de legătură
Nu modicaţi lungimea
cablului electric şi nu utilizaţi
priza pentru alte aparate
Deconectaţi de la sursa de
curent dacă generează sunete
ciudate, mirosuri sau fum.
În caz contrar, există risc de şoc
electric sau incendiu datorită
generării de căldură în exces.
Nu modicaţi lungimea cablului electric
şi nu utilizaţi priza pentru alte aparate
Există risc de incendiu
sau electrocutare
Există risc de şoc electric sau
incendiu datorită generării
de căldură în exces.
Există risc de şoc electric.
Există risc de defectare a aparatului
sau şoc electric.
Conţine substanțe nocive şi
vă puteţi îmbolnăvi.
Există risc de şoc electric
sau incendiu.
Piesele din plastic se pot topi şi
pot provoca un incendiu.
Există risc de şoc electric sau rănire.
Există risc de explozie sau incendiu.
Nu porniţi şi nu opriţi unitatea
prin pornirea sau oprirea
curentului.
Nu introduceţi şi nu trageţi
cablul cu mâinile umede.
Nu se recomandă să încercaţi
să desfaceţi sau să reparaţi
unitatea personal.
Nu consumaţi şi nu utilizaţi
apa scursă din aerul condiţionat.
Nu utilizaţi aparatul în apropiere
de gaz sau combustibili inamabili
cum ar gazolină, benzen, diluant etc.
Nu deterioraţi şi nu utilizaţi
un cablu electric
necorespunzător.
Nu aşezaţi unitatea lângă
o sursă de căldură.
Înainte de a curăţa, opriţi
curentul şi deconectaţi
unitatea.
! !
ATENŢIE
Când utilizaţi în cabinete sau
în alte spaţii mici, asiguraţi-vă
că lăsaţi uşile deschise.
Lipsa aerisirii poate provoca
supraîncălzire şi incendiu.
Nu aşezaţi în locuri în care
unitatea poate împroşcată
cu apă.
Apa poate pătrunde în unitate
şi afecta izolarea. Poate cauza
şoc electric sau incendiu.
Aşezaţi unitatea la
înălţime, pe o secţiune
rigidă pe podea.
Dacă unitatea cade, apa se
poate împrăştia şi prejudicia
bunurile sau provoca şoc
electric sau incendiu.
!
Pentru a preveni rănirea utilizatorului sau a altor persoane şi prejudicierea proprietăţii, trebuie respectate următoarele
instrucţiuni. Utilizarea incorectă ca urmare a nerespectării instrucţiunilor poate provoca rănire sau distrugere.
Gravitatea este evaluată în baza următoarelor indicaţii.
Acest simbol indică riscul de deces sau rănire gravă.
Acest simbol indică riscul de rănire sau distrugere a proprietăţii.
Acţionaţi întotdeauna aşa.
Nu procedaţi niciodată aşa.
ATENŢIE
Acest simbol indică riscul de rănire sau distrugere a proprietăţii.
AVERTISMENT
AVERTISMENT
Există risc de şoc electric
Nu deschideţi unitatea
în timpul funcţionării.
MĂSURI DE SIGURANŢĂ
Nu acoperiţi priza sau
oriciile de evacuare
cu cârpe sau prosoape.
.
Lipsa aerului poate conduce
la supraîncălzire şi incendiu.
Unitatea va afectată de
substanţele chimice şi de
solvenţii dizolvaţi în aer.
Nu utilizaţi în zone
în care se folosesc
substanţe chimice.
Unitatea va afectată de
substanţele chimice şi de
solvenţii dizolvaţi în aer.
Atenţie când utilizaţi unitatea
într-o cameră în care se aă
următoarele persoane:
Bebeluşi, copii, persoane mai în
vârstă şi persoane care nu sunt
sensibile la umiditate.
Există risc de rănire în cazul
în care cădeţi sau dacă
unitatea cade.
Apa poate pătrunde îninteriorul
unităţii, provocând defectarea
izolaţiei şi şoc electric sau incendiu.
!
!
Există riscul de defectare
a unităţii sau risc de accident.
Există risc de incendiu sau
şoc electric.
Funcţionarea fără ltre poate
provoca o disfuncţie.
Introduceţi întotdeauna
ltrele în siguranţă. Curăţaţi
ltrul o dată la două săptămâni.
ATENŢIE
Există risc de incendiu
sau şoc electric.
Nu aşezaţi obiecte grele pe
cablu şi vericaţi cablul pentru
a nu strangulat.
Dacă apa pătrunde în unitate, opriţi
unitatea şi deconectaţi de la sursa de
curent, contactaţi un tehnician calicat.
!
Nu aşezaţi ori, vaze
sau alte recipiente
cu apă pe unitate.
Plăcuţa cu numele producătorului se aă pe panoul anterior al unităţii şi conţine date electrice precum
şi alte informaţii tehnice specice acestei unităţi
Asiguraţi-vă că aerul condiţionat este împământat corespunzător. Pentru a reduce riscurile de electrocutare
şi incendiu, este importantă împământarea corespunzătoare.
Aerul condiţionat trebuie conectat la o priză de perete împământată corespunzător. Dacă priza de perete
pe care intenţionaţi să o utilizaţi nu este împământată corespunzător sau protejată prin amorsă cu întârziere
sau întrerupător, apelaţi la un electrician calicat pentru a instala priza adecvată.
Asiguraţi-vă că priza este accesibilă după instalarea unităţii.
Nu folosiţi prelungitoare sau şe intermediare cu această unitate. Însă, dacă este necesar să utilizaţi
un prelungitor, folosiţi doar prelungitor aprobat pentru „aer condiţionat” (disponibil în majoritatea magazinelor
locale hardware).
Pentru a evita posibilitatea unei prejudicieri personale, deconectaţi întotdeauna unitatea de la sursa
de alimentare înainte de instalare şi/sau reparare.
Informaţii electrice
Unitatea va afectată de
substanţele chimice şi de
solvenţii dizolvaţi în aer.

4
5
BUTOANE DE CONTROL PE DEZUMIDIFICATOR
1
2
3
5
5
1
2
4
6
6
7
Panou (1)
Panou (2)
3
1
2
4
Indicatoare luminoase
Funcţionare dezumidicare (verde)
Cupă plină (roşu)
Funcționarea continuă (verde)
Display
Arată umiditatea setată în procente, iar apoi arată nivelul
în procente al umidității din cameră.
Coduri de eroare:
E1 - Eroare senzor de umiditate - scoateți aparatul din priză
și băgați-l la loc.Dacă erorea persistă, contactați service-ul.
E2 - Eroare senzor de temperatură - scoateți aparatul din
priză și băgați-l la loc. Dacă erorea persistă, contactați service-ul.
P1 - Aparatul se degivrează - Permite degivrarea automată
a aparatului. Indicatorul va dispărea după ce aparatul
oprește degivrarea
P2 - Rezervorul este plin sau nu este așezat corect -Goliți
rezervorul și așezați în poziție corectă.
5
Tastă de pornire aparat
Apăsați pentru a porni sau opri aparatul.
6
Dezumidificare continuă:
Selectaţi funcţionarea continuă a
dezumidicatorului pentru dezumidicarea
maximă până când cupa este plină. Butoanele
de control pentru setarea umidităţii nu pot
utilizate atunci când funcţionarea continuă
este activată. Apăsați din nou acest buton
pentru a opri dezumidicarea continuă.
7
Butoanele pentru setarea umidității
Nivelul umidităţii poate setat în limitele
a 35% RH (Umiditate Relativă) şi 80% RH
(Umiditate Relativă) cu majorări de 5%.
Pentru un aer mai uscat, apăsaţi butonul
şi setaţi la o valoare procentuală mai redusă (%).
Pentru un aer mai umed, apăsaţi butonul
şi setaţi la o valoare procentuală mai ridicată (%).
Butoane de operare
Panoul de control poate arăta astfel:
IDENTIFICAREA PIESELOR
Identicarea pieselor
Alte caracteristici:
Lumină cupă plină
Se aprinde când cupa este pregătită pentru
degolire sau când cupa este înlăturată sau
înlocuită în poziţia corectă.
Oprire automată
Comutatorul de control a nivelului apei
închide dezumidicatorul atunci când cupa
este plină sau când cupa este înlăturată sau
înlocuită în poziţia corectă. Când umiditatea
este xată, aparatul se va închide automat.
Aşteptaţi 3 minute înainte de a relua operarea
După oprirea aparatului, funcţionarea nu poate
reluată în primele 3 minute. Aceasta pentru
a proteja aparatul. Funcţionarea va reluată
automat după 3 minute. În cazul în care compresorul
este întrerupt în timpul funcţionării, nu este posibilă
oprirea în primele 3 minute decât pentru eliminarea
apei, degivrare sau căderea curentului.
Autodegivrare
Când gheaţa acoperă rolele evaporatorului, compresorul
se va opri, iar ventilatorul va continua să funcţioneze până
când gheaţa dispare.
Auto-Restart (la unele modele)
În cazul în care se opreşte sau se întrerupe curentul,
aparatul va reporni automat cu setările utilizate ultima
dată după restabilirea curentului.
FAȚĂ
SPATE
Panou control
Grilaj admisie aer
Cupă pentru apă
Fereastră nivel apă
Mâner
Filtru de aer (în spatele grilei de admisie aer)
Grilaj de eliminare a aerului
Evacuare furtun scurgere (vezi pagina 7)
Cârlig cablu de alimentare (Utilizat doar atunci
când se depozitează aparatul)
Cablu de alimentare
Ștecher
7
8
6
9
1 0
5
3
1
2
4
11
9
10
1 1
7
5
6
8
3
1
2
4
Fig.2
Fig.3
NOTĂ: Toate imaginile din acest manual
au doar scop informativ. Forma reală
a aparatului pe care l-aţi cumpărat poate uşor
diferită, însă operaţiunile şi funcţiile sunt aceleaşi.
Fig.1

6
7
UTILIZAREA APARATULUI
Când se utilizează aparatul
Când se utilizează pentru prima dată dezumidicatorul, utilizaţi aparatul continuu 24 de ore.
Acest aparat este creat pentru a funcţiona într-un mediu de lucru cuprins între 5 gr C și 35 gr C.
Dacă aparatul a fost oprit şi trebuie să e pornit din nou imediat, lăsaţi aproximativ trei minute pentru reluarea
unei funcţionări corecte.
Nu conectaţi dezumidicatorul la o priză multiplă care este utilizată şi pentru alte aparate electrice.
Alegeţi o locaţie adecvată, asigurându-vă că aveţi acces uşor la priza electrică.
Conectaţi aparatul la o priză electrică cu împământare (220V 50Hz).
Asiguraţi-vă că este corect montată cupa de apă, în caz contrar, aparatul nu va funcţiona corect.
Un dezumidicator care funcţionează la subsol va avea un efect
redus sau nu va avea niciun efect de uscare a unui spaţiu de
depozitare închis adiacent cum ar un cabinet decât dacă aerul
circulă corespunzător în şi din spaţiul respectiv.
Evacuare
aer
Admisie
aer
minim
20 cm
minim 20 cm
minim 20 cm
minim
20 cm
minim
40 cm
Aşezarea aparatului
Nu folosiţi în exterior
Acest dezumidicator este destinat doar utilizărilor rezidenţiale
în interior. Acest dezumidicator nu se va utilza în scop
comercial sau industrial.
Aşezaţi dezumidicatorul pe o podea netedă şi nivelată, care
poate susţine aparatul cu cupa de apă plină.
Lăsaţi cel puţin 30 cm spaţiu pentru aer în toate direcţiile
aparatului pentru o bună circulaţie a aerului.
Aşezaţi aparatul într-o zonă în care temperatura nu va scădea
sub 5 gr C (410F). Rolele pot acoperite cu gheaţă
la o temperatură sub 5 gr C (410F), ceea ce poate
afecta funcţionarea.
Aşezaţi aparatul departe de uscătorul de haine,
încălzitor sau radiator.
Folosiţi aparatul pentru a împiedica umezeala să afecteze
cărţile sau lucrurile de valoare.
Folosiţi dezumidicatorul la subsol pentru a împiedica
prejudiciile cauzate de umezeală.
Dezumidicatorul trebuie să e utilizat într-un spaţiu închis
pentru a funcţiona la ecienţă maximă.
Închideţi toate uşile, ferestrele şi toate celelalte deschideri
exterioare din cameră.
Fig.4
Roțile (se instalează în cele patru puncte
de la baza aparatului)
Roțile se pot învârti doar în lateral.
Nu forțați să mutați aparatul peste covor și nici
cu rezervorul plin cu apă (aparatul se poate
răsturna și vărsa apa)
Notă: roțile sunt opționale, iar unele modele sunt fără roți.
Eliminarea apei colectate
Există două metode de eliminare a apei colectate
1. Utilizaţi cupa
Când cupa este plină, aparatul se va opri automat şi
va aşa „P2”, indicatorul luminos se va aprinde.
Scoateţi uşor cupa. Prindeţi mânerul cupei în siguranţă
şi scoateţi cu atenţie pentru a nu vărsa apa. Nu puneţi
cupa pe podea pentru că fundul cupei nu este plat.
În caz contrar, cupa va cădea, iar apa se va împrăştia.
Aruncaţi apa şi înlocuiţi cupa. Cupa trebuie să e xată
şi aşezată în siguranţă pentru ca dezumidicatorul
să funcţioneze.
Aparatul va reporni atunci când cupa este aşezată
în poziţia corectă.
NOTE:
Când scoateţi cupa, nu atingeţi părţile interioare ale
aparatului. Altfel aţi putea prejudicia produsul.
Asiguraţi-vă că împingeţi cupa uşor în aparat. Lovirea
cupei de ceva sau neîmpingerea sa în siguranţă poate
cauza disfuncţia aparatului.
2. Golire continuă
Fig.5
Fig.6
Fig.7
Fig.8
1. Trageţi cupa afară puţin.
2. Prindeţi mânerul cupei cu putere
şi trageţi afară din aparat.
3. Scurgeţi apa
Apa poate eliminată automat într-un canal din
podea prin conectarea aparatului la un furtun
de apă (neinclus) cu diametrul de 13.5 mm.
- Înlăturaţi dopul de cauciuc de la oriciul
furtunului de scurgere din spate și păstrați-l.
- Ataşaţi un furtun de scurgere şi asigurați-vă
că acesta este prins corespunzător astfel încât
să evitați scurgerile accidentale de apă.
- Direcţionaţi-l către o scurgere din podea sau
o facilitate de scurgere adecvată. Scurgerea
trebuie să se ae la un nivel mai jos față de
oriciul de scurgere de la aparat.
- Asigurați-vă că furtunul este așezat
corespunzător. Nu instalați furtunul
ca in gurile 9a și 9b.
NOTĂ: Când caracteristica de scurgere continuă
nu este utilizată, scoateţi furtunul de scurgere
din oriciu şi ataşaţi dopul de cauciuc aşa cum
se indică în Fig. 9 şi 10.
Scoateţi dopul
de cauciuc
Ataşaţi furtunul
la oriciul furtunului
de scurgere
UTILIZAREA APARATULUI
Fig.9a
Fig.9b
Păstrați furtunul întins și fără bucle.
Nu înodați furtunul.

8
9
Bandă
Cablu de alimentare
ÎNGRIJIRE ŞI ÎNTREŢINERE
Îngrijirea şi întreţinerea dezumidificatorului
Opriţi dezumidificatorul şi scoateţi din
priza de perete înainte de curăţare.
1. Curăţaţi grilajul şi cutia
Folosiţi apă şi un detergent n. Nu folosiţi decolorant
sau abrazive.
Nu vărsaţi apă direct pe unitatea principală. În caz
contrar, există risc de şoc electric, prejudiciere
a izolaţiei sau ruginire a aparatului.
Oriciul de admisie a aerului şi grilajele de evacuare
se murdăresc uşor, aşadar, folosiţi un ataşament
de aspirator sau o perie pentru a curăţa.
2. Curăţaţi cupa
La câteva săptămâni, curăţaţi cupa pentru a preveni
sporirea mucegaiului, a ciupercilor şi a bacteriilor.
Umpleţi parţial cupa cu apă curată şi adăugaţi puţin
detergent n. Agitaţi puţin cupa, scurgeţi şi spălaţi.
NOTĂ: Nu folosiţi o maşină de spălat vase pentru
a curăţa cupa. După curăţare, cupa trebuie aşezată
la loc şi xată în siguranţă pentru funcţionarea
dezumidicatorului.
3. Curăţaţi filtrul de aer
Filtrul de aer din spatele grilajului frontal trebuie
vericat şi curăţat cel puţin o dată la 30 de zile sau
mai mult dacă este necesar.
NOTĂ: NU CLĂTIŢI ŞI NU PUNEŢI FILTRUL ÎNTR-O
MAŞINĂ AUTOMATĂ DE SPĂLAT VASE.
4. Când nu folosiţi aparatul perioade de timp îndelungate
După ce opriţi aparatul, aşteptaţi o zi înainte de a goli rezervorul.
Curăţaţi unitatea principală, cupa şi ltrul de aer.
Răsuciţi cablul în exces pe cârligul cablului de alimentare (Vezi Fig. 12)
Acoperiţi aparatul cu o sacoşă din plastic
Aşezaţi aparatul vertical într-un loc uscat şi bine ventilat.
Fig. 9
Fig. 10
Fig. 11
Pentru a înlătura:
Ridicaţi grilajul de pe ltru apoi scoateţi-l aşa cum
se indică în Fig. 9 și Fig. 10.
Curăţaţi ltrul cu apă caldă cu săpun. Clătiţi şi lăsaţi
ltrul să se usuce înainte de a-l înlocui.
Nu curăţaţi ltrul într-o maşină de spălat vase.
Pentru a ataşa:
Introduceţi ltrul de aer în aparat de jos în sus.
Vezi Fig. 10.
ATENŢIE:
NU utilizaţi dezumidicatorul fără ltru pentru că mizeria
şi brele îl vor înfunda şi îi vor reduce performanţa.
Fig.12
DISFUNCŢII
Înainte de a apela la service, analizaţi mai întâi graficul de mai jos.
Problemă
Ce să se verice
Aparatul nu porneşte
Dezumidicatorul nu
usucă aerul cum ar trebui
Asiguraţi-vă că dezumidicatorul este conectat bine la priză
Vericaţi siguranţa/cutia întrerupătorului
Dezumidicatorul a atins nivelul presetat sau cupa este plină.
Rezervorul nu se aă în poziţia adecvată.
,
Nu acordaţi timp sucient pentru eliminarea umezelii
Asiguraţi-vă că nu sunt perdele, jaluzele sau mobilă care blochează
faţa sau spatele dezumidicatorului
Controlul umidităţii nu poate setat la un nivel sucient de scăzut
Vericaţi dacă toate uşile, geamurile şi alte deschideri sunt închise
în siguranţă
Temperatura camerei este prea scăzută, sub 50C (410F )
Există un încălzitor care funcţionează cu petrol lampant sau ceva
care elimină vapori de apă în cameră.
Aparatul scoate
un zgomot puternic
Filtrul de aer este înfundat.
Aparatul este înclinat în loc să stea drept cum ar trebui.
Suprafaţa podelei nu este plană.
Gheaţa îşi face apariţia
pe role
Acesta e un lucru normal. Dezumidicatorul
are funcţia de auto degivrare
Apă pe podea
Cablul către conector sau conectarea cablului poate slăbită.
Intenţia de a utiliza cupa pentru a colecta apa, însă furtunul de
scurgere anterior este înlăturat.
Indicatorul luminos de
funcționare clipește de
5 ori pe secundă.
Senzorul de temperatură sau umiditate dau eroare. Deconectați
aparatul de la priză.
 Loading...