


DEHUMIDIFIER
DE-GDNM16
DE-GDNM20
and service information.
For your convenience record the complete model number (located on the product identification plate )
loading tests . Normal use may draw significantly less power.
The following advice and instructions should be followed closely:
This will help you optimize the operation of your dehumidifier .
Failure to comply with these instructions may damage the unit and
Installation Instructions
Read and follow all the instruction even if you feel you are familiar with the product , and find a place
IMPORTANT INSTRUCTIONS
BEFORE FIRST USE
to keep it handy for future reference.
and the date you received the product , together with your purchase receipt and attach to the warranty
because it contains a cooling agent.
before use .
NOTE: The rating of this product ( as marked on the product identification plate ) is based on specific
Do not install and use your dehumidifier before completely reading these instruction .
1.�Your unit must always be used in anupright position
2.�After unpacking Your unit, place the unit upright to
allow the cooling agent to stabilize , and wait 2 hours
will invalidate the warranty .
1
authorized place for recycling of electrical and
3.This product must not be disposed together with the
domestic waste. This product has to be disposed at an
electronic appliances.
4.The appliance shall not be installed in the laundry.
5.the appliance shall be installed in accordance with national wiring regulations and must be
positioned so that the plug is accessible.
6.If the supply cord is damaged, it must be replaced by the manufacturer or its service agent or a
similarly qualified person in order to avoid a hazard.

2
IMPORTANT SAFEGUARDS
dropped or appears damaged in any way. Return the complete product to the place of purchase for
4. Never connect the unit to a defective socket.
inspection, repair or replacement.
7. Always keep it in an upright position to avoid any damage to the unit.
WARNINNG-to reduce the risk of fire , electrical shock or injury to persons or property :
3. Do not operate any product with a damaged cord or plug, or after the product malfunctions, or is
2. Close supervision is necessary when any product is used by or near children or invalids .Do
1. Always operate the product from a power source of the same voltage ,frequency and rating as
indicated on the product identification plate .
5. To avoid tripping the circuit, DO NOT USE AN EXTENSION CORD FOR THIS UNIT.
always be followed , including the following:
PRODUCT
8. Switch off and unplug from outlet when not in use or before cleaning.
down the unit while it is working.
13. The use of attachments or accessories not recommended or sold by the product distributor may
PLEASE READ AND SAVE THESE INSTRUCTIONS
When using any electrically powered , basic safety precaution should
PLEASE READ ALL INSTRUCTION CAREFULLY BEFORE USING THE
allow children to use it as a toy .
6. Make sure that the unit is correctly connected before turning on the unit's power. Never lay
9. To turn on your unit, always use the switch on the control panel.
10. Never unplug the dehumidifier while it is working, This could damage the electronic circuits.
11. Never place anything on top of the unit and do not cover it with any kind of cloth while it is
plugged in or in-use.
12. Do not place objects on the product or allow objects to obstruct the inlet or outlet openings, or
operate in close proximity to walls or curtains, etc.
cause personal or property hazards or injuries.
15. Allow at least 500mm(20inches) of air space on all sides of the unit for good air ventilation.
14. Keep the area around the warm air outlet sufficiently clean and make sure that it is not congested.
16. Do not place the power cord under a carpet.
17. Never install the unit in direct sunshine.
18. Prevent children from climbing on the unit.
19. This product is intended for normal domestic/household use only.
20. Repairs should only be carried out by competent service department.
21. The operating temperature range is 5℃~35℃.
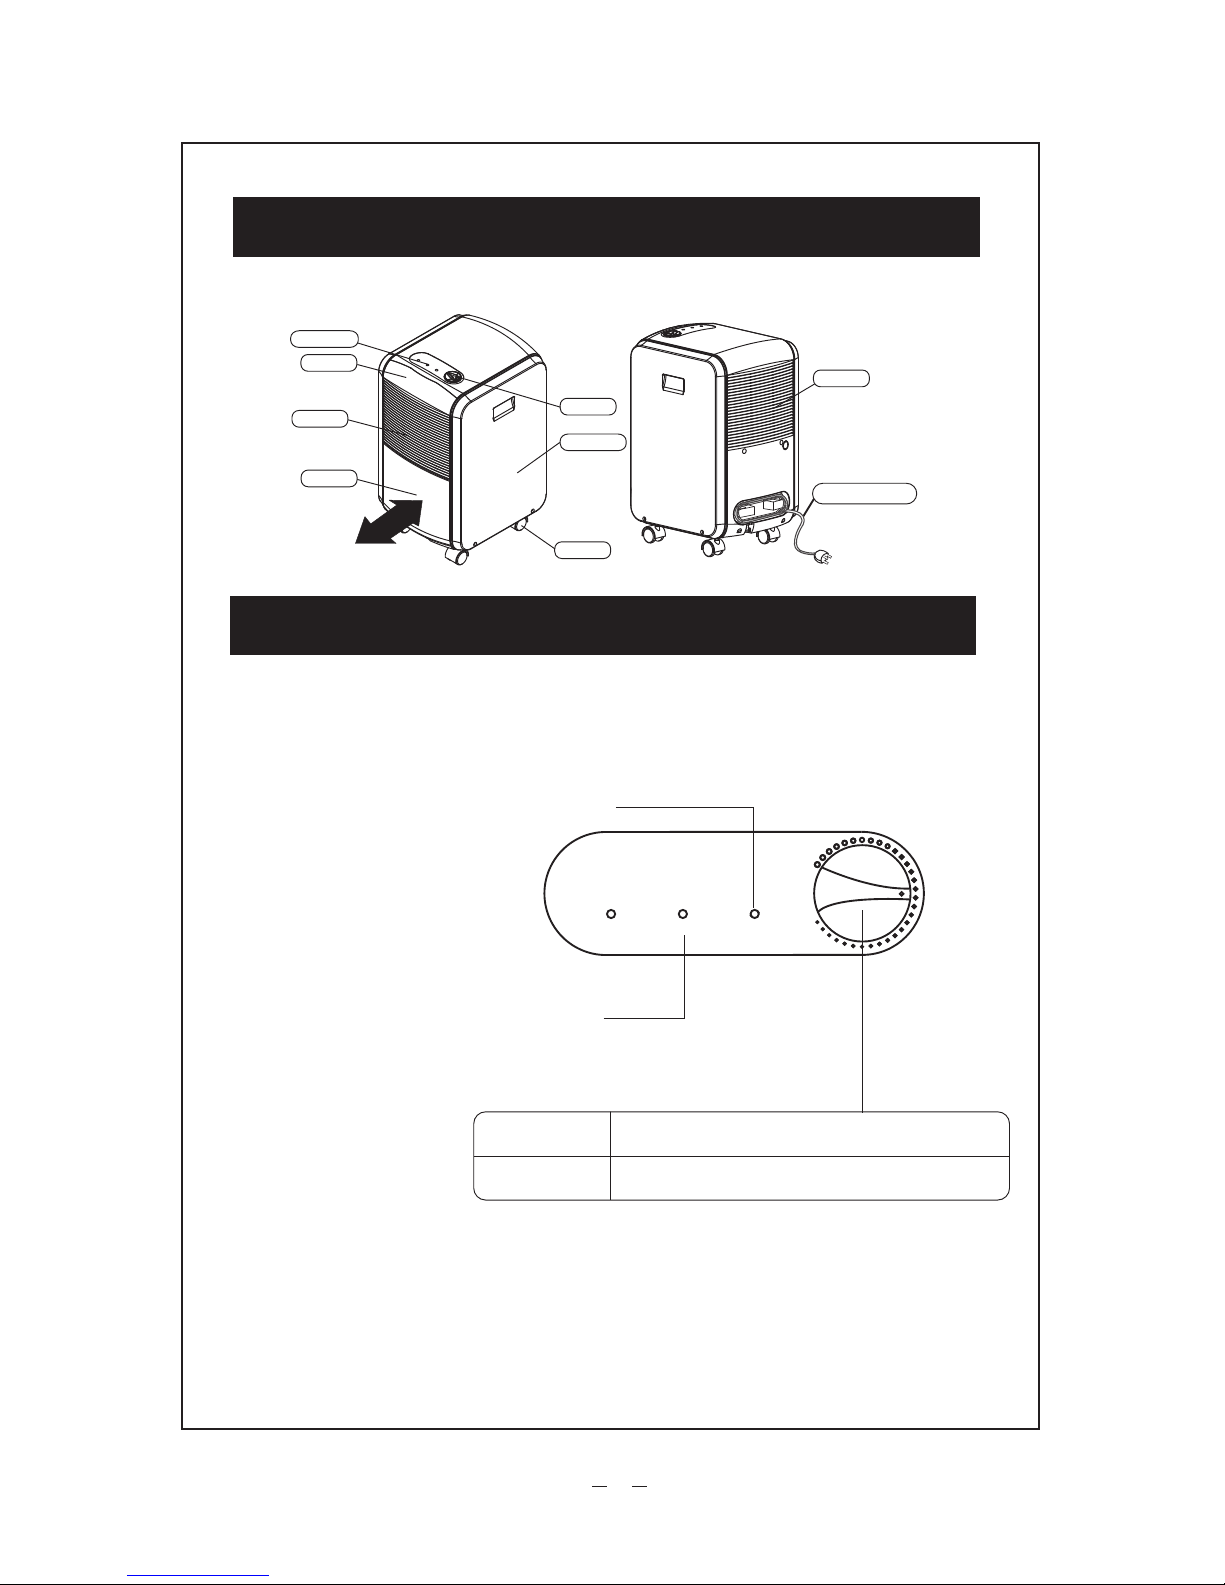
Knob
Water full indication
3
Defrost indicator
CONTROL PANEL
PRODUCT DESCRIPTION
Con
DEFROST
Running
FULL
Dehumidifier continuously running.
Continuous
Humidity control knob
Filter
Tank
Control pannel
Power supply cord
OFF
Switch off.
Castor
Side board
Air outlet
Off
Air inlet

4
This unit has 3-min lag due to the device for protecting circuit .In order to prolong the compressor's
If the ambient temperature is too low the unit will automa-
carefully remove the tank and empty the collected water.
To empty the unit, first unplug from power source then
The lamp will illuminate when the water container is full.
the bucket full lamp illuminates when the unit is first
1.�Ensure that the unit is connected to the power socket.
Defrost Lamp
tank with two hands
Start Operation
OPERATING INSTRUCTIONS
2.�Make sure the water tank is correctly positioned.(If
switched on, remove the tank and replace it .)
(NORMAL)or CONTINUOUS to work
3.�Turn the humidity control knob to the desired setting
clogged.
tically start to defrost and the light will illuminate. The
defrost lamp will also illuminate if the air filter becomes
4.�The unit will shut down when turned to OFF position.
Replace the bucket carefully before switching the unit on
again.
Full Bucket Lamp
Do not use the extension cord or the same socket with other electric appliance.
working life, the compressor will not start until the unit has run for 3 minutes.
Remove the water in the water

5
CONTINUOUS DRAINAGE
Correct Use When Drainage Hose Is Connected
uneven surfaces and do not 'kink' the hose.
When using continuous drainage, the PVC hose must be placed below the drainage hole. Avoid
The unit has a continuous drainage port. Using a commercial hose (with an inner diameter of
14mm), the water in the drainage tank can be continuously drained out of the continuous
port of the unit. When setting up the equipment for continuous drainage, always stop operation
Operation
Draining the water
Continuous drainage of water
2. Push the hose into the continuous drainage port.
Pass a commercial hose (with an inner diameter of 14mm) through
the continuous drainage port, and press it firmly into the drainage
port in the main unit, make surewater does not leak.The level height
of drain piping should always be not higher than the one of the drain-
age port, also drain piping should always be not plugged up,so the
1. Disconnect the drainage tank and open the continuous drainage port.
Use nippers or a similar tool to cut away the continuous drainage
port in the side of the main unit.
first and unplug the power supply plug.
condensed water can be drained out successfully.

Never use alcohol or any product containing solvents.
Clean the dehumidifier by using a damp sponge, and dry it with a clean, soft cloth.
6
MAINTENANCE
EXTERIOR SURFACES OF THE UNIT
Before cleaning the unit, turn it off and unplug it from the outlet.
AIR FILTERS
The air filters located inside the unit collect dust contained in the air. To keep the
dust from clogging the unit, your unit must always be used with its air filters.
Do not immerse unit in water.
cleaned every two weeks, and more often if the machine operates in a dusty atmosphere.
The build up of dust reduces the efficiency of the dehumidifier. Therefore, the air filters must be
warm water(never use hot or soapy water). Make sure that the air filters are completely
If the filters are obstructed, the dehumidifier will be less efficient.
Clean the filters with a vacuum cleaner. If the filters are very dirty, you can wash them in
upward and forward until it is free of the body of the unit.
To remove the filter, as the arrow shown.
dry before putting then back on the unit.
Do not bend the filters.
Air filter

7
LONG TERM STORAGE
At the end of the season. or when you do not plan to use the unit for an extended period of time,
we recommend that you take the following steps.
Remove water from the water bucket. If continuous drainage hose is connected, disconnect it.
Disconnect the unit and wrap the power cord and plug.
Clean the unit and store it, protecting it from dust.
SPECIFICATIONS
Store the unit in an upright position. Keep it in a cool, dry place and away from sunshine.
Rated Frequency
Rated Power
M
oisture Removal
Operating Temperature
Weight
220-240V~
50HZ
400W
16L/D at 30 Rh80‰
13.5Kg
Tank capacity
Rated Voltage
Model
5 -35
6.5L(Automatic stop at about 5.5L)
20 L/D at 30 Rh80‰
450W
13.5Kg
DE-GDNM16
DE-GDNM20

8
Removing breakdowns
If a condition listed below occurs,please check the following items to
help you to save your time and cost.
od ot tahW
esuaC
noitidnoC
moor eht fo erutarepmet eht sI
knat ehT(?gniknilb p
mal" " eht sI
otni droc ylppus rewop eht gulP
nee
b droc
ylppus rewo
p eht
saH
etarepo
noitarepo esac ni detrats eb ton nac tinu
eganiard eht ni retaw eht dracsiD
ton seod tin
u ehT
?d
etcennocsid
.teltuo eht
.knat eht noitisoper neht dna, knat
.
C 2wo
leb roæC 83evoba
eht dna detautca si ecived noitcetorp ehT
.)reifidimuhed eht esu ton od esaelp,esac
taht ni(tnemnorivne dab eht rednu si
.noitisop gnorw a ni ro lluf si
gniyfidimuhed ehT
ton nac nwodkaerb eht tub desu si pets gnidnopserroc dna derrucco sah noitidnoc evoba eht retfA
?deggolc retlif ria eht sI
?ydaetsnu ro detlit si ti os
.trop
ekatni ro trop egrahcsid
."reifidimuhed eht rof gniraC"
.sretnec ecivres dezirohtua eht tcatnoc esaelp, srucco nwodkaerb rehto ro devomer eb
detcurtsni sa retlif ria eht naelC
?detcurtsbo
degrahcsid si ria oN
ton seod noitcnuf .kro
w
."reifidimuhed eht rof gniraC" rednu
trop egrahcsid ro trop ekatni ria sI
eht gnitcurtsbo si revetahw evome
R
?deggolc retlif ria eht sI
.noitacol ydruts,elbats a ni tinu eht esU
rednu detcurtsni retlif ria eht naelC
y
sion si noitarepO
."reifidimuhed eht rof gniraC"
?deggolc retlif ria eht sI
dellatsni ylroop neeb tinu eht sa
H
tinu eht rednu noihsuc a tuP :tpmorP
.esion noitarepo ecuder ot pleh dn
a
re
dnu detcurtsni sa retlif ria eht naelC
MAINTENANCE

9
MAINTENANCE
�Removing breakdowns
motpmys
sesaercni ylneddus esion noitarepo ehT
?maets stime hcihW ,evots enesorek a sa hcus
moor eht ni ecived a ereht sI?yltneuqerf desolc dna denepo
.detavitca si
,yltpurba sesir regnahcxe daeh eht fo erutarepmet eht esuaceB
eht fo ytidimuh ro/ dna erutarepmet eht fi snepp
ah sih
T
?tinu eht rof gib oot moor eht sI srood ro swodniw erA
rosserpmoc eht nehw sesaercni esion noitarepo ehT
nosaeR
degrahcsid
e
ht ,desu tsrif si tinu
eht nehW
,ecalp sekat gniyfidimuhed elttil yreV
pord ton od ytidimuh
e
hT
.esu
gnirud
.ecalp sekat enon ro
.ytsum sllems ria
.wol si moor
The following symptoms do not indicate a breakdown.
seohce tinu ehT
ta detcudnoc tset gniyfidimuhed eht morf tfel retaw si sihT
.knat eganiard eht ni tfel sniats emos era erehT
noitarepo eht ro detrats si noitarepo nehW
noitalucric litnu dnuos emos ekat yam tnaregirfer ehT
llams a ni ro gniroolf doow htiw moor a ni desu si tinu eht fI
.tinu niam ni
draeh si esion lausunu na ,degnahc si edom
.ohce yam ti ,moor
.sezilibats
.melborp a etacidni ton seod ti ,yrotcaf eht
rosserpmoc eht dna gninnur si naf ehT
eht ,spots tinu eht retfa setunim 3 nihtiw detrats si tinu eht fI
. krow ton seod
.spots rosserpmoc eht dna detavitca si noitarepo gnitsorfed
citamotua eht ro ;setunim 3 fo yaled a retfa yllacitamotua
detrats si rosserpmoc eht taht os ,detautca si ecived noitcetorp

1. From the front of machine, hold the side frame of the
10
Installation and Maintenance of Healthy Filter
Installation Instruction:
Air filter
(b)
(c)
(d)
(a)
2. Press the two clamps on the upper of the filter frame
at the same time. Pull it upwards to remove the filter
filter and pull it upwards to remove the filter.
(See Fig. a on right)
frame. (See Fig. b on right)
3. Place the healthy filter flatly on the filter.
(See Fig. c on right)
4. Mount the filter frame. Firstly mount the two lower
clampsand then press and mount the upper clamps
properly. (See Fig. d on right)
5. Mount the filter back to machine.
while active carbon, photocatalyst, low temperature conversion (LTC) catalyst, formaldehyde
eliminator, catechin or mite killing filter can, but can't with brush or hard things.Dry it in the
tallation instruction. Pay special attention to that silver ion filter can't be cleaned with water,
Take out the healthy filter before cleaning and reinstall it after cleaning according to the ins-
Cleaning and Maintenance:
shade or sun after cleaning, but not by wiping.
The healthy filter commonly has its usage lifetime for one year under normal condition.
As for silver ion filter, it is invalid when its surface becomes black (green).
Service Life:
Clamps

66129907364
 Loading...