

Page 1
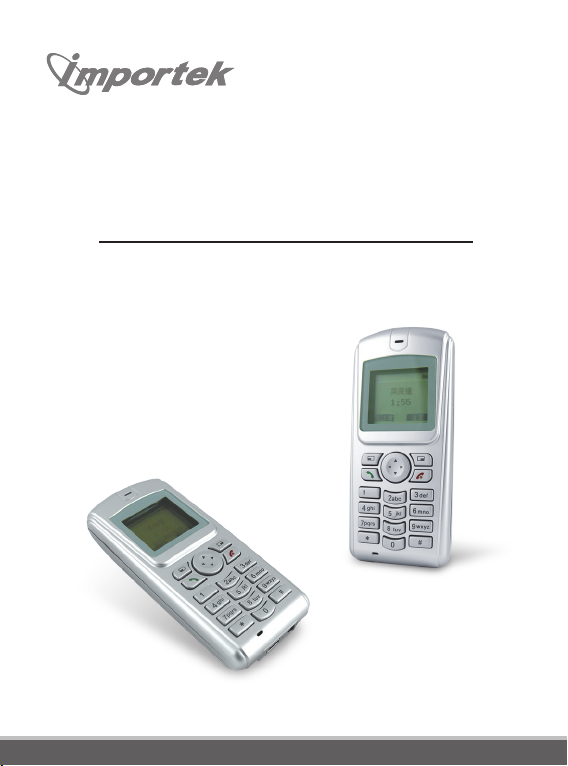
ZEUS Wi-Fi SIP Phone
User Manual
Version 1.1
Page 2

Table of Contents
1. Overview 4
1.1 Prerequisites 4
1.2 Function Description 5
1.3 Wi-Fi SIP Phone Specification 7
1.4 Power On and Off 7
1.5 Charge the battery 7
1.6 Install and Remove Battery 8
1.7 Main Screeen 9
1.8 Edit text 9
1.9 Make a phone call 10
1.10 Answer a call 10
1.11 Keypad lock 10
1.12 Speed Numbers 10
1.13 Multiple Call 10
2. Menu 11
3. Phonebook 13
3.1 Browse the Phonebook 13
3.2 Create a new record 13
4. Net Settings 14
5. Setup 15
5.1 Phone Settings 15
5.1.1 Change 16
5.1.2 Save as 18
5.1.3 Recall from 18
Page 3

1
Inventec Multimedia & Telecom Corp
.
Table of Contents
5.1.4 Rename saved 18
5.2 Profile Settings 18
5.2.1 Change 19
5.2.2 Save as 20
5.2.3 Recall from 20
5.2.4 Rename saved 20
5.2.5 Profile Info 20
5.2.6 Erase settings 20
5.3 Date/Time 20
5.4 Remote Access 20
6. Status 22
7. Call 23
7.1 Phone Book 23
7.2 Call Log 23
7.3 Speed Numbers 24
8. Play 25
8.1 Record/Play 25
8.2 Play melody 25
8.3 Play keytones 26
8.4 System tones 26
9. Utilities 27
10. Troubleshooting 28
1
Overview
ZEUS positions as a Wi-Fi SIP Phone. It is intelligent comm unication device, adds Voiceover-IP comm unications with wireless installations, allowing simultaneous voice and data
support on the sam e wireless back bone. It makes standard voice telephone calls when in
range of and configured for an appropriate 80 2.11g access point. The Wi-Fi Phone has the
same form factor, butto ns and screens as a cell phone. Operation is almo st identical to a
cell phone as well. The Major difference is in coverage. The Wi-Fi Phone works only where
802.11g coverage is available.
1.1
Prerequisites
You w ill n eed to ar range with a VoI P ser vice provid er fo r VoIP (voic e over int ernet
protocol) service.
Your VoIP service provider must provide you with the following information:
●
Your phone number, consisting of decimal digits.
●
SIP server address, in dotted decimal notation only.
●
SIP server port if different than the industry standard port 5060.
●
SIP proxy address, (frequently the same as SIP server address).
●
SIP proxy port if different than the industry standard port 5060.
●
Proxy user name and password (if used).
●
STUN server address, if required for NAT traversal.
●
STUN server port, if different than the industry standard port 3478.
●
Whether g711 or g729 codecs are supported. Usually, g711 codec is always supported.
You will need to arrange for 802.11g network connectivity.
For use of an open network as a guest (e.g. commonly available at coffee shops, motels,
etc.) you will need to know only the SSID (name) of the access point(s), although even this
information is frequently obvious from discovery (see Menu / Net Settings). NOTE that the
handset does NOT sup port n etworks that requ ire logg ing in or pa ying via a we b page,
because the handset does not display web pages.
You may possibly need to give your network administrator the following information:
The MAC address of your Wi-Fi SIP Phone.
This consists of 6 pairs of letters and/or digits, with the pairs separated by colons. It can
be found from the status menu item.
Page 4
2
3
Inventec Multimedia & Telecom Corp
.
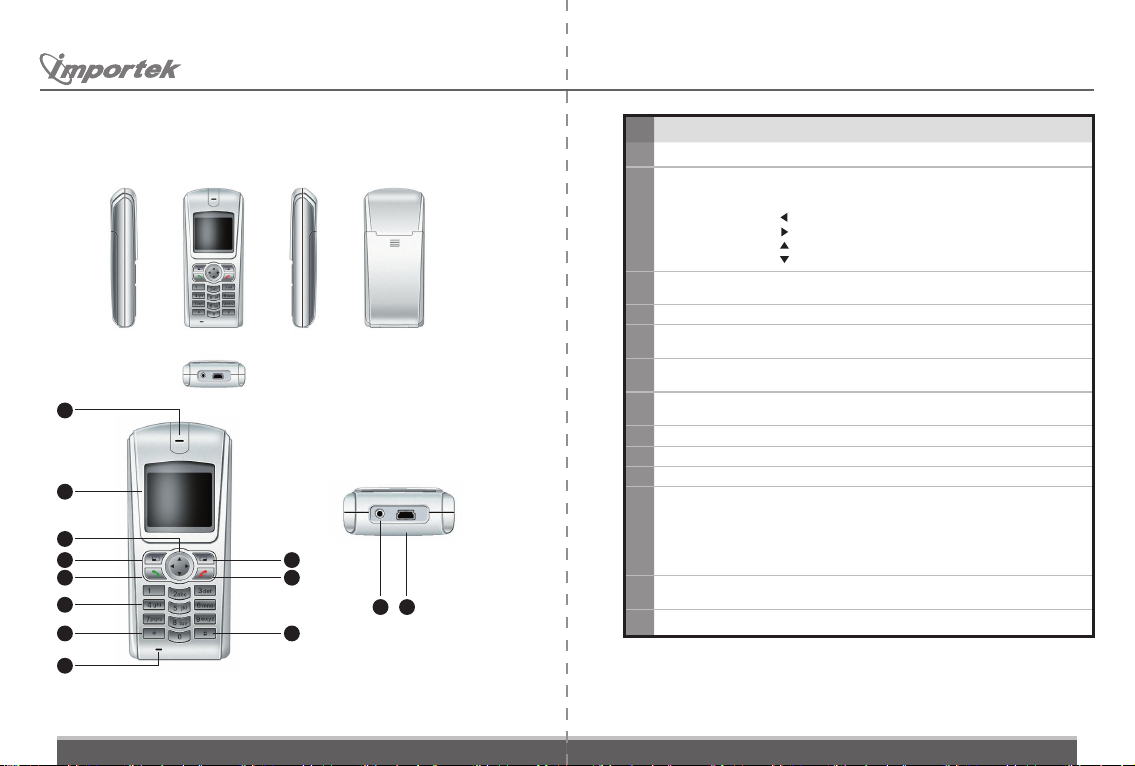
1.2
Function Description
13
1
2
3
4
5
6
8
12
11
10 9
7
- Figure 1.1 ZEUS Wi-Fi SIP Phone -
No. Name Description
1 LCD Display
2 Navigator button
Navigate from one function to another.
Can be used also in :
3 Left soft key
Used to perform functions indicated on the screen above it
4 Talk key
5 0-9
Used to enter numbers and text
6 *
Used to enter “.” , ”@” , ”:”
7 #
Used to select among number, upper or lower case character
8 Microphone
9 Mini-USB port
10 Head phone jack
11 Power key / End key
off phone
End key: used to end of reject a call.
The END key may be briefly depressed at any time to return to
the main window.
Pressing END at the main window will terminate active call if any.
12 Right soft key
Used to perform functions indicated on the screen above it
13 Receiver
Display screen
This key is used to scroll up and down through menu lists.
Phone book
Menu
Adjust speaker volume
Adjust speaker volume
Function operating key:
Used to answer a call or dial a number
Number key:
Asterisk Key:
Pound key:
Talk on phone
Connect to power adapter to charge battery
Connect to ear phone
Power on / power off: Press and hold for 3 seconds to switch
Function operating key:
Listen
- Table 1.1: function description -
Page 5
4
5
Inventec Multimedia & Telecom Corp
.
1.3
Wi-Fi SIP Phone Specication
Spec
Item Description
Flash: 8MB
Memory
LCD Display
Display Size: 1.8 inch With Backlight
Buttons
soft select keys
Ports
Battery
Notification
Dimensions
Weight
Accessories
User Manual USB Cable
Quick Start Guide Li-Ion Rechargeable Battery
SRAM:2MB
LCD Type: Monochrome
1-9, 0, star and pound keys, plus talk, end, navigator key and left and right
Mini-USB port, Head Phone Jack 2.5
Rechargeable, Removable Li-Ion Battery (3.6V, 600mAh)
Ringer / Vibration
107.8 (L) x 47 (W ) x 20.6 (H) mm
81g
Power adapter without cable (USB interface) (Input AC 110-240V/ Output DC 5V)
- Table 1.2: Specification -
1.4
Power On and Off
To power on, pres s the Power ke y for several seconds or until a d isplay a ppears o n the
screen. To power down, press the Power k ey for several seconds until the display announce s
powering down.
In event of a malfunction (e.g. hands et freezes wi th menu di splayed), pressin g the Power
key for several seconds to power off and then releasing and pressing the Power key for several
seconds to power on should fix the problem. If that sh ould fail, removing and replacing the
battery will work. However, the current date and time are lost whenever the battery is removed
or is drained dry.
1.5
Charge the battery
When the battery power is low and needs to recharging, the phone will show “Battery
Low” informat ion. Rem inding you that the battery is running low and the p hone will be
switched off automatically. To c harge the battery, p lease conn ect the power adapter to
Mini-USB port.
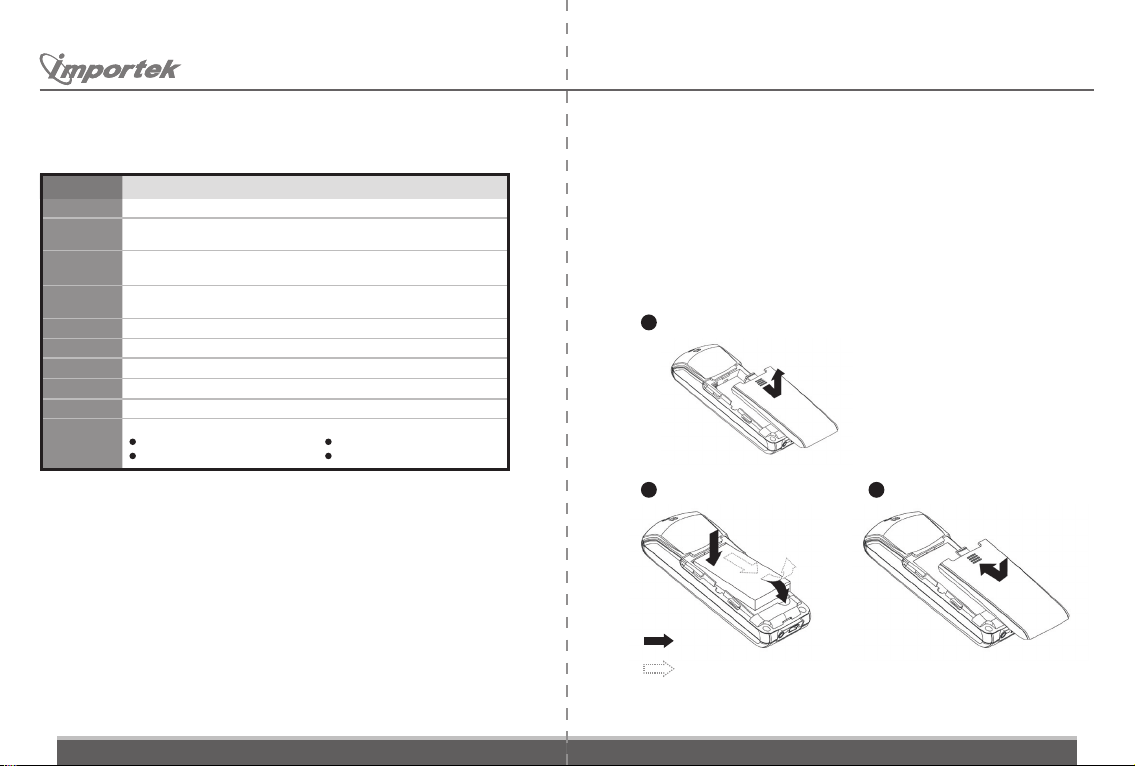
1.6
Install and Remove Battery
Please switch the phone off before inserting or removing the battery.
1
Turn to the back of the phone.
Pull the battery cover.
Insert or remove the battery. Push the battery cover.
2 3
1
1
2
2
Insert
Remove
Page 6
6
7
Inventec Multimedia & Telecom Corp
.
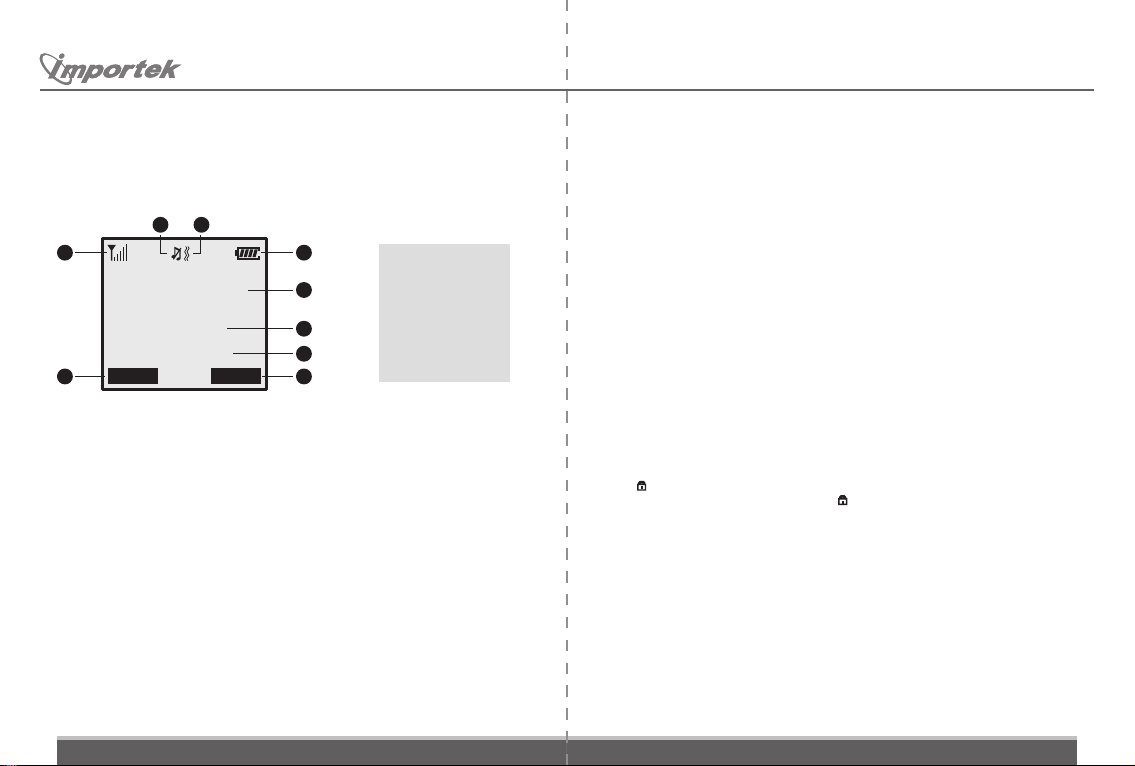
1.7
Main Screen
After powering on, the phone enters standby mode, with the main screen displayed,
as shown in Figure 1.2
9 8
7
Importek
Menu PhBook
6
16:40
6/21/2007
- Figure 1.2 Main Screen -
1
2
3
4
5
1. Battery icon
2. Greeting
3. Time
4. Date
5. Right soft key tab
6. Left soft key tab
7. Signal strength icon
8. Vibration icon
9. Mute icon
1.8
Edit text
●
Press pound key(#) to switch between upper case character, lower case character and
numeric mode with the icon “ABC” , “Abc”, “abc”, “123” shown at the middle of the bottom of
LCD screen respective.
●
Press Asterisk Key(*) to enter “.” , “@” , “/”
●
Press ▲ or ▼ to move the cursor.
●
Press Right soft key to clear the number/character that the cursor points to.
●
Press End key to abort the editing.
1.9
Make a phone call
●
You can enter phone number then press Talk key to make a phone call.
●
You can search the Phone book by name to get the phone number and make a call.
●
You can find the phone number from the Call History to make a phone call.
●
You can press Speed Numbers to make a call.
1.10
Answer a call
To answer a call, press Talk key or “Answer” key. When talking, you can use ▲ or ▼ to adjust
the speaker volume.
To reject a call, press End key or “No” key.
1.11
Keypad lock
Press Right soft key then # ( Pound key) to lock/unlock the keypad.
The lock icon indicates the phone is now locked.
Press Right soft key then # until the lock disappear to unlock the phone.
1.12
Speed Numbers
Up to 9 phone book entries may be associated with digit keys 1 through 9 to allow calling of
phone numbers with the entry of just a single digit.
Please see section 7.3 to setup the speed numbers.
In the main screen, press digit keys 1 through 9 then press Talk key for making a call.
Page 7

8
9
Inventec Multimedia & Telecom Corp
.
1.13
Multiple Call
The Wi- Fi SIP Phone ca n handle a m aximum o f two simultaneou s calls. A call can be
placed on hold, and an incoming call taken or another outgoing call made. It is possible to
switch between the two calls.
While active call, press Right soft key for Hold or unhold, press Left soft key for Call Options.
1. Speaker On/Off 2.Hold / unhold 3.Mute / unmute
4. New call 5.Phone Book 6.Main Menu
2
Menu
In the standby mode, Figure 2.1 shows the main screen.
Press the Left soft key to select the Main menu.
Press the Right soft key to select the Phonebook.
Press Talk key to show the Call Log. See section 7.2 for more information.
Menu
Importek
16:40
6/21/2007
Menu PhBook
- Figure 2.1 Menu and Phonebook -
- Figure 2.1 Menu and Phonebook -
The main menu is displayed , as shown in Figure 2.2. You can select ▲ or ▼ to scroll through
its submenu list and press Left soft key to select submenu.
Net Settings
Setup
Status
Call
Play
Utilities
Page 8

10
11
Inventec Multimedia & Telecom Corp
.
3
Phonebook
This chapter provides information about accessing the Phonebook menu and usi ng its
features.
Figure 3.1 shows the architecture of the Phonebook menu.
The Wi -Fi SIP Phone su pports u p to 100 phone book entries, each of wh ich may have a
name and an optional customized ring tone. The phone book may be viewed sequentially,
or an entr y may be s earched for by name. Se lecting a phon e book entry (and location
choice for that entry, if more than one) allows calling without entry of phone number.
Phonebook
- Figure 3.1 Phonebook -
In Main screen, press Right soft key. The Phone Book menu is displayed, as shown in Figure 3.1
3.1
Browse the Phonebook
●
In the Phonebook menu, press ▲ or ▼ to scroll to Browse. Then press Left soft key to
select it.
●
Press ▲ or ▼ to scroll to the name you want to browse. Then press Left soft key to select
it.
●
Now you can edit phone numbers, modify special ring, edit name, or delete this entry
●
When viewing one record, you can call the number of that record by pressing the Talk
key then make a call.
Browse
Find/add name
3.2
Create a new record
●
In the Phonebook menu, press ▲ or ▼ to scroll to Find/add name. Then press Left soft
key to select it.
●
Now you can enter the user name and its phone number to the phonebook.
Page 9

12
13
Inventec Multimedia & Telecom Corp
.
4
Net Settings
In the main menu, press ▲ or ▼ to scroll to Net Settings. Then press Left soft key to selec t it
●
Enter this settings, it will do WLAN scan. Press ▲ or ▼ to scroll this menu for AP. Then
press Left soft key to select it.
●
Enter SSID, then press Left soft key for “Done”. Press Right soft key for “Clear”
●
Select Security Type (Open, WEP/Shared, WPA PSK/TKIP, WPA2 PSK/AES)
●
Select Key Method (Hex Key, Passphrase/Text)
●
Select WEP key index (Using the same index value as the settings in the Access Point)
●
IP Setup
Use DHCP (IP address, Netmask, Gateway and DNS address will be assigned by AP)
Use Static IP (manually input data)
IP Address
Netmask
Gateway
DNS
●
Enter phone number
●
SIP server
SIP Server Address
SIP Server Port : ( default: 5060)
●
SIP Proxy: If there is no given SIP Proxy, please input SIP Server instead of
Notice: If you input outbound proxy address and port here, STUN server address must set to empty.
SIP Proxy Address
SIP Proxy Port : ( default: 5060)
SIP Proxy User: username
SIP Proxy Password
●
STUN server
STUN Server Address
STUN Server port ( default: 3478)
●
High Compression : Using G729 ( Please ask your SIP service provider before swithcing
this function on.)
Off : ( default)
On
●
Save Profile Setting (save the date above as a profile)
5
Setup
This chapter provides information about accessing the Setup menu and using its features.
Figure 5.1 shows the architecture of the Setup menu.
In the main menu, press ▲ or ▼ to scroll to Setup. Then press Right soft key to select it.
Setup
Phone
Settings
- Figure 5.1 Setup -
5.1
Phone Settings
In th e setup menu, pres s ▲ or ▼ to scroll to Phone S ettings. Then press Left sof t key to
select it. In this settings, you may select “Change” , “Save as” , “Recall from” , “Rename saved”
Phone Settings
Change Rename savedRecall fromSave as
- Figure 5.2 Setup -
Remote AccessDate/TimeProfile Settings
Page 10

14
15
Inventec Multimedia & Telecom Corp
.
5.1.1
Change
In the Phone Settings menu, press ▲ or ▼ to scroll to Change. Then press Left soft key to
select it.
Change
Volume settings
Alert/Ring
Screen/Keys
Language
Telephone tones
Edit greeting
- Figure 5.3 Phone Settings -
5.1.1.1
Volume Settings
●
Speaker volume:
Press ▲ or ▼ to adjust the volume. Then press Left soft key while finish.
●
Ring volume:
Press ▲ or ▼ to adjust the volume. Then press Left soft key while finish.
●
Key click:
Press ▲ or ▼ to adjust the key click volume. Then press Left soft key while finish.
5.1.1.2
Alert/Ring
In the Phone Settings menu, press ▲ or ▼ to scroll to Change. Then press Left soft key to
select it.
●
Ring Vibration:
Vibrator can be turned on or off for incoming calls.
●
Ring tone:
You can select ring tone from “Standard ring”, “Ring melody ”, “Ring recording”
●
Ring test/volume:
Test the ring. Use ▲ or ▼ for ring volume.
5.1.1.3
Screen/Keys
●
Contrast:
Press ▲ or ▼ to adjust the contrast
●
Backlight:
Off / 4 seconds / 7 seconds / 10 seconds / On
●
Key repeat:
Off / Slow / Medium / Fast
●
Key click:
Press ▲ or ▼ to adjust the key click volume
5.1.1.4
Language
●
Traditional Chinese
●
Simplified Chinese
●
English
Page 11

16
17
Inventec Multimedia & Telecom Corp
.
5.1.1.5
Telephone tones
●
Default Tone
●
North America Tone 1
●
North America Tone 2
●
Middle Europe Tone
5.1.1.6
Edit greeting
You can input text.
For text entry, the keypad entry mode is shown just below the entry box. Pressing the sharp
(#) key will cycle between the entry modes. The entry modes are:
ABC
Capital letters and digits using 1-9; punctuation using star (*) key; space or 0 using 0 key.
The sharp (#) key switches to Abc mode.
Abc
Like ABC except only first letter (or first letter following space) is capitalized, with other
letters being lower case. The sharp (#) key switches to abc mode.
abc
Like ABC except only lower case letters. The sharp (#) key switches to 123 mode.
123
Keys 1-9 and 0 are digits only. The star (*) key produces certain punctuation
characters. The sharp (#) key switches to ABC mode.
5.1.2
Save as
In the Phone Settings menu, press ▲ or ▼ to scroll to Save as. Then press Left sof t key to
select it. You may save the current phone setting to the storage.
5.1.3
Recall from
Load the phone setting.
5.1.4
Rename saved
Rename the settings.
5.2
Prole Settings
In th e setup menu, pres s ▲ or ▼ to scroll to Profile S ettings. Then press Left sof t key to
select it.
Profile Settings
Change Rename savedRecall fromSave as
- Figure 5.4 Profile Settings -
Page 12

18
19
Inventec Multimedia & Telecom Corp
.
5.2.1
Change
●
Enter SSID, then press Right soft key for “Done”
●
Select Security Type (Open, WEP/Shared, WPA PSK/TKIP, WPA2 PSK/AES)
●
Select Key Method (Hex Key, Passphrase/Text)
●
Select WEP key index (Using the same index value as the settings in the Access Point)
●
IP Setup
Use DHCP (IP address, Netmask, Gateway and DNS address will be assigned by AP)
Use Static IP (manually input data)
IP Address
Netmask
Gateway
DNS
●
Enter phone number
●
SIP server
SIP Server Address
SIP Server Port : ( default: 5060)
●
SIP Proxy: If there is no given SIP Proxy, please input SIP Server instead of
Notice: If you input outbound proxy address and port here, STUN server address must set to empty.
●
SIP Proxy Address
SIP Proxy Port : ( default: 5060)
SIP Proxy User: username
SIP Proxy Password
●
STUN server
STUN Server Address
STUN Server port ( default: 3478)
●
High Compression : Using G729 ( Please ask your SIP service provider before swithcing
this function on.)
Off : ( default)
On
●
Save Profile Setting (save the date above as a profile)
5.2.2
Save as
You can save the current profile setting to the storage.
5.2.3
Recall from
Load the profile setting.
5.2.4
Rename saved
Rename the settings.
5.2.5
Prole Info
Select the profile to see the information.
5.2.6
Erase settings
Delete the profile.
Page 13

20
21
Inventec Multimedia & Telecom Corp
.
5.3
Date/Time
●
Auto set
You can enable or disable the function of synchronizing Wi-Fi SIP Phone’s time to SNTP
servers.
●
Set time
Press ▲ or ▼ to adjust the time
●
Set date
Press ▲ or ▼ to adjust the date
5.4
Remote Access
The Zeus provides the means to drive all of the Zeus menus via a web interface. This can
be useful for changes to the database, including phone book and configuration.
●
To use the web interface, you must first enable it.
Enabling the web interface makes your handset vulnerable to intruders. Do not enable
it if you have doubts about the security of your wireless surroundings, and do not enable it
for longer than necessary.
●
Next, find your current IP address via Menu Status
And scroll down to where your IP address is listed.
●
From your PC web browser, enter the following URL:
http://www.xxx.yyy.zzz/menu/menu.html
where www.xxx.yyy.zzz is the IP address from the Status screen.
6
Status
This ch apter provides phone informati on about accessing the Status menu and using its
features. In the main menu, p ress ▲ or ▼ to scroll to Status. Then press Left soft key to
select it.
●
VoIP status
●
IP status
●
WLan status
●
Signal strength
●
Storage free
●
Battery percent life
●
Charging information
●
Phone number
●
MAC address
●
Firmware version
●
IP Address
●
Netmask
●
Gateway
●
DNS
●
SIP server
●
Proxy server
●
STUN server
Page 14

22
23
Inventec Multimedia & Telecom Corp
.
7
Call
This chapter provides information about accessing the Call menu and using its features.
Figure 7.1 shows the architecture of the Call menu.
In the main menu, press ▲ or ▼ to scroll to Call. Then press Left soft key to selec t it.
Call
Phone Book Speed NumbersCall Log
- Figure 5.2 Setup -
7.1
Phone Book
Please see section 3.
7.2
Call Log
The call log remembers the last 40 calls received, missed or dialed. Information recorded
includes start time; c all type (missed, received, or dialed); name of other party (if known);
and phone number of othe r part y (if known). Th e call log may be viewed sequenti ally.
Selecting a call log entry allows calling the phone number, and copying of information to
the phone book.
●
In the call menu, press ▲ or ▼ to scroll to Call Log. Then press Left soft key to select it.
●
In the Call Log Menu, press ▲ or ▼ to scroll to each log. Press Right soft key for “Back”.
Press Left soft key for “Open”. Press Talk key for making a call.
7.3
Speed Numbers
Up to 9 p hone bo ok entr ies may be a ssociated with d igit ke ys 1 through 9 to allow
calling of phone numbers with the entry of just a single digit.
How to setup the speed dialing
●
Enter Phone Book
●
Browse and select the name in phone book
●
Enter “Phone numbers” setting
●
Select “General” , “Home” , “Cell” , “Work” or “Other”
●
Enter “Set speed dial” and select the location what you want to save
Page 15

24
25
Inventec Multimedia & Telecom Corp
.
8
Play
This chapter provides information about accessing the Play menu and using its features.
Figure 8.1 shows the architecture of the Play menu.
In the main menu, press ▲ or ▼ to scroll to Play. Then press Left soft key to select it.
Play
Record/Play Play keytonesPlay melody
- Figure 8.1 Play Menu -
8.1
Record/Play
The Wi-Fi SI P Phone suppo rts recording of voice mes sages. Messages ca n be recorded
and played back both off line and while connec ted t o ano ther party. I f conn ected to
another party or parties, the audio from the user and all o ther partie s is re corded when
recording, and both the us er and other parties will hear a ny messages pl ayed. (This does
not ap ply if th e other p arty is put on hold). While recording a phone conversation, other
parties will hear a timed warning tone.
System tines
8.2
Play melody
The Wi-Fi SIP Phone includes several built-in melodies that can be selected by the user
as ring tones, or played for amusement. The melodies are in midi format and can play basic
midi instruments.
8.3
Play keytones
This will play keytones. Press Right soft key for Back.
8.4
System tones
This will play System tones. Press Left soft key for next.
Page 16

26
27
Inventec Multimedia & Telecom Corp
.
9
Utilities
This chapter provid es info rmation about accessi ng the Util ities menu a nd usi ng its
features. Figure 9.1 shows the architecture of the Utilities menu.
In the main menu, press ▲ or ▼ to scroll to Utilities. Then press Left soft key to select it.
Utilities
Stop Watch CalendarCalculator
- Figure 9.1 Utilities Menu -
The Wi-Fi SIP Phone displays the time of day and date on the main display and saves this
information in the call log. You can use the phone as a stop watch; view monthly calendars;
and use a simple arithmetical calculator.
10
Troubleshooting
Symptom Solution
Cannot make call
The network
connection is lost
No Power
Recharging does
not work
Does not function
VoIP not ready
Confirm the called party phone number.
The called party phone number must be registered.
Ensure the following settings are the same as the Access Point.
(1.)The SSID is the same as the Access Point SSID
(2.)The WLAN Settings are the same as the Access Point
(3.)WEP used: Encoding is the same as the settings at the Access Point.
(4.)WPA used: Using the same PSK as the Access Point
Insufficient power in battery.
Please charge the battery.
Please replace the battery.
Power on or power off
Make sure the DHCP has been enabled or whether the phone has the
IP address:
DHCP enabled:
(1.)able to get IP address, subnet mask and default gateway?
(2.)Is the DHCP server function enabled at the Access Point?
DHCP disabled:
(1.) Are the IP addre ss, su bnet mas k, def ault gate way value s se t
correctly?
(2.)Is the DHCP server function disabled at the Access Point?
- Table 1.2: Specification -
Page 17

WARNING
Note: This equipment has been tested and found to comply with
the limits for a
Class B device, pursuant to Part 15 of FCC Rules. These limits
are designed to provide reasonable protection against
harmful interference in a residential installation. This equipment
generates, uses and can radiate radio frequency energy and,
if not installed and used in accordance with the instructions,
may cause harmful interference to radio communications
however, there is no guarantee that interference will not
occur in a particular installation. If this equipment does cause
harmful interference to radio or television reception, which
can be determined by turning the equipment off and on, the
user is encouraged to try to correct the interference by one or
more of the following measures:
˙Reorient or relocate the receiving antenna.
˙Increase the separation between the equipment and
receiver.
˙ Connect the equipment into an outlet on a circuit
different from that to which the receiver in connected.
˙ Consult the dealer or an experienced radio / TV
technician for technician for help.
Notice:
Changes or modifications not expressly approved by the
part responsible for compliance could void the user’s
authority to operate the equipment.
Operation is subject to the following two condition: (1) this
This device complies with Part 15 of the FCC Rules.
device may not cause Harmful interference, and (2) this device
must accept any interference Received, including interference
that may cause undesired operation.
 Loading...