

Page 1

WIRELESS EZCAM USER GUIDE
02/01/2005 IMT Confidential and Proprietary Page 1
Page 2

WIRELESS EZCAM USER GUIDE
1 BEFORE INSTALLATION
This is the brief installation and operation user guide for the Wireless EZCam. Please kindly make
sure your read this document through first before installing/using your device. Thank you.
1.1 Check Your Package Contents
Your package should include following items. If any of the below items are missing, please contact
your retailer. (Photos of EZ Cam and Accessories shall be added later.)
• Wireless EZCam with integrated AC Power Adapter
• Installation CD (Software, Quick Installation Guide)
• Light-bulb Adapter
• Power-center Wall-mountable Adapter
• Three Screws and One Plastic Bolt
• Three Robber Pads
1.2 Before Installation
Before you begin, please check the requirements below.
1.2.1 System Requirements
Minimum System Requirement:
• Wireless Access Point (802.11b/g compatible) with DHCP enabled
• PC with Ethernet or Wireless (802.11b/g compatible) capability
• PC with Windows XP or 2000 operation system
• PC with Xvid or DivX Codec installed (Please refer to the Section 2.2.1
1.2.2 Environment Requirements
To minimize any possible negative impact, please check your network environment:
• Make sure the WEP on your Wireless Access Point is DISABLED (you can turn the WEP on
later after installation)
for more information.)
• Suggest your wireless network has less Wireless Access Point to avoid unnecessary
interference
• Make sure your Firewall on your PC is OFF
02/01/2005 IMT Confidential and Proprietary Page 2
Page 3

WIRELESS EZCAM USER GUIDE
2 EZ CAM INSTALLATION PROCESS
Please make sure you follow the installation process step by step below to ensure the device and
application running properly.
2.1 EZ Cam Hardware Installation
There’s no need to do any hardware install before software installation. Please follow the below
software application installation first.
2.2 EZ Cam Software Application Installation
2.2.1 XviD or DivX Codec Installation
Please check your computer where you installed XviD or DivX codec or not. The XviD or DivX is a
must to display the video in EZ Cam Manager Program. If the XviD or DivX does not exist in your
system, you can download and install the XviD or DivX codec from below websites.
XviD: http://www.XviD.org/
DivX: http://www.DivX.com/
2.2.2 EZ Cam Manager Program Application Installation
Please install the EZ Cam Program from the CD-ROM under the folder “EZCam“(Yet to final devcide).
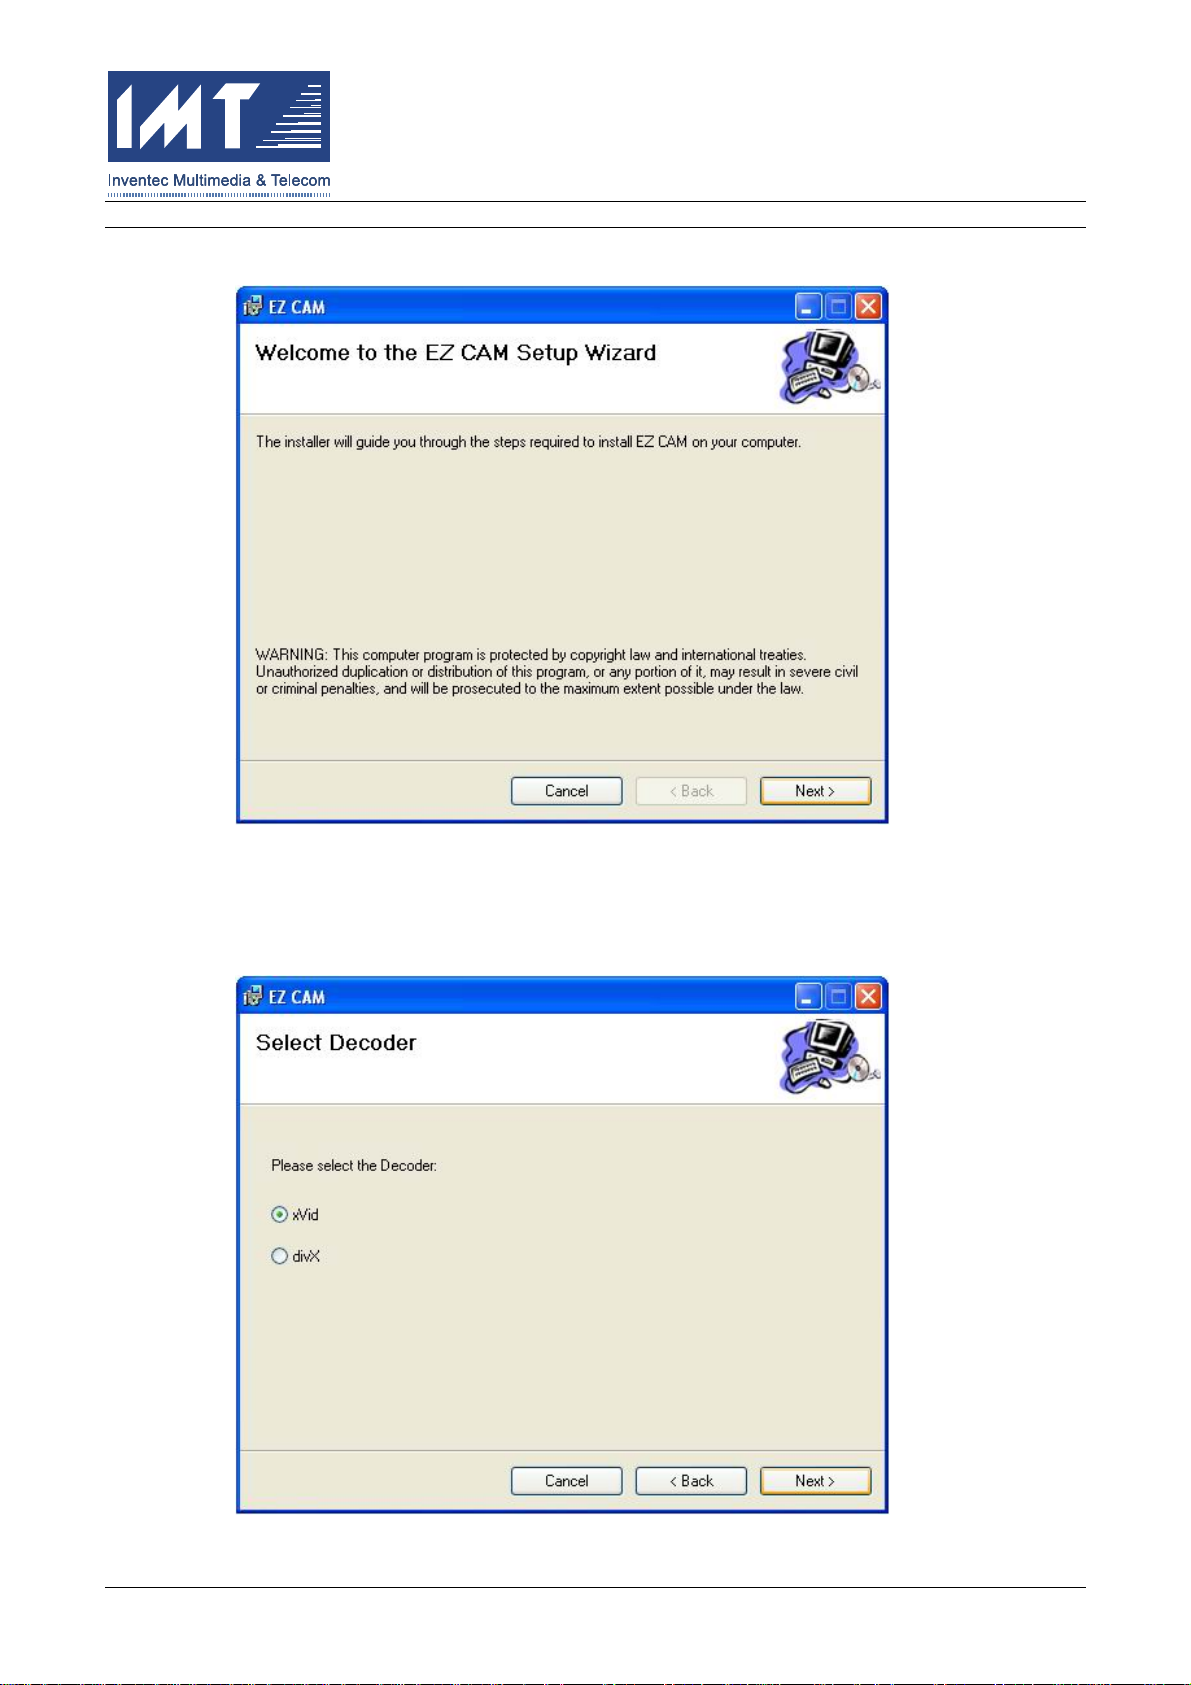
2.2.2.1 Initiate the Setup Wizard
Double click the SETUP.EXE from the CD-ROM to start the Setup Wizard.
The following dialog window will show up. Please confirm the installation process by press
“Next.” (Note: The display language may vary depends on your OS language version.)
02/01/2005 IMT Confidential and Proprietary Page 3
Page 4
WIRELESS EZCAM USER GUIDE
2.2.2.2 Select the Proper Decoder
Please select the proper decoder according (XviD or DivX) which installe d in your PC. And
then press “Next.”
02/01/2005 IMT Confidential and Proprietary Page 4
Page 5
WIRELESS EZCAM USER GUIDE
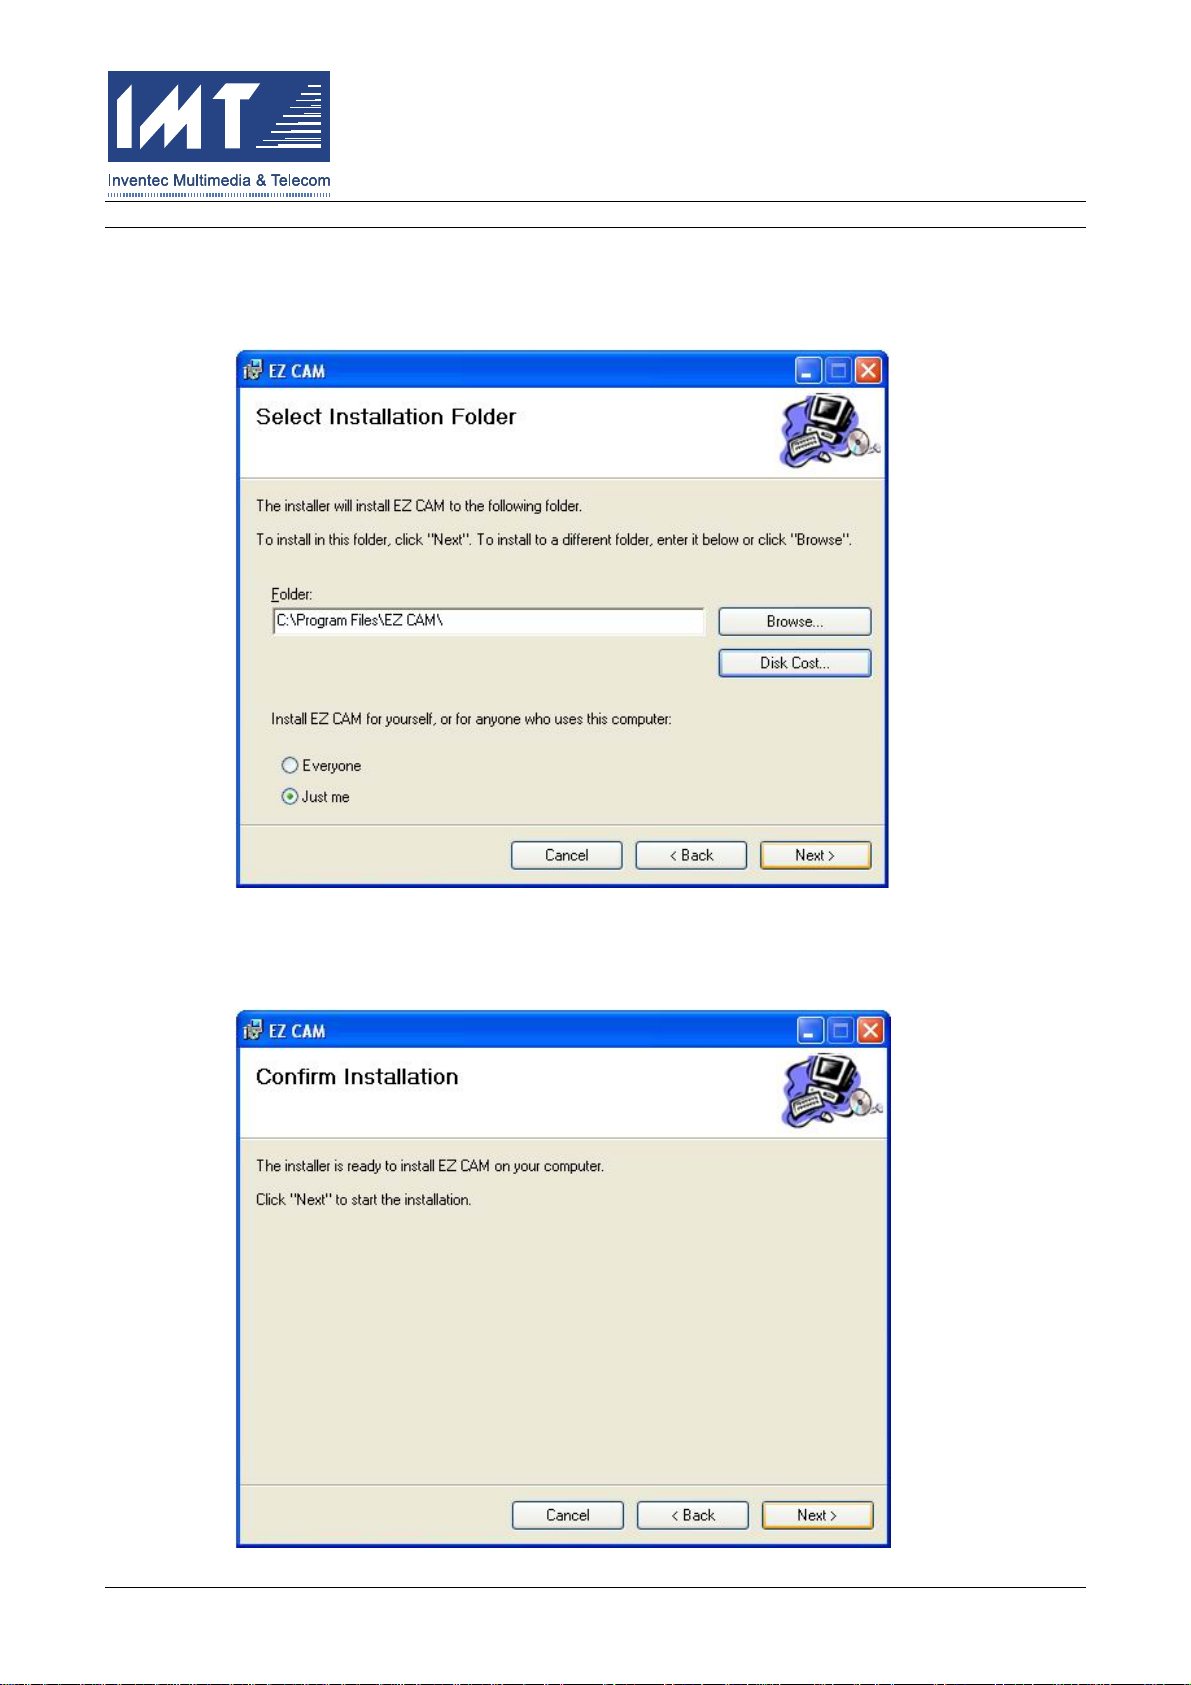
2.2.2.3 Select Installation Folder & Option
Please select the folder you would like the EZ Cam Manager program be installed. If you do
not have any preference, you can just keep the default value and press “Next.”
2.2.2.4 Confirm Installation
Please confirm the installation by pressing “Next.”
02/01/2005 IMT Confidential and Proprietary Page 5
Page 6
WIRELESS EZCAM USER GUIDE
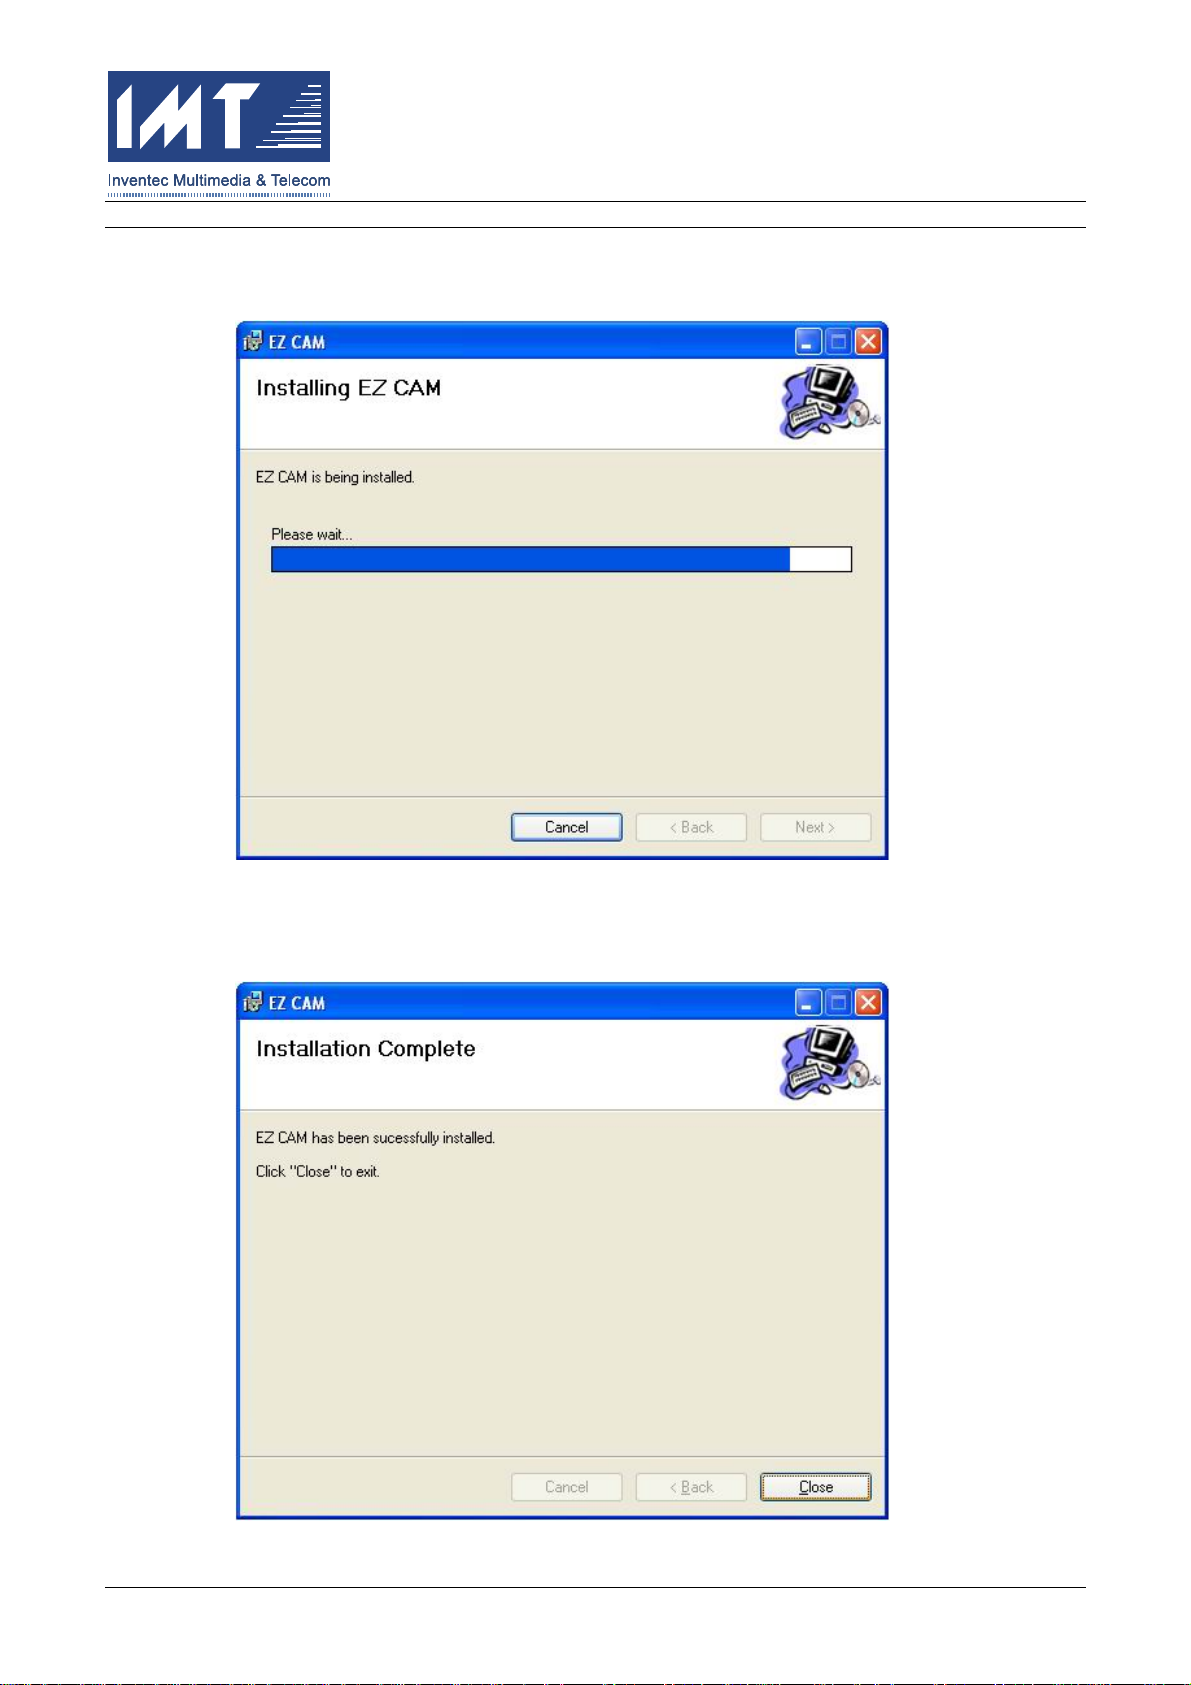
2.2.2.5 Installing EZ Cam
Please wait the installation process until the bar completed.
2.2.2.6 Installation Complete
After installation process completed, please press the “Close” button to close the Setup Wizard.
02/01/2005 IMT Confidential and Proprietary Page 6
Page 7

WIRELESS EZCAM USER GUIDE
Please follow each step shown in the install/setup program to finish installation. After you
followed the installation process, you will be able to run the EZ Cam program.
2.3 EZ Cam Device Installation
Before your EZ Cam device can be operated properly, you have to establish the connection between
your EZ Cam device and your EZ Cam software application on your PC by doing following steps.
2.3.1 Start EZ Cam Program
Click the EZ Cam icon on your desktop (as below) or from the Windows Start Menu to start EZ Cam
software application.
2.3.2 Add the new EZ Cam Device into Network
2.3.2.1 Initiate the “Setup New Camera” Process
Click the search button (with flashlight image) on the very right of the tool bar shown as below
to initiate the searching process.
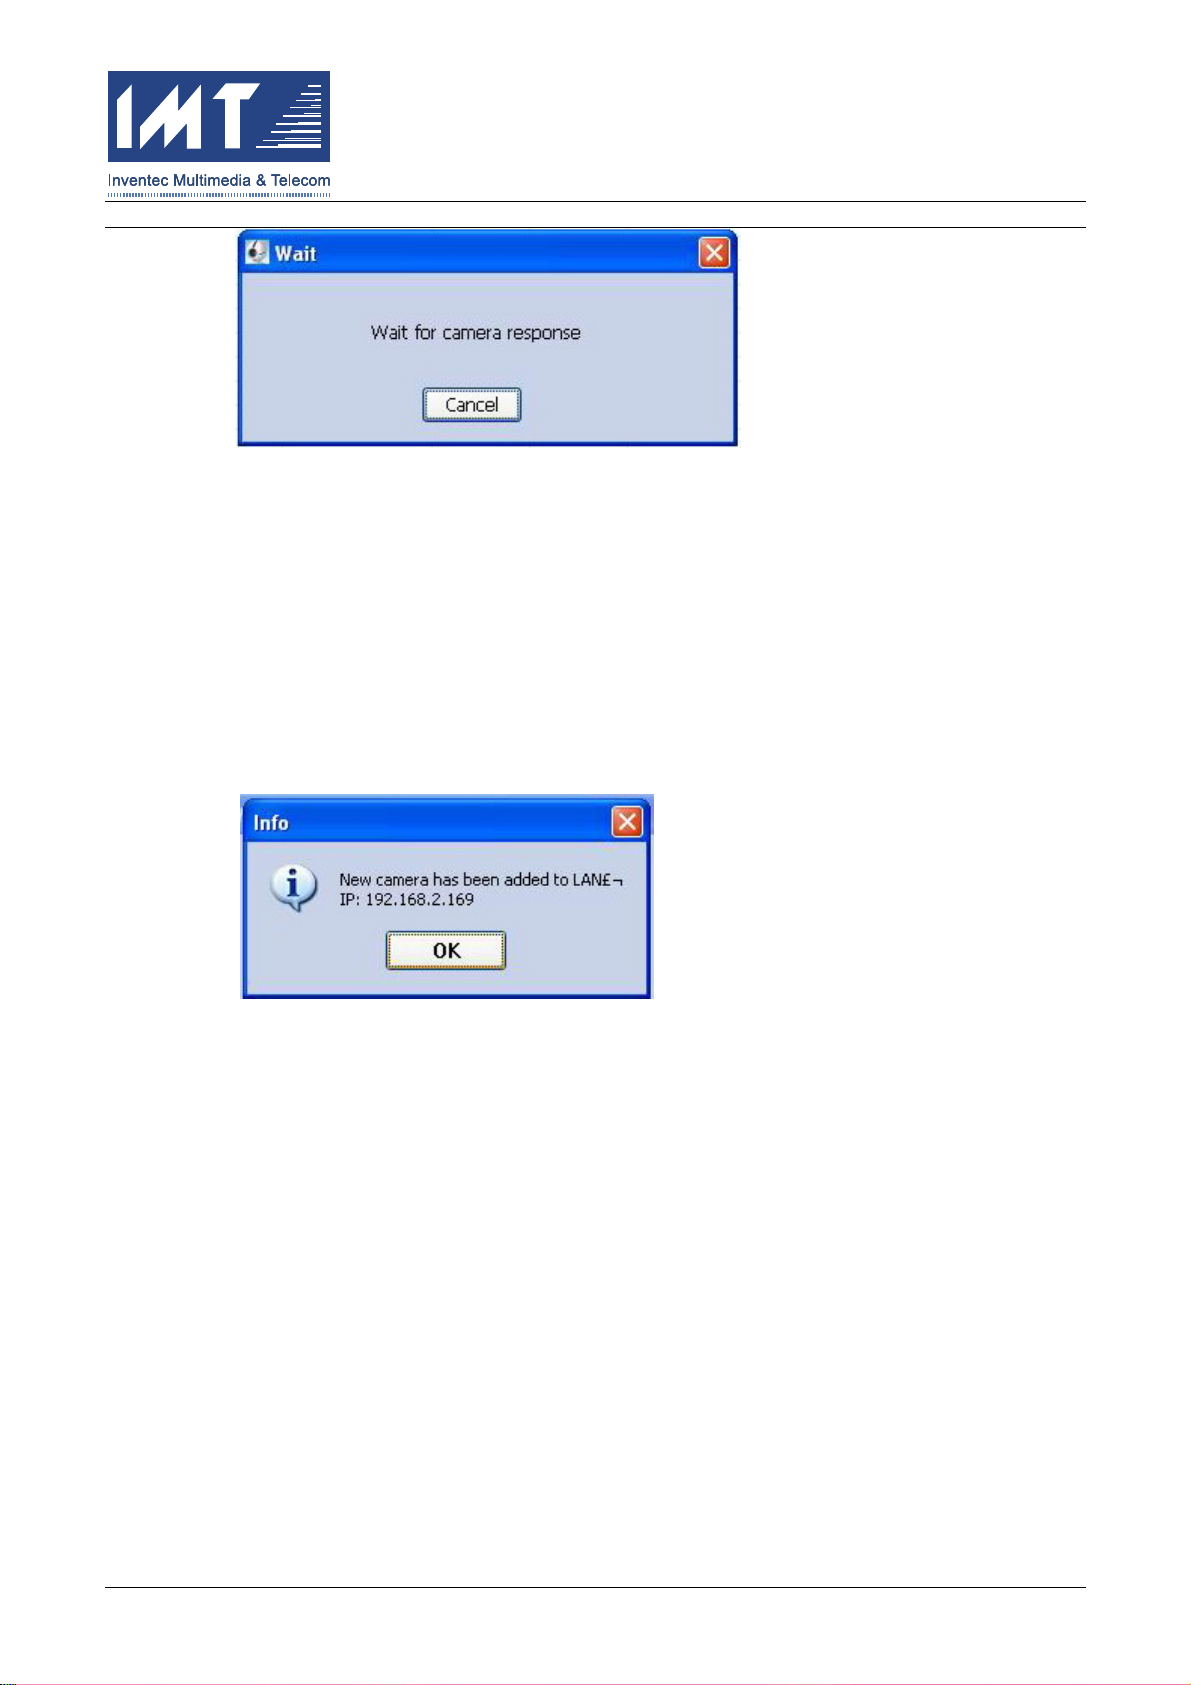
Then, the “Waiting” dialog window will pop out.
02/01/2005 IMT Confidential and Proprietary Page 7
Page 8
WIRELESS EZCAM USER GUIDE
Once the “Waiting” dialog window appeared, you shall be ready to power the EZ Cam device on
for the following setup. Strongly suggest DO NOT power on your EZ Cam device before the
above steps done.
2.3.2.2 Power on the EZ Cam Device
Power on your EZ Cam device by plugging the EZ Cam into the AC outlet. You can also plug
your EZ Cam through Light-bulb Adapter or Power-center Adapter. The EZ Cam will try to
communicate with your EZ Cam Manager Program automatically. In the process of initialization,
the Orange LED on the EZ Cam will constantly flash until the connection established. Once the
connection been established, the follow message will show up.
The above message indicates that a new EZ Cam was added in the local wireless network.
Press the “OK” button, and close the “Waiting” dialog window by press the “Cancel” button.
2.3.2.3 What If No Responding from Device
It is possible that there will be no response on your screen due to no communication settled. If
this does happen, please try to Power Off and Power On again for the EZ Cam Device.
2.3.3 Add existing EZ Cam Device to your EZ Cam Manager Program
After the your EZ Cam been connected into your wireless network, you have to add the EZ
Cam you just established by pressing the “Add Camera” button.
02/01/2005 IMT Confidential and Proprietary Page 8
Page 9

WIRELESS EZCAM USER GUIDE
Then, please click the “Search” button (or you can enter the IP Address manual.)
If you press the “Search” button, you shall be able to find a list of available EZ Cam as below.
02/01/2005 IMT Confidential and Proprietary Page 9
Page 10

WIRELESS EZCAM USER GUIDE
By this method, you can add as many as EZ Cam you found in your wireless network into this
program. Once the all your desired EZ Cam been added in your Camera List, you can close
the “Search Camera” dialog by hitting the “Cancel” button.
2.3.4 Ready to Operation
02/01/2005 IMT Confidential and Proprietary Page 10
Page 11

WIRELESS EZCAM USER GUIDE
Once you see the EZ Cam device list shown on your Camera List, you shall be able to connect
EZ Cam and see the actual video. For the operation guide, please refer to the following section.
Thanks.
02/01/2005 IMT Confidential and Proprietary Page 11
Page 12

WIRELESS EZCAM USER GUIDE
3 EZ CAM BASIC OPERATION GUIDE
For EZ Cam operation, please kindly refer to the below guides.
3.1 Connect to EZ Cam Device
To operate the EZ Cam, you have to initiate the connection between EZ Cam device and program
with default username and password.
By hitting the “Connect” (chain-like) icon on the toolbar, then the user login dialog will pop out. You
have to type in default Username and Password at the first time. Both the default username and
password are “admin.”
02/01/2005 IMT Confidential and Proprietary Page 12
Page 13

WIRELESS EZCAM USER GUIDE
For your own privacy, it is strongly suggested that you should change your password immediately.
Please refer to following section for changing Administrator Password and other property settings.
3.2 EZ Cam Property Setting
You can enter the property setting by press (screwdriver-like) icon. If you already connected to the
EZ Cam device as previous section indicated, then the program will prompt “Camera Property Setting”
dialog as below. If you are not connected or lost connection, please have your EZ Cam device
connected with the program first.
3.2.1 Property -- Camera Name & Administrator Password
After you see the “Camera Property Setting,” you shall be able to change the Camera Name
and Administrator Password. For your own privacy, it is strongly suggested that you should
change your administrator password immediately.
02/01/2005 IMT Confidential and Proprietary Page 13
Page 14

WIRELESS EZCAM USER GUIDE
In this page, you can also change the Camera Name and the description, if you like to.
3.2.1.1 Back to Factory Setting If Forgot Administrator Password
In case you forget the administrator password, you can backup the EZ Cam to default value by
using thin stick such as paper clip to press the switch (inside the hole shown below) for 5
seconds while EZ Cam is attached to AC Outlet (powered on.)
02/01/2005 IMT Confidential and Proprietary Page 14
Page 15

WIRELESS EZCAM USER GUIDE
3.2.2 Property -- IP Address Distribution
You can also modify the setting of the Wireless IP Address in the property setting. The default
setting for the wireless IP is “DHCP”; unless you have substantially knowledge of setting up
wireless network, it is strongly suggested to kept the default setting “DHCP.”
3.2.3 Property -- Add New User
If you like to have the ability for multiple users to access EZ Cam simultaneously, you then have
to add new User Name and User Password in the “User” page.
02/01/2005 IMT Confidential and Proprietary Page 15
Page 16

WIRELESS EZCAM USER GUIDE
Press the “Add” button, the “Add User” dialog will pop out. You can type in the desired User
Name and Password and then press “OK”.
02/01/2005 IMT Confidential and Proprietary Page 16
Page 17

WIRELESS EZCAM USER GUIDE
By this method, you can add up to 30 users for one EZ Cam device. (30-user is the EZ Cam
device limit; however, due to the network bandwidth, the amount of users allowed to connect to
single EZ Cam device may vary.)
3.2.4 Property -- Reset to Factory Default Setting
If there is a need to reset the EZ Cam device back to factory default setting, please press
Recover button, then click “OK”.
02/01/2005 IMT Confidential and Proprietary Page 17
Page 18

WIRELESS EZCAM USER GUIDE
3.2.5 Property -- EZ Cam Device Information
In the Information page, you can find the EZ Cam Hardware Version, Current IP Address, and
the MAC Address.
02/01/2005 IMT Confidential and Proprietary Page 18
Page 19

WIRELESS EZCAM USER GUIDE
3.2.6 Property -- Wireless Network Setting
If you need to connect to a specific Wireless Access Point, you can type in the SSID by yourself.
For your privacy concern, you can check on the “WEP Key” for wireless data encryption. If you
would like to use WEP, please make sure the WEP Key on your EZ Cam device should consist
with your Wireless Access Point.
3.2.7 Property
After you see the “Camera Property Setting,” you shall be able to change the Camera Name
and Administrator Password. For your own privacy, it is strongly suggested that you should
change your administrator password immediately.
02/01/2005 IMT Confidential and Proprietary Page 19
Page 20

WIRELESS EZCAM USER GUIDE
3.2.8 Property -- Record Setting
You have several ways to have your EZ Cam record video. You can setup a prescheduled time
for recording. You can also using Monitor/Surveillance function to trigger the recording event
while motion detected.
02/01/2005 IMT Confidential and Proprietary Page 20
Page 21

WIRELESS EZCAM USER GUIDE
If you get into the Motion Detection Sensitivity Level Setting, you can select the sensitive level
and recording timeframe for each triggered event.
02/01/2005 IMT Confidential and Proprietary Page 21
Page 22

WIRELESS EZCAM USER GUIDE
3.2.9 Property -- Video Quality Setting
In the Video Quality Setting page, you can setup the Lightness, Contrast, and Color Saturation.
Also, the Resolution and Frame Rate can be changed based on your need and your wirel ess
environment.
3.2.10 Property -- Date/Time Setting
In Date/Time page, it is suggested you change your EZ Cam to the correct date and time. The
default value in the EZ Cam device is January, 1
st
, 2005.
02/01/2005 IMT Confidential and Proprietary Page 22
Page 23

WIRELESS EZCAM USER GUIDE
3.3 Connect/Disconnect EZ Cam
By click the “Connect” (chain-like) button and type in the User Name and Password, you can then
connect to your desired EZ Cam. While connected, you can also click the “Disconnect” button
(broken-chain) to disconnect from your EZ Cam device.
02/01/2005 IMT Confidential and Proprietary Page 23
Page 24

WIRELESS EZCAM USER GUIDE
3.4 View EZ Cam Real-time Video
3.4.1 View Single EZ Cam
Select the connected EZ Cam and click the View Single EZ Cam button, you can see the EZ
Cam in full screen.
02/01/2005 IMT Confidential and Proprietary Page 24
Page 25

WIRELESS EZCAM USER GUIDE
3.4.2 View Four EZ Cams
02/01/2005 IMT Confidential and Proprietary Page 25
Page 26

WIRELESS EZCAM USER GUIDE
Select the connected EZ Cams and click the View Four EZ Cams button, you can see the four
EZ Cams showed. If the number of selected/connected EZ Cam is less than four (4) EZ Cams,
the program will show blank/white instead.
02/01/2005 IMT Confidential and Proprietary Page 26
Page 27

WIRELESS EZCAM USER GUIDE
3.4.3 View Nine EZ Cams
Select the connected EZ Cams and click the View Nine EZ Cams button, you can see the nine
EZ Cams showed. If the number of selected/connected EZ Cam is less than nine (9) EZ Cams,
the program will show blank/white instead.
02/01/2005 IMT Confidential and Proprietary Page 27
Page 28

WIRELESS EZCAM USER GUIDE
3.5 Record & Motion Detect Monitor
While your EZ Cams connected, you can start/stop recording anytime by selecting “Start Recording”
and “Stop Recording” or you can click on the buttons shown on the toolbar. Also, you can trigger the
Motion Detect Monitor anytime by select “Monitor” or click on the eye-like button.
02/01/2005 IMT Confidential and Proprietary Page 28
Page 29

WIRELESS EZCAM USER GUIDE
3.6 View the Recorded Images, Videos
You can view the recorded Images, recorded videos, and alarm triggered record by selecting
prospective items in the menu bar or the buttons on the toolbar.
02/01/2005 IMT Confidential and Proprietary Page 29
Page 30

WIRELESS EZCAM USER GUIDE
3.7 Upgrade EZ Cam Firmware
If necessary, you can upgrade your EZ Cam device firmware by selecting “Firmware Upgrade” in
menu bar. Please kindly follow instruction step by step to ensure your EZ Cam firmware can be
upgrade successfully.
Note: Please check service website first to see if there is need for firmware upgrade. If your EZ Cam
runs smoothly without major issue, we strongly suggest NOT to upgrade to the version you are not
sure of. Thank you.
02/01/2005 IMT Confidential and Proprietary Page 30
Page 31

WIRELESS EZCAM USER GUIDE
4 FEDERAL COMMUNICATIONS COMMISSION
This device complies with Part 15 of the FCC Rules. Operation is subject to the following two conditions:(1)
this device may not cause harmful interference, and (2) this device must accept any interference received,
including interference that may cause undesired operation.
NOTE
This equipment has been tested and found to comply with the limits for a Class B digital device, pursuant to
Part 15 of the FCC Rules. These limits are designed to provide reasonable protection against harmful
interference in a residential installation. This equipment generates, uses and ca n radiated radio frequency
energy and, if not installed and used in accordance with the instructions, may cause harmful interference to
radio communications. However, there is no guarantee that interference will not occur in a particular
installation If this equipment does cause harmful interference to radio or television reception, which can be
determined by turning the equipment off and on, the user is encouraged to try to correct the interference by
one or more of the following measures:
-Reorient or relocate the receiving antenna.
-Increase the separation between the equipment and receiver.
-Connect the equipment into an outlet on a circuit different from that to which the receiver is connected.
-Consult the dealer or an experienced radio/TV technician for help.
Changes or modifications not expressly approved by the party responsible for compliance could void the user‘s authority
to operate the equipment.
This device and its antenna(s) must not be co-located or operating in conjunction with any other antenna or transmitter.
02/01/2005 IMT Confidential and Proprietary Page 31
 Loading...