

Page 1

User Manual
Mercury
版 本 : 1.3
日 期 : 95/03/10
Inventec Iris 1/2 User Manual
ROM Version
061130
1
INVENTEC CORPORATION
英業達股份有限公司
Page 2

User Manual
Mercury
版 本 : 1.3
日 期 : 95/03/10
Copyright © 2006 Inventec Corp. All Rights Reserved.
No part of this manual, including the product and software described in it, may be reproduced,
transmitted, transcribed, stored in a retrieval system, or translated into any language in any
form, by any means, without prior written permission from Inventec Corp.
Inventec Corp. provides this publication “as is” without warranty of any kind. This information
could include technical inaccuracies or typographical errors. Inventec Corp. m ay make
improvements and/or changes in the product. Information and specifications contained in this
document are subject to change at any time without notice.
The information contained in this document does not affect or change the product
specifications or warranties. Inventec Corp. is not liable for any damages resulting from the use
of this product.
IMPORTANT SAFETY INFORMATION
Please read the following information carefully before you start using the Inventec Iris 1/2 to
avoid any damages caused by improper usage:
The device is not charged when you tak e it out of the box. The batte ry should be charged
for at least 8 hours before first use. Do not remove the battery while charging.
Do not use batteries, which have not been specified by the manufacturer, as this may
cause leakage or rupture.
Do not charge the battery with an unspecified AC Adapter, as this may cause da mage to
both the device and the battery.
When discarding the batteries, dispose of them in a proper manner, according to the
battery manufacturer’s instructions and your local laws.
Power off the device and remove the battery befor e inserting SIM card. Make sure the SIM
card snaps correctly into the SIM socket.
Do not open or tamper with the device cover, as it will void your warranty.
Do not press hard on this product, as it may cause damage to the screen or the internal
components.
Do not use the device at gas or refuelling stations, chemical plants, and places containing
explosives or flammable materials.
Do not strike, shake, or heat the device in a way which may cause battery leakage or
rupture and damage to the device.
Use only manufacturer specified stylus. Do not scratch the screen with hard objects.
Do not clean the screen with chemical detergents. Only use cloths, specifically designed
2
INVENTEC CORPORATION
英業達股份有限公司
Page 3

User Manual
for cleaning liquid displays, to wipe the device screen.
Do not expose the device to direct sunlight, or leave the device in a humid environment,
for extended periods of time, as this may cause damage to the device and battery.
Do not immerse the device in water.
The device may interfere with the navigation and/or communication syst ems on aircraft.
The use of the device on aircraft is prohibited by laws in most c ountries.
Use hands-free devices, if you need to use the telephony services, while driving a vehicle.
Mercury
版 本 : 1.3
日 期 : 95/03/10
FCC Regulations
This device complies with part 15 of the FCC Rules. Operation is subject to the following
two conditions: (1) This device may not cause harmful interference, and (2) this device
must accept any interference received, including interference that may cause undesired
operation.
This device has been tested and found to comply with the limits f or a Class B digital device,
pursuant to Part 15 of the FCC Rules. These limits are designed to provide reasonable
protection against harmful interference in a residential installation. This equipment
generates, uses and can radiated radio fr equency energy and, if not installed and used in
accordance with the instructions, may cause harmful interference to radio
communications. However, there is no guarantee that interference will not occur in a
particular installation If this equipment does cause harmful interference to radio or
television reception, which can be determined by turning the equipment off and on, the
user is encouraged to try to correct the interference by one or more of the following
measures:
-Reorient or relocate the receiving antenna.
-Increase the separation between the equipment and receiver.
-Connect the equipment into an outlet on a circuit different f rom that to which the receiver
is connected.
-Consult the dealer or an experienced radio/TV technician for help.
Changes or modifications not expressly approved by the party responsible for compliance could
void the user‘s authority to operate the equipment.
Interference with Medical Equipment Functions
This product may cause medical equipment to malfunction. The u se of this device is forbidden
in most hospitals and medical clinics.
Nonionizing Radiation
3
INVENTEC CORPORATION
英業達股份有限公司
Page 4

User Manual
This product should be operated in the suggested normal condition only to ensure the r adiative
performance and safety of the interference. As with ot her mobile radio transmit ting equipment,
users are advised that for satisfactory oper ation of the equipment and for the saf ety personnel,
it is recommended that no part of the human body be allowed to come too close to the antenna
during operation of the equipment.
Mercury
版 本 : 1.3
日 期 : 95/03/10
RF Exposure Information (SAR)
This device meets the government’s requir ements for exposur e to r adio w av es. This device is
designed and manufactured not to exceed the emission limits for exposure to radio frequency
(RF) energy set by the Federal Communications Commission of the U.S. Government.
The exposure standard for wireless devices employs a unit of measurement known as the
Specific Absorption Rate, or SAR. The SAR limit set by the FCC is 1.6W/kg.
are conducted using standard operating positions accepted by the FCC with the device
*
Tests for SAR
transmitting at its highest certified power level in all tested frequency bands. Although the
SAR is determined at the highest certified power level, the actual SAR level of the device while
operating can be well below the maximum value. This is because the device is designed to
operate at multiple power levels so as to use only the poser required to reach the network. In
general, the closer you are to a wireless base station antenna, the lower the power output.
The highest SAR value for the device as reported to the FCC when tested for use at the ear is
0.605 W/kg for GSM850 and 0.348 W/kg for PCS1900 Head SAR and when worn on the body,
as described in this user guide, is 0.863 W/kg for GSM850 and 0.162 W/kg for PCS1900 Body
SAR and 0.036 W/kg for WLAN Body SAR. (Body-worn measurements differ among device
models, depending upon available enhancements and FCC requirements.)
While there may be differences between the SAR levels of various devices and at various
positions, they all meet the government requirement.
The FCC has granted an Equipment Authorization for this device with all reported SAR levels
evaluated as in compliance with the FCC RF exposure guidelines. SAR information on this
device is on file with the FCC and can be found under the Display Grant section of
http://www.fcc.gov/oet/fccid
For body worn operation, this device has been tested and meets the FCC RF exposure
guidelines for use with an accessory that contains no metal and the positions the handset a
after searching on FCC ID: DGIBC0129AAA190.
4
INVENTEC CORPORATION
英業達股份有限公司
Page 5

User Manual
minimum of 1.5 cm from the body. Use of other enhancements may not ensure compliance
with FCC RF exposure guidelines. If you do no t use a body-worn accessory and are not
holding the device at the ear, position the handset a minimum of 1.5 cm from your body when
the device is switched on.
Mercury
版 本 : 1.3
日 期 : 95/03/10
Trademark Information
Microsoft, MS-DOS, Windows, Windows NT, Windows Server, Windows Mobile, ActiveSync,
Excel, Internet Explorer, MSN, Outlook, PowerPoin t, and Word are either registere d tr ademarks
or trademarks of Microsoft Corporation in the United States and/or other countries.
5
INVENTEC CORPORATION
英業達股份有限公司
Page 6

User Manual
Mercury
版 本 : 1.3
日 期 : 95/03/10
Table of Contents
Copyright © 2006 Inventec Corp. All Rights Reserved. .....2
IMPORTANT SAFETY INFORMATION..................................2
Trademark Information......................................................5
Chapter 1. Knowing Your Device......................................11
1.1 Introduction.............................................................................................12
Views of the Device..............................................................................12
The Stylus.................................................................................................14
Notification LEDs...................................................................................14
1.2 Accessories ...............................................................................................15
1.3 Install SIM card and Battery.............................................................16
Installing the SIM Card.......................................................................16
Installing the Battery ..........................................................................16
1.4 Battery Information..............................................................................17
Reducing Risk of Fire or Burns.........................................................17
Checking the Battery Power .............................................................17
Optimizing the Power Performance...............................................18
Managing a Low Battery.....................................................................18
Charging the Battery............................................................................19
1.5 Mini-SD Cards..........................................................................................19
Inserting a Mini-SD Card into the Device ....................................19
Removing a Mini-SD Card from the Device.................................19
Chapter 2. Basic Operations .............................................20
2.1 Getting Started.......................................................................................21
Powering On/Off the Device.............................................................21
Calibrating Your Device......................................................................21
Locking/Unlocking the Device .........................................................22
2.2 Input Methods ........................................................................................23
Keyboard ..................................................................................................23
Letter Recognizer..................................................................................24
Block Recognizer...................................................................................24
Transcriber...............................................................................................25
2.3 Today Screen Components.................................................................25
Today Screen...........................................................................................25
Icon Indicators.......................................................................................26
6
INVENTEC CORPORATION
英業達股份有限公司
Page 7

User Manual
Mercury
版 本 : 1.3
日 期 : 95/03/10
2.4 The Start Menu.......................................................................................27
List of All Programs..............................................................................28
2.5 Settings .....................................................................................................29
Personal....................................................................................................29
Connections.............................................................................................30
2.6 Using Calendar........................................................................................30
Scheduling an Appointment..............................................................31
Deleting an Appointment...................................................................32
Changing Calendar Views ..................................................................34
Changing the Display of the Work Week......................................37
2.7 Using Notes..............................................................................................39
Setting the Default Input Mode.......................................................39
Creating a Note......................................................................................39
Creating a Stand-alone Voice Recording......................................40
Switching between Typing/Writing Modes.................................41
Editing a Handwritten Note...............................................................42
Adding a Voice Recording to a Note...............................................43
Deleting a Note......................................................................................45
Creating a Default Template.............................................................46
2.8 Using Tasks..............................................................................................49
Creating a Task ......................................................................................50
Deleting a Task.......................................................................................54
Changing Task Priority........................................................................54
Sorting/Filtering Your Tasks.............................................................55
Setting Tasks Options..........................................................................55
Viewing Task Details............................................................................56
Charter 3. Phone Features................................................57
3.1 Using the Phone.....................................................................................58
The Phone Screen..................................................................................58
Activating PIN Security.......................................................................58
Setting Ring Tones................................................................................58
3.2 Making a Call...........................................................................................59
Making a Call by Entering a Phone Number................................59
Making a Call from Call History........................................................60
Making a Call from Contacts.............................................................60
Making a Call from Speed Dial .........................................................60
7
INVENTEC CORPORATION
英業達股份有限公司
Page 8

User Manual
Receiving/Rejecting a Call................................................................62
3.3 In-Call options........................................................................................63
Conference Call......................................................................................64
Call waiting..............................................................................................65
Turning On/Off the Speakerphone.................................................67
Muting the microphone.......................................................................67
3.4 SIM Manager...........................................................................................67
Adding a Phonebook Entry to SIM Card .......................................68
Deleting Phonebook Entries from SIM Card...............................68
Saving Phonebook Entries to Contacts.........................................68
Mercury
版 本 : 1.3
日 期 : 95/03/10
Chapter 4. Synchronizing Information .............................70
4.1 Installing and setting up ActiveSync..............................................71
4.2 Synchronizing Information................................................................72
Starting and Stopping Synchronization Manually.....................72
Changing Which Information is Synchronized...........................72
4.3 Changing Settings for an Information Type................................73
4.4 Synchronizing with Exchange Server.............................................73
4.5 Synchronizing via Bluetooth..............................................................74
Connecting to a PC Using Bluetooth..............................................74
Chapter 5. Bluetooth Connections....................................75
5.1 Overview of Bluetooth.........................................................................76
Bluetooth Modes....................................................................................76
Turning Bluetooth On or Off..............................................................76
Making Your Device Visible...............................................................77
5.2 Bluetooth Partnership (Bonding) ....................................................78
Creating a Bluetooth Partnership ...................................................79
5.3 Beaming Information (Bluetooth) ..................................................81
Receiving Beamed Information.......................................................81
Beaming an Item...................................................................................82
Chapter 6. Transferring Files To and From Your Device...84
6.1 Using ActiveSync....................................................................................85
6.2 Transferring from Memory Cards ....................................................86
6.3 Using Bluetooth......................................................................................87
6.4 Transferring to a PC or Other Devices...........................................88
Chapter 7. Connecting to the Internet .............................89
7.1 Setting up Internet connections......................................................90
8
INVENTEC CORPORATION
英業達股份有限公司
Page 9

User Manual
Mercury
版 本 : 1.3
日 期 : 95/03/10
Creating a GPRS Connection.............................................................90
Creating a Proxy Connection ............................................................93
Deleting a Connection.........................................................................93
7.2 Using Internet Explorer Mobile........................................................94
Browsing the Internet.........................................................................94
Adding a Web Page to the Favorite List........................................95
Deleting a Favorite ...............................................................................95
Changing the Size of Text on Web Pages.....................................96
Showing or Hiding Pictures on Web Pages .................................96
Changing Web Page Display Options.............................................96
Clearing History, Cookies, or Temporary Files...........................96
Viewing a Page in Full Screen Mode ..............................................96
7.3 Using Wi-Fi Connection.......................................................................97
Connecting to a Wi-Fi Network........................................................97
Chapter 8. Messaging & Contacts.....................................98
8.1 Text Messaging.......................................................................................99
Creating a Text Message....................................................................99
Using Preset Text Messages..............................................................99
Reading a Text Message.....................................................................99
Changing Message Options .............................................................100
8.2 E-mail.......................................................................................................100
Setting Up an Internet E-mail Account Manually ...................100
Composing an E-mail Message.......................................................101
Reading an E-mail Message ............................................................102
Message Options .................................................................................102
8.3 Changing Messaging Account Options.........................................102
8.4 Using Contacts......................................................................................102
Creating a New Contact....................................................................103
Viewing and Editing Contact Information.................................103
Adding a Picture to a Contact.........................................................103
Assigning a Ring Tone to a Contact..............................................103
Finding a Contact ................................................................................104
Sending an E-mail to a Contact......................................................104
Sending a Text Message to a Contact..........................................104
Creating a SIM Contact.....................................................................104
Chapter 10. Other Applications.......................................105
9
INVENTEC CORPORATION
英業達股份有限公司
Page 10

User Manual
Mercury
版 本 : 1.3
日 期 : 95/03/10
10.1 Word Mobile........................................................................................106
Creating a Document.........................................................................106
Word Mobile Formatting Toolbar..................................................106
10.2 Excel Mobile ........................................................................................107
Creating a New Spreadsheet ..........................................................107
Excel Mobile Formatting Toolbar...................................................107
10.3 PowerPoint Mobile............................................................................108
Starting a PowerPoint Presentation ............................................108
Stopping a PowerPoint Presentation...........................................108
Navigating Between Slides..............................................................108
10.4 Pocket MSN Messenger...................................................................109
Signing In/Out MSN Messenger....................................................109
Adding/Deleting a MSN Messenger Contact.............................109
Sending an Instant Message...........................................................110
Changing MSN Messenger Display Name...................................110
Blocking/Unblocking a Contact.....................................................110
Changing MSN Messenger Settings..............................................110
10
INVENTEC CORPORATION
英業達股份有限公司
Page 11

User Manual
Mercury
版 本 : 1.3
日 期 : 95/03/10
Chapter 1. Knowing Your Device
11
INVENTEC CORPORATION
英業達股份有限公司
Page 12
1.1 Introduction
Views of the Device
User Manual
Mercury
版 本 : 1.3
日 期 : 95/03/10
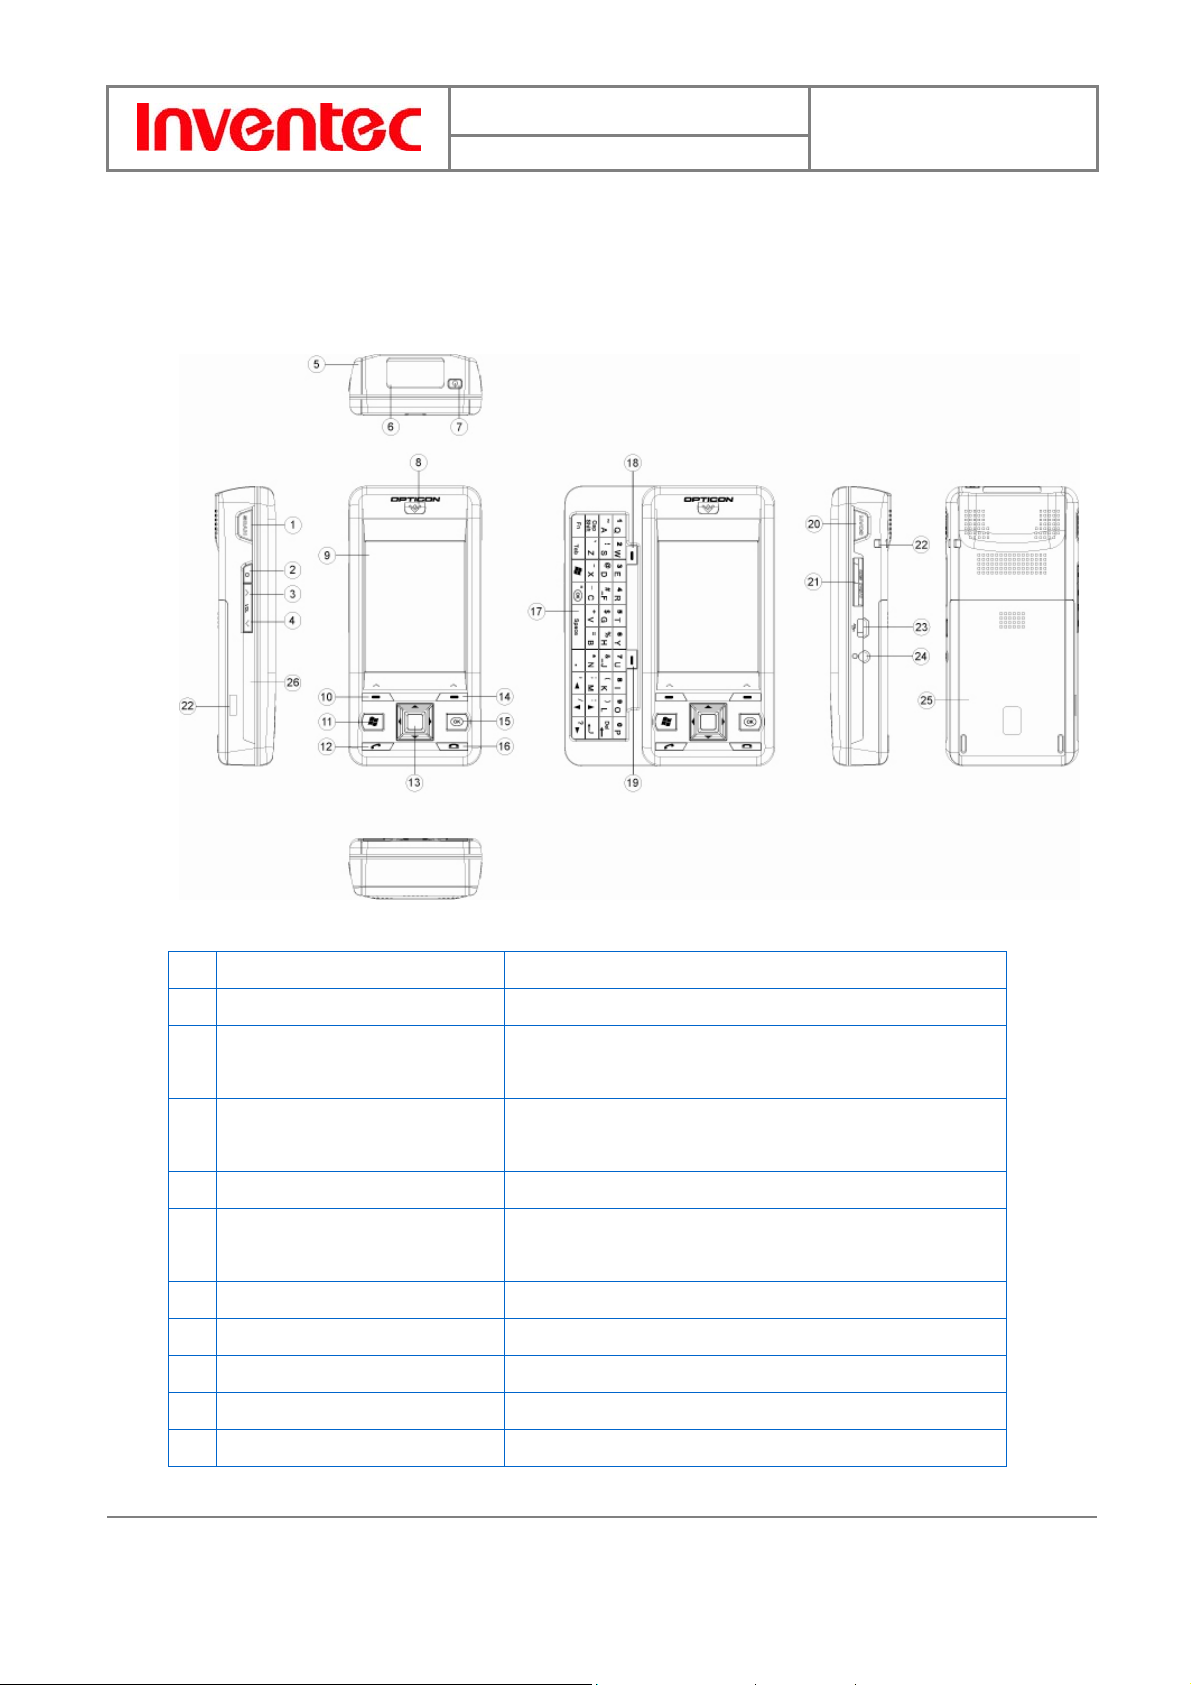
1 Scan key (Left) Press the key to scan and decode bar code/QR code
2 Record key Press and hold this key to record a voice note
3 Volume up Press the Volume up button to turn up the telephone
receiver volume
4 Volume down Press the Volume down button to turn down the
telephone receiver volume
5 Stylus Write, draw, or make selection on the touch screen
6 Scanner Point the reading window of the scanner in the
direction of bar code/QR code
7 Power button Power on or off the device
8 Telephone receiver Listen to a phone call here
Wi-Fi/Bluetooth LED Indicates Wi-Fi/Bluetooth Status
GSM/Battery LED Indicates GSM/Battery LED
9 Display 2.8-inch TFT LCD with touch screen
12
INVENTEC CORPORATION
英業達股份有限公司
Page 13

User Manual
g
10 Soft key 1 Performs the command shown in the label above the
button
11 Start key Pull down the Start menu
12 Send key(Talk key) Press this key to dial or answer a call
13 5-way navigation key Press this button up, down, left, or right to move
through menus; carry out the selection by pressing the
centre button.
Microphone Speak into the microphone when talking on the phone
or recording a voice note
14 Soft key 2 Performs the command shown in the label above the
button
15 OK key Press OK key to make a selection
16 End key End a call or close Phone application
Mercury
版 本 : 1.3
日 期 : 95/03/10
17 QWERTY keyboard A hardware keyboard similar to a standard one on your
PC
18 Soft key 3 Performs the command shown in the label above the
button
19 Soft key 4 Performs the command shown in the label above the
button
20 Scan key(Right) Press the key to scan and decode bar code/QR code
21 Mini-SD card slot Insert a mini-SD card to expand device memory
22 Eyelet for wrist strap Fix a wrist strap here
23 Mini USB connector Mini USB connector for PC sync and battery charging
24 Earphone Jack Connect a 2.5 mm Earphone
Speaker Listen to audio media or listen to a phone call
hands-free
25 Battery pack Remove to place battery and SIM card
26 RESET button/hole Press the RESET button to soft-reset your device
Be sure to press the POWER button to switch the device to sleep mode before resettin
the device or replacing the battery, otherwise unsaved work or settings may be lost.
13
INVENTEC CORPORATION
英業達股份有限公司
Page 14
User Manual
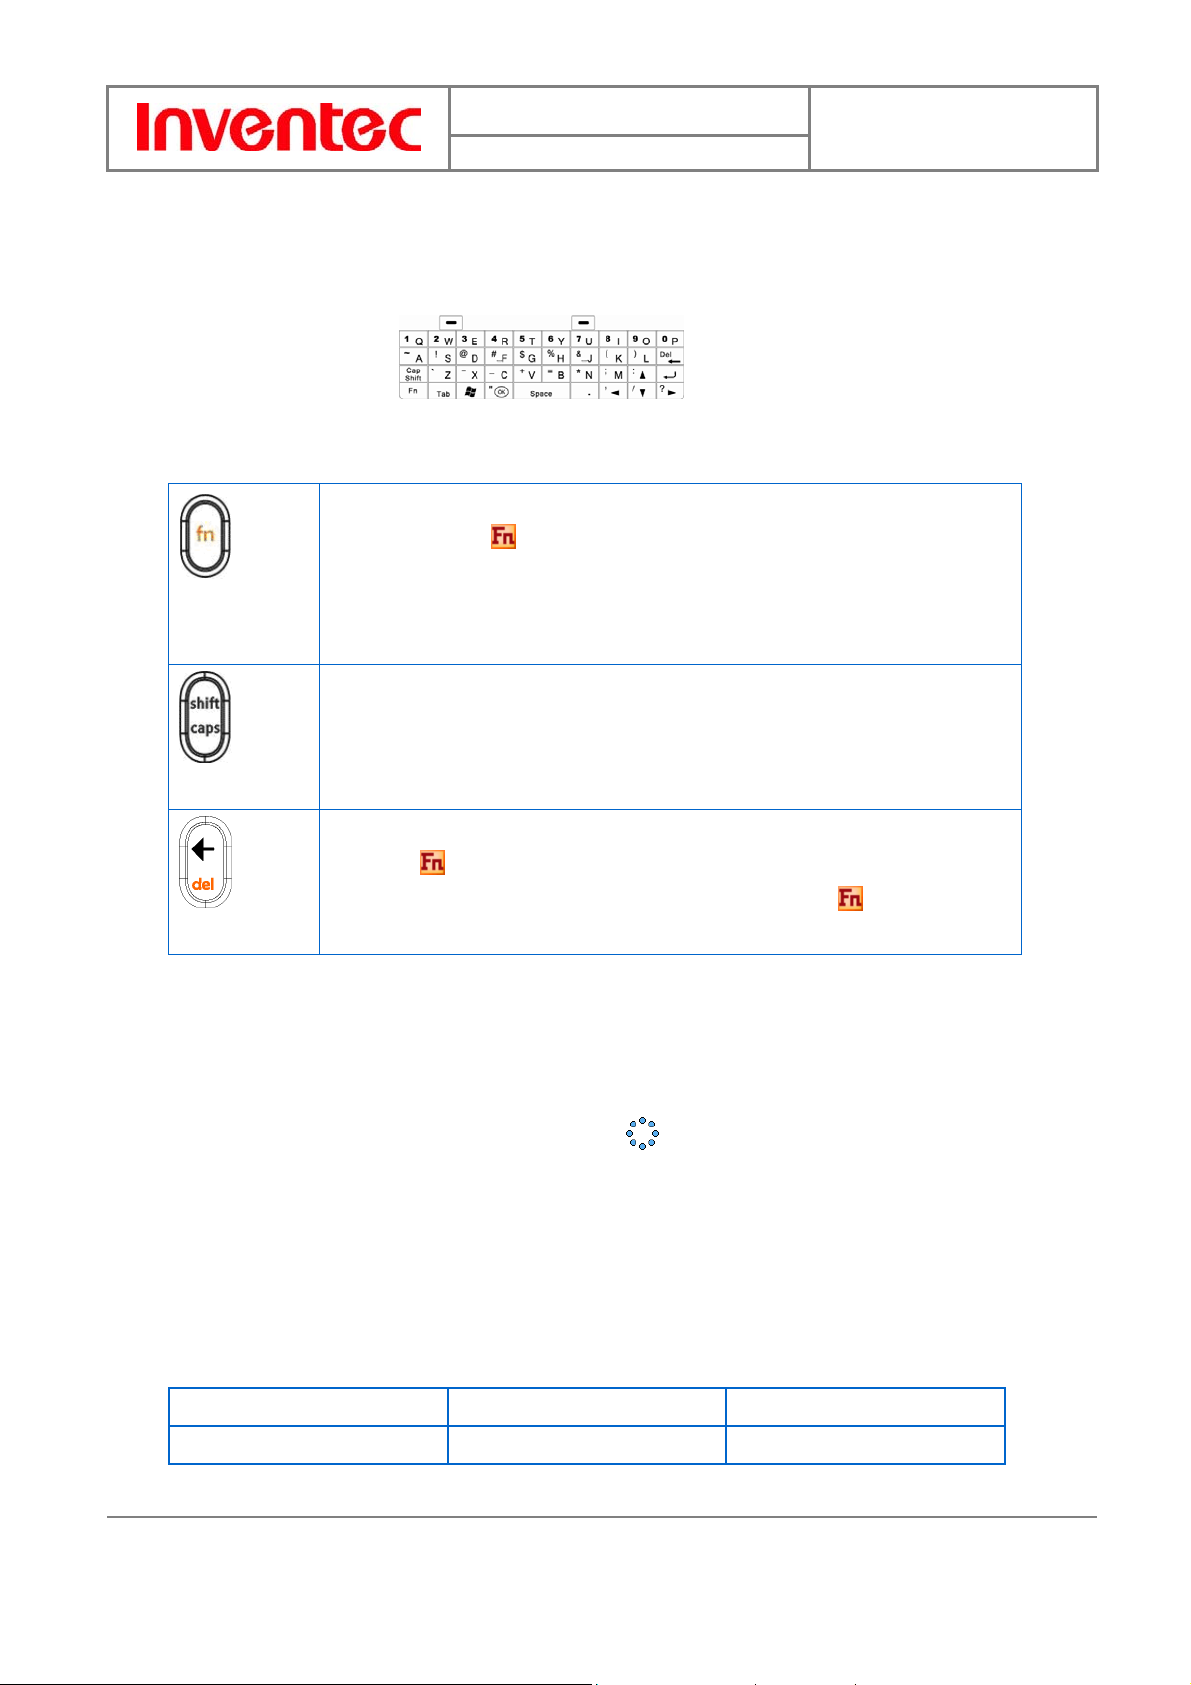
Hardware Keyboard
Other than the on-screen keyboard, this device is equipped with a QWERTY keyboard. Please
slide the main screen to the right to reveal it. (Need one more picture)
Mercury
版 本 : 1.3
日 期 : 95/03/10
To enter capital letters/numbers, or to delete/back by using the hardware keyboard:
The “Fn” key is used to access the symbols in orange on the keypad. Press thi s
incorrect
icon
incorrect
icon
incorrect
icon
key once and the
symbol or number. Press the “Fn” key twice can enter numbers and symbols
constantly. You can also hold down the “Fn” key and press another k ey at the
same time to enter its corresponding symbol.
Press this key once, the next character you enter will be a capital letter. Hold
down this key and press another key at the same time to enter capital letters
constantly.
Press this key to erase the letter in the left side of the cursor. Press the “Fn”
key once (
side of the cursor. To disable the “Fn” key, press it again (
appears) then press this key to delete the first letter in the right
icon appears; the next character you enter will be a
will disappear).
The Stylus
Use the stylus to tap a selection, to drag-and-drop an item, to write, or to draw on
the touch screen.
Tap and hold the stylus on the screen,
submenu is displayed.
Notification LEDs
The device has 2 notification LEDs: the left is Wi-Fi/Bluetooth LED and the right is GSM/Battery
LED.
Bluetooth/Wi-Fi LED tells you about the device’s Bluetooth/Wi-Fi status:
Color Bluetooth on Wi-Fi on
Green Off Blink
14
INVENTEC CORPORATION
英業達股份有限公司
icon is displayed and then a pop-up
Page 15
User Manual
Blue Blink Off
Green and blue blink alternately while both Bluetooth and Wi-Fi are on.
GSM/Battery LED lets you know that you have unanswered calls or tells y ou about the device’s
GSM/battery status:
Color Missed Call/
GSM on
Mercury
GSM on
Charging
版 本 : 1.3
日 期 : 95/03/10
Low Power
Red Blink Off Blink Off
Orange Off Off Off Constantly on
Green Off Blink Off Off
(battery full)
(battery low)
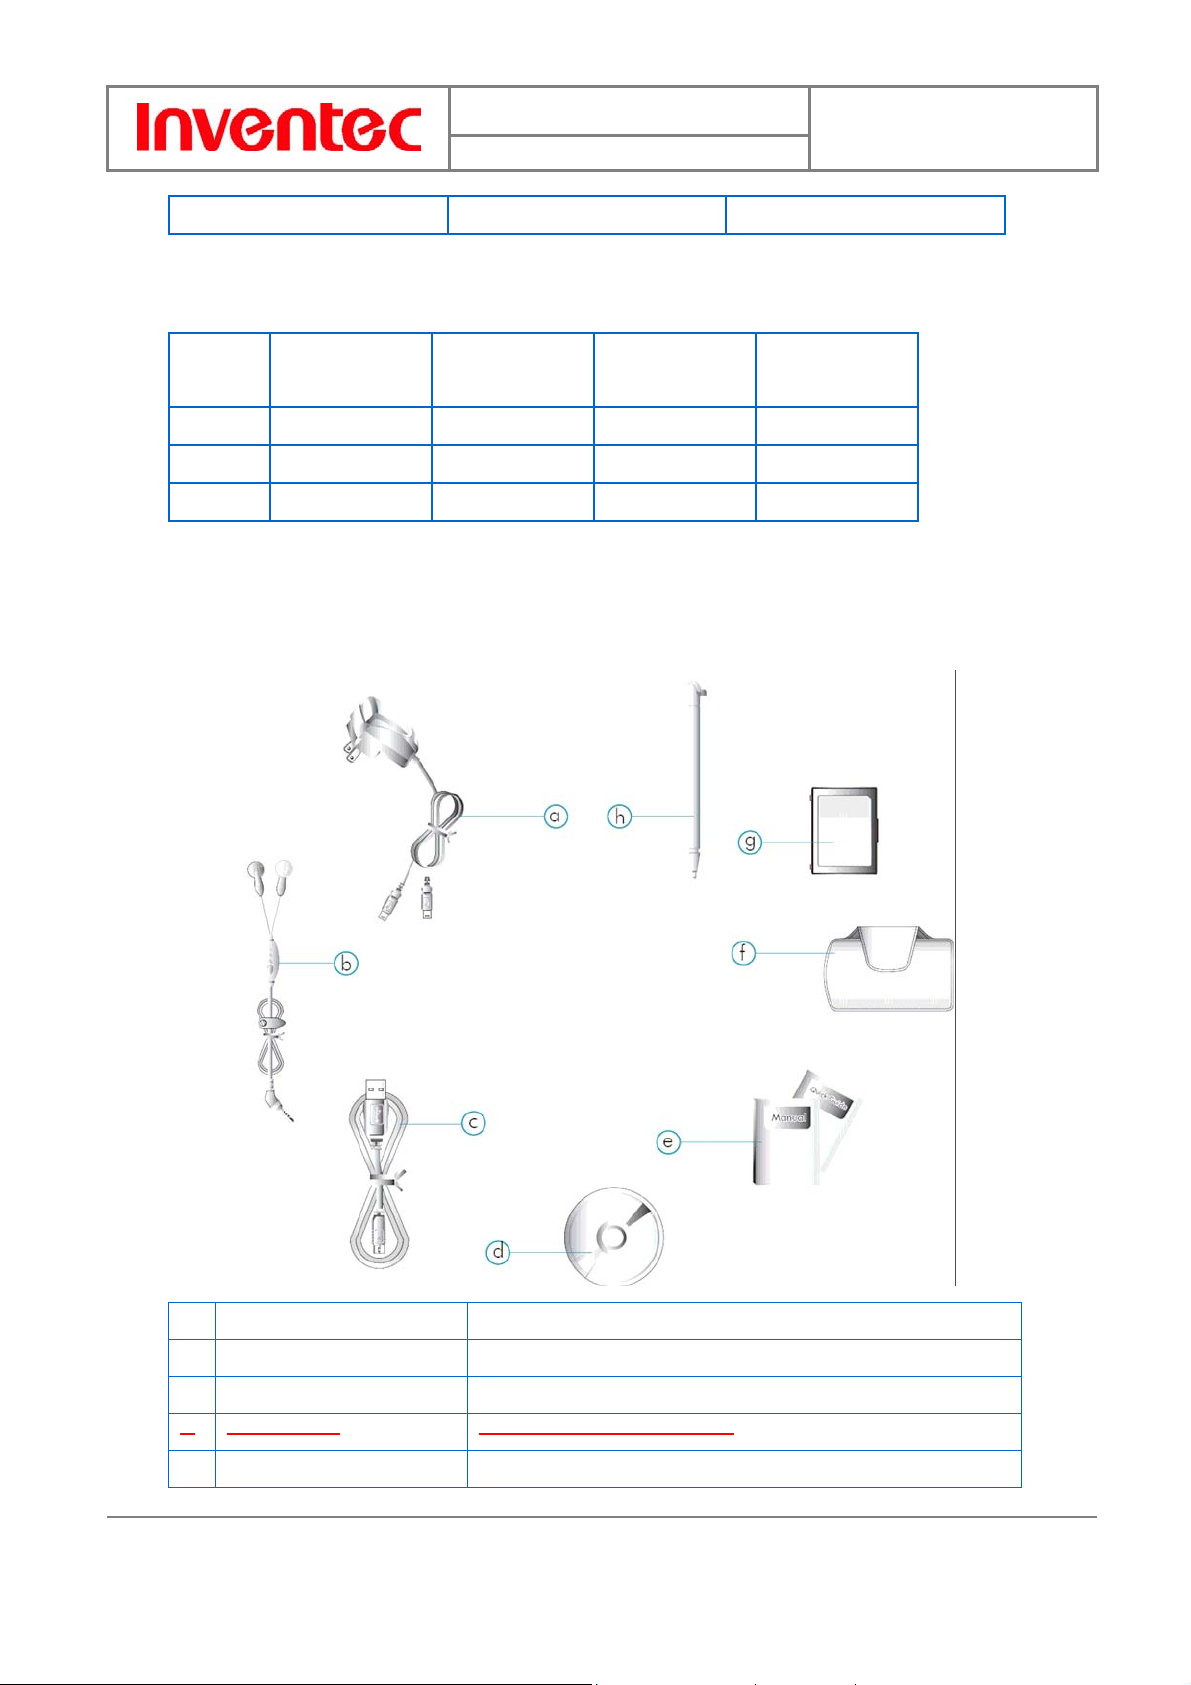
1.2 Accessories
A AC Adapter Recharge the device battery
B Stereo headset Listen to a phone conversation hands-free
C USB Cable Connect the device to a PC
D Mini SD Card Copy files to/from the device
E Pouch Protect the device
15
INVENTEC CORPORATION
英業達股份有限公司
Page 16
User Manual
F Stylus Write, draw, or make selection on the touch screen
G User Manual/Quick Guide Provide instructions of device functions
H Getting Started CD Windows Mobile
I Battery Rechargeable Li-ion polymer battery
Mercury
TM
Getting Started Disc
版 本 : 1.3
日 期 : 95/03/10
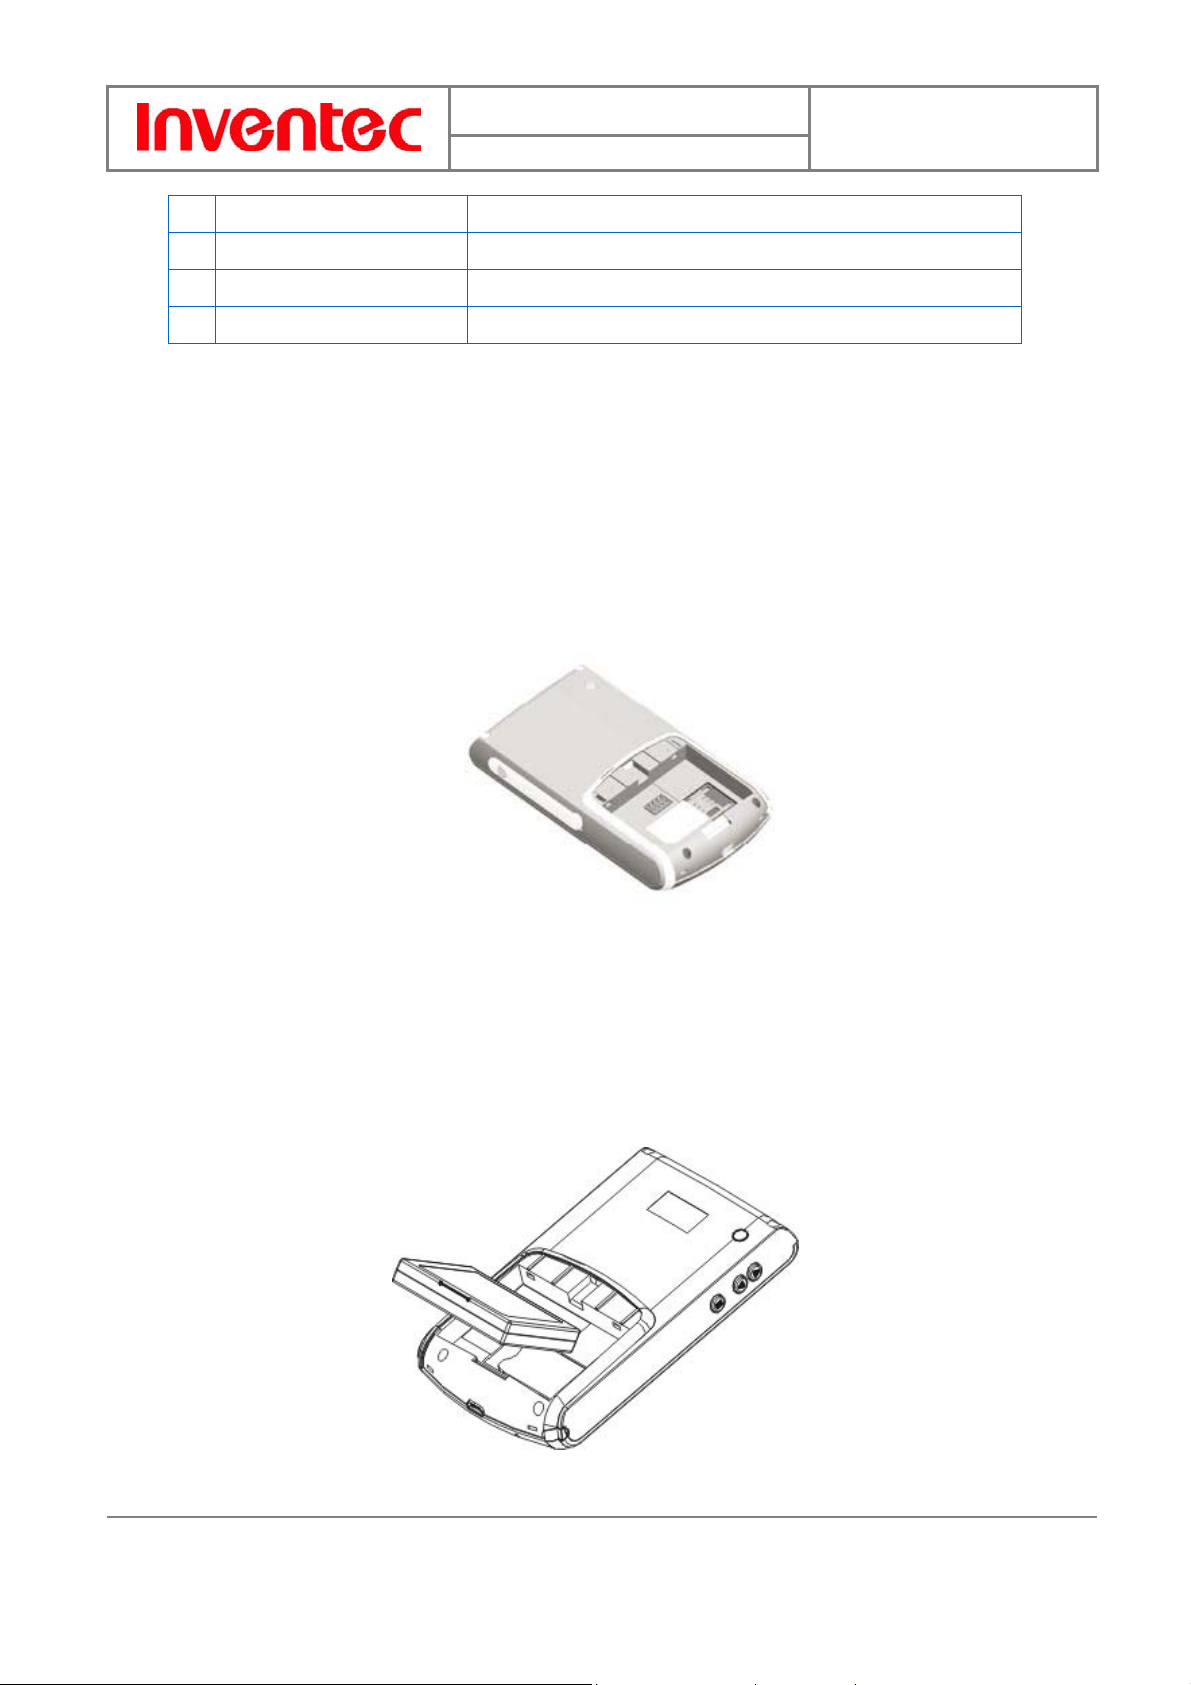
1.3 Install SIM card and Battery
Installing the SIM Card
If you want to use phone features, you must install a GSM SIM card.
Push the back cover down and slide it open.
Place the SIM card in the SIM card slot with the gold contacts facing down. The SIM
card’s cut-off corner should match the cut-off corner in the SIM card slot.
Installing the Battery
Place the battery in position by pressing it’s protrusions on the side of the battery
against the sockets inside the battery slot.
Press the battery down into the battery slot and close the back cover.
16
INVENTEC CORPORATION
英業達股份有限公司
Page 17
User Manual
t
The device contains a rechargeable Li-ion polymer battery completely discharged and
should be charged for at least 8 hours before first use. Use only manufacturer-specified
original batteries. Damages caused by using batteries not specified by manufacturer are no
covered under warranty.
Please follow normal power off procedure to remove the battery or reboot the device,
otherwise unsaved data may be lost.
Mercury
版 本 : 1.3
日 期 : 95/03/10
1.4 Battery Information
Battery performance depends on many factors, including your wireless service provider’s
network configuration, signal strength, the temperature of the environment in which you
operate your phone, the features and/or settings you select and use, items attached to your
phone’s connecting ports, and your voice, data, and other program usage patterns.
Battery life estimates (approximations):
Talk time: 4 hours
Standby time: 150 hours
Reducing Risk of Fire or Burns
Do not attempt to open, disassemble, or service the battery pack.
Do not crush, puncture, short external contacts, or dispose of in fire or water.
Do not expose to temperatures above 60˚C (140˚F).
Replace only with the battery pack designated for this product.
Recycle or dispose of used battery as stipulated by local regulation.
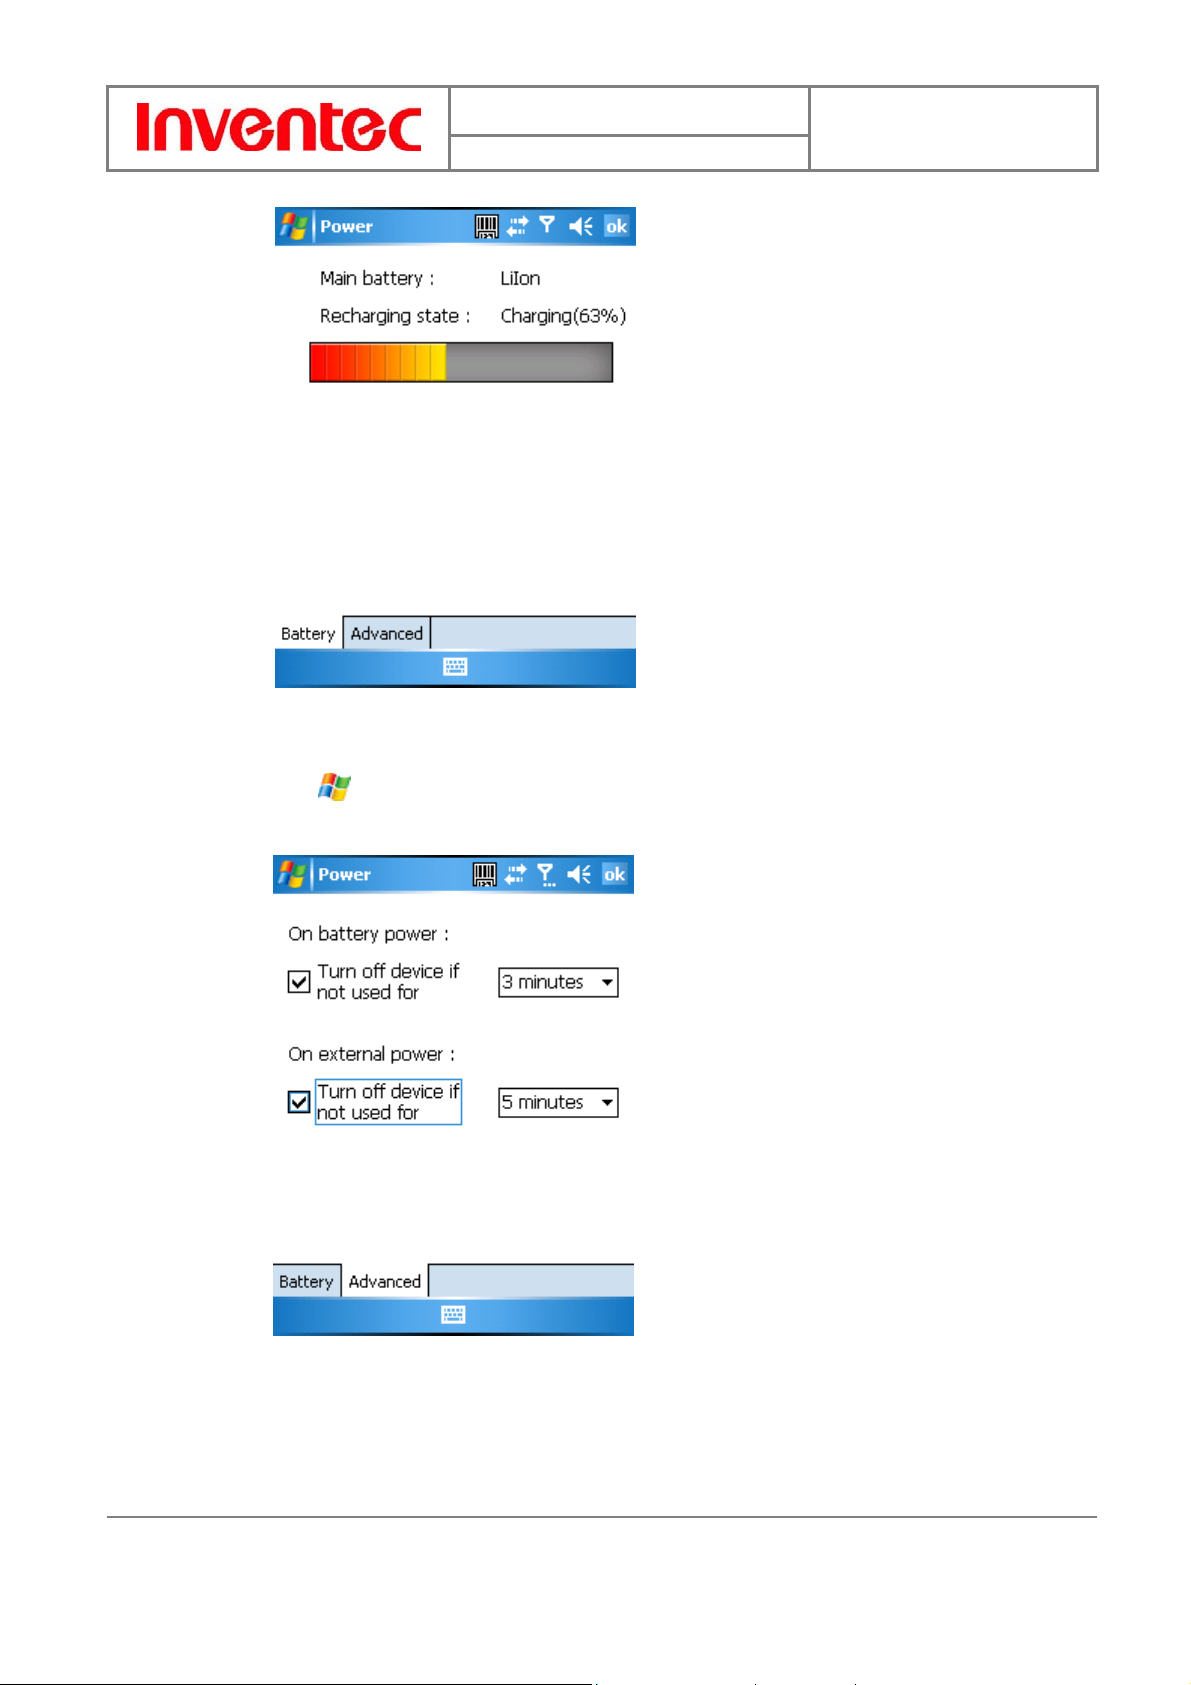
Checking the Battery Power
Tap
> Settings > System tab > Power.
17
INVENTEC CORPORATION
英業達股份有限公司
Page 18
User Manual
Mercury
版 本 : 1.3
日 期 : 95/03/10
Optimizing the Power Performance
Tap
for turning off the device if it is not in use.
> Settings > System tab > Power > Advanced, and adjust the time
Managing a Low Battery
When the low-battery warning appears, do the following:
1. Immediately save your current data.
18
INVENTEC CORPORATION
英業達股份有限公司
Page 19
User Manual
g
2. Start charging the battery or turn off your phone.
Charging the Battery
1. To charge the battery, place the battery into the battery slot correctly. See previous
section for how to install the battery.
2. Do one of the following:
Connect the device with the AC adapter and plug the AC adapter into a power
outlet.
Connect the device to a PC with the USB cable.
T o char ge the device with the USB cable, you must connect the device to a functionin
USB port on a PC that is powered on.
Mercury
版 本 : 1.3
日 期 : 95/03/10
1.5 Mini-SD Cards
Mini-SD is one of the most popular formats for mobile devices. Your device contains a mini-SD
card slot in which you can expand the device’s memory up to 1GB. Mini-SD provides functions
such as built-in security for copyrighted content along with great perf ormance for storing music,
video, and photographs.
Inserting a Mini-SD Card into the Device
Insert the mini SD card with the logo side down and push into place until it clicks down and is
held in place.
Removing a Mini-SD Card from the Device
Mini-SD cards can only be inserted in one direction. Inserting the card in the wrong
direction by force can cause damage to the card and the card slot.
1. Gently press the mini-SD card inward and the card will eject itself.
2. Take out the mini-SD card from the card slot by hand.
19
INVENTEC CORPORATION
英業達股份有限公司
Page 20

User Manual
Mercury
版 本 : 1.3
日 期 : 95/03/10
Chapter 2. Basic Operations
20
INVENTEC CORPORATION
英業達股份有限公司
Page 21

User Manual
Mercury
版 本 : 1.3
日 期 : 95/03/10
2.1 Getting Started
Powering On/Off the Device
Press the POWER button to turn on the device. The POWER button is located on the top side of
the device. When you power on the device for the first time, you are asked to calibrate the
device. Please refer to the “Calibrating your device” section in this chapter for calibr ation steps.
Press the POWER button again to switch the device to sleep mode. You can still receive phone
calls and messages when the device is operating on sleep mode. To power off the device
completely , p ress and hold the POWER button for 3 seconds and the system will pr ompt you to
power off the device.
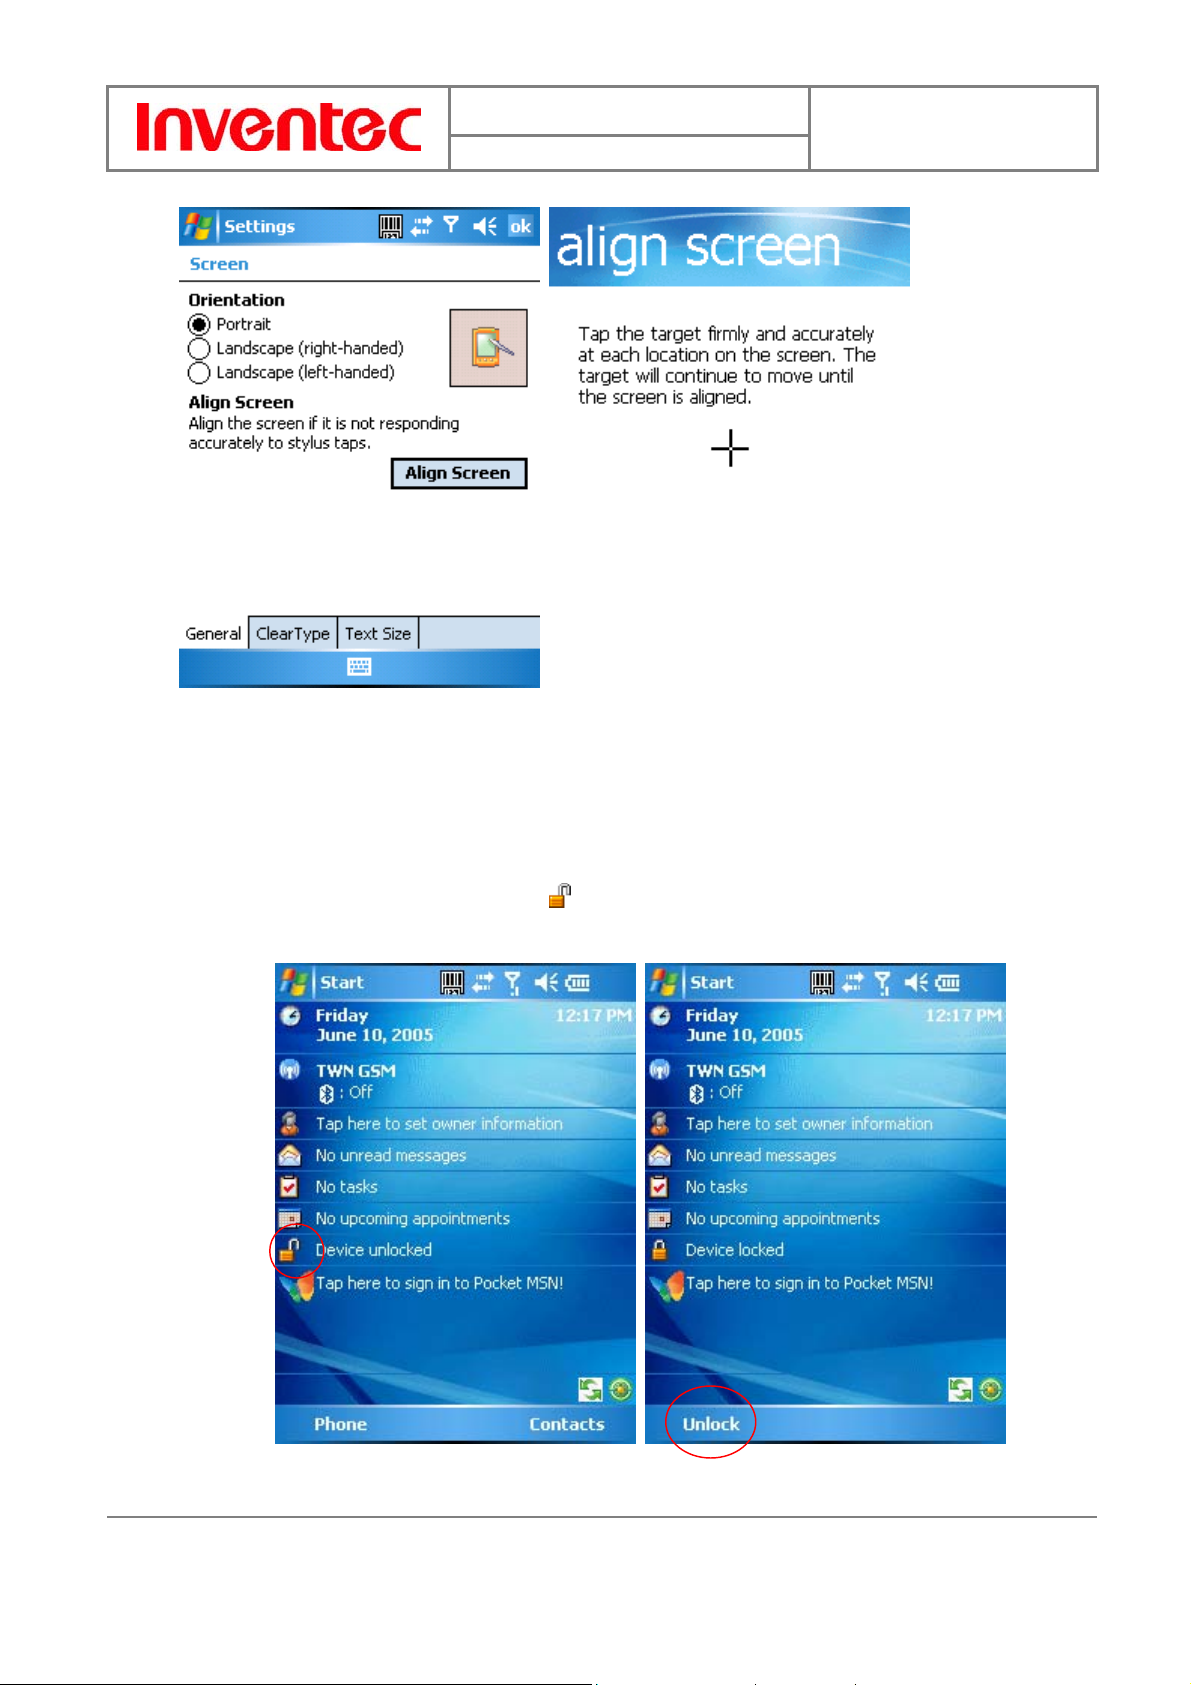
Calibrating Your Device
Calibrating the device ensures the tapped item is activ ated. To calibrate your device, tap the
centre of the cross with the stylus as the cross moves around the screen. If you would like to
re-calibrate the device, follow the steps below:
1. Tap
2. Tap the Align Screen button and follow the on-screen instructions.
> Settings > System tab > Screen .
21
INVENTEC CORPORATION
英業達股份有限公司
Page 22
User Manual
Mercury
版 本 : 1.3
日 期 : 95/03/10
Locking/Unlocking the Device
Locking the device turns off keyboard functionality. This is a helpful feature if, f or example, the
device is turned on and in your pocket, and you want to prevent accidental key presses.
To lock the device, tap on the
locked, the left soft key label changes to Unlock.
icon on the Today Screen. Once the device is
22
INVENTEC CORPORATION
英業達股份有限公司
Page 23

User Manual
You can still receive calls and make emergency calls when the keyp ad is locked.
To unlock the device, tap the Unlock button on the Today screen first, a screen as below will
show. Press the “Fn” key and * to unlock the device, or just tap the Unlock button on the
screen.
Mercury
版 本 : 1.3
日 期 : 95/03/10
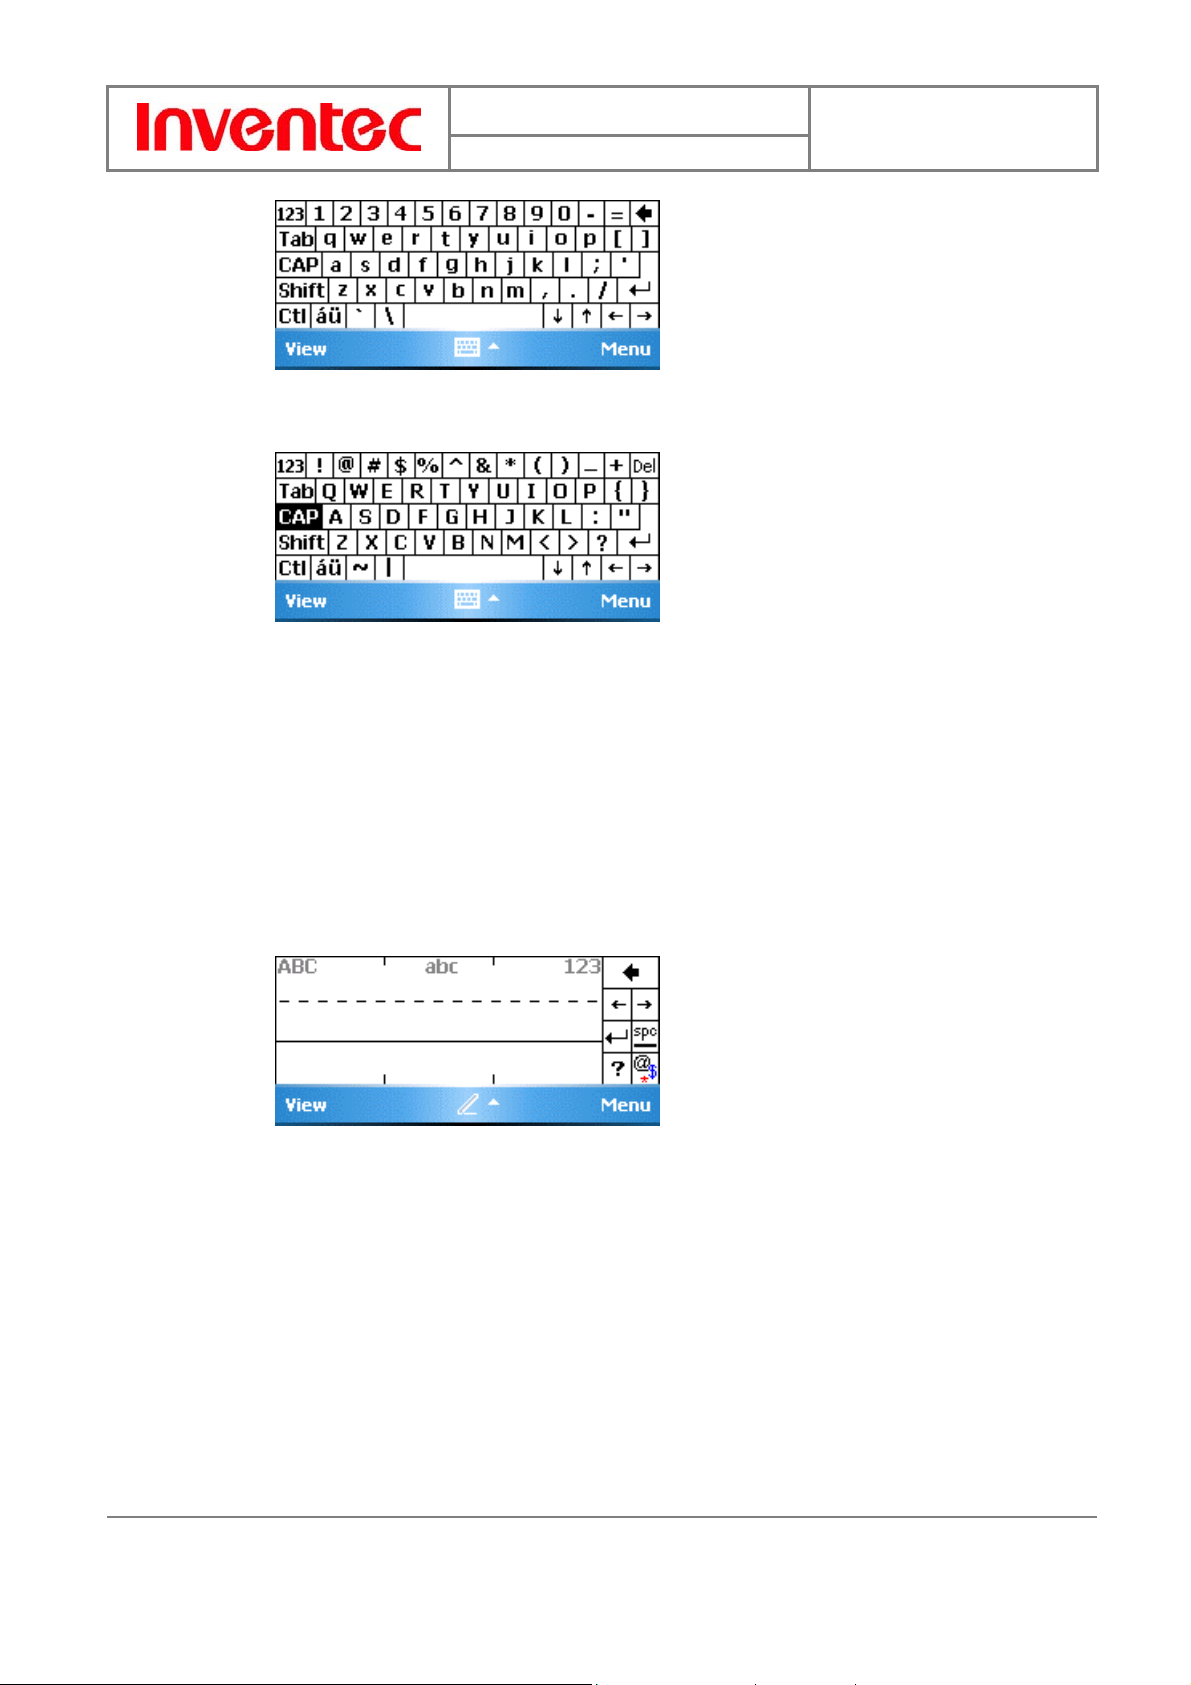
2.2 Input Methods
The device contains 4 different input methods: K eyboard, Letter Recognizer, Block Recognizer,
and Transcriber.
Icon Input Method
Keyboard
Letter/Block Recognizer
Transcriber
Keyboard
Tap
input method, tap the input method selector arrow (the upward arrow next to the
input method icon) and select Keyboard.
To enter text, tap the keys on the on-screen keyboard.
to launch the on-screen keyboar d. If on-screen Keyboard is not the selected
23
INVENTEC CORPORATION
英業達股份有限公司
Page 24
User Manual
Tap the CAP key on the on-scr een keyboard to enter capital letters and/or symbols.
Letter Recognizer
Mercury
版 本 : 1.3
日 期 : 95/03/10
Letter Recognizer recognizes one l etter, number, or symbol at a time.
T o laun ch Letter Recogniz er, tap the input method selector arrow (the upward arrow
next to the input method icon) and select Letter Recognizer.
Write uppercase letters in the left recognition area (the ABC box).
Write lowercase letters in the middle recognition area (the abc box).
Write numbers and symbols in the right recognition area (the 123 box).
Block Recognizer
Block Recognizer recognizes letters written in one stroke.
To launch Block Recognizer, tap the input method selector arrow (the upward arr ow
next to the input method icon) and select Block Recognizer.
Write lowercase letters in the text recognition area (the abc box).
Write numbers and symbols in the numeric recognition area (the 123 box).
T o input symbols, tap any r ecognition area, text or numeric, once and write symbols.
24
INVENTEC CORPORATION
英業達股份有限公司
Page 25
User Manual
Tap ? in Letter or Block Recognizer to see a demo on how to write recognizable
characters.
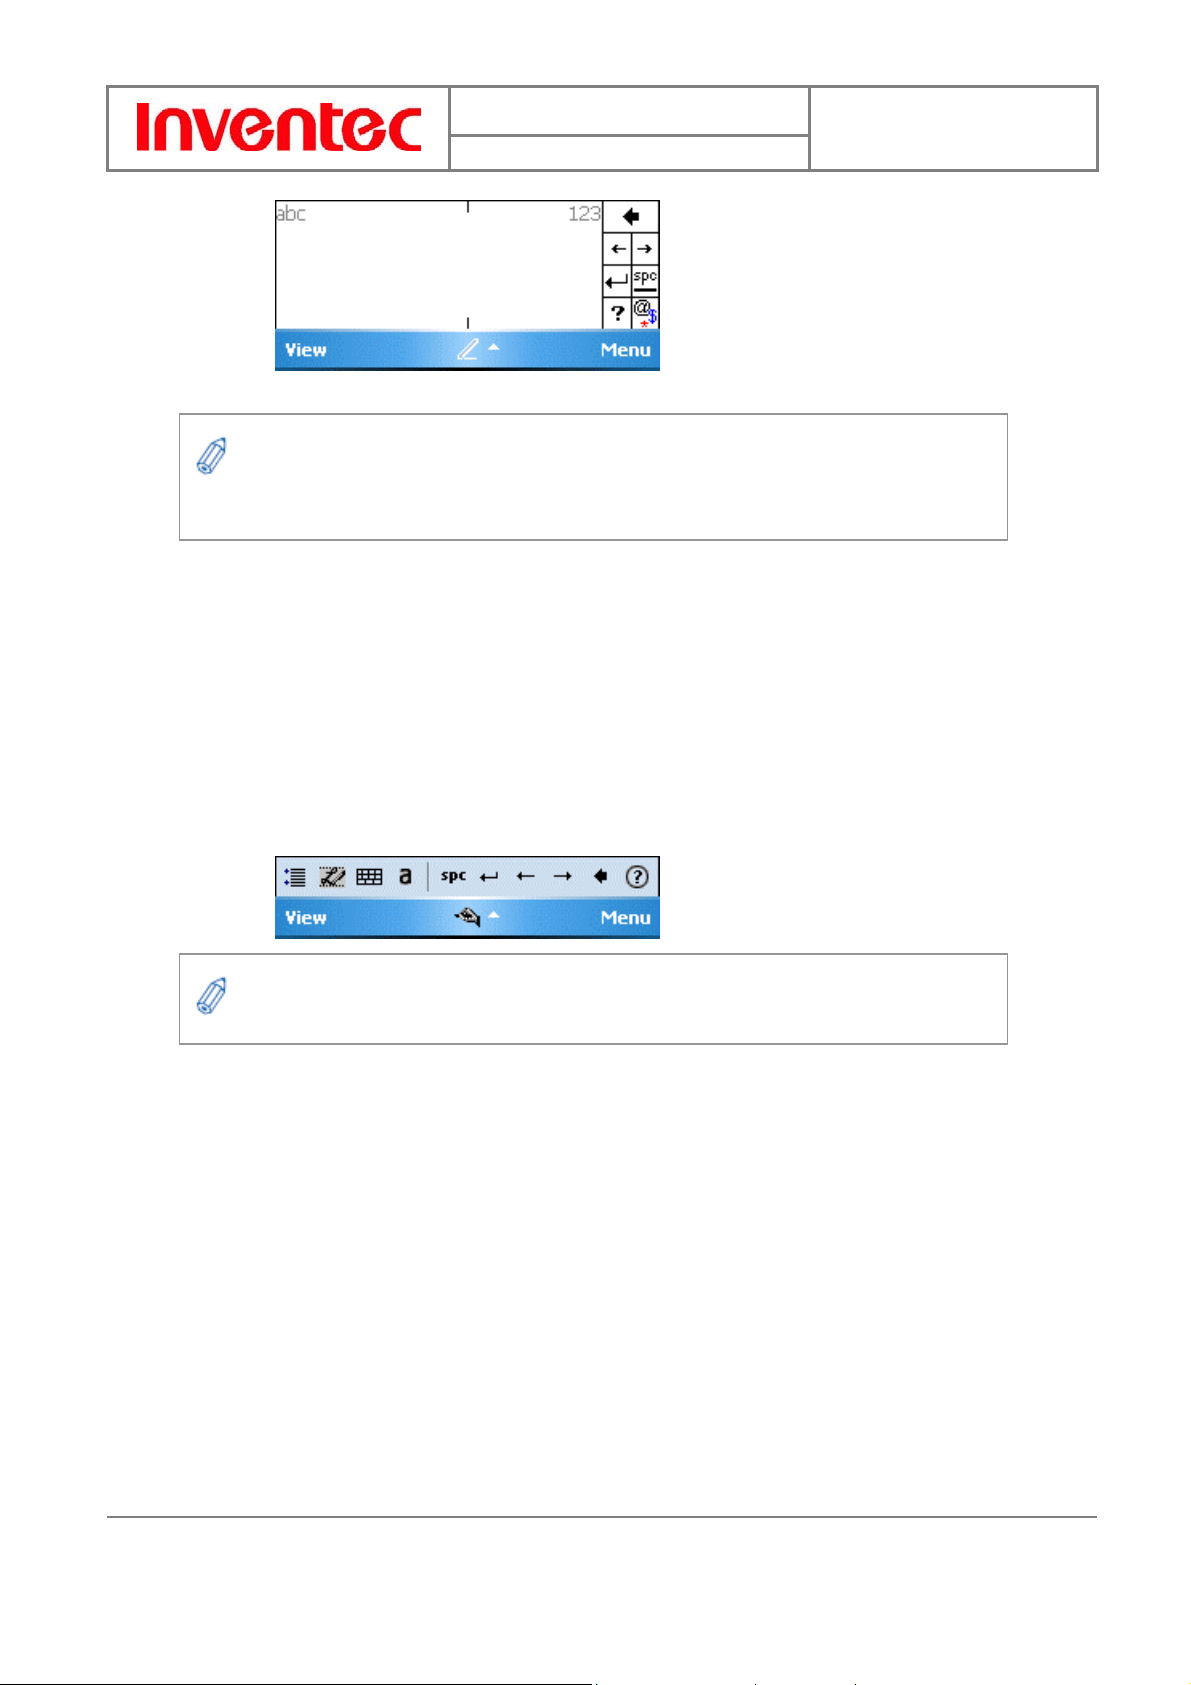
Transcriber
Transcriber recognizes hand writings in cursive and/or print. It uses the full screen as its
recognition area. It interprets the movem ent of the stylus on the screen as you write.
Mercury
版 本 : 1.3
日 期 : 95/03/10
To launch Transcriber, tap the input method selector arrow (the upward arrow next
to the input method icon) and select Transcriber.
Write anywhere on the screen.
The Transcriber comes with a detailed help. Tap ? if you need further assistance.
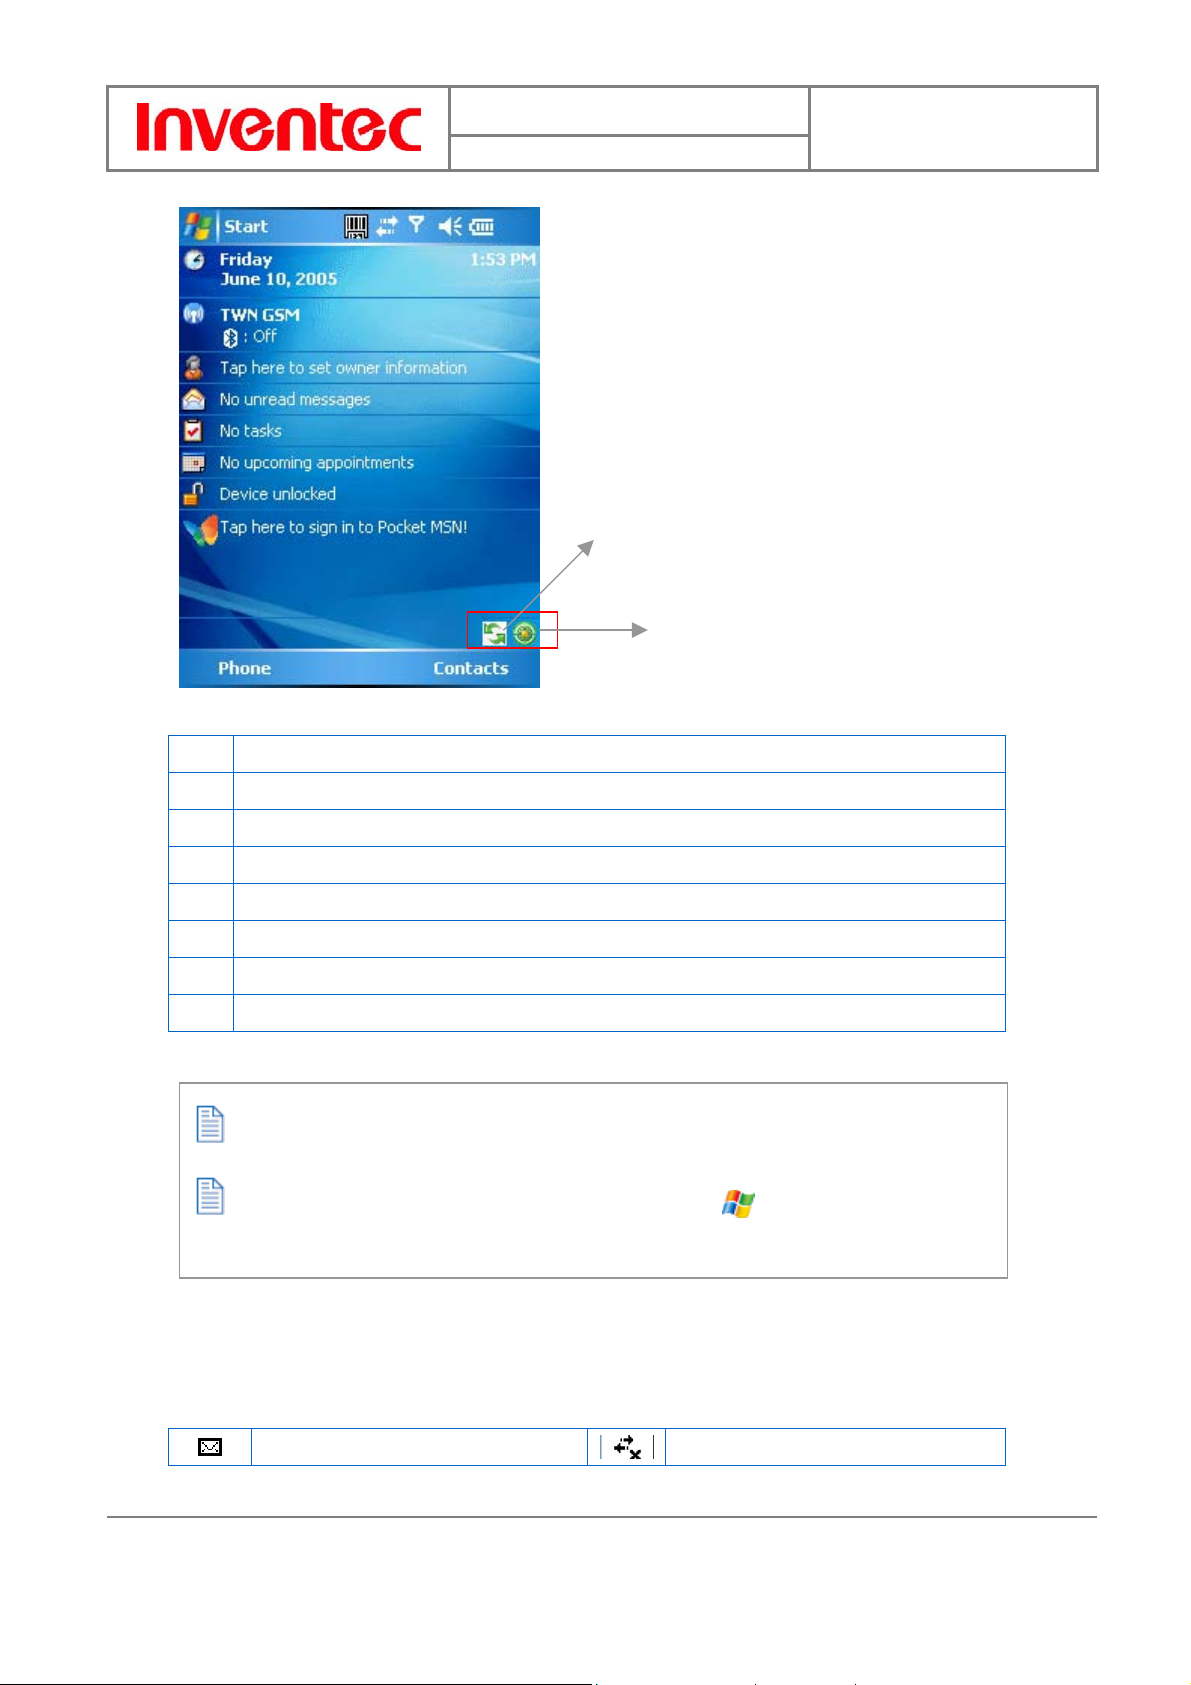
2.3 Today Screen Components
Today Screen
The Today Screen is usually the first screen that appears when you turn on the device for the
first time each day. It displays a summary of information for the day, shows you the system
status and contains a list of shortcuts to programs. The Today screen looks like this:
25
INVENTEC CORPORATION
英業達股份有限公司
Page 26
User Manual
Mercury
Tap here to rotate the screen
Tap here to trigger the Wireless Manager
版 本 : 1.3
日 期 : 95/03/10
1 Date and time
2 Wireless status (GSM, Wi-Fi, and Bluetooth)
3 Owner information
4 Unread messages including text messages, MMS messages, and e-mails
5 Active tasks
6 Upcoming appointments
7 Device lock status
8 Sign in to Pocket MSN
You can also access the Today screen by selecting Today from the Start menu.
To change the items showed in the Today screen, tap > Settings > Today >
Items tab.
Icon Indicators
Status indicators appear at the top of the screen and on the Toady screen. The following table
lists common status indicators and their meanings.
New e-mail or text message (SMS)
26
INVENTEC CORPORATION
英業達股份有限公司
Connection is not active
Page 27
User Manual
① ②
③
New voice mail
New instant message
Voice call
Voice call in progress
Data call in progress
Calls are forwarded
Call on hold
Missed call
Battery level
Low battery
Battery charging
Extremely low battery
Battery charging
Signal strength
Bluetooth bonding in progress
No signal
Flight mode Scanner Information (on/off)
No service
Mercury
Synchronization in progress
Ringer on
Ringer off
Roaming
No Voice mail
Voice mail Lines 1
Call Forwarding Lines 1
Alarm
GPRS available
GRPS in use
No SIM card installed
Wi-Fi connection in progress
Ringer in vibration mode
Function key on
Synchronization error
Caps Lock on
Connection is active
版 本 : 1.3
日 期 : 95/03/10
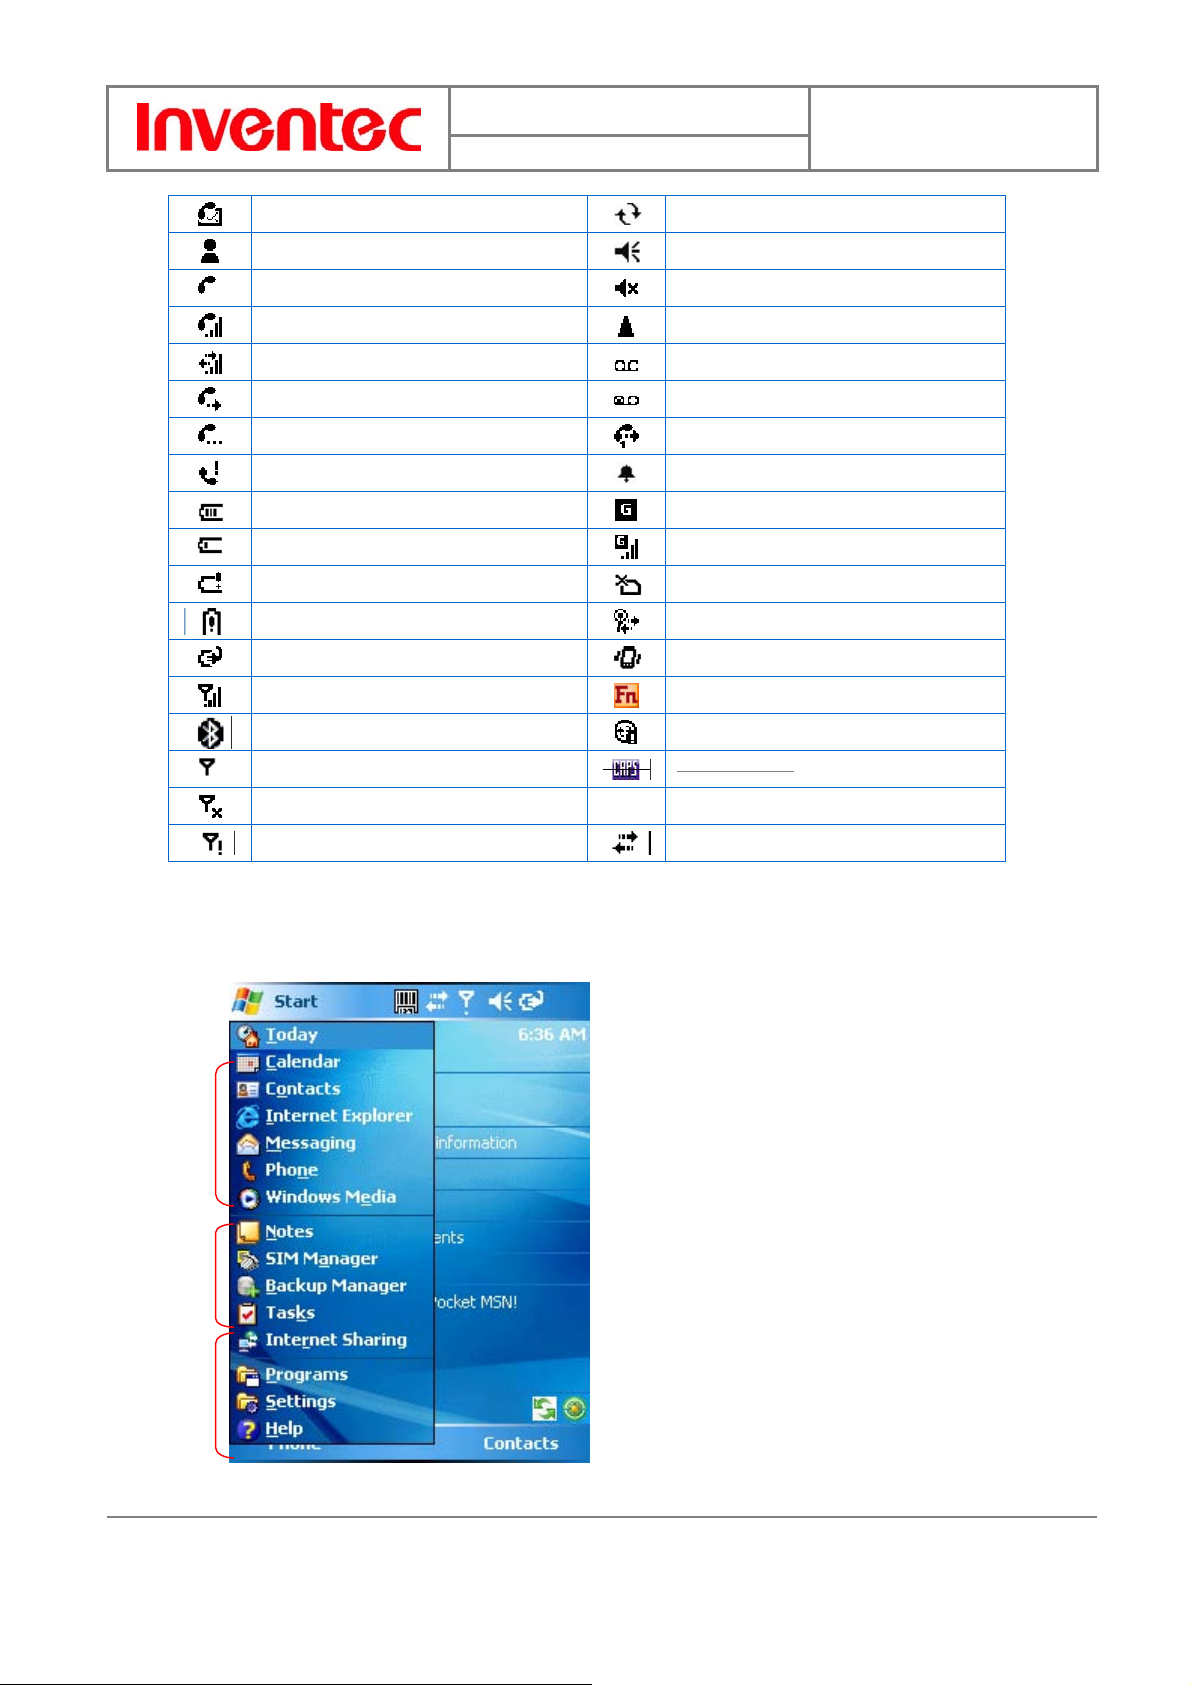
2.4 The Start Menu
The Start menu is divided into 3 groups as described in the following:
27
INVENTEC CORPORATION
英業達股份有限公司
Page 28

User Manual
1 Commonly used items
2 Recently accessed applications
3 List of all programs, device settings, and system help
List of All Programs
The following table lists icons of the programs that are already installed on your device.
ActiveSync Synchronizes information between your device and a PC. See
Calculator Performs basic arithmetic and calculations such as addition,
“Chapter 4. Synchronizing Information” for details.
Mercury
版 本 : 1.3
日 期 : 95/03/10
Download
Agent
Excel Mobile See “10.2 Excel Mobile” for details.
File Explorer Lets you organize and manage the files on your device.
Games Windows Mobile comes with 2 games: Bubble Breaker and
Internet
Sharing
Notes See “2.7 Notes” for details
Pictures &
Video
Pocket MSN Lets you send and receive instant messa ges with your MSN
subtraction, multiplication, and division.
Lets you download Windows Mobile updates.
Solitaire.
Lets you use your device as an external modem for a PC,
connecting through an USB port and Bluetooth.
Collects, organizes, and sorts picture and video files in the My
Pictures folder on your device or on a storage card.
PowerPoint
Mobile
Search Searches the data stored in your device.
SIM Manager Lets you manage your SIM card.
Tasks Keeps track of your tasks. See “2.8 Tasks” for details
Terminal
Services Client
Messenger contacts.
See “10.3 PowerPoint Mob ile” for details.
Allows you to log on to a PC running Terminal Services or
Remote Desktop. (and use all the resources available on that
28
INVENTEC CORPORATION
英業達股份有限公司
Page 29
Word Mobile See “10.1 Word Mobile” for details.
2.5 Settings
Personal
Buttons Configure the device’s buttons.
Input Input method configurations.
Lock Set a password to unlock the device.
Menus Configure the Start menu.
User Manual
PC)
Mercury
版 本 : 1.3
日 期 : 95/03/10
System
MSN Options Configure MSN services.
Owner
Information
Phone Configure the Phone features. See “Chapter 3 Phone Features”
Sounds &
Notifications
Today Configure the Today screen items and theme.
About Windows Mobile information and device name.
Backlight Configure the display backlight.
Enter information about the owner of the device.
for details.
Configure program and event sounds.
Barcode Setting Change settings of barcode scanner
Certificates Manage personal and root certificates.
Clock & Alarms Set time and alarms.
29
INVENTEC CORPORATION
英業達股份有限公司
Page 30
User Manual
DeviceInfo Display the device software and hardware version.
Error Reporting Enable or disable Microsoft product error reporting.
Factory Reset Lets you reset all settings to manufacturer default.
Memory Memory and process management.
Power Power management settings.
Mercury
版 本 : 1.3
日 期 : 95/03/10
Regional
Settings
Remove
Programs
Screen Lets you align the screen. See “Calibrating Your Device” of
Connections
Beam Turn on/off the beam featur e.
Bluetooth Configure Bluetooth settings. See “Chapter 5
Connections Configure the device’s connections.
Network Cards Configure Network adapter.
Configure the device’s locale.
Remove an install application.
Chapter 2 for details.
Bluetooth/Infrared Connections” for detail.
USB to PC Enable/Disable advanced network functionality.
Wireless
Manager
Turn on/off wireless and phone features with the Wireless
Manager.
2.6 Using Calendar
Use Calendar to schedule appointments, including meetings and other events. Your
appointments for the day can be displayed on the Today screen. If you use Outlook on your PC,
you can synchronize appointments between your device and PC. You can also set Calendar to
remind you of appointments with a sound or flashing light, for example.
You can look at y our appointments in se ver al differ ent views (Day, Week, Month, and Agenda).
30
INVENTEC CORPORATION
英業達股份有限公司
Page 31

User Manual
To see detailed appointment information in any view, tap the appointment. For information
about changing the Calendar view, see Change views in Calendar.
Scheduling an Appointment
Mercury
版 本 : 1.3
日 期 : 95/03/10
1. Either tap
2. Tap Menu > New Appointment.
3. Enter information about the appointment.
> Calendar or tap the appointment reminder on the Today Screen.
4. To schedule an all-day event, under All Day, select Yes.
31
INVENTEC CORPORATION
英業達股份有限公司
Page 32

A
5. Select categories and attendees.
User Manual
Mercury
版 本 : 1.3
日 期 : 95/03/10
Categories: Business, Holiday,
Personal, Seasonal
dd attendees to the meeting.
6. Tap
All-day events do not occupy blocks of time in Calendar; instead, they appear in
banners at the top of the calendar.
Deleting an Appointment
1. Tap
2. In Agenda view, select the appointment to delete.
3. Tap Menu > Delete Appointment.
.
> Calendar.
32
INVENTEC CORPORATION
英業達股份有限公司
Page 33

User Manual
Mercury
版 本 : 1.3
日 期 : 95/03/10
4. If the appointment is recurring, tap Yes to delete the series, or tap No to delete only
the current occurrence.
33
INVENTEC CORPORATION
英業達股份有限公司
Page 34

User Manual
r
When you delete an appointment in Calendar on your phone, it is also deleted on you
PC the next time you synchronize. If the appointment has not bee n synchronized with a PC,
it will be deleted only form the phone.
Calendar items can be deleted only from Agenda view or from an open calendar
appointment. To delete from other vi ews, open the appointment, and Tap Menu > Delete.
Changing the Reminder Time
By default, the reminder time is set 15 minutes prior to an appointment.
Mercury
版 本 : 1.3
日 期 : 95/03/10
1. Tap
2. Tap Menu > Options.
3. Tap Appointment tab and change the time.
> Calendar.
4. Tap
Changing Calendar Views
You can look at your appointments in Agenda, Day, Week, or Month view. To see detailed
appointment information in any view , tap the app ointment. To see a list of available actions for
an appointment, tap and hold the appointment.
.
34
INVENTEC CORPORATION
英業達股份有限公司
Page 35

User Manual
1. Tap > Calendar.
2. Tap Menu > View and select the view you want.
View See Screen
Agenda Your current day's activities at a
glance. Upcoming appointments are
bold; past appointments are dimmed.
Mercury
版 本 : 1.3
日 期 : 95/03/10
Day Your schedule for a single day in a
day-planner layout. Free and busy
times in time slots of 1/2 hour or 1
hour.
35
INVENTEC CORPORATION
英業達股份有限公司
Page 36

User Manual
Week Your schedule for the whole week.
Mercury
版 本 : 1.3
日 期 : 95/03/10
Month Your free and booked days for a
month:
: Current day
: morning appointment
: afternoon appointment
: morning and afternoon
appointments
: all-day event with time not
marked free
36
INVENTEC CORPORATION
英業達股份有限公司
Page 37

User Manual
y
Year A calendar for the entire year.
Mercury
版 本 : 1.3
日 期 : 95/03/10
In Month view, a date will appear in red when the Holiday category is assigned to an
appointment for that day.
You can also change the view by tapping Agenda, Day, Week, Month, or Year on the
menu bar.
To quickly see your appointments for the current day, tap Start > Today.
Changing the Display of the Work Week
1. Tap
2. Tap Menu > Options and do one of the flowing:
To specify the first day of the week, in 1
> Calendar.
Monday.
day of week, tap Sunday or
st
37
INVENTEC CORPORATION
英業達股份有限公司
Page 38

User Manual
Mercury
版 本 : 1.3
日 期 : 95/03/10
To specify the number of days you want to appear in a week, in Week view,
tap 5-day week, 6-day week, or 7-day week.
3. Tap
.
38
INVENTEC CORPORATION
英業達股份有限公司
Page 39

User Manual
Mercury
版 本 : 1.3
日 期 : 95/03/10
2.7 Using Notes
Notes helps you to quickly capture thoughts, questions, reminders, to-do lists, and meeting
notes. You can create handwritten and typed notes, record voice n otes, convert handwritten
notes to text for easy readability, and send notes to others.
Your notes and recor dings ar e displa yed in the note list. If y ou ha ve a long list, tap the sort list
(labeled Name by default), and select the option you want. To open a note or play a recording,
tap it. To see a list of available actions for a note or recording, tap and hold the note or
recording.
Setting the Default Input Mode
1. Tap
2. Tap Menu > Options.
3. Select one of the following modes in Default mode:
Select Writing if you prefer your notes to be handwritten.
Select Typing if you would like your notes to be typed.
> Programs > Notes.
4. Tap
Creating a Note
1. Either tap
side of the device.
.
> Programs > Notes or press the Voice Record button on the left
39
INVENTEC CORPORATION
英業達股份有限公司
Page 40

User Manual
Mercury
Press the Voice Record button on the left side to launch
版 本 : 1.3
日 期 : 95/03/10
2. Tap New and enter text.
Notes. (incorrect picture)
3. Tap
Creating a Stand-alone Voice Recording
1. Tap
2. If the recording toolbar is not shown, tap Menu > View Recording Toolbar.
3. Tap the RECORD button
microphone to record your voice in the notes list.
4. Tap the STOP button
5. Tap
listed with a
to save your note.
> Programs > Notes.
on the recording toolbar and speak to the device’s
on the recording toolbar when finished.
to return to the notes list. In the notes list a stand-alone voice recording is
icon.
40
INVENTEC CORPORATION
英業達股份有限公司
Page 41

User Manual
Mercury
版 本 : 1.3
日 期 : 95/03/10
Switching between Typing/Writing Modes
1. Tap
2. Create a new note or open an existing note from the notes list.
3. Tap Menu > Draw to switch to a different mode.
> Programs > Notes.
While in typing mode, tap Draw to switch to writing mode
41
INVENTEC CORPORATION
英業達股份有限公司
Page 42

User Manual
Mercury
版 本 : 1.3
日 期 : 95/03/10
While in writing mode, tap Draw to switch to typing mode
Editing a Handwritten Note
Undo Ink/Redo
Tap Undo Ink to cancel or
reverse an action.
Re-execute an undone
action by tapping Redo.
42
INVENTEC CORPORATION
英業達股份有限公司
Page 43

Select All/Clear
User Manual
Mercury
版 本 : 1.3
日 期 : 95/03/10
Tap Select All to select all handwriting
Tap Clear to clear selected handwriting
Adding a Voice Recording to a Note
1. Tap
2. Create a new note or open an existing note from the notes list.
> Programs > Notes.
INVENTEC CORPORATION
英業達股份有限公司
43
Page 44

User Manual
3. If the recording toolbar is not shown, tap Menu > View Recording Toolbar.
Record
Mercury
版 本 : 1.3
日 期 : 95/03/10
Stop
Play
4. Tap the RECORD
microphone.
5. Tap the STOP
6. Tap
to return to the notes list if you are adding a voice recording to a note.
button on the recording toolbar and speak to the device’s
button on the recording toolbar when finished.
Add a voice recording to a note in typing mode
44
INVENTEC CORPORATION
英業達股份有限公司
Page 45

User Manual
Mercury
版 本 : 1.3
日 期 : 95/03/10
Add a voice recording to a note in writing mode
Deleting a Note
1. Tap
2. Tap and hold the note and tap Delete.
> Programs > Notes.
45
INVENTEC CORPORATION
英業達股份有限公司
Page 46

User Manual
3. Tap the Yes button to delete the selected note.
Mercury
版 本 : 1.3
日 期 : 95/03/10
Creating a Default Template
1. Tap
2. Tap Menu > Options.
> Programs > Notes.
3. Select a template from Default template.
INVENTEC CORPORATION
英業達股份有限公司
46
Page 47

User Manual
Mercury
版 本 : 1.3
日 期 : 95/03/10
Template Screen
Blank
47
INVENTEC CORPORATION
英業達股份有限公司
Page 48

Meeting Notes
User Manual
Mercury
版 本 : 1.3
日 期 : 95/03/10
Memo
48
INVENTEC CORPORATION
英業達股份有限公司
Page 49

Phone Memo
User Manual
Mercury
版 本 : 1.3
日 期 : 95/03/10
To Do
2.8 Using Tasks
Use Tasks to keep track of things y ou need to do. A task can occur once or repeatedly
(recurring). You can set reminders for your tasks and you can organize them by using
categories.
Your tasks are displayed in a task list. Overdue tasks are displayed in red.
49
INVENTEC CORPORATION
英業達股份有限公司
Page 50

User Manual
If you use Outlook on your PC, you can synchronize tasks between your device and PC so that
tasks you create or update on your PC will also be updated on your device and vice versa.
To quickly see the number of active tasks you have, tap Start > Today.
Creating a Task
1. Tap > Programs > Tasks.
2. Do one of the following:
In the Tap here to add a new task box enter the task name and press ENTER
key.
Tap Menu > New Task and enter details about the new task.
Mercury
版 本 : 1.3
日 期 : 95/03/10
1. Enter or select a subject.
50
INVENTEC CORPORATION
英業達股份有限公司
Page 51

User Manual
Mercury
版 本 : 1.3
日 期 : 95/03/10
2. Select a completion status.
3. Pick the start and due time.
51
INVENTEC CORPORATION
英業達股份有限公司
Page 52

User Manual
Mercury
版 本 : 1.3
日 期 : 95/03/10
4. Set a reminder date/time and pick a task category.
Set reminder date and time.
52
INVENTEC CORPORATION
英業達股份有限公司
Page 53

User Manual
5. Select task sensitivity.
Mercury
版 本 : 1.3
日 期 : 95/03/10
Multi-selection
You can synchronize information on your phone with your PC to keep your task list up
to date in both locations.
If you create a new task with a reminder on your PC and then synchronize tasks with
your phone, the reminder will play at the time it was set on your PC.
53
INVENTEC CORPORATION
英業達股份有限公司
Page 54

Deleting a Task
User Manual
Mercury
版 本 : 1.3
日 期 : 95/03/10
1. Tap
2. Select the task, and tap Menu > Delete Task.
> Programs > Tasks.
Changing Task Priority
1. Tap
2. Select the task, and tap Edit.
3. In the Priority box, select a priority.
> Programs > Tasks.
54
INVENTEC CORPORATION
英業達股份有限公司
Page 55

Sorting/Filtering Your Tasks
User Manual
Mercury
版 本 : 1.3
日 期 : 95/03/10
1. Tap
2. Do one of the following:
To sort the tasks, tap Menu > Sort by and select a sorting option.
To filter the tasks by category, tap Menu > Filter and select a category to
> Programs > Tasks.
display.
Setting Tasks Options
1. Tap
2. Tap Menu > Options, there are 3 options you can set:
Set reminders for new items
Show start and due dates
Show Tasks entry bar
> Programs > Tasks.
55
INVENTEC CORPORATION
英業達股份有限公司
Page 56

User Manual
Mercury
版 本 : 1.3
日 期 : 95/03/10
Viewing Task Details
1. Tap
2. Tap twice on a task to view the details.
> Programs > Tasks.
56
INVENTEC CORPORATION
英業達股份有限公司
Page 57

User Manual
Mercury
版 本 : 1.3
日 期 : 95/03/10
Charter 3. Phone Features
57
INVENTEC CORPORATION
英業達股份有限公司
Page 58

User Manual
g
Mercury
版 本 : 1.3
日 期 : 95/03/10
3.1 Using the Phone
You can use y our phone to make, receive, and k eep track of calls, and send text messages (SMS,
Short Message Service) and MMS (Multimedia Messaging Service) messages. You can also dial
a phone number directly from Contacts, and easily copy SIM contacts to Contacts on the phone.
The Phone Screen
From the Phone screen, you can open, call, or find a contact, and even save a new number in
Contacts. To access the Phone screen, do any of the following:
Press Talk ( ). (Incorrect icon)
Tap
Activating PIN Security
Most Subscriber Identity Module (SIM) cards are preset with a personal identification number
(PIN) that is provided by your wireless service provider. When PIN Security is activated, you
need to enter the PIN whenever you use your phone.
1. Tap
2. Enter the preset PIN provided by your wireless service provider.
3. Tap Enter.
Setting Ring Tones
If your PIN is entered incorrectly three times, the SIM card will be blocked. If this
happens, you can unblock it with the PIN Unblockin
service provider.
> Phone.
> Settings > Phone > Select Require PIN when phone is used.
Key (PUK) obtained from y our wireless
You can choose how to be notified for incoming calls, reminders, new messages, alarms, and
more.
To set a ring tone for incoming calls:
1. Tap
2. In the Ring tone list, select a ring tone.
3. Tap
> Settings > Phone.
.
INVENTEC CORPORATION
英業達股份有限公司
58
Page 59

User Manual
To adjust t he earpiece v olume during a call, pr ess the VOL UME control on th e phone
side panel. Adjusting the volume at any other time can affect the ring and notification and
MP3 sound levels.
Mercury
版 本 : 1.3
日 期 : 95/03/10
3.2 Making a Call
Making a Call by Entering a Phone Number
1. On the Phone screen, begin entering the phone number.
2. Do one of the following:
If you see the number or contact name to call, select it, then tap [ Talk] or
press the TALK (?) key.
If you do not see the number or contact name, finish entering the number,
then tap [ Talk] or press the TALK (?) key.
TALK/Send Key END Key
Tap the Backspace ( ) button once to erase one single number; tap and hold the
Backspace ( ) button to erase a whole string of numbers.
59
INVENTEC CORPORATION
英業達股份有限公司
Page 60

User Manual
Making a Call from Call History
Call History displays calls you have made, received, and missed.
1. On the Phone scr een, tap the Call History button on the Phone keypad.
Mercury
Call History
版 本 : 1.3
日 期 : 95/03/10
1. Calls you received
2. Calls you made
3. Calls you missed
2. Select the name or phone number to call.
3. Tap Call or press the TALK key.
Making a Call from Contacts
1. On the Phone scr een, tap Contacts.
2. Tap the desired contact and tap Call or press the TALK Key to dial.
You can tap on the desired contact in the list and tap on the number you want to dial.
You can also tap and hold the desired contact in the list and select Call Work, Call
Home, or Call Mobile from the pop-up submenu.
Making a Call from Speed Dial
You can create speed dial entries for frequently-called numbers or frequently-accessed items so
you can dial a number by pressing a single key. For example, if you assign location 2 to a
contact in Speed Dial, you can simply press and hold 2 on the Phone keypad to dial the
60
INVENTEC CORPORATION
英業達股份有限公司
Page 61

User Manual
contact’s number. Speed dials can be created only for numbers that are stored in Contacts.
To create a speed dial entry for a contact
1. On the Phone scr een, tap Contacts.
2. Tap the contact for whom to create a speed dial.
3. Select the phone number for which to create a speed dial.
4. Tap Menu > Add to Speed Dial.
Mercury
版 本 : 1.3
日 期 : 95/03/10
5. In Location, select the speed dial number to use.
61
INVENTEC CORPORATION
英業達股份有限公司
Page 62

User Manual
Mercury
版 本 : 1.3
日 期 : 95/03/10
6. Tap
Tap the Speed Dial button on the phone screen to check the success of creating a Speed
Dial entry.
The first speed dial location is generally reserved for your voicemail. Speed Dial uses
the next available location by default. If you want to place a number in a location that is
already used, the new number replaces the existing number.
To retrieve a voicemail message (???)
On the Today screen, press and hold 1 to acc ess y our v oice mailb o x, and follow the
To delete a speed dial entry
In the Speed Dial list, tap Menu > Delete.
when finished.
prompts to retrieve your messages.
Receiving/Rejecting a Call
When you receive a phone call, you have the option to answer it or ignore it.
To receive a call
Tap Answer or press TALK ( 換圖) to accept an incoming call.
To end a call
Tap Ignore or press END (
To block incoming or outgoing calls
You will not be able to receive or make calls according to the options you choose.
1. Tap
2. Tap Call Barring > Get Settings.
> Settings > Personal tab > Phone > Services tab.
換圖) to hang up a call.
62
INVENTEC CORPORATION
英業達股份有限公司
Page 63

User Manual
Mercury
版 本 : 1.3
日 期 : 95/03/10
3. Choose the calls you want to block, and tap
Block incoming calls: All calls, When roaming, Off.
Block outgoing calls: All calls, International, International except to home
country, Off.
.
3.3 In-Call options
Your phone provides various options for managing multiple calls at the same time. You are
63
INVENTEC CORPORATION
英業達股份有限公司
Page 64

User Manual
notified when you have another incoming call, and you have the choice of ignoring or accepting
the call. If you are already on a call and accept the new call, you can choose to switch between
the two callers, or set up a conference call between all three parties.
Mercury
版 本 : 1.3
日 期 : 95/03/10
In-Call Options
Conference Call
1. Either put a call on hold and dial a second number; or accept a second incoming call
when you have one in progress.
To dial a second number, tap the Hold
button first then tap Keypad to enter phone
numbers.
INVENTEC CORPORATION
英業達股份有限公司
64
To accept a second incoming call, tap
Answer.
Page 65

2. Tap Menu and select Conference.
User Manual
Mercury
版 本 : 1.3
日 期 : 95/03/10
If the conference connection is successful, the word “Conference” will appear at the
top of the screen. To add additional persons to your conference call, tap Hold, enter the
phone number, and then tap Swap to return and continue.
Not all service providers support conference calling. Contact your service provider for
details.
Call waiting
To turn call waiting notifications on and off
When you are in another call, you will be notified of an incoming call if this option is selected.
1. Tap
> Settings > Phone > Services tab > Call Waiting > Get Settings.
65
INVENTEC CORPORATION
英業達股份有限公司
Page 66

User Manual
Mercury
版 本 : 1.3
日 期 : 95/03/10
2. Select Notify me or Do not notify me, and tap
.
To answer another call
1. Click Answer to take the second call and put the first call on hold.
2. To end the second call and return to the first call, press END (
To switch between calls
66
INVENTEC CORPORATION
英業達股份有限公司
??).
Page 67

User Manual
To switch between two calls, click Swap.
Mercury
版 本 : 1.3
日 期 : 95/03/10
Turning On/Off the Speakerphone
Talk hands-free or let others hear your conversation with the built-in speakerphone in your
device.
Tap Speaker On during a call to turn the speaker on.
Tap Speaker Off to turn the speaker off.
To avoid damage to your hearing, do not hold your phone against your ear when the
Speakerphone is turned on.
Muting the microphone
The device’s microphone can be turned of f during a call. If you turn off the microphone the
caller cannot hear you. However, you can still hear the caller.
Tap Mute during a call to turn the microphone off.
Tap Unmute to turn the microphone on.
3.4 SIM Manager
The SIM Manager helps you to manage the phonebook in your SIM card. Using the SIM
Manager, you can easily transfer phonebook entries from your SIM card to Contacts.
67
INVENTEC CORPORATION
英業達股份有限公司
Page 68

User Manual
Adding a Phonebook Entry to SIM Card
Mercury
版 本 : 1.3
日 期 : 95/03/10
1. Tap
2. Tap Option > Add Entry and enter the name and phone number you want to add.
3. Tap the OK button.
> Programs > SIM Manager.
Deleting Phonebook Entries from SIM Card
1. Tap
2. Select the entries you want to delete by checking the checkboxes in front.
3. Tap Option > Delete Selected.
Saving Phonebook Entries to Contacts
1. Tap
2. Select the entries you want to save to Contacts by checking the checkboxes in front.
3. Tap Option > Add to Contacts.
4. Tap
> Programs > SIM Manager.
> Programs > SIM Manager.
to close the notification dialog box.
68
INVENTEC CORPORATION
英業達股份有限公司
Page 69

User Manual
Mercury
(Delete ?)
版 本 : 1.3
日 期 : 95/03/10
69
INVENTEC CORPORATION
英業達股份有限公司
Page 70

User Manual
Mercury
版 本 : 1.3
日 期 : 95/03/10
Chapter 4. Synchronizing Information
70
INVENTEC CORPORATION
英業達股份有限公司
Page 71

User Manual
ActiveSync synchronizes information on your phone with information on your PC such as
Outlook content. ActiveSync can also synchronize over a wireless or cellular network with
Exchange Server, if your company or service provider is running Exchange Server with
Exchange ActiveSync.
Specifically, you can use ActiveS y nc to:
Synchronize information such as Outlook e-mail, contacts, calendar, or tasks
information on your phone with your PC, as well as pictures, video, and music.
Synchronize Outlook e-mail, contacts, calendar appointments, and tasks on your
phone directly with Exchange Server so that you can stay up to d ate even when your
PC is turned off.
Copy files between your phone and your PC without synchronizing.
Select which types of information are synchronized and specify how much
information is synchronized. For example, you can choose how many weeks of past
Mercury
版 本 : 1.3
日 期 : 95/03/10
calendar appointments to synchronize.
4.1 Installing and setting up ActiveSync
1. Install ActiveSync on your PC, as described on the Windows Mobile™ Getting Started
Disc. After Setup completes, the Synchronization Setup Wizard automatically starts
when you connect your device to the PC.
2. Follow the instructions on the screen to complete the wizard. I n the Sync Setup
Wizard, you can:
Create a synchronization relationship between your PC and the device.
Configure an Exchange Server connection to synchronize directly with Exchange
Server. To synchr onize your device with Exchange Server, obtain the name of the
Exchange Server, your user name, password, and domain name from your
administrator before completing the wizard .
Choose information types to synchronize.
When you finish the wizard, ActiveSync synchronizes your phone automatically. Once
synchronization completes, you can disconnect your phone from your PC.
71
INVENTEC CORPORATION
英業達股份有限公司
Page 72

User Manual
Mercury
版 本 : 1.3
日 期 : 95/03/10
4.2 Synchronizing Information
To synchronize using ActiveSync, you must install ActiveSync on your PC before connecting
your device to the PC.
Starting and Stopping Synchronization Manually
1. Turn on the device.
2. Connect your device to your PC using a serial cable, USB cable, Bluetooth, or inf rar ed
connection. For more detailed information, see "Connecting a mobile device to a PC"
in ActiveSync Help on your PC.
3. On your device, tap > Programs > ActiveSync.
4. To start synchronization, tap Sync.
5. To stop synchronizing, tap Stop.
You can start and stop synchronization only if your device already has a sync
relationship with a PC or Exchange Server.
Some Anti-Virus software may conflict with ActiveSync.
ActiveSync synchronizes a limited amount of information by default to save storage space on
your phone. You can change the amount of information that is synchronized by performing the
following steps.
Changing Which Information is Synchronized
1. On the Today screen, click Start > Programs > ActiveSync.
2. Tap Menu > Options.
3. Do one or more of the following:
Select the check box for the items you want to synchronize. If you cannot select
a check box, you might have to clear the check box for the same information
type elsewhere in the list.
Clear the check box for any items you want to exclude.
To customize synchronization of a computer, select the computer name then
click Settings.
To customize synchronization of particular information, select the information
type then click Settings.
To stop synchronizing with one computer completely, select the comp uter name
and click Delete.
72
INVENTEC CORPORATION
英業達股份有限公司
Page 73

User Manual
Outlook e-mail can be synchronized with only one computer.
Mercury
版 本 : 1.3
日 期 : 95/03/10
4.3 Changing Settings for an Information Type
Before changing settings for an information type on the device, disconnect it from your PC.
1. Tap > Programs > ActiveSync > Menu > Options.
2. Select one of the information types.
3. Do one of the following:
To view or change settings for an inf ormation type (when available), tap
Settings.
To view or change settings for a computer or Exchange Server, tap Settings.
4. Change the amount of information to be synchronized or other settings.
5. Tap
(or Finish in the Exchange Server settings wizard).
4.4 Synchronizing with Exchange Server
To set up your device to synchronize directly with Exchange Server, you will need to get the
name of the server and the server domain name from your service pr ovider or system
administrator. You must also know your Exchange user name and password.
Before changing synchronization settings on the device, disconnect it from your PC.
1. On your device screen, tap
Server. If you have not yet set up sync with Exchang e Server, this will say Add
Server Source.
> Programs > ActiveSync > Menu > Configure
2. In Server address, enter the name of the server running Exchange Server, and tap
Next.
3. Enter your user name, password, and domain name, and tap Next.
4. If you want the device to save your password so that you will not need to enter it
again when connecting, select the Save password check box.
73
INVENTEC CORPORATION
英業達股份有限公司
Page 74

User Manual
g
5. Select the check boxes for the types of information items that you want to
synchronize with Exchange Server.
6. To change available synchronization settings, select the type of information, and tap
Settings.
7. To change the rules for resolving synchronization conflicts, tap Advanced.
8. Tap Finish.
You can also use the Sync Setup Wizard to set up the phone to synchronize remotely
with the Exchan
after installing ActiveSync on the PC.
e Server. This wizard is started when you connect your phone to your PC
Mercury
版 本 : 1.3
日 期 : 95/03/10
4.5 Synchronizing via Bluetooth
Connecting to a PC Using Bluetooth
1. Follow the instructions in ActiveSync Help on the PC f or configuring Bluetooth on your
PC to support ActiveSync.
2. Tap
3. Tap Menu > Connect via Bluetooth. Ensure that the device and PC are within
close range.
4. If this is the first time you have connected to this PC via Bluetooth, you must
complete the Bluetooth wizard on the phone and set up a Bluetooth partnership with
the PC before synchronizing.
5. Tap Sync.
6. When finished, tap Menu > Disconnect Bluetooth.
To preserve battery power, turn off Bluetooth.
> Programs > ActiveSync.
74
INVENTEC CORPORATION
英業達股份有限公司
Page 75

User Manual
Mercury
版 本 : 1.3
日 期 : 95/03/10
Chapter 5. Bluetooth Connections
75
INVENTEC CORPORATION
英業達股份有限公司
Page 76

User Manual
g
Mercury
版 本 : 1.3
日 期 : 95/03/10
5.1 Overview of Bluetooth
Bluetooth is a short-range wireless communications technology. Devices with Bluetooth
capabilities can exchange information over a distance of about 10 metres without requiring a
physical connection. You can even beam information to a device in a different room, as long as
it is within range.
The software included with your phone allows you to use Bluetooth in the following ways:
Beam information, such as files, appointments, tasks, and contact cards, between
devices that have Bluetooth capabilities.
Create a connection between your device and a Bluetooth phone to use the phone
as a modem.
Bluetooth Modes
Bluetooth on your phone operates in three different modes:
1. On. Bluetooth is turned on and you can use Bluetooth features.
2. Off. Bluetooth is turned off. In this m ode, you can neither send nor receive
information using Bluetooth. You might want to turn off the radio at times to
conserve battery power, or in situations where radio use is prohibited, such as
onboard an aircraft and in hospitals.
3. Visible. Bluetooth is turned on, and all other Bluetooth-enabled devices within a
range of 10 metres can detect your phone.
By default, Bluetooth is turned off. If you turn it on, and then turn off your phone,
Bluetooth also turns off. When you turn on your phone a
on.
Turning Bluetooth On or Off
1. Tap
> Settings > Connections tab> Bluetooth.
ain, Bluetooth automatically turns
76
INVENTEC CORPORATION
英業達股份有限公司
Page 77

User Manual
Mercury
版 本 : 1.3
日 期 : 95/03/10
2. Check or uncheck the checkbox in front of Turn on Bluetooth to turn on or off
Bluetooth.
Making Your Device Visible
To receive beamed information, beaming devices or computers must be able to detect your
device.
1. Tap
> Settings > Connections tab > Bluetooth.
77
INVENTEC CORPORATION
英業達股份有限公司
Page 78

User Manual
2. Select Make this device visible to other devices, and tap .
Mercury
版 本 : 1.3
日 期 : 95/03/10
Other Bluetooth-enabled devices can now detect your phone and attempt to beam information
to it, establish a Bluetooth partnership, or use a Bluetooth service.
Selecting Visible also turns on Bluetooth.
Turning off Bluetooth will make your device not visible, and it will also prevent you
from sending a Bluetooth beam.
5.2 Bluetooth Partnership (Bonding)
A Bluetooth partnership is a relationship that you create between your phone and another
Bluetooth-enabled device in order to exchange information in a secure manner. Creating a
partnership between two devices involves entering the same personal identification number
(PIN) on both devices, and this is a one-time process. Once a partnership is created, the
devices can recognize the partnership and exchange information without entering a PIN again.
Make sure the two devices are within a range of 10 meters, and Bluetooth is turned on and in
discoverable mode.
78
INVENTEC CORPORATION
英業達股份有限公司
Page 79

Creating a Bluetooth Partnership
User Manual
Mercury
版 本 : 1.3
日 期 : 95/03/10
1. Tap
2. Tap Add new device. Your device searches f or other Bluetooth-enabled devices and
displays them in the list.
> Settings > Connections tab> Bluetooth > Devices tab.
3. Select the device with which you want to create a Bluetooth partnership, and tap
Next.
Tap the Refresh button if the
device you want to connect is
not listed.
79
INVENTEC CORPORATION
英業達股份有限公司
Page 80

User Manual
4. In Passcode, if you want to use a passcode (recommended for enhanced security),
enter an alphanumeric passcode between 1 and 16 characters, and tap Next.
Otherwise, leave the passcode blank.
Mercury
版 本 : 1.3
日 期 : 95/03/10
5. Enter the same passcode on the other device.
6. Select the service to u se from the device, and tap Finish.
80
INVENTEC CORPORATION
英業達股份有限公司
Page 81

User Manual
Once you create a partnership, the Bluetooth-enabled devices don't need to be visible
to beam information between them; Bluetooth needs only to be turned on.
Mercury
版 本 : 1.3
日 期 : 95/03/10
5.3 Beaming Information (Bluetooth)
Receiving Beamed Information
1. Tap
2. Select Receive all incoming beams.
> Settings > Connections tab > Beam.
81
INVENTEC CORPORATION
英業達股份有限公司
Page 82

User Manual
Mercury
版 本 : 1.3
日 期 : 95/03/10
3. To receive beams by using Bluetooth, ensure Bluetooth is turned on and that your
phone is discoverable and within close range.
4. Tap
Once you select Receive incoming beams, your phone automatically receives beams
until you clear this check box.
Your phone can receive all types of beamed files, but you may not be able to view all
types of files on the phone. You may need to copy some files to a PC for viewing.
Beaming an Item
In the Calendar, Contacts, Notes, Tasks, and Pictures programs, you can beam files and
information to other devices using Bluetooth.
1. From the program, select the item you want to beam, such as an appointment in
Calendar, a task in Tasks, a contact card in Contacts, a picture in Pictur es, a file in File
.
Explorer. In Calendar, for example, first open the appointment in Agenda view.
2. Tap Menu > Beam.
3. Your device will search and show visible devices, select the device to which y ou want
to send the item.
82
INVENTEC CORPORATION
英業達股份有限公司
Page 83

User Manual
g
When using Bluetooth, if the device that you want to beam to doesn't appear in the
list, ensure that the device is turned on, visible, and within close ran
ensure that Bluetooth is turned on.
Mercury
版 本 : 1.3
日 期 : 95/03/10
e of your phone. Also,
83
INVENTEC CORPORATION
英業達股份有限公司
Page 84

User Manual
Mercury
版 本 : 1.3
日 期 : 95/03/10
Chapter 6. Transferring Files To and From Your Device
84
INVENTEC CORPORATION
英業達股份有限公司
Page 85

User Manual
A
You may need to transfer application data such as Word documents, Exc el spreadsheets,
PowerPoint slides, and/or media files from your PC to your device. This section describes
different methods to transfer files from a PC to your device.
Mercury
版 本 : 1.3
日 期 : 95/03/10
6.1 Using ActiveSync
To transfer files from PC to your device with ActiveSync, you must install Microsoft
ctiveSync on the PC first. Please refer to Chapter 4 Synchronizing Information for detail on
how to install and set up ActiveSync.
1. Connect your device to the PC with the USB cable. Microsoft ActiveSync should be
automatically launched on the PC if it is set up correctly.
2. Select an information type under Synchronization Options in the Synchr onization
Setup Wizard by checking the checkbox in front of it.
3. Click the Settings button and add the files you want to transfer. Click the OK button
when you finish.
4. Click Next, and then click Finish to start the synchronization process.
5. On your device, tap
to My Documents. Check to see if the files have been transferred to your device
successfully.
> Programs > File Explorer. The files should be saved
85
INVENTEC CORPORATION
英業達股份有限公司
Page 86

User Manual
Mercury
版 本 : 1.3
日 期 : 95/03/10
6.2 Transferring from Memory Cards
1. Insert your memory card into the device’s mini-SD card slot. (See “1.5 Mini-SD
cards” for details.)
2. Tap
3. In the Show list, select Storage Card.
> Programs > File Explorer.
86
INVENTEC CORPORATION
英業達股份有限公司
Page 87

User Manual
4. File Explore should display all the files stored in your memory card. Tap and hold the
file you want to transfer, and select Copy.
5. From the Show list in File Explor er, go to destination folder. (For example, My
Device > My Documents.)
6. Tap Menu > Edit > Paste.
Mercury
版 本 : 1.3
日 期 : 95/03/10
6.3 Using Bluetooth
Before receiving files, you must turn Bluetooth on and establish a Bluetooth
partnership between your PC and your device. (See “Chapter 5. Bluetooth/Infrared
Connections” for details.)
1. On your PC, locate the file you want to send using Bluetooth with Windows Explorer .
2. Right-click the file and select the device you want to transfer the file to under “to
Bluetooth.”
3. Tap Yes when your device prompts about receiving a file.
4. After the transmission process is finished, the file should be saved in your device
under My Documents in the File Explorer.
87
INVENTEC CORPORATION
英業達股份有限公司
Page 88

User Manual
6.4 Transferring to a PC or Other Devices
Please refer to Section 5.3 “Beaming Information (Bluetooth)” for details.
Mercury
版 本 : 1.3
日 期 : 95/03/10
88
INVENTEC CORPORATION
英業達股份有限公司
Page 89

User Manual
Mercury
版 本 : 1.3
日 期 : 95/03/10
Chapter 7. Connecting to the Internet
89
INVENTEC CORPORATION
英業達股份有限公司
Page 90

User Manual
Mercury
版 本 : 1.3
日 期 : 95/03/10
7.1 Setting up Internet connections
Your device’s powerful networking capabilities allow you to access the Internet or your
corporate network at work through wireless and conventional connections. Specifically, you c an
configure your device to establish a connection via GPRS or Proxy.
With an active connection on your device, you can browse the Web, download e-mails, or use
MSN Messenger. Check with your service provider to see if a connection has already been set
up for you, and if over-the-air configuration is supported.
If you need to manually set up a connection, it is important that you obtain the following
information from your Internet Service Provider (ISP) or the company whose intranet you are
trying to access:
User name
Password
Access point name (required for GPRS connection)
Domain name (required for accessing a corporate network or an intranet)
Creating a GPRS Connection
Every network connection is different. You should gather all of the relevant information or
network settings you need before starting this process.
1. Tap
> Settings > Connections tab > Connections.
90
INVENTEC CORPORATION
英業達股份有限公司
Page 91

User Manual
2. Tap Add a new modem connection.
Mercury
版 本 : 1.3
日 期 : 95/03/10
3. Enter the following information (you may or may not need to enter all of the following
information), and tap Finish.
Enter a name for the connection.
In Select a modem, select Cellular Line (GPRS).
In Access point name, enter the access point name.
91
INVENTEC CORPORATION
英業達股份有限公司
Page 92

User Manual
Mercury
版 本 : 1.3
日 期 : 95/03/10
In User name, enter your user name for the GPRS network, if required.
In Password, enter your password, if required.
Tap Advanced > Servers tab. In DNS, enter the primary Domain Name
System (DNS) address, if required.
In Alt DNS, enter the secondary DNS address, if required.
Tap TCP/IP tab. In Use specific IP address, enter the Internet Protocol (IP)
address for the device, if required.
The phone uses this connection when you open a program that connects to the Internet.
92
INVENTEC CORPORATION
英業達股份有限公司
Page 93

User Manual
Creating a Proxy Connection
Every network connection is different. You should gather all of the relevant information or
network settings you need before starting this process.
Mercury
版 本 : 1.3
日 期 : 95/03/10
1. Tap
2. Tap Edit my proxy server.
3. Check the checkbox in f ront of This network connects to the Internet.
> Settings > Connections tab > Connections.
4. Check the checkbox in f ront of This network uses a proxy server to connect to
the Internet.
5. Under Proxy server, enter the proxy server name.
6. If the proxy server uses a different port or requires a username and password tap
Advanced, select the proxy type to change its settings, then enter username,
password and/or port number in the proper fields.
7. Tap
Deleting a Connection
1. Tap
2. Tap Manage existing connections.
3. Tap and hold on the connection you want to delete and select Delete.
.
> Settings > Connections tab > connections..
93
INVENTEC CORPORATION
英業達股份有限公司
Page 94

User Manual
Mercury
版 本 : 1.3
日 期 : 95/03/10
The device can not connect to a PC through ActiveSync while connecting to the
Internet using GPRS.
7.2 Using Internet Explorer Mobile
Internet Explorer Mobile is a full-featured Web browser, optimized for use on your phone. You
can use Internet Explorer Mobile to browse the Internet once you have set up your Internet
connection (if you haven’t done so, please read the previous chapter before continuing).
Browsing the Internet
1. To browse the Internet you must have a valid connection established.
2. Tap
3. Do either of the following:
Enter the address in the address bar, and tap
Tap Favorites then select a Web Page.
> Internet Explorer.
.
94
INVENTEC CORPORATION
英業達股份有限公司
Page 95

User Manual
A
Mercury
版 本 : 1.3
日 期 : 95/03/10
Adding a Web Page to the Favorite List
1. Tap
2. To go to the page you want to add, tap Menu > Add to Favorites.
3. Confirm or change the name and Web page address.
4. In Create in, select a folder for this favorite.
5. Tap Add.
A quick way to add favorites to your phone is to synchronize with your PC using
ctiveSync. For more information, see ActiveSync Help on your PC.
Deleting a Favorite
1. Tap
2. Tap Favorites.
3. Tap Add / Delete tab.
> Internet Explorer.
> Internet Explorer.
4. Select the favorite to delete.
5. Tap the Delete button.
6. Tap Yes to confirm the deletion.
95
INVENTEC CORPORATION
英業達股份有限公司
Page 96

User Manual
Changing the Size of Text on Web Pages
Mercury
版 本 : 1.3
日 期 : 95/03/10
1. Tap
2. Tap Menu > Zoom and select the size you want.
There are five zoom options you can select: Largest / Larger / Medium / Smaller /
Smallest.
Showing or Hiding Pictures on Web Pages
1. Tap
2. Tap Menu > View > Show Pictures.
A check mark next to Show Pictures indicates that pictures will be displayed.
Changing Web Page Display Options
1. Tap
2. Tap Menu > View.
3. Select one of the following:
One Column. Arranges the content into one column that is as wide as the
Default. Maintains a layout similar to what you see on a desktop computer, but
> Internet Explorer.
> Internet Explorer.
> Internet Explorer.
screen. This means that you will rarely have to scroll horizontally.
makes items smaller and arranges the content so that you can see most of it
without having to scroll horizontally.
Desktop. Keeps the same layout and size as on a desktop computer, which will
require both horizontal and vertical scrolling.
Clearing History, Cookies, or Temporary Files
1. Tap
2. Tap Menu > Tools > Options.
3. Tap Memory tab.
4. Select the typ e of memory to clear.
5. Tap Clear History or Delete Files, then tap
Viewing a Page in Full Screen Mode
1. Tap
2. Tap Menu > View > Full Screen.
> Internet Explorer.
> Internet Explorer.
.
96
INVENTEC CORPORATION
英業達股份有限公司
Page 97

User Manual
To exit full screen mode, press either SOFT KEY, and then tap Menu > View > Full
Screen to cancel the selection.
Mercury
版 本 : 1.3
日 期 : 95/03/10
7.3 Using Wi-Fi Connection
Wi-Fi is an enabling technology that allows you to quickly access e-mail, the internet, and
broadband multimedia content. When your device encounters a hotspot (a place where you can
access Wi-Fi networks), it can then connect to that network wir elessly. While some hotspots are
free, the most robust public Wi-Fi networks are provided by private internet service providers
(ISPs) that charge a fee for users to connect to the internet .
Connecting to a Wi-Fi Network
1. Tap (icon) to open Wireless Manager.
2. Tap the third button to turn on Wi-Fi connection.
3. Follow the prompts to finish related settings. When Wi-Fi connection is active, the (icon)
icon shows on the Today screen.
You may need to consult your ISP before running this utility.
97
INVENTEC CORPORATION
英業達股份有限公司
Page 98

User Manual
Mercury
版 本 : 1.3
日 期 : 95/03/10
Chapter 8. Messaging & Contacts
98
INVENTEC CORPORATION
英業達股份有限公司
Page 99

User Manual
Messaging is the unified point of access for all message types within your device. With
Messaging, you can send and receive text messages, e-m ails, and MMS messages.
Contacts helps you to manage your contact information. Using Contacts you can quickly
communicate with people.
This section describes the procedure on sending and receiving diff erent kinds of messages, and
using Contacts to manage addresses and phone numbers.
Mercury
版 本 : 1.3
日 期 : 95/03/10
8.1 Text Messaging
Creating a Text Message
1. Tap
2. In the message list, tap Menu > Go To > Text Messages.
3. Tap New.
4. Enter the reci pient’s text message number in the To field. Insert a semicolon (;)
between multiple text message numbers.
5. Enter your m essage and tap Send. Text messages are sent immediately.
You can quickly enter text message numbers from your contact cards. In To, press
ENTER and select a recipient from the list. Then, select the recipient’s phone number.
Using Preset Text Messages
You can quickly insert preset or frequently used messages into your text message. While
composing a message, tap Menu > My Text and select a preset message to insert.
To edit a preset message:
> Messaging.
1. While composing a message, tap Menu > My Text > Edit My Text Messages.
2. Select a message and edit.
3. Tap
Reading a Text Message
1. Tap
2. Tap Inbox
.
> Messaging.
▼ and select Inbox under Text Messages.
99
INVENTEC CORPORATION
英業達股份有限公司
Page 100

3. In the message list, tap the text message you want to read.
Changing Message Options
User Manual
Mercury
版 本 : 1.3
日 期 : 95/03/10
1. Tap
2. Tap New.
3. Tap Menu > Message Options.
4. Select this check box to request a message delivery notification.
5. Tap
> Messaging, and select Text Messages account.
.
8.2 E-mail
Setting Up an Internet E-mail Account Manually
Before you set up your Internet e-mail account, please ensure that you have the necessary
information.
Setting Description
User name Usually the first part of your e-mail address, which appears before
the “at” sign (@).
Password Choose a strong password. You will have the option to save your
password, so that you do not need to enter it each time you
connect to your e-mail server.
Domain The domain name. This may be required.
Server type The type of e-mail server that hosts your mailbox (POP3 or IMAP4).
Account name A name for this account. You must use a different name for each
account that you set up.
Network The type of network your e-mail server connects to.
Incoming mail server The name of your e-mail server (POP3 or IMAP4).
Require SSL connection Select this to ensure you always receive e-mail for this account
using an SSL connection. This enables you to receive personal
information more securely. Please note that if you select this and
your ISP does not support an SSL connection, you will not be able
to connect to receive e-mail.
Outgoing mail server The name of your outgoing e-mail server (SMTP).
Outgoing server
requires authentication
Outgoing server Your outgoing e-mail server may require different authentication
Your outgoing e-mail server (SMTP) may require authentication.
Note: Your user name and password from above will be used.
100
INVENTEC CORPORATION
英業達股份有限公司
 Loading...