

Page 1

Confidential Information. All Rights reserved by Inventec Multimedia & Telecom Corp.
Page 2

Confidential Information. All Rights reserved by Inventec Multimedia & Telecom Corp.
C A T A L O G
Chapter I Product Information
1-1 Package Contents
1-2 Features & System Requirements
1-3 Basic Setup
Chapter II System Setup and Basic Operating
2-X Network Setup (Static IP Address)
2-X Network Setup (DHCP / Auto IP Address)
2-X Network Setup (PPPoE Client)
2-2 Network Setup (Web Configuration)
2-3 SIP Server Information Setup
2-4 SIP Server Information Setup (Web
Configuration)
2-5 Accepting and Making Phone Calls
2-6 Calling History
2-7 Call Rejection (DND)
2-8 Using Speakerphone and Headset
Chapter III Advanced Functions and Configurations
3-1 Speed Dial & Advanced Phone Configuration
3-2 Phone Book Management
3-3 Browse System Information
3-4 Change Display Language
3-5 Change Ringer Type
3-6 Adjust the Contrast of LCD Screen
3-7 Select DTMF Modes
3-8 Reboot the IP Phone
Page 3

Confidential Information. All Rights reserved by Inventec Multimedia & Telecom Corp.
3-9 Factory Reset
Chapter IV Appendix
4-1 Troubleshooting
4-2 Specification
4-3 Firmware Update
4-4 Recover from Unsuccessful Firmware
Update
4-5 Change the Administration Password for
Web Config
4-6 FCC Statements
Page 4
Confidential Information. All Rights reserved by Inventec Multimedia & Telecom Corp.
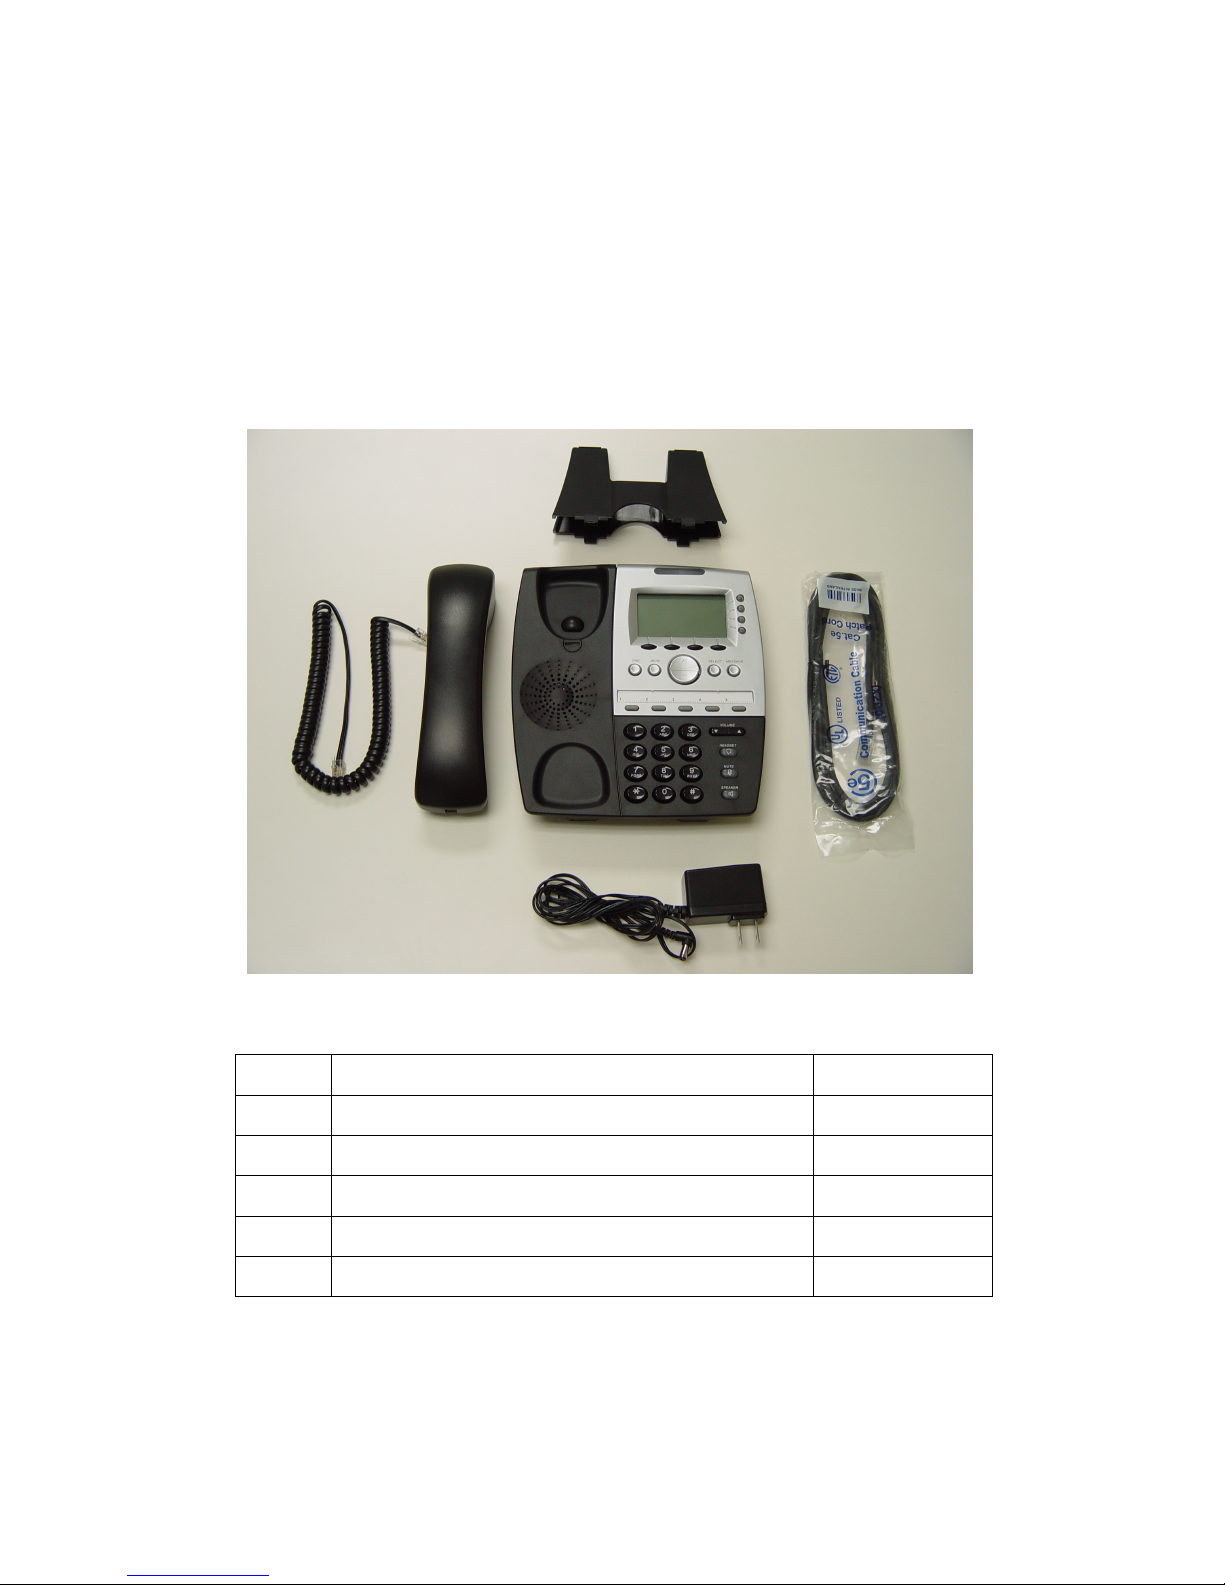
1-1 Package Contents
Thank you for purchasing this IP Phone! Before you continue,
here is a list of all contents in your IP Phone package. Please
contact your dealer if any of them is not in your IP Phone
package.
IP Phone (Main Body) 1 pcs
Handset 1 pcs
Handset Cable 1 pcs
A/C Power Adapter 1 pcs
Network Cable 1 pcs
Phone Stand 1 pcs
Page 5

Confidential Information. All Rights reserved by Inventec Multimedia & Telecom Corp.
1-2 Features & System Requirements
Thanks again for choosing this IP Phone. This IP Phone is a
sophisticated, state-of-the-art internet phone system. Instead of
using conventional PSTN (land line) phone line, it uses IP data
stream to deliver and receive voice calls through internet, you
can make free* calls to other IP Phone, or making / accepting
calls to / from regular land line phone / mobile phone, and the
cost is much cheaper.
*
Depending on your service provider. In most cases making
phone call to another IP phone via internet is free.
For additional features of this IP Phone, please refer to
following list:
1. Multi-protocol support: This IP phone supports multiple
network protocols for communication and management:
TFTP, FTP, RTP, SNTP, HTTP, SIP, DHCP, PPPoE, and
Telnet.
2. QoS Support: Maximizes network performance.
3. Supports all major network connecting methods.
4. Supports headset and speakerphone for hands-free
operation.
5. Standard CCITT numeric keypad (0-9, * and #) providing
fully phone dialing support, with built-in DTMF tone
generator (You can use numeric keypad to access on-line
banking service, dial extension number…etc.).
6. Large, clear LCD display for information and phone status.
7. Comfortable handset, best for long time operation.
8. 5 speed-dial keys.
9. Access all advanced settings by web browser of your
Page 6

Confidential Information. All Rights reserved by Inventec Multimedia & Telecom Corp.
computer. You can also access this IP Phone’s advanced
configuration menu by telnet.
10. Built-in Ethernet switch: One for internet, and one for your
computer.
11. Silence suppression, acoustic echo cancellation, and
dynamic jitter buffer technology for better voice quality.
12. Call-ID display2.
13. The ability of upgrading internal firmware: You can enjoy
new functions of this IP Phone when new firmware is
available.
14. <OPTIONAL> Supports IEEE 802.3af Power-over-Ethernet,
this IP phone can get required electrical power by ethernet
cable, therefore no A/C power adapter is required1
1
This IP Phone must connect to a switch or hub that supports
Power-over-Ethernet, and proper ethernet cable is required.
2
Depending on service provider.
To use this IP Phone, following items are required:
1. One electrical power outlet, or network hub / switch with
Power-over-Ethernet function.
2. Network Configuration Table, provided by your service
provider.
Page 7

Confidential Information. All Rights reserved by Inventec Multimedia & Telecom Corp.
1-3 Basic Setup
Before you can use this IP Phone, there’re few steps required.
Please follow the following instructions to setup the IP Phone,
and make it ready to use.
1. Unpack the package, and check if any item is missing.
2. Insert the Ethernet cable (which is connecting to the router
in your network environment. If you use this IP Phone in
your home, in most cases, the router is your ADSL or cable
modem device provided by your ISP; If you use this IP
phone in office, please connect to a network socket near
you, or ask your network administrator).
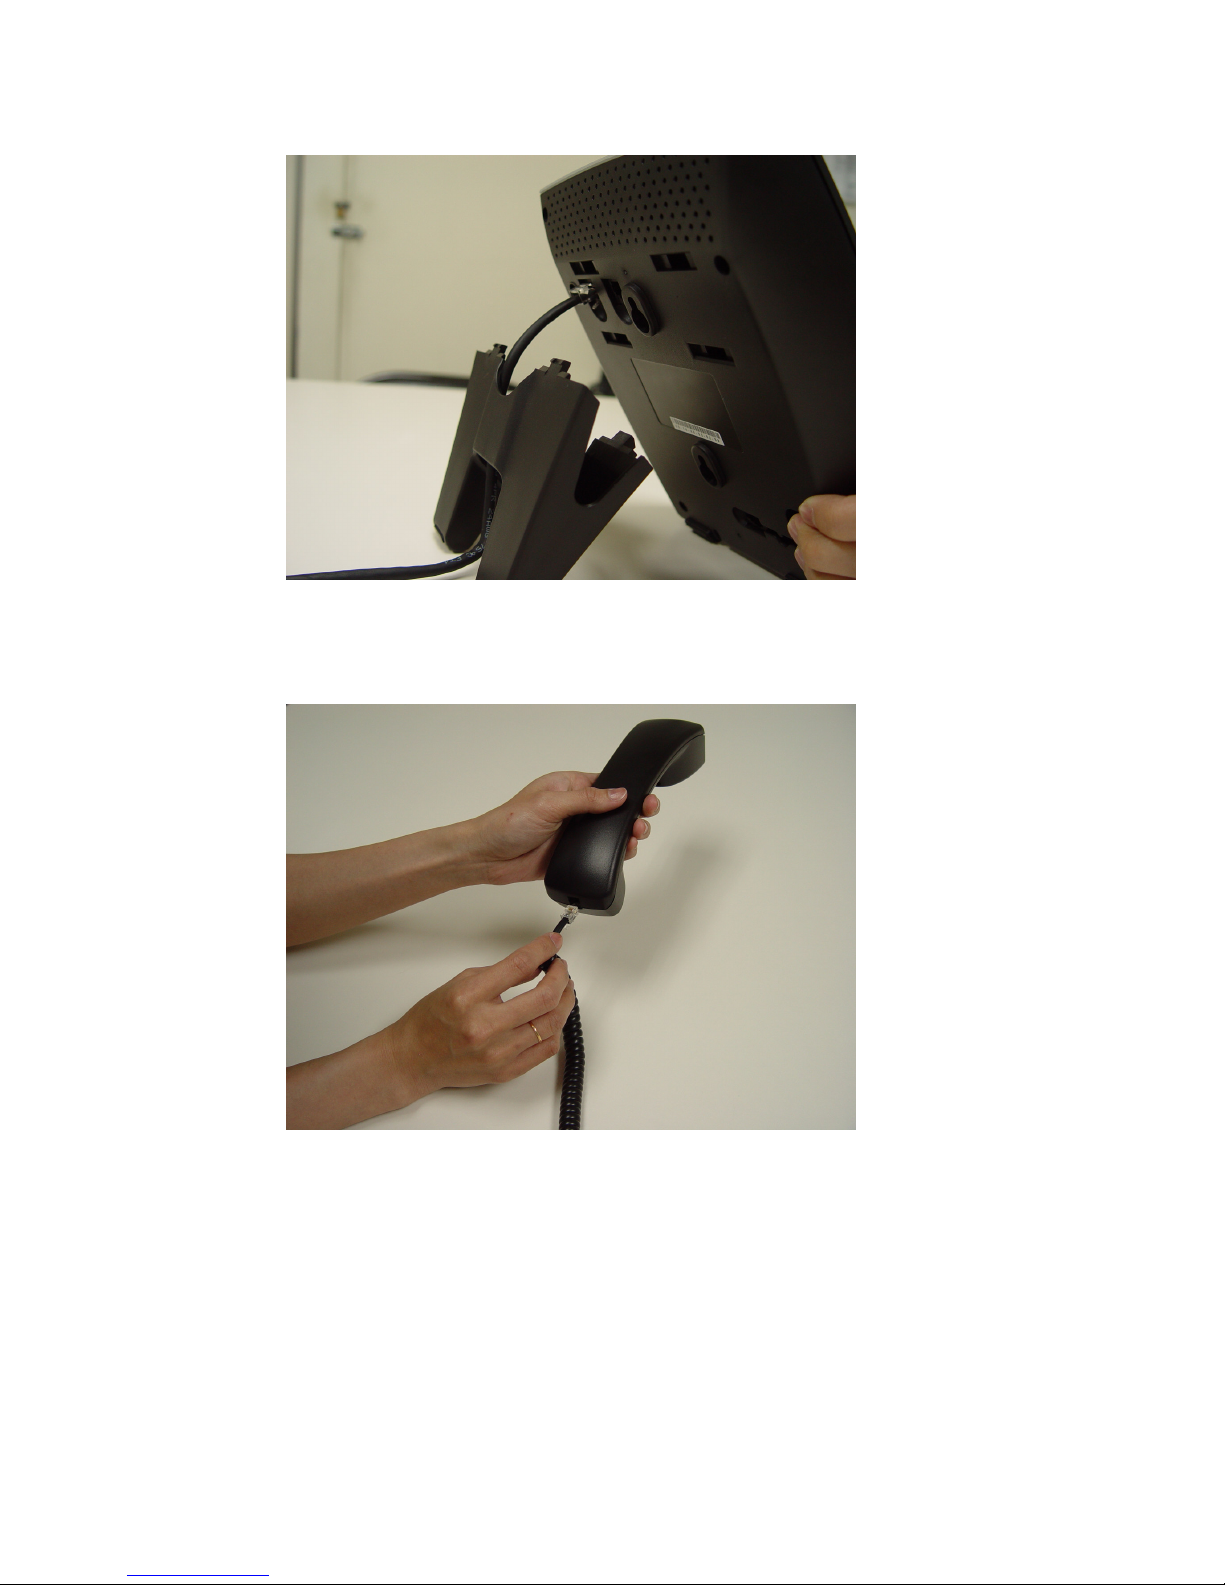
3. Install the phone stand as described in following picture.
Page 8
Confidential Information. All Rights reserved by Inventec Multimedia & Telecom Corp.
4. Insert one end of handset cable to handset, as shown below.
5. Insert another end of handset cable to the handset socket
on the phone, as shown below:
Page 9
Confidential Information. All Rights reserved by Inventec Multimedia & Telecom Corp.
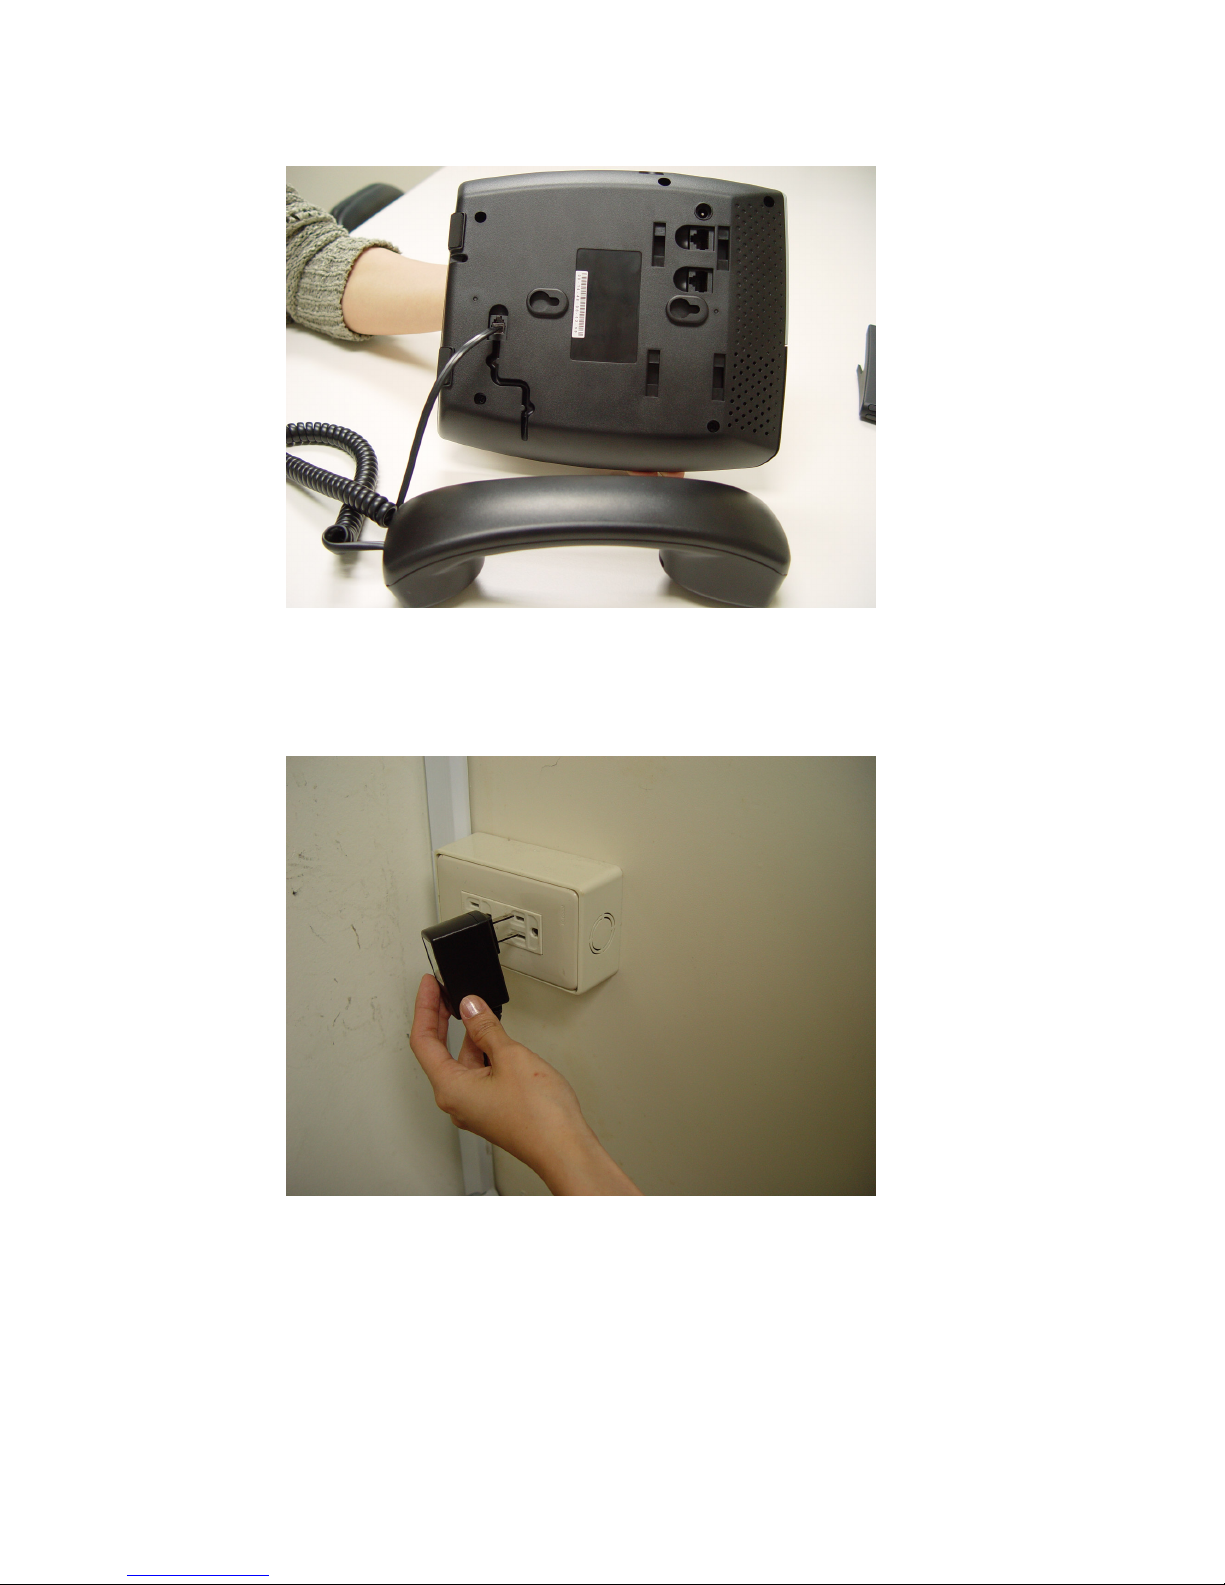
6. Insert the A/C power adapter to the power socket.
7. Insert the power jack of A/C power adapter to this IP Phone,
as shown below.
Page 10
Confidential Information. All Rights reserved by Inventec Multimedia & Telecom Corp.
8. You should see some text on the LCD screen of IP phone
now. If not, please redo step 5 to 6 until you can see some
text on the LCD screen.
03:12 09/09 0123456
VoIP SIP Phone
Redial
Page 11

Confidential Information. All Rights reserved by Inventec Multimedia & Telecom Corp.
8.1 This phone will use DHCP (Dynamic host configuration
protocol) to obtain an IP address automatically by default,
so if the network cable is unplugged or the phone is unable
to get an IP address from DHCP Server, the MWI LED (i.e.
the bar-shaped LED located above the LCD) will be
illuminated in red and following message will be shown on
LCD as below:
This message will be shown on LCD until a valid IP address
is obtained from DHCP server. If the phone can not obtain
an IP address for 2 to 3 minutes, it will not try to obtain an IP
address anymore.
8.2 In case you see ‘Loading’ message displayed on LCD for a
while, please check the network cable connected to this
phone, and if the DHCP server is working properly. If you
want to assign an IP address for this phone manually,
please wait for 2 to 3 minutes, and you can enter setup
menu and assign an IP address for this phone manually.
9. Lift the handset now, and you should hear the dialing tone in
the handset. If not, please redo step 3 to 4 again, until you
can hear some voice in the handset.
Loading ….
Page 12

Confidential Information. All Rights reserved by Inventec Multimedia & Telecom Corp.
When you finish above 8 steps, your IP Phone is ready for use.
Please proceed to next chapter to setup network parameters,
and start to enjoy the functions of this IP Phone!
Page 13

Confidential Information. All Rights reserved by Inventec Multimedia & Telecom Corp.
2-X Network Setup (Static IP Address)
<intro text of service provider>
To setup static IP address, please follow instructions described
in this chapter:
1. Press ‘Menu’ button on IP Phone
2. Press ‘Up’ or ‘Down’ key until ‘3. Setting’ is selected, then
press ‘Select’ key.
3. Press ‘Up’ or ‘Down’ key until ‘4. System Configuration’ is
selected, then press ‘Select’ key.
03:12 09/09 0123456
1. Phone Book
2. Call Records
3. Settings
Select
Exit
03:12 09/09 0123456
1. Phone Book
2. Call Records
3. Settings
Select
Exit
Page 14

Confidential Information. All Rights reserved by Inventec Multimedia & Telecom Corp.
4. Press ‘Select’ key on ‘1: Network Setting’, and use up or
down key to change network setting to ‘Static’, then press
‘Save’ key.
5. Press ‘Down’ key until ‘2. IP Address (Static)’ is selected,
and press ‘Select’ key. You’ll be prompted to enter IP
address, please use the numeric keypad to input IP address;
To input dot (.), press * key on numeric keypad. For example,
if you want to input IP address ‘192.168.4.50’, you should
press following keys on numeric keypad: ‘192*168*4*50’.
03:12 09/09 0123456
1. Language
2. Ring Type
3. Contrast
4. System Configuration
03:12 09/09 0123456
1. Network Setting
Static
2. IP Address (Static)
192.168.4.50
Select
Exit
03:12 09/09 0123456
1. Network Setting
Static
2. IP Address (Static)
192.168.4.50
Select
Exit
Select
Exit
Page 15

Confidential Information. All Rights reserved by Inventec Multimedia & Telecom Corp.
When inputting IP address, each time you press ‘Clear’ key,
you can erase a digit. Before you can input a brand new IP
address, you must clear all previous IP address digits by
pressing ‘Clear’ key for many times. After you’ve inputted
the IP address you want, press ‘Save’ key, or press ‘Cancel’
key to discard.
6. Now you have to set subnet mask. Press ‘Up’ or ‘Down’ key
until ‘3. Subnet mask (Static)’ is selected, then press ‘Select’
key. You’ll be prompted to input subnet mask, please use
the same method described in previous step to input subnet
mask.
7. After subnet mask, it’s time to set default route. Press ‘Up’ or
‘Down’ key until ‘4. Default Router (Static)’ is selected, then
press ‘Select’ key. You’ll be prompted to input the IP address
of the router on your local network, please input here.
03:12 09/09 0123456
1. Network Setting
Static
2. IP Address (Static)
192.168.4.50
Save
Clear Cancel
03:12 09/09 0123456
2. IP Address (Static)
192.168.4.50
3. Subnet Mask (Static)
255.255.255.0
Save
Clear Cancel
Page 16

Confidential Information. All Rights reserved by Inventec Multimedia & Telecom Corp.
8. You have to set the IP Address of DNS, and this is the last
step of static IP setup. Please press ‘Up’ or ‘Down’ key until
‘5. DNS Server 1 (Static)’ is selected, and input the IP
address of DNS server here.
NOTE: You can set a secondary DNS Server IP address by
move to setup item ‘6. DNS Server 2 (Static)’ and set the IP
address of secondary DNS Server there. At lease one DNS
Server is required to make this IP Phone work properly.
9. After the IP address is set, please move to chapter 2-3 or
2-4 to setup your SIP server information.
03:12 09/09 0123456
3. Subnet Mask (Static)
255.255.255.0
4. Default Route (Static)
192.168.1.254
03:12 09/09 0123456
4. Default Router (Static)
192.168.4.254
5. DNS Server 1 (Static)
192.168.4.1
Save
Clear Cancel
Save
Clear Cancel
Page 17

Confidential Information. All Rights reserved by Inventec Multimedia & Telecom Corp.
NOTE: If you only need to change network setting, but don
’t
need to change SIP server information (i.e. this is not an initial
setup), you have to save new network setting and reboot the IP
Phone after all network settings are set. Please refer to step 10 to
11 of chapter 2-3, to save new settings and reboot the IP Phone.
Page 18

Confidential Information. All Rights reserved by Inventec Multimedia & Telecom Corp.
2-X Network Setup (PPPoE)
<intro text of service provider>
By using PPPoE, you don’t have to setup IP address by
yourself. Instead, an IP address will be issued to your IP phone
by internet service provider automatically, which is more
convenient.
To complete your network setup using PPPoE, please follow
instructions described in this chapter:
1. Press ‘Menu’ button on IP Phone
2. Press ‘Up’ or ‘Down’ key until ‘3. Setting’ is selected, then
press ‘Select’ key.
03:12 09/09 0123456
1. Phone Book
2. Call Records
3. Settings
Select
Exit
03:12 09/09 0123456
1. Phone Book
2. Call Records
3. Settings
Select
Exit
Page 19

Confidential Information. All Rights reserved by Inventec Multimedia & Telecom Corp.
3. Press ‘Up’ or ‘Down’ key until ‘4. System Configuration’ is
selected, then press ‘Select’ key.
4. Press ‘Select’ key on ‘1: Network Setting’, and use up or
down key to change network setting to ‘PPPoE’, then press
‘Save’ key.
5. Press ‘Down’ key until ‘7. PPPoE Username’ is selected, and
press ‘Select’ key. You’ll be prompted to your PPPoE username,
please use the numeric keypad to input your username, press
the same key repeatedly to switch input character in following
list:
1: 1
Select
Exit
03:12 09/09 0123456
1. Network Setting
PPPoE
2. IP Address (Static)
192.168.4.50
Select
Exit
03:12 09/09 0123456
1. Language
2. Ring Type
3. Contrast
4. System Configuration
Select
Exit
Page 20

Confidential Information. All Rights reserved by Inventec Multimedia & Telecom Corp.
2: AaBbCc2
3: DdEeFf3
4: GgHhIi4
5: JjKkLl5
6: MmNnOo6
7: PpQqRrSs7
8: TtUuVv8
9: WwXxYyZz9
0: 0
*: +?@.
#: #
For example, if you want to input ‘B’, you have to press ‘2’ key
for 3 times repeatedly, and the time between each keystroke is
less and 2 seconds; If the time period between keystroke is
longer than 2 seconds, the cursor will move right and you can
enter a new character. For example, if you want to enter ‘Bc’,
you have to press ‘2’ key for 3 times repeatedly, stop for 3
seconds, and press ‘2’ key for 5 times. To erase a character,
press ‘Clear’ key.
When you finish input your PPPoE username, remember to
press ‘Save’ key to save it, or press ‘Cancel’ to discard. You can
input up to 40 characters.
Page 21

Confidential Information. All Rights reserved by Inventec Multimedia & Telecom Corp.
6. Now press ‘Down’ key until ‘8. PPPoE Password’ is selected,
and press ‘Select’ key. You’ll be prompted to enter your PPPoE
password, please use the same method described in last step
to enter your password.
7. Please press ‘Down’ key until ‘9. PPPoE Authmode’ is
selected, and press ‘Select’ key. Press up or down key to select
PPPoE authentication mode from ‘PAP’ and ‘CHAP’, after
proper authentication mode is displayed, press ‘Save’ key to
save the setting.
03:12 09/09 0123456
6. DNS Server2 (Static)
168.95.1.1
2. PPPoE Username
Alan
Save
Clear Cancel
03:12 09/09 0123456
7. PPPoE Username
Alan
8. PPPoE Password
Alan123
Save
Clear Cancel
Save
Clear Cancel
Save
Clear Cancel
03:12 09/09 0123456
8. PPPoE Password
alan123
9. PPPoE Authmode
PAP
Save
Page 22

Confidential Information. All Rights reserved by Inventec Multimedia & Telecom Corp.
8. After the PPPoE information is set, please move to chapter
2-3 or 2-4 to setup your SIP server information.
NOTE: If you only need to change network setting, but
don’t
need to change SIP server information (i.e. this is not an initial
setup), you have to save new network setting and reboot the IP
Phone after all network settings are set. Please refer to step 10 to
11 of chapter 2-3, to save new settings and reboot the IP Phone.
Page 23

Confidential Information. All Rights reserved by Inventec Multimedia & Telecom Corp.
2-X Network Setup (DHCP)
<intro text of service provider>
By using DHCP, you don’t have to setup IP address by yourself.
Instead, an IP address will be issued to your IP phone by DHCP
server on your local network automatically, which is more
convenient.
To complete your network setup using DHCP, please follow
instructions described in this chapter:
1. Press ‘Menu’ button on IP Phone
2. Press ‘Up’ or ‘Down’ key until ‘3. Setting’ is selected, then
press ‘Select’ key.
03:12 09/09 0123456
1. Phone Book
2. Call Records
3. Settings
Select
Exit
03:12 09/09 0123456
1. Phone Book
2. Call Records
3. Settings
Select
Exit
Page 24

Confidential Information. All Rights reserved by Inventec Multimedia & Telecom Corp.
3. Press ‘Up’ or ‘Down’ key until ‘4. System Configuration’ is
selected, then press ‘Select’ key.
4. Press ‘Select’ key on ‘1: Network Setting’, and use up or
down key to change network setting to ‘DHCP’, then press
‘Save’ key.
5. Please move to chapter 2-3 or 2-4 to setup your SIP server
information.
03:12 09/09 0123456
1. Language
2. Ring Type
3. Contrast
4. System Configuration
Select
Exit
03:12 09/09 0123456
1. Network Setting
DHCP
2. IP Address (Static)
192.168.4.50
Select
Exit
NOTE: If you only need to change network setting, but don
’t
need to change SIP server information (i.e. this is not an initial
setup), you have to save new network setting and reboot the IP
Phone after all network settings are set. Please refer to step 10 to
11 of chapter 2-3, to save new settings and reboot the IP Phone.
Page 25

Confidential Information. All Rights reserved by Inventec Multimedia & Telecom Corp.
2-2 Network Setup (Web Configuration)
You can also setup the network by web browser (like Microsoft
Internet Explorer, Firefox, Safari, etc.), which is the easiest way
to have the network setting done.
Before you can setup network by web browser, you must know
the IP address of IP Phone. Please setup a static IP address
first, for PPPoE and DHCP users, please refer to chapter 3-4
‘Browse System Configuration’ to get the IP address of the IP
Phone.
1. Use the web browser on your computer to connect to the IP
address of IP Phone. For example, if the IP Phone’s IP address
is 192.168.4.50, please type ‘http://192.168.4.50’ in the
browser’s address bar. A login window will appear, please enter
the username and password.
NOTE: default username is ‘admin’, and password is blank (do
not fill anything in password field).
NOTE: If the IP Phone uses static IP address, the computer used
for network setup must use the IP address which is in the same
network segment of IP Phone. For example, if the IP address of IP
Phone is 10.1.1.1, and netmask is 255.255.255.0, then the IP
address of computer used for network setup must be 10.1.1.x,
where x = 2 to 254.
Page 26

Confidential Information. All Rights reserved by Inventec Multimedia & Telecom Corp.
2. After you have logged in, you’ll see the brief information of
current network setting. Please click ‘Network’ link on the left.
3. In here, you can choose connection mode (static IP, PPPoE, or
DHCP), enter IP address for static IP mode, and enter PPPoE
username and password directly on web page. If you want to
Page 27

Confidential Information. All Rights reserved by Inventec Multimedia & Telecom Corp.
enable VLAN function of PC and phone Ethernet port of this IP
Phone, you can also set it up here.
After you have entered the setting you need, remember to click
‘Submit’ button located at the bottom of the web page, or you
can click ‘ Cancel’ to discard all settings you just entered.
4. Now click ‘Management’ link on the left of webpage, then click
‘Configuration Commit / Reset’ tab. Press ‘COMMIT…’ button,
and you’ll see ‘Configuration OK’ message, which means the
network settings you just made are properly saved.
Page 28

Confidential Information. All Rights reserved by Inventec Multimedia & Telecom Corp.
5. Please click ‘Management’ link on the left of webpage, click
‘System Restart’ tab, and then click ‘RESTART…’ button. The
IP Phone will reboot. After about 1 minute, your IP Phone will be
ready with new network settings.
Page 29

Confidential Information. All Rights reserved by Inventec Multimedia & Telecom Corp.
2-3 SIP Server Information Setup
After the network setup is done, you have to setup SIP server
information, so your IP Phone can log onto service provider’s
server.
1. Press ‘Menu’ button on IP Phone
2. Press ‘Up’ or ‘Down’ key until ‘3. Setting’ is selected, then
press ‘Select’ key.
3. Press ‘Up’ or ‘Down’ key until ‘4. System Configuration’ is
selected, then press ‘Select’ key.
03:12 09/09 0123456
1. Phone Book
2. Call Records
3. Settings
Select
Exit
03:12 09/09 0123456
1. Phone Book
2. Call Records
3. Settings
Select
Exit
Page 30

Confidential Information. All Rights reserved by Inventec Multimedia & Telecom Corp.
4. Press ‘Up’ or ‘Down’ key until ’10. SIP Proxy’ is selected,
then press ‘Select’ key. You’ll be prompted to enter the IP
address of SIP proxy, which is provided by your service
provider. Please use numeric keypad to enter IP address,
remember you can press ‘*’ for dot! After IP address is
entered, press ‘Save’ to keep changes, or ‘Cancel’ to
discard.
5. Now press ‘Down’ key until ’11. SIP PortNum’ is selected,
then press ‘Select’ key. Please enter the SIP server’s port
number provided by your service provider here, by default
it’s ‘5070’.
03:12 09/09 0123456
1. Language
2. Ring Type
3. Contrast
4. System Configuration
Select
Exit
03:12 09/09 0123456
10. SIP Proxy
192.168.4.2
11. SIP PortNum
5060
Save
Clear Cancel
Page 31

Confidential Information. All Rights reserved by Inventec Multimedia & Telecom Corp.
6. Press ‘Down’ key until ’12. SIP Username’ is selected, then
press ‘Select’ key. Please use the numeric keypad to enter
SIP username here, which is assigned by your service
provider.
7. Press ‘Down’ key until ’13. SIP Phone Num’ is selected, then
press ‘Select’ key. Please use the numeric keypad to enter
SIP phone number here, which is assigned by your service
provider.
03:12 09/09 0123456
10. SIP Proxy
192.168.4.2
11. SIP PortNum
5060
Save
Clear Cancel
03:12 09/09 0123456
12. SIP Username
0123456
13. SIP Phone Num
0123456
Save
Clear Cancel
03:12 09/09 0123456
12. SIP Username
0123456
13. SIP Phone Num
0123456
Save
Clear Cancel
Page 32

Confidential Information. All Rights reserved by Inventec Multimedia & Telecom Corp.
8. Press ‘Down’ key until ’13. SIP Password’ is selected, then
press ‘Select’ key. Please use the numeric keypad to enter
SIP phone number here, which is assigned by your service
provider.
NOTE: SIP password is hidden by a series of ‘+’ mark when
you’re not editing it.
9. Now you have to set the audio codec of this IP Phone, press
‘Down’ key until ’15. Codec’ is selected, then press ‘Select’
key. Use ‘Up’ or ‘Down’ key to select a codec designated by
your service provider, and press ‘Save’ key to make
decision.
10. After all above settings are done, please press ‘Down’ key
until ’16. Commit Changes’ is selected, then press ‘Select’ key.
03:12 09/09 0123456
14. SIP Password
1234567890
15. Codec
2. Auto – G.711u
Save
Clear Cancel
03:12 09/09 0123456
15. Codec
2. Auto – G.711u
16. Commit Changes
Save changes
Save
Page 33

Confidential Information. All Rights reserved by Inventec Multimedia & Telecom Corp.
You’ll see ‘’Changes saved’ message displayed on LCD screen,
which means all settings are saved.
11. Please press ‘Down’ key to move to next item ’17. Reboot
System’, and press ‘Select’ key. You’ll see ‘Rebooting’ Message
displayed on LCD screen. Please wait for about 1 minute, after
the reboot procedure is completed, your IP Phone is ready with
new network settings.
03:12 09/09 0123456
15. Codec
2. Auto – G.711u
16. Commit Changes
Changed saved
Select
Exit
03:12 09/09 0123456
16. Commit Changes
Change Saved
17. Reboot System
Press to reboot
Save
Exit
Rebooting . . .
…
Page 34

Confidential Information. All Rights reserved by Inventec Multimedia & Telecom Corp.
2-4 SIP Server Information Setup (Web Configuration)
Excepting setup SIP information on your IP Phone, you can
also use web interface to setup SIP information. This is also the
only way to setup multiple sets SIP username and password.
Please refer to chapter 2-5 to open a web connection to your IP
Phone by web browser on your computer, then follow these
instructions to setup SIP information:
1. After you web browser is connected to the IP Phone, please
click ‘SIP’ link on the left.
2. You can enter SIP proxy server’s IP address, port, and every
phone line’s SIP phone number, username, and password here.
If you have more than one SIP phone number, username, and
password, you can input all of them here. Up to 4 sets of phone
number, username, and password us supported.
3. After all SIP information are properly set here, please click
Page 35

Confidential Information. All Rights reserved by Inventec Multimedia & Telecom Corp.
‘Submit’ button on the bottom of this page, or click ‘Cancel’
button to discard.
4. Now click ‘Management’ link on the left of webpage, then
click ‘Configuration Commit / Reset’ tab. Press ‘COMMIT…’
button, and you’ll see ‘Configuration OK’ message, which
means the network settings you just made are properly saved.
Page 36

Confidential Information. All Rights reserved by Inventec Multimedia & Telecom Corp.
5. Please click ‘Management’ link on the left of webpage, click
‘System Restart’ tab, and then click ‘RESTART…’ button. The
IP Phone will reboot. After about 1 minute, your IP Phone will be
ready with new network settings.
Page 37

Confidential Information. All Rights reserved by Inventec Multimedia & Telecom Corp.
2-5 Accepting and Making Phone Calls
After the network and SIP setting are done, you can start to use
your IP Phone to accept and make phone calls.
Accepting phone calls
Before you can accept phone call, please make sure
that your phone is registered to SIP server. The LCD
screen will be shown as below, which means the IP
Phone has successfully registered.
If the phone is not register to any SIP server, you’ll see
‘Initializing SIP …’ message displayed on LCD screen.
Please check the network cable and network setting again.
03:12 09/09 0123456
VoIP SIP Phone
Redial
03:12 09/09 0123456
Initializing SIP …
Redial
Page 38

Confidential Information. All Rights reserved by Inventec Multimedia & Telecom Corp.
After the phone is registered, the phone will ring when
someone’s calling you. You’ll see a flashing red light on the
phone, the phone line selector which remote party is calling
will also be flashing, with the phone number of remote
party displayed on LCD screen.
Just pick up the handset when you hear the phone rings.
After the phone session is end, please make sure the
handset is placed on the IP Phone properly, or you will not
be able to accept next call.
During the phone session, a call timer will be displayed on
LCD screen and start from 00:00:00, it will show the total
time elapsed since the call is established. Also, several
options are available on LCD screen; you can use these
options by pressing corresponding key:
03:12 09/09 0123456
1002
incoming …
Redial
NOTE
: The phone number may not be displayed if the service
provider does not support this function, please contact your service
provider for detailed information.
Page 39

Confidential Information. All Rights reserved by Inventec Multimedia & Telecom Corp.
Here are descriptions of these 4 keys:
Trfr: Transfer current phone session to another phone
number, this is called as call transfer. Before you do this,
please tell your remote party to hold online (do not hang up
the phone during transfer), then press ‘Trfr’ softkey, and
you’ll see the following message displayed on LCD screen:
The phone session is currently suspended, and you will
hear dialtone in handset again (your remote party will hear
music now). At this moment, user can decide to use
attended or blind call transfer. If you want to use attended
call transfer, please dial another phone number by numeric
keypad, and you’ll see the following message displayed on
03:12 09/09 0123456
1002
Connected
00:00:06
Trfr 3-way End Hold
03:12 09/09 0123456
1002 ON HOLD!!
00:00:06
Back
Page 40

Confidential Information. All Rights reserved by Inventec Multimedia & Telecom Corp.
LCD screen:
Now the IP Phone will connect to the phone number you
just dialed. After the connection is made, you’ll see the
following message displayed on LCD screen:
Press ‘Trfr’ softkey now, and the phone session will be
transferred.
03:12 09/09 0123456
1002 ON HOLD!!
1005 connecting…
00:00:06
Back
03:12 09/09 0123456
1002 ON HOLD!!
1005 connected…
00:00:06
Trfr
03:12 09/09 0123456
transfer completed
Redial
Page 41

Confidential Information. All Rights reserved by Inventec Multimedia & Telecom Corp.
If you don’t hear dialtone after press ‘Trfr’ key, failed to
transfer the call (hear busy tone in handset), or you
changed your mind during phone transfer, please press
‘Back’ softkey during phone transfer, and you can resume
the original phone session. If the ‘Back’ softkey does not
shown on LCD screen, just put the handset back, and the
original call will come back as an incoming call.
If you want a blind transfer, please dial another phone
number by numeric keypad and end with asterisk key - ‘ * ’,
and you’ll see the following message displayed on LCD
screen:
At this moment, the phone will be disconnected from
original call and transfer to the number you want to
transfer.
3-way: You can invite another people to join your current
phone session, so there’re total 3 parties talking on the
phone (including you), this is called as 3-way conference.
Before you do this, please tell your remote party to hold
03:12 09/09 0123456
(null) disconnected…
Page 42

Confidential Information. All Rights reserved by Inventec Multimedia & Telecom Corp.
online, then press ‘3-way’ softkey, you’ll hear dialtone in
handset again, and see the following message displayed
on LCD screen:
You’ll hear the dialtone again. Now please dial the phone
number you want to invite, you'll see the following message
displayed on LCD screen:
After the connection is made, you’ll see the following
message displayed on LCD screen:
03:12 09/09 0123456
1002 ON HOLD!!
00:00:06
Back
03:12 09/09 0123456
1002 ON HOLD!!
1005 connecting…
00:00:06
Back
03:12 09/09 0123456
1002 ON HOLD!!
1005 connected…
3-way
Page 43

Confidential Information. All Rights reserved by Inventec Multimedia & Telecom Corp.
Now press ‘3-way’ softkey, and you’ll see following
message displayed on LCD screen:
When you see this message, the 3-way conference is
successfully established. To end 3-way conference, just
hang up the phone.
End: Ends a phone session. You can also hang-up phone
to end a phone session.
Hold: By pressing this key, you can pause the phone
session, and your remote party will not hear anything from
you. To resume, simply press ‘Back’ key.
Making phone calls
1. If you have multiple sets of SIP phone number,
please select one phone line by pressing
corresponding phone line key 1 – 4 first.
03:12 09/09 0123456
1002,1005 connected
3-way call in progress...
00:00:06
Page 44

Confidential Information. All Rights reserved by Inventec Multimedia & Telecom Corp.
2. Life the handset, and dial the phone number by
numeric keypad, just like using a conventional
telephone. If you dialed the wrong number, or the
remote party is not available currently, you’ll see a text
message ‘dialing xxxx failed’, where xxxx is the phone
number you just dialed.
3. After the phone session is end, please make sure
the handset is placed on the IP Phone properly, or you
will not be able to accept phone call.
03:12 09/09 0123456
dialing 1234 failed …
NOTE: You can press
‘#” key after you have entered all
numbers,
this can speed up the dial process.
Page 45

Confidential Information. All Rights reserved by Inventec Multimedia & Telecom Corp.
2-6 Calling History
There’s an internal calling history database in this IP Phone.
You can check for all outgoing / incoming phone call history,
and all missed calls (i.e. unanswered calls).
1. Press ‘Menu’ button on IP Phone
2. Press ‘Up’ or ‘Down’ key until ‘2. Call Records’ is selected,
then press ‘Select’ key.
3. There are 3 type of call record available here, you can use
‘Up’ and ‘Down’ key to select one of them, then press ‘Select’
key to view a selected call history.
03:12 09/09 0123456
1. Phone Book
2. Call Records
3. Settings
Select
Exit
03:12 09/09 0123456
1. Phone Book
2. Call Records
3. Settings
Select
Exit
Page 46

Confidential Information. All Rights reserved by Inventec Multimedia & Telecom Corp.
Here are descriptions of call histories:
Missed Calls: All unanswered calls will be listed here. You can
use ‘Up’ and ‘Down’ key to move up and down in this list, and
press ‘Dial’ key to make a phone call to the number selected, or
press ‘Delete’ to delete a selected missed call entry. Press ‘Exit’
key to back to previous menu.
Received Calls: All accepted phone calls are listed here. You
can also use ‘Dial’ key to dial the selected number again,
‘Delete’ to key to delete a selected number from list, or press
‘Exit’ to back to previous menu.
Placed Calls: All phone numbers you dialed on the IP Phone
will be listed here. You can use ‘Dial’ key to dial the selected
number again, ‘Delete’ to key to delete a selected number from
03:12 09/09 0123456
1. Missed Calls
2. Received Calls
3. Placed Calls
Select
Clear Exit
03:12 09/09 0123456
1. 5571225
2. 4071243
3. 180
Select
Clear Exit
Page 47

Confidential Information. All Rights reserved by Inventec Multimedia & Telecom Corp.
list, or press ‘Exit’ to back to previous menu.
Also, if you didn’t answer a call, you’ll see the following
message displayed on LCD screen:
You can press ‘miss’ key to dial to the number you didn’t answer
(only when the phone number of remote party is available)
03:12 09/09 0123456
VoIP SIP Phone
Redial
Miss
Page 48

Confidential Information. All Rights reserved by Inventec Multimedia & Telecom Corp.
2-7 Call Rejection (DND)
If you don’t want to accept phone calls, you can active this
function, which is called as DND – Do Not Disturb.
When you want to activate DND, press ‘DND’ key on the IP
Phone. You’ll see a icon displayed on the LCD screen.
When DND function is activated, people who call you will hear
busy tone in his/her telephone, and he/she will think you’re
talking on the phone. You can still make phone calls when the
IP Phone is in DND mode.
When you want to deactivate DND function, press DND key
again, and the on the LCD screen will disappear.
03:12 09/09
0123456 (0123456)
VoIP SIP Phone
Redial
Page 49

Confidential Information. All Rights reserved by Inventec Multimedia & Telecom Corp.
2-8 Using Speakerphone and Headset
Excepting use the handset, you can also use speakerphone
and headset, which provides a hands-free phone operating
environment. When you’re working on computer or something
that requires you to use 2 hands, this function will be very
convenient.
Using speakerphone
There’s a built-in audio amplifier and microphone in
this IP Phone. You can amplify the voice of remote
party by internal speaker, so you don’t have to use
handset to talk.
To use speakerphone, just press ‘SPEAKER’ button
on the IP Phone. You don’t have to pick up the
handset, but just like you do it, you’ll hear the dialtone.
Please dial the phone number as usual, and speak to
the phone.
You can also use speakerphone function to accept
phone call, just press ‘SPEAKER’ button when the IP
Phone rings.
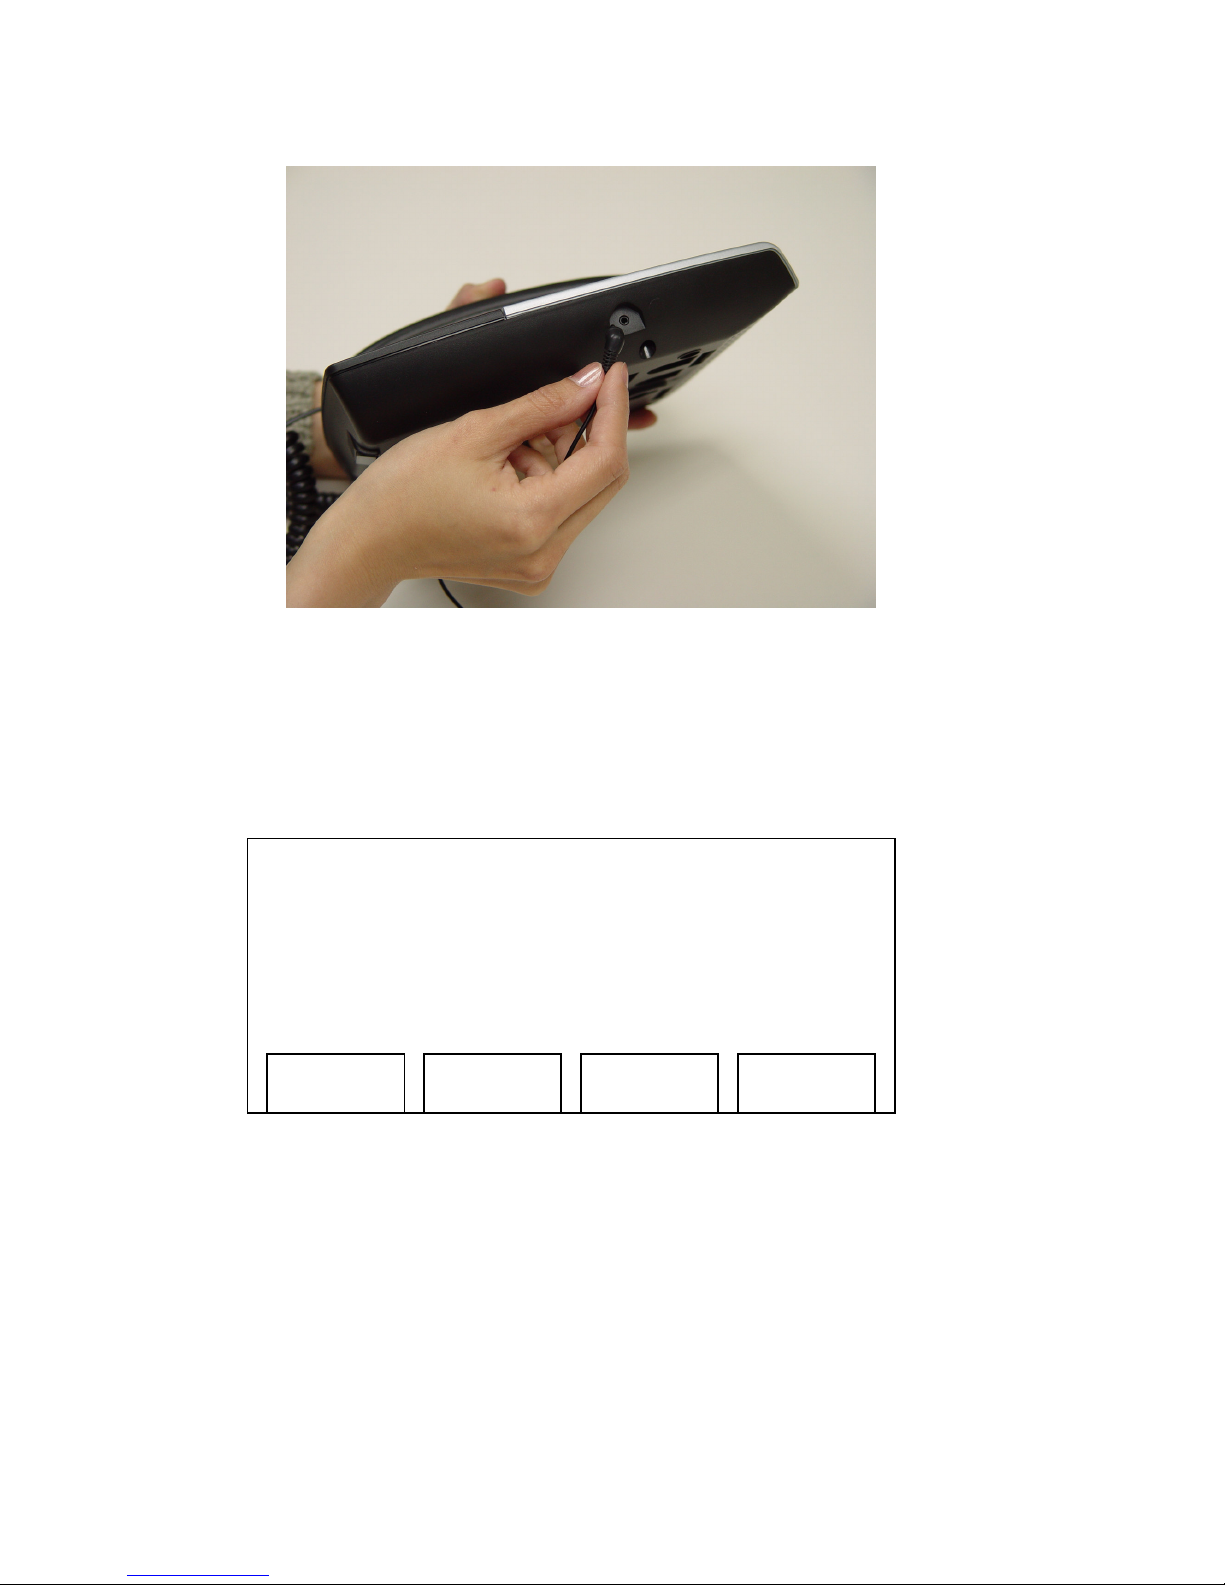
Using headset
To use headset, please insert the headset’s plug into
headset jack on the IP Phone first, like the figure
shown below:
Page 50

Confidential Information. All Rights reserved by Inventec Multimedia & Telecom Corp.
After the headset is connected to the IP Phone, you
can press ‘HEADSET’ button to make and accept calls
by headset, just like using a speakerphone.
WARNING: When you’re using headset, please turn down the
volume. High volume setting would cause damage to your
hearing!
Page 51

Confidential Information. All Rights reserved by Inventec Multimedia & Telecom Corp.
3-1 Speed Dial & Advanced Phone Configuration
This IP Phone supports 5 speed dial button (1 to 5), which allow
you assign a phone number to each speed dial button. To set a
phone number for a speed dial button, refer to chapter 2-4 to
open a web connection to the IP Phone, and follow the
following instructions:
1. After your web browser is connected to the IP Phone, click
the ‘System’ link on the left.
2. Here are 5 spaces for speed dial phone number, you can
enter phone number in speed dial number 1 to 5 (Only accepts
numeric characters, i.e. 0-9, no alphabet and symbol is
accepted). To save setting, press ‘Submit’ button on the bottom
of this webpage.
Page 52

Confidential Information. All Rights reserved by Inventec Multimedia & Telecom Corp.
You can also define busy forward number (i.e. the number that
incoming call will be transferred to if this phone is set to DND
mode), no answer forward number (i.e. no one answers the
phone when someone calls), and unconditional forward number
(i.e. transfer all incoming calls to this phone numer), and DND
forward number (i.e. the number that incoming call will be
transferred to if this phone is set to DND mode). Also, these 4
numbers are numeric only, no alphabet or symbol is accepted.
These settings can be set by LCD setup menu also, please
refer to instructions given in the later part of this chapter.
The rest items in this webpage are advanced settings, and here
are descriptions of these items:
Inter Digit Time: This is a special system parameter and please
don’t modify the default value of this item unless required by
your service provider.
Page 53

Confidential Information. All Rights reserved by Inventec Multimedia & Telecom Corp.
Call Waiting Timer: This is a special system parameter and
please don’t modify the default value of this item unless
requested by your service provider.
End of Dial Key: This is a special system parameter and please
don’t modify the default value of this item unless requested by
your service provider.
DTMF Type: This is a special system parameter and please
don’t modify the default value of this item unless requested by
your service provider.
RFC2833 Payload Type for DTMF: This is a special system
parameter and please don’t modify the default value of this item
unless requested by your service provider.
Handset Volume: You can set the volume level of handset’s
microphone and speaker here. Please input an integer between
0 to 8 in each field (total 9 levels), higher number means louder
voice.
Handsfree Volume: In here you can set the volume level of
speakerphone’s microphone and speaker. Please input an
integer between 0 to 8 in each field (total 9 levels), higher
number means louder voice.
Headset Volume: In here you can set the volume level of
headset’s microphone and earphone. Please input an integer
between 0 to 8 in each field (total 9 levels), higher number
means louder voice.
Page 54

Confidential Information. All Rights reserved by Inventec Multimedia & Telecom Corp.
Ring Volume: In here you can set the volume level of ringer,
please input an integer between 0 to 10.
Silence Suppression: This function will cause the IP Phone not
to transfer data when there’s no voice detected from
microphone. If the network connection you’re using is heavily
loaded, please set to ‘Enable’, but you may found that the
quality of voice is worse. You can set to ‘Disable’ to get better
voice quality.
Ring Tone Type: You can select the type of ringtone here. There
are several ringtones available here, please pick your favorite
one!
Voice Codec: Please ask your service provider for proper
setting. If you don’t know what it is, leave it alone.
Forward Timer: This is a special system parameter and please
don’t modify the default value of this item unless required by
your service provider.
Do Not Disturb: You can enable or disable DND function here.
Set Time Zone: Please select a proper timezone setting
according to the timezone of your residence.
NTP Server Address: This IP Phone can adjust the time of
internal clock via network, and you have to set a valid NTP
server address here. Some NTP Server addresses are:
time.nist.gov
poo.ntp.org
Page 55

Confidential Information. All Rights reserved by Inventec Multimedia & Telecom Corp.
tick.stdtime.gov.tw
tock.stdtime.gov.tw
time.stdtime.gov.tw
*: It’s recommended to use default value unless modification is
requested by your service provider.
How to set auto-forward number by LCD screen
As instructed before, call forwarding settings can be set by web
interface, but they can be set by LCD screen also:
1. Press ‘Menu’ button on IP Phone, and use ‘Up’ and ‘Down’
key to select the third item: ‘3. Settings’, then press ‘Select’ key.
2. Select ‘System Configuration’ by ‘Up’, ‘Down’, and ‘Select’
key.
03:12 09/09 0123456
1. Phone Book
2. Call Records
3. Settings
Select
Exit
03:12 09/09 0123456
1. Language
2. Ring Type
3. Contrast
4. System Configuration
Select
Exit
Page 56

Confidential Information. All Rights reserved by Inventec Multimedia & Telecom Corp.
3. Press down key until a kind of call forward type is selected,
then press ‘select’ key.
4. You’ll be prompted to input the target number of selected call
forward type, then press ‘Save’ key to save changes. You can
press ‘Clear’ to erase a number, or press ‘Cancel’ to keep
original number untouched.
03:12 09/09 0123456
10. BusyForwardNumber
11. NoAnswerForwardNumber
12. UnconditionalForwardNumber
13. DNDForwardNumber
Select
Exit
03:12 09/09 0123456
10. BusyForwardNumber
1234567890
11. NoAnswerForwardNumber
Save
Clear Cancel
Page 57

Confidential Information. All Rights reserved by Inventec Multimedia & Telecom Corp.
3-2 Phone Book Management
To ease the phone dialing, you can use the internal phone book
to memorize frequently dialed phone numbers. Please refer to
chapter 2-4 to open a web connection to the IP Phone, and
follow the following instructions:
1. After you web browser is connected to the IP Phone, please
click ‘Phone Book’ link on the left.
2. In this page, all phone book entries will be displayed here,
and you can input new ones. Please input the phone number in
‘Number’ field (only numeric characters allowed), and the
owner’s name of the phone number in ‘Name’ field, then press
‘Add’ button. The phone number and owner’s name will be
added to the list.
If you want to delete an existing phone number, please enter
Page 58

Confidential Information. All Rights reserved by Inventec Multimedia & Telecom Corp.
the phone number in ‘Number’ field, then press ‘Delete’ button.
You’ll see the number you just entered is removed from the list.
3. You can access the phone book on the IP Phone directly,
after the phone book entries are properly set. Please press
‘Menu’ button on IP Phone, and press ‘Select’ key on the first
item: ‘1. Phone Book’.
4. All phone book entries will be displayed here, you can use
‘Up’ and ‘Down’ key to move up and down in the list, to select a
phone book entry to dial.
03:12 09/09 0123456
1. Phone Book
2. Call Records
3. Settings
Select
Exit
Page 59

Confidential Information. All Rights reserved by Inventec Multimedia & Telecom Corp.
5. After you have selected one phone book entry, the phone
number and owner’s name will be displayed on LCD screen.
Press ‘Dial’ to dial the phone number, or ‘Exit’ to back to
previous menu.
6. When someone is calling you, and his / her phone number is
existed in the phone book, then his / her name will be displayed
on LCD screen, like the figure shown below:
03:12 09/09 0123456
1. Stan Marsh
2. Kyle Brofslovski
3. Kenny McCormic
4. Eric Cartman
Select
Add Exit DelAll
03:12 09/09 0123456
Stan Marsh
5570342
Dial
Exit Del
03:12 09/09 0123456
Stan Marsh (5570342)
incoming ...
Dial
Exit
Page 60

Confidential Information. All Rights reserved by Inventec Multimedia & Telecom Corp.
7. If you wish to delete all entries in the phonebook due to some
reasons (for example, you want to transfer your phone to other
people), you can press ‘DelAll’ key in step 4, you’ll be prompted
to press 1 or 2 key (1 for YES and 2 for NO).
8. If you press ‘1’, all entries in the phonebook will be deleted,
and you’ll see the following message displayed on LCD screen:
03:12 09/09 0123456
1. Stan Marsh
2. Kyle Brofslovski
3. Kenny McCormic
4. Eric Cartman
Select
Add Exit DelAll
Sure to delall? (Yes-1, No-2)
03:12 09/09 0123456
No Records Found
Select
Add Exit DelAll
Page 61

Confidential Information. All Rights reserved by Inventec Multimedia & Telecom Corp.
3-3 Browse System Information
If you want to know the system information about the IP Phone,
like IP address, model information, firmware version…etc., you
can use both LCD screen and web browser to obtain these
system-related information.
On LCD screen:
1. Press ‘Menu’ button on IP Phone
2. Press ‘Up’ or ‘Down’ key until ‘3. Setting’ is selected, then
press ‘Select’ key.
3. Press ‘Up’ or ‘Down’ key until ‘5. Model Information’ is
selected, then press ‘Select’ key.
03:12 09/09 0123456
1. Phone Book
2. Call Records
3. Settings
Select
Exit
03:12 09/09 0123456
1. Phone Book
2. Call Records
3. Settings
Select
Exit
Page 62

Confidential Information. All Rights reserved by Inventec Multimedia & Telecom Corp.
4. All system-related information will be displayed here, please
press ‘Up’ and ‘Down’ to browse, and press ‘Exit’ key when
done.
By web browser:
1. After your web browser is connected to the IP Phone, click
the ‘Status’ link on the left.
03:12 09/09 0123456
2. Ring Type
3. Contrast
4. Sy
stem Configuration
5. Model Information
03:12 09/09 0123456
1. Model Number
1. T5206
2. MAC Address
AA:BB:CC:DD:EE:FF
Select
Exit
Select
Exit
Page 63

Confidential Information. All Rights reserved by Inventec Multimedia & Telecom Corp.
2. You’ll see all network-related system settings here.
3. Click the ‘Version Information’ tab, and you’ll see all
firmware-related information here.
Page 64

Confidential Information. All Rights reserved by Inventec Multimedia & Telecom Corp.
Page 65

Confidential Information. All Rights reserved by Inventec Multimedia & Telecom Corp.
3-4 Change Display Language
The default language on LCD screen of this IP Phone is English.
However, you can change the language on LCD screen from
several options if you need, like to use this IP Phone in other
countries.
1. Press ‘Menu’ button on IP Phone
2. Press ‘Up’ or ‘Down’ key until ‘3. Setting’ is selected, then
press ‘Select’ key.
3. The first item ‘1. Language’ should be selected automatically
when you enter this menu, if not, please use ‘Up’ or ‘Down’ key
to select it, then press ‘Select’ key.
03:12 09/09 0123456
1. Phone Book
2. Call Records
3. Settings
Select
Exit
03:12 09/09 0123456
1. Phone Book
2. Call Records
3. Settings
Select
Exit
Page 66

Confidential Information. All Rights reserved by Inventec Multimedia & Telecom Corp.
4. All available languages will be displayed here, a ‘V’ sign will
appear on the language item which is being used currently.
Please use ‘Up’ or ‘Down’ key to select the language you want,
and press ‘Select’ key, or press ‘Exit’ to leave this menu without
making any change.
03:12 09/09 0123456
1. Language
2. Ring Type
3. Contrast
4. System Configuration
03:12 09/09 0123456
1. English V
2. Traditional Chinese
Select
Exit
Select
Exit
Page 67

Confidential Information. All Rights reserved by Inventec Multimedia & Telecom Corp.
3-5 Change Ringer Type
If you want to change ringer’s sound you hear every time the
phone rings, you can select a ringer sound from several options.
Please follow the following instructions to change ringer sound:
1. Press ‘Menu’ button on IP Phone
2. Press ‘Up’ or ‘Down’ key until ‘3. Setting’ is selected, then
press ‘Select’ key.
3. Press ‘Up’ or ‘Down’ key until ‘2. Ring Type’ is selected, then
press ‘Select’ key.
03:12 09/09 0123456
1. Phone Book
2. Call Records
3. Settings
Select
Exit
03:12 09/09 0123456
1. Phone Book
2. Call Records
3. Settings
Select
Exit
Page 68

Confidential Information. All Rights reserved by Inventec Multimedia & Telecom Corp.
4. All available ringer sound will be listed here, you can browse
by pressing ‘Up’ and ‘Down’ key, and press ‘Select’ key to make
decision, and press ‘Exit’ key to leave to previous menu after
your decision is make. A ‘V’ sign will appear on the curreltly
selected ringer sound.
03:12 09/09 0123456
1. Language
2. Ring Type
3. Contrast
4. System Configuraion
Select
Exit
03:12 09/09 0123456
1. Chime 1
2. Chime 2 V
3. Chime 3
4. Chime 4
Select
Exit
Page 69

Confidential Information. All Rights reserved by Inventec Multimedia & Telecom Corp.
3-6 Adjust the Contrast of LCD Screen
If you encounter difficulties reading the message displayed on
LCD screen, you can adjust the contrast of LCD screen to solve
the problem.
1. Press ‘Menu’ button on IP Phone
2. Press ‘Up’ or ‘Down’ key until ‘3. Setting’ is selected, then
press ‘Select’ key.
3. Press ‘Up’ or ‘Down’ key until ‘3. Contrast’ is selected, then
press ‘Select’ key.
03:12 09/09 0123456
1. Phone Book
2. Call Records
3. Settings
Select
Exit
03:12 09/09 0123456
1. Phone Book
2. Call Records
3. Settings
Select
Exit
Page 70

Confidential Information. All Rights reserved by Inventec Multimedia & Telecom Corp.
4. Press ‘Up’ key to make the displayed messages dark, and
press ‘Down’ key to make the displayed messages bright. Then
press ‘Save’ key to keep new LCD screen contrast, or press
‘Exit’ to leave to previous menu without change.
03:12 09/09 0123456
1. Language
2. Ring Type
3. Contrast
4. System Configuraion
03:12 09/09 0123456
Save
Exit
Select
Exit
Page 71

Confidential Information. All Rights reserved by Inventec Multimedia & Telecom Corp.
3-7 Select DTMF Types
DTMF (Dual-Tone Multiple Frequency) is the tone you heard
when you press a numeric key or * and # key on conventional
telephone. It’s impossible use certain online services (like
online banking service) without DTMF function.
To use DTMF function, you must select a proper DTMF type.
Three types of DTMF are supported by this phone: Transparent,
RFC2833 relay, and SIP info. Your service provider should tell
you which mode you should use. To change DTMF mode,
please connect to this phone by web browser, and click
‘System’ link on the left. Please select a proper DTMF type at
‘DTMF Type’, according to the instruction given by your service
provider.
Page 72

Confidential Information. All Rights reserved by Inventec Multimedia & Telecom Corp.
3-8 Reboot the IP Phone
If you found that this IP Phone is working improperly, you can
try to reboot the IP Phone to solve the problem.
1. Press ‘Menu’ button on IP Phone
2. Press ‘Up’ or ‘Down’ key until ‘3. Setting’ is selected, then
press ‘Select’ key.
3. Press ‘Up’ or ‘Down’ key until ‘4. System Configuration’ is
selected, then press ‘Select’ key.
03:12 09/09 0123456
1. Phone Book
2. Call Records
3. Settings
Select
Exit
03:12 09/09 0123456
1. Phone Book
2. Call Records
3. Settings
Select
Exit
Page 73

Confidential Information. All Rights reserved by Inventec Multimedia & Telecom Corp.
4. Press ‘Up’ or ‘Down’ key until ’17. Reboot System’ is
selected, and press ‘Select’ key to reboot the IP Phone. If
you changed your mind, press ‘Exit’ key to back to previous
menu.
You can also reboot this IP Phone from web browser. To do this,
please refer to chapter 2-4 to open a web connection to the IP
Phone, and follow the following instructions:
1. After your web browser is connected to the IP Phone, click
the ‘Management’ link on the left.
03:12 09/09 0123456
17. Reboot System
Press to reboot
18. Factory Default
Reset
Select
Exit
03:12 09/09 0123456
1. Language
2. Ring Type
3. Contrast
4. System Configuration
Select
Exit
Page 74

Confidential Information. All Rights reserved by Inventec Multimedia & Telecom Corp.
2. In this page, click the ‘Systsm Restart’ tab, then click
‘RESTART’ button. You’ll see ‘Phone is restarting !!’ message
displayed on web page, which means the IP Phone is restarting
now. The IP Phone will be ready again after 40 seconds.
Page 75

Confidential Information. All Rights reserved by Inventec Multimedia & Telecom Corp.
3-9 Factory Reset
If you want to erase all settings stored in this IP Phone, like
you’re move this IP Phone to a new location, you can use this
function to erase all stored information quickly.
1. Press ‘Menu’ button on IP Phone
2. Press ‘Up’ or ‘Down’ key until ‘3. Setting’ is selected, then
press ‘Select’ key.
3. Press ‘Up’ or ‘Down’ key until ‘4. System Configuration’ is
selected, then press ‘Select’ key.
03:12 09/09 0123456
1. Phone Book
2. Call Records
3. Settings
Select
Exit
03:12 09/09 0123456
1. Phone Book
2. Call Records
3. Settings
Select
Exit
Page 76

Confidential Information. All Rights reserved by Inventec Multimedia & Telecom Corp.
4. Press ‘Up’ or ‘Down’ key until ’18. Factory Default’ is
selected, and press ‘Select’ key to erase all information
stored in the IP Phone. If you changed your mind, press
‘Exit’ key to back to previous menu.
You can also erase all settings of this IP Phone from web
browser. To do this, please refer to chapter 2-4 to open a web
connection to the IP Phone, and follow the following
instructions:
1. After your web browser is connected to the IP Phone, click
the ‘Management’ link on the left.
03:12 09/09 0123456
1. Language
2. Ring Type
3. Contrast
4. System Configuration
Select
Exit
03:12 09/09 0123456
17. Reboot System
Press to reboot
18. Factory Default
Reset
Select
Exit
Page 77

Confidential Information. All Rights reserved by Inventec Multimedia & Telecom Corp.
2. In this page, click ‘Configuration commit / Reset’ tab, then
click ‘RESET’ button to erase all information stored in this IP
Phone. You have to click ‘COMMIT’ button to save new settings
again, and restart the phone to get all factory default settings
back.
Page 78

Confidential Information. All Rights reserved by Inventec Multimedia & Telecom Corp.
4-1 Troubleshooting
If your IP Phone is not working properly, before you send it back
to your dealer or our company, please check this
troubleshooting checklist first. Your problem could be very easy
and you can try to solve it by yourself!
Scenario /
Problem
Solution
Nothing is
displayed on LCD
screen
Please check the status of A/C adapter,
is it securely connected to the electric
outlet on the wall?
Is the power cord of A/C adapter still
connected to IP Phone?
If you use Power-over-Ethernet, please
check the status of your POE hub /
switch, and Ethernet cable.
Check contrast setting, and try a darker
setting.
Press ‘SPEAKER’ button on the phone,
or lift handset. If you can hear dialing
tone, please return this IP phone to your
dealer.
Contact your dealer if above solution
don’t work.
I see malformed /
strange text
displayed on the
LCD screen of IP
Phone
If you see strange text / graphic
displayed on LCD screen, please
disconnect the power cord and
Ethernet cable, and reconnect after 10
seconds.
If you just tried to upgrade firmware
and this happens, contact your dealer.
Page 79

Confidential Information. All Rights reserved by Inventec Multimedia & Telecom Corp.
I can not hear
dialtone
Please check the cable connection
between IP phone and handset.
Replace the cable used to connect IP
phone and handset with a new one. (If
you don’t have another cable, bring the
old cable to a telephone / computer
store and show them, they can help).
If you can’t hear dialtone fron handset,
try to press ‘SPEAKER’ button on the
phone, to see if you can hear the
dialtone. Please also check the
connection cable between handset and
the phone.
When you’re adjusting volume, you
won’t hear anything in handset, and
‘SPERAKER’ button will not function,
too. This is not a malfunction, just wait
for few seconds.
Try a higher volume setting.
Try solutions of the scenario titled
‘Nothing is displayed on LCD screen’ in
this troubleshooting checklist
Contact your dealer if above solutions
don’t work.
I can hear
dialtone in the
handset, but I
can not place /
accept phone call
If you hear busy tone (do do do …) in
handset, the party you’re calling may
be busy, not online, or the phone
number you just dialed is wrong,
please try again later and make sure
the phone number you called is
correct.
If you see ‘Initializing SIP server…’ on
Page 80

Confidential Information. All Rights reserved by Inventec Multimedia & Telecom Corp.
LCD screen, please check the network
connection first. If you’re sure there’s
no problem about the network
connection, please contact your
service provider to ask about service
availability.
Page 81

Confidential Information. All Rights reserved by Inventec Multimedia & Telecom Corp.
4-3 Firmware Update
The system software (firmware) used by this IP Phone is stored
on a flash-ROM, and can be updated when newer version of
system software is available. Please go to <service provider’s
webpage> to check for new version of firmware. If there’s newer
firmware available, we’ll publish its download information on the
webpage. The information comprises following items:
a. TFTP/FTP server address
b. Image file name
c. username
d. password.
Please write the above information down, and use the web
browser on your computer to connect to the IP Phone. Then
follow the following instructions to update firmware:
1. Click ‘Management’ link on the left of webpage, then click
‘Firmware Update’ tab.
Page 82

Confidential Information. All Rights reserved by Inventec Multimedia & Telecom Corp.
2. Please input TFTP/FTP server address, select server type
(TFTP or FTP), filename, username, and password in this page,
then press ‘SAVE’ button, it will take several seconds to save
firmware upgrade information. After the information is saved,
press ‘UPGRADE’ button, the IP Phone will connect to the FTP
server and start to download firmware, this will take several
minutes, please be patient. After download is complete, the IP
Phone will reboot, and your IP Phone will be ready again with
new firmware.
WARNING: Do not switch the IP Phone off, press any key on IP Phone, off-hook
the handset, or disconnect the IP Phone from network during upgrade procedure.
Or the downloaded firmware will be corrupt and the upgrade process will be
failed!
Page 83

Confidential Information. All Rights reserved by Inventec Multimedia & Telecom Corp.
4-4 Recover from Unsuccessful Firmware Update
If the downloaded firmware is corrupted, the firmware upgrade
will be failed, and maybe the IP Phone will become malfunction,
too. If this happens, please follow the following instructions to
restore the IP Phone to normal state.
1. Reboot the IP Phone by instructions given in chapter 3-7. If it
doesn’t work, please disconnect the power cord from IP Phone,
then reconnect it after 10 seconds.
2. You should see ‘Loading’ message displayed on the IP
Phone, please be patient, and both the ‘headset’ and ‘mute’ key
will illuminate for 2 seconds. Please press ‘*’ key twice now, and
the firmware of IP Phone will be recovered.
If the instruction given above does not solve the problem,
please contact your dealer, or <service provider’s name>.
Page 84

Confidential Information. All Rights reserved by Inventec Multimedia & Telecom Corp.
4-5 Change the Administration Password for Web Config
The password used at web login of this IP Phone can be
changed for security reason.
Please follow the following instructions to change the password
for web configuration login:
Click ‘Management’ link on the left of webpage, you’ll see
‘Password Configuration’ here. Please input your current
password, new password, and re-type new password again at
corresponding fields, then press ‘Submit’ button. If you changed
your mind and don’t want to change the password now, just
close the web browser or click other link in the configuration
webpage.
 Loading...