

Page 1

Walking Tutor
Assembly, Installation and Operating Instructions
Model No. WT 200
SAVE THESE INSTRUCTIONS
NOTE: Check all parts for shipping damage. In case of damage, DO NOT use. Contact
Carrier/Invacare for further instructions.
Safety Summary
To ensure the safe and proper installation of the WT200 walking tutor, these instructions
MUST be followed:
WARNING
DO NOT use this equipment without first reading and understanding this
instruction sheet. If you are unable to understand the warnings, cautions and
instructions, contact a healthcare professional, dealer or technical personnel if
applicable, before attempting to install this equipment - otherwise, injury or
damage may occur.
Invacare products are specifically designed and manufactured for use in conjunction
with Invacare accessories. Accessories designed by other manufacturers have not
been tested by Invacare and are not recommended for use with Invacare products.
Assembling the Walking Tutor
Tools required:
• 9/16 Open End Wrench
• 16mm Box End Wrench
• 19mm Box End Wrench
• 13mm Socket Wrench
• 16mm Socket Wrench
• 18mm Socket Wrench
• 5mm Allen Key
• 6mm Allen Key
Attaching Strap Assemblies to the Boom
NOTE: For this procedure, refer to FIGURE 1 on page 2.
1. Remove the boom cover to expose the boom crossbar (Detail “C”).
2. Secure the strap assembly on the crossbar by placing the strap around crossbar and
inserting the buckles through the loop (Detail “A”).
For more information regarding Invacare products, parts, and services,
please visit www.invacare.com
Part No 1141439 1 Walking Tutor
Page 2
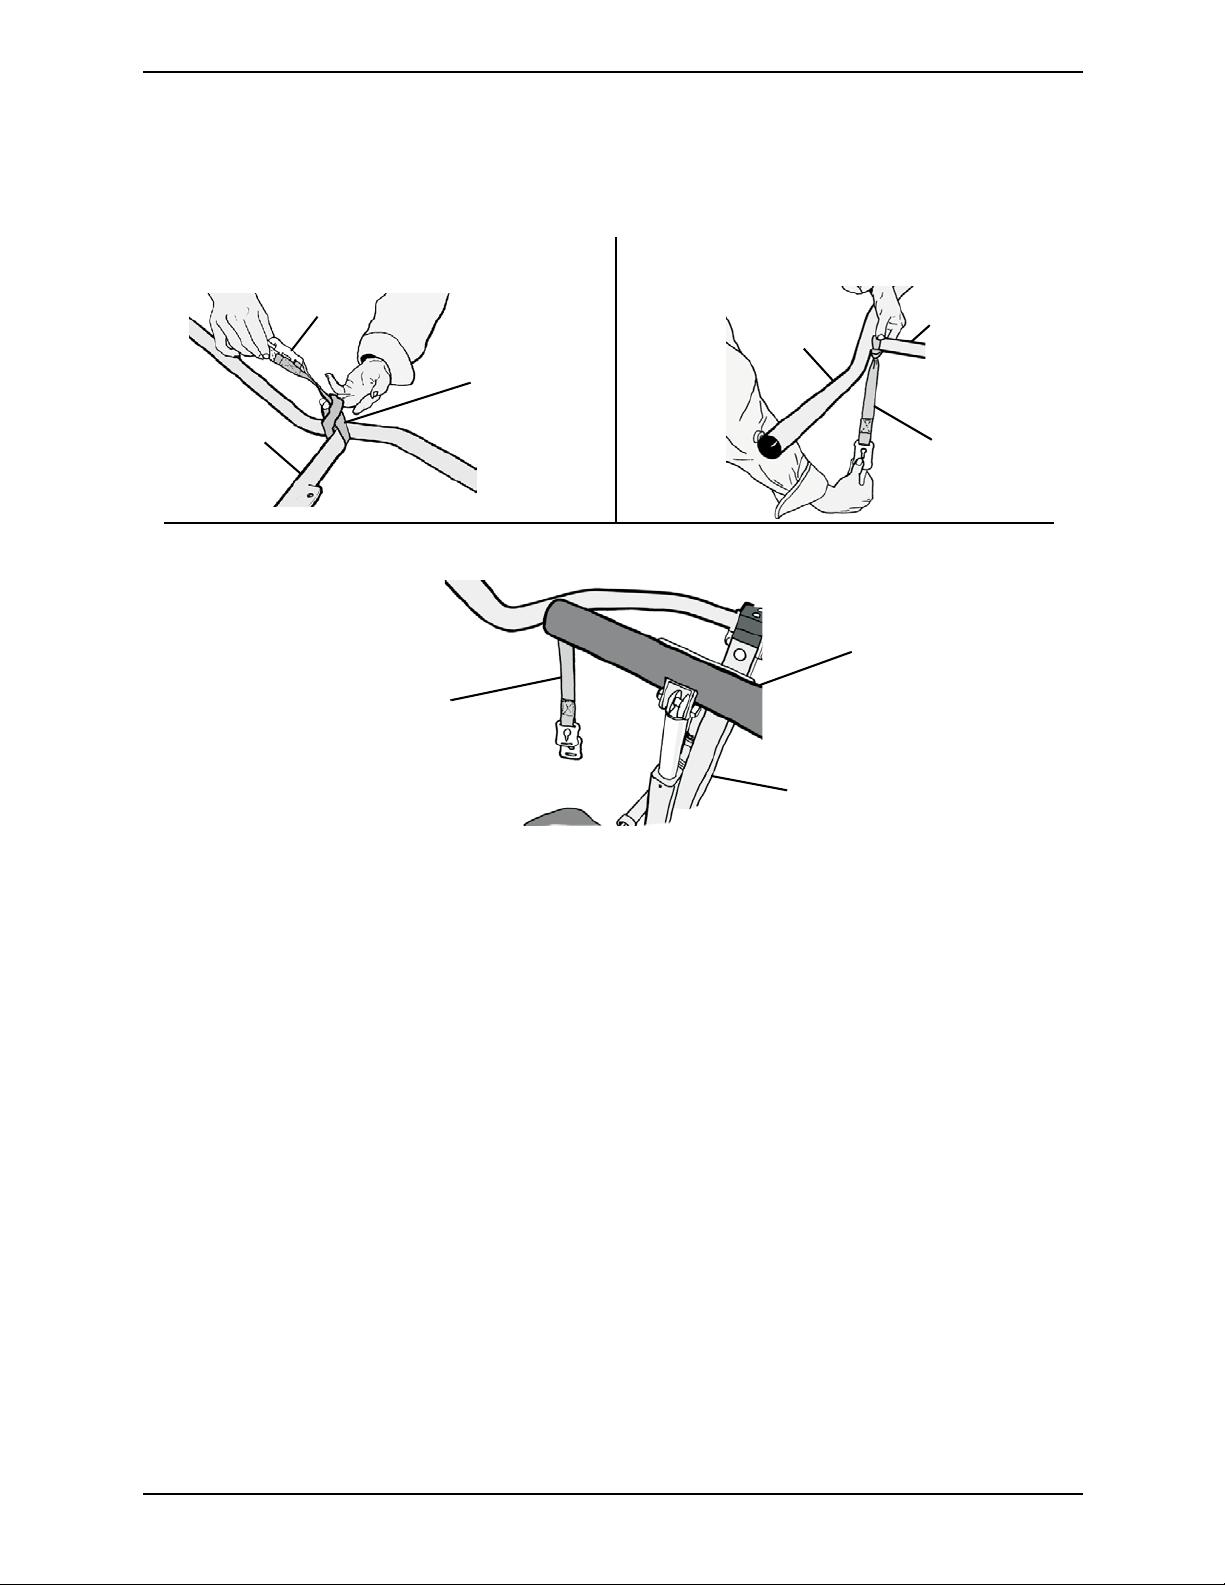
3. Ensure that the strap is up against the boom arm and is pulled down tight (Detail “B”).
4. Repeat Steps 1-3 for the other strap assembly.
5. Replace the boom cover.
Boom
Crossbar
DETAIL “A”
Buckles
Strap
Assembly
Strap
Assembly
DETAIL “C”
DETAIL “B”
Boom
Arm
Boom Cover
Lift
Boom
Crossbar
Strap
Assembly
FIGURE 1 Attaching Strap Assemblies to the Boom
Removing the Boom Bearing Retainer
NOTE: For this procedure, refer to FIGURE 2 on page 3.
1. Using a 6mm Allen key, unscrew the two socket head screws that secure the bearing
block to the top of the mast (Detail “A”).
2. Lift up base of the boom and the bearing blocks to separate them from the mast (Detail
“B”).
NOTE: If the lower bearing block remains seated in the top of the mast, use a soft hammer to
dislodge.
3. Move the actuator and the boom out of way by swinging them forward over the
kneepad.
4. Slide out the boom bearing retainer from the top of mast.
Walking Tutor 2 Part No 1141439
Page 3
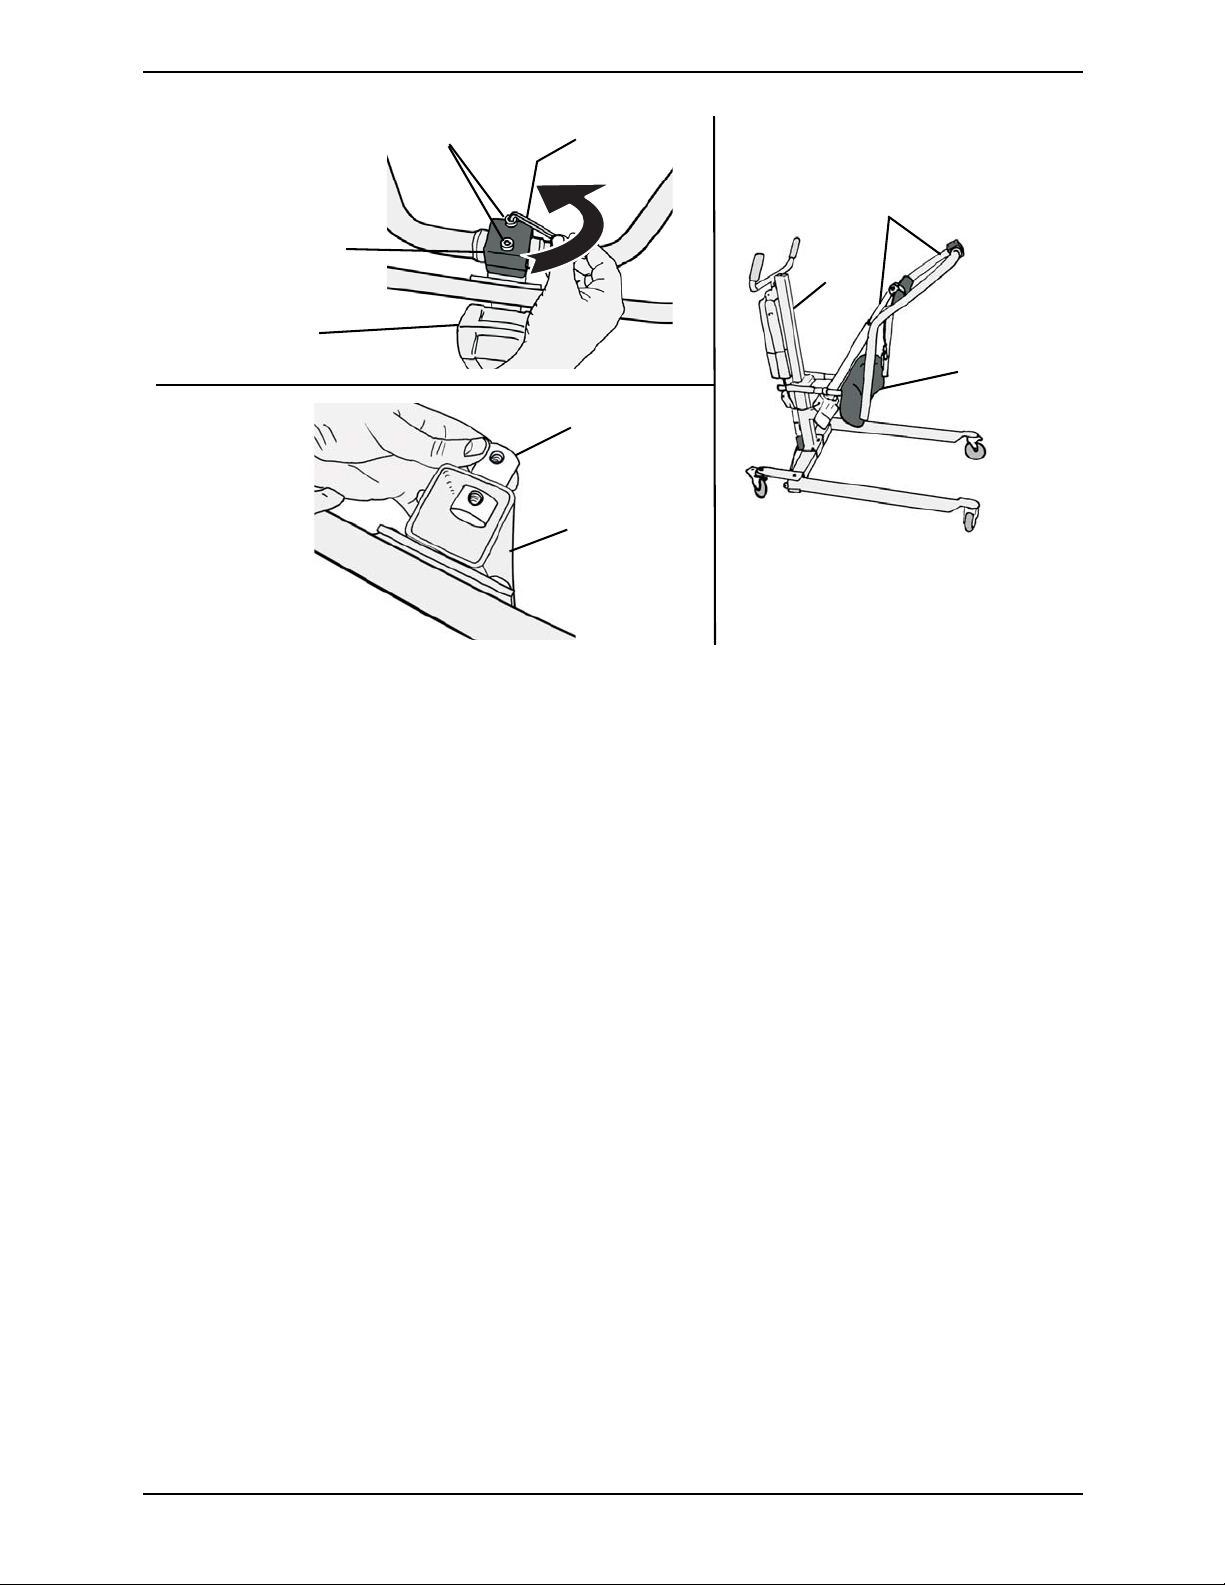
DETAIL “A”
Bearing Block
Mast
Socket Head Screws
Allen Key
DETAIL “B”
Actuator and Boom
Mast
Kneepad
DETAIL “C”
Boom Bearing
Retainer
Mast
FIGURE 2 Removing the Boom Bearing Retainer
Attaching the Walking Tutor to the Lift
NOTE: For this procedure, refer to FIGURE 3 on page 4.
1. Install the pivot assembly to the mast.
2. Replace the boom bearing retainer.
3. Swing the boom back and push the bearing block into the top of the mast.
4. Secure the bearing block to the top of the mast with the existing socket head screws.
5. Ensure that the walking tutor armrests are positioned the correct way before
assembling (not shown).
6. Position the walking tutor in behind the actuator.
7. Rotate the walking tutor to match the boom orientation.
8. Using the socket head screws and locknuts, secure the walking tutor bearing block to
the pivot assembly (Detail “C” and Detail “D”).
Part No 1141439 3 Walking Tutor
Page 4

DETAIL “A”
Boom Bearing
Retainer
Pivot
Assembly
Mast
DETAIL “B”
Bearing Block
Socket Head Screws
Allen Key
Socket Head
Screws
Walking Tutor
Bearing Block
DETAIL “C”
Mast
Bearing Blocks
Actuator
Walking Tutor
Bearing Blocks
Locknut
DETAIL “D”
Pivot
Assembly
FIGURE 3 Attaching the Walking Tutor to the Lift
Assembling the Armrest to Walking Tutor
NOTE: For this procedure, refer to FIGURE 1 on page 2 and FIGURE 4 on page 5.
1. Attach straps to walking tutor arm assembly (FIGURE 1 on page 2).
2. Level the walking tutor arm by using the hand pendant. Refer to Using the Walking
Tutor on page 6.
3. Remove the lever from the walking tutor arm and remove the spacer (not shown).
4. Insert the spacer into the armrest assembly tube.
5. Insert the armrest assembly tube with the spacer inside into the walking tutor arm.
6. Align the hole in the spacer with the walking tutor arm and replace the lever and
tighten in place.
7. Pull out the lever to position it.
Walking Tutor 4 Part No 1141439
Page 5

Hand Grip
Lever
Walking
Tutor Arm
Armrest
Assembly Tube
FIGURE 4 Assembling the Armrest to Walking Tutor
Adjusting the Armrest
NOTE: For this procedure, refer to FIGURE 4.
Height
Armrest
Hand Grip
Adjustment Knob
Armrest
Adjustment Knob
Height Adjustment Holes
1. Loosen and pull out the armrest adjustment knob.
2. Raise or lower armrest to one of the four height adjustment holes that best fits the
patient.
3. Tighten the armrest adjustment knob.
Angle
1. Loosen and pull out the armrest adjustment knob.
2. Position the armrest to one of the seven angle adjustment holes (not shown) that best
fits the patient.
3. Tighten the armrest adjustment knob.
Depth
1. Loosen the lever.
2. Slide the armrest assembly to the desired depth.
3. Tighten the lever.
Hand Grip Distance
1. Loosen the hand grip adjustment knob.
2. Slide the hand grip to the desired position.
3. Tighten the hand grip adjustment knob.
Part No 1141439 5 Walking Tutor
Page 6

Using the Walking Tutor
NOTE: Refer to the warnings and cautions in sling and lift manuals provided with the products
before using the walking tutor.
Removing the Footplate
NOTE: For this procedure, refer to FIGURE 5.
1. Lift the footplate up to disengage the “C” brackets from the main frame.
2. Pull the footplate away.
Footplate
Main Frame
“C” Bracket
FIGURE 5 Removing the Footplate
Fitting the Sling to a Patient
WARNING
ALWAYS position a sling low down around the patient's torso.
NOTE: For this procedure, refer to FIGURE 6.
1. Fit the sling to the patient before wheeling the lifter into position to carry out the lift.
2. Lean the patient forward and position the sling around the lower back with the torso
band against the patient.
NOTE: The sling should be centered so that equal lengths of the sling extend forward under the
arms.
3. Fasten the torso band firmly around the patientʹs chest.
Sling
FIGURE 6 Fitting the Sling to a Patient
Walking Tutor 6 Part No 1141439
Page 7

Lifting the Patient
1. Instruct the patient to place arms outside the sling.
2. Ensure the following:
A. The walking tutor is hanging down out of the way.
B. The patientʹs knees are pressed against the kneepad.
C. The bottom edge of the sling is positioned on the lower back.
D. The rear casters are locked (only when the walking tutor is used).
3. Attach the sling to the lift. Refer to the sling manual provided with the sling.
4. Instruct the patient to lean back into the sling.
5. Lift the patient by pressing the up button on the handset.
Positioning the Walking Tutor to Suit the Patient
1. Raise the patient to an almost standing position.
2. Swing the walking tutor up and attach strap assembly buckles (Detail “C” on Figure
1) hanging from the mast on to the pins.
3. Ask the patient to hold on to the walking tutor handles and to step back to stand up in
an upright position.
4. Adjust the height of the armrests to suit the patient.
5. If necessary, retract the kneepad to clear the patient’s legs.
6. Lower the mast by one inch so that patient is fully supporting their own weight.
Walking the Patient
1. Ensure that the rear casters are unlocked.
2. Stand behind the lift and hold on to caretaker handles.
3. While looking at the patient, gently and slowly pull the lift backward thus allowing
the patient to start walking. Continue guiding the patient in this manner.
Part No 1141439 7 Walking Tutor
Page 8

Invacare Corporation
USA
One Invacare Way
Elyria, Ohio USA
44036-2125
800-333-6900
www.invacare.com
Canada
570 Matheson Blvd E Unit 8
Mississauga Ontario
L4Z 4G4 Canada
800-668-5324
Invacare, Yes, you can. and The Medallion
Design are registered trademarks of
Invacare Corporation.
©2006 Invacare Corporation
PRODUCT MADE
IN AUSTRALIA
Part No 1141439
Rev A - 04/14/06
 Loading...