

Page 1

InTouch™TargIT™
Assembly, Installation and Operating Instructions
Model Nos. ITTG and ITTM
SAVE THESE INSTRUCTIONS
NOTE: Check all parts for shipping damage and test before use. In case of damage, DO
NOT use. C ontact your equipm ent supplier for further instru ction.
Safety Summary
To ensure the safe and proper installation of the InTouch TargIT, these instructions
MUST be followed:
WARNING
DO NOT install this equipment without first reading and understanding this
instruction sheet. If you are unable to understand the warnings, cautions and
instructions, contact a healthcare professional, dealer or technical personnel
if applicable, before attempting to install this equipment - otherwise, injury or
damage may occur.
Invacare products are specifically designed and manufactured for use in
conjunction with Invacare accessories. Accessories designed by other
manufacturers have not been tested by Invacare and are not recommended
for use with Invacare products.
Skin condition should be checked frequently. Otherwise, skin breakdown may
occur.
INSTALLATION WARNING
After ANY adjustments, repair or service and BEFORE use, make sure that
all attaching component parts are secure.
Important information
The best way to avoid problems related to pressure sores is to understand their
causes and your role in a skin management program.
Your therapist and physician should be consulted if you have questions regarding
individual limitations and needs.
All seats should be selected carefully. Working with your therapist, and physician
is the best way to assure that a seat choice matches your individual needs.
As the needs of the individual become more complex, the seat evaluation becomes
more important.
For more information regarding Invacare products, parts, and services,
Part No 1125097 1 InTouch™TargIT™
please visit www.invacare.com
Page 2

Introduction
InTouch TargIT
The InTouch TargIT is designed to provide pelvic stability, leg positioning and
pressure management and is available in two (2) different contours to suit the
amount of positioning required by the user.
Outer/Inner Covers
The outer cover is made from a water repellent fabric to protect the foam. The top
and sides are fabricated from patented waterproof stretch fabrics. The bottom is
fabricated from a heavyweight, waterproof, non-skid fabric.
An inner water repellent cover is also provided for additional protection for the
foam. Regular cleaning and inspection of the inner and outer covers is
recommended. Refer to Seat Inspection and Cleaning on page 6.
Attaching/Removing Seat To/From Seating Surface
NOTE: For this procedure, refer to FIGURE 1.
NOTE: To remove the seat from a seating surface, reverse the following procedures.
NOTE: The seat attaches to the seating surface using the hook and loop fasteners on the
bottom of the seat cover.
NOTE: The seating surface can be one (1) of the following: Seat upholstery, drop base or
seat pan.
NOTE: The zipper on the seat should always face toward the rear of the wheelchair.
WARNING
Make sure the hook and loop fasteners are securely attached to the seating
surface and to the seat BEFORE using. If the seat is not secured to the seating
surface, use caution when transferring in and out of the wheelchair.
Determine whether the seating surface has one (1) of the following features and
refer to one (1) of the procedures that immediately follow:
• Hook attachment strips.
• Loop attachment strips.
• No attachment strips.
InTouch™TargIT™ 2 Part No 1125097
Page 3
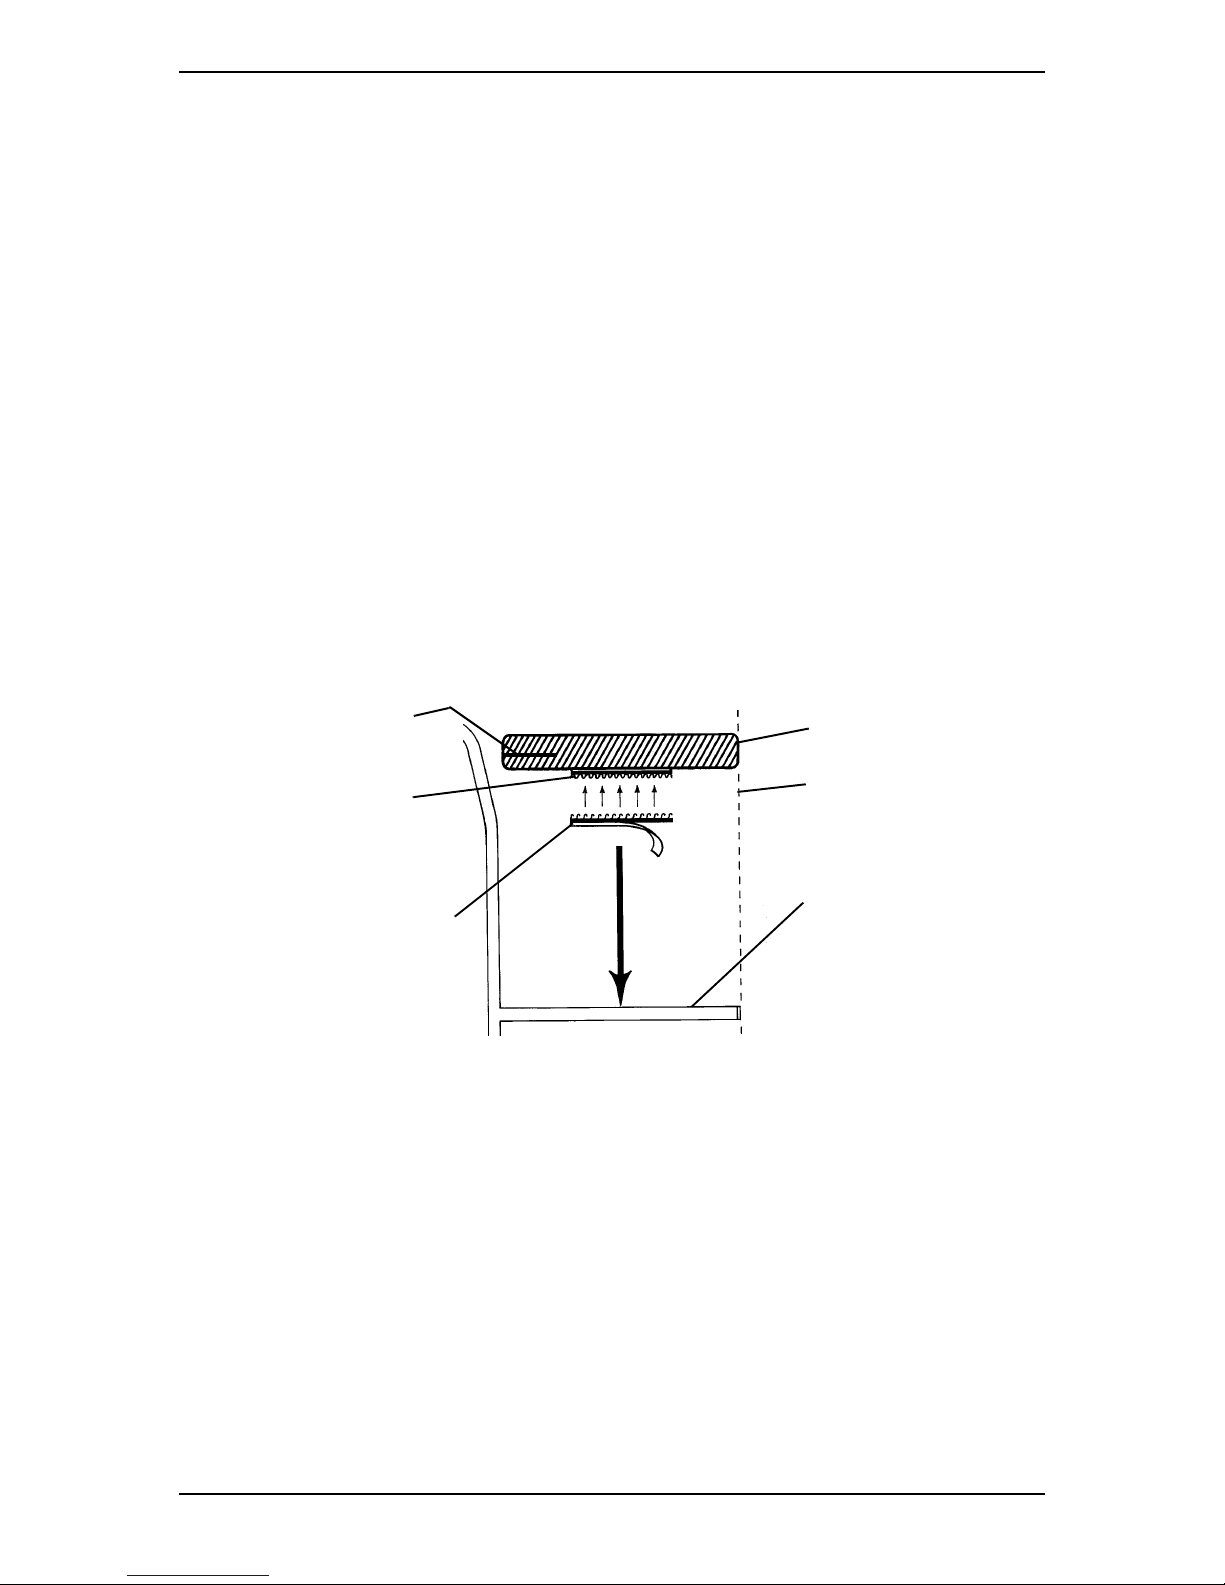
Hook Attachment Strips/No Attachment Strips
1. Remove the double-sided hook from the bottom of the seat.
2. Align the front edge of the seat with the front edge of the seating surface.
3. Perform one (1) of the following:
• Hook Attachment Strips - Secure the seat to the seating surface, making sure
that the strips of loop on the seat cover are securely attached to the strips of
hook on the seating surface.
• No Attachment Strips - Place the seat on the seating surface.
Loop Attachment Strips
1. Verify that the double-sided hook strips are securely attached to the loop
attachment strips on the bottom of the seat.
2. Align the front edge of the seat with the front edge of the seating surface.
3. Secure the seat to the seating surface, making sure that the double sided hook
is securely attached to the strips of loop on the seat cover and the seating
surface.
Zipper faces
rearward
Loop Portion of
Fastening Strap
(Attached to Seat)
Double Sided Hook
Portion of Fastening
Strap (Remove
backing if necessary)
Front of cushion lines up
with front edge of seating
Seating Surface
FIGURE 1 Attaching/Removing Seat To/From Seating Surface
Seat
surface
Part No 1125097 3 InTouch™TargIT™
Page 4
Removing/Installing Seat Covers
WARNING
The covers are designed to protect the foam from moisture and to provide
fire retardency. DO NOT use the seat without either the inner or outer
cover. If the covers are torn, they must be replaced immediately.
Removing Outer Cover
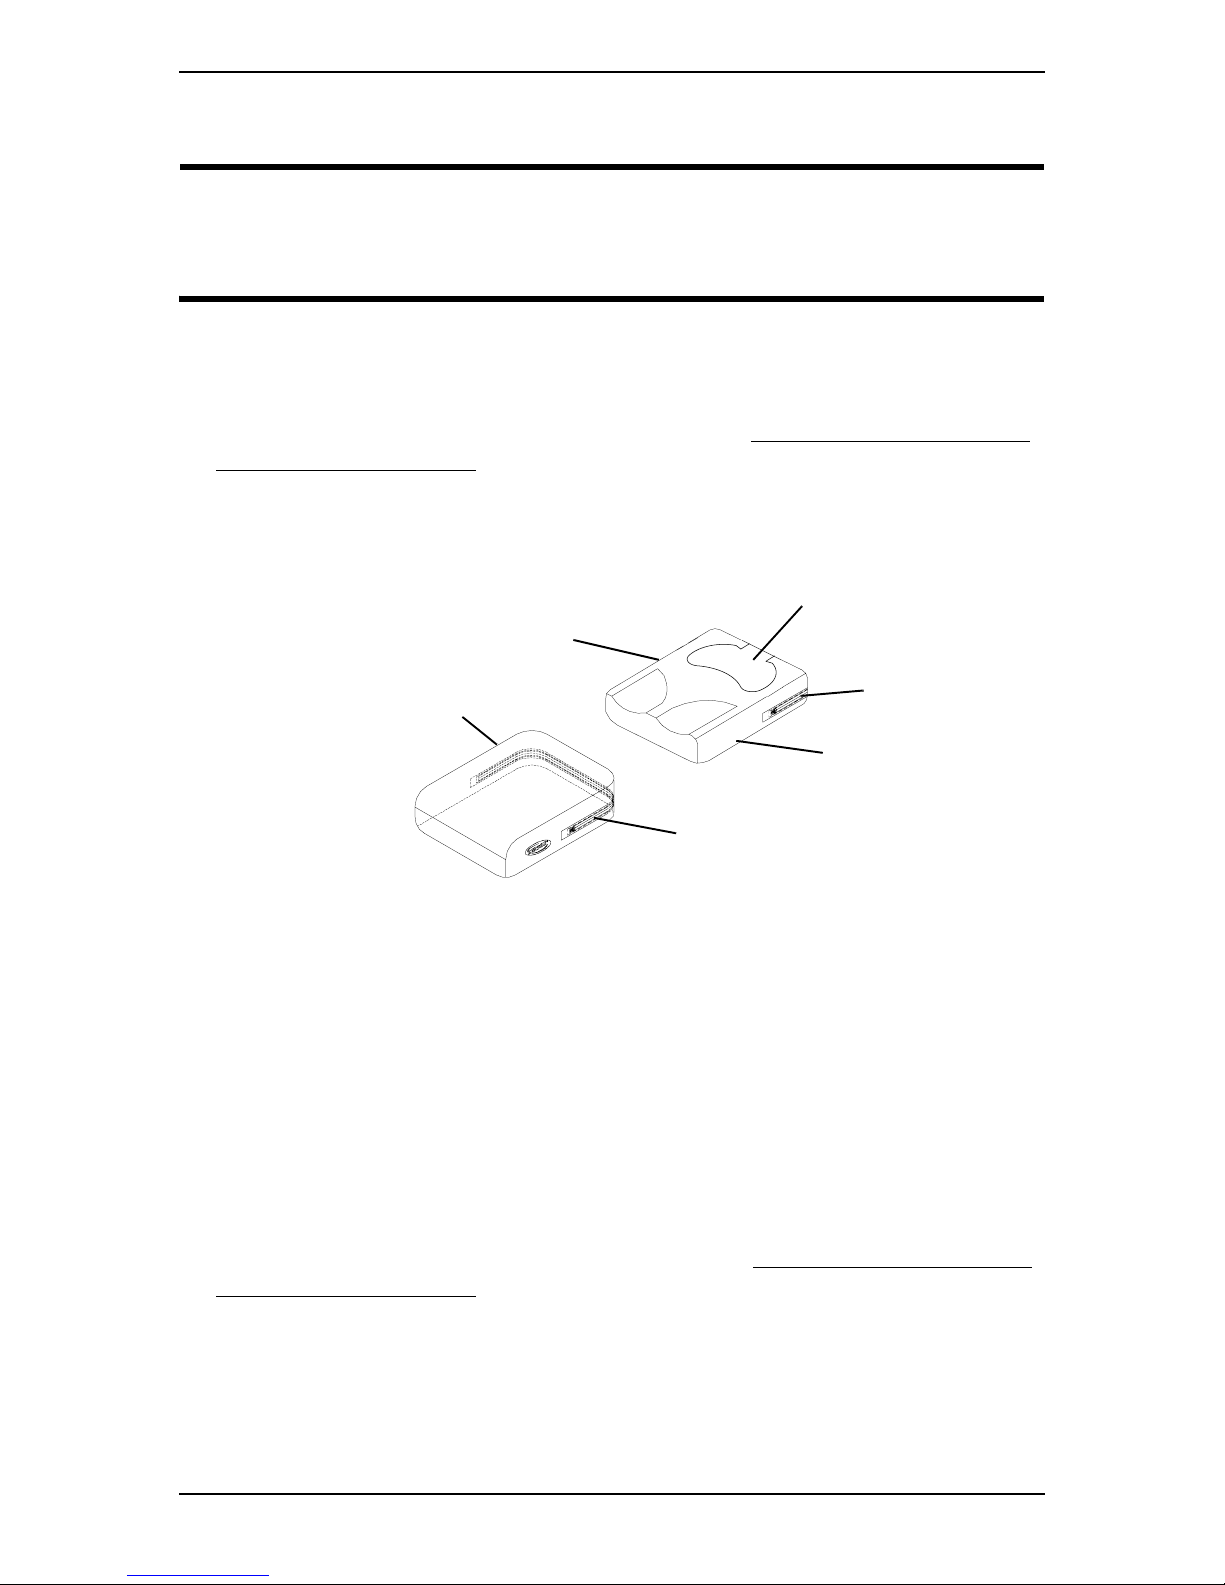
NOTE: For this procedure, refer to FIGURE 2.
1. Remove the seat from the seating surface. Refer to Attaching/Removing Seat
To/From Seating Surface on page 2.
2. Unzip the existing outer cover.
3. Remove seat (still inside inner cover) from existing outer cover.
Ischial Relief
Inner Cover
Area Inside
Outer Cover
Zipper
Zipper
Seat
FIGURE 2 Removing Outer Cover - Installing Outer Cover
Installing Outer Cover
NOTE: For this procedure, refer to FIGURE 2.
1. Position the seat (inside inner cover) with the ischial relief area toward the rear
of the new/existing outer cover.
NOTE: The zipper is at the rear of the cover.
2. Slide the seat (inside inner cover) into the new/existing outer cover.
3. Zip the new/existing outer cover closed.
4. Reattach the seat onto the seating surface. Refer to Attaching/Removing Seat
To/From Seating Surface on page 2.
InTouch™TargIT™ 4 Part No 1125097
Page 5
Removing Inner Cover
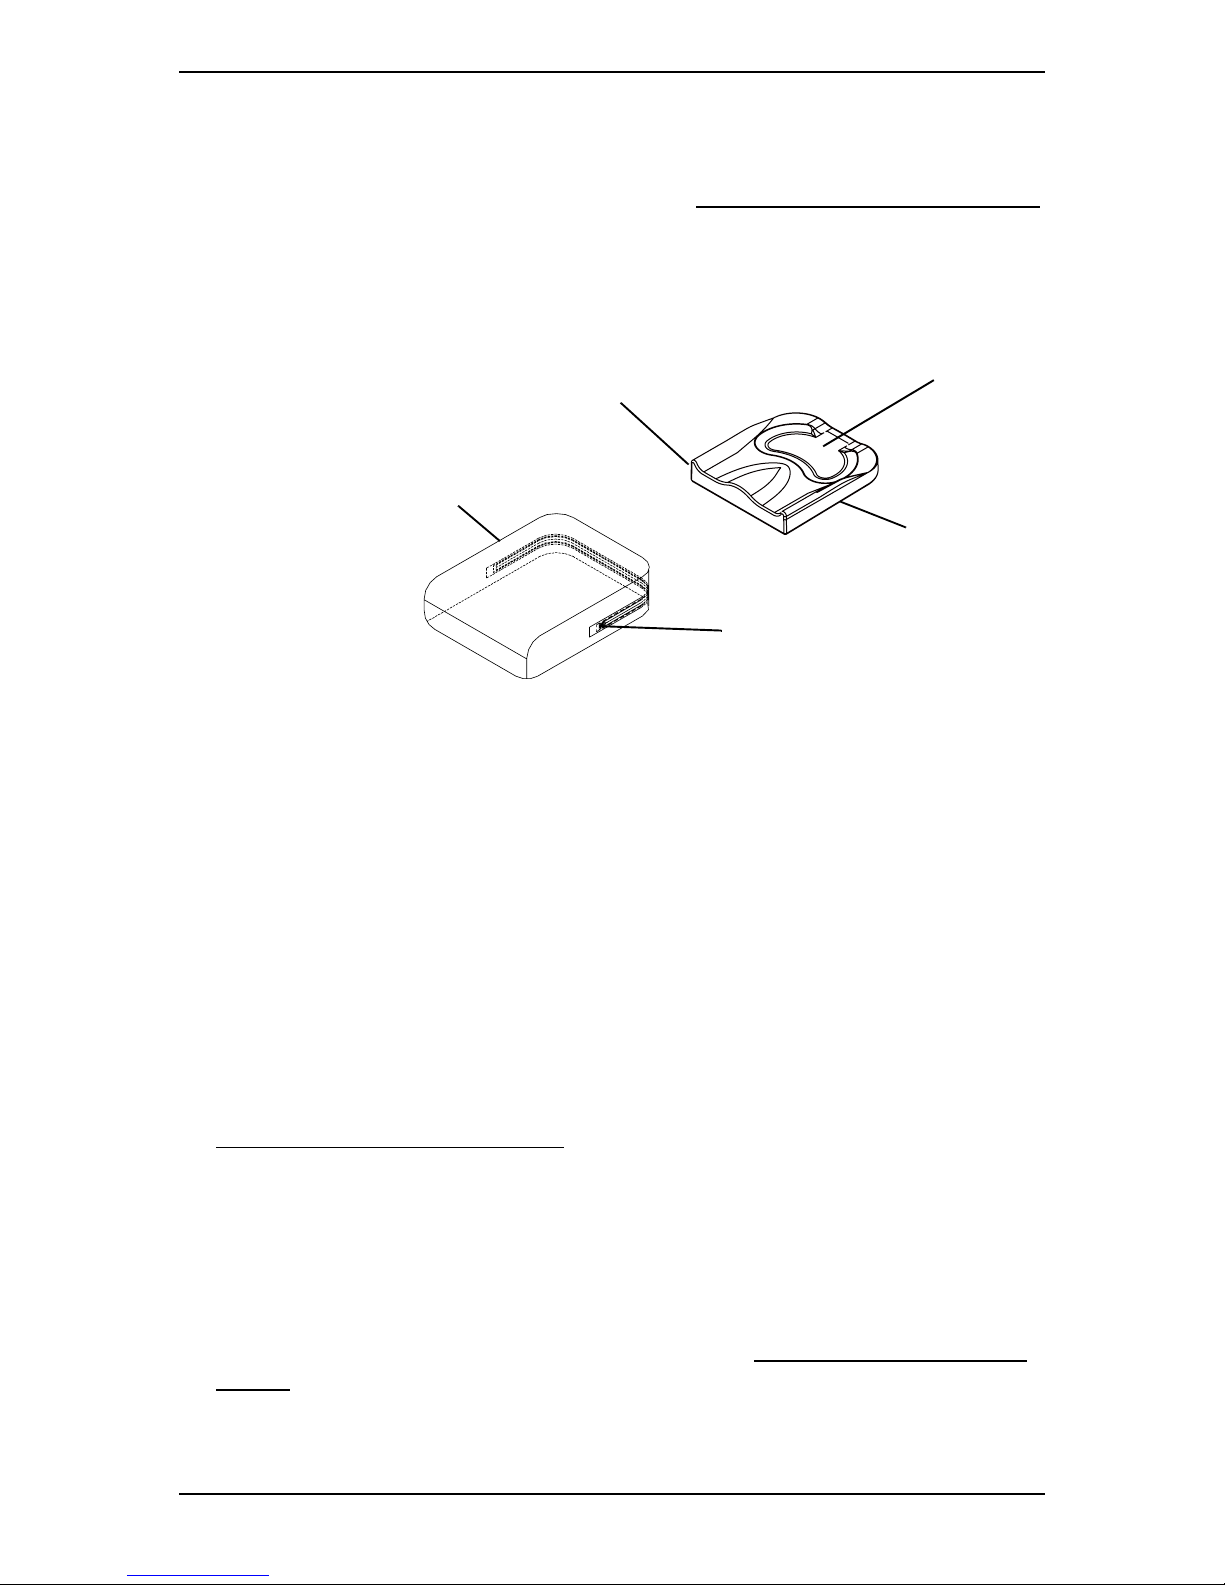
NOTE: For this procedure, refer to FIGURE 3.
1. Remove the seat from the outer cover. Refer to Removing/Installing Seat Covers
on page 4.
2. Unzip the existing inner cover.
3. Remove the seat from the existing inner cover.
Ischial
Insert - Toward Rear of
Inner Cover
Inner Cover
Zipper
Relief
Area
Seat
FIGURE 3 Removing Inner Cover - Installing Inner Cover
Installing Inner Cover
NOTE: For this procedure, refer to FIGURE 3.
1. Position the seat with the ischial relief area toward the rear of the new/existing
inner cover.
NOTE: The bottom rear surface of the seat is marked “REAR”. The zipper is at the rear of
the cover.
2. Slide the seat into the new/existing inner cover.
3. Zip the new/existing inner cover closed.
4. Reinstall the seat (inside inner cover) into the outer cover. Refer to
Removing/Installing Seat Covers on page 4.
Modifying Seat to Fit onto Drop Base
NOTE: This procedure is required only if the seat does not sit flush on the drop base.
NOTE: For this procedure, refer to FIGURE 4.
1. Remove seat from inner and outer covers. Refer to Removing/Installing Seat
Covers on page 4.
2. Without the inner or outer covers, place the seat on the drop base at the desired
position.
Part No 1125097 5 InTouch™TargIT™
Page 6
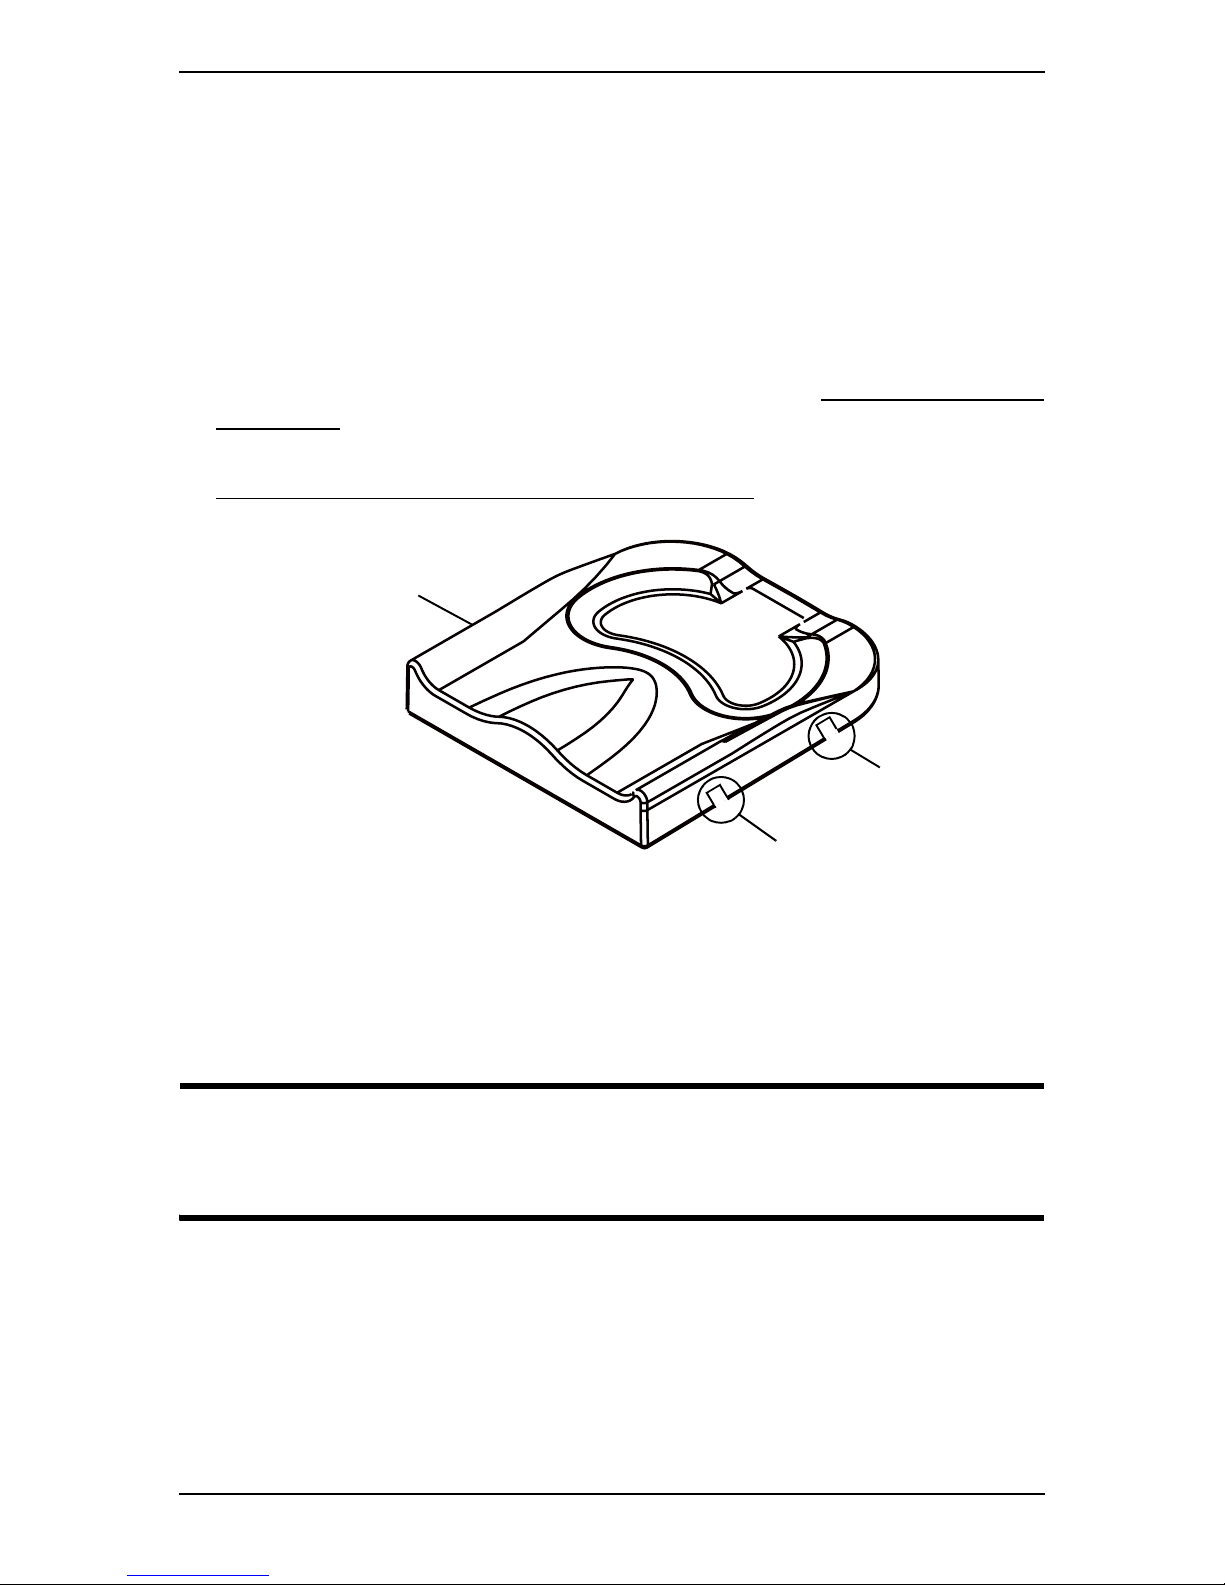
3. Mark the points where the sides of the seat hit the drop base.
NOTE: Each point should be no more than 1 inch wide as shown in FIGURE 4.
4. Remove the seat from the drop base.
5. Notch the seat sides at the points determined in STEP 3. An electric knife works
best for this procedure.
6. Place the seat on the drop base at the desired position.
7. If necessary, repeat STEPS 4-6 until the seat sits flush on the drop base.
8. Reinstall the seat into the inner and outer covers. Refer to Removing/Installing
Seat Covers on page 4.
9. Reattach the seat onto the seating surface of the wheelchair. Refer to
Attaching/Removing Seat To/From Seating Surface on page 2.
Seat
1 inch Wide
1 inch Wide
FIGURE 4 Modifying Seat to Fit onto Drop Base
Seat Inspection and Cleaning
Inspection
WARNING
DO NOT continue to use this product if any of the following problems as
described are discovered. Corrective maintenance can be performed at, or
arranged through, your equipment supplier.
Once a week, visually inspect all parts, including hardware, upholstery materials,
foams, and plastics for deformation, corrosion, breakage, wear and/or
compression.
InTouch™TargIT™ 6 Part No 1125097
Page 7

Cleaning
Clean either the inner cover or the outer cover once a week.
Inner Cover
Hand clean the water repellent inner cover using a soft cloth, warm water and a
mild soap solution. Rinse off and hang dry.
Outer Cover
Machine wash the seat cover in cold water on the gentle cycle using a mild
detergent.
CAUTION
DO NOT use fabric softeners or bleach. DO NOT machine dry. Air dry
ONLY. DO NOT dry in sun.
Part No 1125097 7 InTouch™TargIT™
Page 8

LIMITED WARRANTY
PLEASE NOTE: THE WARRANTY BELOW HAS BEEN DRAFTED TO COMPLY WITH FEDERAL
LAW APPLICABLE TO PRODUCTS MANUFACTURED AFTER JULY 4, 1975.
This warranty is extended only to the original purchaser/user of our products.
This warranty gives you specific legal rights and you may also have other legal rights which vary from
state to state.
Invacare warrants its product to be free from defects in materials and workmanship for two (2) years
on seat and 90 days on cover of use by original purchaser. If within such warranty period any such
product shall be proven to be defective, such product shall be repaired or replaced, at Invacare's
option. This warranty does not include any labor or shipping charges incurred in replacement part
installation or repair of any such product. Invacare's sole obligation and your exclusive remedy under
this warranty shall be limited to such repair and/or replacement.
For warranty service, please contact the dealer from whom you purchased your Invacare product. In
the event you do not receive satisfactory warranty service, please write directly to Invacare at the
address on the next page. Provide dealer's name, address, model number, and the date of purchase,
indicate nature of the defect and, if the product is serialized, indicate the serial number.
Invacare Corporation will issue a return authorization. The defective unit or parts must be returned
for warranty inspection using the serial number, when applicable, as identification within thirty (30)
days of return authorization date. DO NOT return products to our factory without our prior
consent. C.O.D. shipments will be refused; please prepay shipping charges.
LIMITATIONS AND EXCLUSIONS: The warranty shall not apply to problems arising from normal
wear or failure to adhere to the enclosed instructions. In addition, the foregoing warranty shall not
apply to serial numbered products if the serial number has been removed or defaced; products
subjected to negligence, accident, improper operation, maintenance or storage; or products
modified without Invacare's express written consent including, but not limited to: modification
through the use of unauthorized parts or attachments: products damaged by reason of repairs made
to any component without the specific consent of Invacare; products damaged by circumstances
beyond Invacare's control; products repaired by anyone other than an Authorized Invacare Dealer,
such evaluation shall be solely determined by Invacare.
The foregoing express warranty is exclusive and in lieu of any other warranties whatsoever, whether
express or implied, including the implied warranties of merchantability and fitness for a particular
purpose, and the sole remedy for violations of any warranty whatsoever, shall be limited to repair or
replacement of the defective product pursuant to the terms contained herein. The application of any
implied warranty whatsoever shall not extend beyond the duration of the express warranty provided
herein. Invacare shall not be liable for any consequential or incidental damages whatsoever.
IT SHALL NOT EXTEND BEYOND THE DURATION OF THE EXPRESSED WARRANTY
PROVIDED HEREIN AND THE REMEDY FOR VIOLATIONS OF ANY IMPLIED WARRANTY
SHALL BE LIMITED TO REPAIR OR REPLACEMENT OF THE DEFECTIVE PRODUCT
PURSUANT TO THE TERMS CONTAINED HEREIN. INVACARE SHALL NOT BE LIABLE FOR
ANY CONSEQUENTIAL OR INCIDENTAL DAMAGES WHATSOEVER.
THIS WARRANTY SHALL BE EXTENDED TO COMPLY WITH STATE/PROVINCIAL LAWS
AND REQUIREMENTS.
Invacare Corporation
USA
One Invacare Way
Elyria, Ohio USA
44036-2125
800-333-6900
www.invacare.com
Canada
570 Matheson Blvd. E Unit 8
Mississauga Ontario
L4Z 4G4 Canada
800-668-5324
Invacare is a registered trademark of
Invacare Corporation.
Yes, you can., InTouch, and TargIT
are trademarks of Invacare
Corporation.
©2005 Invacare Corporation
Part No 1125097
Rev A - 1/05
 Loading...