

Page 1

Operator’s Manual
HomeFill™II Compressor
User: Before using the product, read this manual
and save for future reference.
Dealer:
This manual must be given to the end user.
For more information regarding
Invacare products, parts, and services,
please visit www.invacare.com
Page 2

WARNING
WARNING
DO NOT OPERATE THIS EQUIPMENT WITHOUT
FIRST READING AND UNDERSTANDING THIS
MANUAL. IF YOU ARE UNABLE TO
UNDERSTAND THE DANGERS, WARNINGS,
CAUTIONS, AND INSTRUCTIONS, CONTACT
INVACARE TECHNICAL SERVICES BEFORE
ATTEMPTING TO USE THIS EQUIPMENT OTHERWISE, SERIOUS INJURY OR PROPERTY
DAMAGE MAY RESULT.
NOTICE
The information contained in this document is subject to change without notice.
WARNING
Users MUST NOT SMOKE while using this device. Keep
all matches, lighted cigarettes or other sources of ignition
out of the room in which this product is located. Textiles
and other materials that normally would not burn are
easily ignited and burn with great intensity in oxygen
enriched air. Failure to observe this warning can result in
severe fire, property damage and cause physical injury or
DEATH.
NOTE: Updated versions of this manual are available on www.invacare.com.
HomeFill™II Compressor 2 Part No 1100873
Page 3

TABLE OF CONTENTS
TABLE OF CONTENTS
SPECIAL NOTES ............................................... 4
TYPICAL PRODUCT ......................................... 5
PARAMETERS ................................................. 5
LABEL LOCATION ............................................ 6
DEALER INFORMATION ................................... 6
HOMEFILL II INFORMATION .............................7
SECTION 1—IMPORTANT SAFETY
INSTRUCTIONS ............................................... 8
Servicing of Double-Insulated Products.......................................11
SECTION 2—INITIAL SETUP ............................ 12
Initial Set Up of Compressor.......................................................... 12
SECTION 3—CHECKLIST AND CYLINDER
INSPECTION .................................................. 16
Compressor Operation Checklist................................................. 16
Cylinder Prefill Inspection...............................................................16
SECTION 4—COMPRESSOR OPERATION .......... 23
Connecting/Disconnecting the Cylinder to/from the
Compressor........................................................................................23
Turning the Compressor On .........................................................29
Setting the Flow Knob to the Prescribed Setting ......................31
SECTION 5—INDICATOR LIGHTS .................... 32
SECTION 6—TROUBLESHOOTING/ CYLINDER
FILL TIMES ..................................................... 34
SECTION 7—MAINTENANCE .......................... 37
Cleaning the Compressor Filter....................................................37
Cabinet ................................................................................................38
LIMITED WARRANTY .................................... 38
HomeFill™II Compressor 3 Part No 1100873
Page 4

SPECIAL NOTES
SPECIAL NOTES
Check all parts for shipping damage. In case of damage, DO NOT use. Contact Invacare for further instruction.
Signal words are used in this manual and apply to hazards or unsafe practices which could result in personal injury or property damage. Refer to the following table for definitions of the signal words.
SIGNAL WORD MEANING
DANGER Danger indicates an imminently hazardous
situation which, if not avoided, will result in
death or serious injury.
WARNING Warning indicates a potentially hazardous
situation which, if not avoided, could result
in death or serious injury.
CAUTION Caution indicates a potentially hazardous
situation which, if not avoided, may result in
property damage.
ACCESSORIES
There are many different types of humidifiers, oxygen tubing,
cannulas and masks that can be used with this device. You
should contact your local home care provider for
recommendations on which of these devices will be best for
you. They should also give you advice on the proper usage,
maintenance, and cleaning.
WARNING
Invacare products are specifically designed and manufactured for use in conjunction with Invacare accessories. Accessories designed by other manufacturers have not been tested by Invacare and are not recommended for use with Invacare products.
HomeFill™II Compressor 4 Part No 1100873
Page 5

TYPICAL PRODUCT
PARAMETERS
Regulatory Listing: Double Insulated Product
ETL Certified Complying with UL73 and UL1097 (US)
ETL Certified Complying with CAN/CSA C22.2 No. 68 (Canada)
For household use only.
TYPICAL PRODUCT PARAMETERS
- COMPRESSOR
Operating temperature:
Storage temperature: -10 to 150° F (-23 to 65° C) @ 15
Input Pressure Required: 14 - 21 psi
Input Flow Required: 2 L/min
Input O
Width: 20 ¼ inches
Height: 15 inches
Depth: 16 inches
Weight: 33 lbs
Shipping Weight: 39 lbs
% Required: >90% O
2
50 to 95° F (10 to 35° C) @ 20 to 60%
non-condensing humidity
to 95% humidity
2
Part No 1100873 5 HomeFill™II Compressor
Page 6
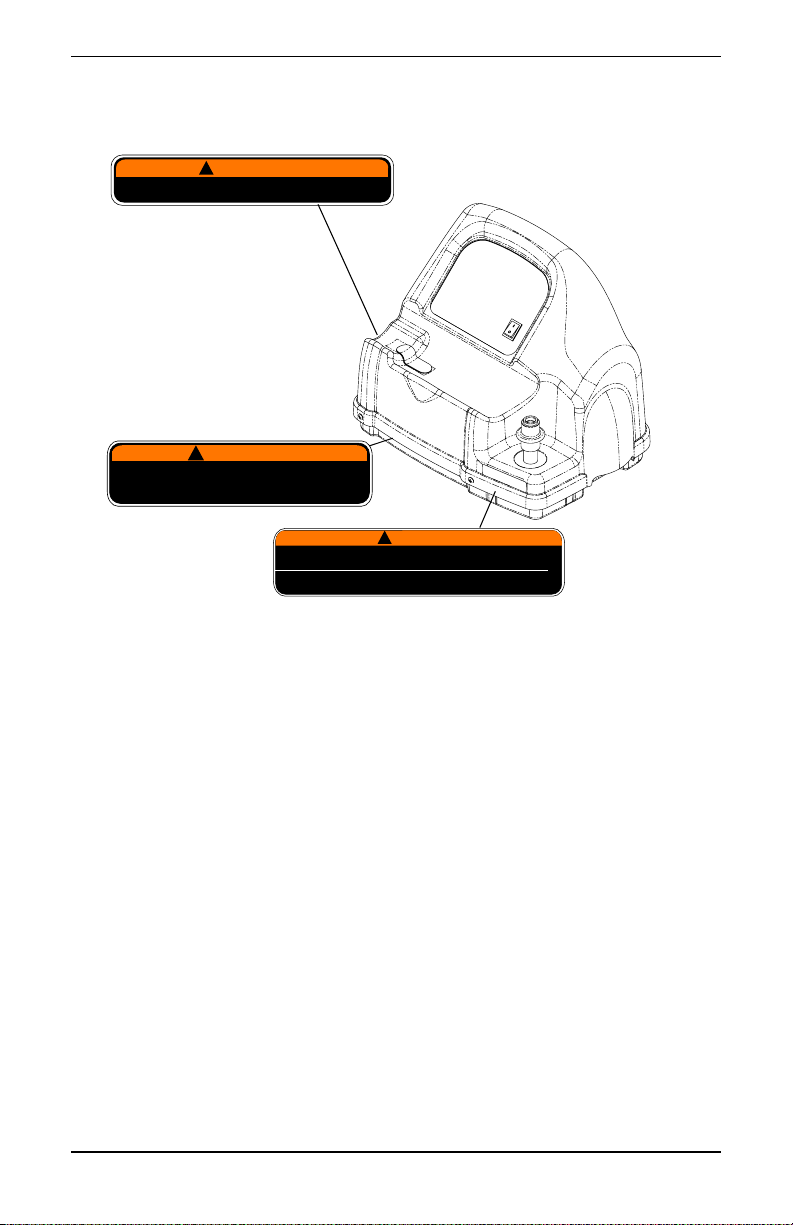
LABEL LOCATION
WARNING
Keep all connections free of oil and grease to avoid violent
ignition. See Owner's Manual before cleaning.
This unit contains moving and high pressure
components. Manufacturer Service Only.
!
!
WARNING
DO NOT REMOVE UNIT COVER
Cylinders filled on this unit must be labeled "Contents of
this cylinder are the product of an oxygen concentrator."
P/N 1075220 RevC - 10/04
P/N 1075221
Rev B - 10/04
!
Keep all connections free of oil and grease.
See Owner's Manual before cleaning.
WARNING
P/N 1075238
Rev B - 10/04
DEALER INFORMATION
NOTE: Invacare recommends leaving a full cylinder of oxygen with the patient after setting up the HomeFill II compressor.
Before leaving a HomeFill II Compressor with a user, the following checklist MUST be completed:
❑ Make sure the pressure test on cylinder has not expired. ❑ Instruct the user on the safe operation of the concentrator
and review all warnings.
❑ Instruct the user on the safe operation of the HomeFill II
compressor and review all warnings.
❑ Leave a full cylinder of oxygen with the user. ❑ Leave a copy of all warnings and filling instructions with
the user.
HomeFill™II Compressor 6 Part No 1100873
Page 7

HOMEFILL II INFORMATION
HOMEFILL II INFORMATION
HomeFill II is an accessory device to the oxygen concentrator that enables the patient to refill custom portable oxygen cylinders for personal use.
NOTICE
The HomeFill II compressor is for use with specially designed Invacare Platinum™5, 10 and XL HomeFill II compatible oxygen concentrators.
The oxygen concentrator can be set to the following maximum flowrates when operating with HomeFill II compressor:
Platinum 5 and XL: 3 L/min. or less.
Platinum 10: 5 L/min. or less.
To determine if your oxygen concentrator is HomeFill II compatible, examine the lower right corner of the rear of the oxygen concentrator for an outlet fitting. Refer to the illustration below.
HomeFill™II Compressor 7 Part No 1100873
Page 8

SECTION 1—IMPORTANT SAFETY INSTRUCTIONS
SECTION 1—IMPORTANT SAFETY
INSTRUCTIONS
WARNING
SECTION 1 - IMPORTANT SAFETY INSTRUCTIONS
contains important information for the safe operation and
use of this product. DO NOT use this product or any
available optional equipment without first completely
reading and understanding these instructions and any
additional instructional material such as Owner’s
Manuals, Service Manuals or Instruction Sheets supplied
with this product or optional equipment. If you are unable
to understand the Warnings, Cautions or Instructions,
contact a health care professional, dealer or technical
personnel before attempting to use this equipment otherwise, injury or damage may occur.
CAUTION
“Caution: Federal law restricts this device to sale by or on order of a physician, or any other practitioner licensed by the law of the State in which he/she practices to use or order the use of this device.”
When using the HomeFill II, basic precautions should ALWAYS be followed, including the following:
WARNING
TO REDUCE THE RISK OF BURNS,ELECTROCUTION, FIRE, OR INJURY TO PERSONS.
NEVER use near any type of flame or flammable/explosive substances, vapors or atmosphere.
Part No 1100873 8 HomeFill™II Compressor
Page 9

SECTION 1—IMPORTANT SAFETY INSTRUCTIONS
DO NOT allow oil from your hands or other sources to come
into contact with the compressor coupling or bottle fittings.
These substances may become flammable in the presence of
oxygen and cause injury. Avoid touching the bottle fitting
whenever possible. Example of items to avoid are hand
creams or lotions, cooking oils, suntan oils or sunblocks and
similar oily products. If you use these types of products
Invacare suggests you wash your hands prior to using the
HomeFill unit. If the bottle fitting should come in contact with
such substances it should be cleaned off with a damp cloth
prior to connecting it to the compressor.
NEVER oil or lubricate the compressor coupler or bottle
fittings. NEVER use any penetrating oil or lubricant such as
WD-40 or 3 in One. If connection difficulty is experienced
verify that the bottle fitting is being inserted straight down
into the compressor coupler. If continued difficulty is
experienced contact your supplier for assistance.
Before moving or repositioning either the compressor or
concentrator, ALWAYS push the power switch to the Off (O)
position, disconnect the AC power cord and the interconnect
hose between the compressor and concentrator. Failure to do
so may result in damage to the unit or personal injury.
Children should ALWAYS be supervised around the
HomeFill II unit. When used with the HomeFill table or
similar elevated support surfaces, a child could pull over any
such table causing the unit to fall. Failure to observe this
warning may result in personal injury or product damage.
Use extreme care when handling and filling an oxygen cylinder. Full oxygen cylinders are under pressure and can become a projectile if dropped or mishandled.
NEVER transport a compressor with a cylinder connected to or stored on the compressor, otherwise injury or damage can occur.
HomeFill™II Compressor 9 Part No 1100873
Page 10

SECTION 1—IMPORTANT SAFETY INSTRUCTIONS
DO NOT store filled oxygen cylinders near a furnace, hot water tank, in the trunk of a car or other high temperature area. Storage in areas such as this can result in bursting of the cylinder or fire.
The use of this device is limited to the oxygen patient. Cylinders MUST be used ONLY by the oxygen patient and are not to be distributed to any other individual for any purpose.
Invacare products are specifically designed and manufactured for use in conjunction with Invacare accessories. Accessories designed by other manufacturers have not been tested by Invacare and are not recommended for use with Invacare products.
DO NOT use outdoors.
The maximum patient flow while filling cylinders with the
IOH200 is 3 L/min. for Platinum 5 and XL, 5 L/min. for
Platinum 10. Patients with a higher prescribed flow should
not transfill while receiving supplemental oxygen treatment
from the Platinum Concentrator.
NEVER block the air openings of the product or place it on a soft surface, such as a bed or couch, where the air opening may be blocked. Keep the openings free from lint, hair and the like.
DO NOT disassemble. The unit is provided with double insulation and has no serviceable parts. Refer to Servicing of Double-Insulated Products on page 11. If any service is required, contact Invacare Technical Service.
If the compressor has a damaged cord or plug, if it is not working properly, if it has been dropped or damaged, or submersed in water, call a qualified technician for examination and repair.
Part No 1100873 10 HomeFill™II Compressor
Page 11

SECTION 1—IMPORTANT SAFETY INSTRUCTIONS
If any leakage of the oxygen cylinder is detected DO NOT
attempt to use the cylinder. Turn the flow selector knob on the
regulator to Off. If leakage persists, place the cylinder
outdoors and notify your Home Health Care Provider or
Service Representative of this condition.
The HomeFill II is equipped with a high pressure relief valve
to ensure the user’s safety. When activated, this safety feature
will make an extremely loud noise. If this noise occurs, turn
the unit Off and contact your Home Health Care Provider or
Service Representative.
Unplug unit from outlet when not in use and before cleaning.
This appliance is provided with double insulation. Use only identical replacement parts. Refer to Servicing of Double-Insulated Products on page 11.
Servicing of Double-Insulated Products
In a double-insulated product, two systems of insulation are
provided instead of grounding. No grounding means is
provided on a double-insulated product, nor is a means for
grounding to be added to the product. Servicing a
double-insulated product requires extreme care and
knowledge of the system, and is to be done only by qualified
service personnel. Replacement parts for a double-insulated
product MUST be identical to the parts they replace. A
double-insulated product is marked with the words
"DOUBLE INSULATION" or "DOUBLE INSULATED". The
symbol ( ) is also able to be marked on the product.
CAUTION
DO NOT unplug the power cord by pulling on the cord. To unplug, grasp the plug not the cord, otherwise damage may occur.
SAVE THESE INSTRUCTIONS
HomeFill™II Compressor 11 Part No 1100873
Page 12

SECTION 2—INITIAL SETUP
SECTION 2—INITIAL SETUP
NOTE: Dealers Only - Refer to Dealer Information on page 6 before performing this procedure.
Initial Set Up of Compressor
Compressor Initial Setup Checklist
Before operating the HomeFill II Compressor for the first time, complete the following checklist:
❑ Choose a location for the compressor. ❑ Transport the compressor to the desired location. ❑ Connect the power cord to the compressor. ❑ Connect the compressor to the concentrator.
Choosing a location
The compressor should be at least three inches away from walls, draperies or furniture to ensure sufficient air flow.
Avoid placing the compressor next to heaters, radiators or hot air registers.
DO NOT use in a closet.
The compressor should sit on a hard flat stable surface, such as a table or the Ready Rack.
WARNING
NEVER use near any type of flame or flammable/explosive substances, vapors or atmosphere.
Part No 1100873 12 HomeFill™II Compressor
Page 13

SECTION 2—INITIAL SETUP
Transporting the Compressor
WARNING
NEVER transport a compressor with a cylinder connected to or stored on the compressor, otherwise injury or damage can occur.
CAUTION
When transporting the compressor, be careful not to bump the compressor or the connectors into obstacles. Otherwise, damage to the compressor may occur.
NOTE: For this procedure, refer to FIGURE 2.1.
1. There are two methods to safely transport the compressor:
A. One hand - Grasp the
hand grip at the
bottom rear of the
compressor.
B. Two hands - Grasp
the hand grips on the
sides of compressor.
Hand Grip
Hand Grip
FIGURE 2.1 Transporting
the Compressor
Hand Grip
Installing the Power Cord
NOTE: For this procedure, refer to FIGURE 2.2 on page 14.
1. Ensure the compressor is on a hard flat stable surface, such as a table or the Ready Rack.
2. Make sure the power switch is in the Off (O) position
3. Plug the power cord into the electric connector in the back of the compressor.
HomeFill™II Compressor 13 Part No 1100873
Page 14

SECTION 2—INITIAL SETUP
4. Plug the opposite end of the power cord into the wall outlet.
Wall
Outlet
Power
Cord
Compressor
(REAR)
Electrical
Connection
NOTE: This product has a polarized plug (one blade is wider than
the other). As a safety feature, this plug will fit in a polarized outlet
only one way. If the plug does not fit fully in the outlet, reverse the
plug. If it still does not fit, contact a qualified electrician. DO NOT
attempt to defeat this safety feature.
FIGURE 2.2 Installing the Power Cord
Connecting the Compressor to the Concentrator
NOTE: For this procedure, refer to FIGURE 2.3 on page 15.
1. Insert one end of the interconnect hose into the outlet fitting on the back of the concentrator (Detail “A”).
2. Insert the opposite end of the interconnect hose into the inlet fitting on the side of the compressor (Detail “B”).
NOTE: The metal tabs on the concentrator outlet fitting and the compressor inlet fitting will pop out with an audible “click” when the end of the interconnect hose is properly installed (Detail “C”).
3. Loop any excess interconnect hose and secure to the back of the concentrator with the fastening straps.
Part No 1100873 14 HomeFill™II Compressor
Page 15

SECTION 2—INITIAL SETUP
FIGURE 2.3 Connecting the Compressor to the Concentrator
HomeFill™II Compressor 15 Part No 1100873
Page 16

SECTION 3—CHECKLIST AND CYLINDER INSPECTION
SECTION 3—CHECKLIST AND
CYLINDER INSPECTION
Compressor Operation Checklist
Each time the HomeFill II Compressor is used to fill a cylinder, complete the following checklist:
❑ Ensure the concentrator has been On for at least thirty
minutes. Refer to the concentrator Owner’s Manual.
❑ Perform the prefill inspection on the cylinder. ❑ Connect the cylinder to the compressor. ❑ Push the compressor power switch to the on ( ) position. ❑ Examine the indicator lights on the control panel. ❑ Disconnect and remove the full cylinder. ❑ Push the compressor power switch to the Off (O) position. ❑ If filling another cylinder, repeat this checklist.
Cylinder Prefill Inspection
WARNING
ONLY use cylinders that have the Invacare HomeFill II connection and the label.
All cylinders MUST be inspected before attempting to fill. Otherwise, injury or damage may occur.
NOTE: For this procedure, refer to FIGURE 3.1 on page 17.
Part No 1100873 16 HomeFill™II Compressor
Page 17

SECTION 3—CHECKLIST AND CYLINDER INSPECTION
DANGER
Improper filling or abuse of this cylinder, or failure to follow
these safety instructions may cause serious bodily injury or
death. High pressure oxidizing gas vigorously accelerates
combustion.
DO NOT alter or modify cylinder or related components.
DO NOT use Oil or Grease. Keep cylinder, cylinder valve, all
equipment and connections free of oil and grease to avoid
violent ignition resulting in serious bodily injury or death.
For medical applications. Use only
practitioner. Uninterrupted use of
over a long duration, without
content of arterial blood, may be harmful.
Oxygen Cylinders filled by the Venture HomeFill
shall be used for personal use only. "Not to be
filled for resale or use by professional users".
This cylinder is to be used with the Invacare Venture
HomeFill system. This cylinder contains
oxygen produced by an oxygen concentrator using
the pressure swing adsorption process.
DO NOT handle cylinder or use contents until you are
professionally trained, including emergency procedures.
Use in accordance
Open valve slowly.
S
ecure cylinder during s
area.
Keep away from heat, flame and spark. Keep out of
reach of children. DO NOT drop.
Transfilling of this gas is performed by Venture HomeFill Only.
Cylinders that have been refinished and/or exposed to
elevated temperatures must be hydrostatically tested before
filling.
Cylinder temperature
Aluminum cylinders subject
temperatures in excess of 350°F
service and condemned by trained
caustic paint strippers. Valve and safety relief devices must be
removed and replaced by trained and authorized
personnel. DO NOT alter or change valve assembly.
Invacare Corporation
2101 E. Lake Mary Blvd.
Sanford, FL 32773
1-800-832-4707
!
!
WARNING
as directed by a
high concentrations
monitoring its effect on
93 + 3%
with Venture HomeFill Operator’s
Close valve after each use
torage and use. No smoking in cylinder
should not exceed 125°F (52°C).
to the action of
must be
withdrawn from
personnel. DO NOT use
licensed
oxygen
OXYGEN
+
Manual.
and when empty.
fire or heated to
DO NOT REMOVE THIS PRODUCT LABEL
Not for Commercial Resale
Part Number 1125090 Rev B - 11/04
of oxygen
2
FIGURE 3.1 Cylinder Prefill Inspection
HomeFill™II Compressor 17 Part No 1100873
Page 18

SECTION 3—CHECKLIST AND CYLINDER INSPECTION
The Hydrostatic Testing Date
Aluminum cylinders MUST undergo testing every five years.
WARNING
DO NOT fill cylinders that have not been tested in the past five years. Otherwise, serious personal injury may result. Contact your dealer for replacement.
External Examination
1. Examine the outside of the cylinder for the following conditions, and replace the cylinder if they exist:
• Dents or dings
•Arc burns
• Oil or grease
• Any other signs of damage that might cause a cylinder
to be unacceptable or unsafe for use.
2. Examine the cylinder for evidence of fire or thermal damage. Evidence includes charring or blistering of the paint, or other protective coating or heat sensitive indicator. If fire or thermal damage is found, replace the cylinder.
3. Inspect the cylinder/regulator assembly for the following and replace if found:
• Debris, oil or grease
• Noticeable signs of damage
• Signs of corrosion inside the valve
• Signs of excessive heat or fire damage
Part No 1100873 18 HomeFill™II Compressor
Page 19

Please Seal with
Tape Before Mailing
Page 20

REGISTER YOUR PRODUCT!
The benefits of registering:
1. Safeguard your investment.
2. Ensure long term maintenance and servicing of your purchase.
3. Receive updates with product information, maintenance tips, and industry
news.
4. Invacare can contact you or your provider, if servicing is needed on your
product.
5. It will enable Invacare to improve product designs based on your input
and needs.
Register ONLINE at www.invacare.com
- or -
Complete form and mail.
Any registration information you submit will be used by Invacare Corporation
only, and protected as required by applicable laws and regulations.
PRODUCT REGISTRATION FORM
NAME _____________________________________________________
ADDRESS __________________________________________________
CITY _______________________ STATE/PROVINCE _____________
ZIP/POSTAL CODE ________________
EMAIL ___________________________ PHONE NO. ____________
INVACARE MODEL NO. _____________________________________
SERIAL NO. ______________________
PURCHASED FROM _______________
DATE OF PURCHASE: _____________
Page 21

1. Method of purchase: (check all that apply)
❏ Medicare ❏ Insurance ❏ Medicaid ❏ Other
2. This product was purchased for use by: (check one)
❏ Self ❏ Parent ❏ Spouse ❏ Other
3. Product was purchased for use at:
❏ Home ❏ Facility ❏ Other
4. I purchased an Invacare product because:
❏ Price ❏ Features (list features)
5. Who referred you to Invacare products? (check all that apply)
❏ Doctor ❏ Therapist ❏ Friend ❏ Relative ❏ Dealer/Provider ❏ Other
❏ Advertisement (circle one): TV, Radio, Magazine, Newspaper ❏ No Referral
6. What additional features, if any, would you like to see on this product?
_________________________________________________________________
7. Would you like information sent to you about Invacare products that may be
available for a particular medical condition? ❏ Yes ❏ No
If yes, please list any condition(s) here and we will send you information by email and/or
mail about any available Invacare products that may help treat, care for or manage such
condition(s):
_________________________________________________________________
8. Would you like to receive updated information via email or regular mail about the
Invacare home medical products sold by Invacare's dealers? ❏ Yes ❏ No
_________________________________________________________________
9. What would you like to see on the Invacare website?
_________________________________________________________________
10. Would you like to be part of future online surveys for Invacare products? ❏ Yes
❏ No
11. User's Year of birth: _________________
If at any time you wish not to receive future mailings from us, please contact us at Invacare
Corporation, CRM Department, 39400 Taylor Parkway, Elyria, OH 44035, or fax to
877-619-7996 and we will remove you from our mailing list.
TO FIND MORE INFORMATION ABOUT OUR PRODUCTS, VISIT
WWW.INVACARE.COM
Page 22

Page 23

SECTION 4—COMPRESSOR OPERATION
SECTION 4—COMPRESSOR
OPERATION
Connecting/Disconnecting the Cylinder to/from the Compressor
Connecting the Cylinder to the Compressor
WARNING
NEVER use tools of any kind to connect/disconnect the cylinder and the compressor. Otherwise, severe injury and/or damage may occur.
DO NOT drop oxygen cylinders. Use two hands when handling/transporting oxygen cylinders. Otherwise, injury or damage may occur.
DO NOT use a liquid leak detector to test for leaks.
NOTE: For this procedure, refer to FIGURE 4.1 on page 24 and FIGURE 4.2 on page 26.
1. Examine the cylinder gauge. If the cylinder pressure is less than 1500 psig, proceed to STEP 2 (FIGURE 4.2).
NOTE: If the cylinder pressure is greater than 1500 psig., DO NOT attempt to top off this cylinder. It may not fill.
2. Set the regulator flow dial on the cylinder to Off (FIGURE
4.2).
3. Remove the cylinder and connector fillport covers (if present).
HomeFill™II Compressor 23 Part No 1100873
Page 24

SECTION 4—COMPRESSOR OPERATION
CAUTION
DO NOT connect the outlet (cannula) connection to the HomeFill II compressor, otherwise the conserving cylinder will not work properly.
4. Momentarily push DOWN on the outer ring (sleeve) of the connector fillport until GREEN dots are visible to reset the connector (FIGURE 4.1).
NOTE: If the outer ring (sleeve) is in the UP position
(GREEN dots not visible), the connector fillport will not
be able to accept the cylinder fillport. Pushing DOWN
momentarily will reset the connector fillport (GREEN
dots visible) to accept the cylinder fillport.
PUSH
DOWN
GREEN Dots
Outer Ring (Sleeve)
Connector Fillport
BEFORE
COUPLING
CYLINDER
PUSH DOWN
ON SLEEVE
UNTIL
GREEN DOTS
ARE VISIBLE
FIGURE 4.1 Resetting Connector Fillport
5. Grasp the cylinder/regulator assembly in the area behind the cylinder gauge (FIGURE 4.2).
6. Position the cylinder in the compressor cradle (FIGURE
4.2).
7. Align the cylinder fillport with the connector fillport (FIGURE 4.2).
Part No 1100873 24 HomeFill™II Compressor
Page 25

SECTION 4—COMPRESSOR OPERATION
8. Pull UP on the outer ring (sleeve) of the connector fillport while pushing DOWN on the cylinder/regulator assembly to couple the cylinder fillport into the connector fillport (FIGURE 4.2).
NOTE: The cylinder is properly connected when an audible “click” is heard.
HomeFill™II Compressor 25 Part No 1100873
Page 26

SECTION 4—COMPRESSOR OPERATION
FIGURE 4.2 Connecting the Cylinder to the Compressor
Part No 1100873 26 HomeFill™II Compressor
Page 27

SECTION 4—COMPRESSOR OPERATION
Disconnecting the Cylinder from the Compressor
WARNING
NEVER use tools of any kind to connect/disconnect the cylinder and the compressor. Otherwise, severe injury and/or damage may occur.
NOTE: For this procedure, refer to FIGURE 4.3.
1. Press the compressor power switch to the Off (O) position.
2. Grasp the cylinder/regulator assembly in the area behind the cylinder gauge.
3. With the other hand, grasp the outer ring (sleeve) of the connector fillport and push DOWN.
4. Lift up on the cylinder/regulator assembly to remove from the connector fillport.
Cylinder/Regulator
Assembly
PUSH DOWN
Cylinder
Gauge
Compressor
Connector
Fillport
Cylinder
Fillport
Outer Ring
(Sleeve)
FIGURE 4.3 Disconnecting the Cylinder from the Compressor
HomeFill™II Compressor 27 Part No 1100873
Page 28

SECTION 4—COMPRESSOR OPERATION
5. When the cylinder fillport is disconnected from the connector fillport, release the outer ring (sleeve) of the connector fillport and use two hands to remove the cylinder from the compressor cradle.
WARNING
The fillport cover on the connector fillport and the cylinder fillport MUST be replaced after filling and whenever not in use. If either of the fillport covers are missing contact your healthcare provider before using.
6. Place the fillport covers onto the connector fillport and cylinder fillport.
7. Examine the cylinder gauge to ensure cylinder is full (needle pointing into GREEN area). If the cylinder is not full, perform the following:
• Repeat Connecting the Cylinder to the Compressor on
page 23.
• If cylinder is not full after second attempt to fill, contact
the provider.
Cylinder Fillport Cover
Connector Fillport Cover
FIGURE 4.4 Fillport Covers
Part No 1100873 28 HomeFill™II Compressor
Page 29

SECTION 4—COMPRESSOR OPERATION
Turning the Compressor On
NOTE: For this procedure, refer to FIGURE 4.5 on page 30.
1. Make sure the concentrator is On. Refer to the concentrator Owner’s Manual.
CAUTION
The concentrator flow rate to the patient MUST be set at maximum: 3 L/min. or less for Platinum 5, XL and 5 L/min. for Platinum 10. Otherwise, the oxygen level to the compressor will be <90% and the compressor will not fill the cylinder.
2. Set the concentrator flow rate to the patient to 3 L/min. or less for Platinum 5, XL and 5 L/min. for Platinum 10. Refer to the concentrator Owner’s Manual.
3. Make sure the cylinder is connected to the compressor. Refer to Connecting the Cylinder to the Compressor on page 23.
4. Push the power switch on the control panel to the On ( ) position.
5. Examine the control panel. The following sequence of events should occur:
A. 0-3 minutes - The O2 Below Normal (YELLOW) light
will be lit while the compressor warms up.
B. After three minutes - The FILLING (GREEN) light will
be on while the cylinder is filling.
C. The FULL (GREEN) light will be on when the cylinder
is finished filling. Proceed to STEP 6.
NOTE: The O
BELOW NORMAL (YELLOW) light may come on
2
if the oxygen level from the concentrator has not yet reached or drops
below 90%. The compressor will begin or resume filling when the
HomeFill™II Compressor 29 Part No 1100873
Page 30

SECTION 4—COMPRESSOR OPERATION
oxygen level reaches 90%. If light does not go Off within 10
minutes, refer to Troubleshooting/ Cylinder Fill times on page 34.
NOTE: If the ATTENTION (RED) light and audible alarm are on. Refer to Troubleshooting/ Cylinder Fill times on page 34.
6. Remove the full cylinder. Refer to Disconnecting the Cylinder from the Compressor on page 27.
7. Push the power switch to the Off (O) position.
Control Panel
Attention (RED light and
Audible Alarm)
TM
Filling
(GREEN
Light)
FILLING
OPERATING INSTRUCTIONS
See Operator's Manual
FIGURE 4.5 Turning the Compressor On
below normal
O
2
(YELLOW light)
Full
(GREEN Light)
I
O
Power Switch
O`qsMn-0026288Q du-@01./5./4
Part No 1100873 30 HomeFill™II Compressor
Page 31

SECTION 4—COMPRESSOR OPERATION
Setting the Flow Knob to the Prescribed Setting
NOTE: For this procedure, refer to FIGURE 4.6.
1. Attach the nasal cannula to the outlet fitting of the cylinder.
2. Turn the flow knob to the L/min. setting prescribed by your physician or therapist.
WARNING
As changing the L/min. setting on the flow knob will affect the dose of oxygen delivered, DO NOT readjust the L/min. setting unless directed by your physician or therapist.
3. To turn the flow of oxygen Off, turn the flow knob counter-clockwise to the Off position.
Outlet Fitting
Flow Knob
Prescribed Setting
FIGURE 4.6 Setting the Flow Knob to the Prescribed Setting
HomeFill™II Compressor 31 Part No 1100873
Page 32

SECTION 5—INDICATOR LIGHTS
SECTION 5—INDICATOR LIGHTS
INDICATOR LIGHT
COLOR
COMPRESSOR
STATUS
EFFECT
None Compressor is Off O2 flowing to user if
concentrator is on
O
BELOW NORMAL -
2
YELLOW
Compressor is On and
warming up
(0-3 minutes after
power is On)
Cylinder filling not started
O
flowing to user if
2
concentrator is On
O
from concentrator
2
is < 90% (any time after
three minute warmup)
Cylinder filling stops,
will restart when O
> 90%
O
flowing to user if
2
concentrator is On
FILLING - GREEN Compressor is On and
cylinder is filling. O
from concentrator is
>90% (any time after
three minute warmup)
FULL - GREEN Compressor is On.
Cylinder is finished
filling (full) -remove
cylinder (FULL light is
On in >10 mins.)
Cylinder is filling
2
flowing to user if
O
2
concentrator is On
Cylinder filling stops
Cannot fill another
cylinder until
compressor is turned
Off and On again
or
Cylinder is not
attached properly -
O
flowing to user if
2
concentrator is On
check connection
(FULL light is On in
<10 mins.)
2
Part No 1100873 32 HomeFill™II Compressor
Page 33

SECTION 5—INDICATOR LIGHTS
INDICATOR LIGHT
COLOR
ATTENTION - RED (Audible Alarm)
COMPRESSOR
STATUS
Compressor is On.
Cylinder NOT filling
Causes:
Full cylinder attached
when unit turned On replace with empty
cylinder
or
Internal failure contact dealer
EFFECT
Compressor does not
begin to fill or stops
filling
Unit must be turned Off
and On before
filling can occur
O
flowing to user if
2
concentrator is On
HomeFill™II Compressor 33 Part No 1100873
Page 34

SECTION 6—TROUBLESHOOTING/ CYLINDER FILL TIMES
SECTION 6—TROUBLESHOOTING/
CYLINDER FILL TIMES
TROUBLESHOOTING
PROBLEM SOLUTION
No indicator lights on when compressor turned on.
RED Light ON 1.Check the cylinder gauge to see if it is FULL.
Compressor cycles ON
and Off
or
O
BELOW NORMAL
2
(YELLOW) and FILLING
(GREEN)
lights are alternating
or
O
BELOW NORMAL
2
(YELLOW)
light goes On and Off
1. Turn compressor Off.
2. Check that power cord is properly plugged
into compressor and wall outlet
3. Turn the compressor On.
4. Clean air filters. Refer to Maintenance
page 37.
5. If performing STEPS 1-4 does not cause any indicator lights to come on, contact your home health care provider or Invacare for service.
Cylinder full - Remove the cylinder and turn the
unit Off. Perform the Cylinder Prefill Inspection
on page 16 with a cylinder that is NOT FULL.
Cylinder not full - Proceed to STEP 2.
2. Check that the cylinder is connected properly. Turn the compressor Off. Remove the cylinder and reinstall. Turn the compressor On.
3. If cylinder is not full and is connected properly,
the compressor may have internal failure.
Contact your home health care provider or
Invacare.
1. Check the concentrator liter flow setting is at 3
L/min. or less.
If necessary, adjust the liter flow setting (refer to
the concentrator owner’s manual). Wait at least
20 minutes for the GREEN light to appear. If it
does not appear, proceed to STEP 2.
2. The concentrator may need service, contact your home health care provider or Invacare.
.
on
Part No 1100873 34 HomeFill™II Compressor
Page 35

SECTION 6—TROUBLESHOOTING/ CYLINDER FILL TIMES
TROUBLESHOOTING
PROBLEM SOLUTION
O2 BELOW NORMAL (YELLOW) light stays On
Fill times exceed
maximum as
recommended fill times
OR GREEN
filling light stays On.
1. Ensure the concentrator has warmed up for at least 20 minutes.If it has not been 20 minutes, turn the compressor Off until the concentrator warms up. If the YELLOW light still remains on proceed to STEP 2.
2. Inspect the connection between the compressor and the concentrator for damage or pinching.
If damaged, replace. If pinched, straighten tubing.
Turn the compressor Off for at least 10
seconds.
Turn the compressor On. If the YELLOW light
still remains on after 10 minutes, proceed to
STEP 3.
3. The concentrator may need service, contact your home health care provider or Invacare.
1. Ensure the cylinder regulator is set to Off.
2. Check the recommended fill times shown in
Cylinder Fill Times
3. Check that the cylinder is connected properly.
Turn the compressor
Off. Remove the cylinder and reinstall. Turn the
compressor ON.
4. Check the compressor/concentrator line for proper connection and/or damage (i.e. - leaks or kinks).
5. Check the concentrator liter flow setting is at
three L/min. or less. If necessary, adjust the liter
flow setting (refer to the concentrator owner’s
manual). If the GREEN filling light does not go Off,
the compressor and/or concentrator may need
service. Contact your home health care
provider or Invacare.
on page 36.
Excessive noise when compressor is On
Hissing sound from Regulator when flow selector
is Off
HomeFill™II Compressor 35 Part No 1100873
1. Call home health care provider or Invacare for service.
1. Turn flow selector Off.
2. If hissing sounds continue, call home health care provider or Invacare.
Page 36

SECTION 6—TROUBLESHOOTING/ CYLINDER FILL TIMES
TROUBLESHOOTING
PROBLEM SOLUTION
Regulator is On but O2 is not being delivered
1. Refill cylinder
2. Check that cannula is straight and not pinched. If damaged, replace.
3. Call home health care provider or Invacare for service.
CYLINDER FILL TIMES
Cylinder
Filling
Times
NORMAL 2 hr 20 min 60 min 1 hr 25 min
MAXIMUM 2 hr 45 min 1 hr 20 min 1 hr 50 min
Concentrator Flow Rate to Patient:
(Platinum 5 up to 3 L/min. and Platinum 10 up to 5
L/min)
HF2PC9 HF2PCL4 HF2PCL6
NOTE: All filling times are approximate and may vary on environmental conditions.
Part No 1100873 36 HomeFill™II Compressor
Page 37

SECTION 7—MAINTENANCE
SECTION 7—MAINTENANCE
Cleaning the Compressor Filter
WARNING
Push the power switch to the Off (O) position and unplug the compressor before cleaning.
DO NOT operate the compressor without the filter installed.
CAUTION
DO NOT unplug by pulling on cord. To unplug, grasp the plug not the cord, otherwise damage may occur.
NOTE: For this procedure, refer to FIGURE 7.1.
NOTE: All compressors have one filter on the back of the cabinet.
NOTE: Perform this procedure at least once a week.
1. Unplug the compressor. Grasp the plug not the cord.
2. Remove the filter.
3. Clean the filter with a vacuum cleaner or wash in warm soapy water and rinse thoroughly.
4. Dry the filter thoroughly before reinstallation.
Filter
FIGURE 7.1 Cleaning the Compressor Filter
HomeFill™II Compressor 37 Part No 1100873
Page 38

LIMITED WARRANTY
Cabinet
WARNING
Push the power switch to the Off (O) position and unplug the compressor before cleaning. To avoid electrical shock, DO NOT remove cabinet.
1. Clean the cabinet with a mild household cleaner and non-abrasive cloth or sponge.
LIMITED WARRANTY
NOTE: THE WARRANTY BELOW HAS BEEN DRAFTED TO COMPLY WITH FEDERAL LAW APPLICABLE TO PRODUCTS MANUFACTURED AFTER JULY 4, 1975.
This warranty is extended only to original purchaser who purchases
this product when new and unused from Invacare Corporation or a
dealer. This warranty is not extended to any other person or entity
and is not transferable or assignable to any subsequent purchaser or
owner Coverage under this warranty will end upon any such
subsequent sale or other transfer of title to any other person. This
warranty gives you specific legal rights and you may also have other
legal rights which may vary from state to state.
Invacare warrants the HomeFill II Compressor to be free from
defects in materials and workmanship for a period of one (1) year
from date of purchase from Invacare or a dealer, with a copy of the
seller’s invoice required for coverage under this warranty.
Invacare warrants the HomeFill II internal wear components (piston
seals and rings, bearings, drive belts, check valves, pressure relief
components and electric motor) for a period of three (3) years from
the date of purchase from Invacare or a dealer, with a copy of the
seller’s invoice required for coverage under this warranty, or 5,000
hours, whichever comes first.
Invacare warrants the HomeFill II control panel components
(electrical switches, reset switch and indicator lights) for a period of
three (3) years from the date of purchase from Invacare or a dealer,
with a copy of the seller’s invoice required for coverage under this
warranty, or 5,000 hours, whichever comes first.
Part No 1100873 38 HomeFill™II Compressor
Page 39

For Model Nos. IOH2M6 and IOH2M9, Invacare warrants the
HomeFill II regulator (NOT including the cylinder) to be free from
defects in materials and workmanship for a period of six (6) years
from date of purchase from Invacare or a dealer, with a copy of the
seller’s invoice required for coverage under this warranty.
For Model Nos. HF2PCL4, HF2PCL6 and HF2PC9, Invacare warrants
the HomeFill II regulator (NOT including the cylinder) to be free
from defects in materials and workmanship for a period of two (2)
years from date of purchase from Invacare or a dealer, with a copy of
the seller’s invoice required for coverage under this warranty
DO NOT OPEN OR ATTEMPT TO SERVICE UNLESS SERVICE IS
PROVIDED BY AN INVACARE-CERTIFIED TECHNICIAN;
otherwise, this will void any and all warranties. If within such warranty
periods any such product shall be proven to Invacare's satisfaction to
be defective, such product shall be repaired or replaced, at Invacare's
option. This warranty only applies to the labor for repairs performed
by the Invacare Service Department or Invacare dealers. It does not
apply to the labor performed by the purchaser or user. This warranty
does not include normal wear and tear, failure to adhere to the
product instructions, or shipping charges incurred in replacement
part installation or repair of any such product. Invacare's sole
obligation and your exclusive remedy under this warranty shall be
limited to such repair or replacement. Routine maintenance items,
such as filters, are excluded from this warranty.
For warranty service, please contact Invacare's service department at the toll free number on the back page during normal working hours.
Upon receiving notice of an alleged defect in a product, Invacare will
issue a serialized return authorization. It shall be the responsibility of
the purchaser, at the purchaser's cost, to return the unit, pack the
unit in a manner to avoid shipping damage and to ship the unit to
either Invacare's plant or service center as specified by Invacare in
advance. Defective units must be returned for warranty inspection
using the serial number as identification within thirty (30) days of
return authorization date. Do not return products to our factory
without prior consent. C.O.D. shipments will be refused; please
prepay shipping charges.
LIMITATIONS AND EXCLUSIONS: THE FOREGOING
WARRANTY SHALL NOT APPLY TO PRODUCTS SUBJECTED
TO NEGLIGENCE, ACCIDENT, IMPROPER OPERATION,
MAINTENANCE OR STORAGE, SOOT OR SMOKE-FILLED
ENVIRONMENTS, OR OTHER THAN NORMAL APPLICATION,
USE OR SERVICE, OR TO PRODUCTS MODIFIED WITHOUT
INVACARE CORPORATION'S EXPRESS WRITTEN CONSENT
HomeFill™II Compressor 39 Part No 1100873
Page 40

(INCLUDING, BUT NOT LIMITED TO, MODIFICATION
THROUGH THE USE OF UNAUTHORIZED PARTS OR
ATTACHMENTS) OR TO PRODUCTS DAMAGED BY REASON OF
REPAIRS MADE TO ANY COMPONENT WITHOUT THE
SPECIFIC CONSENT OF INVACARE CORPORATION OR TO
PRODUCTS DAMAGED BY CIRCUMSTANCES BEYOND
INVACARE CORPORATION'S CONTROL.
THE FOREGOING EXPRESS WARRANTY IS EXCLUSIVE AND IN
LIEU OF ANY OTHER WARRANTIES WHATSOEVER, WHETHER
EXPRESS OR IMPLIED, INCLUDING THE IMPLIED WARRANTIES
OF MERCHANTABILITY AND FITNESS FOR A PARTICULAR
PURPOSE, AND THE SOLE REMEDY FOR VIOLATIONS OF ANY
WARRANTY WHATSOEVER, SHALL BE LIMITED TO REPAIR OR
REPLACEMENT OF THE DEFECTIVE PRODUCT PURSUANT TO
THE TERMS CONTAINED HEREIN. THE APPLICATION OF ANY
IMPLIED WARRANTY WHATSOEVER SHALL NOT EXTEND
BEYOND THE DURATION OF THE EXPRESS WARRANTY
PROVIDED HEREIN. INVACARE SHALL NOT BE LIABLE FOR
ANY CONSEQUENTIAL OR INCIDENTAL DAMAGES
WHATSOEVER.
SOME STATES DO NOT ALLOW THE EXCLUSION OR LIMITATION OF INCIDENTAL OR CONSEQUENTIAL DAMAGE, OR LIMITATION OF HOW LONG AN IMPLIED WARRANTY LASTS, SO THE ABOVE EXCLUSION AND LIMITATION MAY NOT APPLY TO YOU.
THIS WARRANTY SHALL BE EXTENDED TO COMPLY WITH STATE/PROVINCIAL LAWS AND REQUIREMENTS.
Invacare Corporation
USA
One Invacare Way
Elyria, Ohio USA
44036-2125
800-333-6900
Technical Services
800-832-4707
www.invacare.com
Invacare, the Medallion Design,
Yes, You Can. are registered
trademarks of Invacare Corporation.
Platinum and HomeFill are trademarks
of Invacare Corporation
© 2006 Invacare Corporation.
Part No 1100873
Rev G - 11/01/06
 Loading...