

Page 1
INVACARE CHECK O2 PLUS HAND-HELD ANALYZER
ANALYSEUR PORTABLE INVACARE CHECK O
INVACARE CHECK O
INVACARE CHECK O
KOMBI-PRÜFGERÄT
2
ANALIZADOR DE MANO
2
PLUS
2
Assembly, Installation and Operating Instructions - ENGLISH
Installation, Montage et Instructions de Fonctionnement - FRENCH
Zusammenbau, Installation und Gebrauchsanweisung - GERMAN
Montaje, Instalación e Instrucciones de Funcionamiento - SPANISH
USER: BEFORE USING THIS ANALYZER, READ THIS MANUAL AND SAVE FOR FUTURE
REFERENCE.
Page 2
NOTE: Check all parts for shipping damage. If damage is found, DO NOT use. Contact Carrier/Invacare
for further instructions.
SAFETY SUMMARY
The following recommendations are made for
the safe and proper use of the Invacare Check
O
Plus Hand-Held Analyzer:
2
WARNING
DO NOT install this equipment without first reading and understanding this instruction sheet.
If you are unable to understand these instructions, contact a healthcare professional,
dealer or technical personnel if applicable
before attempting to install this equipment otherwise, injury or damage may occur.
Oxygen rapidly accelerates combustion:
DO NOT smoke while using oxygen.
DO NOT use oxygen in the presence of
flames, sparks, or glowing objects.
Ensure that all items are properly and se-
curely installed.
INSTRUCTIONS FOR USE
(FIGURE 1)
1. Press the ON ( I ) button. The LCD display should
come on.
NOTE:The analyzer automatically shuts off after approximately two (2) minutes of operation. This helps
save battery life.
2. The display will show “FLO” for approximately two
(2) seconds and then switch to readings in
L/min.
3. If no reading is displayed or if display is erratic or
frozen, refer to the troubleshooting section of this
instruction sheet.
4. In order to measure oxygen concentration or
flow rate, connect the analyzer’s FLOW/CONCENTRATION inlet with a piece of ¼-inch or
crushproof tubing to the outlet fitting of the gas
source to be measured.
5. In order to measure pressure, connect the
analyzer’s PRESSURE inlet with a piece of ¼inch or crushproof tubing to the outlet fitting of
the gas source to be measured.
CAUTION
DO NOT expose any port of the analyzer to
any pressure greater than 68.95 kPa or damage may result to internal components.
DO NOT use the analyzer on pure oxygen
from high pressure cylinders or liquid systems.
DO NOT use the Invacare Check O
Plus
2
Hand-Held Analyzer on any gas stream that
is humidified. Use of the analyzer with water
vapor can cause erroneous readings and internal damage.
INTENDED USE
NOTE: The Invacare Check O2 Plus Hand-Held
Analyzer is designed and calibrated for use in measuring unhumidified output gas of an oxygen concentrator ONLY.
NOTE: The analyzer is not for continuous monitoring
of patient gases.
NOTE: There are no user serviceable parts inside
the analyzer. Field calibration of the unit is not required.
NOTE: When using the analyzer after storage in either extremely hot or cold conditions, allow the gas
being measured to flow through the analyzer for one
(1) minute to bring the internal sensor up to the gas
stream temperature.
DISPLAY MEASURES VALUE
FLO Flow rate Liters per minute
O2 Oxygen concentration Percentage oxygen
PSI Pressure Pounds per square inch
KPA Pressure KiloPascals
NOTE: The Invacare Check O2 Plus Hand-Held Analyzer can be used to measure the performance of an
oxygen concentrator from its outlet fitting, or any con-
centrator accessory such as the Invacare Remote
Flowmeter or Pediatric Flowmeter. However, Invacare does NOT recommend using the Invacare Check
O
Plus Hand-Held Analyzer to measure flow rates
2
below 1 L/min. See product specifications.
NOTE: The concentrator output gas, measured from
the concentrator outlet fitting or from a concentrator
accessory outlet fitting,must NOT contain humidified
gas. Disconnect any humidifier bottle before taking
any readings to prevent erroneous readings and damage to the internal flow sensor. Be sure to reconnect
any required humidifier bottle before returning any
equipment to patient use.
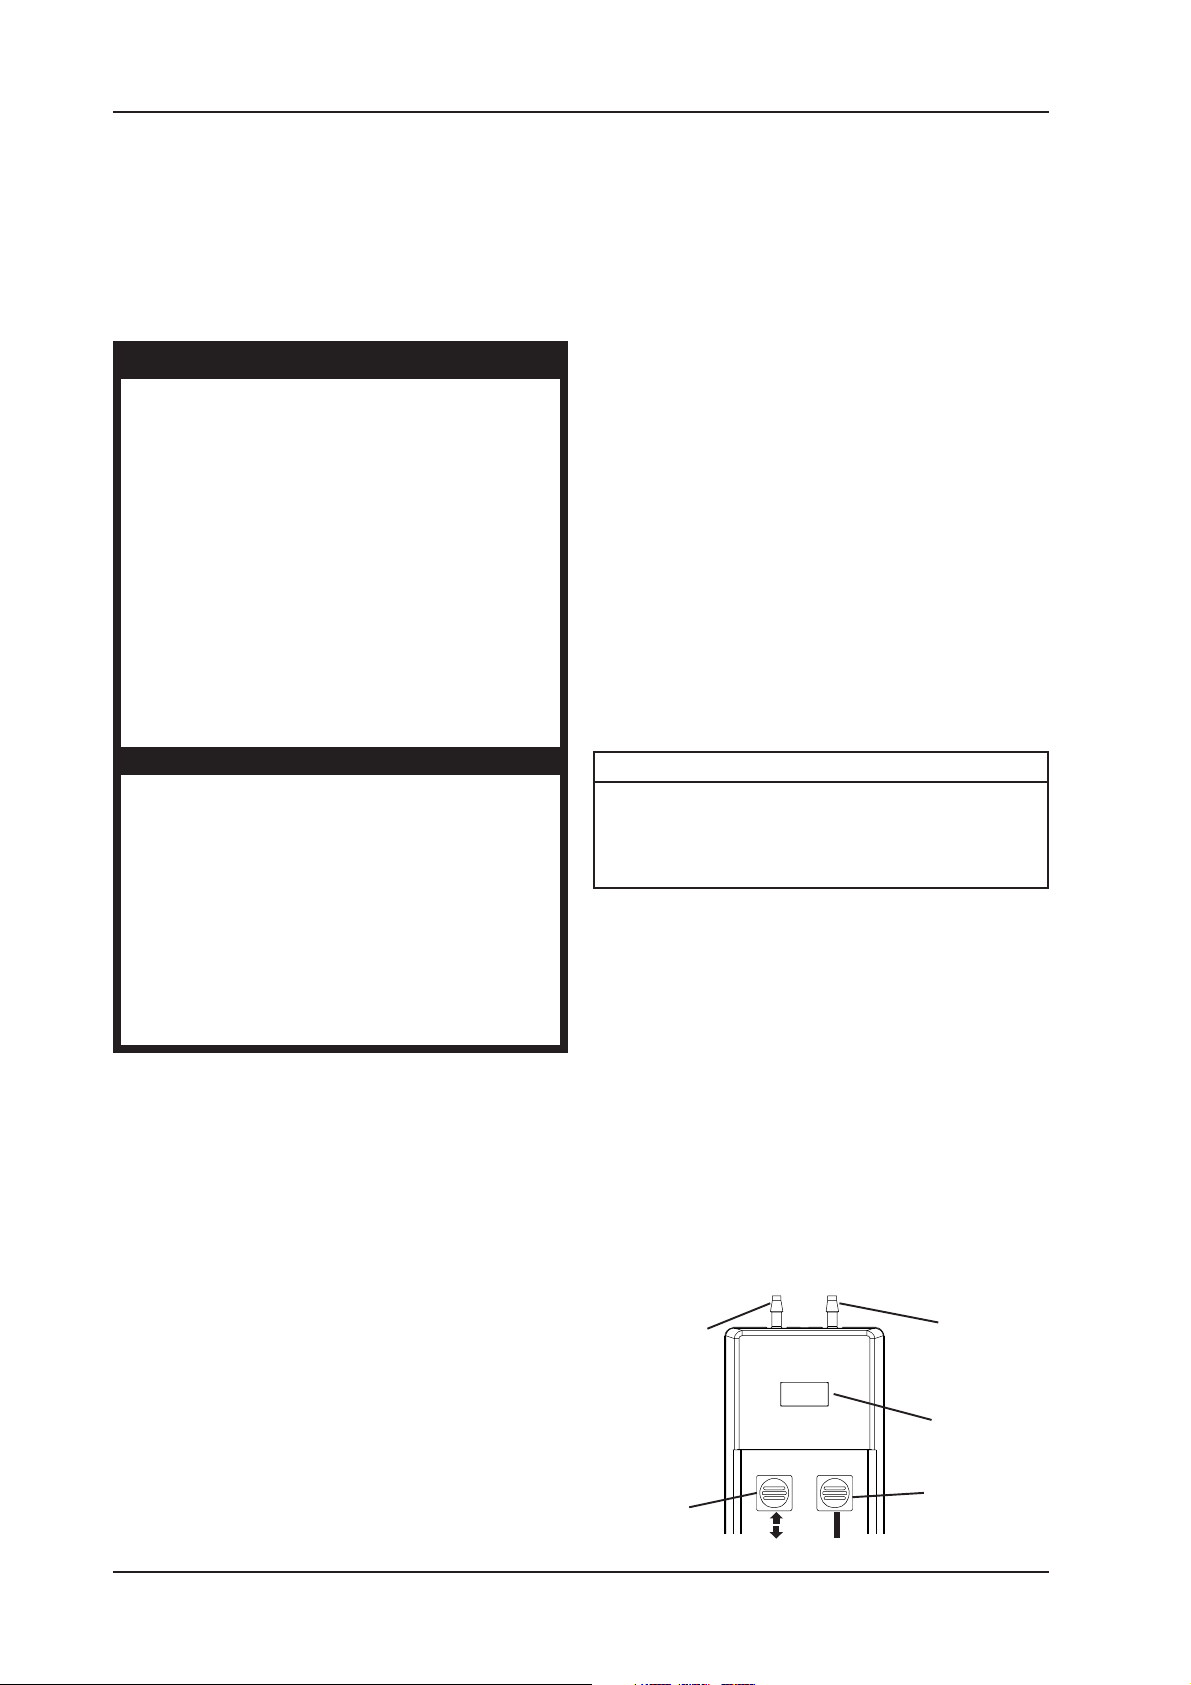
Pressure
Inlet
Flow/
Concentration
Inlet
LCD
Display
Function
On Button
Button
FIGURE 1-INSTRUCTIONS FOR USE
2
Page 3
6. Pressing the FUNCTION ( ) button will toggle
the analyzer through its various detecting functions.
7. With "O2" readings, values below 70% will be
displayed as "LO".
8. When the battery is completely discharged, BAt
will FLASH once on the LCD and the analyzer
will turn itself off. Refer to section on changing
the battery in this Instruction sheet.
CHANGING THE BATTERY
NOTE: The internal battery needs to be replaced
whenever the BAt display is seen on the LCD.
1. Turn the analyzer over.
2. Remove the six (6) screws holding the case bottom to the top and take the bottom cover off.
3. Remove the discharged battery from the battery clips and dispose of or recycle properly.
CAUTION
Observe proper polarity for battery installation.
4. Install a new 9 volt battery on the battery clips.
Make sure the battery snaps tightly on the clips.
NOTE: Use of a DURACELL® alkaline 9 volt battery
will provide for maximum life of the unit.
5. Turn the unit over and press the ON button. The
display should come on. If it does, replace the
bottom cover and install the six cover screws.
6. If the unit does not come on, remove the battery,
check it in another device or on a battery tester
and reinstall it. Try turning the unit on again.
7. If unit still fails to operate with a known good battery, contact Invacare Technical Service for repair.
TROUBLESHOOTING
NOTE: There are no user serviceable parts inside
the analyzer.
1. If the unit fails to come on, replace the battery
with a known good battery.
PRODUCT SPECIFICATIONS
OPERATIONAL
Pressure:
Maximum Input Pressure: 68.95 kPa, 0 to 10 PSIG
Resolution: 0.7 kPa 0.1 PSI
Accuracy:
Flow:
Maximum Flow Rate: 6.0 L/min.
Input: Unhumidified oxygen
Resolution: 0.1 L/min.
Accuracy: + 5% (+ 0.3 L/min.)
Gas Stream Temperature: +15 to +35°C
Concentration:
Range: 73% to 96%
Input: Unhumidified oxygen
Resolution: 0.1 %
Accuracy: + 2%
Gas Stream Temperature: +15 to +35°C
Alarm: Low battery
Power On Time: 1 minute, 45 seconds
Display: LCD
Battery: Single NEDA/ANSI 1604A
Battery life: 400+ hours (13,700+ read
Warranty: 1 year
PHYSICAL Weight: 0.30 kg.
ENVIRONMENTAL
Operating
Temperature Range: +15 to +35°C
+ 2% F.S. + 2% F.S.
concentrator output only
concentrator output only
+ 5 seconds
alkaline 9 volt
cycles) with alkaline battery
Width: 8.380 cm
Length: 18.54 cm
Includung Inlet
Fittings: 20.07 cm
Thickness: 3.18 cm
2. If the unit fails to come on with known good battery, contact Invacare Technical Service for repair.
3. If the unit comes on but the FUNCTION button
does not select any functions, contact Invacare
Technical Service for repair.
4. If the display comes on but the readings are erratic or frozen, contact Invacare Technical Service for repair.
5. If a segment of the display is missing or displayed
intermittently, contact Invacare Technical Service
for repair.
Storage
Temperature Range: -20 to +70°C
Humidity range: 20 to 60% relative humidity
Altitude (maximum): Up to 1828 meters above
sea level
3
Page 4

LIMITED WARRANTY
This warranty is extended only to the original purchaser of our products and does not
affect statutory rights.
Invacare UK warrants the Invacare Check O2 Plus Hand-Held Analyzer to be free from
defects in materials and workmanship for a period of one (1) year from date of purchase. If within such warranty period the product shall be proven to Invacare UK’s
reasonable satisfaction to be defective, it shall be repaired or replaced, at Invacare
UK’s option; Invacare UK’s sole obligation, and your exclusive remedy under this warranty being limited to such repair or replacement.
For warranty service, please contact Invacare UK Service Department during normal
working hours. Upon receiving notice of an alleged defect in a product, Invacare UK
will issue a serialised return authorisation. The product shall then be returned to either
Invacare UK’s plant or service center as specified by Invacare UK. Defective component part(s) must be returned for warranty inspection using the serial number as identification within thirty (30) days of return authorisation date. DO NOT return products to
our factory without prior consent.
LIMITATIONS AND EXCLUSIONS: THE FOREGOING WARRANTY DOES NOT COVER NORMAL WEAR AND TEAR AND SHALL NOT APPLY TO PRODUCTS SUBJECTED TO NEGLIGENCE,
ACCIDENT, IMPROPER OPERATION, MAINTENANCE OR STORAGE, COMMERCIAL OR INSTITUTIONAL USE, PRODUCTS MODIFIED WITHOUT INVACARE UK’S EXPRESS WRITTEN CONSENT (INCLUDING, BUT NOT LIMITED TO, MODIFICATION THROUGH THE USE OF
UNAUTHORISED PARTS OR ATTACHMENTS) OR TO PRODUCTS DAMAGED BY REASON OF
REPAIRS MADE TO ANY COMPONENT WITHOUT THE SPECIFIC CONSENT OF
INVACARE UK.
4
Page 5
NOTE : Vérifiez qu’aucune pièce n’a été endommagée
au cours du transport. En cas de dommage, NE PAS
se servir de l'appareil. Contactez le Ttansporteur/Invacare pour de plus amples informations.
PRECAUTIONS D'UTILISATION
Les recommandations suivantes sont destinées
à garantir une utilisation sûre et appropriée de
l’analyseur portable Invacare Check O
Plus :
2
AVERTISSEMENT
N’INSTALLEZ pas cet appareil sans avoir
préalablement lu et compris cette fiche
d’instructions. En cas d'incompréhension de ces
instructions, contactez un professionnel de la
santé, un distributeur ou un technicien, le cas
échéant, avant de tenter d’installer cet appareil
pour éviter toute lésion ou dommage matériel.
L’oxygène accélère rapidement la combustion:
NE fumez PAS quand vous utilisez de
l’oxygène.
N’utilisez PAS d'oxygène en présence de
flammes, d’étincelles ou d’objets incandescents.
Vérifiez que toutes les pièces sont installées
de façon correcte et sûre.
ATTENTION
N’EXPOSEZ aucun port de l’analyseur à une
pression supérieure à 68,95 kPa, vous risqueriez
d’endommager les composants internes.
N'UTILISEZ PAS l'analyseur avec de l'oxygène
pur provenant d'une bouteille à haute
pression ou d'un système liquide.
N’UTILISEZ PAS l’analyseur portable Invacare
Check O
humidifiés. L’utilisation de l’analyseur avec de
la vapeur d’eau peut provoquer des erreurs
de lecture et des dégâts internes.
Plus avec des flux gazeux
2
CHAMPS D’UTILISATION
RECOMMANDE
NOTE : L’analyseur portable Invacare Check O2 Plus
est conçu et calibré uniquement pour mésurer les gaz
non humidifiés en sortie d’un concentrateur d’oxygène.
NOTE : L’analyseur n’est pas destiné au contrôle
continu des gaz du patient.
NOTE : L’analyseur ne comporte aucune pièce dont
la maintenance peut être assurée par l’utilisateur. Un
calibrage de l’appareil est inutile.
INSTRUCTIONS D'UTILISATION
(SCHEMA 1)
1. Pressez le bouton ON (I). L'écran à cristaux
liquides doit s'allumer.
NOTE : L’analyseur s’arrête automatiquement après
environ deux (2) minutes de fonctionnement. Cela
permet d’économiser la batterie.
2. L’écran affiche "FLO" pendant environ deux (2)
secondes puis passe aux relevés en L/mim.
3. Si aucune lecture ne s’affiche ou si l’affichage
est discontinu ou figé, reportez-vous à la section
résolution des pannes de cette fiche d’instructions.
4. Pour mesurer la concentration en oxygène ou le
débit, raccordez l’entrée DEBIT/CONCENTRA-
TION de l’analyseur avec une section de tube de
¼ de pouce anti-écrasement au raccord de sortie de la source d’oxygène à mesurer.
5. Pour mesurer la pression, raccordez l’entrée
PRESSION de l’analyseur avec une section de
tube de ¼ de pouce anti-écrasement au raccord
de sortie de la source d’oxygène à mesurer.
6. Pressez le bouton FONCTION ( ) pour faire défiler
les différentes fonctions de détection de l’analyseur.
AFFICHAGE MESURES VALEUR
FLO Débit Litres par minute
O2 Concentration en oxygène Pourcentage d'oxygène
PSI Pression Livres par pouce carré
KPA Pression KiloPascals
NOTE : L’analyseur Invacare Check O2 Plus est
destiné à mesurer la performance à la sortie patient
d’un concentrateur d’oxygène ou d’un accessoire
tel que le débitmètre portable et le débitmètre
pédiatrique. Néanmoins Invacare recommande de
ne pas utiliser l’analyseur pour mesurer des débits
inférieur à 1 l/min. Voir spécifications produit.
NOTE : L’oxygène en sortie d’un concentrateur
d’oxygène, mesuré à la sortie patient d’un
concentrateur ou à la sortie patient d’un accessoire
ne doit pas être humidifié. Afin d’éviter des mesures
incorrectes et l’endommagement du sensor interne,
déconnectez l’humidificateur. Assurez-vous d’avoir
reconnectez l’humidificateur, s’il y a lieu, avant de
réinstaller l’appareil chez le patient.
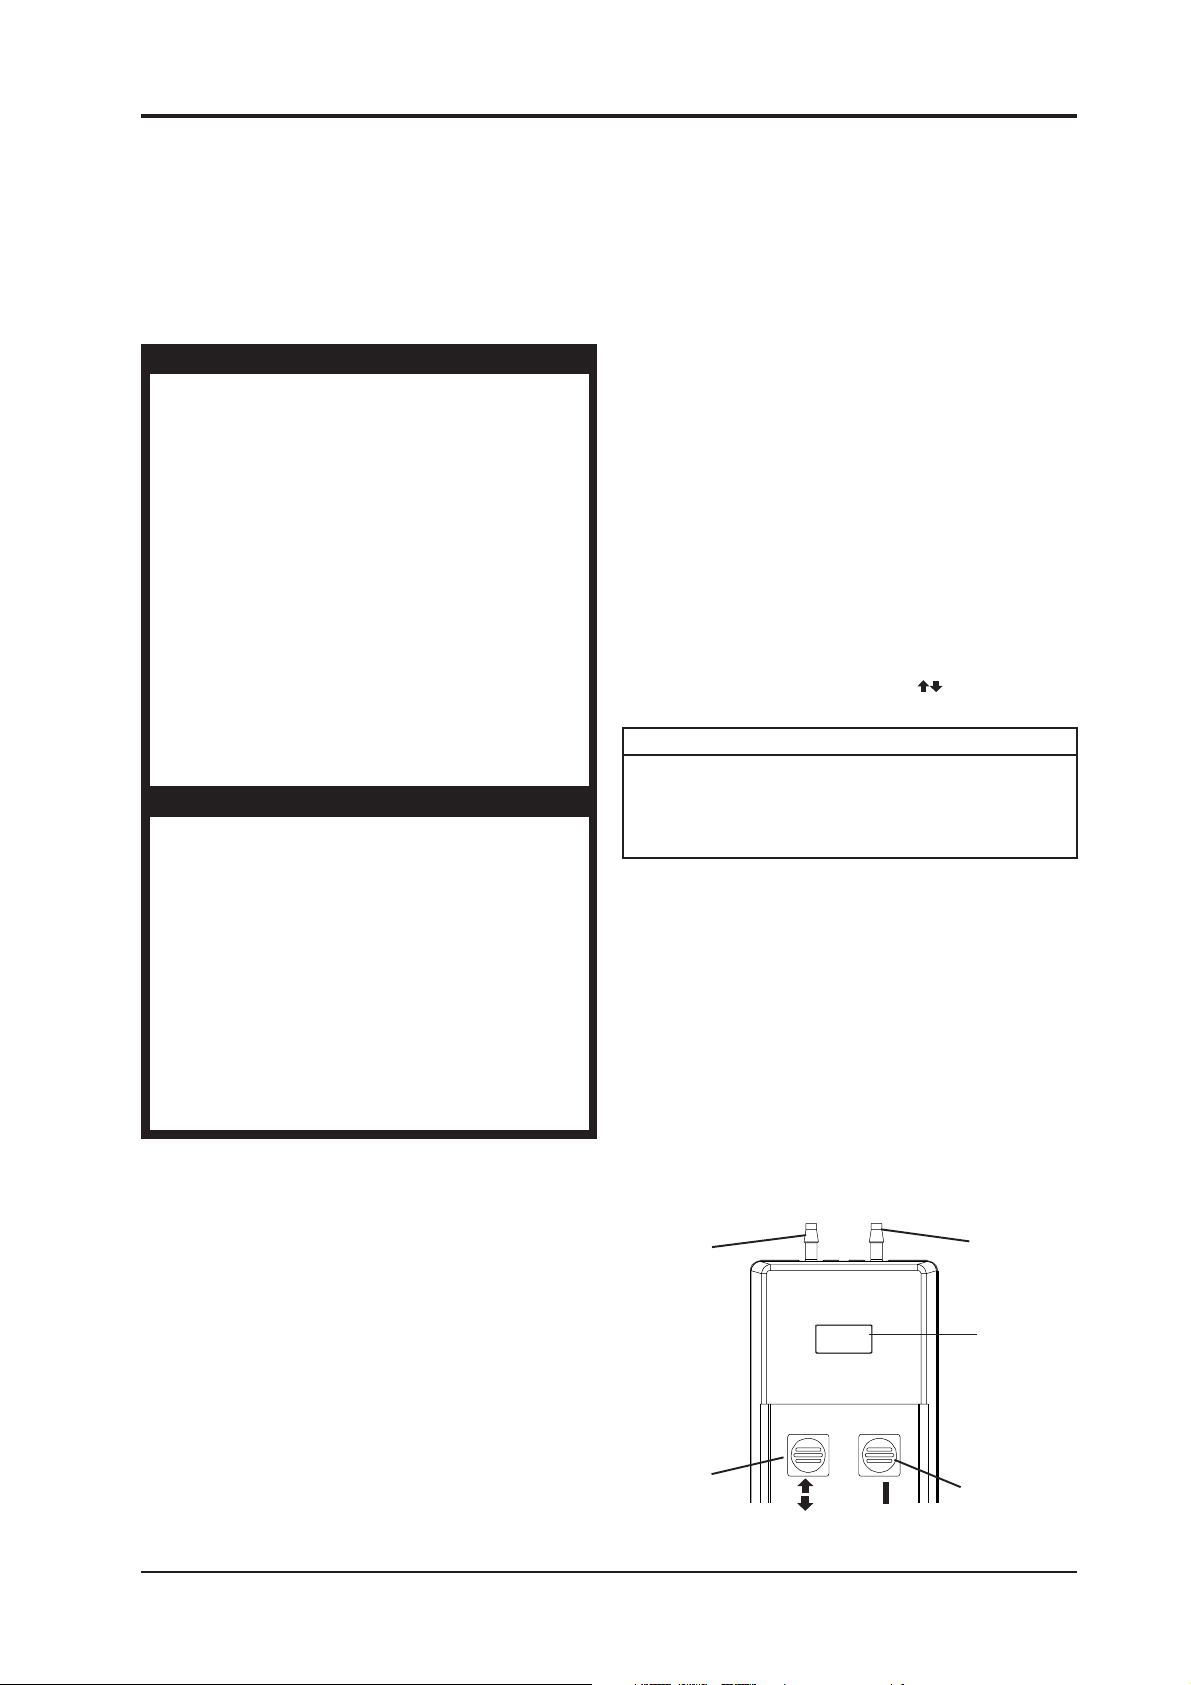
Entrée
Pression
Entrée
Débit/
Concentration
Ecran
d’affichage
à cristaux
liquides
NOTE : Lorsque vous utilisez l’analyseur après
stockage dans un environnement extrêmement
chaud ou froid, faites passer les gaz mesurés dans
l’analyseur pendant une (1) minute pour amener le
capteur interne à la température du flux gazeux.
Bouton
Fonction
SCHEMA 1-INSTRUCTIONS D'UTILISATION
5
Bouton ON
Page 6

7. Quant aux mesures d’O2, les valeurs inférieures
à 70% seront indiquées par l’affichage de “LO”.
8. Quand la batterie est complètement déchargée,
BAt clignotera une fois sur l’écran à cristaux liquides
et l’analyseur s’arrêtera automatiquement.
Reportez-vous à la section de remplacement de
la batterie de cette fiche d’instructions.
REMPLACEMENT DE LA BATTERIE
NOTE : La batterie intérieure doit être remplacée quand
BAt s’affiche sur l’écran à cristaux liquides.
1. Retournez l’analyseur.
2. Enlevez les six (6) vis qui maintiennent les deux
parties de l'appareil et retirez le fond.
3. Enlevez la batterie déchargée de ses pattes de fixation, jetez-la ou recyclez-la correctement.
ATTENTION
Veiller à la bonne polarisation pour
l’installation de la batterie.
4. Installez une nouvelle batterie de 9 volts sur les pattes
de fixation de la batterie. Vérifiez que la batterie se
met correctement en place sur ces pattes.
®
NOTE : L’utilisation d’une pile DURACELL
garantira une durée de service maximale de l’appareil.
5. Retournez l’appareil et pressez le bouton ON.
L’écran d’affichage doit immédiatement s’allumer.
Si c’est le cas, replacez le fond et remettez les
six vis en place.
6. Si l’appareil ne s’allume pas, enlevez la batterie,
contrôlez-la sur un autre appareil ou sur un testeur
de batterie et réinstallez-la. Essayez à nouveau
d’allumer l’appareil.
7. Si l’appareil refuse toujours de fonctionner avec
une batterie dont le bon fonctionnement a été
vérifié, contactez Invacare.
de 9 volts
RESOLUTION DES PANNES
NOTE : L’analyseur ne comporte aucune pièce dont
la maintenance peut être assurée par l’utilisateur.
1. Si l’appareil refuse de se mettre en marche,
remplacez la batterie par une batterie dont le bon
fonctionnement a été vérifié.
2. Si l’appareil refuse toujours de fonctionner avec
une batterie dont le bon fonctionnement a été
vérifié, contactez Invacare.
3. Si l’appareil s’allume mais que le bouton
FONCTION ne permet pas de sélectionner de
fonctions, contactez Invacare.
4. Si l’écran s’allume mais que les relevés sont
discontinus ou figés, contactez Invacare.
5. Si un segment de l’écran d’affichage manque ou ne
s’affiche que par intermittences, contactez Invacare.
SPECIFICATIONS
FONCTIONNEMENT
Pression :
Pression d’entrée max. : 68.95 kPa 0 to 10 PSIG
Résolution : 0.7 kPa 0.1 PSI
Précision : + 2% + 2%
Débit :
Débit maximal : 6.0 l/min.
Entrée : Uniquement pour les gaz
non humidifiés en sortie d’un
concentrateur d’oxygène.
Résolution : 0.1 l/min.
Précision : + 5% (+ 0.3 L/min.)
Température du flux gazeux: +15 à +35°C
Concentration:
Plage : 73% à 96%
Entrée : Uniquement pour les gaz
non humidifiés en sortie
d’un concentrateur
d’oxygène.
Résolution : 0.1 %
Précision : + 2%
Température du flux gazeux : +15 à +35°C
Alarme : Niveau de charge bas de
la batterie
Délai de mise en
marche : 1 minute et 45 secondes
+ 5 secondes
Ecran d’affichage : cristaux liquides
Batterie : une pile alcaline 9 volts
NEDA/ANSI 1604A
Durée de service
de la batterie : 400+ heures (13,700 cycles
de lecture) avec une pile
alcaline, minimum
Garantie : 1 an
PHYSIQUE : Poids: 295 g
Largeur: 8.38 cm
Longueur: 18.54 cm
Longeur avec
raccordements: 20.07 cm
Epaisseur: 3.18 cm
ENVIRONNEMENT
Plage de température
de service : +15 à +35°C
Plage de température
de stockage : -20 à +70°C
Plage d’humidité : 20 à 60% d'humidité relative
Altitude : 1828 mètres au-dessus du
niveau de la mer maximum
6
Page 7

GARANTIE LIMITÉE
La présente garantie ne s’étend qu’à l’acheteur initial du produit.
Les dispositions de présent certificat ne sont pas exclusives du bénéfice, au profit de
l’acheteur, de la garantie légale pour défauts et vices cachés, ladite garantie s’appliquant
en tout état de cause dans les conditions de l’article 1641 et suivants du Code Civil.
Poirier Groupe Invacare garantit les pièces et la main d’oeuvre pour l’Analyseur Portable
Invacare Check O2 Plus™ pendant une période de d'un (1) an à partir de la date d’achat.
Si pendant la durée de la garantie, l’appareil est reconnu défectueux, il sera réparé ou
remplacé, au libre choix de Poirier Groupe Invacare. La responsabilité de Poirier Groupe
Invacare, au titre de la présente garantie se limite à la réparation ou remplacement du
produit à l’exclusion de tout autre recours.
Pour bénéficier de votre garantie, contactez le revendeur qui vous a fourni le matériel.
LIMITES ET EXCLUSIONS: LA PRÉSENTE GARANTIE NE S’APPLIQUE PAS AUX PRODUITS DONT
L’ENTRETIEN A ÉTÉ NÉGLIGÉ, AUX PRODUITS AYANT SUBI UN CHOC, AUX PRODUITS POUR
LESQUELS LES INSTRUCTIONS D’UTILISATION, DE MAINTENANCE OU DE STOCKAGE N’ONT
PAS ÉTÉ RESPECTÉES, AUX PRODUITS UTILISÉS POUR UN USAGE COMMERCIAL OU
INSTITUTIONNEL, AUX PRODUITS AYANT ÉTÉ MODIFIÉS SANS L’ACCORD ÉCRIT DE POIRIER
GROUPE INVACARE (INCLUANT ENTRE AUTRE L’UTILISATION DE PIÈCES OU D’ACCESSOIRES
INADAPTÉS), AUX PRODUITS ENDOMMAGÉS À LA SUITE DE RÉPARATIONS D’UNE OU PLUSIEURS
PIÈCES SANS LE CONSENTEMENT DE POIRIER GROUPE INVACARE, AUX PRODUITS
ENDOMMAGÉS DANS DES CIRCONSTANCES INDÉPENDANTES DE LA VOLONTÉ DE POIRIER
GROUPE INVACARE ET AUX INTERVENTIONS LIÉES À L’USURE NORMALE DU PRODUIT.
7
Page 8

HINWEIS: Alle Teile auf Transportschäden
kontrollieren. Bei Beschädigungen NICHT verwenden.
Kontaktieren Sie umgehend lhren Händler / Invacare.
SICHERHEITSHINWEISE
Die folgenden Hinweise sind als Empfehlungen für
die sichere und korrekte Handhabung des Invacare Check O
Plus Kombi-Prüfgeräts gedacht:
2
WARNUNG
Vor der Installation dieses Geräts zuerst diese
Anweisungen sorgfältig durchlesen. Bei
Unklarheiten Verbindung zu einem Fachmann,
Händler oder Kundendienstmitarbeiter
aufnehmen, bevor versucht wird, dieses Gerät
anzuschließen - andernfalls kann es zu
Verletzungen oder Sachschäden kommen.
Sauerstoff beschleunigt Verbrennungsprozesse:
Bei Verwendung von Sauerstoff NICHT
rauchen.
Sauerstoff NICHT in Gegenwart von Flammen,
Funken oder glühenden Objekten verwenden.
Sicherstellen, daß alle Teile korrekt und sicher
installiert wurden.
VORSICHT
KEIN Teil des Prüfgeräts einem höheren Druck
als 68.95 kPa aussetzen (Beschädigungen
interner Bauteile möglich).
Prüfgerät NICHT mit reinem Sauerstoff aus
Hochdruckflaschen oder Flüssigkeitssystem
verwenden.
Das Invacare Check O
NICHT in Verbindung mit befeuchteten
Gasströmen verwenden. Der Einsatz des
Prüfgeräts mit Wasserdampf kann zu
fehlerhaften Werten und internen
Beschädigungen führen.
Plus Kombi-Prüfgerät
2
EMPFOHLENER
ANWENDUNGSBEREICH
HINWEIS: Das Kombi-Prüfgerät Invacare Check
O
Plus ist ausschließlich für die Messung von nicht
2
angefeuchtetem Atemgas eines Sauerstoffkonzentrators bestimmt und wurde entsprechend
kalibriert.
HINWEIS: Das Prüfgerät ist nicht zur
Dauerüberwachung von Gasen gedacht.
HINWEIS: Das Gerät enthält keine vom Benutzer zu
wartenden Teile. Eine Kalibrierung vor Ort ist nicht
erforderlich.
HINWEIS: Nach Lagerung in extrem heißen oder kalten
Bedingungen zu messendes Gas eine (1) Minute lang
durch das Gerät strömen lassen, damit der
interne Sensor sich auf die Gasstromtemperatur
einstellen kann.
GEBRAUCHSANWEISUNG (ABB. 1)
1. Taste ON (
HINWEIS: Das Prüfgerät schaltet (um Batterien zu
sparen) nach ca. zwei (2) min. automatisch ab.
2. Die Anzeige zeigt ca. zwei (2) Sek. lang “FLO”
und schaltet danach auf die L/min.
3. Werden keine oder wechselhafte Werte
angezeigt, oder bleibt die Anzeige stehen, lesen
Sie den Abschnitt Fehlersuche in diesem Beiblatt.
4. Zur Messung der Sauerstoffkonzentration oder
Flußrate, den Eingang “Fluß/Konzentration” des
Kombi-Prüfgerätes über einen quetschsicheren
1/4-Zoll Schlauch mit dem Ausgang der zu
überprüfenden Gasquelle verbinden.
5. Zur Messung von Druck, den Eingang “Druck” des
Kombi-Prüfgerätes über einen quetschsicheren
1/4-Zoll Schlauch mit dem Ausgang der zu
überprüfenden Gasquelle verbinden.
6. Durch Drücken der Taste FUNKTION ( ) wird
das Gerät auf eine andere Analysefunktion
umgeschaltet.
ANZEIGE MESSUNG WERT
FLO Flußrate Liter pro Minute
O2 Sauerstoffkonzentration % Sauerstoff
PSI Druck Pounds per square inch
KPA Druck Kilopascal
HINWEIS: Das Invacare Check O2 Plus KombiPrüfgerät kann zur Messung der Leistung des
Ausgangs eines Sauerstoffkonzentrators, oder eines
Zubehörgerätes wie dem Invacare
Fernbedienungsflußmeter, verwendet werden. Jedoch
empfiehlt Invacare das Check O2 Plus KombiPrüfgerät nicht zur Messung von Flußraten geringer
als 1 l/min. einzusetzen. Siehe Produktdaten.
HINWEIS: Das Ausgangsgas eines Sauerstoffkonzentrators, oder eines angeschlossenen
Zubehörgerätes, muß unbefeuchtet sein. Zur
Vermeidung fehlerhafter Messungen und
Beschädigung des internen Flussensors, entfernen Sie
sämtliche Befeuchterflaschen aus dem Gasstrom.
Stellen Sie sicher, daß bevor Sie das Gerät dem
Patienten zurückgeben, Sie ggf. zuvor ausgebaute
Befeuchterflaschen wieder eingebaut haben.
Eingang
"Druck"
Taste
"Funktion"
I
) drücken. Das LCD sollte aufleuchten.
Eingang
"Fluß/Konzen-
tration"
LCD-
Anzeige
Taste "ON"
ABB. 1 - GEBRAUCHSANWEISUNG
8
Page 9

7. Messwerte “O2” die unterhalb von 70% liegen,
werden als “LO” auf dem Display angezeigt.
8. Bei vollständig entladener Batterie blinkt auf dem
LCD einmal BAt auf, und das Prüfgerät schaltet
sich ab. Näheres hierzu im Abschnitt
"Batteriewechsel".
PRODUKTDATEN
BETRIEB
Druck:
Max. Eingangsdruck: 68.95 kPa 0 to 10 PSIG
Auflösung: 0.7 kPa 0.1 PSI
Genauigkeit: + 2% + 2%
BATTERIEWECHSEL
HINWEIS: Die interne Batterie muß gewechselt
werden, wenn auf dem LCD BAt angezeigt wird.
1. Gerät umdrehen.
2. Die sechs (6) Gehäuseschrauben lösen und
untere Halbschale abnehmen.
3. Entladene Batterie aus den Klemmen ziehen und
ordnungsgemäß entsorgen.
HINWEIS
Richtige Polarität der Batterie beachten.
4. Neue 9 Volt-Batterie in die Klemmen einsetzen.
Darauf achten, daß die Batterie fest einrastet.
HINWEIS: Maximale Lebensdauer des Geräts wird
durch DURACELL® Alkaline 9 Volt-Batterien erreicht.
5. Gerät umdrehen und Taste "ON" drücken. Die
Anzeige sollte aufleuchten. Hiernach untere
Halbschale wieder aufsetzen und die sechs
Schrauben einschrauben.
6. Schaltet sich das Gerät nicht ein, Batterie
entfernen, diese in einem anderen Gerät oder
Batterietester prüfen, danach wieder einsetzen.
Gerät erneut einschalten.
7. Läßt sich das Gerät trotz funktionsfähiger Batterie
immer noch nicht einschalten, den InvacareKundendienst anrufen.
FEHLERSUCHE
HINWEIS: Das Gerät enthält keine vom Benutzer zu
wartenden Teile.
1. Läßt sich das Gerät nicht einschalten, Batterie
gegen eine funktionsfähige ausstauschen.
2. Läßt sich das Gerät trotz funktionsfähiger Batterie
immer noch nicht einschalten, den InvacareKundendienst anrufen.
3. Läßt sich das Gerät einschalten, können jedoch
keine Funktionen über die Taste FUNKTION
ausgewählt werden, den Invacare-Kundendienst
anrufen.
4. Leuchtet die LCD-Anzeige auf, aber die Werte
wechseln ständig oder die Anzeige bleibt stehen,
den Invacare-Kundendienst anrufen.
5. Fehlt oder blinkt ein LCD-Segment, den Invacare-Kundendienst anrufen.
Fluß:
Max. Flußrate: 6.0 L/min.
Eingang: Nur für noch nicht
angefeuchtetes Atemgas
eines Sauerstoffkonzentrators.
Auflösung: 0.1 L/min.
Genauigkeit: + 5% (+ 0.3 L/min.)
Gasstromtemperatur: +15 bis +35°C
Konzentration:
Bereich: 73% bis 96%
Eingang: Nur für noch nicht
angefeuchtetes Atemgas
eines Sauerstoffkonzentrators.
Auflösung: 0.1 %
Genauigkeit: + 2%
Gasstromtemperatur: +15 bis +35°C
Alarm: Batterie zu schwach
Einschaltdauer: 1 min., 45 s + 5 s
Anzeige: LCD
Batterie: Single NEDA/ANSI 1604A
alkaline 9 volt
Batterielebensdauer: 400+ Std. (13,700+
Lesezyklen) mit Alkaline-
Batterie
Gewährleistung: 1 Jahr
MASSE Gewicht: 295 g
Breite: 8.38 cm
Länge: 18.54 cm
einschl.
Eingängen: 20.07 cm
Tiefe: 3.18 cm
UMWELTDATEN
Betriebstemperaturbereich: +15 bis +35°C
Lagertemperaturbereich: -20 bis +70°C
Feuchtigkeitsbereich: 20 bis 60% rel.
Feuchtigkeit
Höhe (maximal): Bis 1828m über
Normalnull
9
Page 10

GEWÄHRLEISTUNG
Diese Gewährleistung erstreckt sich nur auf den Erstkäufer dieses Produktes.
Die Invacare Deutschland GmbH gewährleistet, daß das Kombi-Prüfgerät INVACARE
Check O2 Plus für die Dauer von einem (1) Jahr ab Kaufdatum in Material und Ausführung
mängelfrei ist. Im Falle eines Produktmangels verpflichtet sich Invacare Deutschland
GmbH ausschließlich wahlweise zur Nachbesserung oder Ersatzlieferung. Bei
Fehlschlagen der Nachbesserung oder Ersatzlieferung kann der Käufer jedoch nach
den gesetzlichen Gewährleistungsvorschriften Herabsetzung des Kaufpreises verlangen
oder vom Vertrag zurücktreten. Ein Anspruch auf Schadensersatz besteht nicht.
Nähere Informationen über die einzelnen Leistungen im Rahmen der Gewährleistung
sind über das Kundendienstzentrum von Invacare Deutschland GmbH zu erhalten.
Nach Erhalt einer Mitteilung über einen Produktmängel versendet Invacare Deutschland
GmbH Rücksendungsgenehmigungen als Serienbrief an die Käufer. Mangelhafte
Bauteile sind innerhalb von dreißig (30) Tagen nach dem Datum der
Rücksendungsgenehmigung unter Angabe der Seriennummer zur
Gewährleistungsinspektion einzuschicken. Ohne vorherige Genehmigung sollten
Produkte nicht an das Werk geschickt werden. Bei Vorhandensein eines
Produktmangels, den Invacare Deutschland GmbH zu vertreten hat, trägt Invacare
Deutschland GmbH die zum Zwecke der Nachbesserung erforderlichen Aufwendungen,
insbesondere Transport-, Wege-, Arbeits- und Materialkosten.
EINSCHRÄNKUNGEN UND GEWÄHRLEISTUNGSAUSSCHLÜSSE: DIE VORSTEHENDE
GEWÄHRLEISTUNG GILT NICHT BEI NORMALEN VERSCHLEIßERSCHEINUNGEN,
FAHRLÄSSIGKEIT, UNFÄLLEN, UNSACHGEMÄßER HANDHABUNG, WARTUNG ODER
LAGERUNG, KOMMERZIELLER NUTZUNG DER PRODUKTE, PRODUKTÄNDERUNGEN OHNE
AUSDRÜCKLICHE SCHRIFTLICHE GENEHMIGUNG SEITENS INVACARE DEUTSCHLAND GMBH
(EINSCHLIEßLICH UNTER ANDEREM ÄNDERUNG DURCH VERWENDUNG NICHT
GENEHMIGTER TEILE ODER ANBAUTEN) ODER FÜR PRODUKTE, DIE OHNE GENEHMIGUNG
SEITENS INVACARE DEUTSCHLAND GMBH REPARIERT ODER DURCH UMSTÄNDE
BESCHÄDIGT WURDEN, DIE AUßERHALB DER EINFLUßMÖGLICHKEITEN VON INVACARE
DEUTSCHLAND GMBH LIEGEN.
STILLSCHWEIGENDE GEWÄHRLEISTUNGEN, EINSCHLIEßLICH GEGEBENENFALLS SOLCHER
DER MARKTGÄNGIGKEIT UND EIGNUNG FÜR EINEN BESTIMMTEN ZWECK, ERSTRECKEN
SICH NICHT ÜBER DIE FRIST DER HIER EINGERÄUMTEN AUSDRÜCKLICHEN GEWÄHRLEISTUNG
HINAUS; RECHTSMITTEL GEGEN DIE VERLETZUNG STILLSCHWEIGENDER
GEWÄHRLEISTUNGEN BESCHRÄNKEN SICH GEMÄß DER HIER AUFGEFÜHRTEN
BEDINGUNGEN AUF NACHBESSERUNG BZW. ERSATZLIEFERUNG DES MANGELHAFTEN
PRODUKTES.
10
Page 11

NOTA: Compruebe que las partes no hayan sufrido
daños ocasionados por el transporte. Si encuentra
desperfectos, NO lo utilice. Contacte con el
Transporte/Invacare para más instrucciones.
MEDIDAS DE SEGURIDAD
Las siguientes recomendaciones están hechas
para una mayor seguridad y un uso correcto
del Analizador de mano InvacareCheck O
.
2
ATENCIÓN
NO instale este equipo sin haber leído y entendido
este folleto de instrucciones. Si no entiende estas
instrucciones, contacte con un asistente
domiciliario, proveedor o personal técnico si es
el caso, antes de intentar instalar este equipo - en
caso contrario, podría provocar lesiones o daños.
El oxígeno acelera la combustión rápidamente.
NO fume cuando esté utilizando oxígeno.
NO use oxígeno ante la presencia de lla-
mas, chispas o objetos encendidos.
Asegúrese de que todos los accesorios
están correctamente instalados.
PRECAUCIÓN
NO exponga ninguna toma del analizador
a una presión superior a 0,690 bares (68.95
kPa), en caso contrario componentes
internos pueden ser dañados.
NO use el analizador con oxígeno puro
procedente de cilindros de alta presión o
sistemas líquidos.
NO use el Analizador de Mano Invacare
Check O
portadora de humedad. El uso del analizador
con vapor de agua puede provocar lecturas
erróneas y daños internos.
con ninguna fuente de gas
2
USO DESEADO
NOTA: Check O2 ha sido diseñado y calibrado para
utilizarse ÚNICAMENTE para toma de medidas en
la salida de gas sin humidificador del concentrador
de oxígeno.
NOTA: El analizador no es para una monitorización
continua de los gases que recibe el paciente.
INSTRUCCIONES DE USO (FIGURA 1)
1. Pulse el botón de marcha ON (I). El visualizador
LCD debe ponerse en marcha.
NOTA:El analizador se para automáticamente
después de aprox. dos (2) minutos de funcionamiento.
Esto ayuda a prolongar la duración de la batería.
2. El visualizador mostrará “FLO” durante
aproximadamente dos (2) segundos, y luego
cambia a lecturas en L/min.
3. Si no aparece ninguna lectura o si la que se
muestra es irregular o bloqueada, vea la sección
de reparaciones en este folleto de intrucciones.
4. Para medir la concentración de oxígeno o el flujo,
conecte la entrada de FLUJO/CONCENTRACIÓN
del analizador a la salida, con una pieza de ¼pulgadas o un tubo de oxígeno, para ser analizada.
5. Para medir la presión, conecte la entrada de
PRESIÓN del analizador a la salida con una pieza
de ¼-pulgadas o un tubo de oxígeno, para ser
analizada.
6. Pulsando el botón de FUNCIÓN ( ) conmutará
el analizador a través de sus diversas funciones.
VISUAL. MEDIDAS VALORES
FLO Flujo Litros por minuto
O2 Concentración O2 Porcentaje de oxígeno
PSI Presión Libras por pulg.cuadrada
KPA Presión KiloPascals
NOTA: El Analizador de mano Invacare Check O2
puede ser utilizado para medir el resultado de su salida
de un concentrador de oxígeno o de cualquier
accesorio del concentrador, tal como el Flujómetro
Remoto Invacare o el Flujómetro Pediátrico. No obstante, Invacare norecomienda utilizar el Analizador
de mano Invacare Check O2 para medir flujos por
debajo de 1 L/min. Ver especificaciones del producto.
NOTA: El gas de la salida del concentrador, mesurado
de la salida del concentrador o de la salida del accesorio
del concentrador, no debe contener gas humidificado.
Desconecte toda botella humidificadora antes de tomar
cualquier lectura para evitar lecturas erróneas y daños
en el sensor de flujo interno. Asegúrese de volver a
conectar toda botella humidificadora antes de devolver
el equipo para su uso al paciente.
Entrada
Presión
Entrada Flujo/
Concentración
NOTA: No hay recambios de las partes internas del
analizador. No es necesario ninguna calibración de
la unidad.
NOTA: Cuando utilice el analizador después de
haberlo guardado en condiciones ambientales
extremadamente calientes o frías, deje fluir el gas que
se analiza a través del analizador durante un (1) minuto
para adaptar el sensor interno a la temperatura de la
fuente de gas.
Botón de
Función
11
Visualizador
LCD
Botón de
Marcha On
FIGURA 1-INSTRUCCIONES DE USO
Page 12

7. Con dos lecturas de “O2”, los valores por debajo
del 70% seran mostrados como “LO”.
8. Cuando la batería está completamente descargada,
BAt parpadeará una vez en el LCD y el analizador
se parará automáticamente. Vea la sección de
cambio de batería en este folleto de Instrucciones.
CAMBIO DE BATERÍA
NOTA: La batería necesita cambiarse cuando el
dispositivo BAt se visualiza en el LCD.
1. De la vualta al analizador.
2. Extraiga los seis (6) tornillos que sujetan la tapa
inferior a la superior y saque la tapa inferior.
3. Saque la batería descargada de los clips de la batería
y deshágase de ella o recíclela adecuadamente.
PRECAUCIÓN
Observe que la polaridad sea la adecuada
para la instalación de las baterías.
4. Instale una nueva batería de 9 voltios en los clips
de la batería. Asegúrese de que la batería queda
ajustada en los clips.
NOTA: El uso de una batería alcalina de 9 voltios
DURACELL® le proporcionará una mayor duración
de la unidad.
5. De la vuelta al analizador y pulse el botón ON. El
visualizador debe aparecer. Si se visualiza, vuelva
a colocar la tapa inferior e instale los seis tornillos
de la cubierta.
6. Si la unidad no se enciende, saque la batería,
compruébela en otro aparato o en un tester de
baterías y vuelva a instalarla. Intente de nuevo
poner en marcha la unidad.
7. Si la unidad continúa fallando contacte con el
Servicio Técnico de Invacare para su reparación.
GUÍA DE AVERÍAS
NOTA: No hay recambios de las partes internas del
analizador.
1. Si la unidad falla al ponerla en marcha, cambie
la batería por una en buen estado.
2. Si la unidad continúa fallando a pesar de la batería
buena, contacte con el Servicio Técnico de Invacare para que se repare.
3. Si la unidad se pone en marcha pero el botón de
FUNCIÓN no selecciona ninguna función,
contacte con el Servicio Técnico de Invacare para
que se repare.
4. Si el dispositivo funciona pero las lecturas son
irregulares o se bloquean, contacte con el Servicio
Técnico de Invacare para que se repare.
5. Si una parte del dispositivo no se visualiza o
aparece intermitentemente, contacte con el
Servicio Técnico de Invacare para que se repare.
ESPECIFICACIONES DEL PRODUCTO
FUNCIONAMIENTO
Presión:
Presión Máxima Entrada: 68.95 kPa 0 to 10 PSIG
Resolución: 0.7 kPa 0.1 PSI
Precisión:
Flujo:
Flujo Máximo: 6.0 L/min.
Entrada: Sólo concentrador de
Resolución: 0.1 L/min.
Precisión:
Temperatura Fuente Gas: +15 a +35°C
Concentración:
Campo: 73% to 96%
Entrada: Sólo concentrador de
Resolución: 0.1 %
Precisión: + 2%
Temperatura Fuente Gas: +15 a +35°C
Alarma: Batería baja
Tiempo Desconexión: 1 minuto, 45 segundos + 5
Visualizador: LCD
Batería: Individual NEDA/ANSI
Duración Batería: 400+ horas (13,700+ ciclos
Garantía: 1 año
DIMENSIONES: Peso: 295 gr.
ENTORNO:
Temperatura
de Funcionamiento: +15 a +35°C
Temperatura
de Almacenamiento: -20 a +70°C
Humedad: 20 a 60% humedad
Altitud (máxima): Hasta 1.828 metros por
+ 2% + 2%
oxígeno sin humidificador.
+ 5% (+ 0.3 L/min.)
oxígeno sin humidificador.
segundos
1604A alcalina 9 voltios
rojos) con batería alcalina
Anchura: 8.38 cm.
Largo: 18.54 cm.
Largo incluyendo
conexiones de
entrada: 20.07 cm
Profundidad: 3.18 cm.
relativa
encima del nivel del mar
12
Page 13

GARANTÍA
La presente garantía se extiende únicamente al comprador original de nuestros productos y
se entiende sin perjuicio de los derechos legalmente estrablecidos.
Invacare S.A. garantiza que el Analizador de Mano Check O2 está libre de cualquier defecto
en sus materiales y mano de obra por un período de un (1) año a partir de la fecha de compra.
Si dentro del período de garantía se acredita a satisfacción de Invacare S.A. la existencia de
algún defecto en el producto cubierto por la misma, dicho producto será reparado o
reemplazado a opción de Invacare S.A. Las obligaciones asumidas por Invacare S.A. y los
derechos concedidos al comprador original al amparo de la presente garantía se limitan
exclusivamente a dicha reparación o reemplazo.
Cuando necesite un servicio cubierto por la garantía, por favor póngase en contacto con el
Departamento de Servicios de Invacare S.A. Al notificarse la posible existencia de un defecto
en un producto, Invacare S.A. le asignará un número de registro con el cual autorizará el
retorno del mismo. El producto será entonces enviado, bien a la fábrica, bien al centro de
servicios, según especifique Invacare S.A. El producto defectuoso deberá ser enviado para su
inspección al amparo de la presente garantía usando el número de registro a efectos
identificativos y dentro de los treinta (30) días siguientes a la fecha de expedición de dicho
número de registro. Por favor, NO envíe productos a nuestra fábrica sin previa autorización.
LIMITACIONES Y EXCLUSIONES : LA PRESENTE GARANTIÁ NO CUBRE EL DETERIORO CAUSADO
POR DESGASTE NORMAL DEBIDO A USO, Y NO ES APLICABLE A PRODUCTOS QUE HAN SIDO
SUJETOS A NEGLIGENCIA, ACCIDENTE, USO IMPROPIO, MANTENIMIENTO INCORRECTO, LARGO
PERÍODO DE ALMACENAMIENTO, USO COMERCIAL O INSTITUCIONAL, PRODUCTOS
MODIFICADOS SIN EL CONSENTIMIENTO EXPRESO Y ESCRITO DE INVACARE S.A. (INCLUYENDO,
A TÍTULO ENUNCIATIVO Y NO LIMITATIVO, MODIFICACIONES POR MEDIO DEL USO DE PARTES O
ACCESORIOS NO AUTORIZADOS) O A PRODUCTOS DAÑADOS DEBIDO A REPARACIONES
REALIZADAS A ALGUNO DE SUS COMPONENTES SIN EL CONSENTIMIENTO ESPECÍFICO DE
INVACARE S.A.
13
Page 14

NOTES
14
Page 15

NOTES
15
Page 16

Invacare Corporation www.invacare.com
USA Canada
One Invacare Way 570 Matheson Blvd E Unit 8 Invacare is a registered
Elyria, Ohio USA Mississauga Ontario trademark of Invacare Corporation.
44036-2125 L4Z 4G4 Canada Yes, you can. is a
800-333-6900 800-668-5324 trademark of Invacare Corporation.
© 2005 Invacare Corporation
Respiratory Products
2101 E. Lake Mary Blvd. Part No. 1085676 Rev B - 1/05
Sanford, Florida USA
32773
800-832-4707
 Loading...