


Quicken for Mac 2006
User Guide

Copyright
© 2005 Intuit Inc. All rights reserved.
Trademarks
Intuit, the Intuit Logo, Quicken, Quicken Loans, QuickBooks, TurboTax, and QuickBase, among others, are registered
trademarks and/or registered service marks of Intuit Inc. in the United States and other countries. The Dollar Sign logo is
a trademark and/or service mark of Intuit Inc. in the United States and/or other countries. Various Quicken products and
services are protected by pending and one or more of the following issued U.S. Patents: 5134564, 5423033, 5649115, 5842185,
5903881 and 6446048.
Apple, the Apple Logo, Macintosh, Mac, the Mac logo, Mac OS and .Mac are trademarks and/or service marks of Apple
Computer, Inc., registered in the U.S.A. and other countries.
All other product names, company names, trademarks and service marks are the property of their respective owners and
should be treated as such. Some names, company names, and data used in examples and help content are fictitious and are
used for illustration purposes only. Any resemblance of fictitious data to a real person or company is purely coincidental.
All features, services and any terms and conditions are subject to change without notice. Online financial services, online
account services, online banking, online investing, transaction download, online payment, online bill presentment, and
online tax preparation, whether prepared by Intuit or third parties, are available only in the United States and require
Internet access. These services may vary from participating financial institutions and may be subject to application
approval, terms, conditions, and additional fees.
Software License Agreement
Please see the Software License Agreement (from Quicken, choose Help > Quicken Help, then click the "Software License
Agreement" link) for the terms and conditions under which the Software is licensed to you.
2

Table of Contents
1 Installation and setup 11
System requirements 11
Installing Quicken 12
Getting started if you’re new to Quicken 13
Upgrading from a previous version of Quicken 14
What’s new in this version of Quicken 16
2 Here’s what Quicken can do for you 17
Managing your bank accounts 17
Online account access 19
Tracking your investments 20
Tracking your assets and debts 21
Planning ahead 22
Reports and graphs 22
Up–to–the–minute financial information on the Web 24
3Working with Quicken 25
The Quicken workspace 25
Customizing your Quicken workspace 27
Getting step-by-step assistance from Quicken Help 29
Using this manual 31
3

4 Accounts track what you own and owe 32
About Quicken data files 32
About Quicken accounts 34
Setting up a Quicken account 35
Opening an account register 37
Editing, hiding and deleting accounts 38
5 Categories and classes track income and expenses 40
About categories 40
Setting up categories and subcategories 42
Editing, deleting, and moving categories and subcategories 47
About classes 48
Setting up classes and subclasses 50
Editing, deleting, and moving classes and subclasses 50
6 Keeping your accounts up to date 52
Recording your day-to-day expenses 52
Correcting mistakes 58
What do I put in the Category field? 59
Transferring money between accounts 64
Entering transactions with more than one category 68
Speeding up data entry 73
Finding a specific transaction 75
Customizing the register 76
Printing the register 77
4

7 Paying your bills 78
Scheduling bill payments 78
Writing checks with Quicken 84
Adding Quicken transactions to iCal 87
Printing Intuit checks 90
8 Reconciling Quicken accounts 104
Before you start reconciling 105
Starting reconciliation 107
Marking cleared transactions 111
Completing reconciliation 113
Solving reconciliation problems 115
9 Banking online 124
Quicken’s online banking services 125
How online banking works 125
Applying at your financial institution 127
Setting up a Quicken account for online banking 128
Downloading transactions 129
Making your downloaded transactions easier to read 134
Transferring money between online accounts 141
Making online payments 142
Communicating with your financial institution 148
Keep your accounts up to date 151
Storing your PINs and passwords 154
Setting up Quicken Bill Pay 157
Using Web Connect 158
5

10 Tracking your cash 162
When to use Quicken cash accounts 162
Entering cash transactions in Quicken bank accounts 163
Setting up and using Quicken cash accounts 165
11 Tracking your credit cards 169
When to use credit card accounts 169
Entering credit card transactions in a checking account 170
Setting up and using credit card accounts 172
12 Tracking assets and liabilities 178
When to use Quicken asset and liability accounts 178
Setting up and using asset and liability accounts 181
13 Tracking loans and mortgages 187
How Quicken tracks a loan 187
Setting up a loan 190
Handling different types of loans 196
Making a loan payment 198
Changing and deleting loans 202
Refinancing a loan 202
Estimating year-to-date loan interest 205
6

14 Tracking investments 206
About investment accounts 206
Tracking your investment data in Quicken 213
Setting up an investment account 225
Setting up a Quicken mutual fund account 235
Recording investment transactions 239
Updating security prices 263
Tracking indexes and securities you don’t own 267
Entering a transaction history for investments 268
Changing, deleting, and moving securities 271
Reconciling investment accounts 274
15 Investing online 276
Setting up an investment account for online access 276
Downloading investment transactions 276
Updating security prices online 280
Researching securities on the Web 286
Exporting your portfolio to Quicken.com 287
7

16 Creating reports 288
About reports 288
Creating an EasyAnswer report 289
Creating a QuickReport 291
Creating a basic Quicken report 291
Customizing reports 293
Reusing custom report settings 310
Investigating items in reports with QuickZoom 312
Changing report preferences 314
Updating reports 314
Printing and exporting reports 315
Seeing the big picture with Insights 316
17 Creating graphs 318
About graphs 318
Creating an EasyAnswer graph 319
Creating a standard graph 320
Customizing a graph 322
Investigating items in graphs with QuickZoom 326
Changing graph preferences 328
Printing graphs 328
8

18 Planning your financial future 329
An overview of Quicken’s planning tools 330
Budgeting 333
Forecasting 345
Financial planning calculators 355
Quicken.com planning tools 358
Home Inventory 359
Emergency Records Organizer 359
19 Getting ready for tax time 360
Tracking tax-related income and expenses 360
Creating tax reports 370
Transferring Quicken data to tax software 373
Estimating taxes with Quicken Tax Planner 374
Estimating capital gains 379
Appendix A: Working with Quicken data files 381
Using more than one Quicken data file 381
Importing and exporting Quicken data 382
Backing up your data file 386
Archiving your data file at the end of the year 389
Setting up passwords 395
Appendix B: Troubleshooting and contacting Intuit 397
Saving a phone call 397
Before you contact us 401
Who to contact 404
9

Index 407
Quicken Keyboard Shortcuts 445
10

1
Installation and setup
System requirements ............................................................................................................11
Installing Quicken.................................................................................................................12
Getting started if you’re new to Quicken..........................................................................13
Upgrading from a previous version of Quicken ..............................................................14
What’s new in this version of Quicken..............................................................................16
System requirements
To use Quicken for Mac 2006, you need the following:
• Macintosh with G3 processor
• Mac OS X, version 10.2.8, 10.3.9, or 10.4.1
• 128MB of RAM
1
• 50MB of available hard disk space
• Color monitor with at least 1024x768 resolution
•To print checks: Intuit checks and a laser or inkjet printer
•To access online features: Internet access (fees may apply), and Internet Explorer
5.2.2 or Safari 1.0.3
11

•To back up to iDisk: a .Mac account (fees apply)
To find out which version of the system software you are using or how much RAM
you have, choose About This Mac from the Apple (K) menu. To find out how much
free space you have on your hard disk, look at the bottom of the Finder window.
Installing Quicken
It’s a good idea to back up your existing Quicken data files before installing if you’ve
used a previous version of Quicken. (See “Backing up your data file” on page 386 for
more information.)
in your
1
Insert the Quicken
2
Double-click the Install Quicken icon.
3
Enter your computer administrator password and click OK.
4
Read the Read Me file and click Continue.
5
Read the Software License Agreement, click Continue, and then click Agree.
6
Select an installation destination and click Continue.
7
Follow the onscreen instructions to complete installation.
If you’re new to Quicken, go to “Getting started if you’re new to Quicken” next.
CD
CD-ROM
drive.
Chapter 1, Installation and setup 12

If you’re upgrading from a previous version of Quicken for Mac, skip to “Upgrading
from a previous version of Quicken” on page 14.
Getting started if you’re new to Quicken
If this is the first time you’ve used Quicken, Quicken will create a new data file for you
and then guide you through setting up your first bank account and entering your first
transaction. The whole process takes only a few minutes.
The Quicken icon looks like this:
See Chapter 6, Keeping your accounts
up to date, on page 52 for information
about entering transactions in a
register.
1
Go to the folder where you installed Quicken and double-click the Quicken icon.
2
Quicken asks you to personalize your copy of Quicken; type your name and click
OK.
3
In the welcome screen, click New User to set up a file for your Quicken data.
4
Follow the onscreen instructions to create your first Quicken account.
Congratulations! You’ve set up your first account. Now you can bring the account up
to date:
• Enter all the transactions that have occurred in this account between the ending
balance on your last bank statement and today. These transactions may be checks
that you have written and recorded in your paper check register, electronic funds
transactions (deposits to or withdrawals
transfers to or from the account, or
ATM
from the account).
Chapter 1, Installation and setup 13

• Enter all transactions dated before the statement’s ending date that have not yet
appeared on any bank statement.
Or you can wait and enter these transactions when you get your next bank
statement and are ready to reconcile your Quicken account with the bank
statement. See “Before you start reconciling” on page 105.
Then, when your next bank statement arrives, you can reconcile it with the
transactions you’ve recorded in your Quicken account. See Chapter 8, Reconciling
Quicken accounts, on page 104 for information about reconciling bank accounts.
Upgrading from a previous version of Quicken
If you are upgrading from a previous version of Quicken, be sure to move your
existing Quicken data files into your Documents folder. Then, if you still have your
Install CD from your previous version of Quicken, you can delete your old Quicken
CD
folder from your hard disk. If you no longer have your original
before you delete it. We strongly recommend that you delete your old copy of
Quicken.
, back up the folder
Note: If you are upgrading from Quicken 1 or 1.5, a document with instructions for
upgrading is available from Intuit Technical Support; choose Online > To the Web >
Online Technical Support.
1
After you have installed Quicken, moved your Quicken data files to your
Documents folder, and removed your old Quicken application from your hard
disk, you can open your Quicken data file one of these three ways:
Chapter 1, Installation and setup 14

• Double-click your Quicken data file icon.
• Double-click the Quicken application icon.
• Drag your Quicken data file icon to the Quicken icon.
2
If Quicken asks you to personalize your copy of Quicken, type your name and click
OK.
3
In the welcome screen, click Upgrading User.
You’ll see a series of screens telling you what’s new in Quicken. Click Continue
after you read each screen.
4
If the Open File dialog appears, select your data file and click Open.
Before Quicken opens your data file, it creates a backup copy of the file and puts it in
your Documents/Quicken Backup Folder/Old Quicken Data folder.
Converting your data file may take a
little while, especially if the file is
large.
After the backup file is created, Quicken updates your original data file for Quicken
2006 and you’re ready to work. To update another Quicken data file, choose File >
Open File and select that file.
Note: After you update your file to Quicken 2006 format, you
CANNOT
go back and
use the same file with an earlier version of Quicken. If you ever need to use your old
data with your previous version of Quicken, you can open the copy of the file that
Quicken put in the Old Quicken Data folder.
Chapter 1, Installation and setup 15

What’s new in this version of Quicken
To see what’s new in this version of Quicken, go to Quicken Help and click
What’s new in Quicken 2006
Chapter 1, Installation and setup 16

Here’s what Quicken can do
2
for you
Managing your bank accounts............................................................................................17
Online account access...........................................................................................................19
Tracking your investments..................................................................................................20
Tracking your assets and debts...........................................................................................21
Planning ahead......................................................................................................................22
Reports and graphs...............................................................................................................22
Up–to–the–minute financial information on the Web.....................................................24
Managing your bank accounts
A Quicken bank account register looks a lot like a paper checkbook register. You enter
all the transactions that affect your account balance in the register, including checks
(automated teller machine)
you’ve written, deposits, electronic transfers,
transactions, and so on.
ATM
2
17
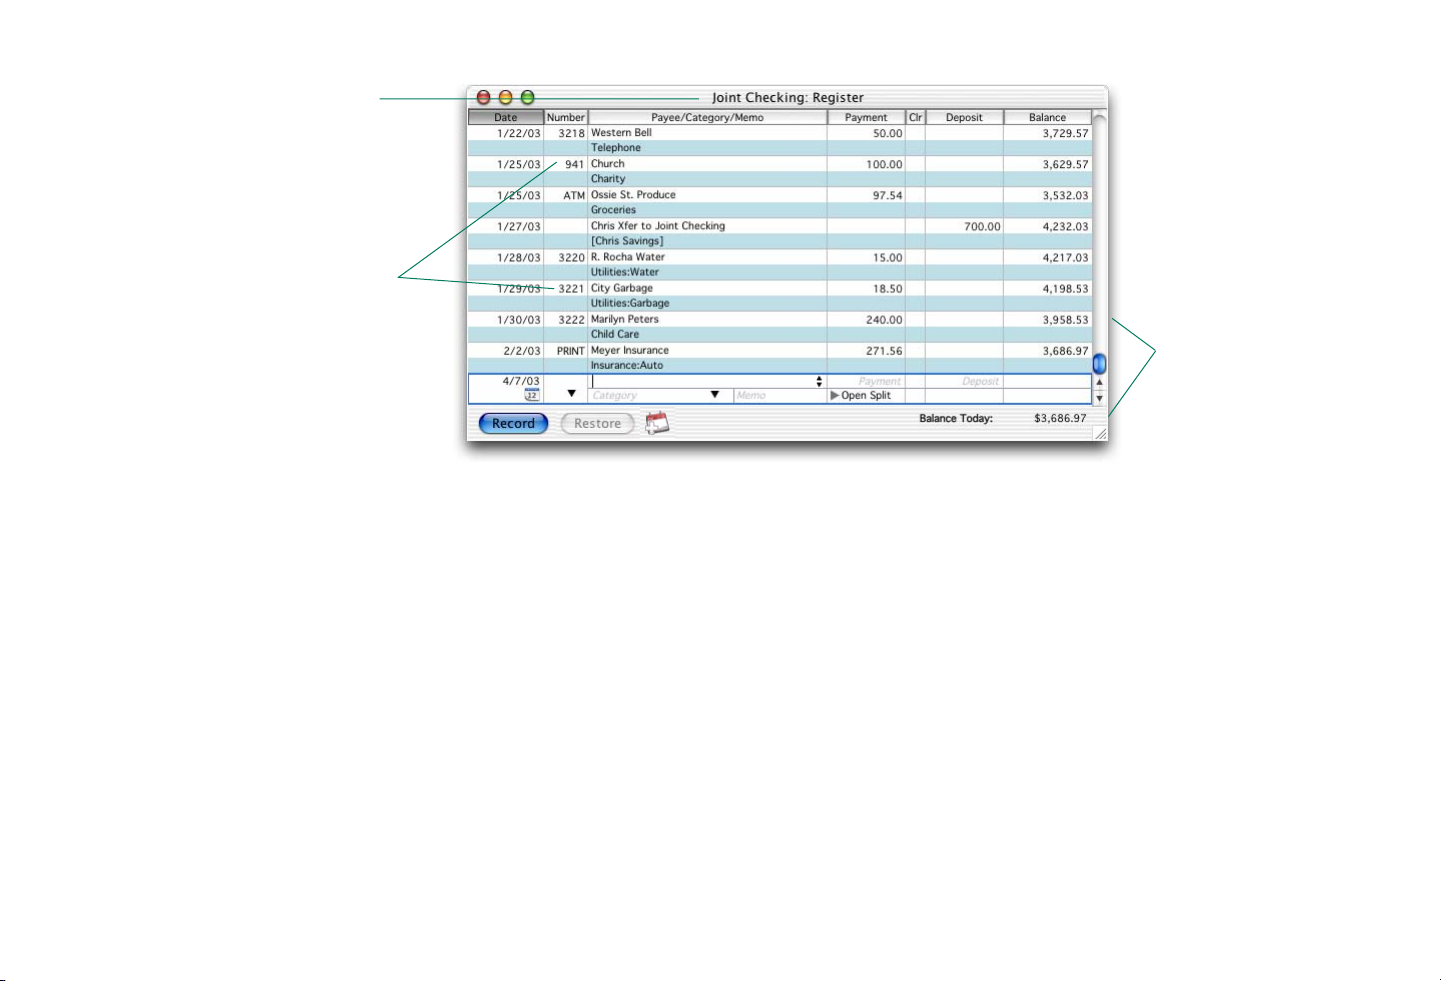
Quicken displays the name of the
account (Joint Checking) in the
window title.
You can use more than one series of
check numbers at a time. You can
write your checks by hand, print Intuit
checks directly from Quicken, or use
a combination of both.
Quicken computes the
account balance
automatically each
time you record a
transaction.
Quicken helps you accomplish many banking tasks quickly and easily:
• Keep detailed records of all your transactions without spending a lot of time
entering data. QuickFill™ remembers each transaction you enter, so you only have
to type recurring transactions once.
• Reconcile your Quicken accounts to make sure they agree with the statements from
your bank.
•Transfer money between Quicken accounts. Quicken records the transfer in both
accounts and updates your balances automatically.
• Schedule any kind of transaction—from a car payment that you pay at the same
time every month, to a class fee that you pay only once, to a paycheck direct
deposit. When a bill is due or when payday finally rolls around, Quicken either
Chapter 2, Here’s what Quicken can do for you 18
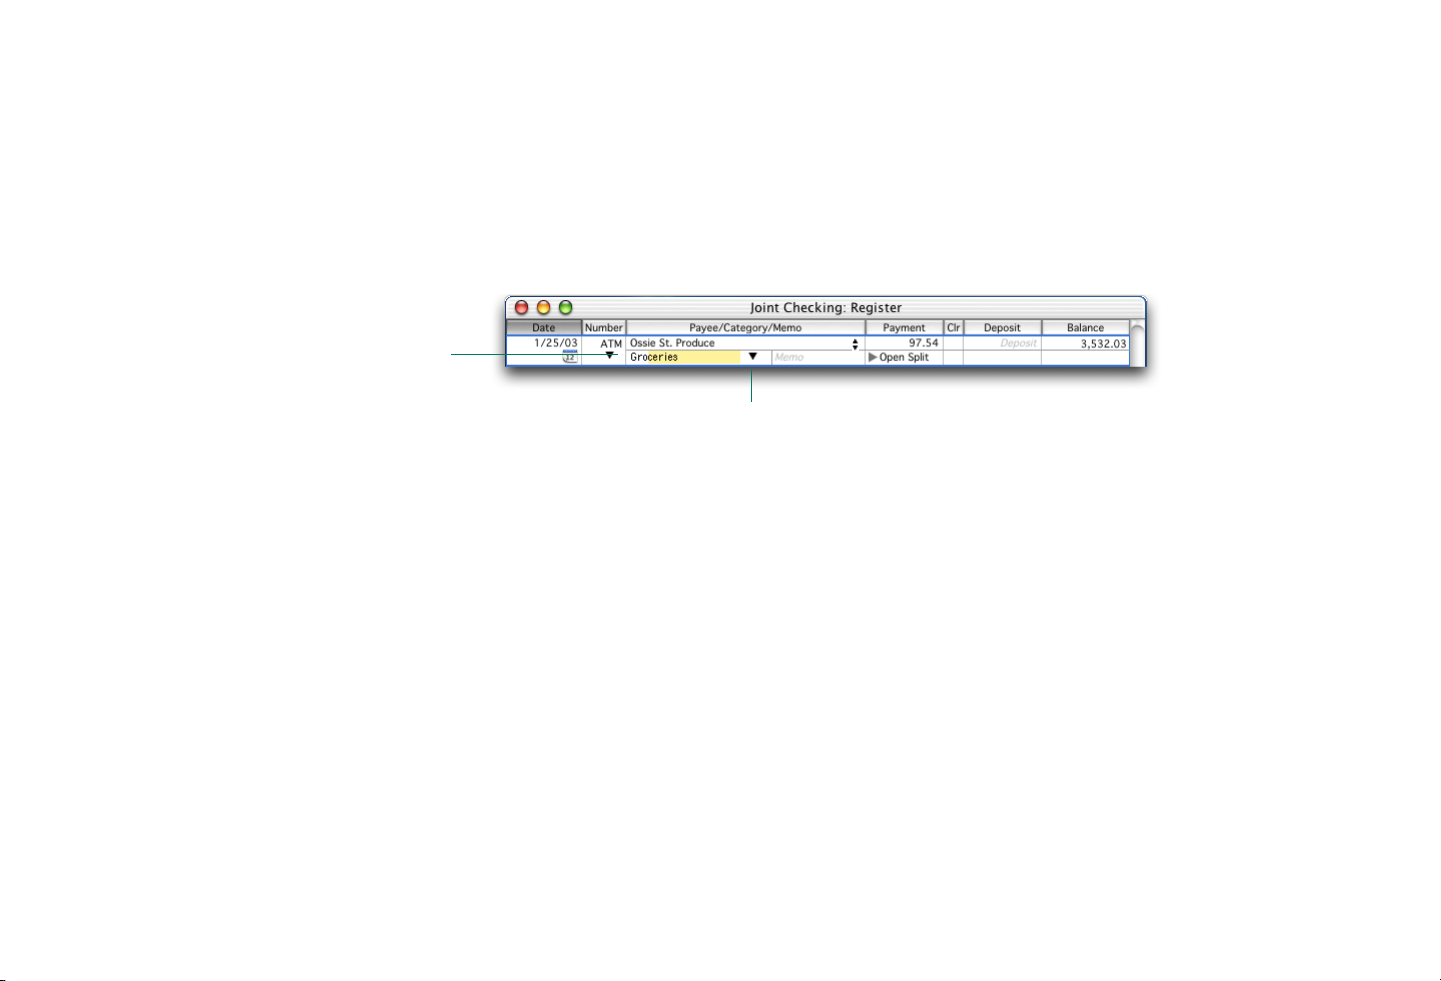
Entering categories is easy. As soon as you
type the letters “Gr,” QuickFill completes
the category name “Groceries.”
reminds you about it or simply enters it for you automatically—whichever you
prefer.
• Keep track of where your money goes with categories. For example, if you buy
groceries at several different stores, you can tell Quicken to use the same
“Groceries” category each time you record a payment to any of those stores in any
Quicken register. Then, at the end of the month, you can create a report or graph
that shows how much you spent on groceries that month.
You can also choose a category name from the pop-up menu in the Category field.
Online account access
Online account access gives you convenient, day or night access to your accounts
using state-of-the-art encryption and security features. With online account access,
you can:
• Update your Quicken registers, following a schedule you choose, with
transactions downloaded directly from your financial institution, saving data
entry time and effort
• Easily reconcile your accounts with automatic transaction matching
• Pay your bills without ever writing a check or licking a stamp
•Transfer funds between accounts at the same financial institution
Chapter 2, Here’s what Quicken can do for you 19

• Retrieve account balances and credit and charge card information, so you have
up-to-date information for better financial decision making
• Schedule a payment now to be paid at a future date you specify
• Update securities transactions in an investment account
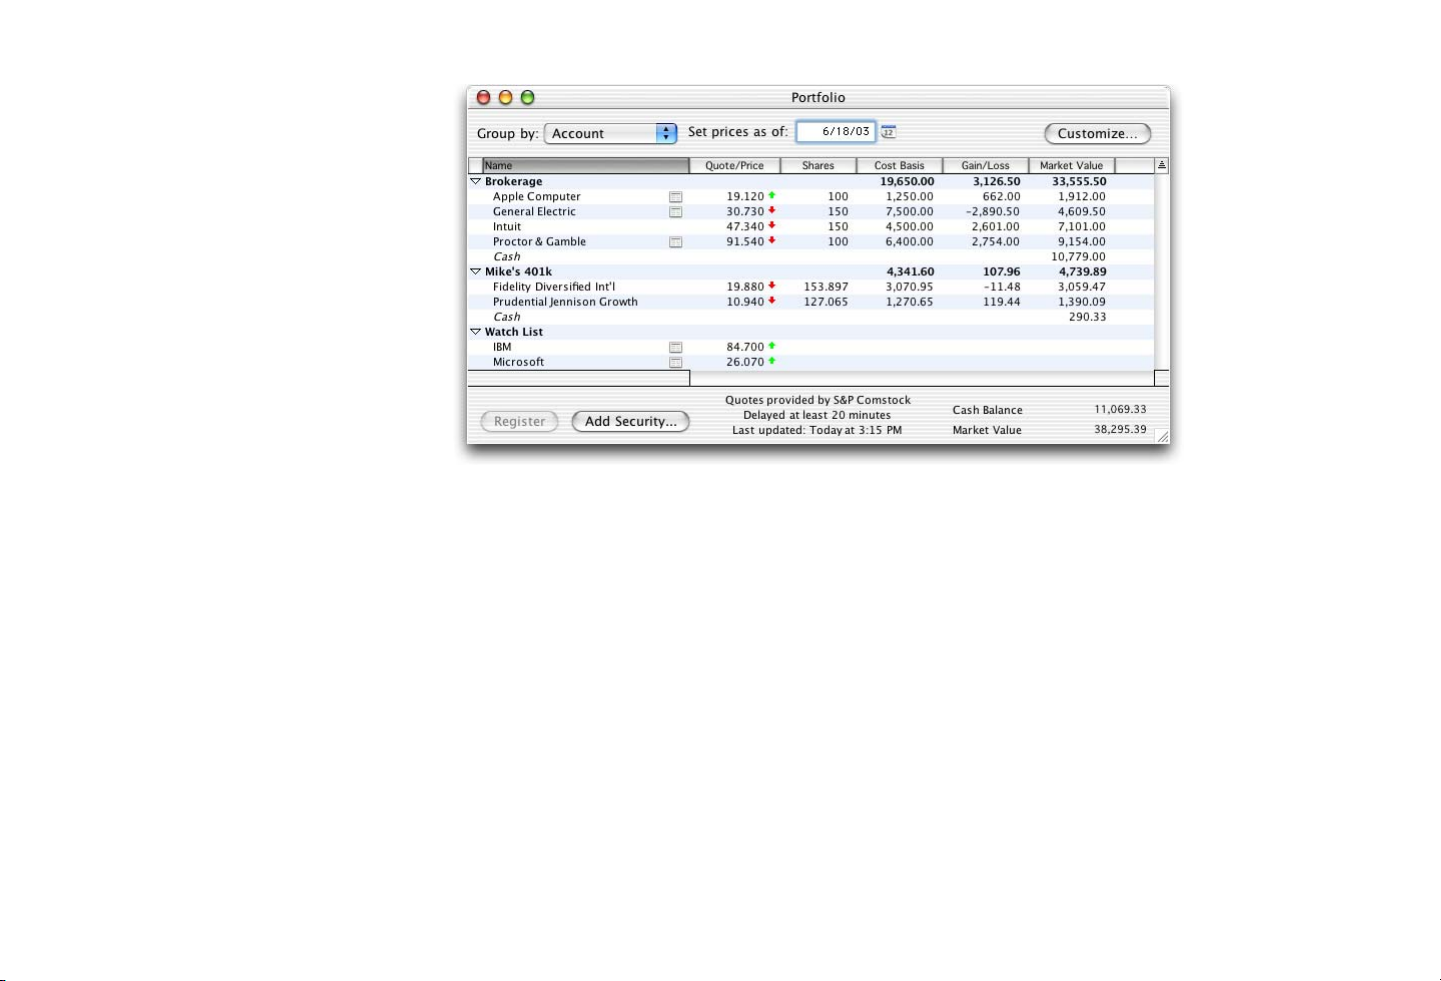
Tracking your investments
Use investment accounts to track what you own in stocks, bonds, mutual funds, and
other types of investments that fluctuate in price. Investment accounts let you:
• Compare the performance of your investments
• Keep detailed records of investment transactions
• Update current market values
• Report on investment income and capital gains
The Portfolio window lets you see all your investment accounts in a single window.
You can update security prices and view summary information for all your securities.
Chapter 2, Here’s what Quicken can do for you 20
Tracking your assets and debts
Quicken can help you track loan balances, the value of your car or other personal
possessions, and the balances due on your credit cards. If you set up accounts for all
your assets and debts, Quicken can include them in net worth reports and graphs to
give you an accurate view of your total financial picture.
When Quicken tracks loans and mortgages, it keeps track of both the amount of
interest you’ve paid and the loan’s outstanding principal balance—it even calculates
the proportions of interest and principal for each payment.
Chapter 2, Here’s what Quicken can do for you 21

Planning ahead
Quicken offers a variety of long- and short-term planning tools to help you look into
your financial future. Use reports, graphs, and budgets to assess your current financial
health, and then try out “what-if” scenarios with the financial planning calculators.
The Quicken Tax Planner helps you estimate what your next tax bill will be, and the
loan tracking tools help you shop for loans by figuring exactly how much interest and
principal you would pay in different loan scenarios.
For more information on Quicken’s planning tools, see Chapter 18, Planning your
financial future, on page 329.
Reports and graphs
Quicken can create many different kinds of reports and graphs to give you insight into
your finances. With Quicken’s flexible reporting tools, you can include information
from any or all of your Quicken accounts. You can create a QuickReport™ or an
EasyAnswer report or graph for a quick update, or you can customize standard
Quicken reports and graphs by changing the layout and choosing just the accounts
and categories you want to see.
Suppose you want to look at your expenses for the last three months of last year. You
can see the information you want in a category summary report or an expense
comparison graph.
Chapter 2, Here’s what Quicken can do for you 22
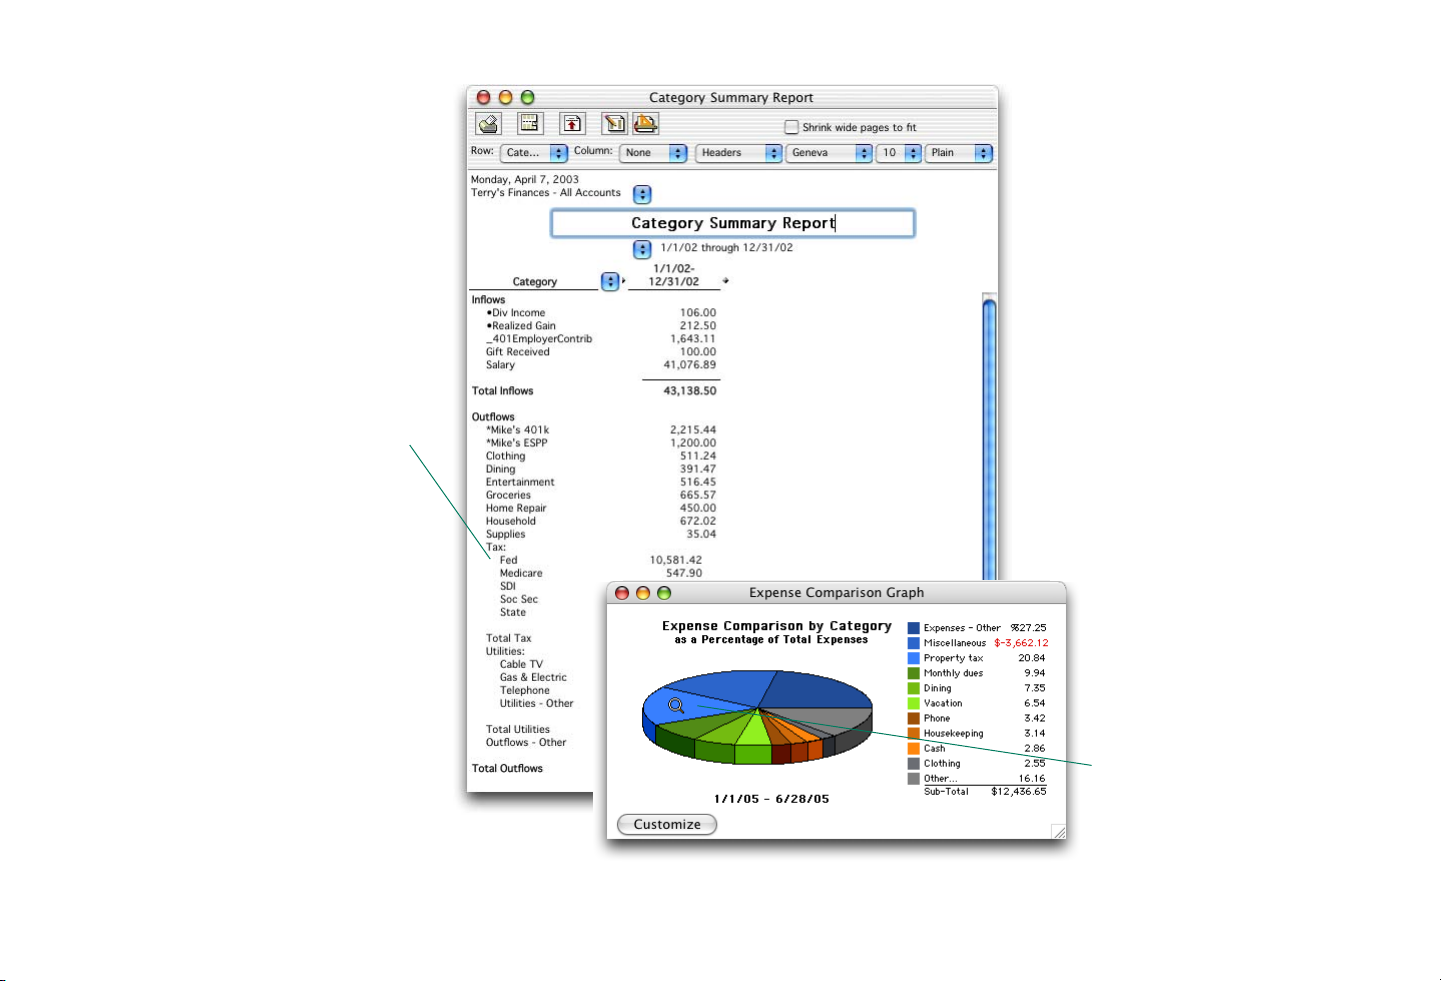
In a category summary report,
Quicken totals your income and
expenses and displays the totals on
the screen. You can also print the
report if you like.
To view the transactions that make up
a value in a report, double-click the
value to get a QuickZoom report (a list
of transactions). To change one of the
transactions in that list, double-click it
to go to the register with that
transaction selected.
Subcategories help you analyze your
spending or income patterns; you can
look at a detailed breakdown of how
much you’ve spent or earned for each
subcategory as well as see a total for
the category.
An expense comparison
graph shows how much you
are spending on individual
categories in relation to your
total spending and to other
categories. You can use graphs
to analyze spending patterns,
show your top ten expenses,
alert yourself to overspending,
and compare historical data.
To see more detail about a
value in a graph (for example,
a specific pie slice),
double-click the value to get a
QuickZoom graph.
Chapter 2, Here’s what Quicken can do for you 23

Up–to–the–minute financial information on the Web
If you have a Web browser, it’s easy to connect to the Web right from Quicken. Just
choose Online > To the Web and then choose your Web destination. Quicken’s home
page on the Web is updated continuously to give you the very latest in financial
information, online banking, and Quicken technical support.
Chapter 2, Here’s what Quicken can do for you 24

3
Working with Quicken
The Quicken workspace.......................................................................................................25
Customizing your Quicken workspace .............................................................................27
Getting step-by-step assistance from Quicken Help .......................................................29
Using this manual .................................................................................................................31
The Quicken workspace
Activity areas
Quicken has six activity areas that are represented by six tabs at the top of your screen.
These tabs help organize your work and prevent your workspace from becoming
cluttered with too many open windows.
• Banking: Work with bank accounts, including checking, savings, and money
market accounts.
3
• Investing: Track stocks, bonds, mutual funds, and other investments.
• Planning: Budget and forecast how new events might affect your finances, plan for
tax time, and develop strategies to save more and pay less interest on your debts.
• Reporting: Create reports and graphs that tell you where your money comes from
and where it goes.
25

• Property & Loans: Track credit cards, loans and mortgages, and assets such as your
home.
• Services: The last area contains task buttons that help you access financial
information resources on the Web.
Toolbar
You can choose Quicken commands by clicking a button in the toolbar. The toolbar
includes the buttons for the most commonly used commands in the activity area
you’ve selected. For example, the toolbar in the Banking area includes buttons for
common banking tasks.
To add, delete, and rearrange command buttons, see “Customizing your Quicken
workspace” on page 27.
Here is the keyboard shortcut for the
Accounts command.
Keyboard shortcuts
A keyboard shortcut is a combination of keys you press at the same time to choose a
command. To use a keyboard shortcut, hold down the x (Command) key while you
press another key. To open the Account list, for example, hold down the x key and
press A. You can see a list of keyboard shortcuts on page 445. You can also create your
own keyboard shortcuts in Quicken. See “Creating your own Command-key
shortcuts” on page 28.
Chapter 3, Working with Quicken 26

Customizing your Quicken workspace
You can define your Quicken workspace by personalizing the toolbar, and adding,
rearranging, or removing tabs and command buttons.
Customizing the toolbar
You can use the toolbar just as it is, or you can change it so it suits your working style.
Adding a button to the toolbar
You can add many Quicken menu commands to the toolbar in any activity area tab.
You could, for example, add the Portfolio button to the toolbar in the Banking tab to
easily access your Portfolio window while you work in the Banking area.
1
Choose Quicken > Configure Toolbar.
2
Click the activity area tab where you want to add the command button.
3
Choose the command button you want to add to the activity area tab from the
scrolling list of commands.
4
Drag the button from the Command Button list onto the toolbar.
Rearranging and removing command buttons
To change the position of a command button, open the Configure Toolbar window.
Select and drag the button you want to move to a new location in the toolbar.
Chapter 3, Working with Quicken 27

To remove a single command button, open the Configure Toolbar window. Select the
button you want to remove and drag it off the toolbar. To remove the whole toolbar,
clear the Show Tabs, Show Command Buttons, and Show Account Buttons
checkboxes.
Creating your own Command-key shortcuts
You can access your favorite commands faster by creating shortcuts for them. A
shortcut lets you execute the command with a simple key sequence: pressing the x key
plus one other key. You can assign a Command-key shortcut to any menu command,
including any account name in the Registers menu.
1
Hold down the x key and click in the menu bar. Don’t release the mouse button.
2
Release the x key and select the menu command to which you want to assign a
shortcut.
3
With the command selected, release the mouse button.
Quicken displays a window that shows the menu name, command name, and
existing Command-key shortcut (if any).
For example, if you want the shortcut
for an account named Checking to be
-1, type 1 and click OK.
x
4 Type the key you want to combine with the x key and click OK.
If another menu command already has the same Command-key shortcut assigned
to it, Quicken asks you to confirm the change. If you confirm the change, Quicken
removes the shortcut from the other menu command and assigns it to the
command you selected.
Chapter 3, Working with Quicken 28

Removing a Command-key shortcut
1 Hold down the x key and click in the menu bar. Don’t release the mouse button.
2 Release the x key and select the menu command.
3 With the menu command selected, release the mouse button.
4 Delete the shortcut from the Command Key field in the Edit Command Key
window.
5 Click OK.
Getting step-by-step assistance from Quicken Help
If you have a question about how to do something in Quicken, go to Quicken Help for
step-by-step assistance. When you use Quicken Help, its window moves in front of
any windows you have open in Quicken. If you need to move it, just drag its title bar.
To return to Quicken, click in any Quicken window.
The step-by-step procedures that are available in Quicken Help are listed in tables like
this one.
For step-by-step help, go to Registers in Quicken Help and select
How do I enter a transaction?
Chapter 3, Working with Quicken 29
There are a number of different ways to open Quicken Help:
• Choose Help > Quicken Help.
•Press x-?
•Press the Help key if you are using an extended keyboard.
• Hold down the Control key, and click in a window to display a contextual menu.
Choose Help for information specific to the window you’re working with.
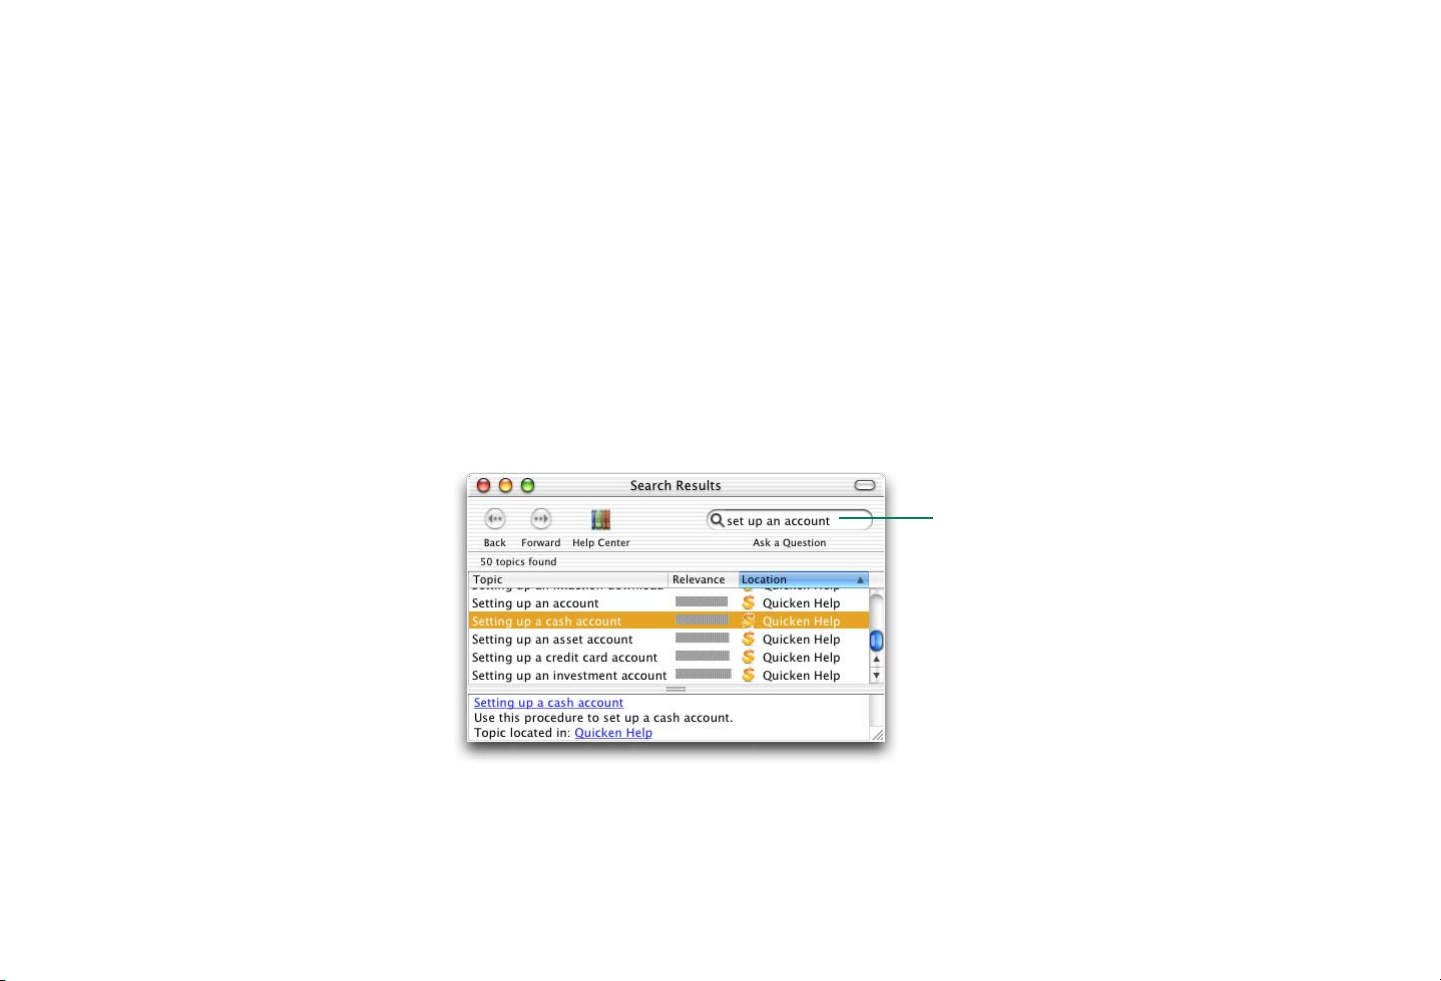
Searching Quicken Help
When you type in your text and click Search (or press Enter), Quicken Help displays
a list of related tasks. Click the topic that interests you.
Type a word or phrase and press Enter.
Chapter 3, Working with Quicken 30

Learning useful tips and shortcuts
Tips & Shortcuts are helpful hints that can help you get more out of using Quicken.
Choose Tips & Shortcuts from the Quicken Help table of contents. Then click a link to
see a series of tips and shortcuts for that topic area.
Using this manual
Quicken includes this onscreen User Guide. You can open this Adobe Acrobat
document by choosing Help > User Guide.
Chapter 3, Working with Quicken 31

Accounts track what you
4
own and owe
About Quicken data files .....................................................................................................32
About Quicken accounts......................................................................................................34
Setting up a Quicken account..............................................................................................35
Opening an account register................................................................................................37
Editing, hiding and deleting accounts ...............................................................................38
About Quicken data files
Your Quicken data file contains all your financial data. Your personal Quicken data
file might contain several accounts, such as a checking account, a savings account,
credit card accounts, and an investment account. If you use your Quicken data file for
business, it might contain a business checking account, an A/R account, an A/P
account, and a capital equipment account.
4
32

A Quicken data file is like a drawer in a filing
cabinet, and the accounts in it are like the
folders in that file drawer. You might, for
example, have folders in your financial file
drawer labeled Checking, Savings, Car loan,
Mortgage, and so on.
All the accounts in one Quicken data file share the same lists of categories, classes, and
other information—and you can transfer funds from one account to another within
the same file. Plus, when you run a Quicken report or graph, you can choose to see
data from any or all of the accounts in your file. For example, if you want a status
report on the accounts you use every day, you can create a net worth report that
includes the balances from your checking, credit card, and savings accounts. If you
want your net worth report to show your overall financial picture, you can include
information from all of the accounts in your file, including investment accounts,
retirement accounts, and the asset and liability accounts you use to track the value of
your home and the remaining balance on its mortgage.
If you use Quicken for personal finances only, you probably need just one data file.
Quicken reports, graphs, and budgets only include information from accounts that are
in the same data file. However, you may decide you need more than one data file if,
for example, you want to keep your personal and business finances completely
separate. See “Using more than one Quicken data file” on page 381.
Chapter 4, Accounts track what you own and owe 33

About Quicken accounts
Each Quicken account represents either something you own (an asset) or something
you owe (a liability), and lets you track the money—or value—that is added to or
subtracted from that account.
Quicken is flexible enough to let you track as many as 255 accounts in one file. Some
people track only their primary checking account; others want to know where every
penny goes. Some people use just one checking account for a while and then add other
accounts as they go along; others set up all their accounts before they begin entering
any data.
Accounts that track what you own
• Bank accounts (checking, savings, and money market). Use these to track your
checking accounts, savings accounts, and money market accounts. You can print
checks and make electronic payments from these types of accounts. See Chapter 7,
Paying your bills, on page 78, and Chapter 9, Banking online, on page 124.
• Cash accounts. Use this to track your cash. See Chapter 10, Tracking your cash, on
page 162.
• Asset, house, and vehicle accounts. Use these to track the value of an asset such as
a home or car. For a business, use asset accounts to track your capital equipment
or accounts receivable. See Chapter 12, Tracking assets and liabilities, on page 178.
• Investment accounts (brokerage, 401(k), and IRA). Use these to track multiple
investments in a single account. See Chapter 14, Tracking investments, on
page 206.
Chapter 4, Accounts track what you own and owe 34

• Single mutual fund accounts. Use this to track a single mutual fund. See
Chapter 14, Tracking investments, on page 206.
Accounts that track what you owe
• Credit card and line of credit accounts. Use these to track your credit cards, lines
of credit, and equity lines. See Chapter 11, Tracking your credit cards, on page 169.
• Liability accounts. Use these to track something you owe, such as a mortgage or
car loan. For a business, use liability accounts to track accrued liabilities or
accounts payable. See Chapter 12, Tracking assets and liabilities, on page 178.
Setting up a Quicken account
The steps for setting up an account are basically the same for all Quicken accounts.
You can edit most account information later if you decide to change it (see page 38).
Note: To set up an investment account or track a loan, see “Setting up an investment
account” on page 225, “Setting up a Quicken mutual fund account” on page 235, or
“Setting up a loan” on page 190, before you set up the account.
1 Choose File > New > Account, or List > Accounts and then click New.
The Account Setup Assistant appears.
2 Follow the onscreen instructions to create the account.
Chapter 4, Accounts track what you own and owe 35

When you are done with the Assistant, Quicken creates the account, adds its name
to both the Account list and the Categories & Transfers list, downloads current
transactions (if you set up online account access), and opens its register.
Chapter 4, Accounts track what you own and owe 36

You can come back
to this transaction
later and change the
opening balance
amount and the date
if you need to.
Opening an account register
There are several ways to open a register in the current data file (or bring it to the front
if it’s already open):
• Click the button for that account in the account bar at the bottom of the toolbar.
Quicken displays buttons of the most recent accounts you’ve opened:
Note: If you don’t see buttons like the ones shown above, choose Lists > Accounts,
select the account, click Edit, and make sure that both the Show account in lists and
Show account in toolbar checkboxes are checked.
• Choose the account from the Registers pop-up menu in the toolbar.
• Choose Lists > Registers > [account].
• Choose Lists > Accounts, and then double-click the account name.
Chapter 4, Accounts track what you own and owe 37

• If the account you want to work with is already open, use the Windows menu to
bring the open account to the front.
You can work with more than one account at a time by opening multiple register
windows. You can always tell which account you have open because the account
name is part of the Register window title.
Editing, hiding and deleting accounts
To edit a Quicken account, select the account name in the Account list and click Edit.
Then change the account information in the Edit Account window. You can rename
an account, change the account description, change an account’s online access, and
read or edit any notes you added. You can edit the credit limit for a credit card account
or change an investment account’s tax status. You can also change the account type in
most cases.*
If you don’t use an account anymore, you can hide it so that it doesn’t show up in the
Account list or the Categories & Transfers list. Its transactions are still there so you can
use them in reports and graphs, but it doesn’t show up in any lists. To hide an account,
select it in the Account list and click Edit. Clear the Show account in lists checkbox. In
the Account list, clear the Show hidden accounts checkbox. To see the hidden account
again, select the Show hidden accounts checkbox in the Account list.
You can delete an account by selecting it in the Account list and clicking Delete.
* You can’t change the account type of an investment or mutual fund account, and you can’t change a
bank, cash, asset, credit card, or liability account into an investment or mutual fund account.
Chapter 4, Accounts track what you own and owe 38

Caution: Do not delete an account as a step in changing account information. If you
delete an account, you lose all of the transactions in it. When you edit the account
information, the account retains all of its transactions.
When you delete an account, you lose all of the transactions in that account, and any
transfers between the deleted account and your other Quicken accounts lose the
transfer information.
For step-by-step help, go to Accounts in Quicken Help and select
How do I edit account information?
How do I hide an account?
How do I delete an account?
Chapter 4, Accounts track what you own and owe 39

Categories and classes track
5
income and expenses
About categories....................................................................................................................40
Setting up categories and subcategories............................................................................42
Editing, deleting, and moving categories and subcategories.........................................47
About classes .........................................................................................................................48
Setting up classes and subclasses .......................................................................................50
Editing, deleting, and moving classes and subclasses.....................................................50
About categories
Categories are labels you assign to transactions to help you track where your money
goes. When you “categorize” your transactions, Quicken can give you insight into
your finances through reports, graphs, and budgets. Reports and graphs can tell you:
5
• How much you spend each month on groceries, utilities, mortgage interest, auto
maintenance, and more. These items are tracked using expense categories.
• How much you receive each month in salary, bonuses, dividends, interest income,
rental income, and so on. These items are tracked using income categories.
40

If you assign categories to the transactions you enter in Quicken, you can:
•Create income- and expense-based reports and graphs that show where your
money comes from and how you spend it. See Chapter 16, Creating reports, on
page 288, and Chapter 17, Creating graphs, on page 318.
• Set up budget amounts for some or all of your categories and create reports or
graphs that compare your budget to your actual expenses and income. See
“Budgeting” on page 333.
• Save time when preparing your tax returns by generating a list of tax-related
income and expenses, or by exporting information to tax-preparation software. See
Chapter 19, Getting ready for tax time, on page 360.
“What do I put in the Category field?”
on page 59, explains how to assign
categories to transactions.
You can assign a category to any transaction in any non-investment account.* If you
write a check for groceries, you could assign the category “Groceries” to the
transaction when you enter it in your Quicken checking account register. If you pay
for the groceries by credit card, you would also assign the category “Groceries” to the
transaction when you enter it in your credit card account register.
The more specific your categories are, the more detailed your reports and budgets will
be.
It is important to assign categories and subcategories consistently. For example, if you
sometimes assign the category “Auto” to transactions for gasoline, but other times
you assign the category and subcategory “Auto:Fuel,” Quicken displays two separate
amounts in reports: one for “Auto” transactions, and another for “Auto:Fuel”
transactions. Use the Replace command to find all occurrences of “Auto” in a register
* Quicken assigns special investment categories to many kinds of investment transactions. See the table
that begins on page 244 for more information.
Chapter 5, Categories and classes track income and expenses 41

and decide whether to recategorize some of them as “Auto:Fuel” (see “Finding a
specific transaction” on page 75).
Tip: You’ll get more accurate reports, graphs, and budgets if you categorize credit and
charge card purchases the same way you categorize checking account transactions,
instead of assigning a general category like “AmEx” or “Credit card.” See Chapter 11,
Tracking your credit cards, on page 169.
Setting up categories and subcategories
When you started Quicken for the first time, you had the opportunity to include a
preset home category list, business category list, or both in your Quicken data file. You
can use the preset categories as they are or modify them to suit your needs.
Note: If you chose not to include Quicken’s preset category lists when you initially
created your data file, but now wish to include them, choose Lists > Categories &
Transfers > Import Business Categories and/or Import Home Categories.
To get started quickly, use one of the preset category lists and then add new categories
as you work with Quicken. Or, if you prefer, review the preset category lists and the
modified lists on page 44 and then create your own list.
To see your list, choose Lists > Categories & Transfers > List.
The next page shows the preset category lists provided by Quicken:
Chapter 5, Categories and classes track income and expenses 42

Quicken’s preset Categories &
Transfers lists
The list on the left is the preset list of
home categories that Quicken
provides, and the one on the right is
the preset list of business categories.
Subcategories are indented under the
main category. Click the triangle to
the left of the category name to hide or
show its subcategories.
Click a column title to change the order in
which categories appear in the list. This
list is sorted by category name, but you
could also choose to sort it by type if, for
example, you want to group your all of
your income categories together. You can
also sort by tax status or
description.
Delete any unused categories by
selecting them in the list and clicking
Delete. For example, if you live in the
U.S., you may want to delete all the
Canadian categories. And if you live
in Canada, you may want to delete the
U.S. tax categories.
You can mark categories as
tax-related and assign tax
form information to them.
See Chapter 19, Getting
ready for tax time, on
page 360.
Chapter 5, Categories and classes track income and expenses 43

Here are two sample category lists:
• The list on the left is a partial view of
a category list used by a couple who
want to track their income and
expenses in more detail than
provided by the preset home category
list.
• The list on the right is shorter than the
preset list of home categories, and it
contains main categories only—no
subcategories.
The first time you set up an investment
or single mutual fund account, Quicken
adds these investment categories
(preceded by •) to your Categories &
Transfers list.
Modifying the preset category lists
You can modify a preset category list by creating new categories or new subcategories
and by editing or deleting existing categories and subcategories. You can also change
a category into a subcategory or a subcategory into a category, and you can move
subcategories from one category to another. See “Creating new categories” on
page 45, “Creating subcategories” on page 46, and “Editing, deleting, and moving
categories and subcategories” on page 47.
Account names in brackets ( [ ] ) are
included in this list so you can transfer
funds between accounts. Double-click
an account name to create a transfer.
See “Transferring money between
accounts” on page 64.
Chapter 5, Categories and classes track income and expenses 44

The category name can be up to 32
characters long. Be careful not to enter
more than one name for the same
category. For example, if you type
“Clothes,” Quicken will see it as a new
category even if you already have a
category called “Clothing.”
Click Income if this is an income category
such as salary, interest income, or rent
from an investment property. Click
Expense if this is an expense category such
as groceries, utilities, mortgage interest, or
charity.
Creating new categories
You can set up your categories before you enter any transactions, or you can set them
up “on the fly” while you are entering transactions.
1 Choose Lists > Categories & Transfers > List (x-L).
2 Click New (x-N).
3 Enter information about the category.
The category description can be up
to 54 characters long. You can show
the description instead of the
category name in reports and
graphs if you want to see a more
detailed description.
(Optional) Select the Tax-related
checkbox if you want to use this
category to track tax-related income
or expenses.
(Optional) Select Assign a tax link if you
wish to assign a category to a specific line
item on an IRS form. See “Marking
categories as tax-related” on page 361.
4 Click Create to add the category to the Categories & Transfers list.
Chapter 5, Categories and classes track income and expenses 45

To add the subcategory “Insurance” under
“Auto,” select “Auto” and click Add
Subcategory. Then type “Insurance” in the
Category field and click Create.
Creating subcategories
Using subcategories gives you more flexibility than using categories alone. For
example, under the category “Utilities” you could have subcategories such as “Cable
TV,” “Gas & Electric,” and “Water.” Then you can show information for each
subcategory under the main categories in your reports, graphs, and budgets.
1 Choose Lists > Categories & Transfers > List (x-L).
2 In the Categories & Transfers window, select the category for which you want to
create a subcategory and click Add Subcategory.
Quicken doesn’t display a type
(income or expense) for
subcategories because they are
always the same type as the parent
category.
3 Enter information about the subcategory just as you would for a new category.
See the illustration in step 3 on page 45.
4 Click Create to add the subcategory to the list.
Quicken displays the new subcategory below the main category in the Categories
& Transfers list. Subcategories are listed in alphabetical order.
Chapter 5, Categories and classes track income and expenses 46

Editing, deleting, and moving categories and subcategories
You can edit category or subcategory information by selecting a category in the
Categories & Transfers list and clicking Edit. If you rename a category or subcategory,
Quicken automatically replaces the old name with the new name in all transactions
categorized with the old name.
You can delete a category or subcategory by selecting it in the Categories & Transfers
list and clicking Delete.* When you delete a category or subcategory, Quicken
removes the name from the Categories & Transfers list and from the Category field of
any transactions to which it is assigned.
Caution: Don’t delete a category or subcategory as a step in changing its name. Delete
a category or subcategory only if you don’t expect to use it again or if you want to
reassign the transactions for the deleted category to several different categories.
You can also change a category into a subcategory, or move a subcategory from one
category to another by dragging and dropping them in the Categories & Transfers list.
For step-by-step help, go to Categories & Classes in Quicken Help and select
How do I edit categories and subcategories?
How do I delete categories and subcategories?
* You cannot edit or delete the predefined investment categories (those preceded by •), and you can
only edit or delete transfer categories from the Categories & Transfers list by editing, hiding, or
deleting the associated account (see “Editing, hiding and deleting accounts” on page 38).
Chapter 5, Categories and classes track income and expenses 47

For step-by-step help, go to Categories & Classes in Quicken Help and select
How do I move categories and subcategories?
About classes
Classes add an additional dimension to reports and graphs by letting you specify
where, to what, or to whom transactions apply. Classes do not replace categories; they
add information to transactions that already have categories. Unlike subcategories,
which can only be used with their parent category, classes can be used with any
category. You can create reports and graphs based on categories, classes, or both.
You can use classes in situations like these:
• If you share a Quicken data file with others in your household, you can create a
class for each person so you can track how much each person earns and spends
without creating subcategories for each category. For example, spouses could
classify dining expenses as Dining/Sue and Dining/Jim, and clothing expenses as
Clothing/Sue and Clothing/Jim.
• If you use your personal checking account for business and personal expenses, you
can identify business transactions with the class Business to distinguish them from
personal expenses in the same category. For example, you could classify business
expenses as Dining/Business, Entertainment/Business and Subscriptions/
Business.
• If you manage properties, you can identify transactions by property name or
address. For example, six water bills could be categorized as utility expenses and
Chapter 5, Categories and classes track income and expenses 48

classified as applying to six different properties by entering Utilities:Water/ElmSt,
Utilities:Water/OakSt, and so on.
• If you work with multiple clients, you can identify transactions by client name.
Then you can report separately on the income and expenses related to each client.
For example, you might classify income earned as Income/Smith, Income/Jones,
and Income/Lee.
The following table gives examples of how to use classes:
Use classes to specify Reason for using classes Examples of class names
Whom the transaction is for:
•Your clients
•Your salespeople
•You or your spouse
Where the transaction applies:
•Sales regions
•Property names
Track income and expense by client
Track commissions
Track income and expense by individual
Track performance by division
Track income and expense by property
SellCo, Mena, Bartel, Lew & Co.
Bob, Karen, Glenn, Kate, Eric
Chris, Terry
Midwest, West, East, North, South
Harlow St, Ward Way, Rusko Ave
What the transaction is for:
•Job or project names
•Equipment or vehicle
•Business use
Perform job costing
Track expense by item
Separate business income and expense
from personal income and expense
Chapter 5, Categories and classes track income and expenses 49
Crandall, Miller, Smith
Truck, phone, fax, copier
Business

Setting up classes and subclasses
Quicken does not provide a preset list of classes. To create a class, choose Lists >
Classes and click New. You can set up classes before you enter any transactions, or
you can set them up “on the fly” while you are entering transactions. For more
information, see “Assigning a class to a transaction” on page 62.
For step-by-step help, go to Categories & Classes in Quicken Help and select
How do I set up classes and subclasses?
Editing, deleting, and moving classes and subclasses
You can edit class or subclass information by selecting a class in the Class list and
clicking Edit. If you rename a class or subclass, Quicken automatically replaces the old
name with the new name in all transactions classified with the old name.
You can delete a class or subclass by selecting it in the Class list and clicking Delete.
When you delete a class or subclass, Quicken removes the name from the Class list
and from any transactions to which it is assigned.
Caution: Don’t delete a class or subclass as a step in changing its name. Delete a class
or subclass only if you don’t expect to use it again or if you want to reassign the
transactions for the deleted class to several different classes.
You can also change a class into a subclass, change a subclass into a class, or move a
subclass from one class to another. Just drag and drop them in the Class list.
Chapter 5, Categories and classes track income and expenses 50

You cannot change a class into a category, or vice versa.
For step-by-step help, go to Categories & Classes in Quicken Help and select
How do I edit classes and subclasses?
How do I delete classes and subclasses?
How do I move classes and subclasses?
Chapter 5, Categories and classes track income and expenses 51

Keeping your accounts up
6
to date
Recording your day-to-day expenses ................................................................................52
Correcting mistakes ..............................................................................................................58
What do I put in the Category field?..................................................................................59
Transferring money between accounts..............................................................................64
Entering transactions with more than one category........................................................68
Speeding up data entry ........................................................................................................73
Finding a specific transaction..............................................................................................75
Customizing the register......................................................................................................76
Printing the register ..............................................................................................................77
Recording your day-to-day expenses
6
Every Quicken account has a register where you can enter transactions for that
account. A transaction is any item that affects the balance in your account. Common
transactions in a bank account include:
52

• checks (written by hand or printed with Quicken)
ATM (automated teller machine) transactions
•
• deposits
• EFT (electronic funds transfer) deposits or withdrawals
• bank service charges and interest
When you set up a new account, Quicken opens the Register window for that account.
You can record all transactions for that account in the register—although you may
want to enter online payments and checks you plan to print with Quicken in the Write
Checks window (see “Writing checks with Quicken” on page 84) or the Enter Online
Payment window (see “Creating and sending online payments” on page 144).
All Quicken accounts have registers. Although the types of transactions vary from
register to register, the basic entry techniques are the same whether you are using the
register for a bank, cash, credit card, asset, or liability account.*
* Investment and single mutual fund accounts also have registers, but investment transactions require
additional information. See “Entering investment transactions in the register” on page 241.
Chapter 6, Keeping your accounts up to date 53

Click Number to sort the register by
check number.
Enter the amount of a check or other
payment in the Payment column;
enter the amount of a deposit in the
Deposit column.
Post-dated transactions appear below
the orange line.
The active, selected transaction has a
blue border around it.
Click Record to save the transaction
and update the account balance.
Click Restore to revert the transaction
to the way it was before you changed
it.
Quicken shows the name of the account in the window title. A "C" in the Clr
column indicates the
cleared status of each
transaction. See
page 114.
Balance Today is the
balance of all
transactions through
today. If you postdate
transactions,
Quicken also
displays an ending
balance that is the
balance of all
transactions in the
register.
Click here to add the selected transaction to iCal (see page 87 for more information).
Entering a transaction in the register
1 Choose Lists > Registers > [account].
You can also open a register by choosing the account name from the Registers
pop-up menu when you are in the Banking, Investing, or Property & Loans areas.
2 If the selected transaction is not a blank transaction, choose Edit > New Transaction
(x-N).
3 Enter information about the new transaction in each field.
Chapter 6, Keeping your accounts up to date 54

Type a date, or use the pop-up
calendar to select a date.
In the Number column, enter a
check number, or press + to
automatically enter the next
check number.
You can also select an item from
the pop-up menu. Choose List
from the pop-up menu to create
your own items.
In the Payee or Description field, enter a payee name or
other description for the transaction.
Enter a category to track income and
expenses. See “What do I put in the
Category field?” on page 59.
(Optional) Enter other
information about this
transaction here.
Press Tab to move the insertion point to the next field. If you prefer to press Return
instead of Tab to move from field to field, see “Customizing the register” on
page 76.
4 Click Record. Quicken saves each new transaction in your data file as you record it.
When you record a transaction, Quicken sorts it in the register and recalculates all
subsequent balances. You can sort transactions by date or by check number.
Entering a transaction in the Calendar
In the Payment or Deposit column, enter the
amount of the payment or deposit.
Quicken calculates a new
balance for you when you record
the transaction.
You can also schedule transactions —
including recurring transactions such
as bill payments and your paycheck
deposit — in the Calendar or the
register for dates in the future (see
“Scheduling bill payments” on
page 78.
You can enter new transactions in the Quicken Financial Calendar™ for today or for
any date in the past. You can also edit or delete transactions or move transactions from
one day to another. You can enter, edit, move, or delete transactions in the Calendar
for any non-investment account.
When you add a new transaction in the Calendar, Quicken automatically records it in
the appropriate register as well.
Chapter 6, Keeping your accounts up to date 55

1 In the Banking area, click the Calendar button in the toolbar, or choose Activities >
Calendar.
Use the arrow keys to move from day to
day, and the PgUp and PgDn keys to move
from month to month.
Today’s date is shaded blue.
If there are more transactions for a day
than will fit, the date is followed by an
ellipsis (...). Double-click the day to see all
its transactions in a separate Transactions
window.
The selected day is shaded gray.
Click Selected Accounts to select the
accounts you want to see. The Calendar
initially shows transactions from all
accounts except investment accounts.
Click the arrow buttons to move forward or backward one month at a time.
Click
Add
Note to
add a
note for
the
selecte
d day.
Double
-click
the
note to
read or
edit the
note.
2 Select the day (past or present) on which you want to record the transaction.
3 Click New Transaction in the lower right corner of the Calendar window.
4 Enter information about the transaction in each field, just as you would in a
register.
For more information, see “Entering a transaction in the register” on page 54.
Chapter 6, Keeping your accounts up to date 56

Make sure the correct account is shown in
the Account field. When you record the
transaction, it is entered both in the
Calendar and in the register for the
selected account.
Quicken 2006 offers more flexibility in
scheduling frequencies than ever before.
For information about the scheduling
section of the window, see “Scheduling a
future transaction in the Calendar” on
page 79.
Click here to add the selected
transaction to iCal (see page 87 for more
information).
Use these buttons to
enter an online
transaction (only if the
account is already
enabled for online
payment), a check, or a
transaction in the register.
This is the Balance Today
(and an ending balance,
if there are any postdated
transactions in the
register) for the selected
account.
5 Click Record to record the transaction in the Calendar and in the register.
You can also enter a new past or present (recorded for today) transaction in the
Calendar by:
• Dragging a transaction from the QuickFill Transactions list (see “Entering data
with QuickFill” on page 73).
• Copying a transaction from any open Transactions window. Hold down the
Option key while you drag and drop the transaction to today or to a day in the past
(or to the Transactions window for that day).
Chapter 6, Keeping your accounts up to date 57

You can also print the Calendar or add a reminder note to a day in the Calendar.
For step-by-step help, go to Paying bills in Quicken Help and select
How do I add calendar notes?
Correcting mistakes
To make a change to a transaction, select it and edit any field by selecting the incorrect
information and typing over it. To undo a single mistake while entering or editing
information in a field, choose Edit > Undo (x-Z). To restore a transaction to the way it
was before you made any changes to it, click the Restore button. The only item in the
transaction you cannot edit is the balance in the Balance column.
Note: Changing a reconciled transaction—one with a bold R in the Clr column—can
cause problems when you reconcile your Quicken records with your bank statement.
Quicken warns if you are about to change a reconciled transaction.
You can edit any transaction in the Calendar, even if you originally entered it in the
register. If you enter a transaction in the wrong account, you can easily move it to the
correct account by editing it in the Calendar to change the account.
You can also move a transaction to another account using the contextual menu in the
register. Select the transaction you want to move, hold down the Control key and click
Chapter 6, Keeping your accounts up to date 58

in the register; choose Move this Transaction from the contextual menu. Then enter
the “to” account name in the Move Transaction window.
For step-by-step help, go to Registers in Quicken Help and select
How do I edit a transaction?
How do I move a transaction?
You can delete a transaction by selecting it and choosing Edit > Delete Transaction
(x-D). Sometimes you may prefer to void a transaction instead of deleting it. By
marking a printed or handwritten check as void, you can keep an accurate record of
each numbered check. To void a transaction, select it and choose Edit > Void
Transaction.
For step-by-step help, go to Registers in Quicken Help and select
How do I delete or void a transaction?
What do I put in the Category field?
You can enter any of these items in the Category field of a transaction:
• Categories and subcategories let you label your transactions so you can track
where your money comes from and where it goes. See “Assigning a category to a
transaction” next.
Chapter 6, Keeping your accounts up to date 59

• Classes and subclasses let you define transactions even more specifically than with
categories alone. Some Quicken users benefit from using classes; others find that
categories are all they need to track their finances. See “Assigning a class to a
transaction” on page 62.
• Transfers let you move money from one Quicken account to another. See
“Transferring money between accounts” on page 64.
Tip: To assign more than one category, class, or transfer to a single transaction, you
can “split” the transaction. See page 68.
Assigning a category to a transaction
See “About categories” on page 40 for
more information about creating and
using categories.
You should assign at least one category to each transaction because Quicken uses the
category information you assign to create reports, graphs, and budgets based on your
income and expenses. If you don’t assign a category to a transaction, Quicken uses the
label “Other” to refer to uncategorized amounts in reports and graphs. You can set a
preference telling Quicken to warn you if you forget to enter a category; see
“Customizing the register” on page 76.
You can assign a category to a transaction by:
• typing the category name in the Category field
• choosing a category from the pop-up menu in the Category field
• selecting a category in the Categories & Transfers list
Chapter 6, Keeping your accounts up to date 60

Typing a category name in the register
1 Click in the Category field of the transaction you want to categorize.
2 Start typing the category name.
If the first few characters match the beginning of more than one category name,
QuickFill enters the first category that begins with the letters you typed. Keep
typing until QuickFill enters the correct category name.
You can also choose a category from the pop-up menu in the Category field.
3 When Quicken displays the category you want, either press Tab to accept that
category, or type a colon ( : ) to enter a subcategory.
The colon always appears at the end of the text that’s currently in the Category
field, no matter where the cursor is located when you type it.
4 (Optional) Start typing a subcategory name.
Type the letter “u” to enter the
category name “Utilities.”
Continue typing until QuickFill fills in the correct subcategory.
To enter a subcategory, type a colon as soon as you see the category you want. In this case, typing the
letter “w” after the colon displays the subcategory name “Water.”
Chapter 6, Keeping your accounts up to date 61

If you enter a category (or subcategory) name that isn’t in the Categories & Transfers
list, Quicken asks if you want to set it up.
Choosing a category from the Categories & Transfers list
1 Click anywhere in the transaction you want to categorize.
2 Choose Lists > Categories & Transfers > List (x-L).
3 Double-click a category name in the list to paste it in the Category field.
You can also select the category name you want and click Use or press Return. Or
you can drag the category name from the Categories & Transfers list and drop it in
the selected transaction in the register.
Assigning a class to a transaction
Classes do not replace categories; rather, they add more information to transactions
that already have categories. See “About classes” on page 48 to determine whether
classes are appropriate for your situation.
You can assign a class to a transaction by:
• typing the class name in the Category field
• selecting a class in the Class list
Typing a class name in the register
1 Click in the Category field of the transaction you want to classify.
Chapter 6, Keeping your accounts up to date 62

You can add a class name after a category name, or after an account name to
classify a transfer transaction.
2 Type a forward slash ( / ).
The forward slash separates the class from the category (or account). It always
appears at the end of the text that’s currently in the Category field, no matter where
the cursor is located when you type it.
3 Begin typing the class name.
If the first few characters match the beginning of more than one class name,
QuickFill enters the first class that begins with the letters you typed. Keep typing
until QuickFill enters the correct class name.
As soon as you type a forward slash, Quicken recognizes that you are entering a class. In this example,
the category is Repairs and the class is Oak St.
4 When Quicken displays the class you want, either press Tab to accept that class or
type a colon ( : ) to enter a subclass.
The colon always appears at the end of the text that’s currently in the Category
field, no matter where the cursor is located when you type it.
5 (Optional) Start typing a subclass name.
Chapter 6, Keeping your accounts up to date 63

Continue typing until Quicken fills in the correct subclass. You might, for example
want to add a subclass to the transaction in step 3 to specify which unit needed
repairs: Repairs/Oak St:Unit1.
If you enter a class (or subclass) name that isn’t in the Class list, Quicken asks if you
want to set it up.
Choosing a class from the Class list
1 Click anywhere in the transaction you want to classify.
2 Choose Lists > Classes (x-K).
3 Double-click a class name to paste it in the Category field.
You can also select the class name you want and click Use or press Return. Or you
can drag the class name from the Class list and drop it in the selected transaction
in the register.
Transferring money between accounts
Transfers can record these and other common transactions:
• movement of funds from a checking account to a savings account
• cash advances from a credit card account to a checking account
• loan payments from a checking account to a liability account that tracks the
balance of the loan
Chapter 6, Keeping your accounts up to date 64

Here is a transfer transaction in the
source account. The brackets show
that it is a transfer.
The transfer transaction is
automatically recorded in the
destination account as a result of the
transfer.
When you record a transfer transaction in a source account, Quicken automatically
creates a parallel transaction in the destination account. If the source transaction is a
payment or decrease, the destination transaction is a deposit or increase.
For example, if you transfer $500 from your savings account to your checking account
to cover household expenses, you would type a left bracket ( [ ), and then enter the
name of the checking account in the Category field of the transfer transaction in your
savings account. Quicken automatically records a corresponding deposit transaction
of $500.00 in the Deposit column of your checking account. You don’t include an
income or expense category in the Category field for a transfer transaction because
you have simply moved funds from one account to another.
If the register for the source account is already open, you can transfer money by
entering the transfer information directly in the Category field of the transfer
transaction.
1 In the register for the source account, enter the name of the destination account in
the Category field by typing [ , and then typing the name of the account.
OR
Chapter 6, Keeping your accounts up to date 65

If you type “[jo”, QuickFill adds “int
Checking].”
Choose the destination account name from the pop-up menu in the Category field
(account names are at the bottom of the list).
2 When Quicken displays the account you want, press Tab.
3 Click Record to record the transfer transaction.
Quicken records the transaction in this register and creates a parallel transaction in
the destination account register for the same amount.
In some cases, you may want to transfer part of the total amount of a transaction. For
example, you may want to transfer some of your paycheck into a retirement account.
Or you might want to transfer the portion of your mortgage payment that goes toward
the loan principal into a liability account that tracks the loan balance and assign an
expense category to the interest portion of the payment. See “Entering transactions
with more than one category” on page 68 for information about transferring part of a
transaction.
You can include class information in a transfer transaction. If, for example, you pay
for an antique table from a checking account and you want to record the purchase in
an asset account called “Personal Assets” and assign the class “Antiques” to the
transaction, you would enter “[Personal Assets]/Antiques” in the Category field.
Chapter 6, Keeping your accounts up to date 66

You can also enter a transfer transaction between accounts by choosing Activities >
Transfer Money.
For step-by-step help, go to Registers in Quicken Help and select
How do I transfer funds between accounts?
Changing a transaction that includes a transfer
When you change a transaction that includes a transfer to or from another account, the
transaction created by the transfer may also change.
• If you edit the date or amount of the transaction, the information changes in both
accounts. But if you edit anything else, the information changes only in the account
where you make the change.
• If you delete the transaction, Quicken deletes it from both accounts.
• If you rename an account, Quicken updates every occurrence of the name in all
transactions.
If a transfer is part of a split transaction (see “Entering transactions with more than one
category” next), you can change the date or amount only in the original transaction in
the source account. You cannot change it in the destination account (the one that
received the transfer).
Chapter 6, Keeping your accounts up to date 67

Click the Open Split button to open the
split.
Entering transactions with more than one category
You can assign multiple categories, classes, or transfers to a single transaction by
splitting the transaction. For example, you might want to create a split transaction if
you write a single check to purchase items such as clothing, office supplies, and home
furnishings from a department store.
When you create a split transaction, you enter category names and amounts to
identify each part of the split.
Entering a split transaction
1 Enter information about the transaction in the Date, Number, and Payee fields, and
enter the total amount of the transaction in either the Payment or Deposit column.
2 Click the Open Split button (x-E).
Quicken copies any
information you have
already entered in the
Category, Payment, or
Deposit fields of the
transaction to the first
split line.
Chapter 6, Keeping your accounts up to date 68

Quicken subtracts the amount you typed
in the Amount field of the first split line
($32.47) from the total amount you
entered for the transaction ($124.57) and
displays the remainder ($92.10) in the
next Amount field.
3 Type a category name in the first Category field in the split, or choose a category
from the pop-up menu and press Tab.
4 (Optional) Type a memo in the first Memo field and press Tab.
5 Type the amount you want to allocate to the first category in the first Amount field.
The amount for the entire transaction is already selected; just type the amount for
the first category right over that amount.
6 Press Tab to move to the next Category field.
7 Continue to add categories, memos, and amounts until you have added one split
line for each part of the transaction.
Chapter 6, Keeping your accounts up to date 69

You can add as many lines as you want to
a split transaction.
If you decide not to split this transaction,
click Clear Split to delete all the
information in the split lines.
If you have an
uncategorized
remainder on the last
line of a split and you
want to recalculate the
transaction total, click
Adjust Total. Quicken
deletes the remainder
and recalculates the
total transaction amount
based on the sum of the
split amounts entered.
8 Click Record to record the transaction.
If you see the message “This split transaction contains one or more uncategorized
items. Save changes?” you have not entered a category for at least one of the
amounts in the transaction. Click Cancel to go back to the transaction and enter the
missing category; click Discard to delete the entire transaction; or click Save to
leave part of the transaction uncategorized.
Sample split transaction: entering your paycheck
See “Scheduling bill payments” on
page 78 for information about
entering your paycheck automatically
every month.
You can split your paycheck deposit into categories for salary, federal income tax,
state income tax, and so on. Once you set up the deposit correctly, Quicken can
memorize the transaction so you can re-use it without having to enter it all again.
1 Start a new transaction in your bank account register (x-N).
Chapter 6, Keeping your accounts up to date 70

Fill in the Date, Number (optional), and Payee fields, and then enter the net
amount you are depositing in the Deposit column. The net amount is your salary
minus taxes and deductions.
2 Click the Open Split button to open the split.
3 In the first line of the split, enter the category you use to track your salary in the
Category field and the gross amount of your paycheck in the Amount field.
If pre-tax amounts are deducted from your gross salary (such as amounts for a
retirement plan or flexible spending for health care), you may want to split your
salary category into subcategories to track the pre-tax amount and the taxable
amount separately. That’s what was done in this example.
Enter your net pay as the total amount for the
transaction. Your net pay is the amount left to
deposit after all the deductions.
Enter the category you use to track gross
salary. In this example, Terry has $196.78 in
pretax deductions taken out of a total gross
pay of $1,290.37, so the gross amount is
divided between two Salary subcategories:
Taxable and Pre-Tax. If you don’t want that
level of detail, use the Salary category for the
full amount.
Enter your gross pay (the
amount before any
deductions) in the
Amount field of the first
split line. To track both
pretax and taxable salary
(as in this example), enter
one amount in the first
split line and the other
amount in the second
split line. Since the gross salary is larger than the net deposit,
the remainder is a negative number.
4 Enter every deduction from your paycheck as a negative amount.
You may have deductions for items such as federal taxes, state taxes, medical
insurance, disability insurance, and so on. You can use Quicken’s standard
categories for some of these items, and you can create additional expense
categories for other deductions as needed.
Chapter 6, Keeping your accounts up to date 71

You can create categories for “Self” and
“Spouse” for salary and taxes to
distinguish between people in a
two-income household.
Deductions are
entered as negative
amounts because they
are subtracted from
your gross salary.
See “Transferring money between
accounts” on page 64 for information
about entering a transfer transaction.
To enter a transfer of money from this
account (the account where you are
depositing the paycheck) to another
account (like a Quicken account that
tracks your 401(k), enter the account
name in brackets and enter the amount as
a negative amount.
You can also assign transfers to amounts in split transactions. You may, for
example, want to enter a 401(k) contribution. This money is not an expense (since
it’s still your money); it is just being transferred to another Quicken account. In this
example, Terry has entered transfers to both a flexible spending account for
medical expenses ( [Medical FSA] ) and a retirement account ( [Terry’s 401k] ).
These transfers are negative amounts because they are deductions from Terry’s
paycheck; they show up as deposits in the destination accounts.
5 Click Record to record the transaction.
Chapter 6, Keeping your accounts up to date 72

Speeding up data entry
Quicken makes it easy to enter transactions quickly:
• QuickFill™ automatically finishes filling in transaction fields for you.
• QuickMath™ lets you make simple calculations right in your register.
• Online account access lets you download information directly from your financial
institution. See Chapter 9, Banking online, on page 124.
Entering data with QuickFill
To stop Quicken from automatically
memorizing transactions, choose
Quicken > Preferences >
Customization > Registers, and clear
the “Add new transactions to the
QuickFill list” checkbox.
To stop QuickFill from filling in
transactions, clear the “Use QuickFill
to fill in transactions” checkbox.
Quicken marks each locked
transaction in the list with a padlock
icon.
QuickFill automatically memorizes transactions as you enter them and stores them in
the QuickFill Transactions list so you can re-use them without having to type them
each time. To look at the list, choose Lists > QuickFill Transactions (x-T).
For example, you may write a check to Blaisdell Grocery every week. The first time
you record that check in a Quicken register, Quicken memorizes everything except the
date and check number and adds “Blaisdell Grocery” to the QuickFill Transactions
list. The next time you begin typing “Blaisdell Grocery” in a Payee field, Quicken finds
the transaction in the QuickFill Transactions list and enters it in the register for you.
You can change any information Quicken enters—such as the amount—and then
record the new transaction. If you change anything, Quicken updates the “Blaisdell
Grocery” transaction in QuickFill Transactions list.
You can lock an individual QuickFill transaction to keep it from changing. When you
recall a locked transaction, you can make changes to it before you enter it in the
register; however, the QuickFill Transactions list retains the original locked
transaction unless you edit it manually. For example, if you usually withdraw $40
Chapter 6, Keeping your accounts up to date 73

when you go to the
always enters $40 for you—even if you changed the amount of your last
ATM, you can memorize that transaction in the list so that QuickFill
ATM
withdrawal.
Even if you choose to work with QuickFill turned off, you can still recall a transaction
by dragging it from the QuickFill Transactions list and dropping it in the register or
the Write Checks window. If you decide you want to change or delete a QuickFill
transaction, you can select it in the QuickFill Transactions list and click Edit or Delete.
For step-by-step help, go to Registers in Quicken Help and select
How do I recall a memorized transaction?
How do I memorize a transaction?
How do I edit a memorized transaction?
How do I delete a memorized transaction?
Calculating transaction amounts with QuickMath
Sometimes you may want to make simple calculations to determine the correct dollar
amount to enter in a transaction. For example, you may want to total the amount due
on several bills before you transfer money from your savings account to your checking
account to pay them. QuickMath can do these calculations for you right in the amount
field. Just press any operator key (+, –, *, /, or =) to pop up a “paper tape” where you
can see numbers as you enter them, just as if you were using an adding machine.
Chapter 6, Keeping your accounts up to date 74

The tape shows your calculations as
you type them.
You can also assign special QuickMath keys to add, subtract, multiply, or divide
dollar amounts with a single keystroke. For example, the percent key ( % ) is
preassigned to multiply amounts by 0.01 so you can easily calculate percentages.
For step-by-step help, go to Registers in Quicken Help and select
How do I calculate transaction amounts?
How do I assign QuickMath keys?
Finding a specific transaction
The Find command locates specific transactions in the register or the Write Checks
window. For example, you might want to find a specific check number or a specific
payee. Choose Edit > Find to open the Find and Replace window.
You can use the Replace command to make changes to text in your transactions. For
example, if you misspelled a payee name, you could search for all occurrences of the
misspelled name and replace them with the correct name. Choose Edit > Replace to
open the Find and Replace window.
Chapter 6, Keeping your accounts up to date 75

You can restrict find and replace actions to a single account, or choose to find or
replace transactions in all your accounts.
For step-by-step help, go to Registers in Quicken Help and select
How do I find a transaction in a register?
Customizing the register
You can change settings that affect Quicken’s registers by choosing Quicken >
Preferences > Customization > Registers, and selecting or clearing the checkboxes. For
example, you can enter amounts without decimal points, use the Return key instead
of the Tab key to move between fields, or ask Quicken to warn you when you enter a
duplicate check number. Any changes you make to the preferences are in effect for all
your registers and other data-entry areas in Quicken.
For step-by-step help, go to Registers in Quicken Help and select
How do I customize the register?
Chapter 6, Keeping your accounts up to date 76

Printing the register
You can specify a time period of a day, a week, a month, a year, or longer, and then
print a record of your transactions for that period of time.
For step-by-step help, go to Registers in Quicken Help and select
How do I print the register?
Chapter 6, Keeping your accounts up to date 77

7
Paying your bills 7
Scheduling bill payments.....................................................................................................78
Writing checks with Quicken..............................................................................................84
Adding Quicken transactions to iCal.................................................................................87
Printing Intuit checks ...........................................................................................................90
Scheduling bill payments
Scheduling your bill payments can save you time and help you remember to pay your
bills when they’re due. Many bills, such as rent and insurance payments, occur at
regular intervals and are always for the same amount. Other bills occur less regularly,
or the amount varies from month to month. Even regular bills don’t come all at once—
they trickle in. You can schedule all your bills in the Calendar, even if the amount
varies. You can also schedule income and transfer transactions, such as paycheck
deposits or monthly transfers from checking to savings.
After you schedule a transaction, Quicken either reminds you about it or records it in
your register automatically when it is due. Then you can make the payment
electronically, print a check with Quicken, or write a check by hand.
When you schedule financial transactions—including bill payments—in the
Calendar, you get a visual month-by-month overview of your financial past, present,
78

and future. You can see at a glance where your income is expected to come from in the
future, and how you expect to spend it. You can also use the Calendar instead of the
register to enter transactions, which is useful if you’re working with more than one
account at a time. See “Entering a transaction in the Calendar” on page 55.
Scheduling a future transaction in the Calendar
1 In the Banking area, click the Calendar button in the toolbar.
For more information about the Calendar, see page 56.
2 Select the day in the Calendar on which you want to schedule a transaction.
3 Click the New Transaction button in the lower right corner of the window (x-N).
4 Enter information about the transaction.
Chapter 7, Paying your bills 79

Choose the name of the Quicken account
from which you will make this payment.
Choose how frequently you make the
payment. Quicken 2006 offers more
scheduling frequency choices than ever
before.
Specify when you want the scheduled
transactions to end. In this example, 7 is
entered because there are seven payments
left on this loan.
Let Quicken know if this is a bill, a deposit
(like a paycheck), or another transaction.
Click here to add the selected transaction
to iCal (see page 87 for more information).
Use these buttons to
enter an online
transaction (only if the
account is already
enabled for online
payment), a check, or a
transaction in the
register.
If each transaction will
be the same fixed
amount, choose "does
not vary", and whether
you want Quicken to
remind you to enter the
transaction, or have
Quicken automatically
enter the transaction for
you. If each
transaction's amount
varies (for example, a
paycheck deposit that
varies by a penny with
each transaction),
choose "varies..."
You can also schedule income transactions, such as a paycheck deposit (see
page 70 for instructions for entering a paycheck).
5 Click Record to save the scheduled transaction.
Quicken may ask you to confirm the scheduled transaction information; click OK
to save the transaction, or click Edit to edit the transaction information.
Chapter 7, Paying your bills 80

Scheduling a future transaction from the register
To enter a scheduled transaction from the register, select an existing transaction, hold
down the Control Key and click within the transaction. Choose Schedule this
Transaction from the Shortcuts contextual menu. Then fill in the Schedule Future
Transaction window as shown in step 4 above.
Scheduling a future transaction from the Bills window
To schedule transactions from the
Insights window, click “Schedule a
future transaction” in either the
Scheduled Transactions area or the Bill
Status area.
You can enter a scheduled transaction from the Upcoming Bills and Scheduled
Transactions window: in the Banking area, click the Bills button in the toolbar, click
the Scheduled Transactions tab, and then click New. Then fill in the Schedule Future
Transaction window as shown in step 4 above.
Missed Bill Reminder scans for recurring transactions
Quicken’s Missed Bill Reminder feature scans for recurring bills that you might want
to set up as scheduled transactions. When you enter a transaction, the Missed Bill
Reminder checks to see if your register contains regularly occurring transactions to
the same payee. If there is a match, Quicken asks if you wish to create a scheduled
transaction based on your entry.
What happens after I schedule a transaction?
Each time you start Quicken, it checks for scheduled transactions that are due or past
due, since the last time you used Quicken. If it finds a scheduled transaction that is due
or past due, one of two things will happen:
Chapter 7, Paying your bills 81

• If you selected Remind Me About when you set up the scheduled transaction:
Quicken displays the Upcoming Bills and Scheduled Transactions window.
You can select and edit the transaction, if necessary, and click Record to record it in
the register and change it from scheduled to recorded (or postdated) in the
Calendar.
• If you selected Automatically Enter when you set up the scheduled transaction:
Quicken records the transaction in the register and changes it from scheduled to
recorded (or postdated) in the Calendar—without asking you for confirmation.
After your transaction has been recorded in the register, you can make the payment
in any of the following ways:
• Send an instruction to make the payment electronically. See “Making online
payments” on page 142.
• Enter and print a check with Quicken. See “Writing checks with Quicken” on
page 84 and “Adding Quicken transactions to iCal” on page 87.
•Write a check by hand.
To pay a scheduled transaction early, double-click the day on which it appears, select
it in the Transactions window, and click Pay Now.
Editing and deleting scheduled transactions
You can edit, delete, and move transactions in the Calendar. Double-click a day in the
Calendar to open the Transactions window for that day. Then:
•To delete a transaction, select it and click Delete (x-D).
Chapter 7, Paying your bills 82

Select a bill you want to pay in the
C
c
Upcoming Bills area.
•To edit a transaction, select it and click Edit (x-E).
•To move a transaction, either edit it to change its date, or drag it from the Transaction window to another day in the Calendar.
When you edit or delete a past, present, or postdated transaction in the Calendar, your
changes are also recorded in the register.
Quicken reminds you to pay your bills
Missed Bill Reminder notifies you of scheduled transactions that are due or overdue
when you start Quicken. If you have bills due or overdue the Upcoming Bills and
Scheduled Transactions window opens.
You can choose to skip a scheduled
transaction, just click Don’t Pay.
Scan For Bills searches for recurring
transactions you may want to add to
the Scheduled Transactions list.
lick Edit to change transaction
information such as the amount or
ategory.
Clicking Pay now adds the transaction
to your register on the date listed in
the Next Due Date column. If you set
up the transaction as a variable
amount, the transaction window
opens for you to enter the correct
figure.
Chapter 7, Paying your bills 83

For step-by-step help, go to Paying Bills in Quicken Help and select
How do I have Quicken notify me when a bill is due?
Writing checks with Quicken
By using Quicken to print checks, you save time and minimize errors because you
avoid the duplicate work of hand-writing checks and then recording them in Quicken.
Intuit checks
Intuit checks are printed to the exacting standards of the American Banking
Association and are pre-approved by all banks, savings and loan institutions, credit
unions, and brokers in the United States and Canada. When you order personalized
checks, Intuit prints your name, address, account number, bank name, check
numbers, and all the information required by financial institutions on your checks.
All Intuit checks are triple guaranteed. We guarantee that:
•Your checks will be accepted by your bank.
•Your checks will work with your inkjet or laser Macintosh-compatible printer.
•Your check order will be printed exactly as you submitted it.
Chapter 7, Paying your bills 84

If we fail to meet these three conditions, please call right away. We will quickly replace
your order or refund your money, whichever you prefer.
Ordering checks
To order checks, choose Online > To The Web > Checks and Supplies. You can also
call the phone number on page 404.
How do I write checks away from home?
For checks you write away from home, use the paper checks you already have or fill
in an Intuit check by hand. The next time you use Quicken, enter the transactions in
your check register.
When you order your Intuit checks, indicate a starting number considerably higher
than your existing paper check numbers. For example, if your personal check
numbers are in the 1000 range, begin your Intuit checks at 3001. That way, you avoid
confusion or possible duplication of numbers.
Quicken can easily manage two sets of check numbers in one account. The bank has
no concerns about which numbers you use on your checks. Check numbers are for
your own records.
You can also add a logo or other art to
your checks when you send them
through your printer. See “Adding art
to checks” on page 102.
How can I get a logo printed on my checks?
Intuit has a large selection of standard logos that can be printed free on Intuit checks.
If you want a custom logo, enclose black-and-white, camera-ready artwork with your
order. There is a one-time setup fee for custom logos. If touch up, typesetting, or
rearrangement is required, additional charges may be incurred.
Chapter 7, Paying your bills 85

Filling out a check
1 In the Banking area, open the account from which you want to write checks.
2 Click the Checks button in the toolbar (x-J).
3 Enter information in the appropriate fields on the check.
To mail the check in an Intuit window
envelope, enter the payee name and
mailing address. You can use up to five
lines; press Return to start a new line. Press
the quote key ( ’ ) to copy the payee name
to the first line.
This memo prints on the check and
appears in the Memo field in the register.
If you don’t want your memo to be visible
when you mail the check in a window
envelope, change Quicken’s Register
preferences to add a Note field where you
can enter it instead.
Enter category, class, or transfer
information here. You can split a check just
as you split a transaction in the register (see
page 68).
Enter the payee name. This name appears in the
Payee field in the register.
Click here to add the selected transaction to iCal (see page 87 for more information).
When you enter the dollar amount in the $
field, Quicken automatically spells out the
amount on the next line.
Balance Today is the balance
of the transactions in the
account through today; the
ending balance is the balance
for all transactions, including
postdated transactions.
4 Enter a category in the Category field.
Enter categories, splits, or transfers just as you would in a register. If you use Intuit
voucher checks, Quicken can print up to nine lines of split information on the
perforated voucher attachment.
Chapter 7, Paying your bills 86

5 Click Record to save it in both the Write Checks window and the register.
You can review your checks before printing by scrolling through the Write Checks
window or by reviewing them in the register.
Quicken inserts the correct check number in the register when it prints the check. Until
the checks print, Quicken displays
transaction in the register.
PRINT in the Number column of each printable
Adding Quicken transactions to iCal
iCal is a calendar application that comes pre-installed on Mac systems running Mac
OS X version 10.2.2 or later. You can add Quicken transactions to your iCal calendar
(version 1.0.2 and later) to help remind you of important bill due dates.
Adding a Quicken transaction to iCal
1 In Quicken, open any bank, cash, or credit card account register.
2 Select the transaction you want to add to iCal.
You can choose a transaction that has already occurred, or a future transaction.
Chapter 7, Paying your bills 87

Select the transaction you want to add to
iCal...
...and then click the iCal icon.
3 Click the iCal icon.
If iCal is already running, Quicken adds the transaction. If iCal isn’t already
running, Quicken opens iCal, adds the transaction, and then closes iCal.
Displaying the transaction in iCal
• In iCal, click the date of the transaction in the left column.
Your Quicken transaction is displayed as an all-day event. To see the details of the
transaction, highlight the event and click the i button.
Chapter 7, Paying your bills 88

The first time you add a Quicken
Quicken adds the transaction as an all-day
transaction to iCal, a Quicken calendar is
event in iCal.
added to the Calendars list.
Quicken creates a new calendar for each
data file, and is named the same as the
data file.
To hide all Quicken transactions in iCal,
uncheck its calendar in the Calendars list.
To see the details of the transaction, select the transaction and then click the ’i’ button.
Hiding Quicken transactions in iCal
• Uncheck the Quicken calendar in the iCal Calendars list.
Other areas of Quicken from where you can add a transaction to iCal
You can also add a Quicken transaction to iCal from:
• the Quicken Write Checks window (see page 86)
Chapter 7, Paying your bills 89

• the Quicken Add and Edit Scheduled Transaction windows (see page 78)
If the scheduled transaction repeats at regular intervals (for example, monthly), it
will be added to iCal as a repeating event.
Printing Intuit checks
You can print checks with Quicken on page-oriented printers (including laser and
inkjet printers).
Setting up your printer
1 Select your printer.
Open Print Center (located in the Utilities folder in the Applications folder on your
hard disk), choose Printers > Add Printer, choose a connection type, select the
printer you plan to use and click Add.
2 Choose Quicken > Preferences > Checks > Print.
3 Make any desired changes, and then click Save Changes.
Chapter 7, Paying your bills 90

These are the default preferences.
Print Checks settings are specific to a
single Quicken bank account. Choose the
account you want to set up from this
pop-up menu.
Choose one of these icons to print a partial
page of checks.
Choose a font name and size for the text that prints on your checks. The Sample box shows an
example of the currently selected font and size.
Choose your check style from this
pop-up menu. For information about
Intuit checks, see “Intuit checks” on
page 84. For information on Check
21, choose Help > Quicken Help, and
click "What’s new in Quicken 2006."
Click here to print category information
from split transactions on the perforated
attachment to voucher checks.
lick here to change the date on the checks
o the date when you print the checks.
You can add a company logo or other
art to your checks. See “Adding art to
checks” on page 102.
Click Positioning to adjust the position
of text on your check.
Printing checks from your account
1 If you haven’t already put the checks in your printer, do it now.
2 Make sure your printer is turned on and online.
3 Open the bank account from which you want to print checks.
4 Choose File > Print Checks.*
Chapter 7, Paying your bills 91

This number should be the same as the
number on the first check in the printer.
Click each check you want to print.
Quicken puts a checkmark in the Print
column for each check you select. If you
accidentally mark a check you don’t want
to print, click it again to remove the
checkmark.
5 Check the settings in the Print Checks window.
Click here to print a full page of
checks. To print a partial page of one
or two checks, see “Printing a partial
first page of checks with pageoriented printers” on page 94.
6 If you chose Selected Checks, mark each check you want to print and then click
OK.
7 Click Print to open the printer dialog for your printer.
* If you see a message that you don’t have any checks to print, you need to enter your checks in the
Write Checks window (see page 86). If you have already entered the checks in the register, enter
PRINT in the Number column to show Quicken which checks you want to print.
Chapter 7, Paying your bills 92

8 Click Print to start printing your checks.
Stopping a print job
If you notice a problem while your checks are printing, stop the printing process by
pressing the Command key (x) and period key together. If your printer continues to
print, turn its power switch off.
Examining printed checks
After the checks have finished printing, Quicken asks if they all printed correctly.
• If any of the checks did not print correctly, click No.
• If all the checks printed correctly, click Yes.
Until you click Yes, unprinted checks in the register still have PRINT in the
Number column. After you click Yes, Quicken enters the check numbers.
Sometimes Quicken displays this message before the printer finishes printing your
checks. Wait a few moments so you can examine the checks before you click Yes or No.
Chapter 7, Paying your bills 93

1 Examine the printed checks.
2 If the checks printed correctly, click Yes.
Quicken puts check numbers in the Number column of the printed checks in the
register. You are finished printing.
3 If any of the checks did not print correctly, click No.
• Quicken asks you to type the number of the first unprinted or incorrectly
printed check. Type the number of the first check that printed incorrectly (or
did not print) and click OK.
• Examine your printer to see if the checks jammed or the printer ran out of
checks.
• If the text on the checks is not aligned correctly, try adjusting the check printing
settings. See “Adjusting check alignment for page-oriented printers” on
page 97.
4 Start printing again after you’ve fixed the problem.
Go back and follow steps 4 through 8 in “Printing checks from your account” on
page 91 to print the remaining checks.
Printing a partial first page of checks with page-oriented printers
If you use standard or wallet checks in your page-oriented printer, you’ll sometimes
find that a partial page of one or two blank checks remains after you’ve finished
printing. You can start printing on that partial page the next time you begin to print
checks.
Chapter 7, Paying your bills 94

Before you start, turn on your printer, but don’t load your checks yet.
1 Choose Quicken > Preferences > Checks > Print.
2 Make sure the account from which you are printing checks is selected in the
Account pop-up menu; then select one of the alignment icons to show Quicken
how you insert envelopes into your printer.
Before you choose your page orientation and insert your partial page of checks in
the printer, you need to know:
• the type of envelope feeder your printer has
• if you should insert the check face up or face down
• if you should insert the left edge or the top of the check into the printer first
Feed partial pages of checks into your
printer the same way you feed envelopes.
See your printer manual for more
information.
The direction of the arrows is toward the
printer.
Note: If your checks print upside down or on the wrong side, reverse the way you load the checks into
the envelope feeder.
Centered in the envelope feeder or paper tray, with the top
edge of the check feeding into the printer.
Positioned against the left side of
the envelope feeder.
Centered in the
envelope feeder.
Positioned against the right side of
the envelope feeder.
3 Click Save Changes.
4 Choose File > Print Checks (Shift-x-P).
Chapter 7, Paying your bills 95

5 Be sure the number in the Starting Check Number field is the same as the number
of the first check on your partial page of checks.
6 Select the one or two checks you want to print on this partial page.
7 Select a Checks on First Page icon.
Choose the icon for the number of checks you’re printing.
Note: Depending on the printer you use, the orientation of the check
icons on the buttons may be horizontal instead of vertical.
8 Load the one or two checks into your envelope feeder or cassette as pictured in the
partial-sheet icon you selected.
If your printer requires that you load letterhead face down, load your checks that
way. Look in your printer manual if you aren’t sure.
9 Click Print to start printing the checks.
Note: If your printer won’t print checks properly from the envelope feeder (or
doesn’t have an envelope feeder), try positioning the checks in the paper tray with
the top of the check touching the rollers. You might need to order forms leaders;
see page 404 for contact information.
After the partial page of checks is printed, you can continue printing on a full page of
checks by following steps 4 through 8 in “Printing checks from your account” on
page 91.
Chapter 7, Paying your bills 96

Adjusting check alignment for page-oriented printers
In most cases, you won’t need to do anything special to print checks with the text
aligned correctly. If you have a non-Apple, page-oriented printer, however, you may
need to use the information in this section to adjust the alignment of text on your
checks—but only if you have followed the instructions for printing checks in this
chapter and the text is still not aligned correctly on the printed checks.
You can make fine-tuning adjustments to the location of text on your check if certain
fields don’t print in quite the right place. Once you get your checks to print correctly,
Quicken saves your alignment settings, so you won’t have to change them again to
print checks with the same alignment in the future.
Note: You can adjust the positioning of text in individual fields on Intuit checks, but
you cannot rearrange the order of the fields to match those on non-Intuit checks.
1 Review your printed checks to decide which field and line positions need
adjusting.
2 Choose Quicken > Preferences > Checks > Print.
3 Make sure the account from which you are printing checks is selected in the
Account pop-up menu, and then click Positioning.
4 In the Adjust Positioning window, enter new settings for the items you want to
change and click OK. You can use positive or negative numbers. See the tables that
follow step 5 for solutions to specific positioning problems.
Chapter 7, Paying your bills 97

Quicken determines the number of Lines
Per Check based on the type of Intuit
check you selected.
Adjust the top-to-bottom position of all the
text on a check, or change the Memo
Position setting to adjust the top-to-bottom
position of the text in the Memo field only.
Enter a smaller number to move the text
up and a larger number to move it down.
Vertical settings are in hundredths of an inch.
Horizontal settings are in number of
characters per field.
Adjust the side-to-side position of text in
individual fields.
Adjust the top-to-bottom position of text on a
check printed as a partial page.
5 Print a test check on blank paper, and then place the paper on top of a check page
and hold them both up to the light to see if the text printed correctly.
Chapter 7, Paying your bills 98

Vertical positioning problem Solution
The text on the first check prints
correctly, but the text on the next check
prints too high.
The text on the first check prints
correctly, but the text on the next check
prints too low.
The text on the first check starts
printing too high.
The text on the first check starts
printing too low.
The memo text on a check prints too
high.
The memo text on a check prints too
low.
Increase the number of lines in the vertical Lines Per Check setting.
Decrease the number of lines in the vertical Lines Per Check setting.
Increase the number in the Fine Tuning setting to move the text down the check.
Decrease the number in the Fine Tuning setting to move the text up the check.
Increase the number in the Memo Position setting to increase the distance between
the Memo field and the top of the check.
Decrease the number in the Memo Position setting to decrease the distance
between the Memo field and the top of the check.
Chapter 7, Paying your bills 99

Horizontal positioning problem Solution
One or more check fields print too far
to the left.
One or more check fields print too far
to the right.
Check amount starts printing in the
right place, but is cut off on the right.
Spelled-out check amount starts
printing in the right place, but doesn’t
fill the line.
Partial-page positioning problem Solution
The text on a partial page of checks
starts printing too high.
The text on a partial page of checks
starts printing too low.
Increase the number of characters in the horizontal Date, Payee, Amount, Text
Amount, Address, or Memo setting to increase the distance between the text in that
field and the left edge of the check.
Decrease the number of characters in the horizontal Date, Payee, Amount, Text
Amount, Address, or Memo setting to decrease the distance between the text in that
field and the left edge of the check.
Decrease the number of characters in the Amount Width setting to force Quicken
to fit the amount into a shorter space. Ten characters is the minimum.
Increase the number of characters in the Text Amount Width setting to make the
spelled-out amount longer.
Increase the number in the Single Check or Two Checks setting to move the text
down the check.
Decrease the number in the Single Check or Two Checks setting to move the text
up the check.
Chapter 7, Paying your bills 100
 Loading...