

Page 1
User Manual
22980_A
Page 2

Introduction to this booklet
The User Manual guides you in how to use and maintain your new hearing device. Please read the User Manual
carefully. This will help you achieve the full benefit of your new hearing device.
Your hearing healthcare provider has adjusted your hearing device to meet your specific needs. If you have additional
questions or wish to report an unexpected operation or event, please contact your hearing healthcare provider.
Please Note:
The use of hearing devices is only part of hearing rehabilitation; auditory training, lip reading
instruction, and learning to interpret gesture cues may be required as well.
In most cases, infrequent use of hearing devices does not provide full benefit. Once you have become
used to wearing your hearing devices, wear your hearing devices all day every day.
Your hearing devices use the most modern components to provide the best possible sound quality in
every listening situation. However, communication devices such as digital cell phones can create
interference (a buzzing sound) in hearing devices. If you experience interference from a cell phone
being used close by, you can minimize this interference in a number of ways. Switch your hearing
devices to another program, turn you heard in a different direction or locate the cell phone and move
away from it.
Page 3

Place UDI label or record serial
Place UDI label or record serial
Intended Use
Hearing devices are sound-amplifying devices intended to compensate for impaired hearing. A hearing device will not
restore normal hearing, and will not prevent or improve biologic hearing sensitivity resulting from damage.
Hearing Device Purchase & Warranty Information
Left Hearing Device Right Hearing Device
Date Purchased:
number here:
NOTE: the FDA’s Universal Device Identification (UDI) system is intended to provide rapid and accurate identification of
medical devices, including hearing aids, using the unique UDI number, and to provide easy access to important
information about the device through the Access GUDID portal located at https://accessgudid.nlm.nih.gov/. Please
retain a copy of your UDI label(s) here.
For more information on warranty for your hearing device(s), please refer to the “Service and Warranty” section.
number here:
Page 4

Table of Contents
Introduction to this booklet .................................................................................................................................................... 2
Intended Use ........................................................................................................................................................................... 3
Hearing Device Purchase & Warranty Information ................................................................................................................ 3
Quick Reference ...................................................................................................................................................................... 5
Your Hearing Device at a Glance ............................................................................................................................................. 6
Turning Your Hearing Device On and Off ................................................................................................................................ 7
Battery ..................................................................................................................................................................................... 8
Low battery indicator .............................................................................................................................................................. 9
Wearing Hearing Device ....................................................................................................................................................... 10
Operating Instructions – Volume Control ............................................................................................................................. 11
Operating Instructions – Program Controls .......................................................................................................................... 12
Maintaining Your Hearing Device ......................................................................................................................................... 13
Maintaining Your Hearing Device with a Thin Tube ............................................................................................................. 14
Maintaining Your Hearing Device with an Earmold .............................................................................................................. 16
Using with Telephones and Cellular Phones ......................................................................................................................... 17
Airplane Mode ...................................................................................................................................................................... 18
Labeling ................................................................................................................................................................................. 19
Optional accessories ............................................................................................................................................................. 20
Optional Accessories: Companion Microphone CM-1 ...................................................................................................... 21
Optional Accessories: Mobile App .................................................................................................................................... 22
Caring for your Hearing Device ............................................................................................................................................. 23
Trouble Shooting ................................................................................................................................................................... 24
Precautions ........................................................................................................................................................................... 25
Warnings ............................................................................................................................................................................... 26
Service and Warranty ............................................................................................................................................................ 27
Compliance Information ....................................................................................................................................................... 28
FCC Information: ............................................................................................................................................................... 31
Information and Description of Symbols .......................................................................................................................... 32
Technical Information ........................................................................................................................................................... 34
Technical Information ........................................................................................................................................................... 35
Page 5
5
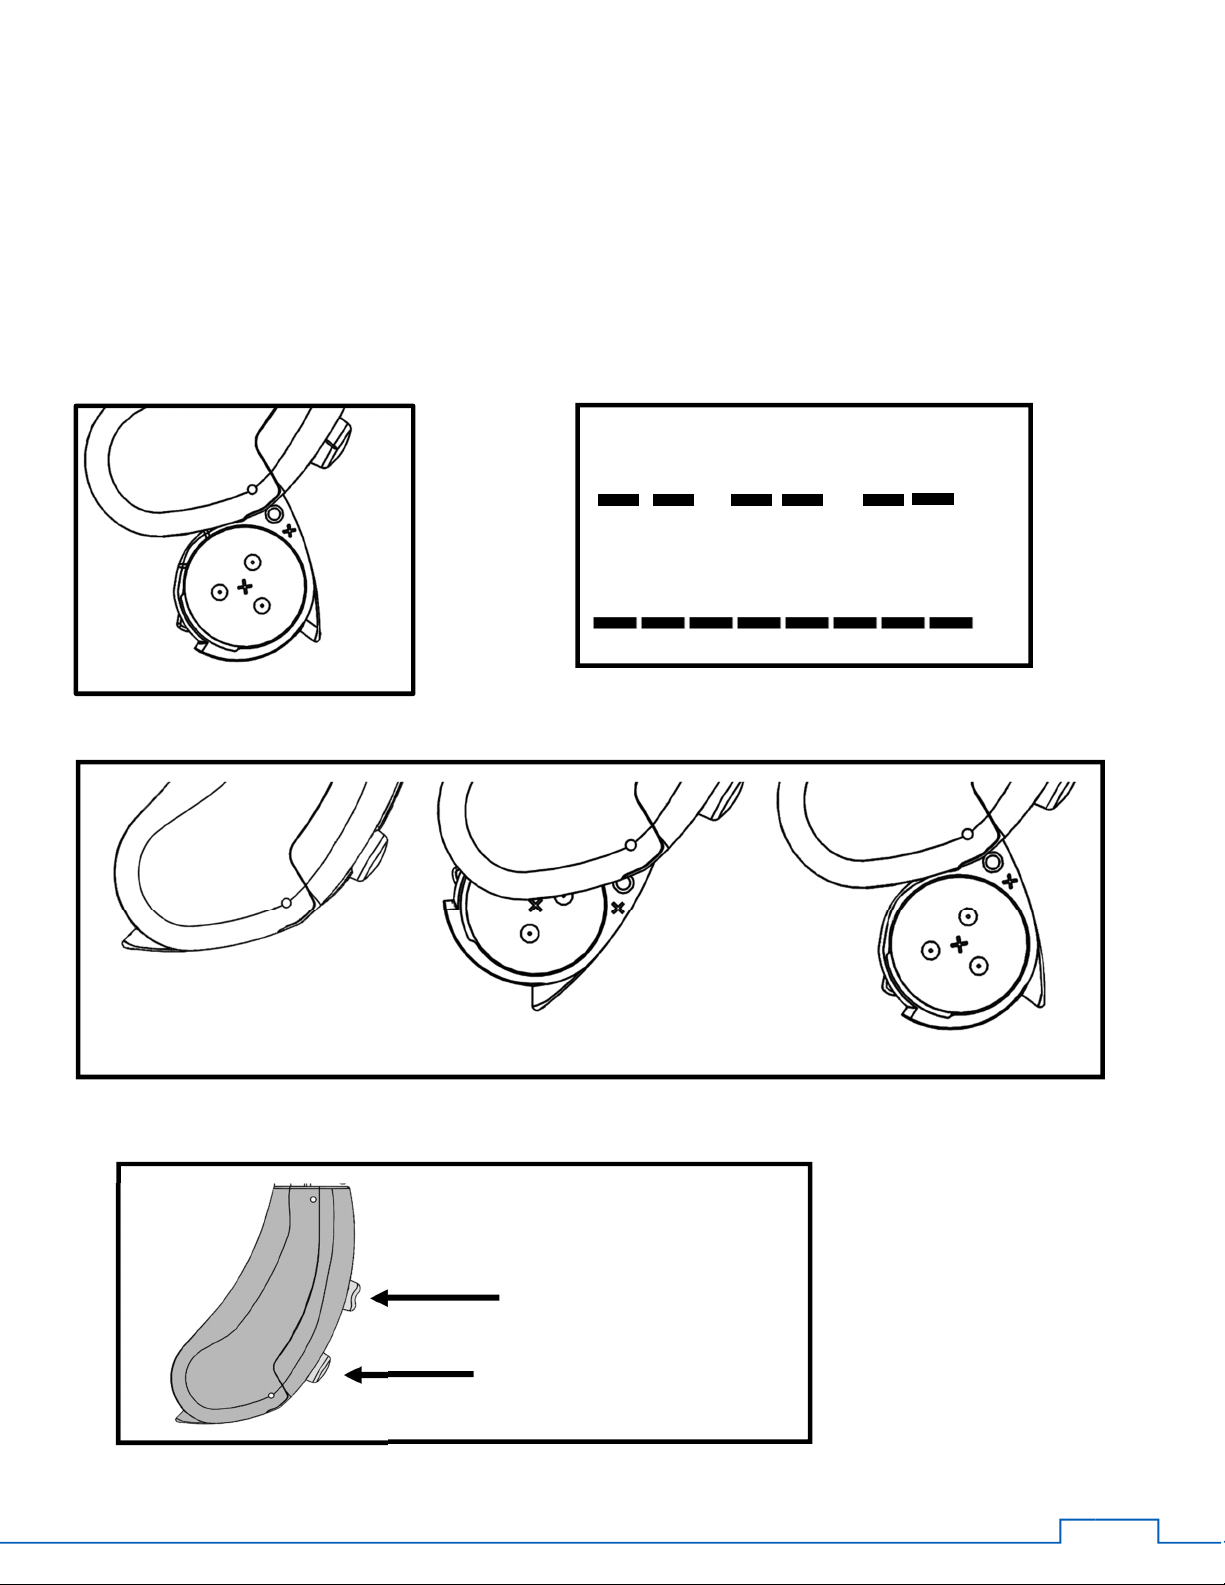
Low Battery
ON/Battery Door Closed OFF/Battery Door Partly Open Fully Open
Program Button
Volume Button
Quick Reference
Battery Size: 312
Changing Battery: Battery Warnings:
On/Off
3 double beeps every 8 minutes
Replace Battery
(Device Shutdown – 8 beeps)
Device Controls Operations
Page 6
6
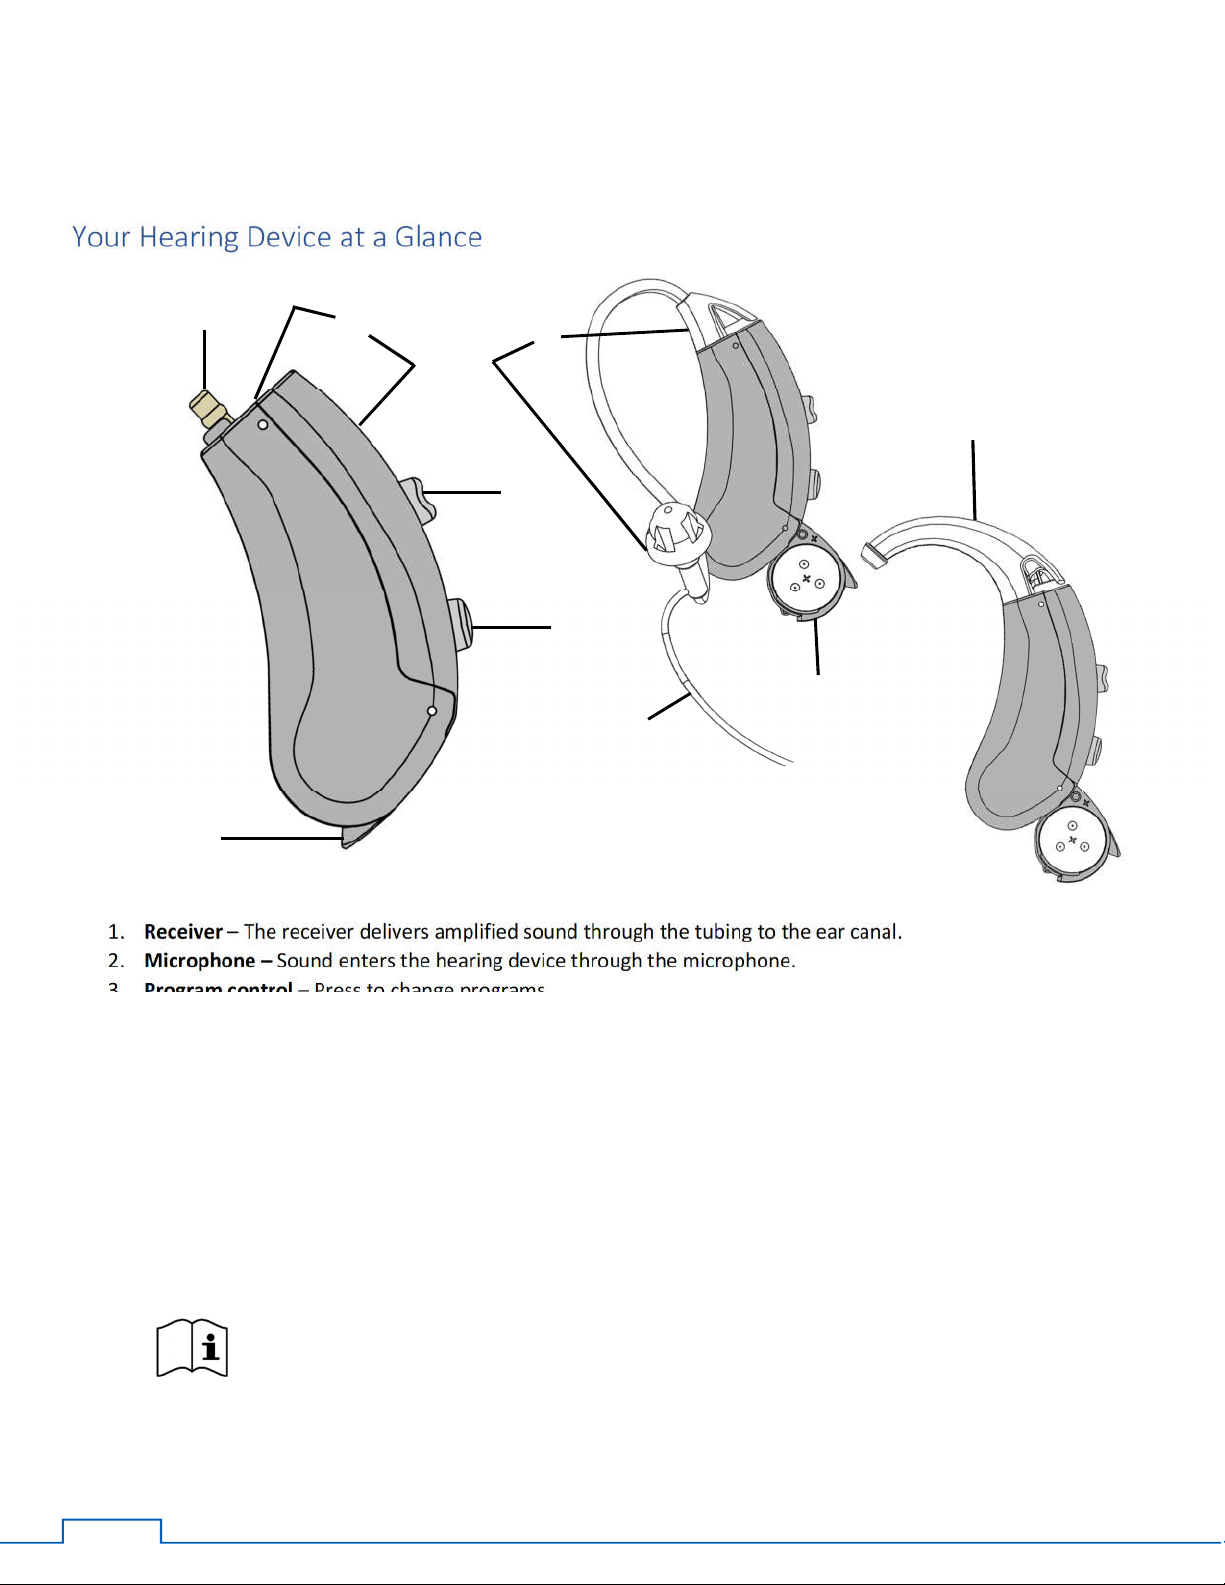
Your Hearing Device at a Glance
For additional information on the use and operation of these hearing devices after reviewing
5
4
1
2
6
8
3
5
7
1. Receiver – The receiver delivers amplified sound through the tubing to the ear canal.
2. Microphone – Sound enters the hearing device through the microphone.
3. Program control – Press to change programs.
4. Volume control – Press the button to increase volume. Once the volume reaches maximum volume, the volume
will reset to the lowest volume setting.
5. Battery door – The battery is inserted here and functions as the on/off switch when operating the device. A (+)
indicator corresponds to the positive side of the battery. A small hole may be filled with a colored plug to be
used as an optional indicator for the right or left ear.
6. Thin tube and Dome tip – Each hearing device comes with a thin tube and dome tip that connects to the hearing
device receiver. Sound travels through the tubing into your ear canal.
7. Retention loop – Keeps the tubing securely in place on or over the ear.
8. Earhook – The hearing device is also available with an earhook that connects to the hearing device receiver.
the contents of this instruction guide, contact your hearing healthcare provider, or visit
www.intricon.com.
Page 7
7
finger tab
Turning Your Hearing Device On and Off
Your hearing device has a battery door that acts as an on/off switch. When turning your hearing device on and off, grasp
the top and bottom of the device with your index finger and thumb and use your other hand to open the battery door by
pulling out on the finger tab. Close the battery door by gently pushing the door into the device.
ON: Close battery door fully
It may take several seconds before the hearing device turns on
after inserting the battery and closing the battery door.
Each time the hearing device is turned on, the device will attempt
to pair with any accessories that are in pairing mode (refer to page
22 for Pairing Mode).
OFF: Open the battery door
NOTE: Your hearing healthcare provider can change the startup
delay if required.
To turn off the hearing device, the battery door should be at least
half way open before it is turned off.
Page 8

8
Battery
Tip: To prolong battery life, remember to turn your hearing device off when not in use.
The hearing device uses a size 312 battery. The battery life varies, depending on the amount of time the hearing device
is used. Battery life is typically 5-8 days long in hearing device mode.
Inserting/replacing the battery:
1. Gently pull open the battery door with your fingernail. Remove the old battery, if present.
2. Insert the new battery into the battery compartment with the (+) sign on the battery facing the same way as the
(+) sign on the battery door. While holding the battery in place, peel off the tab. (As shown in the figure below.)
To ensure best battery performance, wait 15-30 seconds before closing the battery door after
peeling the plastic tab. If the door does not close easily, check to see if the battery was inserted
properly.
3. Close the battery door.
Figure shows Step 3 in the directions above.
Remove the batteries and keep the battery door open will not only conserve the battery’s
life but also allow internal moisture to evaporate.
Tip: Since the battery sits in the battery door, the door should be opened gently and slowly
so that the battery does not fall out.
Page 9

9
Low battery indicator
The chart below shows the low battery indicator available in your hearing device.
Voice Prompt ON Voice Prompt OFF
When the battery is low, a warning will be repeated
on your hearing device every eight minutes to
indicate that the battery needs to be replaced.
If you do not change the battery, you will hear
another warning at which your hearing device will
automatically turn off.
“Low battery” 3 double beeps
“Replace battery” 6 double beeps
Tip: It is recommended for you to carry spare batteries on hand to make sure that the hearing device(s)
are functional at all times and in all locations.
Tip: Open battery door when your hearing device is not in use in order to save battery life.
Warning: Do not place batteries in your mouth or swallow them under any circumstances. If batteries are
swallowed, contact local poison control center immediately.
Dispose used batteries as you would other electronic waste that potentially contains rare earth metals.
Page 10
10
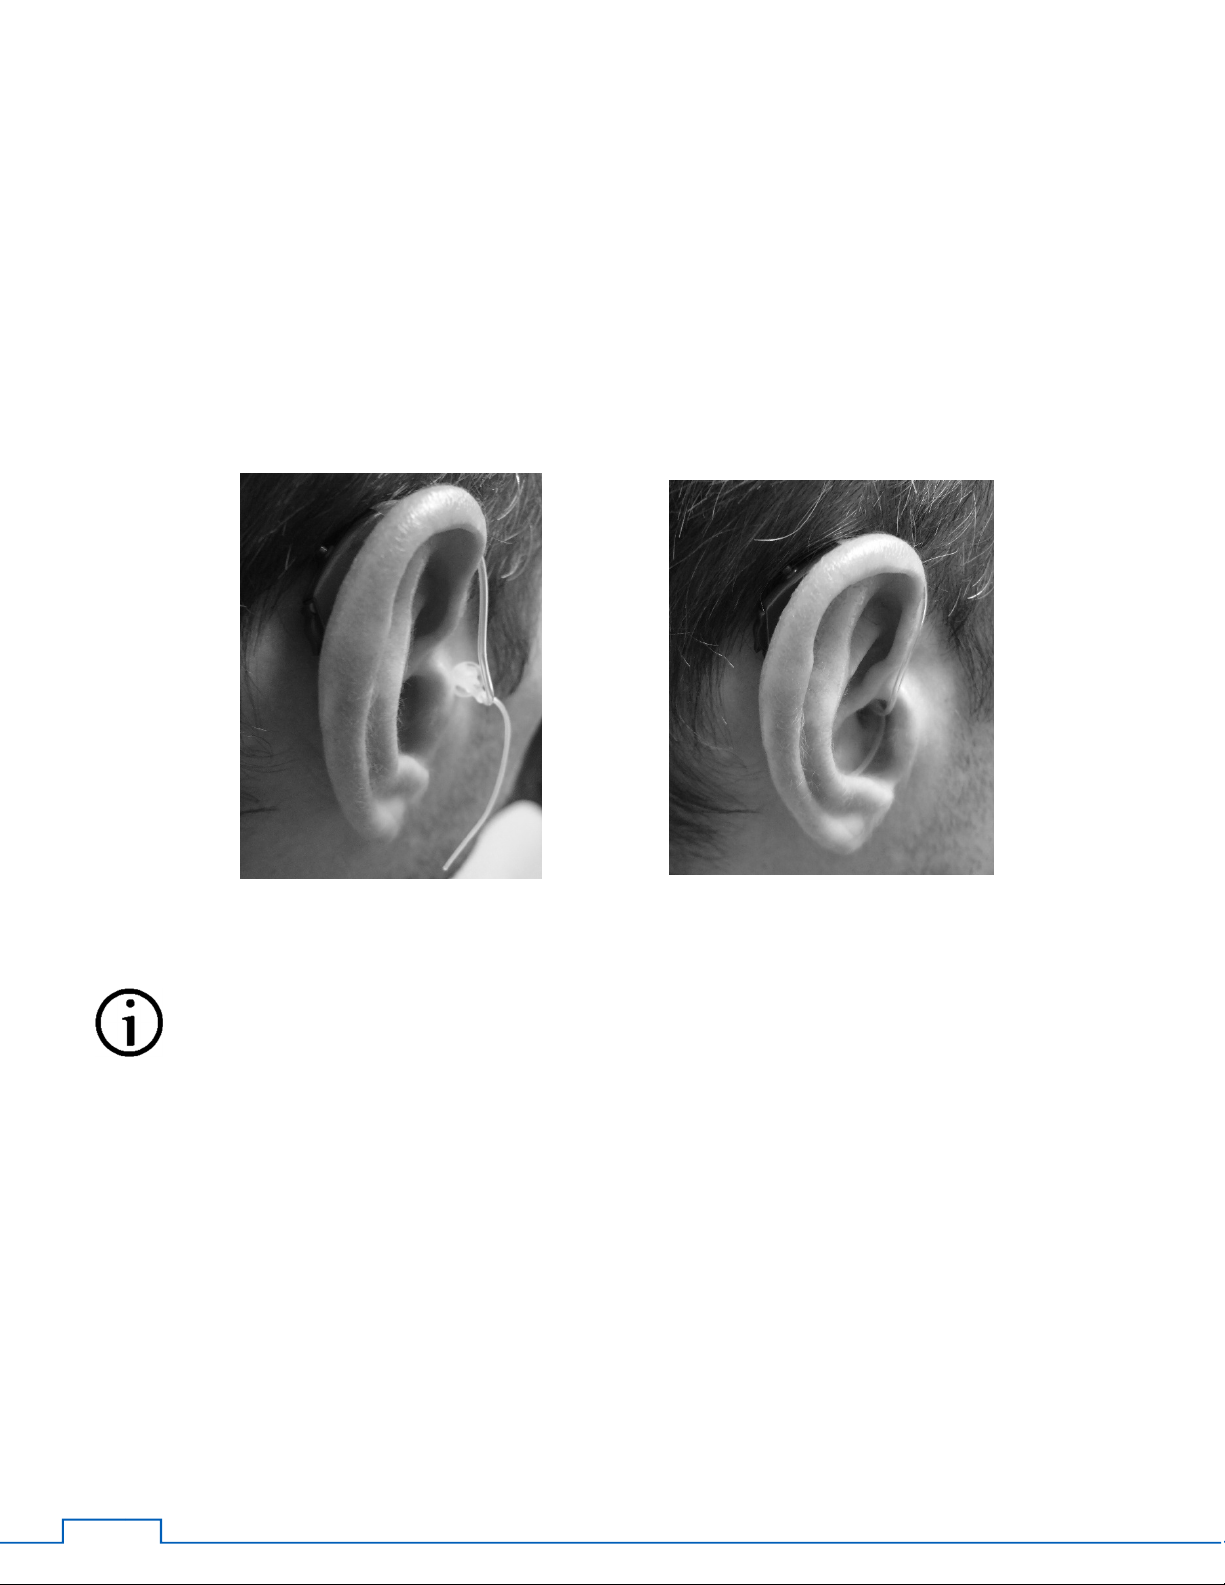
Wearing Hearing Device
1. Place the hearing device behind your ear.
2. Hold the thin tube wire or earmold* between your thumb and index finger with the thin tube ear tip pointing
towards the ear canal.
3. While holding the hearing device in place, insert the ear tip into your ear canal. Curl and tuck the retention loop
along the body of your ear.
* For hearing devices with earmolds, please consult with your hearing health provider about putting it on.
Tip: The ear tip should be completely, or almost completely, in the ear canal. The ear tip cannot touch the
eardrum. Proper insertion of the ear tip is key to getting enough loudness and avoid whistling.
Tip: Pulling up and back on your earlobe may help you insert the thin tube or ear mold into your ear canal
more easily.
Tip: If you wear eyeglasses, put your glasses on first and then put your hearing device on.
Page 11
11
Volume
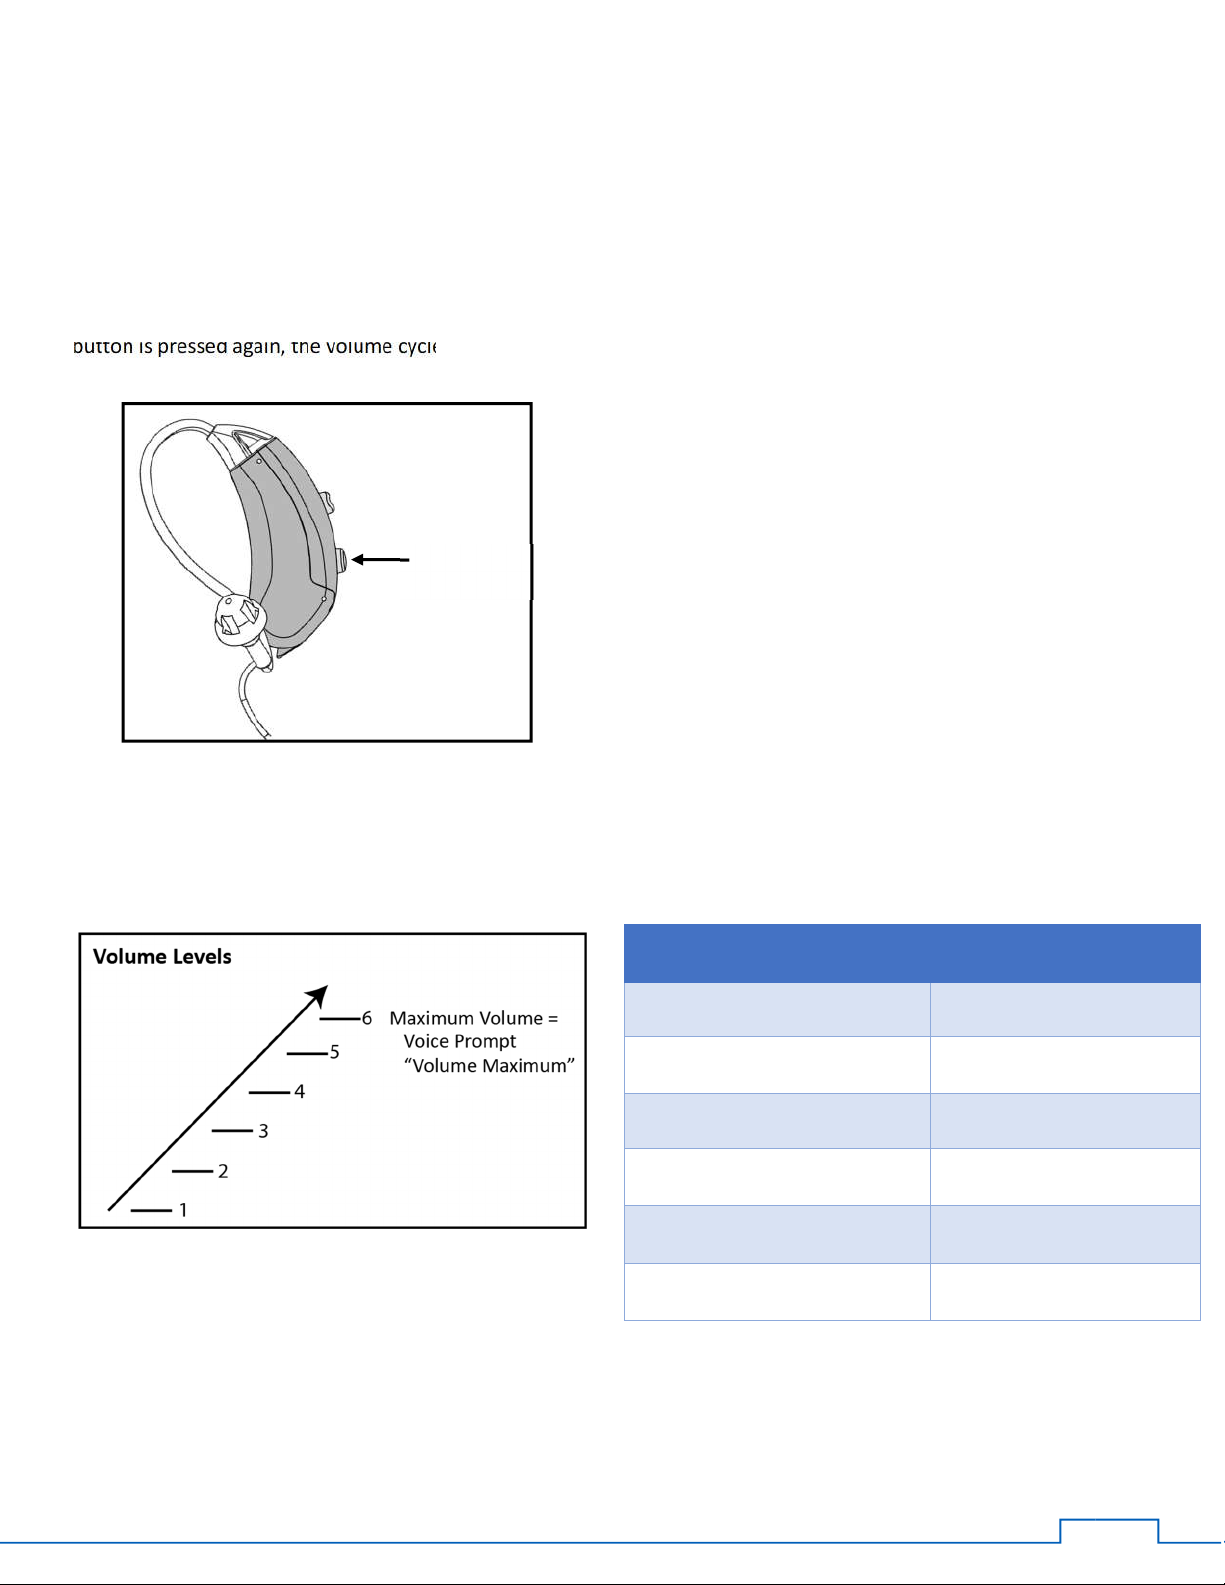
Operating Instructions – Volume Control
The volume control button allows you to increase volume levels. Once the volume reaches maximum volume, if the
button is pressed again, the volume cycle will restart at the minimum volume setting.
If the voice prompts are turned on, you will hear voice prompts when you reach the maximum or minimum volume
setting.
If the voice prompts are turned off, you will hear a single beep signal during each incremental change.
Control
Voice Indicator (Default) Beeps
Beep, “Volume Maximum”
Beep, “Volume 5”
Beep, “Volume 4”
3 Beep ♪♪♪
1 Beep ♪
1 Beep ♪
Beep, “Volume 3”
Beep, “Volume 2”
Beep, “Volume 1”
1 Beep ♪
1 Beep ♪
1 Beeps ♪
Page 12

12
Operating Instructions – Program Controls
Program
Note: When entering a program with streaming
The program control allows you to choose between several program settings. Your instrument may have up to four
programs. By pressing the program control button, you advance the program setting as indicated by beeps or voice
prompts. The dome tip or ear mold must be in your ear to hear the beep(s). Use the program that sounds best the
majority of the time.
If the voice prompts are turned on, you will hear voice prompts letting you know which program number you are
advancing into. If you are on Program 2, you will hear “Program 2.”
If the voice prompts are turned off, you will hear the number of beeps to let you know which program has been
selected. If you are on Program 2, you will hear two beeps.
Within each program, you can also use the volume control to make sounds louder or softer.
Tip: For specific features and program settings tailored to your individual use patterns and settings of
interest, speak to your hearing healthcare provider. They are trained to work with you to meet your
communication needs.
Tip: If your device has wireless functionality enabled (by default, Programs 1 and 2), enabling wireless
streaming accessories will allow inputs to be heard.
Voice Indicator Beeps
“Program 1”
“Program 2”
“Program 3”
“Program 4”
1 Beep ♪
2 Beeps ♪♪
3 Beeps ♪♪♪
4 Beeps ♪♪♪♪
Control
enabled and a paired Companion Microphone
turned on, you will hear a “Connected” prompt
after the program prompt.
(Example: “Program 4” “Connected”)
If the Companion Microphone is shut off while
connected to your hearing device, you will hear
a “Disconnected” prompt in your hearing
device.
Page 13

13
Maintaining Your Hearing Device
Ear wax is natural and common. For some users, wearing a hearing device will increase the production of ear wax.
Ensuring that your hearing device is free of wax obstruction is an important part of the cleaning and maintenance of
your hearing device.
Depending on your requirements, your hearing device will have a thin tube and dome tip or a conventional earmold
attached to it. Review the warnings below and follow the instructions on next pages.
CAUTION: Not following the list below may cause damage to your hearing device and accessories
Do not immerse your hearing device in water or liquid to clean. Instead, use a soft cloth or tissue
to remove moisture or oil residue.
Do not bend the thin tube and tip back and forth to remove it.
Do not use cleaning wire while the thin tube is connected to the hearing device.
Do not use alcohol to clean your earmold or dome tip.
Do not use sharp tools to dislodge ear wax.
If your physician prescribes ear drops, clean any moisture that may get into the earmold or tubing.
Page 14

14
Maintaining Your Hearing Device with a Thin Tube
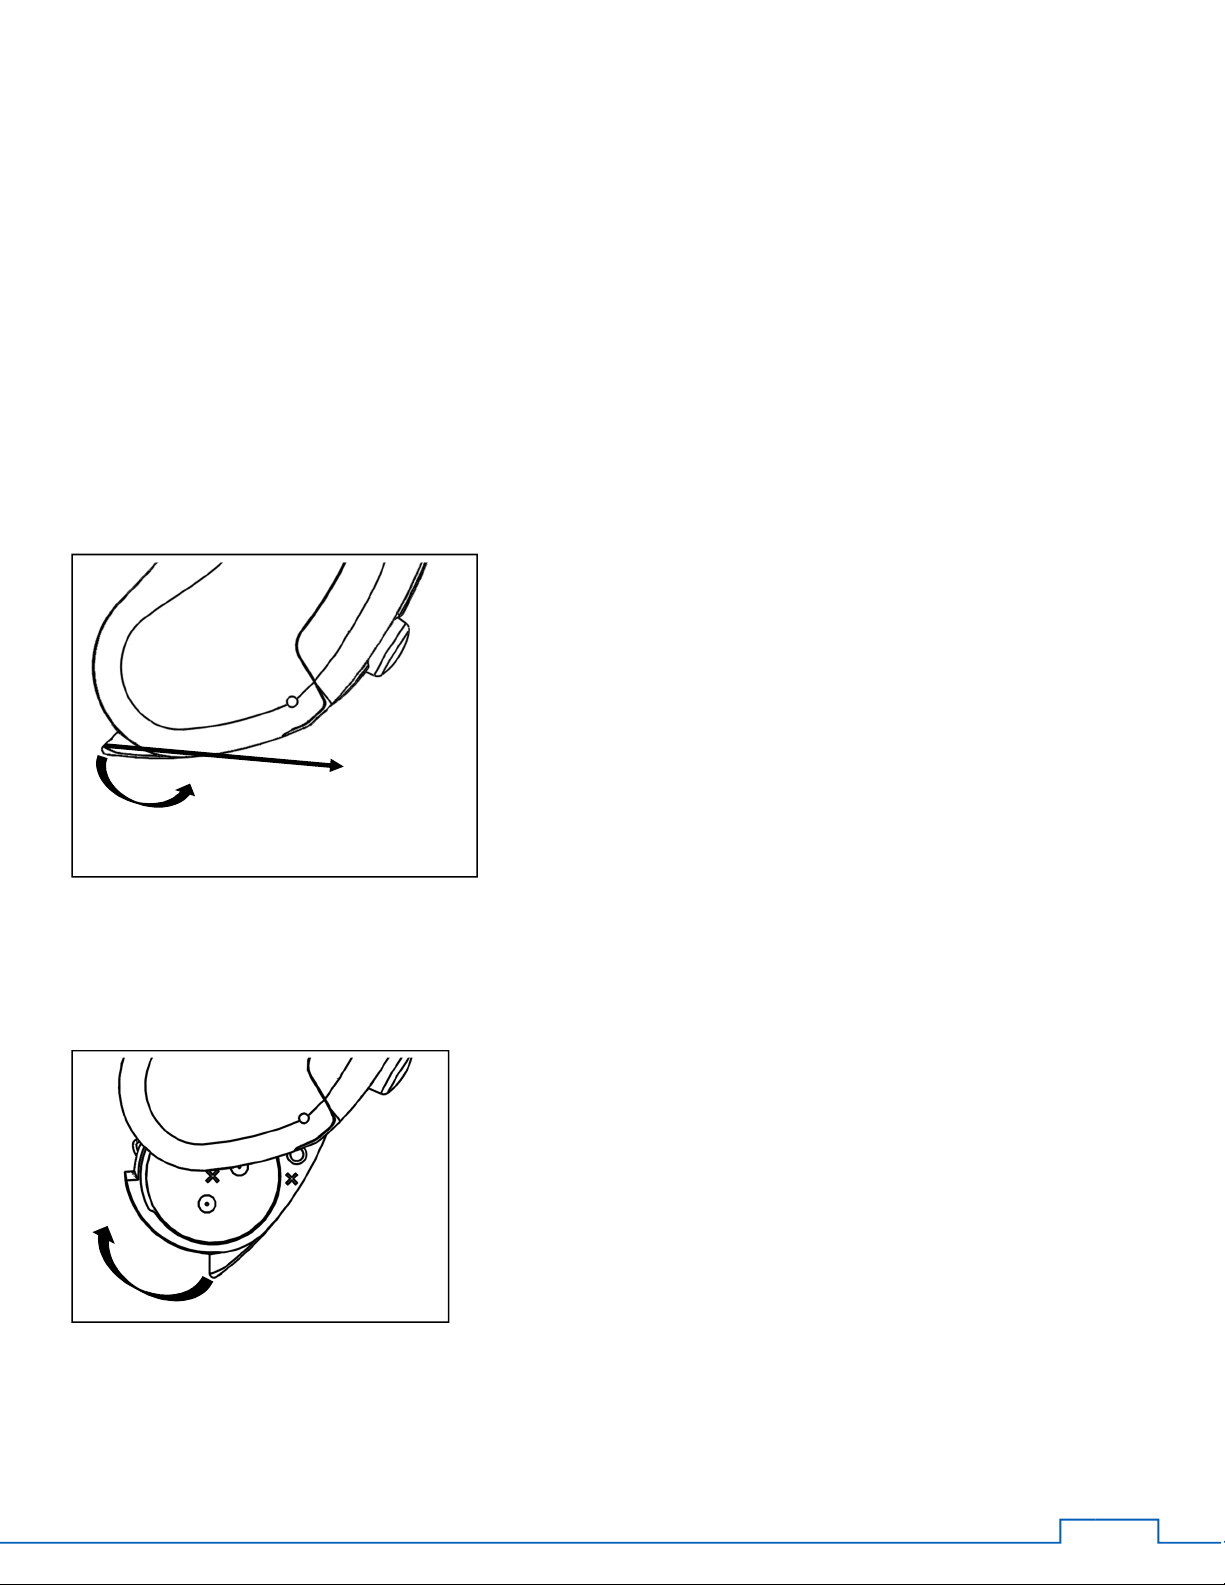
*hearing device end of the thin tube
Replacing thin tube and dome tip:
For optimal performance, replace thin tube and dome tip every three months.
Removing thin tube and dome tip:
Grasp the hearing device end of the thin tube*. Gently turn the hearing device end of the thin tube approximately 90
degrees and pull to remove the ear tube from the hearing device.
Attaching thin tube and dome tip:
Gently push the hearing device end of the thin tube onto the hearing device until it snaps into position and rotate
slightly to lock in place.
Page 15

15
Cleaning thin tube and dome tip:
Between replacements, you’ll need to clean the thin tube and dome tip with a cleaning wire to remove any debris or
accumulated ear wax. Remove the thin tube from the hearing device. Insert cleaning wire into thin tube as indicated
below.
Page 16

16
Maintaining Your Hearing Device with an Earmold
earhook
earmold tube
earmold
hearing device
Ask your hearing healthcare provider to see if this applies to you.
1. Remove the earmold tube from the earhook
2. Wash the tube with warm soapy water and blow air through the tube to remove any water left inside the tube
3. Leave the earmold and tube out overnight to allow any water left inside to dry
4. After the earmold and tube is dry, reconnect the ear mold tube to the ear hook
Page 17

17
Using with Telephones and Cellular Phones
Traditional corded phones, cordless phones, and cellular phones.
First, try to use the phone as you normally would hold it. If you cannot hear well, move the handset to find the position
that sounds best to you. Some users find performance can be improved by tilting the handset towards the hearing
device. It may help to turn the volume up on your phone.
Practice using the telephone with someone familiar to you. Try moving the phone around to get the best sound.
Telecoils
Your device contains a telecoil which needs to be activated by your hearing healthcare provider. The telecoil converts
electromagnetic signals directly from the telephone into sound. To use the telecoil, select the appropriate program
setting, using the push button. The telecoil setting may allow you to hear more clearly on the telephone. After finishing
your phone call, change back to your preferred listening program.
If your phone is labeled “Hearing Device Compatible,” it works with a telecoil.
Other uses of a telecoil
Many people use the telecoil with assistive listening devices called induction loops. If you go to a public event, and the
room is “looped,” then you can use your telecoil. Set your hearing device to the telecoil program. Sound is transmitted
to your hearing device, allowing you to hear the speaker more clearly. After the event, change back to your preferred
listening program.
Note: If you are in a location with an induction loop system, you will notice this symbol. This means the
location you are presently in has special accommodations for the hearing impaired.
Page 18

18
Airplane Mode
press down volume button
Close battery door
When boarding an airplane or entering an area where radiated radio signals are prohibited, wireless functionality must
be deactivated; airplane mode must be turned on.
The airplane mode is enabled by closing the battery door while pressing the volume button for six seconds.
To disable airplane mode, open and close the battery door.
Page 19

19
Labeling
The serial number (S/N) is located on the hearing device as an 8-digit number. The first two digits of the S/N represent
the year of manufacture (i.e. “15” refers to 2015). The last six digits is a unique identifier. All eight numbers create the
serial number of the device.
Page 20

20
Optional accessories
The accessories described on the following pages are optional. Please contact your hearing healthcare provider to learn
more about these accessories.
Page 21

21
Pair Button
Optional Accessories: Companion Microphone CM-1
Your Lumen 155 is compatible with IntriCon’s Companion Microphone device.
The Companion Microphone is used to help you listen to speech or other audio signals. You must pair the Companion
Microphone to your hearing device(s).
To pair the Companion Microphone with your hearing device(s):
1. Open the battery door to turn off the hearing device.
2. Turn on the Companion Microphone and press the Pair button on the
back of the Companion Microphone. The LED will blink blue while in
pairing mode.
3. Within 30 seconds, close the battery door(s) to turn on the hearing
device(s) that you are pairing. Once your hearing device(s) are paired
successfully, you will hear a “Paired” prompt through your hearing
device(s).
NOTE: If you do not have a Companion Microphone, please consult with your
hearing healthcare provider.
Refer to the Companion Microphone CM-1 User Manual for more details.
Page 22

22
Optional Accessories: Mobile App
Your Lumen 155 is compatible with IntriCon’s mobile app.
The mobile app is used to help you control volume level and program number without using the buttons on your hearing
device.
For best pairing results:
1. Download the mobile app on your smartphone and turn on your Bluetooth.
2. Turn your hearing devices on and follow directions on your phone.
Page 23

23
Caring for your Hearing Device
Please use the following instructions to care of your hearing device and to prolong the life of your hearing
device:
Do not drop your hearing device or knock it against hard surfaces.
Protect your hearing device from excessive heat.
Regular use of a dehumidifier can help prevent corrosion and prolong the life of your hearing
device.
Always remove your hearing device when applying hair care products. The hearing device can
become clogged and cease to function properly.
Do not immerse hearing device in water.
Do not wear your hearing device while bathing, showering, swimming, or in a moist atmosphere,
like steam baths or sauna.
If your hearing device gets wet, do not attempt to dry it in an oven or microwave. Do not adjust
any controls. Open the battery door immediately, and allow your hearing device to dry naturally
for 24 hours. Do not use the hearing device until the device is completely dry.
Page 24

24
Trouble Shooting
Hearing device is off
Turn on by closing the battery door
Low/dead battery
Replace battery
Clean/replace thin tube, dome tip, or
Battery upside down
Insert battery plus side (+) up
Moisture
Open battery door and allow to dry
Three double beeps
Low battery
Replace battery
Dome tips not inserted properly
Remove and reinsert
Contact your hearing healthcare
Hair or clothing near ear
Remove hair or clothing near ear
Cracks in ear tube
Replace ear tube and tip
Contact your hearing healthcare
On airplane mode
Open then close the battery door
Bluetooth is turned off
Turn on Bluetooth
Did not pair
Re-pair your hearing devices
SYMPTOMS CAUSE POSSIBLE REMEDY
No sound or not loud enough
Whistling or squealing noise
Ear tip falling out of ears Poor fit
Ear wax/Clogged tube
Poor-fitting ear mold
earmold
provider
provider
Wireless does not work
Page 25

25
Precautions
These PRECAUTIONS point out situations which could cause minor or moderate injuries to the user or to the device.
• You should familiarize yourself fully with the entire contents of this user manual before using Lumen 155 to
ensure personal safety and correct use. Contact customer support if you experience unexpected operations
or performance.
• Do not attempt to modify the shape of the hearing instrument, earmolds, or tubing yourself.
• Use hearing device accessories, i.e. thin tubes and hear hooks, provided by your hearing health provider for
best results.
Page 26

26
Warnings
These WARNINGS point out situations which could cause serious injuries to the user or to the device.
In some acoustic environments, over amplification can cause discomfort and damage to the patient’s hearing.
Hearing devices should only be used as directed by your physician or hearing healthcare provider.
Do not use your hearing device in explosive or oxygen-enriched areas.
Allergic reactions to hearing devices are unlikely. However, if you experience itching, redness, soreness,
inflammation, or a burning sensation in or around your ears, inform your hearing healthcare provider and
contact your physician. You may notice accelerated accumulation of earwax when using your hearing device(s).
This is normal, but see your hearing healthcare provider if you continue to have difficulty.
In the unlikely case that any parts remain in the ear canal after the removal of the hearing device, contact a
physician immediately. Report the event to your hearing healthcare provider as soon as possible.
Remove your hearing device(s) for CT and MRI scans or for other electromagnetic procedures.
Never leave your hearing device(s) or batteries where small children and pets can reach them. If batteries are
swallowed or inhaled, contact local poison control center immediately.
If you feel pain in or behind your ear, if it is inflamed, if skin irritation or accumulations of ear wax occur, please
check with your hearing healthcare provider or physician.
Hearing programs in the directional microphone mode reduce background noises. Please be aware that warning
signals or noises coming from behind, e.g. cars, are partially or entirely suppressed.
Your hearing device(s) have been adjusted for your hearing needs; please do not share your hearing device with
other people.
Use on Wireless Restricted Areas
Your hearing device uses Bluetooth. Airplane mode must be activated, unless the use of Bluetooth has been
permitted.
Page 27

27
Service and Warranty
Please see your hearing healthcare provider if you believe your hearing instrument needs service.
IntriCon offers you a comprehensive, worldwide warranty, valid starting from the date of purchase. Please ask your
hearing healthcare provider about the term of the warranty valid in the country of purchase. The warranty covers
repairs in case of processing and material errors.
NOTE: In accordance with 21 CFR 801.420(c)(1)(v) at least one specific address where to go to obtain service must be
provided.
Note: No warranty claims will be considered if the hearing device shows normal wear and tear, improper handling or
care, exposure to chemicals, immersion in water or undue stress. In case of damage caused by third parties or nonauthorized service, the IntriCon warranty is invalid. This warranty does not cover services performed by a hearing
healthcare provider at his or her workplace.
Page 28

28
Compliance Information
Warning to Hearing Device Dispensers
A hearing device dispenser should advise a prospective hearing device user to consult promptly with a licensed physician
(preferably an ear specialist) before dispensing a hearing device if the hearing device dispenser determines through
inquiry, actual observation, or review of any other available information concerning the prospective user, that the
prospective user has any of the following conditions: (i) Visible congenital or traumatic deformity of the ear. (ii) History
of active drainage from the ear within the previous 90 days. (iii) History of sudden or rapidly progressive hearing loss
within the previous 90 days. (iv) Acute or chronic dizziness. (v) Unilateral hearing loss of sudden or recent onset within
the previous 90 days. (vi) Audiometric air-bone gap equal to or greater than 15 decibels at 500 hertz (Hz), 1,000 Hz, and
2,000 Hz. (vii) Visible evidence of significant cerumen accumulation or a foreign body in the ear canal. (viii) Pain or
discomfort in the ear. Special care should be exercised in selecting and fitting a hearing device whose maximum sound
pressure level exceeds 132 decibels* because there may be risk of impairing the remaining hearing of the hearing device
user.
*The Lumen 155 does not exceed 132 decibels
Page 29

29
Important notice for prospective hearing device users
Good health practice requires that a person with a hearing loss have a medical evaluation by a licensed physician
(preferably a physician who specializes in diseases of the ear) before purchasing a hearing device. Licensed physicians
who specialize in diseases of the ear are often referred to as otolaryngologists, otologists or otorhinolaryngologists.
The purpose of medical evaluation is to assure that all medically treatable conditions that may affect hearing are
identified and treated before the hearing device is purchased. Following the medical evaluation, the physician will give
you a written statement that states that your hearing loss has been medically evaluated and that you may be considered
a candidate for a hearing device. The physician will refer you to an audiologist or a hearing device dispenser, as
appropriate, for a hearing device evaluation. The audiologist or hearing device dispenser will conduct a hearing device
evaluation to assess your ability to hear with and without a hearing device. The hearing device evaluation will enable the
audiologist or dispenser to select and fit a hearing device to your individual needs. If you have reservations about your
ability to adapt to amplification, you should inquire about the availability of a trial-rental or purchase-option program.
Many hearing device dispensers now offer programs that permit you to wear a hearing device for a period of time for a
nominal fee after which you may decide if you want to purchase the hearing device. Federal law restricts the sale of
hearing devices to those individuals who have obtained a medical evaluation from a licensed physician. Federal law
permits a fully informed adult to sign a waiver statement declining the medical evaluation for religious or personal
beliefs that preclude consultation with a physician. The exercise of such a waiver is not in your best health interest and
its use is strongly discouraged.
Page 30

30
Children with Hearing Loss
In addition to seeing a physician for a medical evaluation, a child with a hearing loss should be directed to an audiologist
for evaluation and rehabilitation since hearing loss may cause problems in language development and the educational
and social growth of a child. An audiologist is qualified by training and experience to assist in the evaluation and
rehabilitation of a child with a hearing loss.
Page 31

31
FCC Information:
FCC ID: POMIINHBC1B0
Per FCC 15.19(a)(3) and (a)(4), this device complies with part 15 of the FCC Rules. Operation is subject to the following
conditions:
This device may not cause harmful interference, and this device must accept any interference received, including
interference that may cause undesired operation.
Note: The manufacturer is not responsible for any radio or TV interference caused by unauthorized modifications to this
equipment. Such modifications could void the user’s authority to operate the equipment.
Radio Equipment Directive Information:
The equipment operates in the ISM 2.4 GHz band (2.40 - 2.4835 GHz), using the Bluetooth™ SMART protocol and
IntriCon's proprietary audio streaming protocol, and the maximum RF Power transmitted in that band is -6.0 dBm EIRP.
Statement concerning the use of hearing instruments and life-sustaining implants
IntriCon strongly advises users of hearing instruments to always follow the guidance set out in this hearing
instrument user manual. When life-sustaining implants (“implants”) (like pacemakers) are used along with
hearing instruments, IntriCon strongly advises users to always follow the guidelines of the implant manufacturer
as well.
If you suspect any interference to your implant, please immediately stop using all other electronic devices,
including your hearing instruments, and contact the manufacturer of the implant as well as IntriCon to advise
about the suspected interference.
To ensure our hearing instruments can operate safely and effectively in close proximity to other electronic
devices, IntriCon hearing instruments have been proven to meet the requirements of the international standard
for electromagnetic compatibility (EMC), IEC 60118-13, and ANSI C63.19.
Life-sustaining implants are required to comply with the standards described in ANSI/AAMI/ISO 14117 on
securing electromagnetic compatibility with other electronic devices including hearing instruments. As a
consequence, implants complying with the ANSI/AAMI/ISO 14117 standards should continue to operate within
the requirements of basic safety and essential performance when used with hearing instruments from IntriCon.
Page 32

32
Information and Description of Symbols
With the CE symbol, IntriCon confirms that this product – including accessories – meets the
The symbol with the crossed-out garbage bin is to make you aware that this hearing device and
This symbol indicates important information on handling and product safety.
This is the symbol for caution and warning. This is a safety symbol used to highlight that there are
This is the symbol to keep the device dry.
Telecoil compatible assisted listening Device
This symbol indicates the manufacturer’s serial number. The serial number is located on part as an 8 Indicates the manufacturer’s catalogue number so that the medical device can be identified.
Indicates the medical device manufacturer, as defined in EU Directive 93/42/EEC.
Indicates the year of manufacture. The first 2 digits of the serial number (assume 2 digits are
requirements of the Medical Device Directive 93/42/EEC as well as Radio Equipment Directive
2014/53/EU. A copy of the Declaration of Conformity can be obtained from IntriCon.
batteries may not be thrown away as normal household waste. Please dispose of old or unused
hearing devices, at waste disposal sites intended for electronic waste, or give your hearing device to
your hearing healthcare provider for disposal. Proper disposal protects the environment and health.
specific warnings or precautions associated with the devices that are not otherwise found on the
label.
digit number.
preceded by “20”; e.g. “14” = year 2014)
Consult instructions for use
Symbol for fragile, handle with care.
Page 33

33
During transport or storage, the temperature should not exceed the limit values of 14° to 158°
The air pressure range between 500 and 1100 hPa is appropriate.
During transport or storage, the relative humidity should not exceed the limit values of 10% to 95%
Fahrenheit (-10° to 70° Celsius) for a long period of time.
for a long period of time.
Page 34

34
Technical Information
Thin Tube
Earhook
Equivalent Input Noise (dB SPL)
< 22
Peak OSPL90 (dB)
128
HFA OSPL90 (dB)
122
Peak FOG (dB) 60
HFA FOG (dB) 52
HFA Ref. Test Gain (dB)
46
Frequency Range: f1 – f2
200 - 7100
THD @ 500 Hz (%)
< 7
@ 800 Hz (%)
< 6
@ 1600 Hz (%)
< 0.5
Attack Time (mS) 11
Release Time (mS)
200
Battery Drain, non-streaming (mA)
1.3
Supply Voltage (V) – STD 312
1.3
Induction Coil Sensitivity (STS) (dB)
1
Lumen 155 - Omni Microphone
Page 35

35
Thin Tube
Earhook
Equivalent Input Noise (dB SPL)
< 17
Peak OSPL90 (dB)
125
HFA OSPL90 (dB)
117
Peak FOG (dB) 50
HFA FOG (dB) 41
HFA Ref. Test Gain (dB)
41
Frequency Range: f1 – f2
400 - 6000
THD @ 500 Hz (%)
< 9
@ 800 Hz (%)
< 7
@ 1600 Hz (%)
< 1
Attack Time (mS) 11
Release Time (mS)
215
Battery Drain, non-streaming (mA)
1.3
Supply Voltage (V) – STD 312
1.3
Induction Coil Sensitivity (STS) (dB)
-7
Technical Information
Lumen 155 - Directional Microphone
Page 36

0086
Distributor / Trust
IntriCon Corporation
1260 Red Fox Road
Arden Hills, MN 55112, USA
CEpartner4U BV
Esdoornlaan 13, 3951DB Maarn,
The Netherlands
22980_A
 Loading...