

Page 1
LUMEN 1000 PSAP &
CHARGING TV STREAMER
Quick Start Guide
22602 Rev B
1
Page 2

Table of Contents
Lumen 1000 PSAP Parts …………………………….........3
Charging TV Streamer Parts ..…………………………….4
Charging TV Streamer Setup .…………………….…...4-7
Lumen 1000: Assembly and Charging …………….….8
Lumen 1000: Positioning on the Ear ………………....9
Charging TV Streamer: Device Commands .….....10
Lumen 1000: Rocker Switch Functions …………....11
Additional Information .…………………………………...12
22602 Rev B
2
Page 3
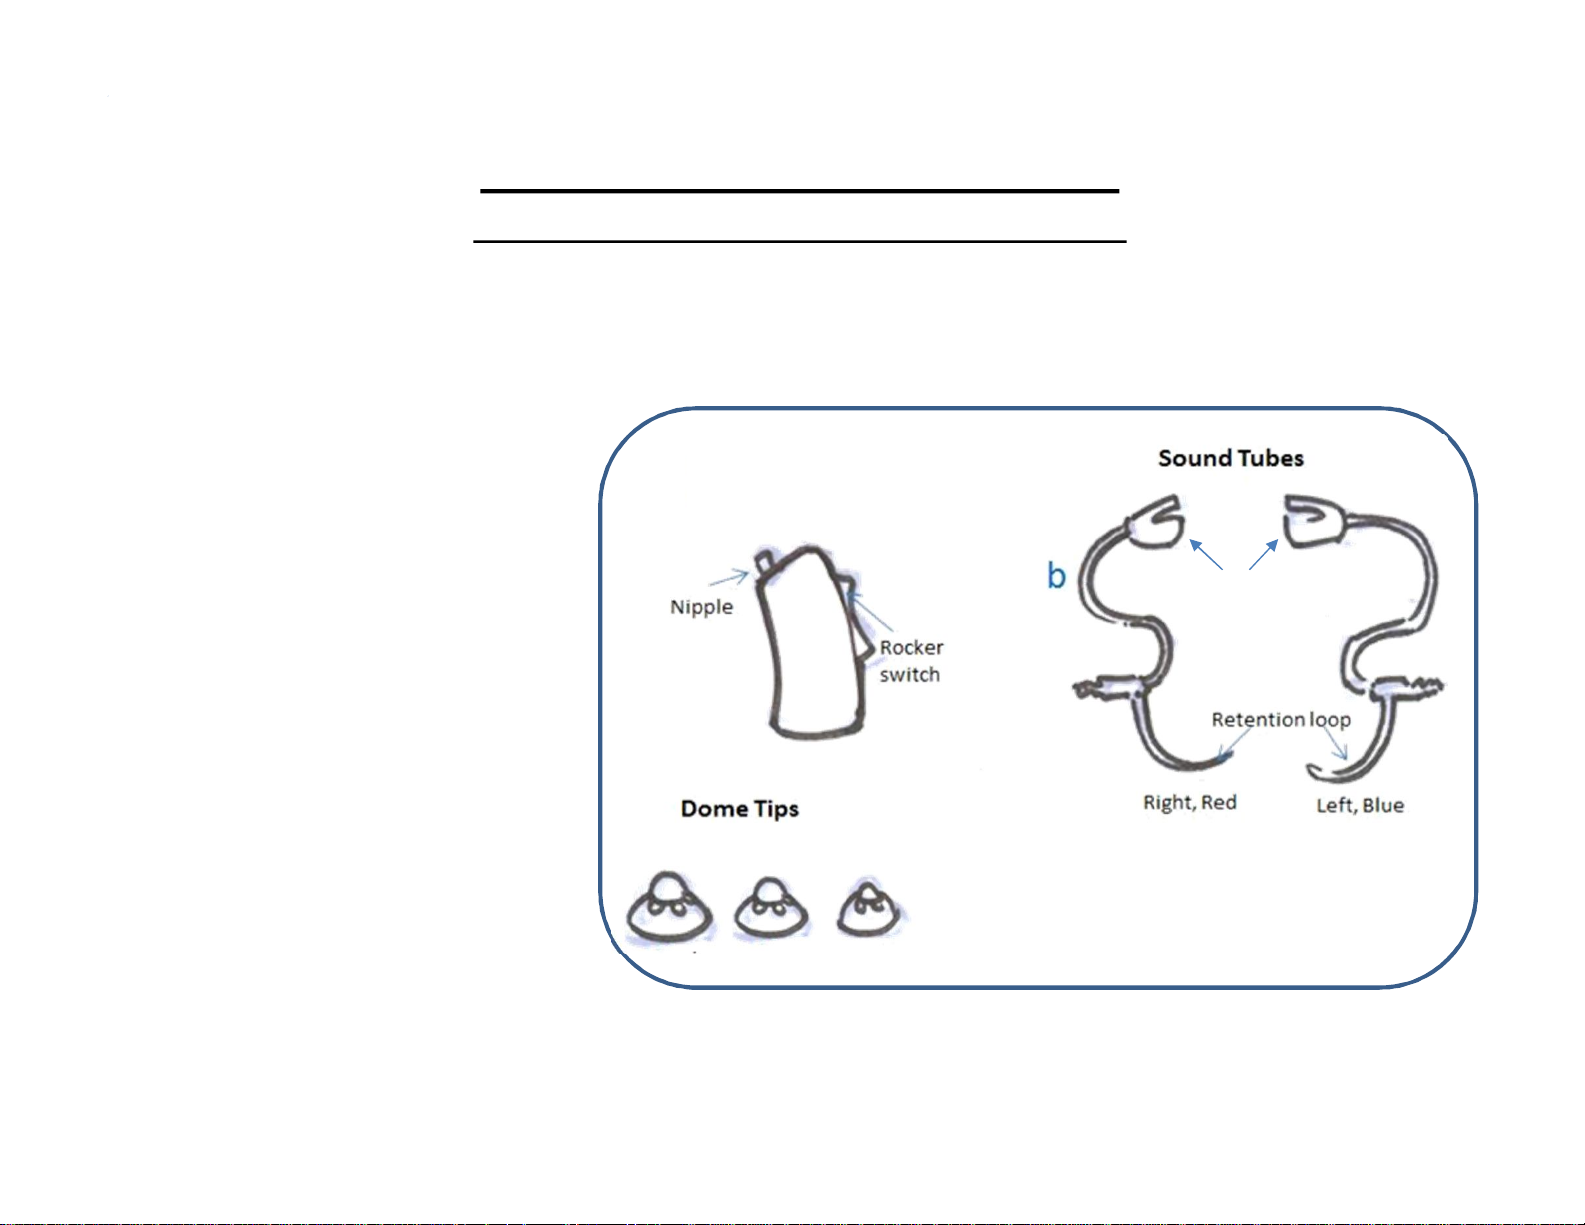
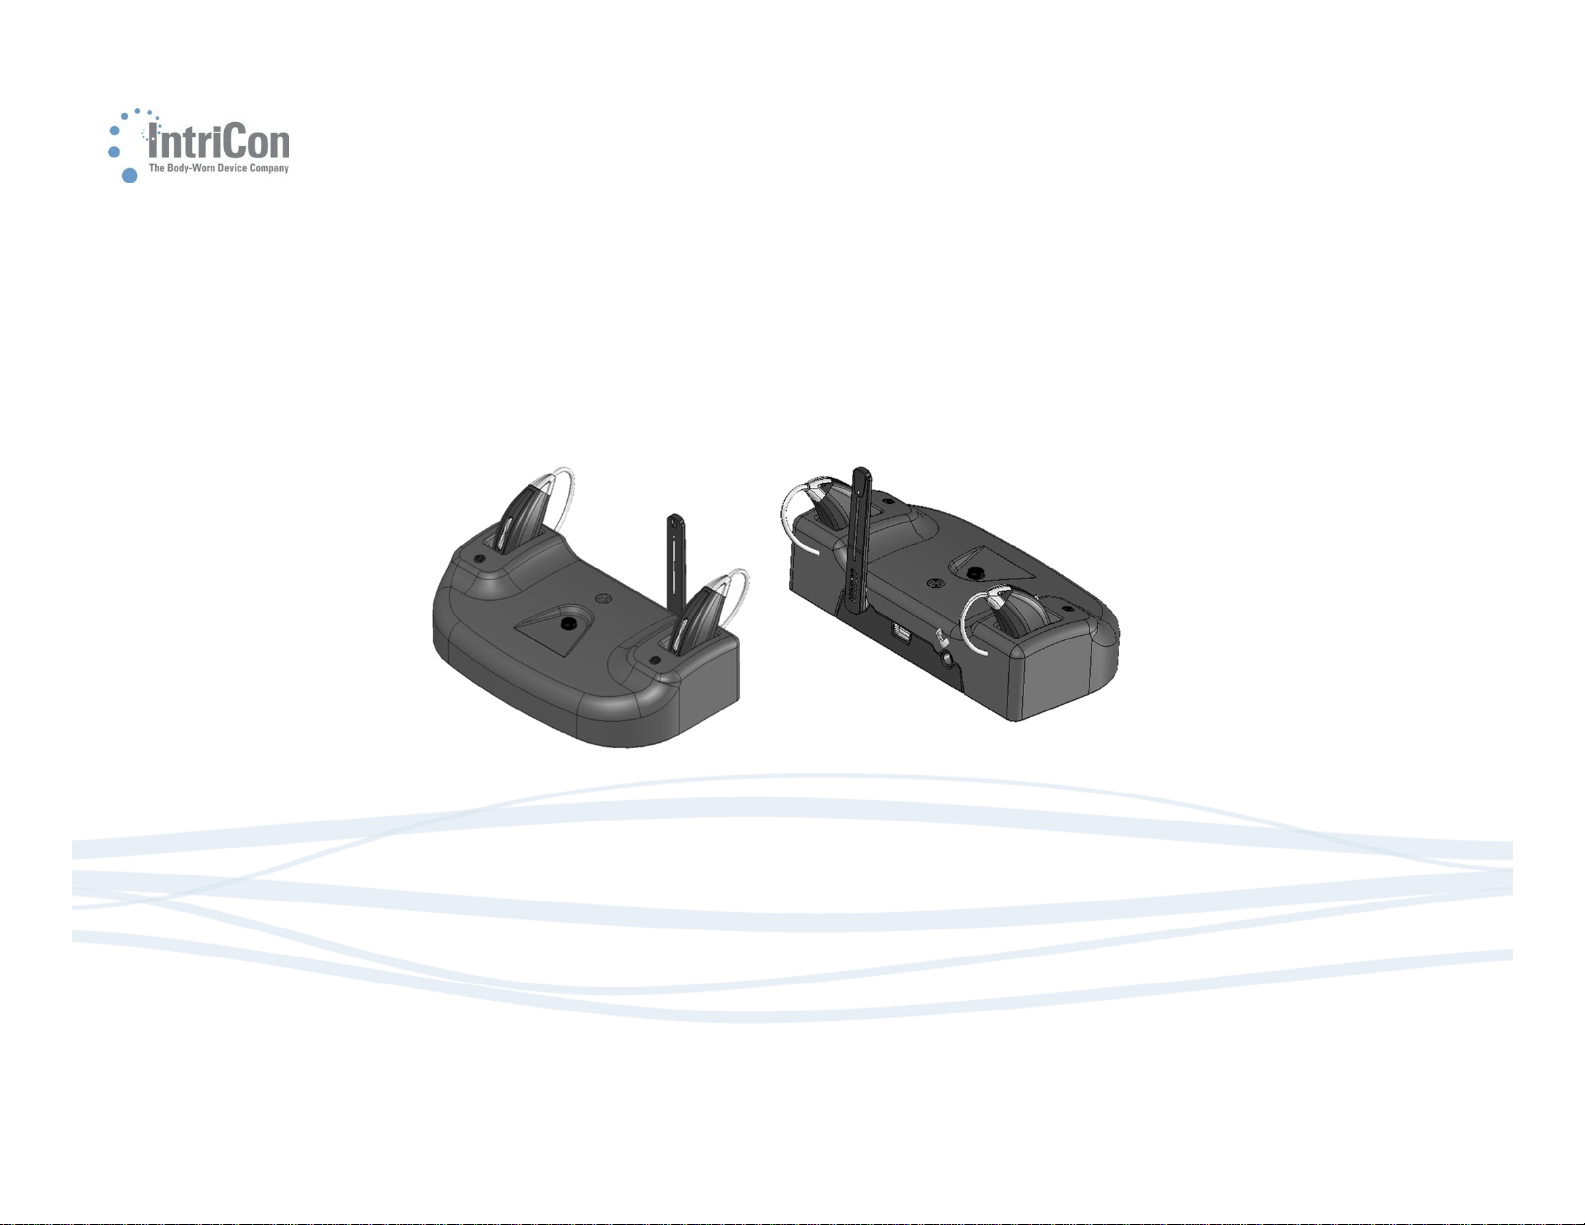
Parts Included
Lumen 1000 PSAP Parts
(Personal Sound Amplification Product)
Lumen 1000
PSAP Devices
a
a. 2 Lumen 1000 PSAP Devices
b. 6 Sound Tubes (3 Left, 3 Right)
c. 6 Dome Tips (2 Small, 2
Medium, 2 Large)
Base
Tip
Tip
c
MediumLarge
22602 Rev B
Small
3
Page 4
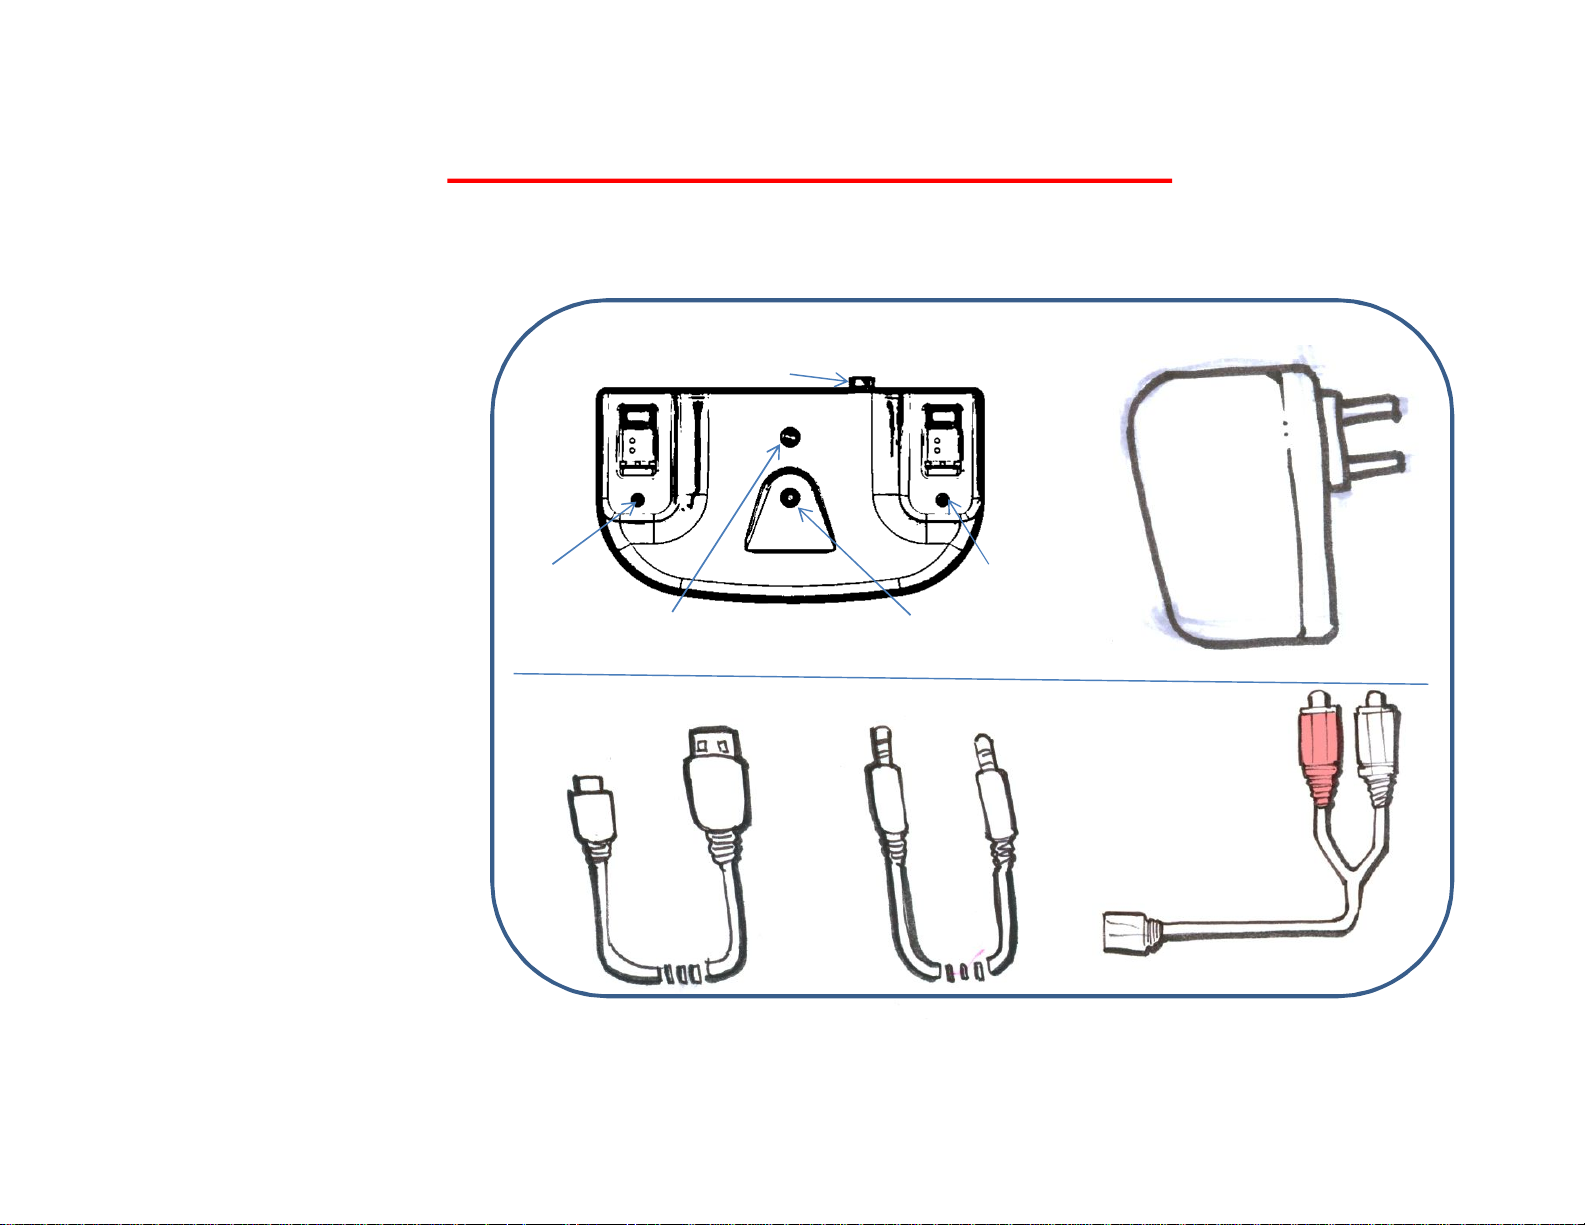
Charging TV Streamer Parts
Parts Included
a. 1 Charging TV Streamer
b. 1 Power Plug
c. 1 Mini USB to USB
Cable
a. 1 Audio Cable
b. 1 RCA to female
audio Adapter
Charging TV Streamer
a
Charging LED
Indicator (Red)
Power LED Indicator
Mini USB to USB Cable
c
Antenna
(Blue)
(M) Mode Button
Audio Cable
d
Power Plug
b
Charging LED
Indicator (RED)
e
RCA to female
audio Adapter
22602 Rev B
4
Page 5

Charging TV Streamer : Set Up
Connecting Charging TV Streamer
1. Raise antenna to vertical position and
insert Mini USB plug into the back of the
Charging TV Streamer.
2. Attach the USB end of the cable to the
Power Plug.
3. Insert the Power Plug into an electrical
outlet.
4. Insert one end of the audio cable into the
Charging TV Streamer.
5. Connect the remaining end of the audio
Tip: When outside of the Charging TV Streamer
range (16 feet), the Lumen 1000 automatically
switches to the PSAP mode.
USB
Mini USB
Audio Cable
Antenna
5.
cable to the desired audio source (TV,
computer or music player). See following
pages for more details.
Tip: The Charging TV Streamer
powerLED will light up Solid blue
when the Mini USB cable is
connected to a power source.
22602 Rev B
Tip: Your Charging TV Streamer
will work best when the antenna is
positioned vertically.
5
Page 6

Charging TV Streamer: Set Up – Connect to TV
Headphone Jack
1. Locate headphone jack on the
front, side or back of your TV.
It will be identified by a
headphone icon label, similar
to the diagram shown.
2. Insert Audio Cable into TV
headphone jack
Audio Output Jacks
1. Locate audio output jacks on the front, side or back of
your TV. They will look similar to the diagramshown. (See
your specific products user manual for more information)
2. Insert the red RCA adapter into the red (R) jack. Insert the
white RCA adapter into the white (L) jack.
3. Insert the audio cable from the Charging TV Streamer
into the female audio jack on the opposite end of the RCA
cable.
622602 Rev B
Page 7

Charging TV Streamer: Set Up – Connect to TV
Computer Headphone Jack
1. Locate headphone jack on the
front, side or back of your
computer. It will be identified by
a headphone icon label, similar
to the diagram shown.
2. Insert Audio Cable into the
computer headphone jack
A/V Receiver Audio Output Jacks
1. Locate audio output jacks on the front, side or back of
your A/V Receiver. They will look similar to the diagram
shown. (See your specific products user manual for
more information)
2. Insert the red RCA adapter into the red (R) jack. Insert
the white RCA adapter into the white (L) jack.
3. Insert the audio cable from the Charging TV Streamer
into the female audio jack on the opposite end of the
RCA cable.
Tip: The TV audio
will be muted if the
headphone jack is
used. Use the RCA
cable connection to
hear audio from the
TV speakers and on
your Lumen 1000
devices.
722602 Rev B
Page 8

Lumen 1000: Assembly and Charging
Assembling the Lumen 1000
1. Choose left and right Sound
Tube
2. Attach Dome Tip to Sound
Tube. Choose a small or
medium Dome Tip based on
your personal comfort.
3. Snap base of Sound Tube
assembly to nipple on
earpiece.
3.
Charging the Lumen 1000
1. Insert body of the Lumen 1000 into the charging
slot of the Charging TV Streamer. The Lumen 1000
must be turned off prior to charging.
2. The Sound Tube will remain hanging on the
Antenna side.
Note: Your Lumen 1000
needs to be fully charged
prior to 1st use. A full charge
takes approximately 1 hour.
1.
Note: Turn off the Charging
TV Streamer(blue LED off)
during Lumen 1000 charging
2.
2.
1.
Note: Turn off Charging
TV Streamerto listen in
PSAP mode only
Tip: The corresponding red LED on the
Charging TV Streamer will turn on
indicating the Lumen 1000 in that
position is charging. The LED will turn
off when the device is fully charged.
22602 Rev B
8
Page 9

Lumen 1000: Positioning on the Ear
Instructions for wearing
1. Place listening device over ear.
2. Insert Dome Tip into ear canal.
3. Tuck Retention Loop along bottom of ear cavity.
1. 2. 3.
922602 Rev B
Page 10

Charging TV Streamer: Device Commands
Note: Make sure Lumen 1000
Using your Charging TV Streamer
1. Wear and turn ON Lumen 1000.
2. Refer to Device Commands table below for the operating modes
Charging TV Streamer Device Commands
Function Button LED
Charging TV Streamer ON Press button Light continuously shines solid blue
and charging TV Streamer is both
ON to hear streaming audio
Charging TV Streamer OFF Press button Light turns off
1022602 Rev B
Page 11

Lumen 1000: Rocker Switch Functions
Command User Action Audible Prompt Says
Turn ON
When in OFF mode, Press rocker down until
an audible response is heard
Press rocker down until an audible response
Turn OFF
is heard
Volume UP Briefly press rocker up
Volume
Briefly press rocker down
DOWN
Low Battery Continuous use “Battery low” at end of battery life
“Battery” followed by “Low”, “One”, “Two”,
“Three”, or “Four” dependent on battery level
“Off”
None. Audible beep when volume reaches
maximum range
None. Audible beep when volume reaches
minimum range
1122602 Rev B
Page 12

Additional Information
The Lumen 1000 battery life is about 4 hours when streaming continuously and 15 hours in
PSAP mode.
Charging TV Streamer range is approximately 16 feet. The Lumen 1000 automatically switches
from PSAP to streaming mode when Charging TV Streamer is turned ON (blue LED on).
Turn OFF Charging TV Streamer (blue LED off) during Lumen 1000 charging.
Turn OFF the Lumen 1000 before charging. This will ensure the Lumen 1000 receives a full
charge.
If the Lumen 1000 battery is completely discharged, place the device in the charger. After a few
minutes, remove the device from the charger, press and hold the rocker down until the “OFF”
voice prompt is heard and then return the device to the charger and allow the device to charge
fully.
When the TV or audio source is ON and the Lumen 1000 is outside the Charging TV Streamer
range, audio from the TV will NOT be heard. The Lumen 1000 will automatically switch to PSAP
mode.
It is required that you turn off the Charging TV Streamer to listen in PSAP mode only
22602 Rev B
12
Page 13

FCC LABEL REQUIREMENTS
This device complies with part 15 of the FCC Rules. Operation is subject to the following two conditions: (1) This
device may not cause harmful interference, and (2) this device must accept any interference received, including
interference that may cause undesired operation. (REF only - PER 15.19(a)(3))
Changes or modifications not expressly approved by IntriCon for compliance could void the user’s authority to
operate the equipment. (REF only – per 15.21)
This equipment has been tested and found to comply with the limits for a Class B digital device, pursuant to part
15 of the FCC Rules. These limits are designed to provide reasonable protection against harmful interference in a
residential installation. This equipment generates uses and can radiate radio frequency energy and, if not
installed and used in accordance with the instructions, may cause harmful interference to radio communications.
However, there is no guarantee that interference will not occur in a particular installation. If this equipment does
cause harmful interference to radio or television reception, which can be determined by turning the equipment
off and on, the user is encouraged to try to correct the interference by one or more of the following measures:
a. Reorient or relocate the receiving antenna. Increase the separation between the equipment and
receiver. Connect the equipment into an outlet on a circuit different from that to which the receiver is
connected. Consult the dealer or an experienced radio/TV technician for help. (REF only – per 15.105)
Draft Version 13
 Loading...