

Page 1

Real-time
managemen
Equipment compliant
with disability
INSTALLATION AND USE
CODED KEYPAD (04-0107)
Keypad with 12 backlit keys.
Indoors or outdoors, surface mounted, compact design.
Real-time updating.
Compatible with the new Mini RF GPRS V2 system.
Visual and audio confirmation of opening (Green LED and
buzzer)
On the Intratone management site, you can:
- Create up to 80 codes which will open 1 to 2 doors
- Create time slots
- Define up to 2 open-access periods
- Check that your Mini RF GPRS system is V2.
Up to 2 keypads per module, which will use the same codes.
V233 – 5022 – AB Installation and Use of the Intratone Mini Keypad
Page 1 / 9
Page 2

SUMMARY
WARNINGS:
The Mini RF GPRS V2 unit is equipped with special voltage-
free 1A relays for garage or carpark gates. To control an
electric or magnet lock, it will be necessary to fit an
additional 5A relay, not supplied.
Never connect directly to the 220V supply.
Dimensions and description ................................. 2
Keypad installation ................................................ 4
Adding or replacing and additional keypad .......... 5
Registration on the management site ................... 6
Troubleshooting and FAQ ..................................... 7
Certificate of compliance ....................................... 8
Certificate of compliance ....................................... 9
V233 – 5022 – AB Installation and Use of the Intratone Mini Keypad
Page 2 / 9
Page 3
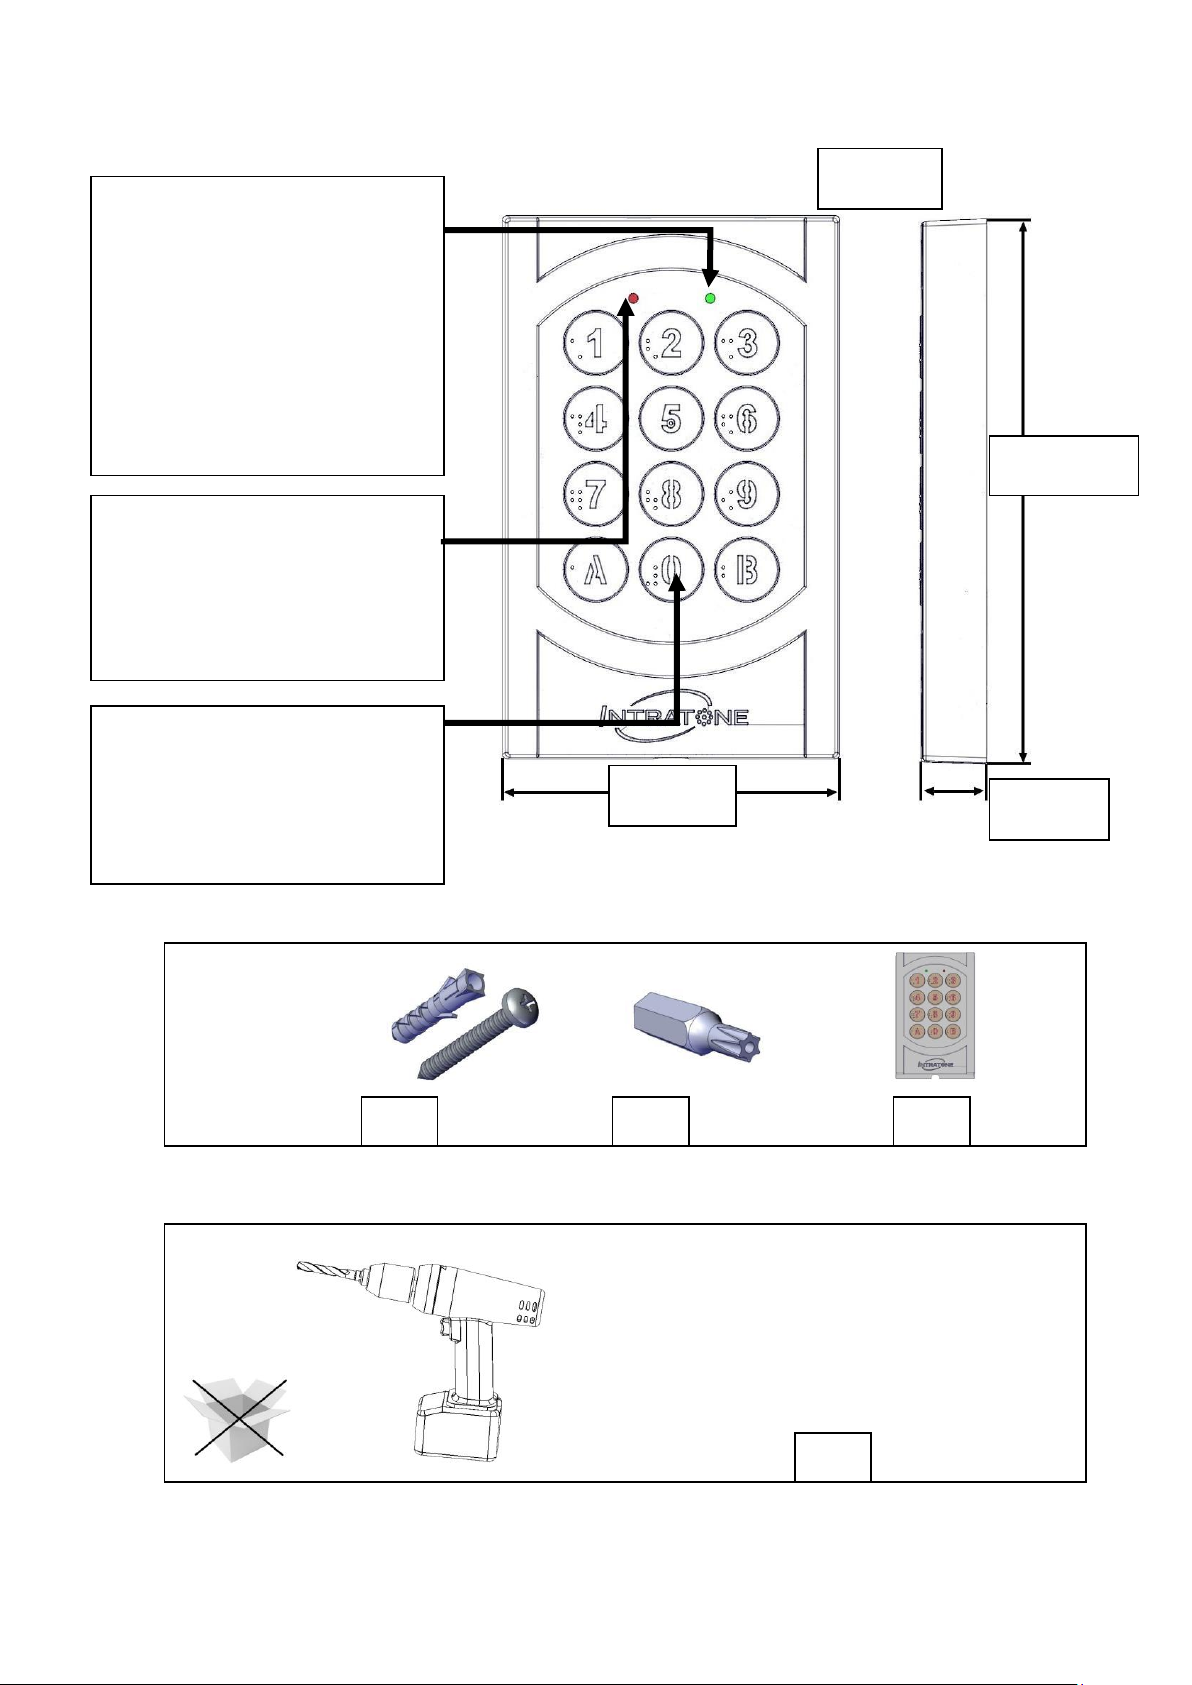
DIMENSIONS AND DESCRIPTION:
TOP
12 backlit keys
0 to 9 and A to B
Red LED: Additional
keypad procedure in
progress (with 2
keypads)
85
137 mm
16
Green LED / buzzer:
Press confirmation:
Short flash and buzz
Valid opening: Long
green LED lit and
buzz
2-wire cable
Ø 0.5 mm up to 100 metres
X 4
X 1
X 1
X 1
Ø 6
V233 – 5022 – AB Installation and Use of the Intratone Mini Keypad
Page 3 / 9
Page 4

KEYPAD INSTALLATION:
3
1
2
4
38
80
63
2-wire Data/Bus SELF-POWERED by the Mini RF
GPRS V2 module Ø 0.5 mm 100 metres max
TOP
Cable
pass
The code 2580 will open relay 1 until the product is updated for the first
V233 – 5022 – AB Installation and Use of the Intratone Mini Keypad
Page 4 / 9
Page 5

ADDING OR REPLACING AN ADDITIONAL
KEYPAD:
2 keypads = same access points / same codes.
Switch the first keypad off and on again and enter this code:
A 759 426 103 B 701
Switch the second keypad off and on again and enter this
code:
A 759 426 103 B 702
When the keypad is switched on, you have 1 minute to enter the
code.
N.B. Nothing needs to be done on the management site. The
new keypad will automatically operate in the same way as the
previously registered one.
V233 – 5022 – AB Installation and Use of the Intratone Mini Keypad
Page 5 / 9
Page 6

REGISTRATION ON THE MANAGEMENT SITE:
Add
Coded keypad
Update
Codes
Residences
www.intratone.info
N.B. If installing an Intrabox kit, ref. 06-0130 GPRS+Keypad, go directly
to Step 3.
Step 1: Go to the residence icon and click “Modify”. Select
your residence, then select your access point.
Step 2: Click:
Step 3: You can now create your “Codes”.
Step 4: After creating your codes, consider upgrading your
residence. >
V233 – 5022 – AB Installation and Use of the Intratone Mini Keypad
Page 6 / 9
Page 7

Problem
Things to check
Is the keypad compatible
with all MINI RF GPRS
modules?
It is only compatible with the V2 version
of the MINI RF GPRS system. At the
back of the GPRS module, the barcode
should begin with 2078 or, on the
management site, check that the GPRS
has the “add” keypad button.
No back-lighting and no
LED lit when a key is
pressed
Is the GPRS switched on?
Is the keypad connected to the 3/4 BUS?
Is there a short-circuit on the bus?
I have installed 2
keypads, but neither of
them are working.
Enter the code A 759 426 103 B 701 on
one keypad and A 759 426 103 B 702 on
the other.
I am replacing one of the
keypads.
My codes do not work
In the “Residences” tab, the update
status is . Click the “Update” button for
your residence.
TROUBLESHOOTING AND FAQ
Operating guarantees:
- The keypad is guaranteed to work at temperatures of between -20°C and +70°C and in
relative humidity that does not exceed 70%.
- The detachable casing must be fitted to protect the module against water damage.
- The top and bottom of this keypad are to be positioned as indicated in these instructions.
- Never connect directly to the 220V supply (out of guarantee)
-
End-of-life recycling of the product:
V233 – 5022 – AB Installation and Use of the Intratone Mini Keypad
The keypad must not be disposed of with unsorted waste, but must be collected for
recycling as Electrical and Electronic Waste.
Page 7 / 9
Page 8

V233 – 5022 – AB Installation and Use of the Intratone Mini Keypad
Page 8 / 9
Page 9

V233 – 5022 – AB Installation and Use of the Intratone Mini Keypad
Page 9 / 9
 Loading...