


High-Power Ceiling Mount Wireless
300N PoE Access Point
User manual

300M High Power Wireless Ceiling AP
Version 1.0 | 7/15/2015
Table of Content
Chapter 1 Product Introduction ............................................................................1
1.1 Product Features...........................................................................................1
1.2 Package Contents.........................................................................................1
1.3 Hardware Description ...................................................................................2
Chapter 2 Hardware Installation Wizard.............................................................3
Chapter 3 Configuration Management................................................................4
3.1 Set Network Configuration...........................................................................4
3.2 Login Device Management Interface..........................................................6
Chapter 4 Function Deployment...........................................................................7
4.1 Status...............................................................................................................7
4.1.1 Overview................................................................................................................7
4.1.2 Firewall...................................................................................................................8
4.1.3 Routes....................................................................................................................8
4.1.4 System Log............................................................................................................8
4.1.5 Kernel Log.............................................................................................................9
4.1.6 Processes..............................................................................................................9
4.1.7 Realtime Graphs.................................................................................................10
4.1.7.1 Load ..........................................................................................................10
4.1.7.2 Traffic.........................................................................................................10
4.1.7.3 Wireless.................................................................................................... 11
4.1.7.4 Connections.............................................................................................11
4.2 System...........................................................................................................12
4.2.1 System.................................................................................................................12
4.2.2 Administration......................................................................................................13
4.2.3 Software...............................................................................................................15
4.2.4 Startup..................................................................................................................16
4.2.5 Scheduled Tasks.................................................................................................17
4.2.6 LED Configuration.............................................................................................. 18
4.2.7 Backup/Flash Firmware .....................................................................................18
4.2.8 Reboot ..................................................................................................................20
4.3 Service...........................................................................................................20
4.3.1 Dynamic DNS......................................................................................................20
4.3.2 UPNP....................................................................................................................22
4.4 Network.........................................................................................................24
4.4.1 Interfaces.............................................................................................................24

300M High Power Wireless Ceiling AP
4.4.1.1 LAN............................................................................................................24
4.4.1.2 WAN..........................................................................................................26
4.4.2 Wifi........................................................................................................................30
4.4.2.1 Radio0: Master "OpenWrt".....................................................................32
4.4.3 DHCP and DNS.................................................................................................. 34
4.4.4 Hostnames ..........................................................................................................38
4.4.5 Static Routes.......................................................................................................38
4.4.6 Diagnostics..........................................................................................................39
4.4.7 Firewall.................................................................................................................40
4.4.7.1 General Settings......................................................................................40
4.4.7.2 Port Forwards ..........................................................................................43
4.4.7.3 Traffic Rules.............................................................................................45
4.4.7.4 Custom Rules..........................................................................................46
4.4.8 QoS.......................................................................................................................47
4.5 Logout............................................................................................................48
4.6 FCC Statement..............................................49

300M High Power Wireless Ceiling AP
1
Chapter 1 Product Introduction
The 300M High Power Wireless Ceiling AP is based on 802.11n standard, using MIMO,
OFDM technology, provides a wireless data transmission rate up to 300Mbps; using high
power PA design of wireless power up to 400mW, long distance transmission and provide
greater coverage simultaneously has signal strong penetration force; by ceiling type
installation design that is very suitable enterprises, hotels, airports, schools and other
indoor or public places, to realize high-speed network coverage. At the same time the
product support Ethernet PoE power and external power adapter, support the
IEEE802.3af standard power supply, so that the AP can also be installed in places without
power supply, reduces the installation cost, also make the installation and use more
simple and convenient, flexible network layout and installation, improve the network layout.
This AP also provides very convenient comprehensive network management functions,
support a variety of wireless data encryption, can guarantee the security of data in the
wireless network transmission, support for IP, for AP SSID, encryption, upgrade, reset and
restart management function.
1.1 Product Features
z 1-Port 10/100Mbps RJ45 Ethernet interface, Supports standard 802.3af PoE by
electricity.
z Be consistent with 802.11b/g/n wireless protocol, providing up to 300Mbps wireless
rate.
z Wireless high power up to 400mW meet the remote transmission and large area
coverage.
z Support AP, WDS mode, can easily realize the wireless AP, wireless repeater, a
wireless point-to-point, point to multipoint wireless bridge bridge.
z Support 64/128 bit WEP encryption, wpa/wpa2, wpa-psk/wpa2-psk encryption and
security mechanism.
z Support Web interface management, which can be configured and management of
the rich AP.
z Using ceiling type installation design, indoor decoration. With small size, simple
installation and stability.
1.2 Package Contents
z Ceiling AP
z Set of installation accessories
z User Manual
z Warranty Card

300M High Power Wireless Ceiling AP
2
1.3 Hardware Description
Ethernet Port: Ethernet port jack (RJ45). For wired Ethernet connection, and PoE
-powered devices to be powered by the port to the AP.
Power Interface: When the Ethernet does not support the PoE power supply, the port can
be connected to DC12V/1A power supply adapter.
Reset Button: If you need to restore the AP to the factory default settings, please use
sharp object to hold the reset button for about 6 seconds after release, AP will
automatically restore factory settings and restart.
300M High Power Wireless Ceiling AP
3
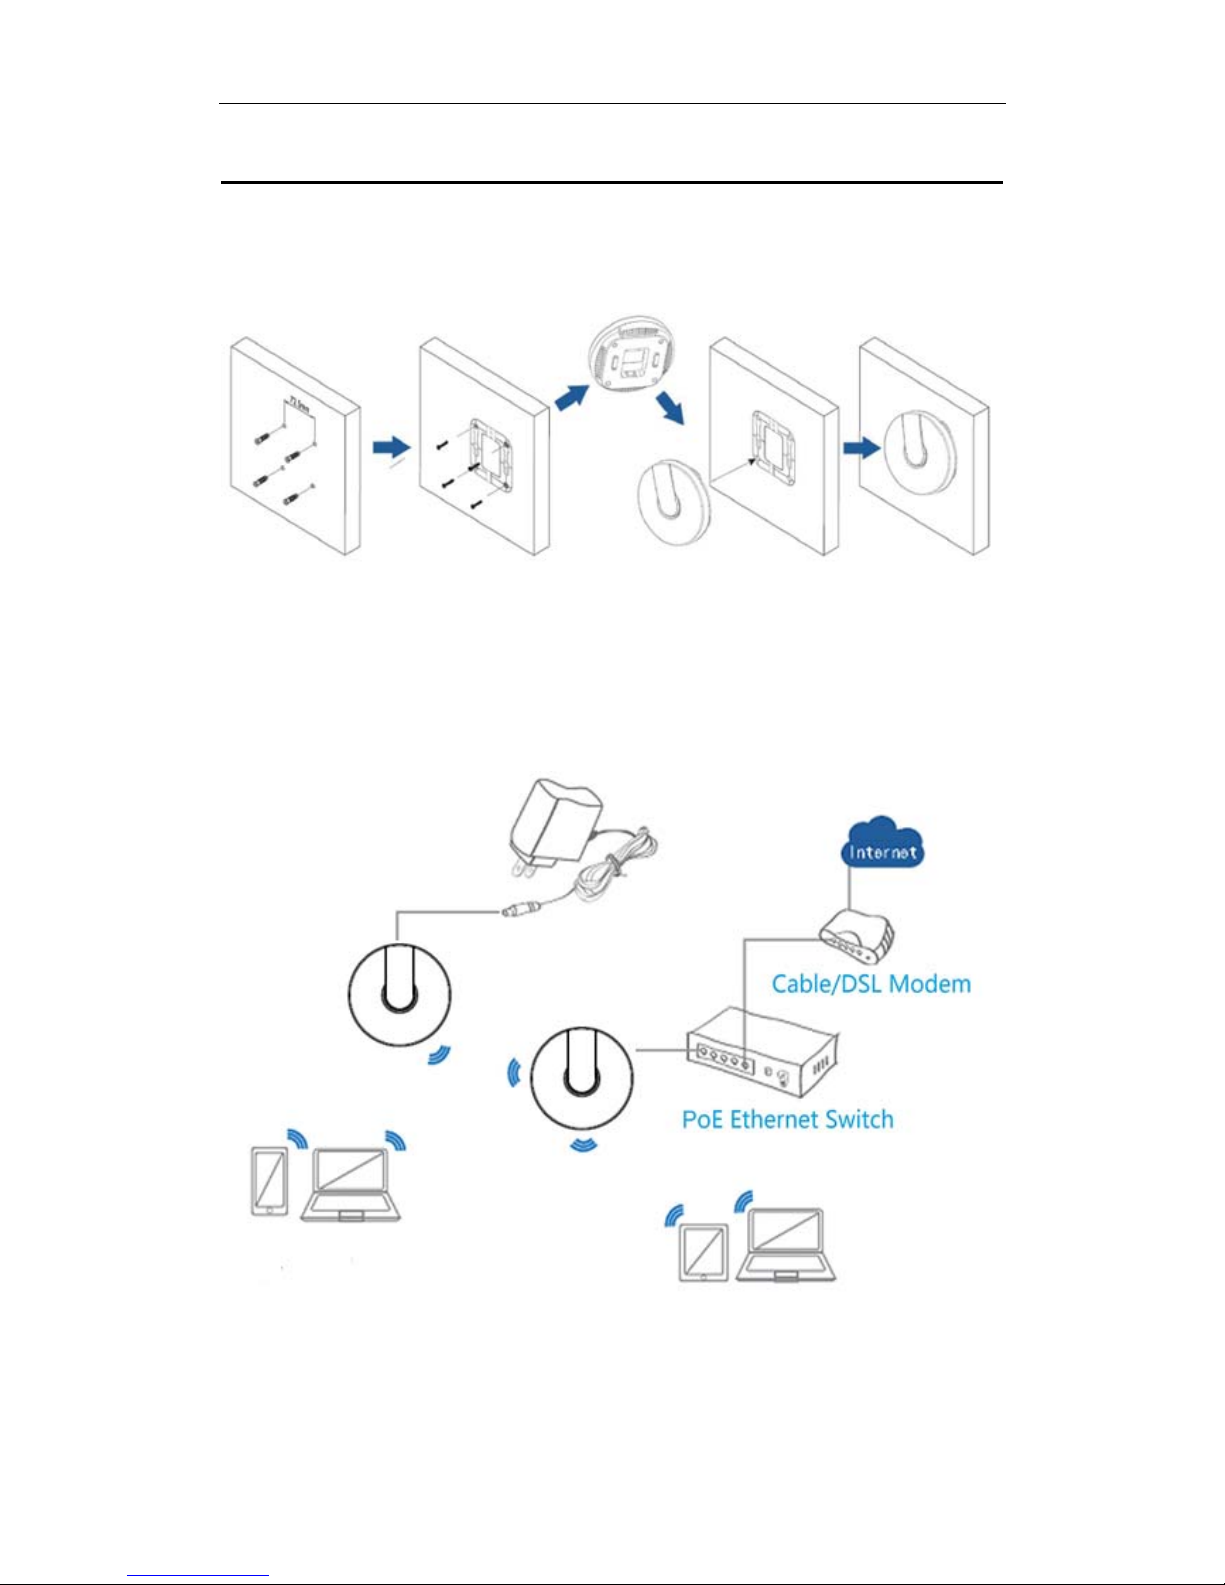
Chapter 2 Hardware Installation Wizard
1. The AP chassis are placed on the wall or the ceiling, with mark pen mark hole fixed
position, and then drilling.
2. AP chassi s with screw s is fixed on the wall or the ceiling.
3. Will support the PoE Ethernet cable to the AP has been configured Ethernet ports
(optional up or down), if you do not support PoE power supply , DC 12V/1A power supply is
connected.
4. The AP linked to the fixed good chassis.
Note: The default SSID for the AP: OpenWrt
The default wireless password: 12345678
300M High Power Wireless Ceiling AP
4
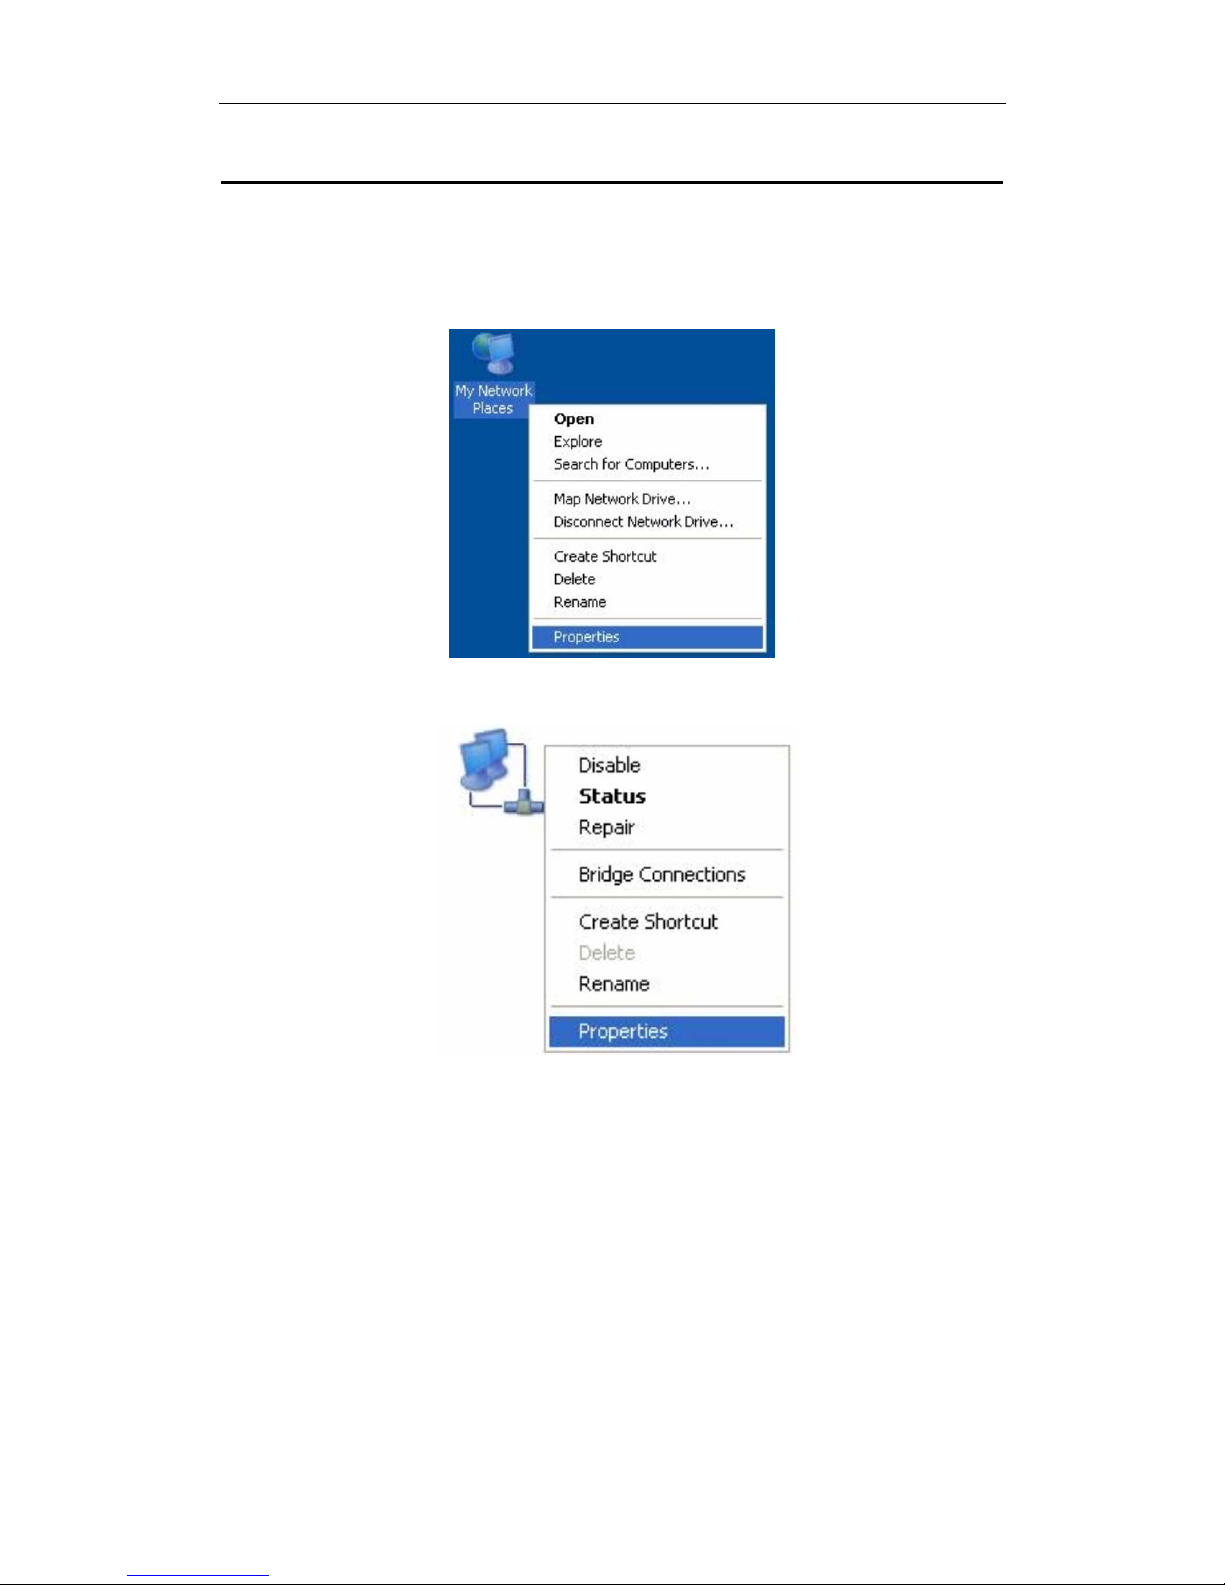
Chapter 3 Configuration Management
3.1 Set Network Configuration
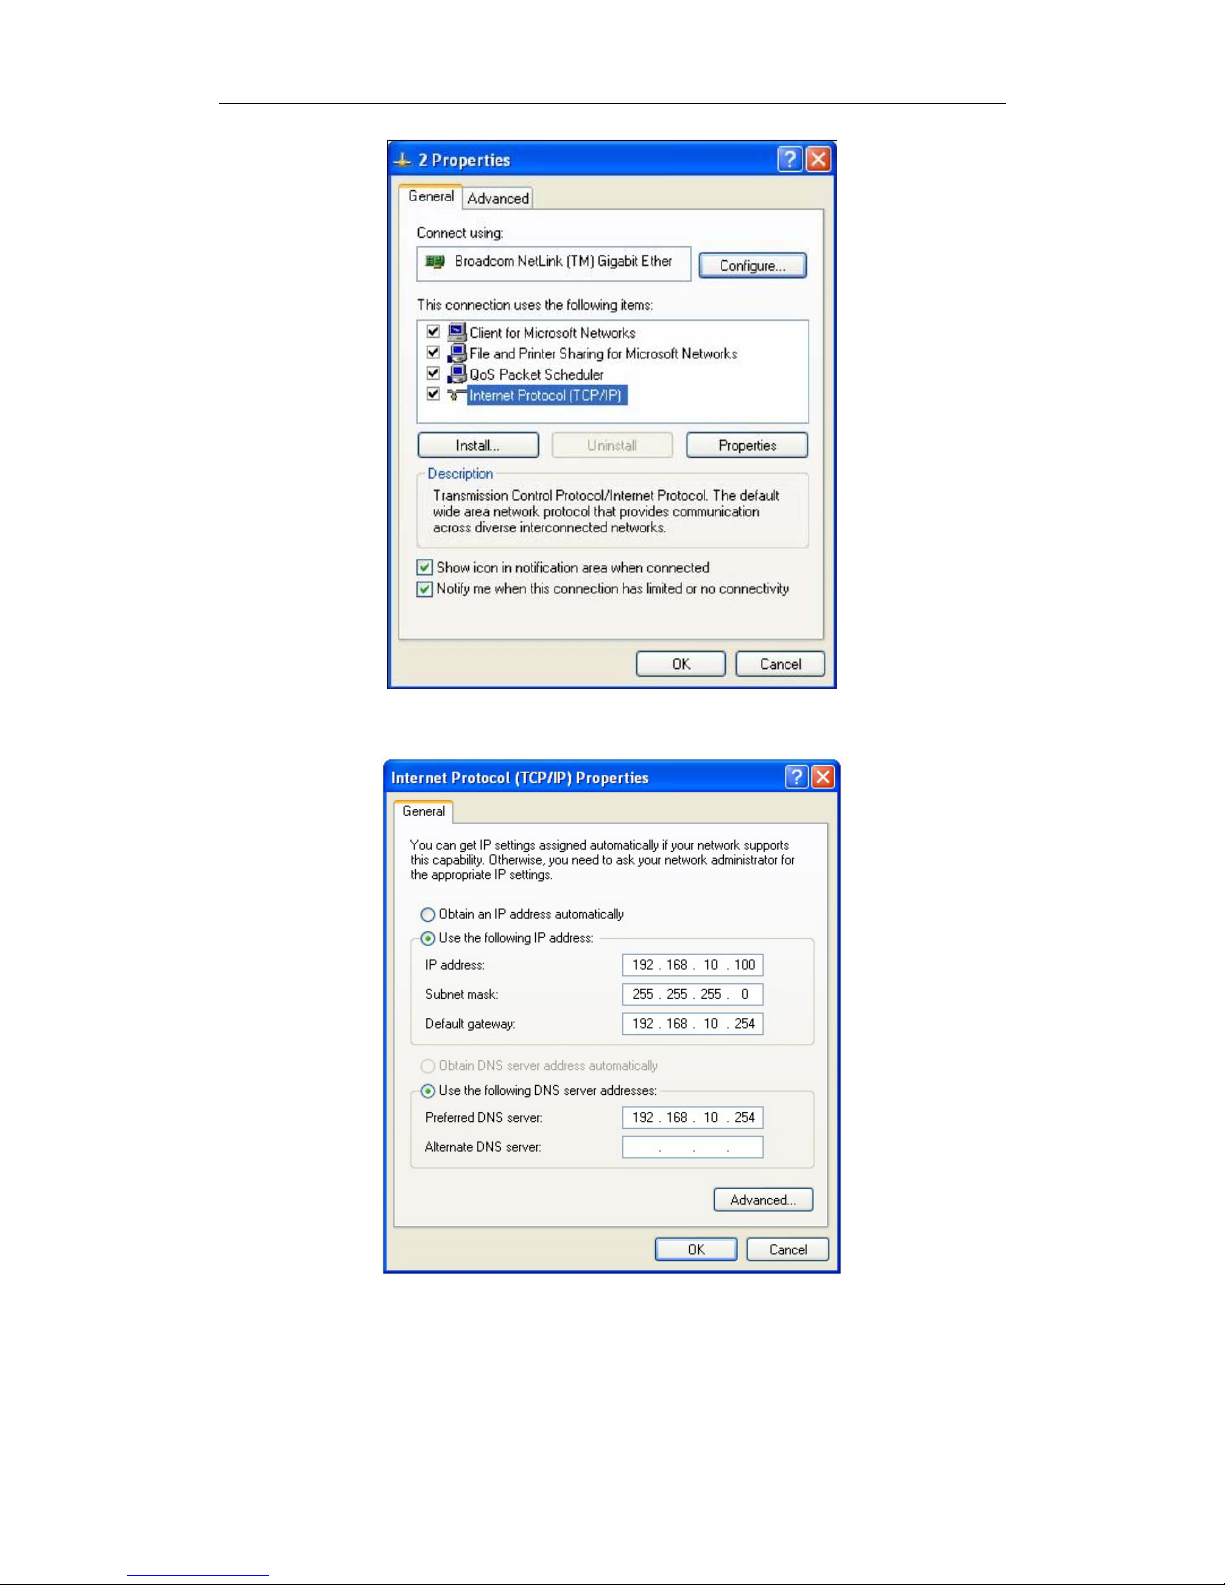
1. On your computer desktop, right click "My Network Places" and select "Properties".
2. Right click "local Area Network Connection" and select "Properties".
3. Select "Internet Protocol(TCP/IP)" and click "Properties".
300M High Power Wireless Ceiling AP
5
4. Select "Use the following IP address(s)" and "Use the following DNS server
address". Click "OK".
IP address: 192.168.10.XXX: ( XXX is a number from 1~253)
Subnet mask: 255.255.255.0
Default gateway: 192.168.10.254
Preferred DNS server: 192.168.10.254
Click "OK" to save the setting.
300M High Power Wireless Ceiling AP
6
Note: IP address set here is only for entering the AP management page to set specific IP
address setting, please refer to the actual use of the environment.
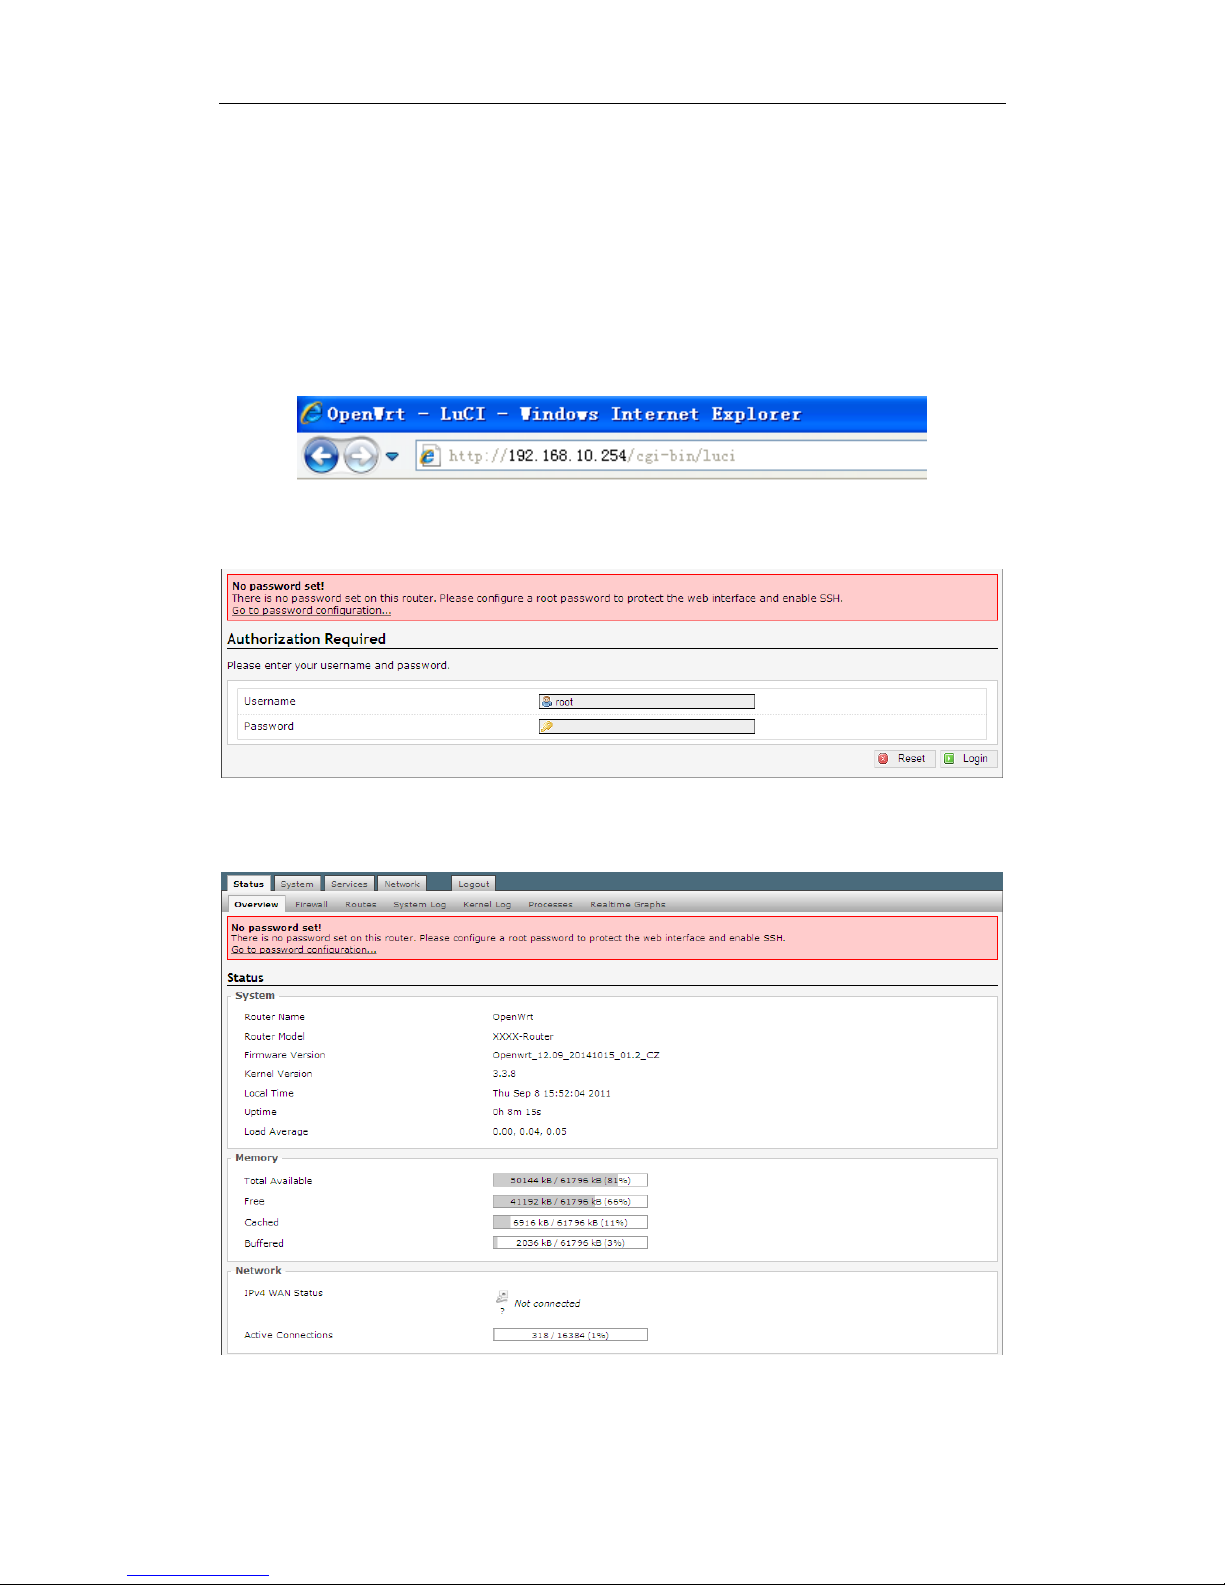
3.2 Login Device Management Interface
1. Connect to the AP through a wireless network or wired network.
2. Open IE browser, in the address bar enter http://192.168.10.254, press the Enter key to
enter the login screen.
3. The default user name is root, the password is blank, click on the "Login", the login
page as shown below.
4. After the above steps to successfully log AP management interface page. Click Home
at the top of the main menu bar to configure the corresponding function.

300M High Power Wireless Ceiling AP
7
Chapter 4 Function Deployment
4.1 Status
Click on "Status", you can see the Overview, Fire wall, Routes, System Log, Kernel Log,
Processes, Realtime Graphs options.
4.1.1 Overview
Click on the "Status>Overview" option, you can see the following interface.
Through this interface, you can learn "System" information(AP Name, AP Model,
Firmware Version, Kernel Version, Local Time, Uptime, Load Average), "Memory"
information(Total Available, Free, Cached, Buffered), "Network" information(IPv4 WAN
Status), "DHCP Leases" information, "Wireless" information, "Associated Stations"
information, "Active UPnP Redirects" information.
300M High Power Wireless Ceiling AP
8
4.1.2 Firewall
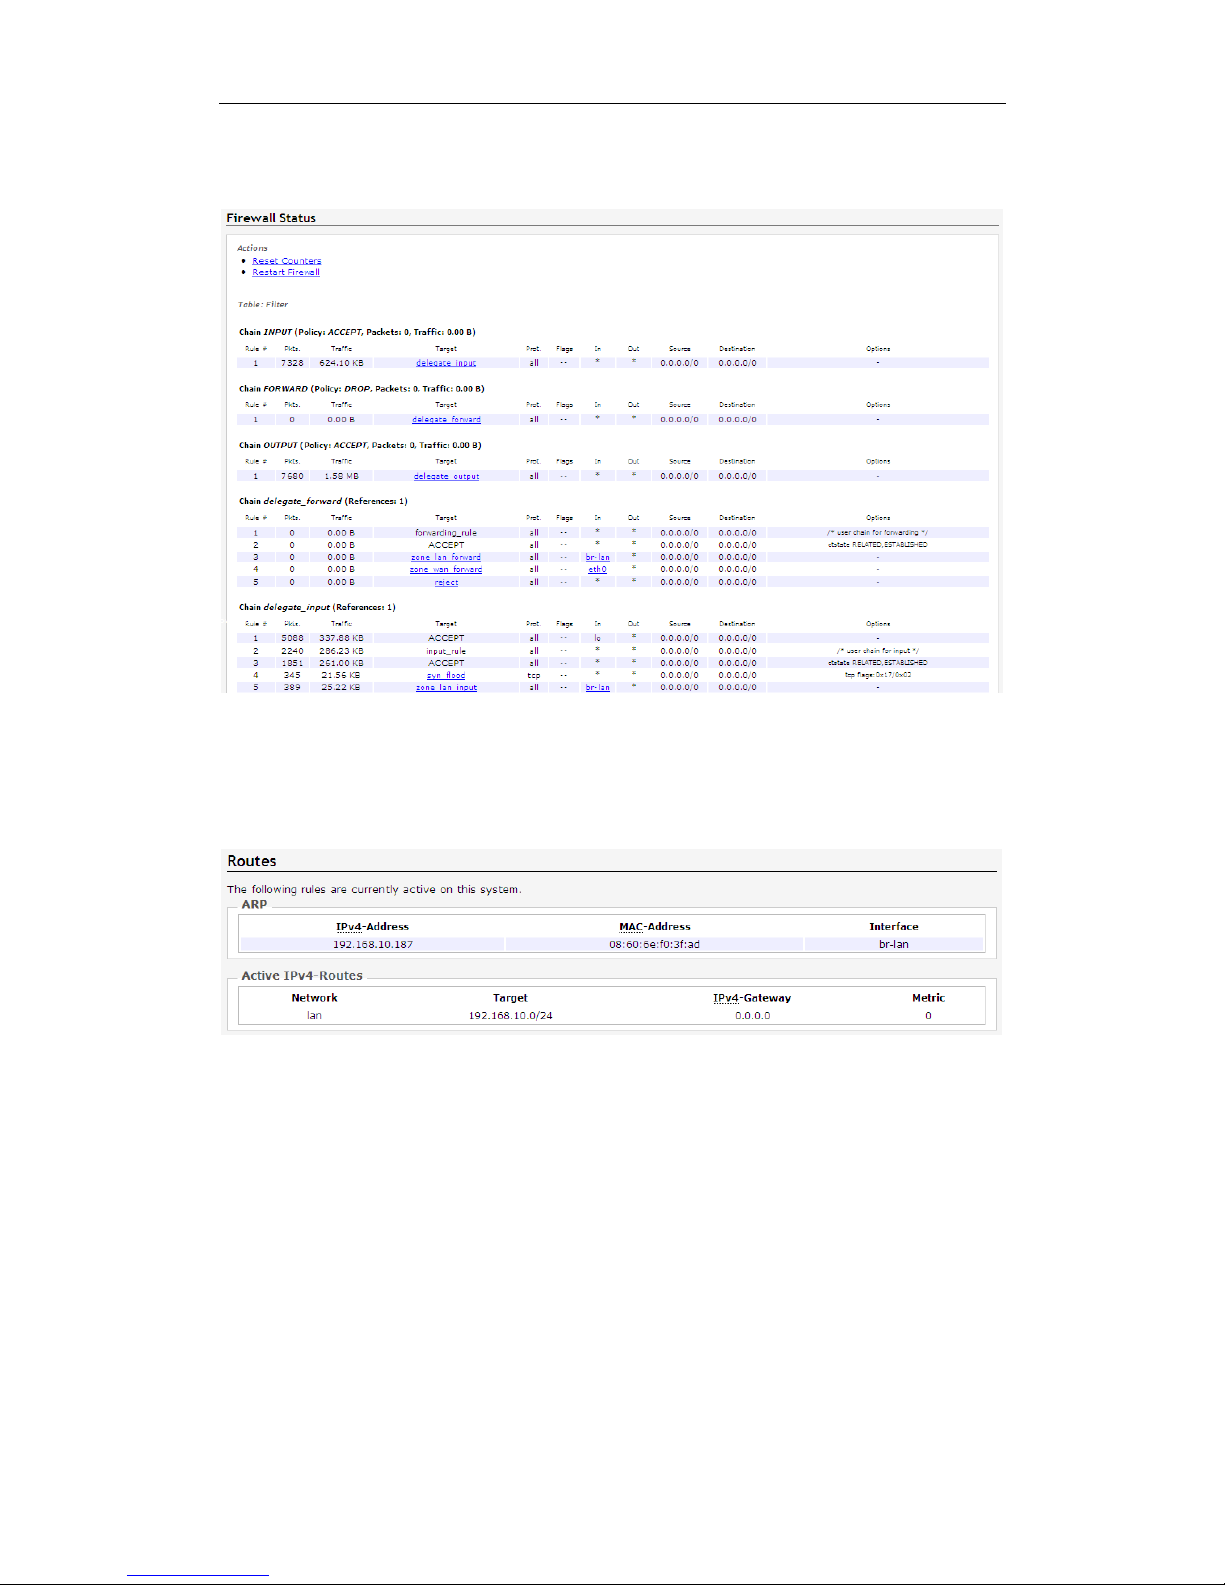
Click on the "Status>Firewall" option, you can see the following interface.
Through this interface, you can know what is allowed by the packet, which is filtered
packets.
4.1.3 Routes
Click on the "Status>Routes" option, you can see the following interface.
Through this interface, you can learn the relevant information systems active connections:
IP address, MAC address, and gateway.
4.1.4 System Log
Click on the "Status>System Log" option, you can see the following interface.

300M High Power Wireless Ceiling AP
9
Through this interface, you can get information link establishment fails, the packet filter log
information, etc. through the log. By logging on to the log host, the system administrator
can understand the log events for log analysis. Logs can help administrators locate faults,
troubleshooting, can also help administrators to manage network security.
4.1.5 Kernel Log
Click on the "Status>Kernel Log" option, you can see the following interface.
Through this interface, you can record information can not be written about the kernel disk,
this is because the information is loaded before the file system generated.
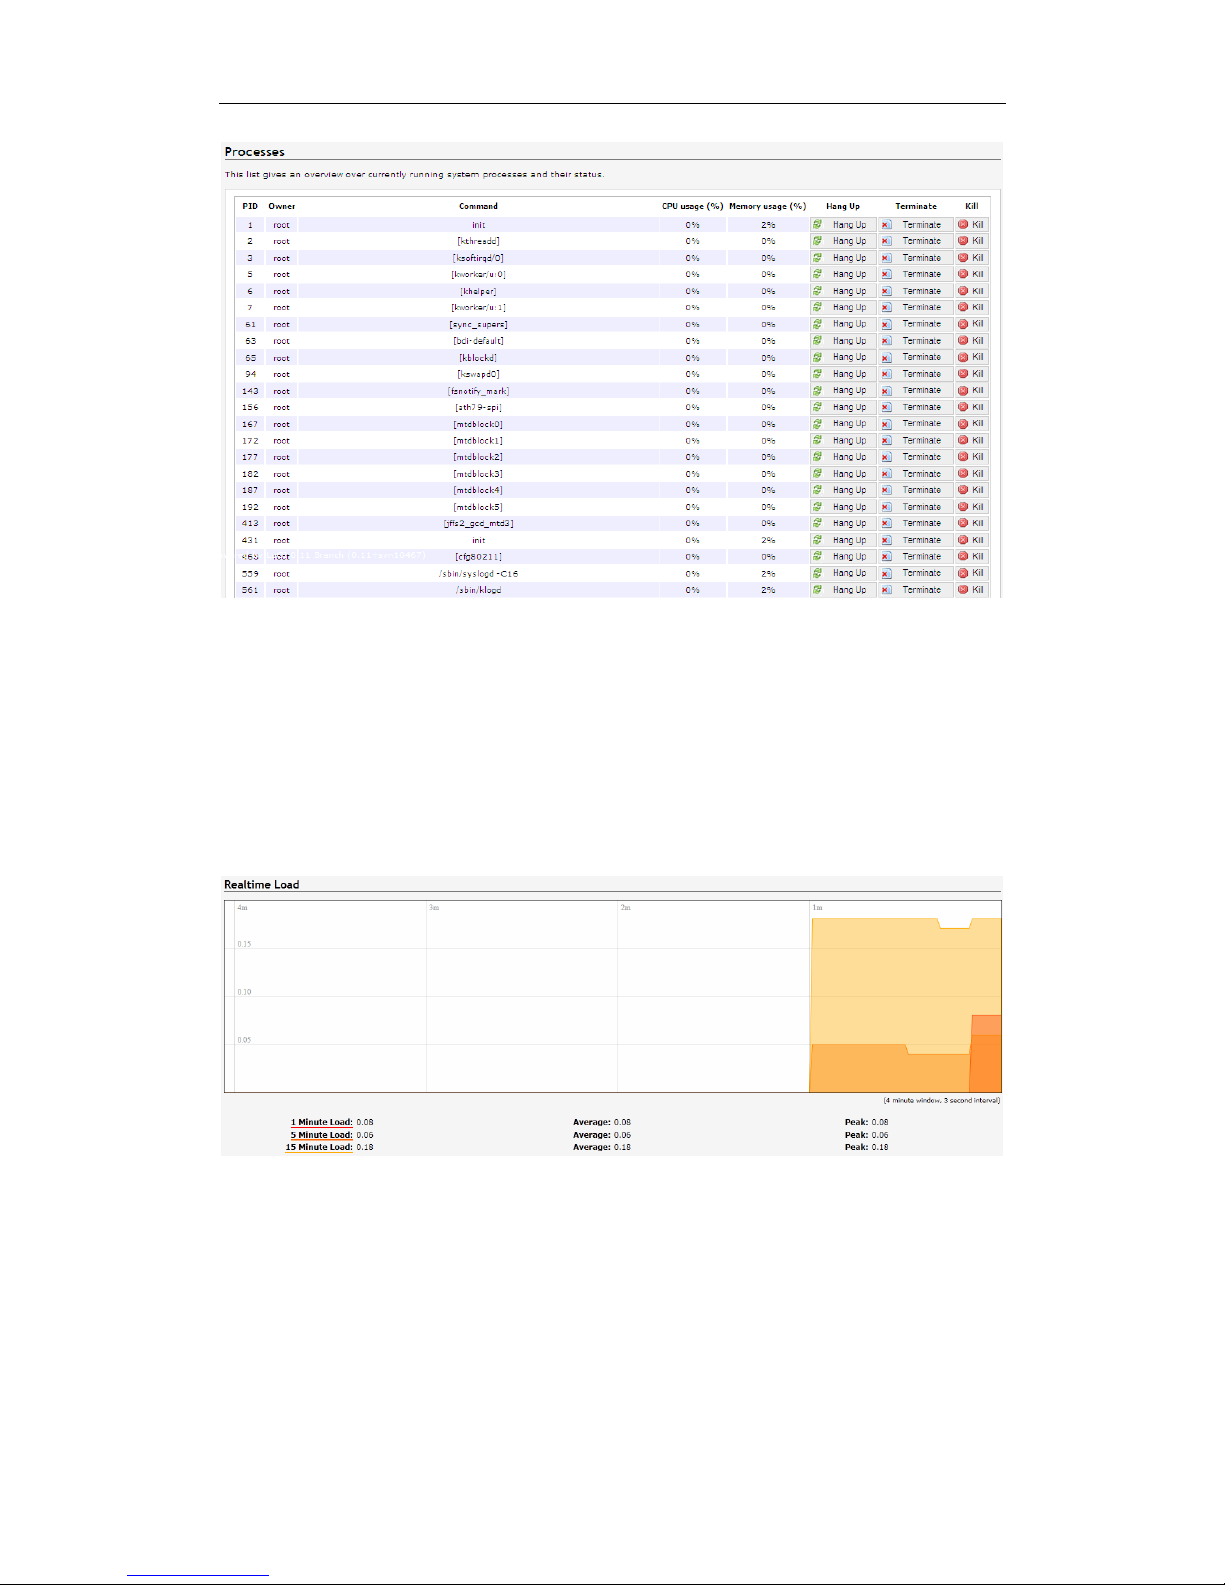
4.1.6 Processes
Click on the "Status>Processes" option, you can see the following interface.
300M High Power Wireless Ceiling AP
10
Through this interface, you can understand the process of running the system and their
status information. And its suspended, closed, forced to close operations.
4.1.7 Realtime Graphs
Click the "Status> Realtime Graphs" option, you can see the Load, Traffic, Wireless and
Connections options.
4.1.7.1 Load
Click the "Status>Realtime Graphs>Load" option, you can see the following screen in
Realtime Load information.
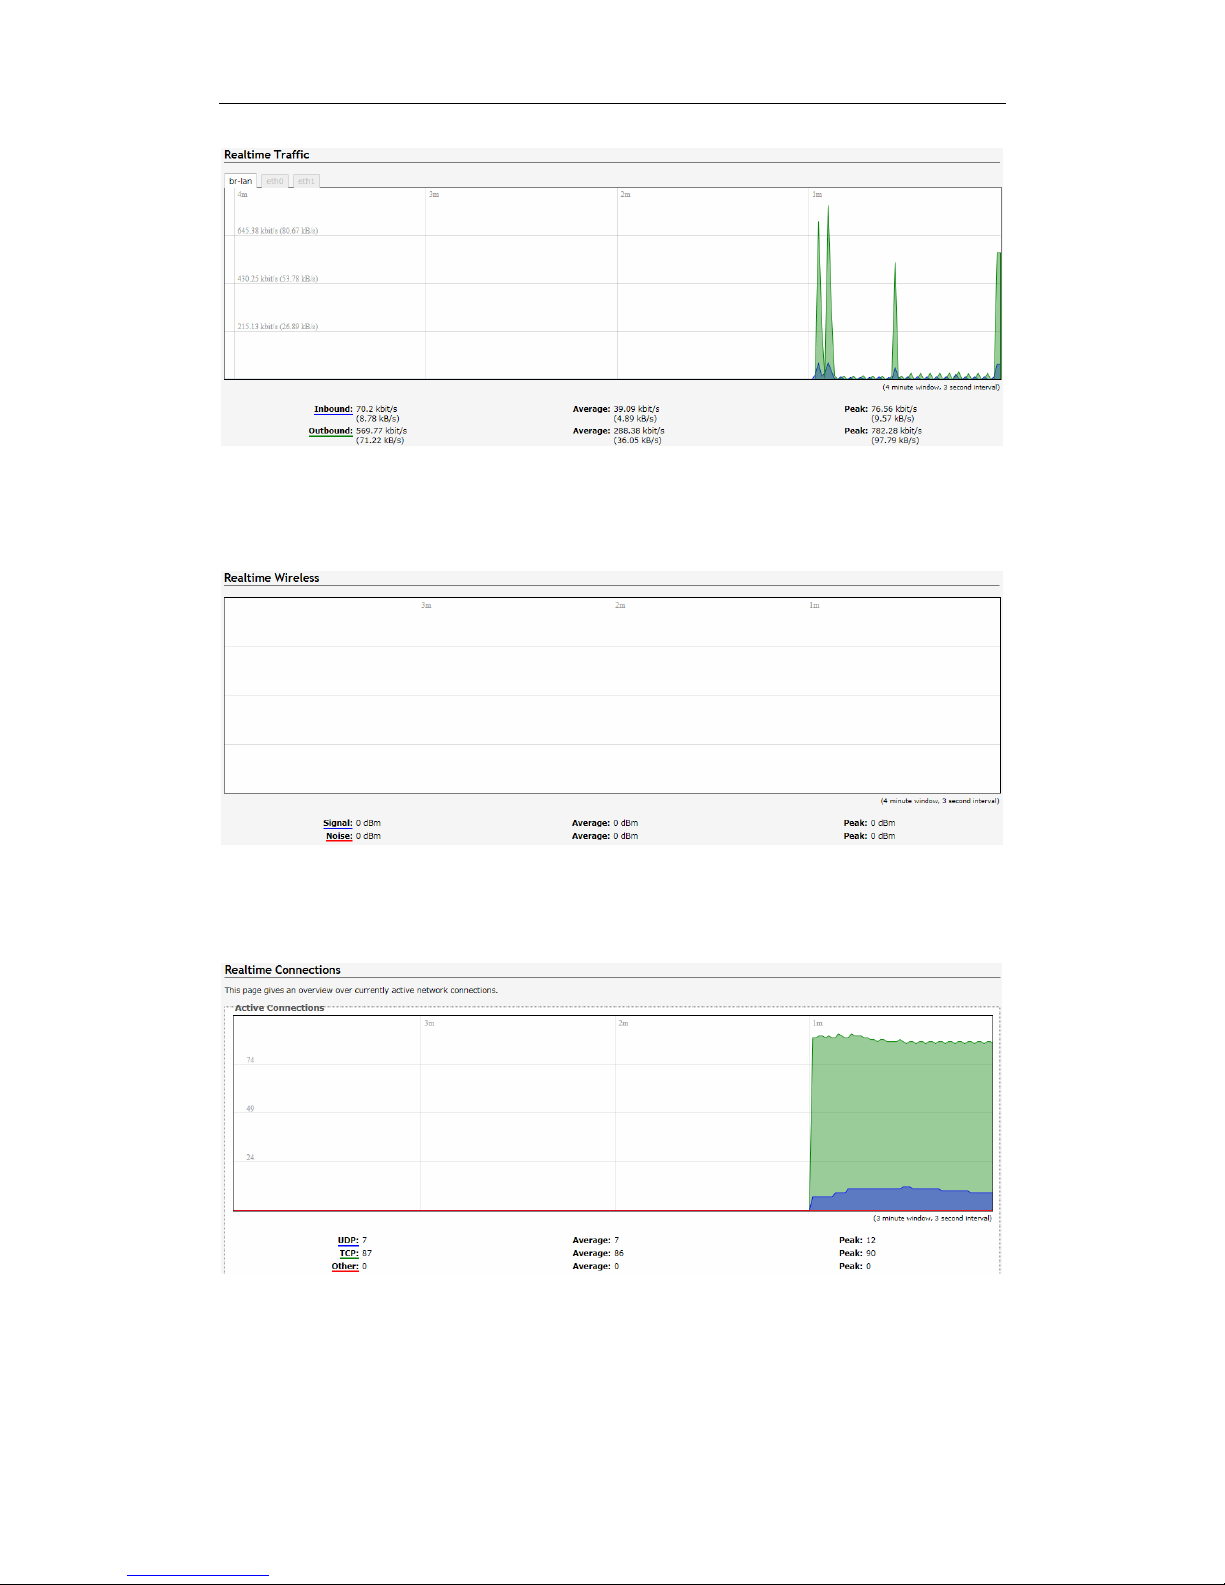
4.1.7.2 Traffic
Click the "Status>Realtime Graphs>Traffic" option, you can see the following screen in
Realtime Traffic information.
300M High Power Wireless Ceiling AP
11
4.1.7.3 Wireless
Click the "Status>Realtime Graphs>Wireless" option, you can see the following screen in
Realtime Wireless information.
4.1.7.4 Connections
Click the "Status>Realtime Graphs>Connections" option, you can see the following
screen in Realtime Connections information.
300M High Power Wireless Ceiling AP
12
4.2 System
Click on "System", you can see the System, Administration, Software, Starup, Scheduled
Tasks, LED Configuration, Backup/Flash Firmwar e, Reboot options.
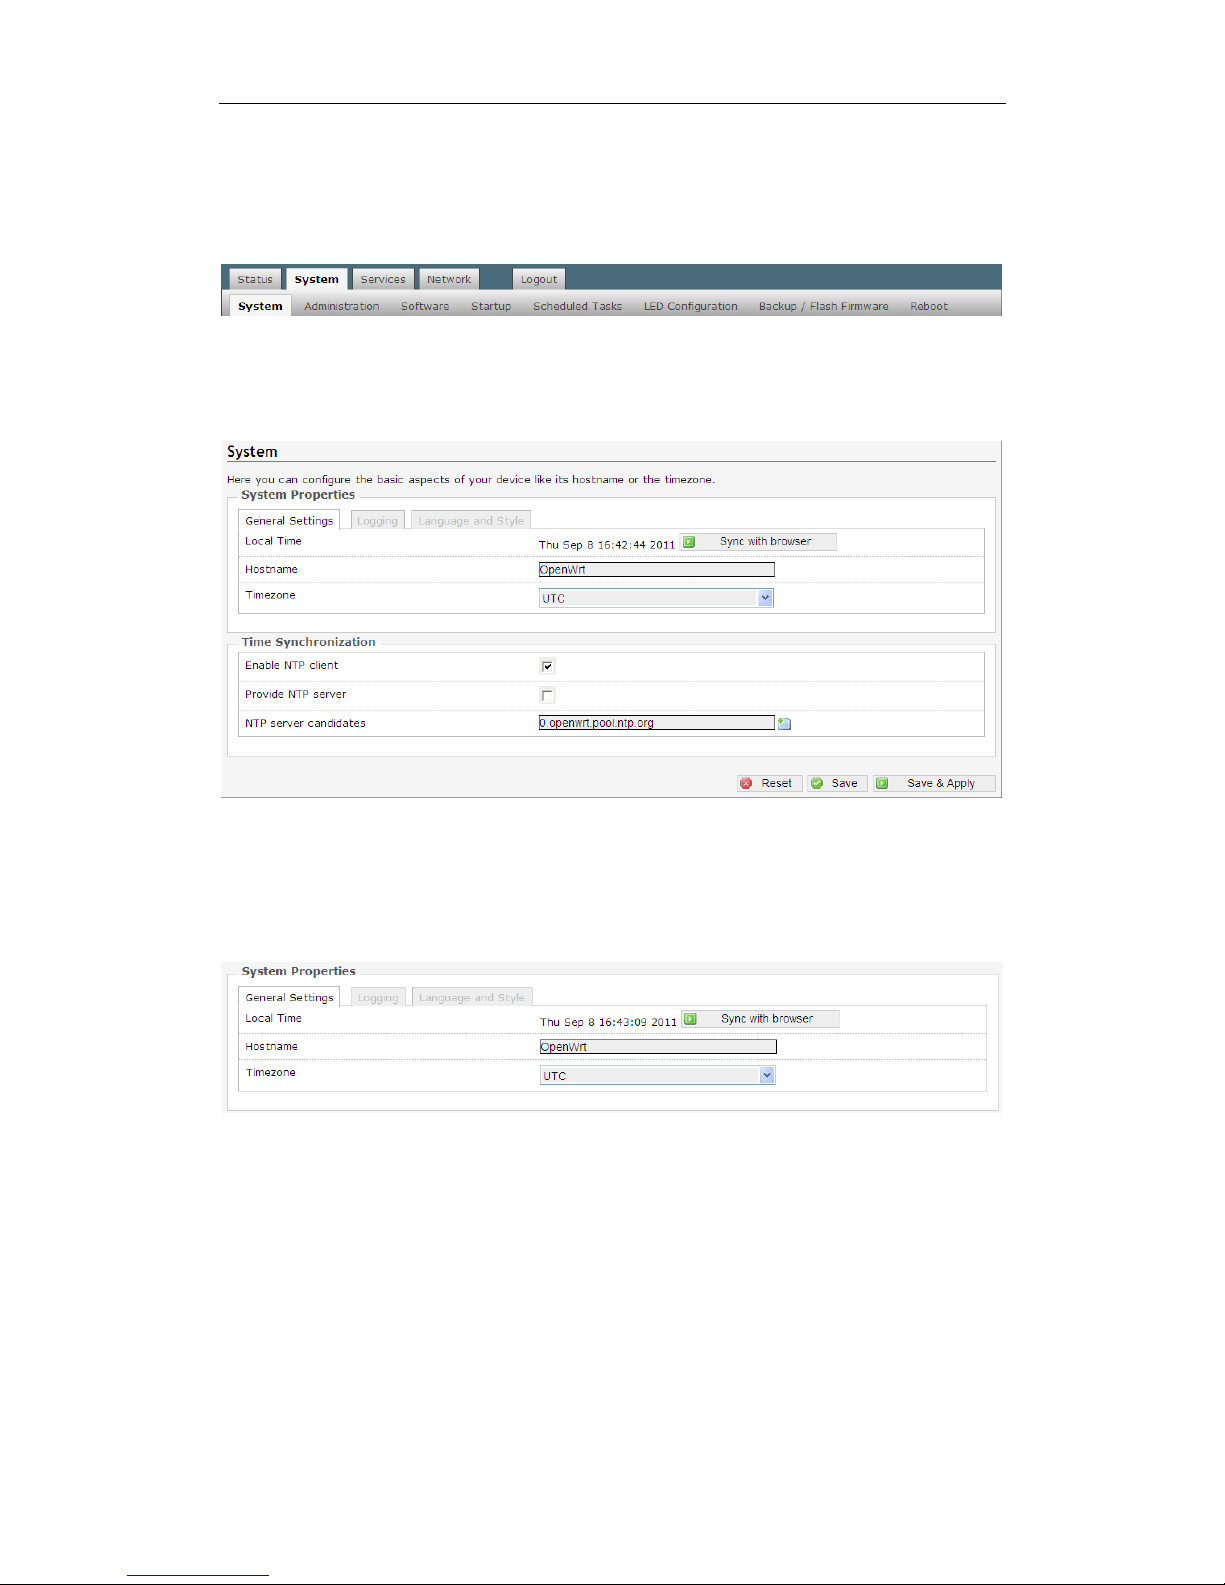
4.2.1 System
Click "System>System" option, you can set the System Properties and Time
Synchronization.
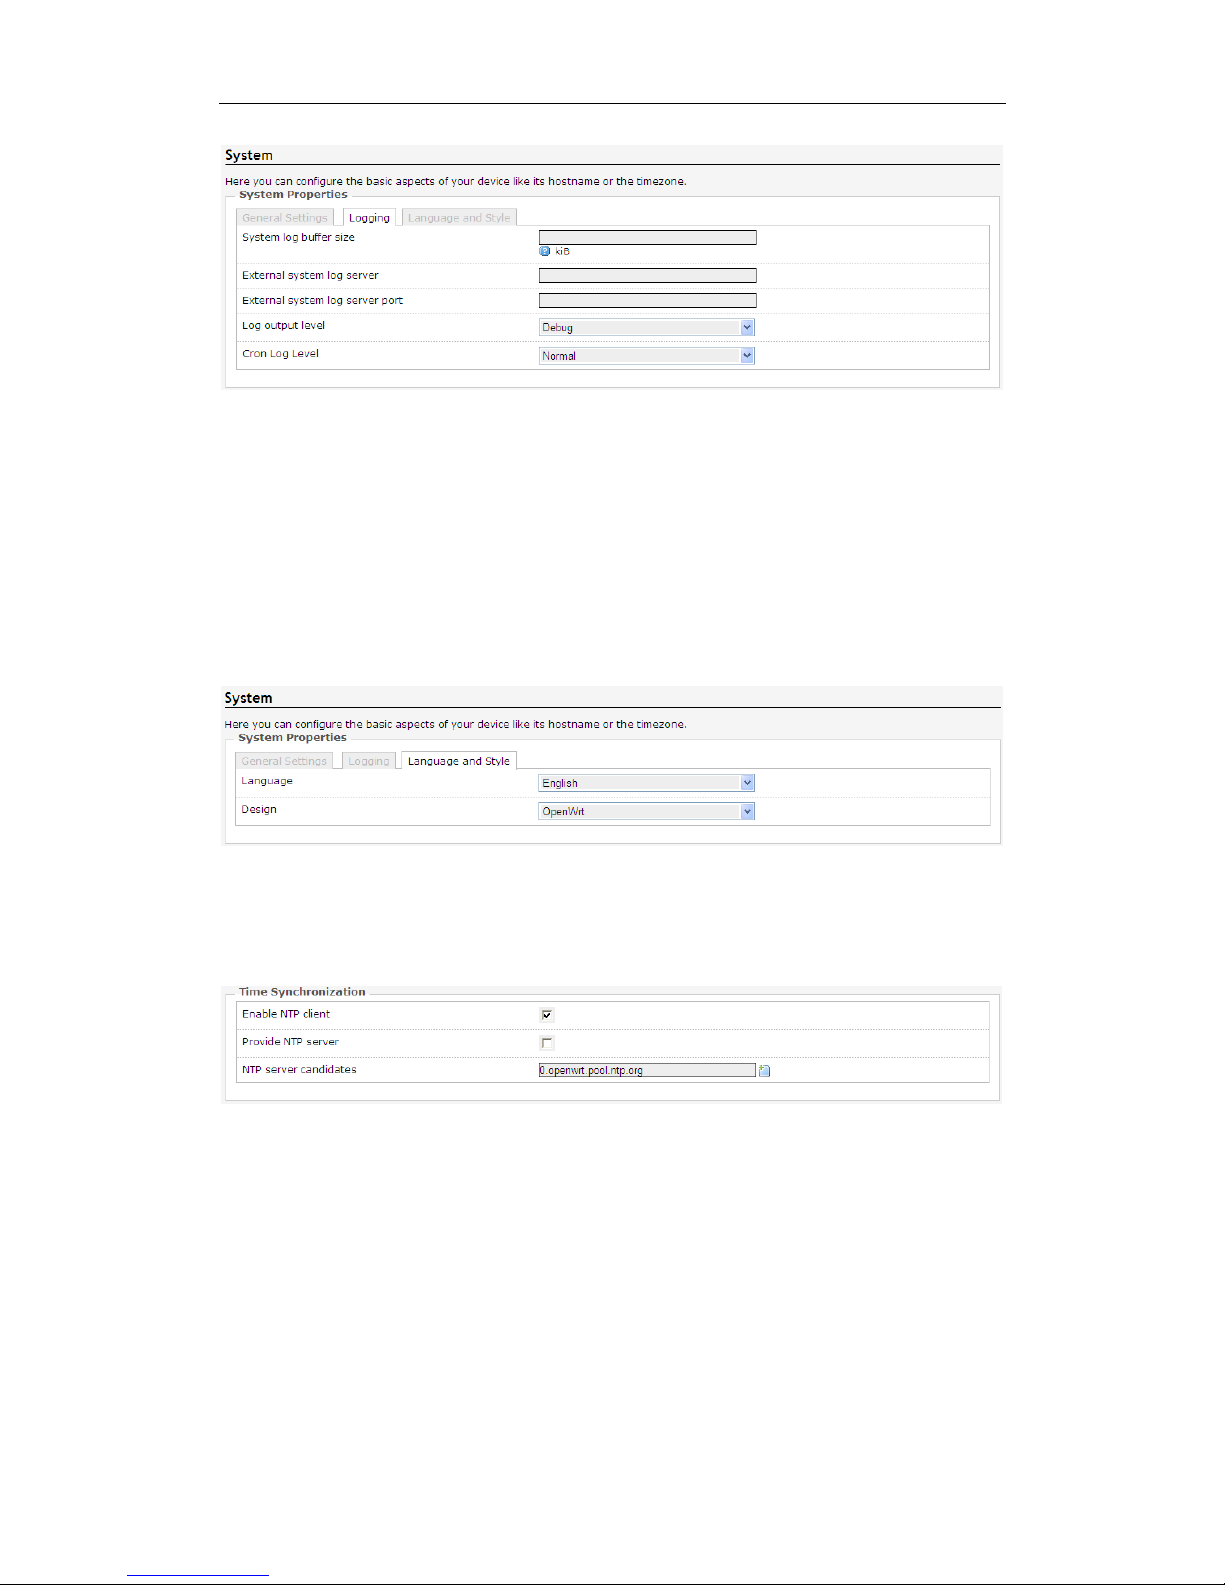
System Properties
System Properties are divided into General Settings, Logging, Language and Style three
options.
Click on the "General Settings" option, you can see the following interface.
Local Time: Click "Sync with browser", you can display the time zone that corresponds to
your choice time.
Hostname: you use a AP name.
Timezone: you can select the desired time zone from the drop-down list.
300M High Power Wireless Ceiling AP
13
System log buffer size: You can specify the size of the log buffer here.
External system log server: remote host is configured to receive log information
machine.
External system log server port: configured to receive a remote host machine’s port log
information.
Log output level: Select the level of logging, Debug, Info, Notice, Warning, Error, Critical,
Alert and Emergency eight grades.
Cron Log Level: Select the level Cron logs, Debug, Normal and Warning three levels.
Click on the "Language and Style" option, you can see the following interface.
Language: Select the AP management interface in the language used, there are auto,
English and Chinese three kinds to choose from.
Time Synchronization
Time Synchronization settings interface as shown below.
Enable NTP client: If you check this, you can configure the server multiple time sources.
Provide NTP server: As long as your computer can be networked, can be a LAN or WAN
computer time calibration within.
4.2.2 Administration
Click on the "System>Administration" option, you can see the following interface.

300M High Power Wireless Ceiling AP
14
Router Password
Router Password settings interface as shown below.
Password: You can modify the registry Router's password in this column, the default
password is blank.
Confirmation: Enter your password again.
Click the "Save & Apply",Save your router's password.
SSH Access
SSH Access settings interface as shown below.

300M High Power Wireless Ceiling AP
15
SSH: Secure Shell SSH abbreviation for the establishment in the application layer and the
transport layer on the basis of security protocols. SSH is more reliable, designed to
provide security protocol for remote login session, and other network services. SSH
protocol can effectively prevent the use of remote management process of information
disclosure issue.
Dropbear: Provides integrated SCP server and SSH -based shell access.
Interface: listen specified interface, not specified monitor all of them.
Port: Specify Dropbear listening port is 22.
Password authentication: Check the Allow SSH password authentication.
Allow root logins with password: Check the root user is allowed to log in with a
password.
Gateway ports: Allows remote hosts to connect to the local SSH port forwarding.
Public key authentication, in fact, use a pair of encrypted string, called a public key(public
key), anyone can see its contents for encryption; another called key(private key). Only to
have those who can see, for decryption. By public key encrypted ciphertext can be easily
decrypted using a key , but according to public to guess the key is very difficult. SSH public
key authentication is to use this feature. Server and client each have their own public and
private keys.
4.2.3 Software
The AP provides two methods to install the package: p age insta llation(action) and telnet or
ssh connection backstage installation(configuration).
For example, you want to install tftp server name for tftpd-hpa, then follow the steps below.
Page installation
Click the "System>Software>Actions", the interface as shown below.

300M High Power Wireless Ceiling AP
16
If this AP does not tftpd-hpa server proceed as follows.
Enter "tftpd" in the "Download and install the package", click "OK" to.
If this AP has tftpd-hpa server proceed as follows.
In the "Filter" which enter "tftpd", click on "Find packages" in the "Status" box below t o
show the current OpenWrt support packages and find you need, click the "install" .
telnet or ssh connection backstage installation
Click the "System>Software>Configuration" screen as shown below.
Input box in the image above: #opkg download tftpd-hpa /download packages
#opkg install tftpd-hpa / installation package
4.2.4 Startup
Click on the "System>Startup" option, you can see the following interface.

300M High Power Wireless Ceiling AP
17
Start the project when the system is switched on in the foreground or the background
programs running.
You can enable or disable installed init scripts here. Change will applied after a device
reboot. Different starup scripts start with different priorities, starup scripts can be
Enable/Disable, Start, Restart and Stop operations.
Startup script: startup script to enable or disable installed. Changes take effect after the
device reboot. (Note: If you disable the necessary startup script, such as "network", may
cause the device can not access and therefore do not arbitrarily change the startup
script!)
Local startup script: You can block the figure of "exit 0" previously entered commands to
start or stop a service. /etc/init.d/ in store all the startup script, we usually can start an
application by/etc/init.d/ script name start up mode. For example, enter the command
"/etc/init.d/smb start" to start the smb service. Although/etc/in it. d directory script can start
and stop individual services, but at system boot, in it not find the startup script for each
service directly in the /etc/init.d catalog, but in/ etc/ under rc.d/ directory lookup, this
directory contains rc0.d, rc1.d, respectively, representing different levels of subdirectories
init starts, each subdirectory contains the corresponding start -level startup script.
4.2.5 Scheduled Tasks
Click on the "System>Scheduled Tasks" option, you can see the following interface.

300M High Power Wireless Ceiling AP
18
You can fill you want to accomplish in the box, especially repetitive tasks.
Example: Yon want to restart the AP every night at 21.30(OpenWrt), would enter in the
box "30 21 * * * /usr/local/etc/rc.d/OpenWrt restart".
4.2.6 LED Configuration
Click on the "System>LED Configuration" option, you can see the following interface.
Name: Name of the AP interface.
LED Name: Corresponds to the name of its display lights.
Default state: Trigger mode determines the corresponding LED lights flashing mode
interface. Either way you can choose to trigger the drop-down list provide.
4.2.7 Backup/Flash Firmware
Click "System>Backup/Flash Firmware" option, you can see the Action and Configuration
two options.
Action
Click on the "Action" option, you can see the following interface.

300M High Power Wireless Ceiling AP
19
Download backup: This feature can be set up the AP as files stored in the computer to
prepare for the next use; AP software upgrade or a new configuration file before loading
the original backup AP configuration, software upgrades can effectively prevent or load
the new configuration file is lost during the original configuration issues. Click the
"Generate Backup" to complete this operation.
Reset to defaults: Click the "Perform reset" to restore to factory settings, restore factory
settings, the AP will automatically rest art the AP to restore all settings to the factory default
state(Including: the default user name: root; default password: empty; default IP address:
192.168.10.154; default netmask: 255.255.255.0)
Note: Please restore the factory settings before configuration information backup system,
if necessary through the load configuration information to restore the backup AP
configuration.
Restore backup: Click "Browse" to find the file has been backed up, select a file has
been backed up, and then click the "upload archive..." to complete the recover
configuration.
Keep settings: Check the box, you can write the new firmware in the brush, still retain the
original system configuration information; If not checked, the original system configuration
information in the brush to write the new firmware, it will be erased.
Image: Click "浏览" to find the new firmware file, select the new firmware file, then click on
the "Flash image" to flash the new firmware operation.
Configuration
Click on the "Configuration" option, you can see the following interface.

300M High Power Wireless Ceiling AP
20
Click "Open list", you can see a list of files to be backed up, The configuration file contains
the changes necessary foundation files and user-defined files to be backed up.
4.2.8 Reboot
Click on the "System>Reboot" option, you can see the following interface.
Click "Perform reboot" to complete manual restart the AP.
4.3 Services
Click on "Services", you can see the Dynamic DNS, UPNP options.
4.3.1 Dynamic DNS
Click on the "Services>Dynamic DNS" option, you can see the following interface.

300M High Power Wireless Ceiling AP
21
Dynamic DDNS: Its main function is to achieve a fixed domain name to resolve dynamic
IP address. If the address of the AP's WAN port IP address is dynamically acquired
through this feature allows access to other hosts on the Internet AP or virtual server with a
fixed domain approach.
Dynamic DNS feature for user dynamic IP address each time the Internet to get a new IP
address, AP built-in Dynamic DNS software will send the IP address to the DDNS server
provided by DDNS service providers, and update resolves database. When other users
on the Internet need to access this domain name, dynamic DNS server will return the
correct IP address. This feature is not used for the majority of users of fixed IP address
can also be economical and efficient to build its own network.
For example, on dyndns.org apply a dynamic domain mypersonaldomain.dyndns.org,
user name usename, password 1234567890.
Click the "Add" button, make the following configuration, the configuration is completed,
click "Save&Apply" button.
Service: Choose to provide dynamic domain name service provider, in this case, is
dyndns.org.
Hostname: The host name of the application.
Username: User name to use when applying for dynamic domain name.

300M High Power Wireless Ceiling AP
22
Password: Password used when applying dynamic domain name.
Source of IP address: The IP address of your Internet possible source URL, or network
interface.
4.3.2 UPNP
Click on the "Services>UPNP" option, you can see the following interface.
Universal Plug and Play(UPnP) is an architecture for PC and smart devices(or equipment)
common peer network connections, especially in the home. UPnP to Internet standards
and technologies(such as TCP /IP, HTTP and XML)-based, so that such devices can
automatically connect to each other and work together, so that the network (especially the
home network) for more people to become possible. Relying on UPnP(Universal Plug and
Play, Universal Plug and Play) protocol functions, LAN hosts can request automatic port
switching AP, so that the external host can access resources on the internal host when
needed, such as Windows XP and Windows ME systems the installation of MSN
Messenger or Thunder, BT, PPLive and other applications that support the UPnP protocol.
Active UPnP Redirect
MiniUPnP settings

300M High Power Wireless Ceiling AP
23
Start UPnP and NAT-PMP service: Check this box is switched on when this feature is
enabled.
Enable UPnP functionality: Check this box is switched on when this feature is enabled.
Enable NAT-PMP functionality: NAT-PMP is to allow private network inside the device
and routing communication to external devices and it can contact, based on UDP protocol.
Enable secure mode: Allows you to add only forwarded to the requesting IP address,
when enabled, UPnP clients can be forwarded only to its IP.
Enable additional logging: enabled the extraction of additional debugging information to
the system log.
Downstream and upstream rates according to their actual broadband modifications.
Port: Input port services provided by the server within the network used.
MiniUPnP of ACL
Access Control List ACL(Access Control List) is a list of APs and switches command
interface to control the port out of the packet. ACL is applicable to all routing protocols.
ACL can limit network traffic and improve network performance. For example, ACL packet
according to the agreement specifies the packet priority. ACL provides traffic control
measures. For example, ACL can limit or simplify routing update information length, thus
limiting through a AP on a network segment traffic. ACL is to provide access to basic
means of network security. ACL allow Host A to access the Human Resources Network,
and refused access to the host B. ACL can decide what type of traffic is forwarded or
blocked at the AP port. For example, users can allow E-mail traffic is routed, reject all
Telnet traffic. a department requires only use WWW this feature, you can achieve by ACL;
another example, a department in order to privacy, do not allow it to access the Internet,
are not allowed outside the network to access it, you can achieve through the ACL.
Click the "Add" button.you can see the following interface.
Comment: Memo entries can name.
External ports: Display practical AP for port switching time.

300M High Power Wireless Ceiling AP
24
Internal addresses: Shows the need for a LAN host IP address port translation.
Internal Ports: Displays the port needs to be converted LAN host port number.
Action: Allow(allow) or reject(deny) access the internal or external network.
4.4 Network
Click on “Network”, you can see the Interfaces, Wifi, DHCP and DNS, Hostnames, Static
Routes, Diagnostics, Firewall and QoS options.
4.4.1 Interfaces
Click the "Network>Interfaces" option, you can see the following screen.
On this page, you can select and set WAN or LAN.
4.4.1.1 LAN
Click the "Network>Interfaces>LAN" option, On this page you can configure the network
interfaces(lan).

300M High Power Wireless Ceiling AP
25
Common Configuration
Common Configuration screen as shown below.
On this page you can set IP address and netmask. Yon can manage the AP via this IP
address. If you share access for ordinary family , you do not need to change the IP address
of the LAN port, keep the default value.
Protocol: Select the protocol type.
IPv4 address: Enter the AP's IP address on the LAN. IP address of all computer in LAN
must be in the same network segment and the default gateway for this IP address. The
factory default IP address is 192.168.10.254, for Class C IP address, you can change it
according to the network needs.
IPv4 netmask: Select the AP on the LAN net-mask. Class C IP address corresponding to
the net-mask is 255.255.255.0. To ensure that the network connection is normal, do no t

300M High Power Wireless Ceiling AP
26
change the net-mask. Yon can choose different types of LAN net-mask according to the
actual IP address types.
IPv4 gateway: Enter this AP on the LAN gateway. The default is 192.168.1.1.
Use custom DNS servers: DNS address provided by your ISP, if not provided, the
default is 192.168.1.1.
Note: If you change the local IP address, you must login with a new IP address to the AP's
Web management interface, and the default gateway for all computer in the LAN must be
set to the IP to the normal Internet. Their net-mask must be set the same net-mask here.
Advanced settings and physical settings are the default values, do not do the settings.
DHCP Server
DHCP Server setting interface as shown below.
DHCP: Dynamic Host Configuration Protocol. OpenWrt has a built-in DHCP server, the
computer can automatically assign IP address on the LAN.
Ignore interface: Check this box, you can disable this DHCP function interface.
Start: Lowest leased address as offset from the network address.
Limit: Maximum number of leased addresses. The AP default to 150.
Leasetime: Setting DHCP server IP address for client retention lease expiration time. In
that period, the server will not assign IP address to other hosts. The AP default to 12h.
Dynamic DHCP: Dynamic allocation of DHCP addresses. If disabled, it can only provide
network services for static lease table client.
Force: Force DHCP on this network even if another server is detected.
IPV4-Netmask: The default net-mask DHCP server assigned to the client.
DHCP-Options: Set DHCP additional options, such as setting "6, 192.168.2.1,
192.168.2.2" means notice different DNS server to the client.
4.4.1.2 WAN
Click the "Network>Interfaces>WAN" option, enter the WAN port settings interface.

300M High Power Wireless Ceiling AP
27
Expand Agreement are: Static address, DHCP client, PPPOE.
Static address
If you select the "static address" protocol, please complete the following information to
suppliers(ISP)requirements. Click "Save&Apply" button, the next step is set.

300M High Power Wireless Ceiling AP
28
Ipv4 address: The AP's IP address on the WAN. Please enter the public IP address
provided by your ISP.
Ipv4 netmask: The net-mask for the WAN AP. Please enter the Net-mask provided by
your ISP.
Ipv4 gateway: Please fill in the gateway provided by your ISP.
Use custom DNS server: Please fill provided by your ISP's DNS address.
Override MAC address: Please fill in this AP for W AN MAC address, the MAC address of
the default AP WAN's physical interface MAC address. Some ISP may require MAC
address binding, then the ISP will provide a valid MAC address to the user, based on the
value you as long as it provides input to the "MAC address" column. Change the MAC
address is not recommended unless the ISP has special requirements.
Override MTU: MTU called the data transmission unit, the default value is 1500. Please
ask if you need to change to the ISP. Such as non-special needs, do not change.
DHCP client
If you select "DHCP client" protocol. Simply enter the MAC address of the computer as
your modem MAC address of your AP. Click "Save&Apply" button,the next step is set.
Host name when requesting DHCP sent: Enter the host name of this feature.
Bring up on boot: Check the power automatically when you select this means of access.
Use broadcast flag: You can fill this need according to ISP.
Use default gateway: Check in at the gateway to fill empty default route is not configure.

300M High Power Wireless Ceiling AP
29
Use DNS servers advertised by peer: Check the DNS server address in the fill blank are
ignored at the advertised DNS server address.
Use gateway metric: The destination network midway take several segments, that is,
how many APs through.
Client ID to send when requesting DHCP: Enter the DHCP mode when you apply
online, ISP provide your identity label number.
Vendor Class to send when requesting DHCP:DHCP mode input to your Internet
provider category.
Override MAC address: Please fill in this AP for W AN MAC address, the MAC address of
the default AP WAN's physical interface MAC address. Some ISP may require MAC
address binding, then the ISP will provide a valid MAC address to the user, based on the
value you as long as it provides input to the "MAC address" column. Change the MAC
address is not recommended unless the ISP has special requirements.
Override MTU: MTU called the data transmission unit, the default value is 1500. Please
ask if you need to change to the ISP. Such as non-special needs, do not change.
PPPoE
If you select "PPPoE" protocol. Click "Save&Apply" button, the next step is set.

300M High Power Wireless Ceiling AP
30
PAP/CHAP username, PAP/CHAP password: Please enter your ISP username and
password.
Access Concentrator: input connector center terminal, computer or communications
device connection point device. Leave empty to autodetect.
Service Name: Enter the name of your broadband connection, leave empty to autodetect.
Use default gateway: Check in at the gateway to fill empty default route is not configured.
Use gateway metric: Destination network segment midway need to go through a few,
that is, how many APs through.
Use DNS servers advertised by peer: Check the DNS server address in the fill blank are
ignored at the advertised DNS server address.
LCP echo failure threshold: LCP, which link control protocol(Link Control Protocol), is a
subset of the PPP agreement, the PPP communication, the sender and receiver by
sending LCP packets to determine that the necessary information in the data transmission.
Check the link LCP identification equipment, the decision whether to accept or reject;
determine the number of bytes transferred in packets that can be received; check both
configurations match, if you do not match the broken link. Only in the case of LCP packet
links are available, the data communication network can be achieved. LCP is responsible
for creating a link between the equipment, maintenance and termination. After a specified
number of LCP response failures assumed link is disconnected, 0 to ignore failure.
LCP echo interval: time to send LCP response(s), only when combined with effective
fault threshold.
Inactivity timeout: Timing off inactive link(s), 0 for persistent connections.
Override MTU: MTU called the data transmission unit, the default is 1500. Please ask if
need to change to the ISP. Such as non-special needs, do not change.
4.4.2 Wifi
Click the "Network>Wifi" option, you can see the following screen.
Click on the "Scan" button, you can enter the following interface.

300M High Power Wireless Ceiling AP
31
If you want to join the SSID as "AP" in the network, according to the following steps to
configure.
Step 1: first determine the IP "AP" where(for example 192.168.1.2), encryption(WPA),
channels(6 channels). Then modify your AP’s LAN port IP, must be "AP" in the same
subnet(192.168.1.X), encryption, channel must also be "AP" setting is the same.
Step 2: Select the "AP", click on the option of "Join Network" button, enter the following
setting interface.
Step 3: Fill WPA passphrase(AP wireless password), the same of the new network.
Step 4: Select "Create/assign firewall-zone", or if you choose, you have a good firewall
distribution area; If selected, fill in the "Create" tab, you can create a firewall area.
Step 5: Click "Submit" button, enter the following interface.
Associated Stations
You can see the information on this device is connected to your wireless network, MAC

300M High Power Wireless Ceiling AP
32
address, IP address, signal, noise, transmission rate and receive rates and other
information.
4.4.2.1 Radio0: Master "OpenWrt"
Click the "Network>Wifi>Radio0: Master "OpenWrt" option, Device Configuration and
Interface Configuration can be configured.
Device Configuration
Device Configuration is divided into General Setup and Advance Settings.
Click on the "General Setup" option, you can see the following interface.
Channel: In the wireless signal transmitted as a data signal transmission media, channel
selection range from 1 to 11.
Transmit Power: You can choose according to need to select the appropriate power.
Click on the "Advanced Settings" option, you can see the following interface.

300M High Power Wireless Ceiling AP
33
Mode: Wireless AP is used to set the operating mode "automatic", "802.11b", "802.11g",
"802.11g+n" four modes, we recommend that you select "802.11g+n", spread faster, more
transmission range wide.
HT mode: "20MHZ", "40MHZ HT40-", “40MHZ HT40+” modes.
Country Code: Yon can select the desired country code from the drop-down list.
Distance Optimization: The data used to determine the maximum size of the package is
divided into several packages before higher if the packet error rate, you may slightly
increase the Fragmentation Threshold; if fragmentation threshold is set too low, it may
degrade network performance. Recommended slightly lower defaults, but in most cases,
should be left at its default value of 2346.
RTS/CTS Threshold: RTS is a Request-To-Send shorthand, CTS is Clear-To-Send
shorthand. After setting up the RTS threshold, if it exceeds this threshold will send a
message to be sent before the RTS, to reduce interference, the corresponding CTS will
respond before the RTS. AP sends CTS data are generally rather Station sends RTS data.
Interface Configuration
Interface Configuration is divided into General Setup, Wireless Security and MAC-Filter
three options.
Click on the "General Setup" option, you can see the following interface.
ESSID: The difference between the service number and is used to identify a wireless
network radio signals. The AP defaults to "OpenWrt", you can modify it to show your
wireless network.
Mode: Yon can select your desired interface mode via the drop-down list.
Network: Select assigned to this network wireless interface.
Hide ESSID: If you check this, the search is less than you are currently using a AP.
WMM Mode: A sub-protocol wireless transmission protocol, to open, then a link to the AP

300M High Power Wireless Ceiling AP
34
requires hardware(mobile phones, laptops, etc.)are required to support it can ba linked
successfully.
Click on the "Wireless Security" option, you can see the following interface.
Encryption: The AP provides a "WEP Open System/Shared Key", "WPA-PSK/WPA2
-PSK", "WPA-EAP/WPA2-EAP", "WPA-PSK/WPA2-PSK Mixed Mode" and other seven
encryption.
Cipher: The AP prov ides the "auto", "Force CCMP(AES)", "Force TKIP", "Force TKIP and
CCMP(AES)".
Key: WEP, enter the 5 or 10 characters; WPA/WPA2, enter 8 or more characters.
Recommends using WPA/WPA2 mode.
Click on the "MAC-Filter" option, you can see the following interface.
MAC-Address Filter: The AP provides a "disable", "Allow listed only", "Allow all except
listed" in three ways.
MAC-List: Yon can fill the need for a host MAC address access restrictions within the
wireless network.
Example: If you "MAC-Filter" fill in the interface's MAC address as "08-60-6E-F0-3F-AD"
as shown below.
1. In "MAC-Filter" drop-down list, select "disable", the MAC-address filtering does not
work.
2. In "MAC-Filter" drop-down list, select "Allow listed only", only allow MAC address is
"08-60-6E-F0-3F-AD" host access your wireless network.
3. In "MAC-Filter" drop-down list, select "Allow all except listed", it is prohibited MAC
address is "08-60-6E-F0-3F-AD" host access to your wireless network, you can access
other hosts.
4.4.3 DHCP and DNS
Click the "Network > DHCP and DNS", you can see the following interface.

300M High Power Wireless Ceiling AP
35
Server Settings
Dnsmasq for NAT firewall provides an integrated DHCP server and DNS forwarder.
Click on "General Settings" screen as shown below.
Domain required: Enable DNS names are not forwarded no resolution requests.
Authoritative: unique within the network DHCP server.
Local server: the local domain rule, never forwarded and processed only from the local
DHCP or HOSTS file name data.
Local domain: DNS is enabled, you will receive a written request to the system log.
DNS forwardings: The specified domain DNS resolution be forwarded to the specified

300M High Power Wireless Ceiling AP
36
DNS server.
Rebind protection: Enable RFC1918 up link response data is discarded.
Allow localhost: Enable the Allow up link response within 127.0.0.0/8 loop range, for
Example: RBL services.
Domain Whitelist: Enter the allowed domain list RFC1918 response.
Click the "Resolv and Hosts Files", there may be the following interface.
Use/ etc/ ethers: Enable according to/ etc/ ethers to configure DHCP-Server.
Leasefile: Store files DHCP lease.
Ignore resolve file: Checked,then turn on this feature.
Resolve file: Store the local DNS resolution files.
Ignore the Hosts files: Checked,then turn on this feature.
Additional Hosts files: Check this , turn on this feature .
Click "TFTP Settings" screen may appear as follows.
Enabling the TFTP server, then the following interface.
TFTP server root: Store the root directory of the TFTP server.
Network boot image: Store advertised to the client boot image file name.

300M High Power Wireless Ceiling AP
37
Click on the "Advanced Settings" screen may appear as follows.
Filter private: no forwarding enabled local network lookups reverse lookup command.
Filter useless: Public domain name server is not enabled unable to respond to requests
forwards.
Localization queries: When there are multiple IP, enabling this feature will be based on
the subnet request to localize the source of a host name.
Expand hosts: Enables you to add a local domain suffix to the hosts file name.
No negative cache: cache is not enabled useless responses, such as domain does not
exist.
Strict order: Enable you will query the DNS in the specified order.
Bogus NX Domain Override: Enter the domain name to allow false responses empty
server list.
DNS server port: Enter the inbound DNS query port.
DNS query port: Enter the specified DNS query source port.
Max. DHCP leases: Enter the maximum allowed number of leased DHCP.
Max. EDNS0 packet size: Enter the maximum allowed EDNS.0 UDP packet size.
Max. concurrent queries: Enter the maximum number of concurrent DNS lookup
allowed.
Active DHCP Leases
If another device is connected to this network, there will be a display device host name,
IPv4 address, MAC address, and the remaining lease and other information on this box.
Static Leases
Static leases are used to assign fixed IP addresses and symbolic hostnames to DHCP
clients. They are also required for non-dynamic interface configurations where only hosts

300M High Power Wireless Ceiling AP
38
with a corresponding lease are served.
Use the Add Button to add a new lease entry. The MAC-Address identifies the host, the
IPv4-Address specifies to the fixed address to the Hostname is assigned as symbolic
name to the requesting host.
4.4.4 Hostnames
Click on the "Network>Hostnames" option, you can see the following interface.
This feature is for your convenience with easy to remember way to access the host you
need.
Click the "Add" button, fill in the box to add the host name and IP address, and then click
"Save&Apply" button.
Hostname: The name of the host you want to access, for example: aa.
IP address: The host you want to access the corresponding IP address.
4.4.5 Static Routes
Click on the "Network>Static Routes" option, you can see the following interface.
Static routing is a static routing table information. In some network environments, you
need to modify the static routing table that specifies a static AP to communicate properly.
For example, within a specified network host access 192.168.10.146 this network, you
can press operation, click the "Add" button, make the following configuration, you can visit

300M High Power Wireless Ceiling AP
39
with you not in the same segment of the network.
Target: Enter the network address of the destination network.
IPv4-Netmask: Enter the netmask address of the destination network.
IPv4-Gateway: Enter the gateway address that matches the destination network data
delivery.
4.4.6 Diagnostics
Click on the "Network>Diagnostics" option, you can see the following interface.
Use the ping command to test the client-to-gateway connection is normal.
Tracert command to trace the AP, Tracert command can be used to track the use of
packet routing (path). Check the network hop routing information to confirm the export
terminal to the network connectivity.
Nslookup command to check the DNS resolve is configured correctly.
If you want to check your current network connections, you can follow the steps below.
1. Fill "www.baidu.com" In the first box, click on "ping" button.
If the interface is shown, then connect you to the gateway of normal.
If the interface appears as shown below, then connect you to the gateway is not normal.
2.Fill "www.baidu.com" in the second box, click the "Traceroute" button.
If the interface is shown below appears, you are connected to the network outlet is.

300M High Power Wireless Ceiling AP
40
If the interface appears as shown below, then you are not connected to a network of
export.
3. Fill "www.baidu.com" In the third box, click on the "Nslookup" button.
If the interface appears as shown below, then configure the correct DNS resolution.
If the interface is shown there, the instructions to configure DNS resolution is not correct.
4.4.7 Firewall
Click on the "Network>Firewall" option, you can make General Settings, Port Forwards,
Traffic Rules, Custom Rules.
4.4.7.1 General Settings
Click on the "Network>Firewall>General Settings" option, you can see the following
interface.

300M High Power Wireless Ceiling AP
41
General Settings
Enable SYN-flood defenses: SYN Flood is currently the most popular DoS(Denial of
Service Attack)with one of the DDoS(distributed denial of service attack)approach, which
is a using TCP protocol flaw, sending a large number of forged TCP connection requests,
thereby causing the attacker depletion of resources(CPU full load or insufficient memory)
way to attack. Enabling you can defend some denial of service attacks.
Drop invalid packets: Check the packet is discarded invalid.
Input: It is passed from the remote data locally. Discarded, simply discards invalid data,
does not respond to any feedback. Needs of customers waiting for a timeout, the
customer is likely to find himself blocked by a firewall; refused to return a reject(terminate)
invalid data packets(TCP FIN or UDP-ICMP-PORT-UNREACHABLE), explicitly rejected
the other's connection action; accept, receive effective inbound data.
Output: It refers came from local to remote data.
Forward: It refers to a specific(one or more)data packets between different subnets
forwarding area.
Regional
Click the "Add" button, the following interface will appear.
For example you want to add "lan
⇒
wan", then make the following settings.

300M High Power Wireless Ceiling AP
42
Regional "newzone"
General Settings
Name: lan.
Inbound and outbound data packet for setting "in" "out" AP(an interface) default.
Forward: It refers to a specific(one or more) data packets between different subnets
forwarding area.
Masquerading: IP masquerading is a special kind of SNAT rule, when a computer within
the network computers to access the external network through the AP, it replaces the
source address of IP packets to a predetermined address(usually the external network
card address). In this way, the computer will think outside the network, the packet is sent

300M High Power Wireless Ceiling AP
43
to this AP response packets can be correctly returned to the AP. (Otherwise, the network
computer IP address 192.168.XXX.XXX, for external network servers, do not know how to
return, or return to other computers go up.)
MSS clamping: MSS value that is the largest data segment for each TCP packet can be
transmitted. In order to achieve the best performance of TCP transport protocol
connection is established when the two sides are usually negotiated MSS value that the
TCP protocol at the time of realization is often replaced with the MTU value, check you
can clearly tell the remote: Do sent packets exceed this value.
Covered networks: Select the network belonging to this region.
Advanced Settings
Restrict to address family: Here you can choose to limit the type of address.
Restrict Masquerading to given source subnets: Enter the IP address of your internal
Network.
Restrict Masquerading to given destination subnets: Enter the IP address of the
firewall legitimate(usually outside the network card address).
Forced connection tracking: Checked,then turn on this feature.
Enable logging on this zone: Checked,then turn on this feature.
Inter-Zone Forwarding
Figure above options can control area (lan) and forwarding rules for other regions. Target
area received from "lan" forwarding traffic. Forwarding traffic from the source region to
match the target as requiring "lan" in the region. If the hook option shown, then the
following rules can not forward: forward lan traffic to wan, but does not allow wan
forwarded to the lan.
After the above are set, click "Save & Apply" button to successfully add a firewall area.
4.4.7.2 Port Forwards

300M High Power Wireless Ceiling AP
44
Click on the "Network>Firewall>Port Forwards" option, you can see the following
interface.
This interface provides configure port forwarding rules. When the network using a private
address 10.X.X.X/172.16.X.X/192.168.X.X, external network can not access the network
directly within the server. By doing port forwarding on the AP, then the configuration of the
network server IP and port, external network can access the network server to use the
services provided by the network.
Example: There are 50 computers in the network have been configured an FTP server , it s
IP address is 192.168.1.102, if you want Internet users can also access this server, you
can make the following actions.
Click the "Add" button, make the following configuration, the configuration is completed,
click "Save&Apply" button.
Name: Please fill in an easy to remember name.
Protocol: Protocol used by the service provided by the server. If not clear what kind of
agreement, you can choose "TCP+UDP" protocol. Please refer to the "common ports and
services table".
External zone: WAN area.
External port: Specify an opening port, mapped to the internal server ports open. If not
specified, the same external port and internal port. Fill in the range 1-65535.
Internet zone: Internal LAN area.
Internet IP address: IP address of the network server.
Internet port: Port services provided by the server within the network used. Please refer
to the "common ports and services table".

300M High Power Wireless Ceiling AP
45
common ports and services table
Network Services Agreement Port
ftp TCP 21
Ssh TCP 22
telnet TCP 23
Smtp TCP 25
Time TCP 37
DNS UDP 53
www TCP 80
POP3 TCP 110
Snmp UDP 161
CS server TCP 27015
4.4.7.3 Traffic Rules
Click on the "Network>Firewall>Traffic Rules" option, you can see the following interface.
Communication rules define the traffic transmitted between different regions, for example:
some refuse to communications between the host and open to the WAN port.
For example, you want to add the name of aa traffic rules, follow these steps to configure.
Fill in the information according to the map, click on the "Add" button, you can enter the

300M High Power Wireless Ceiling AP
46
following interface configuration.
Name: corresponds to add your name, such as aa.
Restrict to address family: IPv4 and IPv6, only IPv4, only IPv6, any for you to choose,
according to the traffic rules you want to add to choose.
Protocol: Select the protocol based on your intranet server.
Match ICMP type: You can select the type of ICMP packet, if you are unsure type, you
can choose "any"
Source zone: You can select lan, wan or all areas.
Source MAC address: Here you can customize the source MAC address.
Source address: Here you can customize the source IP address.
Source Port: Port of services provided by the source server is used.
Destination Zone: You can select lan, wan or all areas.
Destination address: You can customize the destination IP address here.
Destination port: Enter the port services provided by the target server being used.
Action: You can choose to discard , accept, reject , or no action .
Extra arguments: Additional parameters passed to iptables, careful to use!
4.4.7.4 Custom Rules
Click on the "Network>Firewall>Custom Rules" option, you can see the following
interface.

300M High Power Wireless Ceiling AP
47
In this interface you can define some functions not included in the firewall so that the AP
can play against the computer maximum protection.
4.4.8 QoS
Click on the "Network>QoS" option, you can see the following interface.
Download speed/Upload speed: To modify according to their actual broadband.
Classification Rules:Here the program allows you to specify the port column graded,
according to the rules of what you want to do.
Example: You want to play the game, you want the port at the most laid-back, to prevent
gaming card machine dropped. Game port: 12701, then do the following.
Click the "Add" button, make the following configuration, the configuration is completed,
click "Save&Apply" button.

300M High Power Wireless Ceiling AP
48
Target: There are the "priority", "express", "normal", "low" four options to choose from. In
this example select "priority".
Source host: Fill the local IP address.
Destination host: Fill the destination IP to be controlled.
Service: Choose one of your own network.
Protocol: Protocol used by the service provided by the server. If not clear what kind of
agreement, you can choose "TCP+UDP" protocol.
Ports: Port services provided by the server within the network used. In this example
12701.
Number of bytes: That is the amount of how many bytes of data through your AP has.
Sort: If you add two more goals, you can press this button to select their order.
Note: Be sure to fill out the total bandwidth of the actual bandwidth carriers, the only way
to be precise limit network speed.
4.5 Logout
Click the “Logout”, you can exit the Web management interface, back to the landing
interface.
4.6 FCC Statement
This device complies with part 15 of the FCC Rules. Operation is subject to the following two
conditions: (1) This device may not cause harmful interference, and (2) this device must accept
any interference received, including interference that may cause undesired operation.
This equipment has been tested and found to comply with the limits for a Class B digital device,
pursuant to part 15 of the FCC Rules. These limits are designed to provide reasonable protection
against harmful interference in a residential installation. This equipment generates, uses and can
radiate radio frequency energy and, if not installed and used in accordance with the instructions,

300M High Power Wireless Ceiling AP
49
may cause harmful interference to radio communications. However, there is no guarantee that
interference will not occur in a particular installation. If this equipment does cause harmful
interference to radio or television reception, which can be determined by turning the equipment off
and on, the user is encouraged to try to correct the interference by one or more of the following
measures:
—Reorient or relocate the receiving antenna.
—Increase the separation between the equipment and receiver.
—Connect the equipment into an outlet on a circuit different from that to which the receiver is
connected.
—Consult the dealer or an experienced radio/TV technician for help.
Caution: Any changes or modifications not expressly approved by the party responsible for
compliance could void the user's authority to oper ate th e equ ipment.
FCC Radiation Exposure Statement
This equipment complies with FCC radiation exposure limits set forth for an uncontrolled
environment. This equipment should be installed and operated with minimum distance 20cm
between the radiator & your body
Federal Communications Commission (FCC) Radiation Exposure Statement
This equipment complies with FCC radiation exposure limits set forth for an uncontrolled environ
ment. In order to avoid the possibility of exceeding the FCC radio frequency exposure limits, hum
an proximity to the antenna shall not be less than 20 cm (8 inches) during normal operation.
 Loading...