


FCC STATEMENT (For customers in USA)
This device complies with Part 15 of the FCC Rules. Operation is subject to the
following two conditions:
(1) This device may not cause harmful interference, and
(2) This device must accept any interference received, including interference that may
cause undesired operation.
Note:
This equipment has been tested and found to comply with the limits for Class B digital devices,
pursuant to Part 15 of the FCC rules. These limits are designed to provide reasonable protection
against harmful interference in a residential installation.This equipment generates uses and can
radiate radio frequency energy and, if not installed and used in accordance with the instructions,
may cause harmful interference to radio communications. However, there is no guarantee that
interference will not occur in a particular installation. If this equipment does cause harmful
interference to radio or television reception, which can be determined by turning the equipment off
and on, the user is encouraged to try to correct the interference by one or more of the following
measures:
Reorient or relocate the receiving antenna.
Increase the separation between the equipment and receiver.
Connect the equipment into an outlet on a circuit different from that to which the receiver is
connected.
Consult the dealer or an experienced radio/TV technician for help.
Use of shielded cable is required to comply with Class B limits in Subpart B of Part 15
of the FCC rules.
Do not make any changes or modifications to the equipment unless otherwise
specified in the manual. If such changes or modifications should be made, you could
be required to stop operation of the equipment.
EN-1

READ THIS FIRST
Trademark Information
Microsoft® and Windows® are U.S. registered trademarks of Microsoft
Corporation.
Pentium® is a registered trademark of Intel Corporation.
Macintosh is a trademark of Apple Computer, Inc.
SD™ is a trademark.
Photo Explorer and Photo Express are trademarks.
Other names and products may be trademarks or registered trademarks of their
respective owners.
Product Information
Product design and specifications are subject to change without notice. This
includes primary product specifications, software, software drivers, and user’s
manual. This User Manual is a general reference guide for the product.
The product and accessories that come with your digital camera may be different
from those described in this manual. This is due to the fact that different retailers
often specify slightly different product inclusions and accessories to suit their
market requirements, customer demographics, and geographical preferences.
Products very often vary between retailers especially with accessories such as
batteries, chargers, memory cards, cables, carrying cases/pouches, and language
support. Occasionally a retailer will specify a unique product color, appearance,
and internal memory capacity. Contact your dealer for precise product definition
and included accessories.
The illustrations in this manual are for the purpose of explanation and may differ
from the actual design of your digital camera.
The manufacturer assumes no liability for any errors or discrepancies in this user
manual.
For user manual and driver updates, refer to our website or contact your dealer.
Notice
If static electricity or electromagnetism causes data transfer to discontinue midway
(fail), restart the application or disconnect and connect the communication cable
(USB, etc.) again.
EN-2
SAFETY INSTRUCTIONS
Read and understand all Warnings and Cautions before using this product.
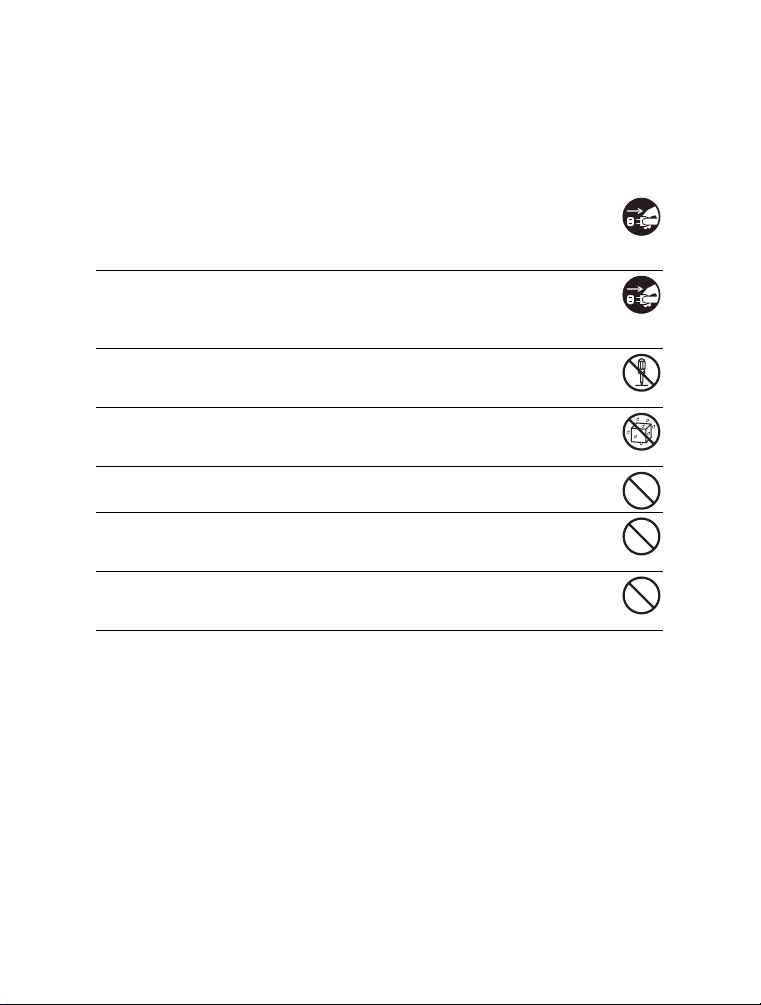
Warnings
If foreign objects or water have entered the camera, turn the power
OFF and remove the batteries.
Continued use in this state might cause fire or electric shock. Consult the
store of purchase.
If the camera has fallen or its case has been damaged, turn the power
OFF and remove the batteries.
Continued use in this state might cause fire or electric shock. Consult the
store of purchase.
Do not disassemble, change or repair the camera.
This might cause fire or electric shock. For repair or internal inspection, ask
the store of purchase.
Do not use the camera in areas near water.
This might cause fire or electric shock. Take special care during rain, snow,
on the beach, or near the shore.
Do not place the camera on inclined or unstable surfaces.
This might cause the camera to fall or tilt over, causing injury.
Keep the batteries out of the reach of children.
Swallowing batteries might cause poisoning. If the battery is accidentally
swallowed, immediately consult a physician.
Do not use the camera while you are walking, driving or riding a
motorcycle.
This might cause you to fall over or result in traffic accident.
EN-3

Cautions
Insert the batteries paying careful attention to the polarity (+ or –) of
the terminals.
Inserting the batteries with its polarities inverted might cause fire and injury,
or damage to the surrounding areas due to the battery rupturing or leaking.
Do not fire the flash close to anyone’s eyes.
This might cause damage to the person’s eyesight.
Do not subject the LCD monitor to impact.
This might damage the glass on the screen or cause the internal fluid to
leak. If the internal fluid enters your eyes or comes into contact with your body
or clothes, rinse with fresh water. If the internal fluid has entered your eyes,
consult a physician to receive treatment.
A camera is a precision instrument. Do not drop it, strike it or use
excessive force when handling the camera.
This might cause damage to the camera.
Do not use the camera in humid, steamy, smoky, or dusty places.
This might cause fire or electric shock.
Do not remove the battery immediately after long period of continuous
use.
The battery becomes hot during use. Touching a hot battery might cause
burns.
Do not wrap the camera or place it in cloth or blankets.
This might cause heat to build up and deform the case, resulting in fire. Use
the camera in a well-ventilated place.
Do not leave the camera in places where the temperature may rise
significantly, such as inside a car.
This might adversely affect the case or the parts inside, resulting in fire.
Before you move the camera, disconnect cords and cables.
Failure to do this might damage cords and cables, resulting in fire and
electric shock.
EN-4

Notes on Battery Usage
When you use the battery, carefully read and strictly observe the Safety Instructions
and the notes described below:
Different battery types and surrounding temperatures may affect the battery
performance.
Avoid using batteries in extremely cold environments as low temperatures can
shorten the battery life and reduce camera performance. This low temperature will
also influence Alkaline battery performance, therefore Ni-MH rechargeable battery
is highly recommended.
If you are using the new rechargeable batteries or rechargeable batteries that have
not been used for an extended period of time (batteries that pass the expiry date
are exceptions) might affect the number of pictures that can be taken. Therefore,
to maximize their performance and lifetime, we recommend that you fully charge
the batteries and discharge them for at least one complete cycle before use.
The battery may feel warm when using the camera for an extended period of time
or using the flash continuously. This is normal and not a malfunction.
The camera may feel warm when being used continuously or for an extended
period of time. This is normal and not a malfunction.
If you will not be using the batteries for an extended period of time, remove them
from the camera to prevent leakage or corrosion.
Never use batteries of different types (together) or mix old and new batteries.
Always keep the terminals in a clean state.
Never use manganese batteries.
Risk of explosion if battery is replaced by an incorrect type.
Dispose of used batteries according to the instructions.
EN-5

CONTENTS
INTRODUCTION .................................................................................................8
Package Contents........................................................................................................9
GETTING TO KNOW YOUR CAMERA ............................................................10
Front View ..................................................................................................................10
Rear View...................................................................................................................11
Mode Dial ...................................................................................................................12
LCD Monitor Information ............................................................................................13
PREPARING THE CAMERA ............................................................................15
Installing the Batteries................................................................................................15
Inserting and Removing an SD Memory Card (Optional Accessory) .........................16
Attaching the Camera Strap.......................................................................................17
LED Indicator and Self-timer Indicator .......................................................................17
GETTING STARTED.........................................................................................18
Turning the Power On/Off ..........................................................................................18
Choosing the Screen Language.................................................................................18
Setting the Date and Time..........................................................................................19
Formatting an SD Memory Card or Internal Memory .................................................20
Using the LCD Monitor...............................................................................................21
PHOTOGRAPHY MODE...................................................................................22
Shooting Images ........................................................................................................22
Setting Image Resolution and Quality........................................................................23
Using the Zoom Function ...........................................................................................24
Using the Flash ..........................................................................................................25
Setting Focus .............................................................................................................26
Capture Mode...................................................................................................27
Burst ...........................................................................................................................27
Auto Bracket...............................................................................................................28
Self-Timer...................................................................................................................29
Adjusting the Exposure (EV Compensation)..............................................................30
Setting White Balance................................................................................................31
EN-6

PLAYBACK MODE - THE BASICS ..................................................................32
Viewing Images..........................................................................................................32
Magnifying Images .....................................................................................................33
Thumbnail Display......................................................................................................34
Slideshow Display ......................................................................................................35
Resizing an Image......................................................................................................36
MOVIE MODE ...................................................................................................37
Recording Movie Clips ...............................................................................................37
Playing Back Movie Clips...........................................................................................38
PLAYBACK MODE - ADVANCED FEATURES ...............................................39
Playing Back Still Images/Movie Clips on TV.............................................................39
Deleting Images/Movie Clips......................................................................................40
Protecting Images/Movie Clips...................................................................................41
Setting the DPOF .......................................................................................................42
TRANSFERRING RECORDED IMAGES AND VIDEOSTO YOUR COMPUTER ... 44
Connect the digital camera to your computer.............................................................45
Download images or movie clips................................................................................46
EDITING SOFTWARE INSTALLATION ...........................................................47
Installing Photo Explorer ............................................................................................47
Installing Photo Express.............................................................................................48
MENU OPTIONS ...............................................................................................49
Camera Menu.............................................................................................................49
Movie Menu................................................................................................................52
Playback Menu...........................................................................................................53
Setup Menu................................................................................................................55
SPECIFICATIONS.............................................................................................57
TROUBLESHOOTING GUIDE.........................................................................
.58
EN-7

INTRODUCTION
Thank you for purchasing the new digital still camera!
Equipped with a 6.0 Megapixels CCD sensor, your camera delivers high quality, 2816
x 2112 resolution images. Other features provided by the camera include the
following:
6.0 Megapixels
A high-resolution CCD sensor
provides 6.0 megapixels for high
quality of images.
Auto flash
An auto flash sensor automatically
detects the shooting (lighting)
conditions and determines whether
the flash should be used.
2.4” TFT color image LCD
monitor
Optical zoom: 1x~3x
Digital zoom: 1.2x~4x
Approx. 16MB internal (built-in)
memory
Images can be captured without
using an SD memory card.
Support for SD memory card for
memory expansion
You may wish to expand the
memory capacity (up to 2GB
capacity) by using an additional SD
memory card.
USB connection
Still images or movie clips that you
have recorded can be downloaded
to your computer using the USB
cable.
DPOF functionality
DPOF can be used to print your
images on a DPOF compatible
printer by simply inserting the SD
memory card.
Provided editing software:
Photo Explorer/ Photo Express
You can enhance and retouch your
images on your computer by using
the provided editing software.
EN-8

Package Contents
Carefully unpack your kit box and ensure that you have the following items. In the
event that any item is missing or if you find any mismatch or damage, promptly contact
your dealer.
Common Product Components:
Digital Camera
User's Manual
Software CD-ROM
Camera Strap
Camera Pouch
AV C a ble
USB Cable
Batteries
*******************************************************************************
Common (Optional) Accessories:
SD memory card
Accessories and components may vary by retailer.
EN-9
GETTING TO KNOW YOUR CAMERA
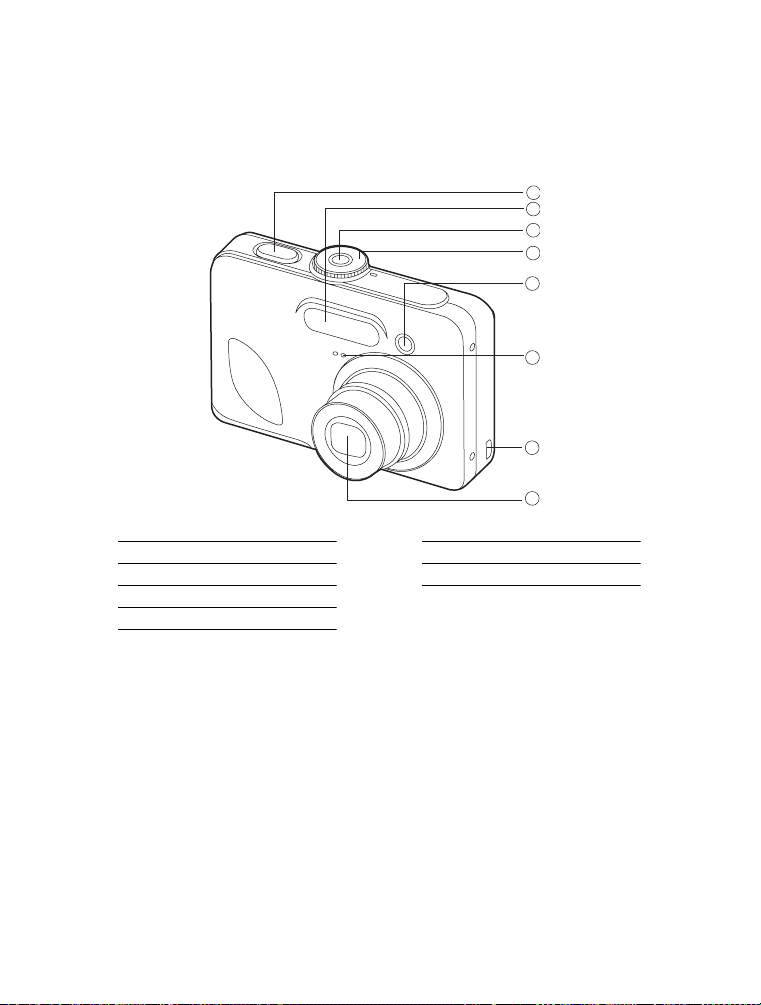
Front View
1
2
3
4
5
6
7
8
1. Shutter release button
2. Flash
3. Power switch
4. Mode dial
5. Self-timer LED
6. Microphone
7. PC / AV terminal
8. Lens
EN-10
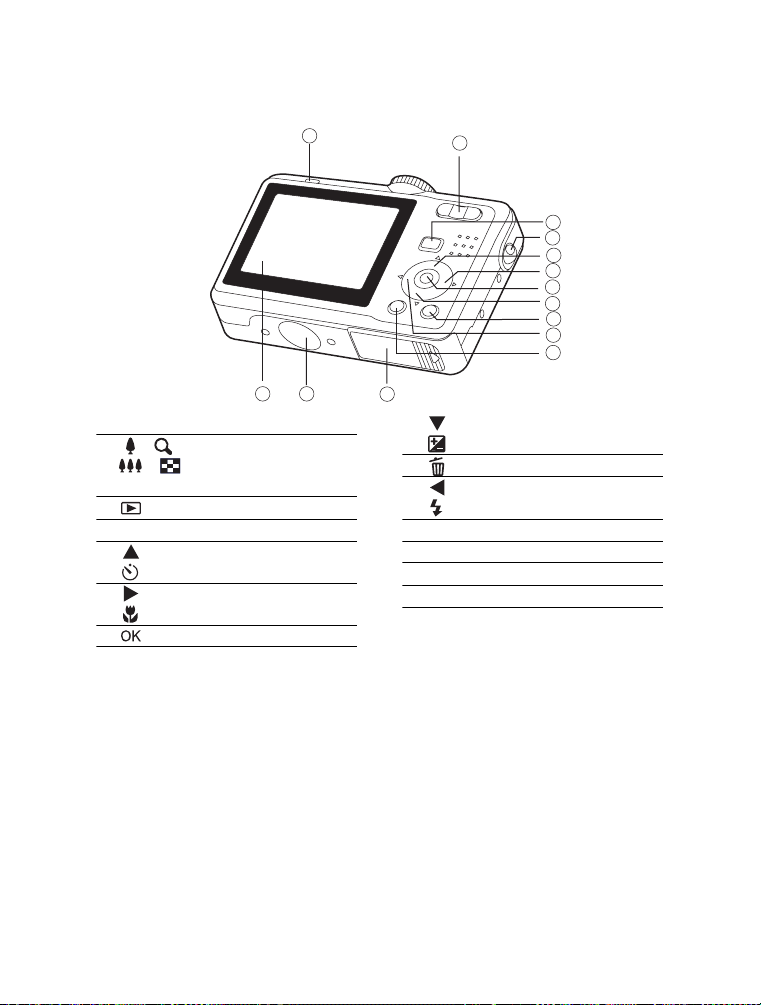
Rear View
1
2
3
4
5
6
7
8
9
10
11
13
14
1. LED indicator
2. / Zoom in (telephoto) button
/ Zoom out (wide-angle)
button
3. Playback button
4. Strap holder
5. Arrow button (Up)
Self-timer button
6. Arrow button (Right)
Focus
7. button
12
8. Arrow button (Down)
Exposure compensation button
9. Delete button
10. Arrow button (Left)
Flash button
11. MENU button
12.Battery / card cover
13. Tripod socket
14. LCD monitor
EN-11

Mode Dial
You can select from seven shooting modes and setup mode according to shooting
conditions to achieve the desired effect.
8
7
6
4
5
Mode Description
1. Program Select this mode to permit the ISO, EV, and White
2. Portrait Select this mode to make people stand out with the
3. Landscape Select this mode to take phototgraphs of distant scenery
4. Sports Select this mode to shoot fast moving objects.
5. Night Select this mode to take phototgraphs of people against a
6. Setup Select this mode to adjust the camera settings.
7. Video Select this mode to record video clips.
8. Auto Select this mode to adjust point-and-shoot action.
Using the Mode Dial
1. Rotate the mode dial to the desired mode and turn your camera on by pressing the
power switch.
2. Compose your subject within the focus frame. For Auto mode, when you press the
shutter release button down half way, the camera’s Auto Focus feature
automatically focuses the image. Proper exposure is determined and locked at the
same time.
3. Press the shutter release button all the way down to capture the image.
Balance to be set manually.
background out-of-focus.
or landscapes.
dusk or night-time background.
1
2
3
EN-12
LCD Monitor Information
+0. 3
3
2.2 X
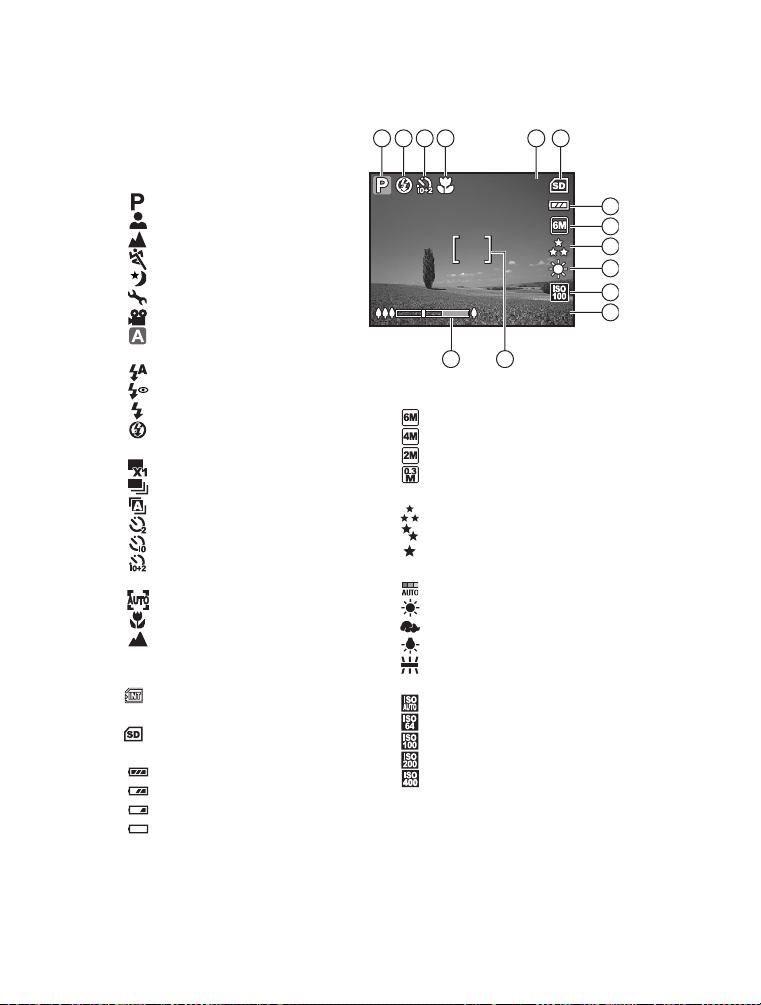
Camera Mode
1. Mode indication
[ ] Program Mode
[] Portrait Mode
[ ] Landscape Mode
[ ] Sport Mode
[ ] Night Mode
[] Setup Mode
[ ] Movie Mode
[ ] Auto Mode
2. Flash mode
[] Auto
[] Red eye
[ ] Flash on
[ ] Flash off
3. Capture mode
[] Single
[] Burst
[ ] AEB
[ ] 2 sec. Self-timer
[ ] 10 sec. self-timer
[ ] 10+2 sec. Self-timer
4. Focus mode
[ ] Standard
[] Macro
[ ] Infinity
5. Possible number of shots
6. Memory status
: Built-in memory
(without card)
: SD memory card
7. Battery
[ ] Full battery power
[ ] Medium battery power
[ ] Low battery power
[ ] No battery power
2.2X
2.2X
14 13
8. Recorded pixels
[ ] 2816 x 2112
[ ] 2304 x 1728
[ ] 1600 x 1200
[ ] 640 x 480
9. Image quality
[] Fine
[] Normal
[ ] Economy
10.White balance
[ ] Auto
[] Daylight
[ ] Cloudy
[ ] Tungsten
[ ] Fluorescent
11. ISO sensitivity
[ ] Auto
[] 64
[] 100
[] 200
[] 400
12. EV compensation
13.Focus area
14.Zoom bar
5321 4
3
+0.3
+0.3
6
7
8
9
10
11
12
EN-13
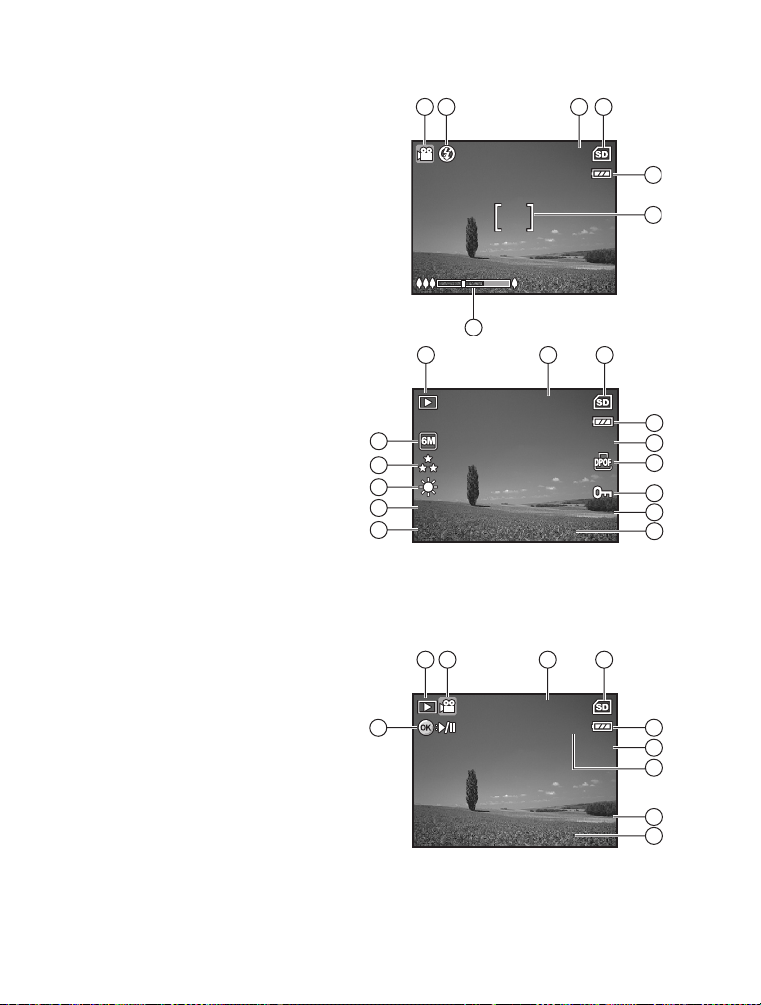
Movie Mode
00: 49
12: 00
+0. 3
ISO 1 00
01/ 01 /2 006
1/7
100 -0 00 1
12: 01
01/ 01 /2 006
1/7
100 -0 00 1
00: 05
1. Movie mode
2. Flash mode
3. Recordable movie time available
4. Memory status
5. Battery power indicator
6. Focus area
7. Zoom bar
Image Playback
1. Playback mode
2. Number of image
3. Memory status
4. Battery power indicator
5. Index number of total number
6. DPOF indicator
7. Protect indicator
8. Date
9. Time
10. EV compensation
11. ISO sensitivity
12. White balance
13. Image quality
14. Recorded pixels
321
4
00:49
00:49
5
6
7
21
3
100-0001
100-0001
4
1/7
14
13
12
ISO 100
ISO 100
11
+0.3
10
1/7
01/01/2006
01/01/2006
12:00
12:00+0.3
5
6
7
8
9
Movie Playback
1. Playback mode
2. Movie mode
3. Number of movie
4. Memory status
5. Battery power indicator
6. Index number of total number
7. Elapsed time
8. Date
9. Time
10.Play/Pause indicator
EN-14
31 2
4
100-0001
100-0001
00:05
10
00:05
1/7
1/7
5
6
7
01/01/2006
01/01/2006
12:01
12:01
8
9
PREPARING THE CAMERA
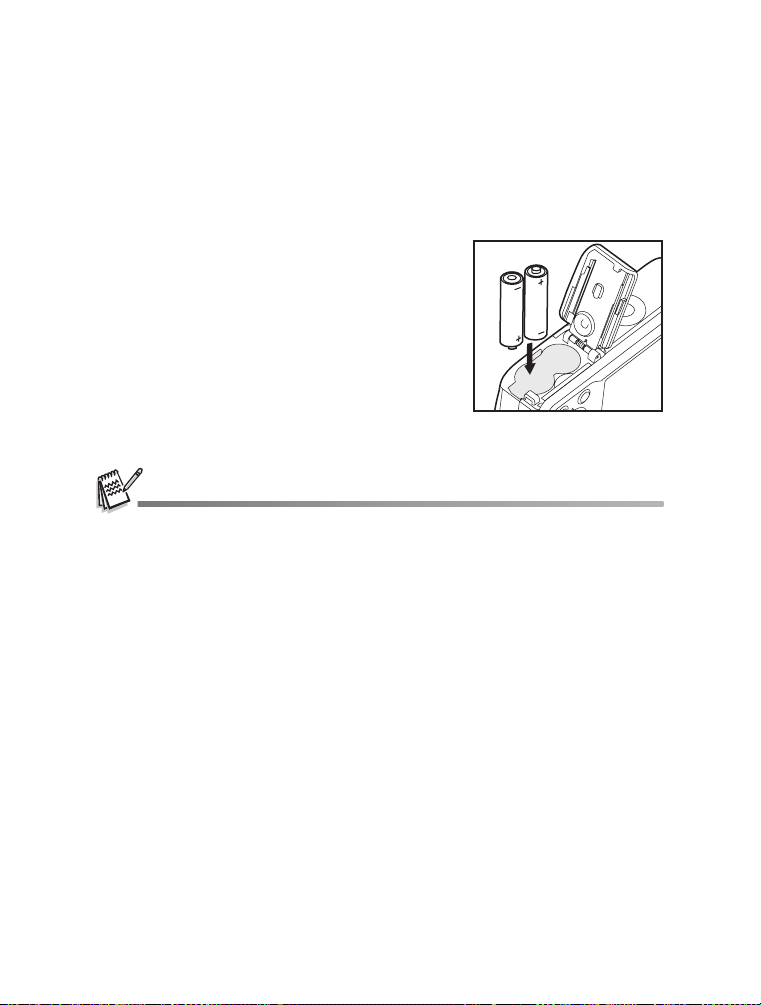
Installing the Batteries
You can use 2 AA size batteries (alkaline or Ni-MH rechargeable) to power the
camera. Make sure that the power of the digital camera is off before inserting or
removing the batteries.
1. Make sure the camera is turned off.
2. Open the battery cover.
3. Insert the batteries in the correct
orientation as shown in the illustration.
4. Close the battery cover.
To remove the batteries, turn the
camera off before removing batteries
and hold the camera with the battery
cover facing upward, then open the
battery cover.
Be careful not to drop the batteries when opening or closing the battery cover.
Due to the characteristics of AA alkaline battery, camera performance may deteriorate. AA
alkaline battery is not recommended except in emergencies and checking the camera's
functionality.
EN-15

Inserting and Removing an SD Memory Card
(Optional Accessory)
The digital camera comes with 16MB of internal memory, allowing you to store
captured still images or video clips in the digital camera. Moreover, you can also
expand the memory capacity by using an optional SD (Secure Digital) memory card so
that you can store more files.
1. Make sure your camera is turned off before
inserting or removing a memory card.
2. Open the SD memory card cover.
3. Insert an SD memory card in the correct
orientation as shown in the illustration.
4. Close the battery/SD memory card cover.
To remove the SD memory card, make
sure the camera is turned off. Press
lightly on the edge of the memory card
and it will eject.
Be sure to format an SD memory card with this
digital camera before using it. Refer to section in
the manual titled “Formatting an SD Memory
Card or Internal Memory” for further details.
To prevent valuable data from being accidentally
erased from an SD card, you can slide the write
protect tab (on the side of the SD memory card) to
“LOCK”.
To save, edit, or erase data on an SD memory
card, you must unlock the card.
EN-16
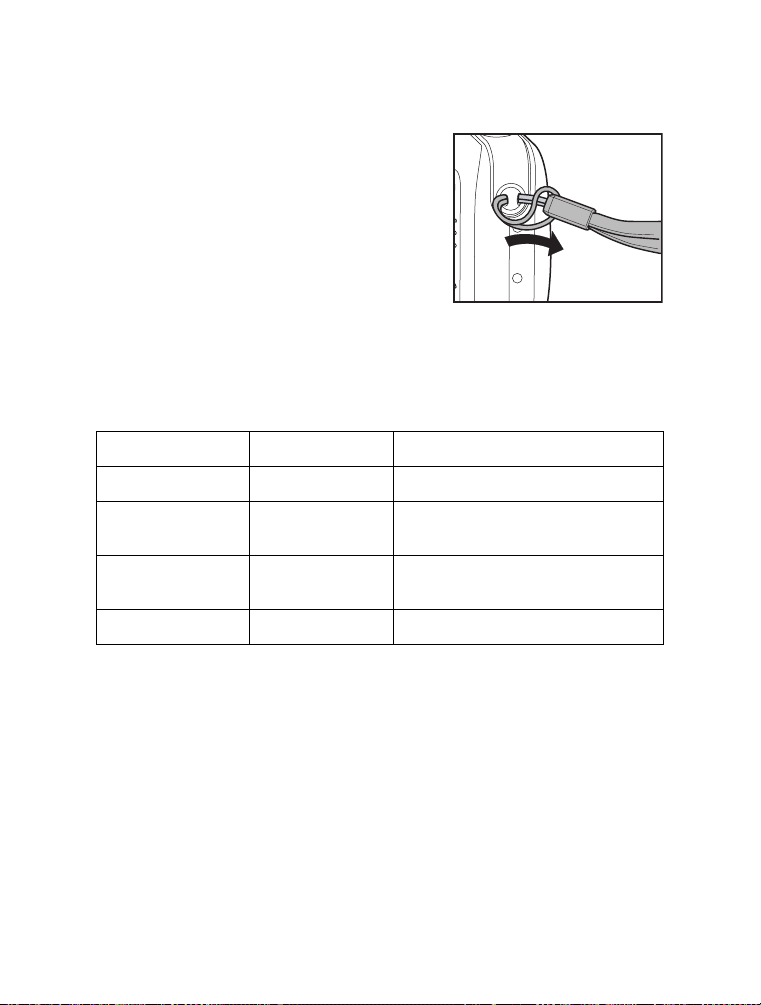
Attaching the Camera Strap
Attach the strap as shown in the illustration.
LED Indicators and Self-timer Indicators
Indicators State Description/Activity
LED indicator Solid green The digital camera is on.
LED indicator Blinking red and
green
LED indicator Blinking red and
green
Self-timer indicator Blinking blue The self-timer function is activated.
USB communication/transfer in
progress
Charging the flash.
EN-17

GETTING STARTED
Set-up1
Set-up2
Set-up3
Language
Da
te & Time
Beeper
Format
Select :
Eng
lish
m/d/y
Louder
Turning the Power On/Off
Press the power switch until the digital
camera turns on.
To turn the power off, press the power
switch again.
Choosing the Screen Language
Follow the steps below to choose the desired language.
1. Rotate the mode dial to and turn your
camera on by pressing the power switch.
Power switch
2. [Set-up1] is displayed.
3. Use the four-way controller (T) to select
[Language], then press the button.
4. Use the four-way controller (ST) to select
the language you want.
5. Press the button to confirm.
EN-18
Set-up1
Set-up1 Set-up2
Set-up2 Set-up3
For mat
Beeper
Beeper
te & Tim
Date & Time
Langu
Language
Set-up3
Louder
Louder
m/d/y
m/d/y
English
En
Select :
Select :
lis

Setting the Date and Time
Set-up1
Set-up2
Set-up3
Language
Da
te & Time
Beeper
Format
Select :
Eng
lish
m/d/y
Louder
Da
te & Time
d / m / y
12h
01 / 09 / 2006
00 : 00
Date & Time
Select :
Set :
Follow the steps below to set the date display style, current date and time.
1. Rotate the mode dial to and turn your
camera on by pressing the power switch.
2. [Set-up1] is displayed.
3. Use the four-way controller (T) to select
[Date & Time], then press the button.
Set-up1
Set-up1 Set-up2
Set-up2 Set-up3
For mat
Beeper
Beeper
te & Tim
Date & Time
Langu
Language
Set-up3
Louder
Louder
m/d/y
m/d/y
English
En
Select :
Select :
lis
4. Press the four-way controller (WX) to
select date style, Day, Month, Year and
Time fields.
To increase a value, press the four-way
controller (S).
To decrease a value, press the
four-way controller (T).
To select the time display in 12-hours or
Set :
Set :
Date & Time
Date & Time
Date & Time
te & Tim
d/m/y
d/m/y 12h
01 / 09 / 2006
01 / 09 / 2006
00 : 00
00 : 00
24-hours format, press the four-way
controller.
5. Press the button after all fields are set.
The date illustration shown is for the purpose of explanation and may differ from the actual
setting of your camera.
12h
AMAMAM
Select :
Select :
EN-19

Formatting an SD Memory Card or Internal Memory
Set-up1
Set-up2
Set-up3
Language
Da
te & Time
Beeper
Format
Select :
Eng
lish
m/d/y
Louder
Select :
Foorrmmaatt
No
s
The term “Formatting” means preparing an “SD memory card” to record images; this
process is also called “initialization”. This utility formats an SD memory card or the
internal memory and erases all stored images and data.
1. Rotate the mode dial to and turn your
camera on by pressing the power switch.
[Set-up1] is displayed.
2. Use the four-way controller (T) to select
[Format], then press the button.
3. Use the four-way controller (ST) to select
[Yes], then press the button to
confirm.
When you format an SD memory card, be aware that all data on the SD memory card will be
erased. Protected images are also erased.
To format the internal memory, do not insert an SD memory card into the camera. Otherwise,
you will format the SD memory card.
An SD memory card having any problem cannot be properly formatted.
Set-up1
Set-up1 Set-up2
Set-up2 Set-up3
For mat
Beeper
Beeper
Date & Time
te & Tim
Langu
Language
F
For mat
Yes
YYees
No
No
Select :
Select :
Set-up3
Louder
Louder
m/d/y
m/d/y
English
En
Select :
Select :
lis
EN-20

Using the LCD Monitor
Your camera is equipped with a 2.4” full color TFT LCD monitor to help you compose
images, replay recorded images/movie clips or adjust menu settings. The mode icons,
text and numbers displayed on the monitor may vary according to the current settings.
1. Rotate the mode dial to , , , ,
, or .
2. Press the power switch to turn on the
power.
3. Compose your scene on the LCD monitor.
4. Press the shutter release button.
The LCD monitor darkens in strong sunlight or bright light. This is not a malfunction.
To prevent your images from being blurred while pressing the shutter release button, always
hold it carefully. This is especially important when you are shooting under low lighting
conditions, since your camera may decelerate the shutter speed to ensure your images are
properly exposed.
EN-21

PHOTOGRAPHY MODE
Shooting Images
1. Rotate the mode dial to , , , ,
, or and turn your camera on by
pressing the power switch.
2. Compose the image on the LCD monitor
screen so that the main subject is within
the focus frame.
3. Press the shutter release button down
halfway to focus the image.
When you press the shutter release
button down halfway, the camera’s Auto
Focus feature automatically focuses the image. The focus frame turns green if
the subject is in focus. Proper exposure is determined and locked at the same
time.
4. Press the shutter release button the rest of the way down to capture the image.
The actual captured image appears to be larger than the one displayed by the LCD monitor
screen after the image has been captured.
Pressing the button switches the LCD monitor display mode. Each time you press the
button, the display changes in the following order: Normal Display Æ Infomation Display Æ No
Icons Æ LCD Off.
EN-22

Setting Image Resolution and Quality
Mode1
Mode2
Mode3
Select :
ISO
Quality
Ima
ge Size
W
. Balance
R
eturn n :
Ima
ge Size
Select :
Cancel :
2816 X 2112
2204 X 1728
1600 X 1200
640 X 480
As you get to know the digital camera, you can set the image resolution (number of
vertical and horizontal pixels) and image quality (compression ratio) based on the
types of images you want to shoot.These settings affect the number of images that
can be stored in the internal memory, or on an SD memory card.
Higher resolution and higher quality images provide finer detail but cause the images’
file size to be larger.
To change image resolution or image quality, perform these steps below:
1. Rotate the mode dial to , , , ,
, or and turn your camera on by
pressing the power switch.
2. Press the MENU button.
[Mode1] is displayed.
In the mode, [Auto] is displayed.
3. Use the four-way controller (T) to select
[Image Size], then press the button.
4. Use the four-way controller (ST) to select
the desired setting, then press the
button to confirm.
5. Follow the step 3 and 4 above to set the
[Quality].
Mode1Mode1
Mode1 Mode2
etu
Return :
Cancel :
Mode2 Mode3
Im
ge Si
Image Size
Quality
Quality
. Balanc
W. Balance
ISO
ISO
Im
ge Si
Image Size
2816 X 2112
2816 X 2112
2304 X 1728
2204 X 1728
1600 X 1200
1600 X 1200
640 X 480
640 X 480
Mode3
Select :
Select :
Select :
Select :Cancel :
The possible number of shots and recording time depend on the storage size, resolution and
quality settings and the subject of the image to be captured.
You can resize the images later. Please refer to the section in this manual titled “Resizing an
Image” for further detail.
EN-23

Using the Zoom Function
3
2.2 X
This camera is equipped with 3x optical zoom. The lens moves during the optical
zoom photography, allowing you to capture telephoto and wide-angle shots. By using
the optical zoom function, images appear closer by pressing the button, or smaller
away by pressing the button.
The zoom bar indicates the current level of
magnification. When the digital zoom is within
3x magnification, the zoom bar is within the
optical zoom range. When the digital zoom
function is set to On, you can further enlarge
the subjects with 4x digital zoom by pressing
continuously the button. It is activated after
your camera reaches its maximum optical
zoom factor (3x) and the zoom bar is within the
digital zoom area. You can enlarge the subject
to a maximum magnification equivalent to 12
Optical zoom
range
2.2X
2.2X
Zoom bar
times. A useful feature as it is, however, the more the image is enlarged, the more
pixelated the image will appear.
To capture a zoomed image, perform the following steps:
1. Rotate the mode dial to , , , ,
, or and turn your camera on by
pressing the power switch.
2. Adjust the magnification ratio by using the
/ button.
To exit the zoom photography, press
continuously the button.
The status of digital magnification is
displayed on the LCD monitor.
3. Compose your scene and press the shutter
release button.
3
Digital zoom range
To enable digital zoom feature, set the [Mode2- Digital Zoom] to [On] in the , , , ,
, or mode.
EN-24

Using the Flash
F
lash Mode
A
uto
OK :
The flash is designed to function automatically when lighting conditions warrant the
use of flash. You can take an image using a desired flash mode to suit your
circumstances.
1. Rotate the mode dial to , , , ,
, or .
2. Press the power switch to turn on the
power.
3. Press the four-way controller (W/). The
flash mode changes each time the button
is pressed. You can also change the
setting using the four-way controller
(ST).
4. Press the button to confirm the setting.
5. Compose your scene and press the shutter release button.
The camera has four flash modes: Auto, Auto + Red-eye, Flash on and Flash off.
The table below will help you to choose the appropriate flash mode:
Flash mode Description
Auto The flash fires automatically according to the photographic
conditions.
Red-eye Use this mode to reduce the red-eye phenomenon when you want
to take natural-looking photographs of people and animals in
low-light conditions.When taking photographs, the red-eye
phenomenon can be reduced by asking the subject (person) to
look at the digital camera or get as close to the digital camera as
possible.
Flash on The flash will always fire regardless of the surrounding brightness.
Flash off The flash will not discharge, regardless of the brightness. Use this
mode when taking pictures using indoor lighting, for stages and
indoor competitions, and when the subject is too far away for the
flash to be effective.
lash Mod
Flash Mode
Auto
ut
OK :
OK :
EN-25

Setting Focus
F
ocus
Standard
OK :
Images can be captured with the focus determined automatically using auto focus.
You may over-ride the auto focus and specify [ ] macro or [ ] infinity.
1. Rotate the mode dial to , , , ,
, or .
2. Press the power switch to turn on the
power.
3. Press the four-way controller (X/). The
focus mode changes each time the button
is pressed. You can also change the
setting using four-way controller (ST).
4. Press the button to confirm the setting.
5. Compose your scene and press the shutter release button.
The camera has three focus modes: Standard, Macro and Infinity.
The table below will help you choose the appropriate focus mode:
Focus mode Description
Standard Select Standard-focus setting for most occasions when you want
the camera to automatically determine the focus setting.When
using Standard-focus setting, any object at a range of focus is 40
cm or greater can be in focus.
Macro Select Macro-focus setting to capture close-up images. When the
lens is zoomed to its widest position you may focus objects as
close as 5 cm.When the lens is zoomed to its telephoto position
(3x zoom) you may focus objects as close as 35 cm.
Infinity Select Infinity-focus setting when you want to capture images of
subject at a distance of infinity. The flash mode will be set to Flash
Off automatically.
ocu
Focus
Standard
Standa
OK :
OK :
EN-26

Capture Mode
Ca
ptur
e Mode
Burst
OK :
Burst
This mode is used for continuous shooting. 3 pictures are taken continuously once the
shutter release button is pressed. Secure the camera to a tripod or place it on a stable
surface.
1. Rotate the mode dial to , , , ,
, or .
2. Press the power switch to turn on the
power.
3. Press the four-way controller (S/) and
use (S) to select [Burst]. You can also
change the setting using four-way
controller (WX).
4. Press the button to confirm the setting.
The indicator is displayed on the monitor screen.
5. Press the shutter release button halfway to lock the focus.
6. Press the shutter release button to capture a sequence of images.
In Burst mode, the flash mode will be set to Flash Off automatically.
ptu
e Mod
Capture Mode
Burst
Bu
OK :
OK :
EN-27

Auto Bracket
Ca
ptur
e Mode
AEB
OK :
In this mode, the camera automatically changes the exposure within a set range to
take three shots after you press the shutter release button once. Auto Bracket settings
can be combined with exposure compensation settings to extend the adjustment
range.
1. Rotate the mode dial to , , , ,
, or .
2. Press the power switch to turn on the
power.
3. Press the four-way controller (S/) and
use (S) to select
[AEB]. You can also change the setting
using the four-way controller (WX).
4. Press the button to confirm the setting.
The indicator is displayed on the LCD monitor screen.
5. Press the shutter release button to capture the three images.
In AEB mode, the flash mode will be set to Flash Off automatically.
ptu
e Mod
Capture Mode
AEB
AEB
OK :
OK :
EN-28

Self-Timer
Ca
ptur
e Mode
2 sec. Self-timer
OK :
The self-timer can be used in situations such as group shots. When using this option,
you should either mount the camera on a tripod (recommended) or rest it on a flat,
level surface.
1. Secure the camera to a tripod or place it on
a stable surface.
2. Rotate the mode dial to , , , ,
, or .
3. Press the power switch to turn on the
power.
4. Press the four-way controller (S/) and
use (S) to select your desired self-timer
mode. You can also change the setting
using four-way controller (WX).
5. Press the button to confirm the setting.
6. Compose your scene and press the shutter
release button.
The self-timer function is activated.
The photograph is then taken after the preset time.
To cancel the self-timer at any time, press the four-way controller (S/) or
press the shutter release button halfway.The table below will help you choose
the appropriate self-timer mode:
Self-timer mode Description
2 sec.
Self-timer
10 sec.
Self-timer
The image is captured about 2 seconds after the shutter is
pressed. This mode is useful for preventing camera shake.
The image is captured about 10 seconds after the shutter is
pressed. This mode is suitable for the shots in which the
photographer has to be included.
10+2 sec.
Self-timer
The first image is captured about 10 seconds after the shutter
release button is pressed, and then the second image is
captured 2 seconds later. This mode is convenient when
capturing group images in succession. Flash does not fire in this
mode.
ptu
e Mod
Capture Mode
2 sec. Self-timer
2 sec. Self-timer
OK :
OK :
After one shot is taken, the self-timer mode is turned off.
If you wish to take another image using the self-timer, repeat these steps.
EN-29

Adjusting the Exposure (EV Compensation)
Set :
Select :
±
0. 0
You can manually adjust the exposure determined by the digital camera. Use this
mode when the proper exposure cannot be obtained, for example, when the contrast
(difference between bright and dark areas) between the subject and the background is
extremely high. The EV compensation value can be set in the range from -2.0EV to
+2.0EV.
1. Rotate the mode dial to , , , ,
or .
2. Press the power switch to turn on the
power.
3. Press the four-way controller (T/) and
use WX to set the range of EV
compensation value from -2.0EV to
+2.0EV.
4. Press the button to confirm the setting.
Select :
EVEVEV
0.0
±0.0
Set :
Set :Select :
EN-30

Setting White Balance
Mode1
Mode2
Mode3
Select :
ISO
Quality
Ima
ge Size
W
. Balance
R
eturn n :
Select :
Cancel :
Aututoo
T
ungstenn
Daylight
Cloudy
W
. Balance
Select :
Cancel :
F
luor
escent
W
. Balance
This feature lets you make adjustments to compensate for different lighting types
according to your shooting conditions.
1. Rotate the mode dial to , , , ,
or .
2. Press the power switch to turn on the
power.
3. Press the MENU button. [Mode1] is
displayed.
4. Use the four-way controller (T) to select
[W. Balance], then press the button.
5. Use the four-way controller (ST) to select
the desired white balance setting, then
press the button to confirm.
6. To cancel the setting, press the MENU
button and exit the menu.
7. Press the shutter release button to capture
the image.
Mode1Mode1
Mode1 Mode2
etu
Return :
Cancel :
Cancel :
Mode2 Mode3
Im
ge Si
Image Size
Quality
Quality
. Balanc
W. Balance
ISO
ISO
. Balanc
W. Balance
A
Auto
Daylight
Daylight
Cloudy
Cloudy
ungste
Tungsten
T
. Balanc
W. Balance
luo
escen
Fluorescent
Mode3
Select :
Select :
Select :
Select :Cancel :
Select :
Select :Cancel :
EN-31

PLAYBACK MODE - THE BASICS
100 -0 00 1
Viewing Images
You can display the still images one by one.
1. Rotate the mode dial to , , , ,
, or and turn your camera on by
pressing the power switch.
2. Press the button.
The last recorded image appears on
the LCD monitor screen.
Basic information is shown by
indicators on the LCD monitor screen.
To see full information display, press
the button.
3. Use the four-way controller (WX) to select the desired images.
To view the previous image, press the four-way controller (W).
To view the next image, press the four-way controller (X).
For protected images/movie clips, mark will be displayed. Refer to the section in this
manual titled “Protecting Images/Movie Clips” for further details.
For images selected for printing with DPOF setting, mark will be displayed. (Refer to the
section in this manual titled “Setting the DPOF” for further details.)
If there is no image stored in the internal memory or on the SD memory card, [No image]
message will appear on the LCD monitor screen.
You cannot enter the Playback mode from the Setup mode.
100-0001
100-0001
EN-32

Magnifying Images
1.5 X
While reviewing your images, you may enlarge a selected portion of an image. This
magnification allows you to view fine details. The zoom factor displayed on the screen
shows the current magnification ratio.
1. Press the button.
The last recorded image appears on
the LCD monitor screen.
To view the previous image, press the
four-way controller (W).
To view the next image, press the
four-way controller (X).
2. Adjust the zoom ratio by using the /
button.
To enlarge the selected image, press
the button.
To return to the normal image, press the button.
The magnification factor is displayed on the LCD monitor screen.
3. To view different portions of the images, press the four-way controller (STWX) to
adjust the display area.
The magnification factors range from 1.5X to 4X (within 6 stages: 1.5X, 2.0X, 2.5X, 3.0X, 3.5X
and 4.0X).
1.5X
1.5X
EN-33

Thumbnail Display
1 2 3
4 5 6
7 8 9
This function allows you to view 9 thumbnail images on the LCD monitor screen
simultaneously so you may search for a particular image.
1. Press the button.
The last recorded image appears on
the LCD monitor screen.
2. Press the button once.
Nine thumbnail images are displayed
simultaneously.
For recorded movie clips, the movie
mode icon will be displayed.
For protected images/movie clips,
mark will be displayed. (Refer to the
section in this manual titled
“Protecting Images/Movie Clips” for
further details.)
3. Use the four-way controller (STWX) to move the cursor to select the image to be
displayed at regular size.
4. Press the or / button to display the selected image on full screen.
123
456
789
EN-34

Slideshow Display
Select :
R
eturn n :
Playback2
Playback1
DPOF
Pr
otect
Slide Show
Slide Show
Start t :
Cancel :
3 Sec.
5 Sec.
10 Sec.
The slideshow function enables you to play your images back automatically in
sequential order. This is very useful and entertaining feature for reviewing recorded
images and for presentations.
1. Press the button.
The last recorded image appears on
the LCD monitor screen.
2. Press the MENU button to access the
Playback menu. Then use the four-way
controller (T) to select [Slide Show] and
Playba
Playback1
Slide Sh
Slide Show
otec
Protect
DPOF
DPOF
press the button.
etu
Return :
3. Use the four-way controller (ST) to set
the playback interval, then press the
button.
The slideshow starts.
The movie clips display the first frame
image, and the movie is not played
back.
To stop slideshow, press the button.
You can adjust the slideshow display interval within the range of 3 sec., 5 sec., 10 sec..
Cancel :
Slide Sh
Slide Show
3 Sec.
3 Sec.
5 Sec.
5 Sec.
10 Sec.
10 Sec.
Playba
Playback2
Select :
Select :
Sta
Start :Cancel :
EN-35

Resizing an Image
Select :
R
eturn n :
Playback2
Playback1
Copy y T
o Card
Quality Change
R
esize
R
esize
2304 X 1728
1600 X 1200
640 X 480
Select :
Cancel :
You can change the image size of a captured image to one of the following sizes:
2304 x 1728 pixel, 1600 x 1200 pixel and 640 x 480 pixel.
1. Press the button.
The last recorded image appears on
the LCD monitor screen.
2. In the mode, use the four-way
controller (WX) to select the desired
images.
Playba
Playback1 Playback2
esi
Resize
Quality Change
Quality Change
Copy To Card
Co
To view the previous image, press the
four-way controller (W).
etu
Return :
To view the next image, press the
four-way controller (X).
3. Press the MENU button to access the Playback menu. Press the four-way
controller (X) to select [Playback2] and press (T) to select [Resize] and press the
button.
4. Use the four-way controller (ST) to select
the desired setting, then press the
button to confirm.
Cancel :
You can only choose a smaller size image; you cannot increase the resolution of an image.
Movie cannot be resized.
Playba
o Ca
esi
Resize
2304 X 1728
2304 X 1728
1600 X 1200
1600 X 1200
640 X 480
640 X 480
Select :
Select :
Select :
Select :Cancel :
EN-36

MOVIE MODE
00: 49
Recording Movie Clips
This mode allows you to record movie clips with sound via built-in microphone.
1. Rotate the mode dial to and turn your
camera on by pressing the power switch.
2. Press the shutter release button to start
recording.
3. To stop recording, press the shutter
release button again.
00:49
00:49
The optical zoom function (3X) can be activated before you start recording the movie clips
The digital zoom function can be activated before and during the recording.
Pressing the button switches the LCD monitor screen display mode. Each time you press
the button, the display changes in the following order: Normal Display Æ No Icons Æ LCD
Off.
EN-37

Playing Back Movie Clips
12: 01
01/ 01 /2 006
1/7
100 -0 00 1
00: 05
You can play back the recorded movie clips on the LCD monitor screen. However, the
sound recorded with movie clips can only be played back on a TV or on a computer.
1. Press the button.
2. Use the four-way controller (WX) to go
through the images until the movie clip you
want to play back is displayed.
To view the previous image, press the
four-way controller (W).
To view the next image, press the
four-way controller (X).
3. Press the button to start playing back
the movie clips.
To pause or resume movie playback, press the button again.
The index number, date and time indicators displayed on the LCD monitor screen will disappear
after a few seconds.
The zoom function cannot be activated when playing back movie clips.
To playback the movie clips on the computer, we recommend you to use Windows Media Player
9.0 or later (WMP 9.0 or later). You can download WMP version from the website at
www.microsoft.com.
100-0001
100-0001
00:05
00:05
01/01/2006
01/01/2006
12:01
12:01
1/7
1/7
EN-38

PLAYBACK MODE - ADVANCED
FEATURES
Playing Back Still Images/Movie Clips on TV
You can also playback your images on a TV screen. Before connecting to any device,
make sure to select NTSC/PAL system to match the video output system of the video
equipment you are going to connect to the digital camera, then turn off all devices to
be connected.
1. Connect one end of the AV cable to the AV
terminal of the digital camera.
2. Connect the other end to the AV input
socket of the TV set.
3. Turn the TV and digital camera on.
4. Playback the images/movie clips.
The method of operation is the same as
playing back still images and movie
clips on the digital camera.
The sound recorded with movie clips can only be played back on a TV or on a computer.
PC/AV terminal
EN-39

Deleting Images/Movie Clips
Delete
Select :
Cancel :
T
his Image
All Imageges
Select :
Delete
No
s
Use this function to delete one or all images/movie clips stored in SD memory card or
the internal memory. Please note that the deleted images or movie clips cannot be
recovered. Exercise caution before deleting a file.
1. Rotate the mode dial to , , , ,
, or and turn your camera on by
pressing the power switch.
2. Press the button.
The last recorded image/movie clip
appears on the LCD monitor screen.
3. Use the four-way controller (WX) to select
the image/movie clip you want to delete.
4. Press the button to delete.
5. Use the four-way controller (ST) to select
[This Image] or [All Images] by your
preference, then press the button.
6. When the delete message appears, use
the four-way controller (ST) to select
[Yes], then press the button to confirm
the deletion.
If you wish to cancel the deletion, select
[No].
Protected images cannot be deleted with the delete function.
Cancel :
Delete
Delete
his Im
This Image
All Images
All Im
Delete
Delete
YYees
Yes
No
No
Select :
Select :
Select :
Select :Cancel :
EN-40

Protecting Images/Movie Clips
Slide Show
Select :
R
eturn n :
Playback2
Playback1
DPOF
Pr
otect
Select :
Cancel :
Pr
otect One
Pr
otect All
Pr
otect One
Select :
Cancel :
Lock
Unlock
Set the data to read-only to prevent images from being erased by mistake.
1. Press the button.
The last recorded image appears on
the LCD monitor screen.
2. In the mode, use the four-way
controller (WX) to select the desired
images.
To view the previous image, press the
four-way controller (W).
To view the next image, press the
four-way controller (X).
3. Press the MENU button, then use the
four-way controller(T) to select [Protect]
and press the button.
4. Use the four-way controller (ST) to
choose the desired setting, then press the
button.
[Protect One]: Protect one image/
movie.
[Protect All]: Protect all images/movies
(at once).
5. Use the four-way controller (ST) to select
[Lock], then press the button to
confirm.
Press the MENU button to return to the
mode. The indicator appears on
the selected image.
If you wish to cancel the protect
function of a protected image, select
[Unlock].
Playba
Playback1
Slide Sh
Slide Show
Protect
DPOF
DPOF
etu
Return :
Cancel :
Cancel :
otec
Protect
otect On
Protect One
otect Al
Protect All
otect On
Protect One
Lock
Lo
Unlo
Unlock
Playba
Playback2
Select :
Select :
Select :
Select :Cancel :
Select :
Select :Cancel :
EN-41

Setting the DPOF
100 -00 01
Pr
otect
Slide Show
Select :
R
eturn n :
Playback2
Playback1
DPOF
R
eset All
DPOF
Select :
Cancel :
One Image
All Imageges
DPOF (Digital Print Order Format) allows you to embed printing information on your
SD memory card. By using DPOF, you can select an image to be printed and then
specify how many prints or which image you would like. Take your SD memory card to
a DPOF enabled printer that accepts SD memory cards. The DPOF/card-compatible
printer will read the embedded information on the SD memory card and print your
images as specified.
To configure print settings for a single image / all images.
1. Press the button, then use the four-way
controller (WX) to select the desired image you
want to print.
100-0001
100-0001
2. Press the MENU button. Use the four-way
controller (ST) to select [DPOF], then press
the button.
3. Use the four-way controller (ST) to select by
your preference, then press the button.
[One Image]: To configure print settings for a
single image.
[All Images]: To configure print settings for all
images.
[Reset All]: Resets all DPOF settings.
EN-42
Playba
Playback1
Slide Show
Slide Sh
Protect
DPOF
DPOF
etu
Return :
Cancel :
otec
One Image
One Im
All Im
All Images
eset Al
Reset All
DPOF
DPOF
Playba
Playback2
Select :
Select :
Select :
Select :Cancel :

4. Use the four-way controller (ST) to select by
100 -00 01
Yes
1
One Image
Select :
Cancel :
Quantity
Date
One Image
Yes
0
Select :
Cancel :
Quantity
Date
R
eset All
DPOF
Select :
Cancel :
One Image
All Imageges
your preference, then press the button.
[Quantity]: Allows you to select image quantity
(0~10). Use the four-way controller (WX) to
set the image quantity.
[Date]: The date of recording can be printed
directly on the images. Select [Yes] or [No]
with the four-way controller (WX).
5. Press the MENU button to return to the image
playback mode.
The print icon is marked on the
displayed image.
To cancel the DPOF settings for a single
image, go back to step 3 to select [One
Image] and select 0 in [Quantity] in the next
step. For resetting all the DPOF settings,
go back to step 3 to select [Reset All].
Cancel :
Cancel :
Cancel :
One Im
One Image
Quantity
Quantity
Date
One Im
One Image
Quantity
Quantity
Date
100-0001
100-0001
DPOF
DPOF
One Image
One Im
All Im
All Images
eset Al
Reset All
Yes
Select :
Select :Cancel :
Yes
Select :
Select :Cancel :
Select :
Select :Cancel :
1
0
Before you perform the DPOF settings on your camera, always remember to copy your images
from the internal memory to an SD memory card first.
The
print icon will appear on the LCD monitor screen indicating images selected for
printing.
You cannot print movies.
Depending on the printer or printing equipment at the photo processing lab., the date may not
be imprinted on the pictures even if the DPOF settings are made.
EN-43

TRANSFERRING RECORDED IMAGES
AND VIDEOS TO YOUR COMPUTER
System Requirements (Windows)
Pentium III 600 MHz or higher
Windows 2000/XP
64MB RAM
128MB hard disk space
CD-ROM drive
Available USB port
System Requirements (Macintosh)
PowerPC G3/G4OS 9.0 or later
64MB RAM
128MB hard disk space
CD-ROM drive
Available USB port
EN-44

Connect the digital camera to your computer
Select :
Set-up1
Set-up2
Set-up3
A
uto Shut Down
L
CD Brightness
TV
USB Mode
3 Min.
NTSC
PC
USB Mode
Select :
PC
1. Rotate the mode dial to and turn your
camera on by pressing the power switch.
2. Press the four-way controller (X) to select
the [Set-up2] menu, then use the four-way
controller (T) to select [USB Mode].
3. Press the button.
4. Use the four-way controller (T) to select
[PC], then press the button.
5. Turn off your camera.
6. Connect your camera and the computer via
the supplied USB cable.
7. Turn your camera on by pressing the
power switch.
8. There will be a new “Removable Disk” icon
detected in “My Computer”, which contains
your recorded images or movie clips. (For
Mac users, double-click [untitled] or
[unlabeled] disk drive icon on our desktop.)
Set-up1
Set-up1 Set-up2
Set-up2 Set-up3
USB Mode
USB Mode
TV
TV
CD Brightnes
LCD Brightness
uto Shut D
Auto Shut Down
USB Mode
USB Mode
PC
PC
PC/AV terminal
Set-up3
PC
PC
NTSC
NTSC
3 Min.
3 Min.
Select :
Select :
Select :
Select :
EN-45

Download images or movie clips
When the digital camera is turned on and connected to your computer, it is considered
to be a disk drive, just like a floppy disk or CD. You can download (transfer) images by
copying them from the “Removable disk” (“untitled” or “unlabeled” disk on a
Macintosh) to your computer hard drive.
Windows
Open the “removable disk” and double click on the DCIM / DSCIM folder to open it to
find more folders. Your images are inside these folder(s). Select the desired still
images or video clips and then choose “Copy” from the “Edit” menu. Open the
destination location (folder) and choose “Paste” from the “Edit” menu. You may also
drag and drop image files from the digital camera to a desired location.
Macintosh
Open the “untitled” disk icon, and the destination location on your hard disk. Drag and
drop from the digital camera to the desired destination.
Memory card users may prefer to use a memory card reader (highly recommended).
Video playback application is not included with the package. Make sure that video playback
application has been installed in your computer.
EN-46

EDITING SOFTWARE INSTALLATION
Installing Photo Explorer
Ulead® Photo Explorer provides a simple and efficient way to transfer, browse, modify and
distribute
types and easily browse or add personal descriptions; make timely modifications; or
distribute the media through the medium of your choice: E-mail, Print, Slideshow
Presentations. It is an indispensable all-in-one tool for owners of digital cameras,
WebCams, DV camcorders, scanners, or anyone who strives to effectively organize a
large collection of digital media.
1. Insert the enclosed CD-ROM into your CD-ROM drive.
2. When the welcome screen appears, click “INSTALL PHOTO EXPLORER 8.0”.
For more information about the operation of Photo Explorer application software, refer to its
For Windows 2000/XP users, please make sure to install and use the Photo Explorer in
Photo Explorer is not supported on the Mac. iPhoto or iPhoto2 is recommended.
digital media. Acquire photos, video or sound clips from various digital device
Follow the on-screen instructions to complete the installation.
respective help documentation.
“Administrator” mode.
EN-47

Installing Photo Express
®
Ulead
Photo Express is complete photo project software for digital images. The
step-by-step workflow,
creating exciting photo projects. Acquire digital photos effortlessly from digital
cameras or scanners. Organize them conveniently with the Visual Browse mode. Use
hundreds of ready-to-use templates such as albums, cards, posters, slideshows, and
more. Edit and enhance images with photo editing tools, photographic filters, and
special effects. Embellish projects by adding creative design elements such as
frames, callouts, and stamp objects. Share results with family and friends via e-mail
and multiple print options.
1. Insert the enclosed CD-ROM into your CD-ROM drive.
2. When the welcome screen appears,click “INSTALL PHOTO EXPRESS 5.0”.
Follow the on-screen instructions to complete the installation.
For information on how to use Photo Express to edit and retouch your recorded images, please
refer to its online help.
For Windows 2000/XP users, make sure to install and use the Photo Express while logged in as
a user with an Administrator account.
Photo Express is not supported on the Mac.
visual program interface, and in-program help assist users in
EN-48

MENU OPTIONS
Select :
Aututo
Quality
Ima
ge Size
R
eturn n :
Mode1
Mode2
Mode3
ISO
Quality
Ima
ge Size
W
. Balance
R
eturn n :
Mode1
Mode2
Mode3
R
eturn n :
On
Digital Zoom
Metering
Mode1
Mode2
Mode3
R
eturn n :
Da
te Imprint
Shar
pness
Color
Satutura
tion
Off
Medium
Medium
Camera Menu
This menu is for the basic settings to be used when capturing still images.
etu
Return :
Im
ge Si
Image Size
Quality
Quality
Auto
Select :
Select :
Mode1
Mode1 Mode2
Mode2 Mode3
Im
ge Si
Image Size
Quality
Quality
. Balanc
W. Balance
ISO
ISO
etu
Return :
Mode3
Mode1
Mode1 Mode2
Mode2 Mode3
Metering
Metering
Digital Zoom
etu
Return :
Mode3
On
OnDigital Zoom
Mode1
Mode1 Mode2
Color
Color
Sha
pnes
Sharpness
tio
Saturation Medium
te Imprin
Date Imprint
etu
Return :
Mode3
Mode3Mode2
Medium
Medium
Medium
Off
1. Rotate the mode dial to , , , , , or and turn your camera on.
2. Press the MENU button, then use the four-way controller (WX) to select the
[Mode1] / [Mode2] / [Mode3] menu.
In Mode, press the MENU button to access the [Auto] menu directly.
3. Use the four-way controller (ST) to select the option item, then press the
button.
4. Press the four-way controller (ST) to select the desired setting, then press the
button.
In the Mode
Item Functional Description
Image Size Sets the size of the image that will be captured. Refer to the section
in this manual titled "Setting Image Resolution and Quality" for
further details.
2816x2112
2304x1728
1600x1200
640x480
Quality Sets the quality (compression rate) at which the image is captured.
Refer to the section in this manual titled "Setting Image Resolution
and Quality" for further details.
Fine
Normal
Economy
EN-49

In the , , , , or Mode.
Mode1 settings
Item Functional Description
Image Size Refer to the section in this manual titled “Setting Image Resolution
and Quality” for further details.
Quality Refer to the section in this manual titled “Setting Image Resolution
and Quality” for further details.
W.Balance Sets the white balance when shooting under a variety of lighting
conditions and permits photographs to be taken that approach the
conditions that are seen by the human eye.
Auto
Daylight
Cloudy
Tungsten
Fluorescent
ISO Sets the sensitivity for taking pictures. When the sensitivity is raised
(and the ISO figure is increased), photography will become possible
even in dark locations, but the more pixelated (grainier) the image will
appear.
Auto / 64 / 100 / 200 / 400
Mode2 settings
Item Functional Description
Metering You can select the metering mode that sets which part of the subject to
measure to determine the exposure.
Center-weighted: Averages the light metered from the entire
frame, but gives greater wieght to the subject matter at the center.
Spot: The exposure is determined by the small area in the center
of the screen only.
Digital
Zoom
This sets whether or not to use digital zoom at the time of shooting. Refer
to the section in this manual titled “Using the Zoom Function”
for further
details.
Quick View Set to display a photographed image on LCD monitor screen
immediately after you have taken the shot.
EN-50

Mode3 settings
Item Functional Description
Color Sets the color of the image that will be captured.
Sharpness Sets the level of image sharpness.
Saturation To capture an image, your camera offers you three different degrees of
Date
Imprint
Full Color
Black & White
Sepia
High
Medium
Low
color to match with your preference.
Your images will demonstrate different impression by selecting different
degrees of color. This is called “Saturation”.
High
Medium
Low
The date of recording can be printed directly on the still images. This
function must be activated before the image is captured. The date
appears on the right bottom of the captured picture. When images are
shot with date imprint feature, the date cannot be removed later.
EN-51

Movie Menu
Select :
V
ideo
R
eturn n :
On
Digital Zoom
Color
This menu is for the basic settings to be used when recording movie clips.
ide
Video
Color
Color
Digital Zoom
etu
Return :
1. Rotate the mode dial to and turn your camera on.
2. Press the MENU button.
3. Press the four-way controller (ST) to select the option item. Then press the
button
4. Press the four-way controller (ST) to select the desired setting, then press the
button.
5. To exit the movie menu, press the MENU button.
Item Functional Description
Color
Refer to the Camera Menu's option item (the , , , , or
Mode) for further details.
OnDigital Zoom
On
Select :
Select :
Digital
Zoom
EN-52
Refer to the Camera Menu's option item (the , , , , or
Mode) for further details.

Playback Menu
Select :
R
eturn n :
Playback2
Playback1
DPOF
Pr
otect
Slide Show
Select :
R
eturn n :
Playback2
Playback1
Copy y T
o Card
Quality Change
R
esize
In the menu, set the settings used for playback.
Playba
Playback1
Slide Sh
Slide Show
Protect
DPOF
DPOF
etu
Return :
otec
Playba
Playback2
Select :
Select :
o Ca
Playba
Select :
Select :
Playba
Playback1 Playback2
esi
Resize
Quality Change
Quality Change
Copy To Card
Co
etu
Return :
1. Press the button.
The last recorded image appears on the LCD monitor screen.
2. Press the MENU button, then use the four-way controller (ST) to select the
[Playback1] / [Playback2] menu.
3. Use the four-way controller (ST) to select the option item, then press the
button.
4. Press the four-way controller (ST) to select the desired setting, then press the
button.
5. To exit the playback menu, press the MENU button.
Playback1
Item Functional Description
Slide
Show
You can play back recorded images in order with a selected interval time.
This function is useful for checking your images or for presentations, etc.
Refer to the section in this manual titled “Slideshow Display” for further
details.
3 Sec. / 5 Sec. / 10 Sec.
Protect Set the data to read-only to prevent images from being erased by
mistake.
Refer to the section in this manual titled “Protecting Images/Movie
Clips” for further details.
DPOF Allows you to select the desired pictures to be printed and set the number
of prints and whether or not to imprint the data in DPOF format. You can
print images easily just by inserting the SD memory card to a
DPOF-compatible printer or taking it to a print shop. Refer to the section
in this manual titled “Setting the DPOF” for further details.
EN-53

Playback2
Item Functional Description
Resize Changes the size of a recorded image.
Quality
Change
Copy to
Card
Resizing replaces the original image with the changed image. Only
resizing to a smaller size is available. Refer to the section in this manual
titled “Resizing an Image” for further details
2304x1728
1600x1200
640x480
Changes the quality (compression rate) of a recorded image.
Compresses images and overwrites an old size images with a newly
compressed image. Only quality changing to a lower quality level is
available.
Normal
Economy
Allows you to copy your files from the digital camera’s internal memory
to an SD memory card. You can only do this if you have an SD memory
card installed and some files in internal memory.
EN-54

Set-up1
Set-up2
Set-up3
Language
Da
te & Time
Beeper
Format
Select :
Eng
lish
m/d/y
Louder
Select :
Set-up1
Set-up2
Set-up3
A
uto Shut Down
L
CD Brightness
TV
USB Mode
3 Min.
NTSC
PC
Select :
Set-up1
Set-up2
Set-up3
Ver
sion
Set T
o Def
ault
R
eset Number
11
Setup Menu
This feature allows you to set up the default settings by preference for using your
camera.
Set-up1
PC
PC
Set-up1 Set-up2
eset Numbe
Reset Number
Set To Default
Set
Version
sio
Set-up1
Set-up1 Set-up2
Set-up2 Set-up3
Form at
Beeper
Beeper
Date & Time
te & Tim
Langu
Language
Set-up3
Louder
Louder
m/d/y
m/d/y
English
En
Select :
Select :
Set-up1 Set-up2
lis
Set-up2 Set-up3
USB Mode
USB Mode
TV
TV
CD Brightnes
LCD Brightness
uto Shut D
Auto Shut Down
Set-up3
NTSC
NTSC
3 Min.
3 Min.
Select :
Select :
Set-up1
1. Rotate the mode dial to mode and turn your camera on.
2. Press the four-way controller (WX) to select the [Set-up1] / [Set-up2] / [Set-up3]
menu.
3. Use the four-way controller (ST) to select the desired option item, then press the
button.
4. To exit the setup menu, rotate the mode dial to another mode.
Set-up1 settings
Item Functional Description
Format Erases all images and reformats the SD memory card loaded in your
camera. Protected images are also erased. SD memory card cannot be
formatted if it is write-protected.
Refer to the section in this manual titled “Formatting an SD Memory
Card or Internal Memory” for further details.
Beeper This sets whether or not to mute the startup sound, and the camera
sound each time you press a camera button.
Louder / Soft / Off
Date &
Time
This sets the date and the time.
Refer to the section in this manual titled “Setting the Date and Time”
for further details.
d/m/y
m/d/y
y/m/d
Language Sets the language that is displayed on the LCD monitor screen.
Refer to the section in this manual titled “Choosing the Screen
Language” for further details.
o De
aul
Set-up3
Set-up3Set-up2
Select :
Select :
EN-55

Set-up2 settings
1
Item Functional Description
USB Mode Selects to choose one of the following modes for further settings.
PC
TV Sets video output of the camera for matching the video output system
LCD
Brightness
Auto Shut
Down
Set-up3 settings
Item Functional Description
Reset
Number.
Set to
Default
Version This displays the current firmware version of the camera.
of the equipment that you are going to connect to the camera.
PAL / N TSC
This sets the brightness of the LCD monitor screen.
The adjustment range is from -5 to +5.
If no operation is performed for a specific period of time, the power to
the camera is automatically turned off. This feature is useful to reduce
battery wear.
2 Min. / 3 Min. / 5 Min. / Off
Sets whether or not to reset the file number when you take
photographs. This creates a new folder. The captured images are
recorded to the newly created folder from number 0001. If you want to
reset the file number, be sure that no images are recorded in the
internal memory or the SD memory card.
Returns all basic settings to the digital camera's default settings. The
time setting will not be reset.
EN-56

SPECIFICATIONS
Item Description
Image Sensor CCD
Effective pixels 6.0 Mega pixels
Image size Still image: 2816x 2112, 2304 x 1728, 1600 x 1200, 640 x 480
Image quality Still image: Fine / Normal / Economy
Recording media Approx. 16MB internal memory
File format JPEG (Exif 2.2), DCF, Motion JPEG (AVI)
Lens F-no.: Wide: 2.8 / Tele: 4.8
Focus range Normal :40cm ~ infinity
Flash effective
range
LCD monitor 2.4" color TFT-LCD
Self-timer 10 sec self-timer, 2 sec self-timer, 10+2 sec self-timer
Exposure
compensation
White balance Auto, Daylight, Cloudy, Tungsten, Fluorescent
ISO Auto, 64, 100, 200, 400
Interface PC/AV terminal
Power 2 x AA (alkaline or Ni-MH rechargeable) batteries
Dimension Approx. 90 x 62 x 27 mm
Weight Approx. 130g (without batteries & SD card)
* Recording capacity shows approximate number of shots recorded during CIPA-compliant testing.
Actual performance may vary according to operating conditions.
* Design and specifications are subject to change without notice.
Movie clip: 320 x 240
Movie image: QVGA
SD memory card (Optional, up to 2 GB)
Focal length: 5.5mm~16.5mm (equivalent to 34~102mm)
Macro : Wide: 6cm ~ infinity
Tele: 35cm ~ infinity
Wide: Approx. 0.5 m - Approx.3.0 m (at the standard output
sensitivity of 200)
Tele: Approx. 0.5 m - Approx. 1.8 m (at the standard output
sensitivity of 200)
Approx. 112K pixels display
-2.0EV~ +2.0EV (in 1/3 EV increments)
EN-57

TROUBLESHOOTING GUIDE
Symptom Possible causes Solutions / Corrective Actions
Power does not
turn on.
Camera
suddenly
powers down.
Image is not
captured when
the shutter
release button
is pressed.
Flash does not
fire.
Continuous
shooting is not
possible.
Cannot transfer
files over a USB
connection.
* The battery has run out.
* The battery is not oriented
correctly.
* The battery cover is not
closed properly.
* The function of [Auto Shut
Down] in the mode has
been activated.
* The battery has run out.
* The camera is in the or
mode.
* Memory is full.
* Flash off is selected in flash
mode.
* 10+2 sec. Self-timer is
selected in self-timer mode.
* The [Capture Mode] is set
to [Burst] or [AEB].
* The camera is in the
(video) mode.
* The capacity of the built-in
memory or SD memory
card is full.
* USB cable is not connected
securely.
* USB driver is not installed.
* Camera is turned off.
* Load new or fully charged battery.
* Load the battery in the correct
direction.
* Close the battery cover correctly.
* Turn the power back on and set
the option of [[Auto Shut Down] to
[Off].
* Load new or fully charged battery.
* Rotate the mode dial to , ,
, , , or .
* Transfer the desired files to your
computer and then delete
unnecessary files, or use a
different memory card.
* Select a different flash mode.
* Select [AF] in the [Capture Mode].
* Switch the mode dial to another
mode.
* Insert SD memory card with
available space or delete
unwanted images.
* Check all connections.
* Install the USB driver on your
computer.
* Turn on the camera.
EN-58

Possible Number of Recordable Image
The frame counter indicates the approximate number of images that can be stored on
the internal memory and the SD memory card. The number of recordable images may
vary depending on the recorded subject, the capacity of the memory card, if there are
files other than images or when the recording is made while switching the picture
quality or resolution.
Resolution Quality
2816 x 2112 Fine 4 9 20 41 83 168 337 676
2304 x1728 Fine 6 14 30 62 125 253 507 1015
1600 x 1200 Fine 13 30 61 125 252 506 1014 2031
640 x 480 Fine 68 152 311 628 1263 2534 5076 10160
Normal 8 19 41 83 168 337 676 1354
Economy
Normal 13 30 61 125 252 506 1014 2031
Economy
Normal 26 60 124 251 505 1013 2030 4063
Economy
Normal 113 254 519 1048 2106 4225 8460 16934
Economy
Internal
Memory
32MB64MB128MB256MB512M
13 30 61 125 252 506 1014 2031
19 43 88 179 360 723 1450 2902
38 86 177 359 721 1448 2900 5805
152 339 692 1397 2808 5633 11281 22579
SD Memory Card
B
1GB 2 GB
The above data shows the standard testing results. The actual capacity varies
according to the shooting conditions and settings.
Approximate Duration of Recording Time
The table below indicates the approximate duration of recording time depending on
the capacity of the internal memory and the SD memory card.
Image size
Internal
Memory
32MB 64MB 128MB 256MB 512MB 1GB 2GB
SD Memory Card
320 x 240 00:49 01:51 03:48 07:42 15:28 31:03 62:12 124:30
The values for the recording time may vary depending on the shooting conditions
and settings.
The frame rate is 20 fps (frames per second).
EN-59
 Loading...