

Page 1
Precautions
» Before using th e camera, read the precaut ions to ensure correct use,
the best per formance and longer life span.
» Do not leave or store t he camera in direct sunligh t, especially the
lens, as prolon ged exposure to direct su nlight can damage the
image sensor.
» Store in a cool, dr y environment.
» During stora ge, note that battery must b e recharged periodica lly
to maintain oper ating ability. Allowing total dis charge may ruin the
bat tery.
» Clean with a sof t dry cloth and take specia l care around lens.
» Format Memor y Card prior to rst use.
FCC STATEMENT:
This device comp lies with part 15 of the FCC Rules. O peration is subject to
the following two conditions:
(1) This device may not cause har mful interference, an d
(2) this device must acce pt any interference re ceived, including inter ference
that may cause und esired operation.
This equipme nt has been tested and fou nd to comply with the limit s for a
Class B digital d evice, pursuant to Part 15 of the FCC Rules . These limits are
designed to pr ovide reasonable prote ction against harmf ul interference in
a residential in stallation. This equ ipment generates, use s and can radiate
radio frequ ency energy and, if n ot installed and used in a ccordance with
the instruc tions, may cause harmfu l interference to radi o communications.
However, there is no gua rantee that interfere nce will not occur in a part icular
installatio n. If this equipment doe s cause harmful inter ference to radio or
television re ception, which can be de termined by turning the e quipment o
and on, the user i s encouraged to try to cor rect the interfer ence by one or
more of the foll owing measures:
» Reorient or rel ocate the receiving ante nna.
» Increase the sep aration between th e equipment and receive r.
Connect the e quipment into an outlet on a circui t dierent from that to
which the receive r is connected.
» Consult the dealer o r an experienced rad io/TV technicia n for help.
Changes or mod ications not expres sly approved by the part y responsible
for compliance co uld void the user’s author ity to operate the equi pment.
BAT TERY
Maximiz ing Battery L ife:
The batter y icon has a line across it wh en the battery is ver y low. If the
battery r eaches 0% while recordi ng, the camera saves the l e and powers
o. Extrem e cold temperatures can de crease battery li fe. To maximize
battery l ife in cold conditions, ke ep the camera in a warm pla ce prior
to use. Shootin g at higher frame rates and re solutions increases p ower
consumption.
The batter y charges to 100% in approxi mately 6 hours when using a US Bcompatible Wall o r Auto Charger.
Battery Storage & Handling:
The camera co ntains sensitive compon ents, including the ba ttery. Avoid
exposing you r camera and batter y to very cold or very ho t temperatures.
Low or high tempe rature conditions may temp orarily shorten th e battery
life or cause th e camera to temporaril y stop working proper ly. Avoid
dramatic chang es in temperature or humi dity when using the cam era, as
condensatio n may form on or within the cam era.
The camera h ousing protects the c amera from water damag e. For more
information , see Camera Housing. D o not turn on your camera i f it is wet.
If your camer a is already on, turn it o. Allow th e camera to dry thorou ghly
before using i t again. Do not dry the c amera with an extern al heat source
such as a microwave ove n or hair dryer. Damage to the cam era caused by
contact wit h liquid is not covered under th e warranty.
Battery Disposal:
Most rechargeable lithium-ion batteries are classied as non-hazardous
waste and are sa fe for disposal in the nor mal municipal waste stre am. Many
localities h ave laws in place requiring bat tery recycling . Check your local
laws to make sure that yo u can dispose of recharge able batteries in your
regular trash . To safely dispose of lithium -ion batteries, pr otect terminals
from exposu re to other metal with pac king, masking or ele ctrical tape so
they do not caus e a re while being transpo rted. Lithium-i on batteries,
however, do contain re cyclable materials an d are accepted for recycli ng by
the Recharge able Battery Rec ycling Corporation ’s (RBRC) Battery Re cycling
Program. We enco urage you to visit Call2Rec ycle at call2recycle. or g or call
1-800- BATTERY in North Americ a to nd a convenient recycli ng location.
Never dispose o f a battery in a re bec ause it may explode.
HOUSING
MAINTENENCE
Rinse housi ng in cool
clean water af ter use.
Inspect O -ring caref ully
prior to each u se: any
debris on O -ring can
cause leak age.
Store in a cool dr y area
with housin g door
slightly op en to prevent
O-ring deforming.
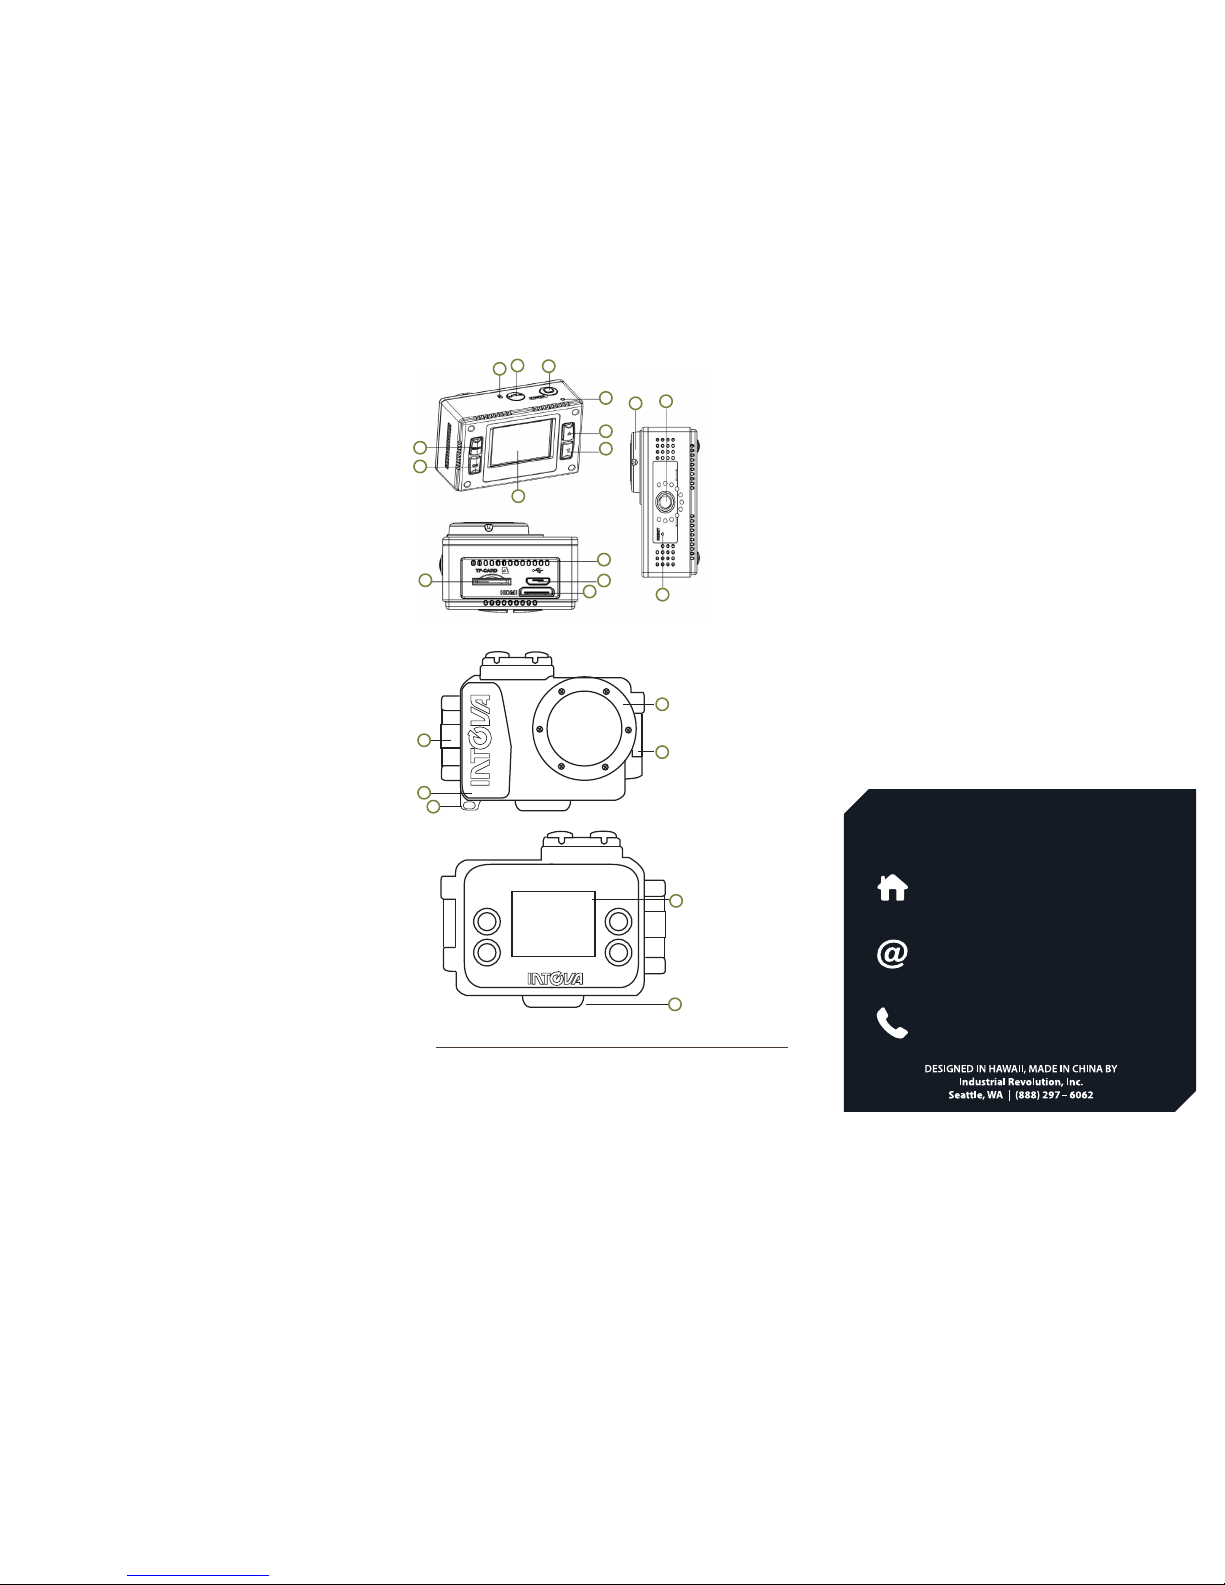
CAMERA
WATERPROOF HOUSING
1: POWER/SHUTTER BUTTON
2: MODE/TOGGLE BETWEEN MENU
3: MICROPHONE
4: ENTER/EXIT MENU BUTTON
5: OK BUTTON
6: 1.5” TFT LCD SCR EEN
7: DOWN BUTTON /ONE TOUCH LCD OFF
8: UP BUTTO N/PAUSE VIDEO RECORDI NG
9: INDIC ATOR LED
10: MICRO SD CAR D PORT
11: MINI HDMI TV OUT PO RT
12: MICRO USB POR T
13: S PEAK ER
14: RESET
15: TRIPOD MOUNT
16: LE NS
3
4
5
10
14
16
15
6
2
1
9
13
8
12
7
11
17
20
21
18
19
23
22
LIMITED WARRANTY: This pro duct has a limited 1 y ear warranty, to the o riginal purcha ser,
to be free fro m defects in ma terials and work manship. Follow al l product instr uctions and
warnings as w arranty does n ot cover damage due to m isuse, improper c are, accidents , or
alterations. See www.intova.com for further details, limitations, and restrictions.
WARNIN G: Do not drop, dis assemble, ope n, crush, bend, d eform, punc ture, shred,
microwave, in cinerate or paint t he camera. Do not i nsert foreig n objects into th e battery
opening on t he camera. Do not u se the camera or th e battery if i t has been damage d—for
example, i f cracked, punc tured or harmed b y water. Disassembl ing or punctur ing the
batter y can cause an expl osion or re.
Need help using your camera?
WE’RE HERE FOR YOU.
Visit our website:
www.intova.com
Call customer support:
+1(808) 837-0074
Email customer support:
17: TEXTURED GR IP
18: LENS PORT
19: HINGE
20: LANYARD ATTACHMEN T
21: LOCK
22: TRIPOD MOUNT
23: BACK DOOR
Page 2
GETTING STARTED NAVIGATING MENUS TO ADJUST SETTINGS
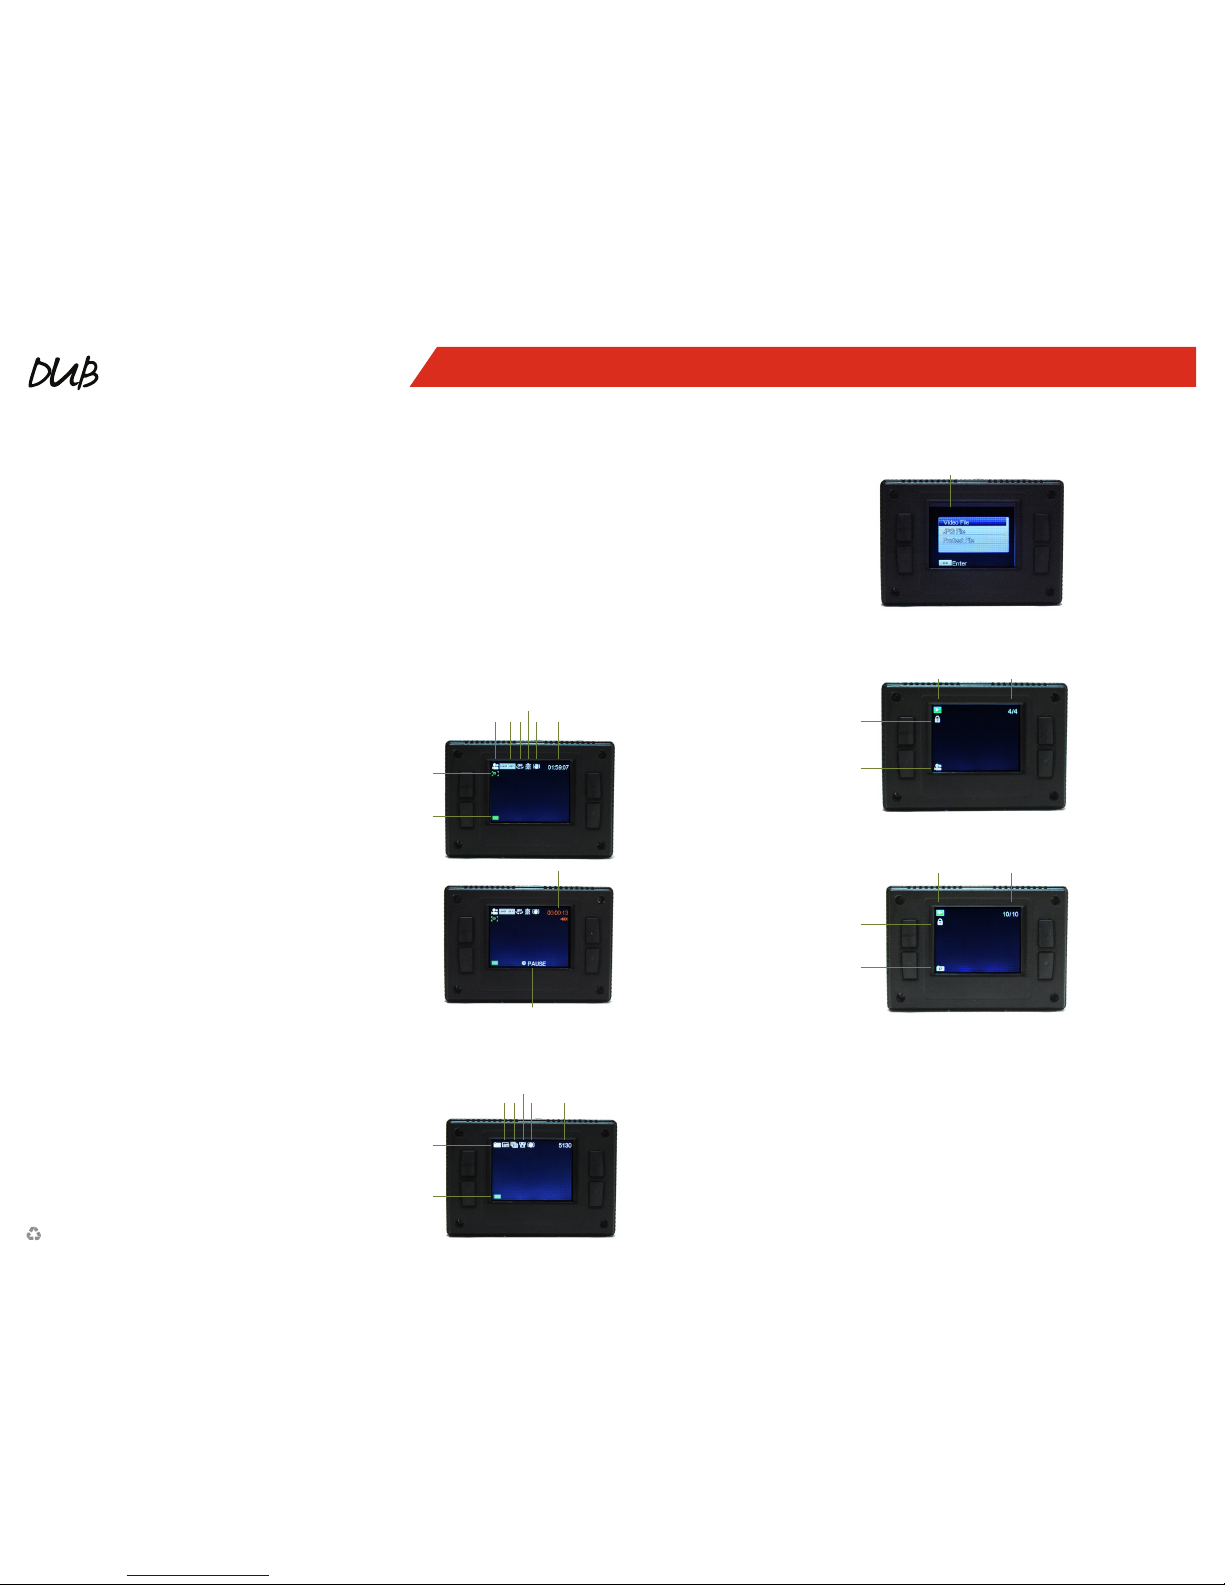
VIDEO STATUS SCREEN
PLAYBACK SELECTION SCREEN
VIDEO PLAYBACK STATUS SCREEN
PHOTO PLAYBACK STATUS SCREEN
TRANSFERRING FILES TO A COMPUTER
PHOTO STATUS SCREEN
QUICK START GUIDE
INSERT # 1207 - 7/16
For complete instructions go to www.intova.com.
HOUSING REMOVE/REPLACE
Unlock Housin g: Flip the housing lock (marke d by OPEN) away from the
housing and unh ook the latch from the back d oor. Push the thumb press
mechanism to po p open backdoor if ther e is a vacuum seal.
Lock Housing: C lose back door, hook latch and p ush lock towards housing .
CHARGE
Prior to chargin g, remove the camera from i ts housing.
Charge the bat tery by connectin g the camera to a computer or ot her USB
charging adap ter using the included USB ca ble. When the camera tu rns on,
press the power b utton to turn camera o. T he red LED indicator light tu rns
on during charging and turns o when charging is complete.
When chargin g with a computer, be sure that the comp uter is connected to
a power source. I f the LED indicator light doe s not turn on, use a dierent
USB port.
The camera d oes not come fully charge d. No damage occurs to the c amera
or batter y if used without a full ch arge.
For more batt ery information, se e Battery.
MICRO SD CA RD USE
The DUB camer a is compatible with microS D memory cards with a ca pacity
up to 32GB (sold separ ately). Intova recommends us ing our Intova memory
cards for maximum reliability.
Insert the m icroSD Card: Slide the memo ry card into the card slot w ith the
label facin g the front of the camera. W hen fully inserted , the card clicks into
place. Note: Th e card must be formatte d prior to use. To remove the micro
SD Card: Place your n gernail against the ed ge of the memory card an d
lightly press it f urther into the camer a. The card springs out f ar enough to
be removed.
NOTICE: The camera is n ot equipped with buil t-in memory. A memory c ard
is required. Us e care when handling mem ory cards. Avoid liquid s, dust and
debris. As a p recaution, power o the c amera before inser ting or removing
the card. Check manufacturer guidelines regarding use in acceptable
temperature ranges.
POWER ON/OFF
Power-on: press an d hold POWER button for 3 s econds, the screen st arts up
and the camer a enters video mode.
Power-o: pre ss and hold POWER button f or 3 seconds, the camer a turns o.
CHOOSE MOD E
The camera is e quipped with three mo des: video, photo and p layback. The
default mod e is video.
ALERTS & IM PORTANT MESSAGES
Missing SD card Notication:
Noticatio n that there is no memory c ard in the camera. A microS D card is
required to ca pture videos, photos an d to playback images. Ins ert microSD
card and this not ication will vanish.
Operation indicator:
The LED light on top a nd front of camera illum inates blue when the came ra
is turned on, co nnected to a computer to do wnload images, and bli nks
when recording video.
Charger indicator:
The LED light on top o f the camera illuminates r ed when the camera is
charging.
WARNI NG: Do not drop, dis assemble, open, crus h, bend, deform,
puncture, shred, microwave, incinerate or paint the camera.
Do not inser t foreign objects in to the battery open ing on the
camera. Do n ot use the camera or the bat tery if it has been
damaged—for example, if cracked, punctured or harmed by
water. Disassemb ling or puncturing th e battery can cause a n
explosion or re.
TO NAVIGATE THE SETT INGS FOR A GIVEN MO DE:
1. Verify that the cam era is in the desired came ra mode.
2. Press the MENU but ton to open the menu sele ction screen.
3. Press the MOD E button to toggle bet ween video or photo m enu and
settings m enu.
4. Press the OK butto n to enter the selected m enu.
5. Use the UP/DOWN buttons to cycle th rough the menu choices. (Con tinue
to press the UP/DOWN bu ttons for additional c hoices)
6. Press the OK butto n to enter sub menu.
7. Use the UP/DOWN buttons to cycle through the setting options. (Continue
to press the up/down buttons for additional options)
8. Press the OK butt on to select the desire d setting in the sub menu .
9. Press the MENU button to g o back/exit.
1: Battery leve l
2: Motion detection mode
3: Video mode
4: Video resolution
5: Recording interval
6: Voice recorder
7: Image stabilizer
8: Video recording time remaining
9: Video reco rding time
10: Pause or restar t video recording
1: Battery leve l
2: Photo mode
3: Photo resoluti on
4: Photo burst or s elf timer icon
5: Exposure com pensation
6: Image stabilization
7: Number of photos remaining
1: Video or photo le
selection
1: Video le icon
2: File lock indicator icon
3: Playback icon
4: File number
5: Photo le icon
6: File lock indicator icon
7: Playback icon
8: File number
Your DUB camera disp lays the following infor mation about modes and
settings.
Your DUB camera disp lays the following infor mation.
Your DUB camera disp lays the following infor mation.
Your DUB camera disp lays the following infor mation.
The DUB camer a is plug and play.
1. Make sure camera is p owered o.
2. Connect c amera to computer with USB ca ble.
3. Camera will p ower on and enter MSDC (downlo ad) mode.
Your DUB camera disp lays the following infor mation about modes and
settings
3
2
1
4 5 7 8
1
6
9
10
2
1
3 4 6 7
5
43
2
1
87
6
5
NOTE: You can als o
transfer l es to a computer
using a card rea der (sold
separatel y). Connect
the card read er to your
computer and i nsert the
micro SD card in to the
reader. You can then
transfer l es to your
computer or delete
selecte d les on your card.
 Loading...