

Page 1
(299NL) SPA (JET + BUBBLE) ENGLISH 7.5” X 10.3” PANTONE 295U 08/07/2018
English
299
NLA
IMPORTANT
SAFETY RULES
Please read, understand, and follow
all instructions carefully before
installing and using this product.
Keep for future reference.
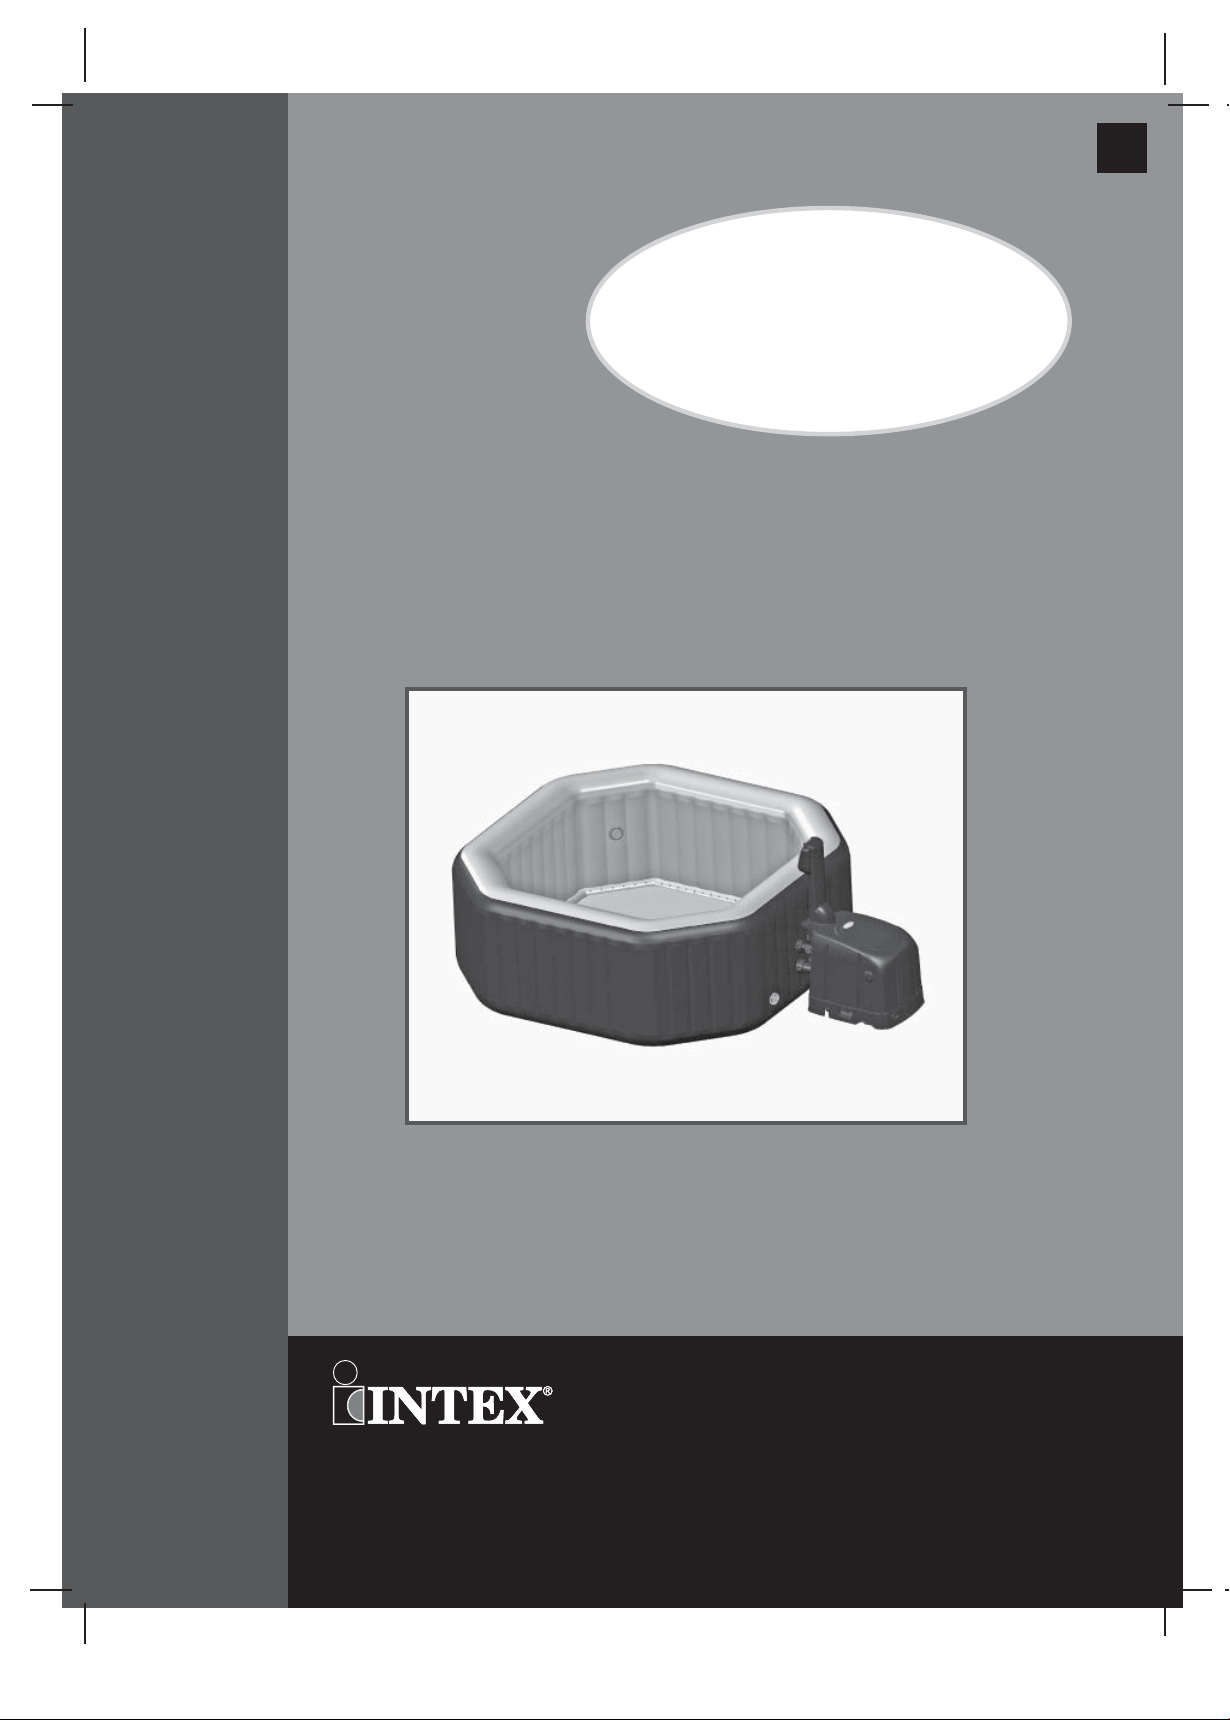
PureSpa™
SJB-HS-20-1G / SJB-HS-22-1G
SJB-HS-30-1G / SJB-HS-33-1G
For illustrative purposes only.
Do not forget to try these other fi ne Intex products: pools, pool
accessories, in-home toys, airbeds and boats available at fi ne
retailers or visit our website.
Due to a policy of continuous product improvement, Intex reserves
the right to change specifi cations and appearance, which may
result in updates to the instruction manual without notice.
OWNER’S MANUAL
®™ Trademarks used in some countries of the world under license from/®™ Marques utilisées dans certains pays sous
licence de/Marcas registradas utilizadas en algunos países del mundo bajo licencia de/Warenzeichen verwendet in einigen
Ländern der Welt in Lizenz von/
Kong & Intex Recreation Corp., P.O. Box 1440, Long Beach, CA 90801
dans l’Union Européenne par/Distribuido en la unión Europea por/Vertrieb in der Europäischen Union durch/
B.V., Venneveld 9, 4705 RR Roosendaal – The Netherlands
www.intexcorp.com
©2018 Intex Marketing Ltd. - Intex Development Co. Ltd. - Intex Recreation Corp.
All rights reserved/Tous droits réservés/Todos los derechos reservados/Alle
Rechte vorbehalten. Printed in China/Imprimé en Chine/Impreso en China/
Gedruckt in China.
Intex Marketing Ltd. to/à/a/an Intex Development Co. Ltd., G.P.O Box 28829, Hong
• Distributed in the European Union by/Distribué
Intex Trading
299-*NL-R0-1908
Page 2

(299NL) SPA (JET + BUBBLE) ENGLISH 7.5” X 10.3” PANTONE 295U 08/07/2018
English
TABLE OF CONTENTS
Warning.......................................................................................... 3-6
Parts............................................................................................... 7-8
Product Information & Specifi cations........................................ 9
Set-up............................................................................................. 9-13
Salt Level Information.................................................................. 14
Operation....................................................................................... 15-16
LED Code Chart............................................................................ 17
299
NLA
Minimize Heat Loss and Energy Consumption Advice............ 17
Maintenance and Chemicals........................................................ 18-24
Storage........................................................................................... 24
Troubleshooting............................................................................ 25-27
Filter pump motor disassembly................................................... 28
Warranty......................................................................................... 29
S AVE THESE INSTRUCTIONS
Page 2
Page 3
(299NL) SPA (JET + BUBBLE) ENGLISH 7.5” X 10.3” PANTONE 295U 08/07/2018
English
299
NLA
IMPORTANT SAFETY RULES
When installing and using this electrical equipment, basic safety precautions should always be followed, including the following.
READ AND FOLLOW ALL INSTRUCTIONS
DANGER
• Risk of Accidental Drowning (especially children under 5 years). Caution shall be exercised to
prevent unauthorized access to spa by children. This can be reached by adult supervisor securing
the means of access or installing a safety protection device to the spa. To avoid accidents during
spa use, ensure that children are kept under constant supervision.
• Risk of drowning. Inspect the spa cover regularly for leaks, premature wear and tear, damage, or
signs of deterioration. Never use a worn or damaged cover: it will not provide the level of protection
required to prevent unsupervised access to the spa by a child.
• Risk of injury. The suction fi ttings in this spa are sized to match the specifi c water fl ow created by
the pump. Should the need arise to replace the suction fi ttings or the pump, be sure that the fl ow
rates are compatible. Never operate spa if the suction fi ttings are broken or missing. Never replace
a suction fi tting with one rated less than the fl ow rate marked on the original suction fi tting.
• Risk of injury. Replace damaged cord immediately. Do not bury cord. Never use an extension cord.
• Risk of Electric Shock. Do not permit any electric appliance, such as a light, telephone, radio, or
television, within 3.5 m (11.5 feet) of a spa or hot tub.
• Risk of Electric Shock. Do not use and unplug the spa when it is raining, thundering or lightning.
WARNING
• The spa electrical appliance should be supplied through a residual current device (RCD) having a
rated residual operating current not exceeding 30 mA.
• The spa electrical appliance comprises a portable residual current device (PRCD) having a
rated residual operating current not exceeding 10 mA. If a leakage current of more than 10 mA
is detected, the PRCD will operate and cut-off the power supply, in such case, unplug and stop
using the spa at once. You must contact the local service center for assistance and/or repair of the
product.
• Parts containing live parts, except parts supplied with safety extra-low voltage not exceeding 12V,
must be inaccessible to a person in the spa.
• Electrical installation shall fulfi ll the requirements of local national standards.
• Parts incorporating electrical components, except remote control devices, must be located or fi xed
so that they cannot fall into the spa.
• To reduce the risk of injury, do not permit children to use this product unless they are closely
supervised at all times.
• Children should not use spas or hot tubs without adult supervision.
• To reduce the risk of child drowning, supervise children at all times. Attach and lock spa cover after
each use.
• To reduce the risk of injury/illness:
a) The water in a spa should never exceed 40°C (104°F). Water temperatures between 38°C (100°F)
and 40°C (104°F) are considered safe for a healthy adult. Lower water temperatures are
recommended for young children and when spa use exceeds 10 minutes. It is recommended to
seek medical advice before use.
b) Since excessive water temperatures have a high potential for causing fetal damage during the early
months of pregnancy, pregnant or possibly pregnant women should limit spa water temperature
and duration of use and should also seek medical advice.
S AVE THESE INSTRUCTIONS
Page 3
Page 4
(299NL) SPA (JET + BUBBLE) ENGLISH 7.5” X 10.3” PANTONE 295U 08/07/2018
English
299
NLA
WARNING
c) The user should check the water temperature before entering the spa.
d) The use of alcohol, drugs, or medication before or during spa use may lead to unconsciousness with
the possibility of drowning.
e) Persons with any medical condition should seek medical advice before using a spa.
f) Persons using medication and/or having an adverse medical history should seek medical advice
before using a spa since some medication may induce drowsiness while other medication may affect
heart rate, blood pressure, and circulation.
g) Avoid putting the head underwater and swallowing spa water.
• People with infectious diseases should not use a spa or hot tub.
• To avoid injury exercise care when entering or existing the spa or hot tub.
• Pregnant and possible pregnant women should consult a physician before using a spa or hot tub.
• Water temperature in excess of 38°C degree may be injurious to your health.
• Do not use a spa or hot tub immediately following strenuous exercise.
• Prolonged immersion in a spa or hot tub may be injurious to your health.
• When pregnant, soaking in hot water for long periods can harm your fetus. Measure the water
temperature before entering. Do not enter spa if water is hotter than 38°C (100°F). Do not stay in spa
for longer than 10 minutes.
• Spa heat in conjunction with alcohol, drugs, or medication can cause unconsciousness.
• Exit immediately if uncomfortable, dizzy, or sleepy. Spa heat can cause hyperthermia and
unconsciousness.
• The causes, symptoms, and effects of hyperthermia may be described as follows: Hyperthermia
occurs when the internal temperature of the body reaches a level several degrees above the normal
body temperature of 37°C (98.6°F). The symptoms of hyperthermia include an increase in the internal
temperature of the body, dizziness, lethargy, drowsiness, and fainting. The effects of hyperthermia
include failure to perceive heat; failure to recognize the need to exit spa or hot tub; unawareness of
impending hazard; fetal damage in pregnant women; physical inability to exit the spa or hot tub; and
unconsciousness resulting in the danger of drowning.
• The use of alcohol, drugs, or medication can greatly increase the risk of fatal hyperthermia in hot tubs
and spas.
• Always add chemicals to water, never add water to chemicals. Adding water to chemicals may cause
strong fumes or violent reactions and hazardous chemical spray.
• Never jump or dive into a spa or any shallow body of water.
• Assembly and disassembly by adults only.
• This appliance can be used by children aged from 8 years and above and persons with reduced
physical, sensory or mental capabilities or lack of experience and knowledge if they have been given
supervision or instruction concerning use of the appliance in a safe way and understand the hazards
involved. Children shall not play with the appliance. Cleaning and maintenance must be performed by
an adult above 18 years old, and who is familiar with the risk of electric shock.
• No part of the electrical appliance is to be located above the bath during use.
• Keep the plug of this product more than 4m away from the spa and at a height of 1.2m at least.
• Always unplug this product from the electrical outlet before removing, cleaning, servicing or making
any adjustment to the product, and on raining days.
• Do not bury the electrical cord. Locate the cord where it will not be damaged by lawn mowers, hedge
trimmers and other equipment.
S AVE THESE INSTRUCTIONS
Page 4
Page 5

(299NL) SPA (JET + BUBBLE) ENGLISH 7.5” X 10.3” PANTONE 295U 08/07/2018
English
299
NLA
WARNING
• If the supply cord is damaged, it must be replaced by the manufacturer, its service agent or similarly
qualifi ed persons in order to avoid a hazard. Use only identical replacement parts when servicing.
Always keep plug dry, plug in with wet plug is defi nitely forbidden!
•
• The plug of SPA must be directly connected only to a earthed socket-outlet from a fi xed electrical
installation.
• To reduce the risk of electric shock and fi re, do not use extension cords, timers, plug adaptors or
converter plugs to connect unit to electrical supply; provide a properly located outlet.
• Do not attempt to plug in or unplug this product while standing in water or when your hands are wet.
• Do not leave the spa empty for extended period of time. Do not expose the spa to direct sunlight for
extended period of time.
• When the appliance is not in use for long period of time, such as in the winter, the spa set should
be disassembled and stored indoor.
• Do not allow the water in the spa to freeze. Do not turn on the spa when the water is frozen.
• Do not use the spa if damaged in delivery and/or malfunctioning in any fashion. Contact the Intex
service center for further direction.
• Never use the spa alone or allow others to use the spa alone.
• Never pour water with a temperature higher than 40°C (104°F) into the spa directly.
• Keep all pets away from spa to avoid any damage.
• Do not add bath oil or bath salt to the spa water.
• The spa must be setup on a level, fl at and smooth surface that is capable of supporting the
maximum load of the fi lled spa with four adult occupants: weight 2500 lbs (1136 kg); six adults:
3500 lbs (1592 kg).
• Provide adequate drainage system around the spa to deal with overfl ow water and splashes.
• Use accessories exclusively provided by the spa manufacturer for safety reasons.
• Not for public/commercial use and/or domestic renting dwelling settings.
• All the information pertaining to the installation, cleaning and maintenance please refer to below
paragraphs of the manual.
Carefully read, understand, and follow all information in this user manual before installing and using
the spa. These warnings, instructions, and safety guidelines address some common risks of water
recreation, but they cannot cover all risks and dangers in all cases. Always use caution, common
sense, and good judgment when enjoying any water activity. Retain this information for future use.
Non swimmers safety
• Continuous, active, and vigilant supervision of weak swimmers and non-swimmers especially in
exercise spas, by a competent adult is required at all times (remembering that children under fi ve
are at the highest risk of drowning).
• Designate a competent adult to supervise the spa each time it is being used.
• When the spa is not in use, or unsupervised, remove all toys from the spa and its surrounding area
to avoid attracting children to the spa.
Safety devices
• A safety cover or other safety protection device shall be used, or all doors and windows (where
applicable) shall be secured to prevent unauthorized access to the spa.
S AVE THESE INSTRUCTIONS
Page 5
Page 6
(299NL) SPA (JET + BUBBLE) ENGLISH 7.5” X 10.3” PANTONE 295U 08/07/2018
English
299
NLA
WARNING
• Barriers, covers, alarms, or similar safety devices are helpful aids, but they are not substitutes for
continuous and competent adult supervision.
Safety equipment
• Keep a working phone and a list of emergency phone numbers near the spa.
Safe use of the spa
• Encourage all users especially children to learn how to swim.
• Learn Basic Life Support (Cardiopulmonary Resuscitation - CPR) and refresh this knowledge
regularly. This can make a life-saving difference in the event of an emergency.
• Instruct all spa users, including children, what to do in case of an emergency.
• Never dive into any shallow body of water. This can lead to serious injury or death.
• Do not use the spa when using alcohol or medication that may impair your ability to safely use the
spa.
• When covers are used, remove them completely from the water surface before entering the spa.
• Protect spa occupants from water related illnesses by advising them to keep water treated and
practicing good hygiene. Consult the water treatment guidelines in the user’s manual.
• Store chemicals out of the reach of children.
• Attached the safety signage provided on the spa or within 2 m of the spa in a prominent visible
position.
WARNING
• This product is provided with a RCD located at the end of the power cord. The RCD must be
tested before each use. Do not use the spa if the RCD does not function properly. Disconnect
the power cord until the fault has been identifi ed and corrected. Contact a qualifi ed electrician
to correct the fault. Do not bypass the RCD. There are no serviceable parts inside the RCD.
Opening the RCD will void the warranty.
1.
Plug the unit into a grounded electrical outlet.
2.
Press the
3.
Turn on the spa electrical equipment.
4.
Press the
RESET
TEST
button on the RCD.
button on the RCD. The RCD indicator should
RESET
turn off and the electrical equipment should shut off. If the RCD
indicator does not turn off, and the electrical equipment does not
shut off, the RCD is faulty. Do not use the spa. Contact a qualifi ed
electrician to correct the fault.
5.
Press the
should turn on. If the RCD indicator does not turn on, the RCD is
RESET
button on the RCD. The indicator on the RCD
TEST
faulty. Do not use the spa. Contact a qualifi ed electrician
immediately to correct the fault.
RESET
RESET
TEST
TEST
RESET
TEST
TEST
CAUTION
• In order to avoid a hazard due to inadvertent resetting of the thermal cut-out, this appliance must
not be supplied through an external switching device, such as a timer, or connected to a circuit
that is regularly switched on and off by the utility.
• Maintain water chemistry in accordance with manufacturer’s instructions.
S AVE THESE INSTRUCTIONS
Page 6
Page 7
(299NL) SPA (JET + BUBBLE) ENGLISH 7.5” X 10.3” PANTONE 295U 08/07/2018
English
PARTS
Before assembling your product, please take a few minutes to check the contents
and become familiar with all the parts.
17
11
19
14
1213
21
15
23
299
NLA
26
25
10
18
20
28
29
30
31
32
33
16
6
4
3
35
34
1
9
7
24
22
NOTE:
5
Drawings for illustration purpose only. Actual product may vary. Not to scale.
S AVE THESE INSTRUCTIONS
27
2
8
Page 7
Page 8
(299NL) SPA (JET + BUBBLE) ENGLISH 7.5” X 10.3” PANTONE 295U 08/07/2018
English
PARTS (continued)
Before assembling your product, please take a few minutes to check the contents
and become familiar with all the parts.
REF. NO. DESCRIPTION QTY.
CONTROL BASE 1 12338 12342
1
SPA FILTER MOTOR 1 11888 11888
2
CONTROL PANEL (INCLUDED #4) 1 11949 11949
3
4 CONTROL PANEL BOLT 3 11996 11996
AIR PRESSURE RELEASE VALVE CORE 1 12589D 12589D
5
CONTROL PANEL BOLT WRENCH 1 11053 11053
6
SPA INFLATION HOSE 1 11830 11830
7
SPA CONTROL INLET/OUTLET O-RING 2 11788 11788
8
9 CONTROL BASE INFLATION CAP 1 11991 11991
SPA DRAIN PLUG 1 11995 11995
10
SPA DRAIN VALVE ADAPTOR 1 11718 11718
11
FILTER CARTRIDGE HOUSING 1 11798 11798
12
13 FILTER CARTRIDGE 3 11692 11692
FILTER CARTRIDGE HOUSING LID 1 11797 11797
14
INLET PLUG 1 11739 11739
15
SPA TUB 1 12090 12116
16
SPA COVER 1 11951 12117
17
SPA COVER INFLATABLE BLADDER (PRE-INSTALLED IN SPA COVER)
18
GROUND CLOTH 1 11933 12110
19
ELECTROLYTIC CELL NUT WRENCH 1 11854 11854
20
TEST STRIPS 1 11855 11855
21
22 WRENCH 1 11742 11742
OUTLET PLUG 2 11782 11782
23
INFLATION HOSE ADAPTOR 1 11829 11829
24
MALE BUCKLE 8 11994 11994
25
FEMALE BUCKLE 8 11993 11993
26
27 SPA CONTROL AIR INLET O-RING 1 11687 11687
ELECTROLYTIC CELL COVER SCREW 4 11712 11712
28
ELECTROLYTIC CELL COVER 1 11890 11890
29
ELECTROLYTIC CELL COVER O-RING 1 11897 11897
30
31 ELECTROLYTIC CELL NUT 1 11852 11852
32 ELECTROLYTIC CELL 1 11851 11851
ELECTROLYTIC CELL O-RING 1 11853 11853
33
34 DEFLATION OUTLET CAP 1 11992 11992
35 DEFLATION HOSE ADAPTOR 1 11935 11935
1 11884 12114
PART NO.
4 ADULTS 6 ADULTS
299
NLA
When ordering parts, be sure to quote the model number and part numbers.
S AVE THESE INSTRUCTIONS
Page 8
Page 9
(299NL) SPA (JET + BUBBLE) ENGLISH 7.5” X 10.3” PANTONE 295U 08/07/2018
English
299
NLA
PRODUCT SPECIFICATIONS
Voltage / Frequency / Phase 220 – 240 V / 50 Hz / 1 PH
Maximum seating capacity: 4 adults 6 adults
Water capacity: 210 gal (795 L) 290 gal (1098 L)
Inner/outer diameter: 59/79 in (150/201 cm) 66/86 in (168/218 cm)
Height: 28 in (71 cm)
Jet pump: 650 Watts 700 Watts
Bubble air blower: 800 Watts
Filter pump fl ow rate: 460 gal/hr (1,741 L/hr)
Heater power: 2,200 Watts
Temperature range: 20ºC – 40ºC (68ºF – 104ºF)
Temperature rise: 1.5-2.5ºC/hr (3ºF – 4.5ºF/hr) 1-2ºC/hr (2ºF – 3.5ºF/hr)
Number of Water Jet Nozzles: 4 6
Number of Bubble Jets: 120 140
Spa tub recommended working air pressure: 0.083 bar (1.2 psi)
Infl atable, portable aboveground cord-connected spa with pump, heater, water jet, blower, control panel,
built-in hard water treatment, and sanitation system.
WARNING:
are 13 to 16 AMPS. If the circuit breaker trips, please check that no other appliances or other
large loads are on the same circuit as the spa. Never use an extension cord. Unfold the line
cord prior to use. Never place the plug on combustible materials.
Note:
the spa equipment features a complete grounding system that is also in contact with the spa water. It
is possible that a person may build up static electricity that discharges when touching the water. Regardless,
any electric shock experienced should be investigated by a qualifi ed electrician prior to use of the spa.
Unplug the spa until the cause is determined and any corrective action completed.
Risk of fi re: This product draws a minimum of 13 AMPS. Most household circuits
SET UP
Site preparation and requirements
• The spa can be installed indoor or outdoor. For household use only.
• Make sure the area is water resistant, level, fl at and free of sharp objects under or around the spa.
• Provide a properly located grounded electrical outlet with a protection grade of IPX4 or higher to connect
the spa and allow easy access for periodic testing of the cord mounted RCD.
• Make sure there is enough clearance around the spa for full access to the spa equipment for maintenance
and/or service.
• The area shall facilitate draining purposes during long term spa storage. Check local and national
regulations regarding spa water disposal requirements.
• To reduce noise disturbance, do not install the spa in the immediate vicinity of vertical walls.
• The area shall be within reach of fresh water supply in compliance with local water regulations, and whose
parameters shall be adjusted according to the spa water chemistry and balance section of the manual
before fi rst use of the spa.
• Check your local laws and regulations regarding indoor and/or outdoor spa installation.
Additional requirements for indoor installation
• Make sure the fl oor can support the full weight of the fi lled spa with the maximum number of occupants.
Check with a qualifi ed contractor or a structural engineer to verify this requirement.
• Make sure the fl oor is water resistant and non-slip surface. Do not install the spa on carpet or other
materials that will be damaged by moisture, condensation.
• Do not install the spa indoors on a second fl oor above fi nished living space due to the possibility of water
and humidity damage.
S AVE THESE INSTRUCTIONS
Page 9
Page 10

(299NL) SPA (JET + BUBBLE) ENGLISH 7.5” X 10.3” PANTONE 295U 08/07/2018
English
SET UP (continued)
• Humidity is a natural side effect of indoor spa installation. The room shall be properly ventilated to allow
moisture to escape. Install a ventilating system to prevent excess condensation, moisture in the room.
Additional requirements for outdoor installation
• Spa owners may need to comply with local or states laws relating to childproof fencing, safety barriers,
lighting, and other safety requirements. Contact your local building code enforcement offi ce for further
details.
• Make sure the surface is level, fl at, smooth and strong enough to support the full weight of the fi lled spa.
• Do not setup the spa on grass or dirt, as this increases the amount of debris entering the spa, and damage
the spa fl oor.
• Do not expose the spa to direct sunlight for extended period of time. Provide protection from the
sun such as sunshade, tent, awning or gazebo.
• It is possible to install and leave the spa outside at a temperature not lower than 4°C (39°F) provided the
water temperature inside the spa is higher than 4°C (39°F) and the water inside the circulation system,
pump, pipe are not frozen. Put a “temp barrier mat” between the spa fl oor and the ground to prevent heat
loss from the bottom of the spa and to provide better heat retention. Do not use the spa if the ambient or
water temperature is 4°C (39°F) or lower.
Setup the spa with at least 2 persons.
1.
Move the entire package to the selected site. Do not drag the spa tub across the ground as this can
cause damage and leakage.
Open the carton carefully as this carton can be used to store the spa during long term storage or when
not in use.
2.
Lay out all the parts on the ground and make sure all the parts are accounted for. For missing or
damaged parts contact the appropriate Intex Service Center listed in the separate “Authorized service
Centers” sheet.
299
NLA
Spa Control Unit Assembly
1.
Connect the control panel
the plug cover fi rmly by hand
down over the cleared area where you intend to setup your spa.
2.
Screw the control panel bolts
drawing 2)
3.
Plug the spa control unit into an electrical outlet.
.
(3)
cable plug into the receptacle on top of the spa control base and screw in
(see drawing 1). Note:
(4)
with the provided bolt wrench
Spread the ground cloth with the bubbles facing
(6)
to secure the control panel
1
3
2
1
Infl ation
Infl ate the Spa Tub Wall
1.
Take out the ground cloth
the ground cloth and point the drain valve towards a suitable draining area.
NOTE:
to setup your spa.
Spread the ground cloth with the bubbles facing down over the cleared area where you intend
(19)
and spread it over the cleared area. Then spread out the spa liner over
(see
2
6
4
S AVE THESE INSTRUCTIONS
Page 10
Page 11

(299NL) SPA (JET + BUBBLE) ENGLISH 7.5” X 10.3” PANTONE 295U 08/07/2018
English
SET UP (continued)
2.
Unscrew the control base infl ation cap
infl ation hose
3.
Unscrew the air valve cap to reveal the stem in the up position for infl ation. Insert the other end of the
infl ation hose
4.
Press the button to turn on the control unit panel
buttons fi rst. Press the button to infl ate the spa tub
wall for 8 to 10 minutes until it is fi rm to the touch but not
(see drawing 5)
hard
IMPORTANT:
compressor to infl ate.
5.
Press the button again to turn it off.
6.
Replace the air valve cap back.
NOTE:
Never exert force as this could cause the complete
internal infl ation system of the valve to come loose. See “Spa Tub Air Valve Fastening” for valve
maintenance.
(7)
into the outlet and turn to the right to lock it
(7)
into the valve and turn to the right to lock it in position
.
Do not over infl ate or use high pressure air
The cap is designed to be screwed on and off.
(9)
to reveal the air blower infl ation outlet, insert one end of the
(see drawing 3)
3
.
(see drawing 4)
1 2
.
9
24
299
NLA
4
7
5
Infl ate the Spa Cover Air Bladder
1.
Open the infl ation valve and insert the infl ation hose
into the valve; press to infl ate until it is fi rm to the
touch but not hard
2.
Disconnect the infl ation hose
infl ation outlet and the valve.
3.
Replace the control base infl ation cap
recess the infl ation valve.
NOTE:
spa cover air bladder after they have been setup, refer to above “Infl ate the Spa Tub Wall” and “Infl ate the
Spa Cover Air Bladder” sections. The cover air bladder is preinstalled inside the spa cover. If it needs to be
reinstalled, place the uninfl ated air bladder inside the spa cover lip before infl ating the bladder.
If there is a need to add some air to the spa tub wall or
(see drawing 6)
(7)
from the air blower
.
(9)
back; close and
(7)
7
6
Defl ation
For Spa Tub Wall:
1.
Unscrew the cap to reveal the stem, push the stem in
and turn 90 degree right to secure it in the down position
(see drawing 7)
2.
Once the defl ation is completed, push the stem in and
turn 90 degree left to return it to the infl ation position.
3.
Replace the cap back.
NOTE:
section.
To defl ate the spa tub for storage, see “STORAGE”
.
7
For Cover Air Bladder:
1.
Pull valve cap out and squeeze the valve at its base until defl ated.
2.
Close and recess the valve back.
S AVE THESE INSTRUCTIONS
Page 11
Page 12

(299NL) SPA (JET + BUBBLE) ENGLISH 7.5” X 10.3” PANTONE 295U 08/07/2018
English
SET UP (continued)
IMPORTANT
The spa tub infl ation/defl ation valve incorporates an “air pressure release” function that automatically
releases excess air when the spa tub internal pressure is between 1.5 - 2.5 psi (0.103 - 0.172 bar).
Air pressure release valve.
Infl ation of spa in the morning.
Air expands in the midday heat.
Air pressure release valve kicks
in and releases excess air.
299
NLA
Colder temperatures at night
cause the spa to seem less
infl ated.
NOTE:
If there is a need to replace the spa tub air pressure
release valve core
wrench
Replace a new air pressure release valve core back. Make
sure the core is securely tightened
(22)
(5)
due to wear and tear, use the included
to unscrew the core from the valve base.
Air expands in the midday
heat and correct air
pressure is restored.
(see drawing 8)
.
5
8
22
S AVE THESE INSTRUCTIONS
Page 12
Page 13

(299NL) SPA (JET + BUBBLE) ENGLISH 7.5” X 10.3” PANTONE 295U 08/07/2018
English
299
NLA
SET UP (continued)
Spa Control Unit Installation
1.
Connect the spa control unit to the spa tub
Do not use tools to tighten.
CAUTION:
2.
Attach the fi lter cartridge housing assembly to the inside of the spa tub outlet grid (marked “B”)
drawing 10).
3.
Before fi lling with water ensure the bottom drain valve caps are securely closed on the inside and outside.
4.
Fill the spa tub with freshwater to a level between MIN and MAX marked on the inside of the spa wall. Do
not over fi ll the spa. Never move the spa tub with water inside and/or with the control base attached to the
spa as the spa or control base may be damaged.
WARNING:
Do not sit, lean, cover or place any objects over the spa control unit.
Infl ate the spa tub fi rst before installing fi lter pump fi ttings.
Never pour water with a temperature higher than 40°C (104°F) into the spa
directly. It is recommended to fi ll the spa tub with lukewarm water for quick heating and
energy saving.
5.
Place the spa cover and spa air bladder (pre-installed in spa cover) over the spa tub, and make sure the
spa cover buckles are locked using the key provided after pulling the buckled straps tight.
IMPORTANT:
use a damaged spa cover.
6.
Ensure the spa is plugged into an electrical socket and press the button to turn on the control unit
panel buttons fi rst. Press the button on the control panel to activate the heater, see “Spa Control Unit
Panel” operation section.
Inspect the spa cover regularly for leak, premature wear and tear or deterioration. Never
(see drawing 9)
9
. Hand-tighten the connectors securely.
10
B
(see
IMPORTANT:
• The ambient temperature is lower than 50ºF (10ºC).
• Outdoor wind speed is above 8-12 mph (3.5-5.4 m/s).
• The jet function is activated when heating the spa water.
• The spa is not properly covered with the spa cover when the water is heating.
The following conditions will lead to slow water heating:
Spa Cover
The attachment buckles of the cover are locking buckles. Two keys are provided in the plastic bag with the
manual and other accessories. Each buckle is marked with “locked” and “unlocked” symbols for easy operation:
put the key into the slot on the buckle and turn it to the appropriate position to lock or unlock the buckle
respectively.
To assure safety from unauthorized access, always put the cover on when spa is not in use and lock all
buckles. Always keep the keys out of reach of children. In case you misplace the keys, you can use any similar
size fl at screwdriver to lock or unlock the buckles.
When the spa is being used, the cover should be placed in a clean, dry area, otherwise it can pick up dirt and
bacteria. Covers should not be put on wooden tables or wooden decking because of the risk of bleaching the
wood. A cover lifter, dedicated support or similar device, is recommended for ensuring that the cover, mostly its
side facing the water, does not come into contact with the ground or any other dirty surfaces.
S AVE THESE INSTRUCTIONS
Page 13
Page 14

(299NL) SPA (JET + BUBBLE) ENGLISH 7.5” X 10.3” PANTONE 295U 08/07/2018
English
SALT LEVEL INFORMATION
The spa comes with a built-in saltwater sanitation system. Common salt (sodium chloride) is
made up of two elements, sodium and chloride. During the installation of the device, a
measured quantity of salt is dissolved in the SPA water to make it slightly salty. The SPA water
fl ows through the sanitation system’s electrolytic cell to produce chlorine. The chlorine dissolves
in the water and instantly starts destroying bacteria and algae. It also oxidizes all other organic
materials.
• Which kind of salt to use:
Use only Sodium Chloride Salts
Use only sodium chloride (NaCl) salt that is at least 99.9% pure. It is also acceptable to use water
conditioning salt pellets (the compressed forms of evaporated salt). However, it will take a longer
time for them to dissolve.
salt.
Salt is added to the SPA water and the electrolytic cell uses the salt to create chlorine. The
purer the salt the better the performance of the electrolytic cell.
• Optimum Salt Levels
The ideal salt level in the SPA water is between 2000-3000 ppm (parts per million). The optimal
level is 2500 ppm.
A too low salt level will reduce the effi ciency of the sanitation system and result in low chlorine
production. Too high a salt level may damage the power supply and cause corrosion to metal
fi xtures and accessories. The salt in the SPA is constantly recycled. The loss of salt is due only to
SPA water being physically removed from the SPA. Salt is not lost due to evaporation.
Do not use iodized or yellow (yellow prussiate of soda) colored
299
NLA
• Adding Salt
1.
Switch the JET pump on to start the water circulation.
2.
Keep the sanitation system turned off.
3.
Evenly spread 4.4 lbs / 2 kg (for 4 adults’) of salt around the inside perimeter of the SPA. For
six adults’: 5.5 lbs / 2.5 kg of salt.
4.
Brush the SPA bottom to speed up the dissolving process. Do not allow salt to pile up on the
bottom of the SPA. Run the JET pump for one hour to thoroughly dissolve the salt.
5.
When all the salt is dissolved, press the sanitizer button to activate the sanitation system
(see “Sanitation System Operating Instructions” section), code “003H” is fl ashing and set the
sanitation system to desired operating hours.
control panel, and attach the spa cover during the sanitizing process.
NOTE:
DO NOT press any other buttons on the
• Removing Salt if Salt Level is too high
If too much salt has been added, the unit will beep and display “E92” (see “LED Code Chart”). If
this happens, turn off the sanitation system by pressing the ON/OFF button , and unplug the
spa. You will need to lower the salt concentration. The only way to do so is to partially drain the
SPA and refi ll it with fresh water. Drain and refi ll approximately 25% of the SPA water until the “E92”
alarm code disappears.
• Adding Salt if Salt Level is too low
If not enough salt has been added, the unit will beep and display “E91” (see “LED Code Chart”).
If this happens, turn off the sanitation system by pressing the ON/OFF button , unplug the
spa and wait 10 seconds. Plug and turn on the spa, add 1.1 lbs / 0.5 kg increment of salt until the
“E91” alarm code disappears (see “Adding Salt” section).
S AVE THESE INSTRUCTIONS
Page 14
Page 15

(299NL) SPA (JET + BUBBLE) ENGLISH 7.5” X 10.3” PANTONE 295U 08/07/2018
)
English
299
NLA
OPERATION
SPA CONTROL UNIT PANEL
A: Heat Button
F
H
J
E
G
light next to the button is green when activated. Press this button to turn off all currently activated functions.
water temperature reaches the set temperature. When the spa water temperature drops 1-2°C (1.8-3.6°F)
below the set temperature the heating system will restart. When the fl ame icon on the display is red, the
heating system is activated. When the fl ame icon turns green, the water is at the set temperature. The
heating system is at rest and the fi ltration system will continue working nonstop.
the fi lter button. Pressing the fl ame button only while the heater is at rest mode will turn off the heating
system only and the fi ltration system will operate for another 24 hours before it turns off automatically.
The temperature can be displayed in either Fahrenheit or Celsius. The system’s default is Celsius.
cause the LED to fl ash. When fl ashing you can adjust to the desired temperature setting. If you hold these
buttons down the values will rapidly increase or decrease. The new and desired temperature setting will
remain on the LED display for 5 seconds to confi rm the new value.
On/Off Button:
NOTE:
The On/Off button may appear as a black button in the center of the control panel.
Heat Button:
NOTE:
To stop the fi ltration system while the heater is at rest mode, press the fl ame button fi rst and then
Celsius/Fahrenheit Toggle button:
CAUTION:
Temperature Adjustment Buttons:
NOTE:
The default temperature is 20°C (68°F).
NOTE:
Temperature adjustment ranges from 20°C (68°F) to 40°C (104°F).
Once the unit is plugged in, use this button to active the control unit panel buttons. The
Use this button to activate the heating system. The pump will heat the spa water until the
NEVER use the spa if indicated water temperature is more than 40°C (104ºF).
Pressing the Temperature Increase or Decrease buttons will
A
B
C
I
D
Water Filter Button:
automatically start.
The water fi lter icon on the display is green when activated.
use, the jet massage system will automatically turn off. The water jet icon on the displays is green when
activated. The angle of the water jet nozzles inside the spa tub wall can be adjusted manually.
This button turns the fi lter pump on and off. If the heating system is activated the fi ltration system will
Water Jet Button:
WARNING:
Do not run jet system when the cover is attached, air pressure may accumulate inside the spa
Use this button to activate the jet massage system. After 30 minutes of continues
and cause irreparable damage and bodily harm.
feature. The bubble icon on the displays is green when activated.
cause irreparable damage and bodily harm.
Bubble Button:
WARNING:
Sanitizer Button:
Use this button to activate the massage system, which has a 30-minute auto-shutoff
Do not run Bubble system when the cover is attached, air can accumulate inside the spa and
Use this button to activate and set operating hours for the sanitation system.
B: Celsius/Fahrenheit Toggle Button
C: Temperature Increase Button
D: Temperature Decrease Button
E: Water Filter Button
F: Water Jet Button
G: Sanitizer button
H: LED Display
I: On/Off Button
J: Bubble Button
NOTE:
Jet Nozzle Adjustment
The amount of water and pressure coming out from the jet nozzles can be adjusted by turning the jet
-
nozzle rim clockwise (maximum water output), counterclockwise (low water output) or anything in between.
Closing one or 2 jet nozzles will divert more water pressure to the other jet nozzles.
LED Display:
The built-in hard water treatment function works automatically in conjunction with the fi ltration system.
+
S AVE THESE INSTRUCTIONS
Once plugged in the LED displays the current water temperature automatically.
Page 15
o
C
40
Page 16

(299NL) SPA (JET + BUBBLE) ENGLISH 7.5” X 10.3” PANTONE 295U 08/07/2018
English
SANITATION SYSTEM OPERATING INSTRUCTIONS
1. Activate the sanitation system:
Press the sanitizer button on the control panel, this will
activate the sanitation system as well as the fi lter pump. The
sanitizer icon and the fi lter icon turn green. Flashing code “003H”
appears on the control panel’s LED, indicating that the unit is ready
to be programmed.
2. Set operating hours for the sanitation system:
With the minimum preset hours (code “003H”) fl ashing, press the
sanitizer button to increase the time from 003H, 005H to 008H
hours (see “LED CODE CHART” section). Pressing the button
after the maximum number of hours (code “008H”) will deactivate
the sanitation function and the LED panel will display the spa water
temperature. If you have selected too many hours keep pressing to
repeat the cycle. Once the operating time is set, the display LED
panel will stop fl ashing after 10 seconds and the sanitation system
starts working. For fi rst time use of the spa, set the operating hours
to “008H”. During the sanitation, the information displayed on the
LED panel alternates between the spa water temperature and the
remaining hours of sanitation.
After the cycle is completed the LED panel displays the water
temperature. Test the water with the included test strips, and make sure the free chlorine
level is between 2-4 ppm.
Note:
the sanitizing process.
DO NOT press any other buttons on the control panel, and attach the spa cover during
299
NLA
3. Readjust operating time if necessary:
During the sanitizing process, the operating hours can be re-adjusted if necessary. Press the
sanitizer button, the LED code “003H” will fl ash. Repeat step 2.
4. Turn off the sanitation system manually if necessary:
During the sanitizing process, you can turn off the sanitation system manually. Simply press
the ON/OFF button on the control panel. The sanitation system will stop and the
sanitizer icon light will disappear.
5. Restart the sanitation system:
When the programmed cycle ends, the LED panel displays the water temperature, the unit
will stop sanitizing and the sanitizer icon light disappears. To restart the sanitation system,
follow the above steps.
6. Test the SPA water regularly:
The free chlorine level in the SPA water may vary depending on the number of occupants,
local water condition and sunlight intensity exposure (outdoor use). During the initial use of
the spa, test the spa water at least 2 times per day with the included test strips to maintain
the free chlorine between 2-4 ppm. After the free chlorine level appears to be stabilized, test
the SPA water every week to maintain optimal sanitizing level.
Note:
Flush all pipes with treated water by activating the bubble and jet functions for an hour a
day.
S AVE THESE INSTRUCTIONS
Page 16
Page 17

(299NL) SPA (JET + BUBBLE) ENGLISH 7.5” X 10.3” PANTONE 295U 08/07/2018
LED CODE CHART
LED Reading Defi nitions
001H Operating Hour (1 hour remaining)
002H Operating Hours (2 hours remaining)
003H Operating Hours (3 hours remaining)
004H Operating Hours (4 hours remaining)
005H Operating Hours (5 hours remaining)
006H Operating Hours (6 hours remaining)
007H Operating Hours (7 hours remaining)
008H Operating Hours (8 hours remaining)
E90 No water fl ow
E91 Alarm Code (Low Salt Level)
E92 Alarm Code (High Salt Level)
E94 Water temperature too low
E95 Water temperature is around 50°C (122°F)
E96 System Error
E97 Dry-fi re Protection
E99 Water temperature sensor broken
After 72 hours of continuous heating operation, the pump will hibernate
END
automatically. The rapid heating and water fi ltration functions are
disabled.
English
299
NLA
MINIMIZE HEAT LOSS AND ENERGY CONSUMPTION ADVICE
1) Always keep the spa cover on to minimize heat loss during heating of the spa between
uses (but not while it is being used). Ensure the cover is fi tted tightly, as per manufacturer’s
instructions to maximize insulation. It shall be recommended that the cover, when not in
use, should be kept off the ground to retain its cleanliness (particularly the surface in close
proximity to the water spa water surface). The cover should be stored in an appropriate
location, where it cannot be damaged, or cause damage.
2) Check the set water temperature and consider lowering it for the times when the spa will
typically not be in use.
3) Depending on external conditions, consider turning off the heater entirely if not using the spa
for an extended period of time (where the spa provides this option, but still maintains residual
disinfection/pH-values).
4) Consider that the comfortable temperature range during use may be lower than the maximum
safe temperature.
5) Use the included insulating ground cloth underneath the spa to minimize heat loss through
the bottom of the spa.
6) Maintain clean fi lters to preserve appropriate working conditions for the pump and avoid
unnecessary water replacement and re-heating.
S AVE THESE INSTRUCTIONS
Page 17
Page 18

(299NL) SPA (JET + BUBBLE) ENGLISH 7.5” X 10.3” PANTONE 295U 08/07/2018
English
299
NLA
MAINTENANCE AND CHEMICALS
WARNING
Always unplug this product from the electrical outlet before removing, cleaning, servicing or
making any adjustment to the product.
Water Sanitation
The spa owner must regularly check and keep the spa water sanitized with scheduled maintenance (daily, if
necessary). Adding sanitizer and other chemical will control bacteria and viruses present in the spa water.
The maintenance of a proper water balance through appropriate use of sanitizers is the single most important
factor in maximizing the life and appearance of the spa tub as well as ensuring clean, healthy and safe water.
Proper technique is important for water testing and treating the spa water. See your pool/spa professional for
chemical, sanitizer, test kits and testing procedures questions.
CAUTION:
THE HEALTH AND HAZARD WARNINGS.
Do not add chemicals if the spa is occupied. This can cause skin or eye irritation.
solutions can damage the spa tub. In no event is Intex Recreation Corp., Intex Development Co. Ltd., their
related companies, authorized agents and service centers, retailers or employees liable to the buyer or any
other party for costs associated with the loss of spa water, chemicals or water damage.
ALWAYS FOLLOW THE CHEMICAL MANUFACTURER’S DIRECTIONS, AND
Concentrated chlorine
SPA WATER CHEMISTRY AND BALANCE
Parameter Value
Water clarity clear view of the bottom
Total Alkalinity (TA) in mg/l 60 to 120
Calcium Hardness (CaCO3) in mg/l 150 to 250
Colour of the water no colour should be observed
Turbidity in FNU/NTU
Nitrate concentration above that of fi ll water in mg/l
Total organic carbon (TOC) in mg/l
Redox potential against Ag/AgCI 3.5 M KCl in mV min. 650
pH value
Free active chlorine (without cyanuric acid) in mg/l 0.3 to 1.5
Bromine in mg/l 2.0 to 4.0
When using alternative/additional disinfectants other appropriate parameters may be considered.
a
b
c
d
e
f When pH is greater than 7.5 the free active chlorine is less than 50 %.
g
h
e, f
Consult national regulations and guidelines for any deviations.
Natural water sources may introduce water colouration.
Intentional water colouration is excluded.
When using organic compounds this value may be higher.
Subject to the fl occulant(s) used (if any).
Commonly recommended concentration of free chlorine in aquatic settings is 0.3 to 1.5 mg/l. However,
in order to ensure water hygiene in the spa setting where the water is heated and the water volume to
user ratio is low, it is acceptable to temporarily exceed this concentration with manual dosage, provided
the health of the user is not compromised. Therefore, a range of 2.0 to 4.0 mg/l is acceptable as also
recommended by the U.S. Environmental Protection Agency and the Center for Disease Control. Do not
use cyanuric acid.
Temporary exceeding due to manual dosage and low water volume to user ratio is acceptable, provided
the health of the user is not compromised.
d
max. 1.5
(preferably less than 0.5)
max. difference of 20 compared
to the fi ll water concentration
max. 4.0
6.8 to 7.6
g
h
a
b, c
S AVE THESE INSTRUCTIONS
Page 18
Page 19

(299NL) SPA (JET + BUBBLE) ENGLISH 7.5” X 10.3” PANTONE 295U 08/07/2018
English
299
NLA
SPA WATER CHEMISTRY AND BALANCE (continued)
Particular care should be taken with chemical treatment of the water with special attention to disinfectant limits
and control of pH values. The use of ozone or UV, where applicable, shall always be accompanied by residual
disinfection with an oxidising biocide (e.g. Chlorine or Bromine or other biocide products, compatible with
manufacturer’s recommendations).
Improper use of chemicals may result in degradation, damage and other imperfections of the spa surface and
other spa components (typically discolouration of materials, corrosion of metal parts).
Free chlorine:
Result if too low – Inadequate level of disinfection.
Result if too high – cause odor problem, skin & eye irritation, corroded metals and other materials.
pH:
a value that indicates how acidic or basic the spa water is.
Result if too low – Corroded metals, eye & skin irritation, and destruction of total alkalinity.
Result if too high – Scale formation, cloudy water, shorter fi lter/heater runs, eye & skin irritation, poor chlorine
effi ciency.
Total Alkalinity (TA):
and ease of pH change, so always adjust total alkalinity before adjusting the pH level.
Result if too low – Corroded metals, eye & skin irritation. Low alkalinity will cause the pH to be unstable.
Result if too high – Scale formation, cloudy water, shorter fi lter/heater runs, eye & skin irritation, high chlorine
demand.
is the chlorine residual present in the spa water.
indicates the degree of the water’s resistance to pH change. It determines the speed
Calcium Hardness (CaCO
Result if too low – Diffi culty balancing water, corrosion of metal components, eye & skin irritation and water
foaming.
Result if too high – Scale formation, cloudy water, eye & skin irritation, diffi culty balancing water and fi lter/
heater ineffi ciency.
Saturation Index (SI):
main factors infl uencing scale formation. The tendency of water to either form scale or corrode is indicated by
the Saturation Index (SI):
*Where: TF = Temperature Factor; CF = Calcium Hardness Factor; AF = Total Alkalinity Factor
Water Temperature
(ºC) (ºF)
8 46 0.2 75 1.5 50 1.7
12 54 0.3 100 1.6 75 1.9
16 61 0.4 150 1.8 100 2.0
19 66 0.5 200 1.9 150 2.2
24 75 0.6 250 2.0 200 2.3
29 84 0.7 300 2.1 300 2.5
34 93 0.8 400 2.2 400 2.6
40 104 0.9 500 2.3 -- --
Test the water pH, Temperature, Calcium Hardness and Total Alkalinity levels. Use the equivalent Factors in
the SI equation.
SI = 0, Balance
If SI > 0, Scaling or cloudy water condition.
If SI < 0, Corrosive to metals or eye & skin irritating condition.
The SI is considered satisfactory if the value is within -0.3 to +0.3 range. Zero being perfect.
):
refers to the amount of calcium and magnesium dissolved in the water.
3
temperature, calcium hardness concentration, total alkalinity and pH represent the
SI = pH+TF+CF+AF-12.1
TF
Hardness (ppm)
Calcium
CF
Total
Alkalinity (ppm)
AF
S AVE THESE INSTRUCTIONS
Page 19
Page 20

(299NL) SPA (JET + BUBBLE) ENGLISH 7.5” X 10.3” PANTONE 295U 08/07/2018
English
299
NLA
SPA WATER CHEMISTRY AND BALANCE (continued)
SPA Water Adjustment
How to adjust the spa water chemistry when the levels are off the range.
chemical manufacturer’s directions, and the health and hazard warnings.
Total Alkalinity (TA) Adjustment
Remove the spa cover to aerate the water and use the included test strips to check the chemistry level.
Ensure the chlorine level in the water is between 2-4 ppm fi rst, as chlorine will affect the TA test result.
If the TA level (and not the pH) is higher than 120 ppm, add appropriate chemical product to lower the TA
level.
If the TA level is lower than 60 ppm, add appropriate chemical product to raise the TA level.
NOTE:
After adjustment, retest the water after 24 hours and adjust again if necessary.
pH Adjustment
After the total alkalinity has been lowered to 120 ppm or raised to 80 ppm and the pH is still high or low, add
appropriate chemical product to adjust the pH level between 6.8 and 7.6.
Calcium Hardness Adjustment
Use the included test strips to check the water hardness level and adjust it with appropriate chemical product.
CAUTION:
Always follow the
WARNING
Handle all chemicals with care and wear extra personnel protective equipment
including goggle and gloves. It is very important not to splash acid onto your skin
or clothing, or into your eyes.
S AVE THESE INSTRUCTIONS
Page 20
Page 21

(299NL) SPA (JET + BUBBLE) ENGLISH 7.5” X 10.3” PANTONE 295U 08/07/2018
English
MAINTENANCE
Maintenance of Spa Water and Cartridge
Protect all the spa occupants from possible water-related illnesses by keeping the spa water clean and
sanitized. Always practice good hygiene. To ensure proper spa water quality follow these procedures:
1.
Inspect and clean the fi lter cartridge every day, and change the fi lter
cartridge every 3 days.
a.
Unscrew the cartridge housing assembly from the spa tub wall
and remove the cartridge
b.
Use a garden hose to rinse off the cartridge. If the cartridge
remains soiled and discolored it should be replaced. Keep spare
cartridges on hand.
c.
Reinstall the clean cartridge back into the cartridge housing and
replace the cartridge housing assembly back onto the spa tub wall.
2.
Change the spa water every 2 weeks. See “Spa Tub Drainage” and
“Spa Tub Cleaning” sections for details.
3.
Use spa chemicals to maintain proper water chemistry. Spa damage
resulting from misuse of chemicals and mismanagement of spa water
is not covered by the warranty.
4.
All occupants must shower before entering the spa.
(see drawing 11)
.
13
14
299
NLA
11
12
IMPORTANT
Unplug the power cord before cleaning the system. Cover the water inlet and outlet with
the plugs to prevent water spillage. After completing all maintenance tasks, you must
plug the power cord back in and remove the plugs.
Electrolytic Cell Cleaning
The electrolytic cell has a self cleaning function incorporated into the electronic control's programming. In
most cases this self cleaning action will keep the cell working at optimum effi ciency. In some regions, the
SPA water is hard (high mineral content) which varies depending on the local water condition, this would
cause deposits on the titanium plate and affect the sanitizing effi ciency, so the cell may require periodic
manual cleaning. To maintain maximum performance, we recommend that you open and visually inspect
the electrolytic cell every two weeks for SPA water (Calcium hardness < 100 ppm) or weekly for SPA water
(Calcium hardness > 350 ppm).
The following steps provide instructions on how to clean the cell.
Inspection and cleaning:
1.
Turn off the spa and unplug the power cord from the electrical socket.
2.
Unscrew the fi lter cartridge assembly from the spa tub wall, and use the included plugs
cover the water inlet and outlet fi ttings from inside of the spa tub to prevent water from fl owing out.
3.
Remove the four screws from the transparent cover using a Phillips screwdriver (not included) and
remove the cover from the spa control unit.
(15 & 23)
to
S AVE THESE INSTRUCTIONS
Page 21
Page 22

(299NL) SPA (JET + BUBBLE) ENGLISH 7.5” X 10.3” PANTONE 295U 08/07/2018
English
MAINTENANCE (continued)
4.
Unplug the electrolytic cell cord. Unscrew the electrolytic cell nut in a counter-clockwise motion using the
included electrolytic cell nut wrench
5.
Pull out the electrolytic cell and place it in a container, pour kitchen grade vinegar into the container to
soak the titanium plate for about one hour until no deposits remain.
(20)
.
299
NLA
6.
Remove the electrolytic cell and fl ush the titanium plate with fresh water. Be careful: Keep the
electrolytic cell receptacle completely dry, do not let it come into contact with the vinegar and water.
7.
Reverse the above steps to reinstall the electrolytic cell.
NOTE:
Ensure the notch on the electrolytic cell is aligned with the ridge on the electrolytic cell housing.
INTEX® TEST STRIPS (PACKED WITH THE PRODUCT)
The Test Strips can test the “Free Chlorine”, “pH”, “Total Alkalinity” and “Calcium Hardness” levels at the
same time. We recommend that you test the water chemistry weekly, and maintain the chlorine
concentration at 2-4 ppm.
Directions and Use
1.
Dip the entire strip into the water and remove immediately.
2.
Hold the strip level for 15 seconds. Do not shake excess water from the strip.
3.
Now compare the strip pad to the color chart on the packaging label. If necessary, adjust the chemical
level in the spa water. It is very important, to use the proper technique when testing the water's
chemical level. Read and follow the written strip instructions carefully.
S AVE THESE INSTRUCTIONS
Page 22
Page 23

(299NL) SPA (JET + BUBBLE) ENGLISH 7.5” X 10.3” PANTONE 295U 08/07/2018
MAINTENANCE (continued)
Spa Tub Drainage
1.
Turn off and unplug the spa control unit.
2.
Connect the drain valve adaptor to a garden hose and point the other end
of the garden hose to a suitable draining area
3.
Remove the drain valve cap from outside of the spa tub and attach the
drain valve adaptor to the drain valve
4.
From inside of the spa tub, open the drain valve cap, water will start
fl owing out from the garden hose.
5.
When the water stops draining, disconnect the spa control unit from
the spa tub wall. Lift the spa tub wall from the side opposite the drain,
leading any remaining water to the drain and emptying the spa completely
(see drawing 13)
6.
Turn over the spa tub to empty any remaining water
7.
Unscrew the drain valve on the spa control unit side using a coin to drain
out any water
8.
Use a clean towel to wipe up any remaining water and moisture on the
spa tub and spa control unit.
9.
Ensure the spa tub and spa control unit are thoroughly dried.
NOTE:
inlet and outlet connectors from the inside of the spa tub to prevent water
from fl owing out.
The enclosed plugs
.
(see drawing 15)
(15 & 23)
(see drawing 12)
.
can be used to cover the water
Spa Tub Cleaning
If dirt is visible in the water or water becomes cloudy and proper water
chemistry does not clear it up, change the water and clean the spa tub.
See “Spa Tub Drainage” section on how to drain the spa.
While empty, remove the cartridge housing from inside of the spa tub wall,
clean and/or replace the fi lter cartridge. Use a sponge and mild soap solution
to wipe away any soil or stains on the inside of the spa wall. Rinse thoroughly
before refi lling with clean water.
IMPORTANT:
Do not use steel wool, hard brushes or abrasive cleaners.
(see drawing 12)
.
(see drawing 14)
.
.
English
11
299
NLA
12
1
2
3
13
14
15
Biofi lm Removal
See your local spa professional for biofi lm removal products and advice.
Spa Tub Air Valve Fastening
Check the spa tub air valve for leakage and tightness before use. If air is leaking
from the air valve, use the provided wrench
1.
Make sure the spa tub is defl ated, open the air valve cap and insert the
wrench
2.
With one hand, hold the backside of the air valve base from the inside of the
spa tub wall and turn the wrench
IMPORTANT:
fi lled with water. Only use the air valve wrench if the air valve is loose or
there is leakage around air valve base. Do not over tighten the air valve: over tightening can damage the
valve. Just ensure the air valve is snug and not leaking.
(22)
into the air valve body
Never adjust the air valve base when the spa is in use or
(22)
to tighten the air valve as follow:
(see drawing 16)
(22)
clockwise.
22
.
16
Spa Cover
Inspect the spa cover regularly for leaks, premature wear and tear, damage, or signs of deterioration. Never use
a worn or damaged cover: it will not provide the level of protection required to prevent unsupervised access to the
spa by a child.
Clean the cover inside and outside periodically using a sponge and a suitable solution that includes adequate
disinfection (10 mg per liter of free chlorine). Do not use steel wool, hard brushes or abrasive cleaners.
S AVE THESE INSTRUCTIONS
Page 23
Page 24

(299NL) SPA (JET + BUBBLE) ENGLISH 7.5” X 10.3” PANTONE 295U 08/07/2018
English
MAINTENANCE (continued)
Spa Surround
Barefoot areas and relaxing areas around the spa shall be cleaned on a regular basis. No cleaning water may
fl ow into the spa or spa water cycle. The dirt and cleaning agents shall be rinsed carefully to drain in the spa
surround.
Spa Tub and Cover Air Bladder Repair
Use the enclosed repair patch to repair any puncture:
• Clean and dry the area to be repaired thoroughly.
• Remove the patch backing paper and press patch fi rmly over the puncture. Smooth out the surface to
remove any air bubbles under the patch.
STORAGE
In regions subject to freezing temperatures, drain, clean, disassemble and properly store the spa set and related
components indoors when the temperature drops below 4°C (39°F).
299
NLA
1.
Drain and clean the spa following the “Spa Tub Drainage” and “Spa Tub Cleaning” sections.
2.
Reverse set up instructions to defl ate and disassemble the spa tub, spa control unit and spa cover air
bladder.
3.
To defl ate the tub and the cover air bladder:
a) Open the defl ation outlet cap
wrench
b) Insert defl ation hose adaptor
c) Insert infl ation hose
d) Insert the other end of the infl ation hose into the tub air valve
or cover air bladder valve.
e) Press the air bubble button to defl ate.
f) When defl ation is completed reverse above steps and
ensures the defl ation outlet cap
Caution:
Keep the infl ation hose away from water or small objects when the
defl ation function is activated to avoid damage to the blower motor.
4.
Make sure all the spa components and accessories are thoroughly
clean and dry before storage. Air-dry the spa tub in the sun for an
hour before folding.
5.
Fold the spa tub loosely and avoid any sharp corners to prevent
damage or leakage to the spa tub liner.
6.
Prepare additional new cartridges for next time use.
7.
Store the spa tub and accessories in a dry, temperature controlled, between 0º – 40ºC (32º – 104ºF),
storage location.
8.
The original packing can be used for storage.
(6) (see drawing 17)
(7)
Only use for the purpose described in this manual.
(34)
with the included bolt
.
(35)
into the defl ation outlet.
over the defl ation hose adaptor
(34)
is securely fastened.
(35)
34
.
6
35
24
17
1
2
3
S AVE THESE INSTRUCTIONS
Page 24
Page 25

(299NL) SPA (JET + BUBBLE) ENGLISH 7.5” X 10.3” PANTONE 295U 08/07/2018
TROUBLESHOOTING
PROBLEM CAUSE SOLUTION
NO DISPLAY/SPA
CONTROL UNIT
DOES NOT WORK
HOUSEHOLD
CIRCUIT BREAKER
TRIPPED
NOT HEATING
PROPERLY
JET FUNCTION
DOES NOT WORK
• Spa is unplugged or off.
• Control panel cable plug loose.
• Power failure.
• RCD tripped.
• RCD broken.
• Circuit breaker under rated.
• Overloaded circuit breaker.
• An electrical fault in the line.
• Temperature set too low.
• Dirty fi lter cartridge.
• Water temperature decreasing during
heater STANDBY mode.
• Heating element failed.
• Jet pump is too hot. • Turn off and unplug the spa. Let it cool down and
• Ensure the spa is plugged and switched on.
• Ensure the control panel cable plug is fi rmly
attached to the control base receptacle.
• Check power source.
• Reset the RCD.
• Contact Intex Service Center.
• Ensure correct circuit breaker rating.
• Provide a dedicated circuit breaker feeding the
spa electrical outlet only.
• Contact a qualify electrician to correct the
electrical fault.
• Increase the temperature and attach the spa
cover.
• Clean or replace the fi lter cartridge in time.
• If heater is in STANDBY mode, press the fl ame
button twice to heat up the water to the set
temperature.
• Contact Intex Service Center.
restart all over again.
• If problem persists contact Intex Service Center.
English
299
NLA
JETS OUTPUT ARE
WEAK
JET AIR CONTROL
KNOB NOT
WORKING
FILTRATION PUMP
NOT WORKING
WATER NOT CLEAN • Cartridge assembly not properly
PUMP
CONNECTORS ARE
NOT LEVEL
WITH THE SPA
CONNECTORS
• Low water level.
• Obstruction in the suction inlet inside
the tub.
• Jet nozzles clogged or dirty.
• Jet nozzles plumbing pipes damaged.
• Jet nozzles clogged or dirty.
• Jet airfl ow plumbing inside the spa tub
damaged.
• Dirty fi lter cartridge.
• Filtration inlet and/or outlet clogged.
• Filter pump motor failed.
attached.
• Insuffi cient fi ltering time.
• Dirty fi lter cartridge.
• Improper water maintenance.
• Filtration inlet and outlet clogged.
• One characteristic of PVC is that
it changes shape, which is normal.
• Add water between MIN and MAX level.
• Ensure suction inlet is not covered or blocked.
• Clean any dirt inside the jet nozzles.
• Contact Intex Service Center.
• Clean any dirt inside the jet nozzles.
• Contact Intex Service Center.
• Clean or replace the fi lter cartridge in time.
• Check and clean fi ltration inlet and outlet
regularly.
• Contact Intex Service Center.
• Ensure the cartridge assembly is properly
attached.
• Increase fi ltration time.
• Clean or replace the fi lter cartridge in time.
• Keep the spa water properly sanitized. Refer to
the chemical manufacturer’s instructions.
• Check and clean fi ltration inlet and outlet
regularly.
• Elevate the pump with wood or another type of
insulated material to bring the pump’s connectors
level with the spa’s connectors.
S AVE THESE INSTRUCTIONS
Page 25
Page 26

(299NL) SPA (JET + BUBBLE) ENGLISH 7.5” X 10.3” PANTONE 295U 08/07/2018
TROUBLESHOOTING (continued)
PROBLEM CAUSE SOLUTION
TUB HAS A
STRANGE SHAPE
TUB LOSES AIR
PRESSURE
LEAKING BETWEEN
SPA TUB
CONNECTORS AND
CONTROL UNIT
CONNECTORS
SPA IS TOO NOISY
IN FILTRATION
MODE ONLY
INSUFFICIENT
CHLORINE
BUBBLE AIR
BLOWER DOES NOT
WORK
• Expanded internal air pressure by
strong sunshine.
• Air valve cap loose.
• Air valve base loose.
• Hole, cut or split on spa tub.
• Spa control base inlet/outlet
connections not securely tight.
• Spa control base inlet/outlet o-ring
missing/dirty.
• Control base components not
securely attached.
• Control base ground not level and
fi rm.
• Spa fi lter motor failed.
• Insuffi cient operating time of the
sanitation system and/or heater is
running at the same time.
• Chlorine loss due to intense
sunlight exposure.
• The bather load has increased.
• Clogged or dirty electrolytic cell.
• Air blower pump is too hot. • Turn off and unplug the spa. Let it cool down and
• Do not expose the spa to direct sunlight for
extended period of time.
• Check the air pressure and release air if
necessary. During very hot weather, you must
check to see whether it is necessary to release
some air. This is to avoid any possible damage
to the tub.
• Ensure air valve cap is securely closed.
• Fill up the spa tub with air then make sure the
air valve base is tighten, see “Spa Tub Air Valve
Fastening” section.
• Put liquid soap and water in a squirt bottle and
spray on seams. If there is a leak it will bubble.
After you fi nd the leak, clean and dry the leaking
area, then apply the repair patch that comes with
your spa.
• Tighten inlet and outlet connections.
• Coat the o-ring with petroleum jelly for water
proof.
• Remove grid from inside spa with a screwdriver,
ensure inlet/outlet O-ring is in place, clean and
not damaged.
• Ensure control panel, back cover and all
inlet/outlet are securely connected.
• Ensure ground is level, fi rm and smooth.
• Replace the failed fi lter motor with a new one.
• Increase the sanitation system operating time
and ensure the heater is off during the
sanitation process. See “Sanitation System
Operating Instructions”.
• Use a SPA cover when the SPA is not in use
and/or when the sanitation system is operating.
• Increase the sanitation system operating time
and test the water using the test strips. See
“Sanitation System Operating Instructions”.
• Check and clean the cell if necessary. See
“Maintenance”.
restart all over again.
• If problem persists contact Intex Service Center.
English
299
NLA
IMPORTANT
If you continue to experience diffi culty, please contact our Consumer Service Department for
assistance. See separate “Authorized Service Centers” sheet.
S AVE THESE INSTRUCTIONS
Page 26
Page 27

(299NL) SPA (JET + BUBBLE) ENGLISH 7.5” X 10.3” PANTONE 295U 08/07/2018
TROUBLESHOOTING (continued)
LED PANEL
CODE
LED Panel Code Flash & Alarm On (
•
E90
PROBLEM SOLUTION
No water fl ow.
NOTE
: Always turn off the power before cleaning and servicing).
•
Turn off and unplug the control unit.
•
Ensure the outlet cover grid is clean and free from obstructions.
•
Clean or replace the cartridge, see Maintenance and Storage section.
•
Ensure the in/outlet connections on the spa tub and fi lter pump are not
blocked.
•
Keep the spa water properly sanitized to ensure a clean and unclogged
fi lter cartridge.
•
Press the button to turn off the unit. Release trapped air by
unscrewing the drain valve cap on the control base side with a coin.
Air has been release once a steady stream of water is fl owing out from
the drain valve. Wait for 15 seconds and screw the drain valve cap
back. Press the button to activate the control panel buttons, and
then run the fi lter function by pressing the button to push out any
remaining air in the system.
•
If problem persists, contact Intex Service Center.
English
299
NLA
E91
E92 •
E94
E95
E96
E97
E99
•
Dirt or scale on titanium plates.
•
Low salt level / No salt.
•
Electrolytic cell cord is loose.
•
Possible electrolytic cell failure.
High salt level.
•
Water temperature too low.
•
Water temperature is
around 50°C (122°F).
•
System Error.
•
Dry-fi re Protection.
•
Water temperature sensor broken.• Contact Intex Service Center.
•
Remove the electrolytic cell for inspection. Clean it if necessary. See
“Maintenance”.
•
Add salt. See “Salt Level Information”.
•
Ensure that the cell cord is plugged fi rmly into the cell receptacle.
•
Contact Intex Service Center. Replace the cell if needed.
•
Partially drain the pool and refi ll it with fresh water. See “Salt Level
Information”.
•
If the ambient temperature is below 4°C (39°F), we recommend not to
use the spa.
•
Turn off and unplug the control unit, add some warm water to raise the
spa water temperature above 5°C (41°F), then press the button to
heat up the water to the desired temperature.
•
If problem persists, contact Intex Service Center.
•
Turn off and unplug the control unit. When the water has cooled down,
plug the RCD and restart all over again.
•
Turn the heater off, then press the fi lter and jet buttons to lower the
water temperature.
•
If problem persists, contact Intex Service Center.
•
Turn off and unplug the control unit. Plug the RCD and restart all over
again.
•
If problem persists, contact Intex Service Center.
•
Contact Intex Service Center.
END
•
After 72 hours of continuous
heating operation, the pump will
hibernate automatically. The
rapid heating and water fi ltration
functions are disabled.
•
Press the button to re-active the fi lter pump.
S AVE THESE INSTRUCTIONS
Page 27
Page 28

(299NL) SPA (JET + BUBBLE) ENGLISH 7.5” X 10.3” PANTONE 295U 08/07/2018
English
FILTER PUMP MOTOR DISASSEMBLY
If there is a need to replace the fi lter motor (for qualifi ed technician only), follow below steps to
disassemble it:
IMPORTANT:
before replacing any parts.
Tools required:
You must drain out any remaining water inside the piping system of the control base
One adjustable wrench and one Philip screwdriver.
299
NLA
NOTE:
with the spa set.
The “special wrench tool” is included with the new fi lter pump motor replacement and not
123
456
S AVE THESE INSTRUCTIONS
Page 28
Page 29

(299NL) SPA (JET + BUBBLE) ENGLISH 7.5” X 10.3” PANTONE 295U 08/07/2018
English
299
NLA
WARRANTY
Your PureSpa has been manufactured using the highest quality materials and workmanship. All Intex
products have been inspected and found free of defects prior to leaving the factory. This limited
warranty applies only to the PureSpa only.
This limited warranty is in addition to, and not a substitute for, your legal rights and remedies. To the
extent that this warranty is inconsistent with any of your legal rights, they take priority. For example,
consumer laws across the European Union provide statutory warranty rights in addition to the
coverage you receive from this limited warranty: for information on EU-wide consumer laws, please
visit the European Consumer Center website at http://ec.europa.eu/consumers/ecc/contact_en/htm.
The provisions of this limited warranty apply only to the original purchaser and are not transferable.
This limited warranty is valid for a period of one (1) year from the date of the initial retail purchase.
Keep your original sales receipt with this document, as proof of purchase will be required and must
accompany warranty claims or the limited warranty will be invalid.
PureSpa Warranty – 1 Year
If you fi nd a manufacturing defect in the PureSpa during the warranty period, please contact the
appropriate Intex Service Center listed in the separate “Authorized Service Centers” sheet. If the item
is returned as directed by the Intex Service Center, the Service Center will inspect the item and
determine the validity of the claim. If the item is covered by the provisions of the warranty, the item will
be repaired or replaced, with the same or comparable item (at Intex’s choice) at no charge to you.
Other than this warranty, and other legal rights in your country, no further warranties are implied. To
the extent possibly in your country, in no event shall Intex be liable to you or any third party for direct
or consequential damages arising out of the use of your PureSpa, or Intex or its agents’ and
employees’ actions (including the manufacture of the product). If your country does not allow the
exclusion or limitation of incidental or consequential damages, this limitation or exclusion does not
apply to you.
You should note that this limited warranty does not apply in the following circumstances:
• If the PureSpa is subject to negligence, abnormal use or application, accident, improper operation,
improper voltage or current contrary to operating instructions, improper maintenance or storage;
• If the PureSpa is subject to damage by circumstances beyond Intex’s control, including but not
limited to, ordinary wear and tear and damage caused by exposure to fi re, fl ood, freezing, rain, or
other external environmental forces;
• If the PureSpa is used for any commercial purposes;
• To parts and components not sold by Intex; and/or.
• To unauthorized alterations, repairs or disassembly to the PureSpa by anyone other than Intex
Service Center personnel.
The costs associated with the loss of pool water, chemicals or water damage are not covered by this
warranty. Injury or damage to any property or person is not covered by this warranty.
Read the owner’s manual carefully and follow all instructions regarding proper operation and
maintenance of your PureSpa. Always inspect your product prior to use. This limited warranty will be
void if use instructions are not followed.
S AVE THESE INSTRUCTIONS
Page 29
 Loading...