

Page 1
148
IO
(148IO)
SOLAR LED LANDSCAPE LIGHT ENGLISH
4.875” X 7.25” 09/22/2009
SAVE THESE INSTRUCTIONS
Page 1
148
IO
SAVE THESE INSTRUCTIONS
Page 2
(148IO)
SOLAR LED LANDSCAPE LIGHT ENGLISH
4.875” X 7.25” 09/22/2009
INTEX®OWNER'S MANUAL
SOLAR LED LANDSCAPE LIGHT
148IO-R0-1009
• This product is not a toy, keep away from children. Assembly and disassembly
by adult only.
• The rechargeable battery is not replaceable. Do not open, short circuit, or
destroy the battery as injury may occur.
• Do not dispose of LiFePO4 batteries in regular trash, municipal waste stream
or by fire as battery may leak or explode.
• Do not stare directly at the light emitted by this product.
• Never lift or handle the product by the solar panel. Do not touch the solar
panel surface.
• Do not set up the product on slope, incline surface or shaded areas.
• Do not sit, straddle, step or exert pressure on the product as injury could
occur.
FOLLOW THESE RULES AND ALL INSTRUCTIONS TO AVOID PROPERTY
DAMAGE OR OTHER INJURY.
WARNING
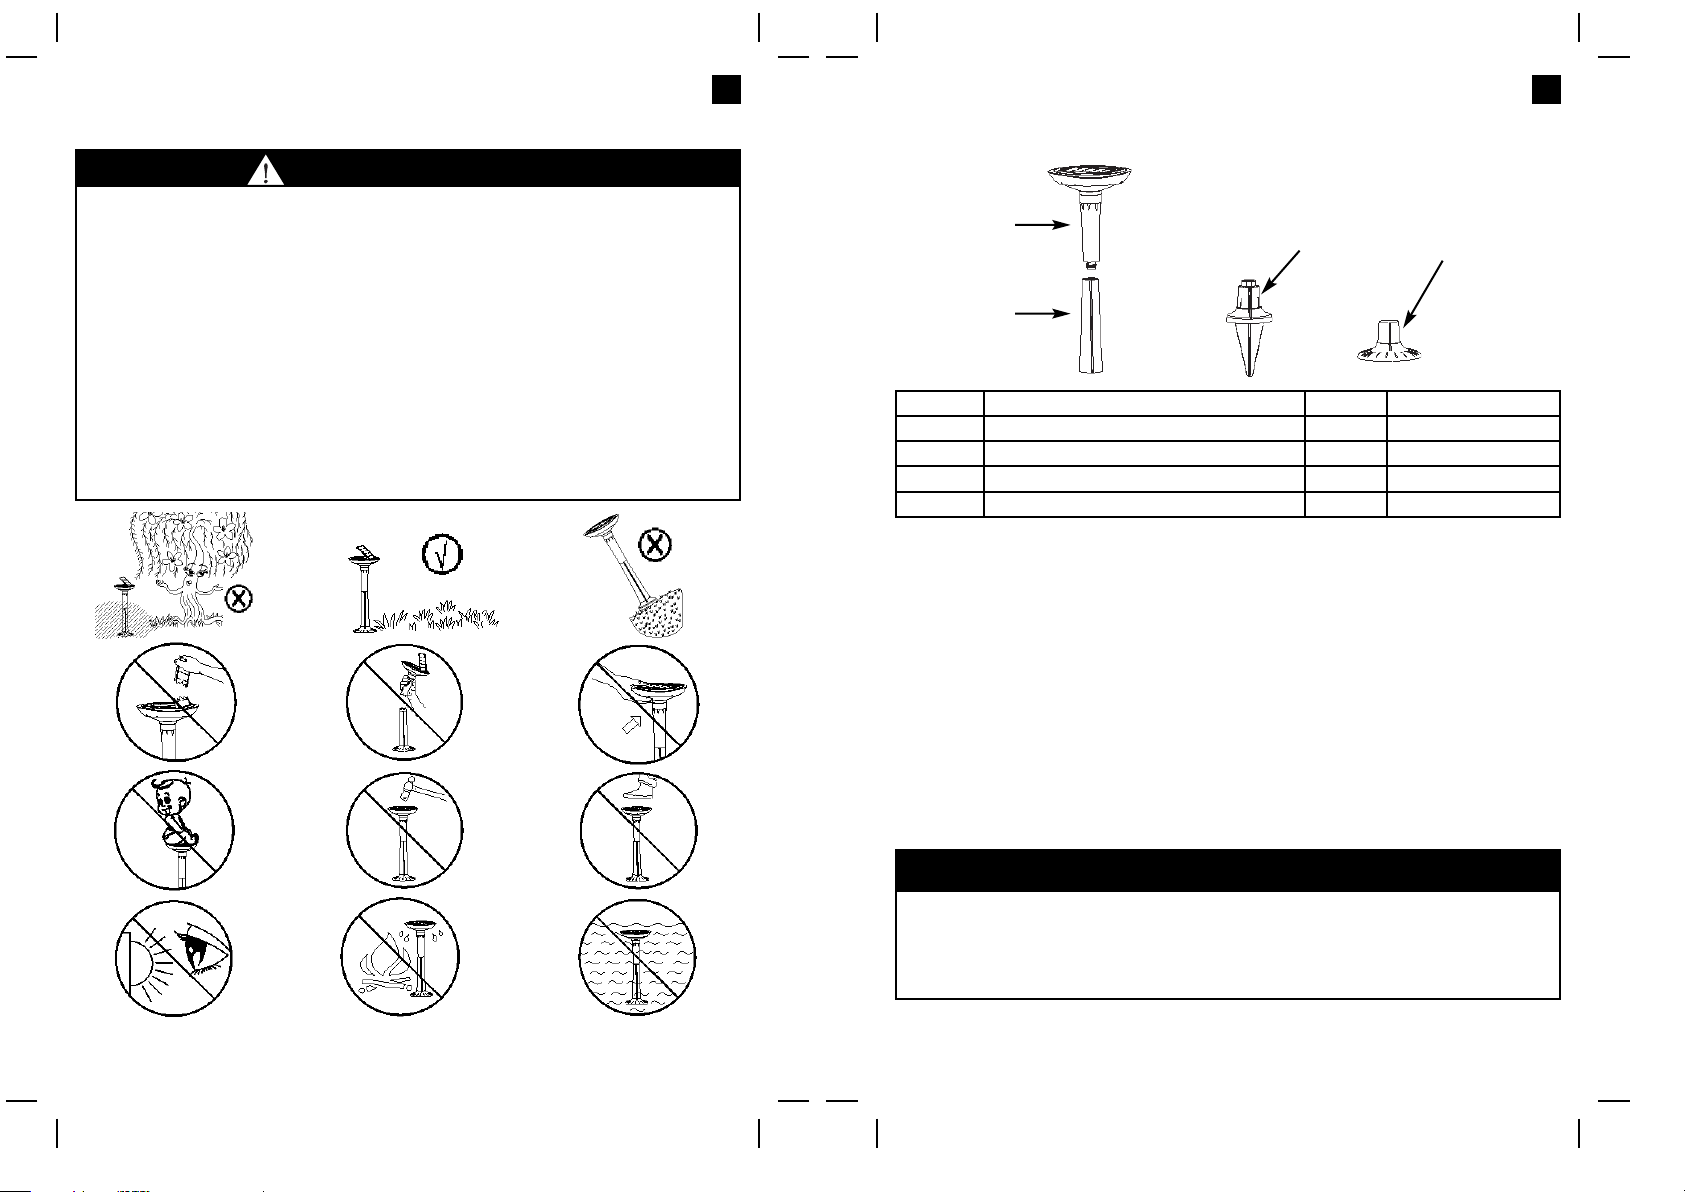
PARTS LIST
REF. NO. DESCRIPTION QTY. SPARE PARTS NO.
1
SOLAR LIGHT
1 11255
2
LOWER TUBE
1 11256
3
STAKE
1 11257
4
BASE
1 11258
1
2
3
4
INSTRUCTIONS
General
• The solar panel will charge the battery during daytime and the light will turn on
automatically when it gets dark. It will also turn off when it gets bright again.
• The adjustable solar panel allows maximum sunlight exposure.
• Depending on weather conditions and sun exposure, a full day charge under the
sunlight provides an average of 3-5 hours of illumination.
• For better performance, the product should be installed in a bright sunny area
and not in shaded areas, under the trees or areas with low sunlight exposure.
• Keep the solar panel surface clean and clear from leaves or debris that may
affect its efficiency.
IMPORTANT
• Do not setup this product near other sources of lighting devices.
• To allow maximum sun exposure, northern hemisphere users should
position the product with the solar panel facing south. Southern hemisphere
users should position the product with the solar panel facing north.
Page 2
Installation:
The product comes with two separate fixing accessories:
• A stake for anchoring the product into the lawn or garden yard.
• A pedestal base with fixation holes for wooden platform, terrace or
cement floor.
1. Slide the switch to the opposite end to activate the solar panel control system
located under the solar light. See fig (1).
2. Screw the lower tube (2) to the solar light unit. See fig (2).
3. Insert the stake (3) into the lawn or garden where desired, ensure the stake is
firmly anchored; insert the assembled light device into the stake. See fig (3).
NOTE: If the ground is hard and packed, moisten the ground with water before
inserting the stake.
4.
The solar light also can be mounted on a wooden platform or cement floor
using the pedestal base. See fig (4).
148
IO
(148IO)
SOLAR LED LANDSCAPE LIGHT ENGLISH
4.875” X 7.25” 09/22/2009
SAVE THESE INSTRUCTIONS
Page 3
148
IO
SAVE THESE INSTRUCTIONS
Page 4
(148IO)
SOLAR LED LANDSCAPE LIGHT ENGLISH
4.875” X 7.25” 09/22/2009
FIG (1)
FIG (2)
FIG (3)
FIG (4)
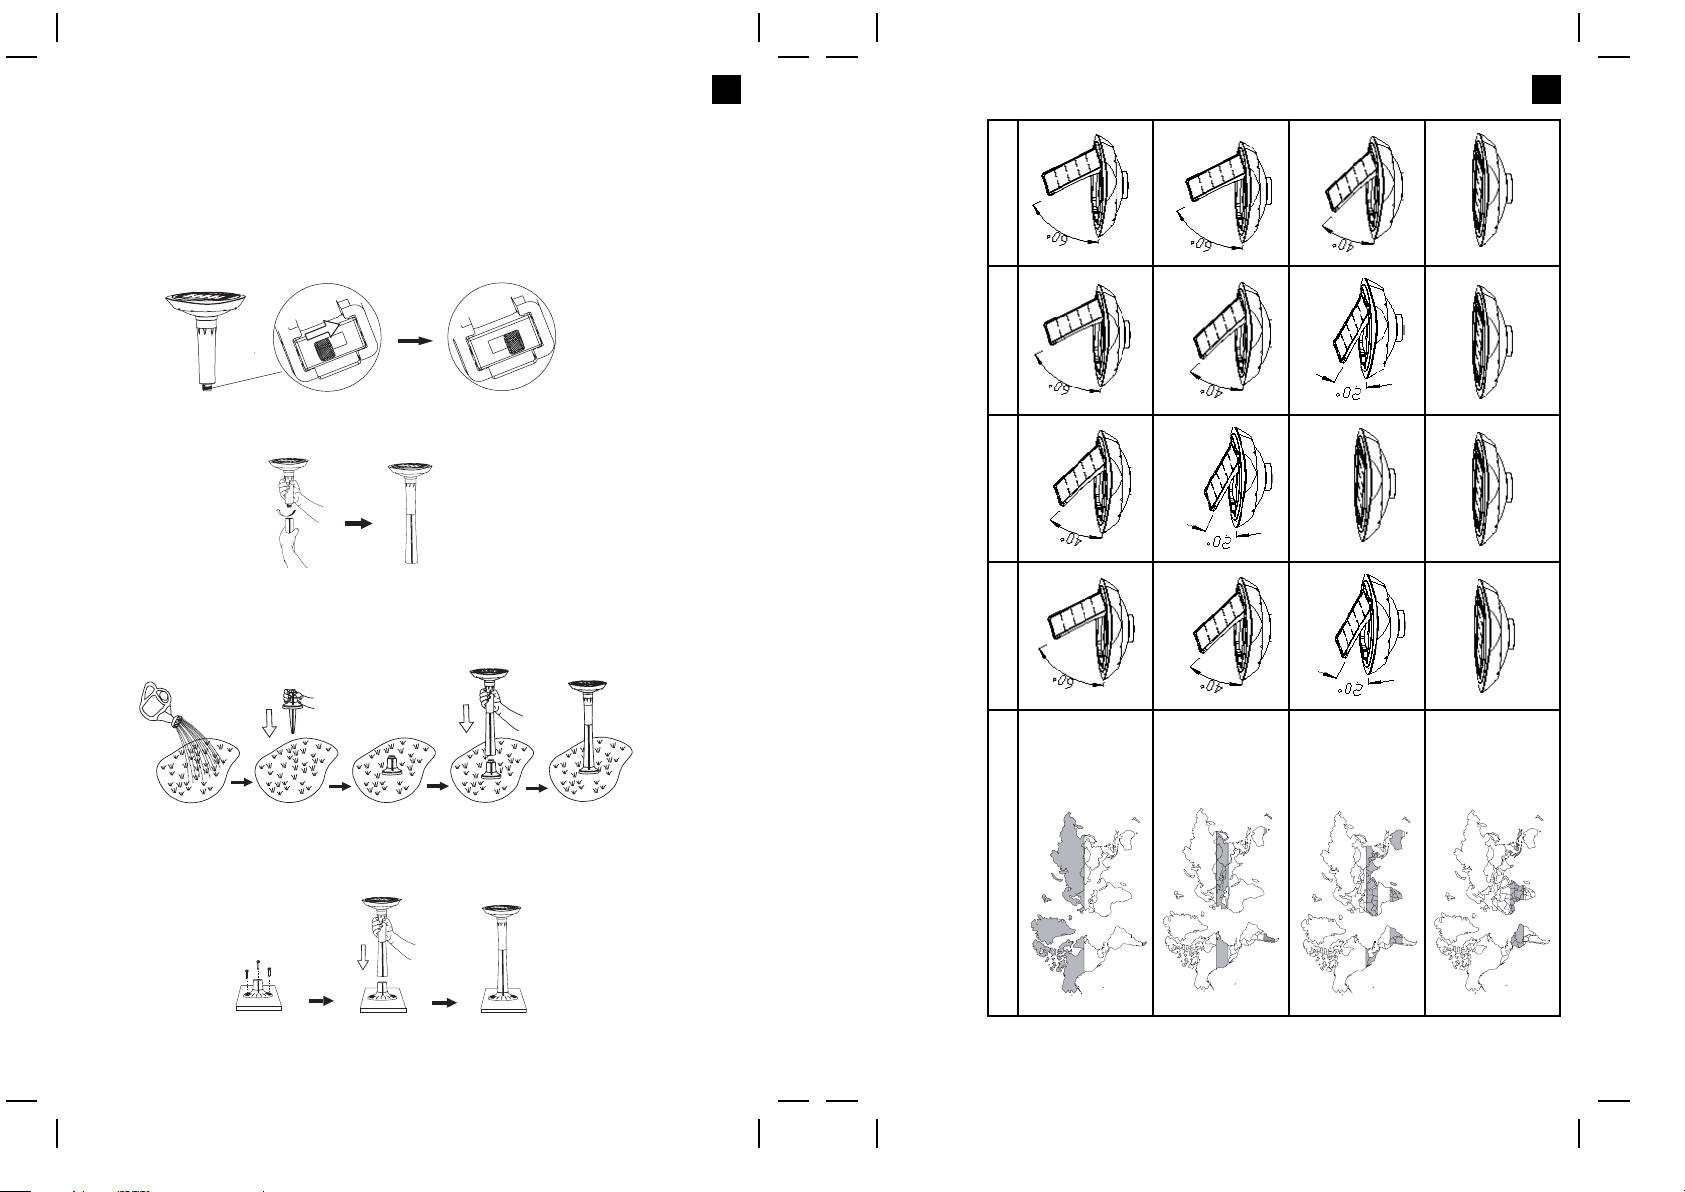
Installation (continued):
5. Adjusting the solar panel
In different regions and depending on the season, the solar panel needs to be adjusted to allow maximum sun
light exposure for better performance. See below chart.
Latitude
50
O
and
above
Latitude
30
O
~ 50
O
Latitude
10
O
~ 30
O
Latitude
0
O
~ 10
O
AREA
SPRING
SUMMER
AUTUMN
WINTER
Page 3

148
IO
(148IO)
SOLAR LED LANDSCAPE LIGHT ENGLISH
4.875” X 7.25” 09/22/2009
SAVE THESE INSTRUCTIONS
Page 5
148
IO
SAVE THESE INSTRUCTIONS
Page 6
(148IO)
SOLAR LED LANDSCAPE LIGHT ENGLISH
4.875” X 7.25” 09/22/2009
LIMITED WARRANTY
Your Solar LED landscape light has been manufactured using the highest quality
materials and workmanship. All Intex products have been inspected and found free of
defects prior to leaving the factory. This Limited Warranty applies only to the Solar LED
landscape light.
The provisions of this Limited Warranty apply only to the original purchaser and is not
transferable. This Limited Warranty is valid for a period of two (2) years from the date of the
initial retail purchase. Keep your original sales receipt with this manual, as proof of
purchase will be required and must accompany warranty claims or the Limited Warranty is
invalid.
If a manufacturing defect is found within this two (2) years period, please contact the
appropriate Intex Service Center listed in this manual. The Service Center will determine the
validity of the claim.
IMPLIED WARRANTIES ARE LIMITED TO THE TERMS OF THIS WARRANTY AND IN NO
EVENT SHALL INTEX, THEIR AUTHORIZED AGENTS OR EMPLOYEES BE LIABLE TO
THE BUYER OR ANY OTHER PARTY FOR DIRECT OR CONSEQUENTIAL
DAMAGES OR LIABILITIES.
This Limited Warranty does not apply if the Solar LED landscape light is subject to
negligence, abnormal use or operation, accident, improper operation, improper voltage or
current contrary to operating instructions, or to damage by circumstances beyond Intex’s
control, including but not limited to, ordinary wear and tear and damage caused by
exposure to fire, flood, freezing, rain, or other external environmental forces. This Limited
Warranty applies only to those parts and components sold by Intex.The Limited Warranty
does not cover unauthorized alterations, repairs or disassembly by anyone other than Intex
Service Center personnel.
The costs associated with the loss of pool water, chemicals or water damage are not
covered by this warranty. Injury or damage to any property or person is not covered by this
warranty.
AREAS LOCATION AREAS LOCATION
For service questions or to order replacement parts, please contact the
appropriate office listed below or visit www.intexdevelopment.com for
answers to most frequently asked questions.
• ASIA INTEX DEVELOPMENT CO. LTD.
8TH FLOOR,
DAH SING FINANCIAL CENTRE,
108 GLOUCESTER ROAD,
WANCHAI, HONG KONG
TEL: 852-28270000
FAX: 852-23118200
E-mail: xmservicesupport@intexcorp.com.cn
Website: www.intexdevelopment.com
• EUROPE INTEX TRADING B.V.
POSTBUS 1075, 4700 BB ROOSENDAAL,
THE NETHERLANDS
TEL: 31-(0)165-593939
FAX: 31-(0)165-593969
E-mail: service@intexcorp.nl
Website: www.intexcorp.nl
• FRANCE INTEX SERVICE FRANCE
(CASS INTEX FRANCE)
52, ROUTE NATIONALE,
39190 BEAUFORT, FRANCE
TEL: 08 90 71 20 39
FAX: 03 84 25 18 09
E-mail: sav@intexcorp.com.fr
Website: www.intex.fr
• GERMANY
STEINBACH VERTRIEBSGMBH
C/O WEBOPAC LOGISTICS GMBH
INTER-LOGISTIK-PARK 1-3
87600 KAUFBEUREN
TEL: 0180 5 405 100 200
(0,14€/min aus dem Festnetz, Mobilfunk max. 0,42€/min)
FAX: + 43 (7262) 61439
E-mail: service@intexcorp.de
Website: www.intexcorp.de
• ITALY A & A MARKETING SERVICE
VIA RAFFAELLO SANZIO
20058 VILLASANTA (MI)
TEL: 199 12 19 78
FAX: +39 039 2058204
E-mail: intex@aeamarketingservice.com
Website: www.intexitalia.com
• UK TOY BROKERS LTD
MARKETING HOUSE,
BLACKSTONE ROAD,
HUNTINGDON, CAMBS.
PE29 6EF. UK
TEL: 0844 561 7129
FAX: 01480 414761
E-mail: sales@toybrokers.com
Website: www.intexspares.com
• SWITZERLAND GWM AGENCY
GARTEN-U. WOHNMÖBEL,
RÄFFELSTRASSE 25,
POSTFACH,
CH-8045 ZURICH/SWITZERLAND
TEL: 0900 455456 or +41 44 455 50 60
FAX: +41 44 455 50 65
E-mail: gwm@gwm.ch
Website: www.gwm.ch
• SPAIN / PORTUGAL Nostrum Iberian Market S.A.
Av. de la Albufera, 321
28031 Madrid, Spain
TEL: +34 902101339
FAX: +34 902908976
Email for Spain: sat@intexiberian.com
Email for Portugal: spv-pt@intexiberian.com
Website: www.intexiberian.com
• AUSTRALIA HUNTER OVERSEAS PTY LTD
LEVEL 1, 225 BAY STREET,
BRIGHTON, VICTORIA,
AUSTRALIA
TEL: 61-3-9596-2144 or 1800-224-094
FAX: 61-3-9596-2188
E-mail: enquiries@hunteroverseas.com.au
Website: www.hunteroverseas.com.au
• NEW ZEALAND
HAKA NEW ZEALAND LIMITED
UNIT 4, 11 ORBIT DIVE, ALBANY,
AUCKLAND 0757, NEW ZEALAND
TEL: 649-4159213
FAX: 649-4159212
E-mail: geoff@hakanz.co.nz
• MIDDLE EAST
FIRST GROUP INTERNATIONAL
REGION AL MOOSA GROUP BUILDING,
1ST FLOOR, OFFICE 102 & 103,
UMM HURAIR ROAD, KARAMA,
DUBAI, UAE
TEL: 00971-4-3373322
FAX: 00971-4-3375115
E-mail: info@firstgroupinternational.com
Website: www.firstgroupinternational.com
• SOUTH AFRICA WOOD & HYDE
15-17 PACKER AVENUE, INDUSTRIA 2,
CAPE TOWN, SOUTH AFRICA 7460
TEL: 27-21-0800-204-692
FAX: 27-21-505-5600
E-mail: ygoldman@melbro.co.za
• CHILE / URUGUAY
COMEXA S.A.
EL JUNCAL 100, PARQUE INDUSTRIAL
PORTEZUELO, QUILICURA, SANTIAGO,
CHILE.
TEL: 600-822-0700
E-mail: serviciotecnico@silfa.cl
• ARGENTINA
JARSE INDUSTRIAL Y COMERCIAL S.A
MANUEL GARCIA Nº124, PARQUE
PATRICO, BUENOS AIRES, ARGENTINA
TEL: 4942-2238 (interno 106);
TEL: 4942-2238( interno 145)
E-mail: Martín Cosoleto: mcosoleto@jarse.com.ar
E-mail: Daniel Centurion: dcenturion@jarse.com.ar
• PERU COMEXA S.A.
AVENIDA COMANDANTE ESPINAR 142,
MIRAFLORES, LIMA, PERÚ
TEL: 446-9014
Page 4

148
IO
(148IO)
SOLAR LED LANDSCAPE LIGHT ENGLISH
4.875” X 7.25” 09/22/2009
SAVE THESE INSTRUCTIONS
Page 7
©2009 Intex Marketing Ltd. - Intex Development Co. Ltd.- Intex Trading Ltd. - Intex Recreation Corp.
All rights reserved/Tous droits réservés/Todos los derechos reservados/Alle Rechte vorbehalten.
Made in China/Fabriqué en Chine/Hecho en China/Hergestellt in China.
®™ Trademarks used in some countries of the world under license from/®™ Marques utilisées dans certains pays sous licence de/Marcas registradas
utilizadas en algunos países del mundo bajo licencia de/Warenzeichen verwendet in einigen Ländern der Welt in Lizenz von/Intex Marketing Ltd. to/à/a/an
Intex Trading Ltd., Intex Development Co. Ltd., G.P.O Box 28829, Hong Kong & Intex Recreation Corp.,P.O. Box 1440, Long Beach,
CA 90801 • Distributed in the European Union by/Distribué dans l’Union Européenne par/Distribuido en la unión Europea por/Vertrieb in der Europäischen
Union durch/Intex Trading B.V., P.O. Box nr. 1075 – 4700 BB Roosendaal – The Netherlands
AREAS LOCATION AREAS LOCATION
For service questions or to order replacement parts, please contact the
appropriate office listed below or visit www.intexdevelopment.com for
answers to most frequently asked questions.
• SAUDI ARABIA
SAUDI ARABIAN MARKETING &
AGENCIES CO. LTD.
PRINCE AMIR MAJED STREET,
AL-SAFA DISTRICT. JEDDAH,
KINGDOM OF SAUDI ARABIA
TEL: 966-2-693 8496
FAX: 966-2-271 4084
E-mail: toy@samaco.com.sa
Website: www.samaco.com.sa
• AUSTRIA STEINBACH VERTRIEBSGMBH
AISTINGERSTRAßE 2
4311 SCHWERTBERG
TEL: 0820 - 200 100 200
(0,145€/min aus allen Netzen)
FAX: + 43 (7262) 61439
E-mail: service@intexcorp.at
Website: www.intexcorp.at
• CZECH REPUBLIC INTEX TRADING S.R.O.
/EASTERN EUROPE BENESOVSKA 23,
101 00 PRAHA 10,
CZECH REPUBLIC
TEL: +420-267 313 188
FAX: +420-267 312 552
E-mail: info@intexcorp.cz
• BELGIUM
N.V. SIMBA-DICKIE BELGIUM S.A.
MOESKROENSESTEENWEG 383C,
8511 AALBEKE, BELGIUM
TEL: 0800 92088
FAX: 32-56.26.05.38
E-mail: intex@nicotoy.be
E-mail: intexsupport@nicotoy.be
• DENMARK K.E. MATHIASEN A/S
SINTRUPVEJ 12, DK-8220
BRABRAND, DENMARK
TEL: +45 89 44 22 00
FAX: +45 86 24 02 39
E-mail: intex@keleg.dk
Website: www.intexnordic.com
• SWEDEN LEKSAM AB
BRANDSVIGSGATAN 6,
S-262 73 ÄNGELHOLM,
SWEDEN
TEL: +46 431 44 41 00
FAX: +46 431 190 35
E-mail: intex@leksam.se
Website: www.intexnordic.com
• NORWAY NORSTAR AS
PINDSLEVEIEN 1,
N-3221 SANDEFJORD,
NORWAY
TEL: +47 33 48 74 10
FAX: +47 33 48 74 11
E-mail: intex@norstar.no
Website: www.intexnordic.com
• FINLAND NORSTAR OY
SUOMALAISTENTIE 7,
FIN-02270 ESPOO,
FINLAND
TEL: +358 9 8190 530
FAX: +358 9 8190 5335
E-mail: info@norstar.fi
Website: www.intexnordic.com
• RUSSIA LLC BAUER
KIEVSKAYA STR., 20,
121165 MOSCOW, RUSSIA
TEL: 099-249-9400/8626/9802
FAX: 095-742-8192
E-mail: intex.russia@gmail.com
Website: www.intex.su
• POLAND KATHAY HASTER
UL. LUTYCKA 3, 60-415 POZNAN
TEL: +48 61 8498 381/380
FAX: +48 61 8474 487
E-mail: inx@kathay.com.pl
Website: www.intexpoland.pl
• HUNGARY RECONTRA LTD./RICKI LTD.
H-1113 BUDAPEST, DARÓCZI ÚT 1-3,
HUNGARY
TEL: +361 372 5200/113
FAX: +361 209 2634
E-mail: service@recontra.hu
• BRASIL
KONESUL MARKETING & SALES LTDA
RUA ANTONIO DAS CHAGAS,
1.528 - CEP. 04714-002,
CHÁCARA SANTO ANTONIO - SÃO
PAULO - SP - BRASIL
TEL: 55 (11) 5181 4646
FAX: 55 (11) 5181 4646
E-mail: sacintexbrasil@uol.com.br
• ISRAEL ALFIT TOYS LTD
MOSHAV NEHALIM,
MESHEK 32, 49950, ISRAEL
TEL: +972-3-9076666
FAX: +972-3-9076660
E-mail: michald@chagim.co.il
 Loading...