

Page 1

295
A
(295IO) SPA ENGLISH 7.5” X 10.3” PANTONE 295U 08/20/2016
English
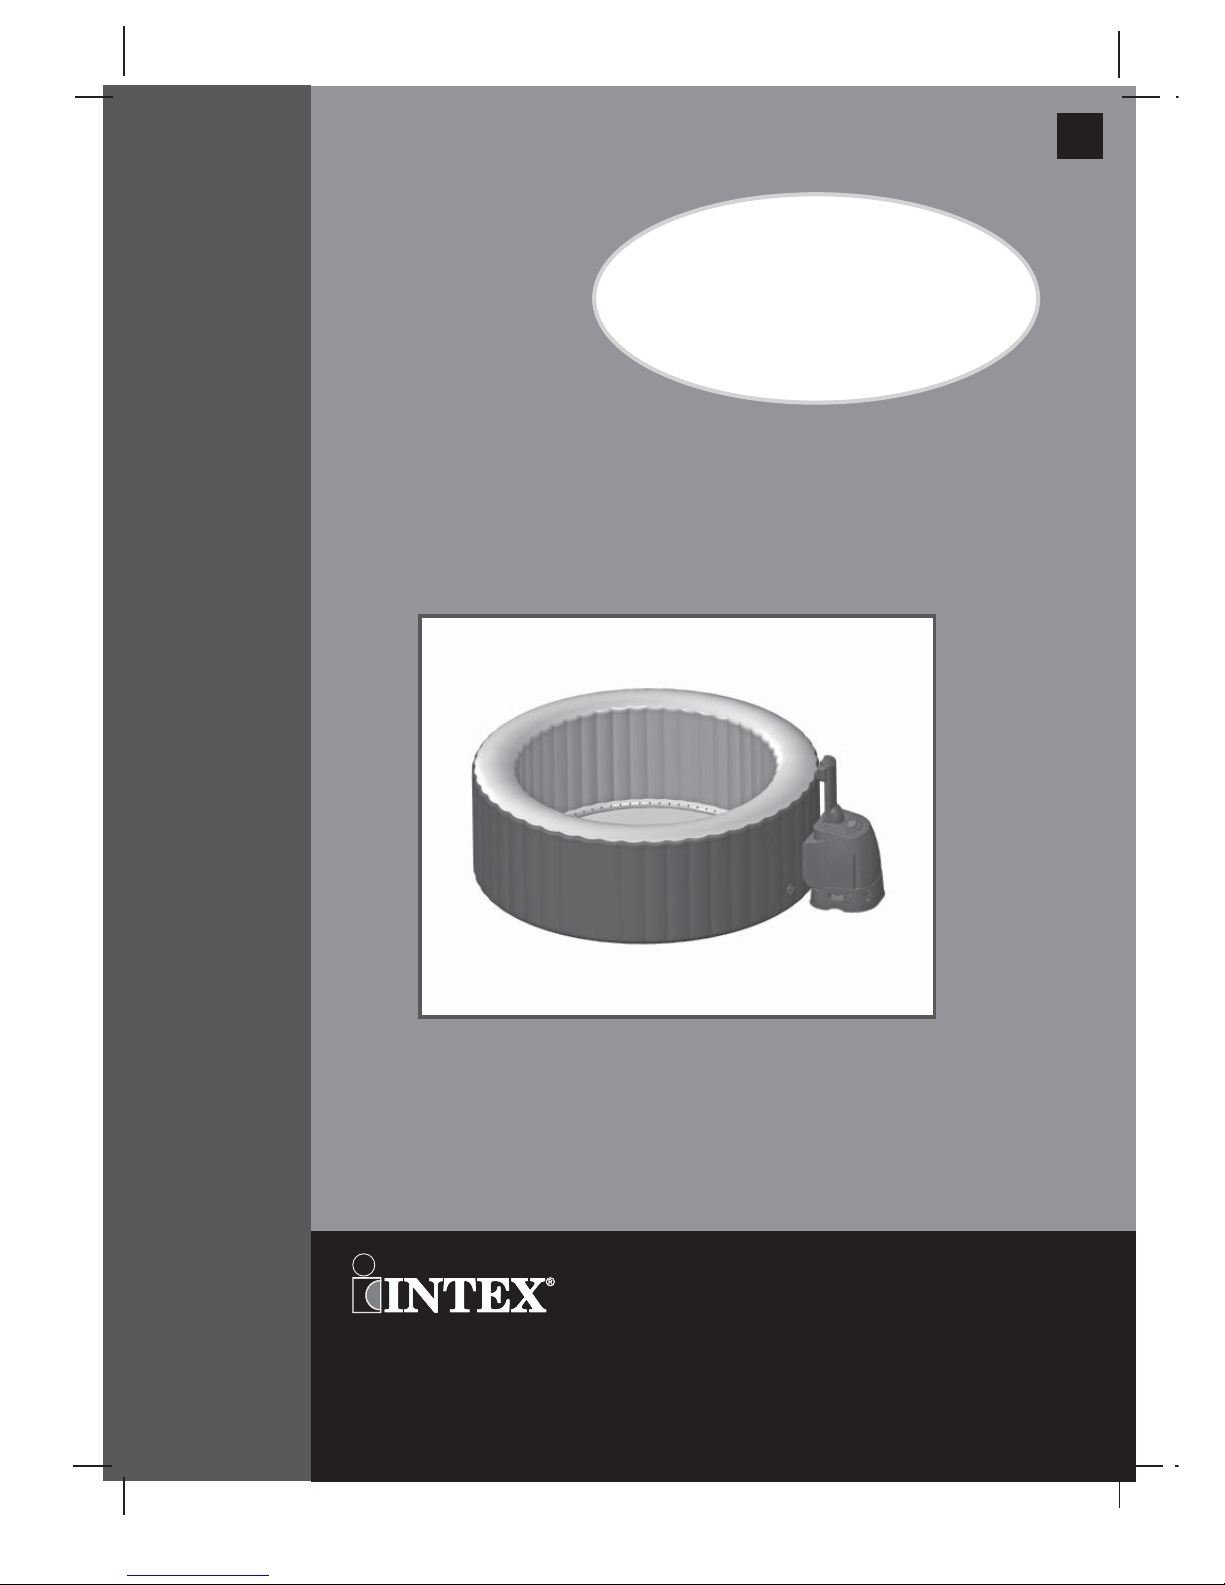
OWNER’S MANUAL
PureSpa™
SSP-H-20-1C
295-*A*-R2-1708
Do not forget to try these other fi ne Intex products: pools, pool
accessories, in-home toys, airbeds and boats available at fi ne
retailers or visit our website.
Due to a policy of continuous product improvement, Intex reserves
the right to change specifi cations and appearance, which may
result in updates to the instruction manual without notice.
For illustrative purposes only.
©2016 Intex Marketing Ltd. - Intex Development Co. Ltd. - Intex Trading Ltd.
- Intex Recreation Corp.
All rights reserved/Tous droits réservés/Todos los derechos reservados/Alle Rechte
vorbehalten. Printed in China/Imprimé en Chine/Impreso en China/Gedruckt in China.
®™ Trademarks used in some countries of the world under license from/®™ Marques utilisées dans certains pays sous licence de/
Marcas registradas utilizadas en algunos países del mundo bajo licencia de/Warenzeichen verwendet in einigen Ländern der Welt in
Lizenz von/
Intex Marketing Ltd. to/à/a/an Intex Trading Ltd., Intex Development Co. Ltd., G.P.O Box 28829, Hong Kong & Intex
Recreation Corp., P.O. Box 1440, Long Beach, CA 90801
• Distributed in the European Union by/Distribué dans l’Union Européenne
par/Distribuido en la unión Europea por/Vertrieb in der Europäischen Union durch/
Intex Trading B.V., Venneveld 9, 4705 RR
Roosendaal – The Netherlands
www.intexcorp.com
IMPORTANT
SAFETY RULES
Please read, understand, and follow all
instructions carefully before installing
and using this product. Keep for future
reference.
Page 2

295
A
S AVE THESE INSTRUCTIONS
(295IO) SPA ENGLISH 7.5” X 10.3” PANTONE 295U 08/20/2016
English
Page 2
Warning.......................................................................................... 3-5
Parts............................................................................................... 6-7
Set-up............................................................................................. 8-11
Operation....................................................................................... 12
LED Code Chart............................................................................. 13
Maintenance and Chemicals........................................................ 14-19
Storage........................................................................................... 19
Troubleshooting............................................................................ 20
Warranty......................................................................................... 21
TABLE OF CONTENTS
Page 3
295
A
S AVE THESE INSTRUCTIONS
(295IO) SPA ENGLISH 7.5” X 10.3” PANTONE 295U 08/20/2016
English
Page 3
IMPORTANT SAFETY RULES
When installing and using this electrical equipment, basic safety precautions should always be followed, including the following.
READ AND FOLLOW ALL INSTRUCTIONS
• Risk of Accidental Drowning. Extreme caution must be exercised to prevent unauthorized access
by children. To avoid accidents, ensure that children cannot use this spa unless they are
supervised at all times.
• Risk of Drowning. Inspect the spa cover regularly for leaks, premature wear and tear, damage, or
signs of deterioration. Never use a worn or damaged cover: it will not provide the level of
protection required to prevent unsupervised access to the spa by a child.
• Risk of Injury. Replace damaged cord immediately. Do not bury cord.
• Risk of Electric Shock. Do not permit any electric appliance, such as a light, telephone, radio, or
television, within 3.5 m (11.5 feet) of a spa or hot tub.
• Risk of Electric Shock. Do not use the spa when it is raining, thundering or lightning.
• The spa electrical appliance should be supplied through a residual current device (RCD) having a
rated residual operating current not exceeding 30 mA.
• The spa electrical appliance comprises a portable residual current device (PRCD) having a rated
residual operating current not exceeding 10 mA. If a leakage current of more than 10 mA is
detected, the PRCD will operate and cut-off the power supply, in such case, unplug and stop
using the spa at once. You must contact the local service center for assistance and/or repair of the
product.
• Parts containing live parts, except parts supplied with safety extra-low voltage not exceeding 12 V,
must be inaccessible to a person in the spa.
• Electrical installation shall fulfi ll the requirements of local national standards.
• Parts incorporating electrical components, except remote control devices, must be located or fi xed
so that they cannot fall into the spa.
• To reduce the risk of injury, do not permit children to use this product unless they are closely
supervised at all times.
• Children should not use spas or hot tubs without adult supervision.
• To reduce the risk of child drowning, supervise children at all times. Attach and lock spa cover after
each use.
• To reduce the risk of injury:
a) The water in a spa should never exceed 40°C (104°F). Water temperatures between 38°C (100°F)
and 40°C (104°F) are considered safe for a healthy adult. Lower water temperatures are
recommended for young children and when spa use exceeds 10 minutes.
b) Since excessive water temperatures have a high potential for causing fetal damage during the
early months of pregnancy, pregnant or possibly pregnant women should limit spa water
temperatures to 38°C (100°F).
c) Before entering a spa or hot tub, the user should measure the water temperature with an accurate
thermometer since the tolerance of water temperature-regulating devices varies.
d) The use of alcohol, drugs, or medication before or during spa use may lead to unconsciousness
with the possibility of drowning.
e) Obese persons and persons with a history of heart disease, low or high blood pressure, circulatory
system problems, or diabetes should consult a physician before using a spa.
DANGER
WARNING
Page 4
295
A
S AVE THESE INSTRUCTIONS
(295IO) SPA ENGLISH 7.5” X 10.3” PANTONE 295U 08/20/2016
English
Page 4
f) Persons using medication should consult a physician before using a spa since some medication
may induce drowsiness while other medication may affect heart rate, blood pressure, and
circulation.
g) People using medications and/or having an adverse medical history should consult a physician
before using a spa or hot tub.
h) Check with a doctor before use if pregnant, diabetic, in poor health, or under medical care.
• People with infectious diseases should not use a spa or hot tub.
• To avoid injury exercise care when entering or existing the spa or hot tub.
• Do not use drugs or alcohol before or during the use of a spa or hot tub to avoid unconsciousness
and possible drowning.
• Pregnant and possible pregnant women should consult a physician before using a spa or hot tub.
• Water temperature in excess of 38°C degree may be injurious to your health.
• Do not use a spa or hot tub immediately following strenuous exercise.
• Prolonged immersion in a spa or hot tub may be injurious to your health.
• When pregnant, soaking in hot water for long periods can harm your fetus. Measure the water
temperature before entering. Do not enter spa if water is hotter than 38°C (100°F). Do not stay in
spa for longer than 10 minutes.
• Spa heat in conjunction with alcohol, drugs, or medication can cause unconsciousness.
• Exit immediately if uncomfortable, dizzy, or sleepy. Spa heat can cause hyperthermia and
unconsciousness.
• The causes, symptoms, and effects of hyperthermia may be described as follows: Hyperthermia
occurs when the internal temperature of the body reaches a level several degrees above the
normal body temperature of 37°C (98.6°F). The symptoms of hyperthermia include an increase in
the internal temperature of the body, dizziness, lethargy, drowsiness, and fainting. The effects of
hyperthermia include failure to perceive heat; failure to recognize the need to exit spa or hot tub;
unawareness of impending hazard; fetal damage in pregnant women; physical inability to exit the
spa or hot tub; and unconsciousness resulting in the danger of drowning.
• The use of alcohol, drugs, or medication can greatly increase the risk of fatal hyperthermia in hot
tubs and spas.
• Always add chemicals to water, never add water to chemicals. Adding water to chemicals may
cause strong fumes or violent reactions and hazardous chemical spray.
• Never jump or dive into a spa or any shallow body of water.
• Assembly and disassembly by adults only.
• This appliance can be used by children aged from 8 years and above and persons with reduced
physical, sensory or mental capabilities or lack of experience and knowledge if they have been
given supervision or instruction concerning use of the appliance in a safe way and understand the
hazards involved. Children shall not play with the appliance. Cleaning and maintenance must be
performed by an adult above 18 years old, and who is familiar with the risk of electric shock.
• No part of the electrical appliance is to be located above the bath during use.
• Keep the plug of this product more than 4m away from the spa and at a height of 1.2 m at least.
• Always unplug this product from the electrical outlet before removing, cleaning, servicing or making
any adjustment to the product, and on raining days.
• Do not bury the electrical cord. Locate the cord where it will not be damaged by lawn mowers,
hedge trimmers and other equipment.
• If the supply cord is damaged, it must be replaced by the manufacturer, its service agent or similarly
qualifi ed persons in order to avoid a hazard. Use only identical replacement parts when servicing.
WARNING
Page 5
295
A
S AVE THESE INSTRUCTIONS
(295IO) SPA ENGLISH 7.5” X 10.3” PANTONE 295U 08/20/2016
English
CAUTION
• Maintain water chemistry in accordance with manufacturer’s instructions.
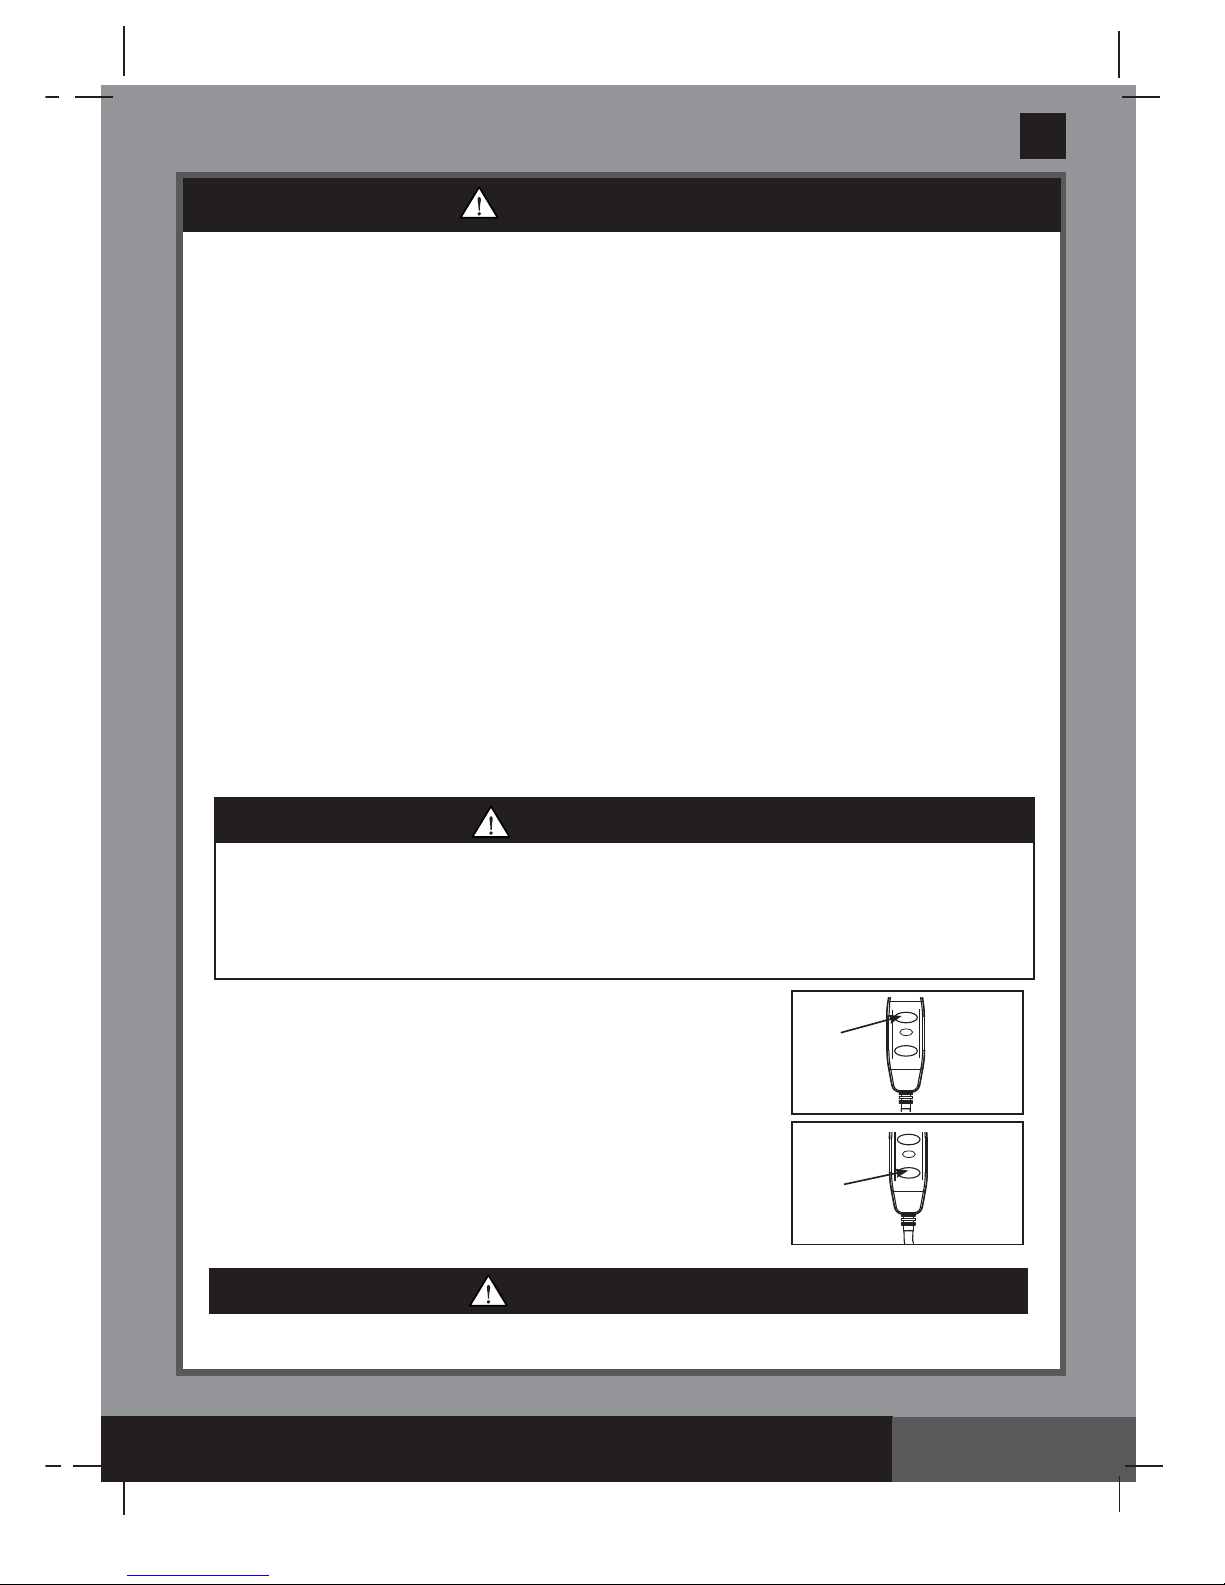
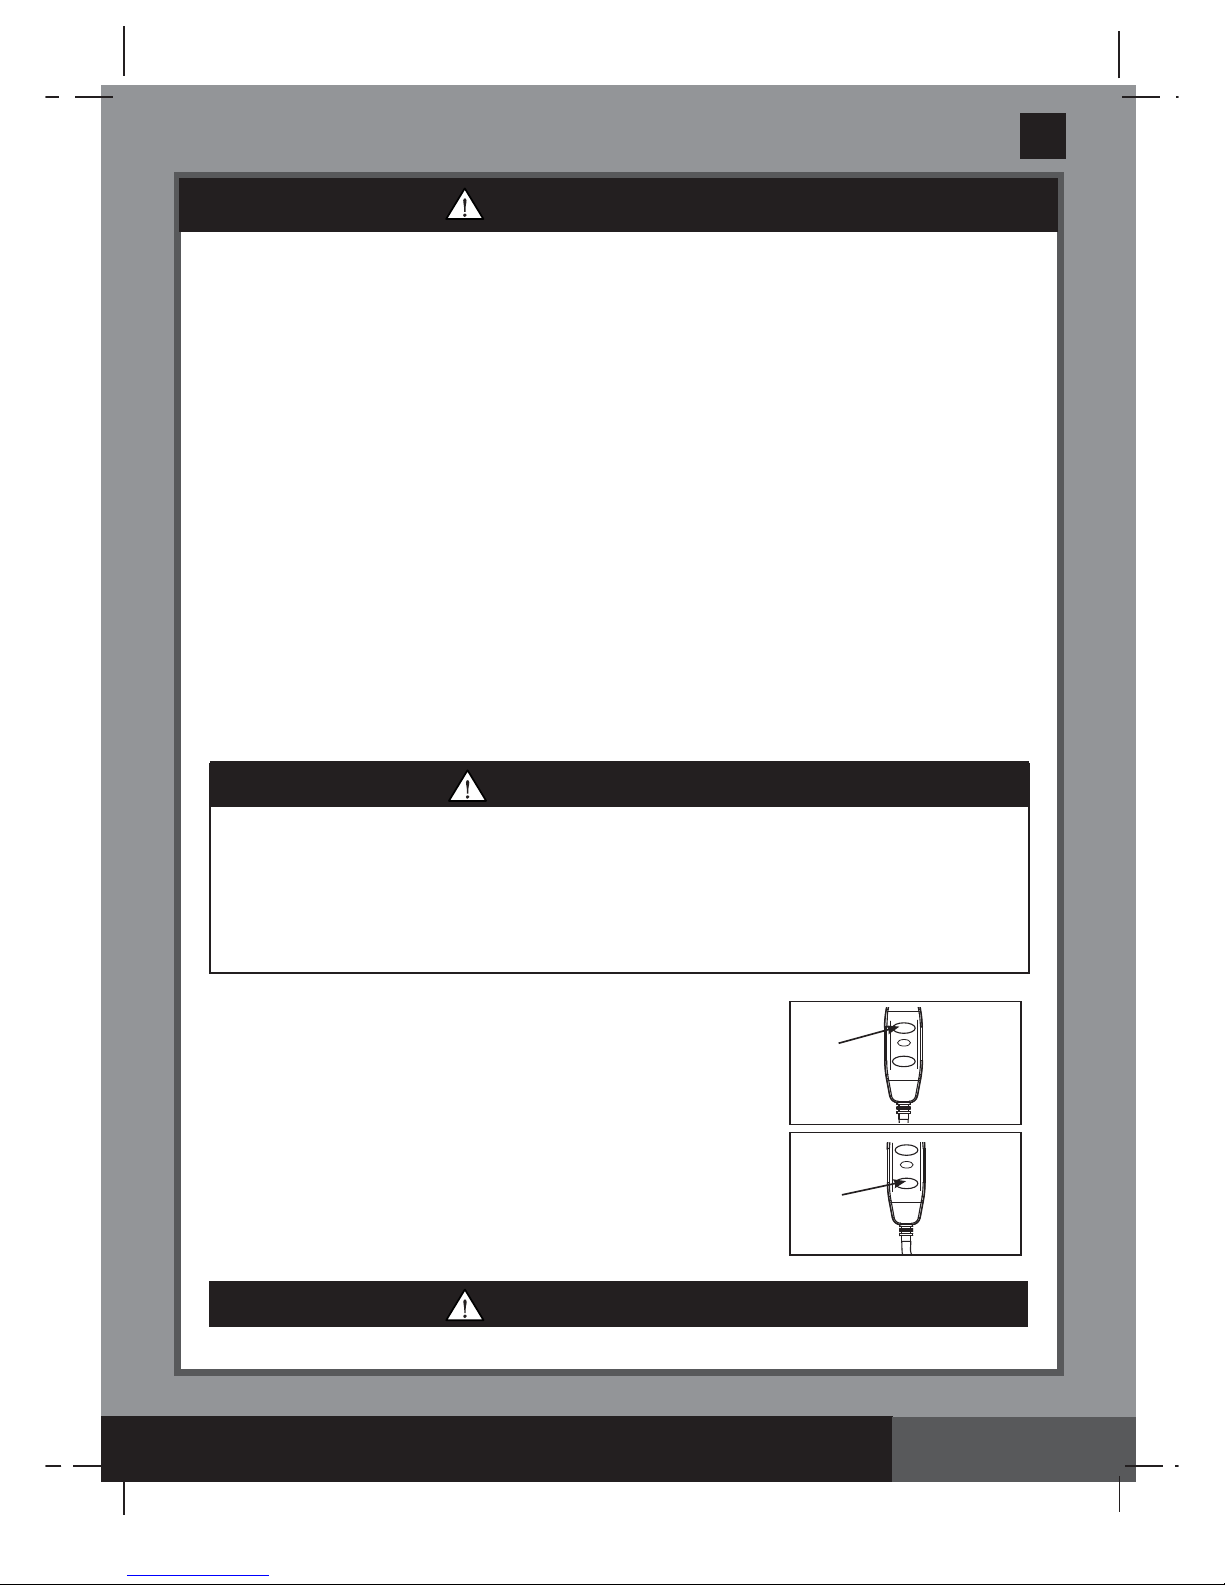
• This product is provided with a RCD located at the end of the power cord. The RCD must be
tested before each use. Do not use the spa if the RCD does not function properly. Disconnect
the power cord until the fault has been identifi ed and corrected. Contact a qualifi ed electrician to
correct the fault. Do not bypass the RCD. There are no serviceable parts inside the RCD.
Opening the RCD will void the warranty.
1.
Press the
RESET
button on the RCD.
2.
Turn on the spa electrical equipment.
3.
Press the
TEST
button on the RCD. The RCD indicator should turn
off and the electrical equipment should shut off. If the RCD indicator
does not turn off, and the electrical equipment does not shut off, the
RCD is faulty. Do not use the spa. Contact a qualifi ed electrician to
correct the fault.
4.
Press the
RESET
button on the RCD. The indicator on the RCD
should turn on. If the RCD indicator does not turn on, the RCD is
faulty. Do not use the spa. Contact a qualifi ed electrician
immediately to correct the fault.
WARNING
TEST
RESET
RESET
TEST
TEST
RESET
RESET
TEST
TEST
Page 5
• Always keep plug dry, plug in with wet plug is defi nitely forbidden!
• The plug of SPA must be directly connected only to a earthed socket-outlet from a fi xed electrical
installation.
• To reduce the risk of electric shock, do not use extension cords, timers, plug adaptors or converter
plugs to connect unit to electrical supply; provide a properly located outlet.
• Do not attempt to plug in or unplug this product while standing in water or when your hands are wet.
• Do not leave the spa empty for extended period of time. Do not expose the spa to direct sunlight for
extended period of time.
• When the appliance is not in use for long period of time, such as in the winter, the spa set should be
disassembled and stored indoor.
• Do not allow the water in the spa to freeze. Do not turn on the spa when the water is frozen.
• Do not use the spa if damaged in delivery and/or malfunctioning in any fashion. Contact the Intex
service center for further direction.
• Never use the spa alone or allow others to use the spa alone.
• Never pour water with a temperature higher than 40°C (104°F) into the spa directly.
• Keep all pets away from spa to avoid any damage.
• Do not add bath oil or bath salt to the spa water.
• The spa must be setup on a level, fl at and smooth surface that is capable of supporting the
maximum load of the fi lled spa with four adult occupants: weight 1136 kg (2500 lbs); six
adults: 1592 kg (3500 lbs).
• Provide adequate drainage system around the spa to deal with overfl ow water and splashes.
WARNING
Page 6

295
A
S AVE THESE INSTRUCTIONS
(295IO) SPA ENGLISH 7.5” X 10.3” PANTONE 295U 08/20/2016
English
Page 6
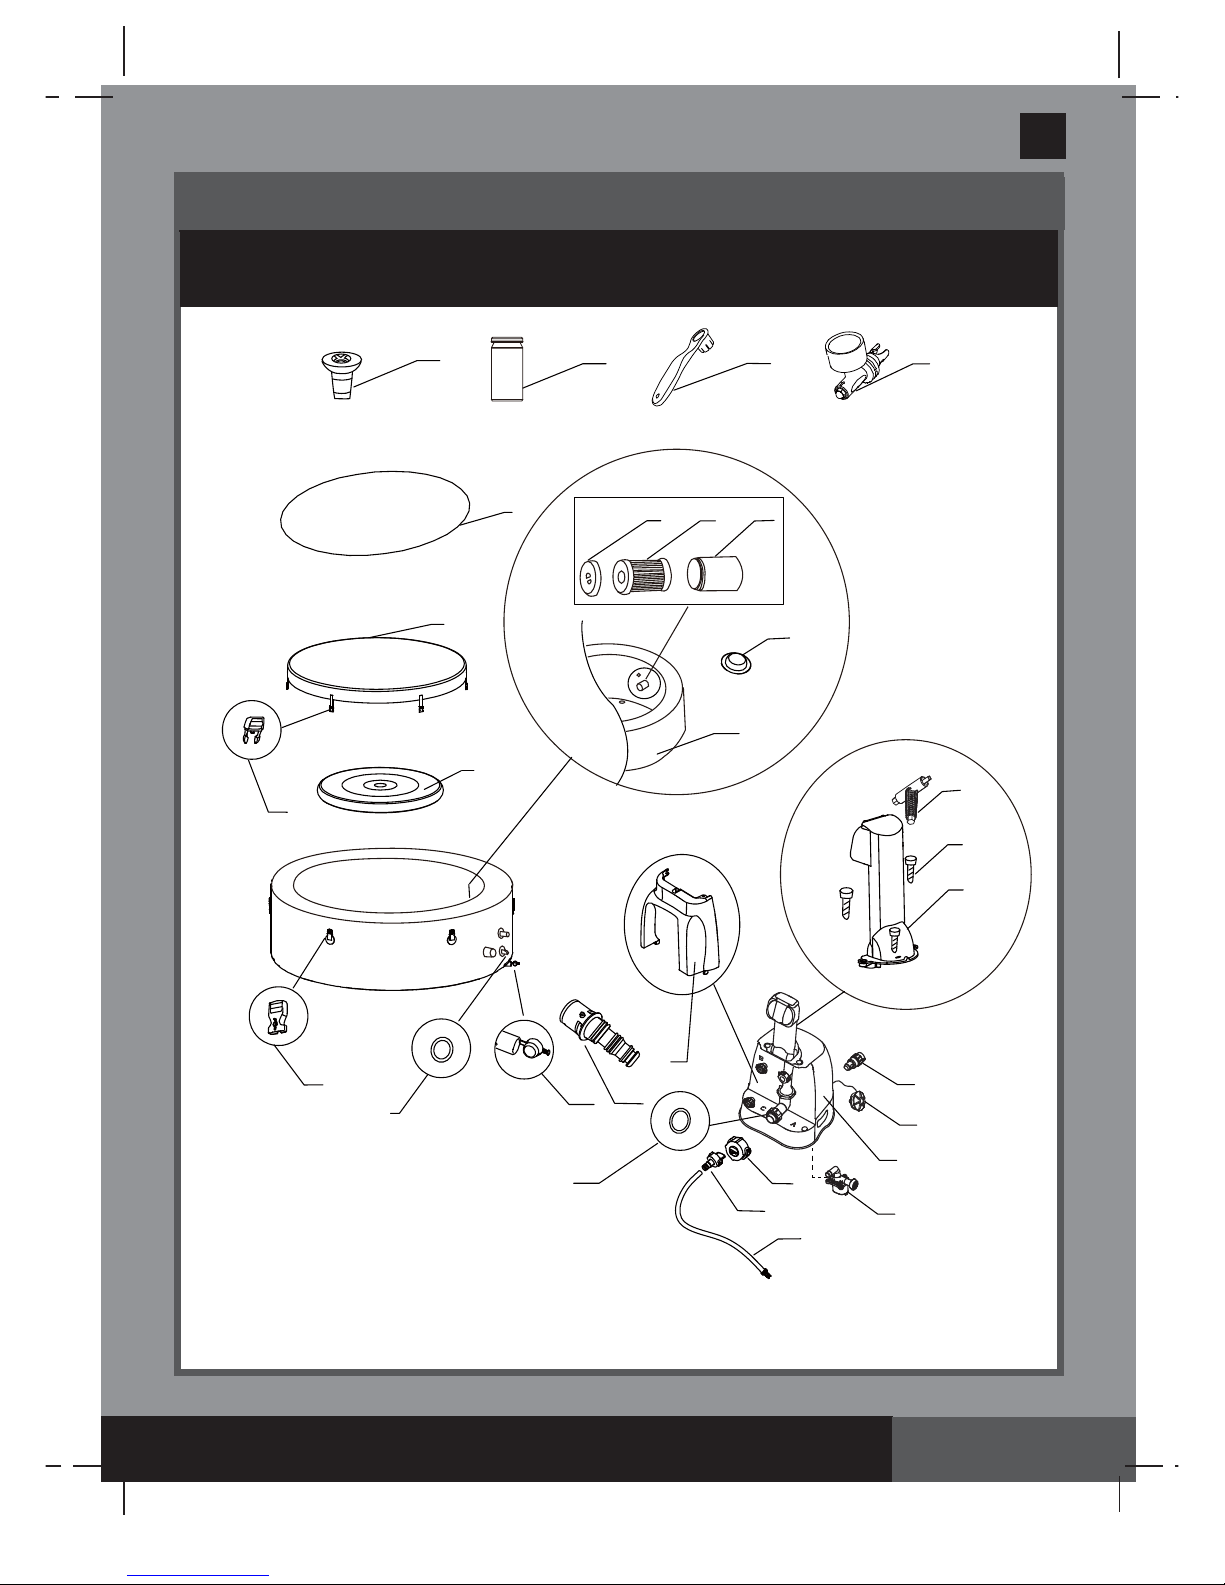
PARTS
Before assembling your product, please take a few minutes to check the contents
and become familiar with all the parts.
NOTE:
Drawings for illustration purpose only. Actual product may vary. Not to scale.
8
10
11
18
17
19
9
21
23
22
2
6
7
3
4
5
12
13
14
15
16
20
24
25
26
A
B
C
28
29
27
1
Page 7
295
A
S AVE THESE INSTRUCTIONS
(295IO) SPA ENGLISH 7.5” X 10.3” PANTONE 295U 08/20/2016
English
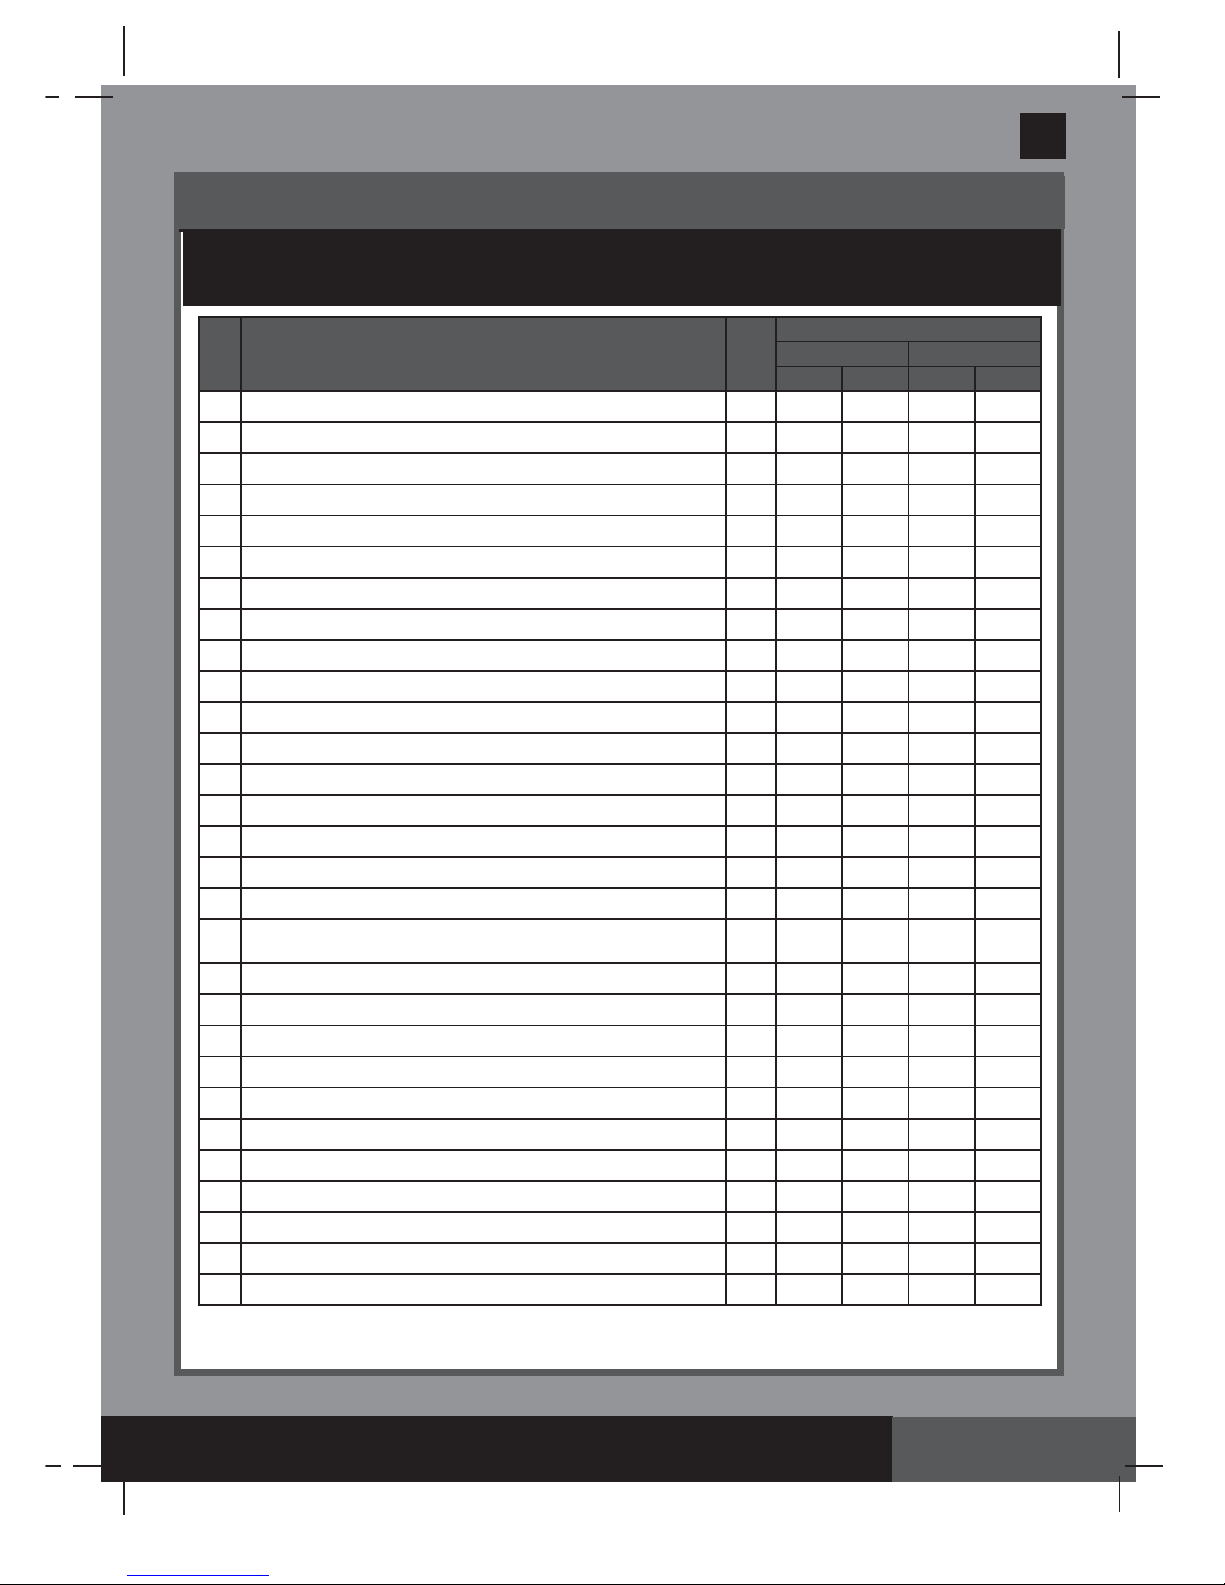
When ordering parts, be sure to quote the model number and part numbers.
PARTS (continued)
Before assembling your product, please take a few minutes to check the contents
and become familiar with all the parts.
Page 7
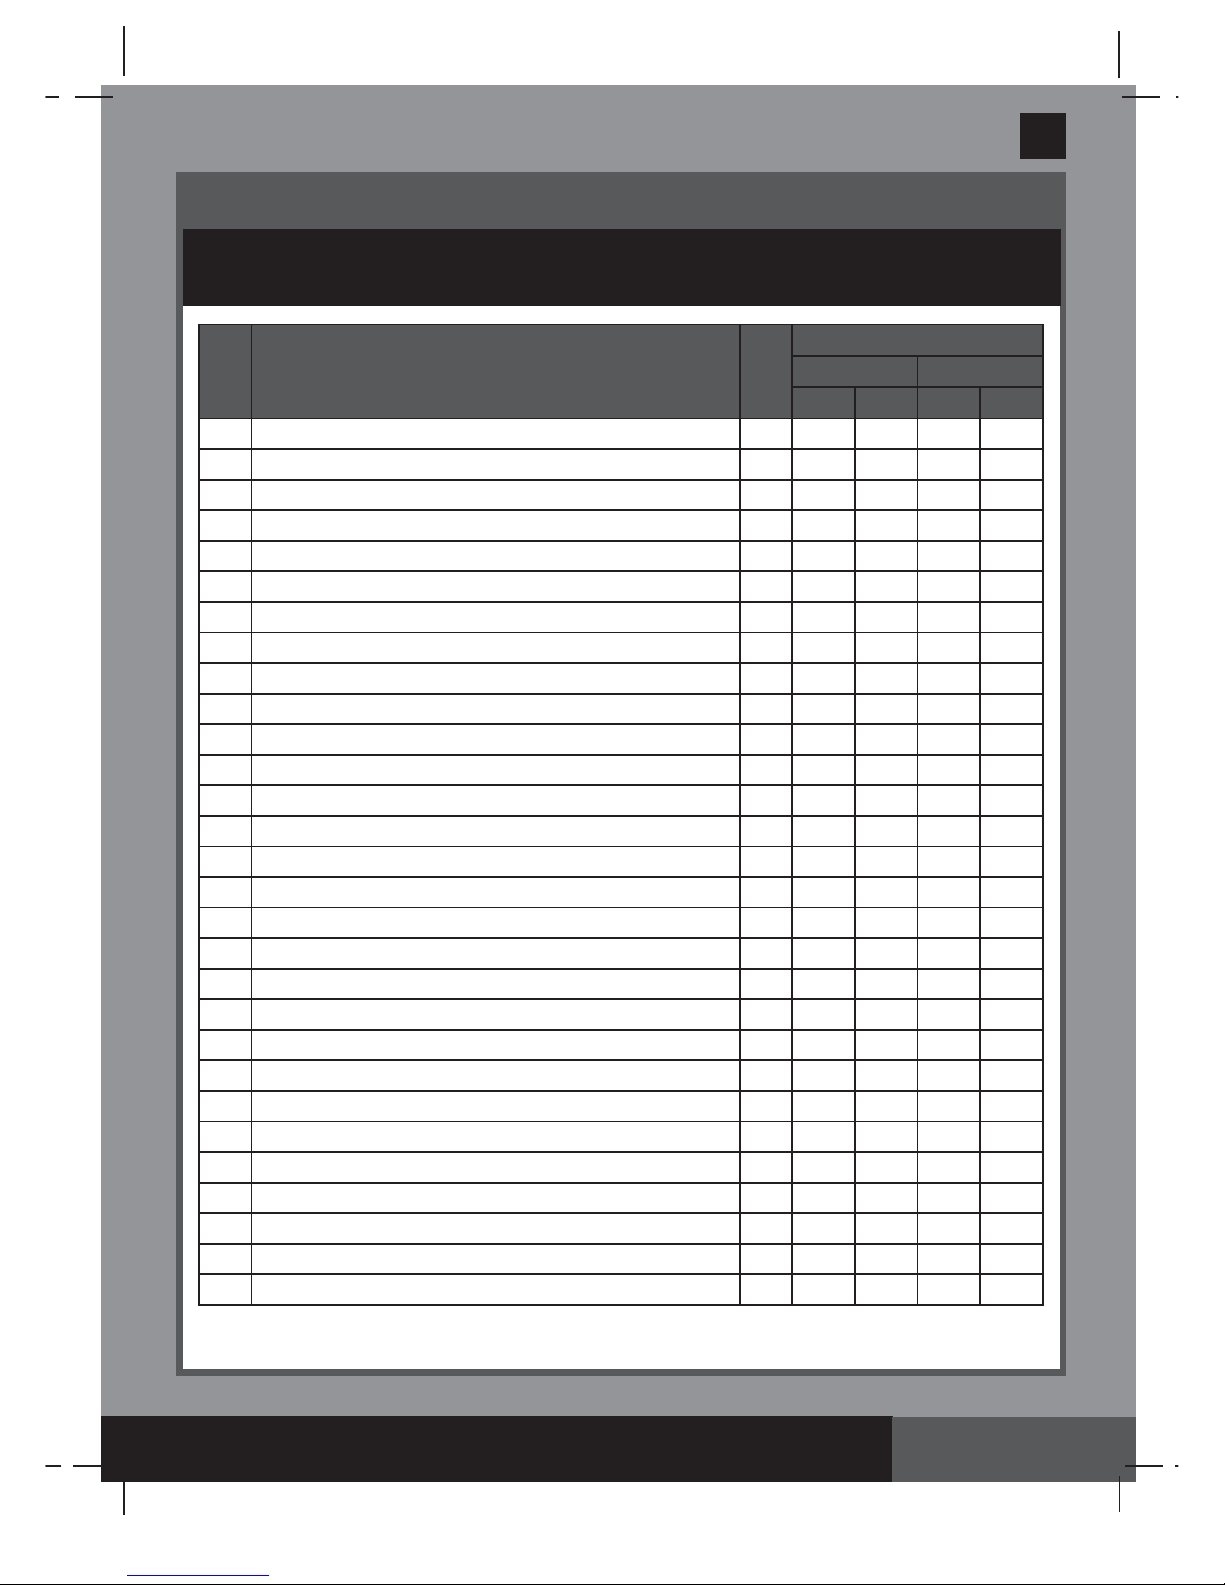
REF.
NO.
DESCRIPTION QTY.
PART NO.
4 ADULTS 6 ADULTS
28404 28406 28408 28410
1 CONTROL BASE 1 12320 12320B 12320 12320B
2 CONTROL BASE BACK COVER 1 11719 11719B 11719 11719B
3 CONTROL PANEL (INCLUDED #4) 1 11930 11930B 11930 11930B
4 CONTROL PANEL BOLT 3 11024 11024B 11024 11024B
5 CONTROL BASE INFLATION CAP 1 11831 11831B 11831 11831B
6 CONTROL PANEL BOLT WRENCH 1 11053 11053 11053 11053
7 SPA/COVER INFLATION HOSE 1 11830 11830 11830 11830
8 SPA CONTROL INLET/OUTLET O-RING 2 11699 11699 11699 11699
9 SPA CONTROL AIR INLET O-RING 1 11687 11687 11687 11687
10 SPA DRAIN PLUG 1 11696 11696B 11696 11696B
11 SPA DRAIN VALVE ADAPTOR 1 11718 11718 11718 11718
12 FILTER CARTRIDGE HOUSING 1 11798 11798 11798 11798
13 FILTER CARTRIDGE 2 11692 11692 11692 11692
14 FILTER CARTRIDGE HOUSING LID 1 11797 11797 11797 11797
15 INLET/OUTLET PLUG 3 11739 11739 11739 11739
16 SPA TUB 1 11842 12260 12106 12258
17 SPA COVER 1 11841 12261 12107 12256
18
SPA COVER INFLATABLE BLADDER (PRE-INSTALLED IN SPA COVER)
1 11689 11689 12108 12108
19 GROUND CLOTH 1 11717 11717 12109 12109
20 CHEMICAL DISPENSER 1 11614 11614 11614 11614
21 TEST STRIPS 1 11855 11855 11855 11855
22 WRENCH 1 11742 11742 11742 11742
23 PRESSURE GAUGE 1 11741 11741 11741 11741
24 INFLATION HOSE ADAPTOR 1 11829 11829 11829 11829
25 MALE BUCKLE 6 11698 11698B 11698 11698B
26 FEMALE BUCKLE 6 11799 11799B 11799 11799B
27 DEFLATION OUTLET CAP 1 11934 11934B 11934 11934B
28 DEFLATION HOSE ADAPTOR 1 11935 11935 11935 11935
29
SPA FILTER MOTOR
1 11886 11886B 11886 11886B
Page 8
295
A
S AVE THESE INSTRUCTIONS
(295IO) SPA ENGLISH 7.5” X 10.3” PANTONE 295U 08/20/2016
English
Page 8
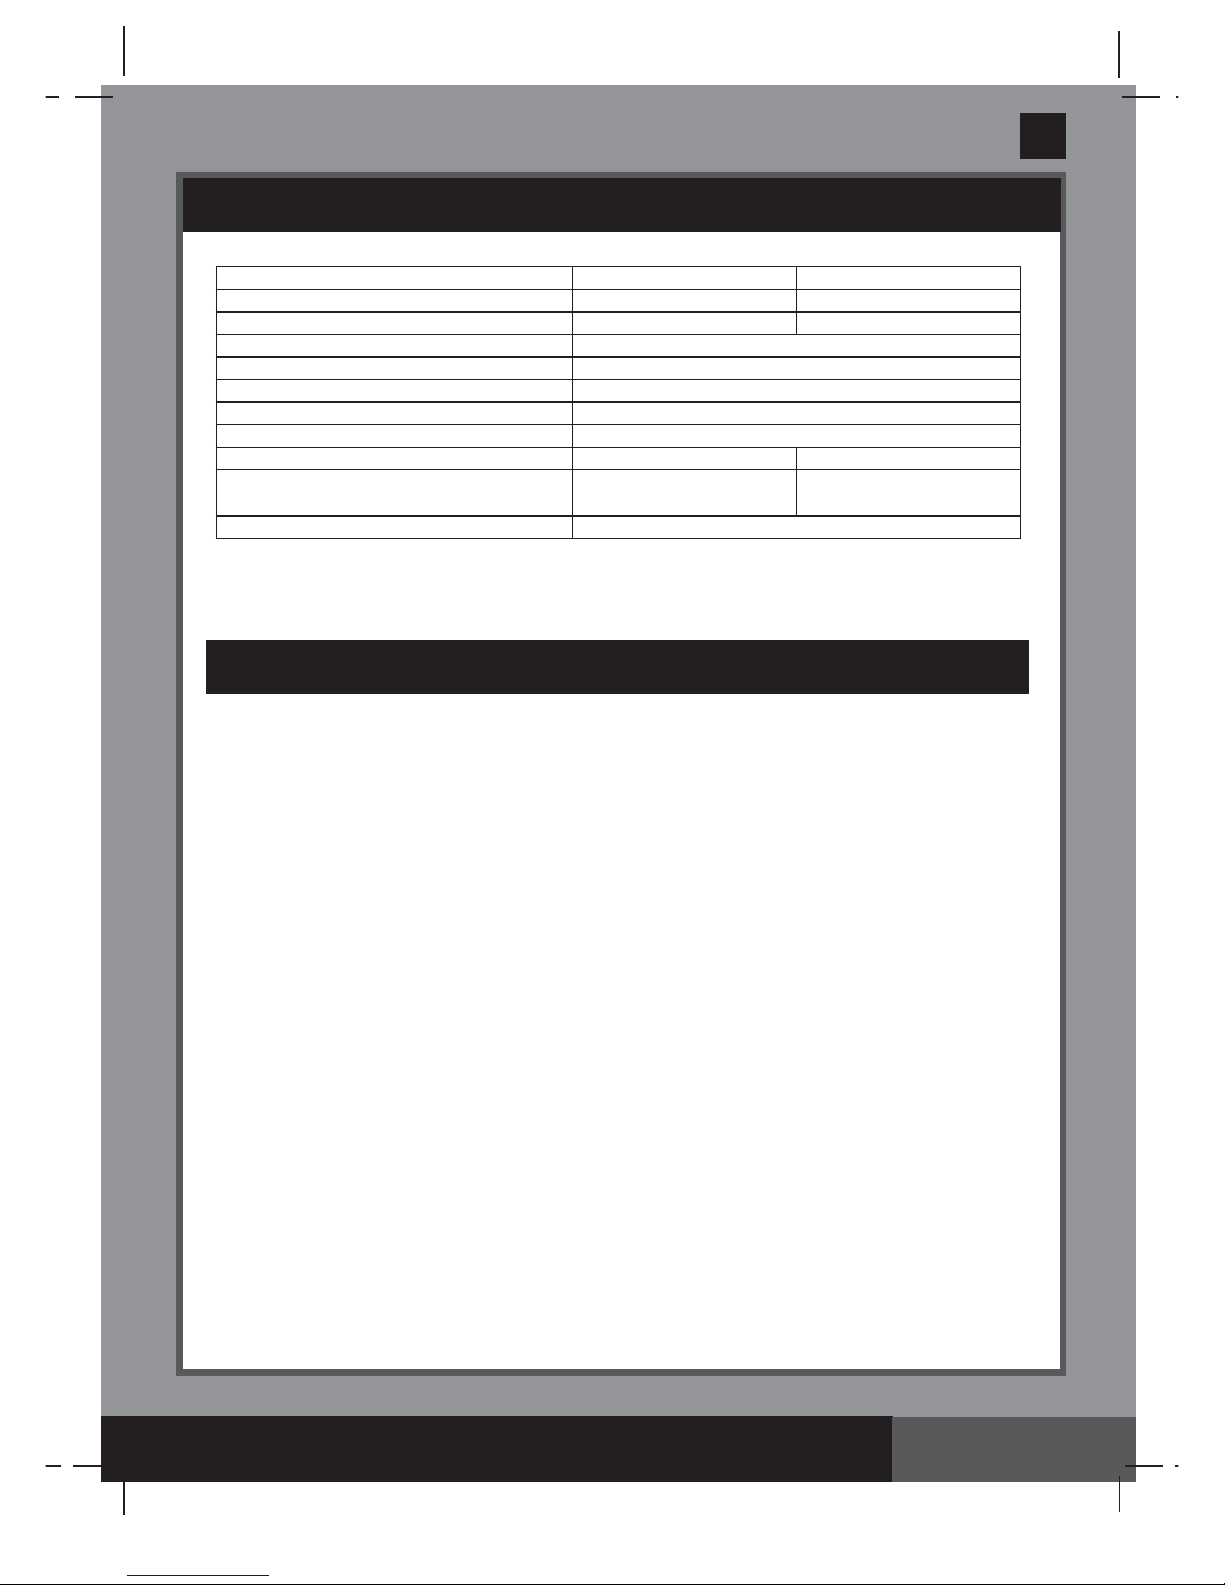
PRODUCT SPECIFICATIONS
SET UP
Cord-connected spa with pump, heater, blower, built-in hard water treatment and control panel.
This product requires a minimum of 13 Amps. If the circuit breaker trips, please check that no other
appliances or other large loads are on the same circuit as the spa.
Site preparation and requirements
• The spa can be installed indoor or outdoor. For household use only.
• Make sure the area is free of sharp objects under or around the spa.
• Provide a properly located power outlet to connect the spa and allow easy access for periodic testing of the
cord mounted RCD.
• Make sure there is enough clearance around the spa for full access to the spa equipment for maintenance
and/or service.
• The area shall facilitate draining purposes during long term spa storage.
Additional requirements for indoor installation
• Make sure the fl oor can support the full weight of the fi lled spa with the maximum number of occupants.
Check with a qualifi ed contractor or a structural engineer to verify this requirement.
• Make sure the fl oor is water resistant and non-slip surface. Do not install the spa on carpet or other
materials that will be damaged by moisture, condensation.
• Do not install the spa indoors on a second fl oor above fi nished living space due to the possibility of water
and humidity damage.
• Humidity is a natural side effect of indoor spa installation. The room shall be properly ventilated to allow
moisture to escape. Install a ventilating system to prevent excess condensation, moisture in the room.
Additional requirements for outdoor installation
• Spa owners may need to comply with local or states laws relating to childproof fencing, safety barriers,
lighting, and other safety requirements. Contact your local building code enforcement offi ce for further
details.
• Make sure the surface is level, fl at, smooth and strong enough to support the full weight of the fi lled spa.
• Do not setup the spa on grass or dirt, as this increases the amount of debris entering the spa, and damage
the spa fl oor.
•
Do not expose the spa to direct sunlight for extended period of time.
• It is possible to install and leave the spa outside at a temperature not lower than 4°C (39°F) provided the
water temperature inside the spa is higher than 4°C (39°F) and the water inside the circulation system,
pump, pipe are not frozen. Put a “temp barrier mat” between the spa fl oor and the ground to prevent heat
loss from the bottom of the spa and to provide better heat retention.
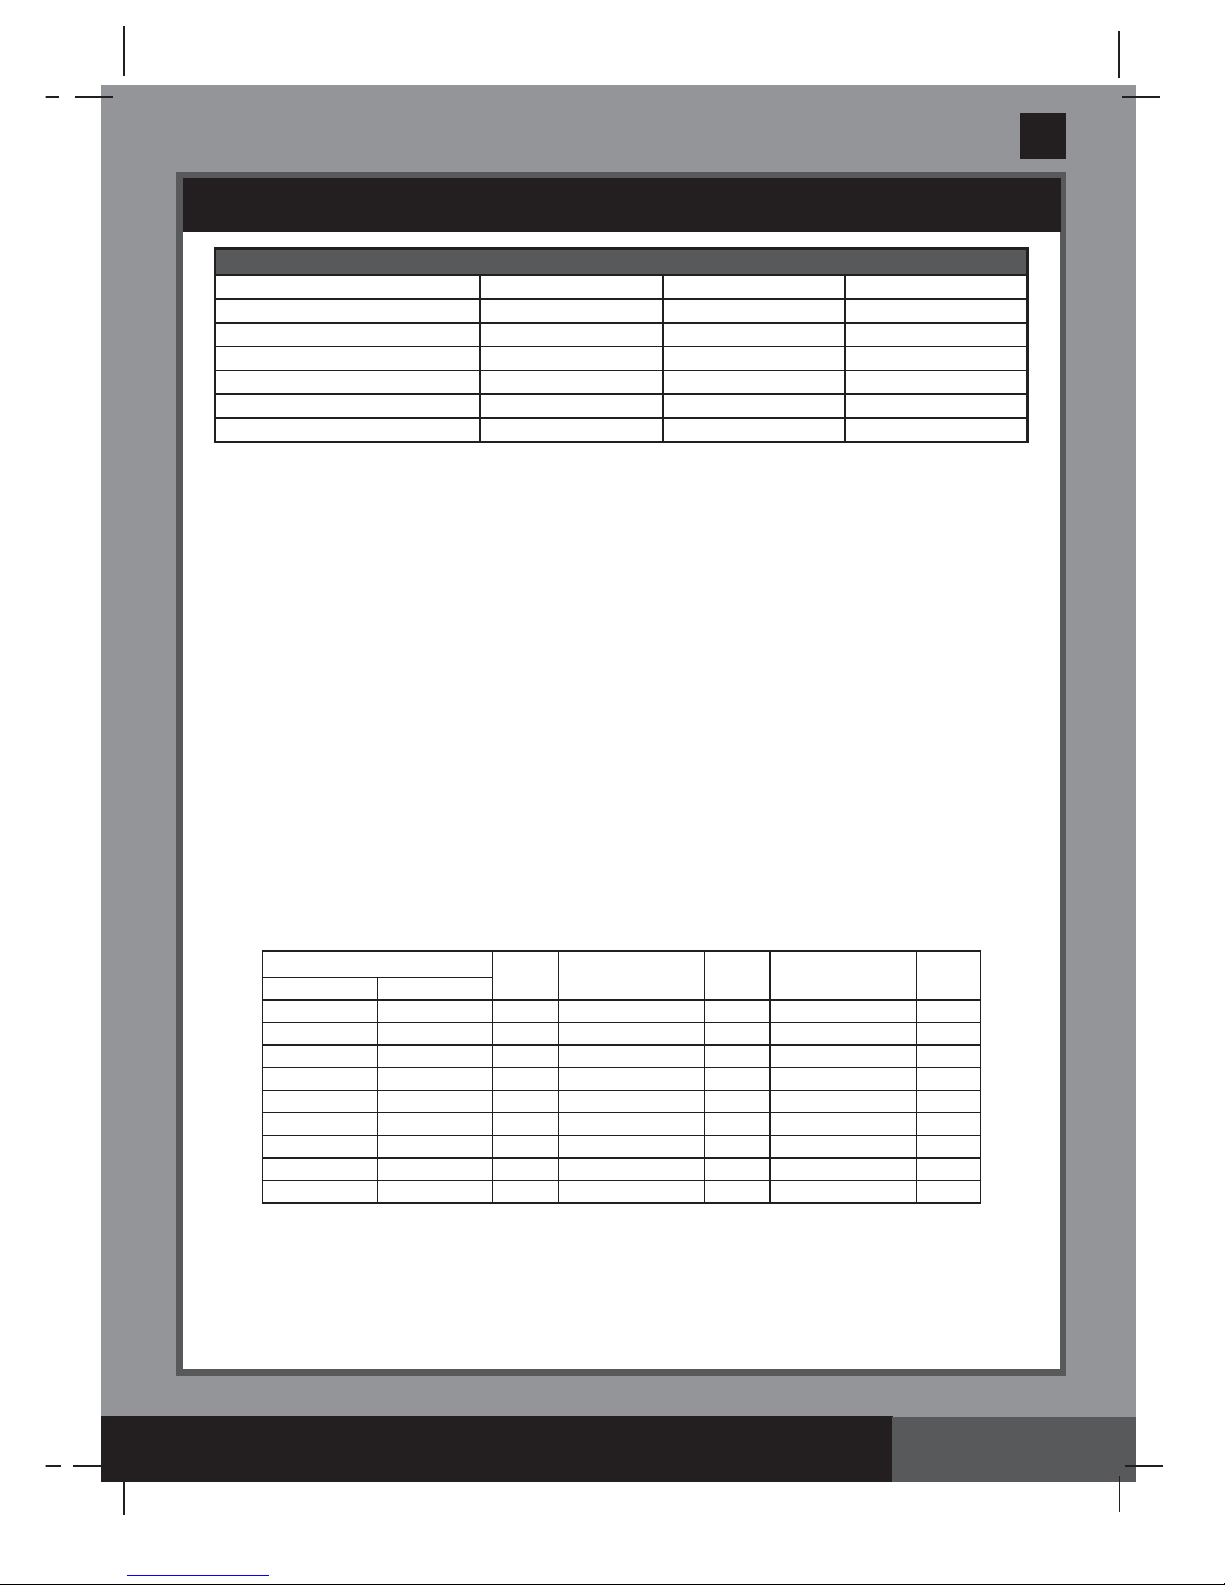
Maximum seating capacity: 4 adults 6 adults
Water capacity: 210 gal (795 L) 290 gal (1098 L)
Inner/outer diameter: 57/77 in (145/196 cm) 65/85 in (165/216 cm)
Height: 28 in (71 cm)
Bubble air blower: 1.1 HP / 220-240 V / 50 Hz
Filter pump fl ow rate: 460 gal/hr (1,741 L/hr)
Heater power: 2,200 Watts / 220-240 V / 50 Hz
Temperature range: 20ºC – 40ºC (68ºF – 104ºF)
Temperature rise: 1.5-2.5ºC/hr (3ºF – 4.5ºF/hr) 1-2ºC/hr (2ºF – 3.5ºF/hr)
Number of Bubble Jets:
120 (28404)
140 (28406)
140 (28408)
170 (28410)
Spa tub recommended working air pressure: 0.083 bar (1.2 psi)
Page 9
295
A
S AVE THESE INSTRUCTIONS
(295IO) SPA ENGLISH 7.5” X 10.3” PANTONE 295U 08/20/2016
English
SET UP (continued)
Setup the spa with at least 2 persons.
1.
Move the entire package to the selected site. Do not drag the spa tub across the ground as this can
cause damage and leakage.
Open the carton carefully as this carton can be used to store the spa during long term storage or when
not in use.
2.
Lay out all the parts on the ground and make sure all the parts are accounted for. For missing or
damaged parts contact the appropriate Intex Service Center listed in the separate “Authorized service
Centers” sheet.
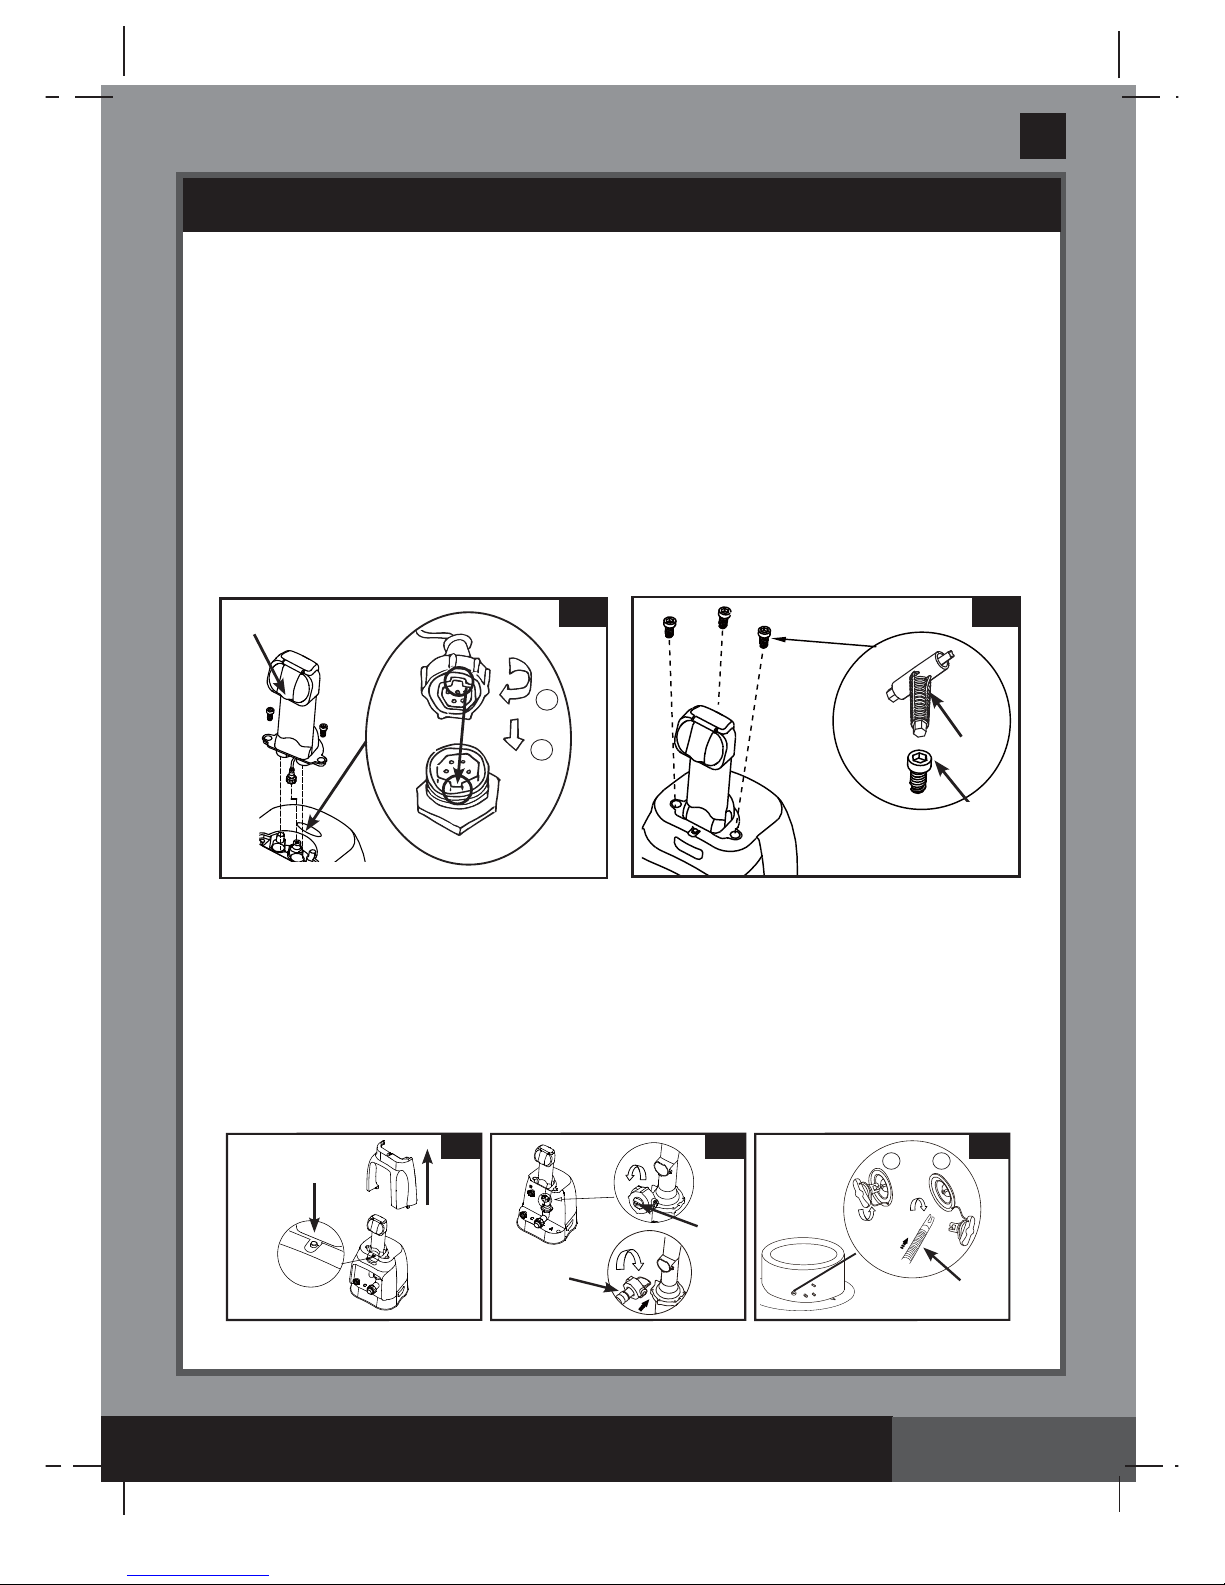
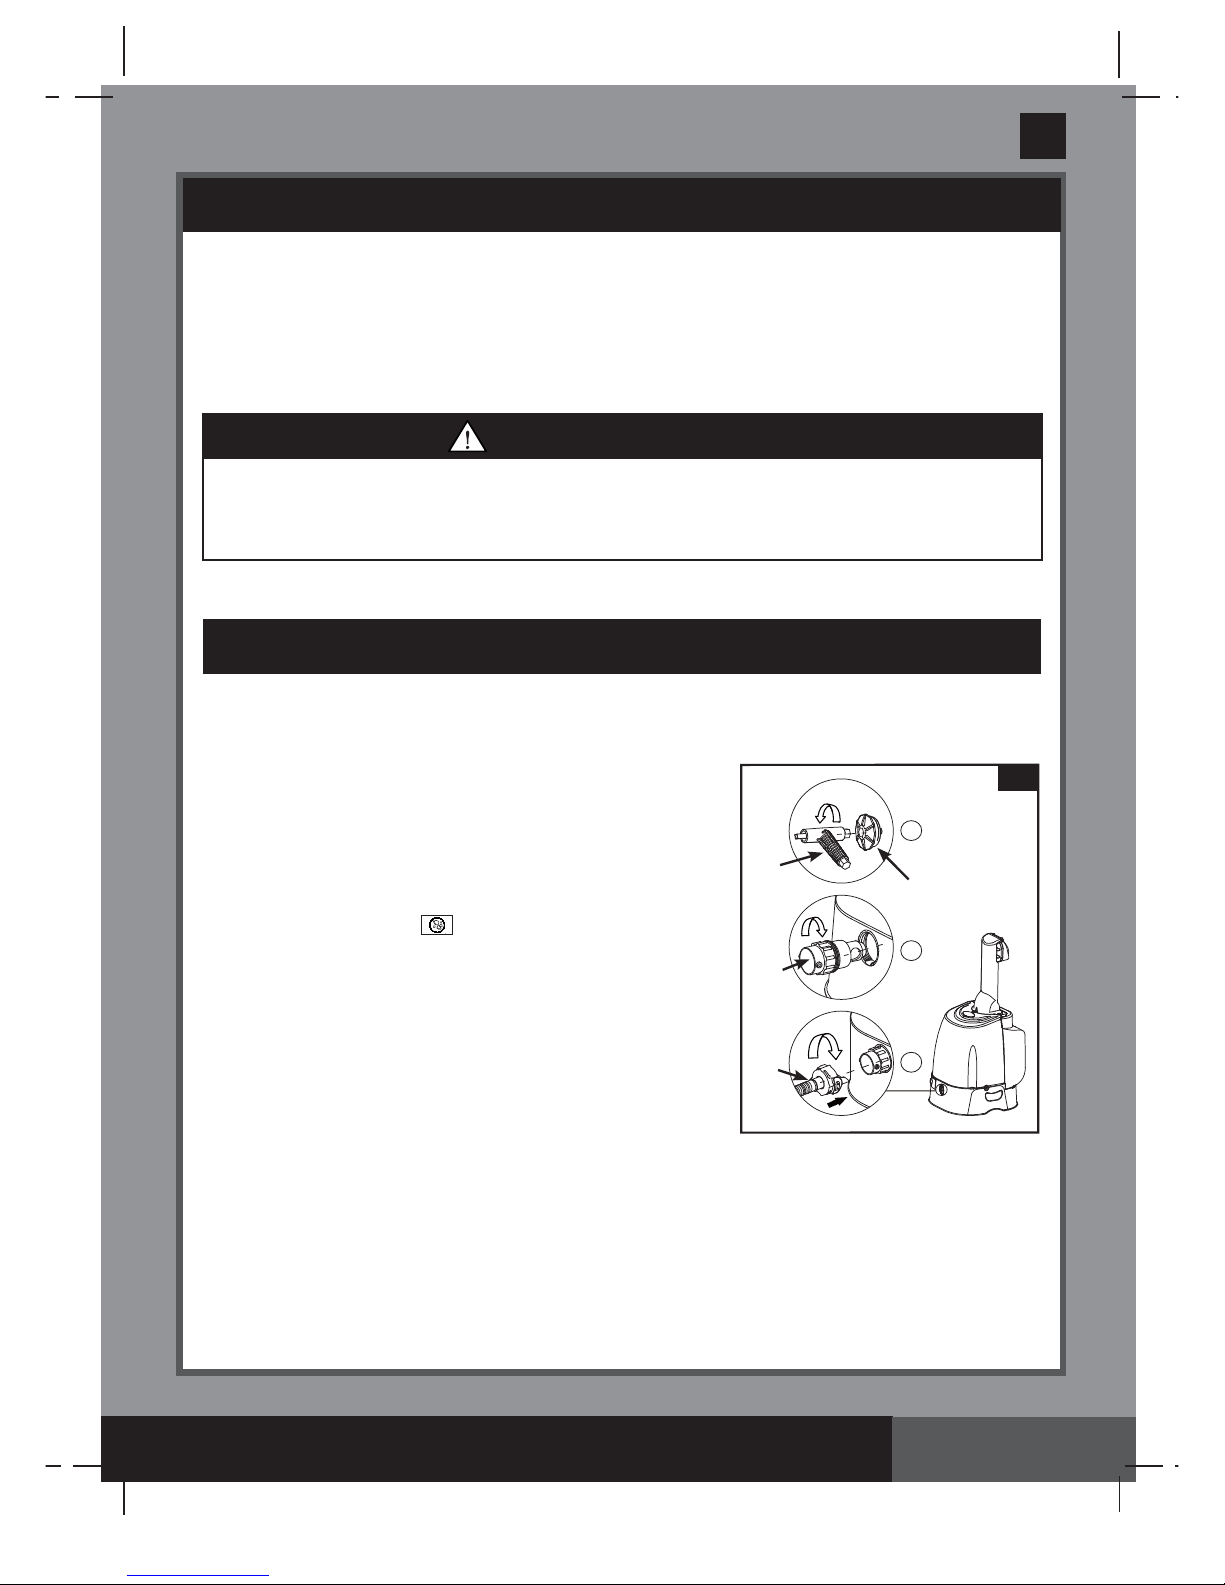
Spa Control Unit Assembly
1.
Connect the control panel
(3)
cable plug into the receptacle on top of the spa control base and screw in
the plug cover fi rmly by hand
(see drawing 1)
.
2.
Screw the control panel bolts
(4)
with the provided bolt wrench
(6)
to secure the control panel
(see
drawing 2)
.
3.
Plug the spa control unit into a electrical outlet.
Page 9
2
4
6
Infl ation
Infl ate the Spa Tub Wall
1.
Take out the ground cloth
(19)
and spread it over the cleared area. Then spread out the spa liner over
the ground cloth and point the drain valve towards a suitable draining area.
Note:
Spread the ground
cloth with the bubbles facing down over the cleared area where you intend to setup your spa.
2.
Press the button located on top of the control base and remove the back cover
(see drawing 3)
.
3.
Unscrew the control base infl ation cap
(5)
to reveal the air blower infl ation outlet, insert one end of the
infl ation hose
(7)
into the outlet and turn to the right to lock it
(see drawing 4)
.
4.
Unscrew the air valve cap to reveal the stem in the up position for infl ation. Insert the other end of the
infl ation hose
(7)
into the valve and turn to the right to lock it in position
(see drawing 5)
.
3
Press
4
5
7
5
7
1 2
1
3
1
2
Page 10
295
A
S AVE THESE INSTRUCTIONS
(295IO) SPA ENGLISH 7.5” X 10.3” PANTONE 295U 08/20/2016
English
Page 10
SET UP (continued)
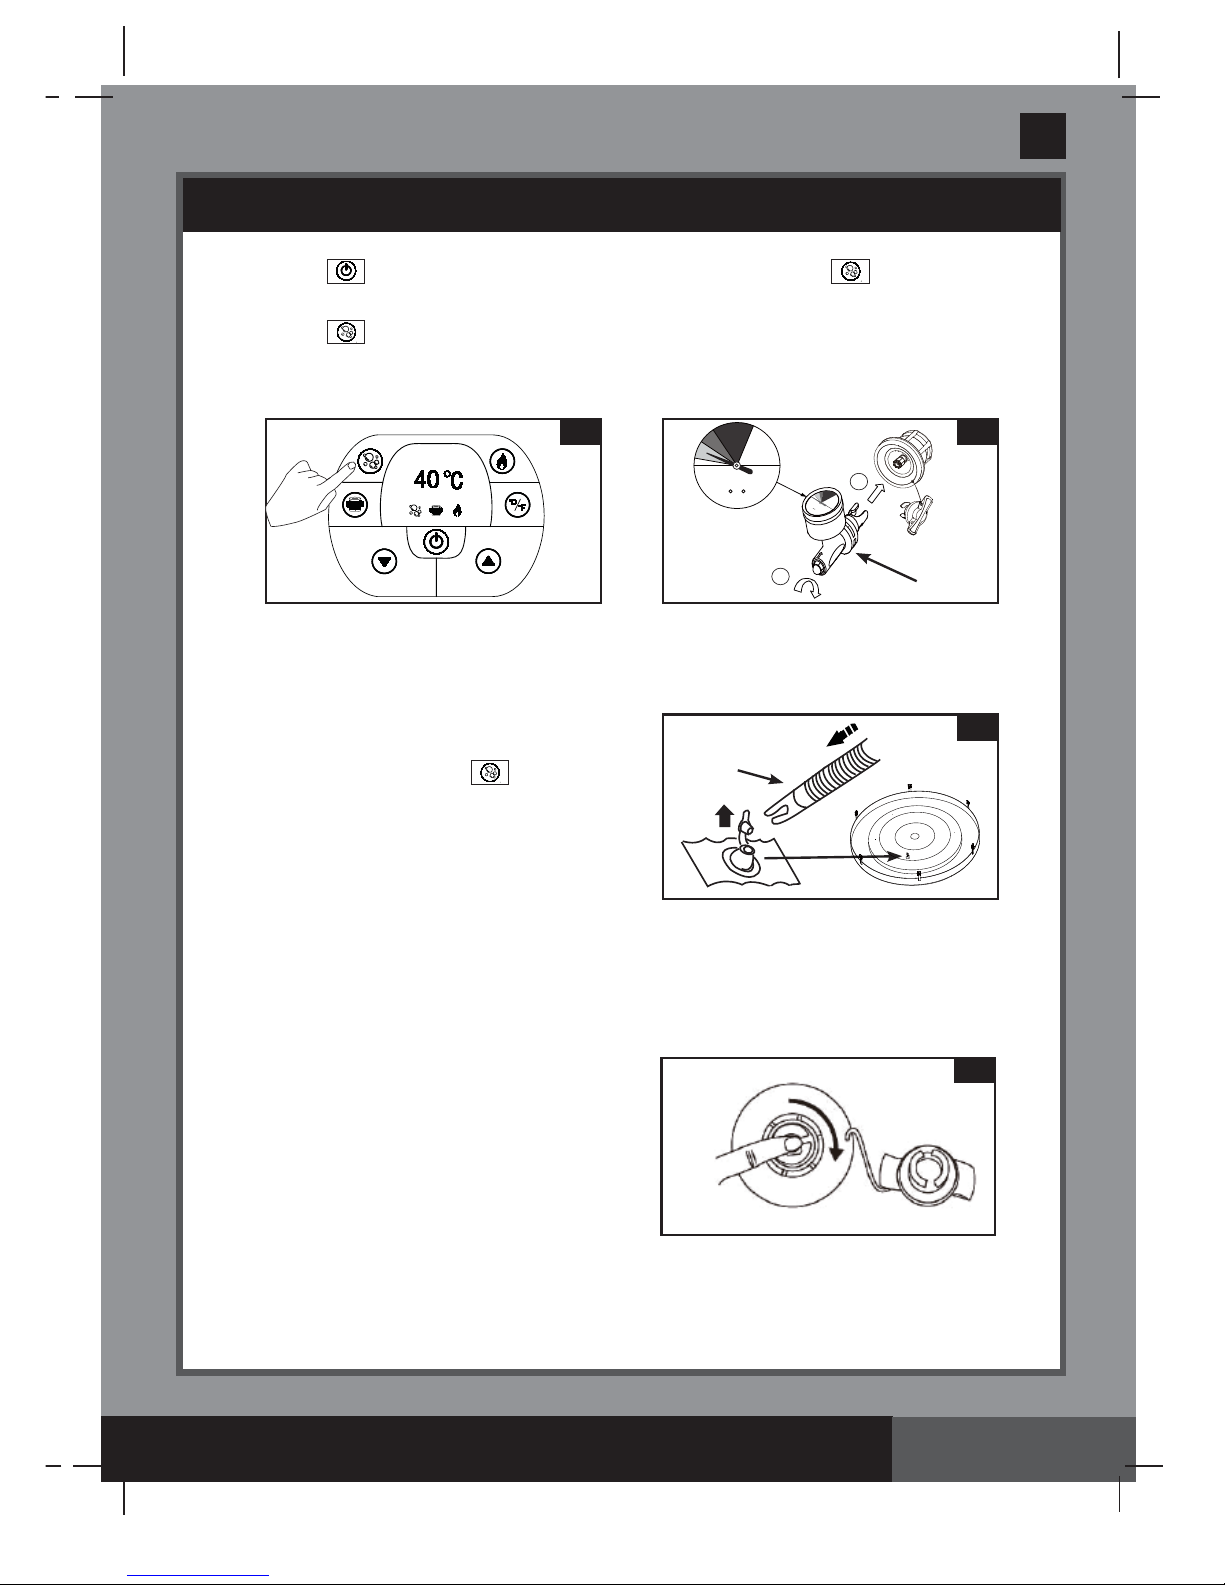
5.
Press the button to turn on the control unit panel buttons fi rst. Press the button to infl ate the
spa tub wall until it is fi rm to the touch but not hard
(see drawing 6)
.
IMPORTANT:
Do not over infl ate or use high pressure air compressor to infl ate.
6.
Press the button again to turn it off.
7.
Disconnect the infl ation hose
(7)
from the air valve and attach the pressure gauge
(23)
to the air valve.
The pressure gauge indicator should be in the green area for a properly infl ated spa tub
(see
drawing 7)
. Repeat previous steps to add more air if necessary.
8.
Replace the air valve cap back.
NOTE:
The cap is designed to be screwed on and off. Never exert force as this could cause the
complete internal infl ation system of the valve to come loose. See “Spa Tub Air Valve Fastening” for
valve maintenance.
Infl ate the Spa Cover Air Bladder
1.
Open the infl ation valve and insert the infl ation
hose
(7)
into the valve; press to infl ate
until it is fi rm to the touch but not hard
(see
drawing 8)
.
2.
Disconnect the infl ation hose
(7)
from the air
blower infl ation outlet and the valve.
3.
Replace the control base infl ation cap
(5)
back; close and recess the infl ation valve.
NOTE:
If there is a need to add some air to the spa tub wall or spa cover air bladder after they have been
setup, refer to above “Infl ate the Spa Tub Wall” and “Infl ate the Spa Cover Air Bladder” sections. The cover
air bladder is preinstalled inside the spa cover. If it needs to be reinstalled, place the uninfl ated air bladder
inside the spa cover lip before infl ating the bladder.
Defl ation
For Spa Tub Wall:
1.
Unscrew the cap to reveal the stem, push the stem in
and turn 90 degree right to secure it in the down
position
(see drawing 9)
.
2.
Once the defl ation is completed, push the stem in and
turn 90 degree left to return it to the infl ation position.
3.
Replace the cap back.
For Cover Air Bladder:
1.
Pull valve cap out and squeeze the valve at its base
until defl ated.
2.
Close and recess the valve back.
8
7
6 7
23
1
2
9
Page 11
295
A
S AVE THESE INSTRUCTIONS
(295IO) SPA ENGLISH 7.5” X 10.3” PANTONE 295U 08/20/2016
English
Page 11
SET UP (continued)
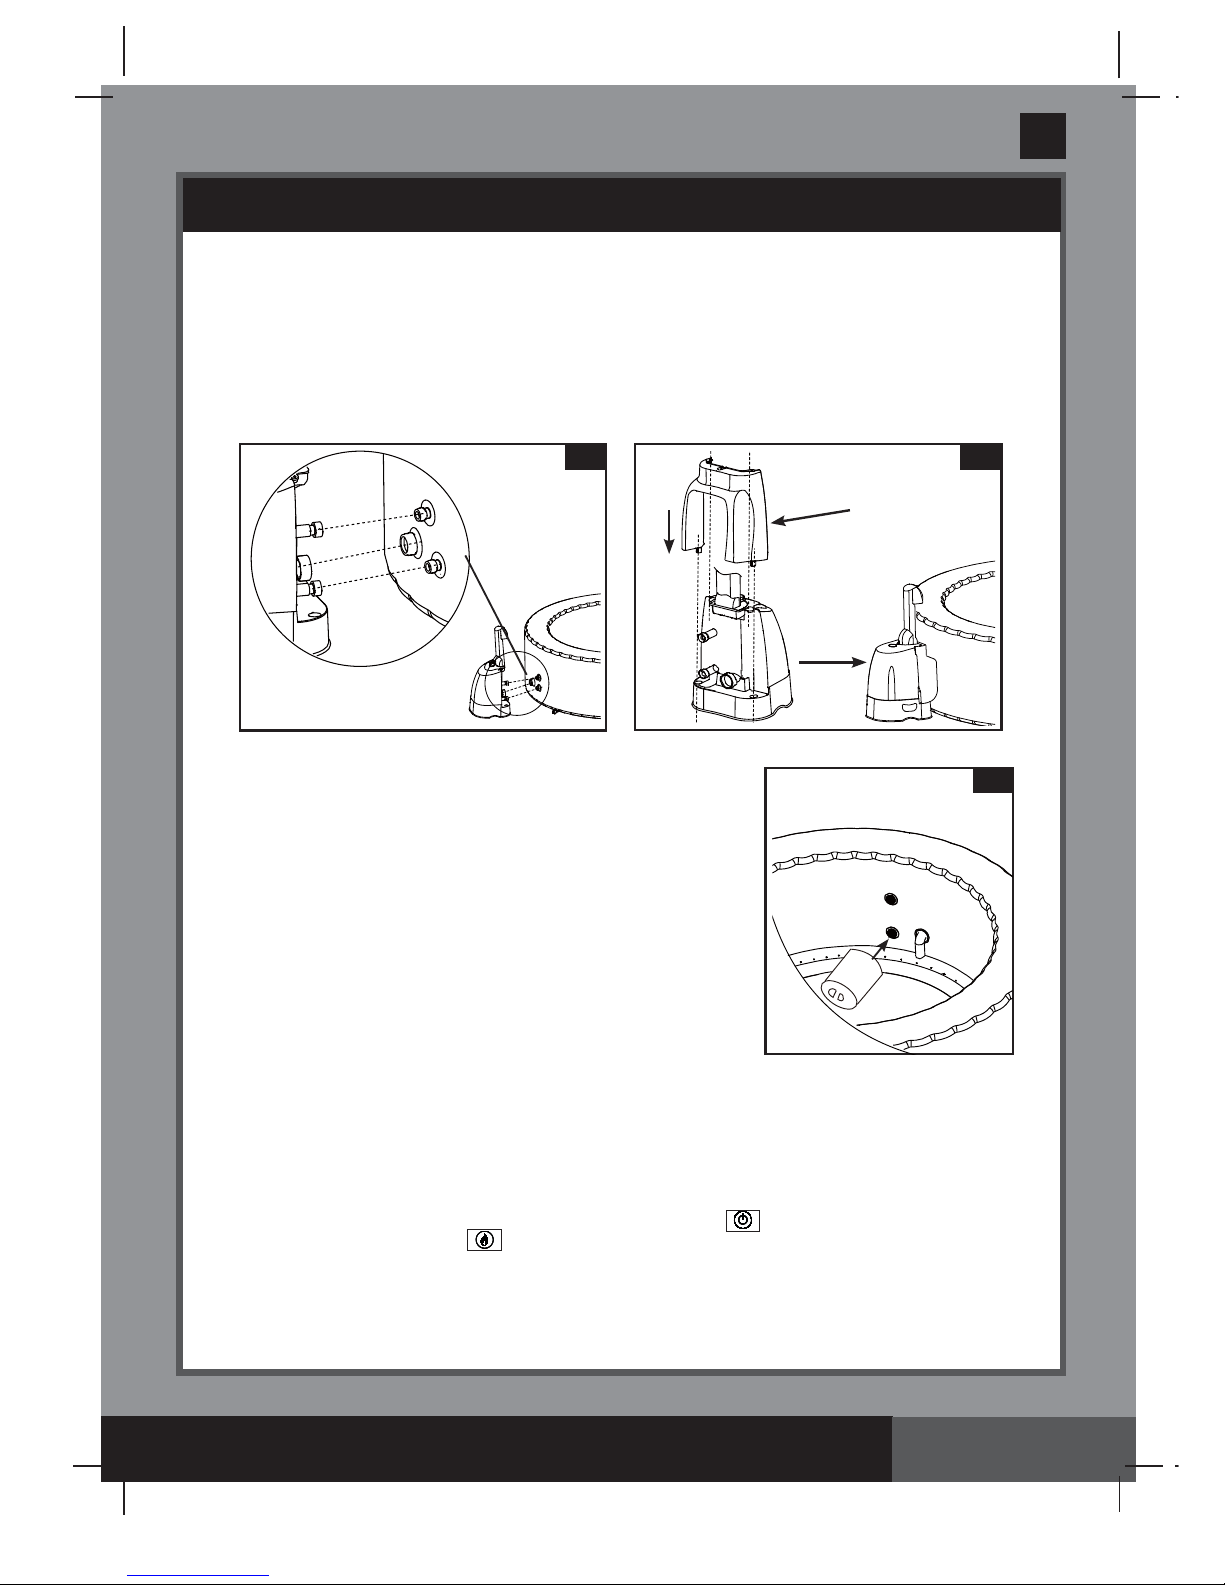
Spa Control Unit Installation
1.
Connect the spa control unit to the spa tub
(see drawing 10)
. Hand-tighten the connectors securely.
Do not use tools to tighten.
2.
Reinstall the back cover
(2)
to the spa control base
(see drawing 11).
Back cover must be installed
before using the SPA.
CAUTION:
Do not sit, lean, cover or place any objects over the spa control unit.
3.
Attach the fi lter cartridge housing assembly to the inside of the spa
tub outlet grid (lower position, marked “C”)
(see drawing 12).
Infl ate
the spa tub fi rst before installing fi lter pump fi ttings.
4.
Before fi lling with water ensure the bottom drain valve caps are
securely closed on the inside and outside.
5.
Fill the spa tub with freshwater to a level between MIN and MAX
marked on the inside of the spa wall. Do not over fi ll the spa.
Never move the spa tub with water inside and/or with the control
base attached to the spa as the spa or control base may be
damaged.
WARNING:
Never pour water with a temperature higher than
40°C (104°F) into the spa directly. It is recommended to fi ll the
spa tub with lukewarm water for quick heating and energy saving.
6.
Place the spa cover and spa air bladder (pre-installed in spa cover) over the spa tub, and make sure the
spa cover buckles are locked using the key provided after pulling the buckled straps tight.
IMPORTANT:
Inspect the spa cover regularly for leak, premature wear and tear or deterioration. Never
use a damaged spa cover.
7.
Ensure the spa is plugged into a electrical socket and press the button to turn on the control unit
panel buttons fi rst. Press the button on the control panel to activate the heater, see “Spa Control
Unit Panel” operation section.
11
2
10
A
B
C
B
C
A
12
C
Page 12

295
A
S AVE THESE INSTRUCTIONS
(295IO) SPA ENGLISH 7.5” X 10.3” PANTONE 295U 08/20/2016
English
Page 12
OPERATION
SPA CONTROL UNIT PANEL
On/Off Button:
Once the unit is plugged in, use this button to active the control unit panel
buttons. The light next to the button is green when activated. Press this button to turn off all
currently activated functions.
NOTE:
The On/Off button may appear as a black button in the center of the control panel.
Heat Button:
Use this button to activate the heating system. The pump will heat the spa water
until the water temperature reaches the set temperature. When the spa water temperature drops
1-2°C (1.8-3.6°F) below the set temperature the heating system will restart. When the fl ame icon
on the display is red, the heating system is activated. When the fl ame icon turns green, the
water is at the set temperature. The heating system is at rest and the fi ltration system will
continue working nonstop.
NOTE:
To stop the fi ltration system while the heater is at rest mode, press the fl ame button fi rst
and then the fi lter button. Pressing the fl ame button only while the heater is at rest mode will
turn off the heating system only and the fi ltration system will operate for another 24 hours before
it turns off automatically.
Celsius/Fahrenheit Toggle button:
The temperature can be displayed in either Fahrenheit or Celsius. The system’s default is
Celsius.
CAUTION:
NEVER use the spa if indicated water temperature is more than 40°C (104ºF).
Temperature Adjustment Buttons:
Pressing the Temperature Increase or Decrease
buttons will cause the LED to fl ash. When fl ashing you can adjust to the desired temperature
setting. If you hold these buttons down the values will rapidly increase or decrease. The new
and desired temperature setting will remain on the LED display for 5 seconds to confi rm the new
value.
NOTE:
The default temperature is 20°C (68°F).
NOTE:
Temperature adjustment ranges from 20°C (68°F) to 40°C (104°F).
Water Filter Button:
This button turns the fi lter pump on and off. If the heating system is activated the fi ltration
system will automatically start.
The water fi lter icon on the display is green when activated.
Bubble Button:
Use this button to activate the massage system, which has a 30-minute
auto-shutoff feature. The bubble icon on the displays is green when activated.
WARNING:
Do not run Bubble system when the cover is attached, air can accumulate
inside the spa and cause irreparable damage and bodily harm.
LED Display:
Once plugged in the LED displays the current water temperature automatically.
NOTE:
the built-in hard water treatment function works automatically in conjunction with the fi ltration system.
IMPORTANT:
The following conditions will lead to slow water heating.
• The ambient temperature is lower than 10ºC (50ºF).
• Outdoor wind speed is above 3.5-5.4 m/s (8-12 mph).
• The air bubble function is activated when heating the spa water.
• The spa is not properly covered with the spa cover when the water is heating.
A: Heat Button
B: Celsius/Fahrenheit Toggle Button
C: Temperature Increase Button
D: Temperature Decrease Button
E: Water Filter Button
F: Bubble Button
G: LED Display
H: On/Off Button
40
C
o
F
E
D
C
B
A
G
H
Page 13

295
A
S AVE THESE INSTRUCTIONS
(295IO) SPA ENGLISH 7.5” X 10.3” PANTONE 295U 08/20/2016
English
Page 13
LED CODE CHART
E90
No water fl ow
• Turn off and unplug the control unit.
• Ensure the outlet cover grid is clean and free
from obstructions.
• Clean or replace the cartridge, see
Maintenance and Storage section.
• Ensure the in/outlet connections on the spa tub
and fi lter pump are not blocked.
• Keep the spa water properly sanitized to
ensure a clean and unclogged fi lter cartridge.
• If problem persists, contact Intex Service
Center.
E94
Water temperature too low
• If the ambient temperature is below 4°C (39°F),
we recommend not to use the spa.
• Turn off and unplug the control unit, add some
warm water to raise the spa water temperature
above 5°C (41°F), then press the button to
heat up the water to the desired temperature.
• If problem persists, contact Intex Service
center.
E95
Water temperature too high
• Turn off and unplug the control unit. When the
water has cooled down, plug the RCD and
restart all over again.
• Turn the heater off, then press the fi lter and
bubble buttons to lower the water temperature.
• If problem persists, contact Intex Service
Center.
E96
System Error
• Turn off and unplug the control unit, use the
cap to stop the water from fl owing out of the
tub, disassemble and drain out the control unit.
Reassemble the control unit back to the tub.
Plug the RCD and restart all over again.
• If problem persists, contact Intex Service
Center.
E97
Dry-fi re Protection • Contact Intex Service Center.
E99
Water temperature sensor broken • Contact Intex Service Center.
END
After 72 hours of continuous
heating operation, the pump will
hibernate automatically. The rapid
heating and water fi ltration
functions are disabled.
• Press the button to re-active the
fi lter pump.
LED Reading CAUSE SOLUTION
Page 14
295
A
S AVE THESE INSTRUCTIONS
(295IO) SPA ENGLISH 7.5” X 10.3” PANTONE 295U 08/20/2016
English
Page 14
MAINTENANCE AND CHEMICALS
Water Sanitation
The spa owner must regularly check and keep the spa water sanitized with scheduled maintenance (daily, if
necessary). Adding sanitizer and other chemical will control bacteria and viruses present in the spa water.
The maintenance of a proper water balance through appropriate use of sanitizers is the single most important
factor in maximizing the life and appearance of the spa tub as well as ensuring clean, healthy and safe water.
Proper technique is important for water testing and treating the spa water. See your pool/spa professional for
chemical, sanitizer, test kits and testing procedures questions.
CATUTION:
ALWAYS FOLLOW THE CHEMICAL MANUFACTURER’S DIRECTIONS, AND THE
HEALTH AND HAZARD WARNINGS.
Do not add chemicals if the spa is occupied. This can cause skin or eye irritation.
Concentrated chlorine
solutions can damage the spa tub. In no event is Intex Recreation Corp., Intex Development Co. Ltd., their
related companies, authorized agents and service centers, retailers or employees liable to the buyer or any other
party for costs associated with the loss of spa water, chemicals or water damage.
Maintenance of Spa Water and Cartridge
Protect all the spa occupants from possible water-related illnesses by keeping the spa water clean and sanitized.
Always practice good hygiene. To ensure proper spa water quality follow these procedures:
1.
Inspect and clean the fi lter cartridge every day, and change the fi lter
cartridge every 3 days.
a.
Unscrew the cartridge housing assembly from the spa tub wall and
remove the cartridge
(see drawing 13)
.
b.
Use a garden hose to rinse off the cartridge. If the cartridge remains
soiled and discolored it should be replaced. Keep spare cartridges
on hand.
c.
Reinstall the clean cartridge back into the cartridge housing and
replace the cartridge housing assembly back onto the spa tub wall.
2.
Change the spa water every 3 days. See “Spa Tub Drainage” and “Spa
Tub Cleaning” sections for details.
3.
Use spa chemicals to maintain proper water chemistry. Spa damage
resulting from misuse of chemicals and mismanagement of spa water
is not covered by the warranty.
4.
All occupants must shower before entering the spa.
Water Chemistry Balance
Maintain the spa water pH level between 7.2 and 7.8, total alkalinity level between 80 and 120 ppm and free
chlorine level between 2 to 4 ppm. Use the included test strips to test the spa water chemistry before each use
of the spa and continue to test the water no less than once a week.
The Test Strips can test the “Free Chlorine”, “pH”, “Total Alkalinity” and “Calcium Hardness” levels at the same
time:
1.
Dip the entire strip into the water and remove immediately.
2.
Hold the strip level for 15 seconds. Do not shake excess water from the strip.
3.
Compare the strip pad to the color chart on the packaging label. If necessary, adjust the chemical level
in the pool water.
NOTE:
Check the expiry date of the test kit as the test results may be inaccurate if the kit is used after that date.
Low pH will damage the spa tub and pump. Damage resulting from chemical imbalance is not covered by the
warranty.
Use the included chemical fl oater dispenser to administer chlorine [chemical tablet size: less than 1” (2.5 cm)
diameter] into the spa water. Add 1 tablet into the dispenser. Always follow the chemical manufacturer’s
directions. Remove the chemical fl oater dispenser when the spa is in use.
Never let chlorine come in contact with the spa tub if it is not completely dissolved.
IMPORTANT:
Press the button on the spa control panel to turn on the bubble air blower and help dissolve
the chemicals into the water.
Never mix chemicals together. Add the chemicals to the spa water separately. Thoroughly dissolve each
chemical before adding another one to the water.
WARNING
Always unplug this product from the electrical outlet before removing, cleaning, servicing or
making any adjustment to the product.
13
14
12
13
Page 15
295
A
S AVE THESE INSTRUCTIONS
(295IO) SPA ENGLISH 7.5” X 10.3” PANTONE 295U 08/20/2016
English
SPA WATER CHEMISTRY AND BALANCE
Preferred Water Chemistry Reading
Minimum Ideal Maximum
Free Chlorine
2 ppm 2 - 4 ppm 5 ppm
pH
7.2 7.2 - 7.6 7.8
Total Alkalinity (TA)
60 ppm 80 ppm 120 ppm
Calcium Hardness (CaCO
3
)
100 ppm 150–250 ppm 350 ppm
Saturation Index (SI)
–0.3 0 +0.3
Water Temperature
20ºC / 68ºF 20–40ºC / 68–104ºF 40ºC / 104ºF
Free chlorine:
is the chlorine residual present in the spa water.
Result if too low – Inadequate level of disinfection.
Result if too high – cause odor problem, skin & eye irritation, corroded metals and other materials.
pH:
a value that indicates how acidic or basic the spa water is.
Result if too low – Corroded metals, eye & skin irritation, and destruction of total alkalinity.
Result if too high – Scale formation, cloudy water, shorter fi lter/heater runs, eye & skin irritation, poor chlorine
effi ciency.
Total Alkalinity (TA):
indicates the degree of the water’s resistance to pH change. It determines the speed
and ease of pH change, so always adjust total alkalinity before adjusting the pH level.
Result if too low – Corroded metals, eye & skin irritation. Low alkalinity will cause the pH to be unstable.
Result if too high – Scale formation, cloudy water, shorter fi lter/heater runs, eye & skin irritation, high chlorine
demand.
Calcium Hardness (CaCO
3
):
refers to the amount of calcium and magnesium dissolved in the water.
Result if too low – Diffi culty balancing water, corrosion of metal components, eye & skin irritation and water
foaming.
Result if too high – Scale formation, cloudy water, eye & skin irritation, diffi culty balancing water and fi lter/
heater ineffi ciency.
Saturation Index (SI):
temperature, calcium hardness concentration, total alkalinity and pH represent the
main factors infl uencing scale formation. The tendency of water to either form scale or corrode is indicated by
the Saturation Index (SI):
SI = pH+TF+CF+AF-12.1
*Where: TF = Temperature Factor; CF = Calcium Hardness Factor; AF = Total Alkalinity Factor
Water Temperature
TF
Calcium
Hardness (ppm)
CF
Total
Alkalinity (ppm)
AF
(ºC) (ºF)
8 46 0.2 75 1.5 50 1.7
12 54 0.3 100 1.6 75 1.9
16 61 0.4 150 1.8 100 2.0
19 66 0.5 200 1.9 150 2.2
24 75 0.6 250 2.0 200 2.3
29 84 0.7 300 2.1 300 2.5
34 93 0.8 400 2.2 400 2.6
40 104 0.9 500 2.3 -- --
-- -- -- 1000 2.6 -- --
Test the water pH, Temperature, Calcium Hardness and Total Alkalinity levels. Use the equivalent Factors in
the SI equation.
SI = 0, Balance
If SI > 0, Scaling or cloudy water condition.
If SI < 0, Corrosive to metals or eye & skin irritating condition.
The SI is considered satisfactory if the value is within -0.3 to +0.3 range. Zero being perfect.
Page 15
Page 16
295
A
S AVE THESE INSTRUCTIONS
(295IO) SPA ENGLISH 7.5” X 10.3” PANTONE 295U 08/20/2016
English
SPA WATER CHEMISTRY AND BALANCE (continued)
SPA Water Adjustment
How to adjust the spa water chemistry when the levels are off the range.
CAUTION:
Always follow the chemical manufacturer’s directions, and the health and hazard warnings.
Total Alkalinity (TA) Adjustment
Remove the spa cover to aerate the water and use the included test strips to check the chemistry level.
Ensure the chlorine level in the water is between 2-4 ppm fi rst, as chlorine will affect the TA test result.
If the TA level (and not the pH) is higher than 120 ppm, to lower the TA level, you add muriatic acid (hydrochloric
acid) or sodium bisulfate.
If the TA level is lower than 60 ppm, you add sodium bicarbonate.
For example (for 4 adults), if the TA level is 180 ppm, the desired decrease is 60 ppm, from below chart, you
need to add 0.269 Lb (121 g) of sodium bisulfate or 0.101 qt (96 ml) of muriatic acid.
If the test strip color is between 180 ppm and 240 ppm, and close to 180 ppm, you can also add 0.269 Lb
(121 g) of sodium bisulfate or 0.101 qt (96 ml) of muriatic acid.
If the reading is more than 240 ppm, you can add sodium bisulfate or muriatic acid to the water drop by drop
until the test strip indicates a 240 ppm reading, then add 0.528 Lb (238 g) of sodium bisulfate or 0.202 qt
(192 ml) of muriatic acid.
NOTE:
After adjustment, retest the water after 24 hours and adjust again if necessary.
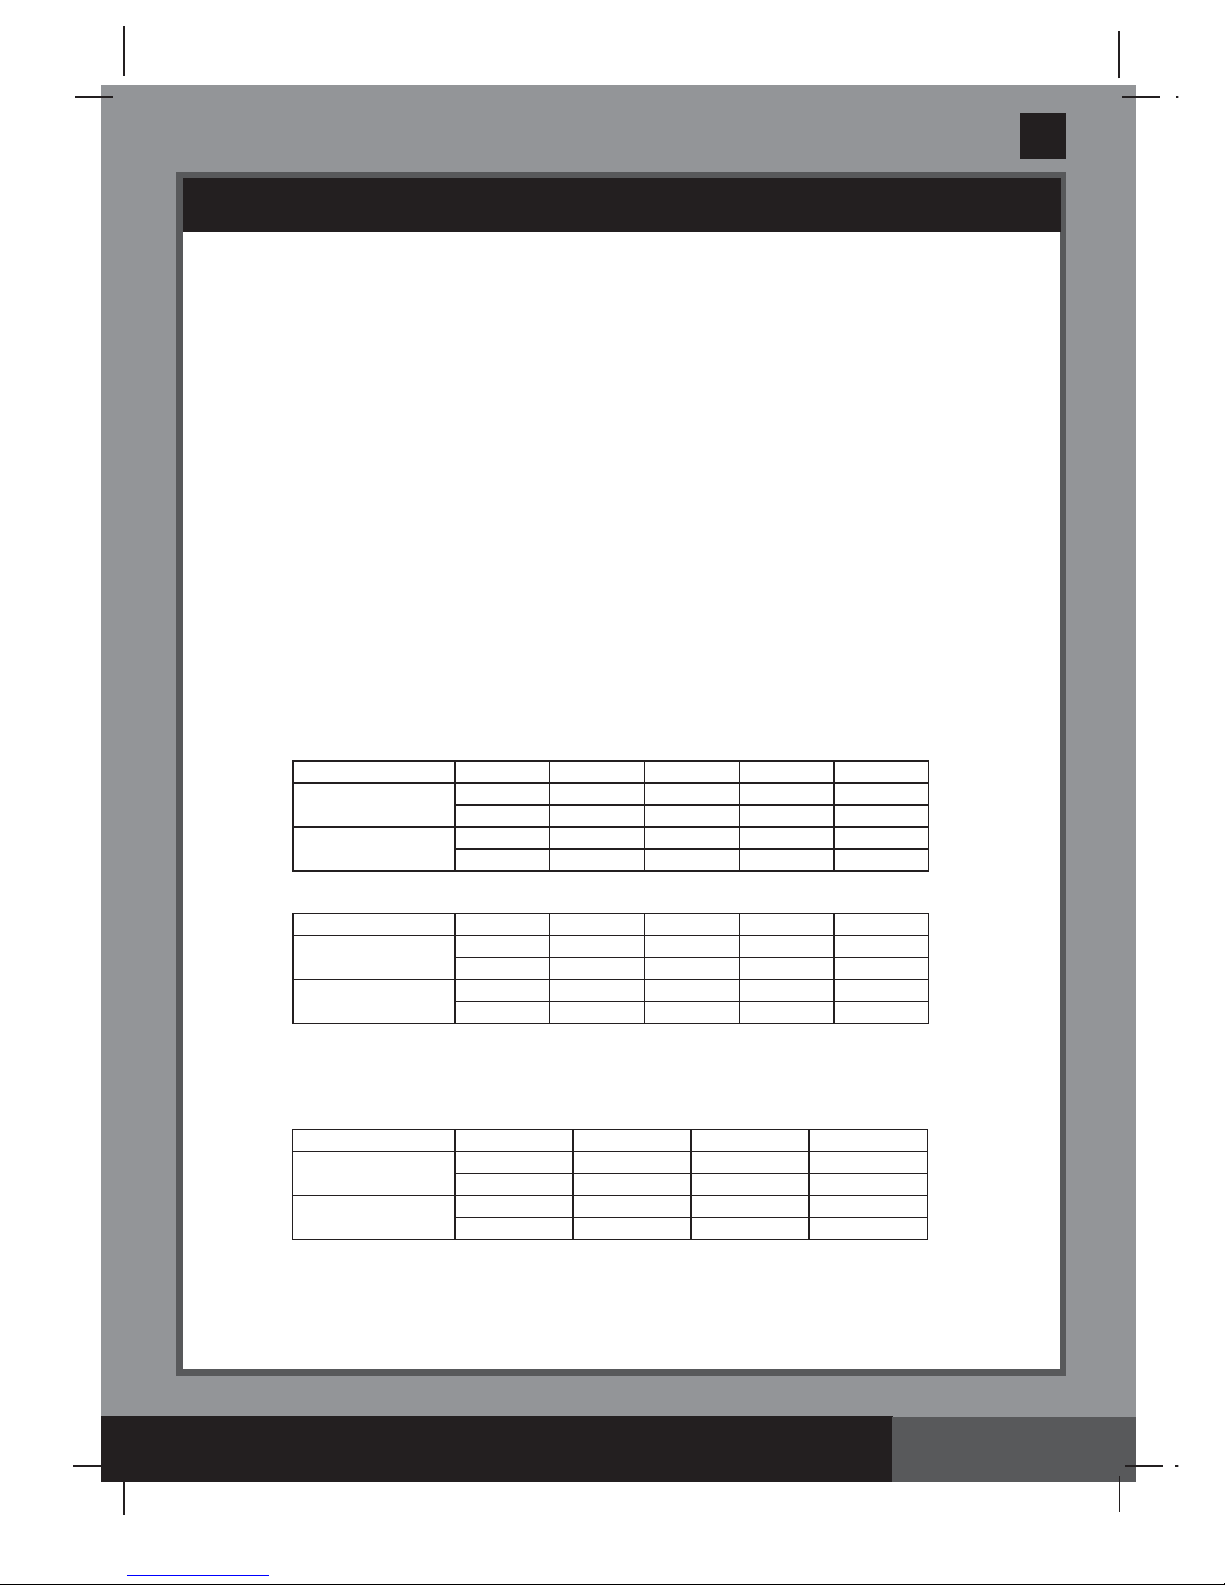
Desired level 60 ppm 80 ppm 100 ppm 120 ppm 140 ppm
Volume:
210 gal / 795 L
0.269 Lb 0.358 Lb 0.448 Lb 0.528 Lb 0.627 Lb
121 g 161 g 202 g 238 g 283 g
Volume:
290 gal / 1098 L
0.368 Lb 0.492 Lb 0.614 Lb 0.737 Lb 0.860 Lb
168 g 224 g 279 g 335 g 391 g
Lowering Total Alkalinity
Amount of Sodium Bisulfate to lower Total Alkalinity
Desired level 20 ppm 40 ppm 60 ppm 80 ppm
Volume:
210 gal / 795 L
0.059 Lb 0.118 Lb 0.178 Lb 0.237 Lb
27 g 53 g 80 g 107 g
Volume:
290 gal / 1098 L
0.081 Lb 0.162 Lb 0.244 Lb 0.326 Lb
37 g 74 g 111 g 148 g
Raising Total Alkalinity
Amount of Sodium Bicarbonate to raise Total Alkalinity
Desired level 60 ppm 80 ppm 100 ppm 120 ppm 140 ppm
Volume:
210 gal / 795 L
0.101 qt 0.135 qt 0.169 qt 0.202 qt 0.234 qt
96 mL 128 mL 160 mL 192 mL 223 mL
Volume:
290 gal / 1098 L
0.139 qt 0.185 qt 0.232 qt 0.278 qt 0.324 qt
132 mL 176 mL 220 mL 264 mL 308 mL
Amount of Muriatic Acid to lower Total Alkalinity
(Muriatic acid: 31.45%)
Page 16
pH Adjustment
After the total alkalinity has been lowered to 120 ppm or raised to 80 ppm and the pH is still high or low, you
can adjust it using the following chart.
Page 17
295
A
S AVE THESE INSTRUCTIONS
(295IO) SPA ENGLISH 7.5” X 10.3” PANTONE 295U 08/20/2016
English
SPA WATER CHEMISTRY AND BALANCE (continued)
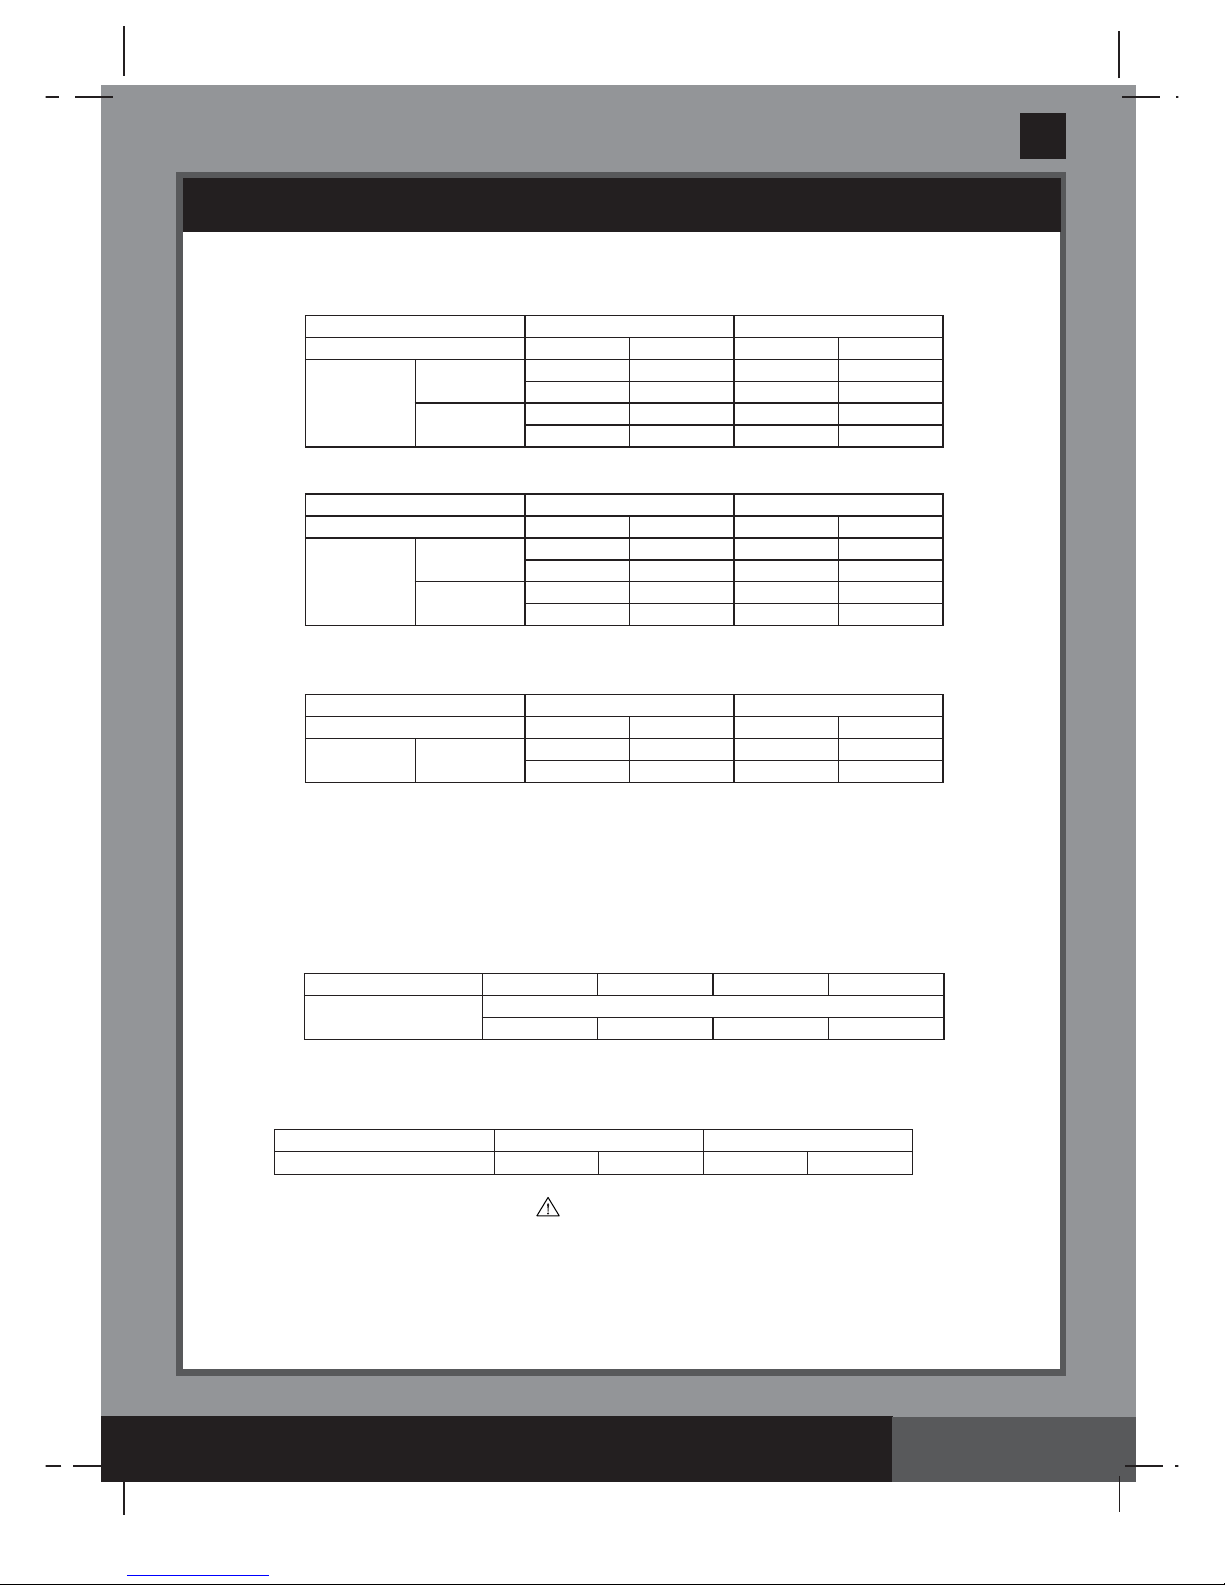
Lowering pH Using Sodium Bisulfate
Calcium Hardness Adjustment
Use the included test strips to check the water hardness level and adjust it following below chart.
Lowering Calcium Hardness
If your household water supply is treated with a softener, mix the spa hard water with the soft water
according to the water volume ratio chart to lower the calcium hardness:
Initial level 1000 ppm 500 ppm 350 ppm 250 ppm
Desired level:
100 ppm
Water Volume Ratio
(Vhard water: Vsoft water)
1:9 1:4 2:5 2:3
Lowering Calcium Hardness Using Soft Water
Raising pH
Raising pH Using Sodium Bicarbonate
WARNING
Muriatic acid is a caustic chemical and liquid solution of sodium bisulfate (NaHSO
4
)
is highly acidic. Handle all chemicals with care and wear extra personnel protective
equipment including goggle and gloves. It is very important not to splash acid onto
your skin or clothing, or into your eyes.
Lowering pH
Lowering pH Using Muriatic Acid
Page 17
Volume 210 gal (795 L) 290 gal (1098 L)
Total Alkalinity 120 ppm 80 ppm 120 ppm 80 ppm
From→To
8.4→7.2
0.028 qt 0.018 qt 0.038 qt 0.025 qt
26 mL 18 mL 36 mL 24 mL
7.8→7.2
0.019 qt 0.013 qt 0.026 qt 0.017 qt
18 mL 12 mL 22 mL 16 mL
Volume 210 gal (795 L) 290 gal (1098 L)
Total Alkalinity 120 ppm 80 ppm 120 ppm 80 ppm
From→To
8.4→7.2
0.071 Lb 0.047 Lb 0.095 Lb 0.063 Lb
32 g 21 g 43 g 29 g
7.8→7.2
0.047 Lb 0.032 Lb 0.064 Lb 0.043 Lb
21 g 14 g 29 g 20 g
Volume 210 gal (795 L) 290 gal (1098 L)
Total Alkalinity 120 ppm 80 ppm 120 ppm 80 ppm
From→To 6.8→7.2
0.541 Lb 0.361 Lb 0.737 Lb 0.491 Lb
243 g 163 g 335 g 224 g
Raising Calcium Hardness
Volume 210 gal (795 L) 290 gal (1098 L)
m (CaCl
2
) 0.197 Lb 89 g 0.269 Lb 122 g
If the calcium hardness level in the spa water is lower than 100 ppm, add calcium chloride into the spa
water.
Page 18

295
A
S AVE THESE INSTRUCTIONS
(295IO) SPA ENGLISH 7.5” X 10.3” PANTONE 295U 08/20/2016
English
Spa Tub Drainage
1.
Turn off the spa control unit.
2.
Connect the drain valve adaptor to a garden hose and point the other end
of the garden hose to a suitable draining area
(see drawing 14)
.
3.
Remove the drain valve cap from outside of the spa tub and attach the
drain valve adaptor to the drain valve
(see drawing 14)
.
4.
From inside of the spa tub, open the drain valve cap, water will start
fl owing out from the garden hose.
5.
When the water stops draining, disconnect the spa control unit from
the spa tub wall. Lift the spa tub wall from the side opposite the drain,
leading any remaining water to the drain and emptying the spa completely
(see drawing 15)
.
6.
Attached the infl ation hose
(7)
to the air blower infl ation outlet on the
control unit.
7.
Turn on the spa and press the button, aim the infl ation hose at the
inlet/outlets on the spa tub and spa control unit to dry out any water in the
piping system
(see drawings 16 & 17)
.
8.
Use a clean towel to wipe up any remaining water and moisture on the
spa tub and spa control unit.
9.
Ensure the spa tub and spa control unit are thoroughly dried.
NOTE:
The enclosed plugs
(15)
can be used to cover the water inlet and
outlet connectors from the inside of the spa tub to prevent water from
fl owing out.
Spa Tub Cleaning
If dirt is visible in the water or water becomes cloudy and proper water
chemistry does not clear it up, change the water and clean the spa tub.
See “Spa Tub Drainage” section on how to drain the spa.
While empty, remove the cartridge housing from inside of the spa tub wall,
clean and/or replace the fi lter cartridge. Use a sponge and mild soap solution
to wipe away any soil or stains on the inside of the spa wall. Rinse thoroughly
before refi lling with clean water.
IMPORTANT:
Do not use steel wool, hard brushes or abrasive cleaners.
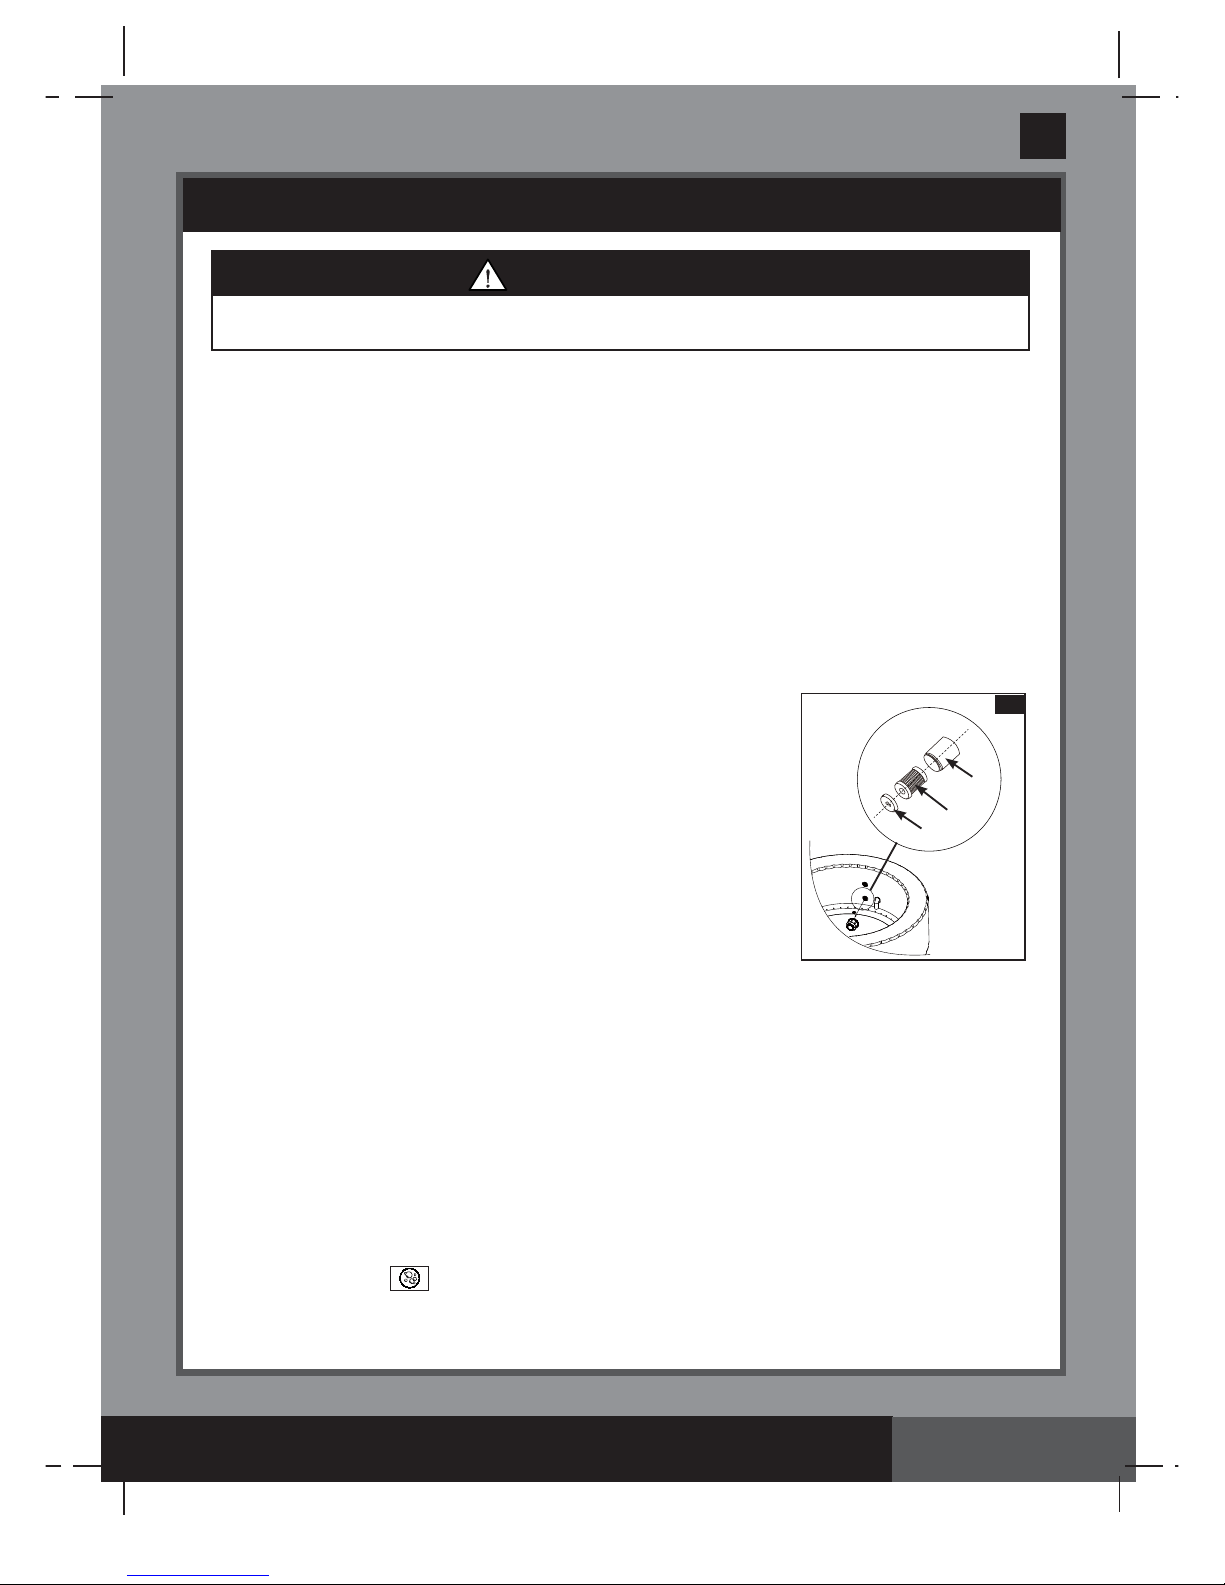
Spa Tub Air Valve Fastening
Check the spa tub air valve for leakage and tightness before use. If air is leaking
from the air valve, use the provided wrench
(22)
to tighten the air valve as follow:
1.
Make sure the spa tub is defl ated, open the air valve cap and insert the
wrench
(22)
into the air valve body
(see drawing 18)
.
2.
With one hand, hold the backside of the air valve base from the inside of
the spa tub wall and turn the wrench
(22)
clockwise.
IMPORTANT:
Never adjust the air valve base when the spa is in use or
fi lled with water. Only use the air valve wrench if the air valve is loose or
there is leakage around air valve base. Do not over tighten the air valve: over tightening can damage the
valve. Just ensure the air valve is snug and not leaking.
Spa Cover
The attachment buckles of the cover are locking buckles. Two keys are provided in the plastic bag with the
manual and other accessories. Each buckle is marked with “locked” and “unlocked” symbols for easy operation:
put the key into the slot on the buckle and turn it to the appropriate position to lock or unlock the buckle
respectively.
To assure safety from unauthorized access, always put the cover on when spa is not in use and lock all buckles.
Always keep the keys out of reach of children. In case you misplace the keys, you can use any similar size fl at
screwdriver to lock or unlock the buckles.
Inspect the spa cover regularly for leaks, premature wear and tear, damage, or signs of deterioration. Never use
a worn or damaged cover: it will not provide the level of protection required to prevent unsupervised access to the
spa by a child.
MAINTENANCE
Page 18
14
1
2
3
11
18
22
16
17
7
7
15
Page 19
295
A
S AVE THESE INSTRUCTIONS
(295IO) SPA ENGLISH 7.5” X 10.3” PANTONE 295U 08/20/2016
English
Page 19
MAINTENANCE (continued)
1.
Drain and clean the spa following the “Spa Tub Drainage” and “Spa Tub Cleaning” sections.
2.
Reverse set up instructions to defl ate and disassemble the spa tub, spa control unit and spa cover air
bladder.
3.
To defl ate the tub and the cover air bladder:
a) Open the defl ation outlet cap
(27)
with the included bolt
wrench
(6) (see drawing 19)
.
b) Insert defl ation hose adaptor
(28)
into the defl ation outlet.
c) Insert infl ation hose
(7)
over the defl ation hose adaptor
(28)
.
d) Insert the other end of the infl ation hose into the tub air valve
or cover air bladder valve.
e) Press the air bubble button to defl ate.
f) When defl ation is completed reverse above steps and
ensures the defl ation outlet cap
(27)
is securely fastened.
Caution:
Only use for the purpose described in this manual.
Keep the infl ation hose away from water or small objects when the
defl ation function is activated to avoid damage to the blower motor.
4.
Make sure all the spa components and accessories are thoroughly
clean and dry before storage. Air-dry the spa tub in the sun for an
hour before folding.
5.
Fold the spa tub loosely and avoid any sharp corners to prevent
damage or leakage to the spa tub liner.
6.
Prepare additional new cartridges for next time use.
7.
Store the spa tub and accessories in a dry, temperature controlled, between 0º – 40ºC (32º – 104ºF),
storage location.
8.
The original packing can be used for storage.
STORAGE
Spa Tub and Cover Air Bladder Repair
Use the enclosed repair patch to repair any puncture:
• Clean and dry the area to be repaired thoroughly.
• Remove the patch backing paper and press patch fi rmly over the puncture. Smooth out the surface to
remove any air bubbles under the patch.
IMPORTANT
The ambient temperatures of air have an effect on the spa tub internal pressure. Air inside of the
spa tub may expand and contract with varying temperature leading to reduce pressure inside
of the spa tub. If this occurs, simply use the provided pressure gauge to check the internal air
pressure and add more air if necessary.
19
6
7
28
1
2
3
27
Page 20
295
A
S AVE THESE INSTRUCTIONS
(295IO) SPA ENGLISH 7.5” X 10.3” PANTONE 295U 08/20/2016
English
TROUBLESHOOTING
Page 20
NO DISPLAY/SPA
CONTROL UNIT DOES
NOT WORK
HOUSEHOLD CIRCUIT
BREAKER TRIPPED
NOT HEATING
PROPERLY
BUBBLE AIR BLOWER
DOES NOT WORK
FILTRATION PUMP
NOT WORKING
WATER NOT CLEAN
PUMP CONNECTORS
ARE NOT LEVEL WITH
THE SPA CONNECTORS
TUB HAS A STRANGE
SHAPE
TUB LOSES AIR
PRESSURE
LEAKING BETWEEN SPA
TUB CONNECTORS AND
CONTROL UNIT
CONNECTORS
SPA IS TOO NOISY IN
FILTRATION MODE ONLY
• Spa is unplugged or off.
• Control panel cable plug loose.
• Power failure.
• RCD tripped.
• RCD broken.
• Circuit breaker under rated.
• Overloaded circuit breaker.
• An electrical fault in the line.
• Temperature set too low.
• Dirty fi lter cartridge.
• Water temperature decreasing during
heater STANDBY mode.
• Heating element failed.
• Air blower pump is too hot.
• Dirty fi lter cartridge.
• Filtration inlet and/or outlet clogged.
• Filter pump motor failed.
• Cartridge assembly not properly attached.
• Insuffi cient fi ltering time.
• Dirty fi lter cartridge.
• Improper water maintenance.
• Filtration inlet and outlet clogged.
• One characteristic of PVC is that
it changes shape, which is normal.
• Expanded internal air pressure by
strong sunshine.
• Air valve cap loose.
• Air valve base loose.
• Hole, cut or split on spa tub.
• Spa control base inlet/outlet connections
not securely tight.
• Spa control base inlet/outlet o-ring
missing/dirty.
• Control base components not securely
attached.
• Control base ground not level and fi rm.
• Spa fi lter motor failed.
• Ensure the spa is plugged and switched on.
• Ensure the control panel cable plug is fi rmly
attached to the control base receptacle.
• Check power source.
• Reset the RCD.
• Contact Intex Service Center.
• Ensure correct circuit breaker rating.
• Provide a dedicated circuit breaker feeding the
spa electrical outlet only.
• Contact a qualify electrician to correct the
electrical fault.
• Increase the temperature and attach the spa
cover.
• Clean or replace the fi lter cartridge in time.
• If heater is in STANDBY mode, press the fl ame button
twice to heat up the water to the set temperature.
• Contact Intex Service Center.
• Turn off and unplug the spa. Let it cool down and
restart all over again.
• If problem persists contact Intex Service Center.
• Clean or replace the fi lter cartridge in time.
• Check and clean fi ltration inlet and outlet regularly.
• Contact Intex Service Center.
• Ensure the cartridge assembly is properly attached.
• Increase fi ltration time.
• Clean or replace the fi lter cartridge in time.
• Keep the spa water properly sanitized. Refer to the
chemical manufacturer’s instructions.
• Check and clean fi ltration inlet and outlet regularly.
• Elevate the pump with wood or another type of
insulated material to bring the pump’s connectors
level with the spa’s connectors.
• Do not expose the spa to direct sunlight for extended period of time.
• Check the air pressure and release air if necessary.
During very hot weather, you must check to see whether it is
necessary to release some air. This is to avoid any possible
damage to the tub.
• Ensure air valve cap is securely closed.
• Fill up the spa tub with air then make sure the air valve
base is tighten, see “Spa Tub Air Valve Fastening” section.
• Put liquid soap and water in a squirt bottle and spray on
seams. If there is a leak it will bubble. After you fi nd the leak,
clean and dry the leaking area, then apply the repair patch
that comes with your spa.
• Tighten inlet and outlet connections.
• Coat the o-ring with petroleum jelly for water proof.
• Remove grid from inside spa with a screwdriver,
ensure inlet/outlet O-ring is in place, clean and not
damaged.
• Ensure control panel, back cover and all inlet/outlet
are securely connected.
• Ensure ground is level, fi rm and smooth.
• Replace the failed fi lter motor with a new one.
PROBLEM CAUSE SOLUTION
Page 21
295
A
S AVE THESE INSTRUCTIONS
(295IO) SPA ENGLISH 7.5” X 10.3” PANTONE 295U 08/20/2016
English
WARRANTY
Page 21
Your PureSpa has been manufactured using the highest quality materials and workmanship. All Intex
products have been inspected and found free of defects prior to leaving the factory. This limited
warranty applies only to the PureSpa only.
This limited warranty is in addition to, and not a substitute for, your legal rights and remedies. To the
extent that this warranty is inconsistent with any of your legal rights, they take priority. For example,
consumer laws across the European Union provide statutory warranty rights in addition to the
coverage you receive from this limited warranty: for information on EU-wide consumer laws, please
visit the European Consumer Center website at http://ec.europa.eu/consumers/ecc/contact_en/htm.
The provisions of this limited warranty apply only to the original purchaser and are not transferable.
This limited warranty is valid for a period of one (1) year from the date of the initial retail purchase.
Keep your original sales receipt with this document, as proof of purchase will be required and must
accompany warranty claims or the limited warranty will be invalid.
PureSpa Warranty – 1 Year
If you fi nd a manufacturing defect in the PureSpa during the warranty period, please contact the
appropriate Intex Service Center listed in the separate “Authorized Service Centers” sheet. If the item
is returned as directed by the Intex Service Center, the Service Center will inspect the item and
determine the validity of the claim. If the item is covered by the provisions of the warranty, the item will
be repaired or replaced, with the same or comparable item (at Intex’s choice) at no charge to you.
Other than this warranty, and other legal rights in your country, no further warranties are implied. To
the extent possibly in your country, in no event shall Intex be liable to you or any third party for direct
or consequential damages arising out of the use of your PureSpa, or Intex or its agents’ and
employees’ actions (including the manufacture of the product). If your country does not allow the
exclusion or limitation of incidental or consequential damages, this limitation or exclusion does not
apply to you.
You should note that this limited warranty does not apply in the following circumstances:
• If the PureSpa is subject to negligence, abnormal use or application, accident, improper operation,
improper voltage or current contrary to operating instructions, improper maintenance or storage;
• If the PureSpa is subject to damage by circumstances beyond Intex’s control, including but not
limited to, ordinary wear and tear and damage caused by exposure to fi re, fl ood, freezing, rain, or
other external environmental forces;
• If the PureSpa is used for any commercial purposes;
• To parts and components not sold by Intex; and/or.
• To unauthorized alterations, repairs or disassembly to the PureSpa by anyone other than Intex
Service Center personnel.
The costs associated with the loss of pool water, chemicals or water damage are not covered by this
warranty. Injury or damage to any property or person is not covered by this warranty.
Read the owner’s manual carefully and follow all instructions regarding proper operation and
maintenance of your PureSpa. Always inspect your product prior to use. This limited warranty will be
void if use instructions are not followed.
Page 22
295
B
(295IO) SPA DANISH 7.5” X 10.3” PANTONE 295U 08/20/2016
Dansk
BETJENINGSVEJLEDNING
PureSpa™
SSP-H-20-1C
Prøv også disse andre produkter fra Intex: pools, tilbehør til pools,
oppustelige pools og indendørs legetøj. Luftmadrasser og både fås
hos større forhandlere. Besøg også vores hjemmeside.
Som led i vores politik om hele tiden at forbedre vores produkter,
forbeholder Intex sig retten til uden varsel at ændre specifi kationer
og design, hvilket kan resultere i opdateringer af denne vejledning.
Kun til illustration.
©2016 Intex Marketing Ltd. - Intex Development Co. Ltd. - Intex Trading Ltd.
- Intex Recreation Corp.
All rights reserved/Tous droits réservés/Todos los derechos reservados/Alle Rechte
vorbehalten. Printed in China/Imprimé en Chine/Impreso en China/Gedruckt in China.
®™ Trademarks used in some countries of the world under license from/®™ Marques utilisées dans certains pays sous licence de/
Marcas registradas utilizadas en algunos países del mundo bajo licencia de/Warenzeichen verwendet in einigen Ländern der Welt in
Lizenz von/
Intex Marketing Ltd. to/à/a/an Intex Trading Ltd., Intex Development Co. Ltd., G.P.O Box 28829, Hong Kong & Intex
Recreation Corp., P.O. Box 1440, Long Beach, CA 90801
• Distributed in the European Union by/Distribué dans l’Union Européenne
par/Distribuido en la unión Europea por/Vertrieb in der Europäischen Union durch/
Intex Trading B.V., Venneveld 9, 4705 RR
Roosendaal – The Netherlands
www.intexcorp.com
VIGTIGE
SIKKERHEDSREGLER
Sørg for at læse, forstå og følge alle
instruktionerne nøje, før du installerer
produktet og tager det i brug.
Opbevares til senere brug.
Page 23
295
B
GEM DENNE VEJLEDNING
(295IO) SPA DANISH 7.5” X 10.3” PANTONE 295U 08/20/2016
Dansk
Side 2
Advarsel.......................................................................................... 3-5
Oversigt over indhold.................................................................... 6-7
Opstillingsvejledning..................................................................... 8-11
Betjeningsvejledning..................................................................... 12
LED-koder....................................................................................... 13
Vedligeholdelse og kemikalier..................................................... 14-19
Vinteropbevaring........................................................................... 19
Fejlfindingsvejledning................................................................... 20
Begrænset garanti......................................................................... 21
INDHOLDSFORTEGNELSE
Page 24
295
B
GEM DENNE VEJLEDNING
(295IO) SPA DANISH 7.5” X 10.3” PANTONE 295U 08/20/2016
Dansk
Side 3
VIGTIGE SIKKERHEDSREGLER
Når et elektrisk udstyr installeres og anvendes, skal grundlæggende sikkerhedsforholdsregler altid følges, herunder følgende.
LÆS OG FØLG ALLE ANVISNINGERNE
• Spabadets elektriske apparat skal strømforsynes ved hjælp af en reststrømsanordning (RCD) med
en nominel restdriftsstrøm, der ikke overskrider 30 mA.
• De elektriske spa-apparat består af en transportabel fejlstrømsafbryder (PRCD) med en nominel
resterende driftsstrøm, der ikke kommer over 10 mA. Hvis fejlstrømsafbryderen registrer et
strømudsving på over 10 mA, afbryder den strømforsyningen. Sker dette må spaen ikke bruges, og
stikket skal afbrydes fra strømforsyningen med det samme. Du skal kontakte dit lokale servicecenter
vedrørende hjælp og/eller reparation af produktet.
• Dele, der indeholder strømførende dele, undtagen dele leveret med ekstra lav sikkerhedsspænding,
der ikke overskrider 12 V, skal være utilgængelige for en person i spabadet.
• Den elektriske installation skal opfylde kravene i de lokale nationale standarder.
• Dele, der inkorporerer elektriske komponenter, undtagen fjernbetjeningsenheder, skal være placeret
eller fastgjort, så de kan ikke falde i spabadet.
• For at reducere risikoen for personskade må børn ikke få lov til at bruge produktet, medmindre de
holdes under opsyn hele tiden.
• Børn må ikke bruge spabade eller badekar uden en voksens opsyn.
• For at reducere risikoen for drukning af børn skal disse holdes under opsyn hele tiden. Fastgør og
lås spabadets dæksel efter hver brug.
• For at reducere risikoen for personskade:
a) Vandet i et spabad må aldrig være varmere end 40°C (104°F). Vandtemperaturer mellem 38°C
(100°F) og 40°C (104°F) anses for at være sikre for en rask voksen. Lavere vandtemperaturer er
anbefalet for unge børn, samt når brugen af spabadet er længere end 10 minutter.
b) Da for høje vandtemperaturer har et højt potentiale for at forårsage fosterskade under de første
graviditetsmåneder, bør gravide eller muligvis gravide kvinder begrænse vandtemperaturer i
spabadet til 38°C (100°F).
c) Inder brugeren går ind i et spabad eller badekar, skal vandtemperaturen måles med en nøjagtig
termometer, idet tolerancen af enheder til regulering af vandtemperaturen varierer.
d) Brug af alkohol, stoffer eller medicin inden eller under anvendelse af spabadet kan medføre
ubevidsthed med mulighed for at drukne.
e) Overvægtige personer samt personer med hjertesygdomsanamnese, lavt eller højt blodtryk,
kredsløbsproblemer eller diabetes skal spørge en læge, før de bruger et spabad.
FARE
ADVARSEL
• Risiko for utilsigtet drukning. Vær yderst forsigtig for at undgå uautoriseret adgang af børn. For at
undgå ulykker skal man sørge for, at børn ikke kan bruge dette spabad, medmindre de er under
opsyn hele tiden.
• Risiko for drukning. Kontrollér spabadet regelmæssigt for lækker, for tidligt slitage og rivning, skade
eller tegn på forværring. Man må aldrig bruge et slidt eller beskadiget dæksel: Det giver ikke det
beskyttelsesniveau, der kræves til at forhindre uovervåget adgang af børn til spabadet.
• Risiko for personskade. Udskift beskadiget ledning straks. Ledningen må ikke graves ned.
• Risiko for elektrisk stød. Man må ikke tillade at have et elektrisk apparat, som f.eks. en lygte, telefon,
radio eller fjernsynsapparat, inden for 3,5 m (11,5 ft) fra et spabad eller badekar.
• Risiko for elektrisk stød. Spabadet må ikke bruges, når det regner, eller når der er lyn eller torden.
Page 25
295
B
GEM DENNE VEJLEDNING
(295IO) SPA DANISH 7.5” X 10.3” PANTONE 295U 08/20/2016
Dansk
Side 4
ADVARSEL
f) Personer, der indtager medicin, skal spørge en læge, før de bruger et spabad, idet nogle slags
mediciner kan fremkalde døsighed, mens andre slags mediciner kan påvirke hjertefrekvensen,
blodtrykket og kredsløbet.
g) Personer, der bruger mediciner og/eller har en negativ medicinsk historie, skal spørge en læge, før
de bruger et spabad eller badekar.
h) Tal med en læge før brug, hvis du er gravid, diabetiker, i dårlig helbredstilstand eller under medicinsk
behandling.
• Personer med smitsomme sygdomme må ikke bruge et spabad eller badekar.
• For at undgå personskade skal du være yderst forsigtig, når du går ind eller ud af spabadet eller
badekarret.
• Brug ikke stoffer eller alkohol inden eller under brug af et spabad eller badekar for at undgå
ubevidsthed og mulighed for drukning.
• En gravid eller mulig gravid kvinde skal spørge en læge inden brug af et spabad eller badekar.
• Vandtemperatur over 38°C grader kan være skadelig for helbredet.
• Brug ikke et spabad eller badekar straks efter anstrengende fysisk øvelse.
• Langvarig ophold i et spabad eller badekar kan være skadeligt for helbredet.
• Langvarigt ophold i varmt vand kan beskadige det ufødte barn. Mål vandets temperatur, før du går
ind. Hvis vandet er varmere end 38°C (100°F), må du ikke gå ind i spabadet. Hold dig ikke i
spabadet i mere end 10 minutter.
• Spabadets varme i kombination med alkohol, stoffer eller medicin kan forårsage ubevidsthed.
• Kom straks ud, hvis du føler dig utilpas, svimmel eller søvnig. Spabadets varme kan give usædvanlig
høj legemestemperatur.
• Årsagerne, symptomerne og indvirkninger af usædvanlig høj legemestemperatur kan beskrives på
følgende måde: Usædvanlig høj legemestemperatur opstår, når den indre kropstemperatur når et
niveau, som er fl ere grader over den normale kropstemperatur på 37°C (98.6°F). Symptomerne på
usædvanlig høj legemstemperatur omfatter en øgning i den indre kropstemperatur, svimmelhed,
letargi, døsighed og afkraftning. Indvirkninger af usædvanlig høj legemstemperatur omfatter
manglende evne til at opfatte varme; manglende evne til at genkende behovet for at forlade spabadet
eller badekarret; uvidenhed om forestående fare; fosterskade i gravide kvinder; fysisk uegnethed til at
forlade spabadet eller badekarret og ubevidsthed med drukningsfare til følge.
• Brug af alkohol, stoffer eller medicin kan markant øge risikoen for livstruende usædvanlig høj
legemstemperatur i badekar og spabade.
• Kemikalier skal altid tilsættes til vand, men vand må aldrig tilsættes til kemikalier. Tilsætning af vand
til kemikalier kan producere stærk røg eller voldelige reaktioner samt farlig kemisk spray.
• Man må hoppe i eller springe på hovedet i et spabad eller i enhver form for lavvand.
• Samling og demontering må kun foretages af voksne.
• Dette apparat må kun anvendes af børn fra 8 år og opefter og af personer med nedsatte fysiske og
metale evner, nedsat følelse eller mangel på erfaring og viden, hvis de er under opsyn eller har fået
vejledning i sikker brug af apparatet og forstår risikoen ved at bruge det. Børn må ikke lege med
apparatet. Rensning og vedligeholdelse skal foretages af en voksen på over 18 år, som er bekendt
med risikoen for elektrisk stød.
• Man må ikke anbringe nogen af det elektriske apparats dele ovenpå badet under brug.
• Hold produktets stik længere end 4 m væk fra spabadet og i en højde på mindst 1,2 m.
• Tag altid stikket ud, før du fjerner, renser, efterser eller justerer produktet, samt når det regner.
• Undgå at nedgrave ledningen. Placer ledningen et sted, hvor den ikke bliver beskadiget af
plæneklippere, hækkesakse og andet udstyr.
• Hvis ledningen er defekt, skal den udskiftes af producenten, serviceværkstedet eller en elektriker,
så der ikke opstår farlige situationer. Brug kun identiske reservedele ved servicering.
Page 26
295
B
GEM DENNE VEJLEDNING
(295IO) SPA DANISH 7.5” X 10.3” PANTONE 295U 08/20/2016
Dansk
ADVARSEL
• Bevar vandkemien i overensstemmelse med producentens anvisninger.
• Produktet er udstyret med en RCD-anordning, der fi ndes på enden af netledningen.
RCD-anordningen skal testes før hver brug. Brug ikke spabadet, hvis RCD-
anordningen ikke virker korrekt. Træk nedledningen ud, indtil fejlen er blevet
identifi ceret og afhjulpet. Kontakt en kvalifi ceret elektriker for at afhjælpe fejlen.
RCD-anordningen må ikke undgås. Der fi ndes ingen dele inde i RCD-anordningen,
der kan serviceres. Garantien ugyldiggøres, hvis RCD-anordningen åbnes.
1.
Tryk på knappen
RESET
(NULSTIL) på RCD-anordningen.
2.
Tænd spabadets elektriske udstyr.
3.
Tryk på tasten
TEST
på RCD-anordningen. Indikatoren for
RCD-anordningen bør slukkes, og el-udstyret bør slukkes.
Hvis indikatoren for RCD-anordningen ikke slukkes, og hvis
el-udstyret ikke slukkes, betyder det, at RCD-anordningen
ikke fungerer korrekt. Brug ikke spabadet. Kontakt en kvalifi ceret
elektriker for at afhjælpe fejlen.
4.
Tryk på knappen
RESET
(NULSTIL) på RCD-anordningen.
Indikatoren på RCD-anordningen bør lyse. Hvis indikatoren
for RCD-anordningen ikke lyser, så betyder det, at RCD anordningen ikke fungerer korrekt. Brug ikke spabadet.
Kontakt en kvalifi ceret elektriker straks for at afhjælpe fejlen.
ADVARSEL
Side 5
• Sørg altid for, at stikket er tørt når det tilslutte. Et vådt stik må aldrig tilsluttes!
• Spaens stik må kun forbindes direkte til en jordforbundet stikkontakt i væggen.
• For at reducere risikoen for elektrisk stød skal du undgå at anvende forlængerledninger, timere, stikadaptere
eller stikomformere for at slutte enheden til strømforsyningen. Brug en fastmonteret stikkontakt.
• Undgå at slutte stikket til eller at trække det ud, hvis du står i vand eller har våde hænder.
• Spabadet må ikke blive tomt i lang tid. Spabadet må ikke udsættes for direkte sollys i længere tid.
• Skal spaen ikke bruges i en længere periode, som f.eks. om vinteren, bør den skilles ad og opbevares
indendørs.
• Vandet i spabadet må ikke få lov til at fryse. Tænd ikke spabadet, når vandet er frosset.
• Brug ikke spabadet, hvis det er blevet beskadiget under levering og/eller ikke fungerer korrekt på en
hvilken som helst måde. Kontakt Intex servicecenter og få yderligere vejledning.
• Spabadet må aldrig bruges alene, og andre personer må heller ikke få lov til at bruge spabadet alene aldrig.
• Hæld aldrig vand med en højere temperatur end 40°C (104°F) direkte i spabadet.
• Hold alle kæledyr væk fra spabadet for at undgå eventuelle skader.
• Tilsæt ikke badeolie eller badesalt til vandet i spabadet.
• Spabadet skal opstilles på en nivelleret, fl ad og jævn overfl ade, der kan understøtte den maksimale
belastning af det fyldte spabad med fi re personer: vægt på 1136 kg (2500 lbs). 6 voksne: vægt på
1592 kg (3500 lbs).
• Installer et passende dræningssystem rundt om spabadet, så overskydende vand og sprøjtninger
kan håndteres.
ADVARSEL
TEST
RESET
RESET
TEST
TEST
NULSTILLE
RESET
TEST
TEST
Page 27
295
B
GEM DENNE VEJLEDNING
(295IO) SPA DANISH 7.5” X 10.3” PANTONE 295U 08/20/2016
Dansk
Side 6
OVERSIGT OVER INDHOLD
Før du installerer produktet, skal du bruge et par minutter på at
kontrollere indholdet og gøre dig fortrolig med delene.
BEMÆRK:
Tegningerne er kun til illustration. Viser ikke det korrekte produkt og er ikke i skala.
8
10
11
18
17
19
9
21
23
22
2
6
7
3
4
5
12
13
14
15
16
20
24
25
26
A
B
C
28
29
27
1
Page 28
295
B
GEM DENNE VEJLEDNING
(295IO) SPA DANISH 7.5” X 10.3” PANTONE 295U 08/20/2016
Dansk
Oplys modelnummer og reservedelsnummer i forbindelse med bestilling af reservedele.
OVERSIGT OVER INDHOLD (fortsat)
Før du installerer produktet, skal du bruge et par minutter på at
kontrollere indholdet og gøre dig fortrolig med delene.
Side 7
N° DE
PIÈCE
BESKRIVELSE
ANTAL
RESERVEDEL NUMMER
4 VOKSNE 6 VOKSNE
28404 28406 28408 28410
1 KONTROLBASE 1 12320 12320B 12320 12320B
2 KONTROLBASENS BAGESTE DÆKSEL 1 11719 11719B 11719 11719B
3 KONTROLPANEL (#4 MEDFØLGER) 1 11930 11930B 11930 11930B
4 BOLT TIL KONTROLPANEL 3 11024 11024B 11024 11024B
5 VENTILHÆTTE TIL KONTROLENHED 1 11831 11831B 11831 11831B
6 BOLTNØGLE TIL KONTROLPANEL 1 11053 11053 11053 11053
7 OPPUSTNINGSSLANGE TIL SPABAD/DÆKSEL 1 11830 11830 11830 11830
8 INDGANGS-/UDGANGS-O-RING TIL STYRING AF SPABADET 2 11699 11699 11699 11699
9 LUFTINDGANGS-O-RING TIL STYRING AF SPABADET 1 11687 11687 11687 11687
10 SPABADETS DRÆNINGSPROP 1 11696 11696B 11696 11696B
11 ADAPTER TIL SPABADETS DRÆNINGSVENTIL 1 11718 11718 11718 11718
12 FILTERPATRONHUS 1 11798 11798 11798 11798
13 FILTERINDSATS 2 11692 11692 11692 11692
14 LÅG TIL FILTERPATRONHUSET 1 11797 11797 11797 11797
15 INDGANGS-/UDGANGSPROP 3 11739 11739 11739 11739
16 SPABADETS KAR 1 11842 12260 12106 12258
17 SPABADETS DÆKSEL 1 11841 12261 12107 12256
18
OPPUSTELIG BLÆRE TIL SPABADETS DÆKSEL
(FORUDINSTALLERET PÅ SPABADETS DÆKSEL)
1 11689 11689 12108 12108
19 UNDERLAG 1 11717 11717 12109 12109
20 KEMISK UDDELER 1 11614 11614 11614 11614
21 TESTSTRIMLER 1 11855 11855 11855 11855
22 NØGLE 1 11742 11742 11742 11742
23 TRYK MÅLER 1 11741 11741 11741 11741
24 ADAPTER TIL VENTILSLANGE 1 11829 11829 11829 11829
25 HANSPÆNDE 6 11698 11698B 11698 11698B
26 HUNSPÆNDE 6 11799 11799B 11799 11799B
27 HÆTTE TIL LUFTUDTAG 1 11934 11934B 11934 11934B
28 ADAPTER TIL LUFTUDTAGSSLANGE 1 11935 11935 11935 11935
29 MOTOR TIL SPAFILTER 1 11886 11886B 11886 11886B
Page 29
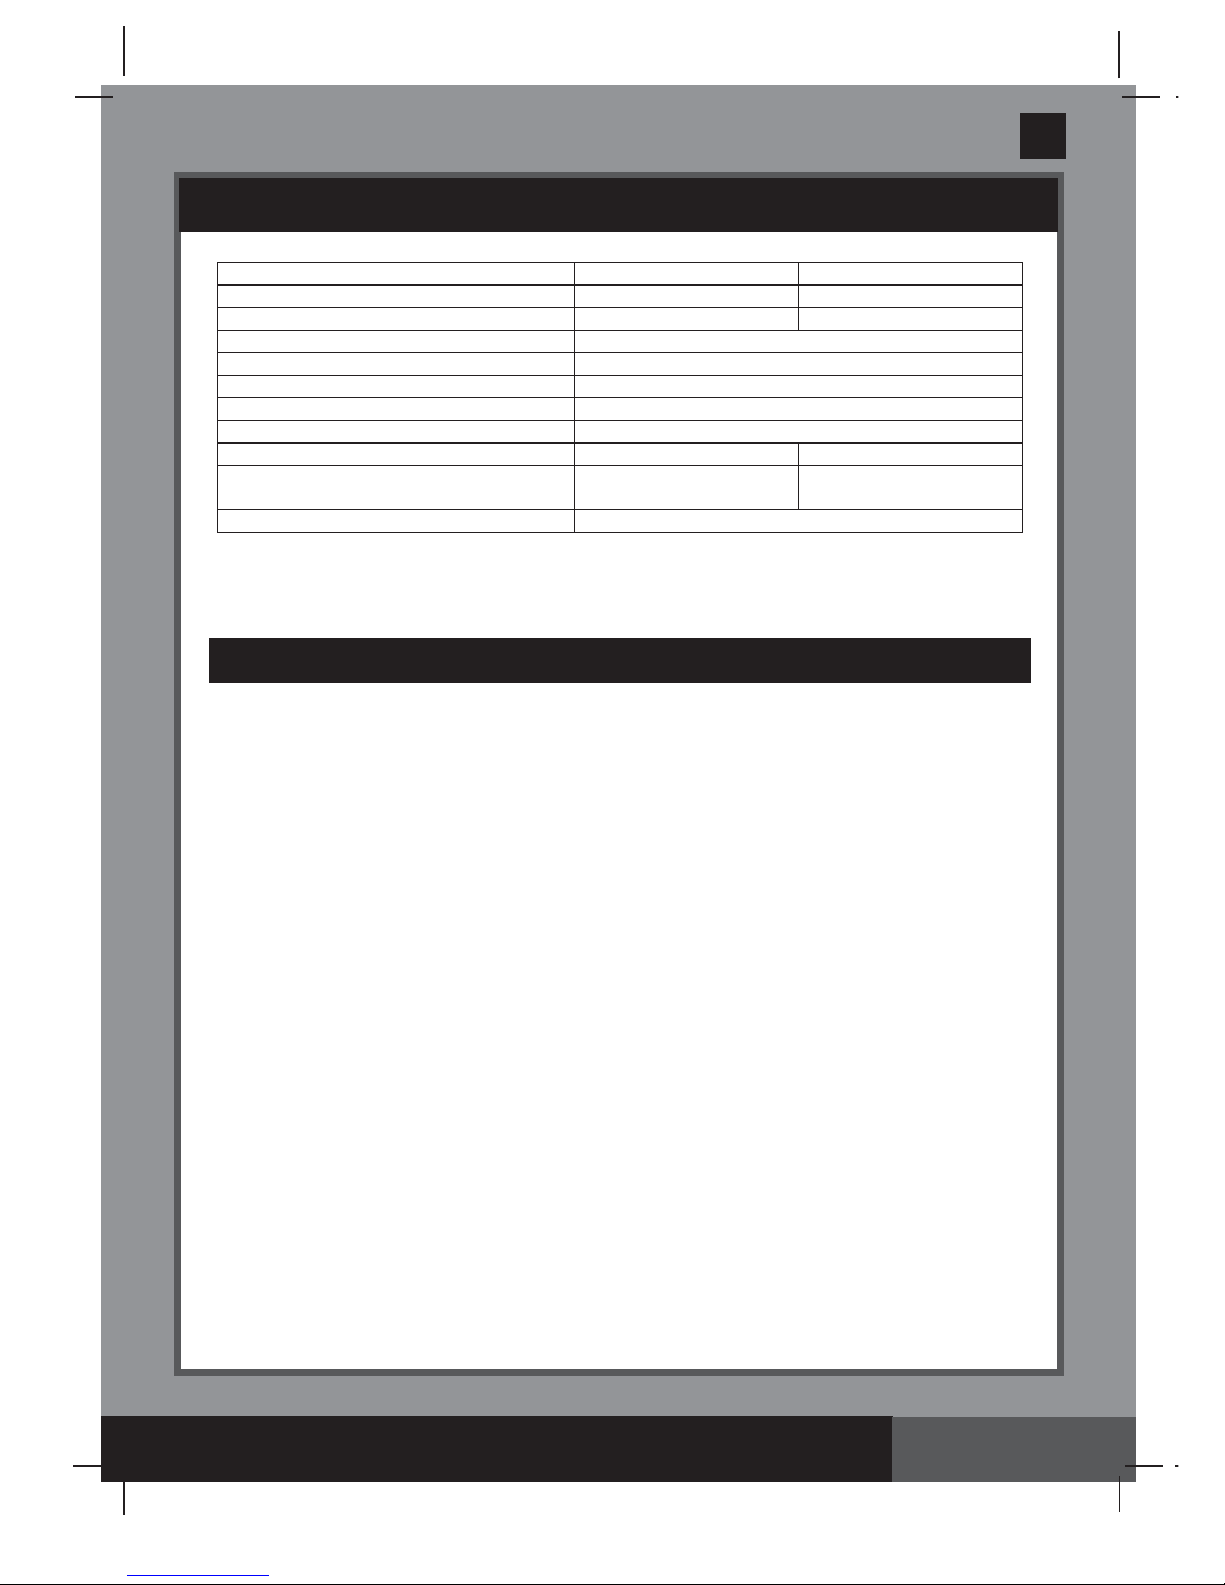
295
B
GEM DENNE VEJLEDNING
(295IO) SPA DANISH 7.5” X 10.3” PANTONE 295U 08/20/2016
Dansk
Side 8
PRODUKTSPECIFIKATIONER
OPSTILLINGSVEJLEDNING
Ledningsforbundet spa med pumpe, opvarmer, blæser, indbygget hårdtvandssystem og kontrolpanel.
Dette produkt kræver et minimum af 13 ampere. Hvis relæet går, bør du sikre dig, at der ikke er tilsluttet
andre apparater eller andre store belastninger til det samme kredsløb som spabadet.
Forberedelse af stedet og krav
• Spabadet kan installeres indendørs eller udendørs. Kun beregnet til privat brug.
• Sørg for, at området er frit for skarpe genstande under eller omkring spabadet.
• Installer en vel placeret stikkontakt for at tilslutte spabadet, og giv god adgangsplads til regelmæssig testning af den
ledningsmonterede RCD-anordning.
• Sørg for, at der er nok fri plads omkring spabadet, så der er fuld adgang til spabadets udstyr med henblik på
vedligeholdelse og/eller service.
• Område skal lette dræningsaktiviteter under langvarig opbevaring af spabadet.
Yderligere krav til opstilling indendørs
• Sørg for, at gulvet kan understøtte den fulde vægte af det fyldte spabad sammen med det maksimale antal personer.
Tal med en uddannet entreprenør eller en strukturingeniør for at bekræfte dette krav.
• Sørg for, at gulvet er vandtæt og har en glidesikker overfl ade. Spabadet må ikke opstilles på et tæppe eller andre
materialer, der beskadiges af fugt, kondensering.
• Spabadet må ikke opstilles indendørs på en etage lige ovenpå en udtalt opholdsplads, da vand og fugtighed muligvis
kan forårsage skade.
• Fugtighed er en naturlig bivirkning af indendørs opstilling af spabadet. Værelset skal være vel udluftet, så fugt kan få lov
til at komme ud. Installer et ventilationssystem for at forhindre for meget kondensering og fugt på værelset.
Yderligere krav til udendørs installation
• Ejerne af spabad skal muligvis opfylde de lokale eller statslige love vedrørende barnesikker hegn, sikkerhedsbarrierer,
belysning samt andre sikkerhedskrav. Kontakt det lokale kontor, der har til opgave at overvåge, at bygningskoderne
overholdes, angående yderligere oplysninger.
• Sørg for, at overfl aden er nivelleret, fl ad, jævn og stærk nok til at understøtte den fulde vægt at det fyldte spabad.
• Spabadet må ikke opstilles på græs eller jord, idet dette øger mængden af rester, der trænger ind i spabadet, og
beskadiger spabadets gulv.
• Spabadet må ikke udsættes for direkte sollys i e lang tid.
• Det er muligt at opstille og lade spabadet blive udenfor ved en lavere temperatur end 4°C (39°F), forudsat at
vandtemperaturen inde i spabadet er højere end 4°C (39°F), og at vandet inde i kredsløbssystemet, pumpen, rør ikke
er frosset. Læg en “isolerende måtte” mellem spabadets gulv og jorden for at forhindre varmetabet fra bunden af
spabadet og give bedre varmefastholdelse.
Maksimalt antal pladser: 4 voksne 6 voksne
Vandkapacitet: 210 gal (795 L) 290 gal (1098 L)
Indvendig/udvendig diameter: 145/196 cm 165/216 cm
Højde: 71 cm
Bobleblæser: 1.1 HP / 220-240 V / 50 Hz
Filterpumpens gennemstrømningshastighed: 1,741 liter/time
Varmereffekt: 2,200 watt / 220-240 V / 50 Hz
Temperaturområde: 20ºC – 40ºC (68ºF – 104ºF)
Temperaturstigning:
1.5-2.5ºC/time (3ºF – 4.5ºF/time) 1-2ºC/time (2ºF – 3.5ºF/time)
Antal bobledyser:
120 (28404)
140 (28406)
140 (28408)
170 (28410)
Anbefalet driftsmæssigt lufttryk til spabadets kar:
0.083 bar (1.2 psi)
Page 30
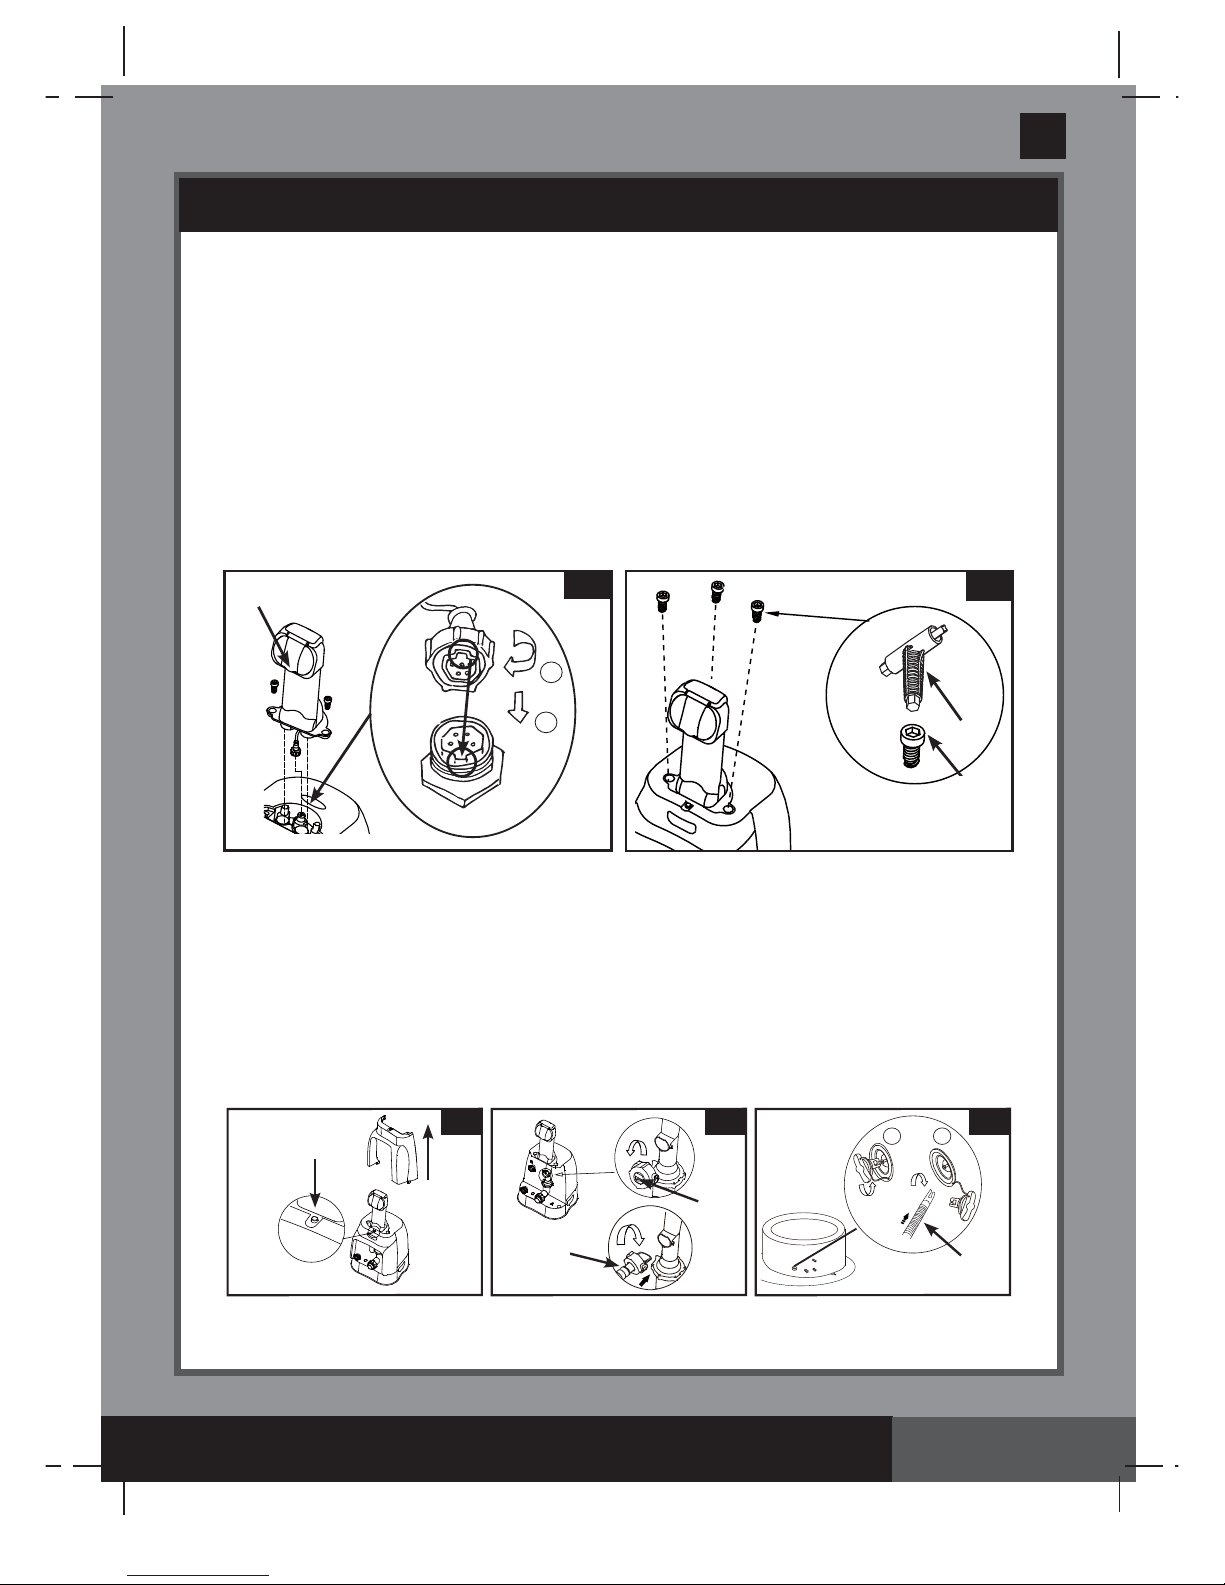
295
B
GEM DENNE VEJLEDNING
(295IO) SPA DANISH 7.5” X 10.3” PANTONE 295U 08/20/2016
Dansk
OPSTILLINGSVEJLEDNING (fortsat)
Opstil spabadet ved hjælp af mindst 2 personer.
1.
Flyt hele pakken til det valgte sted. Træk ikke spabadet henover jorden, idet dette kan forårsage skade
og lækage. Åbn emballagen forsigtigt, da denne emballage kan bruges til at opbevare spabadet under
langvarig opbevaring, eller når det ikke er i brug.
2.
Læg alle delene på gulvet, og sørg for, at alle delene følger med. Kontakt det passende Intex
servicecenter, som er anført på det særskilte ark “Autoriserede servicecentre” ved manglende eller
beskadigede dele.
Samling af spabadets kontrolenhed
1.
Sæt kontrolpanelets
(3)
kabel i stikkontakten øverst på spaens kontrolenhed, og skru stikket godt fast
med hånden
(se tegning 1)
.
2.
Skrue boltene
(4)
til kontrolpanelet ved hjælp af den medfølgende boltnøgle
(6)
for at sikre
kontrolenheden på plads
(se tegning 2)
.
3.
Sæt spabadets kontrolenhed i en jordforbundet stikkontakt.
Side 9
2
4
6
3
Tryk
4 5
5
7
7
1 2
Oppustning
Oppust spabadets karvæg
1.
Tag gulvunderlaget
(19)
ud, og fordel det over det ryddede område. Læg derefter spabadets tæppe
ovenpå gulvunderlaget, og peg dræningsventilen mod et passende dræningsområde.
BEMÆRK:
Spred underlaget, med boblerne nedad, over det ryddede område, hvor du vil opsætte dit
spabad.
2.
Tryk på knappen, der fi ndes øverst på kontrolbasen, og fjern det bageste dæksel
(se tegning 3)
.
3.
Løsn kontrolenhedens
(5)
ventilhætte for at få adgang til blæserens ventiludgang, sæt ventilslangens
ene ende
(7)
i udgangen, og drej mod højre for at låse den
(se tegning 4)
.
4.
Skru luftventilens hætte af for at afsløre spindlen i oppepositionen for oppustning. Indsæt den anden
ende af oppustningsslangen
(7)
i ventilen, og drej mod højre for at låse den på plads
(se tegning 5)
.
1
3
1
2
Page 31

295
B
GEM DENNE VEJLEDNING
(295IO) SPA DANISH 7.5” X 10.3” PANTONE 295U 08/20/2016
Dansk
Side 10
OPSTILLINGSVEJLEDNING (fortsat)
5.
Tryk på for at tænde for kontrolenhedens panelknapper først. Tryk på knappen for at puste
spabadets karvæg op, indtil den føles stram ved berøring, men ikke hård
(se tegning 6)
.
VIGTIGT:
Man må ikke oppuste for meget eller bruge en højtryksluftskompressor til at puste op.
6.
Tryk på knappen igen for at slå den fra.
7.
Kobl oppustningsslangen
(7)
fra luftventilen, og fastgør trykmåleren
(23)
til luftventilen. Trykmålerens
indikator skal være i det grønne område som indikation på, at spabadets kar er vel oppustet
(se
tegning 7)
. Gentag forrige trin for at puste mere luft i, hvis nødvendigt.
8.
Sæt luftventilens hætte tilbage på plads.
BEMÆRK:
Hætten er designet til at blive skruet på og af. Den må aldrig tvinges, idet det kunne
medføre, at ventilens komplette indvendige oppustningssystem bliver løst. Se “Fastgørelse af
luftventilen til spabadets kar” angående vedligeholdelse af ventilen.
Oppustning af luftblæren til spabadets dæksel
1.
Åbn oppustningsventilen, og indsæt
oppustningsslangen
(7)
i ventilen. Tryk på for
at puste op, indtil den er stram ved berøring, men
ikke hård
(se tegning 8)
.
2.
Kobl oppustningsslangen
(7)
fra både luftblæserens
oppustningsudgang og ventilen.
3.
Slut ventilhætten til kontrolenheden
(5)
igen, luk, og
nulstil pumpeventilen.
BEMÆRK:
Hvis der er behov for at puste mere luft i
spabadets karvæg eller i luftventilen til spabadets
dæksel, efter at de er blevet opstillet, skal du læse ovenfor i afsnittene “Oppustning af spabadets karvæg”
samt “Oppustning af luftblæren til spabadets dæksel”. Luftpuden sidder inden i spaens betræk. Hvis den
skal geninstalleres, skal du anbringe den uoppumpede luftpude inden i spaens betræk, før du pumper den
op.
Luftudsugning
Angående spabadets karvæg:
1.
Skru hætten af for at afsløre spindlen, tryk spindlen i,
og drej den 90 grader mod højre for at sikre den i
nedepositionen
(se tegning 9)
.
2.
Når luftudsugningen er færdig, skal du trykke spindlen
i og dreje den 90 grader mod venstre for at sætte den
tilbage til oppustningsposition.
3.
Sæt hætten tilbage på plads.
Angående dækslets luftblære:
1.
Træk ventilhætten ud, og klem ventilen i bunden, indtil den er tom.
2.
Luk og neddrej ventilen tilbage på plads.
9
8
7
6 7
23
1
2
Page 32

295
B
GEM DENNE VEJLEDNING
(295IO) SPA DANISH 7.5” X 10.3” PANTONE 295U 08/20/2016
Dansk
Side 11
OPSTILLINGSVEJLEDNING (fortsat)
Installation af spabadets kontrolenhed
1.
Slut spabadets kontrolenhed til spabadets kar
(se tegning 10)
. Stram konnektorerne godt fast med
hånden. Brug ikke værktøjer til at stramme.
2.
Monter det bageste dæksel
(2)
tilbage på spabadets kontrolbase
(se tegning 11).
Bagskærmen skal
være installeret inden SPA’en bruges.
FORSIGTIG:
Man må ikke sidde, dække eller anbringe objekter ovenpå spabadets kontrolenhed.
3.
Fastgør fi lterpatronhuset på indersiden af gitteret til spabadets
karudgang (nederste position, mærket med “C”)
(se tegning 12).
Pump først spaen op, før du installerer tilbehør til fi lterpumpen.
4.
Inden du fylder op med vand, skal du sørge for, at de nederste
dræningsventilhætter er lukket sikkert på både indersiden og
ydersiden.
5.
Fyld spabadet med ferskvand op til et vandniveau mellem
mærkerne MIN og MAX (MAKS) på indersiden af spabadets
karvæg. Fyld ikke spabadet for meget. Flyt aldrig spaen, når den
er fyldt med vand og/eller hvis kontrolenheden sidder fast på spaen,
da dette kan beskadige spa og kontrolenhed.
ADVARSEL:
Hæld aldrig vand med en højere temperatur end
40°C (104°F) direkte i spabadet. Det anbefales at fylde
spabadets kar med lunkent vand, så det varmer hurtigt op, og
der spares på strøm.
6.
Anbring spabadets dæksel og spabadets luftblære (forudmonteret i spabadets dæksel) ovenpå
spabadets kar, og sørg for, at spænderne til spabadets dæksel er låst ved hjælp af den medfølgende
nøgle, efter at stropperne er blevet spændt fast.
VIGTIGT:
Kontrollér spabadet regelmæssigt for lækage, for tidligt slitage og rivning eller forværring.
Brug aldrig et beskadiget dæksel til spabadet.
7.
Sørg for, at spaen er sluttet til en stikkontakt med jordforbindelse, og tryk derefter på for at tænde
for kontrolpanelets knapper først. Tryk på kontrolpanelet for at aktivere opvarmeren, se afsnittet
om spaens kontrolpanel for yderligere informationer.
11
2
10
A
B
C
B
C
A
12
C
Page 33

295
B
GEM DENNE VEJLEDNING
(295IO) SPA DANISH 7.5” X 10.3” PANTONE 295U 08/20/2016
Dansk
Side 12
BETJENINGSVEJLEDNING
SPABADETS KONTROLENHEDSPANEL
Knappen På/Af:
Når enheden er tilsluttet, skal du bruge denne knap til at aktivere
kontrolenhedens panelknapper. Lampen ved siden af knappen lyser grønt, når den er aktiveret.
Tryk på knappen for at slukke alle de funktioner, der allerede er aktiveret.
BEMÆRK:
Tænd/slukknappen kan være en sort knap i midten af kontrolenheden.
Knappen Opvarm:
Brug denne knap til at aktivere opvarmningssystemet. Pumpen vil
opvarme spavandet indtil vandtemperaturen når den indstillede temperatur. Varmesystemet
genstarter, når vandtemperaturen i spabadet falder til 1 - 2°C (1,8 - 3,6°F) under den indstillede
temperatur. Når lyset ovenpå knappen Opvarm er rødt, betyder det, at opvarmningssystemet
er aktiveret. Når fl ammeikonet lyser grønt, har vandet opnået den indstillede temperatur.
Varmesystemet går i dvale, mens fi ltreringssystemet vil arbejde uafbrudt.
BEMÆRK:
For at stoppe fi ltreringssystemet, mens varmeren er i dvaletilstand, skal du først
trykke på fl ammeknappen og derefter på fi lterknappen. Trykker du kun på fl ammeknappen,
mens varmesystemet er i dvaletilstand, vil du kun slukke for varmeanlægget, mens
fi ltreringssystemet vil fortsætte i yderligere 24 timer, før det slukker automatisk.
Drejeknappen Celsius/Fahrenheit:
Temperaturen kan vises enten i Fahrenheit eller Celsius. Standardværdien for systemet er
Celsius.
FORSIGTIG:
Brug ALDRIG spabadet, hvis den angivne vandtemperatur er højere end
40°C (104°F).
Knapperne til temperaturjustering:
Hvis knapperne Øg temperatur eller Reducer
temperatur trykkes, blinker lysdioden. Når den blinker, kan du justere den ønskede
temperaturindstilling. Hvis du holder disse knapper nede, øges eller reduceres værdierne hurtigt.
Den nye og ønskede temperaturindstilling forbliver på LED-displayet i 5 sekunder som
bekræftelse på den nye værdi.
BEMÆRK:
Standardtemperaturen er 20°C (68°F).
BEMÆRK:
Temperaturjustering varierer fra 20°C (68°F) til 40°C (104°F).
Knappen Vandfi lter:
Denne knap slår fi lterpumpen til og fra. Hvis opvarmningssystemet er aktiveret, starter
fi ltreringssystemet automatisk.
Lyset over Vandfi lterknappen lyser grønt, når den er aktiveret.
Knappen Bobler:
Brug denne knap til at aktivere massagesystemet, som har en automatisk
slukkefunktion på 30 minutter. Lyset over Bobleknappen lyser grønt, når den er aktiveret.
ADVARSEL:
Boblesystemet må ikke aktiveres, når dækslet er sat på, da luft kan samle sig inde
i spabadet og forårsage ubodelig skade og fysisk skade.
LED-display:
Når LED-displayet tændes, viser det vandtemperaturen automatisk.
BEMÆRK:
Det indbyggede hårdtvandssystem fungerer automatisk sammen med fi ltersystemet.
VIGTIGT:
Følgende forhold medfører langsom vandopvarmning.
• Omgivelsestemperaturen er lavere end 10°C (50°F).
• Udendørs vindhastighed er højere end 3,5 - 5,4 m/s (8 - 12 mil/t).
• Funktionen luftbobler aktiveres ved opvarmning af spabadets vand.
• Spabadet er ikke dækket korrekt med spabadets dæksel, når vandet opvarmes.
A: Knappen Opvarm
B: Drejeknappen Celsius/Fahrenheit
C: Knappen Øg temperatur
D: Knappen Reducer temperatur
E: Knappen Vandfi lter
F: Knappen Bobler
G: LED-display
H: Knappen På/Af
F
E
D
C
B
A
G
H
40
C
o
Page 34

295
B
GEM DENNE VEJLEDNING
(295IO) SPA DANISH 7.5” X 10.3” PANTONE 295U 08/20/2016
Dansk
Side 13
LED KODESKEMA
E90
Intet vandfl ow
• Sluk for kontrolenheden, og tag stikket ud.
• Sørg for, at udgangens dækningsgitter er rent
og frit for tilstopninger.
• Rens eller udskift patronen. Se afsnittet
Vedligeholdelse og opbevaring.
• Sørg for, at indgangs-/udgangsforbindelser på
spabadets kar samt fi lterpumpe ikke er blokeret.
• Hold spavandet ordentligt disinfi ceret for at
holde fi lterpatronen ren og undgå at den
tilstoppes.
• Kontakt Intex servicecenter, hvis problemet
varer ved.
E94
Vandtemperatur er for lav
• Hvis omgivelsestemperaturen er under 4°C
(39°F), fraråder vi at bruge spabadet.
• Sluk for kontrolenheden, og tag stikket ud,
Tilføj lidt varmt vand for at hæve spavandets
temperature til mere end 5°C (41°F). Tryk
derefter på knappen for at varme vandet
op til den ønskede temperatur.
• Kontakt Intex servicecenter, hvis problemet
varer ved.
E95
Vandtemperatur er omkring
50°C (122°F)
• Sluk for kontrolenheden, og tag stikket ud.
Når vandet er nedkølet, sluttes eller
HPFI-relæet til for at genstarte processen.
• Slå varmesystemet fra og tryk derefter på fi lter
og dyseknapperne for at sænke temperaturen.
• Kontakt Intex servicecenter, hvis problemet
varer ved.
E96
Systemfejl
• Sluk for kontrolenheden, og tag stikket ud,
Brug hætten til at stoppe vandet fra at løbe ud
af badet, adskil og tøm derefter styreenheden.
Saml styreenheden igen og sæt den på badet
igen. Sæt RCD-relæet og start forfra igen.
• Kontakt Intex servicecenter, hvis problemet
varer ved.
E97
Tørhed/brandbeskyttelse • Kontakte Intex service agent.
E99
Vandtemperaturføleren virker ikke • Kontakte Intex service agent.
END
Pumpen går automatisk i dvale
efter 72 timers uafbrudt
opvarmning. Hurtigfunktionerne
for opvarmning og fi ltrering bliver
afbrudt.
• Tryk på knappen vandfi lter for at aktivere
fi lterpumpen igen.
LED afl æsning ÅRSAG AFHJÆLPNING
Page 35

295
B
GEM DENNE VEJLEDNING
(295IO) SPA DANISH 7.5” X 10.3” PANTONE 295U 08/20/2016
Dansk
Side 14
VEDLIGEHOLDELSE OG KEMIKALIER
Opretholdelse af vandkvaliteten
Ejeren af spabadet skal regelmæssigt kontrollere og holde spabadets vand desinfi ceret ved hjælp af planlagt
vedligeholdelse (dagligt, hvis nødvendigt). Tilføjelse af desinfektionsmiddel og en anden kemikalie kontrollerer bakterier
og virus i spabadets vand. Vedligeholdelse af en korrekt vandbalance gennem passende brug af desinfektionsmidler er
den eneste og vigtigste faktor til maksimering af levetiden og udseendet af spabadets kar samt sikring af rent, sundt og
sikkert vand. Korrekt teknik er vigtig for vandtestning og behandling af spabadets vand. Besøg din pools/dit spabads
tekniker angående spørgsmål om kemikalier, desinfektion, testsæt og testprocedurer.
ADVARSEL:
FØLG ALTID KEMIKALIEPRODUCENTENS INSTRUKTIONER SAMT HELBREDS-OG
RISIKOADVARSLER.
Tilsæt ikke kemikalier, når spabadet er optaget. Dette kan give hud- eller øjenirritation.
Koncentrerede
kloropløsninger kan beskadige spabadets kar. "Intex Recreation Corp.", "Intex Development Co. Ltd.", relaterede
fi rmaer, autoriserede agenter, servicecentre, detailhandlere eller medarbejdere kan ikke i noget tilfælde gøres
ansvarlige overfor køber eller anden part for omkostninger i forbindelse med tab af vand, kemikalier eller vandskader.
Vedligeholdelse af spabadets vand og patron
Beskyt alle personer i spabadet mod mulige vandrelaterede sygdomme ved at holde spabadets vand rent og
desinfi ceret. Udøv altid god hygiejne. Følgende procedurer skal følges for at sikre passende kvalitet af spabadets
vand:
1.
Inspicer og rengør fi lterpatronen hver dag, og udskift fi lterpatronen hver 3. dag.
a.
Skru patronhuset af fra spabadets karvæg, og fjern patronen
(se
tegning 13)
.
b.
Brug en haveslange til at skylle patronen af. Hvis patronen stadigvæk er
snavset og misfarvet, skal den udskiftes. Hold reservepatroner ved
hånden.
c.
Monter den rene patron i patronhuset igen, og sæt patronhuset tilbage på
spabadets karvæg.
2.
Skift spabadets vand hver 3. dag. Find fl ere oplysninger i afsnittene “Dræning
af spabadets kar” og “Rengøring af spabadets kar”.
3.
Brug kemikalier til spabad til at opretholde korrekt vandkemi. Skade til
spabadet som følge af misbrug af kemikalier og forkert håndtering af
spabadets vand er ikke dækket af garantien.
4.
Alle personer i spabadet skal tage et brusebad, inden de går ind i spabadet.
Vandkemiens Balance
Bevar pH-niveauet i spabadets vand mellem 7,2 og 7,8, det samlede alkaliniveau mellem 80 og 120 ppm og det frie
klorniveau mellem 2 til 4 ppm. Brug de medfølgende teststrimler til at teste spabadets vandkemi før hver brug af
spabadet, og bliv ved med at teste vandet mindst én gang om ugen.
Med teststrimlerne kan du teste indholdet af frit klor, pH-værdien, vandets hårdhed og kalkindholdet på samme tid:
1.
Dyp hele strimlen i vand, og tag den straks op.
2.
Hold strimlen vandret i 15 sekunder (undlad at ryste overskydende vand af den).
3.
Sammenlign delene med fri klor, pH og samlet alkaliindhold på strimlen med farveskemaet på pakkens
mærkat. Reguler poolvandet efter behov.
BEMÆRK:
Kontrollér udløbsdatoen på testsættet, da testresultaterne kan være unøjagtige, hvis sættet anvendes efter
denne dato. Lavt pH beskadiger spabadets kar og pumpe. Skade som følge af kemikalieubalance er ikke dækket af
garantien.
Brug den medfølgende kemiske fl oateruddeler til at afl evere klor [kemisk tabletstørrelse: mindre end 2,5 cm (1”) i
diameter] i spabadets vand. Læg 1 tabletter i dispenseren. Anvisningerne fra kemikalieproducenten skal altid følges.
Fjern den kemiske fl oateruddeler, når spabadet er i brug.
Klor må aldrig komme i kontakt med spabadets kar, hvis den ikke er helt opløst.
VIGTIGT:
Tryk på knappen på spabadets kontrolpanel for at tænde bobleblæseren og hjælpe med at opløse
kemikalierne i vandet.
Kemikalier må aldrig blandes sammen. Tilsæt kemikalierne til spabadets vand hver for sig. Hver kemikalie skal opløses
grundigt, før en anden kemikalie tilsættes til vandet.
ADVARSEL
Tag altid stikket ud af stikkontakten, før du fl ytter produktet, gør det rent, udfører service på det
eller foretager justeringer af det.
13
14
12
13
Page 36

295
B
GEM DENNE VEJLEDNING
(295IO) SPA DANISH 7.5” X 10.3” PANTONE 295U 08/20/2016
Dansk
SPAVANDETS KEMI OG BALANCE
Anbefalede stofkoncentrationer i poolvandet
Minimum Ideel Maksimum
Fri klor
2 ppm 2 - 4 ppm 5 ppm
pH
7.2 7.2 - 7.6 7.8
Samlet alkaliindhold (TA)
60 ppm 80 ppm 120 ppm
Vandets hårdhed (CaCO3)
100 ppm 150–250 ppm 350 ppm
Mætningsgrad (SI)
–0.3 0 +0.3
Vandtemperatur
20ºC / 68ºF 20–40ºC / 68–104ºF 40ºC / 104ºF
Fri klor:
er klorrester i spavandet.
Er værdien for lav – Utilstrækkeligt desinfektionsniveau.
Er værdien for høj – Kan forårsage lugtproblemer, hud- og øjenirritationer og tære metaller og andre materialer.
pH:
en værdi, der angiver, hvor surt eller basisk spavandet er.
Er værdien for lav – Kan der forekomme rust på metaldele, øjen- og hudirritation, ødelæggelse af det
samlede alkaliindhold.
Er værdien for høj – Kalkafl ejringer, grumset vand, forkortede fi ltrerings-/opvarmningsperioder, øjen- og
hudirritation, dårlig kloreffektivitet.
Samlet Alkaliindhold (TA):
Angiver vandets modstandsdygtighed over for ændringer i pH-værdien. Værdien
angiver, hvor hurtigt og hvor let pH-værdien ændres, så det samlede alkaliindhold skal altid reguleres, før
pH-værdien reguleres.
Er værdien for lav – Kan der forekomme rust på metaldele, øjen- og hudirritation. Et lavt alkaliindhold gør
pH-værdien ustabil.
Er værdien for høj – Kalkafl ejringer, grumset vand, forkortede fi ltrerings-/opvarmningsperioder, øjen- og
hudirritation, højt klorforbrug.
Vandets Hårdhed (CaCO
3
):
Angiver mængden af kalcium og magnesium, som er opløst i vandet.
Er værdien for lav – Gør det svært at afbalancere vandkvaliteten, kan medføre tæring af metalkomponenter,
øjen- og hudirritation og skummende vand.
Er værdien for høj – Kalkafl ejringer, grumset vand, øjen- og hudirritation, gør det svært at afbalancere
vandkvaliteten og nedsætter effektiviten af fi lteret/varmelegemet.
Mætningsgrad (SI):
temperatur, vandhårdhedsgrad, samlet alkalinitet og pH-værdi repræsenterer de vigtigste
faktorer, der påvirker kalkafl ejringer. Vandets evne til at forme kalkafl ejringer eller rust kan afl æses i
Mætningsgraden (SI):
SI = pH+TF+CF+AF-12.1
*Hvor: TF = Temperaturfaktor, CF = Hårdhedsgradsfaktor, AF = Samlet alkalinitetfaktor
Vandtemperatur
TF
Vandets Hårdhed
(ppm)
CF
Samlet
Alkaliindhold (ppm)
AF
(ºC) (ºF)
8 46 0.2 75 1.5 50 1.7
12 54 0.3 100 1.6 75 1.9
16 61 0.4 150 1.8 100 2.0
19 66 0.5 200 1.9 150 2.2
24 75 0.6 250 2.0 200 2.3
29 84 0.7 300 2.1 300 2.5
34 93 0.8 400 2.2 400 2.6
40 104 0.9 500 2.3 -- --
-- -- -- 1000 2.6 -- --
Test vandets pH-værdi, temperatur, hårdhedgrad og samlet alkalitet. Brug disse faktorer i SI ligningen.
SI = 0, vandet er i balance
Hvis SI > 0, kan det medføre kalkafl ejringer eller grumset vand.
Hvis SI < 0, kan det medføre øjen- & hudirritation og virke tærende på metaller.
SI anses for tilfredsstillende, hvis værdien ligger mellem -0.3 og +0.3. Nul ville være ideelt.
Side 15
Page 37

295
B
GEM DENNE VEJLEDNING
(295IO) SPA DANISH 7.5” X 10.3” PANTONE 295U 08/20/2016
Dansk
Side 16
SPAVANDETS KEMI OG BALANCE (fortsat)
Justering af Spabadets Vand
Sådan justeres spabadets vandkemi når værdierne er ude af balance.
ADVARSEL:
Følg altid anvisningerne
fra producenten af de kemiske produkter samt sundheds- og advarselssymbolerne.
Justering af den Samlet Alkalitet (TA)
Fjern spabadets dække for at ilte vandet og brug de medfølgende teststrimler til at kontrollere kemien. Sørg
først for at vandets klorniveau ligger mellem 2 og 4 ppm, da klor vil påvirke TA testresultatet.
Hvis TA-niveauet (og ikke pH) er højere end 120 ppm, kan du tilsætte saltsyre eller natriumbisulfat til at
sænke det.
Hvis TA-niveauet er lavere end 60 ppm, kan du tilsætte natriumbicarbonat.
For eksempel (til 4 voksne), hvis TA-niveauet er 180 ppm, vil den ønskede nedsættelse, udfra nedenstående
diagram, være 60 ppm, hvorfor du skal tilsætte 0,269 Lb (121 g) natriumbisulfat eller 0,101 qt (96 ml) saltsyre.
Viser teststrimlen en farve der ligger mellem 180 ppm og 240 ppm, men tæt på 180 ppm, kan du også tilføje
tilsætte 0,269 Lb (121,1 g) natriumbisulfat eller 0,101 qt (96 ml) saltsyre.
Giver afl æsningen en værdi der er højere end 240 ppm, skal du tilføje natriumbisulfat eller saltsyre til vandet
dråbevis indtil teststrimlen indikerer en værdi på 240 ppm. Derefter tilsætter du 0,528 Lb (238 g)
natriumbisulfat eller 0,202 qt (192 ml) saltsyre.
BEMÆRK:
Efter enhver justering, skal du teste vandet igen efter 24 timer og justere niveauerne igen om
nødvendigt.
Nedsætte den samlet alkalitet
Mængde af natriumbisulfat påkrævet for at sænke den samlede alkalitet
Hæve den samlede alkalitet
Mængde af natriumbicarbonat påkrævet for at hæve den samlede alkalitet
Mængde af saltsyre påkrævet for at sænke den samlede alkalitet
Justering af pH-værdi
Er pH-værdien stadig for høj eller for lav efter at den samlede alkalitet er nedsat til 120 ppm eller hævet til
80 ppm, kan du justere værdien som anvist i følgende diagram.
Ønsket niveau 60 ppm 80 ppm 100 ppm 120 ppm 140 ppm
Volumen:
210 gal / 795 L
0.269 Lb 0.358 Lb 0.448 Lb 0.528 Lb 0.627 Lb
121 g 161 g 202 g 238 g 283 g
Volumen:
290 gal / 1098 L
0.368 Lb 0.492 Lb 0.614 Lb 0.737 Lb 0.860 Lb
168 g 224 g 279 g 335 g 391 g
Ønsket niveau 20 ppm 40 ppm 60 ppm 80 ppm
Volumen:
210 gal / 795 L
0.059 Lb 0.118 Lb 0.178 Lb 0.237 Lb
27 g 53 g 80 g 107 g
Volumen:
290 gal / 1098 L
0.081 Lb 0.162 Lb 0.244 Lb 0.326 Lb
37 g 74 g 111 g 148 g
Ønsket niveau 60 ppm 80 ppm 100 ppm 120 ppm 140 ppm
Volumen:
210 gal / 795 L
0.101 qt 0.135 qt 0.169 qt 0.202 qt 0.234 qt
96 mL 128 mL 160 mL 192 mL 223 mL
Volumen:
290 gal / 1098 L
0.139 qt 0.185 qt 0.232 qt 0.278 qt 0.324 qt
132 mL 176 mL 220 mL 264 mL 308 mL
(Saltsyre: 31.45%)
Page 38

295
B
GEM DENNE VEJLEDNING
(295IO) SPA DANISH 7.5” X 10.3” PANTONE 295U 08/20/2016
Dansk
Side 17
Nedsætte pH-værdien
Nedsætte pH-værdien ved hjælp af saltsyre
SPAVANDETS KEMI OG BALANCE (fortsat)
Nedsætte pH-værdien ved hjælp af natriumbisulfat
Justering af hårdhedsgrad
Brug de medfølgende teststrimler til at undersøge vandets hårdhedsgrad og juster denne som anvist i
følgende diagram.
Nedsætte hårdhedsgraden
Hvis husstandens vand går igennem et blødgøringsnalæg, kan du nedsætte hårdhedsgraden ved at blande
spabadets hårde vand med det bløde vand som anvist i vandvolumen ratio-diagrammet herunder:
Oprindeligt niveau 1000 ppm 500 ppm 350 ppm 250 ppm
Ønsket niveau:
100 ppm
Vandvolumen ratio
(Vhårdt wand:Vblødt vand)
1:9 1:4 2:5 2:3
Nedsætte hårdhedsgraden ved hjælp af blødt vand
Hæve hårdhedsgraden
Hæve pH-værdien
Hæve pH-værdien ved hjælp af natriumbicarbonat
ADVARSEL
Saltsyre er en fl ydende opløsning af natriumbisulfat (NaHSO
4
) og en ætsende kemisk
væske. Håndtér alle kemikalier med stor forsigtighed og brug altid ekstra personale
værnemidler, herunder goggle og handsker. Det er meget vigtigt at undgå at få syre
på huden, tøjet eller i øjnene.
Volumen 210 gal (795 L) 290 gal (1098 L)
Samlet Alkaliindhold 120 ppm 80 ppm 120 ppm 80 ppm
Fra → Til
8.4→7.2
0.028 qt 0.018 qt 0.038 qt 0.025 qt
26 mL 18 mL 36 mL 24 mL
7.8→7.2
0.019 qt 0.013 qt 0.026 qt 0.017 qt
18 mL 12 mL 22 mL 16 mL
Volumen 210 gal (795 L) 290 gal (1098 L)
Samlet Alkaliindhold 120 ppm 80 ppm 120 ppm 80 ppm
Fra → Til
8.4→7.2
0.071 Lb 0.047 Lb 0.095 Lb 0.063 Lb
32 g 21 g 43 g 29 g
7.8→7.2
0.047 Lb 0.032 Lb 0.064 Lb 0.043 Lb
21 g 14 g 29 g 20 g
Volumen 210 gal (795 L) 290 gal (1098 L)
Samlet Alkaliindhold 120 ppm 80 ppm 120 ppm 80 ppm
Fra → Til 6.8→7.2
0.541 Lb 0.361 Lb 0.737 Lb 0.491 Lb
243 g 163 g 335 g 224 g
Volumen 210 gal (795 L) 290 gal (1098 L)
m (CaCl
2
) 0.197 Lb 89 g 0.269 Lb 122 g
Hvis spa-vandets hårdhedsgrad er lavere end 100 ppm, skal du tilsætte calciumchlorid.
Page 39

295
B
GEM DENNE VEJLEDNING
(295IO) SPA DANISH 7.5” X 10.3” PANTONE 295U 08/20/2016
Dansk
Dræning af spabadets kar
1.
Sluk for spaens kontrolenhed.
2.
Slut adapteren til dræningsventil til en haveslange, og peg den anden ende
på haveslangen mod et passende dræningsområde
(se tegning 14)
.
3.
Fjern hætten på dræningsventilen fra ydersiden af spabadets kar, og sæt
dræningsventiladapteren på dræningsventilen
(se tegning 14)
.
4.
Åbn hætten til dræningsventil fra indersiden af spabadets kar. Vand
begynder at løbe ud fra haveslangen.
5.
Når vandet holder op med at dræne, skal spabadets kontrolenhed kobles
fra spabadets karvæg. Løft spabadets karvæg fra den modsatte side af
drænet, og før alt overskydende vand til drænet, så spabadet kan tømmes
fuldstændigt
(se tegning 15)
.
6.
Slut ventilslangen
(7)
til blæserens ventiludgang på kontrolenheden.
7.
Tænd for spaen, tryk på , og ret derefter ventilslangen mod spaens
indgang/udgang og kontrolenhed for at fjerne eventuelt vand i rørsystemet
(se tegninger 16 og 17)
.
8.
Brug et rent håndklæde til at tørre alt overskydende vand og fugt på
spabadets kar og spabadets kontrolenhed af.
9.
Sørg for, at spabadets kar og spabadets kontrolenhed tørres grundigt.
BEMÆRK:
De medfølgende propper
(15)
kan bruges til at dække
konnektorerne til vandindgang og -udgang fra indersiden af spabadets kar
for at forhindre vand i at løbe ud.
Rengøring af spabadets kar
Hvis der er synligt snavs i vandet, eller hvis vandet bliver uklart, og den egnede
vandkemi udvasker det ikke, skal du skifte vandet og rengøre spabadets kar.
Find oplysninger om, hvordan spabadet skal drænes i afsnittet “Dræning af
spabadets kar”.
Fjern patronhuset fra indersiden af spabadets karvæg, mens spabadet er tomt,
og rens og/eller udskift fi lterpatronen. Brug en svamp og en mild sæbeopløsning
til at fjerne eventuel jord eller pletter på indersiden af spabadets væg. Skyl
grundigt, før du fylder op igen med rent vand.
VIGTIGT:
Brug ikke stålbomuld, hårdbørster eller slibende rengøringsmidler.
Fastgørelse af luftventilen til spabadets kar
Kontrollér luftventilen til spabadets kar for lækage og tæthed før brug. Hvis der
er luft, der siver ud af luftventilen, skal den medfølgende nøgle
(22)
bruges til at
stramme luftventilen på følgende måde:
1.
Sørg for, at spabadets kar er tom for luft, åbn luftventilens hætte, og indsæt
nøglen
(22)
i luftventilens legeme
(se tegning 18)
.
2.
Hold bagsiden af luftventilens base med den ene hånd fra indersiden af
spabadets karvæg, og drej nøglen
(22)
med uret.
VIGTIGT:
Luftventilens base må ikke justeres, når spabadet er i brug eller
fyldt med vand. Brug kun ventilskruenøglen, hvis luftventilen er løs eller der lækker vand fra bunden af
luftventilen. Stram ikke luftventilen for meget, da dette kan beskadige ventilen. Du skal sikre dig, at ventilen
er tætsiddende og ikke lækker.
Spabadets dæksel
Bemærk at dækslets hængsler er låsehængsler. Plastikposen med betjeningsvejledningen og andet tilbehør
indeholder også to nøgler. Hvert hængsel er markeret med "låst" og "åben" symboler for lette betjeningen: Sætte
nøglen i hængslets nøglehul og drej den til den ønskede position for henholdsvist at låse eller åbne hængslet.
For øget sikkerhed mod uautoriseret adgang, skal du altid lægge dækslet på, når spabadet ikke er i brug, og låse
alle hængsler. Nøglerne bør altid holdes utilgængelige for børn. Hvis du forlægger nøglerne, kan du bruge en
fl ad skruetrækker af lignende størrelse til at åbne eller låse hængslerne.
Kontrollér spabadet regelmæssigt for lækker, for tidligt slitage og rivning, skade eller tegn på forværring.
Man må aldrig bruge et slidt eller beskadiget dæksel: Det giver ikke det beskyttelsesniveau, der kræves til at
forhindre uovervåget adgang af børn til spabadet.
VEDLIGEHOLDELSE
Side 18
14
1
2
3
11
18
22
16
17
7
7
15
Page 40

295
B
GEM DENNE VEJLEDNING
(295IO) SPA DANISH 7.5” X 10.3” PANTONE 295U 08/20/2016
Dansk
Side 19
VEDLIGEHOLDELSE (fortsat)
1.
Dræn og rengør spabadet ved at følge afsnittene “Dræning af spabadets kar” og “Rengøring af spabadets
kar”.
2.
Følg opstillingsvejledning i omvendt rækkefølge for at tømme og adskille spabadets kar, spabadets
kontrolenhed og luftblæren til spabadets dæksel.
3.
Sådan lukker du luften ud af spaen og luftpuden:
a) Åbn hætte til luftudtag
(27)
med den medfølgende boltnøgle
(6)
(se tegning 19)
.
b) Sæt adapteren til luftudtagsslangen
(28)
i luftudtaget.
c) Sæt ventilslangen
(7)
over adapteren til luftudtagsslangen
(28)
.
d) Sæt den anden ende af ventilslangen i spaens eller luftpudens
ventil.
e) Tryk på luftbobbelknappen for at lukke luften ud.
f) Når du er færdig med at lukke luft ud, gentager du trinene
ovenfor i omvendt rækkefølge og sikrer dig, at hætten til
luftudtag
(27)
sidder ordentligt fast.
Advarsel:
Brug kun til formålet beskrevet i denne vejledning.
Hold luftslangen væk fra vand og små objekter under punkteringen
for at undgå at beskadige motoren.
4.
Sørg for, at alle spabadskomponenter og -tilbehør er blevet
grundigt renset og tørret før opbevaring. Lufttør spabadets kar i
solen i en time, før det foldes sammen.
5.
Fold spabadets kar løst, og undgå skarpe kanter for at forhindre skade eller lækage til spabadets karfor.
6.
Forbered yderligere nye patroner til næste brug.
7.
Spabadets kar og tilbehør skal opbevares et tørt opbevaringssted under kontrolleret temperatur mellem
0°C – 40°C (32°F – 104°F).
8.
Den originale emballage kan bruges til opbevaring.
VINTEROPBEVARING
Reparation af spabadets kar og dækslets luftblære
Brug den medfølgende reparationslap til at reparere en eventuel punktering:
• Rens og tør det område, der skal repareres, grundigt.
• Fjern lappens bagsidepapir, og tryk lappen godt fast på punkteringen. Udjævn overfl aden for at fjerne
eventuelle luftbobler under lappen.
VIGTIGT
Luftens omgivelsestemperaturer har indvirkning på det indvendige tryk af spabadets kar. Luft
i spabadets kar kan udvides og sammentrækkes med temperaturvariationer, hvilket medfører
reduceret tryk i spabadets kar. Hvis dette opstår, skal du simpelthen bruge den medfølgende
trykmåler til at kontrollere det indvendige lufttryk og puste mere luft i, hvis nødvendigt.
19
6
7
28
1
2
3
27
Page 41

295
B
GEM DENNE VEJLEDNING
(295IO) SPA DANISH 7.5” X 10.3” PANTONE 295U 08/20/2016
Dansk
Side 20
FEJLFINDINGSVEJLEDNING
INGEN VISNING I
DISPLAYET/SPAENS
KONTROLENHED VIRKER
IKKE
DER ER RØGET EN
SIKRING
OPVARMER IKKE
KORREKT
BOBLEBLÆSER VIRKER
IKKE
FILTERPUMPEN
FUNGERER IKKE
VAND ER IKKE RENT
PUMPEADAPTERE ER
IKKE NIVELLERET MED
SPABADETS ADAPTERE
KARRET HAR EN
MÆRKELIG FACON
KARRET TABER
LUFTTRYK
LÆK MELLEM SPAENS
OG KONTROLENHEDENS
SAMLELED
SPAEN LARMER MEGET
NÅR FILTERSYSTEMET
KØRER
• Spaen er ikke tilsluttet, eller der er slukket
for den.
• Kontrolpanelets ledningsstik sidder løst.
• Strømsvigt.
• RCD-anordning udløst.
• RCD-anordning i stykker.
• Sikringssystemet er ikke kraftigt nok.
• Sikringssystemet er overbelastet.
• Der er opstået en fejl i det elektriske system.
• Temperatur indstillet for lavt.
• Snavset fi lterpatron.
• Vandtemperaturen er faldet, mens
opvarmeren har stået på STANDY.
• Opvarmningselement svigtede.
• Pumpen er for varm.
• Snavset fi lterpatron.
• Filterpumpens indløb og/eller udløb er
tilstoppet.
• Filterpumpens motor fungerer ikke.
• Filterindsatsen er ikke monteret korrekt.
• Utilstrækkelig fi ltreringstid.
• Snavset fi lterpatron.
• Forkert vandvedligeholdelse.
• Filterpumpens indløb og/eller udløb er tilstoppet.
• En af PVC’ens karakteristika er, at den
ændrer form, hvilket er normalt.
• Ekstra lufttryk under stærkt sollys.
• Luftventilens hætte er løs.
• Luftventilens base er løs.
• Hul eller fl ækning på spabadets kar.
• Indgangs-/udgangsforbindelser til
spabadets kontrolenhed er ikke
strammet godt.
• Indgangs-/udgangs-O-ring til styring af
spabadet mangler.
• Kontrollér, at basens komponenter sidder
forsvarligt fast.
• Kontrollér, at underlaget er jævnt og fast.
• Spabadets fi ltermotor virker ikke.
• Sørg for, at stikker er sat i, og der er tændt for spaen.
• Sørg for, at stikket på kontrolenhedens ledning er
sluttet korrekt til kontrolenhedens stikkontakt.
• Kontrollér strømkilden.
• Nulstil RCD-anordningen.
• Kontakte Intex service agent.
• Sørg for, at sikringssystemet er tilstrækkeligt.
• Anskaf et sikringssystem specielt beregnet til spaen.
• Kontakt en autoriseret elektriker for at rette fejlen.
• Øg temperaturen, og overdæk spaen.
• Rengør eller udskift fi lterpatronen i god tid.
• Hvis varmesystemet er i DVALE-tilstand, tryk to gange
på fl ammeknappen for at varme vandet op til den
indstillede temperatur.
• Kontakte Intex service agent.
• Sluk for spaen, og tag stikket ud. Lad den køle af, og start forfra.
• Kontakte Intex service agent.
• Rengør eller udskift fi lterpatronen i god tid.
• Kontrollér og rens fi lterpumpens indløb/udløb
jævnligt.
• Kontakte Intex service agent.
• Sørg for, at fi lterindsatsen er korrekt monteret.
• Øg fi ltreringstiden.
• Rengør eller udskift fi lterpatronen i god tid.
• Sørg for at holde spavandet ordentligt disinfi ceret.
Læs anvisningerne fra kemikalieproducenten.
• Kontrollér og rens fi lterpumpens indløb/udløb jævnligt.
• Løft pumpen ved hjælp af et træbræt eller et
andet isoleret materiale for at få pumpens
adaptere på niveau med spabadets adaptere.
• Spabadet må ikke udsættes for direkte sollys i længere tid.
• Kontrollér lufttrykket, og lukke luft ud, hvis nødvendigt.
Under varmt vejr skal man kontrollere for at se, om der skal
lukkes luft ud. Dette gøres for at undgå enhver mulig skade
til karret.
• Sørg for, at luftventilens hætte er lukket.
• Fyld spaen med luft, og kontrollér derefter, at
luftventilens base er strammet (se afsnittet om,
hvordan ventilen fastgøres).
• Hæld fl ydende sæbe og vand i en sprøjtefl aske, og
sprøjt på samlingerne. Hvis der er en læk, bobler
den. Når du fi nder lækken, skal su rense og tørre
lækkeområdet, og efterfølgende skal du lægge den
reparationslap, der følger med spabadet, på.
• Stram indgangs- og udgangsforbindelser.
• Dæk o-ringen med petroleumsgelé for at gøre den
vandtæt.
• Fjern gitteret indefra med en skruetrækker. Sørg
derefter for, at indløbets/udløbets O-ring sidder
korrekt, er ren og ikke beskadiget.
• Sørg for, at kontrolpanelet, bagbeklædningen og alle
indløb/udløb er korrekt forbundet.
• Sørg for, at underlaget er jævnt og fast.
• Udskift den defekte fi ltermotor med en ny.
PROBLEM KONTROLLÉR MULIGE LØSNINGER
Page 42

295
B
GEM DENNE VEJLEDNING
(295IO) SPA DANISH 7.5” X 10.3” PANTONE 295U 08/20/2016
Dansk
BEGRÆNSET GARANTI
Side 21
Dit PureSpa er blevet fremstillet ved hjælp af materialer og arbejdskraft af højeste kvalitet. Alle
Intex-produkter er blevet kontrolleret og er fri for defekter ved deres afsendelse fra fabrikken. Denne
begrænset garanti gælder kun for det PureSpa, der anføres nedenfor.
Denne begrænsede garanti er et tillæg til, og ikke en erstatning for, dine juridiske rettigheder og
retsmidler. I tilfælde, hvor denne garanti er i modstrid med dine juridiske rettigheder, prioriteres dine
rettigheder. For eksempel yder forbrugerlovgivning i hele EU lovpligtig garantirettigheder ud over
dækningen, du for af denne begrænsede garanti: Du kan læse mere om den EU-dækkende
forbrugerlovgivning på det europæiske forbrugercenter på http://ec.Europa.EU/consumers/ECC/
contact_en/htm.
Bestemmelserne i denne begrænsede garanti gælder kun for den oprindelige køber og kan ikke
overdrages. Denne begrænsede garanti gælder i en periode på ét (1) år fra købsdatoen. Gem den
originale kvittering sammen med denne brugsanvisning som dokumentation for køb af produktet ved
fremsættelse af krav under garantien; i modsat fald bortfalder den begrænsede garanti.
PureSpa-garanti – 1 år
Hvis en fabrikationsfejl fi ndes inden for de frister, nævnt ovenfor, bedes du kontakte et af Intex’
servicecentre som fi ndes på den separate oversigt over autoriserede servicecentre. Hvis enheden
returneres som instrueret af Intex Service Center, vil servicecenteret inspicere enheden og evaluere
validiteten af kravet. Hvis varen er dækket af bestemmelserne i garantien, repareres eller udskiftes
varen, med den samme eller tilsvarende vare (efter Intexs eget valg), uden beregning.
Udover denne garanti, og andre juridiske rettigheder i dit land, er ingen yderligere garantier
underforstået. I omfanget, hvor det er muligt i dit land, er Intex under ingen omstændigheder
ansvarlig for dig eller nogen tredjepart for direkte eller indirekte skader, som følge af brugen af din
PureSpa, eller Intexs eller deres agenters og medarbejdernes handlinger (herunder fremstilling af
produktet). Nogle lande, eller juridiske områder tillader ikke udelukkelsen eller begrænsningen af
tilfældige eller følgeskader, derfor kan ovenstående begrænsning eller udelukkelse ikke nødvendigvis
være gældende for dig.
Bemærk venligst, at denne begrænsede garanti ikke gælder i følgende tilfælde:
• Hvis PureSpa forsømmes, bruges på unormal vis, udsættes for en ulykke, ukorrekt betjening,
forkert spænding eller strøm, der er i strid med instruktionerne, forkert vedligeholdelse eller
opbevaring;
• Hvis PureSpa beskadiges pga. omstændigheder, der er uden for Intexs kontrol, herunder, men ikke
begrænset til, almindelig slidtage og skader, som følge af brand, oversvømmelse, frysning, regn
eller andre miljømæssige kræfter;
• Hvis dit PureSpa bruges til kommercielle formål;
• Dele og komponenter, der ikke sælges af Intex; og/eller.
• Uautoriserede ændringer, reparationer eller adskillelse af PureSpa af nogen andre end Intexs
servicepersonale.
Omkostninger forbundet med tab af poolvand, kemikalier eller vandskade er ikke omfattet af denne
garanti. Personskade eller tingsskade er ikke omfattet af denne garanti.
Læs vejledningen grundigt, og følg alle instruktioner om betjening og vedligeholdelse af din PureSpa.
Kontrollér altid luftmadrassen, før du bruger den. Din begrænsede garanti kan annulleres hvis
instruktionerne ikke følges.
Page 43

295
A
(295IO) SPA SWEDISH 7.5” X 10.3” PANTONE 295U 08/20/2016
Swedish
BRUKSANVISNING
PureSpa™
SSP-H-20-1C
VIKTIGA
SÄKERHETSREGLER
Innan du monterar och använder den här
produkten ska du läsa, förstå och noga
följa alla anvisningar. Spara
för framtida bruk.
Prova även dessa utmärkta produkter från Intex: pooler,
pooltillbehör, uppblåsbara pooler, leksaker, luftmadrasser och
båtar. Du hittar dem hos en återförsäljare eller på vår webbsida.
P.g.a. en policy gällande kontinuerlig produktförbättring
reserverar sig Intex rätten att ändra specifi kationerna och
utseendet, vilket kan resultera i uppdateringar av
bruksanvisningen utan förvarning.
©2016 Intex Marketing Ltd. - Intex Development Co. Ltd. - Intex Trading Ltd.
- Intex Recreation Corp.
All rights reserved/Tous droits réservés/Todos los derechos reservados/Alle Rechte
vorbehalten. Printed in China/Imprimé en Chine/Impreso en China/Gedruckt in China.
®™ Trademarks used in some countries of the world under license from/®™ Marques utilisées dans certains pays sous licence de/
Marcas registradas utilizadas en algunos países del mundo bajo licencia de/Warenzeichen verwendet in einigen Ländern der Welt in
Lizenz von/
Intex Marketing Ltd. to/à/a/an Intex Trading Ltd., Intex Development Co. Ltd., G.P.O Box 28829, Hong Kong & Intex
Recreation Corp., P.O. Box 1440, Long Beach, CA 90801
• Distributed in the European Union by/Distribué dans l’Union Européenne
par/Distribuido en la unión Europea por/Vertrieb in der Europäischen Union durch/
Intex Trading B.V., Venneveld 9, 4705 RR
Roosendaal – The Netherlands
www.intexcorp.com
Endast som illustration.
Page 44

295
A
SPARA DENNA BRUKSANVISNING
(295IO) SPA SWEDISH 7.5” X 10.3” PANTONE 295U 08/20/2016
Swedish
Sidan 2
Varningar...................................................................................... 3-5
Lista över komponenter.............................................................. 6-7
Monteringsanvisningar................................................................ 8-11
Driftsinstruktioner........................................................................ 12
Tabell för alarmkoder och lysdiodkoder.................................... 13
Underhåll och kemikalier........................................................ 14-19
Långtidsförvaring.......................................................................... 19
Felsökningsguidee........................................................................ 20
Begränsad garanti......................................................................... 21
Page 45

295
A
SPARA DENNA BRUKSANVISNING
(295IO) SPA SWEDISH 7.5” X 10.3” PANTONE 295U 08/20/2016
Swedish
Sidan 3
VIKTIGA SÄKERHETSREGLER
Innan du monterar och använder den här produkten ska du läsa, förstå och noga följa alla anvisningar.
LÄS OCH FÖLJ ALLA ANVISNINGAR
• Drunkningsrisk. Stor försiktighet måste iakttas för att förhindra barn från obehörig åtkomst. För att
undvika olyckor, se till att barn inte kan använda detta spa om de inte är övervakade hela tiden.
• Drunkningsrisk. Inspektera spaöverdraget regelbundet för läckage, förtida slitage, skador, eller
tecken på försämringar. Använd aldrig ett slitet eller skadat överdrag: det kommer inte att ge den
skyddsnivå som krävs för att förhindra oövervakad tillgång till spaet av ett barn.
• Risk för skada. Byt ut skadade elsladdar omedelbart.
• Risk för elektriska stötar. Se till att inte ha någon elektrisk apparat, såsom en lampa, telefon, radio
eller TV, inom 3,5 m (11,5 fot) av ett spa eller en varmbadpool.
• Risk för elektriska stötar. Använd inte spaet när det regnar, åskar eller blixtrar.
• Spaets elektriska apparat bör anslutas via en jordfelsbrytare, som har en märkström som inte
överstiger 30 mA.
• Spaets elektriska apparat innefattar en portabel jordfelsbrytare (PRCD) med en märkström på
10 mA. Om läckström på mer än 10 mA detekteras kommer jordfelsbrytaren att aktiveras och
stänga av strömförsörjningen. Om detta inträffar, koppla omedelbart ur spaet och upphör all
användning. Du måste kontakta ett lokalt servicecenter för hjälp och/eller reparation av produkten.
• Delar som innehåller spänningsförande delar, med undantag av delar som levereras med extra
låg spänning som inte överstiger 12 V, måste vara oåtkomlig för en person i spabadet.
• Elinstallationen ska uppfylla kraven i lokala nationella standarder.
• Delar som innehåller elektriska komponenter, med undantag för fjärrkontrollenheter, måste
lokaliseras eller fästas så att de inte kan falla in i spabadet.
• För att minska risken för skador, tillåt inte barn att använda denna produkt såvida de inte är under
noggrann uppsikt vid alla tidpunkter.
• Barn bör inte använda spabadet eller varmbadpool utan uppsikt av vuxen.
• För att minska risken att ett barn drunknar, övervaka barn hela tiden. Fäst och lås spa-överdraget
efter varje användning.
• För att minska risken för personskador:
a)Vattnet i ett spabad bör aldrig överstiga 40 °C (104 °F). Vattentemperaturer mellan 38 °C
(100 °F) och 40 °C (104 °F) anses vara säkert för en frisk vuxen person. Lägre
vattentemperaturer rekommenderas för yngre barn och när de använder spabadet mer än 10
minuter.
b)Eftersom höga vattentemperaturer innebär en stor risk för fosterskador under de första
månaderna av graviditeten, bör spabadets vattentemperaturer begränsas till 38 °C (100 °F) för
gravida eller möjligen gravida kvinnor.
c)Innan man sätter sig i ett spabad eller varmbadpool, bör användaren mäta vattentemperaturen
med en korrekt termometer då toleransen på vattentemperaturens reglerdon varierar.
d)Användning av alkohol, droger eller läkemedel före eller under användningen av spabadet kan
leda till medvetslöshet med risk för drunkningsolycka.
e)Överviktiga personer med en historia av hjärtsjukdomar, lågt eller högt blodtryck, problem med
blodcirkulationen eller diabetes bör konsultera en läkare innan de använder ett spabad.
FARA
VARNING!
Page 46

295
A
SPARA DENNA BRUKSANVISNING
(295IO) SPA SWEDISH 7.5” X 10.3” PANTONE 295U 08/20/2016
Swedish
Sidan 4
f) Personer som använder läkemedel bör rådfråga en läkare, innan de använder ett spabad då vissa mediciner
kan framkalla trötthet medan andra mediciner kan påverka hjärtfrekvensen, blodtrycket och cirkulationen.
g) Personer som använder läkemedel och/eller har en negativ medicinsk historia bör konsultera en läkare innan
de använder ett spabad eller varmbadpool.
h) Kontrollera med en läkare innan användning, om man är gravid, diabetiker, i dålig hälsa, eller under läkarvård.
• Personer med smittsamma sjukdomar bör inte använda spabad eller varmbadpool.
• För att undvika skador utöva försiktighet när du tar dig in eller ut från spabadet eller varmbadpoolen.
• Använd inte droger eller alkohol innan eller under användning av ett spabad eller varmbadpool för att undvika
medvetslöshet och möjlig drunkning.
• Gravida och misstänkt gravida kvinnor bör rådfråga en läkare innan de använder ett spabad eller varmbadpool.
• Vattentemperatur över 38 °C grader kan vara skadlig för din hälsa.
• Använd inte ett spa eller en varmbadpool direkt efter ett ansträngande träningspass.
• Långvarigt badande i ett spabad eller varmbadpool kan vara skadligt för din hälsa.
• Vid graviditet, kan liggande i hett vatten under långa perioder skada ditt foster. Mät vattentemperaturen innan
du går i. Sätt dig inte i spabadet om vattnet är varmare än 38 °C (100 °F). Stanna inte längre än 10 minuter i
spabadet.
• Värmen från spabadet i kombination med alkohol, droger eller medicin kan orsaka medvetslöshet.
• Avsluta badandet omedelbart om du känner dig obekväm, yr eller sömnig. Värmen från spabadet kan orsaka
förhöjd kroppstemperatur och medvetslöshet.
• Orsakerna, symptomen och effekterna av förhöjd kroppstemperatur kan beskrivas på följande sätt: Förhöjd
kroppstemperatur inträffar när den interna temperaturen i kroppen når en nivå fl era grader högre än kroppens
normala temperatur på 37 °C (98,6 °F). Symptomen på förhöjd kroppstemperatur innefattar en ökning av den
interna temperatur i kroppen, yrsel, slöhet, sömnighet, och svimning. Effekterna av förhöjd kroppstemperatur
innefattar felbedömningen att uppfatta värme; oförmåga att uppfatta när man ska avsluta spabadet eller
varmbadpoolen; omedvetenhet om hotande fara; fosterskador hos gravida kvinnor; fysisk oförmåga att ta sig
ur spabadet eller varmbadpoolen; med medvetslöshet som resulterar i risk för drunkningsolycka.
• Användning av alkohol, droger eller läkemedel kan kraftigt öka risken för dödlig förhöjd kroppstemperatur i
varmbadpool och spabad.
• Tillsätt aldrig vatten till kemikalier, utan kemikalier i vatten. Tillsättning av vatten till kemikalier kan orsaka
starka ångor eller våldsamma reaktioner och farligt kemisk sprej.
• Hoppa eller dyk aldrig i ett spabad eller i något grunt vattendrag.
• Montering och demontering ska endast göras av vuxna.
• Denna apparat kan användas av barn från 8 år och uppåt och personer med nedsatt fysisk eller mental
förmåga eller brist på erfarenhet och kunskap, under förutsättningen att de övervakas eller fått instruktioner
om hur man använder apparaten på ett säkert sätt och är medvetna om riskerna. Barn får inte leka med
apparaten. Rengöring och underhåll måste utföras av en vuxen som är över 18 år gammal och är medveten
om risken för elektriska stötar.
• Ingen del av den elektriska apparaten ska vara placerad ovanför badet vid användning.
• Håll kontakten på denna produkt mer än 4m bort från spabadet och på en höjd av 1,2 m minst.
• Koppla alltid ur produkten från eluttaget före borttagning, rengöring, service eller vid justering av produkten,
samt under regniga dagar.
• Gräv inte ner den elektriska sladden. Placera elsladden där den inte kommer att skadas av gräsklippare,
häcksaxar och annan utrustning.
• Om sladden är skadad måste den bytas ut av en behörig elektriker för att undvika fara. Använd endast
identiska reservdelar vid underhåll.
VARNING!
Page 47

295
A
SPARA DENNA BRUKSANVISNING
(295IO) SPA SWEDISH 7.5” X 10.3” PANTONE 295U 08/20/2016
Swedish
TEST
RESET
RESET
TEST
TEST
RESET
RESET
TEST
TEST
Sidan 5
• Håll alltid kontakten torr. Det är strängt förbjudet att ansluta en blöt stickkontakt!
• SPAETS stickkontakt måste anslutas direkt till ett jordat vägguttag från en fast elinstallation.
• För att minska risken för elektriska stötar, använd inte förlängningssladdar, timers, adapters eller
konverteringsadapter för att ansluta enheten till elnätet; tillhandahåll ett korrekt beläget uttag.
• Försök inte att koppla in eller ur den här produkten när du står i vatten eller när händerna är blöta.
• Lämna inte spabadet tomt under en längre tid. Utsätt inte spabadet för direkt solsken.
• När apparaten inte ska användas under en längre tidsperiod, t.ex. under vintern, ska spat
monteras isär och förvaras inomhus.
• Låt inte vattnet i spaet frysa. Slå inte på spaet när vattnet är fruset.
• Använd inte spaet om det skadats vid leveransen och/eller har funktionsfel på något sätt.
Kontakta Intex servicecenter för ytterligare direktiv.
• Använd aldrig spabadet ensamt eller tillåta andra att använda spaet ensamt.
• Häll aldrig i vatten med en temperatur högre än 40 °C (104 °F) direkt i spabadet.
• Håll alla husdjur borta från spabadet för att undvika skador.
• Lägg inte badolja eller badsalt i badvattnet.
• Spabadet måste ställas upp på en jämn, plan och slät yta, som är i stånd att bära den största
belastningen av det fyllda spabadet med fyra vuxna i badet; vikt 1136 kg; 6 vuxna: 1592 kg.
• Sörj för god dränering runt spaet för att ta itu med översvämmat vatten och stänk.
VARNING!
VARNING
• Bibehåll vattnets kemi enligt tillverkarens instruktioner.
• Produkten är försedd med en jordfelsbrytare som ligger i slutet av elsladden. Jordfelsbrytaren
måste testas före varje användning. Använd inte spaet om jordfelsbrytaren inte fungerar
korrekt. Koppla bort nätsladden förrän felet har identifi erats och åtgärdats. Kontakta en behörig
elektriker för att åtgärda felet. Kringgå inte jordfelsbrytaren. Det fi nns inga reservdelar inuti
jordfelsbrytaren. Garantin blir ogiltig om jordfelsbrytaren öppnas.
1.
Tryck på knappen
RESET
på jordfelsbrytaren.
2.
Slå på spaets elektriska utrustning.
3.
Tryck på knappen
TEST
på jordfelsbrytaren. Jordfelsbrytarens
indikator bör slås av och den elektriska utrustningen ska stängas
av. Om indikatorn till jordfelsbrytaren inte stängs av, och den
elektriska utrustningen inte slås av, är jordfelsbrytaren defekt.
Använd inte spaet. Kontakta en behörig elektriker för att åtgärda
felet.
4.
Tryck på
RESET
-knapp på RCD. Indikatorn på jordfelsbrytaren
bör slås på. Om jordfelsbrytarens indikator inte tänds, är j
ordfelsbrytaren defekt. Använd inte spaet. Kontakta en behörig
elektriker omedelbart för att korrigera felet.
VARNING!
Page 48

295
A
SPARA DENNA BRUKSANVISNING
(295IO) SPA SWEDISH 7.5” X 10.3” PANTONE 295U 08/20/2016
Swedish
Sidan 6
LISTA ÖVER KOMPONENTER
Innan du monterar produkten bör du under några minuter kontrollera innehållet och bekanta
dig med alla komponenter.
OBS!
Ritningarna är endast i illustrationssyfte. Det kan hända att det inte är den aktuella
produkten som visas. Ej skalenlig.
8
10
11
18
17
19
9
21
23
22
2
6
7
3
4
5
12
13
14
15
16
20
24
25
26
A
B
C
28
29
27
1
Page 49

295
A
SPARA DENNA BRUKSANVISNING
(295IO) SPA SWEDISH 7.5” X 10.3” PANTONE 295U 08/20/2016
Swedish
Ange modellnummer och artikelnummer när du beställer delar.
LISTA ÖVER KOMPONENTER (fortsättning)
Innan du monterar produkten bör du under några minuter kontrollera innehållet och
bekanta dig med alla komponenter.
Sidan 7
REF.
NR.
BESKRIVNING ANTAL
RESERVDELS. VANLIG NUMMER
4 VUXNA 6 VUXNA
28404 28406 28408 28410
1 KONTROLLBAS 1 12320 12320B 12320 12320B
2 KONTROLLBASENS BAKSIDA 1 11719 11719B 11719 11719B
3 KONTROLLPANEL (#4 INGÅR) 1 11930 11930B 11930 11930B
4 KONTROLLPANELENS BULT 3 11024 11024B 11024 11024B
5 KONTROLLBASENS UPPBLÅSNINGSLOCK 1 11831 11831B 11831 11831B
6 KONTROLLPANELENS BULTNYCKEL 1 11053 11053 11053 11053
7 SPA/ÖVERDRAG UPPBLÅSNINGSSLANG 1 11830 11830 11830 11830
8 SPA KONTROL AV INLOPPETS/UTLOPPETS O-RING 2 11699 11699 11699 11699
9 SPA KONTROLL AV LUFTINLOPPETS O-RING 1 11687 11687 11687 11687
10 SPAETS AVTAPPNINGSPLUGG 1 11696 11696B 11696 11696B
11 TÖMNINGSVENTILENS ADAPTER TILL SPAET 1 11718 11718 11718 11718
12 FILTERPATRONHUS 1 11798 11798 11798 11798
13 FILTERPATRON 2 11692 11692 11692 11692
14 LOCK TILL HUSET MED FILTERPATRON 1 11797 11797 11797 11797
15 PLUGG TILL INLOPP/UTLOPP 3 11739 11739 11739 11739
16 SPABAD 1 11842 12260 12106 12258
17 SPA ÖVERDRAG 1 11841 12261 12107 12256
18
SPA ÖVERDRAG MED UPPBLÅSBAR LUFTSPALTIGA
DEL (FÖRINSTALLERAD I SPA-ÖVERDRAGET)
1 11689 11689 12108 12108
19 MARKDUK 1 11717 11717 12109 12109
20 KEMISK DISPENSER 1 11614 11614 11614 11614
21 TESTREMSOR 1 11855 11855 11855 11855
22 SKIFTNYCKEL 1 11742 11742 11742 11742
23 TRYCKMÄTARE 1 11741 11741 11741 11741
24 ADAPTER UPPBLÅSNINGSSLANG 1 11829 11829 11829 11829
25 HANDEL SPÄNNE 6 11698 11698B 11698 11698B
26 HONDEL SPÄNNE 6 11799 11799B 11799 11799B
27 UTBLÅSNINGSHYLSA 1 11934 11934B 11934 11934B
28 UTBLÅSNINGS SLANGADAPTER 1 11935 11935 11935 11935
29
SPAFILTERMOTOR
1 11886 11886B 11886 11886B
Page 50

295
A
SPARA DENNA BRUKSANVISNING
(295IO) SPA SWEDISH 7.5” X 10.3” PANTONE 295U 08/20/2016
Swedish
Sidan 8
PRODUKTSPECIFIKA TIONER
MONTERINGSANVISNING
Kabelanslutet spabad med pump, värmare, fl äkt, inbyggd behandling för hårt vatten och kontrollpanel.
Denna produkt kräver ett minimum av 13 ampere. Om kretslösaren löses ut, kontrollera att inga andra
apparater eller andra höga belastningar är på samma krets som spat.
Iordningställande och krav på platsen
• Spaet kan installeras inomhus eller utomhus. Endast för hushåll.
• Se till att området är fritt från vassa föremål under eller runt spabadet.
• Tillhandahålla ett korrekt lokaliserat vägguttag för att ansluta spabadet och ge enkel åtkomst för periodisk
provning av sladden monterad på jordfelsbrytaren.
• Se till att det fi nns tillräckligt med utrymme runt spabadet för full tillgång till spa-utrustning för underhåll
och/eller service.
• Området ska underlätta dräneringsändamål under långvarig förvaring av spabadet.
Ytterligare krav på installation inomhus
• Se till att golvet kan bära hela tyngden av det fyllda spabadet med maximalt antal badande. Kontrollera
med en kvalifi cerad entreprenör eller en byggnadsingenjör för att kontrollera detta krav.
• Se till att golvet är vattenavvisande och halkfri yta. Installera inte spabadet på matta eller annat material
som kan skadas av fukt, och kondens.
• Installera inte spabadet inomhus på övervåningen över färdig boyta på grund av risken för vatten -och
fuktskador.
• Fukt är en naturlig bieffekt av att ha ett inomhus-spa installerat. Rummet ska vara väl ventilerat, så att fukt
kan ta sig ut. Installera ett ventilationssystem för att förhindra kraftig kondens, och fukt i rummet.
Ytterligare krav på installation utomhus
• Ägare av ett spabad kan behöva överensstämma med lokala eller statliga lagar om barnsäkra staket,
säkerhetsbarriärer, belysning och andra säkerhetskrav. Kontakta ditt lokala byggnadskontor för
verkställighet, för ytterligare detaljer.
• Se till att ytan är jämn, plan, slät och stark nog att bära hela tyngden av det vattenfyllda spabadet.
• Undvik att ställa upp spabadet på gräs eller smuts, eftersom detta ökar mängden skräp som letar sig in i
spabadet, och skadar spa golvet.
• Utsätt inte spabadet för direkt solljus under en längre tid.
• Det är möjligt att installera och lämna spabadet utomhus vid en temperatur som inte understiger 4 °C
(39 °F) under förutsättning att vattentemperaturen i spabadet är högre än 4 °C (39 °F) och vattnet inne i
cirkulationssystemet, pump, och rör inte har fryst. Sätt dit en “temporär mattbarriär“ mellan spa golvet och
marken för att förhindra värmeförlust från botten av spabadet och tillhandahålla bättre värmeisolering.
Maximal platskapacitet: 4 vuxna 6 vuxna
Vattenkapacitet: 210 gal (795 L) 290 gal (1098 L)
Inre/yttre diameter: 57/77 in (145/196 cm) 65/85 in (165/216 cm)
Höjd: 28 in (71 cm)
Utblåsningsanordning för bubblor: 1.1 HP / 220 - 240 V / 50 Hz
Filterpumpens fl ödeshastighet: 460 gal/tim (1741 L/tim)
Effekt från värmeapparat: 2200 Watts / 220 - 240 V / 50 Hz
Temperaturområde: 20 ºC - 40 ºC (68 ºF - 104 ºF)
Temperaturstegring:
1.5 - 2.5 ºC/tim (3 ºF - 4.5 ºF/tim) 1 - 2 ºC/tim (2 ºF - 3.5 ºF/tim)
Antal jetstrålar med bubblor:
120 (28404)
140 (28406)
140 (28408)
170 (28410)
Rekommenderat effektivt lufttryck för spabadet: 0.083 bar (1.2 psi)
Page 51

295
A
SPARA DENNA BRUKSANVISNING
(295IO) SPA SWEDISH 7.5” X 10.3” PANTONE 295U 08/20/2016
Swedish
MONTERINGSANVISNING (FORTS.)
Sätt upp spaet med minst 2 personer.
1.
Flytta hela paketet till den valda platsen. Släpa inte spabadet över marken då detta kan orsaka skador
och läckage. Öppna kartongen försiktigt då den kan användas för att förvara spabadet vid
långtidsförvaring eller när den inte används.
2.
Lägg ut alla delar på plats och se till att alla delar fi nns med. För saknade eller skadade delar, kontakta
lämplig Intex servicecenter som anges i det separata bladet "auktoriserade serviceverkstäder".
Montering av kontrollenheten för spaet
1.
Anslut kontrollpanelens
(3)
kabelkontakt i uttaget ovanpå spakontrollbasen och skruva ordentligt in
kontaktkåpan för hand
(se ritning 1)
.
2.
Skruva fast bultarna på kontrollpanelen
(4)
med den medföljande bultnyckel
(6)
för att säkra
kontrollpanelen
(se ritning 2)
.
3.
Anslut spaets kontrollenhet till ett jordat eluttag.
Sidan 9
3
Tryck
4 5
5
7
7
1 2
Uppumpning
Pumpa luft i spabadets vägg
1.
Ta ut markduken
(19)
och sprid den över det röjda området. Sprid sedan ut spaets liner över markduken
och peka tömningsventilen mot ett lämpligt dräneringsområde.
OBS!
Sprid ut markduken med
bubblorna nedåt över området som rensats för placeringen av ditt spa.
2.
Tryck på knappen som är placerad ovanpå kontrollbasen och ta bort bakstycket
(se ritning 3)
.
3.
Skruva loss kontrollbasens uppblåsningslock
(5)
för att frilägga fl äktens luftutlopp, sätt in den ena änden
av uppblåsningsslangen
(7)
i utloppet och vrid åt höger för att låsa den
(se ritning 4)
.
4.
Skruva av locket på luftventilen och visa stammen i det övre läget för uppblåsning. För in i den andra
änden av uppblåsningsslangen
(7)
i ventilen och vrid åt höger för att låsa den på plats
(se ritning 5)
.
1
3
1
2
2
4
6
Page 52

295
A
SPARA DENNA BRUKSANVISNING
(295IO) SPA SWEDISH 7.5” X 10.3” PANTONE 295U 08/20/2016
Swedish
Sidan 10
MONTERINGSANVISNING (FORTS.)
5.
Tryck på
knappen för att aktivera manöverpanelknapparna först. Tryck på knappen för att
blåsa upp det uppblåsbara spabadets vägg tills den är fast vid beröring, men inte allt för svårt
(se ritning 6). VIKTIGT:
Blås inte in för mycket luft eller använd luftkompressor med högt tryck för att
blåsa in luft.
6.
Tryck på knappen igen för att stänga av den.
7.
Koppla bort uppblåsningsslangen
(7)
från luftventilen och fäst tryckmätaren
(23)
till luftventilen.
Tryckmätarens indikator bör visa sig i det gröna området för ett ordentligt uppblåst spabad
(se ritning 7)
.
Upprepa föregående steg för att fylla på mer luft om det behövs.
8.
Byt ut luftventilens baklock.
OBS!
Locket är utformat för att skruvas på och av. Utöva aldrig kraft då
detta kan få hela det interna uppblåsningssystemet med ventilen att lossna. Se “Fästande av spabadets
luftventil” underhåll av ventil.
Blås upp spa-överdragets luftspaltiga del
1.
Öppna uppblåsningsventilen och infoga
uppblåsningsslangen
(7)
in i ventilen; tryck för att
blåsa upp tills den är fast vid beröring, men inte allt för
hårt
(se ritning 8)
.
2.
Koppla bort pumpslangen
(7)
från utloppet för den
uppblåsbara enheten och ventilen.
3.
Sått tillbaka kontrollbasens uppblåsningslock
(5)
; stäng
och tryck in uppblåsningsventilen.
OBS!
Om det fi nns ett behov av att fylla på lite luft till spabadets vägg eller spa-överdragets luftspaltiga
del efter att de har satts upp, se avsnitten ovan “Blås upp spabadets vägg” och “Blås upp spa-överdragets
luftspaltiga del”. Höljets luftblåsa är förmonterad på insidan av the spahöljet. Om den måste återmonteras,
placeras den ouppblåsta luftblåsan på insidan av spahöljestätningen innan blåsan blåses upp.
Tömning av luft
För spabadets vägg:
1.
Skruva av locket för att visa skaftet, tryck på skaftet och
vrid 90 grader till höger för att säkra den i nedfällt läge
(se ritning 9)
.
2.
När luften är tömd, tryck in skaftet och vrid 90 grader till
vänster för att återgå till läget uppblåsning.
3.
Sätt tillbaka locket igen.
För överdragets luftspaltiga del:
1.
Dra ut locket till ventilen och pressa ventilen vid dess botten tills den är tömd.
2.
Stäng och tryck ventilen tillbaka.
8
7
6
9
7
23
1
2
Page 53

295
A
SPARA DENNA BRUKSANVISNING
(295IO) SPA SWEDISH 7.5” X 10.3” PANTONE 295U 08/20/2016
Swedish
Sidan 11
MONTERINGSANVISNING (FORTS.)
Installation av kontrollenheten med spabadet
1.
Anslut spaets kontrollenhet till spabadet
(se ritning 10)
. Dra åt ordentligt anslutningarna för hand.
Använd inte verktyg för att dra åt.
2.
Installera tillbaka bakstycket
(2)
i spaets kontrollbas
(se ritning 11)
. Baköverdraget måste vara installerat
innan du använder spabadet.
VIKTIGT:
Sitt inte på, luta dig mot, täck eller placera några föremål över
kontrollenheten för spabadet.
3.
Fäst aggregatet med fi lterpatronhuset på insidan av spa-badets
utloppsgaller (nedre läget, märkt “C”)
(se ritning 12)
. Blås upp
spabadet först innan fi lterpumpdelarna installers.
4.
Före påfyllning med vatten säkerställ att de nedersta locken med
tömningsventilen är ordentligt stängda på insidan och utsidan.
5.
Fyll på spabadet med sötvatten till en nivå mellan MIN och MAX
markeringarna på insidan av spabadets vägg. Överfyll inte spabadet.
Flytta aldrig spabadet med vatten i och/eller med kontrollenheten
ansluten till spabadet, eftersom badet eller kontrollenheten då kan
skadas.
VARNING:
Fyll aldrig på vatten direkt med en temperatur som
är högre än 104 °F (40 °C) till spabadet. Det rekommenderas
att du fyller på spabadet med ljummet vatten för snabb
uppvärmning och energibesparing.
6.
Placera spa-överdraget och spaets luftspaltiga del (förinstallerad i spabadets överdrag) över spabadet, och
se till att spännena till spaets överdrag låses med nyckeln efter att ha dragit spännet med remmarna hårt
åt.
VIKTIGT:
Inspektera spa-överdraget regelbundet för läckage, tidig förslitning eller försämring. Använd
aldrig ett skadat spa-överdrag.
7.
Säkerställ att spabadet är anslutet till ett jordat eluttag och tryck på knappen för att aktivera
manöverpanelknapparna först. Tryck på knappen på kontrollpanelen för att aktivera värmaren,
se avsnittet “Spabadet med panelens kontrollenhet”.
11
2
10
A
B
C
B
C
A
12
C
Page 54

295
A
SPARA DENNA BRUKSANVISNING
(295IO) SPA SWEDISH 7.5” X 10.3” PANTONE 295U 08/20/2016
Swedish
Sidan 12
DRIFTSINSTRUKTIONER
SPABADET MED PANELENS KONTROLLENHET
Knapp till/från:
När väl enheten är ansluten, använd denna knapp för att aktivera
manöverpanelknapparna. Lampan intill knappen lyser grönt när den är aktiverad. Tryck på
denna knapp för att slå från alla vid tillfället aktiverade funktioner.
OBS!
Till-/frånknappen kan visas som en svart knapp mitt på kontrollpanelen.
Värmeknappen:
Använd denna knapp för att aktivera värmesystemet. Pumpen kommer att
värma vattnet i spabadet tills vattentemperaturen uppnår den inställda temperaturen. När
spats vattentemperatur sjunker 1-2 °C under inställd temperatur kommer
uppvärmningssystemet att startas igen. När eldslågan på displayen är röd har
uppvärmningsystemet aktiverats. När eldslågan är grön är vattnet på inställd temperatur.
Uppvärmningssystemet är i viloläget och fi ltreringssystemet fortsätter jobba kontinuerligt.
OBS!
För att stoppa fi ltreringssystemet när värmaren är i viloläge, tryck först på eldslågan och
sedan på fi lterknappen. Om endast eldslågan trycks in när värmaren är i viloläge kommer
endast uppvärmningssystemet att stängas av och fi ltreringssystemet förblir i drift under
ytterligare 24 timmar innan det stängs av automatiskt.
Omkopplaren Celsius/Fahrenheit:
Temperaturen kan visas antingen i Fahrenheit eller Celsius. Systemets standardinställning är
Celsius.
VIKTIGT:
Använd ALDRIG spabadet om den indikerade vattentemperaturen är över 40 °C (104 ºF).
Knapparna för justering av temperaturen:
Genom att trycka på knapparna temperaturökning
eller sänkning börjar LED-lampan att blinka. När den blinkar, kan du justera till önskad
temperaturinställning. Om du håller ner dessa knappar, kommer värdena snabbt att öka
eller minska. Den nya och önskade temperaturinställningen blir synlig på LED-displayen i
5 sekunder för att bekräfta det nya värdet.
OBS!
Den förvalda temperaturen är 20 °C (68 °F).
OBS!
Justering av temperaturen varierar från 20 °C (68 °F) till 40 °C (104 °F).
Knappen för vattenfi lter:
Denna knapp växlar fi lterpumpen till på och av. Om värmesystemet är aktiverat, startar
fi ltreringssystemet automatiskt.
Lampan ovanför knappen för vattenfi lter visar grönt när den är aktiverad.
Bubbel-knappen:
Använd denna knapp för att aktivera systemet med massage, som har en
30-minuters automatisk avstängningsfunktion. Lampan ovanför Bubbel-knappen knappen visar
grönt när den är aktiverad.
VARNING:
Kör inte Bubbel-systemet när överdraget är fäst. Luft kan samlas inuti spabadet
och orsaka irreparabla skador och skada på kroppen.
LED-skärm:
När den en gång har startats, visar LED-skärmen automatiskt den aktuella
vattentemperaturen.
OBS!
Den inbyggda funktionen för behandling av hårt vatten arbetar automatiskt tillsammans med
fi ltreringssystemet.
VIKTIGT:
Följande villkor kommer att leda till en långsam uppvärmning av vattnet.
• Den omgivande temperaturen är lägre än 10 ºC (50 ºF).
• Vindhastigheten utomhus är över 3,5-5,4 m/s (8-12 mph).
• Luftbubbel funktionen aktiveras vid uppvärmning av vattnet i spabadet.
• Spabadet är inte ordentligt täckt med spa-överdraget när vattnet värms upp.
A: Värmeknappen
B: Omkopplaren för Celsius/Fahrenheit
C: Knappen för temperaturökning
D: Knappen för temperatursänkning
E: Knappen för vattenfi lter
F: Knappen för bubblor
G: LED-skärm
H: Knapp till/från
40
C
o
F
E
D
C
B
A
G
H
Page 55

295
A
SPARA DENNA BRUKSANVISNING
(295IO) SPA SWEDISH 7.5” X 10.3” PANTONE 295U 08/20/2016
Swedish
Sidan 13
TABELL FÖR LYSDIODKODER
E90
Inget vattenfl öde
• Stäng av och koppla från kontrollenheten.
• Se till att gallerkåpan till utloppet är ren och fri
från hinder.
• Rengör eller byt ut patronen, se avsnittet
Underhåll och förvaring.
• Se till att inlopps-/utloppsanslutningarna på
spabadet och fi lterpumpen inte är blockerade.
• Håll spavattnet korrekt sanerat för att garantera
en ren fi lterpatron som inte täpps igen.
• Om problemet kvarstår, kontakta Intex
servicecenter.
E94
Vattentemperaturen är för låg
• Om den omgivande temperaturen är under
4 °C (39 °F), rekommenderar vi att du inte
använder spabadet.
• Stäng av och koppla från kontrollenheten,
tillsätt lite varmt vatten för att höja vattnets
temperatur över 5 °C och tryck sedan på
för att värma upp vattnet till önskad temperatur.
• Om problemet kvarstår, kontakta Intex
servicecenter.
E95
Vattentemperaturen ligger runt
50 °C (122 °F)
• Stäng av och koppla från kontrollenheten. När
vattnet har svalnat, anslut RCD och starta om
på nytt.
• Stäng av värmaren och tryck sedan på
fi lter- och bubbelknapparna för att sänka
vattnets temperatur.yhb
• Om problemet kvarstår, kontakta Intex
servicecenter.
E96
Systemfel
• Stäng av och koppla från kontrollenheten,
använd locket för att stoppa vattnet från att
strömma ut ur badkaret, ta lös och tappa ut
vattnet ur styrenheten. Montera tillbaka
styrenheten i badkaret. Anslut RCD:n och
starta om på nytt.
• Om problemet kvarstår, kontakta Intex
servicecenter.
E97
Torr-brandskydd • Kontakta Intex servicecenter.
E99
Vattnets temperatursensor är trasig • Kontakta Intex servicecenter.
SLUT
Efter 72 timmars kontinuerlig
uppvärming försätts pumpen
automatiskt i viloläget.
Snabbuppvärmning och
vattenfi ltrering är inaktiverad.
• Tryck på knappen för vattenfi lter för att åter
aktivera fi lterpumpen.
LED-avläsning ORSAK LÖSNING
Page 56

295
A
SPARA DENNA BRUKSANVISNING
(295IO) SPA SWEDISH 7.5” X 10.3” PANTONE 295U 08/20/2016
Swedish
Sidan 14
UNDERHÅLL OCH KEMIKALIER
Vattenhygien
Ägaren av spabadet måste regelbundet kontrollera och hålla badvattnet sanitärt med planerade underhåll
(dagligen om så krävs). Tillsättning av desinfektionsmedel och andra kemikalier kommer att hålla bakterier
och virus under kontroll som fi nns i spabadets vatten. Upprätthållandet med en god vattenbalans genom
lämplig användning av desinfektionsmedel är den enskilt viktigaste faktorn för att maximera livslängden
och utseendet på spabadet, samt att se till att rent, sunt och säker vatten fl ödar. Korrekt teknik är viktigt för
vattenprover och hantering av vattnet i spabadet. Rådgör med din professionella kontaktperson i frågor om
pool/spabad för kemikalier, desinfektionsmedel, testutrustningar och provningsmetoder.
UTÖVA FÖRSIKTIGHET:
FÖLJ ALLTID KEMIKALIETILLVERKARENS DIREKTIV, OCH
VARNINGAR OM HÄLSA OCH FAROR.
Tillsätt inga kemikalier när spabadet är ockuperat. Detta kan orsaka hud- och ögonirritation.
Koncentrerade klorlösningar kan skada spabadet. Under inga omständigheter är Intex Recreation Corp, Intex
Development Co Ltd, deras närstående företag, auktoriserade agenter och servicecenter, återförsäljare eller
anställda ansvariga inför köparen eller annan part för kostnader i uppstår i samband med förlusten av spavatten, kemikalier eller vattenskador.
Underhåll av spa-vatten och patron
Skydda alla som nyttjar spabadet från eventuella vatten-relaterade sjukdomar genom att hålla badvattnet rent
och desinfi cerat. Praktisera alltid god hygien. För att säkerställa korrekt vattenkvalitet i spabad, följa dessa
procedurer:
1.
Inspektera och rengör fi lterpatronen varje dag, och byta ut fi lterpatronen
var tredje 3 dag.
a.
Skruva loss aggregatet med patronhuset från spabadets vägg och
avlägsna patronen
(se ritning 13)
.
b. Använd en trädgårdsslang för att skölja av patronen. Om patronen är
fortfarande smutsig och missfärgad ska den bytas ut. Ha
reservpatroner till hands.
c. Sätt tillbaka den rena patronen i patronhuset och montera tillbaka
aggregatet med patronhuset i spabadets vägg.
2.
Byt ut vattnet i spabadet var tredje 3 dag. Se avsnitten “Tömning av
spabadet” och “Rengöring av spabadet” för mer information.
3.
Använd spa kemikalier för att upprätthålla god vattenkemi. Skador på
spabadet till följd av felaktig användning av kemikalier och misskötsel av
vattnet i spabadet täcks inte av garantin.
4.
Alla badgäster måste duscha innan hoppar in spabadet.
Balans i vattenkemin
Underhåll pH-nivån i spabadets vatten på mellan 7,2 och 7,8, total alkalitetsnivå på mellan 80 och 120 ppm
och fri klornivå på mellan 2 till 4 ppm. Använd de medföljande 3-vägs teststickor för att testa vattenkemin
i spabadet före varje användning av spabadet och fortsätt att testa vattnet minst en gång i veckan.
Testremsorna kan samtidigt prova nivåerna för “Fritt klor”, “pH”, “Total alkalihalt” och “Kalkhårdhet”.
1.
Doppa hela stickan i vattnet och ta genast upp den.
2.
Håll sticknivån i 15 sekunder. Skaka inte av överfl ödigt vatten från stickan.
3.
Jämför stickblocket med färgkartan på förpackningens etikett. Om nödvändigt, justera den kemiska nivån i
poolvattnet.
OBS!
Kontrollera utgångsdatum för testutrustningen då provresultaten kan vara felaktiga om satsen används
efter detta datum. Lågt pH-värde skadar spabadet och pumpen. Skador orsakade av kemisk obalans omfattas
inte av garantin.
Använd den medföljande fl ytande kemiska dispenser för att administrera klor [kemisk tablettstorlek: mindre
than 1 tum (2,5 cm) i diameter] i badvattnet. Tillsätt 1 tablett i dispensern. Följ alltid anvisningarna från
tillverkaren av kemikalier. Avlägsna den fl ytande kemiska dispensern när spabadet används.
Låt aldrig klor kommer i kontakt med spabadet, om det inte är helt upplöst.
VIKTIGT:
Tryck på knappen på spabadets kontrollpanel för att slå på utblåsmingsanordningen för
bubblor och bidra till att lösa upp kemikalierna i vattnet.
Blanda aldrig ihop kemikalier. Lägg till kemikalierna till badvattnet separat. Se till att grundligt upplösa varje
kemikalie innan du lägger till ytterligare en kemikalie till vattnet.
13
14
12
13
VARNING!
Dra alltid ur stickproppen ur eluttaget innan du tar bort, rengör, servar eller justerar
något på produkten.
Page 57

295
A
SPARA DENNA BRUKSANVISNING
(295IO) SPA SWEDISH 7.5” X 10.3” PANTONE 295U 08/20/2016
Swedish
Sidan 15
SPAVATTNETS KEMI OCH BALANS
Testa vattnets pH, temperatur, kalkhårdhet och totala alkalihalter. Använd motsvarande faktorer i
SI-ekvationen.
SI = 0, balans
Om SI > 0, avlagringar bildas eller grumliga vattenförhållanden.
Om SI < 0, vattnet korroderar metaller eller ger ögon- och hudirritation.
SI anses tillfredsställande om värdet ligger inom området -0.3 to +0.3. Noll är perfekt.
Avläsning av önskad vattenkemi
Minst Idealisk Maximalt
Fritt klor
2 ppm 2-4 ppm 5 ppm
pH
7.2 7.2-7.6 7.8
Total alkalinitet (TA)
60 ppm 80 ppm 120 ppm
Kalkhalt (CaCO
3
)
100 ppm 150
-
250 ppm 350 ppm
Satureringsindex (SI)
-0.3 0 +0.3
Vattentemperatur
20 ºC / 68 ºF 20-40 ºC / 68-104 ºF 40 ºC / 104 ºF
Fritt klor:
beror på klorrester i spavattnet.
Resultat vid för låg halt – Otillräcklig desinfektionsnivå.
Resultat vid för hög halt – orsakar luktproblem, hud- och ögonirritation, korroderade metaller och andra
material.
pH:
ett värde som indikerar hur surt eller basiskt spavattnet är.
Resultat vid för låg halt – Korroderad metall, ögon- och hudirritation, den totala alkaliniteten förstörs.
Resultat vid för hög halt – Avlagringar bildas, grumligt vatten, kortare körtid för fi lter/värmare, ögon- och
hudirritation, dålig kloreffekt.
Total alkalinitet (TA):
visar graden av vattnets motståndskraft mot förändring av pHvärdet. Påverkar hur
snabbt och lätt pH-halten förändras, så justera alltid total alkalinitet innan pH-nivån justeras.
Resultat vid för låg halt – Korroderad metall, ögon- och hudirritation. Låg alkalinitet kan leda till instabilt
pH-värde.
Resultat vid för hög halt – Avlagringar bildas, grumligt vatten, kortare körtid för fi lter/värmare, ögon- och
hudirritation, kräver högre klornivå.
Kalkhårdhet (CaCO
3
):
halten av kalk och magneium i vattnet.
Resultat vid för låg halt – Svårigheter att balansera vattnet, korroderade metallkomponenter, ögon- och
hudirritation och skummande vatten.
Resultat vid för hög halt – Avlagringar bildas, grumligt vatten, ögon- och hudirritation, svårigheter att balansera
vattnet och ineffektivt fi lter/värmare.
Satureringsindex (SI):
temperatur, kalkhårdhetskoncentration, totala alkali- och pH-värden är de
huvudfaktorer som påverkar uppkomsten av avlagringar. Vattnets benägenhet att antingen bilda avlagringar
eller korrodera indikeras av satureringsindex (SI):
SI = pH+TF+CF+AF-12.1
*Där: TF = Temperaturfaktor; CF = kalkhårdhetsfaktor; AF = total alkalifaktor.
Vattentemperatur
TF
Kalkhårdhet
(ppm)
CF
Total alkalinitet
(ppm)
AF
(ºC) (ºF)
8 46 0.2 75 1.5 50 1.7
12 54 0.3 100 1.6 75 1.9
16 61 0.4 150 1.8 100 2.0
19 66 0.5 200 1.9 150 2.2
24 75 0.6 250 2.0 200 2.3
29 84 0.7 300 2.1 300 2.5
34 93 0.8 400 2.2 400 2.6
40 104 0.9 500 2.3 -- --
-- -- -- 1000 2.6 -- --
Page 58

295
A
SPARA DENNA BRUKSANVISNING
(295IO) SPA SWEDISH 7.5” X 10.3” PANTONE 295U 08/20/2016
Swedish
Sidan 16
SPAVATTNETS KEMI OCH BALANS (FORTS.)
Spavattenjustering
Så här korrigerar du spavattnets kemiska sammansättning när nivåerna ligger utanför området.
OBS:
Följ alltid kemikalietillverkarens anvisningar samt hälso- och riskvarningarna.
Justering av total alkalihalt (TA)
Ta bort spaöverdraget för att lufta vattnet och använd medlevererade testremsor för att kontrollera den
kemiska nivån. Se först till att vattnets klorhalt ligger mellan 2-4 ppm, eftersom kloret påverkar
TA-testresultatet.
Om TA-nivån (och inte pH-värdet) är högre än 120 ppm, sänks TA-nivån genom att tillsätta klorvätesyra
(saltsyra) eller natriumbisulfat.
Om TA-nivån är lägre än 60 ppm, tillsätts natriumbikarbonat.
Om exempelvis (4 vuxna) TA-nivån är 180 ppm och önskad minskning är 60 ppm, enligt tabell nedan,
behöver du tillsätta 121 g natriumbisulfat eller 96 ml saltsyra.
Om färgen på testremsan är mellan 180 ppm och 240 ppm, och nära 180 ppm, kan du också tillsätta 121 g
natriumbisulfat eller 96 ml saltsyra.
Om avläsningen visar mer än 240 ppm, kan du droppvis tillsätta natriumbisulfat eller saltsyra i vattnet till dess
testremsan indikerar 240 ppm, tillsätt då 238 g natriumbisulfat eller 192 ml saltsyra.
OBS:
Efter korrigering, testa åter vattnet efter 24 timmar och justera igen vid behov.
Minska total alkalinitet
Mängd natriumbisulfat för minskning av total alkalinitet
Justera pH-värde
När total alkalinitet har minskat till 120 ppm eller ökat till 80 ppm och pH-värdet fortfarande är högt eller lågt,
går det att justera med hjälp av tabell nedan.
Mängd saltsyra för att minska total alkalinitet
(Saltsyra: 31.45%)
Öka total alkalinitet
Mängd natriumbisulfat för att öka total alkalinitet
Önskad nivå 60 ppm 80 ppm 100 ppm 120 ppm 140 ppm
Volym:
210 gal / 795 L
0.269 Lb 0.358 Lb 0.448 Lb 0.528 Lb 0.627 Lb
121 g 161 g 202 g 238 g 283 g
Volym:
290 gal / 1098 L
0.368 Lb 0.492 Lb 0.614 Lb 0.737 Lb 0.860 Lb
168 g 224 g 279 g 335 g 391 g
Önskad nivå 20 ppm 40 ppm 60 ppm 80 ppm
Volym:
210 gal / 795 L
0.059 Lb 0.118 Lb 0.178 Lb 0.237 Lb
27 g 53 g 80 g 107 g
Volym:
290 gal / 1098 L
0.081 Lb 0.162 Lb 0.244 Lb 0.326 Lb
37 g 74 g 111 g 148 g
Önskad nivå 60 ppm 80 ppm 100 ppm 120 ppm 140 ppm
Volym:
210 gal / 795 L
0.101 qt 0.135 qt 0.169 qt 0.202 qt 0.234 qt
96 mL 128 mL 160 mL 192 mL 223 mL
Volym:
290 gal / 1098 L
0.139 qt 0.185 qt 0.232 qt 0.278 qt 0.324 qt
132 mL 176 mL 220 mL 264 mL 308 mL
Page 59

295
A
SPARA DENNA BRUKSANVISNING
(295IO) SPA SWEDISH 7.5” X 10.3” PANTONE 295U 08/20/2016
Swedish
Sidan 17
SPAVATTNETS KEMI OCH BALANS (FORTS.)
Sänka pH-värdet
Sänka pH-värdet med saltsyra
Sänka pH-värdet med natriumbisulfat
Kalcium, hårdhetsjustering
Använd de medföljande testremsorna för att kontrollera vattnets hårdhet och justera enligt tabell nedan.
Minska vattnets hårdhet
Om ditt hushållsvatten behandlas med mjukgörare, blanda det hårda spavattnet med det mjuka vattnet i
enlighet med diagrammet för vattenvolymförhållande för att minska hårdheten:
Initial nivå 1000 ppm 500 ppm 350 ppm 250 ppm
Önskad nivå:
100 ppm
Vattnets volymförhållande
(Vhårt vatten:Vmjukt vatten)
1:9 1:4 2:5 2:3
Minska hårdheten med mjukt vatten
Öka vattnets hårdhet
Om spavattnets hårdhetsnivå är mindre än 100 ppm, tillsätt kalciumklorid.
Öka pH-värdet
Öka pH-värdet med natriumbikarbonat
Volym 210 gal (795 L) 290 gal (1098 L)
Total alkalinitet 120 ppm 80 ppm 120 ppm 80 ppm
Från→Till
8.4→7.2
0.028 qt 0.018 qt 0.038 qt 0.025 qt
26 mL 18 mL 36 mL 24 mL
7.8→7.2
0.019 qt 0.013 qt 0.026 qt 0.017 qt
18 mL 12 mL 22 mL 16 mL
Volym 210 gal (795 L) 290 gal (1098 L)
Total alkalinitet 120 ppm 80 ppm 120 ppm 80 ppm
Från→Till
8.4→7.2
0.071 Lb 0.047 Lb 0.095 Lb 0.063 Lb
32 g 21 g 43 g 29 g
7.8→7.2
0.047 Lb 0.032 Lb 0.064 Lb 0.043 Lb
21 g 14 g 29 g 20 g
Volym 210 gal (795 L) 290 gal (1098 L)
Total alkalinitet 120 ppm 80 ppm 120 ppm 80 ppm
Från→Till 6.8→7.2
0.541 Lb 0.361 Lb 0.737 Lb 0.491 Lb
243 g 163 g 335 g 224 g
VARNING!
Saltsyra är en frätande kemikalie och en fl ytande lösning med natriumbisulfat (NaHSO
4
)
är extremt sur. Hantera alla kemikalier varsamt och bär extra personlig
skyddsutrustning, inklusive glasögon och handskar. Det är mycket viktigt att inte stänka
syra på hud, kläder eller i ögonen.
Volym 210 gal (795 L) 290 gal (1098 L)
m (CaCl
2
) 0.197 Lb 89 g 0.269 Lb 122 g
Page 60

295
A
SPARA DENNA BRUKSANVISNING
(295IO) SPA SWEDISH 7.5” X 10.3” PANTONE 295U 08/20/2016
Swedish
Tömning av Spa-badkaret
1.
Slå från spakontrollenheten.
2.
Anslut adaptern med tömningsventilen på en trädgårdsslang och rikta
den andra änden av trädgårdsslangen mot ett lämpligt område för
tömning
(se ritning 14)
.
3.
Ta av locket på tömningsventilen från utsidan av spa-badkaret och fäst
adaptern på tömningsventilen
(se ritning 14)
.
4.
Genom att öppna locket på tömningsventilen från insidan av
spa-badkaret, kommer vatten att börja rinna från trädgårdsslangen.
5.
När vattnet har tömts, koppla bort spaets styrenhet från spa-badkarets
vägg. Lyft spa-badkarets vägg från sidan mittemot avloppet, som leder
kvarvarande vatten till avloppet och tömning av spaet helt och hållet
(se ritning 15)
.
6.
Fäst uppblåsningsslangen
(7)
på fl äktens uppblåsningsutlopp på
kontrollenheten.
7.
Starta spabadet och tryck på knappen, rikta uppblåsningsslangen
mot in-/utloppen på spabadkaret och spakontrollenheten för att torka
upp allt vatten i rörsystemet
(se ritningarna 16 och 17)
.
8.
Använd en ren handduk att torka upp eventuellt kvarvarande vatten
och fukt i spabadet och på kontrollenheten till spaet.
9.
Säkerställ att spabadet och kontrollenheten till spaet torkas noggrant.
OBS!
De medföljande pluggarna
(15)
kan användas för att täcka
anslutningarna till vatteninloppet och vattenutloppet från insidan av
spabadet för att förhindra att vatten rinner ut.
Rengöring av spabadet
Om smuts upptäcks i vattnet eller att vattnet blir grumligt och korrekt
vattenkemi inte rengör det, byt då vatten och rengöra spabadet.
Se avsnittet “Tömning av spabadet” på hur man tömmer spabadet.
Medan den är tom, avlägsna patronhuset från insidan av spabadets vägg,
rengör och/eller byt ut fi lterpatronen. Använd en svamp och mild tvållösning
för att torka bort jord eller fl äckar på insidan av spabadets vägg. Skölj
noggrant innan påfyllning med rent vatten görs.
VIKTIGT:
Använd inte stålull, hårda borstar eller rengöring med slipmedel.
Fästande av luftventilen på spabadet
Kontrollera spabadets luftventil för läckage och täthet före användning. Om
luft läcker från luftventilen, använd den medföljande nyckeln
(22)
för att dra
åt luftventilen enligt följande:
1.
Kontrollera att spabadet är tömt på luft, öppna locket till luftventilen och
sätt in nyckeln
(22)
i luftventilens kropp
(se ritning 18)
.
2.
Med ena handen ta tag i baksidan av luftventilen bas från insidan av
spabadets vägg och vrid nyckeln
(22)
medurs.
VIKTIGT:
Dra inte åt luftventilen allt för hårt. Justera aldrig luftventilens
bas när spaet är i bruk eller fyllt med vatten. Använd enbart luftningsventilnyckeln om luftningsventilen
sitter löst eller om det uppstår ett läckage kring luftningsventilens bas. Dra inte åt luftningsventilen alltför
hårt, då detta kan skada ventilen. Se bara till att luftningsventilen sitter ordentligt och inte läcker.
Spa-överdrag
Överdragets fästspännen är låsspännen. Två nycklar fi nns med i plastpåsen med instruktionsbok och andra
tillbehör. Varje spänne är märkt med symboler för “låst” och “olåst” för enkel funktion: sätt nyckeln i slitsen på
spännet och vrid till rätt läge för att låsa respektive låsa upp spännet. För att skapa säkerhet mot obehörigt
tillträde, ska överdraget alltid sättas på när spabadet inte används och alla spännen låsas. Håll alltid nycklarna
utom räckhåll för barn. Om du förlägger nycklarna, kan du använda en skruvmejsel av liknande storlek för att
låsa eller låsa upp spännena. Inspektera spaöverdraget regelbundet för läckage, förtida slitage, skador, eller
tecken på försämringar.
Använd aldrig ett slitet eller skadat överdrag: det kommer inte att ge den skyddsnivå som krävs för att
förhindra oövervakad tillgång till spaet av ett barn.
UNDERHÅLL
Sidan 18
18
22
16
7
17
7
14
1
2
3
11
15
Page 61

295
A
SPARA DENNA BRUKSANVISNING
(295IO) SPA SWEDISH 7.5” X 10.3” PANTONE 295U 08/20/2016
Swedish
Sidan 19
UNDERHÅLL (FORTS.)
1.
Töm och rengör genom att följa avsnitten “Tömning av spa-badet” och “Rengöring av
spa-badet”.
2.
Utför instruktionerna i omvänd ordning för att tömma och demontera spabadet, kontrollenheten
och spa-överdragets luftspaltiga del.
3.
För avlufta karet och höljets luftblåsa:
a) Öppna utblåsningshylsan
(27)
med den
medlevererade nyckeln
(6) (se ritning 19)
.
b) Sätt in utblåsningsslangadaptern
(28)
i
utblåsningsutloppet.
c) Sätt in uppblåsningsslangen
(7)
över
utblåsningsslangadaptern
(28)
.
d) Sätt in den andra änden av uppblåsningsslangen i
badets luftningsventil eller ventilen till höljets
luftblåsa.
e) Tryck på luftbubbelknappen för utblåsning.
f) När utblåsningen är avslutad, utförs ovanstående
steg i omvänd ordning och se till att
utblåsningshylsan
(27)
sitter säkert fast.
Varning!
Använd endast för det ändamål som bekrivs i
denna bruksanvisning. Håll pumpslangen borta från
vatten eller små föremål när tömningsfunktionen är
aktiverad, annars kan fl äktmotorn skadas.
4.
Se till att alla spa-komponenter och tillbehör är ordentligt rengjorda och torra innan förvaring.
Lufttorka spa-badet i solen i en timme innan du viker ihop den.
5.
Vik ihop spa-badet löst och undvik skarpa hörn för att förhindra skada eller läckage på
spa-badets liner.
6.
Ha nya patroner i lager till nästa gång du använder den.
7.
Förvara spa-badet och tillbehören på en torr, temperaturkontrollerad förvaringsplats, mellan
0 º
-
40 ºC (32 º - 104 ºF).
8.
Originalförpackningen kan användas som förvaring.
LÅNGTIDSFÖRVARING
Reparation av spabadet och överdragets luftblåsa Reparera
Använd den medföljande lagningslappen för att reparera punkteringshålet:
• Rengör grundligt och torka området som skall repareras.
• Ta bort bakgrundspapperet på lagningslappen och tryck lagningslappen bestämt över
punkteringshålet. Jämna ut ytan för att avlägsna eventuella luftbubblor under lappen.
VIKTIGT
De omgivande temperaturerna av luft har en effekt på spa-badets inre tryck. Luft inuti spa-badet
kan expandera och dras samman med varierande temperatur som leder till att minska trycket
inne i spa-badet. Om detta inträffar, använd den medföljande manometern för att kontrollera det
interna lufttrycket och fyll på mer luft om det behövs.
19
6
7
28
1
2
3
27
Page 62

295
A
SPARA DENNA BRUKSANVISNING
(295IO) SPA SWEDISH 7.5” X 10.3” PANTONE 295U 08/20/2016
Swedish
FELSÖKNINGSGUIDE
Sidan 20
INGEN DISPLAY/
SPAKONTROLLENHETEN
FUNGERAR INTE
HUSHÅLLETS
KRETSBRYTARE HAR
LÖST UT
VÄRMER INTE UPP
ORDENTLIGT
BUBBELNS
UTBLÅSNINGSANORDNING
FUNGERAR INTE
VATTENFILTRERINGEN
FUNGERAR INTE
VATTNET ÄR INTE RENT
PUMPENS ADAPTRAR ÄR
INTE I NIVÅ MED SPAETS
ADAPTRAR
SPA-BADET HAR EN
MÄRKLIG FORM
SPA-BADET TAPPAR
LUFTTRYCK
LÄCKAGE MELLAN
SPABADKARETS
ANSLUTNINGAR OCH
KONTROLLENHETENS
ANSLUTNINGAR
SPABADET LÅTER
MYCKET, ENBART I
FILTRERINGSLÄGE
• Spabadet inte anslutet eller avstängt.
• Kontrollpanelens kabelkontakt är lös.
• Strömavbrott.
• Jordfelsbrytaren har utlösts.
• Jordfelsbrytaren är trasig.
• Kretsbrytarens märkström för låg.
• Överbelastad kretsbrytare.
• Ett elledningsfel.
• Temperatur är satt för lågt.
• Smutsig fi lterpatron.
• Vattentemperaturen sjunker när värmaren
är i STANDBY-läge.
• Fel på värmeelement.
• Luftinblåsningspumpen är för varm.
• Smutsig fi lterpatron.
• Filtreringsinlopp och/eller -utlopp igensatt.
• Filterpumpmotor fungerar inte.
• Insatsenheten inte korrekt fastsatt.
• Otillräcklig fi ltreringstid.
• Smutsig fi lterpatron.
• Felaktigt underhåll av vattnet.
• Filtreringsinlopp och -utlopp igensatt.
• Ett kännetecken drag för Polyvinylklorid
(PVC) är att det ändrar form, vilket är
normalt.
• Extra lufttryck av ett starkt solsken.
• Luftventillock löst.
• Luftventilbas lös.
• Hål i eller spricka på spa-badet.
• Inloppets/utloppets anslutningar till spaets
kontrollenhet är inte ordentligt åtdragna.
• O-ringen till inloppets/utloppets spa
kontroll saknas.
• Kontrollbaskomponenter inte säkert fastsatta.
• Kontrollbasens underlag inte jämnt och fast.
• Spats fi ltermotor fungerar inte.
• Se till att spabadet är anslutet och igångsatt.
• Se till att kontrollpanelens kabelkontakt sitter
ordentligt fast i uttaget på kontrollbasen.
• Kontrollera strömkällan.
• Återställ jordfelsbrytaren.
• Kontakta Intex servicecenter.
• Säkerställ korrekt kretsbrytarkapacitet.
• Ordna en särskild kretsbrytare för enbart matningen
till spabadets eluttag.
• Kontakta en behörig elektriker för att åtgärda elfelet.
• Höj temperaturen och sätt på spaöverdraget.
• Rengör eller byt ut fi lterpatronen i god tid.
• Om värmaren är i STANDBY-läge, tryck två gånger på
eldslågan för att värma upp vattnet till inställd temperatur.
• Kontakta Intex servicecenter.
• Stäng av och koppla bort spabadet från nätet. Låt
det svalna och starta om på nytt.
• Kontakta Intex servicecenter.
• Rengör eller byt ut fi lterpatronen i god tid.
• Kontrollera och rengör fi lterinloppet och -utloppet regelbundet.
• Kontakta Intex servicecenter.
• Se till att insatsenheten är korrekt fastsatt.
• Öka fi ltreringstiden.
• Rengör eller byt ut fi lterpatronen i god tid.
• Håll spavattnet korrekt sanerat. Se instruktionerna från
tillverkaren av kemikalier.
• Kontrollera och rengör fi lterinloppet och -utloppet regelbundet.
• Höj pumpen med trä eller en annan typ av
isoleringsmaterial för att lyfta pumpens adaptrar till
en nivå med spaets adaptrar.
• Utsätt inte produkten för direkt solljus.
• Kontrollera lufttrycket och släpp ut luft om det
behövs. Vid mycket varmt väder, måste du
kontrollera om det är nödvändigt att släppa ut luft.
Detta för att undvika eventuella skador på spa-badet.
• Se till att luftventillocket är säkert stängt.
• Fyll up spabadkaret med luft och se sedan till att
luftventilsbasen är åtdragen, se avsnittet “Fästande
av luftventilen på spabadet”.
• Sätt i fl ytande tvål och vatten i en spreyfl aska och
spreja på skarvarna. Om det fi nns en läcka kommer
det att bubbla. När du hittar läckan, rengör och torka
det läckande området och använd lagningslapp som
medföljer spaet.
• Dra åt inlopps-och utloppsanslutningarna.
• Belägg o-ringen med vaselin för vattentäthet.
• Ta bort gallret från spabadets insida med en
skruvmejsel, säkerställ att in-/utlopps-O-ring är på
plats, ren och inte skadad.
• Säkerställ att kontrollpanel, bakstycke och alla
in-/utlopp är säkert anslutna.
• Säkerställ att underlaget är vågrätt, fast och jämnt.
• Byt ut den trasiga fi ltermotorn mot en ny.
PROBLEM ORSAK ÅTGÄRD
Page 63

295
A
SPARA DENNA BRUKSANVISNING
(295IO) SPA SWEDISH 7.5” X 10.3” PANTONE 295U 08/20/2016
Swedish
BEGRÄNSAD GARANTI
Din PureSpa har tillverkats med material av högsta kvalitet och utförande. Alla Intex-produkter har
inspekterats och befunnits vara felfria före leverans från fabriken. Denna begränsade garanti gäller
endast PureSpa listad nedanför.
Denna begränsade garanti är ett tillägg till, och inte en ersättning för dina juridiska rättigheter och
rättsmedel. Om denna garanti strider mot någon av dina juridiska rättigheter så har de prioritet.
Konsumentlagar inom EU ger till exempel lagstadgade garantirättigheter utöver omfattningen
du får från denna begränsade garanti: För information om EU-konsumentlagar, besök European
Consumer Centers hemsida: http://ec.europa.eu/consumers/ecc/contact_en/htm.
Villkoren i denna begränsade garanti gäller enbart för den ursprunglige köparen och kan inte
överföras. Den begränsade garantin gäller för perioden som anges nedan räknat från inköpsdagen.
Förvara dina ursprungliga kassakvitton tillsammans med bruksanvisningen eftersom bevis för
inköpet kommer att krävas och måste åtfölja garanti-krav, annars är garantin ogiltig.
PureSpa garanti – 1 år
Om produkten returneras enligt direktiven från Intex servicecenter kommer servicecentret att
inspektera produkten och besluta beträffande kravets giltighet. Om produkten omfattas av
bestämmelserna i garantin kommer objektet att repareras eller bytas ut, med samma eller liknande
produkt (Intex val) utan kostnad för dig.
Förutom denna garanti, och andra juridiska rättigheter i ditt land, är inga ytterligare garantier
underförstådda. I den mån som omfattas av ditt land, skall under inga omständigheter Intex hållas
ansvariga gentemot dig eller någon tredje part för direkta eller indirekta skador till följd av dina
PureSpa eller Intex eller dess företrädares eller anställdas åtgärder (inklusive tillverkning av
produkten). Om ditt land inte tillåter uteslutning eller begränsning av oförutsedda skador eller
följdskador gäller inte denna begränsning eller undantag för dig.
Observera att denna begränsade garanti inte gäller under följande omständigheter:
• Om PureSpa utsätts för vårdslöshet, onormal användning eller tillämpning, olyckshändelse,
felaktig användning, felaktig spänning eller ström som motstrider bruksanvisningen, felaktigt
underhåll eller förvaring.
• Om PureSpa utsätts för skador genom omständigheter utanför Intex kontroll, inklusive men inte
begränsat till vanlig användning och slitage och skada som orsakats av exponering för eld,
översvämning, frysning, regn eller andra yttre miljökrafter.
• Om PureSpa används i kommersiellt syfte.
• För delar och komponenter som inte säljs av Intex.
• För obehöriga ändringar, reparationer eller isärtagningar av PureSpa som utförts av någon
annan än service personal för Intex.
Kostnader i samband med förlust av pool-vatten, kemikalier eller vattenskada täcks inte av
garantin. Skada på egendom eller person täcks inte av garantin.
Läs ägarhandboken noggrant och följ alla anvisningar avseende korrekt användning och underhåll
av din PureSpa. Inspektera alltid produkten före användning. Din garanti kan upphävas om
instruktionerna inte följs.
Sidan 21
Page 64

295
A
(295IO) SPA NORWEGIAN 7.5” X 10.3” PANTONE 295U 08/20/2016
Norwegian
BRUKSANVISNING
PureSpa™
SSP-H-20-1C
VIKTIGE
SIKKERHETSREGLER
Les, forstå og følg alle instruksjonene
nøye før du begynner å installere og bruke
dette produktet. Oppbevar disse
anvisningene for fremtidig
referanse.
Glem ikke å prøve disse andre fl otte produktene fra Intex:
bassenger, bassengtilbehør, oppblåsbare bassenger og
inneleker, luftmadrasser og båter kan fås hos utvalgte
forhandlere eller på vårt nettsted.
På grunn av kontinuerlige produktforbedringer forbeholder
Intex seg retten til å endre spesifi kasjoner og utseende, som
kan føre til en oppdatering av instruksjonsboken uten
forutgående varsel.
©2016 Intex Marketing Ltd. - Intex Development Co. Ltd. - Intex Trading Ltd.
- Intex Recreation Corp.
All rights reserved/Tous droits réservés/Todos los derechos reservados/Alle Rechte
vorbehalten. Printed in China/Imprimé en Chine/Impreso en China/Gedruckt in China.
®™ Trademarks used in some countries of the world under license from/®™ Marques utilisées dans certains pays sous licence de/
Marcas registradas utilizadas en algunos países del mundo bajo licencia de/Warenzeichen verwendet in einigen Ländern der Welt in
Lizenz von/
Intex Marketing Ltd. to/à/a/an Intex Trading Ltd., Intex Development Co. Ltd., G.P.O Box 28829, Hong Kong & Intex
Recreation Corp., P.O. Box 1440, Long Beach, CA 90801
• Distributed in the European Union by/Distribué dans l’Union Européenne
par/Distribuido en la unión Europea por/Vertrieb in der Europäischen Union durch/
Intex Trading B.V., Venneveld 9, 4705 RR
Roosendaal – The Netherlands
www.intexcorp.com
Bare til illustrasjon.
Page 65

295
A
TA VARE PÅ BRUKSANVISNINGEN
(295IO) SPA NORWEGIAN 7.5” X 10.3” PANTONE 295U 08/20/2016
Norwegian
Side 2
Advarsel......................................................................................... 3-5
Oversikt over deler....................................................................... 6-7
Installasjonsveiledning................................................................ 8-11
Driftsanvisninger.......................................................................... 12
Alarmkode- og LED-kodetabell................................................... 13
Vedlikehold og kjemikalier.......................................................... 14-19
Langtidslagring............................................................................. 19
Feilsøkingsguide........................................................................... 20
Garantibestemmelser.................................................................... 21
Page 66

295
A
TA VARE PÅ BRUKSANVISNINGEN
(295IO) SPA NORWEGIAN 7.5” X 10.3” PANTONE 295U 08/20/2016
Norwegian
Side 3
VIKTIGE SIKKERHETSREGLER
Les, forstå og følg alle instruksjonene nøye før du begynner å installere og bruke dette produktet.
LES OG FØLG ALLE INSTRUKS ENE
• Drukningsfare. Ekstrem forsiktighet må utvises for å forhindre uautorisert tilgang av barn. For å
unngå ulykker, sikre at barn ikke kan bruke dette boblebadet med mindre de er under oppsyn
hele tiden.
• Drukningsfare. Inspiser boblebad-dekselet regelmessig for lekkasjer, tidlig slitasje, skader eller
tegn på forringelse. Bruk aldri et slitt eller skadet deksel: Det vil ikke gi beskyttelsesnivået som
kreves for å hindre barns ukontrollerte tilgang til boblebadet.
• Fare for skade. Erstatt eventuell ødelagt ledning umiddelbart. Ikke begrav ledningen.
• Fare for elektrisk støt. Ikke la noe elektrisk apparat, som for eksempel en lampe, telefon, radio
eller et fjernsyn, befi nne seg innenfor 3,5 m (11,5 fot) fra et boblebad eller en badestamp.
• Fare for elektrisk støt. Ikke bruk boblebadet når det regner, tordner eller lyner.
• Boblebadets elektriske apparater bør tilføres strøm gjennom en jordfeilbryter (RCD) med et relé
som ikke overstiger 30 mA.
• Det elektriske apparatet er utstyrt med en bærbar reststrøminnretning (PRCD) med
utløsningsverdi på 10 mA. Hvis en lekkasjestrøm på mer enn 10 mA oppdages, vil PRCD-en tre
i funksjon og kutte strømforsyningen. Hvis dette skjer, må du koble fra og slutte å bruke
spa-bassenget umiddelbart. Kontakt det lokale servicesenteret for bistand og/eller reparasjon av
produktet.
• Strømførende deler, unntatt deler som leveres med ekstra lav spenning som ikke overstiger 12 V,
må være utilgjengelig for en person i boblebadet.
• Elektrisk installasjon skal oppfylle kravene til lokale, nasjonale standarder.
• Deler som omfatter elektriske komponenter, bortsett fra fjernkontrollenheter, må plasseres eller
festes slik at de ikke kan falle ned i boblebadet.
• For å redusere risikoen for skader, må du ikke la barn bruke dette produktet, med mindre de er
under strengt tilsyn hele tiden.
• Barn bør ikke bruke boblebad eller badestamper uten tilsyn av en voksen.
• For å redusere faren for drukning, må du ha tilsyn med barn til alle tider. Fest og lås
boblebad-dekselet etter hver bruk.
• For å redusere faren for skade:
a) Boblebadvannet bør aldri overstige 40 °C (104 °F). Vanntemperaturer mellom 38 °C (100 °F) og
40 °C (104 °F) regnes som trygge for en frisk voksen. Lavere vanntemperaturer anbefales for
små barn og når boblebadbruken overstiger 10 minutter.
b) Siden høye vanntemperaturer har høyt potensial for å forårsake fosterskade under de første
månedene av svangerskap, bør gravide eller de som kanskje er gravide begrense boblebadets
vanntemperatur til 38 °C (100 °F).
c) Før man går ut i et boblebad eller en badestamp bør brukeren måle vanntemperaturen med et
nøyaktig termometer, da toleransen til reguleringsenheter av vanntemperatur varierer.
d) Inntak av alkohol, narkotika eller medisiner før eller under bruk kan føre til bevisstløshet med
fare for drukning.
e) Overvektige og personer med en kjent sykehistorie med hjertesykdom, lavt eller høyt blodtrykk,
problemer med blodsirkulasjon eller diabetes bør konsultere lege før man bruker et boblebad.
FARE
ADVARSEL
Page 67

295
A
TA VARE PÅ BRUKSANVISNINGEN
(295IO) SPA NORWEGIAN 7.5” X 10.3” PANTONE 295U 08/20/2016
Norwegian
Side 4
f) Personer som bruker medikamenter bør konsultere lege før de bruker et boblebad, da noen
medisiner kan forårsake søvnighet, mens andre medisiner kan påvirke hjerterytme, blodtrykk og
sirkulasjon.
g) Personer som bruker medisiner og/eller har en ugunstig medisinsk historie bør konsultere lege
før de bruker et boblebad eller en badestamp.
h) Sjekk med en lege før bruk hvis man er gravid, diabetiker, har dårlig helse eller er under
medisinsk behandling.
• Personer med smittsomme sykdommer bør ikke bruke et boblebad eller en badestamp.
• For å unngå skader, utvis forsiktighet når du går ut i eller ut av et boblebad eller en badestamp.
• Ikke innta narkotika eller alkohol før eller under bruk av et boblebad eller en badestamp for å
unngå bevisstløshet og mulig drukning.
• Gravide og mulig gravide kvinner bør konsultere lege før de bruker et boblebad eller en
badestamp.
• Vanntemperatur i overkant av 38 °C kan være skadelig for helsen din.
• Ikke bruk et boblebad eller en badestamp umiddelbart etter hard trening.
• Lengre opphold i et boblebad eller en badestamp kan være skadelig for helsen din.
• Når du er gravid, kan det å oppholde deg i varmt vann over lengre tid skade fosteret. Mål
temperaturen på vannet før du går i. Ikke gå ut i boblebad hvis vannet er varmere enn 38 °C
(100 °F). Ikke opphold deg i boblebadet mer enn 10 minutter.
• Boblebadvarme i forbindelse med alkohol, narkotika eller medisiner kan føre til bevisstløshet.
• Avslutt umiddelbart hvis du kjenner på ubehag, svimmelhet eller søvnighet. Boblebadvarme kan
føre til hypertermi og bevisstløshet.
• Årsaker, symptomer og effekter på hypertermi kan beskrives som følger: Hypertermi oppstår
når den indre kroppstemperaturen blir fl ere grader høyere enn normal kroppstemperatur på
37 °C (98,6 °F). Symptomene på hypertermi er en økning i den interne kroppstemperaturen,
svimmelhet, slapphet, døsighet og besvimelse. Effektene av hypertermi er manglende evne
til å oppfatte varme, manglende evne til å erkjenne behovet for å gå ut av boblebadet eller
badestampen; uoppmerksomhet overfor fare; fosterskader hos gravide kvinner, fysisk
manglende evne til å gå ut av boblebadet eller badestampen, og bevisstløshet som resulterer i
fare for drukning.
• Inntak av alkohol, narkotika eller medisiner kan øke risikoen for dødelig hypertermi i boblebad
og badestamper.
• Alltid tilsett kjemikalier til vann. Aldri tilsett vann til kjemikalier. Det å tilsette vann til kjemikalier
kan føre til sterk røyk eller kraftige reaksjoner og farlig kjemisk spray.
• Aldri hopp eller stup inn i et boblebad eller grunt vann.
• Montering og demontering skal kun utføres av voksne.
• Dette apparatet kan brukes av barn i alderen fra 8 år og over, og av personer som har nedsatt
sanseevne, fysisk eller psykisk funksjonsevne, eller mangel på erfaring og kunnskap, dersom
de får tilsyn eller instruksjoner om bruk av apparatet på en sikker måte, og forstår farene
involvert i bruken av produktet. Barn kan ikke leke med apparatet. Rengjøring og vedlikehold
må utføres av en voksen over 18 år som er kjent med risikoen for elektrisk støt.
• Ingen del av det elektriske apparatet skal plasseres over badet under bruk.
• Hold pluggen til dette produktet mer enn 4 m unna boblebadet og i en høyde på minst
1,2 meter.
• Produktet må alltid kobles fra strømuttaket før det skal fl yttes eller bli rengjort og før service
eller justeringer skal foretas, samt på regnværsdager.
• Ikke begrav den elektriske ledningen. Plasser ledningen slik at den ikke skades av
gressklippere, hekksakser og annet utstyr.
• Hvis strømledningen er skadet, må den skiftes ut av en kvalifi sert elektriker for å unngå fare.
• Bruk kun identiske reservedeler ved vedlikehold.
ADVARSEL
Page 68

295
A
TA VARE PÅ BRUKSANVISNINGEN
(295IO) SPA NORWEGIAN 7.5” X 10.3” PANTONE 295U 08/20/2016
Norwegian
TEST
RESET
RESET
TEST
TEST
RESET
RESET
RESET
TEST
TEST
Side 5
• Hold alltid støpslet tørt. Det er strengt forbudt å sette et vått støpsel inn i kontakten!
• Spa-bassengets støpsel må kun kobles direkte til et jordet strømuttak i en fast elektrisk
installasjon.
• For å redusere risikoen for elektrisk støt, må du ikke bruke skjøteledninger, tidsbrytere,
kontaktadaptere eller plugger for å koble enheten til strømnettet; sørg for å ha en riktig plassert
stikkontakt.
• Ikke prøv å plugge til eller fra dette produktet mens du står i vann eller når hendene er våte.
• Ikke la boblebadet stå tomt over lengre tid. Ikke utsett boblebadet for direkte sollys.
• Dersom spabassenget ikke skal brukes over en lengre periode, f.eks. om vinteren, bør det
demonteres og lagres innendørs.
• Ikke la boblebadvannet fryse. Ikke slå på boblebadet når vannet er frosset.
• Ikke bruk boblebadet hvis det har blitt skadet under frakt og/eller feilfungerer på noen måte.
Kontakt Intex servicesenter for ytterligere rådgivning.
• Aldri bruk boblebadet alene eller la andre bruke det alene.
• Hell aldri vann med en temperatur høyere enn 40 °C (104 °F) direkte i boblebadet.
• Hold alle kjæledyr unna boblebadet for å unngå skader.
• Ikke tilsett boblebadvannet badeolje eller badesalt.
• Boblebadet må settes opp på en vatret, fl at og jevn overfl ate som er i stand til å støtte den
maksimale belastningen av det fylte boblebadet med fi re voksne, vekt 1136 kg; 6 voksne:
1592 kg.
• Sørg for at det er et tilstrekkelig dreneringssystem rundt boblebadet for å kunne håndtere
vannsprut og vann som fl yter over.
ADVARSEL
FORSIKTIG
• Oppretthold vannkjemien i henhold til produsentens instruksjoner.
• Dette produktet er utstyrt med en jordfeilbryter på enden av strømledningen. Jordfeilbryteren
må testes før hver bruk. Ikke bruk boblebadet hvis jordfeilbryteren ikke fungerer riktig. Koble
fra strømledningen før feilen er identifi sert og korrigert. Kontakt en kvalifi sert elektriker for å
rette feilen. Ikke omgå jordfeilbryteren. Det er ingen deler som må repareres inne i
jordfeilbryteren. Åpning av jordfeilbryteren vil ugyldiggjøre garantien.
1.
Trykk på
RESET
-knappen på jordfeilbryteren.
2.
Slå på boblebadets elektriske utstyr.
3.
Trykk på
TEST
-knappen på jordfeilbryteren. Både
jordfeilindikatoren og det elektriske utstyret skal slå seg av.
Hvis jordfeilindikatoren og det elektriske utstyret ikke slår seg
av, er jordfeilbryteren defekt. Ikke bruk boblebadet. Kontakt en
kvalifi sert elektriker for å rette feilen.
4.
Trykk på
RESET
-knappen på jordfeilbryteren. Indikatoren på
jordfeilbryteren skal slå seg av. Hvis jordfeilindikatoren ikke slår
seg av, er jordfeilbryteren defekt. Ikke bruk boblebadet. Kontakt
en kvalifi sert elektriker umiddelbart for å rette feilen.
ADVARSEL
Page 69

295
A
TA VARE PÅ BRUKSANVISNINGEN
(295IO) SPA NORWEGIAN 7.5” X 10.3” PANTONE 295U 08/20/2016
Norwegian
Side 6
LISTE OVER DELER
Før du går i gang med å sette sammen produktet, er det viktig at du bruker
noen minutter på å bli kjent med de forskjellige delene.
MERK:
Tegningene er kun til illustrasjonsformål. Det aktuelle produktet kan avvike fra dette. Ikke
faktisk størrelse.
8
10
11
18
17
19
9
21
23
22
2
6
7
3
4
5
12
13
14
15
16
20
24
25
26
A
B
C
28
29
27
1
Page 70

295
A
TA VARE PÅ BRUKSANVISNINGEN
(295IO) SPA NORWEGIAN 7.5” X 10.3” PANTONE 295U 08/20/2016
Norwegian
Ved bestilling av deler må du oppgi modellnummer og numre på del (ene).
LISTE OVER DELER
Før du går i gang med å sette sammen produktet, er det viktig at du bruker
noen minutter på å bli kjent med de forskjellige delene.
Side 7
REF.
NR.
BESKRIVELSE ANTALL
RESERVEDELSNR.
4 VOKSNE 6 VOKSNE
28404 28406 28408 28410
1 KONTROLLBASE 1 12320 12320B 12320 12320B
2 KONTROLLBASENS BAKDEKSEL 1 11719 11719B 11719 11719B
3 KONTROLLPANEL (INKLUDERT #4) 1 11930 11930B 11930 11930B
4 BOLT FOR KONTROLLPANEL 3 11024 11024B 11024 11024B
5 KONTROLLBASENS OPPBLÅSNINGSHETTE 1 11831 11831B 11831 11831B
6 FASTNØKKEL FOR KONTROLLPANEL 1 11053 11053 11053 11053
7 OPPBLÅSNINGSSLANGE FOR BOBLEBAD/DEKSEL 1 11830 11830 11830 11830
8
O-RING FOR BOBLEBADETS KONTROLLUTLØP/-INNLØP
2 11699 11699 11699 11699
9 O-RING FOR BOBLEBADETS LUFTINNLØP 1 11687 11687 11687 11687
10 BOBLEBADETS DRENERINGSPLUGG 1 11696 11696B 11696 11696B
11 ADAPTER FOR BOBLEBADETS DRENERINGSVENTIL 1 11718 11718 11718 11718
12 FILTERPATRONENS INNFATNING 1 11798 11798 11798 11798
13 FILTERPATRON 2 11692 11692 11692 11692
14 LOKKET TIL FILTERPATRONENS INNFATNING 1 11797 11797 11797 11797
15 INNLØPS-/UTLØPSPLUGG 3 11739 11739 11739 11739
16 BOBLEBAD 1 11842 12260 12106 12258
17 BOBLEBAD-DEKSEL 1 11841 12261 12107 12256
18
BOBLEBAD-DEKSELETS OPPBLÅSBARE BLÆRE
(FORHÅNDSINSTALLERT I BOBLEBAD-DEKSELET)
1 11689 11689 12108 12108
19 GULVDEL 1 11717 11717 12109 12109
20 KJEMISK DISPENSER 1 11614 11614 11614 11614
21 TESTREMSER 1 11855 11855 11855 11855
22 NØKKEL 1 11742 11742 11742 11742
23 TRYKKMÅLER 1 11741 11741 11741 11741
24 ADAPTER TIL OPPBLÅSNINGSSLANGE 1 11829 11829 11829 11829
25 HANKJØNNSPENNE 6 11698 11698B 11698 11698B
26 HUNKJØNNSPENNE 6 11799 11799B 11799 11799B
27 UTTAKSLOKK FOR TØMMING 1 11934 11934B 11934 11934B
28 SLANGEADAPTER FOR TØMMING 1 11935 11935 11935 11935
29 FILTERMOTOR FOR MINERALBAD 1 11886 11886B 11886 11886B
Page 71

295
A
TA VARE PÅ BRUKSANVISNINGEN
(295IO) SPA NORWEGIAN 7.5” X 10.3” PANTONE 295U 08/20/2016
Norwegian
Side 8
PRODUKTSPESIFIKASJONER
INSTALLASJONSVEILEDNING
Ledningstilknyttet boblebad med pumpe, varme- og blåseapparat, innebygd hardt vannbehandling og
kontrollpanel.
Dette produktet krever minst 13 ampere. Hvis overlastbryteren utløses, kontroller at ingen andre produkter
eller store strømbelastninger er på samme krets som spaet.
Grunnarbeid og krav
• Boblebadet kan installeres innendørs eller utendørs. Kun for privat bruk.
• Påse at området er uten skarpe gjenstander under eller rundt boblebadet.
• Sørg for at du har et riktig plassert strømuttak til å koble til boblebadet og la det være enkel tilgang for
periodisk kontroll av den ledningsmonterte jordfeilbryteren.
• Påse at det er nok klaring rundt boblebadet for full tilgang til boblebadutstyret ved vedlikehold og/eller
service.
• Området skal legge til rette for dreneringsformål under langsiktig lagring av boblebadet.
Tilleggskrav for innendørs installasjon
• Påse at gulvet kan støtte den fulle vekten av boblebadet med det maksimalt tillatte antall personer. Sjekk
med en kvalifi sert entreprenør eller en bygningsingeniør for å bekrefte dette kravet.
• Påse at gulvet er vanntett og har en sklisikker overfl ate. Ikke installer boblebadet på teppe eller annet
materiale som vil bli skadet av fuktighet, kondens.
• Ikke installer boblebadet innendørs i andre etasje over benyttet boareal på grunn av muligheten for
vann- og fuktskader.
• Fuktighet er en naturlig bivirkning av boblebadinstallasjoner innendørs. Rommet skal være godt og riktig
ventilert for utslipp av fuktighet. Installer et ventilasjonssystem for å hindre overfl ødig kondens, fukt i
rommet.
Tilleggskrav for utendørs installasjon
• Boblebadeiere må overholde lokale eller statlige lover gjeldende barnesikring, sikkerhetsbarrierer,
belysning og andre sikkerhetskrav. Kontakt ditt lokale kontor for byggeforskrifter og ytterligere detaljer.
• Påse at overfl aten er vatret, fl at, jevn og sterk nok til å bære den fulle vekten av det oppfylte boblebadet.
• Ikke sett opp boblebadet på gress eller jord, da dette øker boblebades ruskmengde og kan påfølgende
skade gulvet.
• Ikke utsett boblebadet for direkte sollys over lengre tid.
• Det er mulig å installere og la boblebadet forbli utendørs ved en temperatur ikke lavere enn 4 °C (39 °F),
med forbehold om at vanntemperaturen i boblebadet er høyere enn 4 °C (39 °F) og vannet i
sirkulasjonssystemet, pumpen og rørene ikke er frosset. Du kan legge en “temperaturbarriere-matte”
mellom boblebadets gulv og bakken for å hindre varmetap fra bunnen, og for å gi bedre varmeisolering.
Maksimal sittekapasitet: 4 voksne 6 voksne
Vannkapasitet: 210 gal (795 l) 290 gal (1098 l)
Indre/ytre diameter: 57/77 tommer (145/196 cm) 65/85 tommer (165/216 cm)
Høyde: 28 tommer (71 cm)
Luftboble-blåser: 1,1 HP / 220 - 240 V / 50 Hz
Filterpumpens strømningshastighet: 460 gal/t (1741 l/t)
Varmeapparatets strømspenning: 2,200 Watt / 220 - 240 V / 50 Hz
Temperaturområde: 20 ºC - 40 ºC (68 ºF - 104 ºF)
Temperaturstigning: 1,5 - 2,5 ºC/t (3 ºF - 4,5 ºF/t) 1-2 ºC/t (2 ºF - 3,5 ºF/t)
Antall jet-dyser:
120 (28404)
140 (28406)
140 (28408)
170 (28410)
Boblebadets anbefalte driftslufttrykk: 0,083 bar (1,2 psi)
Page 72

295
A
TA VARE PÅ BRUKSANVISNINGEN
(295IO) SPA NORWEGIAN 7.5” X 10.3” PANTONE 295U 08/20/2016
Norwegian
INSTALLASJONSVEILEDNING (FORTS.)
Boblebadet må settes opp av minst 2 personer.
1.
Flytt hele pakken til det valgte området. Ikke dra boblebadet over bakken, ettersom dette kan forårsake
skade og lekkasje.
Åpne esken forsiktig, da denne esken kan brukes til å lagre boblebadet ved langtidslagring eller når det
ikke er i bruk.
2.
Legg ut alle delene på bakken og påse at alle delene er gjort rede for. For manglende eller skadede
deler, kan du kontakte ditt Intex servicesenter oppført i tilleggsskjemaet “Autoriserte servicesentre”.
Montering av boblebadets kontrollenhet
1.
Koble kontrollpanelets
(3)
plugg i kontakten på toppen av boblebadets kontrollbase og skru inn
pluggdekselet stramt for hånd
(se tegning 1)
.
2.
Skru fast kontrollpanelets bolter
(4)
med den medfølgende fastnøkkelen
(6)
for å feste kontrollpanelet
(se tegning 2)
.
3.
Plugg boblebadets kontrollenhet i en jordet stikkontakt.
Side 9
3
Trykk
4 5
5
7
7
1 2
Oppblåsing
Oppblåsing av boblebadveggen
1.
Ta ut gulvdelen
(19)
og spre den over det ryddede området. Deretter spre ut boblebadets hoveddel
over gulvdelen og pek dreneringsventilen mot et passende dreneringsområde.
MERK:
Legg
bunnteppet med boblene ned over, området der du ønsker å plassere spaet.
2.
Trykk på knappen på toppen av kontrollbasen og fjern bakdekselet
(se tegning 3)
.
3.
Skru opp kontrollbasens oppblåsningshette
(5)
for å blottlegge luftblåserens utløp, og før deretter en
ende av oppblåsningsslangen
(7)
inn i utløpet og vri til høyre for å låse den
(se tegning 4)
.
4.
Skru av luftventilens beskyttelseshette, rørstammen skal være i stående stilling for oppblåsning. Før inn
den andre enden av oppblåsningsslangen
(7)
i ventilen og vri den mot høyre for å låse den på plass
(se tegning 5)
.
1
3
1
2
2
4
6
Page 73

295
A
TA VARE PÅ BRUKSANVISNINGEN
(295IO) SPA NORWEGIAN 7.5” X 10.3” PANTONE 295U 08/20/2016
Norwegian
Side 10
INSTALLASJONSVEILEDNING (FORTS.)
5.
Trykk på knappen for å først slå på kontrollpanelknappene. Trykk på knappen for å blåse
opp boblebadveggen inntil den er fast å ta på, men ikke hard
(se tegning 6). IVIKTIG:
Ikke blås opp for
mye eller bruk høyttrykks luftkompressor.
6.
Trykk på knappen igjen for å slå den av.
7.
Koble oppblåsningsslangen
(7)
fra luftventilen og fest trykkmåleren
(23)
til luftventilen. Du har et riktig
oppblåst boblebad
(se tegning 7)
når trykkmåleren er i det grønne området. Gjenta de forrige trinne for
å tilføre mer luft ved behov.
8.
Sett på igjen luftventilens beskyttelseshette.
MERK:
Beskyttelseshetten er designet for å skrus av og på. Aldri bruk stor styrke, da dette kan føre til
at ventilens indre oppblåsningssystem løsner. Se “Feste av boblebadets luftventil” for vedlikehold av
ventil.
Blås opp boblebad-dekselets luftblære
1.
Åpne luftventilen og før inn oppblåsningsslangen
(7)
i ventilen; trykk på for å blåse opp inntil
den er fast å ta på, men ikke hard
(se tegning 8)
.
2.
Koble fra oppblåsningsslangen
(7)
fra luftblåserens
utfl øp og ventilen.
3.
Sett på igjen kontrollbasens oppblåsningshette
(5)
;
lukk luftventilen.
MERK:
Dersom det er behov for å tilføre boblebadveggen eller boblebad-dekselets luftblære litt luft etter at
de er oppsatt, se avsnittene “Oppblåsing av boblebadveggen” og “Blås opp boblebad-dekselets luftblære”
ovenfor. Luftblæredekselet er forhåndsmontert på innsiden av dekselet til mineralbadet. Hvis den må
monteres på nytt, plasser den uoppblåst luftblæren i dekselåpningen til mineralbadet, før du fyller blæren.
Fjerning av luft Boblebadveggen:
1.
Skru av beskyttelseshetten, skyv inn rørstammen
og vri 90 grader til høyre for å feste den i nedre
posisjon
(se tegning 9)
.
2.
Når du er ferdig med å fjerne luft, skyv inn
rørstammen og vri 90 grader til venstre for å
returnere til oppblåsningsposisjon.
3.
Sett på igjen beskyttelseshette.
Dekselets luftblære:
1.
Trekk ut ventilens beskyttelseshette og press ventilen ved roten inntil all luft er fjernet.
2.
Lukk ventilen igjen.
8
7
6
9
7
23
1
2
Page 74

295
A
TA VARE PÅ BRUKSANVISNINGEN
(295IO) SPA NORWEGIAN 7.5” X 10.3” PANTONE 295U 08/20/2016
Norwegian
Side 11
INSTALLASJONSVEILEDNING (FORTS.)
Montering av boblebadets kontrollenhet
1.
Koble kontrollenheten til boblebadet
(se tegning 10)
. Stram kontaktene godt for hånd. Ikke bruk
verktøy til å stramme.
2.
Sett på plass bakdekselet
(2)
til boblebadets kontrollbase
(se tegning 11)
. Bakdekselet må være
installert før du bruker boblebadet.
FORSIKTIGHET:
Ikke sitt, len deg, dekk til eller plasser gjenstander på
boblebadets kontrollenhet.
3.
Fest fi lterpatronens innfatningsenhet til innsiden av boblebadets
utløpsrist (nedre posisjon, som er merket “C”)
(se tegning 12)
.
Fyll mineralbadbøtten, før du monterer festene til fi lterpumpen.
4.
Før du fyller med vann, må du sikre at hettene på
dreneringsventilene i bunnen er lukket på innsiden og utsiden.
5.
Fyll boblebadet med ferskvann til et nivå mellom MIN (MIN) og
MAX (MAKS) avmerket på boblebadveggens innside. Ikke overfyll
boblebadet. Aldri fl ytt på mineralbadbøtten med vann i og/eller
mens kontrollbasen er festet til mineralbadet, fordi mineralbadet
eller kontrollbasen kan skades.
ADVARSEL:
Hell aldri vann med en temperatur
høyere enn 104 °F (40 °C) direkte i boblebadet. Det
anbefales å fylle boblebadet med lunkent vann for rask
oppvarming og energisparing.
6.
Plasser boblebad-dekselet og boblebadets luftblære (forhåndsinstallert i boblebad-dekselet) over
boblebadet, og påse at dekselets spenner er låst med nøkkelen som medfølger etter at du har spent
stroppene stramt.
VIKTIG:
Inspiser boblebad-dekselet regelmessig for lekkasje, tidlig slitasje, skader eller forringelse.
Aldri bruk et skadet basseng-deksel.
7.
Påse at boblebadet er koblet til en jordet stikkontakt og trykk på knappen for å først slå på
kontrollpanelknappene. Trykk på knappen på kontrollpanelet for å aktivere varmeapparatet. Se
driftsavsnittet “Boblebadets kontrollpanel”.
11
2
10
A
B
C
B
C
A
12
C
Page 75

295
A
TA VARE PÅ BRUKSANVISNINGEN
(295IO) SPA NORWEGIAN 7.5” X 10.3” PANTONE 295U 08/20/2016
Norwegian
Side 12
DRIFTSANVISNINGER
BOBLEBADETS KONTROLLPANEL
På/Av-knapp:
Når enheten er iplugget, bruker du denne knappen til å aktivere
kontrollpanelknappene. Lyset ved siden av knappen er grønt når aktivert. Trykk på denne
knappen for å slå av alle nåværende aktiverte funksjoner.
MERK:
På/av-knappen kan vises som en svart knapp i midten av kontrollpanelet.
VARMEKNAPP:
Bruk denne knappen for å aktivere varmesystemet. Pumpen vil varme
badevannet før vanntemperaturen har nådd innstilt temperatur. Når temperaturen på vannet
synker 1-2 °C grader under ønsket temperatur, vil varmesystemet starte. Når fl ammeikonet
på skjermen er rødt, betyr det at varmesystemet er aktivert. Når ikonet er grønt, holder
vannet ønsket temperatur. Varmesystemet er i dvale og fi ltreringssystemet jobber
kontinuerlig.
MERK:
For å stoppe fi ltreringssystemet mens varmesystemet er i dvale, trykk først på
fl ammeknappen og deretter på fi lterknappen. Ved å trykke på fl ammeknappen når
varmesystemer er i dvale, vil det bare slå av varmesystemet, og fi ltreringssystemet vil
fortsette å gå i 24 timer, får det slår seg av automatisk.
Celsius/fahrenheit veksleknapp:
Temperaturen kan vises enten i Fahrenheit eller Celsius. Systemet er som standard stilt etter
Celsius.
FORSIKTIGHET:
Bruk ALDRI boblebadet hvis den angitte vanntemperaturen er mer enn 40 °C (104 ºF).
Temperaturjusteringsknapper:
Det å trykke på knappene for temperaturøkning
eller-senkning vil føre til at LED-lyset blinker. Når det blinker kan du stille inn ønsket
temperatur. Hvis du holder disse knappene nedtrykt, vil verdiene raskt øke eller minke. Den
nye og ønskede temperaturinnstillingen vil forbli på LED-displayet i 5 sekunder for å
bekrefte den nye verdien.
MERK:
Standardtemperaturen er 20 °C (68 °F).
MERK:
Temperaturjustering varierer fra 20 °C (68 °F) til 40 °C (104 °F).
Knapp for vannfi lter:
Denne knappen slår fi lterpumpen på og av. Hvis varmesystemet aktiveres, vil
fi ltreringssystemet starte automatisk.
Lyset over knappen for vannfi lter lyser grønt når aktivert.
Bobleknapp:
Bruk denne knappen for å aktivere massasjesystemet, som har en
30-minutters auto-utkoblingsfunksjon. Lyset over bobleknappen lyser grønt når aktivert.
ADVARSEL:
Ikke kjør boblesystemet når dekselet er festet, fordi luft kan samle seg inne i
boblebadet og forårsake uopprettelig skade og legemsbeskadigelse.
LED-display:
Når strøm er koblet til vil LED-displayet slå seg på og automatisk vise aktuell
vanntemperatur.
MERK:
Den innebygde hardt vannbehandlingsfunksjonen fungerer automatisk sammen med
fi ltreringssystemet.
VIKTIG:
Følgende forhold vil føre til langsom oppvarming av vann.
• Omgivelsestemperaturen er lavere enn 10 ºC (50 ºF).
• Utendørs vindstyrke er over 3,5-5,4 m/s (8-12 mph).
• Luftboblefunksjonen aktiveres ved oppvarming av boblebadvannet.
• Boblebadet er ikke riktig tildekket med dekselet ved oppvarming av vannet.
A: Varmeknapp
B: Celsius/fahrenheit veksleknapp
C: Knapp for temperaturøkning
D: Knapp for temperatursenkning
E: Knapp for vannfi lter
F: Bobleknapp
G: LED-display
H: På/Av-knapp
40
C
o
F
E
D
C
B
A
G
H
Page 76

295
A
TA VARE PÅ BRUKSANVISNINGEN
(295IO) SPA NORWEGIAN 7.5” X 10.3” PANTONE 295U 08/20/2016
Norwegian
Side 13
LED-KODETABELL
Avlesing av
LED-display
ÅRSAK
LØSNING
E90
Ingen vanngjennomstrømning
• Slå av og koble fra kontrollenheten.
• Påse at utløpsristen er ren og uten hindringer.
• Rengjør eller skift ut patronen, se avsnittet
Vedlikehold og lagring.
• Påse at inn-/-utløpstilkoblingene på boblebadet
og fi lterpumpen ikke er blokkert.
• Hold spavannet rent, for å sikre en ren
fi lterpatron uten at den blir tett.
• Hvis problemet vedvarer, ta kontakt med Intex
servicesenter.
E94
Vanntemperaturen er for lav
• Hvis temperaturen er under 4 °C (39 °F),
anbefaler vi at du ikke bruker boblebadet.
• Slå av og koble fra kontrollenheten, tilsett litt
varmt vann for å rense spavannet når
temperaturen er over 5 °C, og trykk på
knappen for å varme vannet til ønsket
temperatur.
• Hvis problemet vedvarer, ta kontakt med Intex
servicesenter.
E95
Vanntemperaturen er rundt
50 °C (122 °F)
• Slå av og koble fra kontrollenheten. Når vannet
er avkjølt, plugg i jordfeilbryteren og start helt
på nytt.
• Slå varmeren av, trykk på fi lteret og
bobleknappene for å senke vanntemperaturen.
• Hvis problemet vedvarer, ta kontakt med Intex
servicesenter.
E96
Systemfeil
• Slå av og koble fra kontrollenheten, bruk lokket
for å forhindre at vannet strømmer ut av
badekaret, demonter og tøm kontrollenheten.
Monter kontrollenheten og plasser den tilbake i
badekaret. Koble til RCD og start den på nytt.
• Hvis problemet vedvarer, ta kontakt med Intex
servicesenter.
E97
Brannbeskyttelse • Kontakt Intex servicesenter.
E99
Temperatursensoren for vannet er
ødelagt
• Kontakt Intex servicesenter.
“END” (SLUTT)
Når oppvarmingsfunksjonen har
vært kontinuerlig i bruk i 72 timer,
går pumpen automatisk i
dvalemodus. Funksjonene for
hurtigoppvarming og vannfi ltrering
deaktiveres.
• Trykk på vannfi lterknappen for å reaktivere
fi lterpumpen.
Page 77

295
A
TA VARE PÅ BRUKSANVISNINGEN
(295IO) SPA NORWEGIAN 7.5” X 10.3” PANTONE 295U 08/20/2016
Norwegian
Side 14
VEDLIKEHOLD OG KJEMIKALIER
Vannhygiene
Boblebadeieren må jevnlig kontrollere og holde badevannet renset med regelmessig vedlikehold (daglig om
nødvendig). Det å tilføre rensemiddel og andre kjemikalier vil kontrollere tilstedeværende bakterier og virus
i badevannet. Opprettholdelsen av riktig vannbalanse gjennom riktig bruk av rensemidler er den viktigste
faktoren i å maksimere boblebadets levetid og utseende, samt å sikre rent, sunt og trygt vann. Riktig teknikk
er viktig for kontroll og behandling av badevannet. Kontakt din lokale ekspert på basseng/boblebad for
kjemikalier, rensemidler, kontrollsett og spørsmål vedrørende kontrollprosedyrer.
FORSIKTIGHET:
FØLG ALLTID KJEMIKALIPRODUSENTENS INSTRUKSJONER OG HELSE-/
FAREADVARSLER.
Ikke tilfør kjemikalier i boblebadet under bruk. Dette kan føre til hud- eller øyeirritasjon.
Konsentrerte
klorløsninger kan skade boblebadet. Ikke i noe tilfelle er Intex Recreation Corp, Intex Development Co
Ltd, deres tilknyttede selskaper, autoriserte agenter og servicesentre, forhandlere eller ansatte ansvarlig
overfor kjøperen eller noen annen part for kostnader forbundet med tap av boblebadvannet, kjemikalier eller
vannskade.
Vedlikehold av boblebadvann og patron
Beskytt alle som bruker boblebadet fra mulige vannrelaterte sykdommer ved å holde boblebadvannet rent.
Alltid praktiser god hygiene. For å sikre riktig vannkvalitet gjør følgende:
1.
Inspiser og rengjør fi lterpatronen hver dag og skift den ut hver 3. dag.
a.
Skru fi lterpatronens innfatningsenhet fra boblebadveggen og fjern
patronen
(se tegning 13)
.
b.
Bruk en hageslange for å skylle av fi lterpatronen. Hvis fi lterpatronen
fortsatt er skitten og misfarget, bør den byttes. Ha alltid
reservepatroner tilgjengelig.
c.
Installer den rene fi lterpatronen tilbake i innfatningsenheten og sett
deretter innfatningsenheten tilbake på boblebadveggen.
2.
Skift ut boblebadvannet hver 3. dag. Se avsnittene “Drenering av
boblebad” og “Rengjøring av boblebad” for detaljer.
3.
Bruk boblebad-kjemikalier for å opprettholde riktig vannkjemi. Skade
på boblebadet som følge av misbruk av kjemikalier og vanstyre av
boblebadvannet er ikke dekket av garantien
4.
Alle brukere må dusje før de går ut i boblebadet.
Vannkjemi-balanse
Oppretthold boblebadvannets pH-nivå mellom 7,2 og 7,8, totalt alkalitetsnivå mellom 80 og 120 ppm og fritt
klornivå mellom 2 til 4 ppm. Bruk de medfølgende testremsene for å kontrollere boblebadvannets kjemi før
hver bruk og fortsett med å kontrollere vannet ikke mindre enn en gang i uken.
Teststrimlene kan teste nivåer av “klorfritt” “pH”, “total alkalitet” og “kalsiumhardhet” på samme tid.
1.
Dypp hele remsen i vannet for deretter å fjerne den raskt.
2.
Hold remsen rett i 15 sekunder. Ikke rist bort overskytende vann fra remsen.
3.
Sammenlign remsens pad med fargekartet på emballasjen. Hvis nødvendig, juster kjeminivået i vannet.
MERK:
Kontroller utløpsdatoen til kontrollsettet, fordi testresultatene kan være unøyaktige hvis settet brukes
etter denne datoen. Lav pH vil skade boblebadet og pumpen. Skader som følge av kjemisk ubalanse dekkes
ikke av garantien.
Bruk den medfølgende fl ytende kjemikaliedispenseren for å administrere klor [kjemikalietablett med
størrelse: Mindre enn 1 tommer (2,5cm) i diameter] i boblebadvannet. Legg 1 tablett i dispenseren. Følg
alltid kjemikalieprodusentens instruksjoner. Fjern den fl ytende kjemikaliedispenseren når boblebadet er i
bruk.
La aldri klor komme i kontakt med boblebadet hvis den ikke er fullstendig oppløst.
VIKTIG:
Trykk på knappen på boblebadets kontrollpanel for å slå på luftboble-blåseren og bidra til å
løse opp kjemikalier i vannet.
Bland aldri kjemikalier sammen. Tilsett boblebadvannet kjemikalier separat. Oppløs hvert kjemikalie grundig
før det tilsettes vannet.
13
14
12
13
ADVARSEL
Koble alltid produktet fra stikkontakten før du fl ytter, rengjør, vedlikeholder eller justerer det.
Page 78

295
A
TA VARE PÅ BRUKSANVISNINGEN
(295IO) SPA NORWEGIAN 7.5” X 10.3” PANTONE 295U 08/20/2016
Norwegian
Side 15
BOBLEBADVANNETS KJEMI OG BALANSE
Test vannets pH, temperatur, herdet kalsium og nivåene med total alkalitet. Bruk de tilsvarende faktorene i
ligningen SI.
SI = 0, balanse
If SI > 0, kalkdannelse eller grumsete vann.
If SI < 0, korrosjon av metaller eller øye- og hudirritasjon.
SI betraktes som tilfredsstillende dersom verdien er innenfor -0,3 til +0,3. Null er perfekt.
Foretrukket vannkjemiverdi
Minimum Ideell Maksimal
Fri klor
2 ppm 2 - 4 ppm 5 ppm
pH
7.2 7.2 - 7.6 7.8
Total alkalitet (TA)
60 ppm 80 ppm 120 ppm
Hardhet (CaCO3)
100 ppm 150 - 250 ppm 350 ppm
Metningsindeks (SI)
-0.3 0 +0.3
Vanntemperatur
20 ºC / 68 ºF 20 - 40 ºC / 68 - 104 ºF 40 ºC / 104 ºF
Fri klor:
er klorrestene gjenværende i boblebadvannet.
Resultat hvis verdien er for lav – Utilstrekkelig desinfi sering.
Resultat hvis verdien er for høy – forårsaker luktproblem, hud- og øyeirritasjon, korroderte metaller og andre
materialer.
pH:
en verdi som angir hvor surt eller basisk boblebadvannet er.
Resultat hvis verdien er for lav – Metallet korroderer, irritasjon i øyne og på huden, ødeleggelse av den
totale alkaliteten.
Resultat hvis verdien er for høy – Kalkdannelser, grumsete vann, kortere fi ltrerings-/oppvarmingsøkter,
øye- og hudirritasjon, dårlig kloreffektivitet.
Total alkalitet (TA):
Angir i hvor stor grad vannet tåler pH-verdiendringer. Avgjør hvor raskt og enkelt
pH-verdien kan endres. Derfor må du justere den totale alkalitetsverdien før du justerer pH-verdien.
Resultat hvis verdien er for lav – Metallet korroderer, irritasjon i øyne og på huden. Lav alkalitetsverdi
medfører ustabil pH-verdi.
Resultat hvis verdien er for høy – Kalkdannelser, grumsete vann, kortere fi ltrerings-/oppvarmingsøkter,
øye- og hudirritasjon, høy kloretterspørsel.
Kalkhardhet (CaCO
3
):
Viser til kalk- og magnesiummengden som er oppløst i vannet.
Resultat hvis verdien er for lav – Vanskelig å avbalansere vannet, korrosjon av metalldeler, øye- og
hudirritasjon og vannet skummer.
Resultat hvis verdien er for høy – Kalkdannelser, grumsete vann, øye- og hudirritasjon, vanskelig å
avbalansere vannet og ineffektivt fi lter/varmeapparat.
Metningsindeks (SI):
temperatur, konsentrasjoner av herdet kalsium, total alkalitet og pH representerer de
viktigste faktorene som påvirker kalkdannelser. Vannets tendens til å enten danne kalk eller korrodere
indikeres av metningsindeksen (SI):
SI = pH+TF+CF+AF-12.1
*Hvor: TF = Temperaturfaktor; CF = Herdingsfaktor for kalsium; AF = Faktor for total alkalitet.
Vanntemperatur
TF
Kalkhardhet
(ppm)
CF
Total alkalitet
(ppm)
AF
(ºC) (ºF)
8 46 0.2 75 1.5 50 1.7
12 54 0.3 100 1.6 75 1.9
16 61 0.4 150 1.8 100 2.0
19 66 0.5 200 1.9 150 2.2
24 75 0.6 250 2.0 200 2.3
29 84 0.7 300 2.1 300 2.5
34 93 0.8 400 2.2 400 2.6
40 104 0.9 500 2.3 -- --
-- -- -- 1000 2.6 -- --
Page 79

295
A
TA VARE PÅ BRUKSANVISNINGEN
(295IO) SPA NORWEGIAN 7.5” X 10.3” PANTONE 295U 08/20/2016
Norwegian
Side 16
BOBLEBADVANNETS KJEMI OG BALANSE (FORTS.)
Justering av boblebadvannet
Hvordan justere boblebadvannets kjemi når nivåene er utenfor det anbefalte.
FORSIKTIGHET:
Følg alltid kjemikalieprodusentens instruksjoner og helse-/fareadvarsler.
Justering av total alkalitet (TA)
Fjern boblebadets deksel for å lufte vannet og bruk de medfølgende testremsene for å sjekke kjeminivået.
Sikre at klornivået i vannet initielt er mellom 2-4 ppm, siden kloren vil påvirke testresultatet for TA. Hvis
TA-nivået (og ikke pH) er høyere enn 120 ppm, må du for å senke vannets TA-nivå tilføre saltsyre
(hydroklorsyre) eller natriumbisulfat. Hvis TA er lavere enn 60 ppm, tilfører du natriumbikarbonat. For
eksempel (4 voksne), hvis TA-nivået er 180 ppm, er den ønskede reduksjonen 60 ppm, så fra tabellen
nedenfor må du tilføre 0,269 pund (121 g) natriumbisulfat eller 0,101 qt (96 ml) saltsyre.
Dersom fargen på testremsen er mellom 180 ppm og 240 ppm, og nær 180 ppm, kan du også tilføre 0,269
pund (121 g) natriumbisulfat eller 0,101 qt (96 ml) saltsyre.
Hvis avlesningen er mer enn 240 ppm, kan du tilføre natriumbisulfat eller saltsyre dråpe for dråpe inntil
testremsen indikerer 240 ppm, deretter tilfører du 0,528 Lb (238 g) natriumbisulfat eller 0,202 qt (192 ml )
saltsyre.
MERK:
Etter justering, retest vannet etter 24 timer og foreta ny justering hvis nødvendig.
Senkning av total alkalitet
Mengde natriumbisulfat for å senke total alkalitet
pH-justering
Etter at den totale alkalitet er senket til 120 ppm eller øket til 80 ppm og pH fortsatt er høy eller lav, kan du
justere den ved hjelp av følgende skjema.
Mengde saltsyre for å senke total alkalitet
(Saltsyre: 31.45%)
Økning av total alkalitet
Mengde natriumbisulfat for å øke total alkalitet
Ønsket nivå 60 ppm 80 ppm 100 ppm 120 ppm 140 ppm
Volum:
210 gal / 795 L
0.269 Lb 0.358 Lb 0.448 Lb 0.528 Lb 0.627 Lb
121 g 161 g 202 g 238 g 283 g
Volum:
290 gal / 1098 L
0.368 Lb 0.492 Lb 0.614 Lb 0.737 Lb 0.860 Lb
168 g 224 g 279 g 335 g 391 g
Ønsket nivå 20 ppm 40 ppm 60 ppm 80 ppm
Volum:
210 gal / 795 L
0.059 Lb 0.118 Lb 0.178 Lb 0.237 Lb
27 g 53 g 80 g 107 g
Volum:
290 gal / 1098 L
0.081 Lb 0.162 Lb 0.244 Lb 0.326 Lb
37 g 74 g 111 g 148 g
Ønsket nivå 60 ppm 80 ppm 100 ppm 120 ppm 140 ppm
Volum:
210 gal / 795 L
0.101 qt 0.135 qt 0.169 qt 0.202 qt 0.234 qt
96 mL 128 mL 160 mL 192 mL 223 mL
Volum:
290 gal / 1098 L
0.139 qt 0.185 qt 0.232 qt 0.278 qt 0.324 qt
132 mL 176 mL 220 mL 264 mL 308 mL
Page 80

295
A
TA VARE PÅ BRUKSANVISNINGEN
(295IO) SPA NORWEGIAN 7.5” X 10.3” PANTONE 295U 08/20/2016
Norwegian
Side 17
BOBLEBADVANNETS KJEMI OG BALANSE (FORTS.)
Senkning av pH
Senkning av pH med saltsyre
Senkning av pH med natriumbisulfat
Justering av herding av kalsium
Bruk de inkluderte testremsene for å sjekke vannets hardhetsnivå og juster det ved å følge skjemaet
nedenfor.
Senkning av herding av kalsium
Hvis husholdningens vannforsyning er behandlet med en vannmykner, må du blande boblebadets hardt
vann med mykt vann i henhold til vannvolumets blandingsskjema for å senke herding av kalsium:
Initielt nivå 1000 ppm 500 ppm 350 ppm 250 ppm
Ønsket nivå:
100 ppm
Blandingsforhold av vannvolum
(Vhardt vann:Vmykt vann)
1:9 1:4 2:5 2:3
Senkning av herding av kalsium med mykt vann
Økning av herding av kalsium
Hvis herdingsnivået av kalsium i boblebadvannet er lavere enn 100 ppm, tilfører kalsiumklorid i
boblebadvannet.
Økning av pH
Økning av pH med natriumbisulfat
Volum 210 gal (795 L) 290 gal (1098 L)
Total alkalitet 120 ppm 80 ppm 120 ppm 80 ppm
Fra→Til
8.4→7.2
0.028 qt 0.018 qt 0.038 qt 0.025 qt
26 mL 18 mL 36 mL 24 mL
7.8→7.2
0.019 qt 0.013 qt 0.026 qt 0.017 qt
18 mL 12 mL 22 mL 16 mL
Volum 210 gal (795 L) 290 gal (1098 L)
Total alkalitet 120 ppm 80 ppm 120 ppm 80 ppm
Fra→Til
8.4→7.2
0.071 Lb 0.047 Lb 0.095 Lb 0.063 Lb
32 g 21 g 43 g 29 g
7.8→7.2
0.047 Lb 0.032 Lb 0.064 Lb 0.043 Lb
21 g 14 g 29 g 20 g
Volum 210 gal (795 L) 290 gal (1098 L)
Total alkalitet 120 ppm 80 ppm 120 ppm 80 ppm
Fra→Til 6.8→7.2
0.541 Lb 0.361 Lb 0.737 Lb 0.491 Lb
243 g 163 g 335 g 224 g
ADVARSEL
Saltsyre er en etsende kjemisk og fl ytende løsning av natriumbisulfat (NaHSO
4
), og
er svært sur. Håndter alle kjemikalier med forsiktighet og bruk ekstra verneutstyr,
inkludert vernebriller og -hansker. Det er veldig viktig å ikke sprute syre på huden eller
klær, eller inn i øynene.
Volum 210 gal (795 L) 290 gal (1098 L)
m (CaCl
2
) 0.197 Lb 89 g 0.269 Lb 122 g
Page 81

295
A
TA VARE PÅ BRUKSANVISNINGEN
(295IO) SPA NORWEGIAN 7.5” X 10.3” PANTONE 295U 08/20/2016
Norwegian
Drenering av boblebad
1.
Slå av boblebadets kontrollenhet.
2.
Koble adapteret for dreneringsventilen til en hageslange og pek den
andre enden av hageslangen til et egnet dreneringsområde
(se
tegning 14)
.
3.
Fjern dreneringsventilens beskyttelseshette fra boblebadets utside og
fest adapteret for dreneringsventilen på selve dreneringsventilen
(se
tegning 14)
.
4.
Fra innsiden av boblebadet, åpne dreneringsventilens
beskyttelseshette, og vannet begynner å strømme ut fra hageslangen.
5.
Når vannet stopper, koble fra boblebadets kontrollenhet fra
boblebadveggen. Løft boblebadveggen fra motsatt side av avløpet,
noe som vil lede gjenværende vann frem til avløpet og påfølgende
tømme boblebadet fullstendig
(se tegning 15)
.
6.
Koble oppblåsningsslangen
(7)
til luftblåserens utløp på
kontrollenheten.
7.
Slå på boblebadet og trykk på knappen, pek
oppblåsningsslangen mot innløpene/utløpene på boblebadet og
kontrollenheten for å tørke ut noe vann i rørsystemet
(se
tegningene 16 og 17)
.
8.
Bruk et rent håndkle til å tørke opp eventuelt gjenværende vann og
fuktighet på boblebadet og kontrollenheten.
9.
Påse at boblebadet og kontrollenheten er grundig tørket.
MERK:
De medfølgende pluggene
(15)
kan benyttes til å tildekke
vannets inn-/utløpstilkoblinger fra boblebadets innside for å hindre
vann fra å strømme ut.
Rengjøring av boblebad
Hvis det er synlig smuss i vannet eller det er uklart og riktig vannkjemi
ikke klarner vannet, skift ut vannet og rengjør boblebadet. Se avsnittet
“Drenering av boblebad” for hvordan man skal tømme det. Mens det er
tomt, fjern fi lterpatronens innfatningsenhet fra boblebadveggens innside,
og deretter rengjør og/eller skift ut fi lterpatronen. Bruk en svamp og mild
såpeblanding for å tørke vekk eventuell jord eller fl ekker på
boblebadveggens innside. Skyll grundig før du fyller med rent vann.
VIKTIG:
Ikke bruk stålull, harde børster eller slipende rengjøringsmidler.
Feste av boblebadets luftventil
Kontroller boblebadets luftventil for lekkasje og tetthet før bruk. Hvis luft lekker fra luftventilen, bruker du
den medfølgende fastnøkkelen
(22)
for å stramme luftventilen som følger:
1.
Påse at boblebadet er tomt for luft, åpne deretter luftventilens
beskyttelseshette og før inn fastnøkkelen
(22)
i selve luftventilen
(se tegning 18)
.
2.
Med den ene hånden, hold luftventilens bakside borte fra
boblebadveggens innside og vri fastnøkkelen
(22)
med klokken.
VIKTIG:
Ikke overstram luftventilen. Aldri juster selve luftventilen
når boblebadet er i bruk eller fylt med vann. Bare bruk skiftenøkkelen
til luftventilen hvis luftventilen er løs, eller hvis det er en lekkasje rundt
luftventilens base. Ikke stram luftventilen for mye – for mye stramming
kan skade ventilen. Sørg for at ventilen er tett og at den ikke lekker.
Boblebad-deksel
Festespennene til dekselet er låsespenner. Det medfølger to nøkler, manualen og annet tilbehør i
plastposen. Hver spenne er merket med symbolene “locked” (låst) og “unlocked” (ulåst) for enkel betjening:
sett nøkkelen i sporet på låsen og vri den til riktig posisjon for å låse eller låse opp spennen hhv. For å sikre
ingen uautorisert tilgang, må du alltid sette på dekselet når boblebadet ikke er i bruk og låse alle spennene.
Hold alltid nøklene utilgjengelig for barn. I tilfelle du mister nøklene, kan du bruke et fl att skrujern med
passende størrelse for å låse eller låse opp spennene.
Inspiser boblebad-dekselet regelmessig for lekkasjer, tidlig slitasje, skader eller tegn på forringelse. Bruk
aldri et slitt eller skadet deksel: Det vil ikke gi beskyttelsesnivået som kreves for å hindre barns ukontrollerte
tilgang til boblebadet.
VEDLIKEHOLD
Side 18
18
22
16
17
7
7
14
1
2
3
11
15
Page 82

295
A
TA VARE PÅ BRUKSANVISNINGEN
(295IO) SPA NORWEGIAN 7.5” X 10.3” PANTONE 295U 08/20/2016
Norwegian
Side 19
VEDLIKEHOLD (FORTS.)
1.
Tøm og rengjør boblebadet ved å følge avsnittene “Drenering av boblebad” og “Rengjøring
av boblebad”.
2.
Følg instruksjonene i omvendt rekkefølge for å slippe
ut luften og demontere boblebadet, kontrollenheten og
boblebad-dekselets luftblære.
3.
Tømme bøtten og luftblæredekselet:
a) Åpne uttakslokket for tømming
(27)
med det
inkluderte bolteverktøyet
(6) (se tegning 19)
.
b) Sett slangeadapteren for tømming
(28)
i uttaket.
c) Sett inntaksslangen
(7)
over slangeadapteren for
tømming
(28)
.
d) Sett den andre enden av inntaksslangen i bøttens
luftventil og ventilen for luftblæredekselet.
e) Trykk på luftboble knappen for å tømme.
f) Når tømmingen er fullført, utfør trinnene ovenfor i
motsatt rekkefølge og sikre at uttakslokket for
tømming
(27)
er festet godt.
Forsiktig:
Skal bare brukes til formålet som er
beskrevet i brukerhåndboken. Hold infl asjonsslangen
unna vann og andre gjenstander når defl asjon er
aktivert, for å unngå skade på viftemotoren.
4.
Sørg for at alle komponenter og tilbehør til boblebadet er helt rene og tørre før lagring.
Lufttørk boblebadet i solen i en time før du bretter det sammen.
5.
Brett boblebadet løst og unngå skarpe hjørner for å hindre skade eller lekkasje på
hoveddelen.
6.
Forbered nye fi lterpatroner for neste gangs bruk.
7.
Oppbevar boblebadet og tilbehøret på en tørr, temperaturstyrt lagringplass, hvor
temperaturen ligger mellom 0 º - 40 ºC (32 º - 104 ºF).
8.
Originalemballasjen kan brukes til lagring.
VINTEROPPBEVARING
Reparasjon av boblebad-dekselet og boblebadets luftblære
Bruk det medfølgende punkteringssettet til å reparere eventuelle punkteringer:
• Rengjør og tørk området som skal repareres grundig.
• Fjern punkteringslappens bakpapir og trykk punkteringslappen hardt over punkteringen.
Glatt ut overfl aten for å fjerne eventuelle luftbobler under lappen.
VIKTIG
Omgivelsestemperaturen i luften har innvirkning på boblebadets interntrykk. Luft i boblebadet
kan utvide og trekke seg sammen på grunn av varierende temperatur, noe som kan føre til
redusert trykk i boblebadet. Hvis dette skjer, kan du bruke den medfølgende trykkmåleren for
å kontrollere det interne lufttrykket og tilføre mer luft ved behov.
19
6
7
28
1
2
3
27
Page 83

295
A
TA VARE PÅ BRUKSANVISNINGEN
(295IO) SPA NORWEGIAN 7.5” X 10.3” PANTONE 295U 08/20/2016
Norwegian
FEILSØKINGSGUIDE
Side 20
IKKE NOE SKJERMBILDE
/ BOBLEBADETS
KONTROLLENHET
FUNGERER IKKE
HUSHOLDNINGENS
EFFEKTBRYTER ER
UTLØST
VARMES IKKE OPP
RIKTIG
LUFTBOBLE-BLÅSER
FUNGERER IKKE
VANNFILTRERING
FUNGERER IKKE
VANN ER IKKE RENT
PUMPEADAPTERE ER
IKKE PÅ NIVÅ MED
BOBLEBAD-ADAPTERE
BOBLEBADET HAR EN
RAR FORM
BOBLEBADET MISTER
LUFTTRYKK
LEKKASJE MELLOM
BOBLEBADETS OG
KONTROLLSKAPETS
KONTAKTER
BOBLEBADET BRÅKER
FOR MYE I KUN
FILTRERINGSMODUS
• Boblebadet er koblet fra eller slått av.
• Kontrollpanelets plugg er løs.
• Strømbrudd.
• Jordfeilbryter utløst.
• Jordfeilbryter ødelagt.
• Effektbryter er for svak.
• Overbelastning av effektbryter.
• En elektrisk feil på linjen.
• Temperatur stilt for lavt.
• Skitten fi lterpatron.
• Vanntemperatur avtagende under
varmeapparatets STANDBY-modus.
• Varmeelemt fungerer ikke.
• Luftblåserpumpen er for varm.
• Skitten fi lterpatron.
• Filtreringsinnløp og/eller -utløp er tett.
• Pumpemotorens fi lter har sviktet.
• Filterpatroninnretningen er ikke festet riktig.
• Utilstrekkelig fi ltreringstid.
• Skitten fi lterpatron.
• Feilaktig vedlikehold av vannet.
• Filtreringsinnløp og -utløp er tett.
• Et kjennetegn ved PVC er at den endrer
form, noe som er vanlig.
• Ekstra lufttrykk ved sterk sol.
• Luftventilhetten er løs.
• Luftventilbasen er løs.
• Hull eller revne i boblebad.
• Boblebadets kontrollinnløp/-utløp er ikke
godt nok strammet.
• O-ring for boblebadets kontrollutløp/-innløp
mangler.
• Kontrollbasekomponentene er ikke godt festet.
• Bakken under kontrollbasen er ikke i vater og
kompakt.
• Spafi ltermotoren fungerer ikke.
• Påse at boblebadet er plugget i og slått på.
• Påse at kontrollpanelets plugg er godt festet til
kontrollbasens støpsel.
• Kontroller strømkilde.
• Tilbakestill jordfeilbryteren.
• Kontakt Intex servicesenter.
• Sikre riktig styrke på effektbryter.
• Sørg for å ha en passende effektbryter som kun
betjener boblebadets strømforsyning.
• Kontakt en sertifi sert elektriker for å rette den
elektriske feilen.
• Øk temperaturen og monter boblebadets deksel.
• Rengjør eller skift ut fi lterpatronen i tide.
• Hvis varmeren er i STANDBY-modus, trykk på
fl ammeknappen to ganger for å varme vannet til
angitt temperatur.
• Kontakt Intex servicesenter.
• Slå av og koble fra boblebadet. La det kjøle seg ned
og start helt på nytt.
• Kontakt Intex servicesenter.
• Rengjør eller skift ut fi lterpatronen i tide.
• Sjekk og rengjør fi ltreringsinnløp og -utløp regelmessig.
• Kontakt Intex servicesenter.
• Sikre at fi lterpatroninnretningen er riktig festet.
• Øk fi ltreringstid.
• Rengjør eller skift ut fi lterpatronen i tide.
• Hold spavannet rent. Se kjemikalieprodusentens
instruksjoner.
• Sjekk og rengjør fi ltreringsinnløp og -utløp regelmessig.
• Hev pumpen med en trebit eller en annen type
isolert materiale for å bringe pumpeadaptere på
høyde med boblebad-adaptere.
• Ikke utsett produktet for direkte sollys.
• Kontroller lufttrykket og slipp ut luft om nødvendig.
Ved svært varmt vær, må du kontrollere for å se om
det er nødvendig å frigjøre litt luft. Dette for å unngå
eventuelle skader på boblebadet.
• Sikre at luftventilhetten er godt lukket.
• Fyll opp boblebadet med luft og deretter sikre at
luftventilbasen er godt strammet. Se avsnittet “Feste
av boblebadets luftventil”.
• Bland fl ytende såpe med vann i en sprayfl aske og
spray på sømmene. Hvis det er en lekkasje vil det
boble. Når du har funnet lekkasjen, rengjør og tørk
lekkasjeområdet og deretter påfør punkteringslappen
som medfølger boblebadet.
• Stram til inn-/-utløpstilkoblingene.
• Smør o-ringen med vaselin for vanntetting.
• Fjern risten fra boblebadets innside med et skrujern,
sikre at O-ringen for innløp/utløp er på plass, ren og
uskadet.
• Sikre at kontrollpanelet, bakdekselet og alle innløp/
utløp er godt tilkoblet.
• Sikre at bakken er vatret, kompakt og jevn.
• Erstatt den ødelagte fi ltermotoren med en ny.
PROBLEM ÅRSAK LØSNING
Page 84

295
A
TA VARE PÅ BRUKSANVISNINGEN
(295IO) SPA NORWEGIAN 7.5” X 10.3” PANTONE 295U 08/20/2016
Norwegian
GARANTIBESTEMMELSER
Ditt PureSpa boblebad har blitt produsert ved bruk av materialer av høyeste kvalitet og utførelse.
Alle Intex-produkter er blitt kontrollert og funnet fri for feil før de forlater fabrikken. Denne
begrensede garantien gjelder kun for det PureSpa boblebadet oppført nedenfor.
Denne begrensede garantien kommer i tillegg til, og er ikke en erstatning for, dine juridiske
rettigheter og rettsmidler. I den utstrekning denne garantien er uforenlig med noen av dine
juridiske rettigheter, har de sistnevnte forrang. Forbrukervernlovgivningen i EU gir for eksempel
lovfestede garantirettigheter i tillegg til dekningen denne begrensede garantien gir. For nærmere
informasjon om forbrukervernlovgivningen i EU, besøk nettstedet til European Consumer Center
på http://ec.europa.eu/consumers/ecc/contact_en/htm.
Bestemmelsene i denne begrensede garantien gjelder kun for den opprinnelige kjøpere og kan
ikke overføres. Denne begrensede garantien gjelder kun for tidsperioden som spesifi sert lenger
ned fra datoen for det opprinnelige kjøpet. Ta vare på original kjøpskvittering sammen med
denne manualen; bilaget er påkrevd som bevis på dette kjøpet og må være vedlagt garantikrav
ellers er denne begrensede garantien ugyldig.
PureSpa garanti – 1 år
Dersom en produksjonsdefekt oppdages innen den tidsperioden som er spesifi sert lenger opp, ta
kontakt med respektive Intex servicesenter som er oppført på eget ark “Autoriserte
servicesenter”. Hvis varen returneres i henhold til avtalen som inngås med Intex Service Center
vil servicesenteret inspisere varen og avgjøre gyldighet av garantikravet. Dersom artikkelen er
dekket av bestemmelsene i garantien, vil den bli reparert eller erstattet med en identisk eller
sammenlignbar artikkel (etter Intex’ eget skjønn), uten kostnader for deg.
Det gis ingen underforståtte garantier utover denne garantien og de juridiske rettighetene som
gjelder i ditt land. I den grad dette er tillatt i ditt land skal Intex ikke under noen omstendigheter
kunne holdes ansvarlig overfor deg eller tredjemann for direkte skader eller følgeskader som
inntreffer som følge av bruken av din PureSpa, eller for handlingene til Intex eller Intex’
representanter eller ansatte (herunder produksjonen av produktet). Dersom eksklusjon eller
begrensning av tilfeldige skader eller følgeskader ikke er tillatt i ditt land, gjelder denne
begrensningen eller eksklusjonen ikke for deg.
Vi gjør oppmerksom på at denne begrensede garantien ikke gjelder:
• Dersom PureSpa har vært gjenstand for uaktsomhet, unormal eller ikke tiltenkt bruk, en
ulykke, feil bruk, feil spenning eller strømstyrke i strid med driftsinstruksjonene, dårlig
vedlikehold eller oppbevaring.
• Dersom PureSpa er blitt påført skade som følge av omstendigheter som ligger utenfor Intex’
kontroll, herunder men ikke begrenset til vanlig slitasje og skader som skyldes eksponering
for brann, oversvømmelse, frost, regn eller andre krefter i det utvendige miljø.
• Dersom PureSpa-enheten brukes for kommersielle formål.
• for deler og komponenter som ikke er solgt av Intex, og /eller.
• Dersom uautoriserte modifi kasjoner, reparasjoner eller demontering av PureSpa er blitt
foretatt av noen annen person enn personalet ved Intex’ servicesenter.
Kostnadene knyttet til tap av bassengvann, kjemikalier eller vannskader dekkes ikke av denne
garantien. Personskader eller skader på eiendom eller personer dekkes ikke av denne garantien.
Les brukermanualen nøye og følg alle instruksjoner om riktig bruk og vedlikehold av PureSpa.
Inspiser alltid utstyret ditt før bruk. Din begrensede garanti kan være ugyldig dersom
instruksjonene ikke er fulgt.
Side 21
Page 85

295
A
(295IO) SPA FINNISH 7.5” X 10.3” PANTONE 295U 08/20/2016
Finnish
KÄYTTÖOHJE
PureSpa™
SSP-H-20-1C
TÄRKEITÄ
TURVAOHJEITA
Lue kaikki ohjeet huolellisesti ennen
laitteen asennusta ja käyttöä ja noudata
ohjeita. Säilytä tulevia
tarpeita varten.
Kokeile myös seuraavia Intex-tuotteita: altaita, allasvarusteita,
ilmatäyt-teisiä altaita ja leluja, ilmapatjoja ja veneitä. Niitä on
saatavana jälleen-myyjiltämme tai verkkosivuiltamme.
Jatkuvan tuotekehityksen takia Intex varaa oikeuden muuttaa
ilman ennakkoilmoitusta teknisiä tietoja ja ulkonäköä, mistä
saattaa seurata päivityksiä käyttöoppaaseen.
©2016 Intex Marketing Ltd. - Intex Development Co. Ltd. - Intex Trading Ltd.
- Intex Recreation Corp.
All rights reserved/Tous droits réservés/Todos los derechos reservados/Alle Rechte
vorbehalten. Printed in China/Imprimé en Chine/Impreso en China/Gedruckt in China.
®™ Trademarks used in some countries of the world under license from/®™ Marques utilisées dans certains pays sous licence de/
Marcas registradas utilizadas en algunos países del mundo bajo licencia de/Warenzeichen verwendet in einigen Ländern der Welt in
Lizenz von/
Intex Marketing Ltd. to/à/a/an Intex Trading Ltd., Intex Development Co. Ltd., G.P.O Box 28829, Hong Kong & Intex
Recreation Corp., P.O. Box 1440, Long Beach, CA 90801
• Distributed in the European Union by/Distribué dans l’Union Européenne
par/Distribuido en la unión Europea por/Vertrieb in der Europäischen Union durch/
Intex Trading B.V., Venneveld 9, 4705 RR
Roosendaal – The Netherlands
www.intexcorp.com
Kuva on tarkoitettu vain havainnollistamiseen.
Page 86

295
A
SÄILYTÄ OHJEET
(295IO) SPA FINNISH 7.5” X 10.3” PANTONE 295U 08/20/2016
Finnish
Sivu 2
Varoitus........................................................................................ 3-5
Osien pikaopas............................................................................ 6-7
Asennusohjeet............................................................................. 8-11
Käyttöohjeet.................................................................................. 12
Hälytyskoodi- ja LED-kooditaulukko........................................... 13
Kunnossapito ja kemikaalit........................................................ 14-19
Pitkäaikainen säilytys................................................................... 19
Vianmääritysopas.......................................................................... 20
Rajoitettu takuu.............................................................................. 21
Page 87

295
A
SÄILYTÄ OHJEET
(295IO) SPA FINNISH 7.5” X 10.3” PANTONE 295U 08/20/2016
Finnish
Sivu 3
TÄRKEÄT TURVALLISUUSSÄÄNNÖT
Lue kaikki ohjeet huolellisesti ennen laitteen asennusta ja käyttöä, ja noudata ohjeita.
LUE OHJEET JA NOUDATA NIITÄ
VAARA
VAROITUS
• Hukkumisonnettomuuden vaara. Lasten luvaton pääsy porealtaalle on estettävä huolellisesti.
Onnettomuuksien estämiseksi lapsia on valvottava tarkasti, jotta he eivät pääse käyttämään
poreallasta yksinään.
• Hukkumisvaara. Tarkista porealtaan kansi säännöllisesti vuotojen, kulumisen, vaurioiden ja
heikkenemisen merkkien varalta. Älä koskaan käytä kulunutta tai vaurioitunutta kantta: kansi
tarjoaa suojaa ja estää lasten pääsyn altaaseen ilman valvontaa.
• Loukkaantumisvaara. Vaihda vaurioitunut johto välittömästi. Älä hautaa johtoa maahan.
• Sähköiskun vaara. Älä jätä mitään sähkölaitteita, kuten valoja, puhelinta, radiota tai televisiota,
3,5 metriä lähemmäs poreallasta.
• Sähköiskun vaara. Älä käytä poreallasta, jos sataa, on ukonilma tai salamoi.
• Porealtaan virta on johdettava jäännösvirtalaitteen (RCD) kautta, jonka nimellinen jäännösvirta
ei ylitä 30 mA.
• Porealtaan sähkölaitteet sisältävät kannettavan vikavirtasuojakytkimen (PRCD), jonka
nimellinen laukaisuvirta saa olla enintään 10 mA. Jos yli 10 mA:n vuotovirta tunnistetaan, PRCD
toimii ja katkaisee virransyötön. Tällaisessa tapauksessa poreallas on irrotettava verkkovirrasta
ja käyttö lopetettava heti. Ota yhteyttä paikalliseen huoltoliikkeeseen saadaksesi neuvoja ja/tai
tuotteen korjaamiseksi.
• Sähköosia, lukuun ottamatta erittäin matalajännitteisiä alle 12 V: n osia, ei saa olla porealtaassa
olevien henkilöiden ulottuvilla.
• Sähköasennuksen on täytettävä paikallisten standardien vaatimukset.
• Osat, joissa on sähköisiä komponentteja, lukuun ottamatta kaukosäätimiä, on sijoitettava
asianmukaisesti, jotta ne eivät pääse putoamaan porealtaaseen.
• Onnettomuuksien välttämiseksi älä anna lasten käyttää tuotetta, ellei heitä valvota koko ajan.
• Lasten ei pitäisi käyttää porealtaita tai kuumavesialtaita ilman aikuisten valvontaa.
• Lapsia on valvottava koko ajan, jotta vältetään hukkumisriskit. Kiinnitä ja lukitse altaan kansi
jokaisen käyttökerran jälkeen.
• Loukkaantumisvaaran vähentämiseksi:
a) Porealtaan vesi ei saa ylittää 40 °C (104 °F) lämpötilaa. 38 ºC (100 °F) ja 40 ºC (104 °F) välistä
lämpötilaa pidetään terveelle aikuiselle turvallisena. Alhaisempia veden lämpötiloja suositellaan
pienille lapsille ja silloin, kun porealtaassa oleskellaan 10 minuuttia pidempään.
b) Koska liian korkea veden lämpötila saattaa aiheuttaa sikiövaurioita raskauden ensimmäisten
kuukausien aikana, raskaana olevat tai mahdollisesti raskaana olevat naiset eivät saisi kylpeä
yli 38 ºC (100 °F) lämpötilassa.
c) Ennen menemistä porealtaaseen tai kuumavesialtaaseen, käyttäjän tulee mitata veden
lämpötila tarkalla lämpömittarilla, koska veden lämpötilaa säätävien laitteiden toleranssi
vaihtelee.
d) Alkoholin, huumeiden tai lääkkeiden käyttö ennen porealtaan käyttöä tai sen aikana saattaa
johtaa tajuttomuustilaan ja mahdollisesti hukkumiseen.
e) Henkilöiden, jotka kärsivät ylipainosta tai joilla on ollut sydänvaivoja, alhainen tai korkea
verenpaine, ongelmia verenkierrossa tai diabetes, tulee kysyä neuvoa lääkäriltä ennen
porealtaan käyttöä.
Page 88

295
A
SÄILYTÄ OHJEET
(295IO) SPA FINNISH 7.5” X 10.3” PANTONE 295U 08/20/2016
Finnish
Sivu 4
f) Lääkkeitä käyttävien henkilöiden tulisi kysyä neuvoa lääkäriltä ennen porealtaan käyttöä, sillä jotkin lääkkeet
saattavat aiheuttaa uneliaisuutta, kun taas toiset lääkkeet voivat vaikuttaa sykkeeseen, verenpaineeseen ja
verenkiertoon.
g) Lääkkeitä käyttävien ja/tai erilaisista sairauksista kärsivien henkilöiden tulee kysyä neuvoa lääkäriltä ennen
porealtaan tai kuumavesialtaan käyttöä.
h) Keskustele lääkärin kanssa ennen käyttöä, jos olet raskaana, diabeetikko, huonokuntoinen tai
lääkehoidossa.
• Tulehduksia sairastavien henkilöiden ei tule käyttää poreallasta tai kuumavesiallasta.
• Loukkaantumisen välttämiseksi ole varovainen siirtyessäsi porealtaaseen tai kuumavesialtaaseen tai
poistuessasi niistä.
• Älä käytä lääkkeitä tai alkoholia ennen porealtaan tai kuumavesialtaan käyttöä tai sen aikana välttääksesi
tajunnanmenetyksen ja mahdollisen hukkumisen.
• Raskaana olevien tai mahdollisesti raskaana olevien naisten tulee kysyä neuvoa lääkäriltä ennen porealtaan
tai kuumavesialtaan käyttöä.
• Yli 38 ºC (100 °F) veden lämpötila saattaa olla terveydelle haitallista.
• Älä käytä poreallasta tai kuumavesiallasta välittömästi raskaan urheilusuorituksen jälkeen.
• Liian pitkäkestoinen oleskelu porealtaassa tai kuumavesialtaassa saattaa olla terveydelle haitallista.
• Raskaana olevien naisten pitkäkestoinen oleskelu kuumassa vedessä saattaa aiheuttaa sikiövaurioita.
Mittaa veden lämpötila ennen altaaseen menoa. Älä mene porealtaaseen, jos lämpötila on yli 38 °C
(100 °F). Älä ole porealtaassa yli 10 minuuttia.
• Porealtaan lämpö yhdessä alkoholin, huumeiden tai lääkkeiden kanssa voi aiheuttaa tajuttomuuden.
• Poistu heti, jos tunnet olosi epämiellyttäväksi, sinua huimaa tai olet unelias. Porealtaan lämpö saattaa
aiheuttaa hypertermian ja tajuttomuuden.
• Hypertermian syyt, oireet ja vaikutukset voidaan kuvata seuraavasti: Hypertermia on kyseessä silloin, kun
ruumiinlämpötila ylittää normaalin 37 °C (98,6 °F) lämpötilan usealla asteella. Hypertermian oireisiin
kuuluvat ruumiinlämmön nousu, huimaus, saamattomuus, uneliaisuus ja pyörtyminen. Hypertermian
vaikutuksia voivat olla lämmönhavaitsemiskyvyn häiriöt; kyvyttömyys todeta altaasta poistumisen
tarpeellisuus; kyvyttömyys havaita uhkaavaa vaaraa; sikiövauriot raskaana olevilla naisilla, fyysinen
kyvyttömyys poistua porealtaasta ja tajuttomuus, joka johtaa hukkumisvaaraan.
• Alkoholin tai lääkkeiden käyttö voi lisätä huomattavasti vaarallisen hypertermian riskiä porealtaassa ja
kuumavesialtaissa.
• Lisää kemikaalit aina veteen, älä lisää vettä kemikaaleihin. Lisää kemikaalit aina altaassa olevaan veteen
välttääksesi voimakkaita höyryjä ja reaktioita, jotka voivat aiheuttaa vaarallisia kemikaaliroiskeita.
• Älä hyppää tai sukella porealtaaseen tai mihinkään matalaan veteen.
• Kokoamisen ja purkamisen saa suorittaa vain aikuinen.
• Laitetta voivat käyttää yli 8-vuotiaat lapset ja henkilöt, joilla on heikentyneet fyysiset, henkiset tai
aistinvaraiset valmiudet tai joilla ei ole tarvittavaa kokemusta tai tietoa, jos heitä valvotaan tai opastetaan
laitteen turvalliseen käyttöön ja he ymmärtävät vaaratekijät. Lapset eivät saa leikkiä laitteella. Vain aikuinen,
yli 18-vuotias henkilö, joka tuntee sähköiskuihin liittyvät vaarat, saa puhdistaa ja huoltaa laitetta.
• Mikään sähkölaitteiden osa ei saa sijaita altaan yläpuolella käytön aikana.
• Aseta tuotteen sähköliitäntä vähintään 4 metrin päähän porealtaasta ja vähintään 1,2 metrin korkeudelle.
• Irrota tuote aina sähköverkosta ennen sen siirtämistä, puhdistamista, huoltamista tai minkäänlaisten
säätöjen tekemistä tuotteelle sekä sateisina päivinä.
• Älä hautaa johtoa maahan. Sijoita johto niin, ettei satu vahinkoja käytettäessä ruohonleikkureita, oksasaksia
tai muita työvälineitä.
• Jos virtajohto on vaurioitunut, sen saa vaihtaa vain ammattitaitoinen sähköasentaja vaarojen välttämiseksi.
• Käytä samanlaisia vaihto-osia, kun huollat laitetta.
VAROITUS
Page 89

295
A
SÄILYTÄ OHJEET
(295IO) SPA FINNISH 7.5” X 10.3” PANTONE 295U 08/20/2016
Finnish
VAROITUS
• Ylläpidä veden kemikaalitasapaino valmistajan ohjeiden mukaisesti.
• Tässä tuotteessa on RCD asennettuna virtajohdon päähän. RCD on testattava ennen jokaista
käyttökertaa. Älä käytä poreallasta, jos RCD ei toimi oikein. Irrota virtajohto pistorasiasta
siihen asti, kunnes vika on löytynyt ja korjattu. Pyydä pätevää sähköasentajaa korjaamaan
vika. Älä ohita RCD-laitetta. RCD:n sisällä ei ole huollettavia osia. RCD:n avaaminen mitätöi
takuun.
1.
Paina RCD:n
RESET
-painiketta.
2.
Kytke porealtaan sähkölaitteet päälle.
3.
Paina RCD:n
TEST
-painiketta. RCD-merkkivalon pitäisi
sammua ja sähkölaitteiden pitäisi kytkeytyä pois päältä.
Jos RCD-merkkivalo ei sammu ja sähkölaitteet eivät kytkeydy
pois päältä, RCD on viallinen. Älä käytä poreallasta. Pyydä
ammattitaitoista sähköasentajaa korjaamaan vika.
4.
Paina RCD:n
RESET
-painiketta. RCD:n merkkivalon pitäisi syttyä.
Jos RCD-merkkivalo ei syty, RCD on viallinen. Älä käytä
poreallasta.
Pyydä välittömästi ammattitaitoista sähköasentajaa korjaamaan
vika.
VAROITUS
TEST
RESET
RESET
TEST
TEST
RESET
RESET
TEST
TEST
Sivu 5
• Pidä pistoke kuivana, märän pistokkeen liittäminen on ehdottomasti kiellettyä!
• Porealtaan pistokkeen saa liittää suoraan vain maadoitettuun pistorasiaan, joka on kiinteästi
asennettu.
• Sähköiskuvaaran välttämiseksi, älä käytä jatkojohtoja, ajastimia, pistokkeen välikappaleita tai
konvertteripistokkeita laitteen sähkövirtaan kytkemisessä; sijoita pistorasia oikein.
• Älä kytke laitetta sähkövirtaan tai irrota sitä sähkövirrasta, jos seisot vedessä tai kätesi ovat
märät.
• Älä jätä poreallasta pitkäksi aikaa tyhjäksi. Älä altista laitetta suoralle auringonpaisteelle.
• Jos laitetta ei käytetä pitkään aikaan, kuten esimerkiksi talvella, poreallas tulee purkaa ja säilyttää
sisätiloissa.
• Älä anna porealtaan veden jäätyä. Älä kytke poreallasta päälle, jos sen vesi on jäässä.
• Älä käytä poreallasta, jos se on vaurioitunut toimituksessa ja/tai siinä on mikä tahansa
toimintahäiriö. Ota yhteys Intexin huoltoliikkeeseen saadaksesi lisäohjeita.
• Älä koskaan käytä poreallasta yksin tai anna muiden käyttää sitä yksin.
• Älä koskaan kaada porealtaaseen vettä, jonka lämpötila on yli 40 °C (104 °F).
• Lemmikkieläimet on pidettävä poissa porealtaalta vaurioiden välttämiseksi.
• Älä lisää kylpyöljyä tai kylpysuolaa altaan veteen.
• Poreallas täytyy sijoittaa vakaalle, tasaiselle ja sileälle pinnalle, jonka täytyy kestää täytetyn
altaan ja neljän aikuisen kylpijän enimmäispaino; paino 1136 kg; 6 aikuista: 1592 kg.
• Porealtaan lähellä on oltava vedenpoistojärjestelmä, joka huolehtii yli roiskuvasta vedestä.
VAROITUS
Page 90

295
A
SÄILYTÄ OHJEET
(295IO) SPA FINNISH 7.5” X 10.3” PANTONE 295U 08/20/2016
Finnish
Sivu 6
OSIEN PIKAOPAS
ITarkista tuotteen sisältö ja tutustu kaikkiin osiin ennen laitteen asentamista.
HUOM.
Kuvat on tarkoitettu vain havainnollistamiseen. Ne eivät välttämättä vastaa varsinaista
tuotetta. Mittasuhteet eivät täsmää.
8
10
11
18
17
19
9
21
23
22
2
6
7
3
4
5
12
13
14
15
16
20
24
25
26
A
B
C
28
29
27
1
Page 91

295
A
SÄILYTÄ OHJEET
(295IO) SPA FINNISH 7.5” X 10.3” PANTONE 295U 08/20/2016
Finnish
Ilmoita tuotteen mallinumero ja varaosanumero lisäosia tilatessasi.
OSIEN PIKAOPAS (jatkoa)
Tarkista tuotteen sisältö ja tutustu kaikkiin osiin ennen laitteen asentamista.
Sivu 7
VIITENRO
KUVAUS KPL
VARAOSANRO
4 AIKUISTA 6 AIKUISTA
28404 28406 28408 28410
1 OHJAUSJALUSTA 1 12320 12320B 12320 12320B
2 OHJAUSJALUSTAN TAKAKANSI 1 11719 11719B 11719 11719B
3 OHJAUSPANEELI (SISÄLTYY #4) 1 11930 11930B 11930 11930B
4 OHJAUSPANEELIN PULTTI 3 11024 11024B 11024 11024B
5 OHJAUSYKSIKÖN JALUSTAN TÄYTTÖKORKKI 1 11831 11831B 11831 11831B
6 OHJAUSPANEELIN PULTTIAVAIN 1 11053 11053 11053 11053
7 POREALTAAN/KANNEN TÄYTTÖLETKU 1 11830 11830 11830 11830
8
POREALTAAN OHJAUKSEN TÄYTÖN/TYHJENNYK-SEN O-RENGAS
2 11699 11699 11699 11699
9 POREALTAAN ILMANTÄYTÖN O-RENGAS 1 11687 11687 11687 11687
10 POREALTAAN TYHJENNYSKORKKI 1 11696 11696B 11696 11696B
11 POREALTAAN TYHJENNYSVENTTIILIN SOVITIN 1 11718 11718 11718 11718
12 SUODATINPATRUUNAN KOTELO 1 11798 11798 11798 11798
13 SUODATINPATRUUNA 2 11692 11692 11692 11692
14 SUODATINPATRUUNAN KOTELON KANSI 1 11797 11797 11797 11797
15 TÄYTTÖ-/TYHJENNYSKORKKI 3 11739 11739 11739 11739
16 POREALLAS 1 11842 12260 12106 12258
17 POREALTAAN KANSI 1 11841 12261 12107 12256
18
POREALTAAN KANNEN TÄYTETTÄVÄ TYYNY
(ESIASENNETTU POREALTAAN KANTEEN)
1 11689 11689 12108 12108
19 ALUSTAKANGAS 1 11717 11717 12109 12109
20 KEMIKAALIEN ANNOSTELIJA 1 11614 11614 11614 11614
21 TESTILIUSKAT 1 11855 11855 11855 11855
22 AVAIN 1 11742 11742 11742 11742
23 PAINEMITTARI 1 11741 11741 11741 11741
24 TÄYTTÖLETKUN SOVITIN 1 11829 11829 11829 11829
25 UROSLIITIN 6 11698 11698B 11698 11698B
26 NAARASLIITIN 6 11799 11799B 11799 11799B
27 ILMAN TYHJENNYSKORKKI 1 11934 11934B 11934 11934B
28 ILMAN TYHJENNYSLETKUN SOVITIN 1 11935 11935 11935 11935
29 ALTAAN SUODATTIMEN MOOTTORI 1 11886 11886B 11886 11886B
Page 92

295
A
SÄILYTÄ OHJEET
(295IO) SPA FINNISH 7.5” X 10.3” PANTONE 295U 08/20/2016
Finnish
Sivu 8
TEKNISET TIEDOT
ASENNUSOHJEET
Johdolla yhdistettävä poreallas, jossa on pumppu, lämmitin, puhallin, sisäänrakennettu vedenkäsittely ja
ohjauspaneeli. Laite vaatii vähintään 13 ampeeria. Jos suojakatkaisija laukeaa, tarkista, ettei mitään muita
laitteita tai muita suuria kuormituksia ole porealtaan kanssa samassa piirissä.
Asennuspaikan valmistelu ja sen vaatimukset
• Poreallas voidaan asentaa sisätiloihin tai ulos. Vain kotikäyttöön.
• Varmista, että altaan alla tai sen ympärillä ei ole teräviä esineitä.
• Poreallasta varten täytyy olla oikein sijoitettu pistorasia ja virtajohtoon asennetun RCD:n testaamisen on
oltava helposti tehtävissä.
• Huolehdi, että porealtaan ympärillä on riittävästi vapaata tilaa allaslaitteiden kunnossapitoa ja/tai huoltoa
varten.
• Alueella tulee olla vedenpoisto porealtaan pitkäaikaista säilytystä varten.
Lisävaatimukset sisälle asennettaessa
• Varmista, että lattia kestää täytetyn altaan ja käyttäjien enimmäismäärän yhteispainon. Pätevä urakoitsija
tai rakennusasiantuntija voi auttaa vaatimusten määrittelyssä.
• Varmista, että lattia on vedenkestävä ja liukumaton. Älä asenna poreallasta maton tai muun materiaalin
päälle, joka vaurioituu kosteudesta ja kondensaatiosta.
• Älä asenna poreallasta sisätiloissa toiseen kerrokseen asuinkerroksen päälle mahdollisten vesi- ja
kosteusvahinkojen takia.
• Kosteus on luonnollinen sivuvaikutus porealtaan sisäasennuksessa. Tilassa on oltava hyvä ilmastointi,
jotta kosteus saada poistettua. Asenna ilmanvaihtojärjestelmä estämään liiallinen kondensaatio ja
kosteus.
Lisävaatimukset ulos asennettaessa
• Porealtaan omistajia koskevat mahdollisesti paikalliset määräykset lapsiturvallisesta aitaamisesta,
turvaesteistä, valaistuksesta ja muista turvallisuutta koskevista asioista. Pyydä lisätietoja määräyksistä
paikkakuntasi rakennusvirastosta.
• Varmista, että asennuspaikka on vakaa, tasainen ja sileä sekä kestää täytetyn altaan koko painon.
• Älä asenna poreallasta nurmikolle tai likaiseen paikkaan, koska tämä lisää altaaseen tulevan lian määrää
ja vaurioittaa porealtaan pohjaa.
• Älä jätä allasta pitkäksi aikaa alttiiksi suoralle auringonpaisteelle.
• Porealtaan voi asentaa ja jättää ulos, jos lämpötila ei laske alle 4 °C ja altaan veden lämpötila on yli 4 °C
ja vesi kiertojärjestelmässä, pumpussa ja putkissa ei jäädy. Aseta “lämpösuojamatto” porealtaan pohjan
ja maan väliin estämään lämpöhävikki porealtaan pohjasta ja parantamaan lämpöeristystä.
Käyttäjien enimmäismäärä: 4 aikuista 6 aikuista
Veden määrä: 795 l 1098 l
Sisä-/ulkohalkaisija: 145/196 cm 165/216 cm
Korkeus: 71 cm
Poreiden ilmapuhaltaja: 1.1 HP / 220 - 240 V / 50 Hz
Suodatinpumpun virtausnopeus: 1 741 l/t
Lämmittimen teho: 2,200 Watts / 220-240 V / 50 Hz
Lämpötila-alue: 20 ºC - 40 ºC (68 ºF - 104 ºF)
Lämpötilan nousu: 1,5 - 2,5 ºC/t (3 ºF - 4,5 ºF/t) 1-2 ºC/t (2 ºF - 3,5 ºF/hr)
Poresuuttimien määrä:
120 (28404)
140 (28406)
140 (28408)
170 (28410)
Porealtaan suositeltu käyttöilmanpaine: 0,083 bar (1,2 psi)
Page 93

295
A
SÄILYTÄ OHJEET
(295IO) SPA FINNISH 7.5” X 10.3” PANTONE 295U 08/20/2016
Finnish
ASENNUSOHJEET (JATKOA)
Porealtaan asennus vaatii vähintään 2 henkilöä.
1.
Vie koko allaspaketti valittuun asennuspaikkaan. Älä vedä porealtaan putkea maata pitkin, koska tämä
voi aiheuttaa vaurioita ja vuotoja. Avaa pakkaus varovasti, koska pakkausta voidaan jatkossa käyttää
porealtaan säilytykseen silloin, kun sitä ei käytetä.
2.
Aseta kaikki osat maahan ja varmista, että kaikki osat ovat mukana. Jos osia puuttuu tai ne ovat
vaurioituneita, ota yhteys Intexin huoltoliikkeeseen, jotka on lueteltu kohdassa
“
Valtuutetut huoltoliikkeet”.
Porealtaan ohjausyksikön kokoaminen
1.
Yhdistä ohjauspaneelin
(3)
kaapelin pistoke porealtaan ohjausjalustan päällä olevaan pistorasiaan ja
käännä pistokkeen kansi paikoilleen käsin
(katso kuva 1)
.
2.
Ruuvaa ohjauspaneelin pultit
(4)
mukana tulevalla pulttiavaimella
(6)
kiinnittämään ohjauspaneeli
(katso kuva 2)
.
3.
Yhdistä porealtaan ohjausyksikkö maadoitettuun pistorasiaan.
Sivu 9
3
Paina
4 5
5
7
7
1 2
Täyttäminen
Porealtaan seinämien täyttäminen ilmalla
1.
Ota pakkauksesta aluskangas
(19)
ja levitä se puhdistetulle asennuspinnalle. Levitä sitten porealtaan
allasliina aluskankaan päälle ja kohdista tyhjennysventtiili kohti vedenpoistoon sopivaa aluetta.
HUOMAUTUS:
Levitä aluskangas kuplat alaspäin puhdistetulle alueelle, jolle aiot asentaa altaan.
2.
Paina painiketta, joka sijaitsee ohjausjalustan päällä ja poista takakansi
(katso kuva 3)
.
3.
Irrota ohjausjalustan täyttökorkki
(5)
, jotta saat esille ilmapuhaltimen poiston, työnnä täyttöletkun
(7)
toinen pää poistoon ja lukitse kääntämällä oikealle
(katso kuva 4)
.
4.
Ruuvaa auki porealtaan koko ilmaventtiiliyksikkö, jotta ilma pääsee poistumaan. Työnnä täyttöletkun
(7)
toinen pää venttiiliin ja lukitse paikoilleen kääntämällä oikealle
(katso kuva 5)
.
1
3
1
2
2
4
6
Page 94

295
A
SÄILYTÄ OHJEET
(295IO) SPA FINNISH 7.5” X 10.3” PANTONE 295U 08/20/2016
Finnish
Sivu 10
ASENNUSOHJEET (JATKOA)
5.
Paina painiketta kytkeäksesi ohjauspaneelin painikkeet päälle ensin. Paina painiketta
porealtaan seinien täyttämiseksi, kunnes ne ovat kiinteitä kosketettaessa, mutta eivät kovia
(katso kuva 6)
.
TÄRKEÄÄ:
Älä täytä liikaa ilmaa tai käytä korkeapaineista ilmakompressoria täyttämiseen.
6.
Kytke pois painamalla painiketta uudelleen.
7.
Irrota täyttöletku
(7)
ilmaventtiilistä ja kiinnitä painemittari
(23)
ilmaventtiiliin. Painemittari osoittimen
pitäisi olla vihreällä alueella, jos porealtaassa on oikea määrä ilmaa
(katso kuva 7)
. Toista edelliset
vaiheet, jos ilman lisääminen on tarpeen.
8.
Aseta ilmaventtiilin korkki takaisin.
HUOMAUTUS:
Korkki on suunniteltu kierrettäväksi kiinni ja auki. Älä koskaan käytä liikaa voimaa, sillä
se voi irrottaa venttiilin koko sisäisen täyttöjärjestelmän. Katso venttiilin kunnossapidosta kohdasta
“Porealtaan ilmaventtiilin kiinnittäminen”.
Porealtaan kannen ilmatyynyn täyttäminen
1.
Avaa täyttöventtiili ja aseta täyttöletku
(7)
venttiiliin;
täytä painamalla , kunnes se on kiinteä koskettaa,
mutta ei liian kova
(katso kuva 8)
.
2.
Irrota täyttöletku
(7)
ilmanpuhalluksen poistosta ja
venttiilistä.
3.
Asenna ohjausjalustan täyttökorkki
(5)
takaisin; sulje ja
vedä täyttöventtiili sisään.
HUOMAUTUS:
Jos on tarvetta lisätä ilmaa porealtaan seiniin tai kannen ilmatyynyyn asentamisen jälkeen,
katso kohdat “Porealtaan seinien täyttäminen” ja “Porealtaan kannen ilmatyyny”. Kannen ilmatyyny on
esiasennettu porealtaan kannen sisäpuolelle. Jos se täytyy asentaa uudelleen, aseta täyttämätön ilmatyyny
porealtaan kannen reunan alle ennen kuin täytät tyynyn.
Ilman tyhjentäminen
Porealtaan seinistä:
1.
Ruuvaa korkki irti ja paljasta kanta, paina kantaa ja
käännä 90 astetta oikealle, kiinnitä ala-asentoon
(katso kuva 9)
.
2.
Kun ilma on tyhjennetty, paina kantaa ja käännä 90
astetta vasemmalle palauttaaksesi täyttöasennon.
3.
Aseta korkki takaisin.
Kannen ilmatyynystä:
1.
Vedä venttiilin korkki irti ja purista venttiiliä sen pohjasta, kunnes tyyny on tyhjä.
2.
Sulje ja aseta venttiili paikoilleen.
8
7
6 7
23
1
2
9
Page 95

295
A
SÄILYTÄ OHJEET
(295IO) SPA FINNISH 7.5” X 10.3” PANTONE 295U 08/20/2016
Finnish
Sivu 11
ASENNUSOHJEET (JATKOA)
Porealtaan ohjausyksikön asentaminen
1.
Yhdistä porealtaan ohjausyksikkö porealtaaseen
(katso kuva 10)
. Kiristä liitännät käsin.
Älä käytä työkaluja kiristämiseen.
2.
Asenna takakansi
(2)
takaisin paikoilleen porealtaan ohjausyksikön jalustaan
(katso
kuva 11)
.
Takakannen täytyy olla paikoillaan ennen porealtaan käyttämistä.
HUOMIO:
Älä koskaan istu, nojaa, peitä tai aseta mitään esineitä porealtaan
ohjausyksikön päälle.
3.
Kiinnitä suodatinpatruuna altaan poistoritilään (alempi
asento, merkitty “C”)
(katso kuva 12)
. Täytä poreallas
vedellä ennen kuin asennat suodatinpumpun varusteet.
4.
Varmista ennen täyttämistä vedellä, että pohjan
poistoventtiilin tulpat ovat kiinni sisäpuolelta ja ulkopuolelta.
5.
Täytä poreallas puhtaalla vedellä tasoon, joka on altaan
sisäpuolelle merkittyjen MIN- ja MAX-merkinnän välissä.
Älä täytä allasta liian täyteen. Älä koskaan siirrä
poreallasta, kun siinä on vettä ja/tai ohjausyksikön jalusta
on kiinnitettynä porealtaaseen, koska poreallas tai
ohjausyksikön jalusta voi vaurioitua.
VAROITUS:
Älä koskaan kaada porealtaaseen vettä, jonka
lämpötila on yli 40 °C (104 °F). Suosittelemme täyttämään
porealtaan kädenlämpöisellä vedellä lämmityksen
nopeuttamiseksi ja energian säästämiseksi.
6.
Aseta porealtaan kansi ja altaan ilmatyyny (esiasennettu altaan kanteen) porealtaan päälle.
Varmista, että kannen salvat on lukittu avaimella sen jälkeen, kun kiinnityshihnat on vedetty
kireälle.
TÄRKEÄÄ:
Tarkista porealtaan kansi säännöllisesti vuotojen, kulumisen, vaurioiden ja
heikkenemisen varalta. Älä koskaan käytä vaurioitunutta porealtaan kantta.
7.
Varmista, että poreallas on kytketty maadoitettuun pistorasiaan ja paina painiketta
kytkeäksesi ohjauspaneelin painikkeet päälle ensin. Paina ohjauspaneelin painiketta
lämmittimen kytkemiseksi päälle, katso kohta “Porealtaan ohjausyksikön paneeli”.
11
2
10
A
B
C
B
C
A
12
C
Page 96

295
A
SÄILYTÄ OHJEET
(295IO) SPA FINNISH 7.5” X 10.3” PANTONE 295U 08/20/2016
Finnish
Sivu 12
KÄYTTÖOHJEET
POREALTAAN OHJAUSYKSIKÖN PANEELI
Virtapainike:
Aktivoi ohjausyksikön paneelin painikkeet tällä painikkeella, kun laite on kytketty
virtaan. Painikkeen vieressä oleva valo palaa vihreänä, jos toiminto on aktivoitu. Painamalla tätä
painiketta voi kytkeä kaikki aktivoidut toiminnot pois päältä.
HUOMAUTUS:
Virtapainike saattaa näkyä mustana painikkeena ohjausyksikön paneelin keskellä.
Lämmityspainike:
Tällä painikkeella aktivoit lämmitysjärjestelmän. Pumppu lämmittää porealtaan
vettä, kunnes vesi saavuttaa asetetun lämpötilan. Jos allasveden lämpötila laskee 1
-
2 °C
(1,8 - 3,6 °F) alle asetetun lämpötilan, lämmitysjärjestelmä käynnistyy uudelleen.
Lämmitysjärjestelmä on toiminnassa, jos näytön liekkikuvake on punainen. Vesi on asetetun
lämpöistä, jos liekkikuvake muuttuu vihreäksi. Lämmitysjärjestelmä ei ole toiminnassa ja
suodatinjärjestelmä jatkaa toimintaa tauotta.
HUOMAUTUS:
Voit pysäyttää suodatinjärjestelmän lämmittimen ollessa lepotilassa painamalla
ensin liekkipainiketta ja sitten suodatinpainiketta. Pelkästään liekkipainikkeen painaminen
lämmittimen ollessa lepotilassa kytkee ainoastaan lämmitysjärjestelmän pois päältä,
suodatinjärjestelmä jatkaa toimimista vielä 24 tuntia ennen kuin sammuu automaattisesti.
Celsius/Fahrenheit-vaihtopainike:
Lämpötila voidaan näyttää joko Fahrenheit- tai
Celsius-yksikköinä. Järjestelmän oletusasetus on Celsius.
HUOMIO:
ÄLÄ KOSKAAN käytä poreallasta, jos veden lämpötila on yli 40 °C (104 °F).
Lämpötilan säätöpainikkeet:
Lämpötilan nosto- tai laskupainikkeen painaminen saa
LED-merkkivalot vilkkumaan. Kun valot vilkkuvat, voit säätää haluamasi lämpötila-asetuksen.
Jos pidät painikkeita painettuina, arvo nousee tai laskee nopeasti. Uusi haluamasi
lämpötila-asetus näkyy LED-näytössä 5 sekuntia vahvistuksen vuoksi.
HUOMAUTUS:
Oletuslämpötila on 20 °C (68 °F).
HUOMAUTUS:
Lämpötilan säätöväli on 20 °C (68 °F) - 40 °C (104 °F).
Vesisuodatinpainike:
Tällä painikkeella saat suodatinpumpun päälle ja päältä pois.
Suodatinjärjestelmä käynnistyy automaattisesti, jos lämmitysjärjestelmä aktivoituu.
Vesisuodatinpainikkeen yläpuolella oleva valo palaa vihreänä, jos toiminto on aktivoitu.
Porepainike:
Tällä painikkeella voit aktivoida hierontajärjestelmän, joka sammuu automaattisesti
30 minuutin kuluttua. Porepainikkeen yläpuolella oleva valo palaa vihreänä, jos toiminto on
aktivoitu.
VAROITUS:
Älä käytä porejärjestelmää, jos kansi on kiinni. Ilma voi kerääntyä porealtaan sisälle
ja aiheuttaa pysyviä vaurioita rungolle.
LED-näyttö:
Virran ollessa päällä LED-näytössä näkyy automaattisesti veden lämpötila.
HUOMAUTUS:
sisäänrakennettu veden kovuuden käsittelytoiminto toimii automaattisesti suodatusjärjestelmän
yhteydessä.
TÄRKEÄÄ:
Seuraavat asiat hidastavat veden lämpenemistä.
• Ympäristön lämpötila on alle 10 ºC (50 °F).
• Tuulen nopeus on yli 3,5
-
5,4 m/s (8-12 mph).
• Ilmaporetoiminto on aktivoituna, kun porealtaan vettä lämmitetään.
• Poreallasta ei ole kunnolla peitetty kannella, kun vettä lämmitetään.
A: Lämmityspainike
B: Celsius/Fahrenheit-vaihtopainike
C: Lämpötilan nostopainike
D: Lämpötilan laskupainike
E: Vesisuodatinpainike
F: Porepainike
G: LED-näyttö
H: Virtapainike
40
C
o
F
E
D
C
B
A
G
H
Page 97

295
A
SÄILYTÄ OHJEET
(295IO) SPA FINNISH 7.5” X 10.3” PANTONE 295U 08/20/2016
Finnish
Sivu 13
LED-KOODITAULUKKO
E90
Vesi ei virtaa
•
Ohjausyksikön kytkeminen pois päältä ja
irrottaminen virrasta.
• Varmista, että poistoritilä on puhdas ja
esteetön.
• Puhdista tai vaihda patruuna, katso
Kunnossapito ja säilytys- osio.
• Varmista, että porealtaan ja suodatinpumpun
tulo/poistoliitännät eivät ole tukossa.
•
Pidä allasvesi puhtaana varmistaaksesi, että
suodatinpatruuna on puhdas eikä ole tukossa.
•
Jos ongelma jatkuu, ota yhteys Intexin
huoltoliikkeeseen.
E94
Veden lämpötila on liian alhainen
•
Jos ympäristön lämpötila on alle 4 °C (39 °F),
emme suosittele porealtaan käyttöä.
•
Ohjausyksikön kytkeminen pois päältä ja
irrottaminen virrasta, lisää hieman vettä
nostaaksesi allasveden lämpötilan yli 5 °C:een
(41 °F), paina sitten painiketta
lämmittääksesi veden haluamaasi lämpötilaan.
•
Jos ongelma jatkuu, ota yhteys Intexin
huoltoliikkeeseen.
E95
Veden lämpötila on noin 50 °C
(122 °F)
•
Ohjausyksikön kytkeminen pois päältä ja
irrottaminen virrasta. Kun vesi on jäähtynyt,
kytke RCD ja käynnistä kaikki uudelleen.
•
Käännä lämmitin pois päältä, paina sitten
suodatin- ja porepainikkeita veden lämpötilan
laskemiseksi.
•
Jos ongelma jatkuu, ota yhteys Intexin
huoltoliikkeeseen.
E96
Järjestelmävirhe
•
Ohjausyksikön kytkeminen pois päältä ja
irrottaminen virrasta, käytä tulppaa
pysäyttämään veden virtaus pois altaasta, irrota
ja kuivaa ohjausyksikkö. Kiinnitä ohjausyksikkö
takaisin altaaseen. Kytke RCD ja käynnistä
kaikki uudelleen.
•
Jos ongelma jatkuu, ota yhteys Intexin
huoltoliikkeeseen.
E97
Laukaisusuojaus
•
Jos ongelma jatkuu, ota yhteys Intexin
huoltoliikkeeseen.
E99
Veden lämpötila-anturi rikki
•
Jos ongelma jatkuu, ota yhteys Intexin
huoltoliikkeeseen.
LOPPU
72 tunnin jatkuvan
lämmitystoiminnon jälkeen,
pumppu siirtyy lepotilaan
automaattisesti. Nopeat
lämmitys- ja
vedensuodatustoiminnot ovat
poissa käytöstä.
•
Paina vedensuodatuksen painiketta
suodatinpumpun aktivoimiseksi uudelleen.
LED-luku SYY RATKAISU
Page 98

295
A
SÄILYTÄ OHJEET
(295IO) SPA FINNISH 7.5” X 10.3” PANTONE 295U 08/20/2016
Finnish
Sivu 14
HOITO JA KEMIKAALIT
Veden puhdistaminen
Porealtaan omistajan on tarkistettava altaan vesi säännöllisesti ja puhdistettava se määrätyin väliajoin (tarvittaessa
päivittäin). Puhdistusaineiden ja muiden kemikaalien lisääminen estää bakteerien ja virusten esiintymistä
porealtaan vedessä. Kunnollisen vesitasapainon ylläpitäminen puhdistusaineiden avulla on tärkeä tekijä
porealtaan käyttöajan maksimoimisessa ja puhtaan, terveellisen ja turvallisen allasveden varmistamisessa.
Oikea tekniikka on tärkeää altaan veden testaamisessa ja käsittelyssä. Pyydä lisätietoja kemikaaleista,
puhdistusaineista, testauspakkauksista ja testausmenetelmistä altaan jälleenmyyjältä.
HUOMIO:
NOUDATA AINA KEMIKAALIEN VALMISTAJAN OHJEITA JA TERVEYTEEN JA VAAROIHIN LIITTYVIÄ VAROITUKSIA.
Älä lisää kemikaaleja, jos altaassa on käyttäjiä. Tämä voi aiheuttaa iho-tai silmä-ärsytystä.
Väkevät
klooriliuokset voivat vaurioittaa allasta. Intex Recreation Corp., Intex Development Co. Ltd., niihin liittyvät
yritykset, valtuutetut edustajat, huoltoliikkeet, jälleenmyyjät tai työntekijät eivät ole missään tapauksessa
vastuussa ostajalle tai millekään muulle osapuolelle kustannuksista, jotka aiheutuvat porealtaan veden hävikistä,
kemikaaleista tai vesivahingoista.
Altaan veden ja patruunan kunnossapito
Suojaa kaikki porealtaan käyttäjät mahdollisilta veteen liittyviltä sairauksilta
pitämällä altaan vesi puhtaana. Noudata aina hyvää hygieniaa. Hyvän veden
laadun säilyttämiseksi toimi seuraavasti:
1.
Tarkista ja puhdista suodatinpatruuna joka päivä ja vaihda suodatinpatruuna
joka 3. päivä.
a.
Ruuvaa patruunan kotelo irti altaan seinästä ja poista patruuna
(katso kuva 13)
.
b. Huuhtele patruuna puutarhaletkulla. Jos patruuna jää likaiseksi ja
värjääntyneeksi, se on vaihdettava. Pidä aina varapatruunoita varastossa.
c. Vaihda porealtaan vesi joka 3. päivä. Katso kohdat “Porealtaan
tyhjentäminen” ja “Porealtaan puhdistaminen”.
2.
Vaihda porealtaan vesi joka 3. päivä. Katso kohdat “Porealtaan tyhjentäminen”
ja “Porealtaan puhdistaminen”.
3.
Käytä allaskemikaaleja kunnollisen vedenlaadun säilyttämiseksi. Takuu ei kata kemikaalien väärästä käytöstä
ja porealtaan huonosta hoidosta aiheutuneita vahinkoja.
4.
Kaikkien allasta käyttävien on käytävä ensin suihkussa.
Veden kemiallinen tasapaino
Suosittelemme pitämään veden pH-arvon 7,2 ja 7,8 välillä, kokonaisalkaliniteetin 80 ja 120 miljoonasosan välillä
ja vapaan kloorin määrän 2- 4 miljoonasosassa. Käytä mukana tulevia testiliuskoja ennen altaan jokaista
käyttöä ja testaa altaan vesi vähintään kerran viikossa.
Testiliuskoilla voidaan testata “vapaa kloori”, “pH”, ”kokonaisalkaliniteetti” ja “kalsiumkovuus” samalla kertaa.
1.
Kasta koko liuska veteen ja nosta välittömästi ylös vedestä.
2.
Pidä liuska vaakatasossa 15 sekuntia. Älä ravistele ylimääräistä vettä liuskasta.
3.
Vertaa liuskaa pakkauksen etiketin värikarttaan. Säädä altaan veden kemiallista tasapainoa tarvittaessa.
HUOMAUTUS:
Tarkista testauspakkauksen viimeinen käyttöpäivä, koska tulokset voivat olla epätarkkoja, jos
liuskat ovat vanhentuneet. Alhainen pH vaurioittaa allasta ja pumppua. Takuu ei korvaa kemiallisen
epätasapainon aiheuttamia vaurioita. Käytä mukana tulevaa kemikaalien kelluvaa jakelijaa kloorin annostelussa
[kemikaalitabletin koko: alle 1″ (2,5 cm) läpimitta] allasveteen. Lisää 1 tabletti annostelijaan. Noudata aina
kemikaalin valmistajan ohjeita. Poista kelluva kemikaalien annostelija, kun allas on käytössä. Älä päästä klooria
kosketuksiin altaan kanssa, jos se ei ole kunnolla liuennut.
TÄRKEÄÄ:
Paina painiketta porealtaan ohjauspaneelista ja kytke poreiden ilmapuhallin päälle auttamaan
kemikaalien veteen liukenemista. Älä koskaan sekoita kemikaaleja yhteen. Lisää kemikaalit altaan veteen
erikseen. Anna jokaisen kemikaalin liueta kunnolla ennen kuin lisäät seuraavan kemikaalin veteen.
VAROITUS
Irrota laite aina sähkövirrasta ennen tuotteen siirtämistä, puhdistamista, huoltamista tai säätöjen tekemistä
.
13
14
12
13
Page 99

295
A
SÄILYTÄ OHJEET
(295IO) SPA FINNISH 7.5” X 10.3” PANTONE 295U 08/20/2016
Finnish
Sivu 15
POREALTAAN VESIKEMIA JA TASAPAINO
Veden suositellut kemialliset arvot
Vähimmäisarvo Ihanteellinen arvo Enimmäisarvo
Vapaa Kloori
2 ppm 2 - 4 ppm 5 ppm
pH
7.2 7.2 - 7.6 7.8
Kokonaisalkalisuus (TA)
60 ppm 80 ppm 120 ppm
Kalsiumkovuus (CaCO
3
)
100 ppm 150 - 250 ppm 350 ppm
Kyllästysaste (SI)
-0.3 0 +0.3
Veden Lämpötila
20ºC / 68ºF 20 - 40ºC / 68 - 104ºF 40ºC / 104ºF
Vapaa kloori:
onko klooria jäljellä porealtaan vedessä.
Seuraus liian matalasta arvosta – Riittämätön desinfi ointitaso.
Seuraus liian korkeasta arvosta – Aiheuttaa hajuhaittaa, iho- ja silmä-ärsytystä, metallien ja muiden
materiaalien syöpymistä.
pH:
arvo, joka ilmaisee kuinka hapanta tai emäksistä porealtaan vesi on.
Seuraus liian matalasta arvosta – Metallien korroosio, silmien kirvely ja ihon ärsytys sekä
kokonaisalkalisuuden heikkeneminen.
Seuraus liian korkeasta arvosta – Karstan muodostuminen veden kanssa kosketuksiin joutuville pinnoille,
veden samentuminen, suodattimien käyttöiän lyheneminen, silmien kirvely ja ihon ärsytys, ‘kloorauksen
tehottomuus.
Kokonaisalkalisuus (TA):
Ilmaisee veden kykyä vastustaa pH-arvon muutosta. Vaikuttaa pH-arvon
muuttamisen nopeuteen ja helppouteen. Säädä kokonaisalkalisuuden arvo sen vuoksi aina ennen pH-arvon
säätämistä.
Seuraus liian matalasta arvosta – Metallien korroosio, silmien kirvely ja ihon ärsytys. Pieni
kokonaisalkalisuus muuttaa veden pH-arvon epävakaaksi.
Seuraus liian korkeasta arvosta – Kattilakiven muodostuminen, samea vesi, lyhyemmät suodatus-/
lämmitysajat, silmien ja ihon ärsyyntyminen, lisääntynyt kloorin tarve.
Kalsiumkovuus (CaCO
3
):
tarkoittaa veteen liuenneen kalsiumin ja magnesiumin määrää.
Seuraus liian matalasta arvosta – Vaikeuksia veden tasapainottamisessa, metalliosien syöpyminen, silmien
ja ihon ärsyyntyminen ja veden vaahtoaminen.
Seuraus liian korkeasta arvosta – Kattilakiven muodostuminen, samea vesi, silmien ja ihon ärsyyntyminen,
veden tasapainottamisen vaikeus ja suodattimen/lämmittimen tehottomuus.
Kyllästysaste (SI):
lämpötila, kalsiumkovuuden keskittyminen, kokonaisalkaliniteetti ja pH ovat päätekijöitä
kattilakiven muodostumisessa. Kyllästysaste (SI) ilmaisee veden taipumuksen muodostaa kattilakiveä tai
syövyttää:
SI = pH+TF+CF+AF-12.1
*Missä: TF = lämpötilakerroin; CF = kalsiumkovuuden kerroin; AF = kokonaisalkaliniteetin kerroin
Veden Lämpötila
TF
Kalsiumkovuus
(ppm)
CF
Kokonaisalkalisuus
(ppm)
AF
(ºC) (ºF)
8 46 0.2 75 1.5 50 1.7
12 54 0.3 100 1.6 75 1.9
16 61 0.4 150 1.8 100 2.0
19 66 0.5 200 1.9 150 2.2
24 75 0.6 250 2.0 200 2.3
29 84 0.7 300 2.1 300 2.5
34 93 0.8 400 2.2 400 2.6
40 104 0.9 500 2.3 -- --
-- -- -- 1000 2.6 -- --
Testaa veden pH, lämpötila, kalsiumkovuus ja kokonaisalkaliniteettitaso. Käytä vastaavia kertoimia
SI-yhtälössä.
SI = 0, tasapaino
Jos SI > 0, kattilakiveä tai vesi on sameaa.
Jos SI < 0, metalli syöpyy ja silmät sekä iho ärsyyntyvät.
SI on tyydyttävä, jos arvo on -0,3:n ja +0,3:n väliltä. Nolla on täydellinen.
Page 100

295
A
SÄILYTÄ OHJEET
(295IO) SPA FINNISH 7.5” X 10.3” PANTONE 295U 08/20/2016
Finnish
Sivu 16
POREALTAAN VESIKEMIA JA TASAPAINO (JATKOA)
POREALTAAN Veden Säätäminen
Miten porealtaan veden kemiallinen tasapaino säädetään, kun tasot ovat väärät.
HUOMIO:
Noudata aina kemikaalien valmistajan ohjeita ja terveyteen ja vaaroihin liittyviä varoituksia.
Kokonaisalkaliniteetin (TA) säätäminen
Poista porealtaan kansi veden ilmastamiseksi ja käytä mukana tulevia testiliuskoja veden kemiallisen tason
tarkastamiseen. Varmista ensin, että veden klooritaso on 2-4 ppm, sillä kloori vaikuttaa TA-testitulokseen.
Jos TA-taso (ei pH) on korkeampi kuin 120 ppm, laske TA-tasoa lisäämällä suolahappoliuosta (suolahappo)
tai natriumbisulfaattia. Jos TA-taso on alhaisempi kuin 60 ppm, lisää natriumbikarbonaattia. Esimerkiksi
(4 aikuista), jos TA-taso on 180 ppm, toivottu lasku on 60 ppm, on alla olevan taulukon mukaisesti lisättävä
121 g (0,269 lb) natriumbisulfaattia tai 96 ml (0,101 qt) suolahappoliuosta.
Jos testiliuoksen väri on 180 ppm:n ja 240 ppm:n väliltä ja lähempänä 180 ppm:ää, voit myös lisätä 121 g
(0,269 Lb) natriumbisulfaattia tai 96 ml (0,101 qt) suolahappoliuosta.
Jos tulos on yli 240 ppm, voit lisätä natriumbisulfaattia tai suolahappoliuosta veteen tippa kerrallaan, kunnes
testiliuska ilmaisee arvoa 240 ppm, lisää sitten 238 g (0,528 Lb) natriumbisulfaattia tai 192 ml (0,202 qt)
suolahappoliuosta.
HUOMAUTUS:
Testaa vesi 24 tunnin päästä säätämisestä ja säädä tarvittaessa uudelleen.
Kokonaisalkaliniteetin Laskeminen
Kokonaisalkaliniteetin Laskemiseen Tarvittava Natriumbisulfaatin Määrä
Kokonaisalkaliniteetin Nostaminen
Kokonaisalkaliniteetin Nostamiseen Tarvittava Natriumbikarbonaatin Määrä
Kokonaisalkaliniteetin Laskemiseen Tarvittava Suolahappoliuoksen Määrä
(Suolahappoliuos: 31.45%)
pH:n Säätäminen
Sen jälkeen, kun kokonaisalkaliniteetti on laskettu arvoon 120 ppm tai nostettu arvoon 80 ppm ja pH on
vielä korkea tai matala, voit säätää sitä seuraavan taulukon mukaisesti.
Toivottu taso 60 ppm 80 ppm 100 ppm 120 ppm 140 ppm
Tilavuus:
210 gal / 795 L
0.269 Lb 0.358 Lb 0.448 Lb 0.528 Lb 0.627 Lb
121 g 161 g 202 g 238 g 283 g
Tilavuus:
290 gal / 1098 L
0.368 Lb 0.492 Lb 0.614 Lb 0.737 Lb 0.860 Lb
168 g 224 g 279 g 335 g 391 g
Toivottu taso 20 ppm 40 ppm 60 ppm 80 ppm
Tilavuus:
210 gal / 795 L
0.059 Lb 0.118 Lb 0.178 Lb 0.237 Lb
27 g 53 g 80 g 107 g
Tilavuus:
290 gal / 1098 L
0.081 Lb 0.162 Lb 0.244 Lb 0.326 Lb
37 g 74 g 111 g 148 g
Toivottu taso 60 ppm 80 ppm 100 ppm 120 ppm 140 ppm
Tilavuus:
210 gal / 795 L
0.101 qt 0.135 qt 0.169 qt 0.202 qt 0.234 qt
96 mL 128 mL 160 mL 192 mL 223 mL
Tilavuus:
290 gal / 1098 L
0.139 qt 0.185 qt 0.232 qt 0.278 qt 0.324 qt
132 mL 176 mL 220 mL 264 mL 308 mL
 Loading...