

Page 1

81-1PO) POOL VACUUM & SKIMMER ENGLISH SIZE: 4.875” X 7.25” 07/14/2011
(
81-1
P
POOL MAINTENANCE KIT ASSEMBLY AND
OPERATING INSTRUCTIONS
IMPORTANT: READ AND UNDERSTAND THE INSTRUCTIONS COMPLETELY BEFORE
STARTING ASSEMBLY.
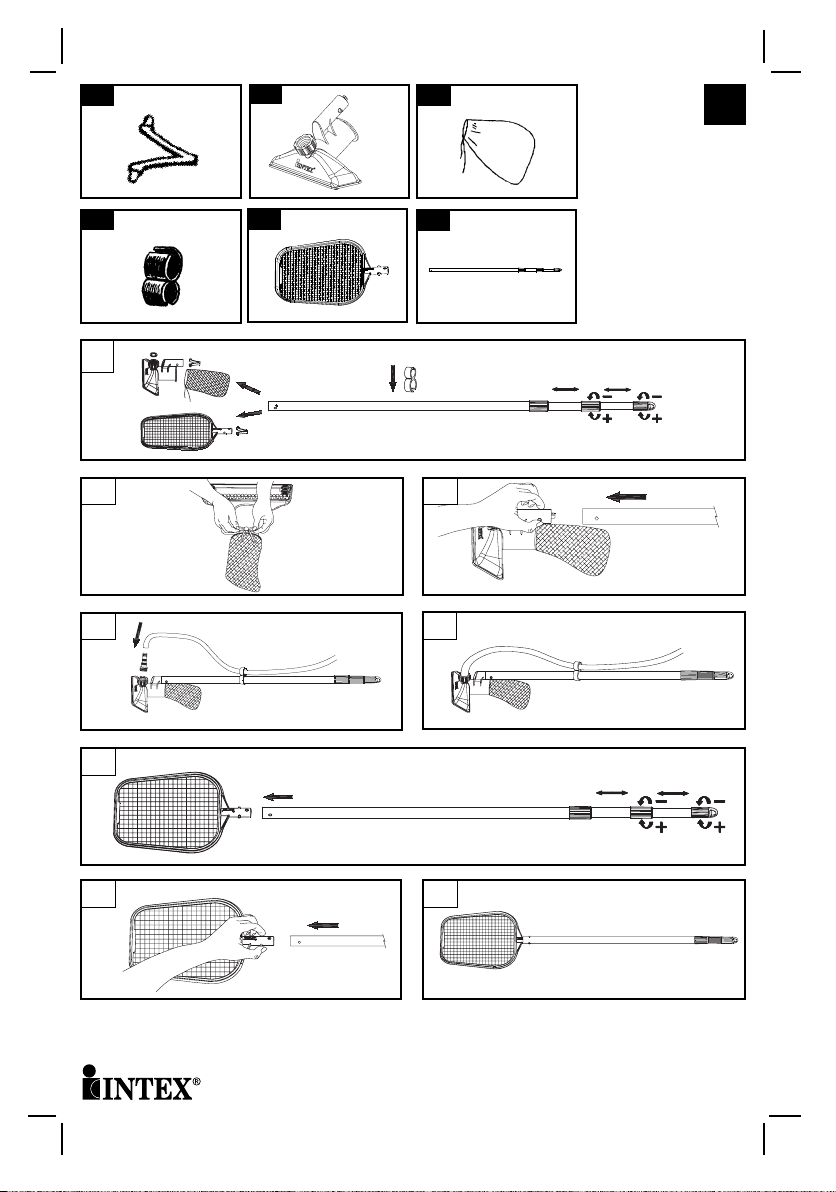
POOL VACUUM ASSEMBLY INSTRUCTIONS
1. Turn handle A and handle B clockwise and slide each section to extend or shorten the
length of the telescoping shaft (6). Turn counterclockwise to lock each section in place.
Clip the hose mount (4) on the shaft.
2. Tie the debris collection bag (3) onto the cleaning head opening opposite from the
garden hose connection, as you would tie shoelaces.
3. The cleaning head (2) has a plastic spring (1) that connects to the bottom shaft. Align
the plastic spring located inside the cleaning head with the holes drilled in the shaft.
Gently squeeze together the plastic spring tips so that the shaft slips onto the cleaning
head and the spring "pops" into the pre-drilled holes.
4. Depending on the type of garden hose connect the hose to the side opposite the debris
bag. Mount the garden hose on the shaft by clipping in the hose mount (4).
IMPORTANT: The flat washer must be placed into coupling before garden hose is
connected.
5. The pool vacuum is now ready to use.
POOL VACUUM OPERATING INSTRUCTIONS
O
1. Connect the garden hose to the water spigot and turn on the water.
NOTE: The water pressure varies in each community so testing will have to be
done to find the correct hose water pressure for optimum cleaning.
2. In soft gentle strokes "sweep" the entire bottom surface of the pool liner until it is clear of
debris.
3. Turn water "OFF", remove the pool vacuum from the pool, disconnect and place the
garden hose in a safe area.
4. Untie and clean the debris collection bag. Allow the debris bag to air dry. Retie the
collection bag onto the cleaning head.
5. Store the pool vacuum in an area where it will not be a safety hazard.
POOL SKIMMER ASSEMBLY AND OPERATING INSTRUCTIONS
1. The pool skimmer uses the same shaft as the pool vacuum’s.
2. The skimmer net (5) has a plastic spring (1) that connects to the bottom shaft. Align the
plastic spring located inside the net with the holes drilled in the shaft. Gently squeeze
together the plastic spring tips so that the shaft slips onto the net and the spring "POPS"
into the pre-drilled holes.
3. Gently sweep the surface of the pool with the skimmer net removing floating leaves, etc.
SAVE THIS INSTRUCTIONS
081-1PO-R1-1207
Page 2
81-1PO) POOL VACUUM & SKIMMER ENGLISH SIZE: 4.875” X 7.25” 07/14/2011
(
1
4
10280
10283
2
5
11191
11230
1
2 3
4
3
6
10282
10637
81-1
P
O
5
1
2 3
©2011 Intex Marketing Ltd. - Intex Development Co. Ltd. - Intex Trading Ltd. - Intex Recreation Corp.
All rights reserved/Tous droits réser vés/Todos los derechos reservados/Alle Rechte vorbehalten.
Printed in China/Imprimé en Chine/Impreso en China/Gedruckt in China.
®™ Trademarks used in some countries of the world under license from/®™ Marques utilisées dans certains pays
sous licence de/Marcas registradas utilizadas en algunos países del mundo bajo licencia de/Warenzeichen verwendet
in einigen Länder n der Welt in Lizenz von/Intex Marketing Ltd. to/à/a/an Intex Trading Ltd., Intex Development Co.
Ltd., G.P.O Box 28829, Hong Kong & Intex Recreation Corp., P.O. Box 1440, Long Beach, CA 90801 • Distributed
in the European Union by/Distribué dans l’Union Européenne par/Distribuido en la unión Europea por/Vertrieb in der
Europäischen Union durch/Intex Trading B.V., P.O. Box nr. 1075 – 4700 BB Roosendaal – The Netherlands
 Loading...