

Intex MegaMixer AMX110, MegaMixer AMX620, MegaMixer AMX622 Operating/safety Instructions Manual
Page 1
FU L LY GUARANTEED
OPERATING & SAFETY
INSTRUCTIONS
AMX110 AMX620 AMX622
intex.com.au • portamix.co.nz
Page 2
BUILDING E XCE LLENCE
BUILDING E XCE LLENCE
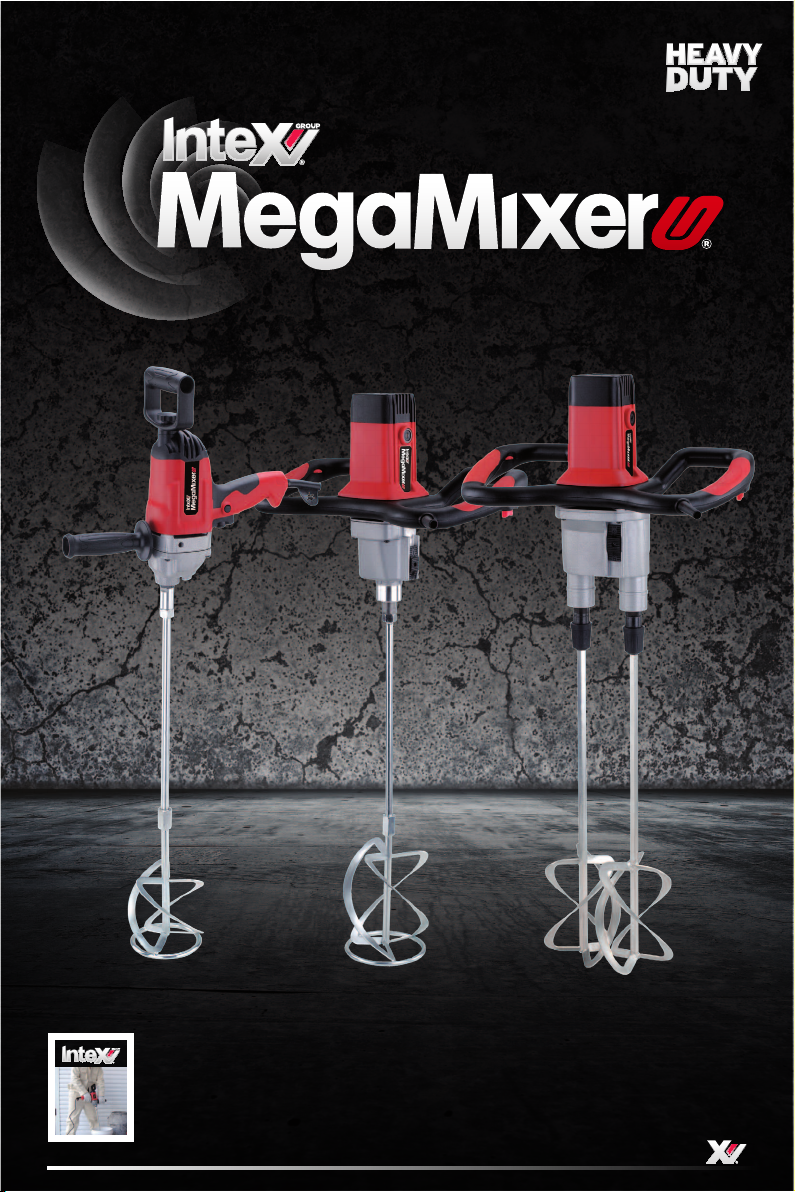
TECHNICAL DATA
TECHNICAL DATA AMX110 AMX620 AMX622
Power Input 1050 W 1600W 1600W
Voltage 230V/50Hz 230V/50Hz 230V/50Hz
Number of Gears 1 2 2
No-Load-Speed 0 - 550
Protection/ Class of Protection
Certification CE, GS CE, GS CE, GS
Thread for fixing the Tool M14X2 M14X2 QR H13
Mixing Paddle (φ max.) 120mm 140mm
Double
Insulation/¨
180-460/300700min-1
Double
Insulation/¨
100-420/15060 0min-1
Double
Insulation/¨
2 x 120mm special
set or 1 x 140mm
QR H13
SAFETY INSTRUCTIONS
Safe operation of this machine is possible only when the operation instructions, and the safety
precautions are read completely and the instructions contained therein are strictly observed.
• Never use the machine in an explosive or inflammable atmosphere where
danger of explosion exits.
• Serious injury can occur through misuse or accident. Do not work in a cluttered or unsafe
working area. Keep children away from mixing equipment.
• The machine must not be damp and must not be operated in a wet environment.
• Always wear eye, respiratory and hearing protection equipment and suitable protective clothing.
• Always inspect cable and plug before using machine. All repairs must be carried out by a
qualified professional.
• Machines that are used with wet materials or in damp areas should be used with a residual
current circuit breaker. Use only extension cables that are intended for outdoor use and are
protected against splash water.
• Ensure the machine is turned off before connecting to the power socket.
• Keep the power cable away from the machine mixing helix.
• Ensure long hair, loose clothing and fashion accessories are well tied back away
from the mixing shafts.
• When working with the machine, always hold it firmly with both hands and ensure a firm stable
working position. Secure the vessel with the mixed substance against moving on the floor.
• Do not carry the machine by the power cord.
• Disconnect the machine from the power source before attaching or removing the mixing
helix or attempting any repairs to the machine.
STARTING OPERATION & USE
Check if the data on the nameplate is corresponding with the actual mains voltage.
IMPROPER USE MAY DAMAGE THE POWER TOOL OR CAUSE INJURY:
• Only use mixing paddles up to the specified diameter.
• The variable speed feature is designed to allow gentle start up and shut down to avoid splashing
and wastage. To avoid the motor overheating or burning out, use the machine on full power
when mixing under load.
CONNECTING THE M14 THREADED MIXING-PADDLE:
Thread the mixing-paddle clock-wise into the mixer spindle until the hex nut on the mixer shaft is in
contact with the spindle. Do not operate the machine unless the mixing helix is correctly fitted.
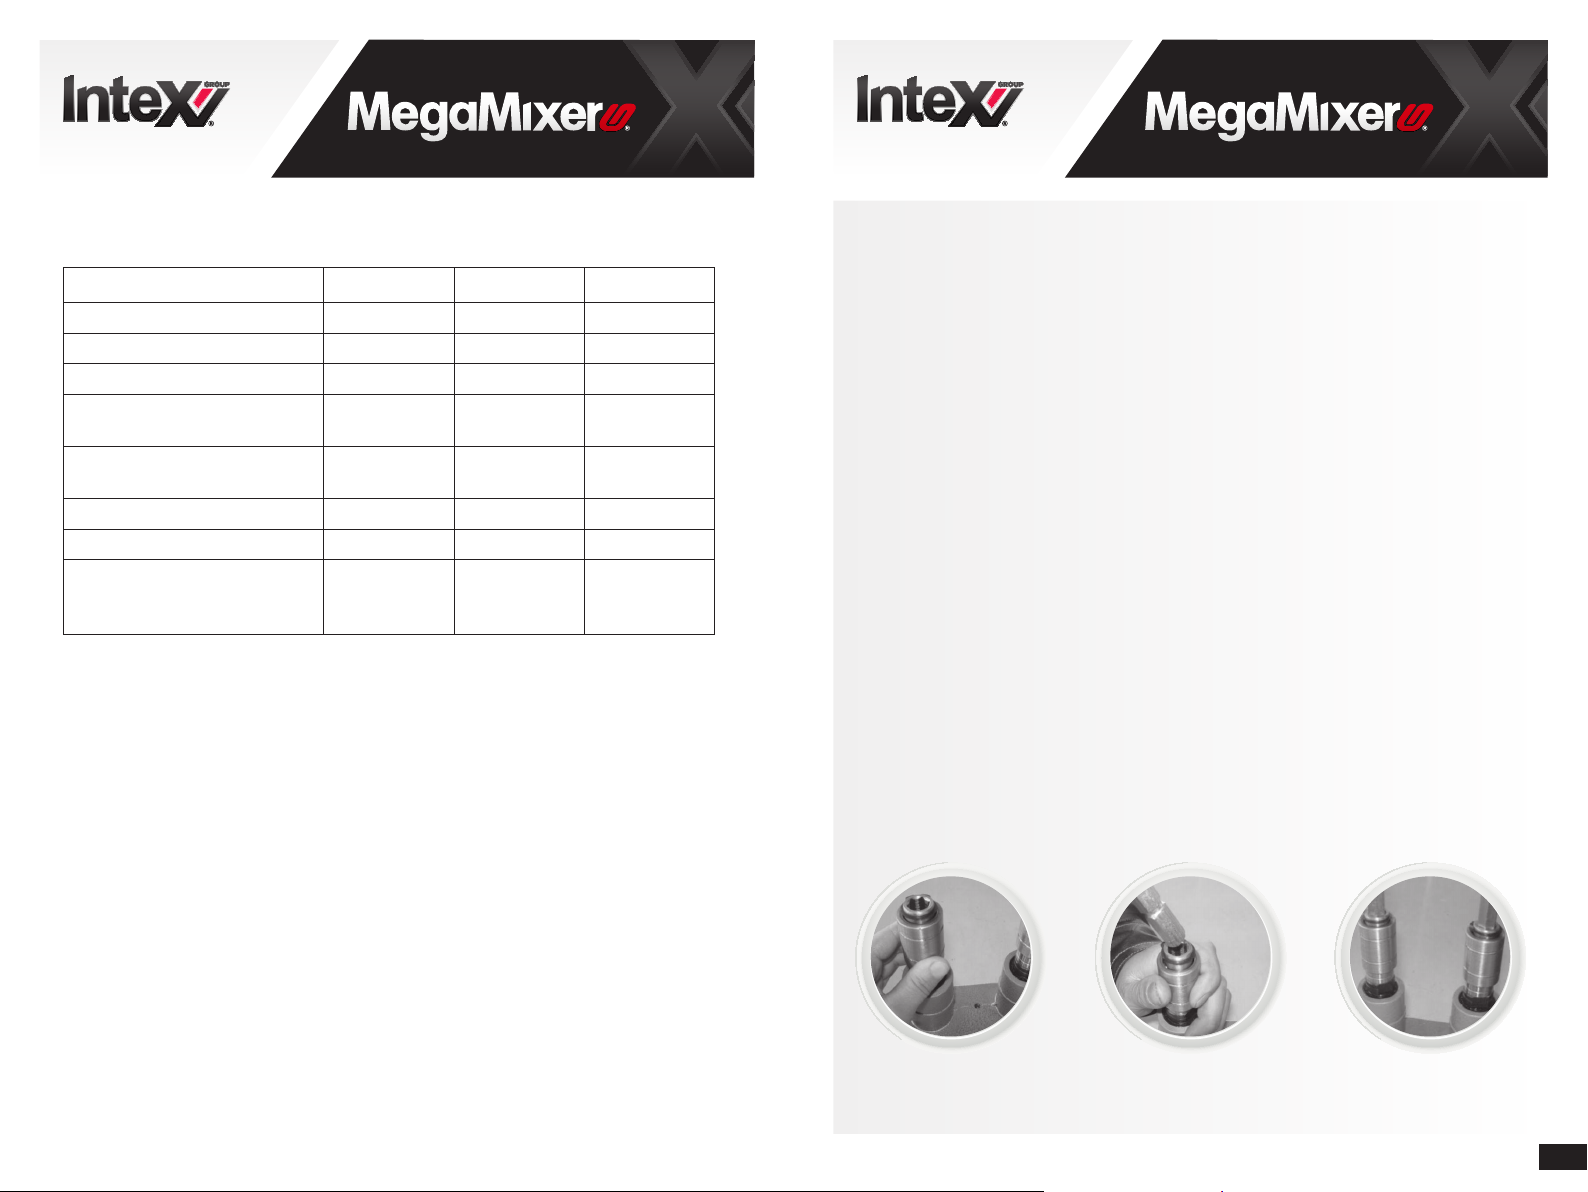
CONNECTING THE DOUBLE COUNTER- ROTATING MIXING HELIXES:
Push down the chuck sleeve by hand (picture 1); Connect the paddle into the spline shaft directly
(picture 2) and release the chuck sleeve (picture 3).
(picture 1) (picture 2) (picture 3)
2 › INTEX GR OUP M EGAMIXE R MAN UAL | w intex.com. au w intex.co m. au | . I NTE X GRO UP MEGAMI XER MANUA L › 3
Page 3

BUILDING E XCE LLENCE
BUILDING E XCE LLENCE
ENSURE THAT THE MIXING HELIXES ARE FIRMLY HELD IN THE
CHUCK B EFORE STARTING OPERATION.
SWITCHING ON AND OFF:
By pressing the switch button the machine is brought into operation and it
stops when this is released.
PERMANENT RUN:
After switching the machine on, the machine can be help on by pressing the lock button.
To release and turn off, press then release the switch.
CHANGING GEAR (2 SPEED GEARBOX MODELS)
Ensure that the motor is turned of and rotation has stopped.
Depress the gear change slide button and shift to next gear position.
DISCONNECTING THE M14 THREADED MIXING-PADDLE:
Using a flat open-end wrench on the spindle flats of the mixing tool and machine spindle,
unthread the mixing-paddle from the spindle by turning it anti-clockwise.
MAINTENANCE
• Before use ensure the ventilation holes on the motor housing are clear and clean.
Periodically these vents should be cleaned out.
• After approx. 100 hours of operation, check the motor brushes and replace if necessary.
Clean the motor housing.
• After approx. 200 hours of operation, renew the grease filling in the gearbox.
To verify that the protective insulation remains intact, the machine much be subjected to a
technical safety test afterwards. For this reason, this work much be performed exclusively by
a professional workshop.
The unit should be stored in a dry place where it is protected against moisture.
4 › INTEX GR OUP M EGAMIXE R MAN UAL | w intex.com. au w intex.com.au | . INTEX GR OUP M EGAMIXE R MAN UAL › 5
Page 4

BUILDING E XCE LLENCE
BUILDING E XCE LLENCE
AMX110 PARTS DIAGRAM AMX110 INDIVIDUAL PARTS
NO DESCRIPTION QUANTITY
1 O UTPUT SH AFT 1
2 S EMI-CIRC ULAR KE Y 3×3.7×10 3
3 S CREW ST 4.8 ×48 6
4 G EAR BOX 1
5 B EARING 60 02 1
6 E LASTI C COLLA R 32 1
7 E LASTI C COLLA R 15 1
8 G EAR FOR OUT PUT SHA FT 1
9 B EARIN G HK1010 1
10 H ANDLE(I NCLUDING S CREW M10×3 8)
11 R ING O 1
12 BE ARING 60 00 1
13 FA N GUIDE 1
14 ROTOR 1
15 IN SULATI ON RING 1
16 BE ARING 60 8 1
17 RU BBER COVE R 608 1
18 STAT OR 1
19 MOTOR HOUSING 1
20 SCRE W M8
21 BAC K COVER FOR MO TOR HOUSIN G 1
22 BACK H ANDLE 1
23 BOLT FOR H ANDLE FIX ING
24 SCR EW ST 3.8×14 4
25 INSID E COVER OF BA CK HANDL E 1
26 CAB LE PRESSI NG BOARD 1
27 SWITCH 1
28 CAPALITAR 1
NO DESCRIPTION QUANTITY
29 INDUCTOR 1
30 CABLE 1
31 CA BLE SLEEV E 1
32 HAN DLE COVE R 1
33 BRUSH H OLD SETS 1
34 CARB ON BRUSH 1
35 MIDDLE COVER 1
36 BEA RING HK0810 4
37 PIN 4×6 2
38 SEA LED WASHE R 1
39 ELA STIC COL LAR 10 1
40 BIG GEA R FOR MAIN DR IVING SHA FT 1
41 EL ASTI C COLLA R 12 4
42 BIG GE AR FOR SUD- DRI VING SHA FT 1
43 MAIN DR IVING SH AFT 1
44 S UB-DRIVING SHAFT 1
45 MIX PADD LE 1
46 SPANNE R 22# 1
47 SPAN NER 19# 1
6 › INTEX GR OUP M EGAMIXE R MAN UAL | w intex.com. au w intex.com.a u | . IN TEX G ROU P MEGA MIXER MA NUAL › 7
Page 5

BUILDING E XCE LLENCE
BUILDING E XCE LLENCE
AMX620 PARTS DIAGRAM AMX620 INDIVIDUAL PARTS
NO DESCRIPTION QUANTITY
1 C ABLE 1
2 C ABLE SLE EVE 1
3 O UTPUT SH AFT 1
4 K EY 5X13 1
5 O IL SEAL 1
6 C ROSSING TA PPING SCRE W ST5X6 0-F 4
7 PUSHING BUTTON SPRING 1
8 PUSHING BUTTON 1
9 P USHING BUT TON FIXI NG SCREW 1
10 SH IFT LEV ER 1
11 PIN 1
12 NE EDLE BEA RING HK1010 2
13 VARIABLE COVER 1
14 KE Y 5X45 1
15 T WO GANG GE AR 1
16 MIDDLE COVER 1
17 PAPER WASHER 1
18 NE EDLE BEA RING HK0810 2
19 EL ASTI C COLLA R 15 1
20 BIG GE AR 1
21 ELA STIC COL LAR 17 1
22 ELA STIC COL LAR 35 1
23 BEA RING 6003-2 Z 1
24 CA BLE PLAT E 1
25 CROS SING TAPPI NG SCREW ST4 X14 2
26 SW ITCH( FA2-6 /2D-A1- B1-F3) 1
27 HEAD HOUSING 1
28 MAI N DRIVING SH AFT 1
29 KEY 4 X8 1
NO DESCRIPTION QUANTITY
30 DIAGONAL GEAR 1
31 BEA RING 608Z Z 2
32 TENSION SPRING 1P AIR
33 STATO R SUBASS EMBLY 1
34 CROS SING TAPPIN G SCREW ST 5X75-F 2
35 DUST W ASHER 1
36 MAGN ETIC RING
37 MOTO R SUBASS EMBLY 1
38 BEA RING 609Z Z 1
39 POTENTIOMETER KNOB 1
40 POTENTIOMETER SLEEVE 1
41 POTENT IOMETER 1
42 FOREGOING HANDLE
43 CROSS ING TAPPIN G SCREW ST4X 20
44 P OTENTIOMETER 1
45 FOREGOING HANDLE 1
46 CROSS ING TAPPIN G SCREW ST4 X16 22
47 BAC K HANDLE
48 LEA D SLEEVE 1
49 HOUSING 1
50 BRUSH H OLD 1PAIR
51 CA RBON BRUSH 1PAI R
52 BRUS H COVER 1PAIR
53 INTEGRATING BLOCK 1
54 CROSS ING TAPPIN G SCREW ST 3X25-F 2
55 HOUS ING BACK CO VER 1
56 CROS SING TAPPIN G SCREW ST 5X45-F 4
57 MIXER PADDLE 1
58 SPANNER 2
8 › INTEX GR OUP M EGAMIXE R MAN UAL | w intex.com. au w intex.com.au | . I NTEX GR OUP M EGAM IXE R MAN UAL › 9
Page 6

BUILDING E XCE LLENCE
BUILDING E XCE LLENCE
AMX622 PARTS DIAGRAM AMX622 INDIVIDUAL PARTS
NO DESCRIPTION QUANTITY
1 ELA STIC COL LAR 20 2
2 COLL ET OUTER C OVER 2
3 COLL ET INNER SL EEVE 2
4 COLLET SPRING 2
5 STEE L BALL 4.76 6
6 COLLET 2
7 OUT PUT SHAF T 2
8 OIL SE AL 2
9 CROS S PAN HEAD SC REW M5X2 0 4
10 CROSS RO UND HEAD SC REW M5X10 1
11 GEA R BOX 1
12 BEAR ING 6003-2 Z 2
13 ELA STIC COLL AR 35 6
14 BEAR ING 6202-2Z 2
15 KEY 5X 12 2
16 BIG GEA R 2
17 IDLER SH AFT 1
18 ELA STIC COLL AR 15 2
19 BEAR ING 608-2Z 3
20 ELAST IC COLLA R 22 1
21 IDLER 1
22 ELAST IC COLLA R 8 1
23 NEEDLE BEA RING HK08 10 1
24 MAIN DRI VING SHA FT 1
25 KEY 3X8 1
26 DIAGONAL GEAR 1
27 MIDDLE COVER 1
28 0 RING 1
29 NEEDLE BEA RING HK1010 2
30 CROSSING TA PPING SCR EW ST5X 55-F 4
31 CABLE 1
32 CABLE SL EEVE 1
33 CABLE PL ATE 1
34 CROSSING TA PPING SCRE W ST4X14-F 2
NO DESCRIPTION QUANTITY
35 SWIT CH(FA2 -6/2D -A1-B1-F 3) 1
36 CROSSING TA PPING SCR EW ST4X16-F 22
37 BACK HAND LE 1
38 POTENTIOMETER 1
39 ROTOR SPRING
40 WOOL WASHE R 1
41 POTENTIOMETER SLEEVE 1
42 POTENTIOMETER KNOB 1
43 BEARING 60 9ZZ 1
44 ROTOR 1
45 MAGNETI C RING
46 DUST WASHE R 1
47 BEARIN G 608ZZ 1
48 CROSSING TA PPING SCRE W ST5X7 5-F 2
48 STATOR SUBA SSEMBLY 1
50 TENSION SPRING 1
51 HANDL E COVER 1
52 WIRE SLEE VE
53 MOTOR HOUSING
54 BRUSH HOLDER 1
55 CARBON BRU SH 1
56 BRUSH COVE R 1
57 INTEYRATING BLOCK 1
58 CROSSING TA PPING SCRE W ST3X2 5-F 2
59 BACK COV ER 1
60 CROSSING TA PPING SCR EW ST5X 45-F 4
61 PUSHING BUTTON 1
62 PUSHING BU TTON FIX ING SCREW 1
63 SHIFT LEV ER
64 PUSHING BUTTON SPRING 1
65 PIN
66 KEY 5X45 1
67 TWOG ANG GEAR 1
68 VARIABLE SHAFT 1
69 MIXING PAD DLE 2
10 › INTEX GR OUP M EGAMIXE R MAN UAL | w intex.com. au w intex.co m. au | . I NTE X GRO UP MEGAMI XER MANUA L › 11
Page 7

PREMIUM PLASTERBOARD ACCESSORIES,
TOOL S & EQUIPMENT
BUILDING EX CELLENCE
3 – 7 AMCOR WAY CAMPBELLFIELD
VICTORIA 3061, AUSTRALIA
PO BOX 109 SOMERTON
VICTORIA 3062, AUSTRALIA
P +61 3 9357 9299
F + 61 3 9357 0777
intex.com.au
SPE SYSTEMS
1 EDWIN FEIST PLACE
MASTERTON 5810
P.O BOX 2007
MASTERTON 5842
NEW ZEALAND
P +64 6 3777 255
F + 64 6 377 7 259
E sales@portamix.co.nz
portamix.co.nz
intex.com.a u
 Loading...