

Page 1
PL
EN
User's manual
Instrukcja obsługi
KOM0655
Crystal clear,
natural sound
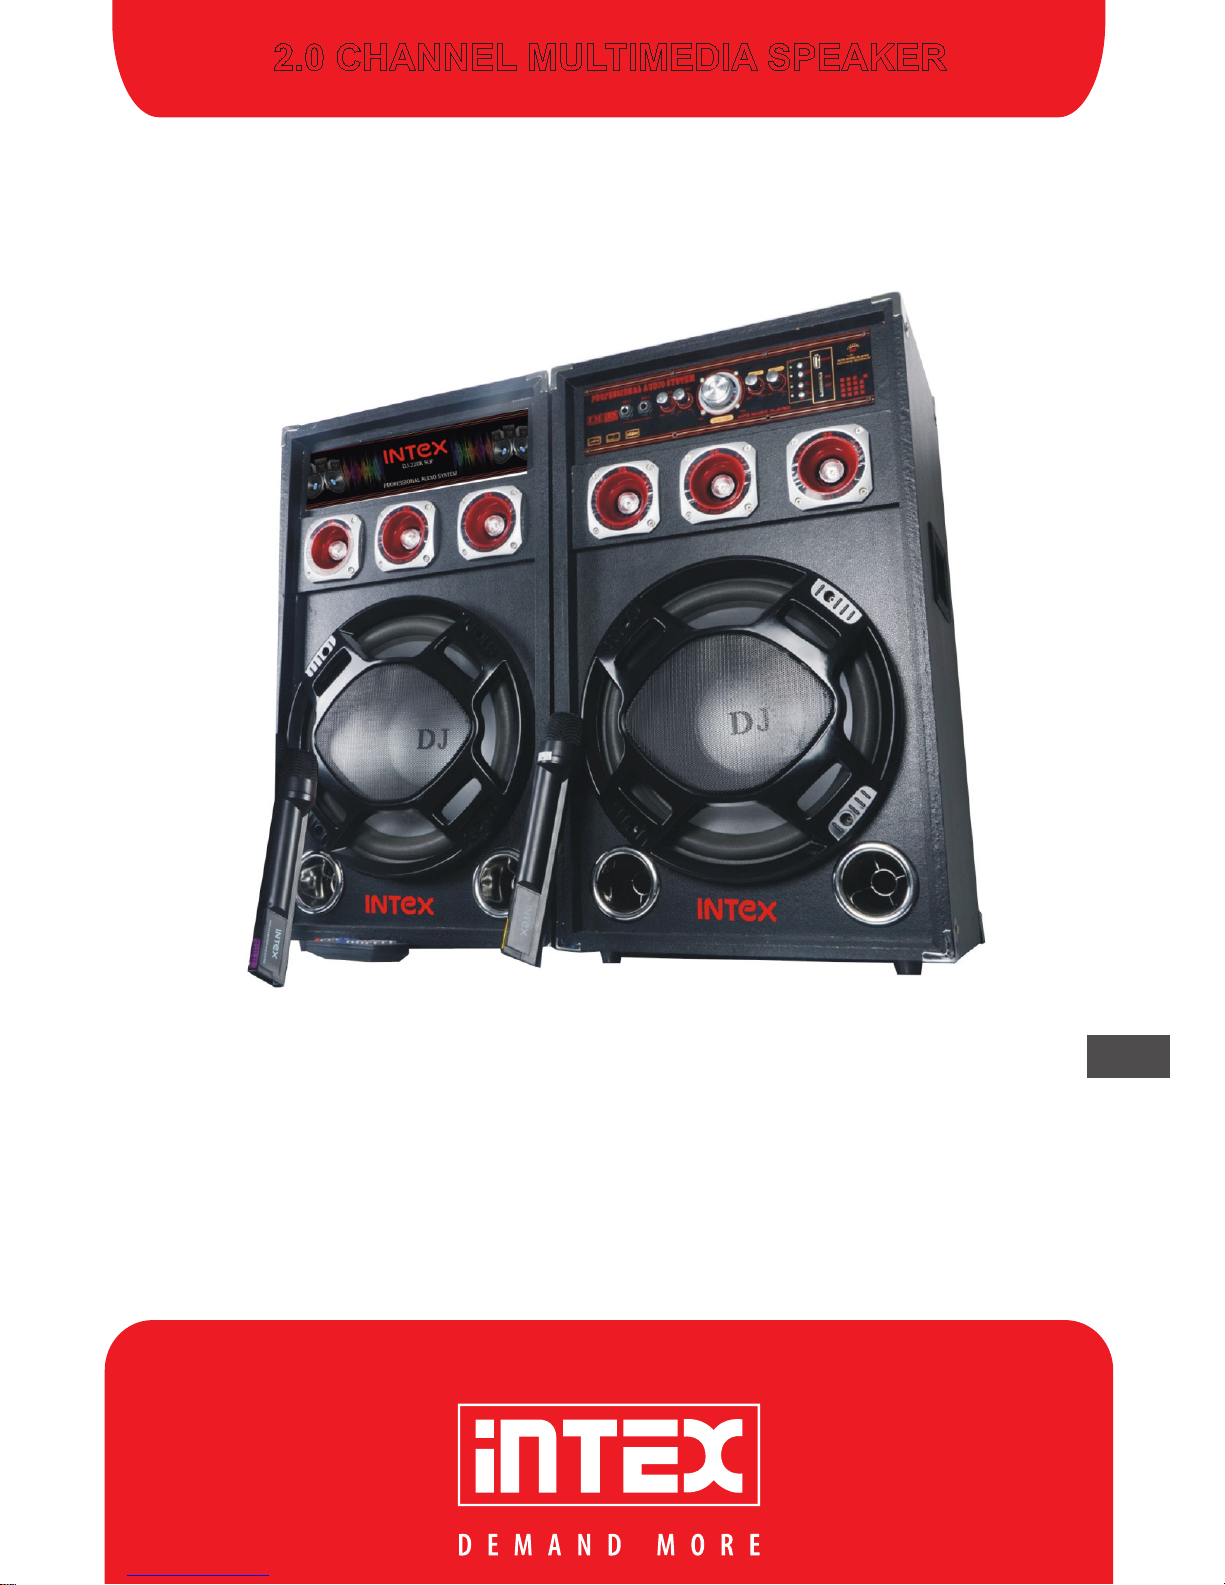
2.0 CHANNEL MULTIMEDIA SPEAKER
Page 2

Page 3

3
Owner’s manual
EN
Dear INTEX customer,
Congratulations on becoming a proud owner of INTEX product. You have now
joined the fraternity of millions of satised INTEX customers spread across the
globe.
Intex Technologies is one of fastest growing IT Hardware, Moble Phones and
Electronics companies. A well established brand, INTEX has kept pace with
the technology needs of millions of IT hardware & electronics consumers and
has been serving them with more than 350 users friendly, high quality, stateof-the art. yet simple products/solutions. The products have been in the market
since 1996 and conform to global standards.
Brand INTEX covers a wide range of computer peripherals and accessories
such as Computer Multimedia speakers, Cabinets, Keyboards, Mouse, UPS,
Add-on cards, Webcams, Headphones, Laptop bags, etc. As a port of it is
divarication strategy, Intex also offers an interesting range of Pcs, TFT-LCD
Monitors, Consumer Electronics (DVD Players) & Mobile Phones.
Every INTEX product goes through rigorous process of sample evaluation
and approval before commercial launch. Customers look upon the brand as
a value-for-money & feature-rich offering, supported by efcient after sales
service.
We look forward to your patronage.
It would be our pleasure to receive feedback and suggestions you may have
for improvements in the product(s) you are using.
Page 4

4
Owner’s manual
EN
CHARACTERISTICS OF THE PRODUCTS
• 2.0 Channel multimedia speaker with cordless MIC
• Digital FM Receiver
• USB/SD/MMC Mp3 Player
• Full function remote control
• AUX audio input compatible with DVD/PC/LCD TV
• LED display
SPECIFICATION
Feature Specication
Power supply
Rated power
Impedance
Sensitivity
Frequency response
SNR
Separation
Speakers
FM frequency response
200 ~ 240V AC 50-60Hz
60W + 60W
4 ohm
< 500 mV
50Hz-20kHz
>=60dB
>=40dB
(2 x 12” + 6 x 4”)
88MHz to 108MHz
Specications are subject to change without notice.
CORDLESS MICROPHONE
The wireless mic is used when the instructor needs to move about the room
and still be heard over the system. The wireless requires a 9 volt battery. To
change batteries press the sides of the battery compartment and lift up. Install
the new battery by matching the negative and the positives.
MICROPHONE POSITION
Place the microphone between 2" and 3" apart from the mouth for clear sound.
Page 5

5
Owner’s manual
EN
HOW TO USE
1. Set the microphone on/off switch to ON position and verify that the LED
indicator lights.
2. Set the on/off switch to OFF position after use and verify that the LED is
extinguished.
USER PRECAUTIONS
1) Take care not to drop the unit on to a hard oor.
2) Avoid placing the unit in areas of extremely high humidity and temperature.
3) Never open the unit or touch its internal components.
4) Clean the unit’s exterior periodically with a soft dry cloth. If it gets a very
dirty wipe rst a soft damp cloth lightly soaked in a neutral detergent and then
dry with a soft cloth.
5) Never use thinner, benzine, or other solvents which may damage the plastic
parts of the unit.
6) Remove the battery if the unit is to be stored for two weeks or more.
FEEDBACK (HOWLING)
If this unit is used in small room with the loudspeaker and is close to the
speaker, feedback may occur. To eliminate the feedback, turn down the volume control of your loudspeaker or change the position of the microphone.
Factors such as speaker position and room structure affect the feedback.
Feedback is most likely to occur when the microphone directly faces the
speakers, so it is advisable to position the speaker accordingly.
INSTALLATION
1) Connect the main unit output port to sub unit with core wire.
2) Insert input cable (two pin socket) into input port of main unit and the other
end at the output port of your audio/video player in respective color socket.
3) Plug in power cable.
4) Rotate all function knobs to minimum level and then press button on.
5) Adjust all knobs (volume, bass, treble) to your listening level and enjoy the
music.
6) Rotate all function knobs to minimum level before pufng the power off.
Note: The wireless mic receiver must also be on for the wireless to work.
Page 6

6
Owner’s manual
EN
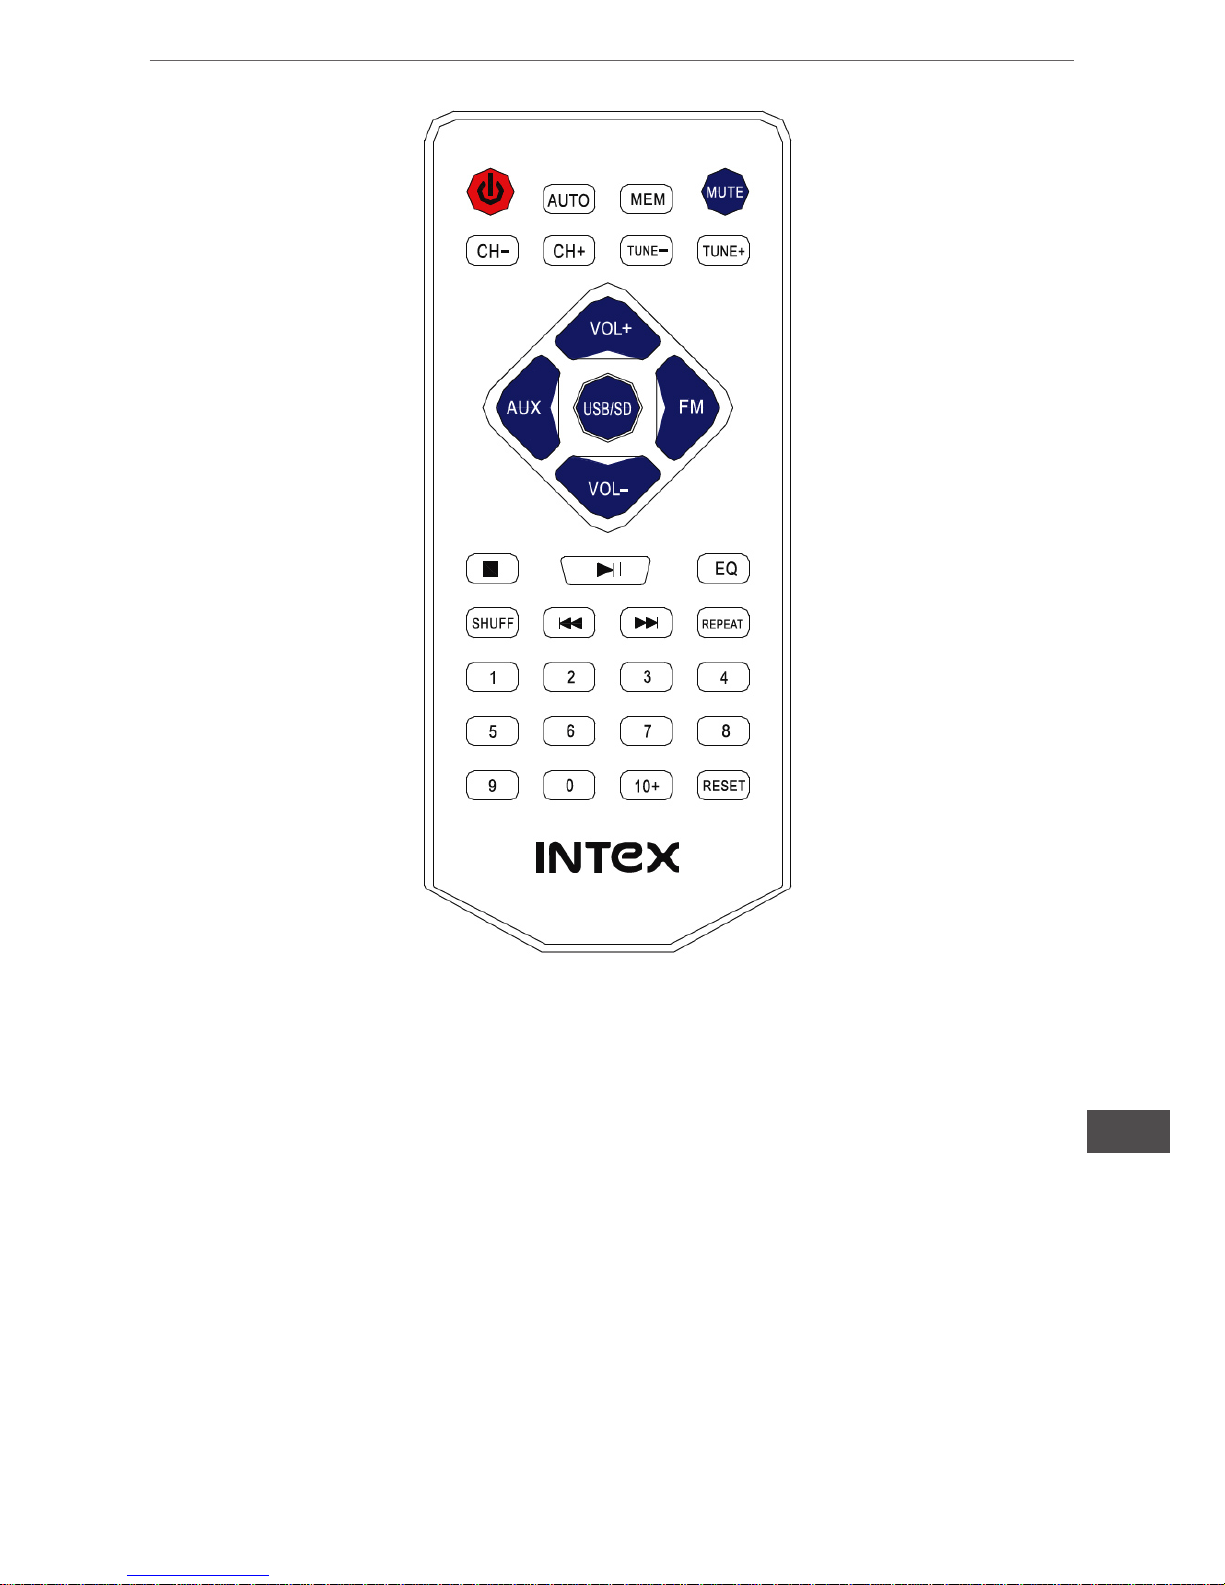
DESCRIPTION FOR THE REMOTE CONTROL
1. USB/SD module power on/off button, available for all modes.
2.
Mute button, available for all modes.
3. FM/AUTO: auto search button in FM mode.
Press the button in FM mode, will auto search FM channel from 88MHz ---l08MHz. and LED digital tube will display gures from 88MHz ---- 108MHz.
And it will stop 3-5 seconds to keep channel after searching into CH- / CH+ It's
un-available in AUX or USB/SD mode.
4. MEM: memory button in FM mode.
When detect one channel in FM mode, LED digital tube will display the chan-
nel gure, press the button and LED digital tube will ash "P01", and press
CH- / CH+ to select store channel from P01 to P30, and press again. LED
digital tube will display existing channel frequency, which means this channel
is kept.
Un-available in AUX or USB/SD mode.
5. CH- / CH+: channel button in FM mode.
Press CH- / CH+ to select favorite FM channels (after press auto search button to select channels which were kept in CH- / CH+) in FM mode.
Un-available in AUX or USB/SD mode.
6. TUNE- / TUNE+: manual search button in FM mode.
Press shortly to change the FM channel in FM mode by every 0.1MHz.
Press for 3 seconds to change to manual search mode, and play when the
channel is locked.
7. AUX: AUX button.
Press this button in every mode (AUX / USB-SD / FM) , will return to AUX
mode, LED digital tube will display “LINE”.
8. USB/SD: USB/SD button.
Press this button in every mode (AUX / USB-SD / FM) , will return to USB/SD
mode (pen drive or SD card inserted on the socket).
9. FM: FM button.
Press this button in every mode (AUX / USB-SD / FM) , will return to FM
mode.
10. VOL- / VOL+: volume button.
Available in all modes for the volume increase and reduce function.
11. stop button, available in USB/SD mode
12. play/pause available in USB/SD mode
13. EQ: sound performance button, available in USB/SD mode, 5 kinds of
sound performance (Jazz, Rock, Bass, Normal, Classic) for customization.
14. SHUFF: random play button (available in USB/SD mode).
Press the button in USB/SD mode, playing music in the pen drive or SD card,
and LED digital tube will display “RNAD”, stand for random playing status.
Press this button again, and LED digital tube will display “OFF”, stand for neu-
Page 7

7
Owner’s manual
EN
tralizing random playing status.
15. preview one song / forward one song, available in USB/SD mode.
16. REPEAT: repeat button, available in USB/SD mode.
Defaults all song repeat, press shortly to repeat existing song, and LED digital
tube will display “ONE”.
Press again will repeat all songs and LED digital tube will display “ALL”.
17. RESET: reset button.
Press this button in every mode (AUX / USB-SD / FM) , will return to AUX
mode (Max. volume), and LED digital tube will display ”LINE”.
18. Number button: Can select song in USB/SD mode.
Page 8

8
Owner’s manual
EN
LAYAUT OF CONNECTION
DESCRIPTION FOR THE FRONT PANEL
1) MODE: Mode selection button, AUX, USB,SD/MMC & FM is optional.
2) NEXT, VOL+: Press for long time means increase the volume, press for
short time means select the next song.
3) PREV, VOL-: Press for long time means reduce the volume, press for short
time means select the prev song.
4) PLAY PAUSE: In USB/SD mode, is play/pause.
In FM mode, press shortly, is auto-search for radio channel and the auto save
the searched radio channel.
Page 9

9
Owner’s manual
EN
Problem Check point
No power Check if the mains power cord is properly connected.
Check ON/OFF switch. Turn ON the power.
No sound Check the input & output cable. It must be connected
properly.
One channel not
working
Check the audio input cable, source audio output.
Barring sound coming in high volume
Reduce the volume
Main unit is not
working
Check the audio input cable
No sound from
microphone
Insert the battery in the microphone properly
Turn the volume up to suitable level
Keep your mouth away from the microphone at a distance of 5-10 cm
FM with noise or
interference
1. Connect the appropriate antenna. You may need an
outdoor antenna
2. Adjust the position of the antenna
3. Separate the antenna from other cables & appliances
4. Turn off nearby TV, DVD & Video decks
Note: If the problem still are not solved, please contact your local dealer. Do
not repair it by yourself.
TROUBLESHOOTING
Connect the cable of the
speakers to+and-positions
Output of volume
Page 10

10
Owner’s manual
EN
SAFETY INSTRUCTIONS
1. There is high voltage in the main unit. Do not remove the outer cover, as
this may result in electric shock.
2.The appliance should not be under direct sun, in high temperature or wet
environment.
3.Please turn off the appliance disconnect power cord from the outlet during
the long term no-use periods.
4.Do not attempt to service the main unit yourself as opening or removing cov-
ers may expose you to dangerous voltage or other hazards.
5.When replacing parts is required please make sure the service technician
has adopted parts that have the same characteristics as the original parts.
Unauthorised substitutions may result in electric shock or other hazards.
The Lechpol company declares that product KOM0655 is consistent with the essential
requirements and other relevant provisions of directive 1999/5/EC. The proper declaration for download from www.lechpol.eu
Page 11

11
Instrukcja obsługi
PL
Drogi kliencie INTEX,
Gratulujemy, stałeś się dumnym właścicielem produktu INTEX. Dołączyłeś do
milionów zadowolonych klientów INTEX na całym świecie.
Intex Technologies jest jednym z najszybciej rozwijających się producentów
sprzętu komputerowego i elektronicznego. Dobrze znana marka INTEX nadąża z potrzebami technologicznymi milionów konsumentów. Produkty są wprowadzane na rynek od 1996 roku, zgodne z międzynarodowymi normami.
Marka INTEX obejmuje szeroką gamę urządzeń peryferyjnych i akcesoriów,
takich jak multimedia, głośniki komputerowe, szafy, klawiatury, myszki, UPS-y,
karty rozszerzeń, kamery internetowe, słuchawki, torby na laptopy, itp.
Każdy produkt INTEX przechodzi rygorystyczny proces oceny. Klienci patrzą
na markę jako stosunek wartości do ceny. Artykuły wspierane są przez efektywną obsługę posprzedażową.
Byłoby nam bardzo miło poznać Państwa opinie i sugestie, które mogą służyć
poprawie używanego przez Państwa produktu.
Page 12

12
Instrukcja obsługi
PL
OPIS PRODUKTU
• Zestaw głośników 2.0 z bezprzewodowym mikrofonem
• Odbiornik FM
• Port USB/SD
• Pilot zdalnego sterowania
• Wejście AUX (kompatybilne z DVD/PC/LCD TV itp.)
• Wyświetlacz LED
SPECYFIKACJA
Cecha Specykacja
Zasilanie
Moc
Impedancja
Czułość
Pasmo przenoszenia
SNR
Separacja
Głośniki
Radio FM
200 ~ 240V AC 50-60Hz
60W + 60W
4 ohm
< 500 mV
50Hz-20kHz
>=60dB
>=40dB
(2 x 12” + 6 x 4”)
88MHz ~ 108MHz
Specykacja urządzenia może ulec zmianie bez powiadomienia.
MIKROFON BEZPRZEWODOWY
Mikrofon bezprzewodowy może być użyty do prowadzenia konferencji, szkolenia, przemówienia itp. Do zasilania mikrofonu służy bateria 9V. W przypadku
rozładowania baterii należy ja wymienić na nową tego samego typu (przy
wymianie baterii należy zwrócić uwagę na jej poprawne umieszczenie zgodnie
z zaznaczoną polaryzacją).
POŁOŻENIE MIKROFONU
Aby uzyskać najlepszą jakość dźwięku, mikrofon należy trzymać w odległości
5cm ~ 8cm od ust.
Page 13

13
Instrukcja obsługi
PL
UŻYWANIE MIKROFONU
1.Aby włączyć mikrofon należy umieścić przełącznik on/off w pozycji ON - zaświeci się dioda LED.
2.Aby wyłączyć mikrofon należy umieścić przełącznik on/off w pozycji OFF dioda LED zgaśnie.
UWAGA
1) Nie należy narażać urządzenia na silne wstrząsy, upadki itp.
2) Nie należy umieszczać urządzenia w miejscach o wysokiej wilgotności
powietrza lub skrajnie wysokiej lub niskiej temperaturze.
3) Nigdy nie należy zdejmować obudowy / dotykać wewnętrznych elementów
urządzenia.
4) Do czyszczenia urządzenia należy użyć miękkiej ściereczki (nie należy
używać środków czyszczących).
5) Należy wyjąć baterię z urządzenia jeżeli nie będzie ono używane przez
dłuższy okres czasu.
SPRZĘŻENIE ZWROTNE
Jeśli urządzenie jest używane w pomieszczeniu z głośnikami i znajduje się
blisko głośników, to może wystąpić sprzężenie zwrotne. Aby wyeliminować
sprzężenie zwrotne, należy zmniejszyć poziom głośności lub zmienić położenie mikrofonu. Czynniki takie jak położenie głośnika i struktura pomieszczenia
wpływa na efekt sprzężenia zwrotnego. Sprzężenie zwrotne jest najbardziej
prawdopodobne, gdy mikrofon jest umieszczony bezpośrednio przed głośnika-
mi.
INSTALACJA
1) W pierwszej kolejności należy wykonać podłączenie kabli sygnałowych.
2) Następnie należy podłączyć kabel zasilający do źródła zasilania.
3) Przed włączeniem urządzenia zaleca się ustawienie poziomu głośności na
minimum.
4) Należy włączyć urządzenie a następnie dokonać regulacji podstawowych
parametrów (głośność, bass, treble).
Page 14

14
Instrukcja obsługi
PL
PILOT ZDALNEGO STEROWANIA
1. Włączenie / wyłączenie modułu USB/SD.
2.
Wyciszenie dźwięków.
3. FM/AUTO: Automatyczne wyszukiwanie kanałów FM.
Naciśnięcie przycisku uruchomi automatyczne wyszukiwanie stacji radiowych
w zakresie 88MHz ~ 108MHz. Aktualna częstotliwość wyświetlana jest na wyświetlaczu.
4. MEM: zapisywanie stacji radiowych w pamięci.
Gdy zostanie znaleziona stacja radiowa (na wyświetlaczu pokaże się jej
częstotliwość) należy nacisnąć przycisk MEM. Na wyświetlaczu ukaże się
informacja "P01". Za pomocą przycisków CH- / CH+ należy wybrać numer
kanału, na którym wyszukana stacja zostanie zapisana i potwierdzić wybór
przyciskiem MEM.
5. CH- / CH+: poprzedni / następny kanał.
6. TUNE- / TUNE+: ręczne wyszukiwanie stacji radiowych.
Każde naciśnięcie przycisku to zmiana częstotliwości o 0.1MHz.
7. AUX: tryb AUX.
Naciśnięcie przycisku spowoduje przejście do trybu AUX.
8. USB/SD: tryb USB/SD.
Naciśnięcie przycisku spowoduje przejście do trybu USB/SD.
9. FM: tryb radia FM.
Naciśnięcie przycisku spowoduje przejście do trybu radia FM.
10. VOL- / VOL+: regulacja głośności.
11. stop, zatrzymanie odtwarzania.
12. play/pauza.
13. EQ: equalizer, dostępne ustawienia (Jazz, Rock, Bass, Normal, Classic)
14. SHUFF: odtwarzanie losowe.
15. poprzedni / następny utwór.
16. REPEAT: powtarzanie odtwarzania.
17. RESET: reset.
18. Przyciski numeryczne.
Page 15
15
Instrukcja obsługi
PL
PANEL PRZEDNI
1) MODE: Wybór trybu odtwarzania: AUX, USB, SD/MMC, FM.
2) NEXT, VOL+: Naciśnięcie przycisku spowoduje przejście do następnego
utworu, naciśnięcie i przytrzymanie przycisku spowoduje zwiększenie poziomu głośności.
3) PREV, VOL-: Naciśnięcie przycisku spowoduje przejście do poprzedniego
utworu, naciśnięcie i przytrzymanie przycisku spowoduje zmniejszenie poziomu głośności.
4) PLAY PAUSE: play/pauza.
W trybie radia FM naciśnięcie spowoduje automatyczne wyszukanie i zapisa-
nie stacji radiowej.
Page 16

16
Instrukcja obsługi
PL
POŁĄCZENIA
Page 17

17
Instrukcja obsługi
PL
Problem Rozwiązanie
Brak zasilania Należy sprawdzić czy urządzenie jest podłączone do
źródła zasilania.
Należy sprawdzić czy urządzenie jest włączone.
Brak dźwięku Należy sprawdzić podłączenie kabli.
Jeden kanał nie
działa
Należy sprawdzić podłączenie kabli.
Zniekształcony
dźwięk przy dużej
głośności
Należy zmniejszyć poziom dźwięku.
Jednostka główna
nie działa
Należy sprawdzić podłączenie kabli.
Brak dźwięku z
mikrofonu
Należy sprawdzić baterię mikrofonu.
Należy zwiększyć poziom dźwięku.
Mikrofon należy trzymać w odległości 5cm ~ 10cm od
ust.
Szumy w odbiorze
radia FM
1. Należy sprawdzić podłączenie anteny, w miejscach
gdzie sygnał jest słaby możliwe, że jest konieczne
podłączenie zewnętrznej anteny.
2. Należy dostosować położenie anteny.
3. Należy odseparować antenę od innych przewodów.
4. Należy umieścić urządzenie z dala od innych urządzeń, które mogą powodować zakłócenia (TV, DVD,
odtwarzacze video itp.).
Uwaga: Jeżeli problem nadal pozostaje nierozwiązany to należy skontaktować się z lokalnym dystrybutorem lub serwisem urządzenia. Nie należy naprawiać urządzenia samodzielnie.
ROZWIĄZYWANIE PROBLEMÓW
Page 18

18
Instrukcja obsługi
PL
BEZPIECZEŃSTWO
1. Wewnątrz urządzenia znajduje się wysokie napięcie, aby uniknąć porażenia
prądem nie należy zdejmować obudowy urządzenia.
2. Nie należy umieszczać urządzenia w miejscach gdzie będzie ono narażone
na bezpośrednie padanie promieni słonecznych, wysoką temperaturę oraz w
miejscach o dużej wilgotności powietrza.
3. Jeżeli urządzenie nie będzie używane przez dłuższy okres czasu to należy
trwale odłączyć je od źródła zasilania.
4. Samodzielna próba naprawy urządzenia może skutkować porażeniem prądem elektrycznym. Wszelkie naprawy należy powierzyć wykwalikowanemu
serwisowi.
5. Jeżeli zajdzie konieczność wymiany jakiegoś elementu przez serwis, należy
upewnić się, że ten element jest kompatybilny z oryginałem. Użycie podzespołów o innej specykacji może skutkować trwałym uszkodzeniem urządzenia.
Niniejszym rma Lechpol oświadcza, że urządzenie KOM0655 jest zgodne z zasadniczymi wymaganiami oraz innymi stosownymi postanowieniami dyrektywy 1999/5/WE.
Właściwa deklaracja do pobrania na stronie www.lechpol.eu
Page 19

Page 20

 Loading...