

Page 1
INTEX UPS
KOM0541
Dear user: Thank you for purchasing INTEX product. You are sincerely recommended
to read this manual carefully & completely prior to use for best usage of this device.
Bedienungsanleitung
User's manual
Instrukcja obsługi
Manual de utilizare
DE
EN
PL
RO
Page 2

Page 3

Bedienungsanleitung
Lieber INTEX - Kunde,
Herzlichen Glückwunsch als stolzer Besitzer eines INTEX – Produkts. Sie
haben Sich nun der Gemeinschaft von Millionen zufriedener INTEX – Kunden,
über den ganzen Globus verstreut, angeschlossen.
INTEX – Technologies ist eines der schnell wachsenden IT Hardware, Mobiltelefonen und Elektronik-Unternehmen. Eine gut bestehende Marke, INTEX
hat Schritt gehalten mit den Technologie-Bedürfnissen von Millionen von IT
Hardware & Elektronik Verbrauchern und hat sie mit über 350 benutzerfreundliche, hochqualitative, auf dem neuesten Stand der Technik, jedoch einfache
Produkte/ Lösungen beliefert. Die Produkte benden sich auf dem Markt seit
1996 und sind gemäß den globalen Standards.
Die Marke INTEX erfasst eine weite Auswahl von Computer-Zubehör und
Peripherie-Geräte, mit denen es in 1996 begonnen hat, wie Computer-Multimedialautsprecher, Gehäuse, Tastaturen, Mouse, Erweiterungskarten, Webkameras, Kopfhörer, HDMI-Player, Laptop-Taschen und Zubehör, Stromversorgung, , USV, 3G Modem, usw. Als Teil seiner Vervielfältigungs-Strategie, bietet
INTEX ebenso eine interessante Auswahl von Mobiltelefonen, Verbraucherelektronik, wie z.B. LCD & CRT TV, DVD-Player, usw., sowie TFT-LCD/LED
Monitore &PCs an. (*)
INTEX hat eine starke Tendenz zu Produkt-Entwurf und Entwicklung und arbeitet eng zusammen mit einigen der führenden Chip und IC Herstellern, durch
sein Entwurf und Entwicklungszentrum. Jedes INTEX Produkt durchlauft einen
rigorosen Prozess von Muster-Beurteilung und Genehmigung vor der kommerziellen Freigabe. Kunden sehen die Marke als ein besonderes Preis-Leis-
tungsverhältnis & reich an Eigenschaften, unterstützt von einem efzienten
Kundendienst.
Wir würden uns freuen über Ihre Anmerkungen und Vorschläge zur Verbesserung des Produkts(e) das Sie benutzen. Wir freuen uns auf Ihre Schirmherrschaft.
(*) Einige Produkte stehen möglicherweise nicht in allen Märkten zur Verfügung.
DE
3
Page 4
Bedienungsanleitung
DIESE BEDIENUNGSANLEITUNG ENTHÄLT WICHTIGE SICHERHEITSHINWEISE, HEBEN
SIE DIESE ANLEITUNG AUF, ZUM SPÄTEREN NACHSCHLAGEN.
INSTALLATION UND BEDIENUNG
Vor DER Installation, bitte folgende Anweisungen lesen und verstehen:
Überprüfen des Packungsinhaltes
• Bedienungsanleitung
• USV
• Netzkabel
AUSPACKEN UND ÜBERPRÜFEN
Überprüfen Sie den Packungskarton auf Beschädigungen. Wenn Sie Beschädigungen feststellen, teilen Sie dies Iren Händler mit. Lagern Sie den Packungskarton an einem sicheren Ort für
eventuell späteres versenden der USV.
USV AUFSTELLEN
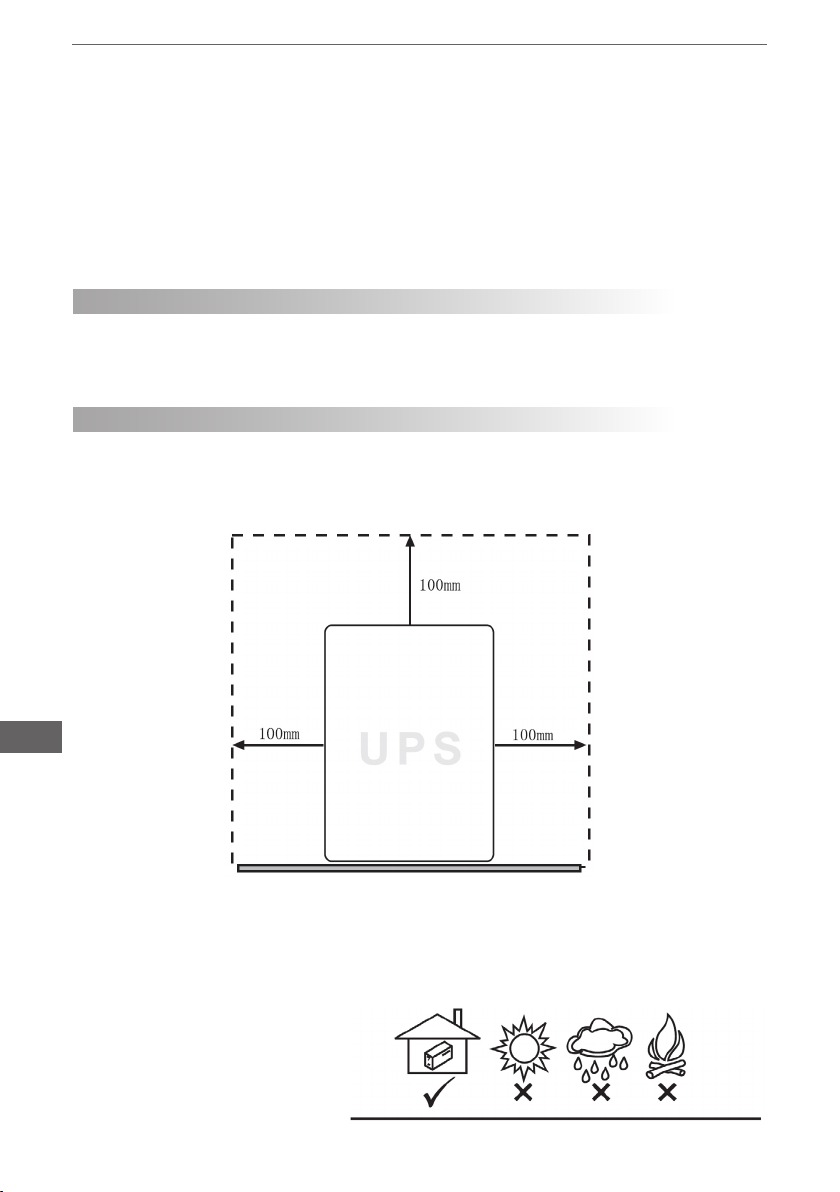
Stellen Sie die USV auf einer stabilen, trockenen Oberäche, an einem gut belüfteten Ort fern
von direkten Wärmequellen. Lassen Sie mindestens 100 mm Abstand um die USV herum, um für
ausreichende Lüftung zu sorgen.
DE
Die USV ist nur für den Innenbereich bestimmt. Obwohl Ihre USV sehr robust ist, die internen
Komponenten sind nicht von der Umgebung geschützt. Bitte beachten Sie folgendes:
• Vermeiden Sie direktes Sonnenlicht
• Vermeiden Sie übermäßige Hitze
• Vermeiden Sie übermäßige Feuchtigkeit oder Flüssigkeiten
• Vermeiden Sie übermäßigen Staub
4
Page 5
Bedienungsanleitung
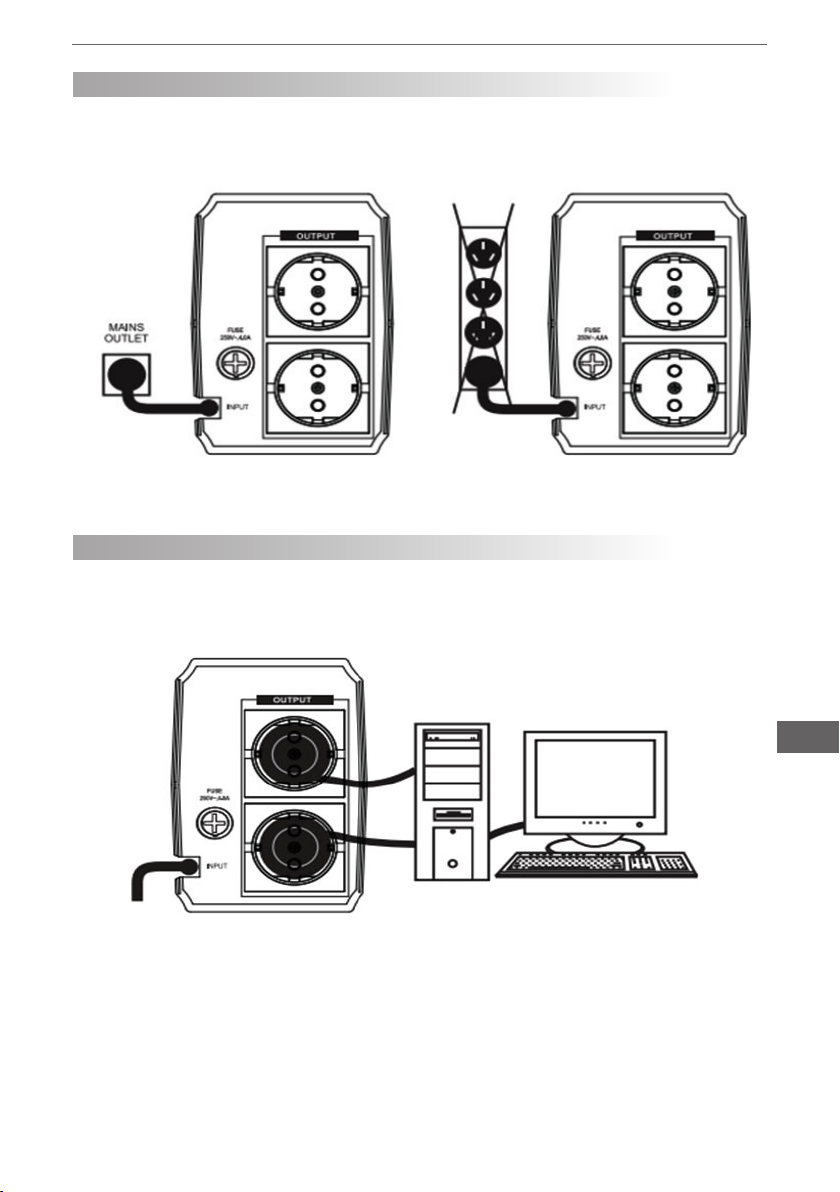
NETZANSCHLUSS DER USV
Schließen Sie das Netzkabel an eine 3-polige Steckdose mit geprüfter Erdung an. Verwenden Sie
keinen Überspannungsschutz oder Verlängerungskabel.
ANSCHLUSS DER GERÄTE AN DIE USV
Schließen Sie nun ihre zu schützenden Geräte (Computer, Monitor, usw.) an die Steckdose mit
Wechselstromausgang auf der Rückseite der USV an.
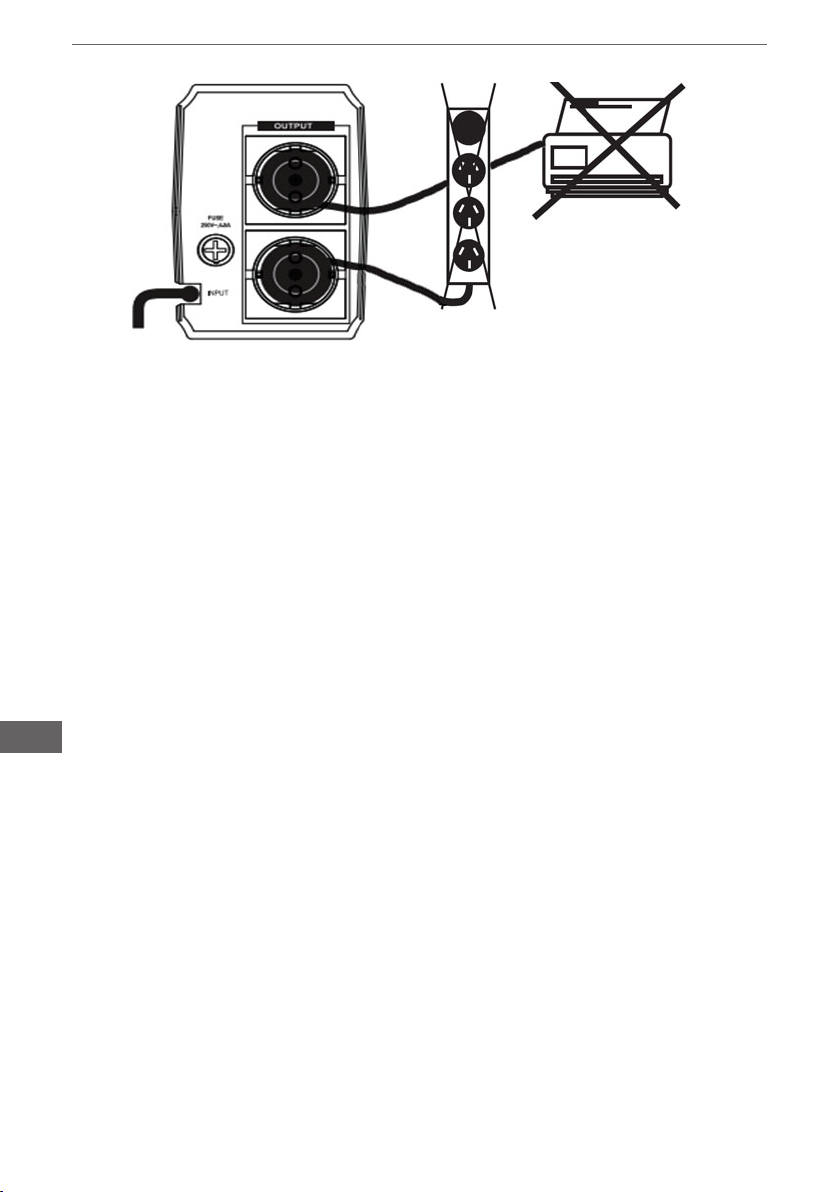
• Schließen Sie keine Laserdrucker oder andere Nichtcomputer Zusatzgeräte an die USV an.
• Schließen Sie Sie keinen Überspannungsschutz, Verlängerungskabel oder Steckdosenleiste an
die USV an.
DE
5
Page 6
Bedienungsanleitung
Schalten Sie die USV ein, durch drücken des Netzschalters an der Frontplatte.
Die USV ist nun betriebsbereit. Schalten Sie Ihre Geräte ein und Sie sind funktionsbereit.
„Sicherheitshinweise“
Dieses Gerät enthält Spannungen die gefährlich sein können. Alle Reparaturen sollten nur von
qualiziertem Fachpersonal durchgeführt werden.
Versuchen Sie nicht den Deckel zu öffnen und das gerät selbst zu reparieren. Keine vom Benutzer zu wartende Teile im inneren. Überlasen Sie die Reparatur qualiziertem Fachpersonal.
Das Gerät hat seine eigene interne Stromquelle (Batterie). An der Steckdose der USV kann Spannung vorhanden sein, auch wenn das Gerät nicht ans Netz angeschlossen ist.
„Warnung“
Um Brandgefahr zu vermeiden, Sicherung nur mit einer gleichwertigen austauschen, oder
Überspannungsschutz wieder aktivieren. Das Produkt ist nur für den Innenbereich bestimmt. Bitte
vermeiden Sie übermäßige Wärme, Staub, Feuchtigkeit oder Flüssigkeiten.
DE
BATTERIE WARTEN/ BATTERIE AUFLADEN
NACH DEM VERLASSEN DER FABRIK, MUSS DIE BATTERIE AUFGELADEN WERDEN.
WENN ES FÜR LÄNGERE ZEIT NICHT BENUTZT WIRD, BEGINNT DIE SELBSTENTLADUNG, WAS ZU EINER KÜRZEREN LEBENSZEIT, ODER ZUR BESCHÄDIGUNG DER
BATTERIE WÄHREND DER GARANTIEZEIT FÜHRT. EBENFALLS SOLLTE ÜBERMÄSSIGE WÄRME IN DER USV UMGEBUNG VERMIEDEN WERDEN, WAS EBENSO ZU EINER
KÜRZEREN LEBENSZEIT, ODER ZUR BESCHÄDIGUNG DER BATTERIE WÄHREND DER
GARANTIEZEIT FÜHRT. FÜR MAXIMALE LEBENSZEIT DER BATTERIE SOLLTEN DIE OBIGEN HINWEISE BEACHTET WERDEN.
Die Batterie der USV wird aufgeladen sobald das Gerät an das Stromnetz angeschlossen und
eingeschaltet wird. In der Regel benötigt die Batterie über 12 Stunden zum völligen auaden. Die
Funktionszeit ist verringert bis die Batterie voll aufgeladen ist.
6
Page 7

Bedienungsanleitung
UPS ANZEIGEN UND BEDIENELEMENTE
EIN/AUS SCHALTER
Stellen Sie den Schalter in Position EIN um Spannung am Ausgang zu bekom-
men. Zum Ausschalten, in Position AUS stellen. Der Schalter bendet sich auf der
Frontplatte der USV.
12 STUNDEN
NORMAL
BACKUP
BACKUP
NORMAL
BACKUP
ANZEIGE AC NORMAL (Grüne LED leuchtet ununterbrochen)
Der Ausgangsstrom der USV wird vom Stromnetz versorgt.
ANZEIGE BACKUP (Rote LED leuchtet ununterbrochen)
Der Summer piept alle 8 Sekunden. Die Batterie versorgt den Ausgang der USV
mit Strom. Die allgemeine Funktionszeit für einen Computer (PC) ist etwa 10 bis
15 Minuten.
DE
ANZEIGE BACKUP (Rote LED leuchtet ununterbrochen)
Der Summer piept schnell wenn die Batterie am ende der Funktionszeit ist.
Speichern Sie unverzüglich alle Daten, beenden Sie alle Anwendungen und
schalten das Betriebssystem des PC aus.
ANZEIGE ÜBERLADUNG
Der Summer piept ununterbrochen. Die USV schützt sich selbst zu diesem Zeitpunkt. Bitte entfernen Sie einige Last.
7
Page 8
Bedienungsanleitung
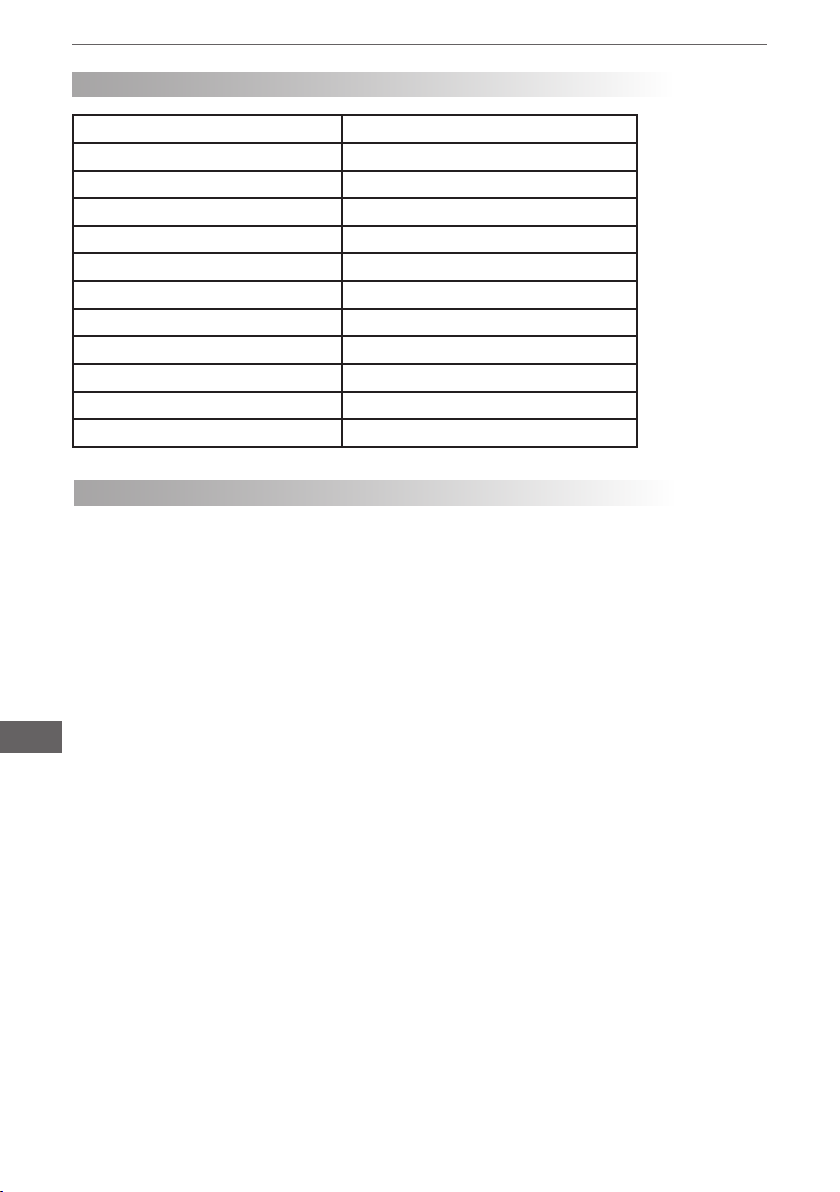
TECHNISCHE DATEN
Kapazität 600VA
Eingangsspannung 145 ~ 290 V AC
Ausgangsspannung 195 ~ 255 V AC
Ausgangsfrequenz 50 HZ
Wellenform Angehaltene Welle während Backup
Funktionszeit 10 15 min.
Batterie 12V 7,2 Ah
Geräuschpegel Unter 45 dB
Funktionstemperatur 0 ~ 45 0C
Feuchtigkeit 10 ~ 90% nicht kondensierend
Abmessungen 310 x 92 x 140 mm
Gewicht 4,37 kg
USV TESTEN
Um die USV zu testen, trennen Sie das Gerät vom Netz und beobachten Sie die Backup Anzeigen. Ebenfalls sollte Ihr PC normal funktionieren.
1. Selbsttest beim einschalten
For dem einschalten der USV blinkt die rote/gelbe/grüne LED zweimal. Die USV ist funktionsbereit.
2. Stummmodus
Im Batteriemodus, kurzes drücken der Taste aktiviert oder desaktiviert den Summer. Wenn die
Batterie schwach ist, oder bei Überladung kann der Summer nicht desaktiviert werden.
DE
3. Überladungsschutz
Wenn die USV, während der Funktion überladen ist, und dieses vom Benutzer nicht entfernt wird,
wird der Stromausgang nach einiger Zeit automatisch abgeschaltet und kehrt danach im Funktionsmodus zurück.
4. Abschalten bei schwacher Batterie
Bei schwacher Batterie schaltet sich die USV automatisch ab, um die Batterie zu schützen.
5. Ausschalten
1) AC Normal
USV schalten den Stromausgang ab und geht in den Standby Modus, beim drücken der Taste für
3 Sekunden.
2) Backup
Drücken der Taste für 3 Sekunden, die USV schaltet sich aus nach einem langen Piepton.
8
Page 9
Bedienungsanleitung
STÖRUNGSBEHEBUNG
Die Störungsbehebungsliste bedeckt die meisten Probleme die Sie unter normalen Funktionsbedingungen antreffen. Wenn die USV nicht richtig funktioniert, überprüfen Sie folgende Schritte
bevor Sie sich an den Kundendienst wenden:
1. Ist die USV an eine korrekt funktionierende Steckdose angeschlossen?
2. Ist die Netzspannung identisch mit der Nominalspannung?
3. Ist die Sicherung durchgebrannt/ der Überlastschutz an der Rückseite offen?
Bitte übermitteln Sie folgende Daten wenn Sie den Kundendienst anrufen:
1. Modellnummer und Seriennummer
2. Daten der Störung
3. Komplette Beschreibung des Problems
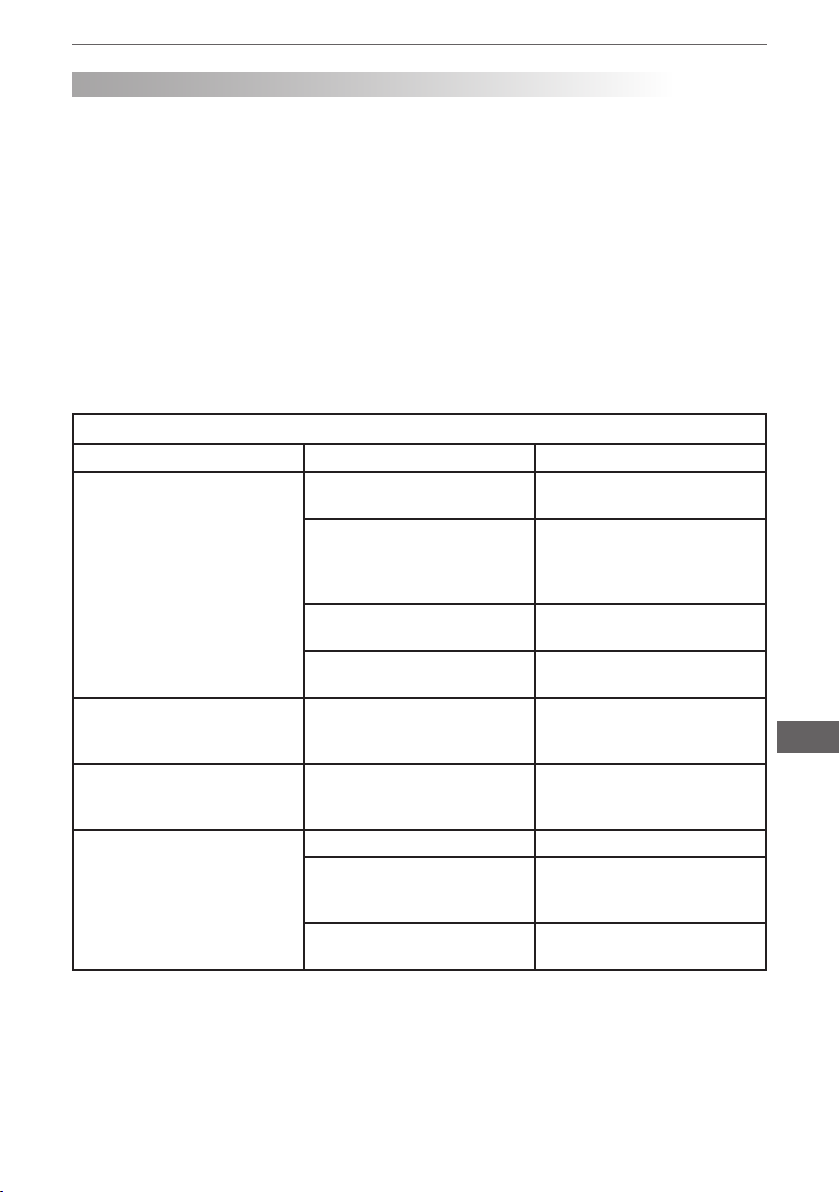
STÖRUNGSBEHEBUNGSTABELLE
PROBLEM MÖGLICHE URSACHE BEHEBUNG
USV lässt sich nicht einschalten
Die rote LED leuchtet ununterbrochen bei einem Piepton
jede 8 Sekunden
Die rote LED leuchtet ununterbrochen bei einem ununterbrochener Piepton
USV bietet nicht die erwartete
Funktionszeit
USV ist nicht am Netz angeschlossen oder überladen
Die Sicherung ist durchgebrannt/ der Überlastschutz
ist offen
AC Eingangsspannung ist zu
niedrig
USV Fehlfunktion Wenden Sie sich an den
USV schaltet plötzlich in den
Batteriemodus, obwohl die
Netzspannung vorhanden ist
Backup-Zeit unter 1 Minute Close the system and re-
USV ist überladen Überlastung entfernen
Schwache Batterie Batterie für mindestens 12
Batterie wird nicht aufgeladen Wenden Sie sich an den
USV ans Netz anschließen
und Überladung entfernen
Sicherung ersetzen oder
Überlastschutz schließen,
Überladung entfernen und auf
Kurzschluss überprüfen
Überprüfen Sie die Eingangsspannung
Kundendienst
Sofort alle Daten speichern
und Betriebssystem ausschalten
charge again
Stunden laden und BackupZeit erneut prüfen
Kundendienst
DE
9
Page 10
Bedienungsanleitung
DE
10
Page 11

Owner’s manual
Dear INTEX customer,
Congratulations on becoming a proud owner of INTEX product. You have now
joined the fraternity of millions of satised INTEX customers spread across the
globe.
Intex Technologies is one of fastest growing IT Hardware, Moble Phones and
Electronics companies. A well established brand, INTEX has kept pace with
the technology needs of millions of IT hardware & electronics consumers and
has been serving them with more than 350 users friendly, high quality, stateof-the art. yet simple products/solutions. The products have been in the market
since 1996 and conform to global standards.
Brand INTEX covers a wide range of computer peripherals and accessories
such as Computer Multimedia speakers, Cabinets, Keyboards, Mouse, UPS,
Add-on cards, Webcams, Headphones, Laptop bags, etc. As a port of it is
divarication strategy, Intex also offers an interesting range of Pcs, TFT-LCD
Monitors, Consumer Electronics (DVD Players) & Mobile Phones.
Every INTEX product goes through rigorous process of sample evaluation
and approval before commercial launch. Customers look upon the brand as
a value-for-money & feature-rich offering, supported by efcient after sales
service.
We look forward to your patronage.
It would be our pleasure to receive feedback and suggestions you may have
for improvements in the product(s) you are using.
EN
11
Page 12

Owner’s manual
THIS MANUAL CONTAINS IMPORTANT SAFETY INSTRUCTIONS. KEEP THIS MANUAL
HANDY FOR FUTURE REFERENCE.
INSTALLATION AND OPERATION
Before installation, please read and understand the following instruction.
Inspect the following items inside box:
• user's manual
• UPS
• mains cord
UNPACKING AND INSPECTION
Examine the packing carton for damage. Notify your dealer immediately if damage is observed.
Store the packing in a safe place for possible future trans-shipment of the UPS.
PLACE THE UPS
Position the UPS on a sturdy, dry surface in a well-ventilated area away from direct sources of
heat. Leave al least 100 mm clearance all around the UPS to provide adequate ventilation.
EN
The UPS is intended for indoor use only. Although your UPS is very rugged, its internal components are not sealed from the environment. Kindly note the following.
• avoid direct sunlight
• avoid excessive heat
• avoid excessive humidity or liquids
• avoid excessive dust
12
Page 13

Owner’s manual
CONNECT UPS TO POWER
Connect the power cord, to a veried grounded 3-wire receptacle. Do not power the UPS using a
surge suppressor or power strip. Switch the utility power ON.
CONNECT EQUIPMENT TO UPS
Now connect your load to be protected (computer, monitor etc.) to the AC Output receptacles at
the rear of the UPS.
* Do not connect a laser printer or any non-computer peripherals to UPS outlets.
* Do not connect a surge suppressor, power strip or extension cord to the UPS outlets.
EN
13
Page 14

Owner’s manual
Enable the UPS by turning on the power ON/OFF switch, which is situated on the front panel.
The UPS is now ready to use. Switch on your equipment and you are ready to function.
*Safety notice*
The product contains voltages, which are potentially hazardous. Qualied service personnel
should perform all repairs.
Do not try to open the cover and to service the system yourself, no user serviceable parts inside.
Refer servicing to qualied service personnel only. The product has its own internal energy source
(battery). The output receptacles may be live even when the product is not connected to an AC
supply.
*Warning*
In case of re risky, please change the fuse with the same kind and same rate or reset the
breaker. The product is intended for indoor use only. Kindly note to avoid excessive heat, dust,
humidity or liquids.
BATTERY MAINTENANCE / BATTERY CHARGING
EN
AFTER SHIPMENT FROM THE FACTORY THE BATTERY NEEDS RECHARGING. IF NOT
USED FOR A LONG PERIOD OF TIME, THE BATTERY WILL START SELF-DISCHARGING,
WHICH MAY RESULT IN A SHORT SERVICE LIFE OF THE BATTERY OR MAY EVEN CAUSE
DAMAGE TO IT DURING WARRANTY PERIOD. CARE SHOULD ALSO BE TAKEN TO AVOID
EXCESSIVE TEMPERATURE AROUND THE UPS, WHICH COULD ALSO RESULT IN REDUCING SERVICE LIFE OF THE BATTERY. TO ACHIEVE MAXIMUM SERVICE LIFE FROM THE
BATTERY THE ABOVE INSTRUCTIONS SHOULD BE FOLLOWED.
The UPS battery charges whenever the UPS is connected to utility power & is switched ON. It
typically requires more than 12 hours to charge fully. Operating runtime is reduced until the battery
is fully charged.
14
Page 15

Owner’s manual
UPS INDICATORS AND CONTROLS
ON/OFF SWITCH
Turn ON this button to supply power to the UPS outlets. To switch off power to the
UPS outlets turn OFF the switch. This switch is situated on the front panel of the
UPS.
12 HOURS
NORMAL
BACKUP
BACKUP
NORMAL
BACKUP
AC NORMAL INDICATOR (green continuous)
The UPS is supplying conditioned utility power to its outlets.
BACKUP INDICATOR (red led continuous bright)
The buzzer beeps every 8 seconds. The battery is powering the UPS outlets. The
expected runtime for a typical personal computer (PC) is about 10 to 15 minutes.
LOW BATTERY INDICATOR (red led continuous bright)
The buzzer beeps fast whenever the battery is near the end of its runtime.
Promptly save your data and exit all applications and shutdown the operating
system.
OVERLOAD INDICATOR
The buzzer continuous beeping. UPS protects itself at this time. Please move
some load.
EN
15
Page 16

Owner’s manual
SPECIFICATIONS
Capacity 600VA
Input voltage 145V AC ~ 290V AC
Output voltage 195V AC ~ 255V AC
Output wave form Stepped wave during the b/up mode
Output frequency 50Hz
Battery rating 12V / 7.2Ah
Backup time 10-15 minutes
Noise level < 45 dB
Operating temperature 0~45
Humidity 10~90% non condensing
Dimensions 310x92x140 mm
Weight 4.37 kg
0
C
TEST THE UPS
To test UPS on battery back-up, switch off utility supply and observe “backup indicator” lights. Also
your PC should continue to function normally.
1. Self-testing while switching on.
Before turning on the UPS, the red /yellow/green led will be bright twice by turns. Then the UPS
will be ready for operation.
2. Silence function
In Battery Mode, shortly press the switch will enable or disable the buzzer. But when UPS is low
battery or overloaded, the buzzer can not be silenced.
3. Overload protection
When UPS is overloaded while operating, which is not solved by the user in time, it will cut off the
output automatically after some time, then turn back to operation mode.
EN
4. Low battery shut off
When the battery is about to be exhausted, UPS will shut down automatically to protect battery’s
life.
5 Switching off
• AC normal
UPS will cut off the output and goes to AC standby mode by pressing the switch for 3 seconds.
• Backup
Press the switch for 3 seconds, the UPS will be turned off after a long beep.
16
Page 17

Owner’s manual
TROUBLE SHOOTING
The trouble shooting chart covers most of the difculties that you may encounter under normal
working conditions. lf the UPS fails to operate properly, please review the following steps before
calling the service center.
1. ls the UPS plugged into a correct working outlet?
2. ls the line voltage within the rating specied?
3. ls the fuse or breaker/circuit protector on back panel open?
Please submit the following information when you call for service.
1. Model No. & Serial No.
2. Date of problem.
3. Full description of problem.
TROUBLE SHOOTING CHART
SYMPTOMS POSSIBLE CAUSES ACTIONS TO TAKE
UPS can not be turned ON UPS is not connecting to AC
The red LED continuous
bright with a beep every 8
seconds
The red LED continuous
bright with continuous beeping
Back-up time less than speci-
ed
and overload
The input fuse is burn or
breaker is off
AC input voltage is to low Please check the AC input
The UPS is failure Please send to the agency to
UPS suddenly turns to battery
mode in spite of utility line
present
Back-up time less than 1
minute
Overload Please reduce the load
Battery is not fully charged Recharge the battery for at
Charging unit fault Please send to the agency to
Please connect to AC and
reduce the load
Replace the fuse or reset the
breaker, remove some load
and check if the load is shortcircuit or faulty
voltage
repair
Save the data promptly and
shut down the operating
system
Close the system and recharge again
least 12 hours and retest the
backup time
repair
EN
17
Page 18

Owner’s manual
EN
18
Page 19

Instrukcja obsługi
Drogi kliencie INTEX,
Gratulujemy, stałeś się dumnym właścicielem produktu INTEX. Dołączyłeś do
milionów zadowolonych klientów INTEX na całym świecie.
Intex Technologies jest jednym z najszybciej rozwijających się producentów
sprzętu komputerowego i elektronicznego. Dobrze znana marka INTEX nadąża z potrzebami technologicznymi milionów konsumentów. Produkty są wprowadzane na rynek od 1996 roku, zgodne z międzynarodowymi normami.
Marka INTEX obejmuje szeroką gamę urządzeń peryferyjnych i akcesoriów,
takich jak multimedia, głośniki komputerowe, szafy, klawiatury, myszki, UPS-y,
karty rozszerzeń, kamery internetowe, słuchawki, torby na laptopy, itp.
Każdy produkt INTEX przechodzi rygorystyczny proces oceny. Klienci patrzą
na markę jako stosunek wartości do ceny. Artykuły wspierane są przez efektywną obsługę posprzedażową.
Byłoby nam bardzo miło poznać Państwa opinie i sugestie, które mogą służyć
poprawie używanego przez Państwa produktu.
PL
19
Page 20

Instrukcja obsługi
NINIEJSZA INSTRUKCJA ZAWIERA WAŻNE INFORMACJE DOTYCZĄCE BEZPIECZEŃSTWA
ORAZ OBSŁUGI URZĄDZENIA. INSTRUKCJĘ OBSŁUGI NALEŻY ZACHOWAĆ W CELU
PÓŹNIEJSZEGO WYKORZYSTANIA.
INSTALACJA
Przed podłączeniem urządzenia, należy sprawdzić zawartość pudełka. W zestawie powinno znajdować się:
• instrukcja obsługi
• UPS
• przewód zasilający
ROZPAKOWANIE I SPRAWDZENIE
Przed podłączeniem urządzenia, należy sprawdzić, czy nie posiada ono uszkodzeń mechanicznych. Jeżeli urządzenie jest uszkodzone (np. wgniecione), to należy skontaktować się ze sprzedawcą (w żadnym wypadku nie należy podłączać uszkodzonego urządzenia do zasilania). Opakowanie UPS-a należy zachować do ewentualnej wysyłki gwarancyjnej.
UMIEJSCOWIENIE UPS
UPS należy umieścić na stabilnej, suchej powierzchni w dobrze wentylowanym miejscu, z dala od
bezpośrednich źródeł ciepła. Należy zostawić co najmniej 100 mm prześwitu wokół urządzenia w
celu zapewnienia odpowiedniej wentylacji.
PL
UPS jest przeznaczony wyłącznie do użytku wewnętrznego. Nie należy narażać urządzenia na:
• bezpośrednie padanie promieni słonecznych
• nadmierne ciepło
• nadmierną wilgotność lub zamoczenie
• kurz
20
Page 21

Instrukcja obsługi
PODŁĄCZENIE URZĄDZENIA
Przewód zasilający należy podłączyć do uziemionego 3-przewodowego gniazda. Urządzenie należy podłączyć bezpośrednio do gniazda, nie należy używać do tego celu przedłużaczy, rozgałę-
ziaczy itp.
PODŁĄCZENIE URZĄDZEŃ DO UPS-A
Urządzenia, które mają być chronione przed utratą zasilania, należy podłączyć do wyjść zasilania
znajdujących się z tyłu UPS-a.
* Do gniazd zasilających nie należy podłączać drukarek oraz urządzeń nie będących sprzętem
komputerowym.
* Do gniazd zasilających nie należy podłączać przedłużaczy, rozgałęziaczy itp.
PL
21
Page 22

Instrukcja obsługi
Po podłączeniu urządzeń, należy włączyć UPS naciskając przycisk Power na panelu przednim.
UPS jest już gotowy do pracy.
*Bezpieczeństwo*
Produkt zawiera napięcie, które jest potencjalnie niebezpieczne dla użytkownika. Wszelkie naprawy urządzenia powinny być wykonywane przez wykwalikowany personel.
Nie należy zdejmować obudowy UPS-a, wewnątrz nie znajdują się żadne elementy, które mogą
być regulowane przez użytkownika. Produkt posiada własne wewnętrzne źródło energii
(akumulator). Wyjścia zasilające mogą być pod napięciem nawet po odłączeniu przewodu zasilającego.
*Uwaga*
Spalony bezpiecznik zawsze należy wymienić na bezpiecznik tego samego typu. Produkt przeznaczony jest wyłącznie do użytku wewnętrznego.
KONSERWACJA / ŁADOWANIE BATERII
PRZY PIERWSZYM WŁĄCZENIU URZĄDZENIA BATERIA WYMAGA NAŁADOWANIA. JEŻELI
URZĄDZENIE NIE JEST UŻYWANE PRZEZ DŁUŻSZY OKRES CZASU, TO BATERIA BĘDZIE
PL
SIĘ POWOLI ROZŁADOWYWAĆ. ABY UNIKNĄĆ ZMNIEJSZENIA ŻYWOTNOŚCI BATERII,
NALEŻY TRZYMAĆ URZĄDZENIE W DOBRZE WENTYLOWANYM MIEJSCU, GDZIE NIE BĘDZIE NARAŻONE NA PRZEGRZANIE.
Bateria jest ładowana jeżeli urządzenie jest włączone i podłączone do źródła zasilania. Zazwyczaj
wymagane jest około 12 godzin do pełnego naładowania baterii.
22
Page 23

WSKAŹNIKI I PRZYCISKI
PRZYCISK POWER
Przycisk służący do włączania / wyłączania UPS-a. Znajduje się na panelu przednim urządzenia.
Instrukcja obsługi
12 GODZIN
NORMAL
BACKUP
BACKUP
NORMAL
BACKUP
AC NORMAL (ciągłe zielone światło)
Normalna praca UPS’a, podłączone urządzenia są zasilane.
BACKUP (ciągłe czerwone światło)
Sygnał dźwiękowy co 8 sekund. Podłączone urządzenia są zasilane z baterii
UPS-a. Czas pracy na baterii jest uzależniony od podłączonych urządzeń i dla
przeciętnego komputera PC wynosi 10 ~ 15 minut.
NISKI STAN NAŁADOWANIA BATERII (ciągłe czerwone światło)
Jeżeli bateria zacznie się wyczerpywać to sygnał dźwiękowy będzie coraz częstszy. Należy natychmiast zapisać dane, zamknąć wszystkie aplikacje i wyłączyć
system operacyjny.
PL
PRZEŁADOWANIE
Ciągły alarm dźwiękowy. Należy odłączyć nadmierne obciążenie.
23
Page 24

Instrukcja obsługi
SPECYFIKACJA
Pojemność 600VA
Napięcie wejściowe 145V AC ~ 290V AC
Napięcie wyjściowe 195V AC ~ 255V AC
Kształt napięcia wyjściowego Quasi sinusoida
Częstotliwość wyjściowa 50Hz
Bateria 12V / 7.2Ah
Czas pracy na baterii 10-15 minut
Głośność < 45 dB
Temperatura pracy 0~45
Wilgotność 10~90%
Wymiary 310 x 92 x 140 mm
Waga 4.37 kg
0
C
TEST UPS-a
Aby przetestować działanie UPS-a na zasilaniu bateryjnym, należy odłączyć zasilanie i obserwować diody sygnalizacyjne. Ponadto podłączony do UPS-a komputer powinien nadal funkcjonować
normalnie.
1. Automatyczny test przy włączaniu UPS-a.
Podczas włączenia wykonywany jest automatyczny test UPS-a. Diody sygnalizacyjne zaświecą
się dwukrotnie.
2. Wyciszenie
Aby wyłączyć lub włączyć alarm dźwiękowy podczas pracy na baterii, należy nacisnąć przycisk
Power na panelu przednim. Alarmu nie da się wyłączyć w przypadku niskiego stanu naładowania
baterii oraz przy przeciążeniu UPS-a.
3. Ochrona przed przeciążeniem
W przypadku dłuższego przeciążenia UPS-a zasilanie na wyjściu zostanie odcięte. W przypadku
zasygnalizowania przez UPS przeciążenia, należy natychmiast odłączyć nadmierne urządzenie.
PL
4. Ochrona przed całkowitym rozładowaniem baterii
W przypadku, gdy stan naładowania baterii jest krytycznie niski, urządzenie odłączy zasilanie na
wyjściu, chroniąc w ten sposób baterię przed całkowitym rozładowaniem.
5. Wyłączanie
UPS zostanie wyłączony po naciśnięciu i przytrzymaniu przycisku Power przez 3 sekundy.
24
Page 25

Instrukcja obsługi
ROZWIĄZYWANIE PROBLEMÓW
W poniższej tabeli przedstawione zostały najczęstsze problemy, jakie mogą powstać przy użytkowaniu UPS-a. Przed kontaktem z serwisem, należy sprawdzić:
1. Czy UPS jest prawidłowo podłączony do gniazda zasilającego.
2. Czy napięcie w gnieździe zasilającym odpowiada specykacji UPS-a.
3. Czy bezpiecznik nie jest spalony.
Przy kontakcie z serwisem wymagane będzie podanie:
1. Modelu i numeru seryjnego urządzenia.
2. Daty wystąpienia problemu.
3. Pełnego opisu problemu.
SYMPTOM PRZYCZYNA ROZWIĄZANIE
Nie można włączyć UPS-a UPS nie jest podłączony do
Sygnał dźwiękowy co 8 sekund oraz zaświecona czer-
wona dioda sygnalizacyjna
Ciągły sygnał dźwiękowy oraz
zaświecona czerwona dioda
sygnalizacyjna
Krótki czas pracy na baterii Przeciążenie Należy odłączyć nadmierne
źródła zasilania lub jest przeciążony
Spalony bezpiecznik Należy wymienić bezpiecznik
Niewłaściwe napięcie w
gnieździe zasilającym AC
UPS nie działa Należy skontaktować się z
Brak zasilania z sieci - UPS
pracuje na zasilaniu awaryjnym (baterii)
Pozostały czas pracy na baterii poniżej 1 minuty
Bateria nie jest w pełni nała-
dowana
Problem z ładowaniem baterii Należy skontaktować się z
Należy podłączyć UPS do
źródła zasilania lub odłączyć
nadmierne obciążenie
na nowy
Należy sprawdzić napięcie w
gnieździe zasilającym
serwisem urządzenia
Należy zapisać dane i wyłączyć komputer.
Należy natychmiast zapisać
dane i wyłączyć komputer.
urządzenie
Należy podłączyć UPS do ła-
dowania na 12 godzin i ponownie sprawdzić czas podtrzymania
serwisem urządzenia
PL
25
Page 26

Instrukcja obsługi
PL
26
Page 27

Manual de utilizare
Draga client INTEX,
Felicitari pentru faptul ca ati devenit fericitul posesor al acestui produs
INTEX.
V-ati alaturat astfel milioanelor de clienti INTEX multumiti de pe cuprinsul
globului.
Intex Technologies este una dintre companiile cu o ascendenta rapida
in domeniul IT Hardware, telefoane mobile si aparatura electronica. Cu o
marca cu traditie in domeniul produselor electronice, INTEX a tinut pasul cu
nevoile tehnologice a milioane de consumatori si i-a servit cu mai mult de 350
de produse/solutii de inalta calitate, moderne si totusi simple. Produsele se
gasesc pe piata inca din anul 1996 si sunt conform standardelor globale.
Marca INTEX acopera o gama larga de periferice pentru calculatoare
si accesorii, cu care au inceput activitatea in 1996, cum ar difuzoare pentru calculator, UPS pentru calculator, incinte (carcase calculator), tastaturi,
mouse, carduri add-on, camere web, casti, player HDMI, genti laptop & accesorii, surse de alimentare, baterii UPS, modem 3G, etc. Ca parte a strat-
egiei de diversicare, Intex ofera de asemenea o gama interesanta de telefoane mobile, articole electronice de larg consum, cum ar LCD & TV CRT,
DVD playere, etc si monitoare TFT-LCD/LED & calculatoare. (*)
INTEX are o inclinatie puternica spre design-ul produsului si dezvoltare si lucreaza in stransa colaborare cu unii dintre cei mai importanti
producatori de IC din lume, prin intermediul Centrului de Design si Dezvoltare.
Fiecare produs INTEX trece printr-un proces riguros de evaluare de proba si
de aprobare inainte de lansarea comerciala. Clientii aleg produsele in functie
de cel mai bun raport pret/calitate impreuna cu servicii eciente post-vanzare.
Ar placerea noastra sa primim sugestiile dumneavoastra pentru im-
bunatatirile care s-ar putea aduce produsului (produselor) utilizate. Asteptam
cu nerabdare sugestiile dumneavoastra.
(*) anumite produse nu sunt disponibile pe toate pietele.
RO
27
Page 28

Manual de utilizare
ACEST MANUAL CONTINE INSTRUCTIUNI DE SIGURANTA IMPORTANTE.
PASTRATI MANUALUL LA INDEMANA PENTRU REFERINTE ULTERIOARE.
INSTALARE SI FUNCTIONARE
Inainte de efectuarea instalarii, va rugam sa cititi urmatoarele instructiuni:
Vericati prezenta urmatoarele produse in interiorul cutiei
• Manual de utilizare
• UPS
• Cablu de alimentare
DESPACHETAREA SI VERIFICAREA PRODUSELOR
Vericati cutia sa nu prezinte urme de deteriorare. In caz contrar, informati de indata furnizorul.
Depozitati cutia intr-un loc sigur in cazul in care va nevoie sa transportati ulterior UPS-ul.
POZITIONAREA DISPOZITIVULUI UPS
Asezati UPS-ul pe o suprafata plana, rezistenta si uscata, intr-o zona ventilata corespunzator, departe de sursele de caldura. Pastrati cel putin 100mm distanta in jurul UPS-ului pentru a-i asigura
acestuia o ventilatie adecvata.
UPS-ul a fost conceput doar pentru utilizare in interior. Cu toate ca UPS-ul este masiv, componen-
RO
tele sale interne nu sunt izolate. Va rugam sa respectati urmatoarele:
• Evitati expunerea produsului in lumina directa a soarelui
• Evitati expunerea produsului la caldura excesiva
• Evitati expunerea produsului in medii cu umiditate excesiva
• Evitati expunerea produsului in medii cu praf in exces.
28
Page 29

Manual de utilizare
CONECTAREA UPS-ului LA ALIMENTARE
Conectati cablul de alimentare la o priza de curent cu pamantare. Nu alimentati UPS-ul cu prin
intermediul unui prelungitor.
CONECTAREA ECHIPAMENTULUI LA UPS
Conectati sarcina care trebuie protejata (calculator,monitor, etc) la prizele iesirii AC ce se aa pe
partea din spate a UPS-ului.
* Nu conectati o imprimanta laser sau sau alte dispozitive periferice la prizele UPS-ului.
* Nu conectati prelungitoare la prizele UPS-ului.
RO
29
Page 30

Manual de utilizare
Porniti UPS-ul prin apasarea butonului de Pornire/Oprire, care se aa pe panoul frontal.
*Nota de siguranta*
Aparatul prezinta tensiuni care sunt periculoase. Toate reparatiile trebuie efectuate doar de catre
personalul calicat.
Nu incercati sa deschideti capacul si sa efectuati intretinerea aparatului, in interiorul aparatului nu
exista componente utile. Consultati doar personalul calicat pentru efectuarea intretinerii aparatului. Produsul are propria sursa de energie interna (baterie). Prizele iesirilor aparatului pot sub
tensiune chiar si atunci cand acesta nu este conectat la o sursa de alimentare AC!
*Avertisment*
In cazul arderii sigurantei, pentru a evita aparitia riscului unui incendiu, schimbati siguranta cu o
alta identica. Produsul a fost conceput doar pentru utilizare in interior. Evitati caldura excesiva,
praful, umezeala sau substantele lichide.
INTRETINEREA BATERIEI/INCARCAREA BATERIEI
DUPA EXPEDIEREA DIN FABRICA, BATERIA NECESITA REINCARCARE. IN CAZUL IN
CARE NU ESTE UTILIZATA TIMP INDELUNGAT, BATERIA SE VA DESCARCA, ACEST LUCRU PUTAND CAUZA O DURATA SCURTA DE FUNCTIONARE SAU CHIAR DETERIORAREA
ACESTEIA. IN TIMPUL PERIOADEI DE GARANTIE, TREBUIE SA EVITATI TEMPERATURILE
EXCESIVE IN JURUL UPS-ULUI, ACEST LUCRU PUTAND DE ASEMENEA CAUZA SCURTAREA DURATEI DE VIATA A BATERIEI. PENTRU A OBTINE O DURATA MAXIMA DE FUNC-
RO
TIONARE A BATERIEI TREBUIE SA URMATI INSTRUCTIUNILE DE MAI SUS.
Bateria UPS-ului se incarca ori de cate ori acesta este conectat la retea si este pornit. In mod normal este nevoie de mai mult de 12 ore pentru o incarcare completa. Asteptati pana cand bateria
se incarca complet.
30
Page 31

INDICATORI UPS SI COMENZI
COMUTATOR PORNIRE/OPRIRE
Apasati butonul pentru a porni UPS-ul. Pentru a opri aparatul, apasati comutatorul din nou. Acest comutator este situat pe panoul frontal al UPS-ului.
Manual de utilizare
12 HOURS
NORMAL
BACKUP
BACKUP
NORMAL
BACKUP
INDICATOR AC NORMAL (Verde intermitent)
UPS-ul alimenteaza cu energie prizele.
INDICATOR BACKUP (led rosu intermitent)
Avertizorul sonor emite sunet la ecare 8 secunde. Aceasta inseamna alimentarea cu energie electrica s-a intrerupt si UPS-ul functioneaza pe baterie. Durata
de functionare cu alimentare prin UPS pentru un calculator este de aproximativ
10 - 15 de minute.
INDICATOR BATERIE DESCARCATA (led rosu intermitent)
Avertizorul sonor emite sunet rapid ori de cate ori bateria se apropie de sfarsitul duratei de functionare. Salvati imediat datele, parasiti aplicatiile si inchideti
calculatorul.
INDICATOR SUPRASARCINA
Avertizorul sonor emite sunet continuu. UPS-ul se protejeaza in acest moment
iesirea. Reduceti consumul de la iesire (scoateti o parte din dispozitivele conectate).
RO
31
Page 32

Manual de utilizare
SPECIFICATII
Capacitate 600VA
Tensiune intrare 145VAC~290VAC
Tensiune iesire 195VAC~255VAC
Iesire unda sinus sintetizat (semnal dreptunghiular)
Frecventa de iesire 50Hz
Capacitate baterie 12V/7.2Ah
Durata back-up 10-15 minute
Nivel zgomot < 45dB
Temperatura de functionare 0 ... 45 °C
Umiditate 10 - 90%, fara condens
Dimensiuni 310x92x140(mm)
Greutate 4.37 kg
TESTARE UPS
Pentru a testa UPS-ul pe modul back-up, opriti alimentarea de la retea si ti atenti la luminile
indicatorului modului back-up. Calculatorul dumneavoastra trebuie sa functioneze in mod normal
in continuare.
1. Auto-testare in timp ce porniti aparatul
Inainte de a porni UPS-ul, led-ul rosu/galben/verde se va aprinde de doua ori prin rotatie, aparatul
va pregatit de functionare.
2. Functia Silentios
Pe modul baterie, apasati scurt butonul pentru activarea sau dezactivarea avertizorului sonor.
Cand UPS-ul are bateria descarcata sau este supraincarcat, avertizorul va emite sunet continuu.
3. Protectie suprasarcina
Cand UPS-ul este supraincarcat in timpul functionarii, iesirea va blocata automat, se va reveni
apoi la modul de functionare.
4. Oprire baterie descarcata
Cand baterie este pe cale sa se descarce, UPS-ul se va opri automat pentru a proteja bateria.
5. Oprire
RO
1) AC Normal
Apasand comutatorul timp de 3 secunde, UPS-ul se va opri si va intra in modul AC standby.
2) Back-up
Apasati comutatorul timp de 3 secunde, UPS se va opri dupa un sunet lung.
32
Page 33

Manual de utilizare
DEPANARE
Tabelul de mai jos acopera majoritatea situatiilor pe care le-ati putea intalni in conditii normale de
functionare. In cazul in care UPS-ul nu functioneaza corespunzator,va rugam sa observati urmatorii pasii inainte de a apela centrul service.
1. UPS-ul este conectat la o priza corespunzatoare?
2. Tensiunea de alimentare de la retea se aa in parametrii specicati?
3. Siguranta sau intrerupatorul/circuitul de protectie de pe spatele panoului sunt OK?
Va rugam sa specicati urmatoarele informatii cand apelati centrul service.
1. Nr. modelului & numarul de serie
2. Data cand a aparut problema
3. Descrierea completa a problemei aparute.
TABEL DEPANARE
INDICII CAUZE POSIBILE SOLUTII
UPS-ul nu poate pornit UPS-ul nu este conectat la
LED-ul rosu lumineaza con-
tinuu si emite sunet la ecare
8 secunde
LED-ul rosu lumineaza continuu si emite sunet continuu
Durata backup mai mica
decat cea specicata
sursa AC sau este supraincarcat
Siguranta de intrare s-a ars
sau intrerupatorul este oprit
Tensiunea de intrare AC este
prea mica
UPS-ul este defect Va rugam sa-l trimiteti pentru
UPS-ul revine brusc la modul
bateriei in ciuda prezentei
liniei de tensiune
Durata backup mai mica de
1 minut
Supraincarcat Va rugam sa reduceti sarcina
Bateria nu este complet
incarcata
Incarcare defectuoasa baterie Va rugam sa trimiteti aparatul
Conectati la sursa AC sau
reduceti sarcina
Inlocuiti siguranta sau resetati
intrerupatorul, indepartati sar-
cina si vericati daca aceasta
este in scurt sau este defecta
Vericati tensiunea de intrare
AC
reparare
Salvati imediat datele si opriti
calculatorul
In chideti sistemul si incarcati
bateria din nou
Reincarcati bateria timp de cel
putin 12 ore si testati din nou
durata de back-up
pentru a reparat
RO
33
Page 34

Manual de utilizare
RO
34
Page 35

Page 36

 Loading...