

Page 1

IN GC5050
GSM+GSM/CDMA Mobile Phone
User Guide
Page 2

-2-
Dear INTEX customer,
Congratulations on becoming a proud owner of INTEX product. You have now joined
the fraternity of millions of satisfied INTEX customers spread across the globe.
Intex Technologies is one of the fastest growing IT Hardware, Mobile Phones and
Electronics Company. A well established brand, INTEX has kept pace with the
technology needs of millions of IT hardware & electronics consumers and has been
serving them with more than 300 user friendly, high quality, state-of-the art yet simple
products/solutions. The products have been in the market since 1996 and conform to
global standards.
Brand INTEX covers a wide range of computer peripherals and accessories such as
Computer Multimedia speakers, Cabinets, Keyboards, Mouse, UPS, Add-on cards,
Webcams, Headphones, Laptop bags, etc. As a part of its diversification strategy, Intex
also offers an interesting range of PCs, TFT-LCD Monitors, Consumer Electronics (DVD
Players), Home UPS & Mobile Phones.
Every INTEX product goes through a rigorous process of sample evaluation and
approval before commercial launch. Customers look upon the brand as a
value-for-money & feature-rich offering, supported by efficient after sales service.
We look forward to your patronage.
It would be our pleasure to receive feedback and suggestions you may have for
improvements in the product(s) you are using.
Intex Technologies (I) Ltd
info@intextechnologies.com
Page 3

-3-
www.intextechnologies.com
Helpline No. 1800-103- 8822 (India)
Intex Way Gulf LLC
service@intexuae.com
www.intexuae.com
Toll Free No. 800-468- 39823 (Dubai)
Tel: 00971 04 3931991
SAFETY TIPS
Use of wireless hands-free system (headphone, headset) with a low power
Bluetooth emitter.
Make sure the cell phone has a low SAR. The highest SAR value for this
mobile phone is < 1.6 W/Kg, in accordance with the requirements of the
ICNIRP, which recommended the limit for exposure to radio waves is 1.6
watts/kilogram (W/kg) averaged over 1 gram of tissue. For more
information, please visit (website) to query
Keep your calls short or send a text message (SMS) (instead. This advice
applies especially to children, adolescents and pregnant women.
Use cell phone when the signal quality is good.
People having active medical implants should preferably keep the cell
phone at least 15 cm away from the implant.
Page 4

-4-
Page 5

-5-
Contents
1 Fundamentals ..................................................................................................................7
1.1Introduction ......................................................................................................................7
1.2Security ............................................................................................................................7
1.3Safety ...............................................................................................................................8
2 About your phone .......................................................................................................... 11
2.1Appearance ................................................................................................................... 11
2.2Key definition .................................................................................................................12
3 Getting Started ...............................................................................................................13
3.1Installing the SIM Cards and UIM Card and the Battery ..............................................13
3.2 Installing the T-Flash Card ...........................................................................................15
3.3Recharging the Battery..................................................................................................16
3.4Powering On/Off the Mobile Phone ..............................................................................18
3.5Connecting the Network ................................................................................................18
3.6Dialing Calls ...................................................................................................................19
3.7Using the Earpiece ........................................................................................................19
4 Input Method ..................................................................................................................20
4.1Icons for Input Methods .................................................................................................20
4.2To Shift Entry Methods ..................................................................................................20
4.3Numeric Input ................................................................................................................20
4.4English input and numeric input: ...................................................................................20
5 Using the Menus ............................................................................................................23
5.1Phonebook ....................................................................................................................23
5.2Messages ......................................................................................................................23
5.3Call history .....................................................................................................................25
Page 6

-6-
5.4Settings ..........................................................................................................................26
5.5Multimedia .....................................................................................................................33
5.6File Manager ..................................................................................................................35
5.7Organizer .......................................................................................................................35
5.8Intex Zone ......................................................................................................................37
5.9Services .........................................................................................................................37
6 Appendix.........................................................................................................................39
6.1: Appendix 1Troubleshooting .........................................................................................39
6.2Appendix2: Abbreviation and Explanation ....................................................................41
6.3Appendix 3: Environment declaration ...........................................................................42
24. Technical Information ................................................................................................44
Model: GC5050 ..................................................................................................................44
Page 7

-7-
1 Fundamentals
1.1Introduction
Please read this manual carefully to guarantee the mobile phone always works
optimally.
Perfectly combining humanized design and fine art, this mobile phone provides a
streamline outlook and feels comfortable. It provides the following features:
Color screen
Musical ring tones
Powerful file management (supporting T-Flash cards)
Fashionable camera and audio recording functions
MP3 player
MP4 player
SIM +UIM two cards standby at the same time
Electric torch
Our company may change this mobile phone without prior written notice and
reserves the final right to interpret the performance of this mobile phone.
As the software of this mobile phone is not provided by the service provider, the
contents of this manual may differ from the actual mobile phone. In the case conflicts
arise, the actual mobile phone shall take precedence.
1.2Security
If your mobile phone has ever been stolen or missing, immediately notify the loss
to the telecommunication operator to disable your SIM cards or UIM cards (network
support is required). This protects you from further losses arising from illegal use of your
Page 8

-8-
phone.
To protect your mobile phone from illegal use, take the following security
measures:
− Set a PIN for each SIM card and Set a PIN for each UIM card as the phone
support GSM and CDMA at the same time;
− Set a phone lock code.
1.3Safety
FOR YOUR SAFETY
ROAD SAFETY COMES FIRST
Do not use a hand-held phone while driving. Use hands-free fittings when calls are
unavoidable while driving. In some countries, dialing or receiving calls while driving is
illegal!
SWITCH OFF IN AIRCRAFT
Wireless devices can cause interference in aircraft. Using a mobile phone in flight
is illegal and risky. In order to protect the airplane’s communication system from
interference, it is forbidden to use mobile phones in flight.
SWITCH OFF BEFORE ENTERING RISKY AREAS
Strictly observe the relevant laws, codes, and regulations on the use of mobile phones in
risky areas. Turn off your mobile phone before entering a place susceptible to explosion,
such as an oil station, oil tank, chemical plant or a place where a blasting process is
under way.
OBSERVE ALL SPECIAL REGULATIONS
Follow any special regulations in force in any area such as hospitals and always switch
off your phone whenever it is forbidden to use it or, when it may cause interference or
danger. Properly use your mobile phone near medical apparatuses, such as
Page 9

-9-
pacemakers, hearing aids and some other electronic medical devices, as it may cause
interference to such apparatuses.
INTERFERENCE
The conversation quality of any mobile phone may be affected by radio interference. An
antenna is built inside the mobile phone and located below the microphone. Do not
touch the antenna area during a conversation, lest that the conversation quality
deteriorate.
QUALIFIED SERVICE
Only qualified personnel may install or repair phone equipment. Installing or repairing
the mobile phone on your own may bring great danger and violates the warranty rules.
ACCESSORIES AND BATTERIES
Use only approved accessories and batteries.
USE SENSIBLY
Use only in a normal and proper manner.
EMERGENCY CALLS
Ensure the phone is switched on and in service, enter the emergency number, e.g. 112,
then press the Dial key. Give your location and state your situation briefly. Do not end
the call until told to do so.
Note: Just like all other mobile phones, this mobile phone does not necessarily
support all the features described in this manual due to network or radio transmission
problems. Some networks even do not support the emergency call service. Therefore,
do not rely solely on the mobile phone for critical communications such as first aid.
Please consult the local network operator.
Precautions
Page 10

-10-
This mobile phone is well designed with fine art. Please exercise special care when
using it. The following suggestions will help your mobile phone survive the warranty
period and extend its service life:
Keep the mobile phone and all its fittings beyond children's reach.
Keep the mobile phone dry. Keep away from rain, moisture, liquid or other
substances that may corrode electronic circuits.
Do not use or store the mobile phone in dusty places, lest that active parts of the
mobile phone be damaged.
Do not store the mobile phone in a high-temperature place. High temperature will
shorten the life of electronic circuits and damage the battery and some plastic parts.
Do not store the mobile phone in a chilly place. Otherwise, moistures will be formed
inside the mobile phone to damage electronic circuits when the mobile phone is moved
to a constant temperature place.
Do not throw, knock or shock the mobile phone, as that will destroy the internal
circuits and high-precision components of the mobile phone.
Page 11
-11-
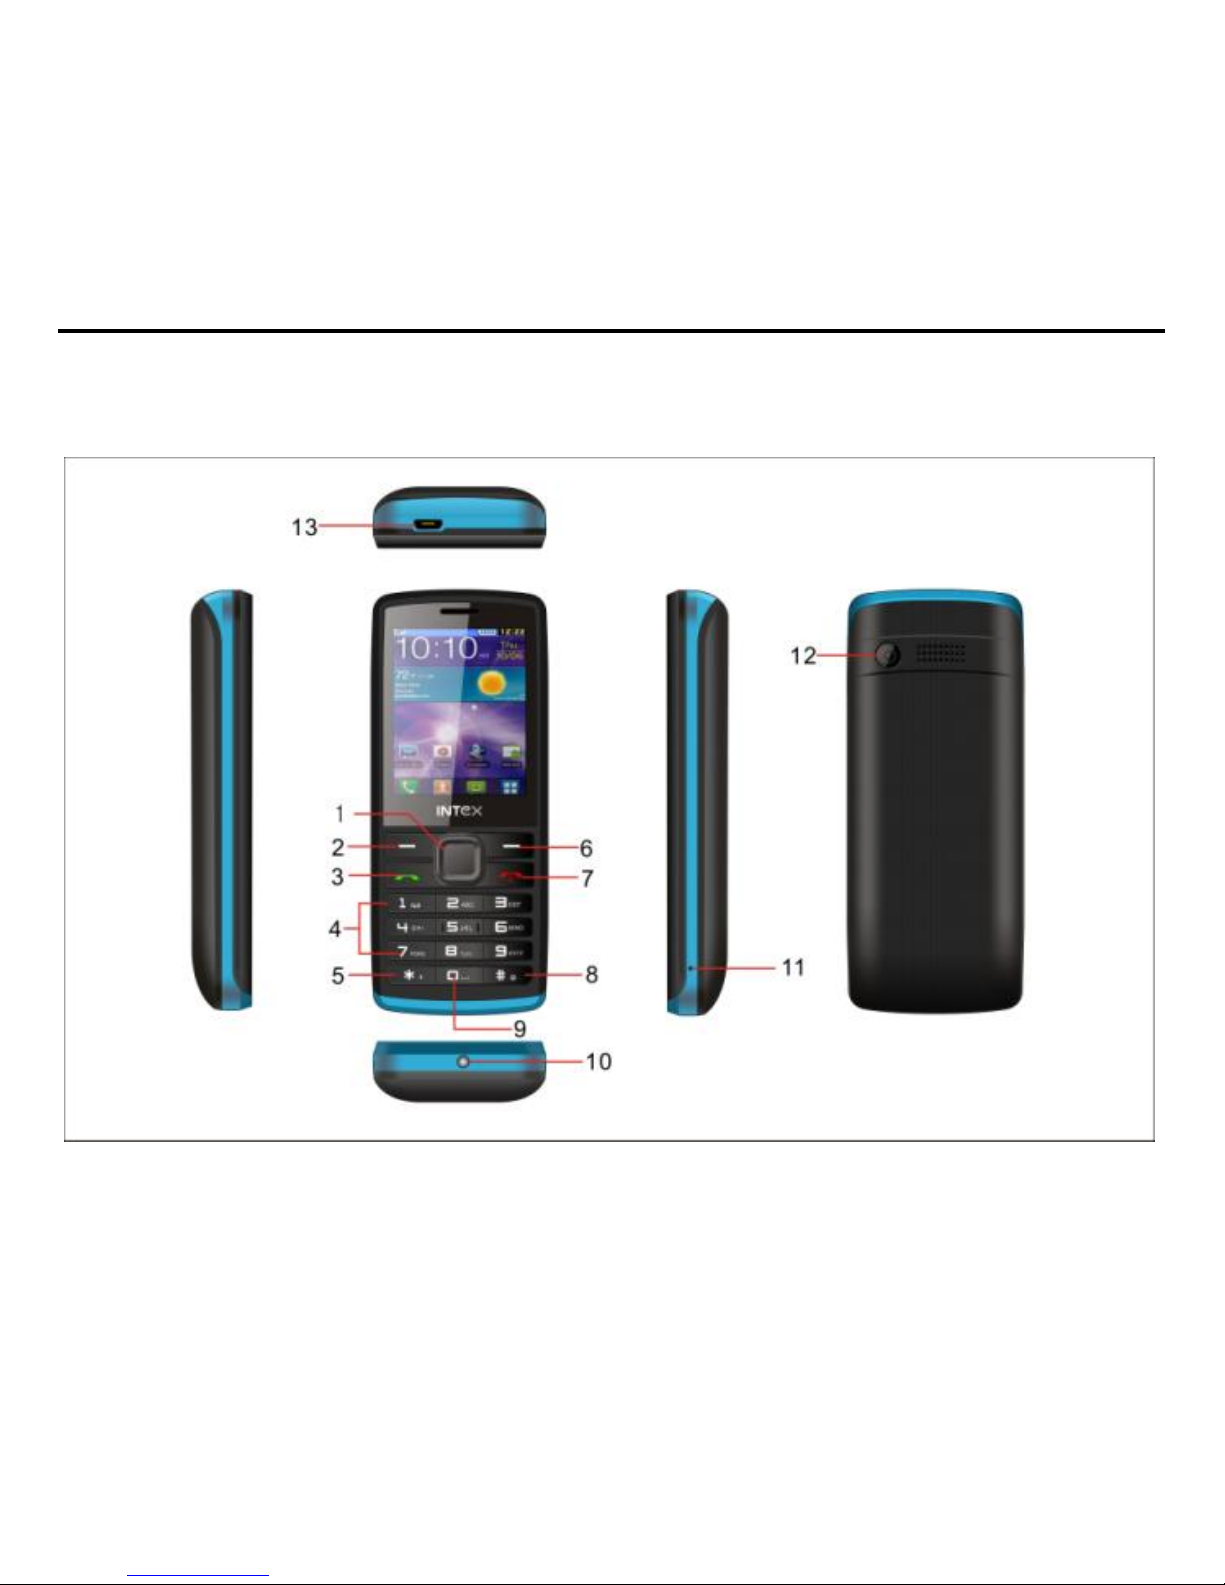
2 About your phone
2.1Appearance
Page 12

-12-
2.2Key definition
The mobile phone provides the following keys:
1.OK key
In standby interface, press it can enter the main menu. In other interfaces, press
OK key to confirm your selection.
2. Left Soft Key
3. Dial Key
Press it to originate a call on SIM card or UIM card by entering the called number
or selecting a contact from the phonebook, or press it to receive an incoming call; or
press it in standby state to show the latest call records; or press it twice in standby state
to show the calling or called number of the last call.
4. Number Keys
5. * Key
6. Right Soft Key
7. End key
Press it to end a call being dialed or end an ongoing call; or press it to exit the
menu and return to the standby state; or hold it for two or three seconds to power
on or off the mobile phone.
8. # Key
9. Space Key
10. Torch
11. Microphone
12. Camera
Page 13

-13-
3 Getting Started
3.1Installing the SIM Cards and UIM Card and the Battery
The mobile phone supports GSM and CDMA at the same time. A SIM card or an
UIM card carries useful information, including your mobile phone number, Personal
Identification Number (PIN), PIN2, PIN Unlocking Key (PUK), PIN2 Unlocking Key
(PUK2), International Mobile Subscriber Identity (IMSI), network information, contact
data, and short message data
Note:
After powering on your mobile phone, wait for a few seconds before removing or
inserting an SIM card.
Exercise caution when operating an SIM card, as friction or bending will damage
the SIM card.
Properly keep the mobile phone and its fittings such as the SIM cards beyond
children's reach.
Installation
Hold the End key for a while to power off the mobile phone
Pull the rear battery cover to remove.
Take out the battery.
Gently insert the SIM/UIM card into the SIM/UIM card slot with its metal surface
facing the phone and its dent facing down, till the SIM/UIM card cannot be further
pushed in.
Aim the positive pole and negative pole of the battery at the battery connector in the
mobile phone, and press down the battery to install the battery into the battery tank.
Page 14

-14-
Using Codes
The mobile phone and the SIM/UIM cards support the setting of multiple codes. This
helps prevent the phone and the SIM/UIM cards from being misused. When you are
prompted to input any of the codes described below, just input the correct code and then
press the OK key. If you input a wrong code, press the Right soft key to clear the wrong
inputs and then input the correct code.
Phone lock code
The phone lock code may be set to prevent your mobile phone from being misused.
In general, this code is provided along with the mobile phone by the manufacturer. The
initial phone lock code is set to 1234 by the manufacturer. If the phone lock code is set,
you need to input the phone lock code when powering on the mobile phone.
PIN
The PIN comprises four to eight digits to prevent your SIM card from being used by
authorized people. In general, the PIN is provided along with an SIM card by the
network operator. If PIN check is enabled, you need to input the PIN each time you
power on your mobile phone. The SIM card will be locked if the PINs you input at three
consecutive times are wrong. To unlock the SIM card, do as follows:
-Input the correct PUK according to the screen prompt to unlock the SIM card.
-Then input the new PIN and press the OK key.
-Input the new PIN again and then press the OK key.
-If the input PUK is correct, the SIM card will be unlocked and the PIN will be reset.
Note: The SIM card will be locked if the PINs you input at three consecutive times
are wrong. To unlock the SIM card, you need to input the PUK. In general, the PUK can
be obtained from the network operator.
PUK
Page 15

-15-
The PUK comprises eight digits to unlock the PIN. It is provided along with an SIM
card by the manufacturer. If you do not yet know the PUK, contact the network operator.
If the PUKs you input at ten consecutive times are all wrong, the SIM card will be invalid.
Please contact the network operator to replace the SIM card.
PIN2
The PIN2 comprises four to eight digits. Provided along with an SIM card, it sets
functions such as call billing and fixed dialing. Please contact the network operator to
verify whether your SIM card supports these functions. If the PIN2 you input at three
consecutive times is wrong, the PIN2 will be locked. To unlock the PIN2, input the
correct PUK2 as follows:
-Input the correct PUK2 according to the screen prompt to unlock the PIN2.
-Then input the new PIN2 and press the OK key.
-Input the new PIN2 again and then press the OK key.
PUK2
The PUK2 comprises eight digits to unlock the PIN2. It is provided along with an
SIM card by the vendor. If you do not yet know the PUK, contact the network operator. If
the PUK2s you input at ten consecutive times are all wrong, the PIN2 will be invalid and
the corresponding functions cannot be used. Please contact the network operator to
replace the SIM card.
Barring code
A barring code is required for setting the call barring function. You can obtain this
code from the network operator to set the call barring function.
3.2 Installing the T-Flash Card
The T-Flash card is a pluggable mobile storage card inside the mobile phone.
To install the T-Flash card, open its latch, place its indented side downward, insert
Page 16

-16-
the card into the card slot, and then close the latch.
To remove the T-flash card, open its latch and slightly take the card out. And then
close the latch.
Note:
The T-Flash card is a miniature object. Keep it beyond children's reach, lest
children swallow it!
3.3Recharging the Battery
The lithium battery delivered with the mobile phone can be put into use
immediately after being unpacked.
Battery level indication:
Your mobile phone can monitor and display the battery state.
Normally the remaining energy of the battery is indicated by the battery level icon at
the upper right corner of the display screen.
When the battery energy is insufficient, the mobile phone prompts "Battery low". If
you have set an alert tone, an alert tone will be given off when the battery level is too
low.
A charging animation appears when the battery is being charged. When the charging
is complete, the animation disappears.
Use of the travel charger:
Install the battery into the mobile phone before charging the battery.
Connect the adapter of the travel charger with the charging slot in the mobile phone.
Ensure that the adapter is fully inserted.
Insert the plug of the travel charger to an appropriate power outlet.
During the charging, the battery level grids in the battery icon keep flickering till the
battery is fully charged.
Page 17

-17-
It is normal of the battery to become hot during the charging period.
The battery icon does no longer flicker when the charging process ends.
Note:
Ensure that the plug of the charger, the plug of the earpiece, and the plug of the
USB cable are inserted in the right direction. Inserting them in a wrong direction may
cause charging failure or other problems.
Before the charging, ensure that the standard voltage and frequency of the local
mains supply match the rated voltage and power of the travel charger.
Using the Battery
The performance of a battery is subject to multiple factors: radio network
configuration, signal strength, ambient temperature, chosen functions or settings, phone
fittings, and the voice, data or other application mode you choose to use.
To guarantee the optimal performance of your battery, please stick to the following rules:
Use only the battery provided by the vendor. Otherwise, damages or even injuries
could be caused during the charging.
Power off the mobile phone before removing the battery.
The charging process lasts a longer time for a new battery or a battery not in use for
long. If the battery voltage is too low to enable the mobile phone to be powered on,
charge the battery for a longer time. In this case, the battery icon does not flicker until a
long time after the battery enters the charge status.
During the charging, ensure the battery is placed in a room temperature environment
or in an environment close to room temperature.
Immediately stop using the battery if the battery produces odor, overheats, cracks,
Page 18

-18-
distorts or has other damage, or if the electrolyte leaks.
The battery wears out with use. A longer charging time is required as the battery is
put into use for a long time. If the total conversation duration decreases but the charging
time increases even though the battery is properly charged, purchase a standard battery
from the OEM or use a battery approved by our company. Using any poor-quality fittings
will cause harm to your mobile phone or even incur danger!
Note: To guarantee your personal safety and protect the environment, do not litter
the battery! Return the old battery to the mobile phone manufacturer or place it in
specified battery reclamation areas. Do not litter any battery with other rubbish.
Warning: Short-circuits of the battery may cause explosion, fire, personal injury or
other severe consequences!
3.4Powering On/Off the Mobile Phone
Hold the End key for a while to power on the mobile phone. A power-on animation
appears on the display screen.
Input the phone lock code and press the OK key if the mobile phone prompts you
to input the phone lock code. The default phone lock code is 1234.
Input the PIN and press the OK key if the mobile phone prompts you to input the
PIN. For a new SIM card, the PIN is provided by the network operator.
Enter the standby interface.
To power off the mobile phone, hold the End key for a while.
3.5Connecting the Network
After the SIM card and the mobile phone are successfully unlocked, the mobile
phone automatically searches for an available network. After finding a network, the
mobile phone enters the standby state. When the mobile phone is registered in the
network, the name of the network operator is displayed on the screen. Now you can dial
Page 19

-19-
or receive the calls.
3.6Dialing Calls
In the standby interface, press number keys to input the area code and the
telephone number, and then press the Dial key to dial a call. To end the call, press the
End key.
Dialing an international call
Hold the * key and input "+". Then input the country code, the area code and the
telephone number. Finally, press the Dial key.
Dialing an extension
Input the main number, press the * key for three or four times, input "p" or "w" and
then the extension number, and finally press the Dial key.
Tuning the volume
During a conversation, you can press the Up and/or Down direction keys to tune
the sound volume.
3.7Using the Earpiece
When you insert the earpiece into the earpiece interface on the mobile phone, the
mobile phone automatically enters the Headset mode and then the earpiece acts as
both the earphone and the microphone. Make sure that the earpiece is inserted in
position.
Page 20

-20-
4 Input Method
This mobile phone provides multiple input methods, including numeric input,
English input in both upper and lower case,and Hindi Language. You can use these
input methods when editing the phonebook, short messages, files and greeting text.
4.1Icons for Input Methods
After you enter an edit window such as a window for editing the phonebook, short
messages or the memorandum, an icon is displayed to indicate the current input
method:
Numeric input:“123”
English input in upper case:“ABC”
English input in lower case:“abc”
English input in lower case:“Abc”
Hindi input:“HI”
4.2To Shift Entry Methods
Press the # key to switch between input methods.
4.3Numeric Input
You can input numbers with the numeric input method. Press a number key to
input the corresponding number.
4.4English input and numeric input:
The keyboards for English input and numeric input are defined in the following
table:
Page 21

-21-
Key
Character or Function
Remarks
Number key 1
. , - ? ! ’@ : # $ /_ 1
Number key 2
ABCabc2
Number key 3
DEFdef3
Number key 4
GHIghi4
Number key 5
JKLjkl5
Number key 6
MNOmno6
Number key 7
PQRSpqrs7
Number key 8
TUVtuv8
Number key 9
WXYZwxyz9
Number key 0
0
* key
Press it to input a symbol
# key
Press it to switch between input methods
Left direction key
Press it to move to the left
Right direction key
Press it to move to the right
Left soft key
Equivalent to OK or Options
Right soft key
Equivalent to Back or Clear
End key
Press it to return to the standby interface
English input:
Each key is used to represent multiple characters. Quickly and continuously press
a key till the character you want appears. Input the next character after the cursor
moves.
Press the # key to switch between input methods
To input a blank, switch to the English input mode (in upper or lower case) and
Page 22

-22-
then press number key 0.
To clear wrong inputs, press the Right soft key.
Press the * key to enter the Select symbol interface, use direction keys to select a
symbol you want.
Page 23

-23-
5 Using the Menus
5.1Phonebook
The mobile phone can store up to 500 telephone numbers. The number of
telephone numbers that an SIM/UIM card can store depends on the storage capacity of
the SIM/UIM card. The telephone numbers stored in the mobile phone and in the
SIM/UIM cards form a phonebook.
After selecting a telephone number in the phonebook, select Options to perform
the following operations:
View: View the content of the telephone number.
Sent text message: sent message to this number.
Sent multimedia message: sent multimedia message to this number.
Call: call the selected number.
Edit: Edit the selected number.
Delete: Delete the selected number from the phonebook.
Copy: Duplicate the selected number from the mobile phone to the SIM card or from
the SIM card to the mobile phone.
Add to Blocklist: Add the selected number to blocklist.
Mark several: mark several phone numbers so you can perform a same operation
on them.
Phonebook settings: Set some parameters of phonebook.
5.2Messages
If the short message memory is full, a blinking SMS icon appears on the top of the
screen. To normally receive short messages, you need to delete some of the existing
Page 24

-24-
short messages.
5.2.1Write message
Access this menu to create a text message or a multimedia message.
5.2.2Inbox
Received messages are listed in this menu.
5.2.3Drafts
From the main menu select “Messages” to create text message. You can type a
message, and you're also able to insert a pre-defined message from “Templates”. While
writing a message, select “Options” to access all the messaging options. You can save
your messages that you send often to “Drafts”.
5.2.4Outbox
The messages which are sent failed are stored in the Outbox.
5.2.5Sent messages
Sent messages are listed in this menu.
5.2.6Delete messages
You can delete messages stored in Inbox, Outbox, Drafts, etc through this function.
5.2.7Broadcast Message
This network service enables you to receive a variety of text messages, such as
broadcast messages about weather forecast or road conditions. At present, few
networks provide this service. Please consult the network operator.
Receive mode: Set it to On to enable or Off to disable cell broadcast service.
Channel settings: Select receiving some types of cell broadcast messages or
edit/delete some channel numbers.
Languages: Select the language in which cell broadcast messages are displayed.
The selected language, however, may not be supported by the network operator.
Page 25

-25-
Read message: View cell broadcast messages. You can press the Up and Down
direction keys to view these messages.
5.2.8Templates
Ten text templates are embedded in the phone. They can be used to create a new
message.
5.2.9Message Settings
This function enables you to set the default features about the SMS, MMS and
service message.
5.3Call history
Choose Call history to enter the call history interface. A call history is displayed,
including missed calls, dialed calls and received calls.
5.3.1 All calls
You can view the latest all calls.
5.3.2 Dialed Calls
You can view the latest dialed calls. Choose dialed calls and then select a dialed
call to delete, save, dial, or edit (or send a short message to it).
5.3.3 Missed Calls
You can view a list of the latest missed calls.
Note: When the mobile phone indicates that some calls are missed, you can select
Read to enter the missed calls list. Navigate to a missed call and then press the Dial
key to dial the number that originated that call.
5.3.4 Received Calls
You can view the latest received calls. Choose received calls and then select a
received call to delete, save, dial, or edit (or send a short message to it).
Page 26

-26-
5.4Settings
5.4.1 Dual SIM Settings
CDMA and GSM1 open: CDMA and GSM1 cards are standby if you set this option.
GSM1 and GSM2 open: Both SIM cards are standby if you set this option.
Only GSM1 open: Only GSM card 1can be identified if you set this option.
Only GSM2 open: Only GSM card 2 can be identified if you set this option.
Flight mode: when this function is engaged, it will suspend many of the device's
signals transmitting functions – thereby disabling the device's capacity to place or
receive calls or text messages– while still permitting use of other functions that do not
require signal transmission (e.g., games, built-in camera, MP3 player.)
5.4.2 Display
Users can access items to set wallpaper, screen saver, animation, backlight effect and
Show date/time etc.
5.4.3 Phone settings
Time and date: Set time, date, time format and date display type.
Schedule power on/off: Set the time when the mobile phone will be automatically
powered on or off.
Language: Select the display language for the mobile phone.
Pre. Input methods: select prefer input method.
Shortcuts: You can set the shortcuts as per your need.
Dedicated key: Customize the shortcut functions of the Up, Down, Left, and Right
direction keys. In the standby interface, you can press a direction key to directly enter
the function menu corresponding to that direction key.
Auto update time: You can select among off, First confirm or On
Page 27

-27-
5.4.4 Call Settings
【SIM1 call settings】
Caller ID: You can select the ID set by the network, hide the ID, or send the ID. By
default, the ID set by the network is chosen.
Note: This function relates to the network. If you select Hide ID, dialing may fail.
Therefore, make sure that calls can be normally dialed before you choose Hide ID.
◆ Call waiting
Activate: After you choose Activate, the mobile phone will contact the network. A
moment later, the network will make a response and send a message to acknowledge
your operation. If the call waiting function is activated, the network will alert you and the
mobile phone screen will display the incoming call number if others are calling you while
you are already in a conversation.
Deactivate: If you choose Deactivate, the network will not alert you when others are
calling you while you are already in a conversation.
Query status: Query the network to obtain the current call waiting status.
Call diverts
this network function enables you to forward incoming calls to another number you have
previously specified.
Divert all voice calls: Divert all incoming calls to the preset number.
Divert if unreachable: Divert an incoming call to the preset number only when the
called party is unreachable.
Divert if no answer: Divert an incoming call to the preset number only when the
called party does not answer the call within the specified time.
Divert if busy: Divert an incoming call to the preset number only when the called
party is busy.
Page 28

-28-
You can further perform the following operations for the above four functions:
- Activate: Input the diverted-to number and then activate the selected call divert
function.
- Deactivate: Deactivate the selected call divert function.
- Query status: Query the network to obtain the current status of the selected call
diverts function. The mobile phone will contact the network. A moment later, the network
will make a response and send the results to the mobile phone.
Divert all data calls: Divert all data calls. This function requires the network
operator's support.
Cancel all divert: Cancel all the set call diverts functions. The mobile phone will
contact the network. A moment later, the network will make a response and send the
operation results to the mobile phone.
Call barring
the call barring function enables you to bar calls as needed. When setting this function,
you need to use a network barring code, which can be obtained from the network
operator. If the code is wrong, an error message will be prompted on the screen. After
selecting a call barring option, continue to select Activate or Deactivate. The mobile
phone will prompt you to input the call barring code and then contact the network. A
moment later, the network will make a response and send the operation results to the
mobile phone.
Outgoing calls
All calls: Bar all outgoing calls. If this option is set, the mobile phone cannot dial any
call.
International calls: Bar all international calls. If this option is set, the mobile phone
cannot dial any international call.
Page 29

-29-
International calls except to home PLMN: Bar all outgoing calls except those
directed to the home PLMN country. If this option is set, the mobile phone can dial only
calls destined to the home PLMN country.
Incoming calls
All calls: Bar all incoming calls. If this option is set, the mobile phone cannot receive
any call.
When roaming: Bar all incoming calls when roaming. If this option is set, the mobile
phone cannot receive any call when roaming outside the home PLMN.
For each call barring option, you can further perform the following operations:
- Activate: Input the call barring code to activate the selected call barring function.
- Deactivate: Deactivate the selected call barring function.
- Query status: Query the network to obtain the current status of the selected call
barring function. The mobile phone will contact the network. A moment later, the network
will make a response and send the results to the mobile phone.
Cancel all: Cancel all the set call barring functions. To do so, you need to input the
barring code provided by the network operator.
Change barring: Change the call barring code. To do so, you need to input the old
code.
Line switching: Switch to Line 1 or Line 2. By default, Line 1 is used.
Note: If you choose Line 2, dialing may fail. This depends on the implementation of
the network operator.
【CDMA call settings】
◆ Call waiting
Activate: After you choose Activate, the mobile phone will contact the network. A
moment later, the network will make a response and send a message to acknowledge
Page 30

-30-
your operation. If the call waiting function is activated, the network will alert you and the
mobile phone screen will display the incoming call number if others are calling you while
you are already in a conversation.
Cancel: If you choose Deactivate, the network will not alert you when others are
calling you while you are already in a conversation.
Call diverts
this network function enables you to forward incoming calls to another number you have
previously specified.
Call forward all: Divert all incoming calls to the preset number.
Call forward no answer: Divert an incoming call to the preset number only when the
called party does not answer the call within the specified time.
Call forward busy: Divert an incoming call to the preset number only when the
called party is busy.
You can further perform the following operations for the above four functions:
- Activate: Input the diverted-to number and then activate the selected call divert
function.
- Deactivate: Deactivate the selected call divert function.
Cancel all: Cancel all the set call forward functions.
【Advanced settings】
Auto redial: Set it to On or Off to enable or disable auto redial. If you set Auto
redial to On, the mobile phone will automatically redial the number a moment later if the
called party does not reply. The number of auto redial times can be set to a maximum of
10. In the auto redial period, you cannot dial other numbers. To end the auto redial
process, press the End key.
Note: This function requires support from the network operator to which the SIM
Page 31

-31-
card is registered.
End with SMS: Reject an incoming call and reply the caller a short message to state
that you are not available at this moment.
Connect notice: Once this function is enabled, the phone would vibrate to remind
you when a call is connected.
Blocklist: access this menu to set blocklist status and its members.
Call time reminder: Set it to Single or Periodic, so that the mobile phone will alert
you once or alert you periodically to the conversation duration.
Answer mode: Set answer mode as per your need
Auto quick end: This function enables you to disconnect a call at a preset time.
Call time display: Display the conversation duration during each conversation.
5.7.5 User Profiles
The mobile phone provides multiple user profiles, so that you can customize some
settings to adapt to the specific events and environments.
Customize the user profiles according to your preference and then activate the user
profiles. The user profiles fall into five scenarios: General, Silent, Meeting, outdoor
and My style.
Select Options and you can perform the following operations: Activate, Customize and
Rename.
Activate
Select Activate to activate the selected mode.
Customize
After choosing one of the above five modes, select Customize to edit the items as per
your need.
Reset
Page 32

-32-
You can reset the setting through this function.
5.4.6 Network Settings
Contact the network operator to obtain the following network services:
Network selection: Set Network selection mode to Automatic or Manual. Automatic
is recommended. When Network selection mode is set to Automatic, the mobile phone
will prefer the network where the SIM card is registered. When Network selection mode
is set to Manual, you need to select the network operator's network where the SIM card
is registered.
Preferences: Select the preferred networks. By default, the network where the
current SIM card is registered will be displayed.
5.4.7 Security settings
【SIM1 security】
PIN lock: To activate PIN lock, you need to input the correct PIN code. If you set PIN
lock to On, you need to input the PIN each time you power on the mobile phone. In the
case you input a wrong PIN for three consecutive times, you need to input the PIN
Unblocking Key (PUK). The PUK is used to unlock and change the locked PIN. To obtain
the PUK, contact the network operator.
Change PIN: To change PIN code of SIM card.
Change PIN2: To change PIN2 code of PIN code.
【UIM security setting】
PIN lock: To set the UIM lock, you need to input the PIN. You can set the UIM lock
only after inputting the correct PIN. If you set PIN lock to On, you need to input the PIN
each time you power on the mobile phone. In the case you input a wrong PIN for three
consecutive times, you need to input the PIN Unblocking Key (PUK). The PUK is used to
unlock and change the locked PIN. To obtain the PUK, contact the network operator.
Page 33

-33-
Change PIN: Change UIM PIN password through this item.
【Phone security】
Phone lock: The function enables you to lock/unlock the phone. Once this function
is enabled, correct password is required when the phone is locked. The password is 4 to
8 digits.
Change password: to change phone password.
【Data protect】
Data protect: The function enables you to lock/unlock the specified item with
password protected. Like Call log, phonebook, Message, Multimedia and file manager.
The initial password is 1234.
Change password: to change phone password.
【Red key locks keypad】
You can select to turn on/off this function.
【Auto keypad lock】
The function enables you to lock/unlock the keypad. Setting the auto locking time that 5s,
30s, 1min or 5mins is available. The keypad will be auto locked with no operation during
the period.
5.4.8 Restore factory settings
Use this function to restore factory settings. The initial password is 1234.
5.5Multimedia
5.5.1Camera
Use this function to capture pictures. In the capture interface, you can press left or
right direction key to adjust exposure value; up or down direction key to zoom in or zoom
out; OK key to capture photos; left soft key to access Options; right soft key to exit
capture interface.
Page 34

-34-
Note: Please abide by relevant laws and regulations on the use of mobile phones
for photo taking, videotaping and recording. Improper use of the mobile phone for photo
taking, videotaping or recording may infringe upon the copyright owner's rights.
5.5.2Audio Player
Use this function to play audio files. By pressing the direction key can you control
the playing process of audio player: play/pause(OK key), switch to last song/next song
(press left or right direction key), fast forward (press and hold right direction key) and
rewind (press and hold left direction key), play list(left soft key). In audio player interface,
you can press * or # key to tune volume. Default storage is My Music
5.5.3Video Player
Use this function to play video files. By pressing the direction key can you control
the playing process of video player: play/pause(OK key), fast forward (press and hold
right direction key) and rewind (press and hold left direction key). In video player
interface, you can press * or # key to tune volume, number key 0 to switch full screen.
Default storage is Videos
5.5.4Video Recorder
This function enables you to record dynamic pictures. In capture interface, you can
press left or right direction key to adjust exposure value; up or down direction key to
zoom in or zoom out ;OK key to capture videos clip; left soft key to access Options;
right soft key to exit capture interface.
5.5.5Image Viewer
You can view the pictures or images through this function.
5.5.6FM Radio
You can use the application as a traditional FM radio with automatic tuning and
saved channels. Before using this function, you need to insert headset into its
Page 35

-35-
corresponding slot. In FM radio interface, you can press * or # key to tune volume, left or
right direction key to search channels manually, up direction key to enable auto search
(once this is enabled, you can press left or right direction key to search channels
automatically) and down direction key to record your program. It’s also support wireless
FM
5.5.7Sound Recorder
The mobile phone supports two recording formats: WAV and AMR. The AMR
format is based on the dynamic compression algorithm. Under the same storage space
condition, the AMR format supports a longer record time than the WAV format.
5.6File Manager
The phone provides a certain space for users to manage files and supports the
T-Flash card. You can use the file manager to conveniently manage various directories
and files on the phone and the T-Flash card.
5.6.1Open
Choose File manager to enter the root directory of the memory. The root directory
will list the default folders, new folders and user files. When the mobile phone is
powered on for the first time or when you have not changed the directory, the root
directory contains the default folders only.
5.6.2Format
You can use this function to format all the data in the memory. The system will
re-create a default folder. The formatted data cannot be recovered. Therefore, think
twice before using the formatting function.
5.7Organizer
5.7.1Bluetooth
With Bluetooth, you can make a wireless connection to other compatible devices,
Page 36

-36-
such as mobile phones, computers, headsets and car kits. You can use the Bluetooth to
send images, video clips, music, sound clips and notes, and transfer files from your
compatible pc.
5.7.2Alarm
Five alarm clocks are set but deactivated by default. You can activate one, multiple
or all of them as needed. For each alarm clock, the ringing days the ringing time can be
set.
5.7.3Calendar
Once you enter this menu, there is a monthly-view calendar for you to keep track
of important appointments, etc. Days with events entered will be marked.
5.7.4Calculator
The calculator can add, subtract, multiply, divide with Memory carry and reminder. To
use the calculator:
Press the up, down, left and right key to select +, -, ×, ÷, = respectively.
Press right soft key to delete the figure.
5.7.5Tasks
Choosing data, call or anniversary to create new memo, which you can view, add,
edit, delete, delete overdue task, delete all, jump to date, send route and saved as file. If
you have set the alarm for the memo, alarm will sound when time is up, the content of
memo will display at the same time.
5.7.6World Clock
Access this menu to view time of main cities in various time zones.
5.7.7Ebook reader
E-book reader enables you to read TXT file. Through the USB connecting line
putting files to E-book folder of phone or T-Flash card. After finishing downloading, you
Page 37

-37-
can find the folder and open the E-book to read text directly.
5.7.8Stopwatch
Stopwatch is simple application for measuring time with possibility to register
several results and suspend/resume measurement.
5.7.9Torch
Select on or off as you needed.
5.8Intex Zone
Two games are embedded in this menu. For specific operation, please refer to
‘help’ option of each game.
You can also log on the social network and turn on the GSM auto call record and
Mobile tracker through this interface.
5.9Services
5.9.1Internet service
This function enables you to surf the Internet using the mobile phone. The mobile
phone provides some means to access the Internet. To surf the Internet, just activate the
means.
Homepage: A homepage address can be specified for each Internet access means.
When WAP browsing is used, the homepage will be accessed first.
Bookmarks: Multiple bookmarks are embedded in the phone. You can select
Options to manage a bookmark as follows:
Input address: To enter the website ensuring it can be linked
Recent page: To view websites you visited latest.
Setting: set up WAP-related service.
Note: For details on the charge and settings, consult the local network service
provider.
Page 38

-38-
5.9.2Data account
Access this interface to set Data account related parameters.
5.9.3STK
The STK service is the SIM card toolkit. This mobile phone supports the STK
service. The actual menu items are determined by both the SIM card and the network.
When the network provides and the SIM card supports the STK service, an STK service
menu will be automatically added to the menu on the phone.
Page 39

-39-
6 Appendix
6.1: Appendix 1Troubleshooting
If you find exceptions when operating the mobile phone, restore the factory
settings and then refer to the following table to solve the problem. If the problem persists,
contact the distributor or service provider.
Fault
Cause
Solution
SIM card error
The SIM card is
damaged.
Contact your network
service provider
The SIM card is not
in position.
Check the SIM card
The metal face of
the SIM card is
polluted.
Clean the SIM card with a
clean cloth
Poor received
signal quality
Signals are
obstructed. For
instance, radio
waves cannot be
effectively
transmitted nearby a
high building or in a
basement.
Move to a place where
signals can be effectively
transmitted
Line congestions
occur when you use
the mobile phone in
high-traffic hours
Avoid using the mobile
phone in high-traffic hours
Page 40

-40-
Fault
Cause
Solution
The mobile
phone cannot
be powered on
The battery energy
is exhausted.
Charge the battery
Calls cannot be
dialed
Call barring is
activated
Cancel call barring
The mobile
phone cannot
connect the
network
The SIM card is
invalid
Contact your network
service provider
The mobile phone is
not in a service area
of the GSM network
Move to the network
operator's service area
The signal is weak
Move to a place where the
signal quality is high
The battery
cannot be
charged
The charging voltage
does not match the
voltage range
indicated on the
charger
Ensure the charging voltage
matches the voltage range
indicated on the charger
An improper charger
is used
Use the charger specially
designed for the mobile
phone
Poor contact
Ensure the charger plug is in
good contact with the mobile
phone
Page 41

-41-
6.2Appendix2: Abbreviation and Explanation
SMS
Short Message Service
EMS
Enhanced Message Service
SIM
Subscriber Identity Module
GSM
Global System for Mobile Communication
CDMA
Code Division Multiple Access
UIM
User Identity Module
PIN
Personal Identity Number
PUK
PIN Unblocking Key
IMEI
International Mobile Equipment Identity
ESN
Electrical Serial number
CB
Cell Broadcast
Page 42

-42-
GPRS
General Packet Radio Service
MMS
Multimedia Message service
6.3Appendix 3: Environment declaration
Part
Poison material or element
Pb
Hg Cd Chromiu-m
(Cr(VI))
Polybro-minat
ed
Biphenyl
(PBB)
Polybro-minat
ed
Dipheny-let
her
(PBDE)
Mobile
phone
O
O O O
O
O
Charging
O
O O O
O
O
Battery
O
O O O
O
O
Earpiece
O
O O O
O
O
Data Cable
O
O O O
O
O
T-Flash card
O
O O O
O
O
Packagin-g
O
O O O
O
O
O: The element volume in the material is below the SJ/T11363-2006 standard.
X: At least one of the elements in the material exceeds the SJ/T11363-2006
Page 43

-43-
standard.
Page 44

-44-
24. Technical Information
Model: GC5050
Weight: 95 gram(with battery)
Size Length: 115.3mm x 47.7mmx 16.7mm
Networks: GSM 900/1800 MHz CDMA 800MHz
SAR Value: 1.027 w/kg-GSM 900MHz, 0.282w/kg –DCS 1800MHz; 0.441 w/kg –CDMA
800MHZ
Lithium Battery
Model: BR 1833S
Nominal voltage: 3.7v
Nominal: 4.2v
Capacity rating: 1800mAh
Continuous standby time*: 350-400hrs
Continuous calling time: 6-7hrs
* Depending on the network
Operation Temperature: -10~+55 °C
The operation time of the battery depends on conditions such as:
• Transmitting power level
• Signal (distance between the phone and the base station)
• Network parameters defined by the operator
• Phone use (WAP, games, SMS)
Page 45

-45-
• Charging procedure used
Exclusions:
Subject to the exclusions contained below:
1. Damage due to the improper use.
2. User does not follow the manual.
Explanation:
The company has the final right of the explanation for this document.
Software upgrades will not be announced.
All pictures are for reference only in the instruction book; please refer to the actual
phone.
Disclaimer
© Intex. All rights reserved.
Features and specifications are subject to change without prior notice. Certain mobile
phone features may not be activated by your service provider, and / or their network
setting may limit the feature's functionality. Services and some features such as GPRS,
email may be dependent on the network, SIM card, as well as on the compatibility of the
devices used and content formats supported and may require network/service
subscription/solutions. Data transfers speeds are network dependent. Always contact
your service provider for details or help. Talk and standby time is quoted in digital mode
and are approximate; battery performance and the signal reception depend on network
Page 46

-46-
configuration, signal strength, type of SIM card, operating temperature, features
selected as well as voice, data and other application usage pattern. The phones
supports Bluetooth, A2DP, in order for Bluetooth devices to communicate with one
another, they must utilize the same Bluetooth Profile. To determine the profiles
supported by other Intex products, visit www.intextechnologies.com, for other devices,
contact their respective manufacturers. Always demand for original Intex mobile phones
to protect against buying tinkered and/or used, refurbished or tampered phones. The
warranty is applicable only for Intex phones; the company is not responsible for any loss
or theft. Always use Intex original Enhancements (including batteries) for safety. The
use of any other type may invalidate and approval or warranty applying to the mobile
phone and may be dangerous. The phone is designed to operate using Li-ion batteries
approved by the phone manufactures. Using non approved batteries with the phone may
result in poor performance and damage to the phone or its enhancements. The display
and products visualization here are illustrative purposes only; Display / color of the
phone may differ from that shown on the manual. All features, functionality and other
product specifications are based on the latest available information and are correct at
the time of printing; however such product specifications are subject to change without
notice. Copyrights are reserved. Intex is the trademark of INTEX TECHNOLOGIES
(INDIA) LTD. which is registered. The unauthorized copying of copyrighted material is
not legalized is inimical to the provisions of the copyright laws of India and other
countries.
Page 47

-47-
INFORMATION UNDER E-WASTE (MANAGEMENT AND HANDLING) RULES, 2011
For disposal of e-waste, please call our helpline no. or visit our website.
E-waste Helpline no. 1800-103-8822
Web link: http://intextechnologies.com/window_self/Waste%20Disposal.html
1. Do’s for disposal of product
a) Always drop your used electronic products, batteries, and packaging materials
after the end of their life in nearest collection point or collection center
b) Separate the packaging material according to responsible waste disposal
options and sorting for recycling.
c) The battery can easily be removed from the product for recycling.
2. Don’t of disposal of equipment
a) Never dump E-waste in garbage bins or municipal solid waste stream.
b) Do not dispose of your product as unsorted municipal waste.
c) Do not throw used batteries into household waste.
d) Do not dispose damaged or leaking Lithium Ion (Li-Ion) battery with normal
household waste.
Page 48

-48-
3. Information on the consequences of improper handling, accidental breakage
damage and improper recycling of the end of life product.
a) If batteries are not properly disposed of, it can cause harm to human health or
the environment.
b) Placing of batteries or devices on or in heating devices, such as microwave
ovens, stoves, or radiators and improper disposal of batteries may lead to explosion.
c) If the battery terminals are in contact with metal objects, it may cause a fire.
 Loading...