

Page 1

4470 ACE
GSM Mobile Phone
User Guide
Page 2

II
Dear INTEX customer,
Congratulations on becoming a proud owner of INTEX product.
You have now joined the fraternity of millions of satisfied INTEX
customers spread across the globe.
Intex Technologies is one of the fastest growing IT Hardware, Mobile
Phones and Electronics Company. A well established brand, INTEX
has kept pace with the technology needs of millions of IT hardware
& electronics consumers and has been serving them with more than
300 user friendly, high quality, state-of-the art yet simple
products/solutions. The products have been in the market since
1996 and conform to global standards.
Brand INTEX covers a wide range of computer peripherals and
accessories such as Computer Multimedia speakers, Cabinets,
Keyboards, Mouse, UPS, Add-on cards, Webcams, Headphones,
Laptop bags, etc. As a part of its diversification strategy, Intex
also offers an interesting range of PCs, TFT-LCD Monitors,
Consumer Electronics (DVD Players), Home UPS & Mobile Phones.
Every INTEX product goes through a rigorous process of sample
Page 3

III
evaluation and approval before commercial launch. Customers look
upon the brand as a value-for-money & feature-rich offering,
supported by efficient after sales service.
We look forward to your patronage.
It would be our pleasure to receive feedback and suggestions you
may have for improvements in the product(s) you are using.
Intex Technologies (I) Ltd
info@intextechnologies.com
www.intextechnologies.com
Helpline No. 1800-103- 8822 (India)
Intex Way Gulf LLC
service@intexuae.com
www.intexuae.com
Toll Free No. 800-468- 39823 (Dubai)
Tel: 00971 04 3931991
SAFETY TIPS
Page 4

IV
Use of wireless hands-free system (headphone, headset) with a
low power Bluetooth emitter.
Make sure the cell phone has a low SAR.
Keep your calls short or send a text message (SMS) (instead.
This advice applies especially to children, adolescents and
pregnant women.)
Use cell phone when the signal quality is good.
People having active medical implants should preferably keep the
cell phone at least 15 cm away from the implant.
CONTENT
1. WARNINGS ..............................................................- 1 -
2. GETTING STARTED .................................................. - 3 -
2.1 APPEARANCE ........................................................ - 3 -
2.2 KEYPAD DEFINITION .............................................. - 5 -
2.3 BATTERY INSTALLATION ........................................ - 8 -
Page 5

V
2.4 SIM CARD/T-FLASH CARD INSTALLATION ................. - 9 -
2.5 CHARGING THE BATTERY ...................................... - 10 -
2.6 SECURITY SETTINGS ............................................. - 11 -
2.7 T-FLASH CARD .................................................... - 12 -
2.8 USB CABLE ......................................................... - 12 -
3. BASIC FUNCTIONS .................................................. - 12 -
3.1 MAKING A CALL ................................................... - 12 -
3.2 EMERGENCY SERVICE ........................................... - 13 -
3.3 ANSWERING A CALL ............................................. - 13 -
3.4 REJECTING A CALL .............................................. - 14 -
4. GUIDE TO MENU OPERATIONS ................................. - 14 -
4.1 PHONEBOOK ........................................................ - 14 -
4.2 MESSAGING ........................................................ - 15 -
4.3 CALL LOG ........................................................... - 21 -
4.3.1 CALL HISTORY .................................................. - 21 -
Page 6

VI
4.3.2 CALL SETTINGS ................................................ - 21 -
4.4 SETTINGS .......................................................... - 23 -
4.4.1 DUAL SIM SETTINGS ......................................... - 23 -
4.4.2 PHONE SETTINGS ............................................ - 23 -
4.4.3 NETWORK SETTINGS ........................................ - 25 -
4.4.4 SECURITY SETTINGS ......................................... - 26 -
4.4.5 CONNECTIVITY ................................................. - 28 -
4.4.6 RESTORE FACTORY SETTINGS ............................ - 28 -
4.5 MULTIMEDIA ...................................................... - 28 -
4.5.1 VIDEO PLAYER ................................................. - 28 -
4.5.2 VIDEO RECORDER ............................................. - 28 -
4.5.3 IMAGE VIEWER ................................................ - 29 -
4.5.4 FM RADIO ....................................................... - 29 -
4.5.5 SOUND RECORDER ........................................... - 30 -
4.6 FILE MANAGER ................................................... - 30 -
Page 7

VII
4.7 ORGANIZER ....................................................... - 30 -
4.7.1 CALENDAR ....................................................... - 30 -
4.7.2 ALARM ............................................................ - 31 -
4.7.3 WORLD CLOCK .................................................. - 31 -
4.7.4 BLUETOOTH ...................................................... - 31 -
4.7.5 CALCULATOR ................................................... - 32 -
4.7.6 TORCH ............................................................ - 32 -
4.8 INTEX ZONE ...................................................... - 33 -
4.8.1 FUN & GAMES .................................................. - 33 -
4.8.2 AUTO CALL RECORD ......................................... - 33 -
4.8.3 MOBILE TRACKER ............................................. - 33 -
4.8.4 STK ............................................................... - 34 -
4.9 SERVICES ........................................................... - 34 -
4.9.1 QQ BROWSER ................................................... - 34 -
4.10 USER PROFILES ................................................. - 35 -
Page 8

VIII
4.11 CAMERA ............................................................ - 35 -
4.12 AUDIO PLAYER .................................................. - 35 -
5. ENTRY MODE ....................................................... - 36 -
6. CARE AND MAINTENANCE ..................................... - 37 -
7. TECHNICAL INFORMATION ....................................... - 41 -
Page 9

- 1 -
1. Warnings
Not following these simple guidelines may be dangerous or illegal. Read
the complete user guide for further information.
TURN ON SAFELY
Do not turn on the phone when wireless phone is prohibited or when
it may cause interference or danger.
ROAD SAFETY
Obey all road safety laws. Always use both of your hands to operate
the vehicle while driving.
INTERFERENCE
All wireless phones may be sensitive to interference, which may
affect performance.
TURN OFF IN HOSPITALS
Follow all restrictions. Turn off the phone near medical equipment.
TURN OFF ON AIRCRAFTS
Page 10

- 2 -
Follow all restrictions. Wireless devices can cause interference on
aircrafts.
TURN OFF WHEN REFUELING
Do not use the phone at/near refueling stations. Do not use near
fuel or chemicals.
USE SENSIBLY
Only qualified personnel may install or repair this product.
ENHANCEMENTS AND BATTERIES
Use only appropriate enhancements and batteries. Do not connect
incompatible products.
WATER-RESISTANCE
Your phone is not water-resistant. Keep it dry.
BACKUP COPIES
Remember to make back-up copies or keep a written record of all
important information stored in your phone.
Page 11

- 3 -
CONNECTING TO OTHER DEVICES
When connecting to any external device, read its user guide for
detailed safety instructions. Do not connect with incompatible
products.
2. Getting Started
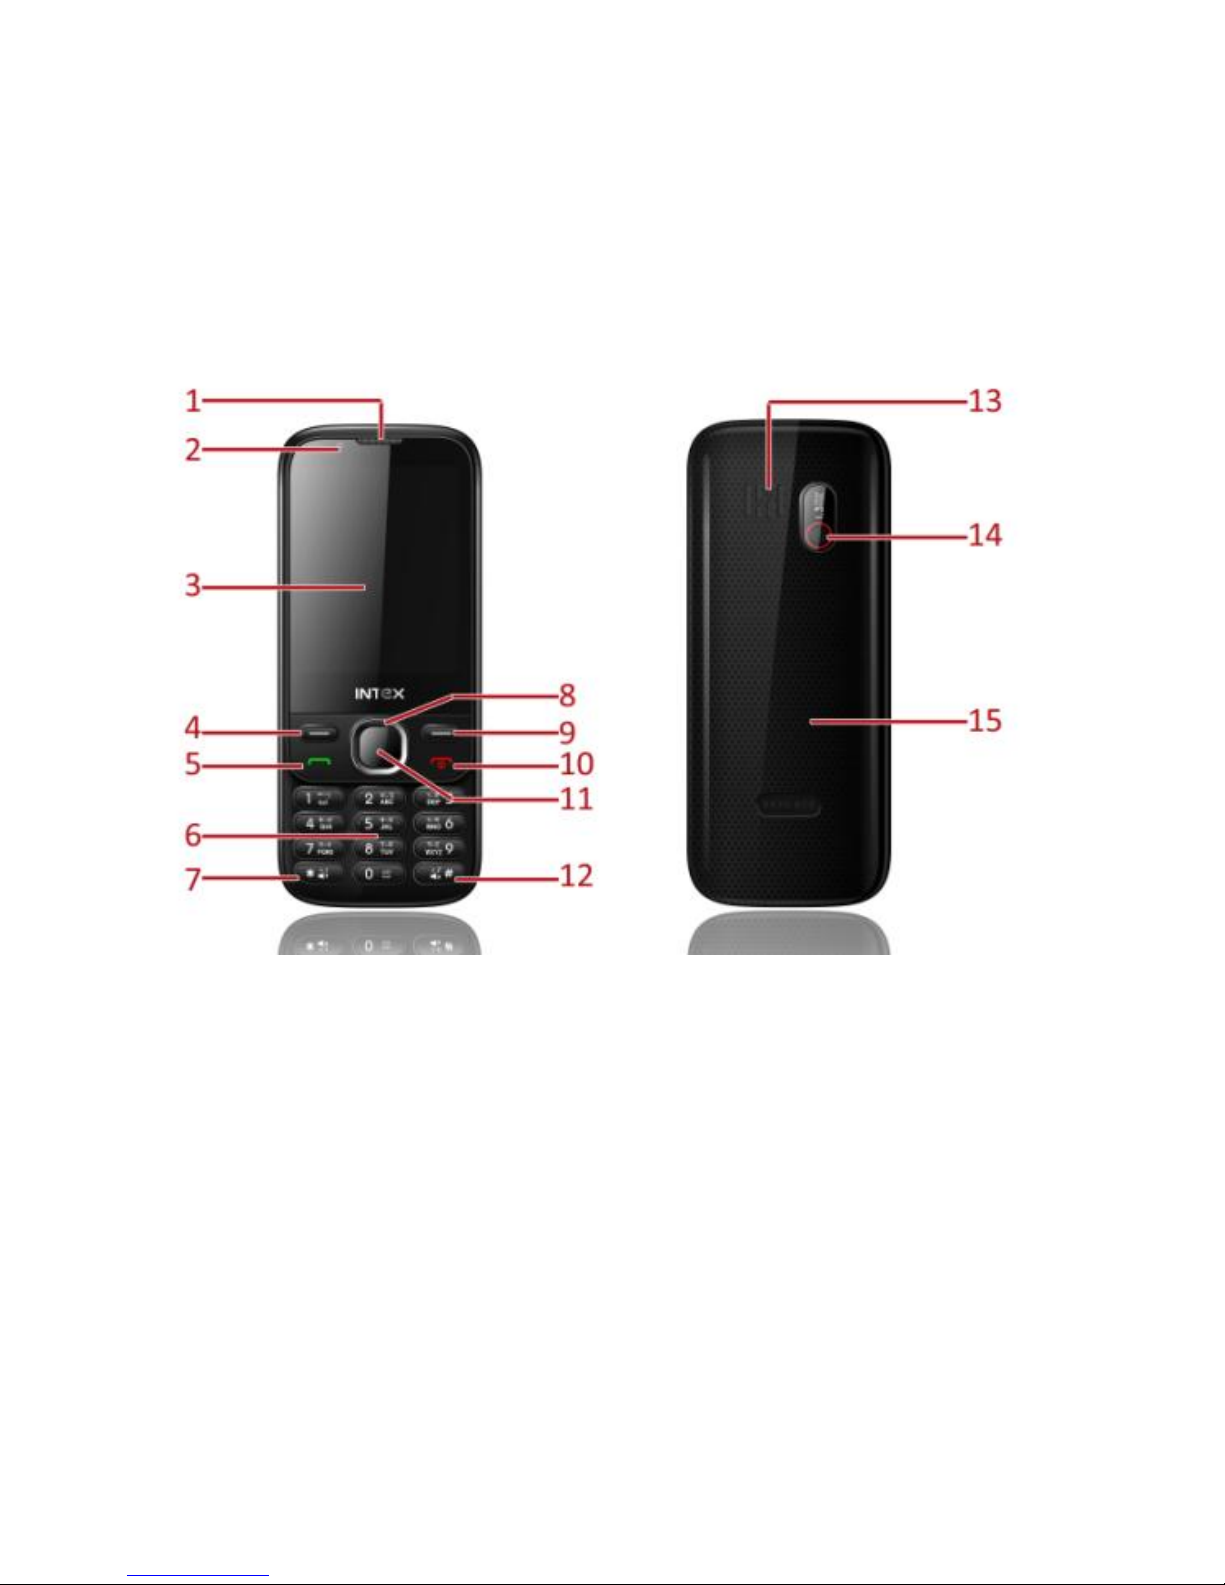
2.1 Appearance
Page 12
- 4 -
The Symbols above indicate:
1. Receiver 2. Front Camera
3. Display Screen 4. Left Soft Key
Page 13

- 5 -
5. Dial Key 6. Number Keys
7. * Key 8. Navigation Keys
9. Right Soft Key 10. End Key/Power Key
11. OK Key 12. # Key
13. Speaker 14. Back Camera
15. Battery Cover
2.2 Keypad Definition
Key
Definitions
Left Soft key /
Right Soft key
1. Execute functions that the
left-down/right-down corner indicator
shows.
2. In the standby mode, press left soft key
to access Shortcut, press right soft key to
access Names.
Page 14

- 6 -
Navigation Keys
1. In other modes, it is used as the
navigation/direction key except for some
special functions.
2. In the standby mode, use navigation
keys to enter shortcuts function.
OK Key
1. In the standby mode, press this key to
enter main menu.
2. In dial panel, after input numbers, press
the key to select SIM1/2 voice call.
3. In other mode, press the key for
confirmation.
End Key/ Power
Key
1. Mainly used as power on/off.
2. Press to return to standby screen in any
interface.
3. End calls or reject incoming calls.
Page 15

- 7 -
4. In standby mode, press the key to lock
keypad and off screen.
Dial Key
1. Press this key to dial or receive an
incoming call.
2. When in the standby mode, press to
check call history.
Number Keys
1. Use these keys to input numbers or
letters.
2. In standby mode, long press the 0 key
to turn on/off torch.
* Key
1. After inputting phone number, quick
press * key thrice, then the symbol “P”
appears and input the extension number.
You can make an extension call.
Page 16
- 8 -
2. In standby mode, press left soft key and
* key to lock or unlock keypad.
# Key
1. In text editing interface, press # key to
switch the text input method.
2. Press and hold # key to transfer the
profile of current mode and Silent mode.
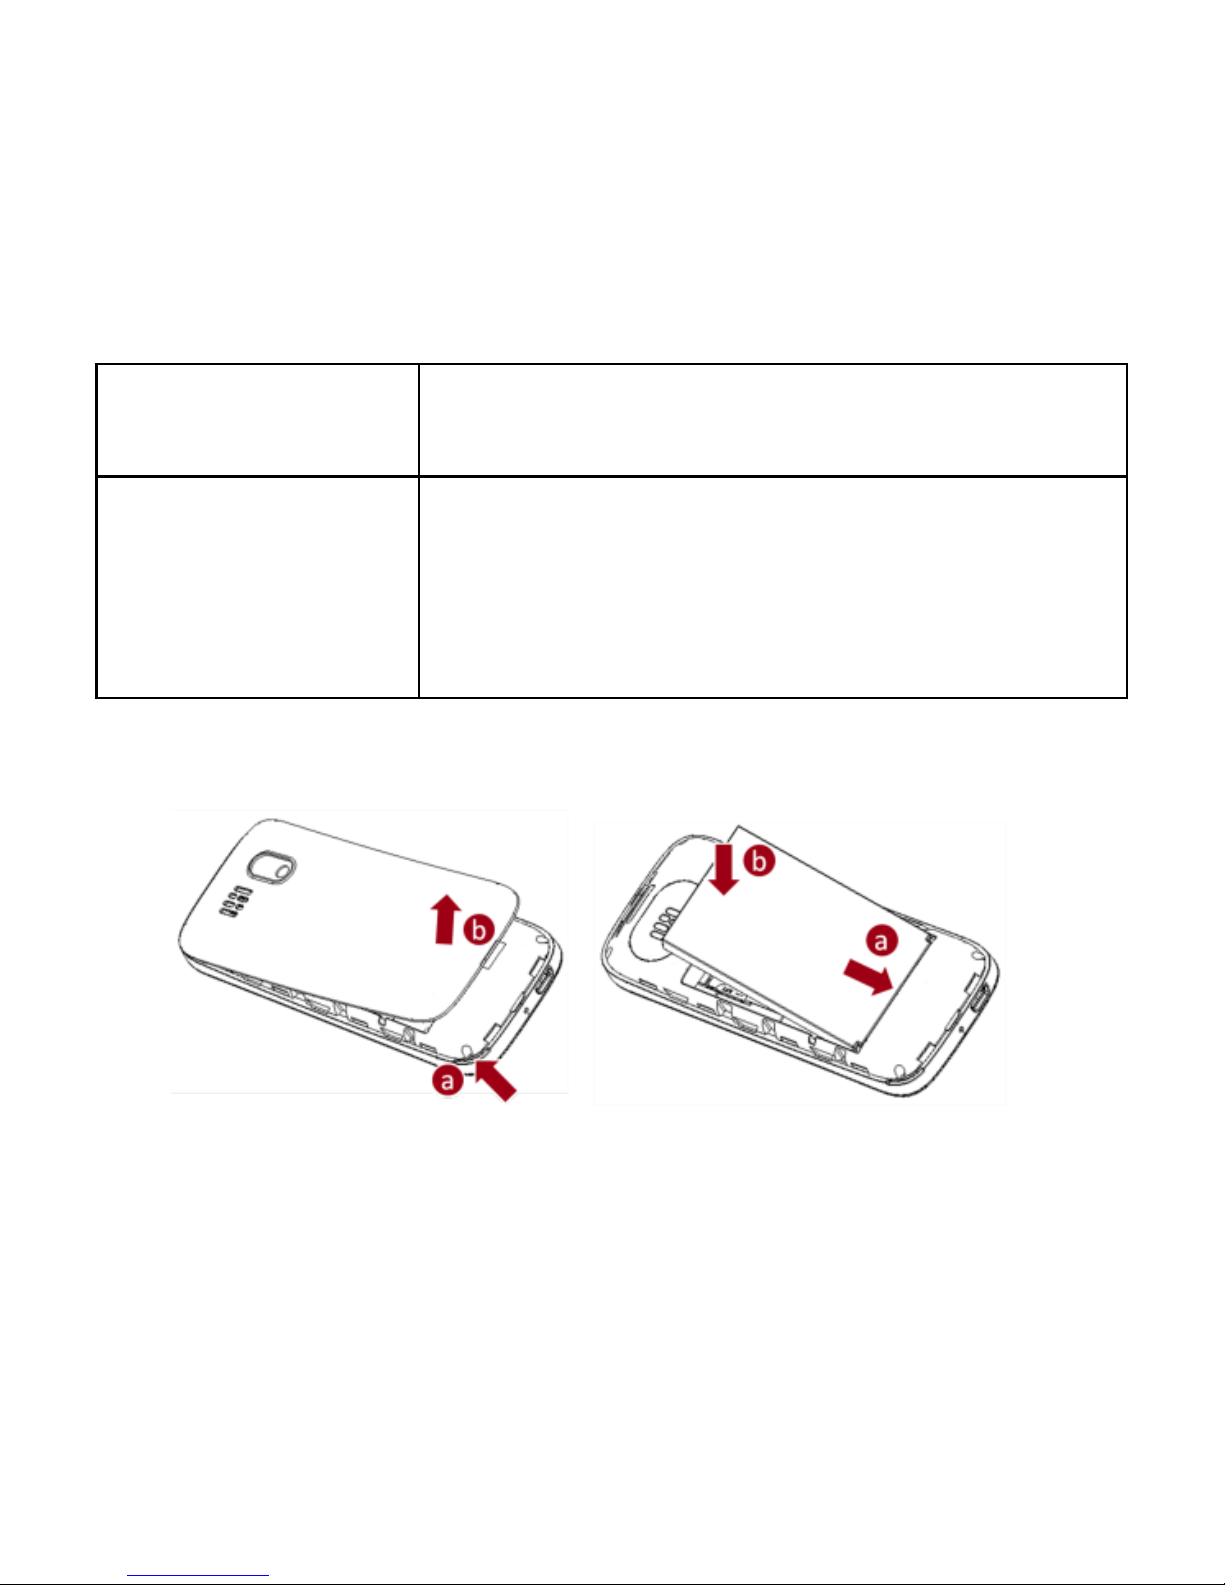
2.3 Battery Installation
Caution: Install according to the illustration above to avoid breaking
Page 17
- 9 -
the battery connectors.
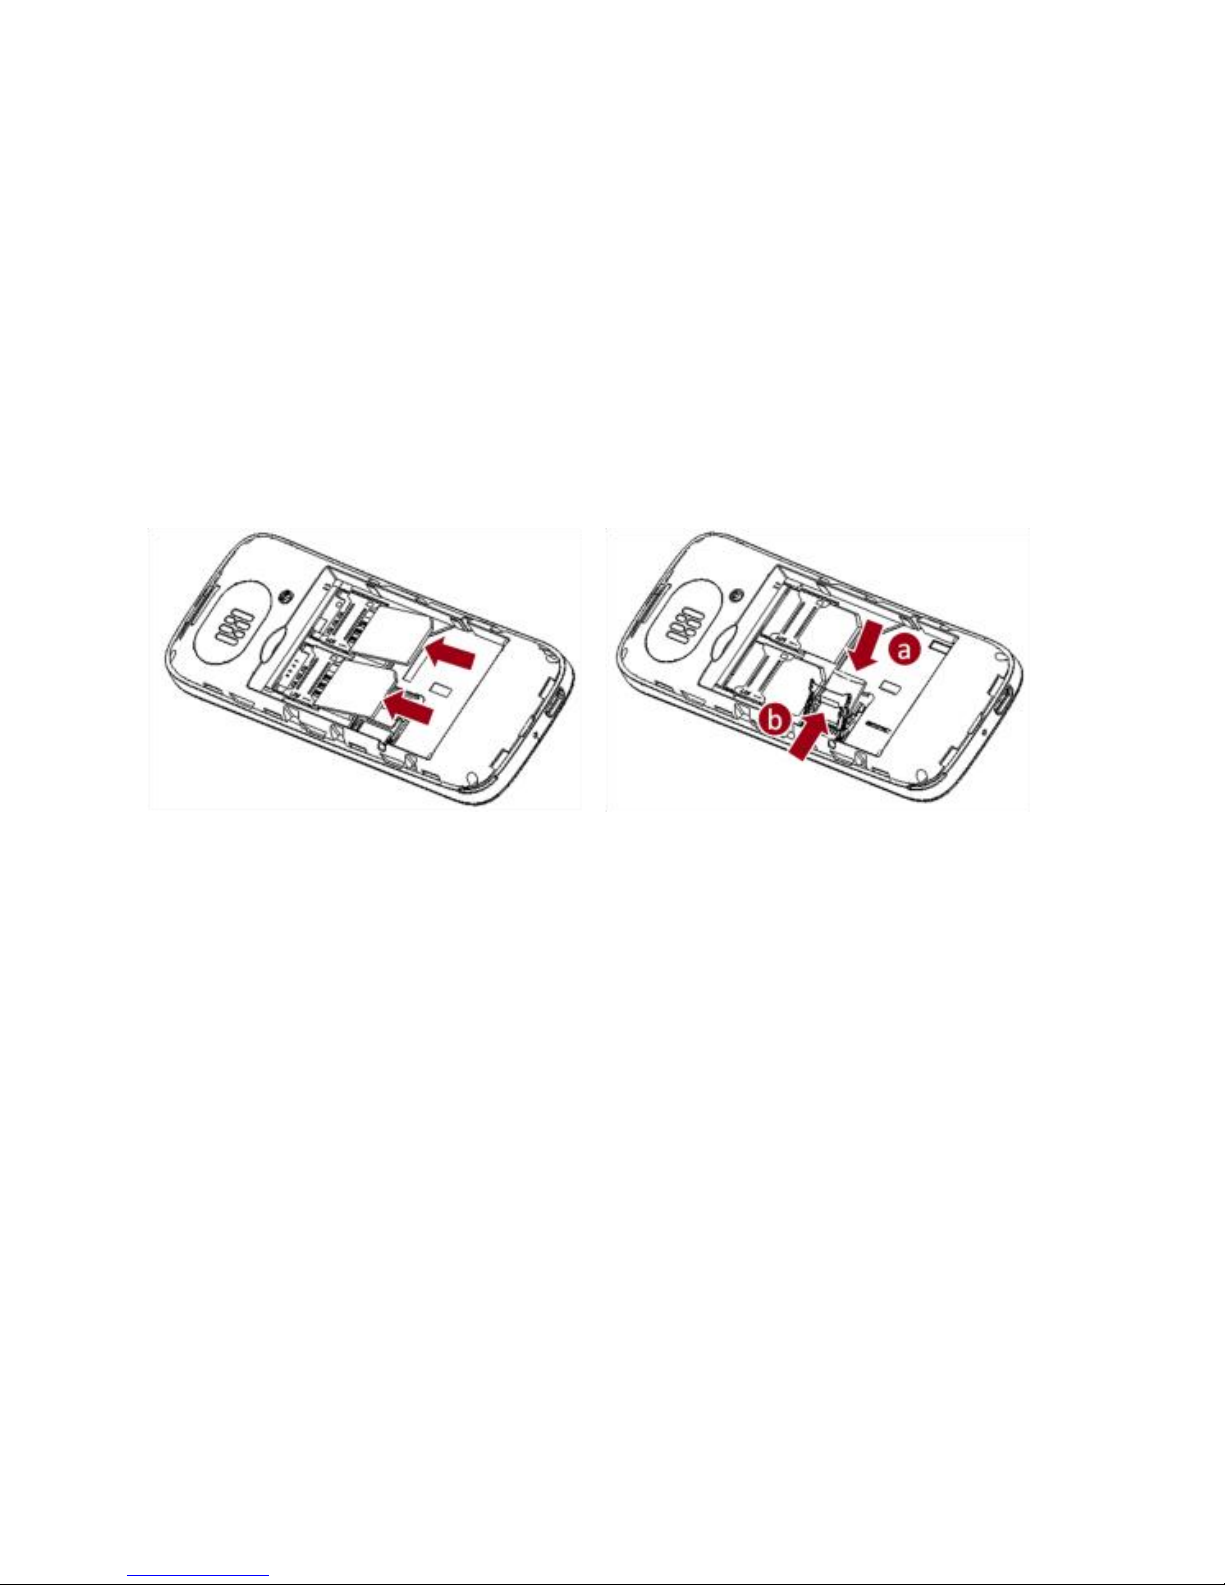
2.4 SIM Card/T-Flash Card Installation
Caution: Do not bend or scratch your SIM card and T-Flash card.
Avoid exposing your SIM card and T-Flash card to static electricity,
water, or dirt.
Tips:Face the gold color contact point of SIM card towards the
cell phone and push the SIM card into the slot. With the metal
Page 18

- 10 -
contacts facing down, gently slide the T-Flash card into the slot.
Press and pull the cover up to lock it.
2.5 Charging the Battery
Insert the charger into USB interface of the phone; the flash symbol
on the charger plug must face upwards.
Connect the charger to a standard wall outlet and the battery
power icon in the up-right corner of the screen will start scrolling.
When the battery bar stops scrolling, the battery charge is complete.
Press the two sides of the charger plug and disconnect the charger
from the phone.
When the battery is low, a "low battery" message will display
across the screen and the battery icon will seem empty. If the
battery level is insufficient, the phone will turn off automatically.
Do not use your phone under low battery state for an extended
Page 19

- 11 -
period of time or it may cause battery damage.
2.6 Security Settings
― PIN Lock
When enter the SIM Lock, you need to input PIN. PIN code (Personal
Identity Number) prevents unauthorized use of your phone. The PIN
code is provided by your network operator with the SIM card.
If you enter the wrong code three times in a row, the PIN code
will be blocked. To unblock the PIN code, you need to enter your
PUK. Your PUK is provided by your network operator.
― Phone Lock
Turn on/off power on password (the length of the password is 4-8
digital numbers). If you activate the “Phone lock”, you need to
enter the password each time you turn on the phone. Enter Change
password to change the password.
Page 20

- 12 -
2.7 T-flash Card
Insert the T-Flash card into phone. This will expand the Flash memory
of the phone.
2.8 USB Cable
You can transfer and store files, such as MP3, MP4 and pictures from
PC, through USB cable, to the mass storage in phone or identified SD
card that is inserted.
3. Basic Functions
3.1 Making a Call
In standby mode, press numerical keys to input phone number to
dial. If you're making a long distance call, add the area code preceding
the telephone number. After inputting phone number, quickly press
Page 21

- 13 -
* key thrice until the symbol “P” appears, then input the extra
number. Press Dial key or OK key and select SIM1/2 voice call to
call the number. Press left soft key to do options. During a call press
up/down navigation keys to adjust volume.
3.2 Emergency Service
You can dial an emergency call without the SIM card. Contact your
service provider to get the emergency call number.
3.3 Answering a Call
When you receive a call, the phone will ring or vibrate and will display
an incoming call indicator. Press the dial key to answer. You can
also press OK key or left soft key and select Answer to answer.
During the calling, you can press left soft key to access Options:
Hold, End single call, New call, Phonebook, Call history, Messaging,
Page 22

- 14 -
Sound recorder, Mute, and DTMF.
3.4 Rejecting a Call
You can press End key to reject or end a call.
4. Guide to Menu Operations
4.1 Phonebook
In the phonebook, you can store contacts' personal information and
numbers while also search for previously stored contacts.
― Select Add new contact:
You can save new contact To SIM1/2 or To Phone.
― Select one contact and press left soft key to access options:
View: Check the detailed information of the contact
Send text message: Edit text message and select SIM1/2 to send
message
Page 23

- 15 -
Call: Select SIM1/2 voice call to call the number
Edit: Edit the contact
Delete: Confirm whether to delete the contact
Copy: Copy the contact To Phone, To SIM1, To SIM2, or To file
Send business card: Send business card as text message or via
Bluetooth
Add to Blocklist: Add the contact to Blocklist
Mark several: Mark one or more contacts, and then move, copy,
or delete
Phonebook settings: Set Preferred storage, Speed dial, Memory
status, etc
4.2 Messaging
4.2.1 Write Message
This function can begin a new message. After completing the
Page 24

- 16 -
message:
― Press OK key:
Enter number: Input number
Add from Phonebook: Select contact from phonebook
― Press left soft key:
Send to: Enter number or Add from Phonebook to send message
Input method: Select input method
Insert template: Insert template into the message
Advanced: Insert number
Save to Drafts: Save the message to drafts
4.2.2 Inbox
After entering the Inbox, press up/down navigation key to select
messages. Press OK key to check the details of message, or press
left soft key to access Options:
Page 25

- 17 -
― View: Check the message
― Reply: Reply message to the sender
― Reply with original text: Send a message with original text content
― Call sender: Select SIM1/2 voice call to call the sender
― Forward: Send the message to others
― Delete: Confirm whether to delete the message
― Delete all: Confirm whether to delete all messages
― Save to Phonebook: Save the number to the phonebook
― Filter by: Select SIM1, SIM2, or All messages
― Mark several: Select one or more messages to mark
4.2.3 Drafts
You can save unsent and edit incomplete messages in draft box.
Press left soft key to access to Options:
― View: Check the message
Page 26

- 18 -
― Send: Enter number or Add from Phonebook and select SIM1/2 to
send the message
― Edit: Edit the message
― Delete: Confirm whether to delete the message
― Delete all: Confirm whether to delete all messages
― Mark several: Select one or more messages to mark
4.2.4 Outbox
Checks the information of unsuccessfully sent message in outbox.
Press left soft key to access to Options:
― View: Check the message
― Resend: Send the message once more
― Edit: Edit the message
― Delete: Confirm whether to delete the message
― Delete all: Confirm whether to delete all messages
Page 27

- 19 -
― Mark several: Select one or more messages to mark
4.2.5 Sent Messages
Check the message in sent box. Select one message to open, or press
left soft key to access Options:
― View: Check the message
― Forward: Send the message to others
― Delete: Confirm whether to delete the message
― Delete all: Confirm whether to delete all messages
― Mark several: Select one or more messages to mark
4.2.6 Voicemail Server
Select SIM1 or SIM2 voice mail. You can select to Edit the number
or Connect to voice mail.
This function needs a network supply. Please contact with your
Page 28

- 20 -
service provider for more information.
4.2.7 SMS Templates
You can check or edit the templates. Press left soft key to use,
edit or remove.
4.2.8 SMS Settings
― SIM1/SIM2: Set SMSC address, Validity period, Message type,
Delivery report, Reply path
― Memory status: Check the message memory of SIM cards and phone
― Save Sent Message
― Preferred storage: Select SIM or Phone as preferred storage
― SMS Backup: Backup all messages
― SMS Blocklist: Check the Mode and edit Blocklist numbers
― Signature: Set signature mode and signature text content
Page 29

- 21 -
4.3 Call Log
4.3.1 Call History
In the menu, you can check dialled calls, received calls, missed calls,
etc.
― Missed calls: Display the latest missed calls list.
― Dialled calls: Display the latest dialled calls list.
― Received calls: Display the latest received calls list.
― Delete call logs: Delete all call records.
― Call timers: Input phone password and check all call time records
― Text msg. counter: To count all messages sent and received.
4.3.2 Call Settings
-SIM1/2 Call Settings
Call Waiting
Page 30

- 22 -
Set the mode of call waiting, this function need to be activated.
Call Divert
When the call divert is activated, incoming calls will be diverted to
voice mail or other phone numbers according to the call divert
settings.
Call Barring
When the call barring is activated, some of the calls will be barred
according to the call barring setting condition. Contact your service
provider to sign up for call barring.
― Advanced Settings
Blocklist
Select whether to Reject number in blocklist and edit Blocklist
numbers.
Auto Redial
Set: On/ Off.
Page 31

- 23 -
Call Time Reminder
Set: Off/ Single/ Periodic.
End with SMS
If you turn on the function, when there is an incoming call, you
can send a SMS to the number and reject the call.
Connect Notice
Select None, Tone only, Vib. only, or Tone and Vib.
Answer Mode
Set: Any key
4.4 Settings
4.4.1 Dual SIM Settings
Select: Dual SIM open, Only SIM 1 open, or Only SIM 2 open
4.4.2 Phone Settings
Page 32

- 24 -
― Time and Date
You can select Set home city, Set time/date, Auto update time,
Set format, and Update with time zone.
― Schedule power on/off
Set time to power on/off the phone automatically
― Language
You can choose several languages under this function.
― Webcam Setting
Select camera sensor main or camera sensor sub
― Pref. Input Method
Select one input method as preferred input method.
― Display
• Wallpaper
You can set wallpaper under this function.
• Power on Display
Page 33

- 25 -
Select System or User defined animation as power on display.
• Power off Display
Select System or User defined animation as power off display.
• Show Network Name
Select On or Off.
― Dedicated Keys
Set shortcut functions for navigation keys.
― Flight Mode
Select Normal mode or Flight mode
― Misc. Settings
Select LCD backlight to set
4.4.3 Network Settings
― SIM1/SIM2
• Network Selection
Page 34

- 26 -
This function can let you select the network manually or
automatically.
― GPRS Transfer Pref.
Select Data prefer or Call prefer.
4.4.4 Security Settings
― SIM 1/SIM 2 Security
• PIN Lock
PIN number setting can avoid unauthorized usage of SIM card. If
PIN number has been wrongly inputted for 3 times, the SIM card
will be locked. PUK number is needed to unlock the SIM card. Please
contact the network provider if you don’t know the PUK number.
• Change PIN
Input old SIM1/2 PIN, and then input new PIN, input the PIN code
again to confirm. Before change PIN, you need to turn on PIN lock.
Page 35

- 27 -
• Change PIN2
Input old SIM1/2 PIN, and then input new PIN, input the PIN code
again to confirm.
― Phone Security
• Phone Lock
Input phone password to turn on/off phone lock. The default
password is 1234.
• Change Password
Input old password, and then input new password, input the new
password again to confirm.
― Auto Keypad Lock
You can set the time to lock the keypad automatically.
― Red Key Locks Keypad
When the function is turned on, you can press red key (end key)
in standby mode once to lock keypad and display screen.
Page 36

- 28 -
4.4.5 Connectivity
― Data Account
Check data account in the list or press left soft key to do options.
4.4.6 Restore Factory Settings
Input default password 1234 to restore factory settings.
4.5 Multimedia
4.5.1 Video Player
Preview the videos. Press * key and # key to adjust volume. Press
navigation keys and OK key to operate the video player. Press left
soft key to access Options.
4.5.2 Video Recorder
Page 37

- 29 -
Press left soft key or OK key to enter. Press OK key to shoot and
right soft key to back, left soft key to access Options.
4.5.3 Image Viewer
Enter image viewer, you can choose photos to view or return. Press
left soft key to access to Options: View, Image information, Browse
style, Send, Use as, Rename, Delete, and Sort by.
4.5.4 FM Radio
Enter FM radio (need insert earphone), it will search channel list
automatically. Press left/right navigation key to change channels,
press up/down navigation keys to change frequency manually, press
* key and # key to adjust volume. Press left soft key to access
Options.
Page 38

- 30 -
4.5.5 Sound Recorder
You can take a recorder in this function. When enter the recorder,
press left soft key to access Options: New record, List, and
Settings.
Press OK key to record, press left soft key to pause, press right
soft key to stop.
After saved, press left soft key to access Options.
4.6 File Manager
Enter this menu; you can check the files store on Memory card.
Select one file to open and press left soft key, you can do options.
4.7 Organizer
4.7.1 Calendar
You can use this feature to view the year, date and term easily.
Page 39

- 31 -
Use navigation keys to navigate other date. Press left soft key, you
can enter submenu to do options.
4.7.2 Alarm
The alarm clock feature sounds an alert or makes a vibration alert
at a time you specify.
4.7.3 World Clock
By pressing left/right navigation keys to change time zone on world
map, you can check time and date of different cities and regions.
Press left soft key to access options.
4.7.4 Bluetooth
This mobile phone support Bluetooth wireless connection. You can
establish wireless connection between mobile phone and device to
Page 40

- 32 -
realize voice communication, data exchange and synchronization.
Press left soft key and OK key to enter: Power, Visibility, My device,
Search audio device, My name, and Advanced.
4.7.5 Calculator
This feature can use your phone as a calculator for simple calculations.
Press keypad to enter the numbers. Use following navigation keys
to calculate:
Navigation keys:+,-,×,÷
OK key: Show the calculation result.
* Key: Double 0
# Key: Decimal point
4.7.6 Torch
The phone can be used as torch. In the menu, press left soft key
or OK key to turn on/off torch.
Page 41

- 33 -
4.8 Intex Zone
4.8.1 Fun & Games
Your phone supplies built-in game, you can play it whenever you
want. Select Game settings to set.
4.8.2 Auto Call Record
You can set: On or Off. After you activate this function, once your
call connected, the phone will record the call automatically.
4.8.3 Mobile Tracker
Enter password to activate mobile tracker function. When user
activated this function and lost the mobile, if someone pick-up the
mobile and insert new SIM card, the Mobile Tracker will send SMS
to predetermined numbers to show detail of the lost mobile. This
Page 42

- 34 -
message can be edited by end user.
4.8.4 STK
If your SIM card supports STK function, the phone can display
different first level menu according to different STK card. This
function needs the network provider support. If user finds STK
function can't operate normally, please contact the network
provider. If the network provider does not support this function,
we do not claim any responsibility whatsoever.
4.9 Services
4.9.1 QQ Browser
You can use QQ browser to browse WAP page. Before using this
function, you need to check the GPRS settings.
Page 43

- 35 -
4.10 User Profiles
This phone provides several profiles, select one profile and press OK
key to activate, or left soft key to customize (except Silent).
4.11 Camera
Press left soft key or OK key to enter. The photo can be previewed
in the screen; press OK key to shoot and right soft key to back,
left soft key to access Options.
4.12 Audio Player
This function menu is used to store and play the audio files. Press
the left soft key or OK key to enter and then use the Navigation
keys and OK key to operate the audio player. Press * key and #
key, or up/down navigation keys to adjust volume. Press left soft
key you can access List.
Page 44

- 36 -
5. Entry Mode
You can use several methods for entering text and numbers. By
selecting a Text Entry Mode, the phone provides a few Text Entry
Mode for new adding, editing contact records, finding contacts,
editing SMS and writing memos.
Select Text Entry Mode:
5.1 Letter entry mode
Press a key once to insert the first letter on the key, twice for
the second letter, etc. If you pause briefly, the last letter in the
display is accepted and the text awaits the next entry.
For example, press the "2" key continuously, it will appear "a"、
"b"、"c"、"2"one by one.
Page 45

- 37 -
5.2 Number entry mode
Number Entry Mode can input the number in the text, such as
telephone number. Tap the proper number and input it.
6. Care and Maintenance
Battery care
Your device is powered by a rechargeable battery. When the power
is weak, please charge the battery. In order to extend the lifespan
of the battery, use all the battery's power before recharging.
Unplug the charger from the electrical plug and the device when
not in use. Do not leave the battery connected to a charger more
than a week. Overcharging may shorten its lifespan.
Page 46

- 38 -
Extreme temperatures can affect the ability of your battery to
charge. Battery needs the fit temperature. If the surrounding
temperature is over 40°C, the battery cannot be charged.
Use the battery only for its intended purpose. Never use any
charger or battery that is damaged.
Do not short-circuit the battery. Accidental short-circuiting can
occur when a metallic object such as a coin, clip, or pen causes direct
connection of the positive (+) and negative (-) terminals of the
battery. (These look like metal strips on the battery.)
Short-circuiting the terminals may damage the battery or the
connecting object.
Leaving the battery in hot or cold places, such as in a closed car
in summer or a freezer in winter conditions, will reduce the capacity
and lifetime of the battery. Always try to keep the battery
between 59°F and 77°F (15°C and 25°C). A hot or cold battery
Page 47

- 39 -
may not function temporarily, even when the battery is fully
charged.
Battery performance is particularly limited in temperatures below
freezing.
Do not dispose of batteries in a fire! Dispose of batteries according
to local regulations. Please recycle when possible. Cell phones are not
considered household waste.
Mobile phone maintenance
Keep the device dry. Precipitation, humidity, and all types of
liquids or moisture can contain minerals that will corrode electronic
circuits. If your device does get wet, remove the battery and allow
the device to dry completely before replacing it.
Do not use or store the device in dusty, dirty areas. Its moving
parts and electronic components can be damaged.
Page 48

- 40 -
Do not store the device in hot areas. High temperatures can
shorten the life of electronic devices, damage batteries, and warp
or melt certain plastics.
Do not store the device in cold areas. When the device returns
to its normal temperature, moisture can form inside the device and
damage electronic circuit boards.
Do not attempt to open the device other than as instructed in
this guide.
Do not drop, knock, or shake the device. Rough handling can break
internal circuit boards and fine mechanics.
Do not use harsh chemicals, cleaning solvents, or strong detergents
to clean the device.
Do not paint the device Paint can clog the moving parts and
prevent proper operation.
Page 49

- 41 -
Use only the supplied or an approved replacement antenna.
Unauthorized antennas, modifications, or attachments could
damage the device and may violate regulations governing radio
devices.
All of the above suggestions apply to your device, battery, charger,
or any enhancement. If any device is not working properly, take it
to the nearest authorized service facility for service.
7. Technical Information
Weight: 100g
Size: 117.8 ×49 ×15.3mm
Battery: 1800mAh
Networks: GSM 900/1800 MHz
SAR Value: 0.970 W/Kg-GSM 900MHz
Page 50

- 42 -
0.972W/Kg-DCS 1800MHz
Model: 4470 ACE
Weight: 100 gram(with battery)
Lithium Battery
Model: BR1802H
Nominal voltage: 3.7v
Nominal: 4.2v
Capacity rating: 1800mAh
Continuous standby time: 350-450hrs
Continuous calling time: 6-8hrs
* Depending on the network
Operation Temperature: -20~+60°C
Networks: GSM
Battery work times refer to the list below (Will not announce if the
Page 51

- 43 -
capacity is changed):
The operation time of the battery depends on conditions such as:
Transmitting power level
Signal (distance between the phone and the base station)
Network parameters defined by the operator
Phone use (games, SMS)
Charging procedure used
Exclusions:
Subject to the exclusions contained below:
1. Damage due to the improper use.
2. User does not follow the manual.
Explanation:
The company has the final right of the explanation for this document.
Software upgrades will not be announced.
Page 52

- 44 -
All the configurations mentioned in this user manual is only for
reference; please refer to the actual phone.
Disclaimer
© Intex. All rights reserved.
Features and specifications are subject to change without prior
notice. Certain mobile phone features may not be activated by your
service provider, and / or their network setting may limit the
feature's functionality. Services and some features such as GPRS,
email may be dependent on the network, SIM card, as well as on
the compatibility of the devices used and content formats
supported and may require network/service subscription/solutions.
Data transfers speeds are network dependent. Always contact your
service provider for details or help. Talk and standby time is quoted
in digital mode and are approximate; battery performance and the
Page 53

- 45 -
signal reception depend on network configuration, signal strength,
type of SIM card, operating temperature, features selected as well
as voice, data and other application usage pattern. The phones
supports Bluetooth, A2DP, in order for Bluetooth devices to
communicate with one another, they must utilize the same
Bluetooth Profile. To determine the profiles supported by other
Intex products, visit www.intextechnologies.com, for other devices,
contact their respective manufacturers. Always demand for original
Intex mobile phones to protect against buying tinkered and/or used,
refurbished or tampered phones. The warranty is applicable only for
Intex phones; the company is not responsible for any loss or theft.
Always use Intex original Enhancements (including batteries) for
safety. The use of any other type may invalidate and approval or
warranty applying to the mobile phone and may be dangerous. The
phone is designed to operate using Li-ion batteries approved by the
Page 54

- 46 -
phone manufactures. Using non approved batteries with the phone
may result in poor performance and damage to the phone or its
enhancements. The display and products visualization here are
illustrative purposes only; Display / color of the phone may differ
from that shown on the manual. All features, functionality and
other product specifications are based on the latest available
information and are correct at the time of printing; however such
product specifications are subject to change without notice.
Copyrights are reserved. Intex is the trademark of INTEX
TECHNOLOGIES (INDIA) LTD. which is registered. The
unauthorized copying of copyrighted material is not legalized is
inimical to the provisions of the copyright laws of India and other
countries.
Page 55

- 47 -
INFORMATION UNDER E-WASTE (MANAGEMENT AND
HANDLING) RULES, 2011
For disposal of e-waste, please call our helpline no. or visit our
website.
E-waste Helpline no. 1800-103-8822
Weblink:
www.intextechnologies.com/window_self/Waste%20Disposal.html
1. Do’s for disposal of product
a) Always drop your used electronic products, batteries, and
packaging materials after the end of their life in nearest collection
point or collection center
b) Separate the packaging material according to responsible waste
disposal options and sorting for recycling.
c) The battery can easily be removed from the product for recycling.
Page 56

- 48 -
2. Don’t of disposal of equipment
a) Never dump E-waste in garbage bins or municipal solid waste
stream.
b) Do not dispose of your product as unsorted municipal waste.
c) Do not throw used batteries into household waste.
d) Do not dispose damaged or leaking Lithium Ion (Li-Ion) battery
with normal household waste.
3. Information on the consequences of improper handling, accidental
breakage damage and improper recycling of the end of life product.
a) If batteries are not properly disposed of, it can cause harm to
human health or the environment.
Page 57

- 49 -
b) Placing of batteries or devices on or in heating devices, such as
microwave ovens, stoves, or radiators and improper disposal of
batteries may lead to explosion.
c) If the battery terminals are in contact with metal objects, it may
cause a fire.
 Loading...