

Page 1
(174IO) DELUXE POOL MAINTENANCE KIT ENGLISH SIZE: 4.875” X 7.25” PANTONE 295U 07/30/2013
174A
English
IMPORTANT
SAFETY RULES
Read, understand, and follow
all instructions carefully before
installing and using this product.
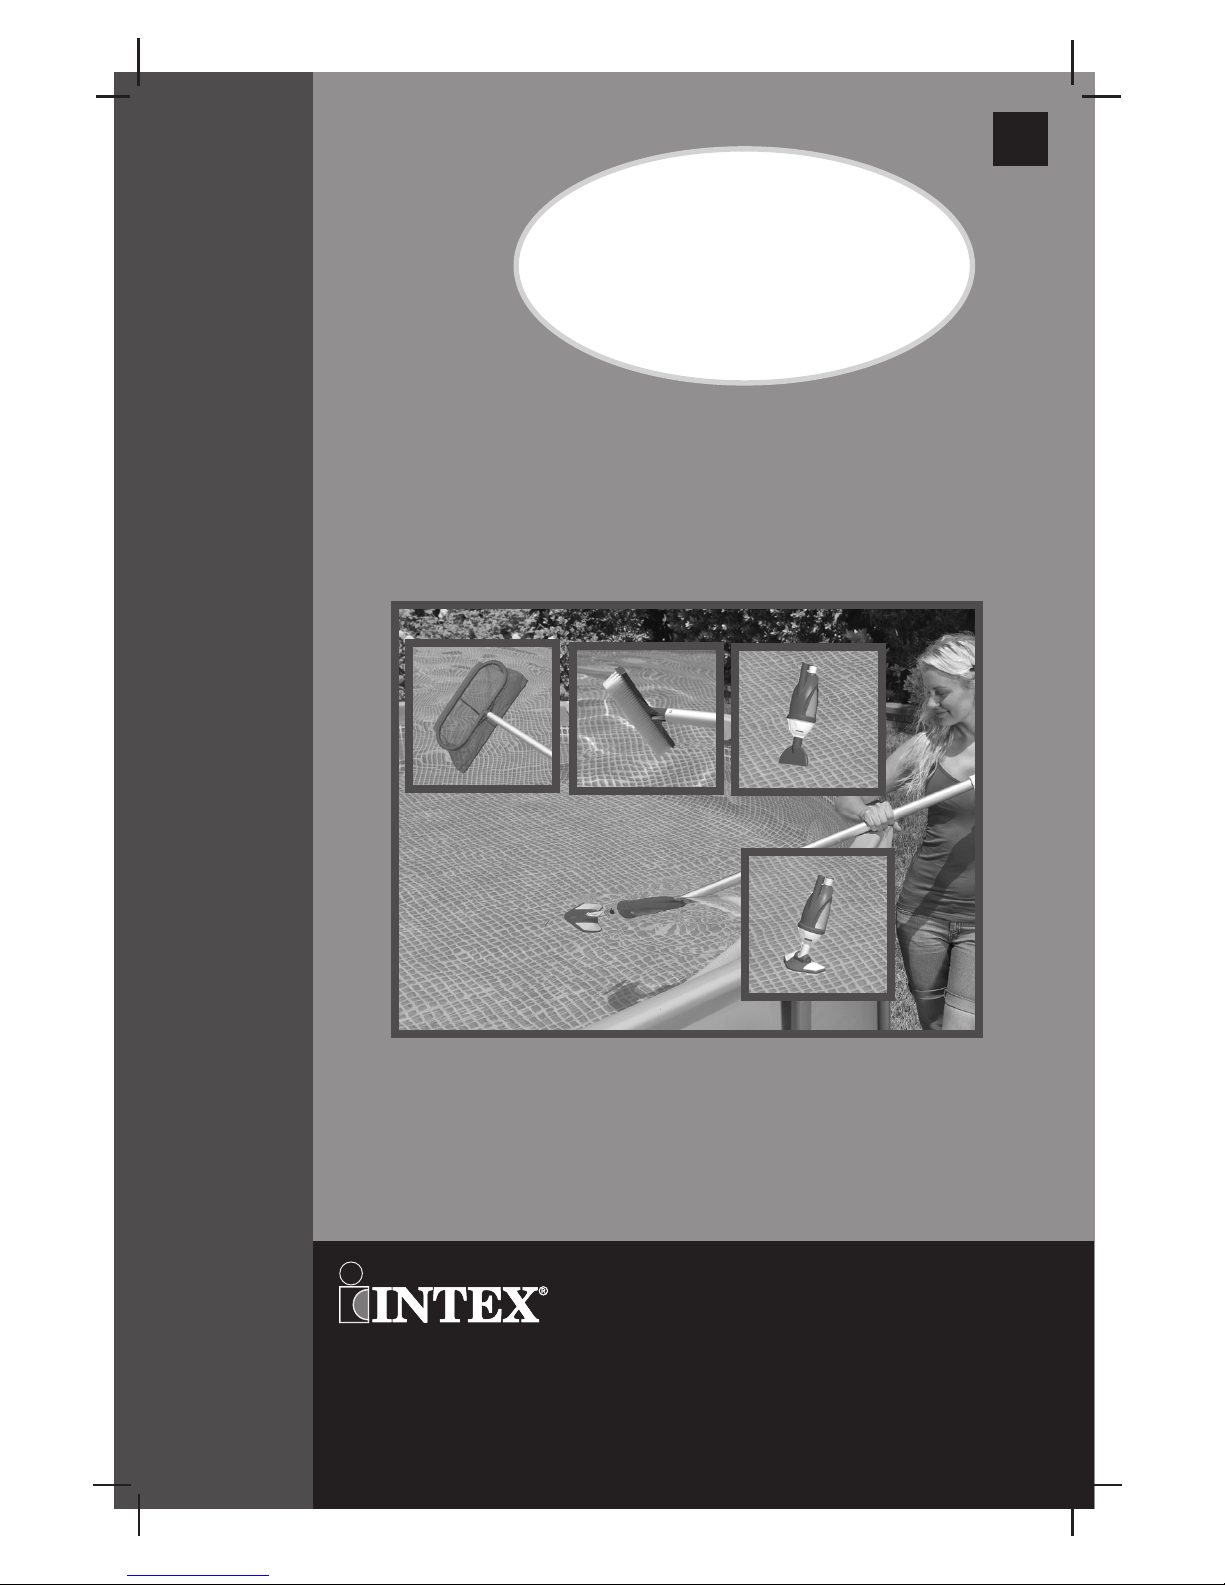
Deluxe Pool
Maintenance Kit (28003/E)
Don’t forget to try these other fine Intex products: Pools, Pool
Accessories, Inflatable Pools and In-Home Toys, Airbeds and Boats
available at fine retailers or visit our website.
Due to a policy of continuous product improvement, Intex reserves
the right to change specifications and appearance, which may result
in updates to the instruction manual without notice.
174-*A*-R0-1407
OWNER’S MANUAL
©2013 Intex Marketing Ltd. - Intex Development Co. Ltd. - Intex Trading Ltd.
- Intex Recreation Corp.
All rights reserved/Tous droits réservés/Todos los derechos reservados/Alle
Rechte vorbehalten. Printed in China/Imprimé en Chine/Impreso en China/Gedruckt in China.
®™ Trademarks used in some countries of the world under license from/®™ Marques utilisées dans certains pays sous
licence de/Marcas registradas utilizadas en algunos países del mundo bajo licencia de/Warenzeichen verwendet in
einigen Ländern der Welt in Lizenz von/Intex Marketing Ltd. to/à/a/an Intex Trading Ltd., Intex Development Co.
Ltd., G.P.O Box 28829, Hong Kong & Intex Recreation Corp., P.O. Box 1440, Long Beach, CA 90801 • Distributed
in the European Union by/Distribué dans l’Union Européenne par/Distribuido en la unión Europea por/Vertrieb in der
Europäischen Union durch/Intex Trading B.V., Venneveld 9, 4705 RR Roosendaal – The Netherlands
www.intexcorp.com
For illustrative purposes only. Pool may not be provided.
Page 2
(174IO) DELUXE POOL MAINTENANCE KIT ENGLISH SIZE: 4.875” X 7.25” PANTONE 295U 07/30/2013
174A
S AVE THESE INSTRUCTIONS
English
Page 2
Warnings.......................................................................... 3
Parts List & Reference................................................... 4
Pool Vacuum Set-Up Instructions................................. 5-8
Pool Vacuum Operating Instructions............................ 9
Hand-held Skimmer Assembly & Operating
Instructions and Long Term Storage............................ 10
TABLE OF CONTENTS
Page 3

(174IO) DELUXE POOL MAINTENANCE KIT ENGLISH SIZE: 4.875” X 7.25” PANTONE 295U 07/30/2013
174A
S AVE THESE INSTRUCTIONS
English
Page 3
IMPORTANT SAFETY RULES
Read, Understand and Follow All Instructions Carefully Before Installing and Using this Product.
WARNING
• Do not permit children to use this product. Adult use only.
• Do not operate the filter pump while the pool is occupied or in use.
• Strong suction. Keep hands and hair away from the vacuum body suction
opening when the filter pump is operating.
• Turn off or unplug the filter pump before adjusting, cleaning, servicing,
removing or changing components.
• Remove all maintenance items when the pool is in use.
• Keep telescoping aluminum handle away from any overhead power lines.
FAILURE TO FOLLOW THESE WARNINGS MAY RESULT IN PROPERTY
DAMAGE, ELECTRIC SHOCK, ENTANGLEMENT OR OTHER SERIOUS
INJURY, DROWNING OR DEATH.
These product warnings, instructions and safety rules provided with the
product represent some common risks of water recreation devices and do
not cover all instances of risk and danger. Please use common sense and
good judgement when enjoying any water activity.
Filter Pump Flow Rate Requirement:
800 - 4000 gallons/hour (3028 - 15140 liters/hour)
Page 4

(174IO) DELUXE POOL MAINTENANCE KIT ENGLISH SIZE: 4.875” X 7.25” PANTONE 295U 07/30/2013
174A
S AVE THESE INSTRUCTIONS
English
Page 4
PARTS REFERENCE
Before assembling your product, please take a few minutes to check the
contents and become familiar with all the parts.
NOTE: Drawings for illustration purpose only. Actual product may vary. Not to scale.
1
2
5
4
3
6
7
8
2
9
11
10
1
12
1
13
COMMON DESCRIPTION QTY.
SPARE
PART NO.
1 SPRING (PREINSTALLED IN 3,11 & 12) 3 10794
2 HOSE SEAL (PREINSTALLED IN 3 & 9) 2 10134
3
VACUUM BODY (SPRING & HOSE SEAL INCLUDED)
1 11431
4 DEBRIS BAG 1 10788
5 VACUUM BODY COVER 1 11443
6 VACUUM HEAD (BRUSH INCLUDED) 1 11445
7 BRUSH 1 11446
8 FLAT VACUUM NOZZLE 1 11444
9
ADAPTOR (HOSE SEAL INCLUDED)
1 11447
10 TELESCOPING ALUMINUM SHAFT 1 10798
11 BRUSH HEAD (SPRING
INCLUDED)
1 11073
12 SKIMMER NET (SPRING
INCLUDED)
1 10796
13 VACUUM HOSE 1 10797
Page 5

(174IO) DELUXE POOL MAINTENANCE KIT ENGLISH SIZE: 4.875” X 7.25” PANTONE 295U 07/30/2013
174A
S AVE THESE INSTRUCTIONS
English
Page 5
SETUP INSTRUCTIONS
1
Insert the debris bag (4),
into the vacuum body (3).
3
2
Install the vacuum body
cover (5) onto the vacuum
body (3). Turn the cover (5)
clockwise to securely lock
it to the vacuum
body (3).
Attach the desired cleaning head accessory to the vacuum body
cover:
a. Use the flat vacuum nozzle (8) to pick up heavy and/or mid-large particles
such as sand, stones, etc; and also to maneuver around tight corners or
pool edges.
b. Use the vacuum head brush (6) to pick up fine and/or small debris such as
dust and dead algae on the bottom of the pool floor.
Note: Make sure the ridge on the vacuum body cover (5) attachment end
matches the groove on the flat vacuum nozzle end or vacuum head brush
end.
Page 6

(174IO) DELUXE POOL MAINTENANCE KIT ENGLISH SIZE: 4.875” X 7.25” PANTONE 295U 07/30/2013
174A
S AVE THESE INSTRUCTIONS
English
Page 6
SETUP INSTRUCTIONS (continued)
4
6 7
5
Attach one end of the
vacuum hose (13) to the
vacuum body (3). Make
sure the vacuum hose end
is covering the hose seal (2)
on the vacuum body.
Squeeze the spring tips (1) and
attach the telescoping aluminum
shaft (10) onto the vacuum
body (3). Make sure the shaft is
securely attached by checking the
spring “pops” into the pre-drilled
holes. Adjust the length of the
shaft by unlocking, extending and
locking each section accordingly.
Screw the
adaptor
(9) to the
threaded strainer connector,
from inside of the pool.
Inlet hose connection
outlet hose connection
Inside of the
Pool Wall
Threaded Strainer
Connector
Strainer Grid
Inlet hose connection
outlet hose connection
Inside of the
Pool Wall
Threaded Strainer
Connector
Inside of the
Pool Wall
Page 7

(174IO) DELUXE POOL MAINTENANCE KIT ENGLISH SIZE: 4.875” X 7.25” PANTONE 295U 07/30/2013
174A
S AVE THESE INSTRUCTIONS
English
Page 7
SETUP INSTRUCTIONS (continued)
8
Place the whole assembled
product into the water.
Fill up the vacuum hose (13)
with water by submerging the
hose into the water slowly to
remove all of the entrapped air
from the hose. TIPS: Starting
from the end closest to the
vacuum body, submerge the
vacuum hose vertically into
the water slowly, section by
section.
Quickly attach the other end
of the vacuum hose (13)
filled with water to the
adaptor (9).
9
10
11
Pool floor
When the vacuum hose (13)
is filled with water, the water
will flow out from the other
end of the hose.
Water
Pool Floor
Water
Page 8

(174IO) DELUXE POOL MAINTENANCE KIT ENGLISH SIZE: 4.875” X 7.25” PANTONE 295U 07/30/2013
174A
S AVE THESE INSTRUCTIONS
English
Page 8
SETUP INSTRUCTIONS (continued)
12
Turn on the pump. To eliminate air trapped in the hose or in the pump system, turn
the air release valve (if any) 1-2 turns to allow air to escape. Refer to the pump
owner’s manual for details. IMPORTANT: Never run the pump dry as the motor may
overheat and damage the pump. Keep the vacuum body under the water at all times
during use, or the air will come into the hose, causing the pump to run dry and
damaging the pump.
13
If the debris bag (4) is full and experiencing low suction when vacuuming, turn off the
pump and bring the vacuum body assembly out of the water. Empty the debris bag by
reversing steps 1 to 3. Make sure the debris bag and vacuum body are clean before
replacing the components back. Repeat steps 1 to 3 to replace all components back.
NOTE: if experiencing low suction and the debris bag is clean, make sure the pump is
running, there is no blockage and/or air trapped along the water
circulation line.
• Release all the air from the hoses and filter pump before use.
• Keep the vacuum body under the water at all times during use.
• Remove the vacuum body assembly, hose and adaptor, and replace the strainer grid when
running the filter pump only and when the pool is not in use.
• Check and empty the debris bag regularly during and after each use.
IMPORTANT
The pool vacuum is now ready to use.
Page 9

(174IO) DELUXE POOL MAINTENANCE KIT ENGLISH SIZE: 4.875” X 7.25” PANTONE 295U 07/30/2013
174A
S AVE THESE INSTRUCTIONS
English
Page 9
POOL VACUUM OPERATING INSTRUCTIONS
1. The filter pump is an airtight system. To eliminate air trapped in the hose or in the
pump, turn the air release valve
(if any)
1-2 turns in a counter-clockwise motion to
open the valve. Refer to the pump owner’s manual for details.
2. When water starts flowing out of the air release valve hole, screw in the air release
valve back into the filter housing cover. Do not over tighten the valve.
3. Connect the filter pump to the power outlet and turn ON the pump.
4. In soft gentle strokes "sweep" the entire bottom surface of the pool liner until it’s
clear of debris.
5. Make sure the filter pump is turned off, and disconnect the power cord from the
electrical outlet. Remove the pool vacuum from the pool.
6. Using the Set-Up instructions in reverse, disassemble the vacuum cleaner. Clean
the debris bag if necessary.
7. Store the pool vacuum in an area where it will not be a safety hazard.
If you experience low suction on the vacuum, check that all of the air
has been removed from the hose. If you still have a low suction
problem, please review the Troubleshooting Guide for your filter pump
under "Filter pump does not pump water or flow is very slow". Also,
check that the debris bag and filter pump cartridge are clean.
IMPORTANT
Page 10

(174IO) DELUXE POOL MAINTENANCE KIT ENGLISH SIZE: 4.875” X 7.25” PANTONE 295U 07/30/2013
174A
S AVE THESE INSTRUCTIONS
English
Page 10
HAND-HELD SKIMMER NET ASSEMBLY & OPERATING INSTRUCTIONS
12
10
1. The hand-held skimmer net uses the same handle as the pool vacuum.
2. The skimmer net (12) has a plastic spring that connects to the end of handle. Align the plastic
spring located inside the net with the holes drilled in the handle. Gently squeeze together the
plastic spring tips so that the handle slips onto the net and the spring "POPS" into the
pre-drilled holes.
3. Gently sweep the surface of the pool with the skimmer net removing floating leaves, etc.
HAND-HELD BRUSH ASSEMBLY & OPERATING INSTRUCTIONS
1. The hand-held brush uses the same handle as the pool vacuum.
2. The brush head (11) has a plastic spring that connects to the end of handle. Align the plastic
spring located inside the brush head with the holes drilled in the handle. Gently squeeze
together the plastic spring tips so that the handle slips onto the brush head and the spring
"POPS" into the pre-drilled holes.
3. Gently sweep the entire side and bottom surfaces of the pool liner until it’s clear of debris.
11
10
LONG TERM STORAGE
1. Make sure the filter pump is turned off and disconnect the power cord from the
electrical outlet.
2. Using the Set-Up instructions in reverse, disassemble pool vacuum, hand-held
skimmer or hand-held brush.
3. Clean and air dry all the accessories and parts thoroughly.
4. The original packaging can be used for storage. Store in a dry, cool storage
location.
 Loading...