

Page 1
92IO) 48" & 52" 2-SECTIONS POOL LADDER ENGLISH 4.875” X 7.25” 07/17/2006
(
92IO 92IO
INTEX®OWNER’S MANUAL - POOL LADDER
48" (122cm) & 52" (132cm) models
IMPORTANT SAFETY RULES
Read, Understand and Follow All Instructions Carefully Before Installing and Using this Product.
(92IO) 48" & 52" 2-SECTIONS POOL LADDER ENGLISH 4.875” X 7.25” 07/17/2006
10914
10913
10912
10809
10810
10911
#10904
52”
10824
10809
10810
10815
#58975
10917A
10917B
10918A
10918B
10348
10349
10822A
10822B
11006A
11006B
WARNING
• LOCATE THE LADDER ON A SOLID BASE.
• ONE PERSON ON THE LADDER AT A TIME TO PREVENT INJURY.
• THE LADDER SHALL BE INSTALLED PER MANUFACTURER'S INSTRUCTIONS.
• FACE THE LADDER AT ALL TIMES WHEN GETTING IN OR OUT OF POOL.
• REMOVE AND SECURE LADDER WHEN POOL IS NOT OCCUPIED TO PREVENT
UNAUTHORIZED USE AND POSSIBLE DROWNING.
• DO NOT USE THE LADDER FOR ANY PURPOSE OTHER THAN THAT FOR WHICH IT WAS
INTENDED.
• CHECK ALL NUTS AND BOLTS REGULARLY TO ENSURE LADDER STAYS STURDY.
• DURING NIGHTTIME POOL USE, ARTIFICIAL LIGHTING SHALL BE USED TO ILLUMINATE ALL
SAFETY SIGNS, LADDERS, STEPS AND WALKS.
• ALWAYS ENSURE THAT THE LADDER IS USED UNDER CONSTANT ADULT SUPERVISION.
• NO DIVING. NO JUMPING. SHALLOW WATER.
FOLLOW THESE RULES TO AVOID SERIOUS INJURY OR DROWNING
These assembly instructions are the same for the 3-step and 4-step ladders.The assembly drawings show
the 4-step ladder.
Tools required: One (1) Phillips screwdriver
IMPORTANT: Do not fully tighten fasteners until last assembly operation.
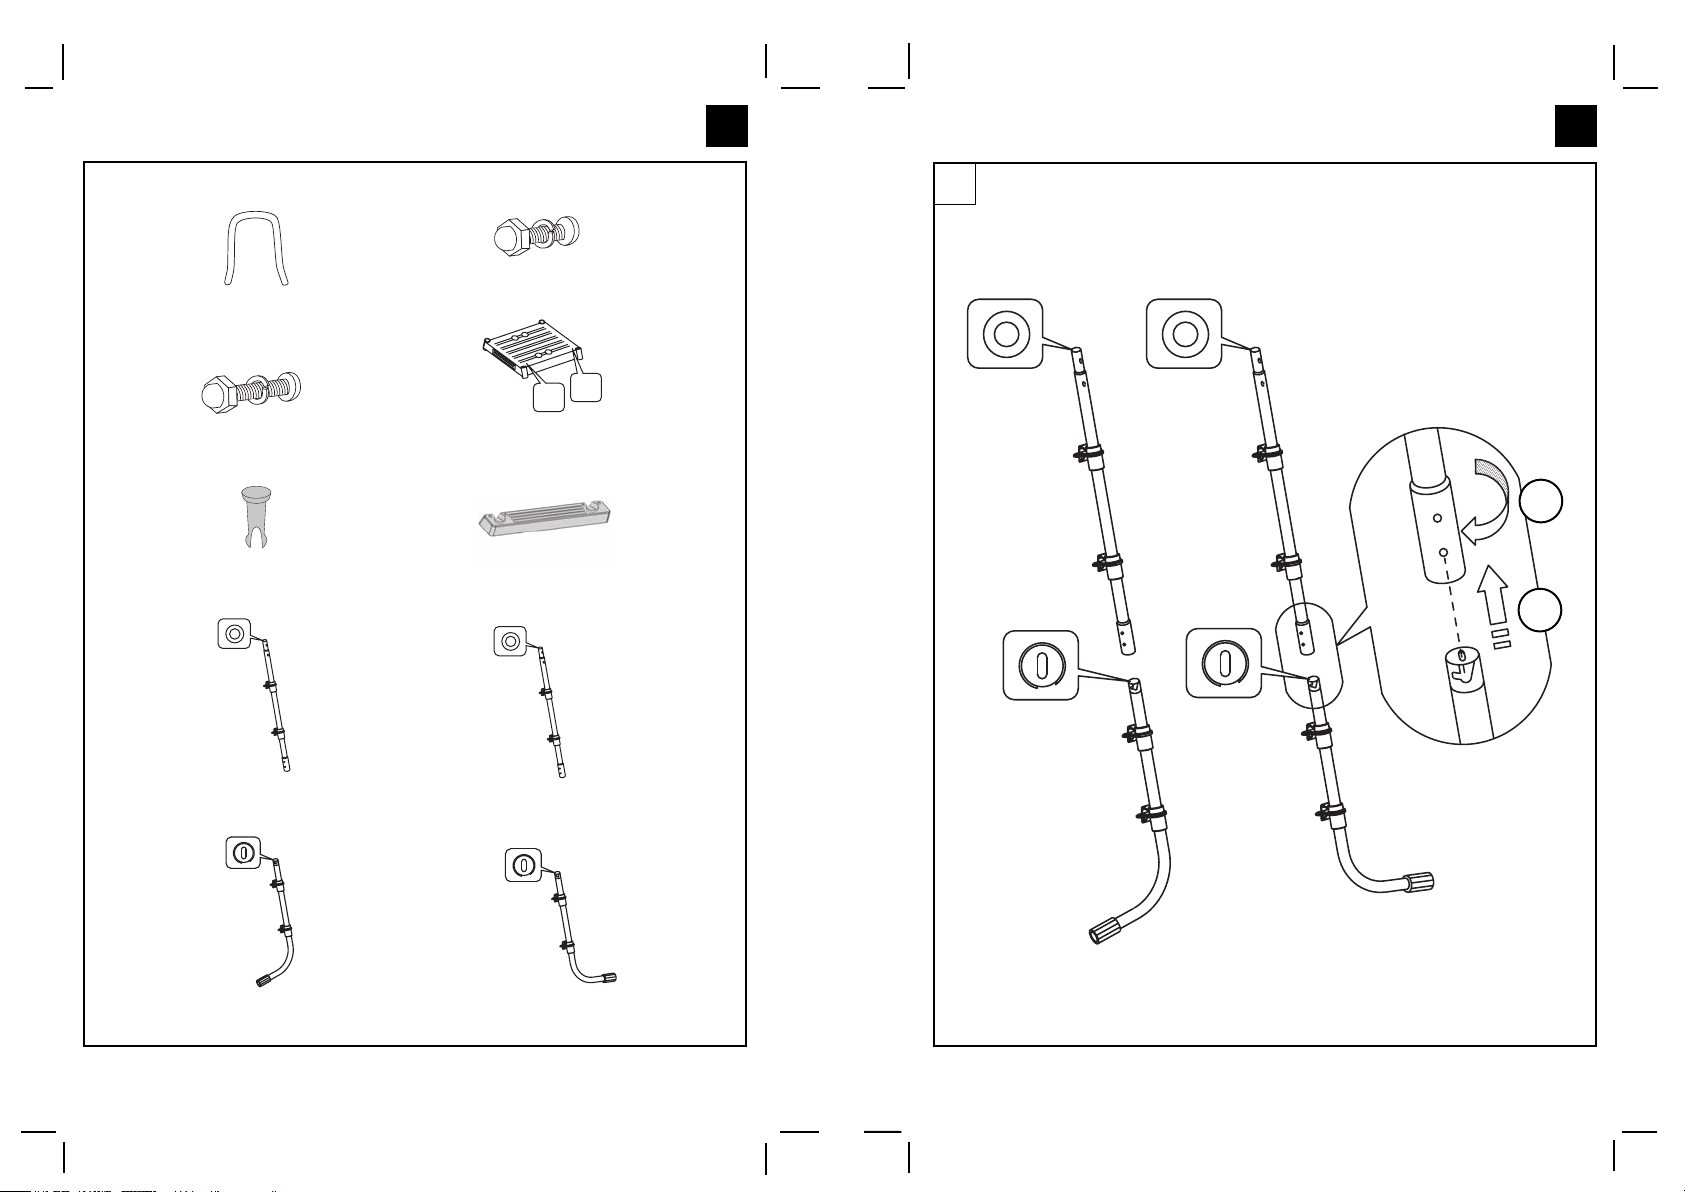
1. Leg Installation
Align the groove and notch, connect the "A" upper legs (7) with the "A" lower legs (9), "B" to "B". Turn the
upper leg clockwise to secure.
2. Step Installation
The pool ladder legs have the step mounting fixtures installed at the factory.
With the arrow on the backside of the step mounting fixture facing up, slip the step (6) onto the mounting
fixture, matching the direction of the arrow on the step.
Ensure the back of the step is flush with the mounting fixture, otherwise the step will be installed upside-down.
IMPORTANT: During assembly, the "A" legs fit into the "A" step holes, and "B" legs into "B". Push the
step mounting pins (5) into the holes securing the step in a fixed position.
op platform Installation (One Side at a Time)
3. T
Look for the "A" identification mark on the top platform (4). Slide the top platform "A" hole onto the "A" leg, "B"
to "B". Fasten with fasteners (3) as shown.
IMPORTANT: Do not fully tighter fasteners at this time. Follow the illustrations as shown.
4. U-Shaped Top Rail Installation
Install the U-Shaped top rails (1) onto the subassembly as shown and connect with fasteners (2).
IMPORTANT: During assembly, pushing both sides of the ladder inwards will help slide the U-shaped
top rails onto the legs.
5. Final Assemb
Fully tighten all fasteners and apply downward pressure to each step to be sure they are fully anchored in
place. The ladder is now ready to use!
This ladder is designed and manufactured for Intex Pool wall height:
Refer back of the manual for Parts Reference.
SAVE THE CARTON FOR STORAGE AND THE INSTRUCTIONS FOR RE-ASSEMBLY
One (1) pair of pliers or a small adjustable wrench
ly
Item # Pool Wall Height
58974 (white & blue) 48" (122 cm)
10903 (silver & white) 48" (122 cm)
58975 (white & blue) 52" (132 cm)
10904 (silver & white) 52" (132 cm)
092IO-R0-0707
10911
#10903
SPARE PART NO.
48”
10824
10809
10810
10815
#58974
2
5
5
52”
QUANTITY
2
48”
LADDER SIZE &
1
5
5
1
10915A
10915B
10916A
10916B
10348
10349
11004A
11004B
11005A
11005B
8
2
2
2
34
6
2
26
2
2
2
2
10914
10913
10912
10809
10810
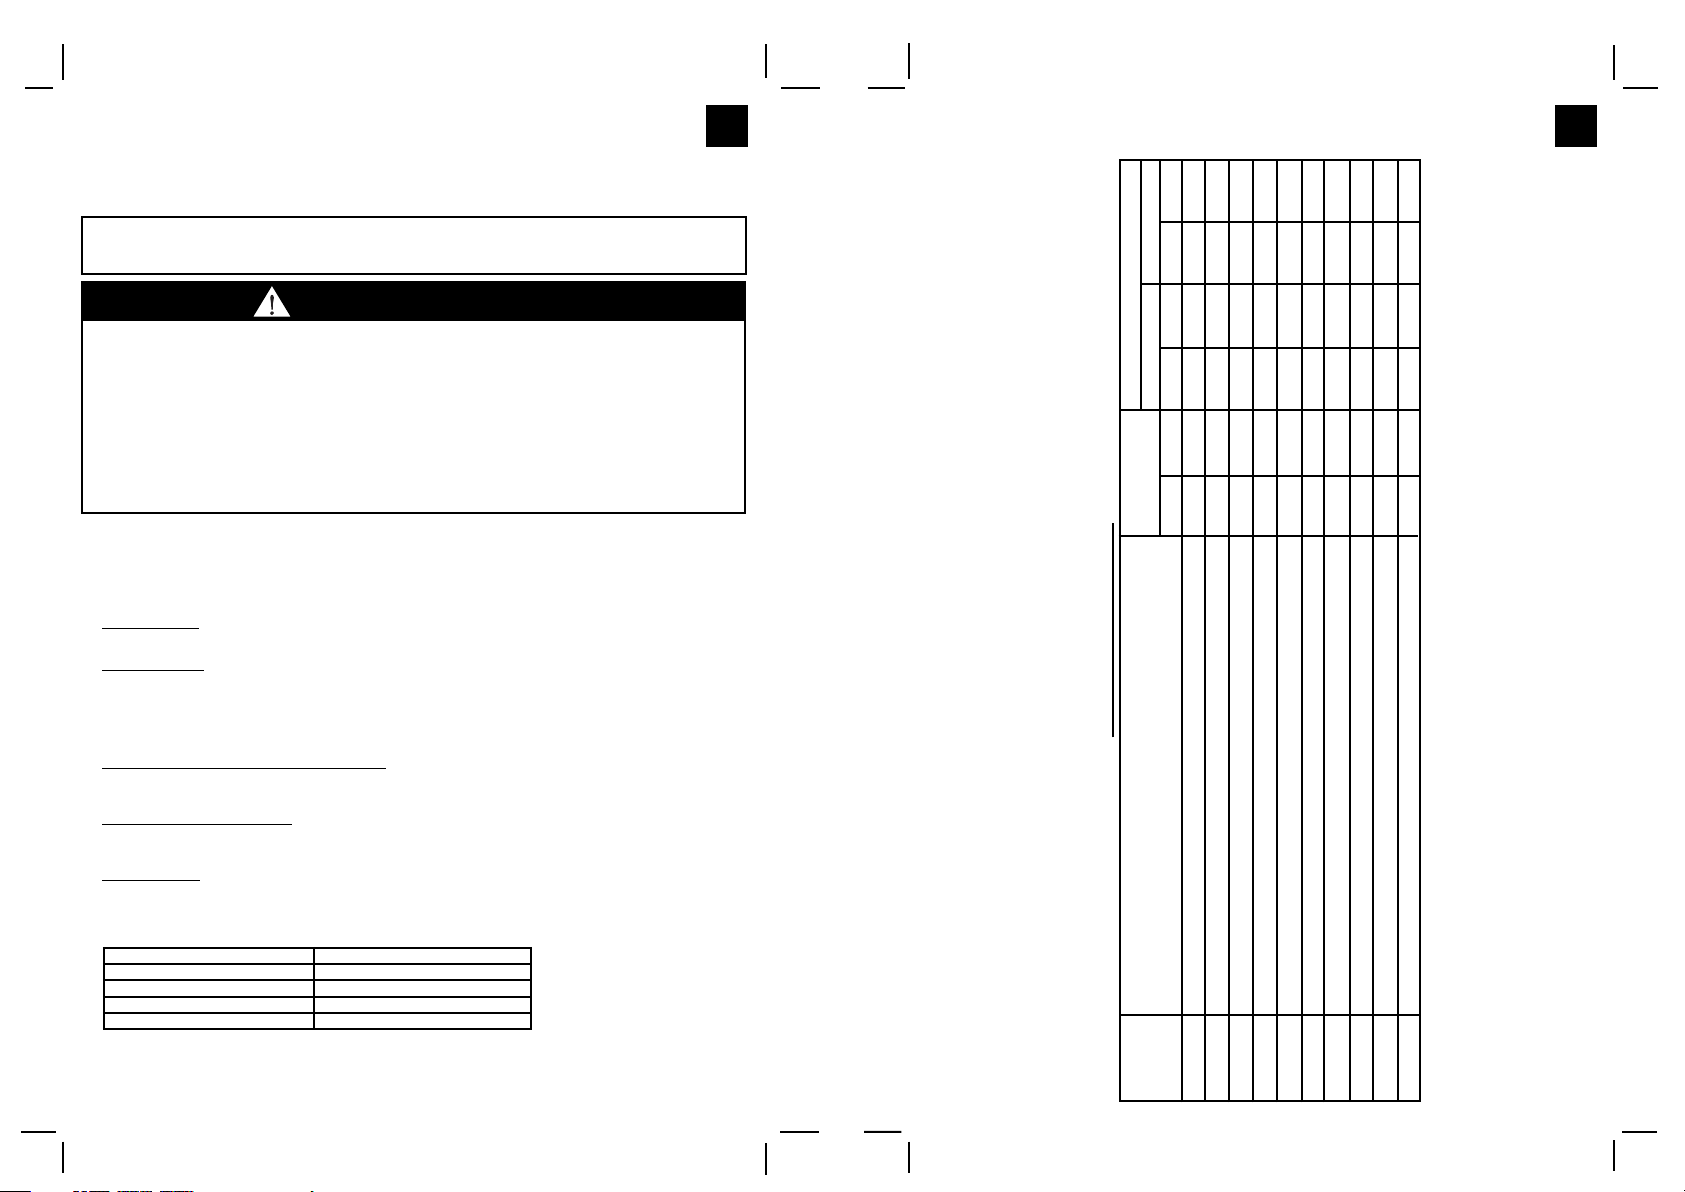
PARTS REFERENCE
DESCRIPTION
SHORT FASTENER FOR U-SHAPED TOP RAIL (WITH 1 EXTRA)
U-SHAPED TOP RAIL
LONG FASTENER FOR TOP PLATFORM (WITH 1 EXTRA)
TOP PLATFORM
1
2
3
4
REF. NO.
UPPER SIDE LEG (“A” ENGRAVED ON TOP CAP)
STEP
STEP MOUNTING PIN (WITH 2 EXTRA)
5
UPPER SIDE LEG (“B” ENGRAVED ON TOP CAP)
LOWER J-SHAPED SIDE LEG (“B” ENGRAVED ON TOP CAP)
LOWER J-SHAPED SIDE LEG (“A” ENGRAVED ON TOP CAP)
6
7
8
9
10
Page 2
92IO 92IO
1
7
2
3
4
5
6
B
A
A
9
A
10
B
8
B
1
A
A
B
B
1
2
1.1
(92IO) 48" & 52" POOL LADDER 4.875” X 7.25” 07/17/2006
(92IO) 48" & 52" POOL LADDER 4.875” X 7.25” 07/17/2006
A
B
A
B
A
A
B
A
B
B
B
Page 3

92IO 92IO
2.1
2.2
2.3
B
A
2
A
B
A
1
2
3
4
3
1
2
3
B
(92IO) 48" & 52" POOL LADDER 4.875” X 7.25” 07/17/2006
(92IO) 48" & 52" POOL LADDER 4.875” X 7.25” 07/17/2006
A
B
A
A
Page 4

92IO 92IO
4
5
1
2
3
6
7
(92IO) 48" & 52" POOL LADDER 4.875” X 7.25” 07/17/2006 (92IO) 48" & 52" POOL LADDER 4.875” X 7.25” 07/17/2006
©2006 Intex Marketing Ltd. - Intex Development Co. Ltd. - Intex Recreation Corp.
All rights reserved/Tous droits réservés/Todos los derechos reservados/Alle Rechte vorbehalten.
Printed in China/Imprimé en Chine/Impreso en China/Gedruckt in China.
®™ Trademarks used in some countries of the world under license from/®™ Marques utilisées dans certains pays sous licence de/Marcas
registradas utilizadas en algunos países del mundo bajo licencia de/Warenzeichen verwendet in einigen Ländern der Welt in Lizenz von/Intex
Marketing Ltd. to/à/a/an Intex Development Co. Ltd., 8th Floor, Dah Sing Financial Centre, 108 Gloucester Road, Wanchai, Hong Kong &
Intex Recreation Corp., P.O. Box 1440, Long Beach, CA 90801 • Distributed in the European Union by/Distribué dans l’Union Européenne
par/Distribuido en la unión Europea por/Vertrieb in der Europäischen Union durch/Intex Trading B.V., P.O. Box nr. 1075 – 4700 BB Roosendaal –
The Netherlands
 Loading...