


[EN] QUICK INSTALL GUIDE 3
[DE] INSTALLATIONSANLEITUNG 5
[FR] GUIDE D’INSTALLATION 7
[IT] GUIDA PER L’INSTALLAZIONE 9
[ES] GUÍA RÁPIDA DE INSTALACIÓN 11
[CA] GUIA RÀPIDA D’INSTALLACIÓ 13
[NO] INSTALLASJONSVEIVISER 15
[SW] INSTALLATIONSGUIDE 17
[DK] INSTALLATIONSVEJLEDNING 19
[NL] INSTALLATIEGIDS 21
[PL] INSTRUKCJA MONTAZ˙U 23
[RU] РУКОВОДСТВОПОУСТАНОВКЕ 25
1
2
3
2-a 2-b
3
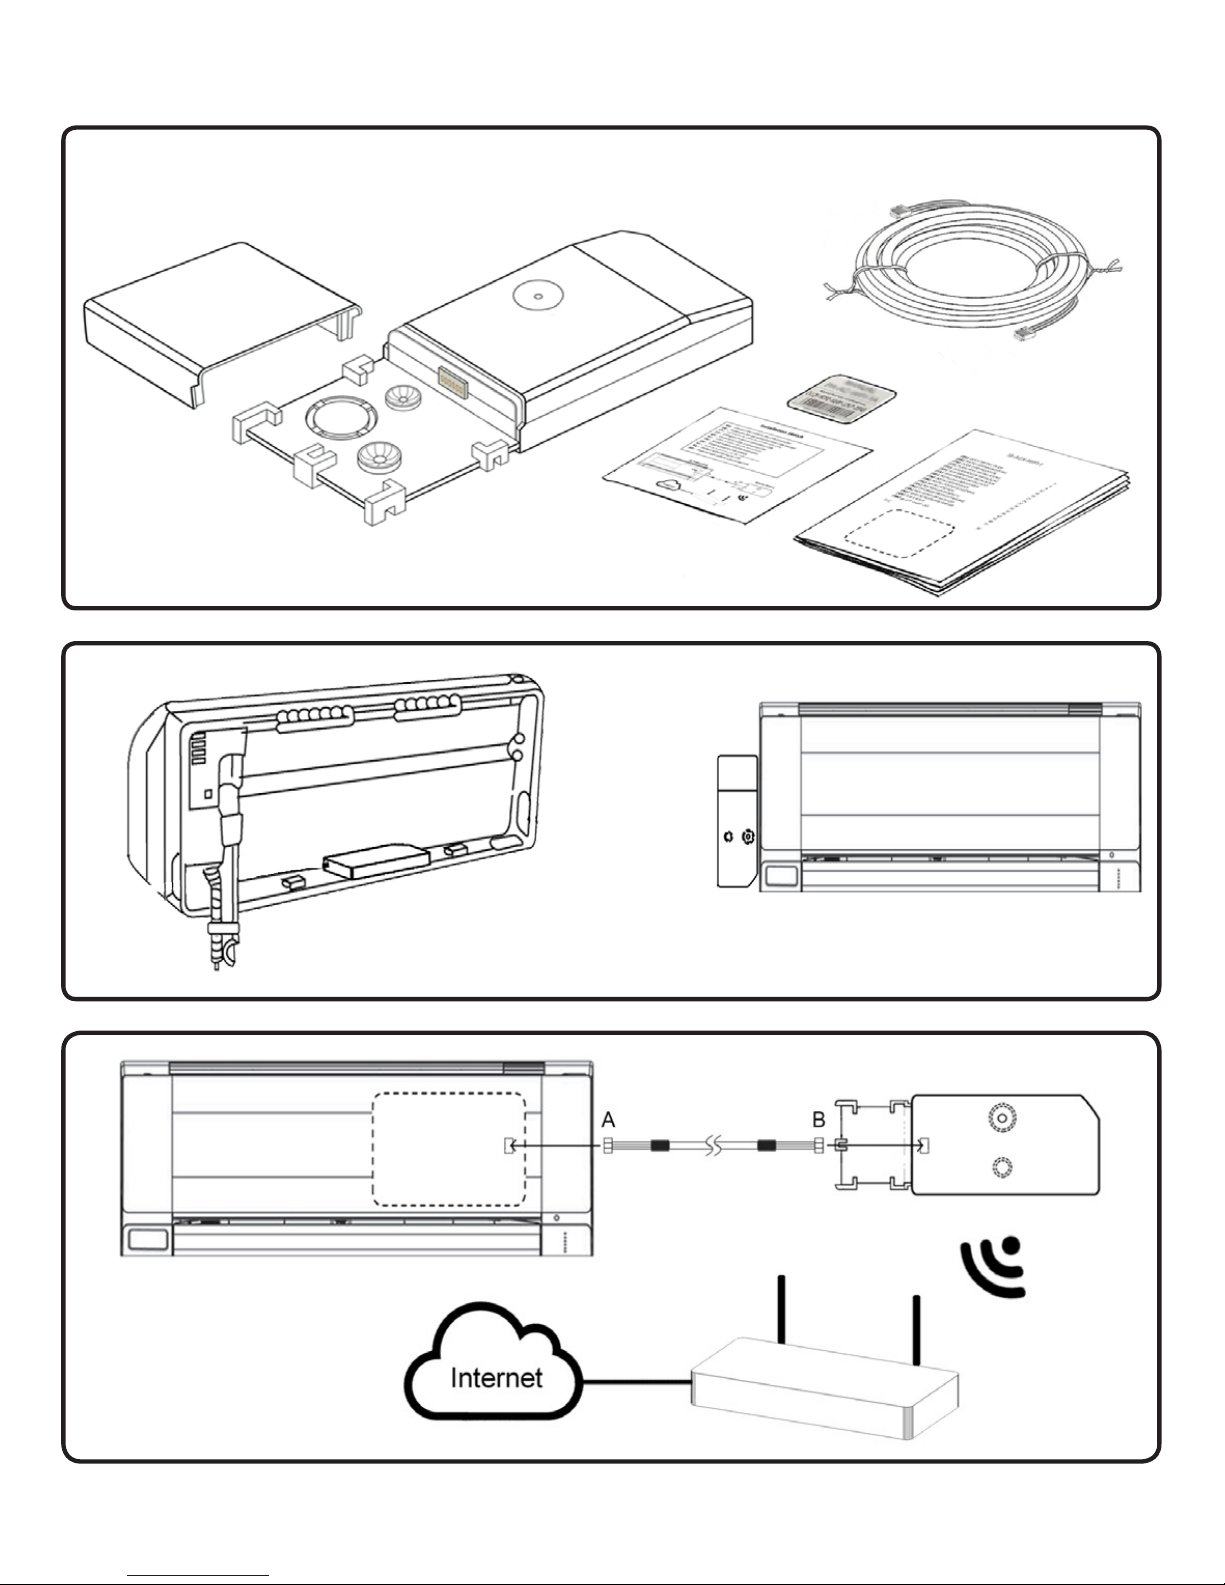
1. Product description (Figure 1)
The device is an external module capable of connecting Air Conditioning units into your WiFi network to
provide global connectivity and remote control applications through a friendly user interface.
Packaging content:
Installation process should only be performed by an authorized installer.
Please follow all Safety Instructions provided by the AC manufacturer manuals.
• Device • Installation Sketch • Quick start guide
4. WiFi conguration
Download the App from Google Play or the App Store and follow instructions.
5. Device registration
1. Download the App from Google Play or the App Store and follow instructions.
2. Create an account (in case you don’t have it yet).
3. Visit the settings/device/ section and click on add device.
4. Introduce the registration code (25-digit code on the label).
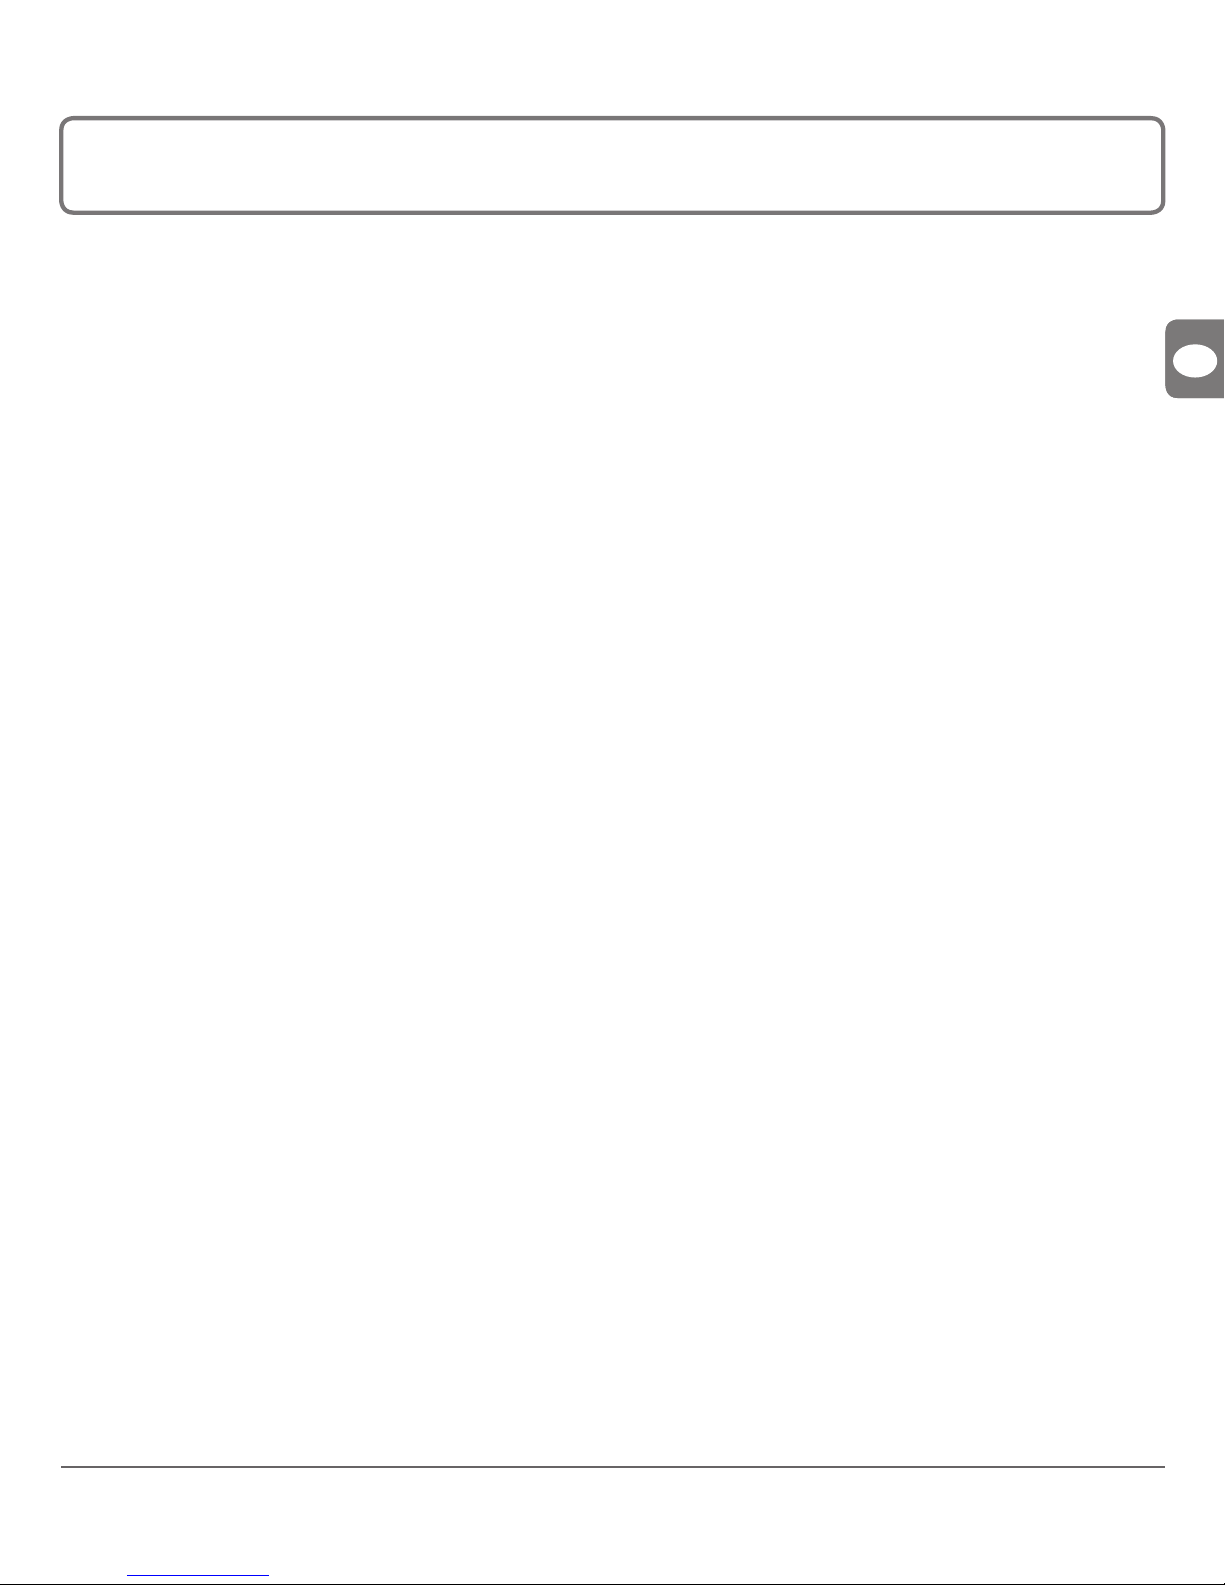
3. Device connection (Figure 3)
1. Unplug the Air Conditioner (AC) unit from mains.
2. Access to the main Printed Circuit Board.
3. Locate the socket connector indicated in the Installation Sketch.
4. Select a location for the device.
5. Connect the A-end (the long one) of the supplied cable to the Air Conditioner specic connector and
the B-end (the short one) to the device connector. *
6. Close the Air Conditioner unit.
7. Plug the AC to the power supply line. If connection with the Air Conditioner has been successful,
device LED will start blinking Green and then will change to steady Green.
* Check the Installation Sketch for detailed information.
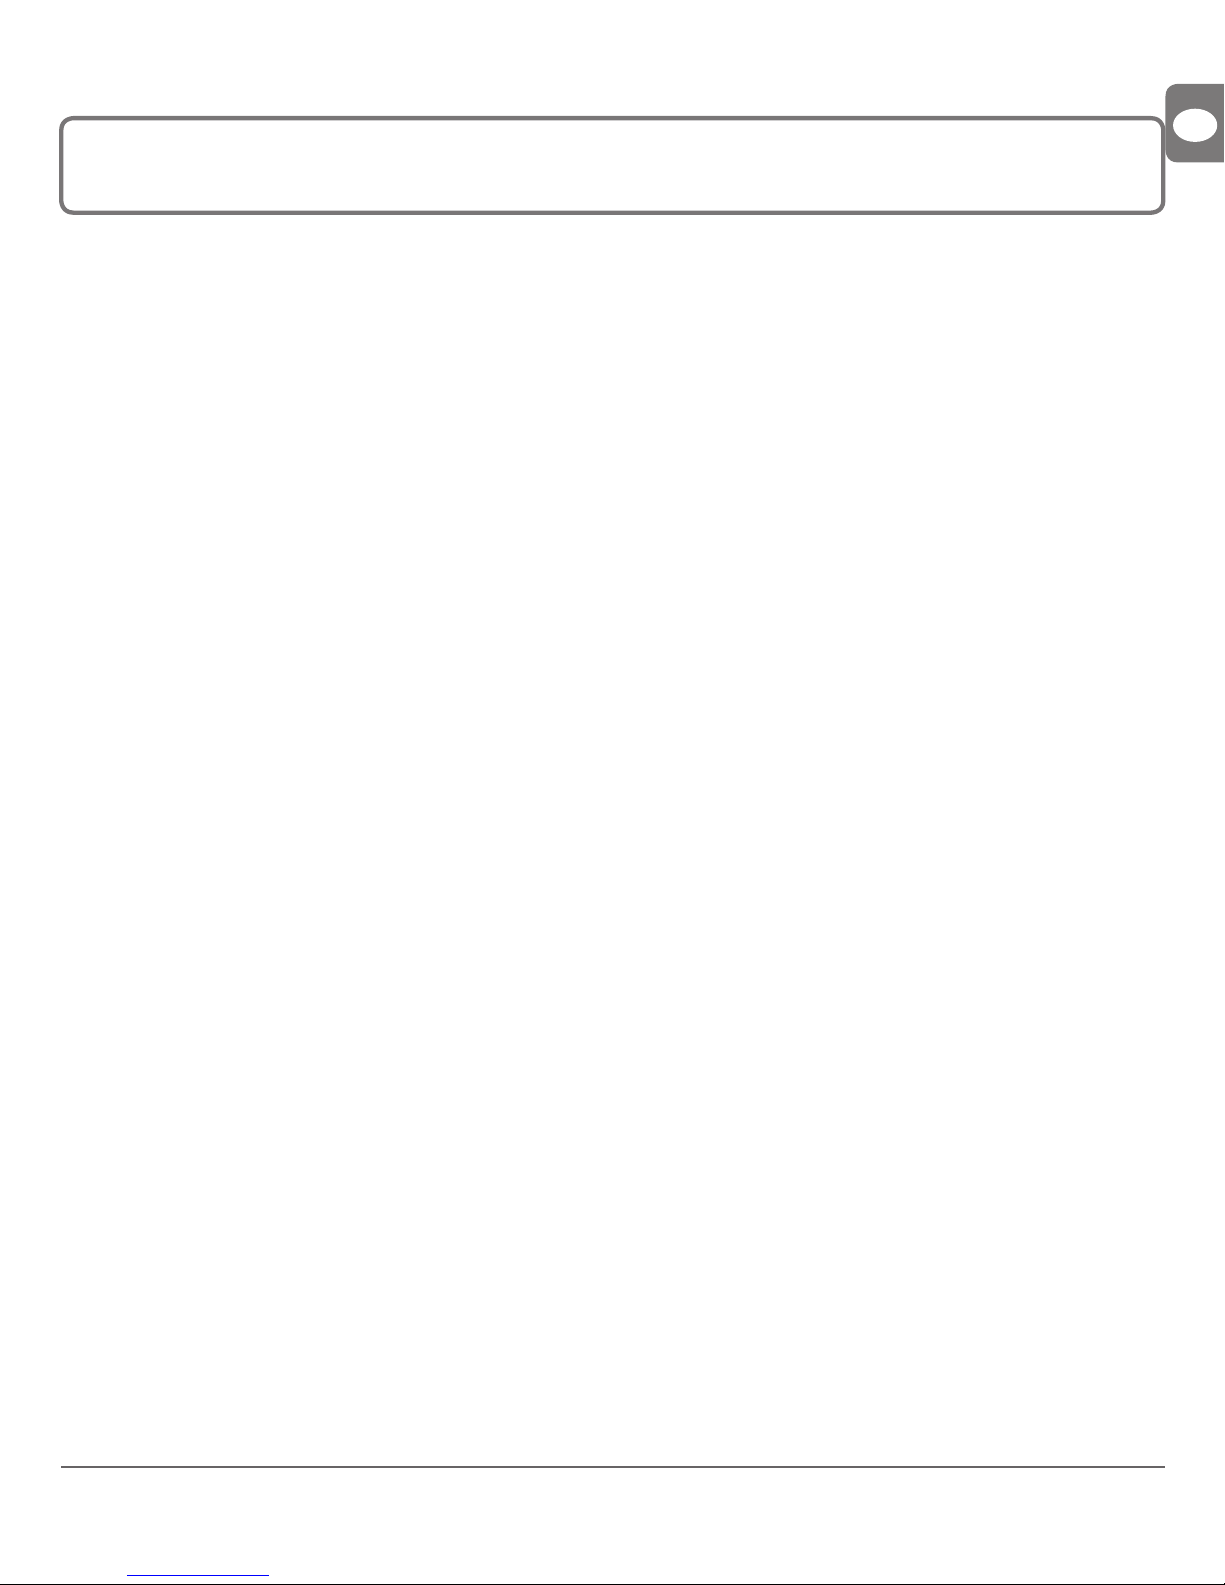
2. Device location
Device installed inside the AC unit or hidden (Figure 2-a)
• The indication LED and the button are not going to be accessible by the user.
• If the
re is not enough space for installation inside the AC unit, the following actions can be performed:
o If it is due to water pipes, change the side of the AC where they are connected to get more
space inside the AC unit.
o Otherwise the support surface can be removed.
Device installed outside the AC unit (Figure 2-b)
• The device can be xed both: using screws of double side tape.
• The cable lid has several options to direct the cables to the desired direction.
EN
• Specic cable
• Label

4
WARRANTY DOCUMENT
1. Intesis Software, S.L.U. (hereinafter “Intesis”), in its capacity as manufacturer, hereby informs you of the rights which Royal
Legislative Decree 1/2007, of November 16, approving the revised General Consumer and User Protection Law and the rest of
the legislation applicable confers on you in your capacity as consumer in the event of nonconformity of the device (hereinafter the
“Device”).
2. Intesis warrants to you that for two (2) years from the delivery of the Device it shall be liable, under the terms and conditions
established in this document, for the nonconformity of the Device, provided that such nonconformity is due to a manufacturing
defect which prevents the use of the Device in the ordinary manner or with its usual levels of quality and performance. In this
respect, it shall be presumed that the nonconformities which are revealed within six (6) months from the delivery of the Device
already existed when the Device was delivered, unless this presumption is incompatible with the alleged nonconformity.
3. If a legitimate nonconformity of the Device in accordance with the previous paragraph is shown, you may choose free of
charge between the repair and the replacement of the Device, provided that the option which you choose is objectively possible
and proportionate.
4. If you have opted for the repair of the Device but when such repair has been performed and the Device has been delivered, it
still contains the manufacturing defect which gave rise to the nonconformity, you may request the replacement of the Device by
another of the same kind, unless such replacement is disproportionate in relation to the defect.
5. If you opt for the repair or the replacement of the Device, the calculation of the warranty period provided in section 2 of this
document shall be suspended from the time you deliver the nonconforming Device until the repaired or replaced Device is
delivered to you, the remaining warranty period resuming from that time onwards. Intesis shall also be liable for the manufacturing
defects which caused the repair for six (6) months from such repair.
6. If repair or replacement is not possible or has not been carried out by Intesis, you may request the reduction of the price or even
the return of the Device with a refund of the price paid. However, you may not return the Device demanding payment of the price
paid if the manufacturing defect giving rise to the nonconformity is of little importance.
7. The warranty of the Device does not cover any defect, irregularity, malfunctioning or reduction of the quality or the performance
caused by:
(i) Any defect or malfunctioning of the air-conditioning equipment in which the Device is installed.
(ii) Defective or incorrect installation of the Device by the technician that you may hire in order to perform such installation or by
any other third party.
(iii) Any handling by you of the Device, as well as any incorrect use which you may make of the Device, including cases of
dismantling or opening of the Device and the addition of parts or additional accessories both to the Device and to the airconditioning equipment in which it is installed.
(iv) Failure or interruptions of the electricity or computer supply or arising from access to and operation of the Internet beyond the
control of Intesis, as well as any others arising from improper use of the Device.
(v) Damages caused by the transport or the storage of the Device not attributable to Intesis, or any other related to the
maintenance of the Device before and after the sale thereof.
(vi) The normal wear and tear of the Device or its parts as a result of the passage of time, as well as the breakage thereof or
others arising from blows, falls or impacts.
(vii) The contact of the Device with water or other inappropriate substances, as well as damage caused as a result of environmental
conditions which are unsuitable or not in accordance with those indicated in the instructions manual.
8. In order to prove the date of receipt of the Device for the purpose of the calculation of the warranty period, you should retain
the invoice or receipt of purchase.
9. This warranty applies to Devices purchased in Spain. In the case of Devices purchased outside Spain, the warranty conditions
established in the country where they were acquired shall apply.
10. In order to exercise the rights derived from this warranty, you may send an e-mail to warranty@intesis.com, in which the
procedure to be followed will be indicated to you.
INTESIS SOFTWARE, S.L.U.
C/ Milà i Fontanals, 1 bis
08700 – Igualada (Barcelona)
Telephone: +34938047134

5
DE
1. Produktbeschreibung (Abbildung 1)
Gerät ist ein externes Modul für die Verbindung von Klimaanlagen mit Ihrem WLan-Netz, das mittels
einer benutzerfreundlichen Schnittstelle eine weltweite Konnektivität sowie Anwendungen für eine
Fernregelung bietet.
Lieferumfang:
Die Installation sollte ausschließlich von einem zugelassenen
Installateur vorgenommen werden.
Bitte befolgen Sie sämtliche in den Handbüchern von AC angegebenen Sicherheitshinweise.
• Geräte
• Spezisches Kabel
• Installationsanleitung
3. Geräteanschlüsse (Abbildung 3)
1. Trennen Sie die Klimaanlage (AC) vom Stromnetz.
2. Zugriff auf die Leiterplatte.
3. Suchen Sie den in der Installation Sketch angegebenen Steckdosenstecker.
4. Wählen Sie einen Installationsort für Geräte aus.
5. Verbinden Sie das (längere) Ende “A” des mitgelieferten Kabels mit dem Anschluss an der Klimaanlage und das (kürzere) Ende “B” mit dem dafür vorgesehenen Anschluss an Ihrem Gerät. *
6. Schließen Sie die Klimaanlage.
7. Verbinden Sie die Klimaanlage erneut mit dem Stromnetz. Wenn die Verbindung zur Klimaanlage
erfolgreich hergestellt werden konnte, beginnt die LED-Leuchte von zunächst zu blinken, und wechselt
dann auf ein durchgehendes grünes Licht.
* Überprüfen Sie die InstallationSketch auf detaillierte Informationen
2. Gerätestandort
Installation des Geräts innerhalb der Klimaanlage oder “versteckt” (Abbildung 2-a)
• In diesem Fall hat der Benutzer keinen Zugriff auf die LED-Lampe und die Taste
• Wenn innerhalb der Klimaanlage nicht ausreichend Platz für die Installation vorhanden ist, kann folgendermaßen vorgegangen werden:
o Wenn aufgrund von Wasserleitungen nicht genügend Platz vorhanden ist, können diese auf der
anderen Seite der Klimaanlage angeschlossen werden, um innerhalb des Gehäuses mehr Platz
zu schaffen.
o Andernfalls kann die Stützplatte entfernt werden
Installation des Geräts außerhalb der Klimaanlage (Abbildung 2-b)
• Das Gerät kann durch Schrauben oder doppelseitiges Klebeband befestigt werden.
• Die Kabelabdeckung verfügt über verschiedene Optionen, um die Kabel in die gewünschte Richtung
zu verlegen.
4. WiFi-Konguration
Laden Sie die App von Google Play oder dem App Store herunter und folgen Sie den Anweisungen.
5. Geräteregistrierung
1. Laden Sie die App von Google Play oder dem App Store herunter und folgen Sie den Anweisungen.
2. Erstellen Sie ein Konto (falls Sie es noch nicht haben).
3. Besuchen Sie die Einstellungen / Gerät / Abschnitt und klicken Sie auf Gerät hinzufügen.
4. Geben Sie den Registrierungscode ein (25-stelliger Code auf dem Etikett).
• Installation Sketch
• Etikette

6
GARANTIE
1. Intesis Software, S.L.U. (im Anschluss “Intesis” genannt) informiert Sie hiermit in seiner Eigenschaft als Hersteller über Ihre
Rechte als Verbraucher, die aus dem königlichen Erlass 1/2007 vom 16. November hervorgehen, welcher die überarbeitete
Version des spanischen Verbraucherschutzgesetzes sowie alle zugehörigen Gesetze anerkennt, im Falle einer Nichtkonformität
des Geräts (im Anschluss das “Gerät”).
2. Intesis gewährt ab Lieferung des Geräts gemäß den in diesem Dokument festgelegten Geschäftsbedingungen zwei (2) Jahre
Garantie bei Nichtkonformität des Geräts, sofern eine solche Nichtkonformität auf einen Herstellungsfehler zurückzuführen ist, der
verhindert, dass eine normale Verwendung des Geräts oder eine Verwendung mit dem üblichen Qualitäts- und Leistungsniveau
möglich ist. Diesbezüglich gelten Nichtkonformitäten, die innerhalb von sechs (6) Monaten nach Lieferung des Geräts festgestellt
werden als zum Zeitpunkt der Lieferung bereits existierende Nichtkonformitäten, außer diese Annahme ist mit der mutmaßlichen
Nichtkonformität unvereinbar.
3. Sollte eine Nichtkonformität festgestellt werden, die den Bedingungen des vorhergehenden Paragraphs entspricht, können Sie
frei zwischen einer Reparatur und einem Austausch des Geräts wählen, sofern die von Ihnen gewählte Option objektiv möglich
und angemessen ist.
4. Wenn Sie sich für eine Reparatur des Geräts entschieden haben, diese ausgeführt wurde und das Gerät nach Lieferung
weiterhin den Herstellungsfehler enthält, der für die Nichtkonformität verantwortlich war, können Sie den Austausch des Geräts
durch ein gleichwertiges Gerät verlangen, außer ein solcher Austausch wäre angesichts des Fehlers unverhältnismäßig.
5. Wenn Sie sich für eine Reparatur oder den Austausch des Geräts entschieden haben, wird die Berechnung des
Garantiezeitraums ausgesetzt zwischen dem Zeitpunkt, an dem Sie das von einer Nichtkonformität behaftete Gerät einschicken,
und dem Zeitpunkt, an dem es Ihnen wieder geliefert wird. Intesis haftet ab einer solchen Reparatur ebenfalls sechs (6) Monate
für Herstellungsfehler, die eine solche Reparatur verursacht haben.
6. Wenn eine Reparatur oder ein Austausch nicht möglich sind oder von Intesis nicht ausgeführt wurden, können Sie eine
Reduzierung des Preises verlangen oder das Gerät einsenden und eine Rückerstattung verlangen. Es ist jedoch nicht möglich,
das Gerät unter Forderung einer Rückerstattung des Kaufpreises einzusenden, wenn der Herstellungsfehler, welcher der
Nichtkonformität zugrunde liegt, von geringer Bedeutung ist.
7. Die Garantie für das Gerät deckt keinerlei Defekt, Unregelmäßigkeit, Funktionsfehler oder Reduzierung der Qualität oder
Leistung, die verursacht wurden durch:
(i) Defekte oder Funktionsstörungen des Klimaanlagensystems, in welchem das Gerät installiert ist.
(ii) Fehlerhafte oder falsche Installation des Geräts durch den Techniker oder Dritte, den/die Sie gegebenenfalls mit der
Durchführung der Installation beauftragt haben.
(iii) Jegliche Handhabung des Geräts oder die unsachgemäße Verwendung des Geräts, einschließlich aller Fälle von Zerlegen
oder Öffnen des Geräts sowie das Hinzufügen von Teilen oder Zubehör zum Gerät oder dem Klimaanlagensystems, in welchem
das Gerät installiert ist.
(iv) Ausfälle oder Unterbrechung der Stromversorgung oder der Computerverbindung oder entstehend aus Zugriff und Nutzung
des Internets außerhalb der Kontrolle von Intensis sowie jegliche andere, die aus einer unsachgemäßen Verwendung des Geräts
entstehen.
(v) Schäden, die durch Transport und Lagerung des Geräts entstehen und nicht Intesis zugeschrieben werden können, sowie
Schäden in Verbindung mit der Wartung des Geräts vor und nach dessen Verkauf.
(vi) Die normale, im Laufe der Zeit entstehende Abnutzung des Geräts sowie Bruch und andere Schäden, die durch Stoß, Fall
oder Schlag entstanden sind.
(vii) Der Kontakt des Geräts mit Wasser oder anderen ungeeigneten Substanzen sowie Schäden, die durch die
Umgebungsbedingungen verursacht wurden, die ungeeignet sind oder nicht mit den Bedingungen übereinstimmen, die in der
Bedienungsanleitung aufgeführt werden.
8. Als Nachweis des Empfangsdatums des Geräts für die Berechnung des Garantiezeitraums müssen Sie die Rechnung oder
die Empfangsbestätigung aufbewahren.
9. Diese Garantie gilt für Geräte, die in Spanien gekauft wurden. Für außerhalb Spaniens gekaufte Geräte gelten die
Garantiebedingungen des Landes, wo das Gerät gekauft wurde.
10. Bitte senden Sie für die Ausübung der aus dieser Garantie hervorgehenden Rechte eine E-Mail an warranty@intesis.com, im
Anschluss daran erhalten Sie eine Erläuterung der zu befolgenden Schritte.
INTESIS SOFTWARE, S.L.U.
C/ Milà i Fontanals, 1 bis
08700 – Igualada (Barcelona)
Telefon: +34938047134

7
FR
1. Description du produit (Illustration 1)
Le dispositif est un module externe servant à connecter un climatiseur au réseau WiFi an de fournir
une connectivité globale et un contrôle distant des appareils grâce à une interface usager intuitive
Contenu du paquet:
La conguration du produit doit être effectuée par un technicien agréé.
Veuillez suivre toutes les Instructions de Sécurité fournies par les manuels de AC.
• Dispositif • Câble spécique• Guide d’Installation
3. Connexions du dispositif (Illustration 3)
1. Débranchez le climatiseur (AC) de votre ligne d’alimentation.
2. Accédez au Tableau du Circuit Imprimé principal.
3. Localisez le connecteur de la prise indiqué dans l’InstallationSketch.
4. Choisissez un endroit pour le dispositif.
5. Connectez l’extrémité A (longue) du câble fourni au connecteur du climatiseur et l’extrémité B
(courte) au connecteur AC du dispositif. *
6. Fermez le climatiseur.
7. Branchez l’AC à la ligne d’alimentation. Si la connexion avec le climatiseur a réussi, le LED vert du
dispositif commencera à clignoter, puis se stabilisera.
* Consultez l’InstallationSketch pour obtenir des informations détaillées.
2. Emplacement du dispositif
Dispositif installé à l’intérieur de l’unité AC ou dissimulé (Illustration 2-a)
• L’utilisateur ne pourra pas avoir accès à l’indicateur LED, ni au bouton
• Si l’espace n’est pas sufsant pour une installation à l’intérieur de l’unité AC, les actions suivantes
peuvent être réalisées:
o Si le manque d’espace est dû aux conduits d’eau, changez le côté de l’AC où ces derniers sont
connectés an de gagner de l’espace à l’intérieur de l’unité AC.
o Sinon, la surface de support peut être retirée
Dispositif installé à l’extérieur de l’unité AC (Illustration 2-b)
• Le dispositif doit être xé à la fois au moyen de vis et d’un adhésif à double face.
• La protection du câble dispose de plusieurs options an de diriger les câbles dans la direction souhaitée.
4. Conguration WiFi
Téléchargez l’application à partir de Google Play ou de l’App Store et suivez les instructions.
5. Enregistrement de périphérique
1. Téléchargez l’application depuis Google Play ou sur l’App Store et suivez les instructions.
2. Créez un compte (dans le cas où vous ne l’avez pas encore).
3. Visitez les paramètres / appareil / section et cliquez sur Ajouter un périphérique.
4. Introduisez le code d’enregistrement (code à 25 chiffres sur l’étiquette).
• Installation Sketch • Étiquette

8
BON DE GARANTIE
1. Intesis Software, S.L.U. (ci-après, “Intesis”), en sa qualité de fabricant, vous informe par la présente des droits que le Décret
Royal Législatif 1/2007, du 16 novembre, approuvant la Loi révisée sur la Protection du Consommateur Général et de l’Utilisateur,
ainsi que le reste de la législation applicable, vous confèrent en qualité de consommateur, dans le cas de non-conformité du
dispositif (ci-après, le “Dispositif”).
2. Intesisvous garantit que pendant une période de deux (2) ans à compter de la livraison du Dispositif, elle sera responsable,
conformément aux conditions établies dans le présent document, de la non-conformité du Dispositif, sous réserve que cette
dernière soit due à un défaut de fabrication empêchant l’utilisation normale du Dispositif, soit à son niveau habituel de qualité
et performance. À cet effet, il sera considéré que les non-conformités découvertes dans un délai de six (6) mois à compter
de la livraison du Dispositif, existaient d’ores et déjà lors de la livraison du Dispositif, sous réserve que cette présomption soit
compatible avec la non-conformité alléguée.
3. Si une non-conformité légitime du Dispositif, conforme au paragraphe précédent du présent document, se découvre, vous
avez le choix, gratuitement, de faire réparer le Dispositif ou de le remplacer, sous réserve que l’option choisie soit objectivement
possible et proportionnelle.
4.Si vous avez opté pour la réparation du Dispositif mais, une fois ce dernier réparé et livré, le même défaut de fabrication ayant
donné lieu à la non-conformité subsiste,vous pouvez solliciter le remplacement du Dispositif par un autre dispositif de même
nature, sous réserve que ledit remplacement ne soit pas disproportionnel par rapport au défaut.
5. Si vous optez pour la réparation ou le remplacement du Dispositif, le calcul de la période de garantie susmentionnée dans la
section 2 du présentdocument se suspendra entre le moment où vous livrez le Dispositif non conforme et celui ou le Dispositif
réparé ou remplacé vous est délivré, la période de garantie restante recommencera de courir à partir de cet instant. Intesissera
également responsable des défauts de fabrication à l’origine de la réparation pendant une période de six (6) mois à compter de
cette réparation.
6. Si la réparation ou le remplacement n’est pas possible ou n’a pas été effectué par Intesis, vous pouvez requérir une réduction
du prix, voire renvoyer le Dispositif et bénécier du remboursement du prix réglé. Cependant, vous ne pourrez pas renvoyer le
Dispositif en sollicitant le règlement du prix déjà payé si le défaut de fabrication à l’origine de la non-conformité est de faible
importance.
7. La garantie du Dispositif ne couvre aucun défaut, aucune irrégularité, aucun mauvais fonctionnement, ni aucune réduction de
la qualité ou performance dus à :
(i) Tout défaut ou mauvais fonctionnement de l’équipement d’air conditionnée sur lequel le dispositif est installé.
(ii) L’installation défectueuse ou inadéquate du Dispositif par le technicien que vous ayez engage an de réaliser l’installation
ou tout autre tiers.
(iii) Toute manipulation du Dispositif de votre part, ou tout usage incorrect que vous puissiez avoir fait du Dispositif, en ce inclus
les cas de démontage ou ouverture du Dispositif, ainsi que l’ajout de pièces ou accessoires additionnels à la fois au Dispositif et
à l’équipement d’air conditionné sur lequel il est installé.
(iv) Pannes ou interruptions de l’alimentation en électricité ou de l’ordinateur, ou dérivés de l’accès à ou du fonctionnement
d’Internet hors du contrôle d’Intesis, ainsi que tout autre dérivé d’un usage non approprié du Dispositif.
(v) Dommages causés par le transport ou l’entreposage du Dispositif non imputables à Intesis, ou tout autre qui soit relatif à
l’entretien du Dispositif avant et après la vente susmentionnée.
(vi) L’usure et la dégradation du Dispositif ou de ses pièces dues au temps, ainsi que la casse ou autres, dérivés de coups,
chutes ou impacts.
(vii) Le contact du Dispositif avec l’eau ou autre substance non appropriée, ainsi que les dommages causés par des conditions
environnementales non adéquates ou non conformes à celles indiquées dans le manuel d’instructions.
8. An de prouver la date de réception du Dispositif aux effets du calcul de la période de garantie, vous devrez conserver la facture
ou le bon de réception d’achat.
9. Cette garantie s’applique aux Dispositifs acquis en Espagne. Dans le cas des Dispositifs acquis hors d’Espagne, les conditions
de garantie établies par le pays où ils ont été acquis s’appliqueront.
10. Aux effets d’exercer les droits dérivés de la présente garantie, vous pouvez envoyer un e-mail à warranty@intesis.com, où la
procédure à suivre vous sera indiquée.
INTESIS SOFTWARE, S.L.U.
C/ Milà i Fontanals, 1 bis
08700 – Igualada (Barcelone)
Téléphone: +34938047134
9
ITIT
1. Descrizione del Prodotto (Figura 1)
Il dispositivo è un modulo esterno in grado di connettere i condizionatori d’aria alla tua rete WiFi
consentendo così un collegamento globale e applicazioni di controllo a distanza grazie ad un’interfaccia
di facile utilizzo.
Contenuto dell’imballaggio:
L’installazione può essere effettuata solo da tecnici autorizzati.
Seguire le istruzioni di sicurezza indicate nei manuali AC.
• Dispositivo
• Cavo aggiuntivo
• Guida per l’installazione
3. Connessione del dispositivo (Figura 3)
1. Staccare la presa di corrente del condizionatore d’aria (AC).
2. Accedere alla scheda principale del circuito stampato.
3. Individuare la presa del connettore indicato nello Sketch di installazione.
4. Selezionare una posizione per il dispositivo Intesis Home.
5. Collegare l’estremità A (quella lunga) del cavo in dotazione al connettore del condizionatore d’aria e
l’estremità B (quella corta) al connettore del dispositivo AC. *
6. Chiudere il condizionatore d’aria.
7. Collegare il condizionatore d’aria alla corrente elettrica. Se la connessione è avvenuta correttamente,
il LED del dispositivo Intesis Home inizia a lampeggiare con luce verde, quindi passerà a luce verde
ssa.
* Per informazioni dettagliate, consultare InstallationSketch.
2. Posizione del dispositivo
Dispositivo installato all’interno del condizionatore d’aria o nascosto (Figura 2-a)
• L’indicazione LED ed il pulsante non saranno accessibili all’utente.
• Se all’interno del condizionatore non c’è sufciente spazio per l’installazione, si possono eseguire le
seguenti operazioni:
o Se la causa sono i tubi dell’acqua, collegarli ad un altro lato del condizionatore per ottenere un
maggiore spazio all’interno.
o Altrimenti, è possibile rimuovere la supercie di supporto
Dispositivo installato all’esterno del condizionatore d’aria (Figura 2-b)
• Il dispositivo può essere ssato sia con viti sia con nastro bi-adesivo.
• Il coperchio del cavo prevede diverse opzioni per orientare i cavi nella direzione desiderata.
4. Congurazione WiFi
Scarica l’App da Google Play o App Store e segui le istruzioni.
5. Registrazione del dispositivo
1. Scarica l’App da Google Play o App Store e segui le istruzioni.
2. Crea un account (se non lo hai ancora).
3. Visitare le impostazioni / dispositivo / sezione e fare clic su Aggiungi dispositivo.
4. Introdurre il codice di registrazione (codice a 25 cifre sull’etichetta).
• Installation Sketch
• Etichetta

10
GARANZIA
1. Intesis Software, S.L.U. (in seguito denominato: “Intesis”), nella sua qualità di produttore, con la presente informa dei diritti che il
Regio Decreto Legge 1/2007, del 16 novembre, che approva il testo riveduto della Legge Generale per la Difesa dei Consumatori
e degli Utenti e le altre leggi complementari applicabili conferiscono ai consumatori nel caso di non conformità del Dispositivo
(in seguito: “ il Dispositivo”).
2. Intesis garantisce che per due (2) anni dalla consegna del Dispositivo deve essere responsabile, nei termini e nelle condizioni
stabilite in questo documento, della non conformità del Dispositivo, purché tale non conformità sia dovuta ad un difetto di
fabbricazione che rende impossibile l’utilizzo del Dispositivo in modo normale ed ai consueti livelli di qualità e di prestazioni.
In riferimento a ciò, si presume che la non conformità rivelatasi entro sei (6) mesi dalla consegna del Dispositivo già esistesse
quando il Dispositivo è stato recapitato, salvo se tale presunzione è incompatibile con la presunta non conformità.
3. Se si manifesta una legittima non conformità del Dispositivo ai sensi del precedente paragrafo, l’Utente può scegliere tra
la riparazione gratuita e la sostituzione del Dispositivo, purché l’opzione scelta sia oggettivamente possibile e proporzionata.
4. Se l’Utente ha optato per la riparazione del Dispositivo, e tuttavia dopo che tale riparazione è stata effettuata e il Dispositivo è
stato consegnato, questo presenta ancora il difetto di fabbricazione che ha causato la non conformità, l’Utente può richiedere la
sostituzione del Dispositivo con un altro dello stesso tipo, salvo se tale sostituzione è sproporzionata rispetto il difetto.
5. Se l’Utente opta per la riparazione o la sostituzione del Dispositivo, il calcolo del periodo di garanzia previsto al punto 2 del
presente documento è sospeso a decorrere dal momento della consegna del Dispositivo non conforme no al momento in cui il
Dispositivo riparato o sostituito viene consegnato all’Utente ed il restante periodo di garanzia decorre da quel momento. Intesis
sarà inoltre responsabile per i difetti causati dalla riparazione entro un periodo di sei (6) mesi da tale riparazione.
6. Se la riparazione o la sostituzione non è possibile o non è stata effettuata da Intesis, l’Utente può chiedere la riduzione
del prezzo o addirittura la restituzione del Dispositivo con rimborso del prezzo pagato. Tuttavia, l’Utente non potrà restituire il
Dispositivo ed esigere il rimborso del prezzo pagato se il difetto di fabbricazione, causa della non conformità, è di scarsa rilevanza.
7. La garanzia del Dispositivo non copre qualsiasi difetto, irregolarità, disfunzione o diminuzione della qualità o delle prestazioni
causato da:
(i) Qualsiasi difetto o cattivo funzionamento dell’impianto di climatizzazione su cui è installato il Dispositivo.
(ii) Un’installazione difettosa o non corretta del Dispositivo effettuata da un tecnico ingaggiato dell’Utente per eseguire tale
installazione o da una qualsiasi altra parte terza.
(iii) Qualsiasi manipolazione del Dispositivo effettuata dell’Utente, nonché qualsiasi possibile uso non corretto del Dispositivo,
compresi i casi di smontatura o apertura del Dispositivo e l’aggiunta di parti o accessori supplementari per il Dispositivo e per
l’impianto d’aria condizionata su cui è installato.
(iv) I guasti o le interruzioni all’erogazione di energia elettrica o del computer o derivanti dall’accesso a Internet e dal suo
funzionamento che non rientrano nel controllo di Intesis, nonché tutti gli altri guasti derivanti da un uso improprio del Dispositivo.
(v) I danni causati dal trasporto o dal magazzinaggio del Dispositivo non imputabili a Intesis o qualsiasi altro danno relativo alla
manutenzione del Dispositivo, anteriore e posteriore alla vendita stessa.
(vi) La normale usura del Dispositivo o delle sue parti dovuta al passare del tempo, così come la loro rottura o altri danni derivanti
da colpi, cadute o impatti.
(vii) Il contatto del Dispositivo con acqua o altre sostanze inappropriate, nonché i danni causati da condizioni ambientali che non
sono adatte o non conformi a quelle indicate nel manuale di istruzioni.
Per poter dimostrare la data di ricezione del Dispositivo ai ni del calcolo del periodo di garanzia l’Utente deve conservare la
fattura o la ricevuta di acquisto.
9. La presente garanzia si applica ai Dispositivi acquistati in Spagna. Nel caso di Dispositivi acquistati fuori dalla Spagna, si
applicano le condizioni di garanzia vigenti nel Paese dove questi sono stati acquistati.
10. Per poter esercitare i diritti derivanti dalla presente garanzia, l’Utente può inviare una e-mail a warranty@intesis.com: il nostro
Servizio gli indicherà la procedura da seguire.
INTESIS SOFTWARE, S.L.U.
C/ Milà i Fontanals, 1 bis
08700 – Igualada (Barcelona)
Telefono: +34938047134

11
ES
1. Descripción del Producto (Figura 1)
El dispositivo es un módulo externo capaz de comunicar sus unidades de Aire Acondicionado a su
red WiFi para proporcionar conectividad global y aplicaciones de control remoto a través de una
interfaz amigable.
Contenido del paquete:
El proceso de instalación sólo deberá realizarse por instaladores autorizados.
Por favor, siga las Instrucciones de Seguridad proporcionadas en los manuales del AA.
• Dispositivo
• Cable especíco
• Guía de Instalación
3. Conexión del dispositivo
1. Desconecte el sistema de Aire Acondicionado (AC) de la alimentación.
2. Acceda a la Placa Electrónica Principal.
3. Localice el conector indicado en la hoja Installation Sketch.
4. Seleccione una localización para el dispositivo.
5. Conecte el extremo A (el extreme largo) del cable subministrado al conector de la unidad de Aire
Acondicionado y el extremo B (el extreme corto) en el conector AC de nuestro dispositivo. *
6. Cierre la unidad de Aire Acondicionado.
7. Conecte el AC a la alimentación. Si la conexión con el Aire Acondicionado has sido exitosa, el LED
del dispositivo empezará a parpadear en verde y posteriormente cambiará a verde jo.
* Consulte el Installation Sketch para más información
2. Ubicación del dispositivo
Dispositivo instalado dentro de la unidad de AA o escondido (Figura 2-a)
• El LED de estado y el botón no van estar accesibles para el usuario.
• Si no hay suciente espacio para la instalación en el interior del AA, las siguientes acciones pueden
lleve a cabo:
o Si la falta de espacio se debe a los conductos de agua, cambie la ubicación de dichos conductos
al otro lado de la unidad interior para ganar espacio dentro del AA.
o Si no pudiera, se puede quitar la supercie de soporte
Dispositivo instalado fuera de la unidad de AA (Figura 2-b)
• El dispositivo se puede jar usando tanto tornillos como cinta adhesiva de doble cara.
• La tapa del cable permite diferentes opciones a la hora de ubicar la salida de los cables.
4. Conguración WiFi
Descargue la App desde Google Play o App Store y sigue las instrucciones.
5. Registro del dispositivo
1. Descargue la aplicación desde Google Play o la App Store y sigue las instrucciones.
2. Cree una cuenta (en caso de que aún no la tenga).
3. Visite la sección de conguración/dispositivo y haga clic en añadir dispositivo.
4. Introduzca el código de registro (código de 25 dígitos en la etiqueta).
• Installation Sketch • Etiqueta

12
DOCUMENTO DE GARANTÍA
1. A través de este documento Intesis Software, S.L.U. (en adelante, “Intesis”), en su condición de fabricante, le informa de los
derechos que el Real Decreto Legislativo 1/2007, de 16 de noviembre, por el que se aprueba el texto refundido de la Ley General
para la Defensa de los Consumidores y Usuarios y el resto de normativa aplicable le otorga en su condición de consumidor ante
la falta de conformidad del dispositivo (en adelante, el “Dispositivo”).
2. Intesis le garantiza que dentro de los dos (2) años contados desde la entrega del Dispositivo responderá, en los términos y
con las condiciones establecidas en este documento, de la falta de conformidad con el Dispositivo, siempre que ésta se deba
a un defecto de fabricación que impida su uso ordinario o con los niveles de calidad y con las prestaciones habituales del
mismo. En este sentido, se presumirá que las faltas de conformidad que se maniesten dentro de los seis (6) meses posteriores
a la entrega del Dispositivo ya existían cuando éste se entregó, salvo que esta presunción sea incompatible con la falta de
conformidad alegada.
3. Si se maniesta una falta legítima de conformidad con el dispositivo de acuerdo con el párrafo anterior, Usted podrá elegir de
forma gratuita entre la reparación o la sustitución del Dispositivo, siempre que la opción que escoja sea objetivamente posible
y proporcionada.
4. Si Usted ha optado por la reparación del Dispositivo pero una vez realizada la misma y entregado el Dispositivo éste sigue
adoleciendo del defecto de fabricación que motivó la falta de conformidad, podrá solicitar la sustitución del Dispositivo por otro
igual, salvo que dicha sustitución sea desproporcionada en relación con el defecto.
5. Cuando Usted opte por la reparación o la sustitución del Dispositivo el cómputo del plazo de garantía previsto en el apartado 2
de este documento se suspenderá desde que Usted entregue el Dispositivo no conforme hasta que le sea entregado el reparado
o sustituido, volviendo a computar el periodo de garantía restante a partir de dicho momento. Asimismo, Intesis responderá de los
defectos de fabricación que provocaron la reparación dentro de los seis (6) meses siguientes a la misma.
6. Si la reparación o la sustitución no son posibles o no han sido llevadas a cabo por Intesis, Usted podrá solicitar la rebaja
del precio o, incluso, la devolución del Dispositivo con el rembolso del precio abonado. No obstante, Usted no podrá devolver
el Dispositivo reclamando el precio abonado si el defecto de fabricación que motiva la falta de conformidad es de escasa
importancia.
7. La garantía del Dispositivo no cubre ningún defecto, anomalía, mal funcionamiento o disminución de la calidad o las
prestaciones causadas por:
(i) Cualquier defecto o mal funcionamiento del aparato de aire acondicionado en el cual se instale el Dispositivo.
(ii) Una instalación defectuosa o incorrecta del Dispositivo realizada por el técnico que Usted contrate para llevar a cabo la misma
o por cualquier otro tercero.
(iii) Cualquier manipulación que Usted realice del Dispositivo, así como cualquier uso incorrecto que Usted le dé al mismo,
incluidos los casos de desmontaje o apertura del Dispositivo y la adición de piezas o accesorios adicionales tanto en el
Dispositivo como en el aparato de aire acondicionado en el que se instale el mismo.
(iv) Fallos o interrupciones del suministro eléctrico, informático o que deriven del acceso y funcionamiento de Internet ajenos a
Intesis, así como cualesquiera otros derivados de usos indebidos del Dispositivo.
(v) Daños ocasionados por el transporte o el almacenaje del Dispositivo no imputables a Intesis, o cualquier otro relacionado con
la conservación del Dispositivo antes y después de su venta.
(vi) El desgaste normal del Dispositivo o sus piezas como consecuencia del paso del tiempo, así como su rotura u otras derivadas
de golpes, caídas o impactos.
(vii) El contacto del Dispositivo con agua u otras sustancias inapropiadas, así como los ocasionados como consecuencia de
condiciones ambientales inadecuadas o disconformes con lo señalado en el manual de instrucciones.
8. Para acreditar la fecha de recepción del Dispositivo a efectos del cálculo del plazo de garantía deberá conservar la factura
o el tiquet de compra.
9. La presente garantía se aplica a Dispositivos comprados en España. Para Dispositivos comprados fuera de España serán de
aplicación las condiciones de garantía establecidas en el Estado donde se adquirió.
10. Para ejercer los derechos derivados de esta garantía, podrá enviar un correo electrónico a warranty@intesis.com, en el que
se le indicará el procedimiento a seguir.
INTESIS SOFTWARE, S.L.U.
C/ Milà i Fontanals, 1 bis
08700 – Igualada (Barcelona)
Teléfono: +34938047134

13
CA
1. Descripció del producte (Figura 1)
El dispositiu és un mòdul extern capaç de connectar les teves unitats d’Aire Condicionat a la teva
xarxa WiFi per tal d’oferir connectivitat global y aplicacions de control remot a través d’una interfície
amigable.
Contingut del paquet:
El procés d’instal·lació s’ha de dur a terme per un instal·lador autoritzat.
Si us plau, segueixi les Instruccions de Seguretat proporcionades pel fabricant de AC.
• Dispositiu
• Cable especíc
• Guia d’Instal·lació
3. Connexió del dispositiu (Figura 3)
1. Desconnecteu l’aparell d’Aire Condicionat (AC) de la xarxa elèctrica.
2. Accediu a la placa de control principal (PCB).
3. Localitza el connector indicat en la fulla Installation Sketch.
4. Selecciona la ubicació del dispositiu.
5. Connecta l’extrem A del cable (part llarga) al connector especíc de l’Aire Condicionat i l’extrem B
(part curta) al connector del dispositiu. *
6. Tanca l’aparell d’Aire Condicionat.
7. Connecta l’aparell de AC a la xarxa elèctrica. Si la connexió ha sigut satisfactòria, el LED del disposi-
tiu farà pampallugues en verd i posteriorment es quedarà en verd x.
* Més informació es pot veure al document Installation Sketch
2. Localització del dispositiu
Dispositiu instal·lat al interior de l’aparell de AC o amagat (Figura 2-a)
• El LED i el botó no seran accessibles per l’usuari.
• Si no hi ha prou espai per a la instal·lació dins de l’aparell d’AC, les següents accions es
poden dur a terme:
o Si es deu a la presència dels tubs d’aigua, instal·leu el dispositiu a l’altra banda del AC per
aconseguir més espai lliure dins el AC.
o També podeu treure la superfície pel suport dels cables del dispositiu
Dispositiu instal·lat fora de l’aparell de AC (Figura 2-b)
• El dispositiu es pot xar amb cargols o amb cinta de doble cara.
• La tapa dels cables disposa de diferents obertures per facilitar la instal·lació dels cables.
4. Conguració WiFi
Descarregui la App des de Google Play o App Store i segueixi les instruccions.
5. Registre del dispositiu
1. Descarregui la App desde Google Play o App Store i segueixi les instruccions.
2. Creï un compte (en cas que no el tingui creat encara).
3. Visiti la secció de conguració/dispositiu i seleccioni afegir dispositiu.
4. Introdueixi el codi de registre (codi de 25 dígits de l’etiqueta).
• Installation Sketch
• Etiqueta

14
DOCUMENT DE GARANTIA
1. A través d’aquest document Intesis Software, S.L.U. (d’ara endavant, “Intesis”), en la seva condició de fabricant,
l’informa dels drets que el Real Decreto Legislativo 1/2007, de 16 de Novembre, pel qual s’aprova el text refós
de la Ley General para la Defensa de los Consumidores y Usuarios i la resta de normativa aplicable li atorga
en la seva condició de consumidor davant la falta de conformitat del dispositiu (d’ara endavant, el “Dispositiu”).
2. Intesis li garanteix que dintre dels dos (2) anys comptats des de l’entrega del Dispositiu respondrà, en els termes i les condicions
establertes en aquest document, de la falta de conformitat amb el Dispositiu, sempre que aquesta es degui a un defecte de fabricació
que impedeixi el seu ús ordinari o amb els nivells de qualitat i amb les prestacions habituals del mateix. En aquest sentit, es presumirà
que les faltes de conformitat que es manifestin dintre dels sis (6) primers mesos posteriors a l’entrega del Dispositiu ja estaven
presents quan aquest es va entregar, llevat que aquesta presumpció sigui incompatible amb la falta de conformitat al·legada.
3. Si es manifesta una falta legítima de conformitat amb el Dispositiu d’acord amb el paràgraf anterior, Vostè podrà escollir de manera
gratuïta entre la reparació o la substitució del Dispositiu, sempre que l’opció que esculli sigui objectivament possible i proporcionada.
4. Si Vostè ha optat per la reparació del Dispositiu, però un cop realitzada la mateixa i entregat el Dispositiu aquest
segueix tenint el defecte de fabricació que va motivar la falta de conformitat, podrà sol·licitar la substitució del
Dispositiu per un altre d’igual, llevat que aquesta substitució sigui desproporcionada en relació amb el defecte.
5. Quan Vostè opti per la reparació o substitució del Dispositiu, el còmput del termini de garantia previst en l’apartat
2 d’aquest document es suspendrà des de que Vostè entregui el Dispositiu no conforme ns que li sigui entregat el
reparat o substituït, tornant a computar el període de garantia restant a partir d’aquest moment. Així mateix, Intesis
respondrà dels defectes de fabricació que van provocar la reparació dins dels si (6) mesos següents de la mateixa.
6. Si la reparació o la substitució no són possibles o no han estat dutes a terme per Intesis, Vostè podrà sol·licitar la rebaixa
del preu o, ns i tot, la devolució del Dispositiu amb el reembossament del preu abonat. No obstant, Vostè no podrà retornar
el Dispositiu reclamant el preu abonat si el defecte de fabricació que motiva la falta de conformitat és d’escassa importància.
7. La garantia del Dispositiu no cobreix cap defecte, anomalia, mal funcionament o disminució de la qualitat o les prestacions
causades per:
(i) Qualsevol defecte o mal funcionament de l’aparell d’aire condicionat en el qual s’instal•li el Dispositiu.
(ii) Una instal·lació defectuosa o incorrecta del Dispositiu realitzada per un tècnic que vostè hagi contractat per a dur a terme la
mateixa o per qualsevol altre tercer.
(iii) Qualsevol manipulació que Vostè realitzi del Dispositiu, així com qualsevol ús incorrecte que Vostè li doni al mateix, incloent
casos de desmuntatge o obertura del Dispositiu i l’addició de peces o accessoris addicionals tant en el Dispositiu com en l’aparell
d’aire condicionat en qual s’instal·li el mateix.
(iv) Problemes o interrupcions del subministrament elèctric, informàtic o que derivin de l’accés i el funcionament d’Internet aliens
a Intesis, així com qualsevol altre derivat de l’ús indegut del Dispositiu.
(v) Danys ocasionats pel transport o emmagatzematge del Dispositiu no imputables a Intesis, o qualsevol altre relacionat amb la
conservació del Dispositiu abans i després de la seva venta.
(vi) El desgast normal del Dispositiu o de les seves peces com a conseqüència del pas de temps, així com el seu trencament o
altres derivades de cops, caigudes o impactes.
(vii) El contacte del Dispositiuamb aigua o altres substàncies inapropiades, així com els ocasionats com a conseqüència de
condicions ambientals inadequades o disconformes amb l’indicat al manual d’instruccions.
8. Per acreditar la data de recepció del Dispositiu a efectes del càlcul del termini de garantia haurà de conservar la factura o
tiquet de compra.
9. La present garantia s’aplica a Dispositius comprats a Espanya. Per a Dispositius comprats fora d’Espanya seran d’aplicació les
condicions de garantia establertes en l’Estaton es va adquirir.
10. Per tal d’exercir els drets derivats d’aquesta garantia podrà enviar un correu electrònic a warranty@intesis.com, on se li
indicarà el procediment a seguir.
INTESIS SOFTWARE, S.L.U.
C/ Milà i Fontanals, 1 bis
08700 – Igualada (Barcelona)
Telèfon: +34938047134

15
NO
1. Produktbeskrivelse (bilde 1)
Apparatet er en ekstern modul som kan koble dine klimaanleggsenheter til ditt WiFi-nettverk for å
kunne gi en global tilkobling og fjernkontrollapplikasjoner via et brukervennlig grensesnitt
Pakkens innhold (bilde 1):
Installasjonsprosessen må kun utføres av en autorisert installatør.
Følg alle sikkerhetsinstruksjonene i AC brukerhåndbøker.
• Enhet
• Spesikk kabel.
• Installasjonsveiviser
3. Enhetstilkoblinger (bilde 3)
1. Koble fra klimaanleggsenheten (AC) fra strømnettet.
2. Tilgang til hovedkretskortet.
3. Finn stikkontakten som er angitt i installasjonsskissen.
4. Velg en plassering for enheten.
5. Koble A-enden (den lange) på den medfølgende kabelen til kontakten på klimaanlegget og B-enden
(den korte) til enhetens AC-kontakt. *
6. Lukk klimaanleggsenheten.
7. Koble AC til strømnettet. Hvis forbindelse med klimaanlegget er vellykket, vil enhetens LED begynne
å blinke grønt og vil deretter endres til å lyse kontinuerlig grønt.
* Kontroller Installation Sketch for detaljerte opplysninger.
2. Plassering av enheten
Enhet installert inne i AC-enheten eller skjult (bilde 2-a)
• Indikator-LEDen og knappen vil ikke være tilgjengelig for brukeren.
• Hvis det ikke er nok plass til installasjonen inne i AC-enheten, kan følgende handlinger utføres:
o IHvis det er på grunn av vannrør, kan du bytte tilkoblingsside i klimaanlegget for å få mer
plass inne i AC-enheten.
o Ellers kan bæreraten fjernes
Enhet installert på utsiden av AC-enhete (bilde 2-b)
• Enheten kan festes både med skruer og dobbeltsidig tape
• Kabellokket har ere muligheter for å dirigere kablene i ønsket retning.
4. WiFi-kongurasjon
Last ned appen fra Google Play eller App Store og følg instruksjonene.
5. Enhetsregistrering
1. Last ned appen fra Google Play eller App Store og følg instruksjonene.
2. Opprett en konto (hvis du ikke har det ennå).
3. Gå til innstillingene / enheten / delen og klikk på Legg til enhet.
4. Innfør registreringskoden (25 sifferkode på merkelapp).
• Installation Sketch • Merkelapp

16
GARANTIDOKUMENT
1. Intesis Software, S.L.U. (heretter kalt “Intesis”), i egenskap av produsent, informerer deg hermed om rettighetene du har som
forbruker iht. kongelige lovdekret 1/2007, av 16. november, som godkjenner den reviderte generelle forbruker- og brukervernloven
og resten av gjeldende lovgivning, ved manglende samsvar av enheten (heretter “Enhet”).
2. Intesis garanterer at selskapet skal være ansvarlig i to (2) år fra levering av enheten, i henhold til vilkårene og betingelsene
fastsatt i dette dokumentet, for mangler ved enheten, forutsatt at slike mangler skyldes en produksjonsfeil som hindrer bruk av
enheten på ordinær måte eller med vanlige kvalitets- og ytelsesnivåer. I denne forbindelse skal det antas at manglene som
avdekkes innen seks (6) måneder fra leveringen av enheten allerede eksisterte da enheten ble levert, med mindre denne
antakelsen er uforenlig med den påberopte mangelen.
3. Hvis det påvises en legitim mangel på enheten i samsvar med foregående bestemmelse, kan du velge gratis mellom reparasjon
og utskifting av enheten, forutsatt at det alternativet du velger er objektivt mulig og rimelig.
4. Hvis du har valgt reparasjon av enheten, men enheten fortsatt inneholder feil eller mangler når reparasjonen er utført og
enheten er levert, som ga opphav til mangelen, kan du be om utskifting av enheten med en annen av samme slag, med mindre
en slik erstatning er urimelig i forhold til mangelen.
5. Hvis du velger å reparere eller skifte ut enheten, skal beregningen av garantiperioden angitt i pkt. 2 i dette dokumentet stoppe
fra tidspunktet du leverte den mangelfulle enheten til den er reparert eller skiftet ut og levert tilbake til deg, og den resterende
garantiperioden gjenopptas fra dette tidspunktet. Intesis skal også være ansvarlig for fabrikasjonsfeil som forårsaket reparasjonen
i seks (6) måneder fra en slik reparasjon.
6. Dersom reparasjon eller utskifting ikke er mulig eller ikke har blitt utført av Intesis, kan du kreve reduksjon av kjøpesummen
eller returnere enheten med full tilbakebetaling av kjøpesummen du betalte. Du kan imidlertid ikke returnere enheten og kreve
tilbakebetaling av kjøpesummen dersom fabrikasjonsfeilen som gir opphav til mangelen er av liten betydning.
7. Garantien på enheten dekker ikke eventuelle feil, uregelmessigheter, feilfunksjon eller reduksjon av kvalitet eller ytelse som
skyldes:
(i) eventuell defekt eller feilfunksjon på klimaanlegget som enheten er installert på.
(ii) defekt eller feil installasjon av enheten av teknikeren som du har leid for å utføre en slik installasjon eller av noen annen
tredjepart.
(iii) eventuell håndtering av enheten fra din side, samt eventuell feil bruk som du gjør av enheten, inkludert tilfeller av demontering
eller åpning av enheten og tillegging av deler eller ekstra tilbehør både til enheten og til klimaanlegget der den er installert.
(iv) svikt eller feil ved elektrisitets- eller datamaskinforsyningen eller som oppstår fra tilgang til og bruk av Internett utenfor Intesis’
kontroll samt eventuelt annet som utspringer fra feil bruk av enheten.
(v) skader forårsaket av transport eller lagring av enheten som ikke skyldes Intesis eller noe annet som gjelder vedlikehold av
enheten før og etter salg av denne.
(vi) normal slitasje på enheten eller delene i den som er en følge av naturlig elde samt ødeleggelse av enheten eller annet som
følge av slag, fall eller støt.
(vii) kontakt med vann eller andre uegnede stoffer for enheten samt skader forårsaket av miljøforhold som er uegnet eller ikke i
samsvar med forhold som er angitt i bruksanvisningen.
8. Du bør oppbevare fakturaen eller kjøpskvitteringen for å bevise datoen for mottak av enheten for beregning av garantiperioden.
9. Denne garantien gjelder enheter kjøpt i Spania. For enheter kjøpt utenfor Spania gjelder garantivilkårene som er etablert i
landet der den ble kjøpt.
10. For å håndheve rettighetene i denne garantien, kan du sende en e-post til warranty@intesis.com, hvor du vil få oppgitt
prosedyren som skal følges.
INTESIS SOFTWARE, S.L.U.
C/ Milà i Fontanals, 1 bis
08700 – Igualada (Barcelona)
Telefon: +34938047134

17
SW
1. Produktbeskrivning (gur 1)
Enheten är en extern modul som har kapacitet att ansluta luftkonditioneringsenheter i WiFi-nätverket
och möjliggör globala anslutnings- och fjärrstyrningstillämpningar som du kontrollerar med hjälp av ett
användarvänligt gränssnitt.
Förpackningens innehåll:
Installationsprocessen får utföras endast av en behörig installatör.
Följ alla säkerhetsanvisningar i handböckerna från AC.
• Enhet
• Specik kabel
• Installationsguide
3. Enhetens anslutningar (gur 3)
1. Koppla bort luftkonditioneringsenheten (AC) från strömförsörjningsledningen.
2. Skapa åtkomst till huvudkretskortet.
3. Leta upp uttagsanslutningen som anges i installationsschemat*
4. Välj en plats för enheten.
5. Anslut A-änden (den långa änden) av den medföljande kabeln till luftkonditioneringens anslutning
märkt och B-änden (den korta änden) till enhetens anslutning för luftkonditionering. *
6. Stäng luftkonditioneringsenheten.
7. Anslut luftkonditioneringsenheten till strömförsörjningsledningen. Om anslutningen till luftkonditioneringsenheten lyckades börjar-enhetens lysdiod att blinka grön och ändras sedan till att lysa stadigt grön.
* Kontrollera Installation Sketch för detaljerad information.
2. Enhetens placering
Enhet installerad inuti luftkonditioneringsenheten eller dold (gur 2-a)
• Indikationslysdioden och knappen kommer inte att vara åtkomliga för användaren.
• Om det inte nns tillräckligt mycket utrymme för installation inuti luftkonditioneringsenheten kan följande åtgärder vidtas:
o Om det beror på vattenledningar byter du sida i luftkonditioneringsenheten där de är anslutna, så
får du mer utrymme inuti luftkonditioneringsenheten.
o Ett annat alternativ är att avlägsna stödytan.
Enhet installerad utanför luftkonditioneringsenheten (gur 2-b)
• Enheten kan sättas fast med skruvar eller dubbelsidig tejp.
• Kabellocket erbjuder era alternativ för att dra kablarna i önskad riktning.
4. WiFi-konguration
Hämta appen från Google Play eller App Store och följ instruktionerna.
5. Enhetsregistrering
1. Hämta appen från Google Play eller App Store och följ instruktionerna.
2. Skapa ett konto (om du inte har det ännu).
3. Besök inställningarna/enheten / sektionen och klicka på Lägg till enhet.
4. Sätt in registreringskoden (25 siffror på etiketten).
• Installation Sketch
• Etiketten

18
GARANTIDOKUMENT
1. Intesis Software, S.L.U. (nedan kallat Intesis) informerar dig härmed, i sin egenskap av tillverkare, om de rättigheter som kungligt
lagdekret 1/2007 av den 16 november 2007 om godkännande av den reviderade allmänna konsument- och användarskyddslagen
och övrig tillämplig lagstiftning tilldelar dig i din egenskap av konsument i händelse av en brist på överensstämmelse hos enheten
(nedan kallad enheten).
2. Intesis garanterar dig att det, under två (2) år efter leveransen av enheten, tar ansvar, enligt de allmänna villkor som anges i
detta dokument, för brister på överensstämmelse hos enheten, förutsatt att en sådan brist på överensstämmelse har orsakats av
ett tillverkningsfel som förhindrar användning av enheten på normalt sätt eller med dess normala kvalitets- och prestandanivåer.
I detta syfte ska det antas att brister på överensstämmelse som uppdagas inom sex (6) månader efter leveransen av enheten
redan fanns när enheten levererades, utom om detta antagande är oförenligt med den påstådda bristen på överensstämmelse.
3. Om en legitim brist på överensstämmelse hos enheten enligt föregående punkt påvisas får du kostnadsfritt välja mellan
reparation och utbyte av enheten, förutsatt att det alternativ som du väljer är objektivt möjligt och proportionellt.
4. Om du har valt reparation av enheten, men det efter att en sådan reparation har utförts och enheten har levererats visar sig att
den fortfarande har det tillverkningsfel som gav upphov till bristen på överensstämmelse så har du rätt att begära att enheten byts
ut mot en annan av samma slag, utom om ett sådant utbyte är oproportionellt i förhållande till felet.
5. Om du väljer reparation eller utbyte av enheten ska beräkningen av den garantitid som anges i avsnitt 2 i detta dokument
avbrytas från den tidpunkt då du tillhandahåller den icke-överensstämmande enheten tills den reparerade enheten eller
ersättningsenheten levereras till dig, så att återstående garantitid fortsätter att löpa från den tidpunkten och framåt. Intesis
ansvarar även för tillverkningsfel som orsakar reparation under sex (6) månader efter en sådan reparation.
6. Om det inte är möjligt att utföra reparation eller utbyte eller om reparation eller utbyte inte har utförts av Intesis har du rätt
att begära prisnedsättning eller till och med retur av enheten med återbetalning av det betalda priset. Du har emellertid inte
rätt att returnera enheten och begära återbetalning av det betalda priset om det tillverkningsfel som gav upphov till bristen på
överensstämmelse är av ringa betydelse.
7. Garantin för enheten täcker inte fel, oegentligheter, funktionsstörningar, kvalitetsförsämringar eller prestandaförsämringar som
orsakats av något av följande:
(i) Ett fel eller en funktionsstörning i den luftkonditionering som enheten har installerats i.
(ii) Defekt eller felaktig installation av enheten av den tekniker som du kan ha anlitat för att utföra en sådan installation eller av
en annan tredje part.
(iii) All hantering av enheten från din sida, samt all felaktig användning av enheten från din sida, inklusive fall med demontering
eller öppnande av enheten och tillägg av komponenter eller ytterligare tillbehör både till enheten och till den utrustning för
luftkonditionering som den har installerats i.
(iv) Fel eller avbrott i ström- eller datorförsörjningen eller till följd av åtkomst till och användning av Internet utanför Intesis kontroll
samt alla övriga som uppstår till följd av felaktig användning av enheten.
(v) Skador orsakade av transport eller förvaring av enheten som inte kan tillskrivas Intesis eller alla övriga relaterade till underhåll
av enheten före och efter försäljningen av den.
(vi) Normalt slitage av enheten eller dess komponenter som ett resultat av tidens gång samt sönderslagning av enheten eller
annat orsakat av slag, fall eller mekaniska stötar.
(vii) Kontakt mellan enheten och vatten eller andra olämpliga ämnen samt skador orsakade av miljöförhållanden som är olämpliga
eller inte överensstämmer med de förhållanden som anges i bruksanvisningen.
8. Bevara fakturan eller kvittot från köpet, så att du kan bevisa mottagningsdatumet för enheten för beräkningen av garantitiden.
9. Denna garanti gäller för enheter som köps i Spanien. För enheter som köps utanför Spanien gäller de garantivillkor som har
fastställts i det land där enheten köptes.
10. Om du behöver utöva dina rättigheter enligt denna garanti kan du skicka ett e-postmeddelande till warranty@intesis.com, så
kommer du att få anvisningar för det förfarande du ska följa.
INTESIS SOFTWARE, S.L.U.
C/ Milà i Fontanals, 1 bis
08700 – Igualada (Barcelona), Spanien
Telefon: +34938047134

19
DK
1. Produktbeskrivelse (gur 1)
Enheden er et eksternt modul, der kan tilslutte klimaanlæg til dit WiFinetværk for at oprette global
forbindelse og anvende fjernstyringsapplikationer via en brugervenlig grænseade.
Pakkens indhold:
Installationsprocessen bør kun udføres af en autoriseret installatør.
Du bedes følge alle de sikkerhedsinstrukser, der foreskrives af AC manualerne.
• Apparat
• Specikt kabel
• Installationsvejledning
3. Apparatforbindelser (gur 3)
1. Træk stikket til airconditioner-enheden (AC) ud af kontakten.
2. Gå til hovedprintkortet.
3. Find den kontaktforbindelse, der er angivet i Installation Sketch.
4. Vælg en placering til apparatet.
5. Tilslut A-enden (den lange) på det medfølgende kabel til airconditioner forbindelsen, og B-enden (den
korte) til AC-apparatets tilslutning. *
6. Luk for airconditioner-enheden.
7. Slut AC til strømforsyningen. Hvis tilslutningen af airconditioneren lykkes, vil apparatets LED begynde at blinke grønt og derefter skifte til fast grønt.
* Kontroller Installation Sketch for detaljerede oplysninger.
2. Placering af apparat
Apparat monteret inde i AC-enheden eller skjult (gur 2-a)
• Indikator LED og knap er ikke tilgængelige for brugeren
• Hvis der ikke er plads nok til montering inde i AC-enheden, kan følgende handlinger udføres:
o Hvis det er på grund af vandrør, skiftes den side af AC, hvor de er tilsluttet, for at få mere plads
inde i AC-enheden.
o Ellers kan støtteoveraden fjernes.
Apparat monteret uden for AC-enheden (gur 2-b)
• Apparatet kan fastgøres både med skruer og med dobbeltklæbende tape.
• Kabellåget har ere alternativer, så kablerne kan føres i den ønskede retning
4. WiFi-konguration
Download appen fra Google Play eller App Store og følg instruktionerne.
5. Enhedsregistrering
1. Download appen fra Google Play eller App Store og følg instruktionerne.
2. Opret en konto (hvis du ikke har det endnu).
3. Besøg indstillingerne / enheden / sektionen og klik på Tilføj enhed.
4. Indfør registreringskoden (25 cifre kode på etiketten).
• Installation Sketch
• Etiket

20
GARANTIAFTALE
1. Intesis Software, S.L.U. (i det følgende “Intesis”), informerer hermed i sin rolle som producent om hvilke rettigheder du i
henhold til Royal Legislative Decree 1/2007 dateret den 16. november, godkender den reviderede General Consumer og User
Protection Law og resten af den gældende lovgivning har i din rolle som forbruger i tilfælde af mangler på produktet (i det følgende
“Enheden”).
2. Intesis garanterer at i to (2) år fra leveringsdatoen af enheden, skal den være erstatningspligtig ifølge handelsvilkårene, der
fremgår af denne aftale, for mangler på enheden under forudsætning af at sådanne mangler skyldes fremstillingsdefekter, der
forhindrer brugen af enheden på den normale måde eller på det sædvanlige kvalitets- og ydelsesniveau. I denne henseende må
man gå ud fra, at manglerne, der er blevet rapporterede inden for seks (6) måneder efter leveringen af enheden, allerede var
tilstede, da enheden blev leveret, med mindre denne antagelse er uforenelig med de påståede mangler.
3. Hvis en retsmæssig mangel på enheden er i overensstemmsle med de tidligere viste parafgraffer, kan du vælge mellem
reparation og udskiftning af enheden vederlagsfrit under forudsætning af at valget du foretager er objektivt muligt og proportionalt.
4. Hvis du valgte at få enheden repareret men den stadigvæk er fejlbehæftet efter reparation med samme mangel som tidligere,
kan du vælge at få enheden udskiftet meden tilsvarende enhed med mindre en sådan udskiftning ikke er proportional med
hensyn til defekten.
5. Hvis du vælger reparation eller udskiftning af enheden, skal beregningen af garantiperioden, der ndes under afsnit 2 i denne
aftale, suspenderes fra det tidspunkt du indsender den mangelfulde enhed indtil den reparerede eller udskiftede enhed bliver
leveret tilbage til dig og den resterende garantiperiode fortsætter fra dette tidspunkt og indtil udløb.Intesis skal holdes ansvarlig for
fremstillingsdefekter der har forårsaget reparationen i seks (6) måneder fra reparationen blev udført.
6. Hvis reparation eller udskiftning ikke er mulig eller ikke er blevet udført af Intesis, kan du anmode om et nedslag i prisen eller
sågar returnere enheden med en refundering af den betalte pris. Men du kan imidlertid ikke returnere enheden og anmode om en
refundering af købsprisen, hvis fremstillingsdefekten er ubetydelig
7. Garantien omfatter ikke defekter, uregelmæssigheder, fejlfunktioner eller forringet kvalitet eller ydeevne forårsaget af følgende
forhold:
(i) Enhver defekt eller fejlfunktion af airconditionudstyret på hvilket enheden er monteret.
(ii) Defekt eller forkert montering af enheden af installatøren du bestiller til at udføre arbejdet eller af en tredjepart.
(iii) Enhver form for håndtering af enheden og ligeledes forkert betjening indbefattet adskillelse eller åbning af enheden og
tilføjelse af ekstra dele eller tilbehør enten på enheden selv eller på airconditionsudstyret på hvilket den er monteret.
(iv) Manglende strømforsyning eller afbrydelser af elektriciteten eller adgang til og betjening af internettet der ligger uden for
Intesis kontrol, såvel som enhver anden fejl der skyldes uhensigtsmæssig betjening af enheden.
(v) Skader der er forårsaget under transport eller opbevaring af enheden der ikke skyldes Intesis eller andre skader der ikke er
relaterede til vedligeholdelse af enheden før og efter salget.
(vi) Almindeligt slid på enheden eller dele dertil som resultat af normalt brug af enheden samt beskadigelse af den eller andre
dele pga. stød, fald eller slag.
(vii) Hvis enheden har været i kontakt med vand eller andre væsker, såvel som skader forårsaget som resultat af miljøforhold der
er uegnede eller ikke i overensstemmelse med de forhold som er angivet i brugsanvisningen.
8. For at kunne bevise hvornår du modtog enheden i forbindelse med beregning af garantiperioden, bør du gemme fakturaen
eller købskvitteringen.
9. Denne garanti omfatter alle enheder der er købt i Spanien.I tilfælde af at du har købt enheder i andre lande, skal
garantibetingelserne for det pågældende land være gældende.
10. For at gøre krav på de rettigheder der er indeholdt i denne garanti, skal du sende en e-mail til waranty@intesis.com, hvor
proceduren du skal følge er angivet.
INTESIS SOFTWARE, S.L.U.
C/ Milà i Fontanals, 1 bis
08700 – Igualada (Barcelona) - Spanien
Telefon: +34938047134

21
NL
1. Productomschrijving (guur 1)
Het apparaat is een externe module die het mogelijk maakt om airconditioning systemen aan te sluiten
op uw draadloos netwerk teneinde te voorzien in globale connectiviteit en bediening op afstand via een
gebruiksvriendelijke interface.
Inhoud van de verpakking:
De installatie dient alleen te geschieden door een bevoegd installateur.
Volg alstublieft alle veiligheidsinstructies op die in de AC handleidingen zijn opgenomen.
• Apparaat
• Specieke kabel
• Installatiegids
3. Verbindingen van het apparaat (guur 3)
1. Ontkoppel de airco-unit van het elektriciteitsnet.
2. Toegang tot de hoofd-printplaat.
3. Zoek de contactdoos die in de Installation Sketch is aangegeven.
4. Zoek een plek voor het apparaat.
5. Verbind het A-uiteinde (het lange uiteinde) van de meegeleverde kabel met de airco connector en het
B-uiteinde (het korte uiteinde) met de airco-connector van het apparaat. *
6. Sluit de airco-unit.
7. Sluit de airco op het elektriciteitsnet aan. Als de airconditioning goed aangesloten is, zal het Led-
lampje van het apparaat groen knipperen en daarna groen branden.
* Controleer de Installation Sketch voor gedetailleerde informatie.
2. Plaatsing van het apparaat
Geïnstalleerde apparaat binnen de airco-unit of verborgen (guur 2-a)
• De LED-indicator en de knop zijn niet toegankelijk voor de gebruiker.
• Indien er niet genoeg ruimte is voor de installatie binnen de airco-unit, kunnen de volgende
handelingen worden verricht:
o Indien dit te wijten is aan de waterleidingen, wijzig dan de aircozijde waar deze aangesloten zijn om meer ruimte binnen de airco-unit te creëren.
o Anderzijds kan de steunplaat worden verwijderd.
Geïnstalleerde apparaat buiten de airco-unit (guur 2-b)
• Het apparaat kan zowel zowel met schroeven als met dubbelzijdige tape worden bevestigd.
• Het kabel snoer heeft verschillende opties om de kabels in de gewenste richting te leiden
.
4. WiFi conguratie
Download de applicatie van Google Play of de App Store en volg de instructies.
5. Apparaatregistratie
1. Download de App van Google Play of de App Store en volg de instructies.
2. Maak een account aan (als u het nog niet hebt).
3. Ga naar de instellingen / apparaat / sectie en klik op het apparaat toevoegen.
4. Stel de registratiecode in (25 cijfers op het label).
• Installation Sketch
• Label

22
GARANTIEDOCUMENT
1. Intesis Software, S.L.U. (hierna “Intesis”), in haar hoedanigheid als fabrikant, informeert u hierbij over de rechten die
bij Koninklijk Wetgevend Decreet nr. 1/2007 van 16 november tot vaststelling van de herziene tekst van de Algemene Wet
betreffende de bescherming van consumenten en gebruikers alsmede overige toepasselijke wet- en regelgeving u als klant
toekent in gevallen van non-conformiteit bij de aankoop van het apparaat (hierna “het apparaat”).
2. Intesis garandeert dat zij gedurende twee (2) jaar na de levering van het apparaat, onder de garantiebepalingen die zijn
opgenomen in dit document, aansprakelijk is voor non-conformiteit bij aankoop van het apparaat, op voorwaarde dat deze
non-conformiteit (het gebrek) te wijten is aan een fabrieksfout dat voorkomt dat het apparaat op een normale wijze of met de
gebruikelijke kwaliteitseisen en prestaties kan worden gebruikt. In dit opzicht zal verondersteld moeten worden dat de nonconformiteit die zich binnen zes (6) maanden vanaf de levering van het apparaat heeft geopenbaard al bestond ten tijde van de
levering van het apparaat, tenzij het vermoeden niet verenigbaar is met de vermeende non-conformiteit.
3. Indien een terechte non-conformiteit van het apparaat overeenkomstig de voorgaande paragraaf is aangetoond, kunt u kiezen
tussen het kosteloos laten reparareren of vervangen van het apparaat, ervan uitgaande dat de optie die u kiest mogelijk is en
evenredig.
4. Indien u hebt gekozen voor het laten repareren van het apparaat, maar nadat genoemde reparatie is uitgevoerd en het apparaat
is afgeleverd nog steeds blijkt dat het fabricagedefect dat tot de non-conformiteitsclaim heeft geleid aanwezig is, dan kunt u een
verzoek indienen tot vervanging van het apparaat door een ander van hetzelfde type, tenzij deze vervanging onevenredig is in
verhouding tot het defect.
5. Indien u kiest voor reparatie of vervanging van het apparaat, dan zal de berekening van de garantietermijn die opgenomen is
onder punt 2 van dit document worden opgeschort vanaf het moment dat u het defecte apparaat inlevert totdat het gerepareerde
of het vervangende apparaat aan u is geleverd. De resterende garantietermijn zal vanaf dat moment weer ingaan. Intesis zal ook
aansprakelijk zijn voor de fabricagegebreken die de oorzaak zijn geweest van de reparatie voor de duur van zes (6) maanden
vanaf de reparatie.
6. Indien reparatie of vervanging niet mogelijk is of niet door Intesis is uitgevoerd, dan kunt u een korting op het aankoopbedrag
aanvragen of zelfs het apparaat retourneren met restitutie van het aankoopbedrag dat u hebt betaald. U mag het apparaat echter
niet retourneren met het verzoek tot terugbetaling van het aankoopbedrag als het ontstane defect dat tot de afwijking lijdt een
klein probleem betreft.
7. De garantie geldt niet voor defecten, gebreken, storingen, kwaliteits- en/of prestatieverlies die veroorzaakt zijn door :
(i) Een defect of storing in het airconditioningsysteem waarin het apparaat is geïnstalleerd.
(ii) Foutieve of ondeugdelijke installatie van het apparaat door de technicus die u mogelijk hebt ingehuurd voor het installeren
van dit apparaat of door derden.
(iii) Handelingen die door u aan het apparaat zijn verricht, alsook voor gevallen van verkeerd gebruik van het apparaat, inclusief
de gevallen van ontmanteling of opening van het apparaat en het toevoegen van onderdelen of extra accessoires aan zowel het
apparaat als het airconditioningsysteem waarin het apparaat is geïnstalleerd.
(iv) Uitval of storingen in de elektriciteitsvoorziening, verlies van computerprestaties of toegang tot een internethandeling buiten de
controle van Intesis, danwel andere storingen die zijn ontstaan door verkeerd gebruik van het apparaat.
(v) Schade die veroorzaakt is door het transport of de opslag van het apparaat en dat niet aan Intesis i s toe te rekenen, of andere
schade die gerelateerd is aan het onderhoud van het apparaat voor en/of na de verkoop ervan.
(vi) De normale slijtage van het apparaat of delen ervan door de jaren heen, alsook het breken ervan of andere schade die
ontstaan is door ontplofng, vallen, stoten of botsingen.
(vii) Het contact van het apparaat met water of andere ongeschikte stoffen, alsmede schade veroorzaakt door
omgevingsomstandigheden die ongeschikt zijn of niet overeenkomstig de omstandigheden die aangegeven zijn in de
gebruiksaanwijzing.
8. Om de garantietermijn van het apparaat te kunnen bepalen, dient u de originele factuur of aankoopbewijs te overleggen die
u met uw bestelling ontving.
9. Deze garantie geldt voor alle apparaten die in Spanje zijn aangekocht. Indien de apparaten buiten Spanje zijn gekocht, zullen
de garantiebepalingen van het land waar die apparaten zijn verkregen van toepassing zijn.
10. Om in aanmerking te komen voor deze garantie, stuur een e-mail naar warranty@intesis.com zodat wij u kunnen informeren
over de te volgen procedure.
INTESIS SOFTWARE, S.L.U.
C/ Milà i Fontanals, 1 bis
08700 – Igualada (Barcelona)
Telefoon: +34938047134

23
PL
1. Opis produktu (rysunek 1)
Urządzenie jest zewnętrznym modułem, który umożliwia połączenie klimatyzatorów rmy do sieci
WiFi w celu zapewnienia globalnej łączności i zdalnego sterowania za pomocą łatwego w obsłudze
interfejsu.
Zawartość opakowania:
Urządzenie powinno zostać zainstalowane przez autoryzowanego instalatora.
Volg alstublieft alle veiligheidsinstructies op die in de AC handleidingen zijn opgenomen.
• Urządzenie • Specjalny kabel• Instrukcja montażu
3. Podłączanie urządzenia
1. Odłączyć klimatyzator od zasilania.
2. Uzyskać dostęp do głównej płytki obwodu drukowanego.
3. Zlokalizuj złącze gniazda wskazane w Installation Sketch.
4. Wybrać miejsce instalacji urządzenia.
5. Podłączyć koniec A (dłuższy) dołączonego w zestawie kabla do złącza klimatyzatora, a koniec B
(krótszy) do złącza klimatyzatora na urządzeniu. *
6. Zamknąć klimatyzator.
7. Podłączyć klimatyzator do zasilania. Jeśli połączenie z klimatyzatorem zostało wykonane praw-
idłowo, dioda LED urządzenia zamiga na zielono, po czym zacznie świecić stałym zielonym światłem.
* Szczegółowe informacje można znaleźć w Installation Sketch.
2. Miejsce instalacji urządzenia
Urządzenie zainstalowane wewnątrz klimatyzatora lub ukryte (rysunek 2-a)
• Wskaźnik LED oraz przycisk nie będą dostępne dla użytkownika.
• W przypadku niewystarczającego miejsca na instalację wewnątrz klimatyzatora można wykonać
poniższe czynności:
o Jeśli powodem są rury z wodą, należy zmienić stronę klimatyzatora, do której rury są podłączone,
aby uzyskać więcej miejsca wewnątrz klimatyzatora.
o Można również usunąć powierzchnię podtrzymującą.
Urządzenie zainstalowane na zewnątrz klimatyzatora (rysunek 2-b)
• Urządzenie można przymocować zarówno za pomocą wkrętów, jak i taśmy dwustronnej.
• Pokrywa okablowania oferuje kilka różnych opcji prowadzenia kabli w żądanym kierunku.
4. Konguracja WiFi
Pobierz aplikację z Google Play lub App Store i postępuj zgodnie z instrukcjami.
5. Rejestracja urządzenia
1. Pobierz aplikację z Google Play lub App Store i postępuj zgodnie z instrukcjami.
2. Utwórz konto (w przypadku, gdy go nie masz).
3. Przejdź do ustawień / urządzenia / sekcji i kliknij dodaj urządzenie.
4. Wprowadzić kod rejestracyjny (25-cyfrowy kod na etykiecie).
• Installation Sketch
• Etykieta

24
GWARANCJA
1. Firma Intesis Software, S.L.U. (zwana dalej „Intesis”), w charakterze producenta, niniejszym informuje o prawach
przysługujących, zgodnie z dekretem królewskim 1/2007 z 16 listopada 2007 r., zatwierdzającym zmienioną ustawę o ochronie
konsumentów i użytkowników oraz pozostałe przepisy w tym zakresie, konsumentowi w przypadku niezgodności urządzenia
(zwanego dalej „Urządzeniem”) .
2. Intesis gwarantuje, że przez okres dwóch (2) lat od daty dostawy Urządzenia rma będzie ponosić odpowiedzialność, zgodnie
z warunkami określonymi w niniejszym dokumencie, za niezgodność Urządzenia, pod warunkiem, że taka niezgodność będzie
wynikać z wady produkcyjnej, która uniemożliwia użytkowanie Urządzenia w zwykły sposób lub na zwykłym poziomie jakości i
wydajności. Zakłada się, że niezgodność, które zostanie ujawniona w ciągu sześciu (6) miesięcy od daty dostawy Urządzenia
istniała w momencie jego dostawy, chyba że takie założenie jest sprzeczne z domniemaną niezgodnością.
3. W przypadku stwierdzenia uzasadnionej niezgodności Urządzenia zgodnie z poprzednim ustępem, konsument może wybrać
darmową naprawę lub wymianę Urządzenia, pod warunkiem, że wybrana opcja jest obiektywnie możliwa i współmierna do takiej
niezgodności.
4. Jeżeli w przypadku wybrania naprawy Urządzenia takie naprawione i dostarczone Urządzenie nadal będzie zawierać wadę
produkcyjną dającą podstawę do stwierdzenia niezgodności, konsument może zażądać wymiany Urządzenia na inne urządzenie
takiego samego rodzaju, chyba że taka wymiana będzie niewspółmierna do takiej wady.
5. W przypadku wybrania naprawy lub wymiany Urządzenia okres gwarancyjny określony w punkcie 2 zostanie zawieszony
od momentu dostarczenia niezgodnego Urządzenia producentowi do momentu dostarczenia naprawionego lub wymienionego
Urządzenia konsumentowi; pozostały okres gwarancyjny zostanie wznowiony od tego momentu. Intesis będzie także ponosić
odpowiedzialność za wady produkcyjne powstałe w ciągu sześciu (6) miesięcy od takiej naprawy.
6. Jeżeli naprawa lub wymiana nie będzie możliwa lub nie zostanie wykonana przez Intesis, konsument może zarządzać obniżenia
ceny lub nawet możliwości zwrotu Urządzenia i odzyskania zapłaconej kwoty. Konsument nie może jednak zwrócić Urządzenia
i zażądać zwrotu zapłaconej kwoty, jeżeli wada produkcyjna dająca podstawę do stwierdzenia niezgodności jest mało istotna.
7. Gwarancja nie obejmuje żadnych wad, nieprawidłowego działania ani obniżenia jakości lub wydajności, jeżeli wynikają one z:
(i) jakiejkolwiek wady lub nieprawidłowego działania urządzenia klimatyzacyjnego, w którym zainstalowano Urządzenie.
(ii) wadliwej lub nieprawidłowej instalacji Urządzenia przez technika zatrudnionego przez konsumenta w celu wykonania takiej
instalacji lub przez jakąkolwiek osobę trzecią.
(iii) obsługi lub nieprawidłowego użytkowania Urządzenia przez konsumenta, w tym demontażu lub otwierania Urządzenia
oraz dodawania części lub akcesoriów do Urządzenia i do urządzenia klimatyzacyjnego, w którym takie Urządzenie zostało
zainstalowane.
(iv) awarii lub przerwy w dostawie prądu lub zasilania komputera, a także uzyskiwania dostępu do Internetu lub jego użytkowania
poza kontrolą Intesis, a także z jakichkolwiek innych przyczyn spowodowanych niewłaściwym użytkowaniem Urządzenia.
(v) Uszkodzeń powstałych podczas transportu lub przechowywania Urządzenia, które nie leżą po stronie Intesis, lub związanych
z obsługą techniczną Urządzenia przed lub po jego sprzedaży.
(vi) zwykłego zużycia Urządzenia lub jego części w wyniki upływu czasu, a także pęknięcia i innych uszkodzeń powstałych w
wyniku uderzeń lub upadków.
(vii) Kontaktu Urządzenia z wodą lub innymi nieodpowiednimi substancjami, a także uszkodzenia spowodowanego warunkami
środowiskowymi, które są niewłaściwe lub niezgodne z warunkami określonymi w instrukcji obsługi.
8. Należy zachować fakturę lub paragon jako dowód daty odbioru Urządzenia dla celów ustalenia okresu gwarancyjnego.
9. Gwarancja dotyczy Urządzeń zakupionych w Hiszpanii. W przypadku Urządzeń zakupionych poza Hiszpanią zastosowanie
mają warunki gwarancyjne obowiązujące w danym kraju.
10. Aby skorzystać ze swoich praw przysługujących na mocy niniejszej gwarancji, wyślij wiadomość e-mail pod adres warranty@
intesis.com. Otrzymasz wiadomość zwrotną ze wskazaniem procedury, do której należy się zastosować.
INTESIS SOFTWARE, S.L.U.
C/ Milà i Fontanals, 1 bis
08700 – Igualada (Barcelona)
Telefon: +34938047134

25
RU
1. Описание устройства (рис. 1)
Устройство является внешним модулем подключения устройств к сети WiFi для обеспечения
универсальной подключаемости и дистанционного управления с помощью удобного
пользовательского интерфейса.
Комплект поставки:
Процесс установки должны выполняться только уполномоченными
специалистами.
Просьба следовать всем требованиям безопасности, указанным в руководстве AC
• Устройство • Удельный кабель.• Руководство по установке
3. Подключение устройства (рис. 3)
1. Отсоедините кондиционер от сети питания.
2. Откройте крышку доступа к главной печатной плате.
3. Найдите разъем разъема, указанный в Installation Sketch.
4. Выберите место для установки устройства.
5. Подключите конец A (длинный) комплектного кабеля к разъему кондиционера,
обозначенному, а конец B (короткий) к разъему АС устройства. *
6. Закройте блок кондиционера.
7. Подключите кондиционер к сети питания. Если соединение с кондиционером установлено,
зеленый светодиод системы сперва начнет мигать, а затем будет гореть не мигая.
* Проверьте Installation Sketch для получения подробной информации.
2. Размещение устройства
Установка внутри кондиционера или скрытая установка (рис. 2-a)
• Светодиодный индикатор и кнопка в этом случае будут недоступными для пользователя
• Если внутри кондиционера недостаточно места для установки устройства, необходимо
выполнить следующее:
o Если места не хватает по причине водяных трубок, подсоедините их к кондиционеру с
противоположной стороны.
o Или же можно снять опорную поверхность.
Установка вне кондиционера (рис. 2-b)
• Устройство можно закрепить как на винтах, так и на двустороннем скотче.
• Конструкция крышки кабельного отсека дает возможность укладывать кабели в нужном
направлении.
4. Конфигурация WiFi
Загрузите приложение из Google Play или в магазин приложений и следуйте инструкциям.
5. Регистрация устройства
1. Загрузите приложение из Google Play или в магазин приложений и следуйте инструкциям.
2. Создайте учетную запись (если у вас ее еще нет).
3. Перейдите в настройки / устройство / раздел и нажмите добавить устройство.
4. Введите регистрационный код (25-значный код на этикетке).
• Installation Sketch
• метка

26
ГАРАНТИЯ
1. Intesis Software, S.L.U. (далее “Intesis”), в качестве производителя, настоящим уведомляет вас о правах,
предусмотренных в Королевском декрете 1/2007 от 16 ноября, посредством которого принимается расширенный текст
Общего закона о защите прав потребителей и пользователей, а также других законодательных документах, которые
наделяют вас правами потребителей в случае наличия несоответствий устройства (далее “Устройство”).
2. Intesis гарантирует вам, что в течение двух (2) лет с момента поставки Устройства, Вам будет обеспечено
обслуживание, в соответствии с условиями данного документа, в случае несоответствия Устройства, в том случае
если данное несоответствие будет связано с производственным дефектом, непозволяющим использовать Устройство
в обычном порядке или в соответствии с его уровнем качества и производительности. В этой связи предполагается, что
несоответствия, которые будут выявлены в течение шести (6) месяцев с момента поставки Устройства уже существовали
в Устройстве в момент поставки, за исключением случаев, когда это предположение будет противоречить выявленному
несоответствию.
3. Если факт несоответствия Устройства в соответствии с предыдущим пунктом будет доказан, вы можете выбрать между
бесплатным ремонтом Устройства или его бесплатной заменой, с обязательным условием, что выбранный вариант будет
объективно возможным и соизмеримым с неисправностью.
4. Если вы выбрали ремонт Устройства, а после его ремонта и доставки производственный дефект сохраняется, вы
можете запросить замену Устройства на другое такого же типа, за исключением случаев, когда данная замена не
пропорциональна дефекту.
5. При выборе ремонта или замены Устройства расчет гарантийного периода, указанного в пункте 2 данного документа
будет прерван с момента получения несоответствующего Устройства до момента отправки вам отремонтированного
или замененного Устройства, оставшийся гарантийный срок возобновляется с этого момента. Intesis также несет
ответственность за производственные дефекты, которые могут потребовать ремонта в течение шести (6) месяцев с
момента ранее проведенного ремонта.
6. Если замена или ремонт невозможны, или не могут быть выполнены Intesis, вы можете запросить снижение стоимости
или даже вернуть Устройство с полной компенсацией его стоимости. Тем не менее, вы не имеете права вернуть
Устройство, требуя компенсации его стоимости, если производственный дефект, являющийся причиной несоответствия,
не имеет большого значения.
7. Гарантия на Устройство не покрывает дефекты, несоответствия, неисправности или снижения качества, вызванные:
(i) Любыми неисправностями или неправильной работой оборудования кондиционирования воздуха, в котором
установлено Устройство.
(ii) Дефектной или некорректной установкой Устройства техником, нанятым вами для выполнения данной установки, или
любой другой третьей стороной.
(iii) Любым вашим обращением с Устройством, а также любым некорректным использованием Устройства, включая
случаи демонтажа или открытия Устройства и добавления деталей или дополнительных аксессуаров, как к Устройству,
так и к оборудованию кондиционирования воздуха, в котором оно установлено.
(iv) Сбоем или перерывом в подачи электроэнергии, сбоем в информатике, перебоями с интернетом, не зависящими от
Intesis, а также любыми другими сбоями, возникшими в результате неправильной работы Устройства.
(v) Повреждениями, вызванными транспортировкой или хранением Устройства, не зависящими от Intesis, или любыми
другими повреждениями, связанными с обслуживанием Устройства до или после продажи.
(vi) Нормальным износом Устройства или его частей с течением времени, а также поломками и другими дефектами,
возникшими в результате удара или падения.
(vii) При контакте Устройства с водой или другими недопустимыми веществами, а также повреждения, вызванные под
воздействием окружающей среды, которые являются нежелательными или не соответствующими указанным в данном
руководстве.
8. Для подтверждения даты приобретения Устройства с целью расчета гарантийного периода необходимо сохранить
счет или чек о покупке.
9. Данная гарантия распространяется на Устройства, приобретенные в Испании. Для Устройств, приобретенных за
пределами Испании, гарантийные условия меняются в зависимости от той страны, где было приобретено Устройство.
10. Чтобы воспользоваться правами, предусмотренными данной гарантией, вы можете направить электронное письмо по
адресу warranty@intesis.com, после чего вам будет указан алгоритм действий.
INTESIS SOFTWARE, S.L.U.
C/ Milà i Fontanals, 1 bis
08700 – Igualada (Барселона)
Телефон: +34938047134

27

28
Intesis Software, S.L.U.
Milà i Fontanals 1bis - 08700 IGUALADA (Barcelona) - SPAIN
rev 2.1
 Loading...