

Page 1
© HMS Industrial Networks S.L.U - All rights reserved
This information is subject to change without notice
URL
https://www.intesis.com
Interfaz INKNXDAI001R000
Interface INKNXDAI001R000
1 / 1
Doc. Rev.1.3
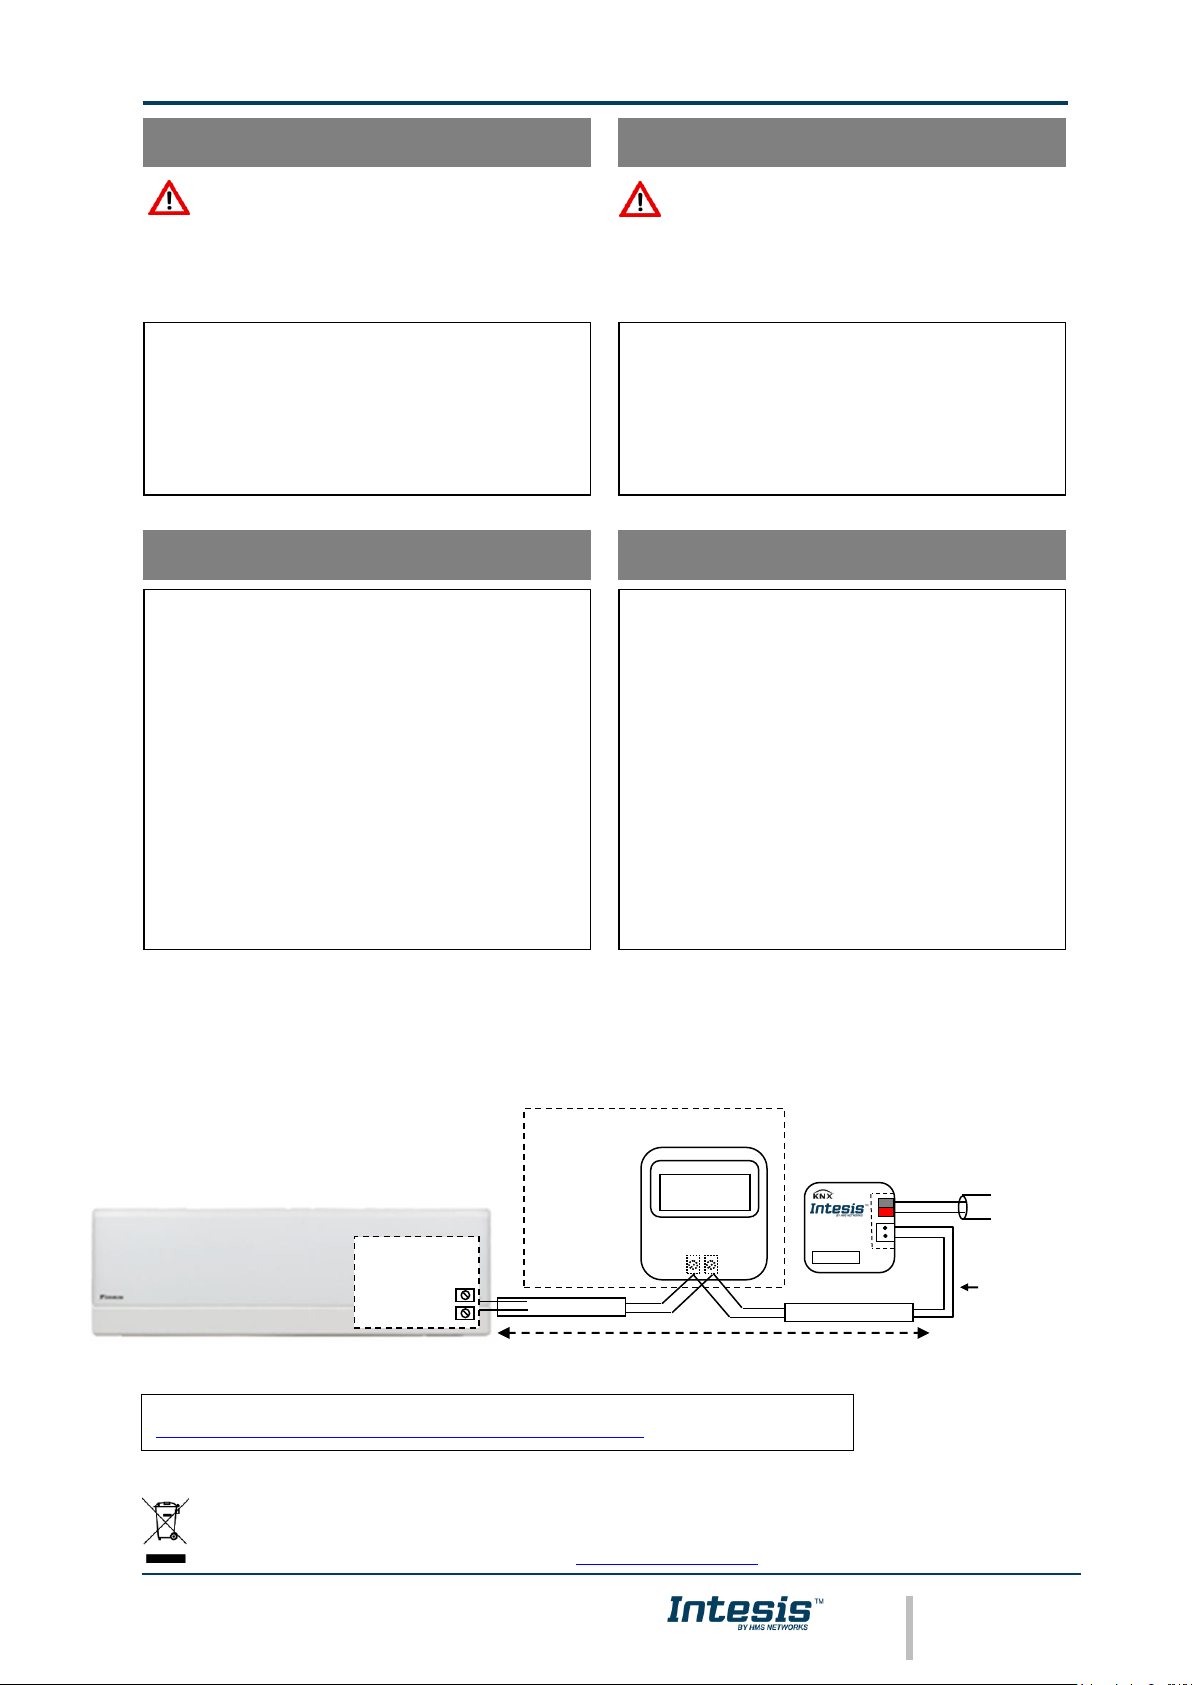
Max. 500 m
(No es obligatorio tenerlo en la red)
(It is not mandatory to have it in the network)
Connection to P1 P2
bus. Two wires cable.
Conexión al bus P1 P2.
Cable de dos hilos.
KNX TP-1
(EIB) bus
P1 P2
DAIKIN
Unidad interior de A.A.
AC Indoor Unit
Remote Control
AC Unit
P1
P2
• Esta interfaz debe ser instalada por personal técnico
acreditado (electricista, instalador de EIB, o personal
técnico cualificado) y siguiendo todas las
instrucciones de seguridad.
• Antes de manipular en el interior del aire
acondicionado o el control remoto, asegúrese de que
está completamente desconectado de la red eléctrica.
• Desconecte la tensión del bus EIB antes de
manipularlo y conectarlo al interfaz.
Instrucciones de seguridad
Safety instructions
• This interface must be installed by accredited
technical personnel (electrician, EIB installer, or
qualified technical personnel) and following all the
safety instructions.
• Before manipulating AC’s indoor unit or the rmote
controller be sure it is completely disconnected from
mains power.
• Disconnect EIB bus’ power before manipulating it and
connecting it to the interface.
• Desconecte el aire acondicionado de la red eléctrica.
• Desconecte la tensión de alimentación del bus EIB.
• Instale el interfaz y conéctelo al bus P1 P2 en
cualquier punto del mismo. El bus P1 P2 es el bus
que conecta la unidad interior de aire acondicionado
y el mando por cable, es un par de hilos que se
conectan los terminales P1 P2, este bus no tiene
polaridad.
• Conecte el bus EIB al conector K NX del interfaz.
Respete la polaridad.
• Vuelva a conectar a la red eléctrica el aire
acondicionado.
• Conecte de nuevo la tensión de alimentación al bus
EIB.
• Siga las instrucciones del manual de usuario para la
configuración y puesta en servicio del interfaz. Vea
abajo como obtener el manual de usuario y la base
de datos para ETS.
Instrucciones de instalación
Installation instructions
• Disconnect the Air Conditioner from mains power.
• Disconnect the power supply of the EIB bus.
• Install the interface and connect it to P1 P2 bus in
any point of the bus. The P1 P2 bus is the bus that
connects the AC indoor unit and the wired remote
controller, is a two-wire bus connecting terminals P1
P2 of both, this P1 P2 connection has no specific
polarity.
• Connect the EIB bus to the KNX connector of the
interface. Respect its polarity.
• Reconnect the AC indoor unit to mains power.
• Reconnect power supply to the EIB bus.
• Follow instructions on user's manual for configuring
and commissioning the interface. See below how to
obtain user's manual and ETS’ database.
WARNING
ATENCIÓN
Siga atentamente estas instrucciones de seguridad e
instalación. Un manejo inadecuado puede ocasionar daños
graves para su salud y puede ocasionar también daños
irreparables en el interfaz y/o en la unidad interior del aire
acondicionado.
Follow carefully this safety and installation instructions.
Improper work may lead to serious harm to your health
and may also seriously damage the interface and/or AC’s
indoor unit.
IMPORTANTE: El cable a usar para la conexión de
INKNXDAI001R000 al bus P1 P2 puede ser cualquier cable
de dos hilos, la distanccia máxima para el bus P1 P2 es de
500 metros, consulte el manual del aire acondicionado
para más detalles.
IMPORTANT: The cable used for connection of
INKNXDAI001R000 to P1 P2 bus can be any two-wire
cable, the maximum distance for bus P1 P2 is 500 meters,
consult the manual of the AC indoor unit for more details.
El manual de usuario y la base de datos para ETS estan disponibles en - User's manual and ETS’ database are available at:
https://intesis.com/products/ac-interfaces/daikin-gateways/daikin-knx-vrv-dk-rc-knx-1
Phys.Addr.
Internal
electronic
control board
P1
P2
This marking on the product, accessories, packaging or literature (manual) indicates that the product contains electronic
parts and they must be properly disposed of by following the instructions at https://intesis.com/weee-regulation
 Loading...